

Page 1

™
GET THE MOST OUT OF YOUR PULSE
SMARTPEN
VISIT US AT WWW.LIVESCRIBE.COM TO LEARN MORE
PULSE™ SMARTPEN RECORDING
The built-in microphone on the Pulse smartpen is optimized for smaller recording
environments, like a small classroom or a conference room.
The included 3-D Recording Headset features a microphone in each earbud that records
in stereo and captures far-fi eld audio, such as a teacher in front of a large classroom or a
speaker on a stage.
1
GETTING STARTED GUIDE
Create a personal account - 500MB of free space for you to store and share notes,
create a profi le, and share content with the community.
Pencast - Upload your notes and drawings to Livescribe Online, where they are
automatically transformed into interactive Flash™ movies.
Download applications - Games, productivity, reference, translation, utilities and more.
Accessories - Purchase Livescribe dot paper products, ink refi lls, smartpen accessories,
and more. The Pulse smartpen requires the use of Livescribe dot paper products and
ink refi lls.
User Manuals - Find the Pulse smartpen and Livescribe Desktop User Manuals under the
Livescribe Desktop Help menu.
Need more info? Check www.livescribe.com/support for more information.
LIVESCRIBE, PULSE, PAPER REPLAY, and NEVER MISS A WORD are trademarks or registered trademarks of
Livescribe, Inc. All other brand and product names are trademarks of their respective owners.
Copyright © 2007-2009 Livescribe, Inc. All rights reserved. Positioning pattern © 1999 Anoto AB.
This product or its use may be covered by the following United States Patent: 6,529,920, and other pending patent
applications.
IMPORTANT
Please read the End User License Agreement with this product before using the accompanying software program(s).
You accept the terms of the End User License Agreement by using any part of the software. Using any non-authorized
charging accessories or ink cartridges may damage your smartpen and voids your smartpen’s warranty.
Software Download Available
Livescribe® Desktop software, updates and new versions of the software are available at www.livescribe.com/support.
Agency Compliance Information
Product, regulatory, and compliance information can be found in the Pulse User Manual located at
www.livescribe.com/support.
REV. G
www.livescribe.com
2
Tip: If you don’t want to look conspicuous while using the 3-D Recording Headset, place
an earbud over each shoulder and aim the microphones toward your subject.
3-D Recording Headset
1. Speaker
2. Microphone
HOW TO REPLACE YOUR INK CARTRI DGE
Insert the Pulse smartpen
ink tip into the hole on top
of the USB mobile charging
cradle.
Tilt your Pulse smartpen
gently forward until it stops.
Keep your Pulse smartpen
tilted forward and slowly
lift it up to pull out your ink
cartridge.
Page 2
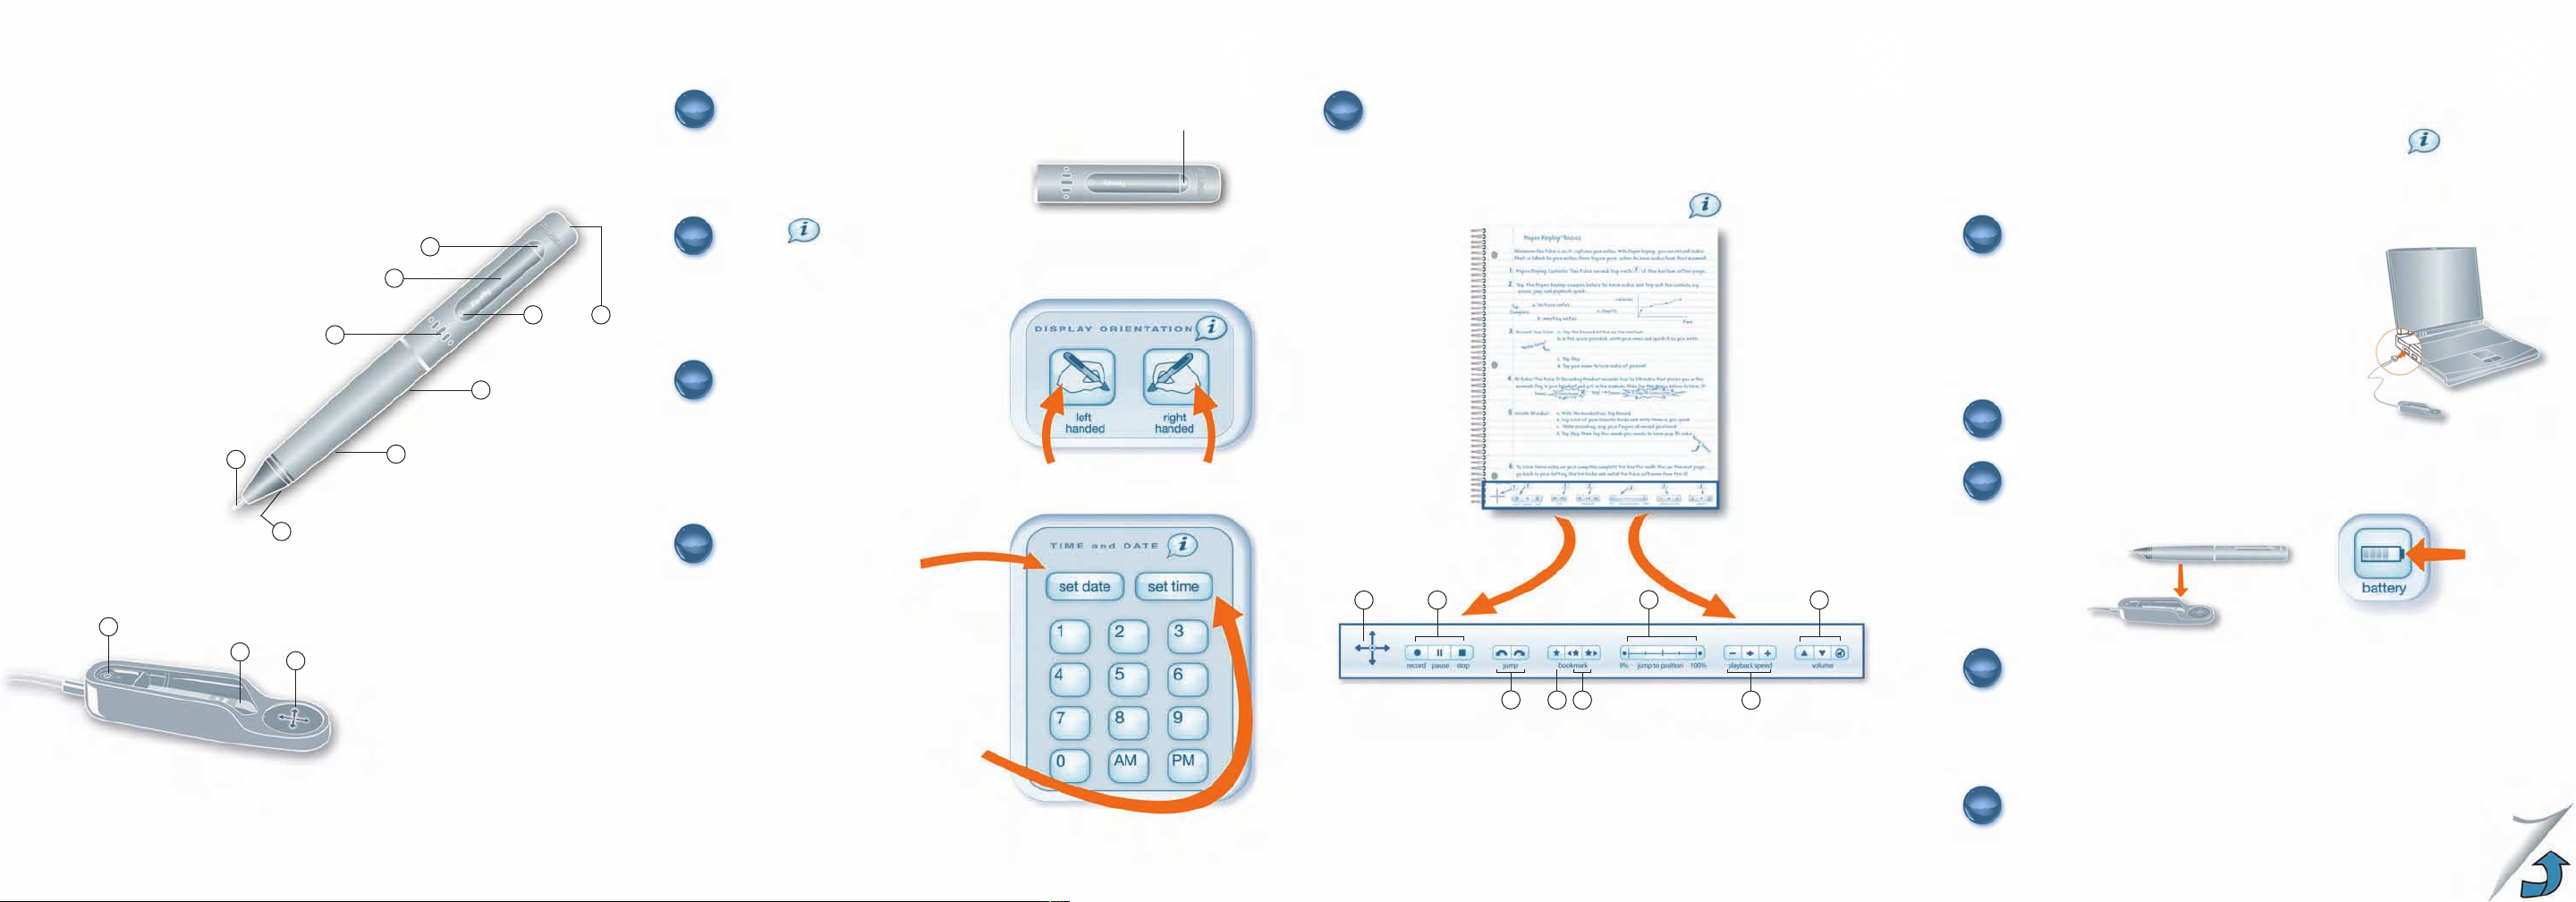
INTRODUCING THE PULSE™ SMARTPEN CONFIGU RE YOUR PULSE
™
EXPE RIENCE PAPER REPLAY
™
INSTALL LIVESCRIBE DESKTOP
This guide will get you up and scribing. If you need additional help,
visit us at www.livescribe.com/support or call 1-877-SCRIBE-9.
Pulse Smartpen
1. Power button
2. Headset jack
3. Built-in microphone
4. Display
5. Speaker
6. USB connector
7. Infrared camera
8. Removable ink cartridge
9. Rechargeable battery
8
3
2
Tip: To replace an ink cartridge:
a. Insert the Pulse smartpen tip into
the ink cartridge removal ring.
b. Tilt Pulse smartpen back and pull
up to remove ink cartridge.
5
7
1
USB Mobile Charging Cradle
1. Nav Plus - navigation control
2. USB smartpen connector
3. Ink cartridge removal ring
1
4
6
Turn on your Pulse smartpen by pressing the
1
Power button. You may need to charge your
smartpen by placing it in the USB charging
cradle and connecting it to your computer.
The computer must be turned on for your
smartpen to charge.
Tap the buttons in this guide
2
with the tip of your smartpen to hear
additional information.
3
9
2
Tip: The printed buttons in this
guide really work!
Orient your display:
3
Tap the “left” or “right” button
to orient your display for
left- or right-handed use.
Left-handed users tap the left button.
Right-handed users tap the right button.
4
Set the time and date:
a. Tap the “set date” button and use
this printed keypad to enter the date.
Example: Tapping 092809 sets the
date to September 28, 2009.
b. Tap the “set time” button and use
this printed keypad to enter the time.
Example: Tapping 1201PM sets
the time to 12:01PM.
Tip: It is important to set the time and date on your Pulse smartpen because
Paper Replay sessions are time-stamped with the date and time they are created.
Power button
1. Nav Plus - navigation control
2. Recording and Playback controls
3. Jump back/forward
4. Create new bookmark
5. Jump to previous/next bookmark
Open your Starter notebook to the fi rst page and go through the tutorial.
5
When you are done, return to this guide.
Paper Replay Basics
Paper Replay Controls
1
2
4 5
3
6
6. Position bar - jump to any point
in the session
7. Playback speed
8. Volume controls
7
1
2
IMPORTANT: Install Livescribe Desktop BEFORE connecting your
USB cradle. If you need additional help, visit us at:
www.livescribe.com/support or call 1-877-SCRIBE-9.
Download and install the Livescribe Desktop software
6
from www.livescribe.com/install.
IMPORTANT: If you are using multiple computers to
manage your Pulse smartpen and notebooks, be sure
to dock your smartpen and transfer your data to each
computer on a regular basis. Every time you archive a
notebook, be sure to archive that notebook on your
other computers.
Once Livescribe Desktop is installed, plug the USB
7
mobile charging cradle into your computer’s USB port.
Place your Pulse smartpen into the USB cradle.
8
Your smartpen will begin charging. Out of the box, fully
charging your smartpen may take up to 2.5 hours.
8
Register your Pulse smartpen when prompted.
9
IMPORTANT: Registration allows you to receive
important software upgrades, download new
applications, and share your notes through
Livescribe Online.
Read the User Manuals for the Pulse smartpen and
10
Livescribe Desktop. They can be found under the
Livescribe Desktop Help menu.
Turn over
3
Tip: Tap
this button
to check
your battery.
 Loading...