

Page 1
Page 2
VR System User Guide
Inside Your Camera Box
Page 3
Get To Know The Camera
Page 4
Camera Quick Setup
Page 5
Live Planet Software Suite
Page 6
Supported VR Headsets
Page 7
Recommended Accessory Hardware
Page 8
Content Creator Key Features
Pages 9 - 37
Camera Software Updates
Page 38
Question and Support Information
Page 42
2
Table of Contents
Copyright 2019 Live Planet, Inc. User Guide modified March 26, 2019
Page 3
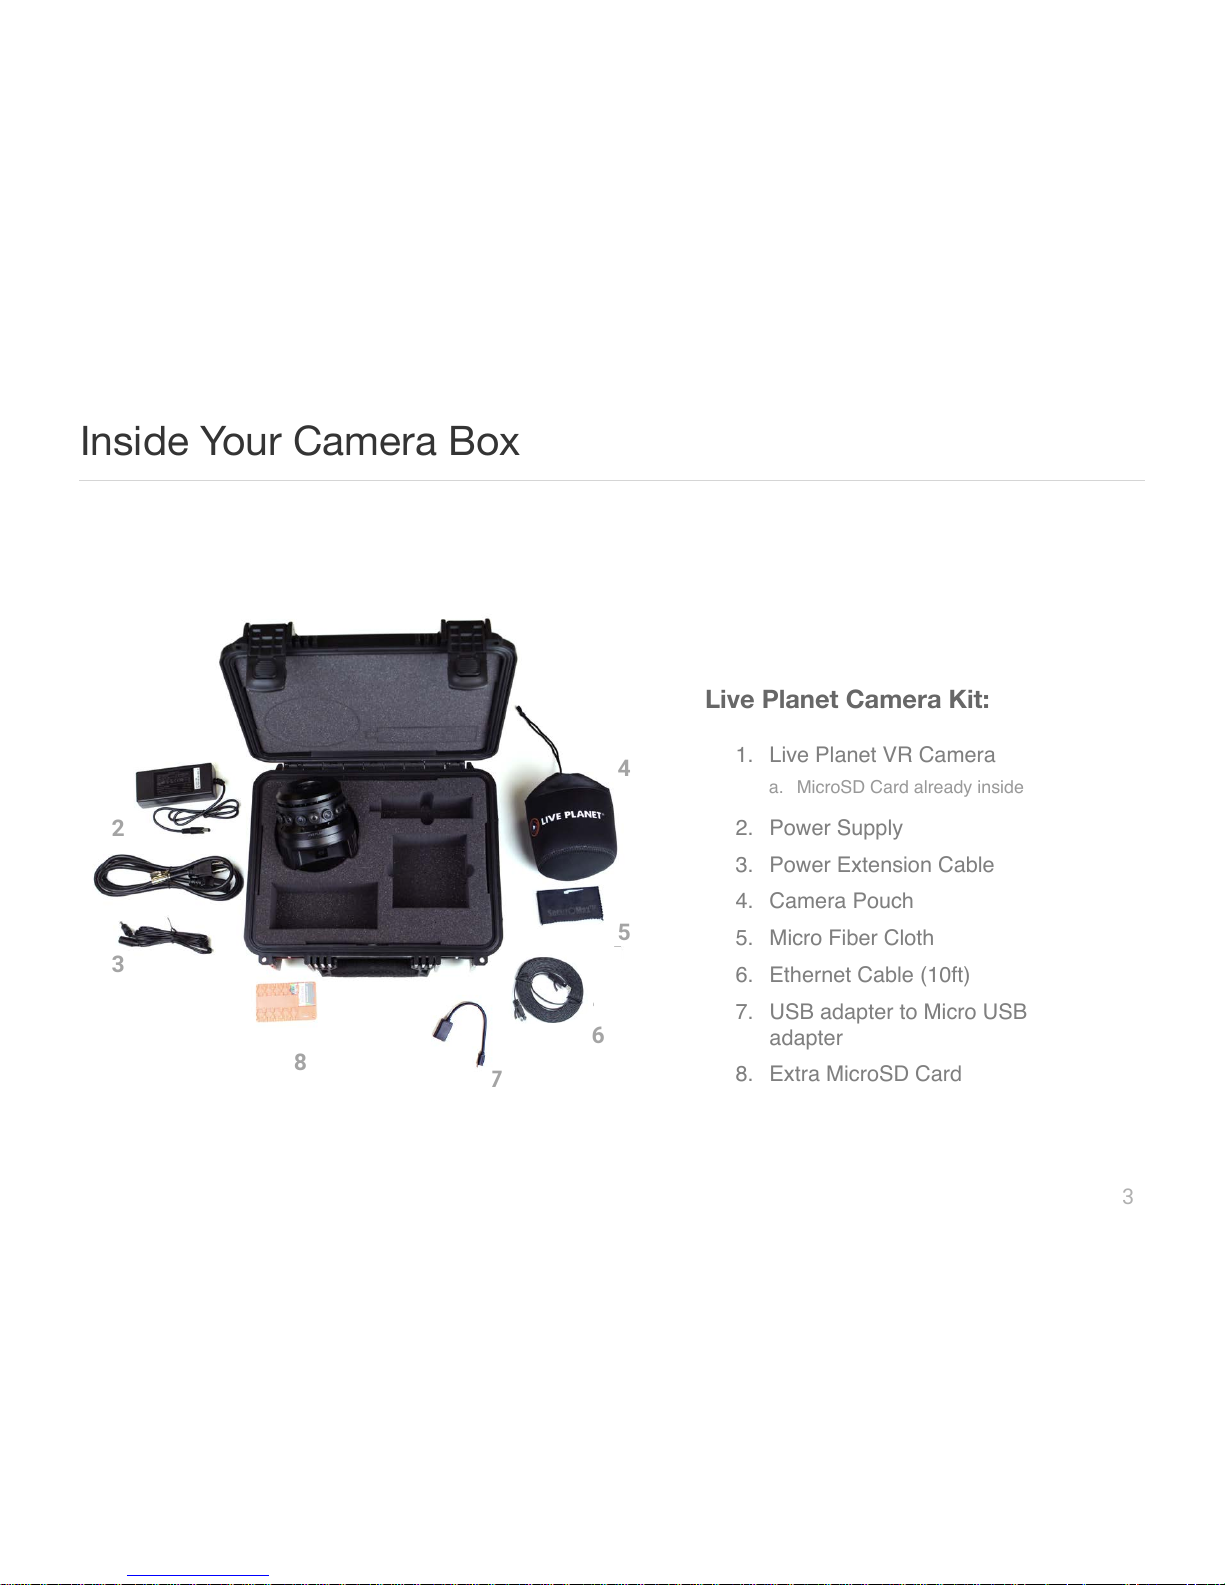
1. Live Planet VR Camera
2. Power Supply
3. Power Extension Cable
4. Camera Pouch
5. Micro Fiber Cloth
6. Ethernet Cable (10ft)
7. USB adapter to Micro USB
adapter
8. Extra MicroSD Card
Live Planet Camera Kit:
2
3
1
4
6
5
a. MicroSD Card already inside
3
Inside Your Camera Box
7
8
Page 4
4
Get To Know The Camera
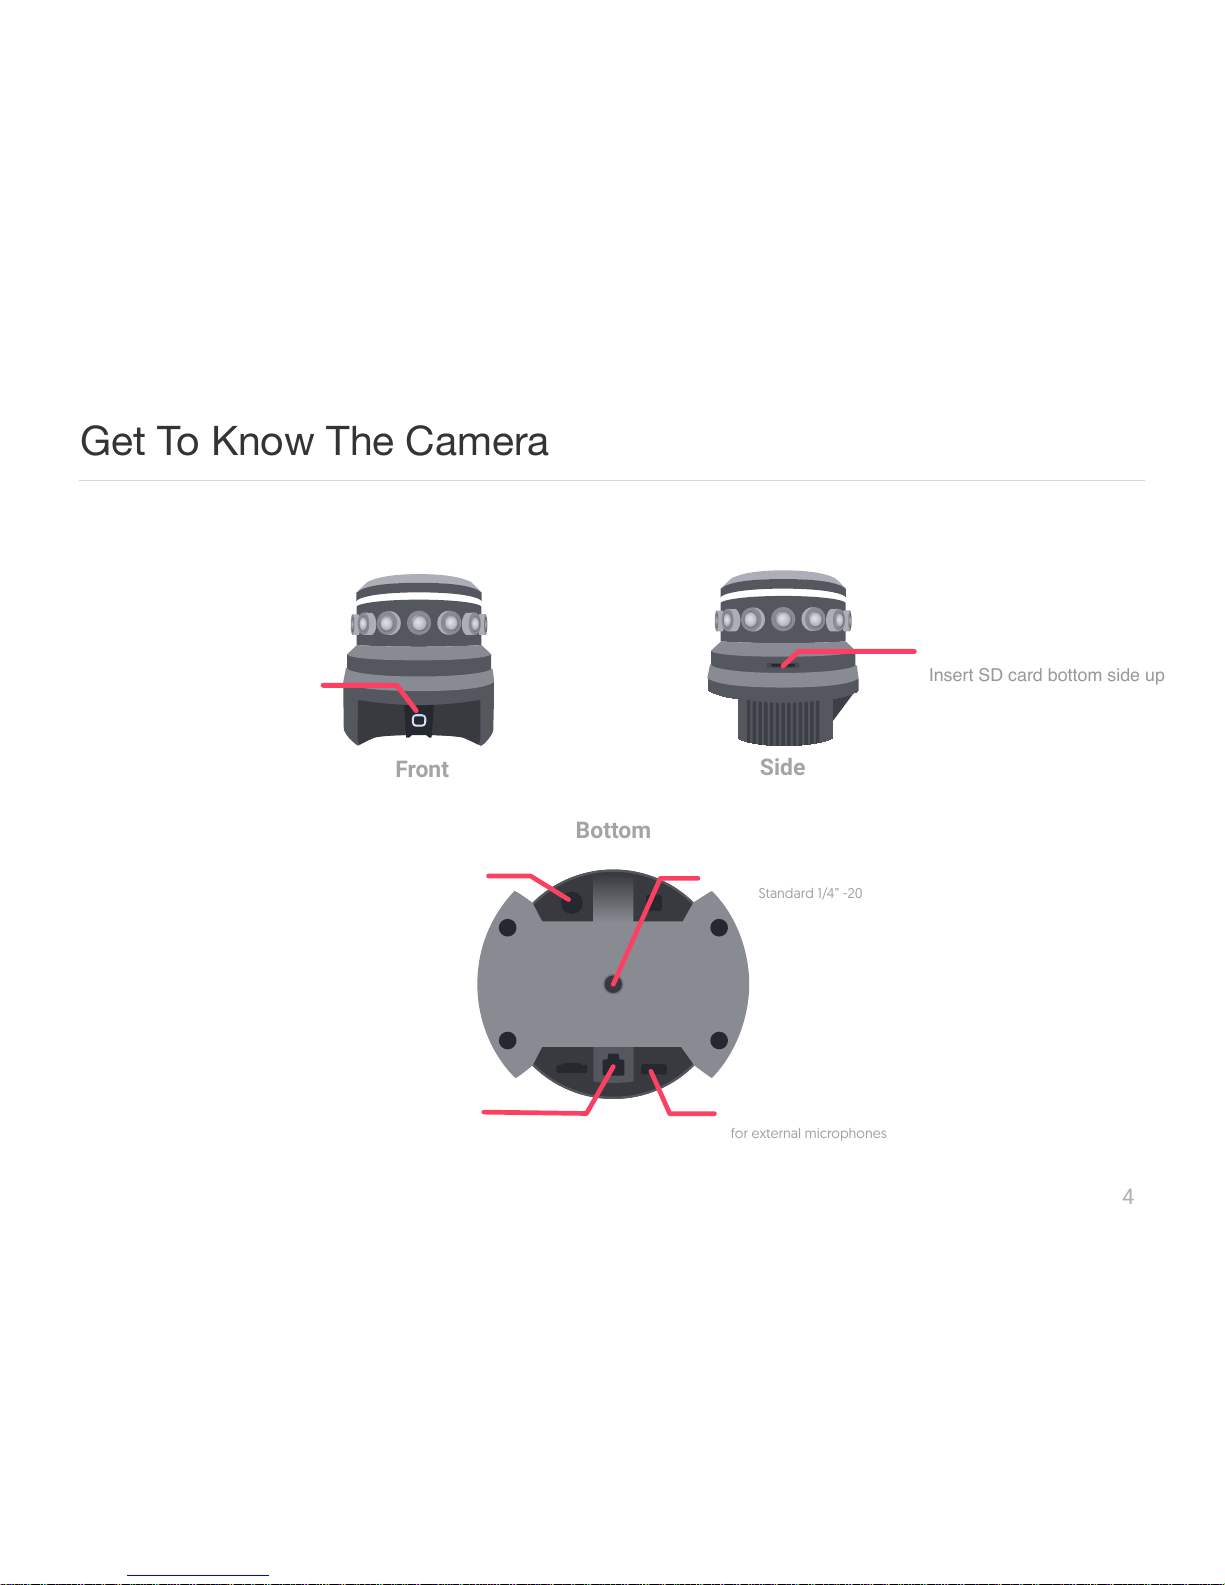
Power Connection
Ethernet Port
Micro USB Audio-In
Tripod Screw Hole
Standard 1/4” -20
for external microphones
Recording Status Indicator
Front
Bottom
Side
Insert SD card bottom side up
Micro SD Card Slot
Page 5
5
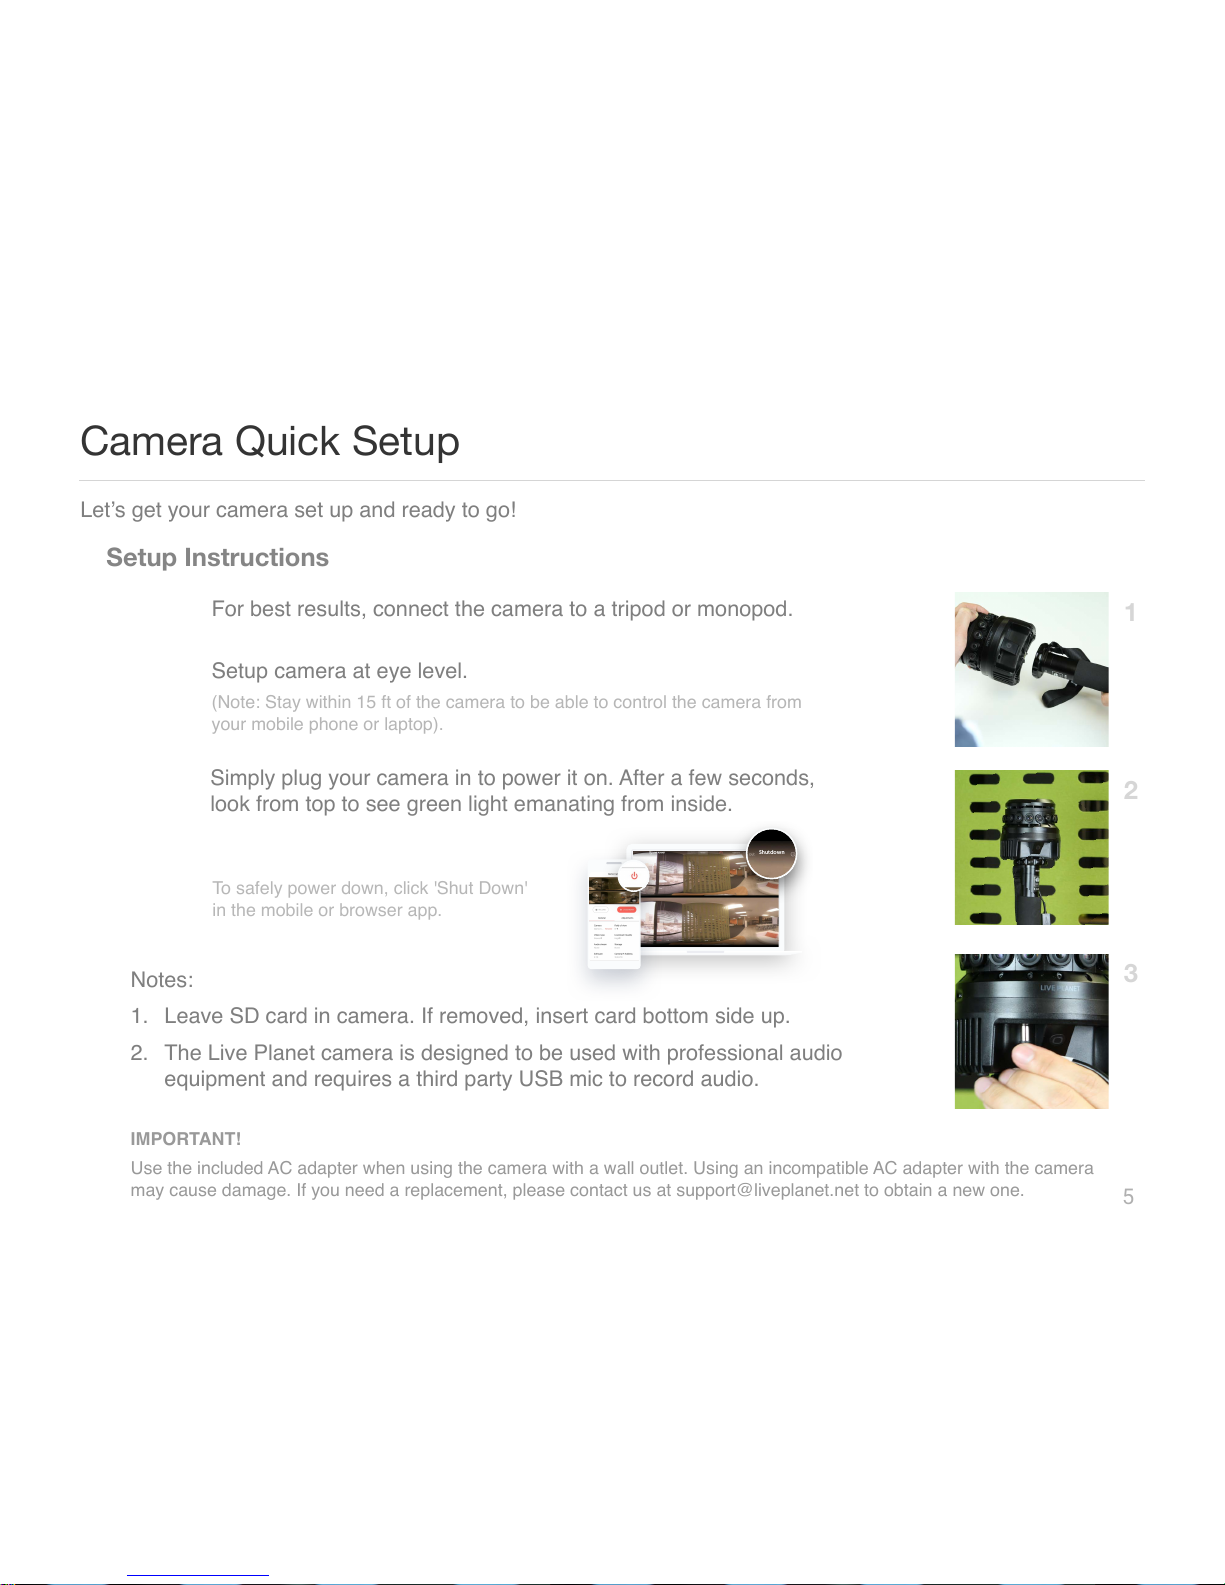
Camera Quick Setup
Setup Instructions
1
2
3
Simply plug your camera in to power it on. After a few seconds,
look from top to see green light emanating from inside.
Let’s get your camera set up and ready to go!
Step 2
Step 1
For best results, connect the camera to a tripod or monopod.
Setup camera at eye level.
(Note: Stay within 15 ft of the camera to be able to control the camera from
your mobile phone or laptop).
Step 3
To safely power down, click 'Shut Down'
in the mobile or browser app.
Notes:
1. Leave SD card in camera. If removed, insert card bottom side up.
2. The Live Planet camera is designed to be used with professional audio
equipment and requires a third party USB mic to record audio.
Shutdown
IMPORTANT!
Use the included AC adapter when using the camera with a wall outlet. Using an incompatible AC adapter with the camera
may cause damage. If you need a replacement, please contact us at![email protected]!to obtain a new one.!
Page 6
6
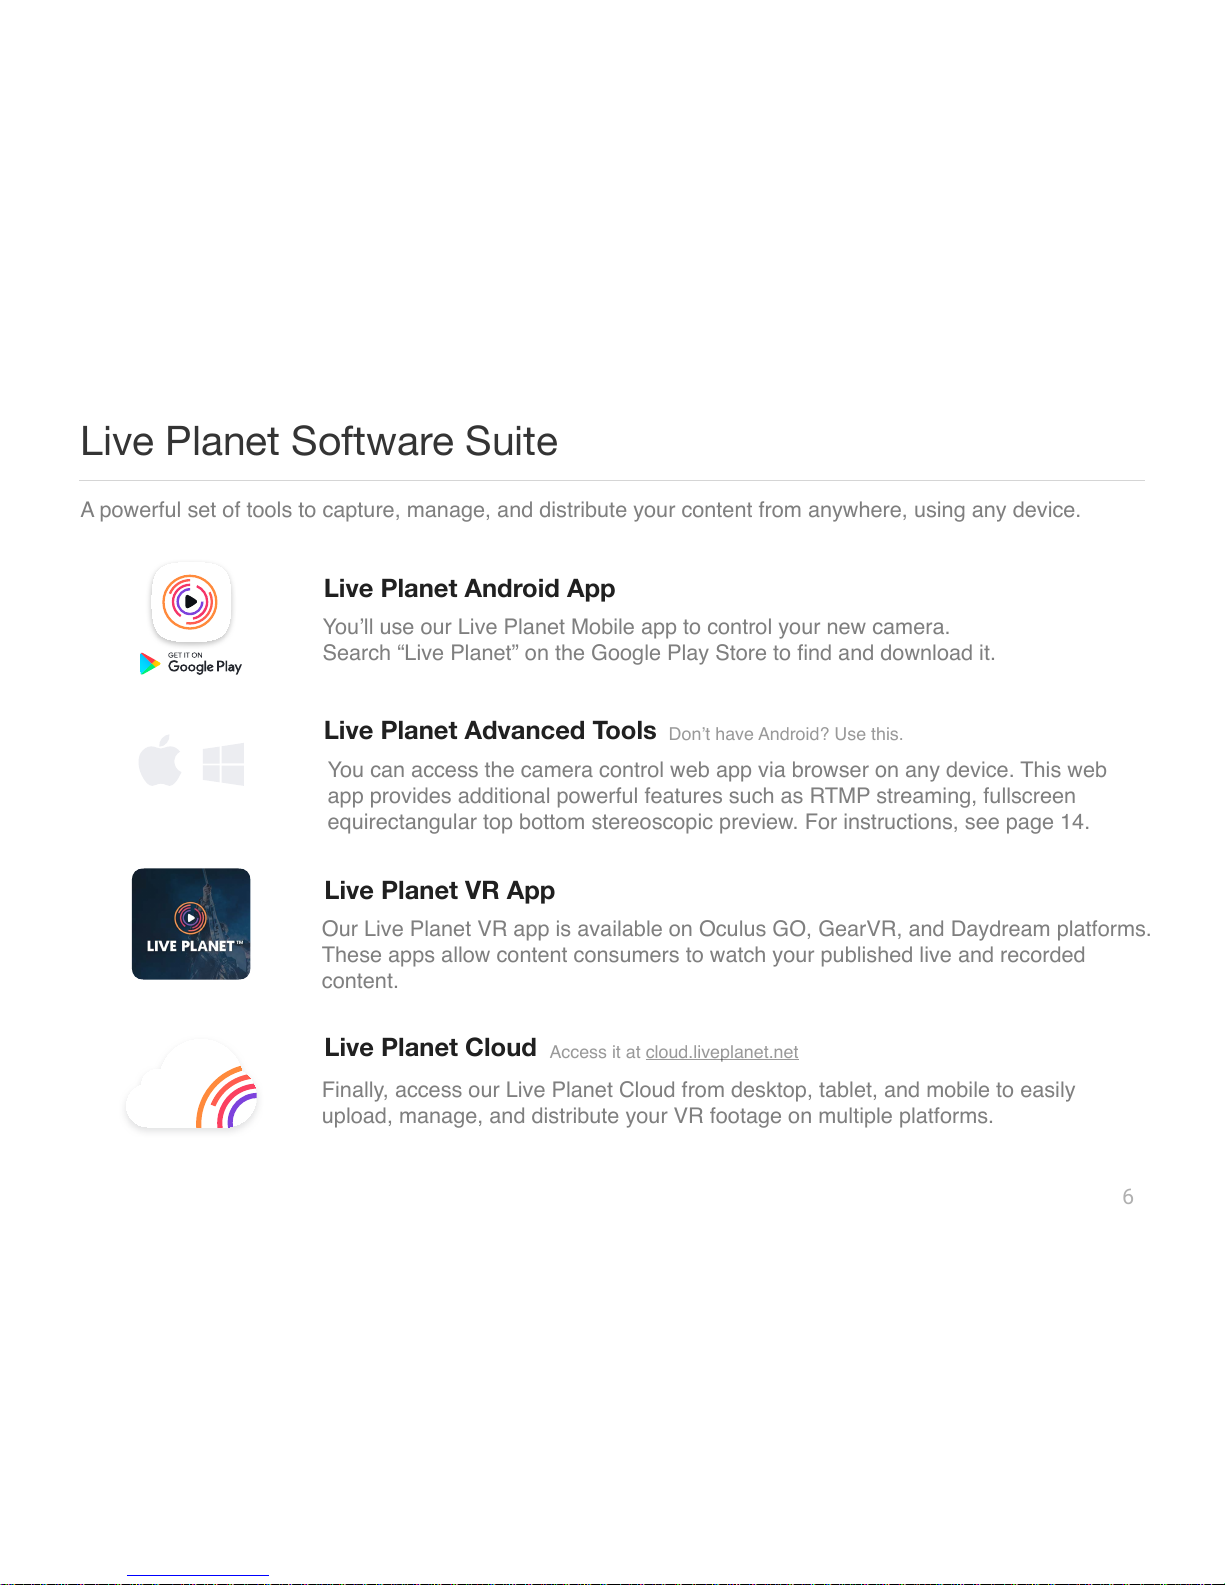
Live Planet Software Suite
A powerful set of tools to capture, manage, and distribute your content from anywhere, using any device.
Live Planet Android App
You’ll use our Live Planet Mobile app to control your new camera.
Search “Live Planet” on the Google Play Store to find and download it.
Live Planet VR App
Our Live Planet VR app is available on Oculus GO, GearVR, and Daydream platforms.
These apps allow content consumers to watch your published live and recorded
content.
You can access the camera control web app via browser on any device. This web
app provides additional powerful features such as RTMP streaming, fullscreen
equirectangular top bottom stereoscopic preview. For instructions, see page 14.
Live Planet Cloud
Live Planet Advanced Tools
Don’t have Android? Use this.
Finally, access our Live Planet Cloud from desktop, tablet, and mobile to easily
upload, manage, and distribute your VR footage on multiple platforms.
Access it at cloud.liveplanet.net
Page 7
7
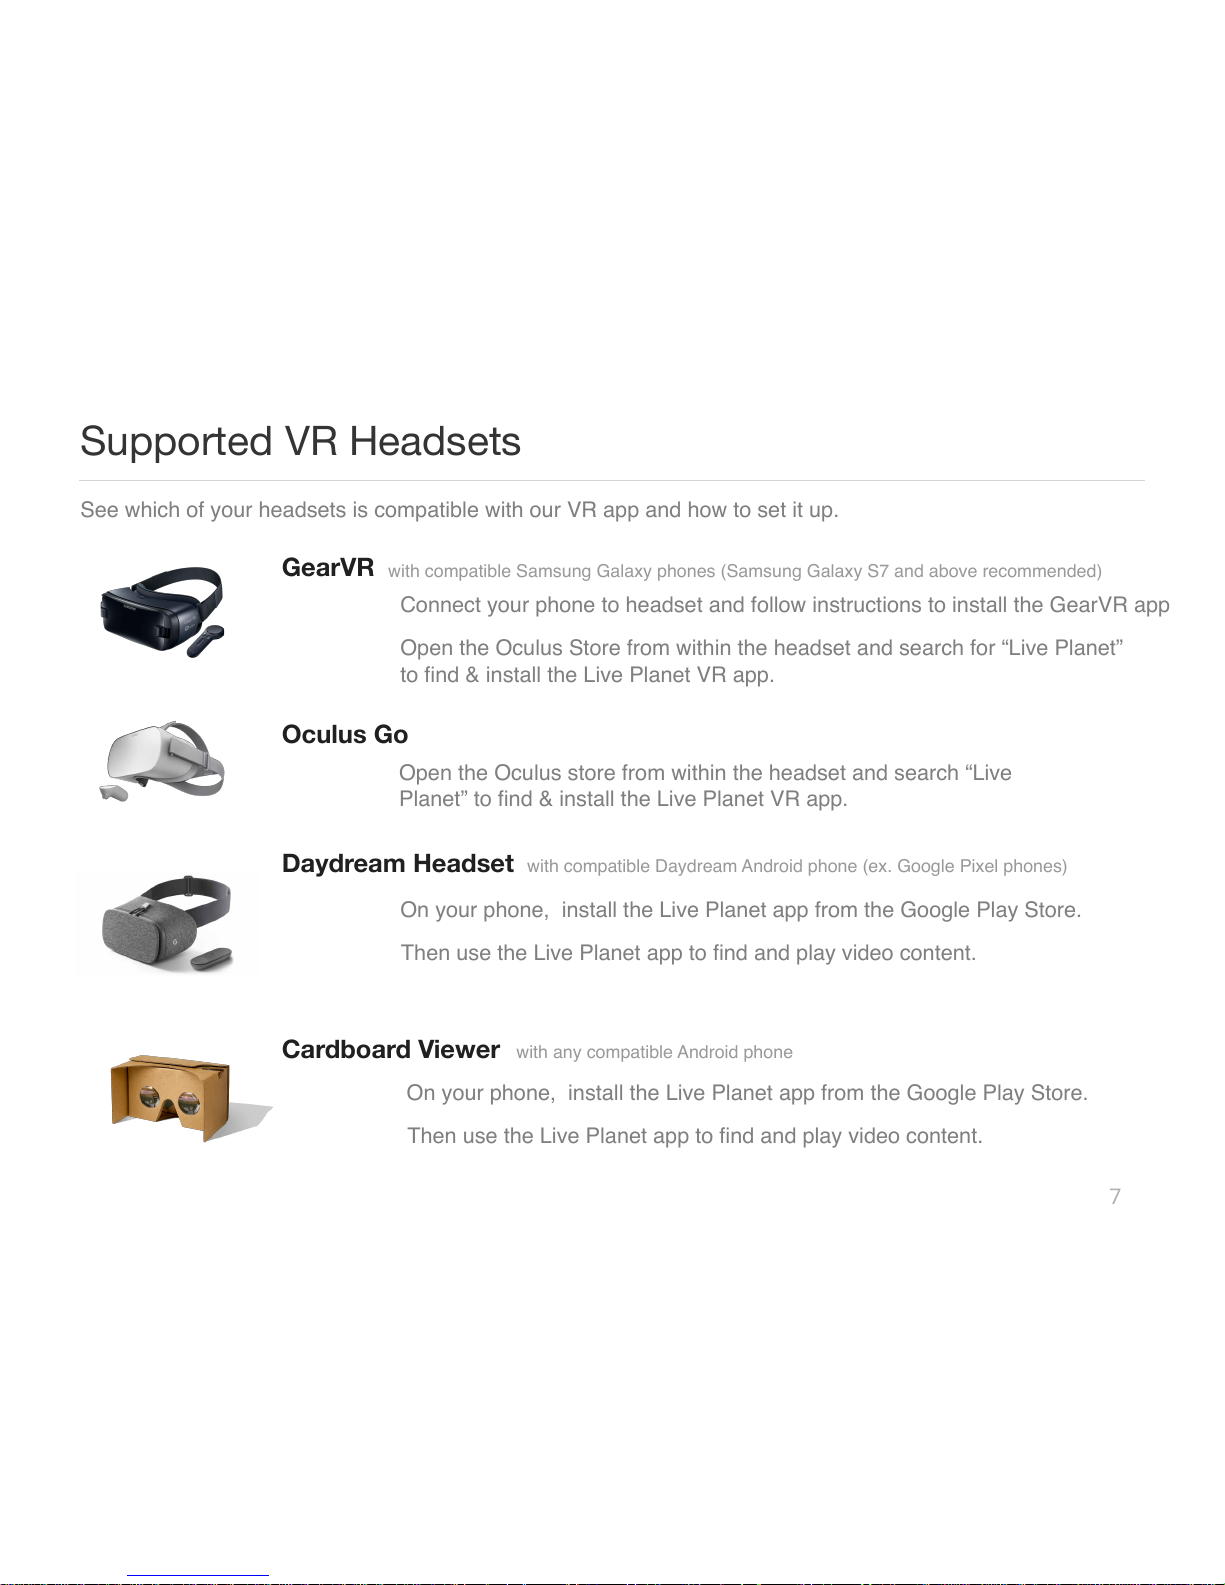
Supported VR Headsets
See which of your headsets is compatible with our VR app and how to set it up.
GearVR
with compatible Samsung Galaxy phones (Samsung Galaxy S7 and above recommended)
Connect your phone to headset and follow instructions to install the GearVR app
Step 1
Open the Oculus Store from within the headset and search for “Live Planet”
to find & install the Live Planet VR app.
Step 2
Daydream Headset
with compatible Daydream Android phone (ex. Google Pixel phones)
On your phone, install the Live Planet app from the Google Play Store.
Step 1
Oculus Go
Open the Oculus store from within the headset and search “Live
Planet” to find & install the Live Planet VR app.
Step 1
Then use the Live Planet app to find and play video content.
Step 2
Cardboard Viewer
with any compatible Android phone
On your phone, install the Live Planet app from the Google Play Store.
Step 1
Then use the Live Planet app to find and play video content.
Step 2
Page 8
8
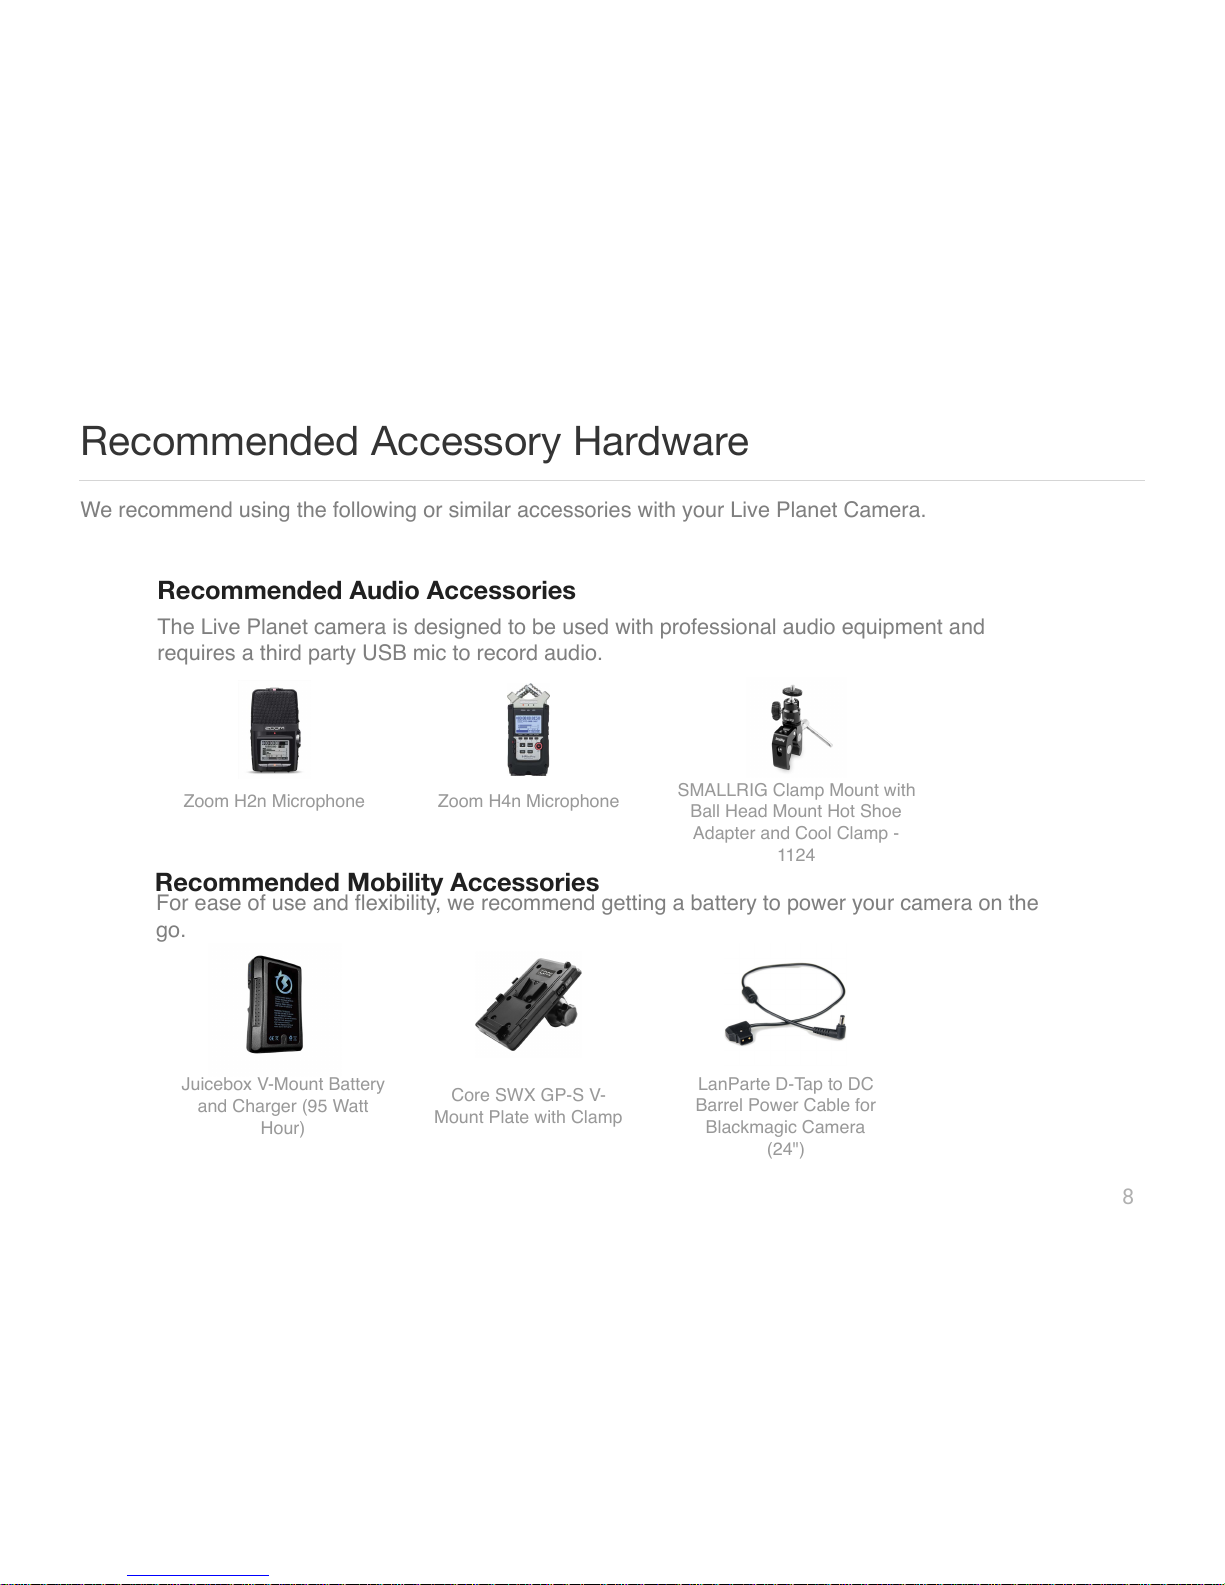
Recommended Accessory Hardware
We recommend using the following or similar accessories with your Live Planet Camera.
Recommended Audio Accessories
Recommended Mobility Accessories
Zoom H2n Microphone
The Live Planet camera is designed to be used with professional audio equipment and
requires a third party USB mic to record audio.
For ease of use and flexibility, we recommend getting a battery to power your camera on the
go.
Zoom H4n Microphone
Juicebox V-Mount Battery
and Charger (95 Watt
Hour)
Core SWX!GP-S V-
Mount Plate with Clamp
LanParte!D-Tap to DC
Barrel Power Cable for
Blackmagic Camera
(24")
SMALLRIG Clamp Mount with
Ball Head Mount Hot Shoe
Adapter and Cool Clamp -
112 4
Page 9
9
Content Creator Key Features
Try out these key features of our system
5. VR Livestreaming to a VR Headset
6. Livestream to YouTube
7. Stream to Any RTMP Endpoint
Up First
Now lets show you Live Planet camera’s flawless realtime
stitching using the live stereoscopic preview.
Estimated Time: 5 min
1. Live Stereoscopic Preview on a VR Headset
2. Live Preview on Big Screen
3. Record to SD Card
4. Upload & Publish With Our Cloud
Page 10
10
Live Stereoscopic Preview on a VR Headset
Key Feature #1
Preview your camera’s feed through a headset in realtime to see yourself and everything
around you, in 3D VR video.
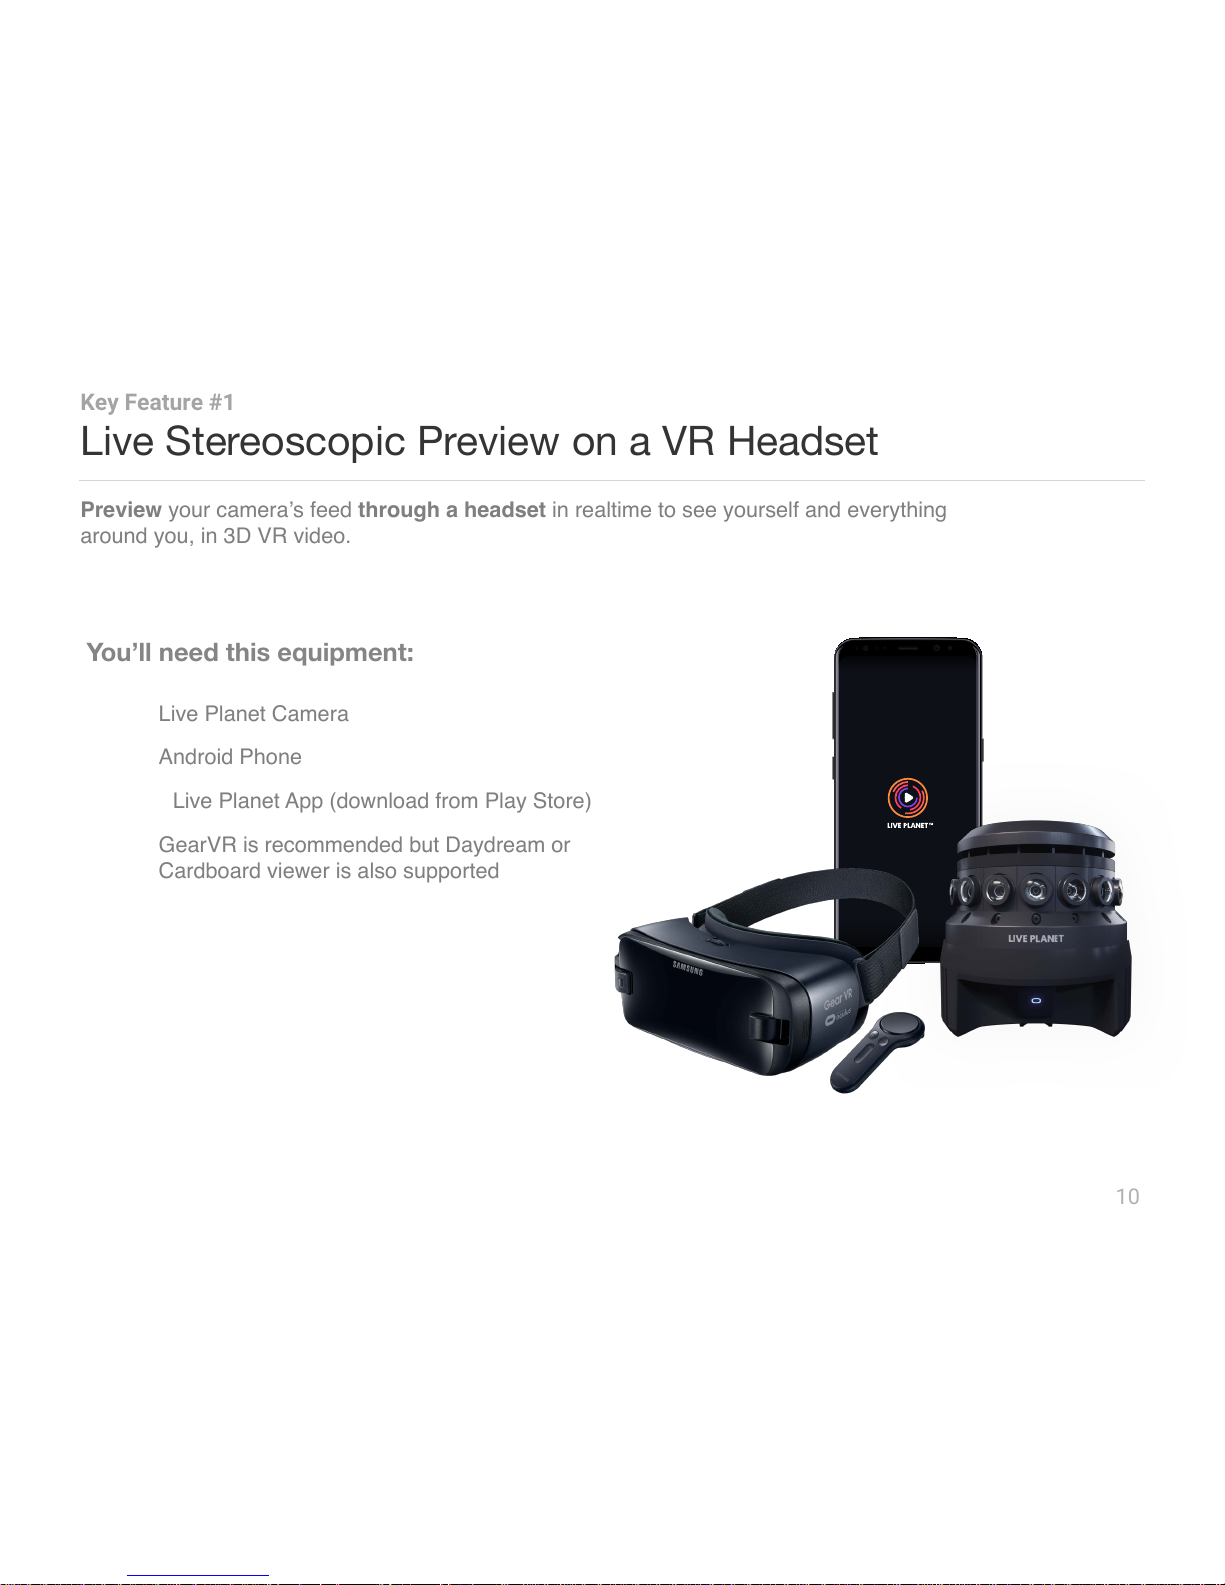
You’ll need this equipment:
1. Live Planet Camera
2. Android Phone
a. Live Planet App (download from Play Store)
3. GearVR is recommended but Daydream or
Cardboard viewer is also supported
Page 11
11
Live Stereoscopic Preview on a VR Headset
Key Feature #1
3
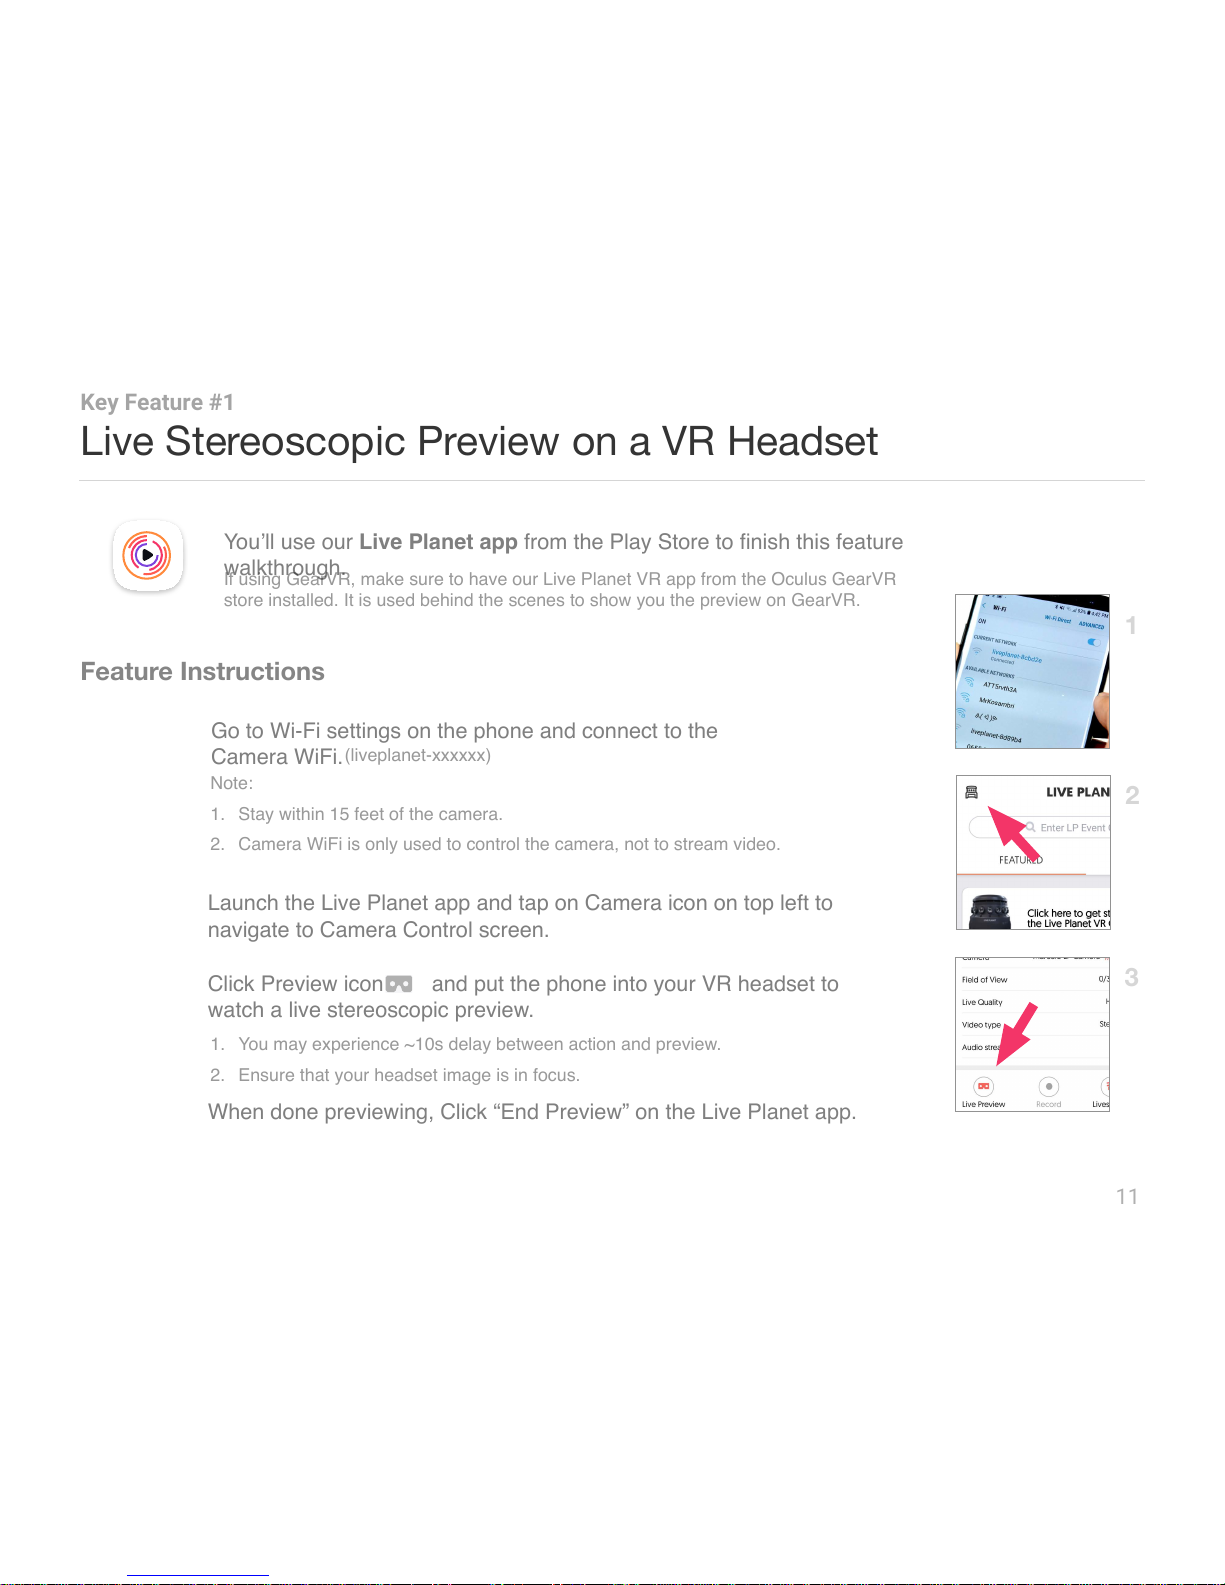
You’ll use our Live Planet app from the Play Store to finish this feature
walkthrough.
Step 1
Step 2
Launch the Live Planet app and tap on Camera icon on top left to
navigate to Camera Control screen.
Step 3
Click Preview icon and put the phone into your VR headset to
watch a live stereoscopic preview.
2
If using GearVR, make sure to have our Live Planet VR app from the Oculus GearVR
store installed. It is used behind the scenes to show you the preview on GearVR.
Note:
1. Stay within 15 feet of the camera.
2. Camera WiFi is only used to control the camera, not to stream video.
When done previewing, Click “End Preview” on the Live Planet app.
1. You may experience ~10s delay between action and preview.
2. Ensure that your headset image is in focus.
Go to Wi-Fi settings on the phone and connect to the
Camera WiFi.
(liveplanet-xxxxxx)
Page 12
Live Stereoscopic Preview on a VR Headset
12
You saw Live Planet camera’s flawless realtime stitching
using the live stereoscopic preview.
Just Finished
Live Preview On Big Screen
Now let’s preview perfectly stitched equirectangular top bottom
stereoscopic view from the Live Planet camera on a big screen.
Up Next
Estimated Time: 5 min
Page 13
13
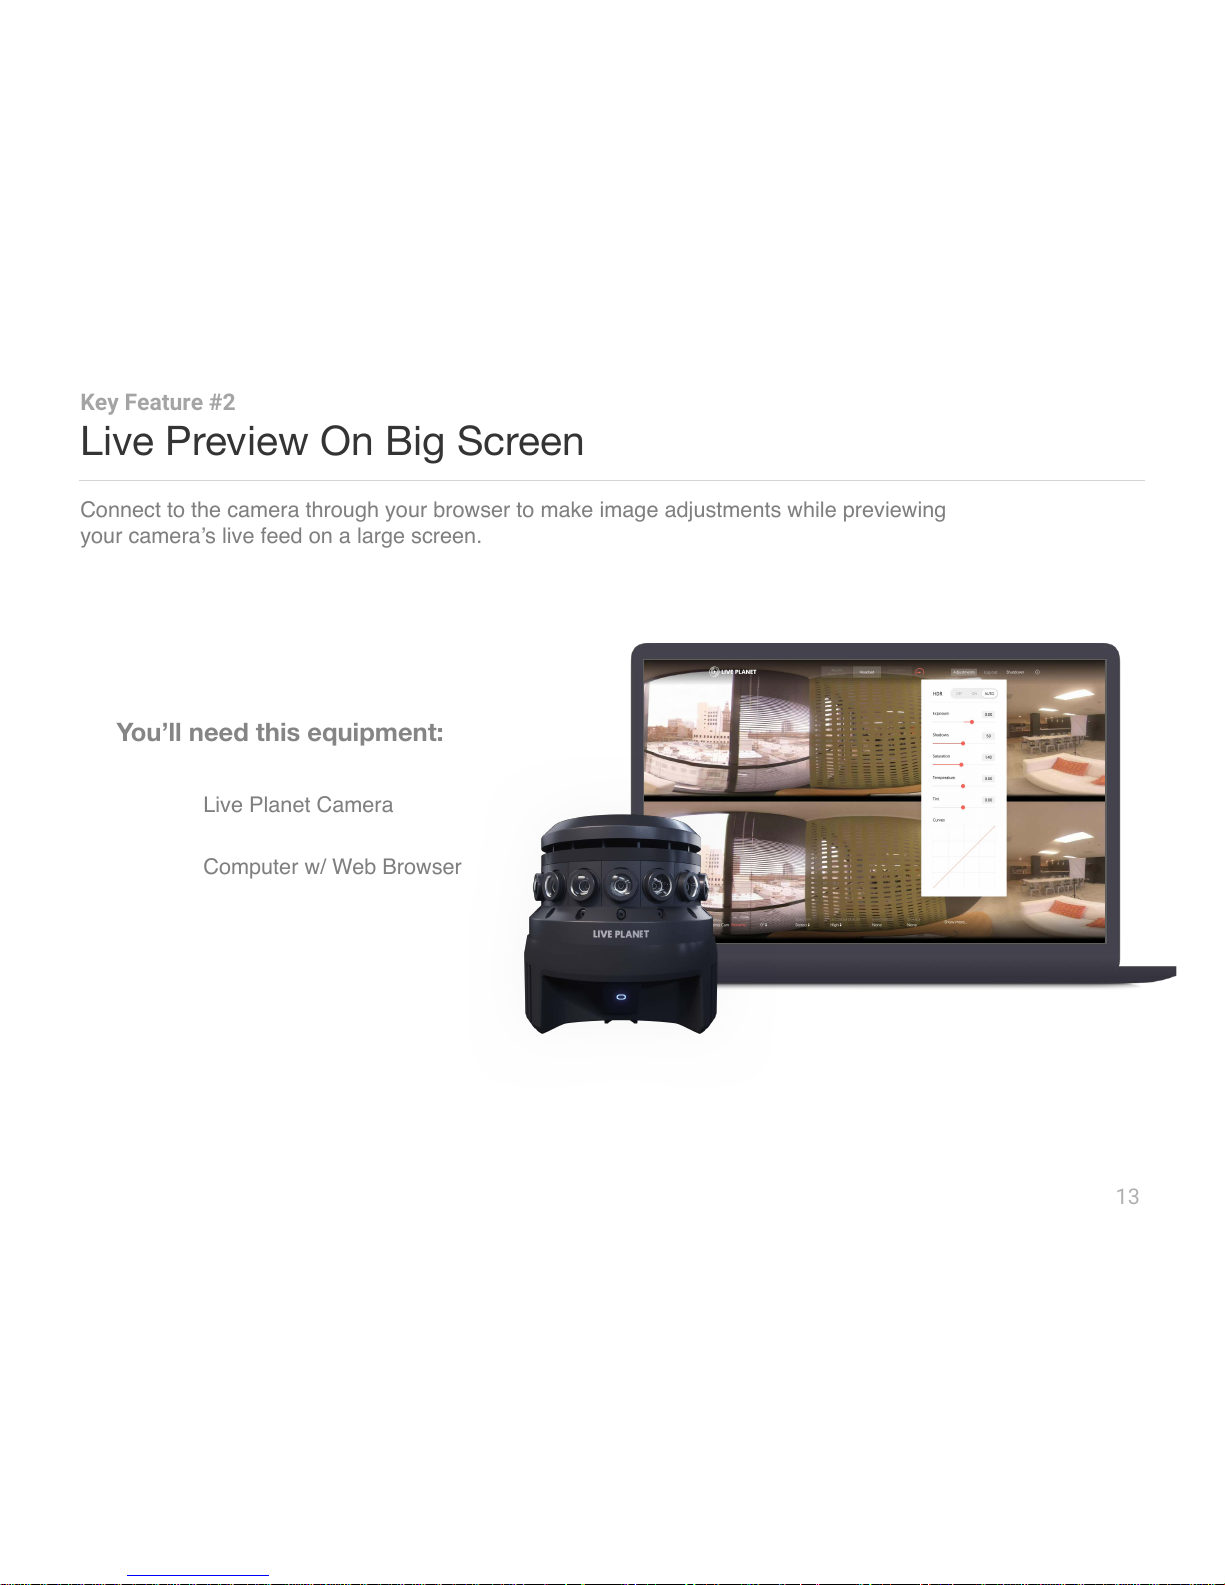
Live Preview On Big Screen
Key Feature #2
Connect to the camera through your browser to make image adjustments while previewing
your camera’s live feed on a large screen.
You’ll need this equipment:
1. Live Planet Camera"
2. Computer w/ Web Browser
Page 14
14
Live Preview On Big Screen
Key Feature #2
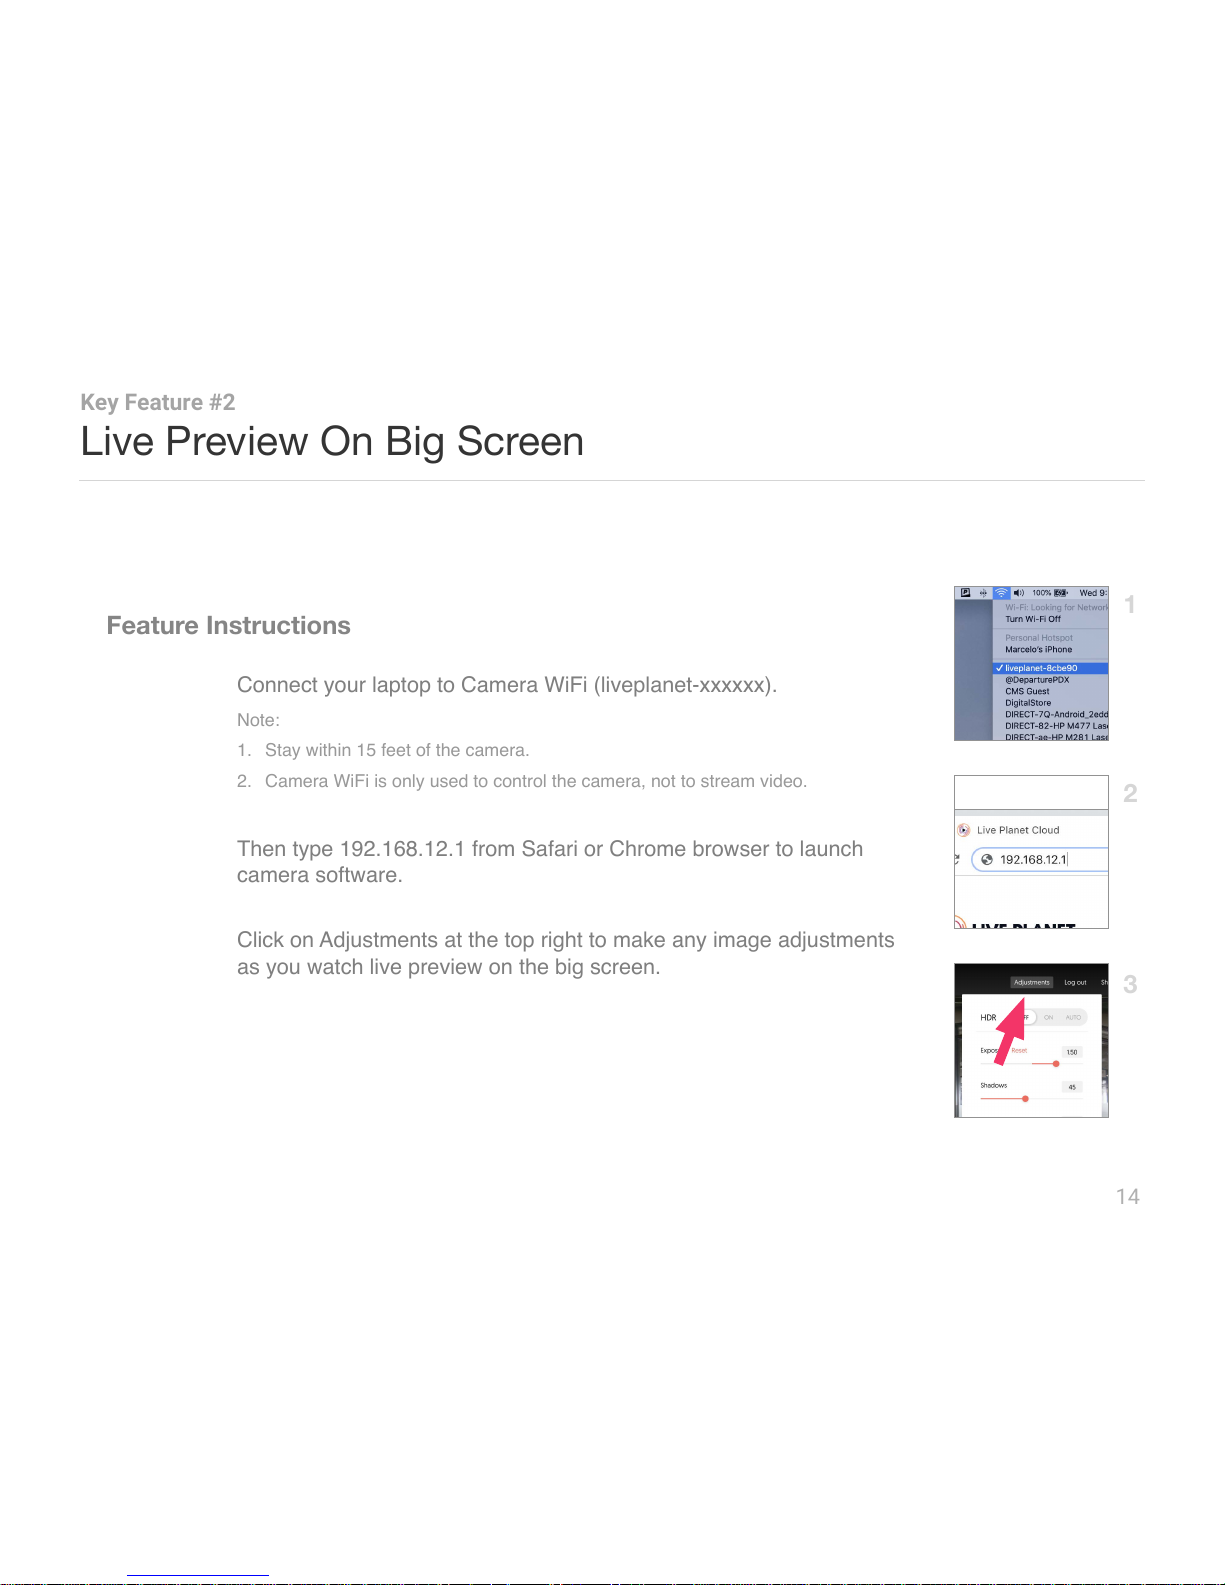
Note:
1. Stay within 15 feet of the camera.
2. Camera WiFi is only used to control the camera, not to stream video.
Step 1
Connect your laptop to Camera WiFi (liveplanet-xxxxxx).
Step 2
Then type 192.168.12.1 from Safari or Chrome browser to launch
camera software.
Step 3
Click on Adjustments at the top right to make any image adjustments
as you watch live preview on the big screen.
2
3
Page 15
Live Preview On Big Screen
15
You just saw how easy it is to make image adjustments while previewing an
equirectangular live video feed on a big screen.
Just Finished
Record To MicroSD Card
Now that you have set up your camera, let’s see how to shoot
360° stereoscopic video and record to a microSD card.
Up Next
Estimated Time: 5 min
Page 16
16
Record To MicroSD Card
Key Feature #3
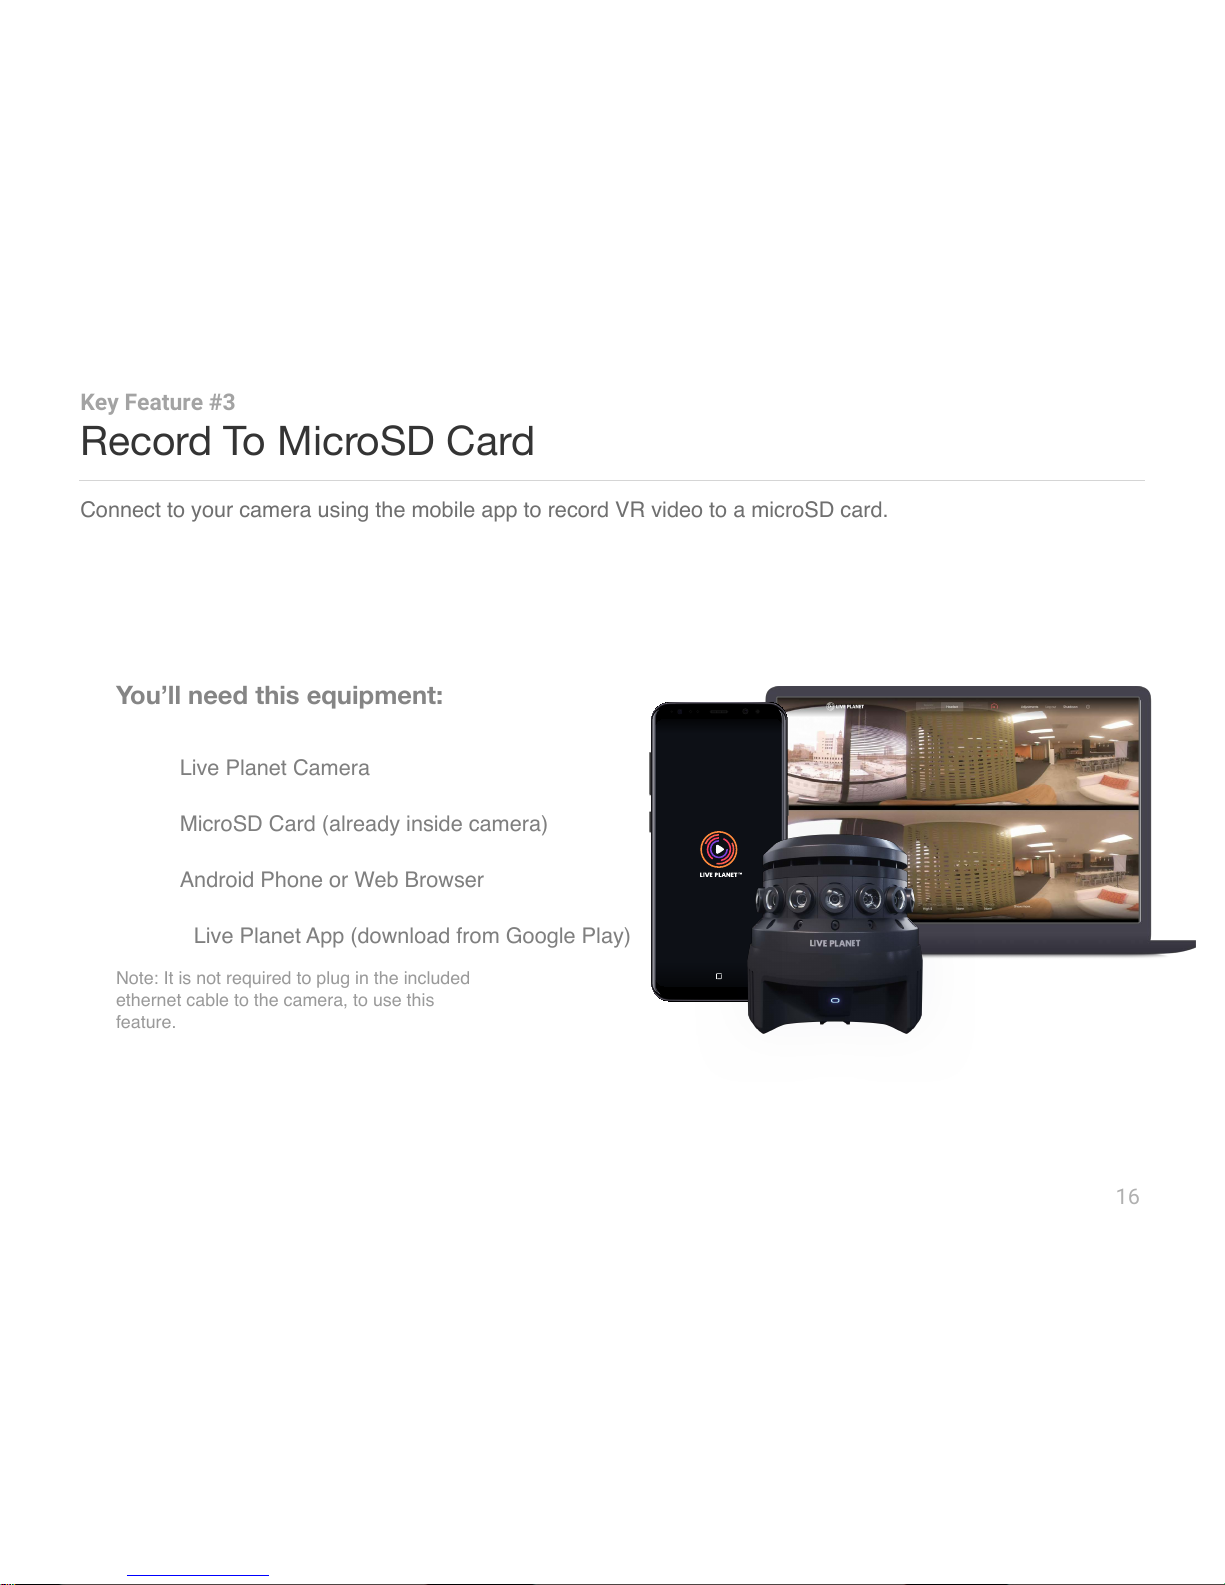
Connect to your camera using the mobile app to record VR video to a microSD card.
You’ll need this equipment:
1. Live Planet Camera
2. MicroSD Card (already inside camera)
3. Android Phone or Web Browser
a. Live Planet App (download from Google Play)
Note: It is not required to plug in the included
ethernet cable to the camera, to use this
feature.
Page 17
17
Record To MicroSD Card
Key Feature #3
2
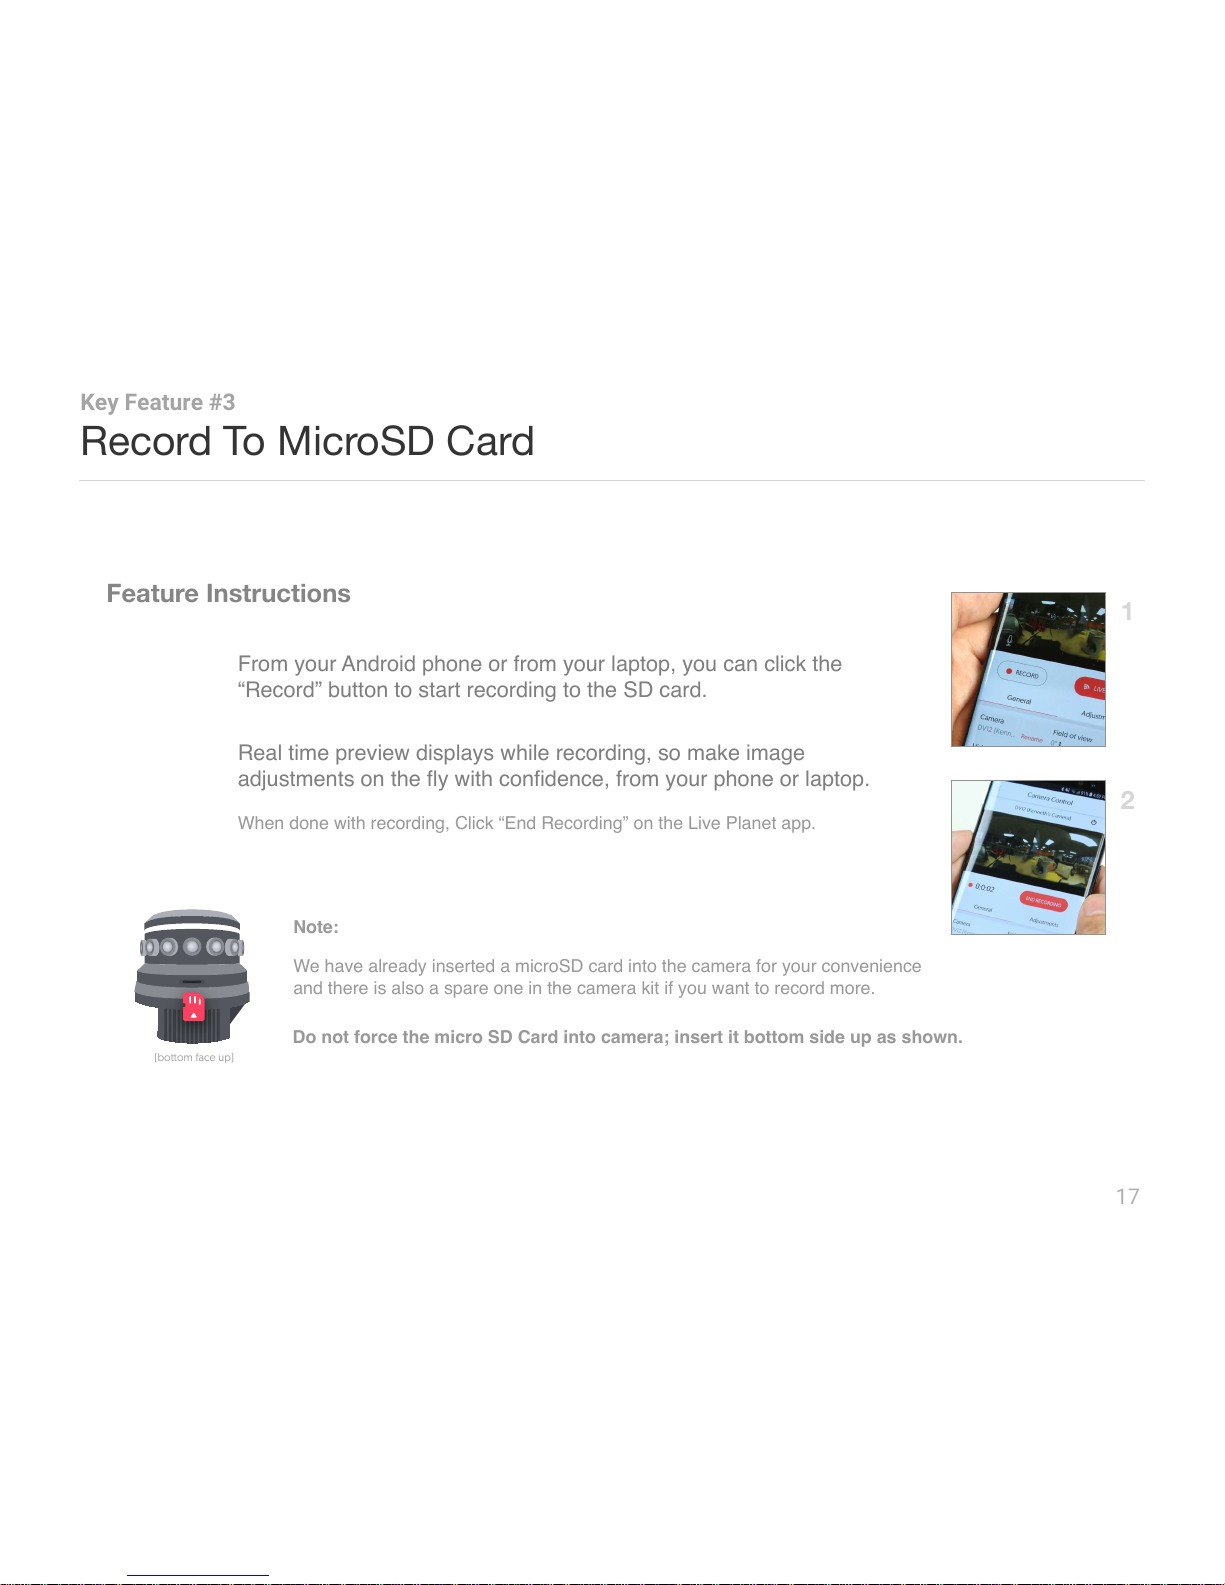
Step 1
From your Android phone or from your laptop, you can click the
“Record” button to start recording to the SD card.
Step 2
Real time preview displays while recording, so make image
adjustments on the fly with confidence, from your phone or laptop.
Note:
We have already inserted a microSD card into the camera for your convenience
and there is also a spare one in the camera kit if you want to record more.
Do not force the micro SD Card into camera; insert it bottom side up as shown.
When done with recording, Click “End Recording” on the Live Planet app.
(bottom face up)
Page 18
Record To MicroSD Card
18
You just saw how this camera stitches 360° stereoscopic video in real-time and
stores the final output to a single microSD Card.
Just Finished
Upload & Publish With Our Cloud
Up next we’ll show you how easy it is to upload VR footage from your
camera to the Live Planet Cloud and publish to multiple platforms.
Up Next
Estimated Time: 15 min
Page 19
19
Upload & Publish With Our Cloud
Key Feature #4
You’ll need this equipment:
1. Live Planet Camera
2. Ethernet Cable (included)
3. Web Browser
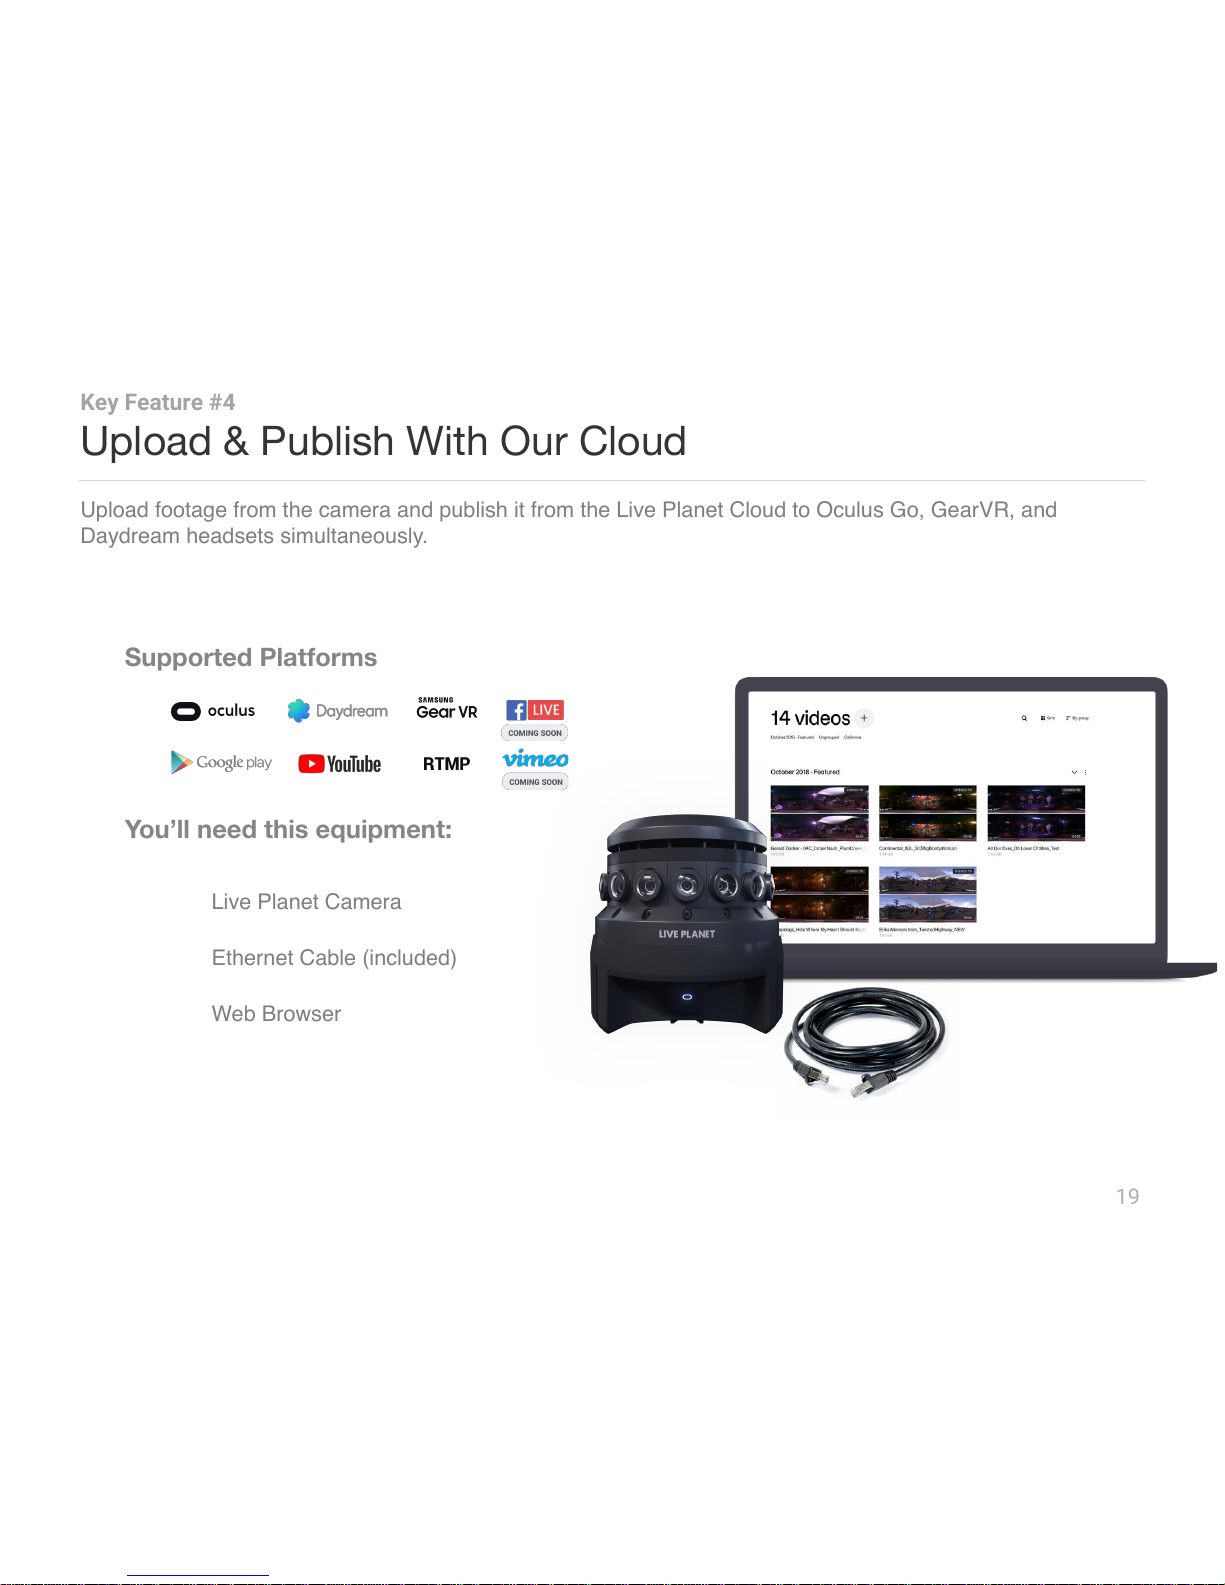
Upload footage from the camera and publish it from the Live Planet Cloud to Oculus Go, GearVR, and
Daydream headsets simultaneously.
Supported Platforms
Page 20
20
Upload & Publish With Our Cloud
Key Feature #4
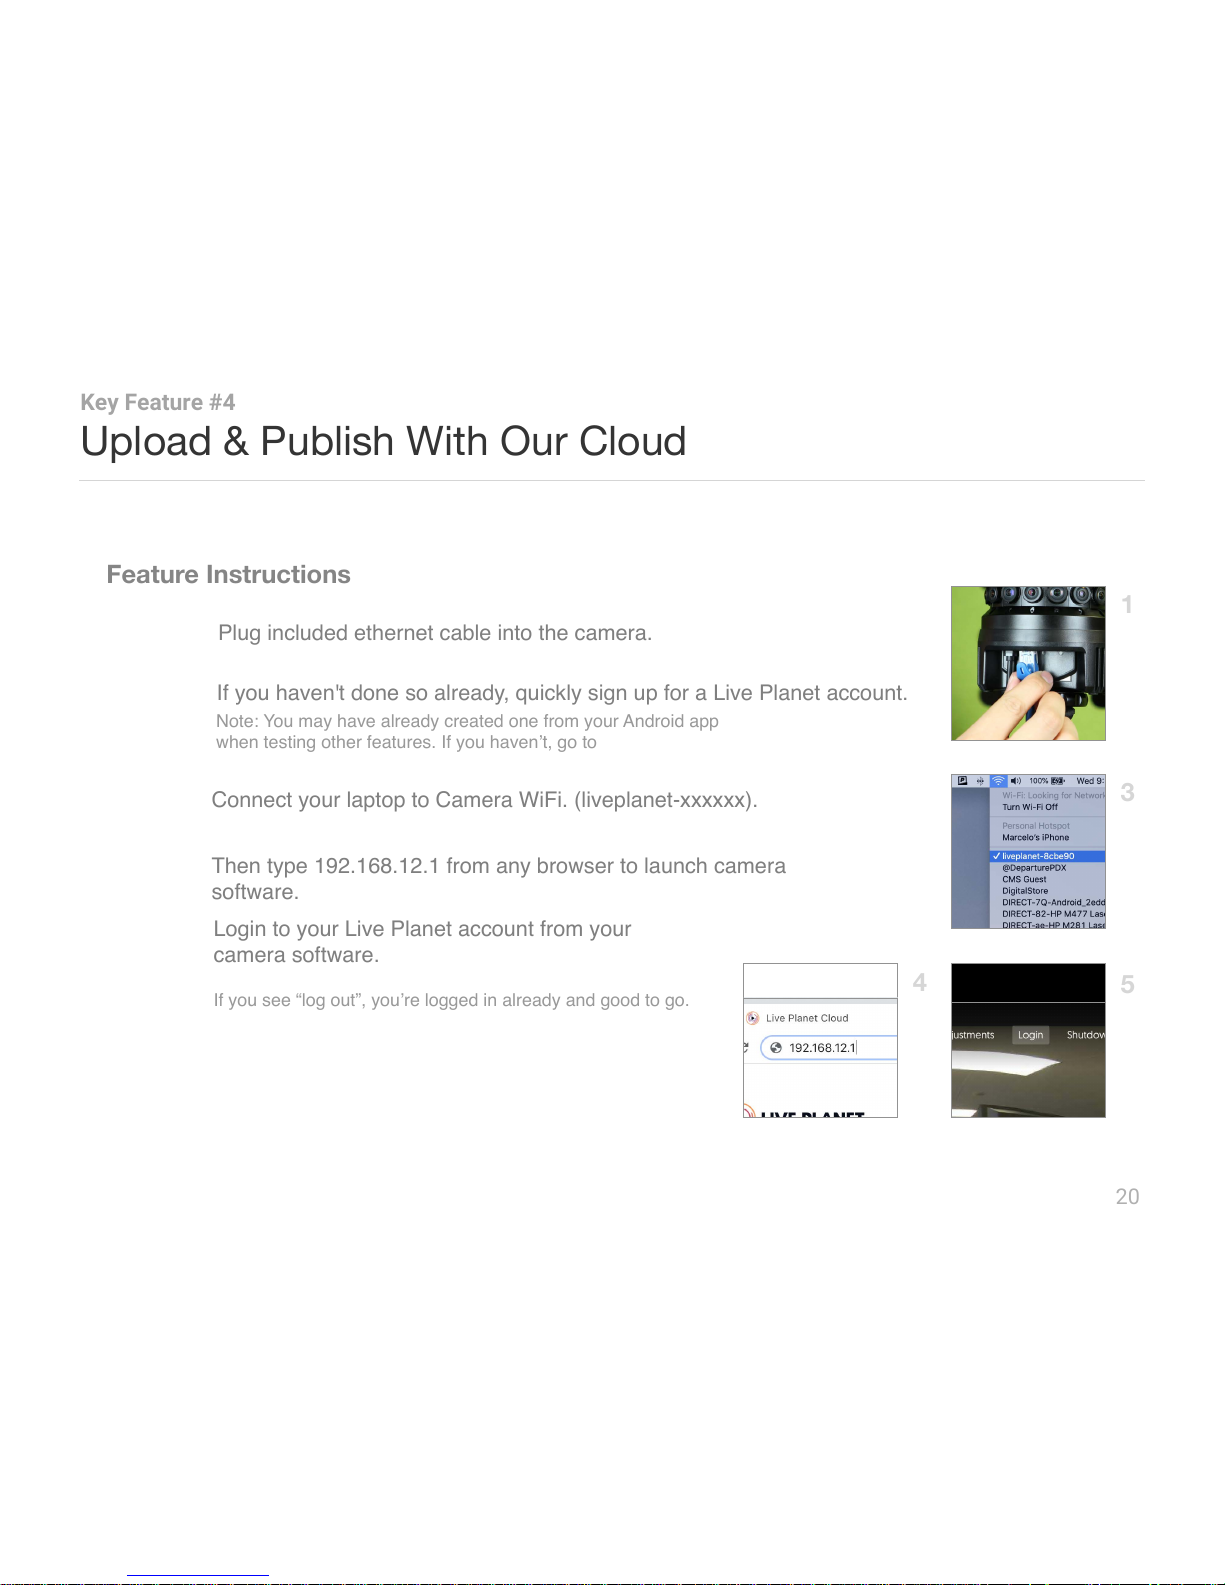
Step 3
Connect your laptop to Camera WiFi. (liveplanet-xxxxxx).
Step 4
Then type 192.168.12.1 from any browser to launch camera
software.
Step 5
3
4
5
Login to your Live Planet account from your
camera software.
If you haven't done so already, quickly sign up for a Live Planet account.
Note: You may have already created one from your Android app
when testing other features. If you haven’t, go to cloud.liveplanet.net/
signup
Step 2
If you see “log out”, you’re logged in already and good to go.
Step 1
Plug included ethernet cable into the camera.
Page 21
21
Upload & Publish With Our Cloud
Key Feature #4
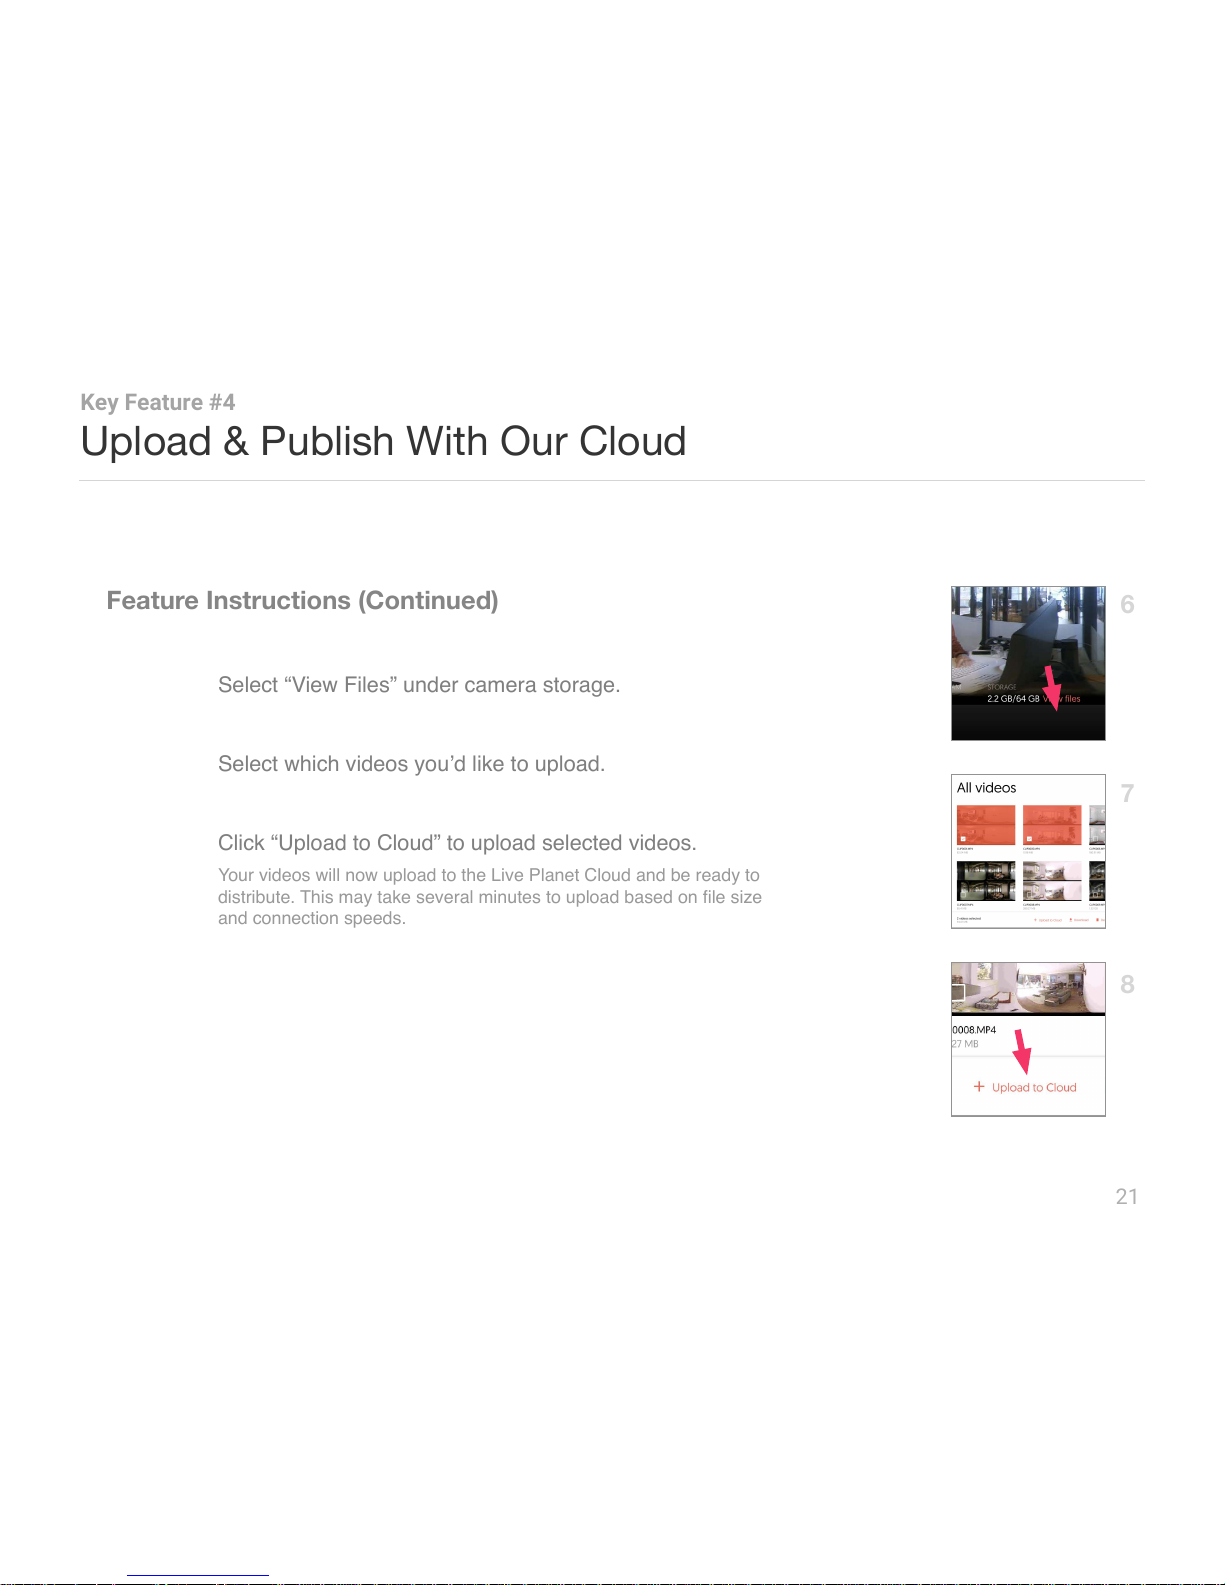
Step 6
Select “View Files” under camera storage.
Step 7
Select which videos you’d like to upload.
Step 8
Click “Upload to Cloud” to upload selected videos.
6
7
8
Your videos will now upload to the Live Planet Cloud and be ready to
distribute. This may take several minutes to upload based on file size
and connection speeds.
Page 22
22
Upload & Publish With Our Cloud
Key Feature #4
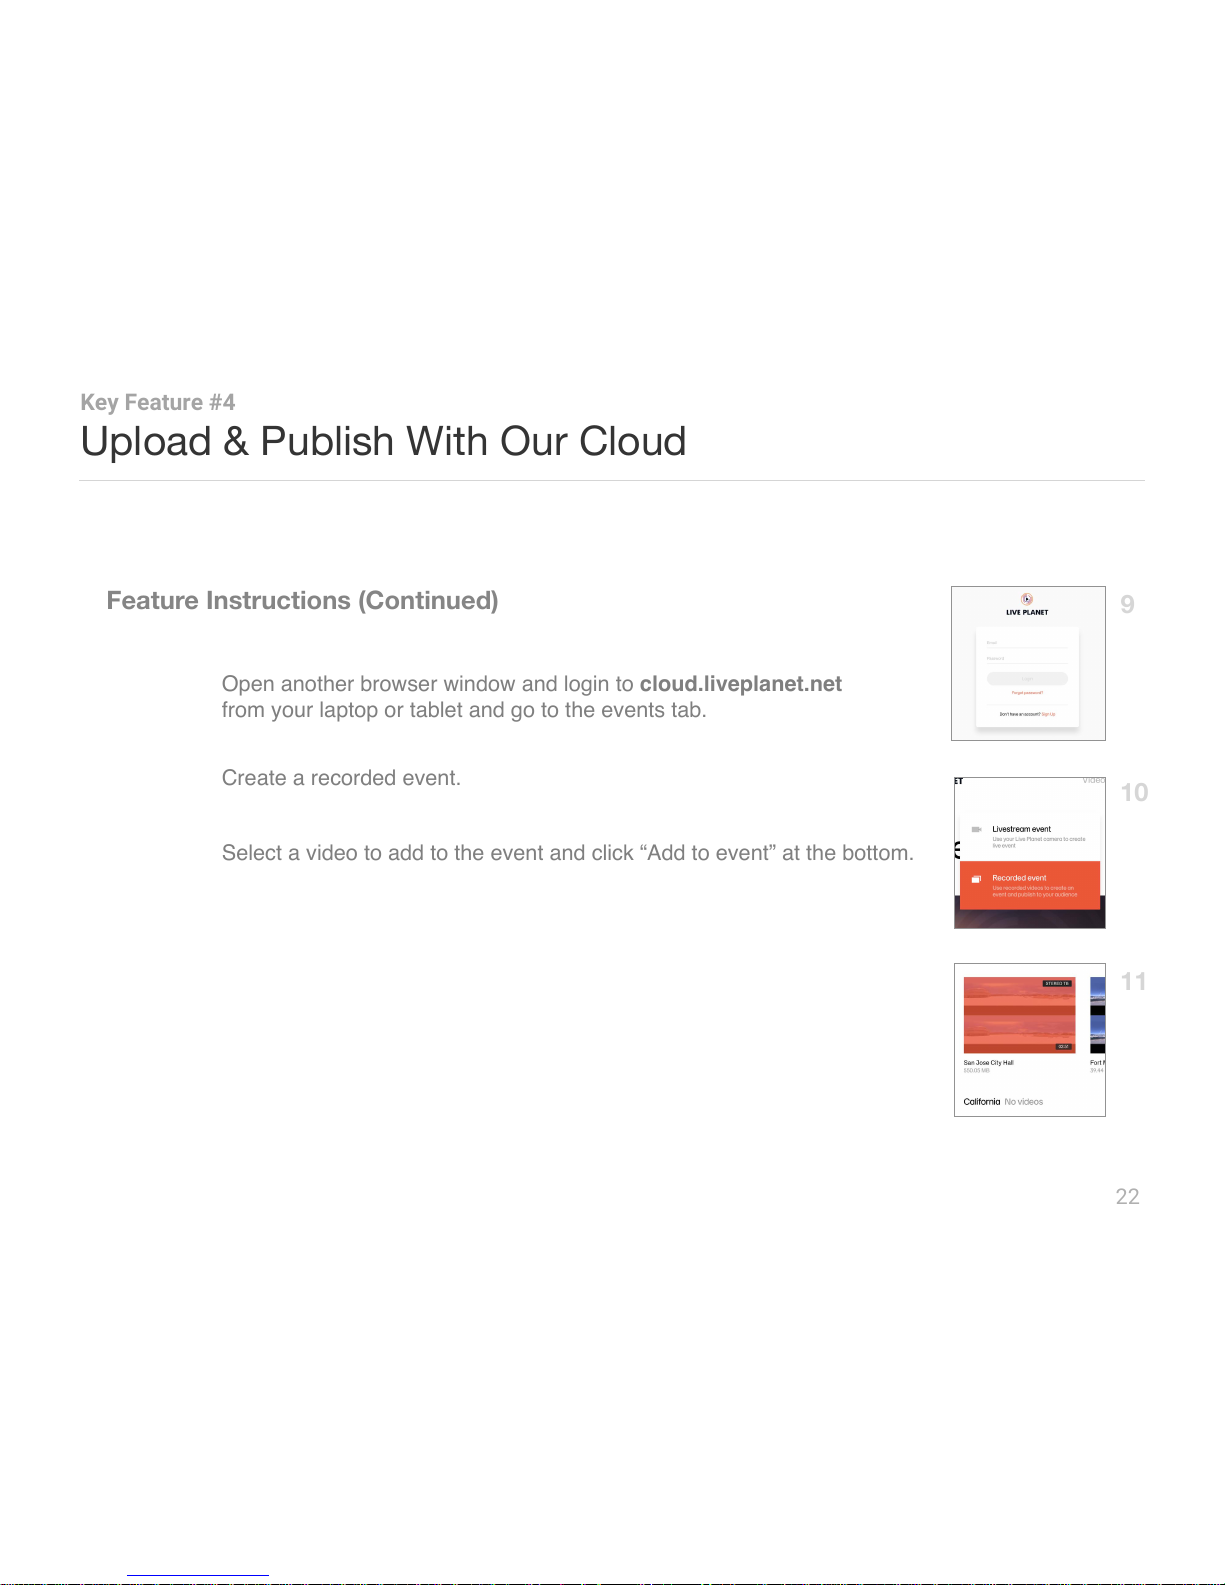
Step 9
Open another browser window and login to cloud.liveplanet.net
from your laptop or tablet and go to the events tab.
Step 11
Select a video to add to the event and click “Add to event” at the bottom.
Step 10
Create a recorded event.
9
Page 23
23
Upload & Publish With Our Cloud
Key Feature #4
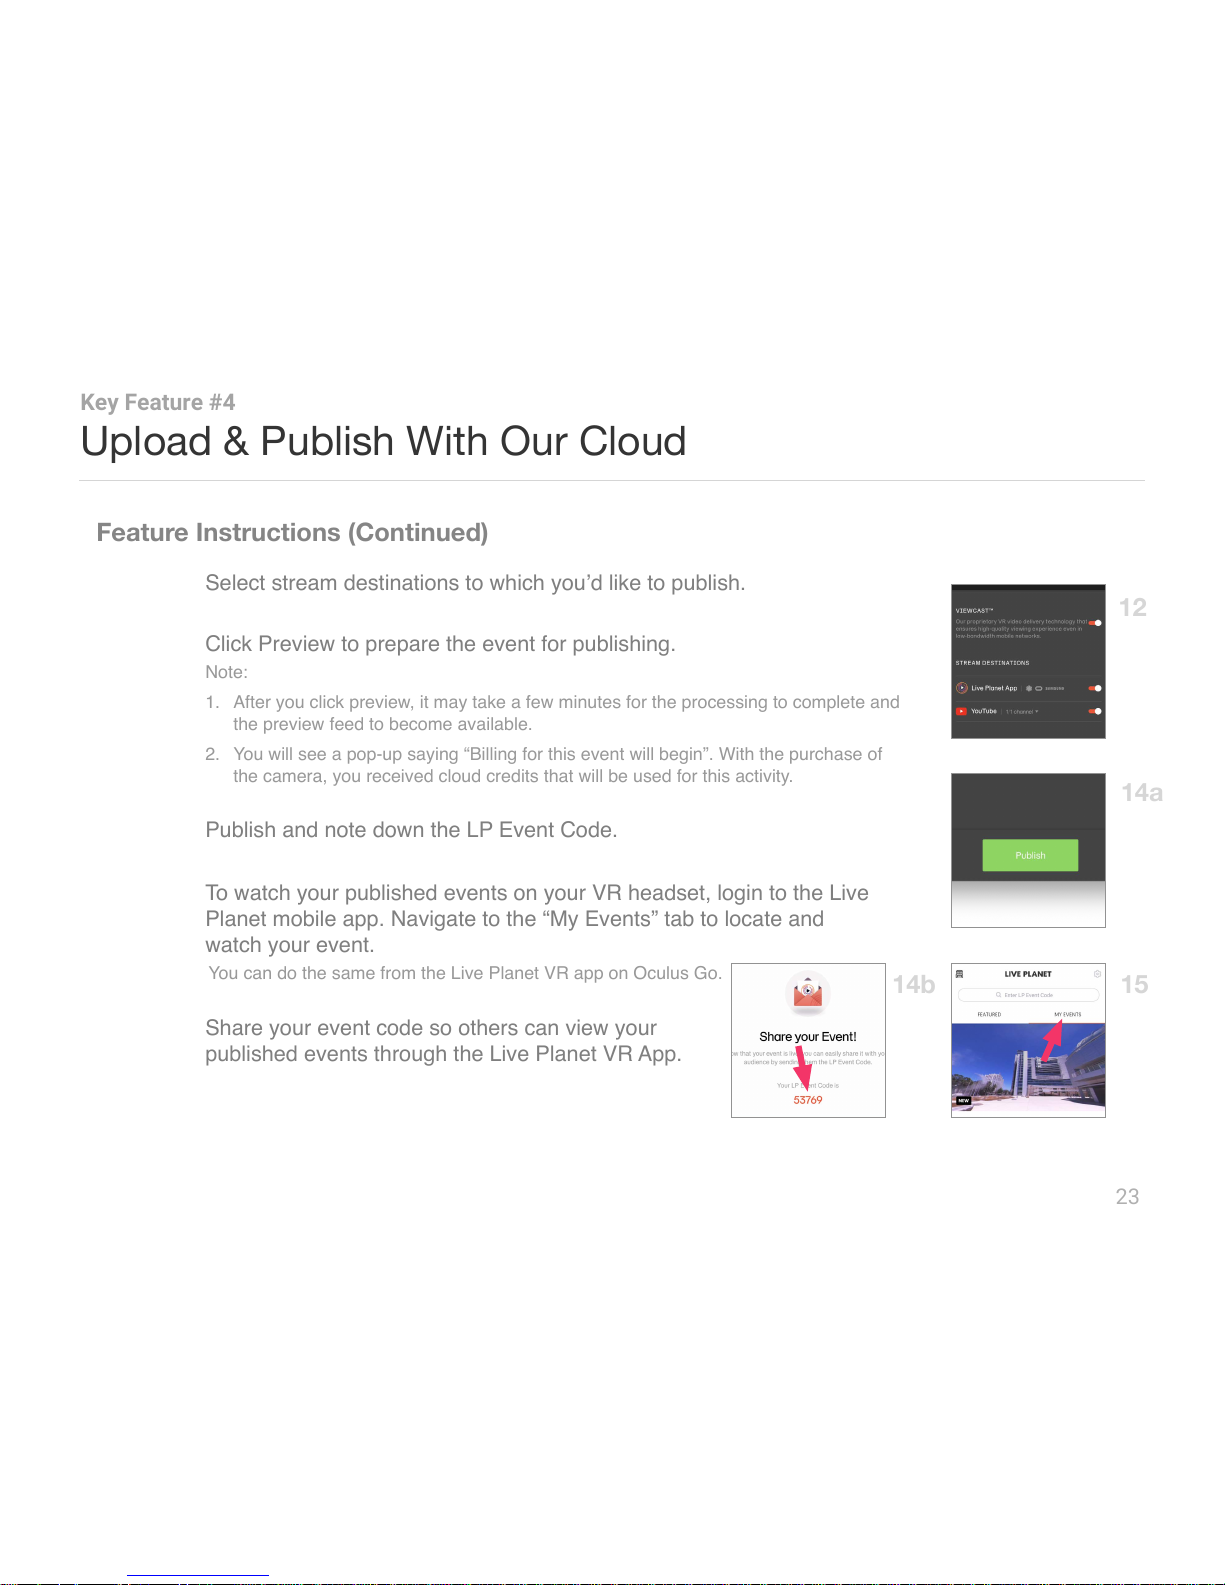
Step 12
Select stream destinations to which you’d like to publish.
Step 13
Click Preview to prepare the event for publishing.
Step 16
Share your event code so others can view your
published events through the Live Planet VR App.
12
15
14b
Note:
1. After you click preview, it may take a few minutes for the processing to complete and
the preview feed to become available.
2. You will see a pop-up saying “Billing for this event will begin”. With the purchase of
the camera, you received cloud credits that will be used for this activity.
Step 14
Publish and note down the LP Event Code.
Step 15
To watch your published events on your VR headset, login to the Live
Planet mobile app. Navigate to the “My Events” tab to locate and
watch your event.
You can do the same from the Live Planet VR app on Oculus Go.
Page 24
Upload & Publish With Our Cloud
24
With just a few clicks, you were able to easily upload VR footage from your
camera to the Live Planet Cloud and publish it to multiple platforms.
Just Finished
VR Livestreaming to a VR Headset
Next we’ll show you how easy it is to setup a VR livestream from our mobile app.
Up Next
Estimated Time: 10 min
Page 25
25
VR Livestreaming to a VR Headset
Key Feature #5
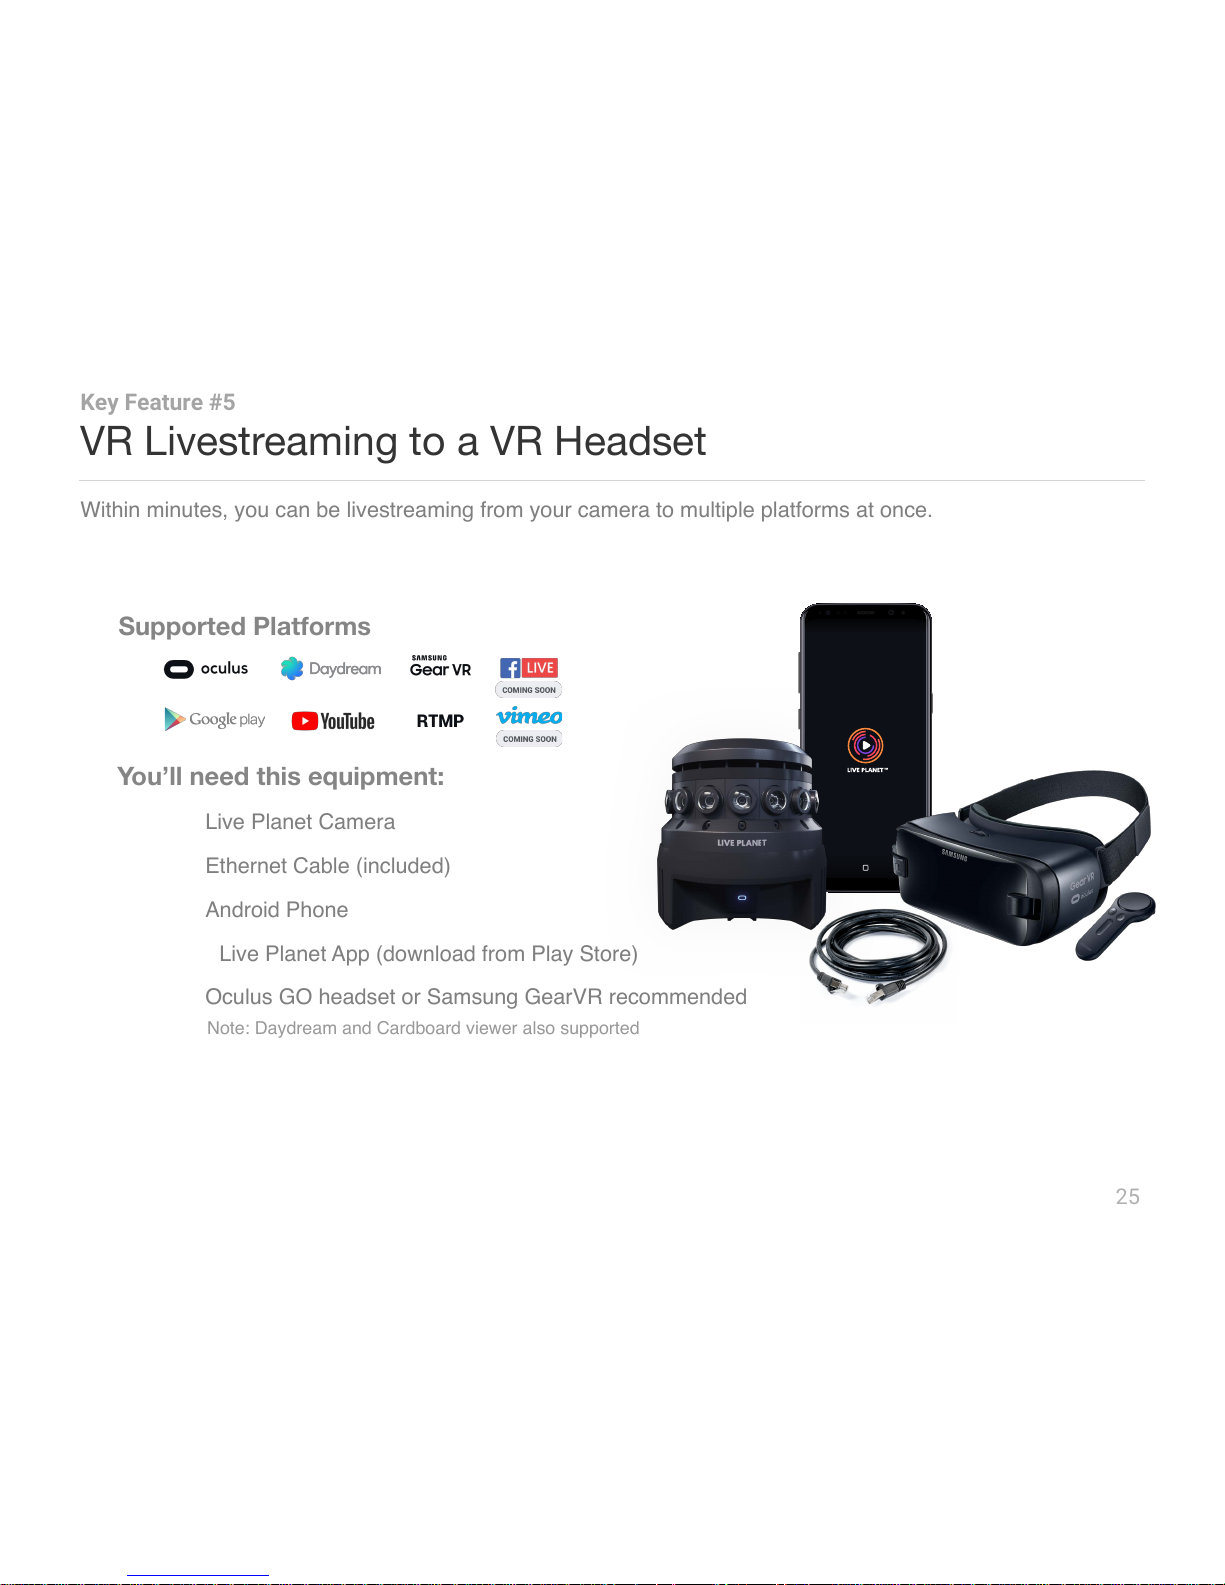
Within minutes, you can be livestreaming from your camera to multiple platforms at once.
You’ll need this equipment:
1. Live Planet Camera
2. Ethernet Cable (included)
3. Android Phone
a. Live Planet App (download from Play Store)
4. Oculus GO headset or Samsung GearVR recommended
Supported Platforms
Note: Daydream and Cardboard viewer also supported
Page 26
26
VR Livestreaming to a VR Headset
Key Feature #5
2
4
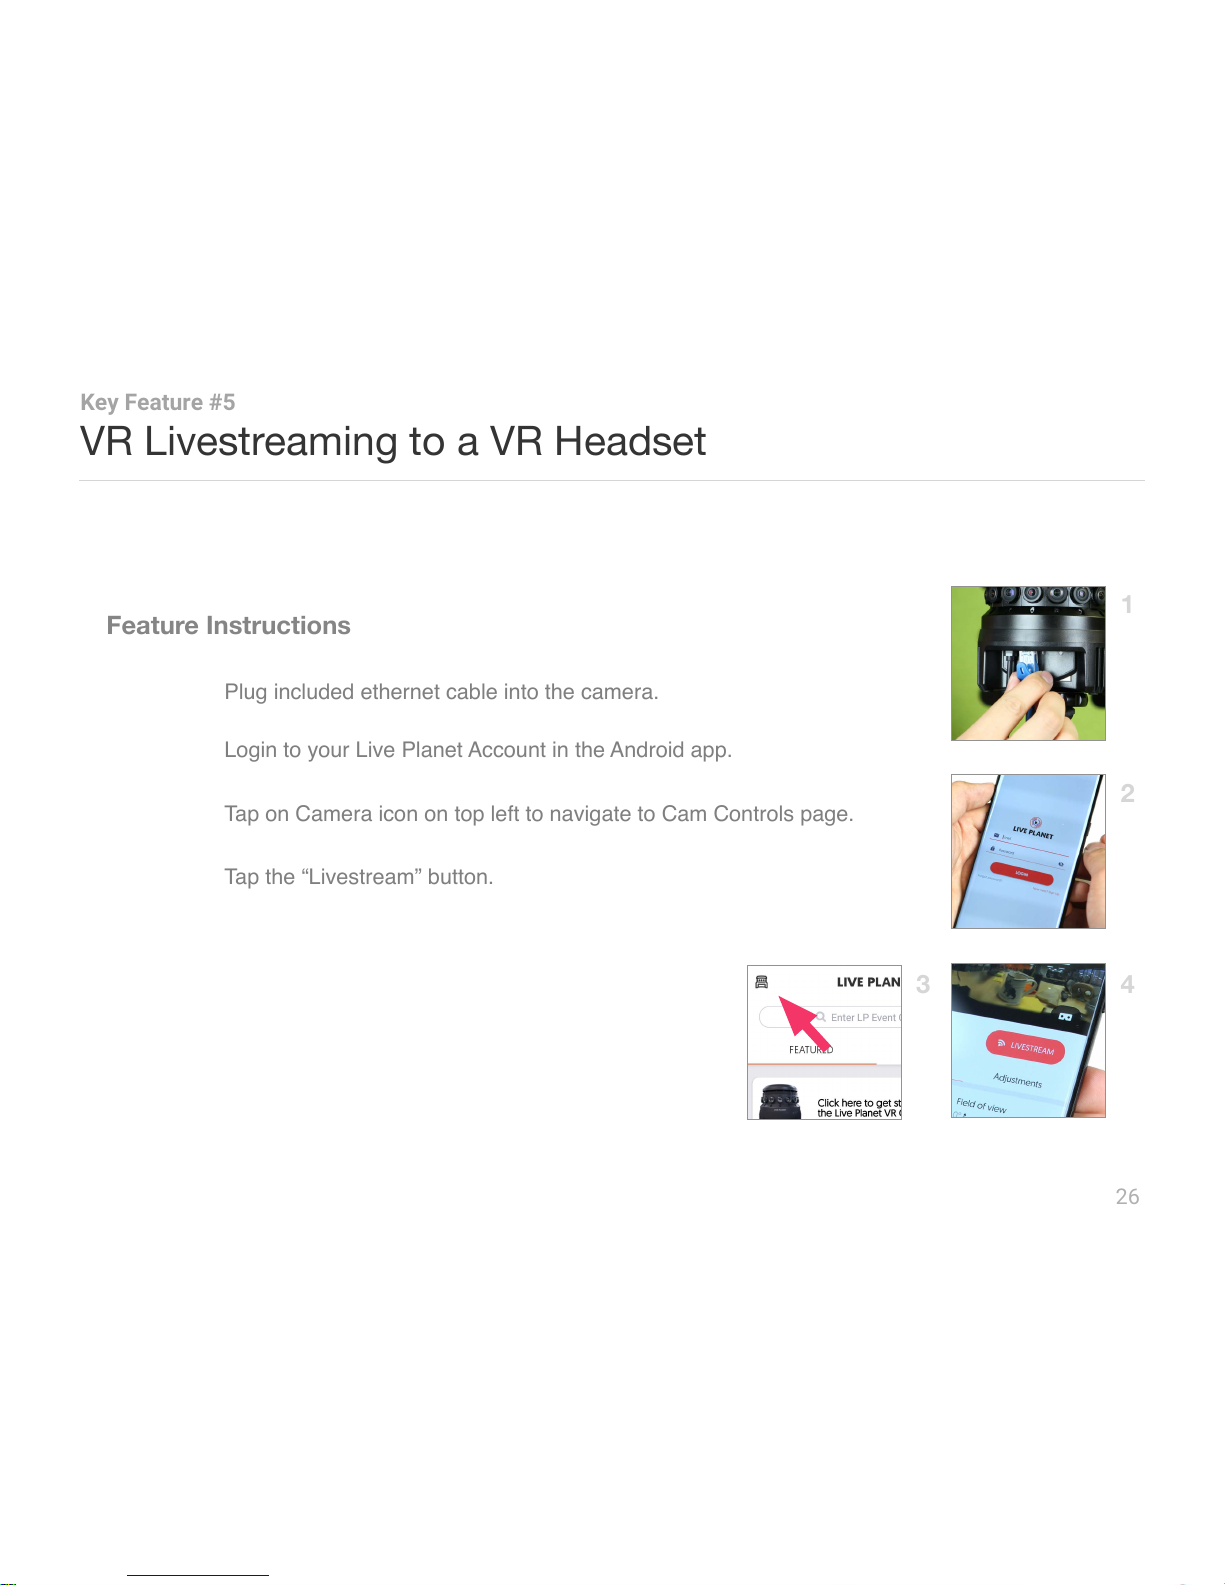
Step 1
Plug included ethernet cable into the camera.
Step 2
Login to your Live Planet Account in the Android app.
Step 3
Tap on Camera icon on top left to navigate to Cam Controls page.
Step 4
Tap the “Livestream” button.
3
Page 27
27
VR Livestreaming to a VR Headset
Key Feature #5
6
8
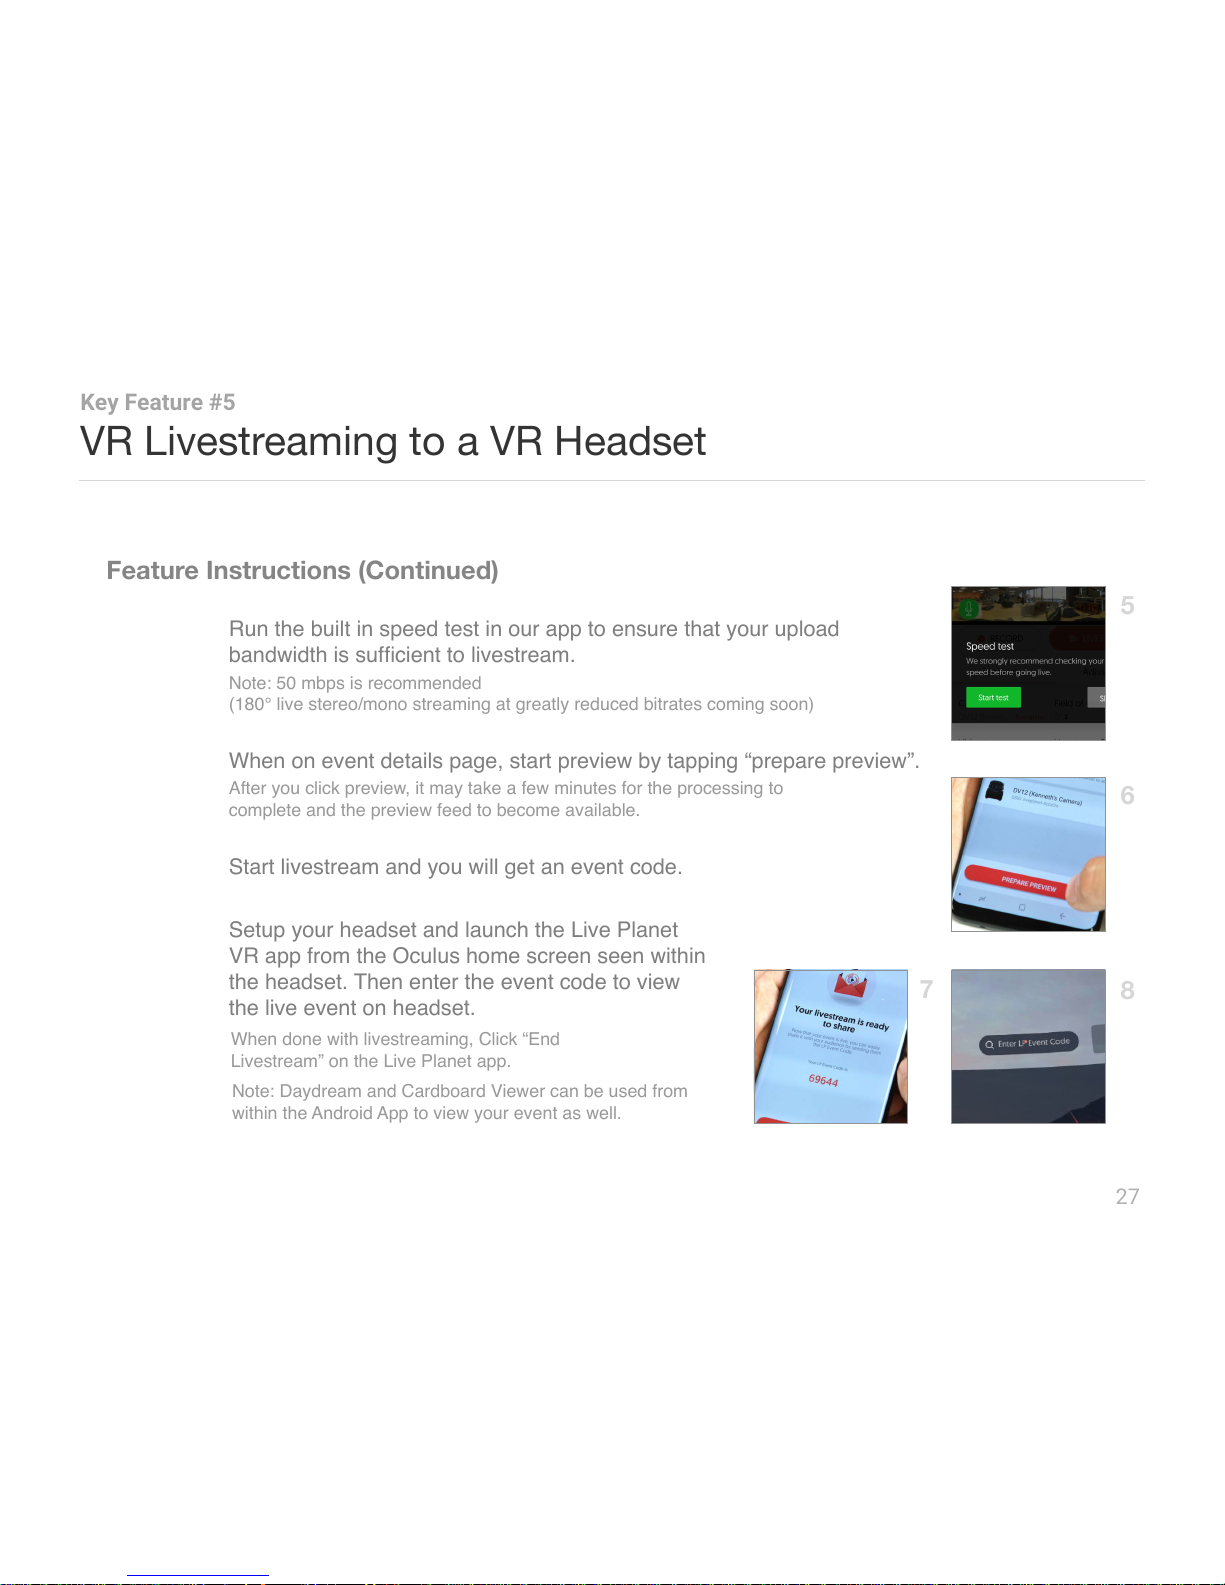
Step 6
When on event details page, start preview by tapping “prepare preview”.
Step 7
Start livestream and you will get an event code.
Step 8
Setup your headset and launch the Live Planet
VR app from the Oculus home screen seen within
the headset. Then enter the event code to view
the live event on headset.
7
Step 5
Run the built in speed test in our app to ensure that your upload
bandwidth is sufficient to livestream.
1
5
After you click preview, it may take a few minutes for the processing to
complete and the preview feed to become available.
Note: 50 mbps is recommended
(180° live stereo/mono streaming at greatly reduced bitrates coming soon)
When done with livestreaming, Click “End
Livestream” on the Live Planet app.
Note: Daydream and Cardboard Viewer can be used from
within the Android App to view your event as well.
Page 28
VR Livestreaming to a VR Headset
28
You just saw how easy it is to set up a VR livestream using
the Live Planet VR system.
Just Finished
Livestream to YouTube
Using the Live Planet Cloud, you can
livestream to YouTube and other VR platforms at the same time.
Up Next
Estimated Time: 20 min
+ up to 24hrs for YouTube to activate livestreaming
Page 29
29
Livestream to YouTube
Key Feature #6
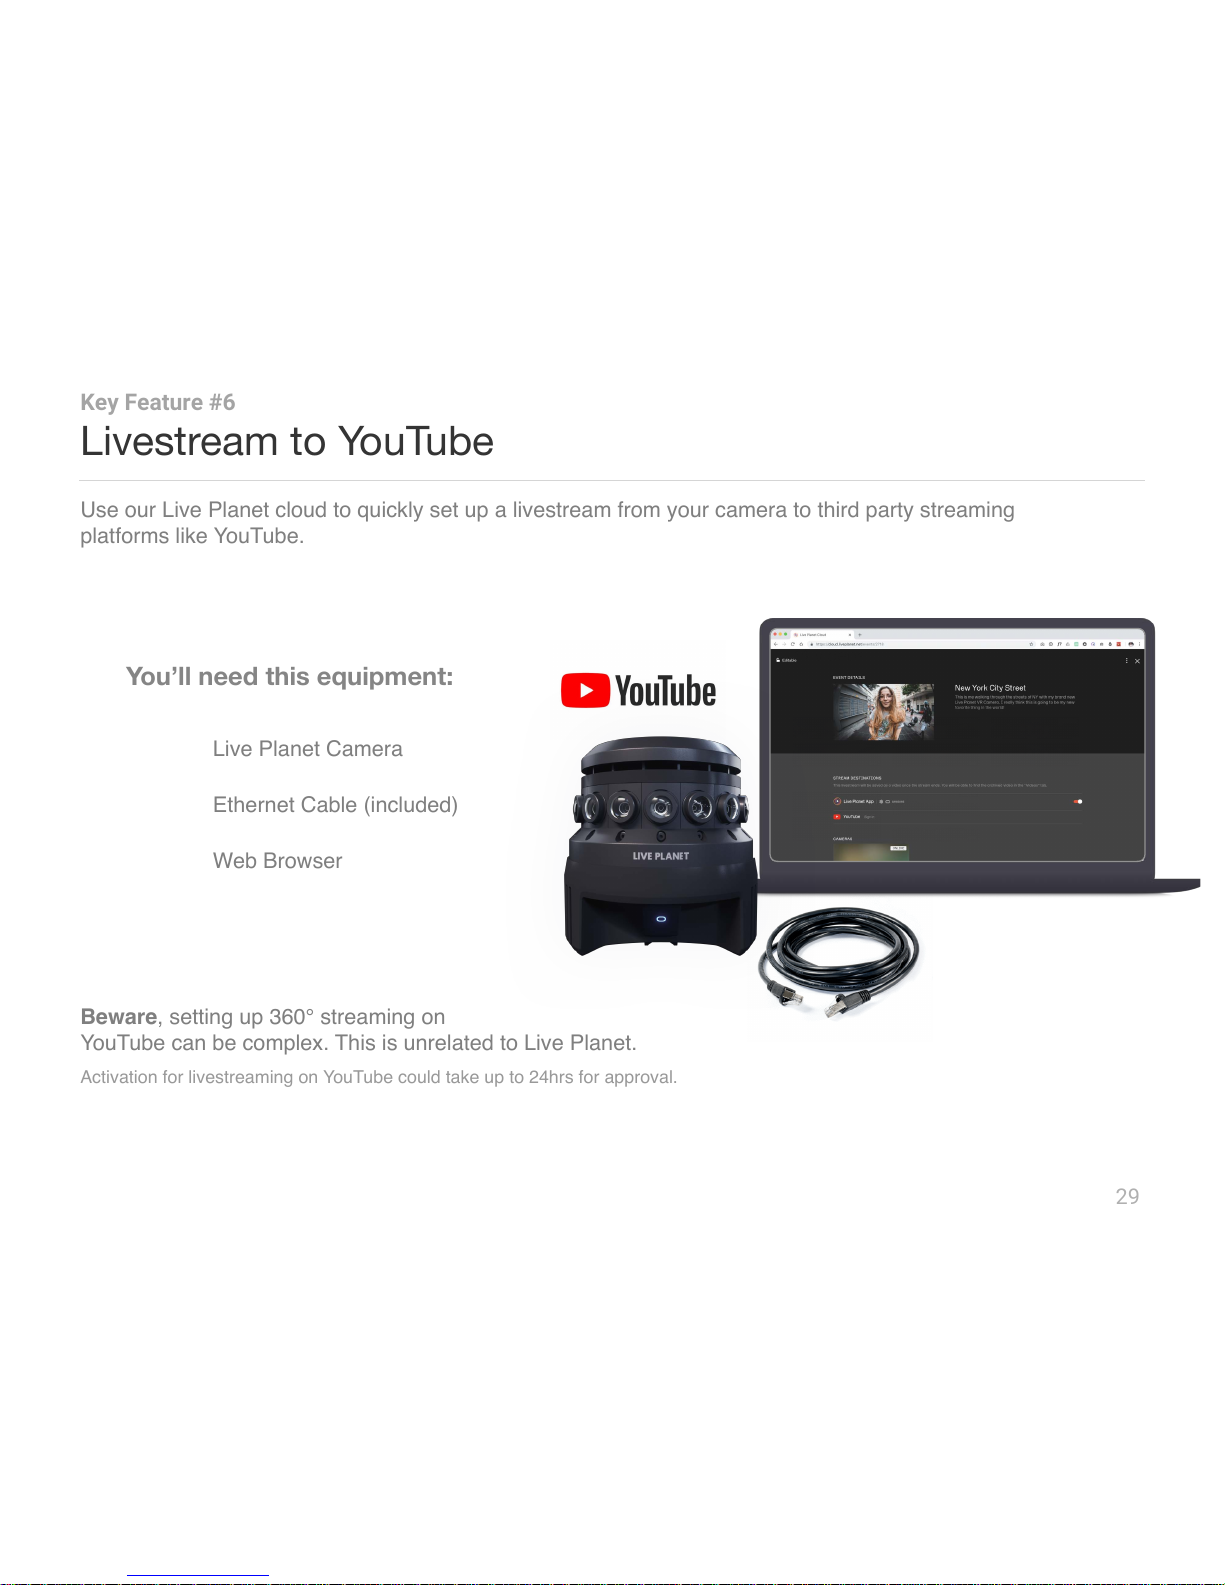
Use our Live Planet cloud to quickly set up a livestream from your camera to third party streaming
platforms like YouTube.
You’ll need this equipment:
1. Live Planet Camera
2. Ethernet Cable (included)
3. Web Browser
Beware, setting up 360° streaming on
YouTube can be complex. This is unrelated to Live Planet.
Activation for livestreaming on YouTube could take up to 24hrs for approval.
Page 30
30
Livestream to YouTube
Key Feature #6
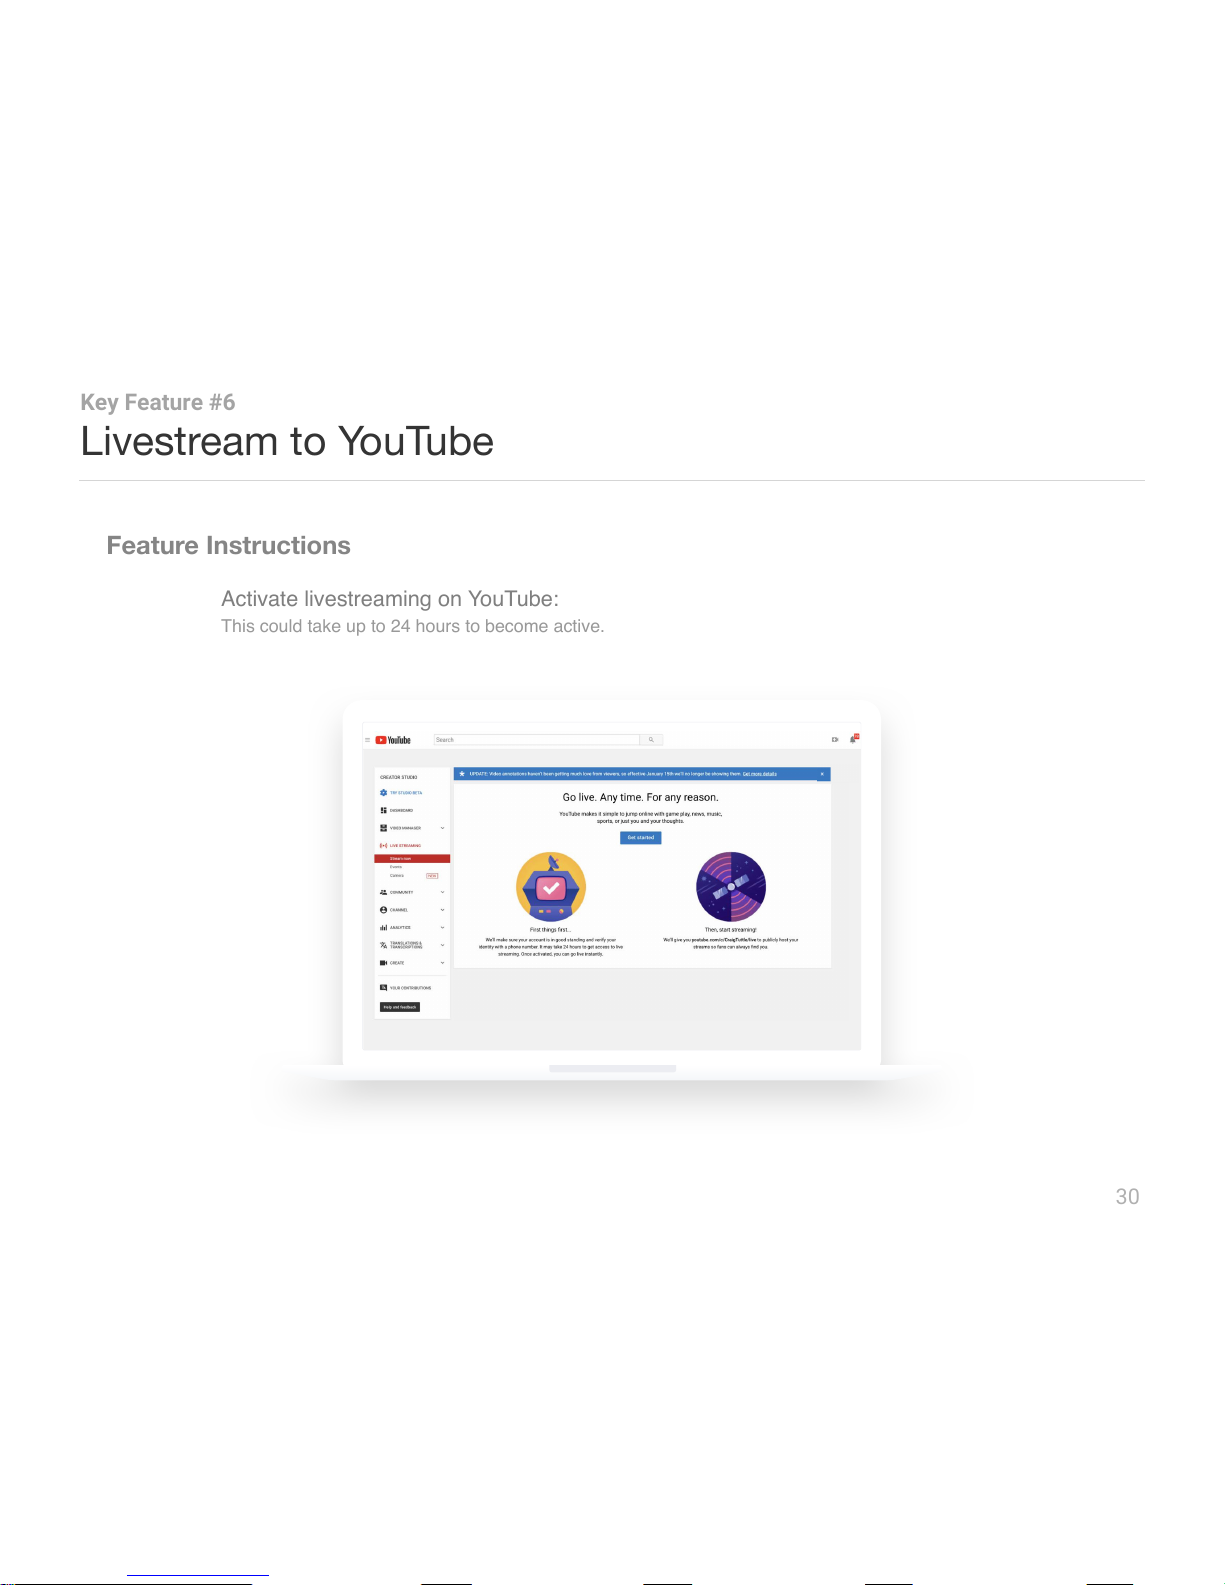
Step 1
Activate livestreaming on YouTube:
www.youtube.com/live_dashboard_splash
This could take up to 24 hours to become active.
Page 31
31
Livestream to YouTube
Key Feature #6
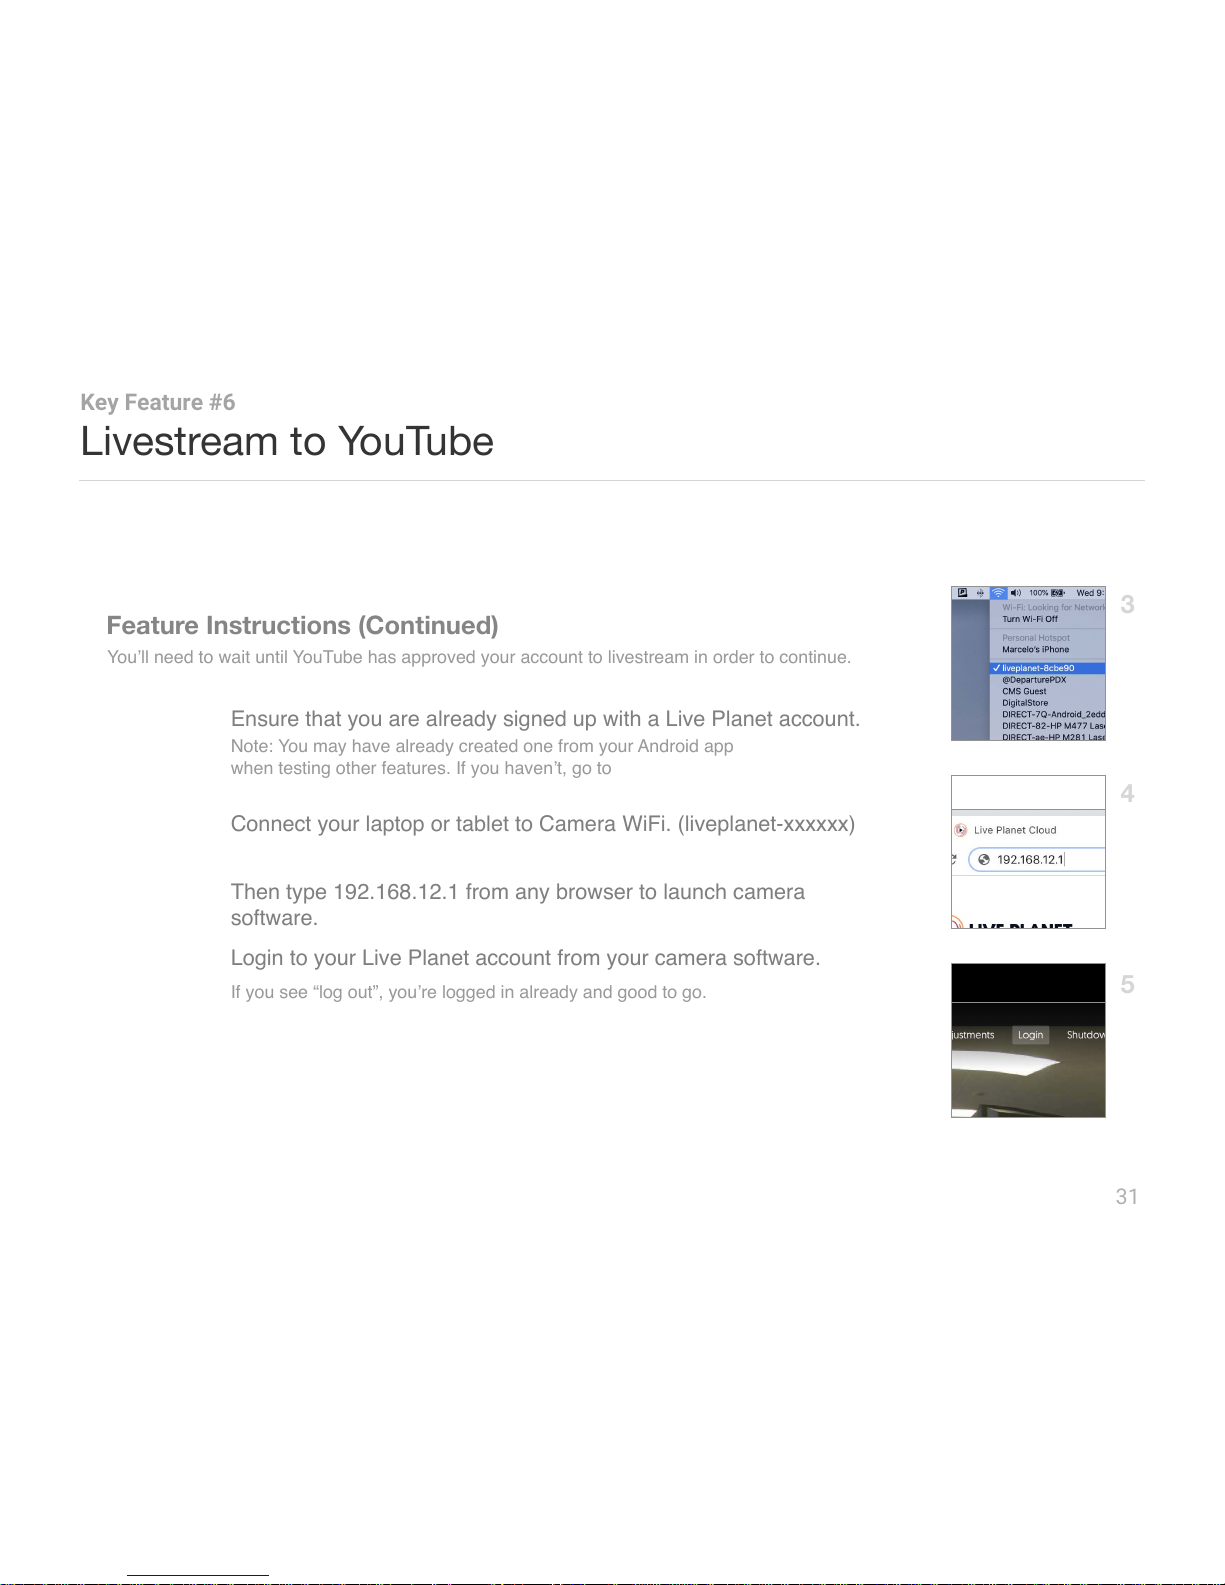
You’ll need to wait until YouTube has approved your account to livestream in order to continue.
Step 3
Connect your laptop or tablet to Camera WiFi. (liveplanet-xxxxxx)
Step 4
Then type 192.168.12.1 from any browser to launch camera
software.
3
4
5
Ensure that you are already signed up with a Live Planet account.
Note: You may have already created one from your Android app
when testing other features. If you haven’t, go to cloud.liveplanet.net/
signup
Step 2
Step 5
Login to your Live Planet account from your camera software.
If you see “log out”, you’re logged in already and good to go.
Page 32
32
Livestream to YouTube
Key Feature #6
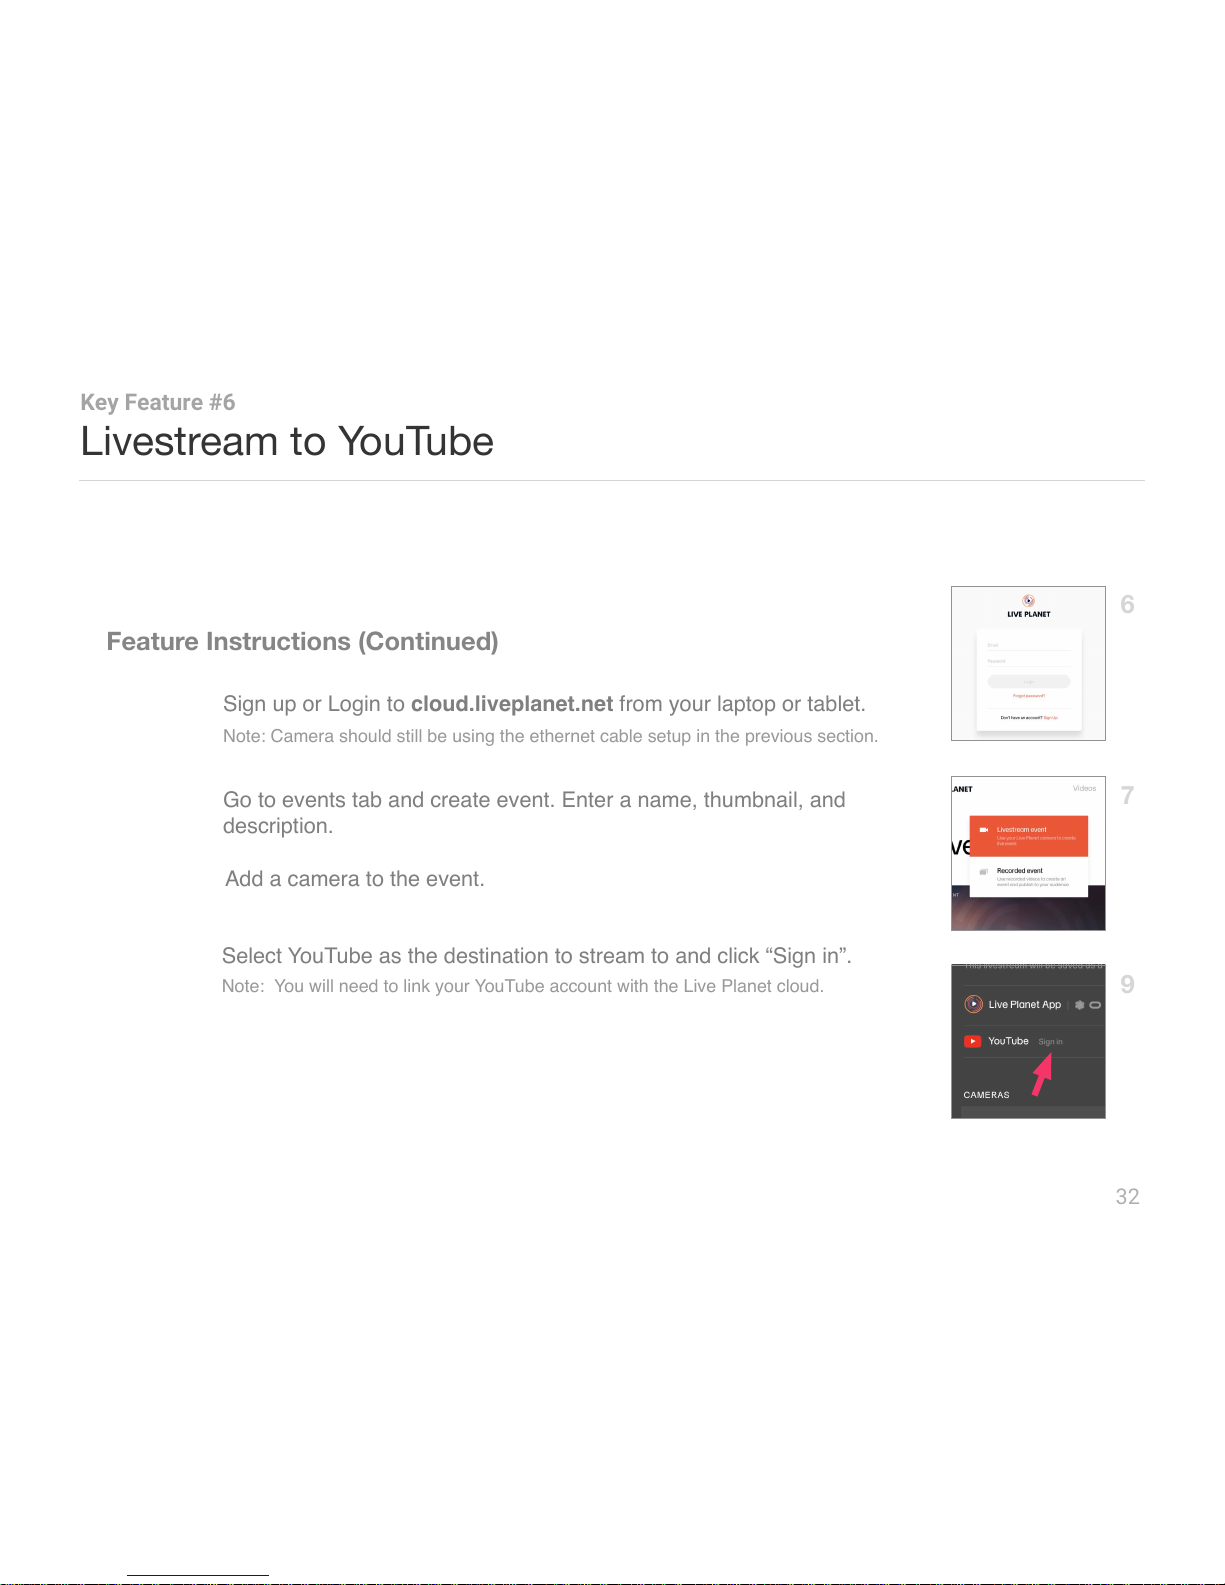
Step 6
Sign up or Login to cloud.liveplanet.net from your laptop or tablet.
Step 7
Go to events tab and create event. Enter a name, thumbnail, and
description.
Step 9
Select YouTube as the destination to stream to and click “Sign in”.
Note: Camera should still be using the ethernet cable setup in the previous section.
Note: You will need to link your YouTube account with the Live Planet cloud.
7
9
6
Step 8
Add a camera to the event.
Page 33
33
Livestream to YouTube
Key Feature #6
Feature Instructions (Continued)
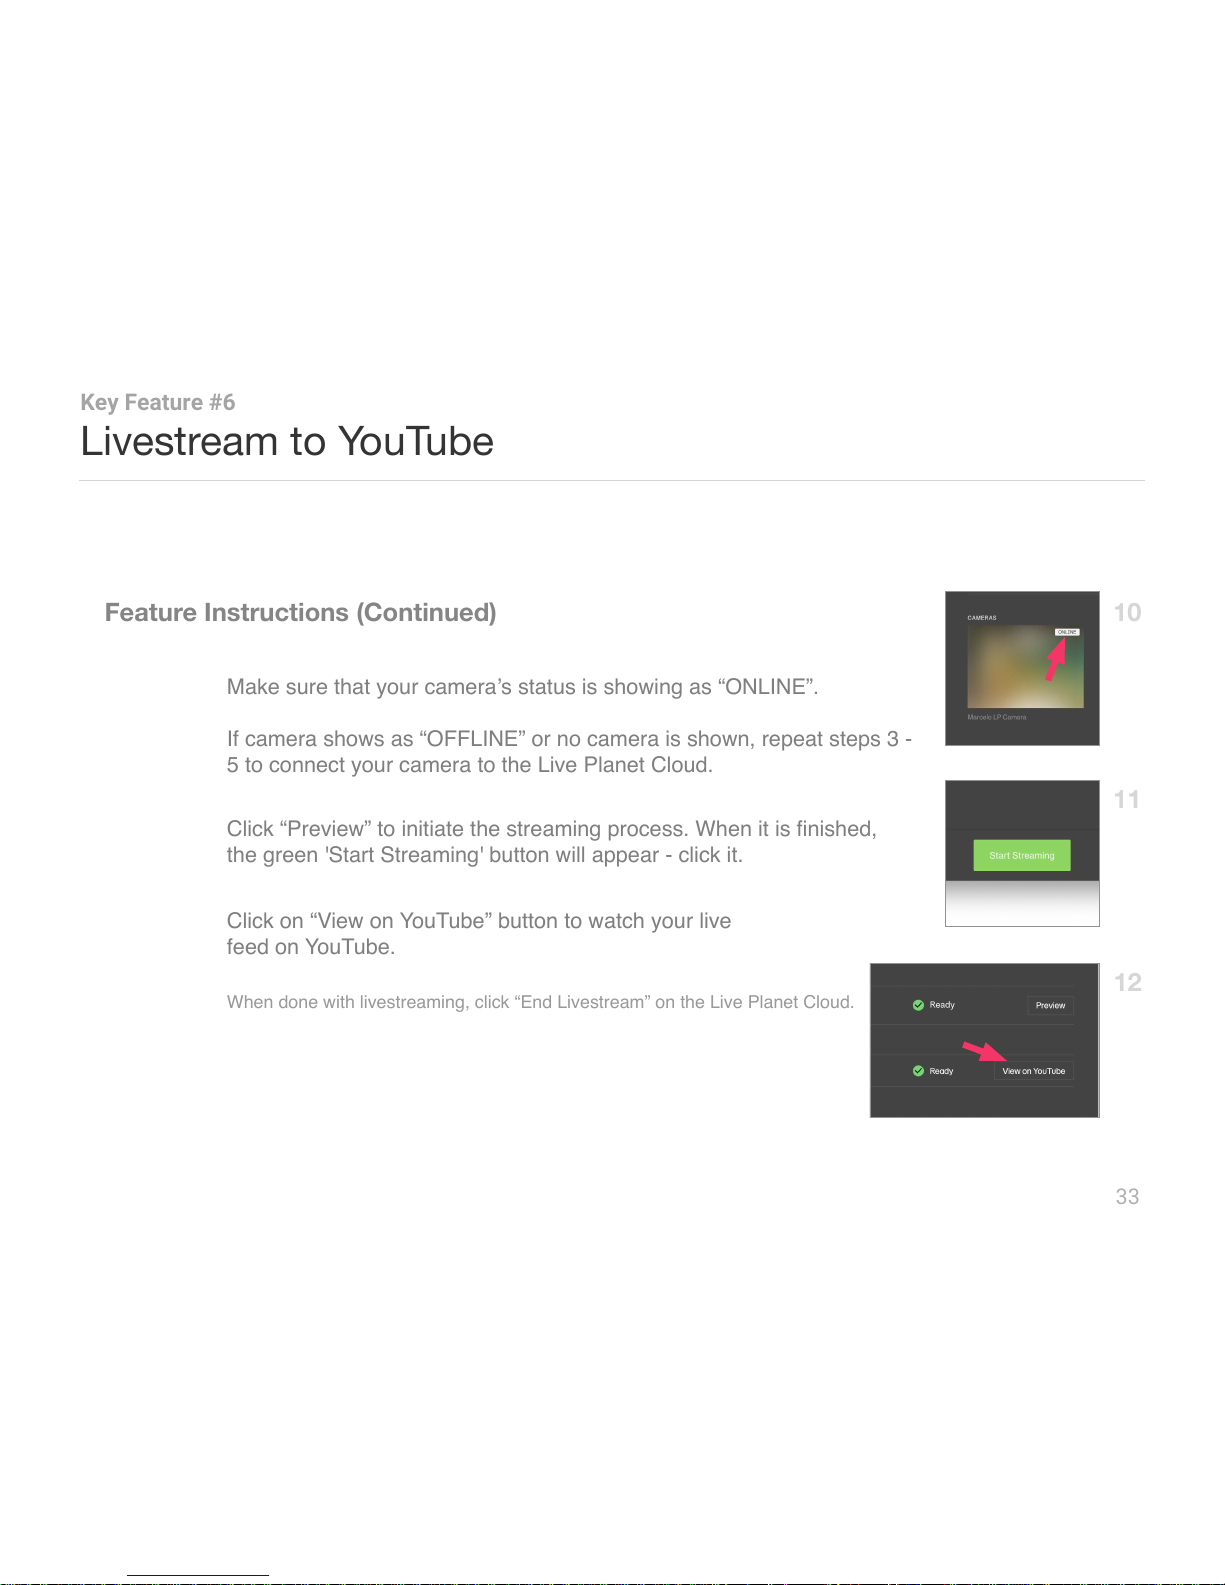
Step 11
Click “Preview” to initiate the streaming process. When it is finished,
the green 'Start Streaming' button will appear - click it.
Step 12
Click on “View on YouTube” button to watch your live
feed on YouTube.
Step 10
Make sure that your camera’s status is showing as “ONLINE”.
If camera shows as “OFFLINE” or no camera is shown, repeat steps 3 -
5 to connect your camera to the Live Planet Cloud.
When done with livestreaming, click “End Livestream” on the Live Planet Cloud.
Page 34
Livestream to YouTube
34
Just Finished
Now you’ve seen how you can use the Live Planet Cloud to
livestream to YouTube and other VR platforms at the same time.
Stream To Any RTMP Endpoint (Advanced)
Next, see how you can easily stream from your Live Planet
Camera to any RTMP endpoint. ( Facebook, Youtube, Twitch, etc.)
Up Next
Estimated Time: 10 min
Page 35
35
Stream To Any RTMP Endpoint (Advanced)
Key Feature #7
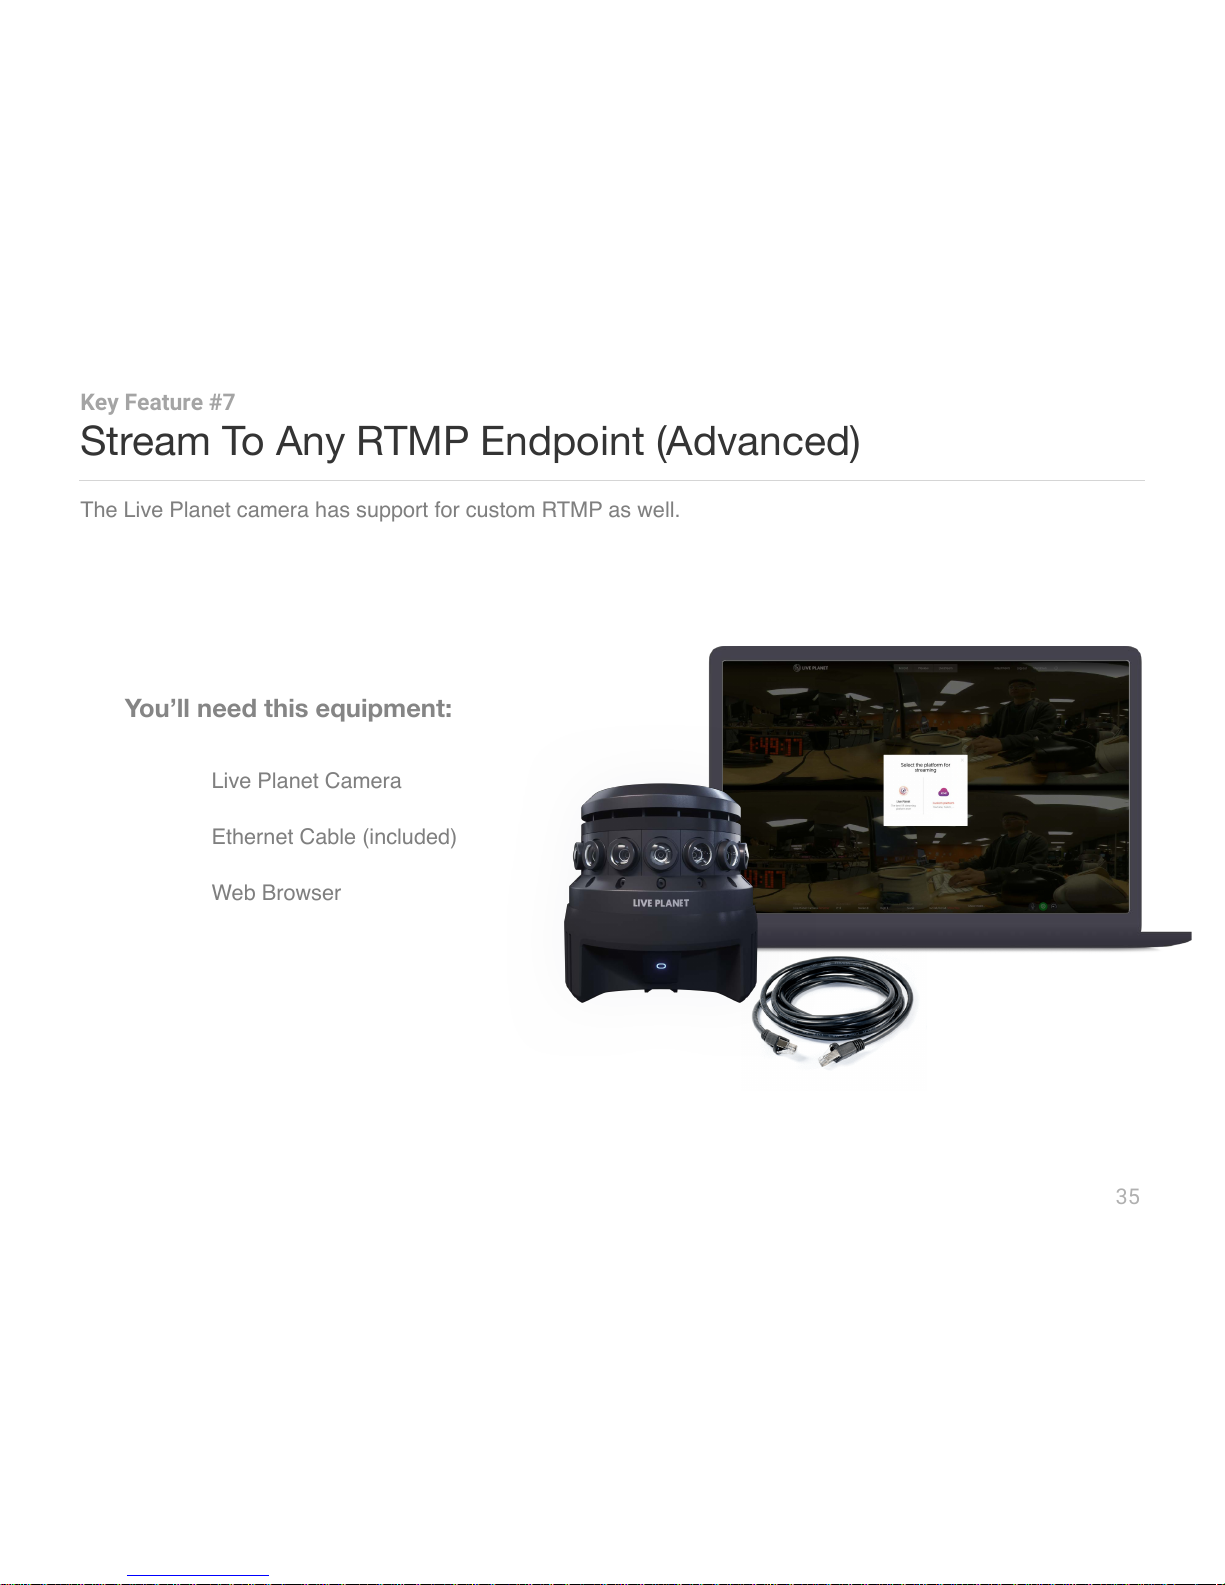
You’ll need this equipment:
1. Live Planet Camera
2. Ethernet Cable (included)
3. Web Browser
The Live Planet camera has support for custom RTMP as well.
Page 36
36
Stream To Any RTMP Endpoint (Advanced)
Key Feature #7
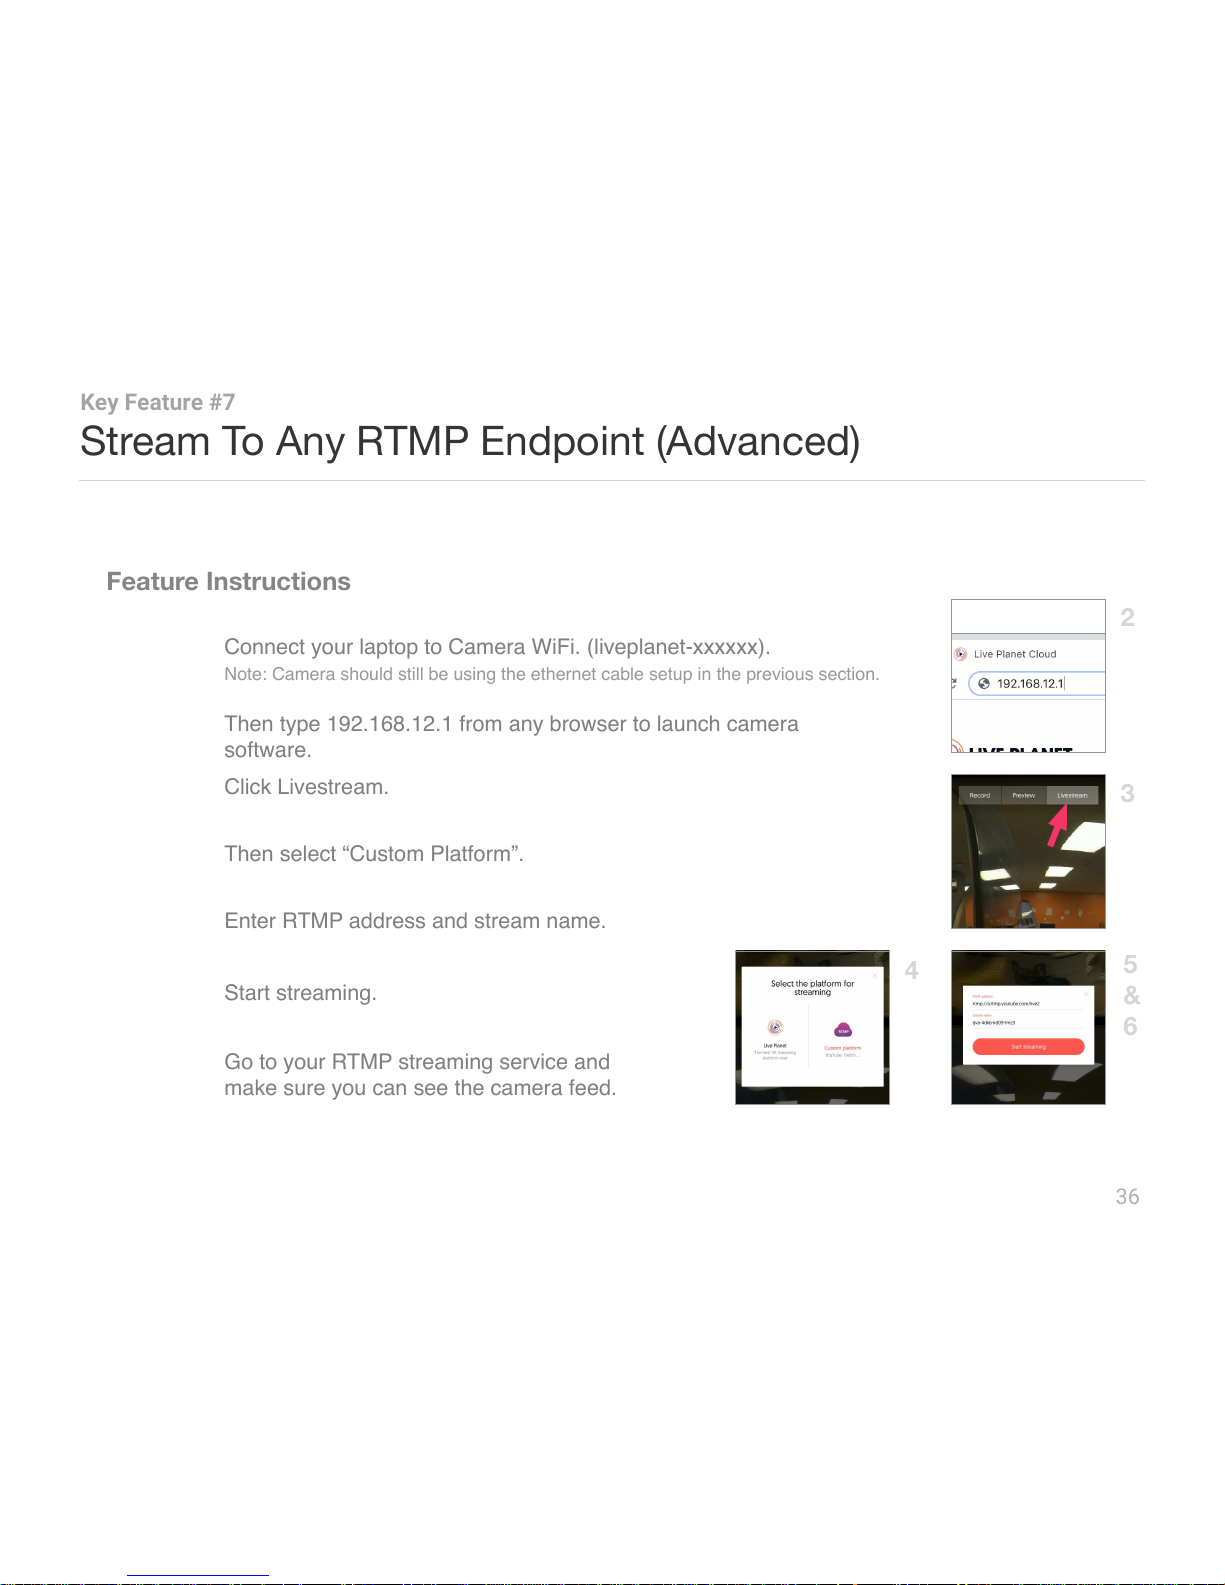
Step 3
Click Livestream.
Step 5
Enter RTMP address and stream name.
Step 6
Start streaming.
Step 7
Go to your RTMP streaming service and
make sure you can see the camera feed.
4
5
&
6
2
3
Step 4
Then select “Custom Platform”.
Step 1
Connect your laptop to Camera WiFi. (liveplanet-xxxxxx).
Step 2
Then type 192.168.12.1 from any browser to launch camera
software.
Note: Camera should still be using the ethernet cable setup in the previous section.
Page 37
Advanced Feature - RTMP
37
Just Finished
You just saw how easy it was to stream from your Live Planet
Camera to any RTMP endpoint. ( Facebook, Youtube, Twitch, etc.)
There is far more you can do with your Live Planet VR System.
Keep Exploring
1. Store and manage all your VR video content in one place on the Live Planet Cloud
2. View your catalog of recorded and live events using your VR headset from the 'My Events' tab of our Live Planet VR app.
3. And far more…
(cloud.liveplanet.net)
Page 38
38
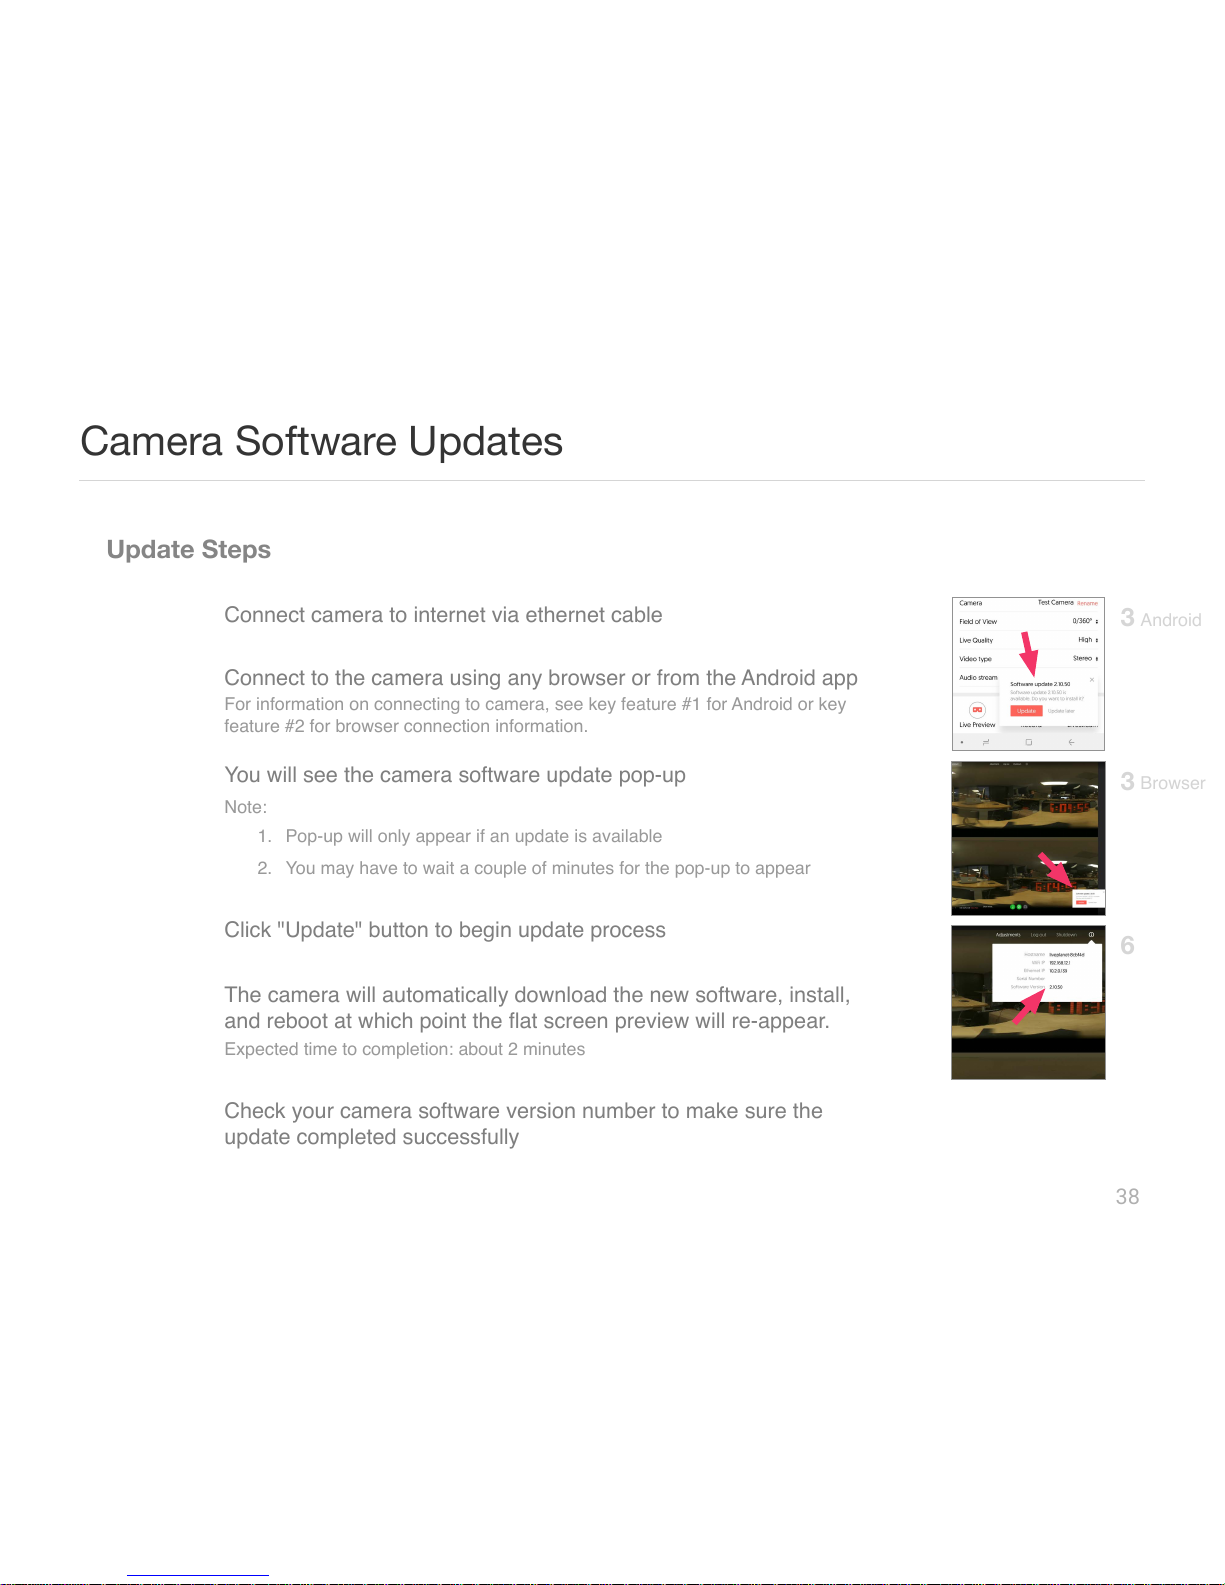
Camera Software Updates
Step 4
Click "Update" button to begin update process
Step 6
Check your camera software version number to make sure the
update completed successfully
Step 5
The camera will automatically download the new software, install,
and reboot at which point the flat screen preview will re-appear.
Step 1
Connect camera to internet via ethernet cable
Step 3
You will see the camera software update pop-up
Note:
Expected time to completion: about 2 minutes
1. Pop-up will only appear if an update is available
2. You may have to wait a couple of minutes for the pop-up to appear
3
Step 2
Connect to the camera using any browser or from the Android app
For information on connecting to camera, see key feature #1 for Android or key
feature #2 for browser connection information.
3
6
Android
Browser
Page 39
39
Camera Shutdown Procedure
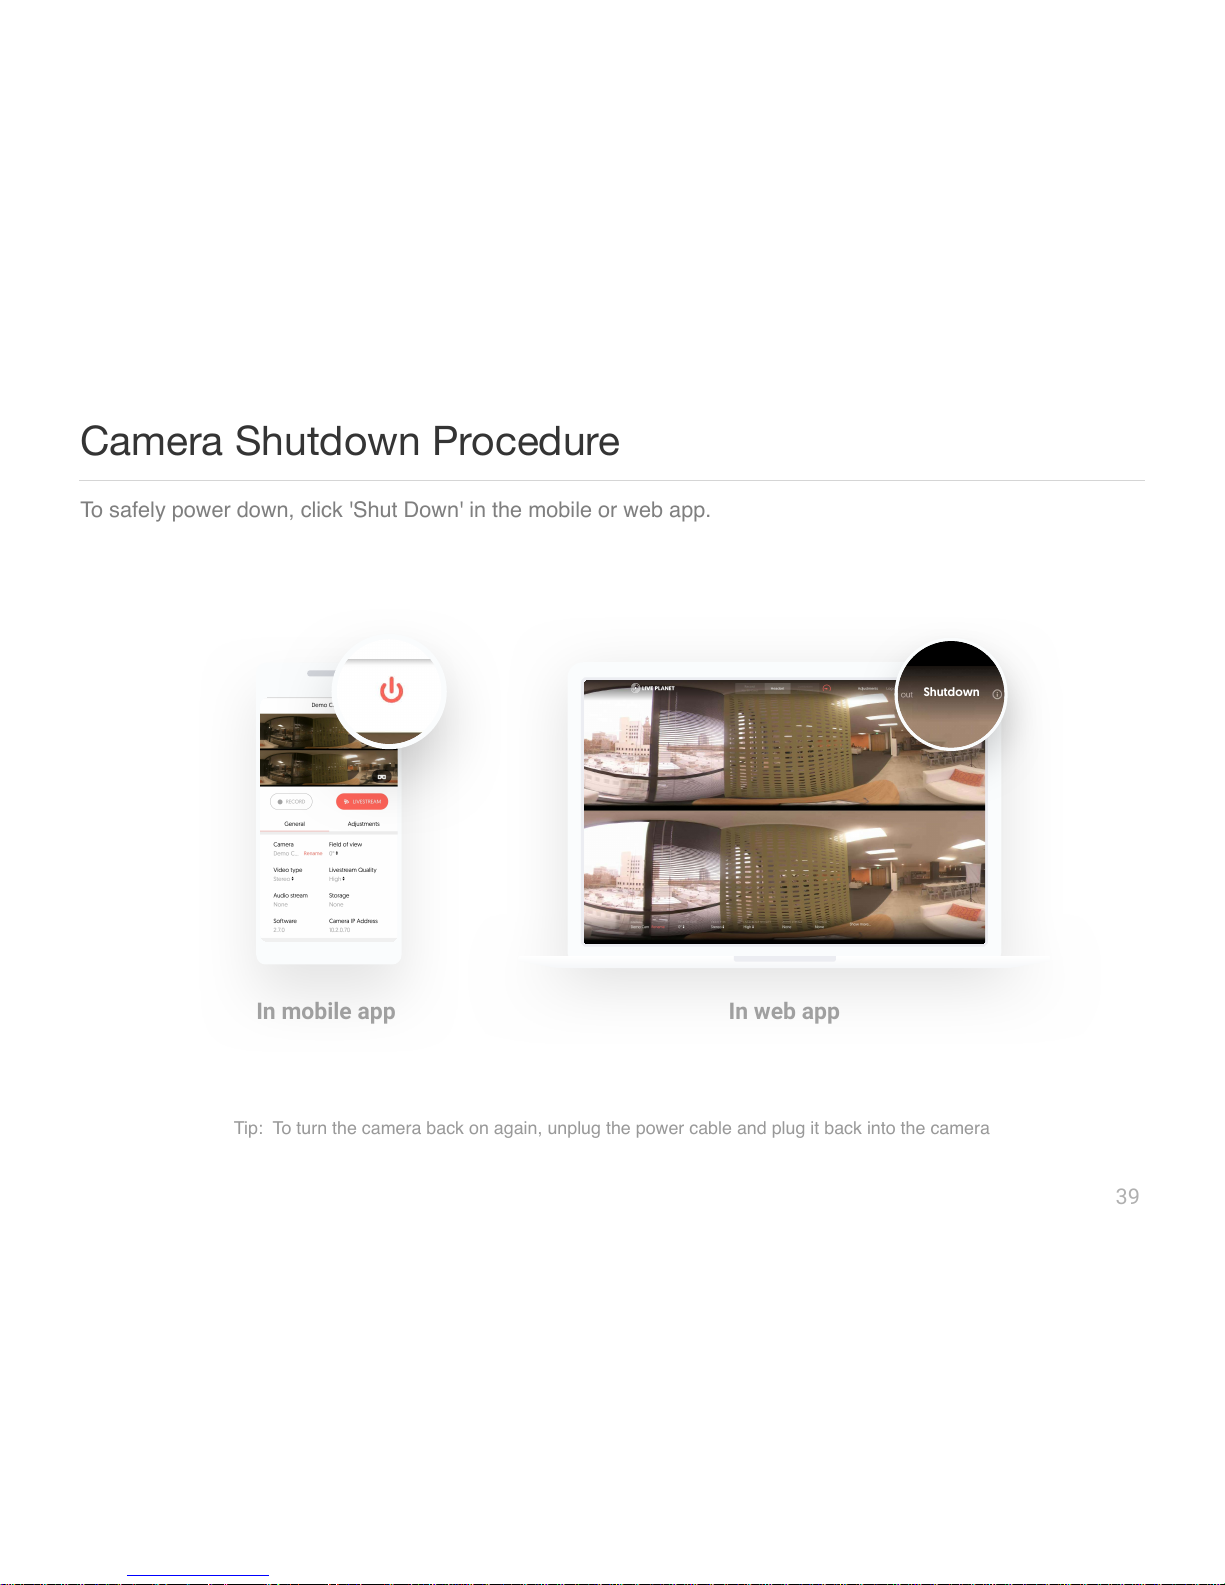
To safely power down, click 'Shut Down' in the mobile or web app.
In mobile app In web app
Tip: To turn the camera back on again, unplug the power cable and plug it back into the camera
Shutdown
Page 40
Feel free to reach out! We’re here to help answer any questions you might have.
40
Have questions?
t
support.liveplanet.net
Get help on our
website
Email our support team
Live Planet Support
Page 41
From everyone here at Live Planet, we hope that you’ve enjoyed using
our VR camera & system that we’ve poured so much love into.
Finally, keep exploring!
Share your world.
41
 Loading...