

Page 1
LIVEMIX
DATA
AD-24
12VDC
3.33A
LIVEMIX
DATA OUT
AD-24
ANALOG MIXER/SNAKE/INTERFACE
TRS CABLE
DB25 CABLE
(TASCAM PINOUT)
LIVEMIX
DATA IN
24VDC
3.75A
LIVEMIX
DATA OUT
STEREO MIXES 1-16
LIVEMIX
DATA OUT
MIX-16/32
STEREO MIXES 17-32 (MIX-32 ONLY)
12VDC
3.33A
LIVEMIX
DATA OUT
AD-24
LIVEMIX
DATA
AD-24
LIVEMIX
DATA IN
24VDC
3.75A
LIVEMIX
DATA OUT
STEREO MIXES 1-16
LIVEMIX
DATA OUT
MIX-16/32
STEREO MIXES 17-32 (MIX-32 ONLY)
SHIELDED
CAT5
GIGABIT NETWORK SWITCH
DANTE ENABLED MIXER/SNAKE/INTERFACE
CAT5/CAT6
CAT5/CAT6
LM-DANTE-EXP
Dante™ is a trademark of Audinate Pty Ltd.
DANTE
NETWORK
LINK/ACT 1G
12VDC
3.33A
LIVEMIX
DATA OUT
AD-24
ANALOG MIXER/SNAKE/INTERFACE
TRS CABLE
DB25 CABLE
(TASCAM PINOUT)
SYSTEM
12VDC
3.33A
LIVEMIX
DATA OUT
AD-24
ANALOG MIXER/SNAKE/INTERFACE
TRS CABLE
DB25 CABLE
(TASCAM PINOUT)
QUICK START
ANALOG OUTPUTS TO
1
AD-24 INPUTS
ANALOG MIXER/SNAKE/INTERFACE
DB25 CABLE
TRS CABLE
AD-24
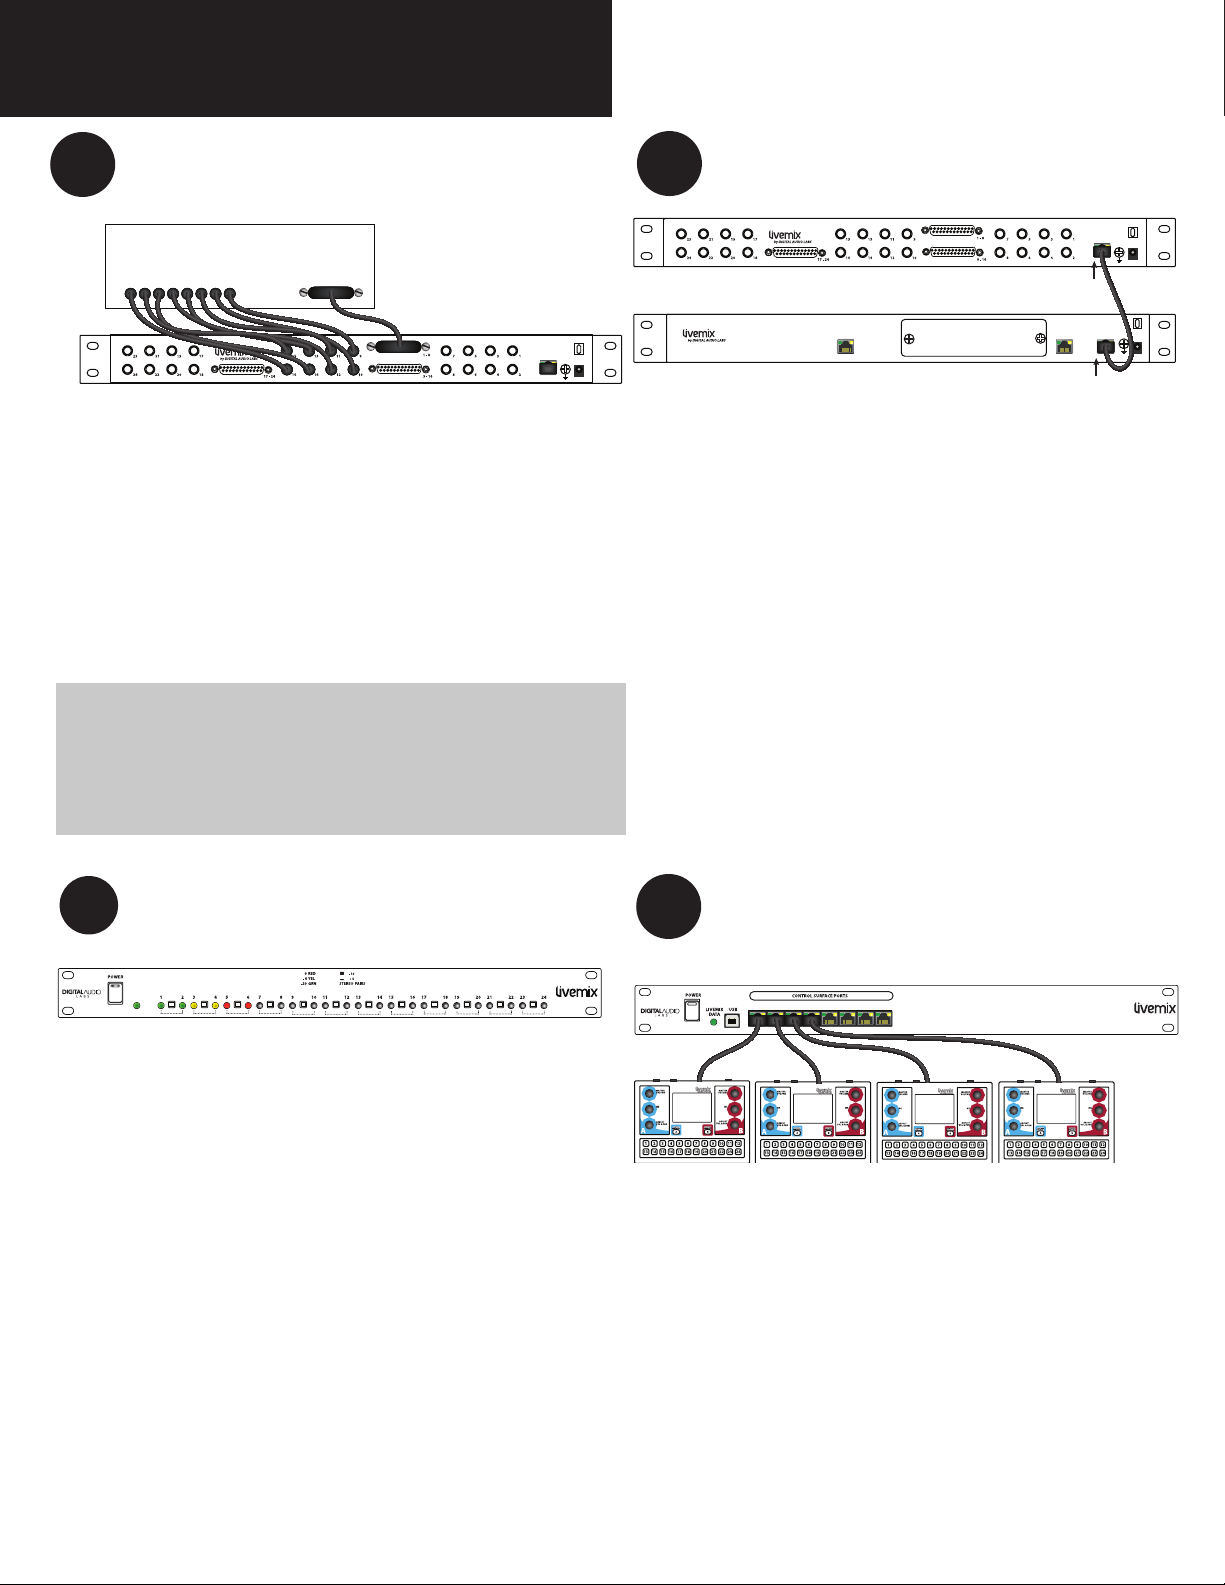
1. Connect the direct outputs of your analog mixer,
snake or interface to the individual analog inputs
on the AD-24.
2. The AD-24 offers both 24 individual ¼” inputs
and three 8-channel DB-25 inputs.
3. The ¼” TRS connections 1-24 are mirrored (in
parallel) on DB-25 connections 1-24 so they can
operate as a pass-through if necessary.
If your mixer does not have direct outs, you can
use the channel inserts, using a specially wired
cable that connects the “tip” and “ring” signal.
Consult your Digital Audio Labs dealer for
details on obtaining this cable.
(TASCAM PINOUT)
LIVEMIX
DATA OUT
3
12VDC
3.33A
AD-24 TO MIX-16/32
AD-24
LIVEMIX
DATA OUT
MIX-16/32
STEREO MIXES 17-32 (MIX-32 ONLY)
LIVEMIX
DATA OUT
STEREO MIXES 1-16
LIVEMIX
DATA OUT
LIVEMIX
DATA IN
12VDC
3.33A
SHIELDED
CAT5
24VDC
3.75A
1. Connect a shielded CAT5 cable from the
Livemix Data Out of the AD-24 to the Livemix
Data In of the MIX-16/32.
2. A direct connection between the AD-24 and
the MIX-16/32 is required. The system will not
function if a switch or hub is used between
the two devices.
AD-24 SETUP
2
LIVEMIX
DATA
1. The AD-24 can accept -10dBV and +4dBu line
level audio. Press the button IN for +4dBu signals
and leave it OUT for -10dBV signals. These operate in stereo pairs, one switch controls both
inputs. If you are unclear on which to use, consult
the manual of the product you are connecting.
2. The front panel has LED indicators to tell you the
signal strength of an input.
• GREEN indicates a signal with appropriate
levels.
• YELLOW indicates the signal level needs to
be lowered. Periodic yellow levels may be
acceptable.
• RED indicates the signal is clipping and will
sound distorted.
AD-24
MIX-16/32 TO CS-DUO
4
1 2 3 4 5 6 7 8
CAT5/CAT6
PUSH TO SETUP
MASTER OUT
PUSH TO SETUP
ME & GROUP
PUSH TO SETUP
PUSH TO SETUP
MASTER OUT
MASTER OUT
PUSH TO SETUP
PUSH TO SETUP
ME & GROUP
ME & GROUP
PUSH TO SETUP
PUSH TO SETUP
MASTER OUT
MASTER OUT
PUSH TO SETUP
PUSH TO SETUP
ME & GROUP
ME & GROUP
MIX-16
PUSH TO SETUP
PUSH TO SETUP
MASTER OUT
MASTER OUT
PUSH TO SETUP
PUSH TO SETUP
ME & GROUP
ME & GROUP
PUSH TO SETUP
MASTER OUT
PUSH TO SETUP
ME & GROUP
1. Using CAT5 cable, connect each CS-DUO to
one of the output ports on the front panel of
the MIX-16/32*.
2. A direct connection between the MIX-16/32
and CS-DUO is required. The system will not
function if a switch or hub is used between the
two devices.
*MIX-16 pictured
LIVEMIX SYSTEM QUICK START
rev 1.1
WWW.DIGITALAUDIO.COM
Page 2
LIVEMIX
DATA IN
24VDC
3.75A
LIVEMIX
DATA OUT
STEREO MIXES 1-16
LIVEMIX
DATA OUT
MIX-16/32
STEREO MIXES 17-32 (MIX-32 ONLY)
12VDC
3.33A
LIVEMIX
DATA OUT
AD-24
1 2 3 4 5 6 7 8
MIX-16
LIVEMIX
DATA
AD-24
LIVEMIX
DATA IN
24VDC
3.75A
LIVEMIX
DATA OUT
STEREO MIXES 1-16
LIVEMIX
DATA OUT
MIX-16/32
STEREO MIXES 17-32 (MIX-32 ONLY)
PUSH TO SETUP
MASTER OUT
PUSH TO SETUP
ME & GROUP
PUSH TO SETUP
MASTER OUT
PUSH TO SETUP
ME & GROUP
PUSH TO SETUP
MASTER OUT
PUSH TO SETUP
ME & GROUP
PUSH TO SETUP
MASTER OUT
PUSH TO SETUP
ME & GROUP
PUSH TO SETUP
MASTER OUT
PUSH TO SETUP
ME & GROUP
PUSH TO SETUP
MASTER OUT
PUSH TO SETUP
ME & GROUP
PUSH TO SETUP
MASTER OUT
PUSH TO SETUP
ME & GROUP
PUSH TO SETUP
MASTER OUT
PUSH TO SETUP
ME & GROUP
SHIELDED
CAT5
GIGABIT NETWORK SWITCH
CAT5/CAT6
CAT5/CAT6
LM-DANTE-EXP
Dante™ is a trademark of Audinate Pty Ltd.
DANTE
NETWORK
LINK/ACT 1G
CAT5/CAT6
12VDC
3.33A
LIVEMIX
DATA OUT
AD-24
ANALOG MIXER/SNAKE/INTERFACE
DB25 CABLE
(TASCAM PINOUT)
5
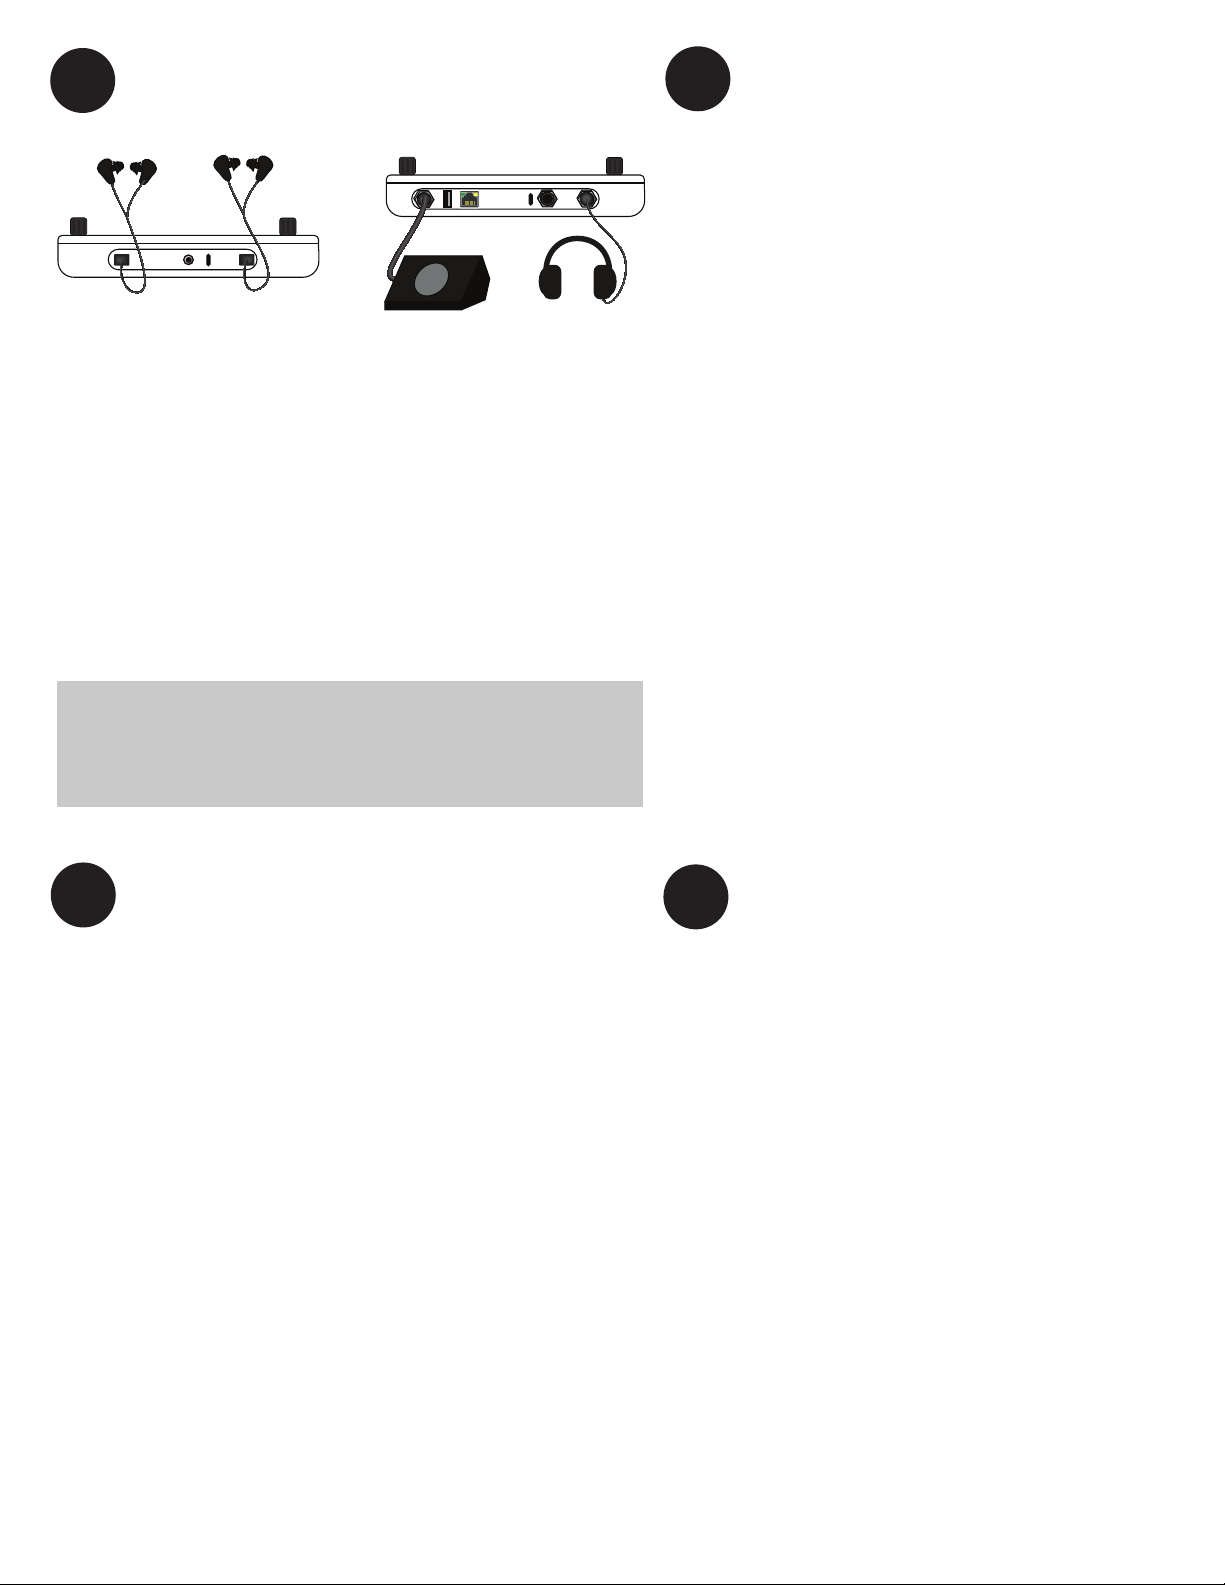
CS-DUO OUTPUT OPTIONS
USB CS PORT
MIX A HEADPHONES
AUX IN MIX B HEADPHONES
1. The CS-DUO allows for 1/8” or 1/4” headphones,
or In-Ear Monitors. It can also be congured as
Balanced Mono for use with a powered oor
monitor.
2. To use 1/8” headphones, use the front panel
headphone jacks. To use with 1/4” headphones,
use the back panel 1/4” jack.
3. To use with oor monitors, the output settings
must be changed in the CS-DUO. This can be
done from the Mix Output Settings screen. See the
CS-DUO Users Guide for detailed information.
7
Once the Livemix system is setup and channels
FOOTSWITCH MIX A OUTMIX B OUT
have been named, it is a good practice to Save
the Global Settings. The Global Templates
differ from the Saved Personal Mixes in that
Global Templates store only the Channel
Names, Channel Effect settings, and Global
information. Saving a Global Template allows
recall of band or team names and settings.
Saving a Global Template
1. PRESS Mix Tools on the touchscreen.
2. PRESS Global Setup.
3. PRESS Global Template Load/Save.
4. SELECT a location to save the template.
5. PRESS Save Selected Global Template.
6. PRESS Yes to conrm save.
7. ENTER Template Name.
8. PRESS Done.
TEMPLATE
LOAD/SAVE GLOBAL
The 1/8” front panel and 1/4” back panel
connections are mirrored (in parallel). The system
can be set up for balanced mono or stereo
output, but not both at the same time.
CHANNEL NAMING
6
Livemix makes it easy to name each channel. It is
covered here as part of a quick setup and further in
the CS-DUO User Guide.
1. PRESS and HOLD on a channel cell on the
touchscreen to select a channel to edit.
2. PRESS and HOLD the top bar with the channel
number.
3. ENTER the channel name on the touchscreen.
4. PRESS Done or continue to the next channel
with the Next Channel button to the right of the
entry box.
5. The name will now show up on all the CS-DUOs
in the system.
Loading a Global Template
1. To Load a saved Global Template, follow
steps 1-3 above.
2. PRESS the slot of the Template you wish to
load.
3. PRESS Load Selected Global Template.
MIRRORMIX® REMOTE MIXING
8
Some performers may need help with their
mix. With MirrorMix, any personal mixer can
control any other mixer while hearing what
the remote performer is hearing. You can also
Load a mix from the local unit onto the remote
unit. Please consult the CS-DUO User Guide
for detailed MirrorMix information.
To MIRRORMIX a remote CS-DUO
1. PRESS Mix Tools on the touchscreen.
2. PRESS MirrorMix.
3. SELECT the Port and Mix to MirrorMix. The
Port corresponds to the Ports on the MIX16/32 with A being the A mix and B being
the B mix.
4. The orange screens indicate you are mixing
a remote personal mixer.
5. PRESS the gray X at the bottom of the
Channel Overview screen to exit.
LIVEMIX SYSTEM QUICK START
rev 1.1
WWW.DIGITALAUDIO.COM
 Loading...