


Deutsch ....................................................................................................................... 2
Français .................................................................................................................... 16
Italiano ..................................................................................................................... 31
English ...................................................................................................................... 45
V 1.2

LIVARNO LUX LSS 520 A1
Inhalt
Einleitung ................................................................................................................... 3
Bestimmungsgemäße Verwendung ............................................................................ 3
Lieferumfang .............................................................................................................. 3
Technische Daten ........................................................................................................ 4
Sicherheitshinweise .................................................................................................... 5
Urheberrecht .............................................................................................................. 7
Vor der Inbetriebnahme ............................................................................................. 8
Der richtige Montageort ................................................................................................................................. 8
Benötigtes Werkzeug ...................................................................................................................................... 9
Vor der Montage ............................................................................................................................................ 9
Montage ....................................................................................................................................................... 10
Inbetriebnahme ........................................................................................................ 11
Bewegungsmelder ausrichten ...................................................................................................................... 11
Leuchtdauer einstellen (TIME) ...................................................................................................................... 11
Sensorempfindlichkeit einstellen (SENS) .................................................................................................... 11
Lichtempfindlichkeit einstellen (LUX) ............................................................................................................ 12
Wartung/Reinigung ................................................................................................. 12
Problemlösung ......................................................................................................... 13
Umwelthinweise und Entsorgungsangaben .............................................................. 13
Konformität .............................................................................................................. 14
Hinweise zu Garantie und Serviceabwicklung ......................................................... 14
2 - Deutsch

LIVARNO LUX LSS 520 A1
Einleitung
Vielen Dank, dass Sie sich für ein LIVARNO LUX Produkt entschieden haben.
Bestimmungsgemäße Verwendung
Der LED-Solarstrahler ist nicht für den gewerblichen Einsatz bestimmt. Er ist für den Betrieb im
Außenbereich geeignet, insbesondere für Orte, an denen kein Stromanschluss vorhanden ist (z.B. Garage
oder Gartenhaus). Das eingebaute LED-Leuchtmittel sorgt für eine gute Ausleuchtung. Der
Bewegungsmelder erfasst Bewegungen und lässt den LED-Solarstrahler automatisch ein- und ausschalten.
Das Gerät erfüllt alle, im Zusammenhang mit der CE-Konformität, relevanten Normen und Standards. Bei
einer nicht mit dem Hersteller abgestimmten Änderung des LED-Solarstrahlers ist die Einhaltung dieser
Normen nicht mehr gewährleistet.
Lieferumfang
Nehmen Sie das Gerät und alle Zubehörteile aus der Verpackung. Entfernen Sie alle
Verpackungsmaterialien und überprüfen Sie, ob alle Teile vollständig und unbeschädigt sind. Im Falle
einer unvollständigen oder beschädigten Lieferung wenden Sie sich bitte an den Hersteller.
LED-Solarstrahler LSS 520 A1
Solar Panel
Montagematerial für LED-Solarstrahler (2 x Schraube groß und 2 x Dübel groß)
Montagematerial für Solar-Panel (4 x Schraube klein und 4 x Dübel klein)
Bedienungsanleitung mit Sicherheitshinweisen
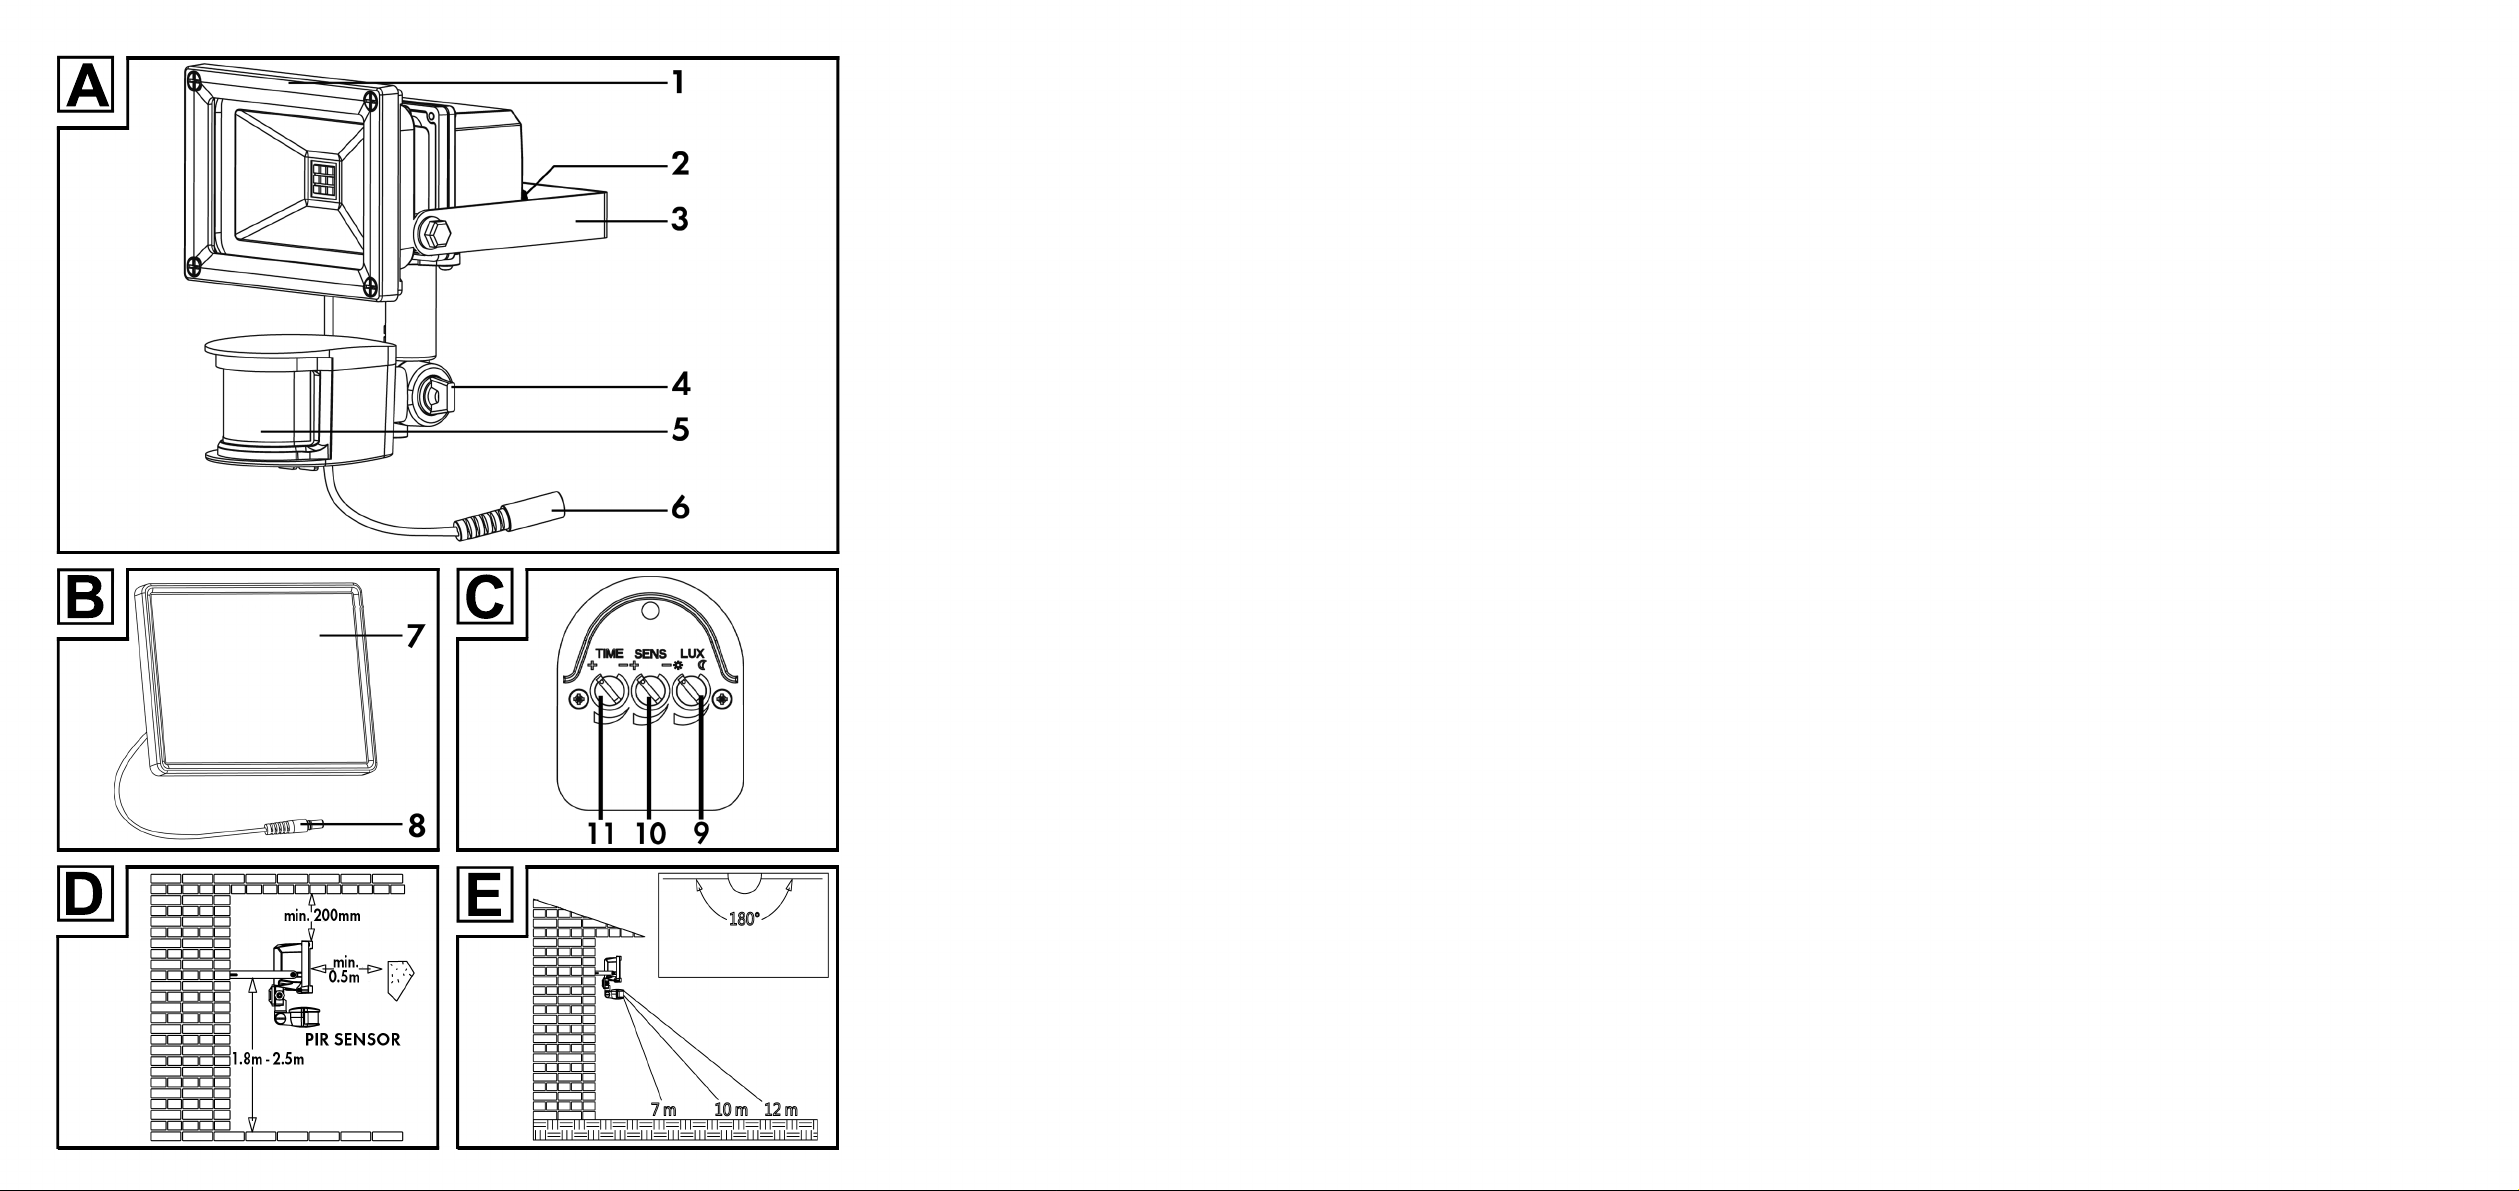
Diese Bedienungsanleitung ist mit einem ausklappbaren Umschlag versehen. Auf der Innenseite des
Umschlags ist der LED-Solarstrahler mit einer Bezifferung abgebildet. Die Ziffern haben folgende
Bedeutung:
1 LED-Solarstrahler LSS 520 A1
2 Ein-/Aus-Schalter
3 Montagebügel
4 Feststellschraube
5 Bewegungsmelder
6 Kabel (mit Buchse)
7 Solar-Panel
8 Kabel (mit Stecker)
9 Regler LUX
10 Regler SENS
11 Regler TIME
Deutsch - 3

LIVARNO LUX LSS 520 A1
Technische Daten
LED Solarstrahler (1):
Marke: LIVARNO LUX
Modellbezeichnung: LSS 520 A1
Leuchtmittel: LG LED: 9 x 1 W max.
Farbtemperatur LED: 5000 K +/-500 K
Ra (Farbwiedergabeindex der LED): 80
LED Abstrahlwinkel: ca. 120°
LED Lebensdauer: ca. 25.000 Std.
Max. Leuchtdauer (bei vollgeladenem Akku): ca. 1,3 Std.
Betriebsspannung: 12 V (Versorgung nur über Solar-Panel)
Li-Ion Akku: 1.800 mAh / 7,4 V
Leistungsaufnahme kompletter Strahler 8,6 W +/-10% (bei 520 lm und vollgeladenem Akku)
Komplette Leistungsaufnahme der LEDs 6,0 W +/-10% (bei 520 lm und vollgeladenem Akku)
Gesamtlichtstrom (mit Abdeckung) 520 lm +/-5% (mit voll geladenem Akku)
Schutzart: IP44 (Spritzwasserschutz)
Abmessungen (B x H x T): ca. 11,4 x 16,5 x 15,6 cm (mit Montagebügel)
Gewicht: ca. 677 g
Solar-Panel (7):
Typ: Polykristallin / 3,5 W / 14,5 V
Länge Anschlusskabel: ca. 3 m
Abmessungen (B x H x T): 21 x 16 x 1,6 cm (ohne Montageplatte)
Gewicht (incl. Montageplatte): ca. 540 g
Bewegungsmelder (5):
Erfassungswinkel Sensor: max. 180°
Sensorreichweite (einstellbar): max. 12 m
Dämmerungsniveau: 5 lux +/- 5 lux bis 20000 lux +/- 10 lux
Schwenkbar (mechanisch): ca. 150° horizontal / ca. 180° vertikal
Leuchtdauer (einstellbar): ca. 10 sec +/- 5 sec bis 4 min +/- 1 min
Änderungen der technischen Daten sowie des Designs können ohne Ankündigung erfolgen.
4 - Deutsch

LIVARNO LUX LSS 520 A1
Sicherheitshinweise
Vor der ersten Verwendung des LED Solarstrahlers (1) lesen Sie
bitte die folgenden Anweisungen genau durch und beachten Sie
alle Warnhinweise, selbst wenn Ihnen der Umgang mit
elektronischen Geräten vertraut ist. Bewahren Sie diese
Bedienungsanleitung sorgfältig als zukünftige Referenz auf. Wenn
Sie den LED Solarstrahler (1) verkaufen oder weitergeben,
händigen Sie unbedingt auch diese Bedienungsanleitung aus, sie ist
Bestandteil des Gerätes.
GEFAHR! Dieses Symbol, mit dem Hinweis
„GEFAHR“, kennzeichnet eine drohende gefährliche
Situation, die, wenn Sie nicht verhindert wird, zu
schweren Verletzungen oder sogar zum Tod führen
kann.
WARNUNG! Dieses Symbol, mit dem Hinweis
„WARNUNG“, kennzeichnet wichtige Hinweise für
den sicheren Betrieb des LED-Solarstrahlers (1) und
zum Schutz des Anwenders.
Dieses Symbol kennzeichnet weitere informative
Hinweise zum Thema.
Brandgefahr: Montieren Sie den LED-Solarstrahler
(1) in einem Abstand von mindestens 0,5m zu
angestrahlten Materialien. Übermäßige
Wärmeentwicklung kann zu Brandentwicklung führen.
Jede zersprungene Schutzabdeckung ist zu ersetzen.
Deutsch - 5

LIVARNO LUX LSS 520 A1
GEFAHR! Elektrische Geräte gehören nicht in Kinderhände.
Auch Personen mit geistigen, sensorischen oder motorischen
Einschränkungen sollten elektrische Geräte nur im Rahmen
ihrer Möglichkeiten verwenden. Lassen Sie Kinder und
Personen mit geistigen, sensorischen oder motorischen
Einschränkungen niemals unbeaufsichtigt elektrische Geräte
benutzen. Es sei denn, sie wurden entsprechend eingewiesen
oder werden durch eine für Ihre Sicherheit zuständige Person
beaufsichtigt. Kinder sollten grundsätzlich beaufsichtigt
werden, damit sichergestellt werden kann, dass sie mit diesem
Gerät nicht spielen. Halten Sie Kinder während der Montage
des LED-Solarstrahlers (1) vom Arbeitsbereich fern. Im
Lieferumfang befinden sich viele Kleinteile, die beim
Verschlucken lebensgefährlich sein können. Kinder können
mögliche Gefahren nicht immer richtig erkennen. Halten Sie
auch die Verpackungsfolien von Kindern fern. Es besteht
Erstickungsgefahr.
GEFAHR! Falls Sie Rauchentwicklung, ungewöhnliche
Geräusche oder Gerüche feststellen, schalten Sie den LEDSolarstrahler (1) sofort aus. In diesen Fällen darf das Gerät
nicht weiter verwendet werden, bevor eine Überprüfung durch
einen Fachmann durchgeführt wurde. Atmen Sie keinesfalls
Rauch aus einem möglichen Gerätebrand ein. Sollten Sie
dennoch Rauch eingeatmet haben, suchen Sie einen Arzt auf.
Das Einatmen von Rauch kann gesundheitsschädlich sein.
6 - Deutsch

LIVARNO LUX LSS 520 A1
GEFAHR! Das Gehäuse des LED-Solarstrahlers (1) und das
Solar-Panel (7) dürfen nicht beschädigt werden. Bei
beschädigtem Gehäuse besteht Verletzungsgefahr.
GEFAHR! Verwenden Sie den LED-Solarstrahler (1) nicht in
explosionsgefährdeter Umgebung, in der sich brennbare
Gase, Dämpfe oder Stäube befinden. Es besteht
Explosionsgefahr.
GEFAHR! Benutzen Sie keinesfalls optische Instrumente, wie
zum Beispiel ein Vergrößerungsglas, um direkt in den
Lichtstrahl zu schauen. Dies kann zu Augenschäden führen.
Bei Verdacht auf Augenschäden suchen Sie sofort einen Arzt
auf.
WARNUNG! Es dürfen keine Gegenstände an den LEDSolarstrahler (1) oder das
Solar-Panel (7) gehängt werden. Das Gehäuse ist nicht zum
Tragen von Lasten geeignet. Andernfalls könnte der LEDSolarstrahler (1) oder das Solar-Panel (7) beschädigt werden.
Urheberrecht
Alle Inhalte dieser Bedienungsanleitung unterliegen dem Urheberrecht und werden dem Leser
ausschließlich als Informationsquelle bereitgestellt. Jegliches Kopieren oder Vervielfältigen von Daten und
Informationen ist ohne ausdrückliche und schriftliche Genehmigung durch den Autor verboten. Dies betrifft
auch die gewerbliche Nutzung der Inhalte und Daten. Text und Abbildungen entsprechen dem
technischen Stand bei Drucklegung. Änderungen vorbehalten.
Deutsch - 7

LIVARNO LUX LSS 520 A1
Vor der Inbetriebnahme
Entnehmen Sie den LED-Solarstrahler (1) und das Montagematerial aus der Verpackung.
Prüfen Sie den LED-Solarstrahler (1) auf Beschädigungen. Bei Beschädigungen darf der LED-Solarstrahler
(1) nicht in Betrieb genommen werden.
Laden Sie den eingebauten Li-Ionen-Akku vor der ersten Inbetriebnahme voll auf. Achten Sie darauf, dass
der Ein-/Aus-Schalter (2) in der Stellung „OFF“ steht.
Die Dauer des Ladevorgangs ist abhängig von der Sonneneinstrahlung. Ein Ladevorgang
dauert bei klarem heiteren Wetter ca. 3 Tage (bei jeweils 4 Stunden und ca. 60.000 Lux).
Der richtige Montageort
Wählen Sie den Montageort sorgfältig aus und bereiten Sie die Montage gut vor.
Legen Sie alle Einzelteile, benötigtes Werkzeug und Montagematerial griffbereit und geordnet
zurecht.
Der LED-Solarstrahler (1) darf nur auf stabilen Untergründen, z.B. Mauerwerk montiert werden.
Montieren Sie den LED-Solarstrahler (1) nicht über einer Wärmequelle oder in unmittelbarer Nähe zu
anderen Lichtquellen. Beachten Sie bei der Auswahl des Montageortes auch die Abbildung [D] auf
der Umschlagseite.
Der eingebaute Akku des LED-Solarstrahlers (1) bezieht seinen Ladestromstrom ausschließlich von
dem mitgelieferten Solar-Panel (7). Das Kabel (8) hat eine Länge von ca. 3 Metern. Der Montageort
des Solar-Panels (7) muss daher so gewählt werden, dass der Stecker nach der Montage problemlos
mit der Buchse am Kabel (6) des LED-Solarstrahlers (1) verbunden werden kann. Dabei ist darauf zu
achten, dass das Kabel (8) so verlegt wird, dass niemand behindert wird oder darüber stolpern kann.
Idealerweise wählen Sie für das Solar-Panel (7) einen hellen Montageort mit Sonneneinstrahlung.
Wählen Sie den Montageort so, dass der LED-Solarstrahler (1) vor Wind, Regen und Verschmutzung
geschützt ist.
Informieren Sie sich vorab, welches Montagematerial für den von Ihnen gewählten Montageort
geeignet ist. Dem LED-Solarstrahler (1) liegt geeignetes Montagematerial für Beton bei.
8 - Deutsch
LIVARNO LUX LSS 520 A1
Benötigtes Werkzeug
Folgende Werkzeuge sind nicht im Lieferumfang enthalten. Diese Liste dient Ihnen zur Orientierung. Die
genaue Beschaffenheit der benötigten Werkzeuge richtet sich nach den individuellen Gegebenheiten vor
Ort.
Leiter
Wasserwaage, Zollstock, Bleistift
Bohrmaschine mit Bohrer
Kreuzschlitzschraubendreher, Schlitzschraubendreher
Maulschlüssel, Kombizange, Seitenschneider
Vor der Montage
Achten Sie beim Bohren der Bohrlöcher darauf, dass keine
in der Wand liegenden Leitungen beschädigt werden.
Verwenden Sie geeignetes Werkzeug zur Montage.
Vor der Montage machen Sie sich mit den Einzelteilen des LED-Solarstrahlers (1), sowie den Anleitungen
und Abbildungen dieser Bedienungsanleitung vertraut und beachten Sie diese.
Deutsch - 9

LIVARNO LUX LSS 520 A1
Montage
LED-Solarstrahler (1):
Lösen Sie den Montagebügel (3) vom LED-Solarstrahler (1).
Nutzen Sie den Montagebügel (3) als Vorlage zum Anzeichnen der zwei äußeren Bohrlöcher.
Bohren Sie nun die zwei Bohrlöcher und befestigen Sie den Montagebügel (3) mittels der
mitgelieferten großen Dübel und Schrauben.
Befestigen Sie nun den LED-Solarstrahler (1) an dem Montagebügel (3). Verwenden Sie dazu die
zuvor entfernten Schrauben, Federringe und Unterlegscheiben. Achten Sie darauf, dass sich die
Federringe zwischen LED-Solarstrahler (1) und Montagebügel (3) befinden. Die Unterlegscheiben
müssen zwischen Schraubenkopf und Montagebügel (3) liegen.
Solar-Panel (7):
Auf der Rückseite des Solar-Panels (7) befindet sich eine Montageplatte mit 6 Bohrungen für Schrauben.
Verwenden Sie die 4 kleinen Schrauben und
Dübel, um das Solar-Panel am ausgewählten
Montageort zu befestigen. Je nach
Gegebenheit des Montageortes können Sie 4
der Bohrungen in der Montageplatte frei
wählen, idealerweise sollten aber jeweils 2
Bohrungen rechts und links genutzt werden.
Das Solar-Panel (7) ist an der Montageplatte
mit einem Drehgelenk verbunden. Stellen Sie
die Montageplatte so ein, dass Sie die 4
kleinen Schrauben bequem eindrehen können.
Verlegen Sie anschließend das Kabel (8) und
verbinden Sie den Stecker mit der Buchse des
Kabels (6) am LED-Solarstrahler (1).
Das Solar-Panel (7) ist an der Montageplatte
mit einem Drehgelenk verbunden. Richten Sie
das Solar-Panel so aus, dass der Lichteinfall
am größten ist.
10 - Deutsch

LIVARNO LUX LSS 520 A1
Inbetriebnahme
Schalten Sie den LED-Solarstrahler (1) mit dem Ein-/Aus-Schalter (2) ein, indem Sie diesen in die Stellung
„ON“ bringen.
Bewegungsmelder ausrichten
Achten Sie darauf, dass im Erfassungsbereich des
Bewegungsmelders (5) keine Bewegungen vorkommen, die
nicht erfasst werden sollen (z.B. Gehwege, Straßen).
Die Einstellung der Lichtempfindlichkeit des
Bewegungsmelders (5) sollten Sie am besten zu dem
Zeitpunkt der Lichtverhältnisse vornehmen, bei welchen der
LED-Solarstrahler (1) aktiv werden soll.
Richten Sie den Bewegungsmelder (5) so aus, dass dieser den gewünschten Bereich möglichst gut
erfassen kann. Die Sicht darf nicht durch Gegenstände o. ä. behindert werden.
Sie können den Bewegungsmelder (5) horizontal durch Drehen ausrichten.
Um den Bewegungsmelder (5) vertikal auszurichten, müssen Sie zuerst die Feststellschraube (4) lösen.
Befindet sich der Bewegungsmelder (5) in der gewünschten Position, müssen Sie die Feststellschraube
(4) wieder fixieren.
Leuchtdauer einstellen (TIME)
Über den Regler TIME (11) an der Unterseite des Bewegungsmelders (5) stellen Sie die Leuchtdauer (ca.
10 sec bis 4 min) ein. Drehen Sie den Regler TIME (11) im Uhrzeigersinn (Richtung +), um die
Leuchtdauer zu verlängern bzw. gegen den Uhrzeigersinn (Richtung -), um die Leuchtdauer zu verkürzen.
Bitte beachten Sie:
Um den Akkuverbrauch möglichst gering zu halten, sollte die Leuchtdauer Ihren
Bedürfnissen entsprechend möglichst kurz eingestellt werden.
Im Auslieferzustand ist eine Leuchtdauer von ca. einer Minute voreingestellt.
Sensorempfindlichkeit einstellen (SENS)
Über den Regler SENS (10) an der Unterseite des Bewegungsmelders (5) stellen Sie die
Sensorempfindlichkeit ein. Drehen Sie den Regler SENS (10) im Uhrzeigersinn (Richtung +), um die
Deutsch - 11
LIVARNO LUX LSS 520 A1
Empfindlichkeit zu erhöhen bzw. gegen den Uhrzeigersinn (Richtung -), um die Empfindlichkeit zu
verringern. Je höher die Empfindlichkeit, desto größer der Erfassungsbereich (maximal 12 Meter).
Lichtempfindlichkeit einstellen (LUX)
Über den Regler LUX (9) an der Unterseite des Bewegungsmelders (5) stellen Sie die Lichtempfindlichkeit
ein. Hier legen Sie fest, bei welchen Lichtverhältnissen der Dämmerungssensor reagiert und somit der LEDSolarstrahler (1) ein- bzw. ausgeschaltet wird.
Drehen Sie den Regler LUX (9) im Uhrzeigersinn (Richtung
helleren Lichtverhältnissen reagiert.
Drehen Sie den Regler LUX (9) gegen den Uhrzeigersinn (Richtung
(5) erst bei dunkleren Lichtverhältnissen.
), damit der Bewegungsmelder (5) bei
), reagiert der Bewegungsmelder
Wartung/Reinigung
Wartung
Das Leuchtmittel des LED-Solarstrahlers (1) besteht aus 9 langlebigen LEDs. Diese sind nicht
auswechselbar und müssen nicht gewartet werden.
Reinigung
Stellen Sie sicher, dass keine Flüssigkeiten in das Gehäuse
des LED-Solarstrahlers (1) eindringen. Der LED-Solarstrahler
(1) könnte beschädigt werden.
Verwenden Sie zur Reinigung des LED-Solarstrahlers (1) und des Solar-Panels (7) ein weiches, trockenes
Tuch und keinesfalls Lösungsmittel oder Reiniger, die Kunststoff angreifen. Verwenden Sie bei stärkerer
Verschmutzung nur ein leicht angefeuchtetes Tuch.
12 - Deutsch

LIVARNO LUX LSS 520 A1
Problemlösung
Das Licht schaltet sich nicht ein
Der Ein-/Aus-Schalter (2) steht in Stellung „OFF“.
Der Bewegungsmelder (5) ist nicht richtig ausgerichtet. Korrigieren Sie die Ausrichtung.
Der eingebaute Akku ist komplett leer. Stellen Sie sicher, dass das Solar-Panel (7) korrekt ausgerichtet
ist und laden Sie den Akku komplett auf. Verkürzen Sie gegebenenfalls die Leuchtdauer, um den
Akkuverbrauch zu reduzieren. Um den Akku komplett aufzuladen, sollte der Ein-/Aus-Schalter (2)
während des Ladvorganges in der Stellung „OFF“ stehen. Nach Abschluss des Ladevorganges
schalten Sie den Ein-/Aus-Schalter (2) wieder in die Stellung „ON“.
Die Dauer des Ladevorgangs ist abhängig von der Sonneneinstrahlung. Ein Ladevorgang
dauert bei klarem heiteren Wetter ca. 3 Tage (bei jeweils 4 Stunden und ca. 60.000 Lux).
Das Licht schaltet schnell ein und aus
Der Sensor wird durch Fremdlicht oder helle reflektierende Flächen gestört. Entfernen Sie die
Fremdlichtquelle, bzw. die störenden Oberflächen.
Das Licht schaltet nicht aus
Im Erfassungsbereich des Bewegungsmelders (5) befinden sich Personen oder Gegenstände.
Entfernen Sie diese.
Der LED-Solarstrahler (1) bewegt sich im Wind, wodurch der Bewegungsmelder (5) ständig auslöst.
Befestigen Sie den LED-Solarstrahler (1) nur an einem stabilen Montageort.
Umwelthinweise und Entsorgungsangaben
Die mit diesem Symbol gekennzeichneten Geräte unterliegen der europäischen
Richtlinie 2012/19/EU. Alle Elektro- und Elektronik- Altgeräte müssen getrennt vom
Hausmüll über dafür staatlich vorgesehene Stellen entsorgt werden.
Mit der ordnungsgemäßen Entsorgung des alten Geräts vermeiden Sie Umweltschäden
und eine Gefährdung Ihrer persönlichen Gesundheit. Weitere Informationen zur
vorschriftsgemäßen Entsorgung des alten Gerätes erhalten Sie bei der
Stadtverwaltung, beim Entsorgungsamt oder in dem Geschäft, wo Sie das Gerät erworben haben.
Der eingebaute Akku ist für die Entsorgung nicht entnehmbar!
Führen Sie auch die Verpackung einer umweltgerechten Entsorgung zu. Kartonagen können bei
Altpapiersammlungen oder an öffentlichen Sammelplätzen zur Wiederverwertung abgegeben werden.
Folien und Kunststoffe des Lieferumfangs werden über Ihr örtliches Entsorgungsunternehmen eingesammelt
und umweltgerecht entsorgt.
Deutsch - 13

LIVARNO LUX LSS 520 A1
Konformität
Dieses Gerät entspricht den grundlegenden Anforderungen und den anderen
relevanten Vorschriften der EMV-Richtlinie 2014/30/EU, der Richtlinie für
Niederspannungsgeräte 2014/35/EU, der ErP-Richtlinie 2009/125/EC sowie der
RoHS Richtlinie 2011/65/EU.
Um die vollständige EU-Konformitätserklärung zu erhalten, senden Sie eine E-Mail an
folgende E-Mailadresse: ce@targa.de
Hinweise zu Garantie und Serviceabwicklung
Garantie der TARGA GmbH
Sehr geehrte Kundin, sehr geehrter Kunde,
Sie erhalten auf dieses Gerät 3 Jahre Garantie ab Kaufdatum. Im Falle von Mängeln dieses Produkts
stehen Ihnen gegen den Verkäufer des Produkts gesetzliche Rechte zu. Diese gesetzlichen Rechte werden
durch unsere im Folgenden dargestellte Garantie nicht eingeschränkt.
Garantiebedingungen
Die Garantiefrist beginnt mit dem Kaufdatum. Bitte bewahren Sie den originalen Kassenbon gut auf. Diese
Unterlage wird als Nachweis für den Kauf benötigt. Tritt innerhalb von drei Jahren ab dem Kaufdatum
dieses Produkts ein Material- oder Fabrikationsfehler auf, wird das Produkt von uns – nach unserer Wahl
– für Sie kostenlos repariert oder ersetzt.
Garantiezeit und gesetzliche Mängelansprüche
Die Garantiezeit wird durch die Gewährleistung nicht verlängert. Dies gilt auch für ersetzte und reparierte
Teile. Eventuell schon beim Kauf vorhandene Schäden und Mängel müssen sofort nach dem Auspacken
gemeldet werden. Nach Ablauf der Garantiezeit anfallende Reparaturen sind kostenpflichtig.
Garantieumfang
Das Gerät wurde nach strengen Qualitätsrichtlinien sorgfältig produziert und vor Auslieferung
gewissenhaft geprüft. Die Garantieleistung gilt für Material- oder Fabrikationsfehler. Diese Garantie
erstreckt sich nicht auf Produktteile, die normaler Abnutzung ausgesetzt sind und daher als Verschleißteile
angesehen werden können oder für Beschädigungen an zerbrechlichen Teilen, z. B. Schalter, Akkus oder
die aus Glas gefertigt sind. Diese Garantie verfällt, wenn das Produkt beschädigt, nicht sachgemäß
benutzt oder gewartet wurde. Für eine sachgemäße Benutzung des Produkts sind alle in der
Bedienungsanleitung aufgeführten Anweisungen genau einzuhalten. Verwendungszwecke und
Handlungen, von denen in der Bedienungsanleitung abgeraten oder vor denen gewarnt wird, sind
unbedingt zu vermeiden. Das Produkt ist nur für den privaten und nicht für den gewerblichen Gebrauch
bestimmt. Bei missbräuchlicher und unsachgemäßer Behandlung, Gewaltanwendung und bei Eingriffen,
14 - Deutsch

LIVARNO LUX LSS 520 A1
die nicht von unserer autorisierten Service-Niederlassung vorgenommen wurden, erlischt die Garantie. Mit
Reparatur oder Austausch des Produkts beginnt kein neuer Garantiezeitraum.
Abwicklung im Garantiefall
Um eine schnelle Bearbeitung Ihres Anliegens zu gewährleisten, folgen Sie bitte den folgenden
Hinweisen:
- Bitte lesen Sie vor Inbetriebnahme Ihres Produktes sorgfältig die beigefügte Dokumentation.
Sollte es mal zu einem Problem kommen, welches auf diese Weise nicht gelöst werden kann,
wenden Sie sich bitte an unsere Hotline.
- Bitte halten Sie für alle Anfragen den Kassenbon und die Artikelnummer bzw. wenn vorhanden
die Seriennummer als Nachweis für den Kauf bereit.
- Für den Fall, dass eine telefonische Lösung nicht möglich ist, wird durch unsere Hotline in
Abhängigkeit der Fehlerursache ein weiterführender Service veranlasst.
Service
E-Mail: service.DE@targa-online.com
Telefon: 02921 - 89 13 000
Telefon: 01 – 26 76 195
E-Mail: service.AT@targa-online.com
Telefon: 044 – 55 10 057
E-Mail: service.CH@targa-online.com
IAN: 275085
Hersteller
Bitte beachten Sie, dass die folgende Anschrift keine Serviceanschrift ist. Kontaktieren Sie zunächst die
oben benannte Servicestelle.
TARGA GmbH
Coesterweg 45
59494 SOEST
DEUTSCHLAND / GERMANY
Deutsch - 15

LIVARNO LUX LSS 520 A1
Contenu
Introduction .............................................................................................................. 17
Utilisation conforme ................................................................................................. 17
Conditions de livraison ............................................................................................. 17
Caractéristiques techniques ...................................................................................... 18
Consignes de sécurité ............................................................................................... 19
Droits d’auteur ......................................................................................................... 22
Avant mise en service ............................................................................................... 22
Le lieu de montage idéal ............................................................................................................................. 22
Outils nécessaires ......................................................................................................................................... 23
Avant le montage ......................................................................................................................................... 23
Montage ....................................................................................................................................................... 24
Mise en service ......................................................................................................... 25
Ajustement du détecteur de mouvement ..................................................................................................... 25
Réglage de la durée d’éclairage (TIME) .................................................................................................... 25
Réglage de la sensibilité du capteur (SENS) ............................................................................................. 25
Réglage de la sensibilité à la lumière (LUX) ............................................................................................... 26
Entretien/nettoyage ................................................................................................. 26
Résolution des problèmes ........................................................................................ 26
Directives environnementales et indications concernant l’élimination des déchets ... 27
Conformité ............................................................................................................... 28
Remarques concernant la garantie et le service après-vente .................................... 29
16 - Français

LIVARNO LUX LSS 520 A1
Introduction
Nous vous remercions d’avoir choisi un produit LIVARNO LUX.
Utilisation conforme
Le spot solaire à LED n’est pas prévu pour une utilisation commerciale. Il convient pour une utilisation en
extérieur, en particulier dans les lieux dépourvus de connecteur d’alimentation électrique (garage ou
cabane de jardin, par ex.). L’ampoule LED intégrée garantit un bon éclairage. Le spot solaire à LED
s’allume et s’éteint automatiquement grâce au détecteur de mouvement. L’appareil satisfait à toutes les
normes et standards applicables en matière de conformité CE. En cas de modification du spot solaire à
LED effectuée sans l’accord du fabricant, le respect de ces normes n’est plus garanti.
Conditions de livraison
Retirez l’appareil et tous les accessoires de leur emballage. Enlevez tous les matériaux d’emballage et
vérifiez que toutes les pièces sont présentes dans leur intégralité et qu’elles sont en bon état. En cas de
livraison incomplète ou détériorée, veuillez vous adresser au fabricant.
Spot solaire à LED LSS 520 A1
Panneau solaire
Matériel de montage pour le spot solaire à LED (2 grandes vis et 2 grandes chevilles)
Matériel de montage pour le panneau solaire (4 grandes vis et 4 petites chevilles)
Mode d’emploi et consignes de sécurité
Le présent mode d’emploi est doté d’une enveloppe pliable. Une illustration chiffrée du spot solaire à LED
est reproduite sur la face interne de l’enveloppe. Les chiffres désignent les éléments suivants :
1 Spot solaire à LED LSS 520 A1
2 Bouton marche/arrêt
3 Étrier de montage
4 Vis de fixation
5 Détecteur de mouvement
6 Câble (avec douille)
7 Panneau solaire
8 Câble (avec fiche d’alimentation)
9 Régulateur LUX
10 Régulateur SENS
11 Régulateur TIME
Français - 17

LIVARNO LUX LSS 520 A1
Caractéristiques techniques
Spot solaire à LED (1) :
Marque : LIVARNO LUX
Modèle : LSS 520 A1
Ampoule : LED LG 9 x 1 W max.
Température de couleur LED : 5000 K +/-500 K
Ra (indice de rendu des couleurs des LED) : 80
Angle de départ LED : env. 120°
Durée de vie LED : env. 25 000 heures
Durée d’éclairage max. (batterie pleinement
chargée) :
Tension :
Batterie Li-Ion : 1 800 mAh / 7,4 V
Puissance totale consommée par le spot :
Puissance totale consommée par les LED :
Flux lumineux global (avec le cache) : 520 lm +/-5 % (batterie pleinement chargée)
Protection : IP44 (protection anti-éclaboussure)
Dimensions (L x h x p) : env. 11,4 x 16,5 x 15,6 cm (avec étrier de montage)
Poids : env. 677 g
env. 1,3 heure
12 V (alimentation par le panneau solaire
uniquement)
8,6 W +/-10 % (pour 520 lm, batterie pleinement
chargée)
6,0 W +/-10 % (pour 520 lm, batterie pleinement
chargée)
Panneau solaire (7) :
Type : polycristallin / 3,5 W / 14,5 V
Longueur du câble de raccordement : env. 3 m
Dimensions (L x h x p) : 21 x 16 x 1,6 cm (sans plaque de montage)
Poids (plaque de montage incluse) : env. 540 g
Détecteur de mouvement (5) :
Angle de détection du capteur : max. 180°
Portée du capteur (réglable) : max. 12 m
Valeur crépusculaire : 5 lux +/- 5 lux jusqu’à 20 000 lux +/- 10 lux
18 - Français

LIVARNO LUX LSS 520 A1
Rotation (mécanique) : env. 150° à l’horizontale / env. 180° à la verticale
Durée d’éclairage (réglable) : env. 10 s +/- 5 s jusqu’à 4 min +/- 1 min
Les caractéristiques techniques ainsi que la conception peuvent être soumises à modifications sans
avertissement préalable.
Consignes de sécurité
Préalablement à la première utilisation du spot solaire à LED (1),
veuillez lire attentivement les instructions suivantes et respectez tous
les avertissements, même si la manipulation d’appareils
électroniques vous est familière. Conservez ce mode d’emploi
soigneusement en vue d’une consultation ultérieure. Si vous vendez
ou transmettez le spot solaire à LED (1) à une autre personne, vous
devez absolument fournir le présent mode d’emploi qui fait partie
de l’appareil.
DANGER ! Ce symbole, avertissant d’un
« DANGER » désigne une situation à caractère
dangereux qui, si elle n’est pas évitée, peut provoquer
des blessures graves, voire présenter un danger de
mort.
AVERTISSEMENT ! Ce symbole, servant d’
« AVERTISSEMENT », indique des consignes
importantes pour un fonctionnement en toute sécurité
du spot solaire à LED (1) et pour la protection de
l’utilisateur.
Ce symbole attire l’attention sur des informations
complémentaires sur le sujet.
Français - 19

LIVARNO LUX LSS 520 A1
Risque d’incendie : installez le spot solaire à LED
(1) à une distance de 0,5 m minimum de matériaux
éclairés. Un dégagement de chaleur excessif peut
provoquer un incendie.
Tout cache de protection cassé doit être remplacé.
DANGER ! Les appareils électriques ne doivent pas être mis
dans les mains des enfants. Les personnes ayant des
capacités mentales, sensorielles ou motrices réduites ne
doivent utiliser des appareils électriques que dans la limite de
leurs possibilités. Ne laissez jamais les enfants et les
personnes ayant des capacités mentales, sensorielles ou
motrices réduites utiliser sans surveillance des appareils
électriques. Ils doivent avoir appris à les utiliser de manière
appropriée ou être surveillés par une personne responsable
de leur sécurité. Les enfants devraient par principe être
surveillés, afin de s’assurer qu’ils ne jouent pas avec
l’appareil. Tenez les enfants éloignés de la zone de travail
lors du montage du spot solaire à LED (1). Des petits
composants très dangereux pour la santé en cas d’ingestion
sont inclus dans la livraison. Les enfants ne sont pas toujours
aptes à reconnaître les dangers potentiels. Mettez également
les films d’emballage hors de portée des enfants. Ils
peuvent faire courir un risque de suffocation.
20 - Français
LIVARNO LUX LSS 520 A1
DANGER ! Suite à la constatation d’une formation de fumée,
de bruits ou d’odeurs inhabituels, éteignez immédiatement le
spot solaire à LED (1). Dans ces cas, l’appareil ne doit plus
être utilisé jusqu’à ce qu’un spécialiste effectue une
vérification. Si l’appareil s’enflamme, ne respirez en aucun cas
la fumée. Consultez un médecin si vous avez inhalé de la
fumée. L’inhalation de fumée peut être nuisible à la santé.
DANGER ! Le boîtier du spot solaire à LED (1) et le panneau
solaire (7) ne doivent pas être endommagés. Un boîtier
endommagé peut provoquer des blessures.
DANGER ! N’utilisez pas le spot solaire à LED (1) dans un
environnement à risque d’explosion contenant des gaz, des
vapeurs ou des poussières inflammables. Ils peuvent faire
courir un risque d’explosion.
DANGER ! N’utilisez en aucun cas des instruments optiques
tels qu’une loupe pour regarder directement le rayon
lumineux. Cela peut provoquer des lésions oculaires. Si vous
pensez souffrir de lésions oculaires, consultez immédiatement
un médecin.
AVERTISSEMENT ! Aucun objet ne doit être suspendu au
spot solaire à LED (1) ou
au panneau solaire (7). Le boîtier n’est pas conçu pour porter
des charges. Cela pourrait endommager le spot solaire à LED
(1) ou le panneau solaire (7).
Français - 21

LIVARNO LUX LSS 520 A1
Droits d’auteur
Tous les contenus du présent mode d’emploi sont soumis aux droits d’auteur et sont mis à disposition du
lecteur exclusivement à titre d’information. Toute copie ou reproduction des données et informations sans
l’accord explicite et écrit de l’auteur est interdite. Cette disposition s’applique également en cas
d’utilisation commerciale des contenus et données. Le texte et les illustrations sont conformes à l’état de la
technique lors de l’impression. Sous réserve de modifications.
Avant mise en service
Sortez le spot solaire à LED (1) et le matériel de montage de l’emballage.
Vérifiez que le spot solaire à LED (1) n’est pas endommagé. En cas de dommages, le spot solaire à LED
(1) ne doit pas être mis en service.
Rechargez pleinement la batterie Li-Ion intégrée avant la première mise en service. Veillez à ce que le
bouton marche/arrêt (2) soit en position « OFF ».
la durée du processus de charge dépend de l’ensoleillement. Le processus de charge dure
environ trois jours par temps clair et dégagé (en comptant quatre heures et env. 60 000 lux
par jour).
Le lieu de montage idéal
Choisissez avec soin le lieu de montage et préparez bien l’installation.
Disposez à portée de main et de façon ordonnée toutes les pièces détachées, les outils nécessaires et
le matériel de montage.
Le spot solaire à LED (1) doit être uniquement monté sur des supports stables tels que des murs.
Ne montez pas le spot solaire à LED (1) au-dessus d’une source de chaleur ou à proximité immédiate
d’autres sources de lumière. Consultez également l’illustration [D] reproduite sur l’enveloppe pour
choisir le lieu de montage.
Le courant de charge de la batterie intégrée du spot solaire à LED (1) provient exclusivement du
panneau solaire (7) inclus dans la livraison. Le câble (8) fait env. trois mètres de long. Le lieu de
montage du panneau solaire (7) doit être choisi de telle sorte qu’une fois le montage effectué, la fiche
d’alimentation puisse être raccordée sans problème au câble (6) du spot solaire à LED (1) avec la
douille. Pour cela, il faut veiller à poser le câble (8) de manière à ne gêner et ne faire trébucher
personne. Idéalement, choisissez un lieu de montage clair et ensoleillé pour le panneau solaire (7).
Choisissez le lieu de montage de telle sorte que le spot solaire à LED (1) soit protégé du vent, de la
pluie et de la saleté.
Informez-vous au préalable sur le matériel de montage approprié pour le lieu de montage que vous
avez choisi. Le matériel de montage approprié pour un montage sur béton est joint au spot solaire à
LED (1).
22 - Français

LIVARNO LUX LSS 520 A1
Outils nécessaires
Les outils suivants ne sont pas inclus dans la livraison. Cette liste est fournie à titre indicatif. La nature
exacte des outils nécessaires dépend des particularités du lieu.
Échelle
Niveau à bulle, mètre pliant, crayon
Perceuse avec mèche
Tournevis cruciforme, tournevis pour vis à fente
Clé mixte, pince universelle, pince coupante
Avant le montage
Veillez à ne pas endommager les câbles présents dans le
mur en perçant les trous.
Utilisez des outils appropriés pour le montage.
Avant le montage, familiarisez-vous avec les pièces détachées du spot solaire à LED (1) ainsi qu’avec les
instructions et les illustrations du présent mode d’emploi et respectez celles-ci.
Français - 23

LIVARNO LUX LSS 520 A1
Montage
Spot solaire à LED (1) :
Détachez l’étrier de montage (3) du spot solaire à LED (1).
Utilisez l’étrier de montage (3) comme modèle pour marquer les deux trous externes.
Percez maintenant les deux trous et fixez l’étrier de montage (3) à l’aide des grandes chevilles et des
vis incluses dans la livraison.
Fixez le spot solaire à LED (1) à l’étrier de montage (3). Pour ce faire, utilisez les vis, les rondelles
Grower et les rondelles plates qui ont été retirées au préalable. Veillez à ce que les rondelles Grower
se trouvent entre le spot solaire à LED (1) et l’étrier de montage (3). Les rondelles plates doivent être
placées entre la tête de vis et l’étrier de montage (3).
Panneau solaire (7) :
Au dos du panneau solaire (7) se trouve une plaque de montage percée de six trous pour les vis.
Utilisez les 4 petites vis et chevilles pour fixer
le panneau solaire sur le lieu de montage
choisi. Selon les particularités du lieu de
montage, vous pouvez choisir librement quatre
trous dans la plaque de montage. Il est
toutefois recommandé d’utiliser deux trous à
droite et deux trous à gauche. Le panneau
solaire (7) est relié à la plaque de montage
par un joint pivotant. Installez la plaque de
montage de manière à pouvoir poser
facilement les quatre petites vis.
Enfin, posez le câble (8) et reliez la fiche
d’alimentation au spot solaire à LED (1) avec
la douille du câble (6).
Le panneau solaire (7) est relié à la plaque de
montage par un joint pivotant. Orientez le
panneau solaire de sorte qu’il reçoive le plus
de lumière possible.
24 - Français

LIVARNO LUX LSS 520 A1
Mise en service
Allumez le spot solaire à LED (1) en positionnant le bouton marche/arrêt (2) sur « ON ».
Ajustement du détecteur de mouvement
Veillez à ce qu’aucun mouvement ne devant pas être détecté
(sur le trottoir ou dans la rue, par ex.) ne soit effectué dans la
zone de détection du détecteur de mouvement (5).
Nous vous conseillons de régler la sensibilité à la lumière du
détecteur de mouvement (5) dans les conditions de luminosité
où le spot solaire à LED (1) sera actif.
Ajustez le détecteur de mouvement (5) de sorte qu’il couvre le mieux possible la zone souhaitée. Aucun
objet ou autre corps ne doit entraver la visibilité.
Vous pouvez ajuster horizontalement le détecteur de mouvement (5) en le faisant pivoter.
Vous devez d’abord retirer la vis de fixation (4) pour ajuster verticalement le détecteur de mouvement
(5). Une fois que le détecteur de mouvement (5) se trouve dans la position souhaitée, vous devez
reposer les vis de fixation (4).
Réglage de la durée d’éclairage (TIME)
Le régulateur TIME (11) situé sur l’envers du détecteur de mouvement (5) permet de régler la durée
d’éclairage (env. 10 s à 4 min). Tournez le régulateur TIME (11) en sens horaire (côté +) pour accroître
la durée d’éclairage et en sens antihoraire (côté -) pour la réduire.
Veuillez prendre en considération ce qui suit :
Afin de minimiser la consommation de la batterie, la durée d’éclairage doit être aussi
courte possible en fonction de vos besoins.
À la livraison, la durée d’éclairage est préréglée sur env. une minute.
Réglage de la sensibilité du capteur (SENS)
Le régulateur SENS (10) situé sur l’envers du détecteur de mouvement (5) permet de régler la sensibilité
du capteur. Tournez le régulateur SENS (10) en sens horaire (côté +) pour accroître la sensibilité du
capteur et en sens antihoraire (côté -) pour la réduire. Plus la sensibilité est élevée, plus la zone de
détection est étendue (12 mètres maximum).
Français - 25

LIVARNO LUX LSS 520 A1
Réglage de la sensibilité à la lumière (LUX)
Le régulateur LUX (9) situé sur l’envers du détecteur de mouvement (5) permet de régler la sensibilité à la
lumière. Il vous permet de définir les conditions de luminosité dans lesquelles le capteur crépusculaire
réagit et le spot solaire à LED (1) s’allume ou s’éteint.
Tournez le régulateur LUX (9) en sens horaire (côté
dans des conditions de forte luminosité.
Tournez le régulateur LUX (9) en sens antihoraire (côté
réagisse que dans des conditions de faible luminosité.
) pour que le détecteur de mouvement (5) réagisse
) pour que le détecteur de mouvement (5) ne
Entretien/nettoyage
Entretien
L’ampoule du spot solaire à LED (1) est composée de neuf LED à longue durée de vie. Celles-ci ne sont
pas remplaçables et ne nécessitent aucun entretien.
Nettoyage
Assurez-vous qu’aucun liquide ne pénètre dans le boîtier du
spot solaire à LED (1). Cela pourrait endommager le spot
solaire à LED (1).
Utilisez un chiffon doux et sec pour nettoyer le spot solaire à LED (1) et le panneau solaire (7), et en
aucun cas des solvants ou des nettoyants qui attaquent le plastique. En cas de fortes salissures, utilisez
uniquement un chiffon légèrement humide.
Résolution des problèmes
La lumière ne s’allume pas
Le bouton marche/arrêt (2) est en position « OFF ».
Le détecteur de mouvement (5) n’est pas ajusté correctement. Corrigez l’ajustement.
La batterie intégrée est épuisée. Assurez-vous que le panneau solaire (7) est orienté correctement et
rechargez pleinement la batterie. Diminuez éventuellement la durée d’éclairage pour réduire la
consommation de la batterie. Afin de charger pleinement la batterie, le bouton marche/arrêt (2) doit
être en position « OFF » pendant le processus de charge. Une fois la batterie chargée, repositionnez
le bouton marche/arrêt (2) sur « ON ».
26 - Français

LIVARNO LUX LSS 520 A1
la durée du processus de charge dépend de l’ensoleillement. Le processus de charge dure
environ trois jours par temps clair et dégagé (en comptant quatre heures et env. 60 000 lux
par jour).
La lumière s’allume et s’éteint rapidement
Le capteur est perturbé par une lumière parasite ou par des surfaces réfléchissantes claires. Éloignez
les sources de lumière parasite ou les objets perturbateurs.
La lumière ne s’éteint pas
Des personnes ou des objets se trouvent dans la zone de détection du détecteur de mouvement (5).
Éloignez-les.
Le spot solaire à LED (1) bouge dans le vent, ce qui déclenche en permanence le détecteur de
mouvement (5). Fixez le spot solaire à LED (1) uniquement sur un lieu de montage stable.
Directives environnementales et indications concernant l’élimination
des déchets
Les appareils marqués de ce symbole sont soumis à la directive européenne
2012/19/EU. Tous les appareils électriques et électroniques doivent être mis au rebut,
séparément des déchets ménagers et par le biais des points prévus par l’État.
L’élimination conforme des anciens appareils permet de préserver l’environnement et
votre santé. Des renseignements complémentaires concernant l’élimination
réglementaire des anciens appareils peuvent être obtenus auprès de la municipalité,
des services d’élimination des déchets, ou du commerce ayant vendu l’appareil.
La batterie intégrée ne peut pas être sortie pour la mise au rebut !
L’emballage devrait également être éliminé d’une manière respectant l’environnement. Les cartons peuvent
être donnés lors de la collecte de vieux papiers ou aux endroits de collecte publics en vue d’une
réutilisation. Les films et plastiques utilisés à la livraison sont collectés par les entreprises de ramassage des
déchets locales et éliminés en respectant l’environnement.
Français - 27

LIVARNO LUX LSS 520 A1
Conformité
Cet appareil répond aux exigences essentielles et autres réglementations applicables
de la directive CEM 2014/30/EU relative à la compatibilité électromagnétique, de
la directive 2014/35/EU relative aux appareils à basse tension, de la directive
2009/125/EC relative aux exigences en matière d'écoconception et de la directive
RoHS 2011/65/EU relative à la limitation d'utilisation de substances dangereuses
dans les équipements électriques et électroniques.
Pour recevoir la déclaration de conformité UE complète, merci de nous envoyer un
courriel à l'adresse suivante: ce@targa.de
28 - Français

LIVARNO LUX LSS 520 A1
Remarques concernant la garantie et le service après-vente
Garantie de TARGA GmbH
Cher client, chère cliente,
La garantie accordée sur ce produit est de trois ans à partir de la date d'achat. En cas de vice sur ce
produit, vous disposez de droits que vous pouvez faire valoir vis-à-vis du vendeur du produit. L’exercice de
ces droits n’est pas limité par notre garantie exposée ci-après.
Conditions de garantie
La période de garantie commence à la date d’achat. Merci de conserver soigneusement le ticket de
caisse d’origine. Il vous sera demandé comme preuve d’achat. Si un vice matériel ou de fabrication
survient dans les trois ans qui suivent la date d’achat de ce produit, le produit sera réparé ou remplacé
gratuitement, le choix restant à notre discrétion.
Période de garantie et droits résultant de vices
La période de garantie n’est pas prolongée en cas de son exercice. La même chose s’applique pour les
pièces remplacées et réparées. Les dégâts et vices éventuellement présents dès l’achat doivent être
signalés immédiatement dès le déballage. Une fois la période de garantie écoulée, toute réparation est
payante.
Prestations incluses dans la garantie
L’appareil a été fabriqué selon des directives qualité strictes et a été soigneusement contrôlé avant d’être
livré. La garantie s’applique aux défauts matériels ou de fabrication. Cette garantie ne s'étend pas aux
pièces soumises à une usure normale et qui peuvent donc être considérées comme des pièces d’usure, ni
aux dégâts sur les pièces fragiles comme p. ex. les interrupteurs, les piles rechargeables ou les pièces en
verre. Cette garantie est invalidée si le produit est endommagé, est utilisé ou entretenu de manière
inappropriée. Pour assurer une utilisation conforme du produit, toutes les instructions indiquées dans le
mode d’emploi doivent être soigneusement respectées. Les utilisations et manipulations non conseillées
dans le mode d’emploi ou qui font l’objet d’un avertissement doivent impérativement être évitées. Ce
produit est destiné exclusivement à une utilisation privée et non commerciale. La garantie prend fin en cas
de manipulation abusive et inappropriée, de recours à la force et d'interventions qui ne sont pas
effectuées par notre service technique autorisé. La réparation ou le remplacement du produit ne prolonge
pas d'autant la période de garantie.
Processus d’application de la garantie
Afin de permettre un traitement rapide de votre demande, nous vous prions de suivre les indications
suivantes :
- Avant de mettre votre produit en service, merci de lire avec attention la documentation jointe. Si
un problème survient qui ne peut être résolu de cette manière, merci de vous adresser à notre
assistance téléphonique.
Français - 29

LIVARNO LUX LSS 520 A1
- Pour toute demande, ayez la référence de l'article et si disponible, le numéro de série, à portée
de main pour apporter la preuve de votre achat.
- S’il est impossible d’apporter une solution par téléphone, notre assistance téléphonique
organisera une intervention technique en fonction de l’origine de la panne.
Indépendamment de la garantie commerciale souscrite, le vendeur reste tenu des défauts de conformité
du bien et des vices rédhibitoires dans les conditions prévues aux articles L211-4 et suivants du Code de
la consommation et aux articles 1641 et suivants du Code Civil.
Service
Téléphone : 01 - 70700853
E-Mail : service.FR@targa-online.com
Téléphone : 02 – 58 87 036
E-Mail : service.BE@targa-online.com
Téléphone : 02 02 04 223
E-Mail : service.LU@targa-online.com
Téléphone : 044 – 55 10 057
E-Mail : service.CH@targa-online.com
IAN: 275085
Fabricant
Important : l’adresse suivante n'est pas l’adresse de notre service technique. Contactez d’abord notre
service technique aux coordonnées ci-dessus.
TARGA GmbH
Coesterweg 45
59494 SOEST
GERMANY
30 - Français

LIVARNO LUX LSS 520 A1
Contenuto
Introduzione ............................................................................................................. 32
Utilizzo previsto ....................................................................................................... 32
Dotazione ................................................................................................................. 32
Specifiche tecniche .................................................................................................... 33
Avvertenze di sicurezza ........................................................................................... 34
Copyright ................................................................................................................. 37
Prima della messa in servizio ................................................................................... 37
Scelta del luogo adatto per l’installazione ................................................................................................. 37
Attrezzi richiesti ............................................................................................................................................ 38
Prima del montaggio .................................................................................................................................... 38
Montaggio .................................................................................................................................................... 39
Messa in servizio ...................................................................................................... 40
Orientamento del rilevatore di movimento ................................................................................................. 40
Impostazione della durata dell’illuminazione (TIME) ................................................................................ 40
Impostazione della sensibilità sensore (SENS) .......................................................................................... 40
Impostazione della sensibilità alla luce (LUX) ............................................................................................ 41
Manutenzione/pulizia .............................................................................................. 41
Risoluzione di problemi ............................................................................................ 41
Indicazioni ambientali e misure di smaltimento ........................................................ 42
Conformità ............................................................................................................... 42
Indicazioni sulla garanzia e la gestione dei servizi ................................................... 43
Italiano - 31

LIVARNO LUX LSS 520 A1
Introduzione
Grazie per aver scelto un prodotto LIVARNO LUX.
Utilizzo previsto
Il radiatore solare con LED non è destinato all’uso commerciale. È adatto per l’utilizzo in ambienti esterni,
in particolare in luoghi in cui non è presente un collegamento alla rete elettrica (ad esempio in un garage
o in una capanna in giardino). I LED offrono un’illuminazione ottimale. Il rilevatore di movimento rileva i
movimenti e attiva e disattiva il radiatore solare con LED. L’apparecchio è conforme a tutte le norme e le
direttive previste dalla dichiarazione di conformità CE. In caso di modifiche applicate al radiatore solare
con LED senza il consenso del produttore non è garantita la conformità a tali norme.
Dotazione
Estrarre dalla confezione l’apparecchio e tutti gli accessori. Rimuovere i materiali di imballaggio e
verificare che tutti i componenti siano completi e intatti. Nel caso in cui la consegna risulti incompleta o
presenti dei danni, contattare il produttore.
Radiatore solare con LED LSS 520 A1
Pannello solare
Materiale per il montaggio del radiatore solare con LED (2 viti grandi e 2 tasselli grandi)
Materiale per il montaggio del pannello solare (4 viti piccole e 4 tasselli piccoli)
Manuale di utilizzo e avvertenze di sicurezza
Questo manuale di istruzioni è dotato di una copertina apribile. All’interno della copertina è presente una
illustrazione del radiatore solare con LED dotata di alcune cifre. Tali cifre hanno il seguente significato:
1 Radiatore solare con LED LSS 520 A1
2 Interruttore on/off
3 Staffa di montaggio
4 Vite di fissaggio
5 Rilevatore di movimento
6 Cavo (con presa)
7 Pannello solare
8 Cavo (con spina)
9 Dispositivo di regolazione LUX
10 Dispositivo di regolazione SENS
11 Dispositivo di regolazione TIME
32 - Italiano

LIVARNO LUX LSS 520 A1
Specifiche tecniche
Radiatore solare con LED (1):
Marca: LIVARNO LUX
Nome del modello: LSS 520 A1
Lampada: LG LED: max. 9 x 1 W
Temperatura colore LED: 5000 K +/-500 K
Ra (Indice di resa cromatica dei LED ): 80
Angolo di fascio di luce LED: ca. 120°
Durata LED: ca. 25.000 ore
Durata max. dell’illuminazione (con batteria
completamente carica):
Tensione di esercizio:
Batteria agli ioni di litio: 1.800 mAh / 7,4 v
Assorbimento di potenza dell’intero radiatore
Assorbimento completo di potenza dei LED
Corrente complessiva per la luce (con
copertura)
Tipo di protezione: IP44 (protezione contro la penetrazione di liquidi)
Dimensioni (L x A x P): ca. 11,4 x 16,5 x 15,6 cm (con staffa di montaggio)
Peso: ca. 677 g
ca. 1,3 ore
12 V (alimentazione esclusivamente tramite il
pannello solare)
8,6 W +/-10% (con 520 lm e batteria completamente
carica)
6,0 W +/-10% (con 520 lm e batteria completamente
carica)
520 lm +/-5% (con batteria completamente carica)
Pannello solare (7):
Tipo: policristallino / 3,5 w / 14,5 v
Lunghezza del cavo di collegamento: ca. 3 m
Dimensioni (L x A x P): ca. 21 x 16 x 1,6 cm (senza piastra di montaggio)
Peso (incl. piastra di montaggio): ca. 540 g
Rilevatore di movimento (5):
Angolo di rilevamento del sensore: max. 180°
Raggio del sensore (regolabile): max. 12 m
Italiano - 33

LIVARNO LUX LSS 520 A1
Livello di penombra: 5 lux +/- 5 lux fino a 20000 lux +/- 10 lux
Orientabile (meccanicamente): ca. 150° orizzontalmente / ca. 180° verticalmente
Durata dell’illuminazione (regolabile): ca. 10 sec +/- 5 sec fino a 4 min +/- 1 min
Eventuali modifiche alle specifiche tecniche e al design possono essere apportate senza preavviso.
Avvertenze di sicurezza
Prima di utilizzare il radiatore solare con LED (1) per la prima volta,
leggere attentamente le seguenti istruzioni e osservare le
avvertenze, anche se si dispone già di dimestichezza con i
dispositivi elettronici. Conservare accuratamente il manuale di
istruzioni per eventuali consultazioni future. In caso di vendita o
cessione del radiatore solare con LED (1), consegnare anche il
presente manuale di istruzioni in quanto è parte integrante del
dispositivo.
PERICOLO! Il simbolo che indica un "PERICOLO"
34 - Italiano
segnala una possibile situazione di pericolo che, se
non evitata, può causare all'utente lesioni gravi e
persino la morte.
ATTENZIONE! Il simbolo "ATTENZIONE" indica
informazioni importanti per la sicurezza operativa del
radiatore solare con LED (1) e per la sicurezza
dell'utente stesso.
Questo simbolo indica ulteriori informazioni
sull'argomento.

LIVARNO LUX LSS 520 A1
Pericolo di incendio: Montare il radiatore solare
con LED (1) a una distanza di almeno 0,5 m da
materiali irradiati. Un eccessivo sviluppo di calore può
provocare un incendio.
Ogni copertura spezzata deve essere sostituita.
PERICOLO! Tenere i dispositivi elettrici lontani dalla portata
dei bambini. Le persone soggette a limitazioni mentali,
sensoriali o motorie devono utilizzare i dispositivi elettrici entro
i limiti delle loro possibilità. Non permettere che bambini e
persone soggette a limitazioni mentali, sensoriali o motorie
utilizzino i dispositivi elettrici senza la dovuta sorveglianza, a
meno che non siano stati appropriatamente addestrati o
eseguano le operazioni sotto la sorveglianza di una persona
responsabile della loro sicurezza. Di norma, i bambini
dovrebbero essere sorvegliati in ogni caso, affinché non
utilizzino il dispositivo come giocattolo. Tenere lontani i
bambini dall’area di lavoro durante il montaggio del
radiatore solare con LED (1). Nella dotazione sono compresi
numerosi componenti di piccole dimensioni: se ingoiati
possono rappresentare un pericolo di vita. I bambini non sono
sempre in grado di riconoscere correttamente i potenziali
pericoli. Tenere fuori dalla portata dei bambini anche le
pellicole da imballaggio. Sussiste il rischio di
soffocamento.
Italiano - 35

LIVARNO LUX LSS 520 A1
PERICOLO! Se si notano lo sviluppo di fumo, rumori o odori
anomali, spegnere immediatamente il radiatore solare con
LED (1). In questi casi, non utilizzare il dispositivo fintanto che
non sia stato controllato accuratamente dal personale
specializzato. Non aspirare il fumo che si sviluppa durante un
eventuale incendio del dispositivo. Se tuttavia si aspira del
fumo, consultare un medico. L’aspirazione di fumo può recare
danni alla salute
PERICOLO! L’alloggiamento del radiatore solare con LED
(1) e il pannello solare (7) non devono essere danneggiati.
Se l’alloggiamento è danneggiato, vi è pericolo di lesioni.
PERICOLO! Non utilizzare il radiatore solare con LED (1) in
ambienti soggetti al rischio di esplosione, in cui sono presenti
gas, vapori o polveri infiammabili. Sussiste il rischio di
esplosione.
PERICOLO! In nessun caso utilizzare strumenti ottici, come
ad esempio lenti d’ingrandimento per guardare direttamente
nel raggio di luce. Ciò può causare lesioni agli occhi. Nel
caso in cui si sospetti che gli occhi abbiano subito delle
lesioni, contattare immediatamente un medico.
ATTENZIONE! Non è consentito appendere oggetti al
radiatore solare con LED (1) o al
pannello solare (7). L’alloggiamento non è adatto per
sopportare pesi: il radiatore solare con LED (1) e/o il
pannello solare (7) potrebbero subire danni.
36 - Italiano

LIVARNO LUX LSS 520 A1
Copyright
I contenuti del presente manuale di istruzioni sono protetti da copyright e vengono forniti all'utente
unicamente a scopo informativo. È rigorosamente vietato copiare o riprodurre i dati e le informazioni ivi
contenute senza l'autorizzazione scritta ed esplicita dell'autore. Il divieto si applica anche in caso di
utilizzo commerciale di tali informazioni e dati. Testi e illustrazioni si intendono aggiornati al momento
della stampa. Con riserva di modifiche.
Prima della messa in servizio
Estrarre dalla confezione il radiatore solare con LED (1) e il materiale per il montaggio.
Verificare che il radiatore solare con LED (1) non presenti segni di danneggiamento. Nel caso di
danneggiamenti al radiatore solare con LED (1) non deve essere messo in servizio.
Prima della messa in servizio caricare completamente la batteria agli ioni di litio incorporata. Assicurarsi
che l’interruttore on/off (2) si trovi nella posizione “OFF”.
La durata della procedura di ricarica varia in base all’irradiazione solare. Una ricarica può
durare, nel caso di bel tempo e cielo chiaro, ca. 3 giorni (con rispettivamente 4 ore e ca.
60.000 lux).
Scelta del luogo adatto per l’installazione
Scegliere con cura il luogo per l’installazione e preparare attentamente il montaggio.
Disporre ordinatamente i singoli componenti, gli attrezzi necessari in modo che siano facilmente
accessibili.
Il radiatore solare con LED (1) deve essere installato soltanto su una base stabile, ad esempio su una
struttura in muratura.
Non montare il radiatore solare con LED (1) su una fonte di calore o in prossimità di altre sorgenti di
luce. Nella scelta del luogo di montaggio tenere in considerazione anche la figura [D] nella pagina
di copertina.
La corrente per la carica della batteria incorporata del radiatore solare con LED (1) viene alimentata
esclusivamente dal pannello solare in dotazione (7). Il cavo (8) ha una lunghezza di ca. 3 metri. Il
luogo di montaggio del pannello solare (7) deve essere scelto in modo tale che, dopo il montaggio,
la spina possa essere collegata facilmente alla presa del cavo (6) del radiatore solare con LED (1).
Assicurarsi che il cavo (8) venga posato in modo che non ostacoli il passaggio delle persone e non
comporti il rischio di inciampo. La posizione ideale per l’installazione del pannello solare (7) è in un
luogo ben esposto all’irradiazione solare.
Scegliere un luogo di installazione del radiatore solare con LED (1) che sia protetto da vento, pioggia
e sporcizia.
Italiano - 37

LIVARNO LUX LSS 520 A1
Informarsi innanzitutto circa il materiale di montaggio necessario per il luogo di installazione
selezionato. Il radiatore solare con LED (1) viene fornito con materiale di montaggio adatto per
calcestruzzo.
Attrezzi richiesti
I seguenti attrezzi non sono forniti in dotazione. Il presente elenco viene fornito a scopo di orientamento.
Le caratteristiche esatte degli attrezzi necessari dipendono dalle caratteristiche individuali del luogo.
Scala
Livella, metro, matita
Trapano con varie punte
Cacciavite a croce, cacciavite piatto
Chiave fissa, pinza universale, pinza a cesoia
Prima del montaggio
Quando si eseguono le forature, assicurarsi di non
danneggiare cavi presenti all’interno della parete.
Per il montaggio utilizzare attrezzi appropriati.
Prima del montaggio, si consiglia di acquisire familiarità con i singoli componenti del radiatore solare con
LED (1) e con le istruzioni e le immagini fornite nel manuale di istruzioni, quindi osservare le indicazioni
fornite.
38 - Italiano

LIVARNO LUX LSS 520 A1
Montaggio
Radiatore solare con LED (1):
Rimuovere la staffa di montaggio (3) dal radiatore solare con LED (1).
Utilizzare la staffa di montaggio (3) come modello per tracciare i due fori esterni.
Eseguire le due forature e fissare la staffa di montaggio (3) tramite i tasselli e le viti in dotazione.
Fissare quindi il radiatore solare con LED (1) alla staffa di montaggio (3). Utilizzare a tale scopo le
viti, le rondelle elastiche e le rosette rimosse in precedenza. Assicurarsi che le rondelle elastiche siano
posizionate tra il radiatore solare con LED (1) e la staffa di montaggio (3). Le rosette devono essere
posizionate tra la testa della vite e la staffa di montaggio (3).
Pannello solare (7):
Sul lato posteriore del pannello solare (7) è presente una piastra di montaggio con 6 fori per viti.
Utilizzare le 4 viti piccole e i relativi tasselli
per fissare il pannello solare nel luogo
selezionato. A seconda delle caratteristiche
del luogo di montaggio, è possibile
selezionare i 4 fori sulla piastra di montaggio.
La soluzione ideale, tuttavia, consiste
nell’utilizzare 2 fori a destra e due a sinistra. Il
pannello solare (7) è collegato alla piastra di
montaggio tramite un giunto. Posizionare la
piastra di montaggio in modo tale che risulti
facile avvitare le 4 viti piccole.
Posare quindi il cavo (8) e collegare la spina
alla presa del cavo (6) sul radiatore solare
con LED (1).
Il pannello solare (7) è collegato alla piastra
di montaggio tramite un giunto. Collocare il
pannello solare in una posizione che assicuri
la massima irradiazione di luce.
Italiano - 39

LIVARNO LUX LSS 520 A1
Messa in servizio
Accendere il radiatore solare con LED (1) tramite l’interruttore on/off (2) impostandolo sulla posizione
“ON”.
Orientamento del rilevatore di movimento
Assicurarsi che nell’area di rilevamento del rilevatore di
movimento (5) non si verifichino movimenti che non devono
essere rilevati (ad esempio marciapiedi, strade).
L’impostazione della sensibilità alla luce del rilevatore di
movimento (5) deve essere effettuata preferibilmente
nell’orario in cui il radiatore solare con LED (1) deve essere
attivo.
Orientare il rilevatore di movimento (5) in modo che possa coprire in modo ottimale l’area desiderata.
La vista non deve essere ostacolata da oggetti o da altre cose.
È possibile orientare il rilevatore di movimento (5) orizzontalmente girandolo.
Per orientare verticalmente il rilevatore di movimento (5), è necessario innanzitutto svitare la vite di
fissaggio (4). Quando il rilevatore di movimento (5) si trova nella posizione desiderata, riavvitare la
vite di fissaggio (4).
Impostazione della durata dell’illuminazione (TIME)
Tramite il dispositivo di regolazione TIME (11), nella sezione inferiore del rilevatore di movimento (5)
impostare la durata dell’illuminazione (ca. 10 sec fino a 4 min). Girare il dispositivo di regolazione TIME
(11) in senso orario (in direzione +), per prolungare la durata dell’illuminazione o in senso antiorario (in
direzione -), per ridurre la durata dell’illuminazione.
Nota:
Per ridurre al minimo il consumo della batteria, impostare in base alle esigenze la
durata dell’illuminazione su un valore più breve possibile.
Nello stato di consegna la durata dell’illuminazione è impostata su circa un minuto.
Impostazione della sensibilità sensore (SENS)
Il dispositivo di regolazione SENS (10), disponibile nella sezione inferiore del rilevatore di movimento (5),
consente di impostare la sensibilità sensore. Girare il dispositivo di regolazione SENS (10) in senso orario
40 - Italiano

LIVARNO LUX LSS 520 A1
(in direzione +), per aumentare la sensibilità o in senso antiorario (in direzione -), per ridurla. Più alta è la
sensibilità, più grande è l’area di rilevamento (massimo 12 metri).
Impostazione della sensibilità alla luce (LUX)
Il dispositivo di regolazione LUX (9) nella sezione inferiore del rilevatore di movimento (5) consente di
impostare la sensibilità alla luce. Qui è possibile stabilire le condizioni di illuminazione in base alle quali
dovrà reagire il sensore crepuscolare e quindi attivare o disattivare il radiatore solare con LED (1).
Girare il dispositivo di regolazione LUX (9) in senso orario (in direzione
movimento (5) reagisca in condizioni di illuminazione più chiare.
Girare il dispositivo di regolazione LUX (9) in senso antiorario (in direzione
movimento (5) reagisca in condizioni di illuminazione più buie.
), affinché il rilevatore di
), affinché il rilevatore di
Manutenzione/pulizia
Manutenzione
La luce del radiatore solare con LED (1) è composta da 9 LED durevoli. I LED non sono sostituibili e non
richiedono manutenzione.
Pulizia
Assicurarsi che non penetrino liquidi nell’alloggiamento del
radiatore solare con LED (1). Il radiatore solare con LED (1)
potrebbe subire danni.
Per la pulizia del radiatore solare con LED (1) e del pannello solare (7) utilizzare un panno morbido
asciutto e non usare mai solventi o detergenti che possano corrodere il materiale plastico. In caso di forte
sporcizia utilizzare un panno soltanto leggermente umido.
Risoluzione di problemi
La luce non si accende
L’interruttore on/off (2) è nella posizione “OFF”.
Il rilevatore di movimento (5) non è orientato correttamente. Correggere l’orientamento.
La carica della batteria integrata è completamente esaurita. Assicurarsi che il pannello solare (7) sia
orientato correttamente ed effettuare la ricarica completa della batteria. Eventualmente accorciare la
durata dell’illuminazione per ridurre il consumo della batteria. Per caricare completamente la batteria,
Italiano - 41

LIVARNO LUX LSS 520 A1
durante la procedura di ricarica l’interruttore on/off (2) deve trovarsi nella posizione “OFF”. Una
volta completata la procedura di ricarica spostare l’interruttore on/off (2) nuovamente sulla posizione
“ON”.
La durata della procedura di ricarica varia in base all’irradiazione solare. Una ricarica può
durare, nel caso di bel tempo e cielo chiaro, ca. 3 giorni (con rispettivamente 4 ore e ca.
60.000 lux).
La luce si accende e si spegne rapidamente
Il sensore viene disturbato da una luce esterna o da superfici chiare riflettenti. Rimuovere la fonte di
illuminazione esterna o le superfici che provocano disturbo.
La luce non si spegne
Nell’area di rilevamento del rilevatore di movimento (5) sono presenti persone o oggetti. Allontanare
le persone e/o rimuovere gli oggetti.
Il radiatore solare con LED (1) viene mosso dal vento, attivando in continuazione il rilevatore di
movimento (5). Fissare il radiatore solare con LED (1) soltanto in un luogo di installazione stabile.
Indicazioni ambientali e misure di smaltimento
I dispositivi contrassegnati da questo simbolo sottostanno alla direttiva 2012/19/EU. I
dispositivi elettrici ed elettronici devono essere smaltiti separatamente dai rifiuti domestici
presso gli appositi centri di raccolta disposti a tale scopo nei vari Paesi.
L'adeguata raccolta differenziata del dispositivo dismesso contribuisce a evitare possibili
danni all'ambiente e alla salute personale. Ulteriori informazioni sullo smaltimento di
dispositivi dismessi sono reperibili presso le amministrazioni comunali, gli enti preposti a
tale servizio o nel negozio dove si è acquistato il dispositivo.
La batteria integrata non è estraibile per lo smaltimento!
Riciclare correttamente anche il materiale da imballaggio. I materiali in cartone possono essere smaltiti
presso gli appositi contenitori per carta oppure nei centri di raccolta pubblici predisposti per tale
riciclaggio. Pellicole e imballaggi di plastica devono essere consegnati presso i punti di raccolta pubblici
e smaltiti adeguatamente.
Conformità
42 - Italiano
Questo apparecchio è conforme, nel rispetto dei requisiti essenziali e delle altre
relative disposizioni, alla direttiva EMC 2014/30/EU, alla direttiva Bassa Tensione
2014/35/EU, alla direttiva ErP 2009/125/EC e alla direttiva RoHS 2011/65/EU.
Per ricevere la dichiarazione di conformità UE completa, inviare un'e-mail al seguente
indirizzo di posta elettronica: ce@targa.de

LIVARNO LUX LSS 520 A1
Indicazioni sulla garanzia e la gestione dei servizi
Garanzia di TARGA GmbH
Gentile cliente,
con questo apparecchio riceve 3 anni di garanzia a partire dalla data di acquisto. Nel caso in cui
dovesse riscontrare difetti del presente prodotto, Lei gode di diritti legali nei confronti del venditore del
prodotto. Tali diritti non sono in alcun modo limitati dalla garanzia qui di seguito riportata.
Condizioni di garanzia
Il periodo di validità della garanzia ha inizio con la data di acquisto. Conservare lo scontrino fiscale
originale come prova d'acquisto. Se entro tre anni dalla data di acquisto dovessero essere riscontrati
difetti di materiale o di fabbricazione, il prodotto sarà, a nostra discrezione, riparato o sostituito
gratuitamente.
Durata della garanzia e diritti per difetti
La durata della presente garanzia non viene prolungata dalla garanzia legale. Ciò vale anche per i
pezzi sostituiti e riparati. Eventuali danni e difetti già presenti al momento dell'acquisto devono essere
notificati immediatamente dopo l'apertura della confezione. Allo scadere della garanzia le riparazioni
saranno a carico del cliente.
Copertura della garanzia
L'apparecchio è stato accuratamente prodotto nel rispetto di elevati standard qualitativi e controllato
scrupolosamente prima della consegna. La garanzia è valida per difetti di materiale o fabbricazione. Tale
garanzia non si estende alle parti del prodotto esposte a normale usura (i cosiddetti pezzi d'usura) o al
danneggiamento di pezzi fragili, ad es. interruttori, accumulatori o pezzi in vetro. La presente garanzia
decade se il prodotto viene danneggiato, non utilizzato correttamente o sottoposto a manutenzione. Per
un corretto utilizzo del prodotto, attenersi scrupolosamente alle istruzioni descritte nel manuale d'uso.
Evitare nel modo più assoluto utilizzi e azioni sconsigliate o segnalate come pericolose nelle istruzioni
d'uso. Il prodotto è destinato esclusivamente all'uso privato e non commerciale. In caso di utilizzo
improprio, scorretto o violento e in caso di interventi non eseguiti dal nostro centro di assistenza
autorizzato, la garanzia è da considerarsi nulla. La riparazione o sostituzione del prodotto non comporta
l’inizio di un nuovo periodo di garanzia.
Gestione in caso di garanzia
Per una rapida soddisfazione della Sua richiesta, si attenga alle seguenti istruzioni:
- Prima della messa in funzione del prodotto, leggere attentamente la documentazione allegata.
Se dovesse presentarsi un problema che non si riesce a risolvere con i mezzi indicati,
contattare la nostra assistenza clienti.
- Per ogni richiesta, si prega di custodire come prova d'acquisto lo scontrino fiscale e il codice
articolo oppure il numero di serie, se esistente.
Italiano - 43
LIVARNO LUX LSS 520 A1
- Nel caso in cui non sia possibile trovare una soluzione per via telefonica, tramite la nostra
assistenza clienti viene contattata una seconda assistenza, in base alla causa del difetto.
Assistenza
Telefono: 0200 68 97 67
E-Mail: service.IT@targa-online.com
Telefono: 044 – 55 10 057
E-Mail: service.CH@targa-online.com
Telefono: 027 78 11 03
E-Mail: service.MT@targa-online.com
IAN: 275085
Produttore
Considerare che il seguente indirizzo non coincide con l'indirizzo dell'assistenza. Contattare in primo
luogo il centro di assistenza sopra indicato.
TARGA GmbH
Coesterweg 45
59494 SOEST
GERMANY
44 - Italiano

LIVARNO LUX LSS 520 A1
Table of contents
Introduction .............................................................................................................. 46
Intended use ............................................................................................................. 46
Package contents ..................................................................................................... 46
Specifications ........................................................................................................... 47
Safety instructions .................................................................................................... 48
Copyright ................................................................................................................. 50
Before start-up ......................................................................................................... 50
Proper mounting location ............................................................................................................................. 51
Required tools ............................................................................................................................................... 51
Before starting assembly .............................................................................................................................. 51
Assembly ....................................................................................................................................................... 52
Initial start-up ........................................................................................................... 53
Configuring the motion sensor ..................................................................................................................... 53
Configuring the illumination time (TIME):.................................................................................................... 53
Configuring the sensor sensitivity (SENS) ................................................................................................... 53
Configuring the photosensitivity (LUX) ........................................................................................................ 53
Maintenance/Cleaning ............................................................................................. 54
Troubleshooting ....................................................................................................... 54
Environmental and waste disposal information ........................................................ 55
Conformity ............................................................................................................... 55
Guarantee and service ............................................................................................. 56
English - 45

LIVARNO LUX LSS 520 A1
Introduction
Thank you for choosing a LIVARNO LUX product.
Intended use
This solar LED spotlight is not intended for commercial use. It is suitable for outdoor use, in particular in
places without a mains outlet (e.g., a garage or garden shed). The built-in LED lamp provides ample
illumination. The motion sensor detects movement and automatically turns the solar LED spotlight on or off.
The device meets the requirements of all relevant standards related to CE conformity. Conformance to
these standards is no longer guaranteed if a change is made to the solar LED spotlight without the
authorisation of the manufacturer.
Package contents
Unpack the device and all accessories. Remove all packaging materials and check all parts for
completeness and for signs of damage. If any parts are missing or damaged, please contact the
manufacturer.
Solar LED spotlight LSS 520 A1
Solar panel
Mounting materials for solar LED spotlight (2x large screw and 2x large dowel)
Mounting materials for solar panel (4x small screw and 4x small dowel)
User manual including safety instructions
This user manual contains a cover that can be unfolded. The inside of the cover provides a schematic of
the solar LED spotlight and a number legend. The numbers identify the following parts/functions:
1 Solar LED spotlight LSS 520 A1
2 On/Off switch
3 Mounting bracket
4 Arresting screw
5 Motion sensor
6 Cable (with socket)
7 Solar panel
8 Cable (with plug)
9 LUX knob
10 SENS knob
11 TIME knob
46 - English

LIVARNO LUX LSS 520 A1
Specifications
Solar LED spotlight (1):
Brand: LIVARNO LUX
Model designation: LSS 520 A1
Lamp type: LG LED: 9 x 1 W max.
LED colour temperature: 5000 K +/-500 K
Ra (colour rendering index of the LED) 80
LED light emission angle: Approx. 120°
LED service life: approx. 25,000 hrs
Max. illumination duration (fully charged
battery):
Operating voltage: 12 V (power supply via solar panel only)
Lithium-ion battery: 1,800 mAh / 7.4 V
Power consumption of entire spotlight unit
Complete power consumption of LEDs
Total luminous flux (with cover) 520 lm +/-5% (when battery is fully charged)
Protection class: IP44 (splash protection)
Dimensions (W x H x D): approx. 11.4 x 16.5 x 15.6 cm (incl. mounting bracket)
Weight: approx. 677 g
approx. 1.3 hrs
8.6 W +/-10% (given 520 lm and a fully charged
battery)
6.0 W +/-10% (given 520 lm and a fully charged
battery)
Solar panel (7):
Type: Polycrystalline / 3.5 W / 14.5 V
Length of connection cable: approx. 3 m
Dimensions (W x H x D): 21 x 16 x 1.6 cm (without mounting plate)
Weight (incl. mounting plate): approx. 540 g
Motion sensor (5):
Sensor detection angle: Max. 180°
Sensor range (adjustable): max. 12 m
Twilight switching level: 5 lux +/- 5 lux to 20,000 lux +/- 10 lux
English - 47

LIVARNO LUX LSS 520 A1
Swivelling (mechanically): approx. 150° horizontally / approx. 180° vertically
Illumination time (adjustable): approx. 10 sec +/- 5 sec to 4 min +/- 1 min
The specifications and design are subject to change without notice.
Safety instructions
Before using the solar LED spotlight (1) for the first time, please read
the following instructions carefully and observe all warnings, even if
you are familiar with using electronic devices. Keep this user manual
in a safe place for future reference. If you give the solar LED
spotlight (1) away or sell it, please ensure that you also pass on this
user manual as it is part of the device.
DANGER! This icon, together with the word
‘DANGER’, indicates an impending dangerous
situation which, if not prevented, can lead to serious
injuries or even death.
48 - English
WARNING! This icon, together with the word
‘WARNING’, indicates important information for the
safe operation of the solar LED spotlight (1) and for
user safety.
This icon indicates further information on the topic.
Fire hazard: Mount the solar LED spotlight (1),
observing a minimum clearance of 0.5 m to materials
exposed to the light. Excessive heat can cause a fire.
A shattered protective cover must be replaced.

LIVARNO LUX LSS 520 A1
DANGER! Keep electrical equipment out of reach of
children. Also, people with reduced mental, sensory or motor
abilities should use electrical devices within the limits of their
capabilities only. Ensure that children and people with
reduced mental, sensory or motor abilities never use electrical
devices unsupervised, unless they have been properly
familiarised with the equipment or are being supervised by a
person in charge of their safety. Children should generally be
supervised to ensure they do not play with this device. Keep
children away from the working area when mounting the solar
LED spotlight (1). The package contents include various small
parts that can result in serious injuries or even death when
swallowed. Children are not always able to identify possible
threats. Therefore, also keep the packaging film away from
children. There is the risk of suffocation.
DANGER! If you notice any smoke, unusual noises or smells,
immediately switch off the solar LED spotlight (1). In these
cases, you must not continue to use the device until it has been
checked by a specialist. Do not inhale smoke possibly caused
by a burning device. If you inhaled smoke, consult a
physician. Inhaling smoke can be harmful to your health.
DANGER! The housing of the solar LED spotlight (1) and the
solar panel (7) must be free of damage. A damaged housing
can result in risk of injury.
English - 49

LIVARNO LUX LSS 520 A1
DANGER! Do not operate the solar LED spotlight (1) in a
potentially explosive atmosphere due to the presence of
combustible gases, vapours or dust, as this would result in risk
of explosion.
DANGER! Never look directly into the light beam with the
aid of optical instruments, such as a magnifying lens. There is
the risk of injuring your eyes. If you suspect that you may have
injured your eyes, immediately consult a physician.
WARNING! Do not attach any objects to the solar LED
spotlight (1) or the
solar panel (7). The housing is not designed to carry any
weights. Ignoring this warning may result in damage to the
solar LED spotlight (1) or the solar panel (7).
Copyright
All contents of these operating instructions are subject to copyright law, and are provided to the user
solely as a source of information. Any form of copying or reproduction of data and information is
prohibited without the express written permission of the author. This also concerns commercial use of the
contents and data. The text and illustrations describe the technical status at the time of printing. All
information is subject to change.
Before start-up
Remove the solar LED spotlight (1) and the mounting materials from the packaging.
Check the solar LED spotlight (1) for signs of damage. If the solar LED spotlight (1) is damaged, it must not
be put into operation.
Fully charge the built-in lithium-ion battery before initial start-up. Please make sure that the On/Off switch
(2) is set to ‘OFF’.
The duration of the charging process depends on the intensity of the solar radiation. In sunny
weather, charging takes approx. 3 days (given about 4 hours daily and approx. 60,000 lux).
50 - English

LIVARNO LUX LSS 520 A1
Proper mounting location
Carefully choose the mounting location and thoroughly prepare for assembly.
Systematically arrange all individual parts, required tools and mounting materials and place them
within easy reach.
The solar LED spotlight (1) may only be mounted on a sturdy support, such as a masonry wall etc.
Do not mount the solar LED spotlight (1) above a heat source or within direct proximity of other light
sources. Also account for Figure [D] on the cover page when selecting the mounting location.
The built-in battery of the solar LED spotlight (1) is exclusively charged via the solar panel (7) part of
the delivery scope. The cable (8) is approx. 3 m long. Therefore, the mounting location of the solar
panel (7) must be chosen such that the plug can be connected to the cable (6) socket of the solar LED
spotlight (1) without difficulty. When doing so, lay the cable (8) in a manner so it does not obstruct
people or become a tripping hazard. Ideally, mount the solar panel (7) at a bright location exposed
to direct sunlight.
Choose a mounting location that protects the solar LED spotlight (1) from wind, rain and soiling.
Determine in advance which mounting materials are suitable for the designated mounting location.
The solar LED spotlight (1) is delivered with mounting materials suitable for concrete.
Required tools
The package does not include the following tools. This list is provided to offer general orientation. The
precise characteristics of the required tools depend on the chosen mounting location.
Ladder
Spirit level, yardstick, pencil
Drilling machine and drill
Phillips screwdriver, flat-tip screwdriver
Open-ended spanner, combination pliers, wire cutter
Before starting assembly
When drilling holes, ensure you do not damage any
hidden cables or pipes.
Mount the device using the proper tools.
Before assembly, make yourself familiar with the individual parts of the solar LED spotlight (1) as well as
with the instructions and illustrations, and observe them during assembly.
English - 51
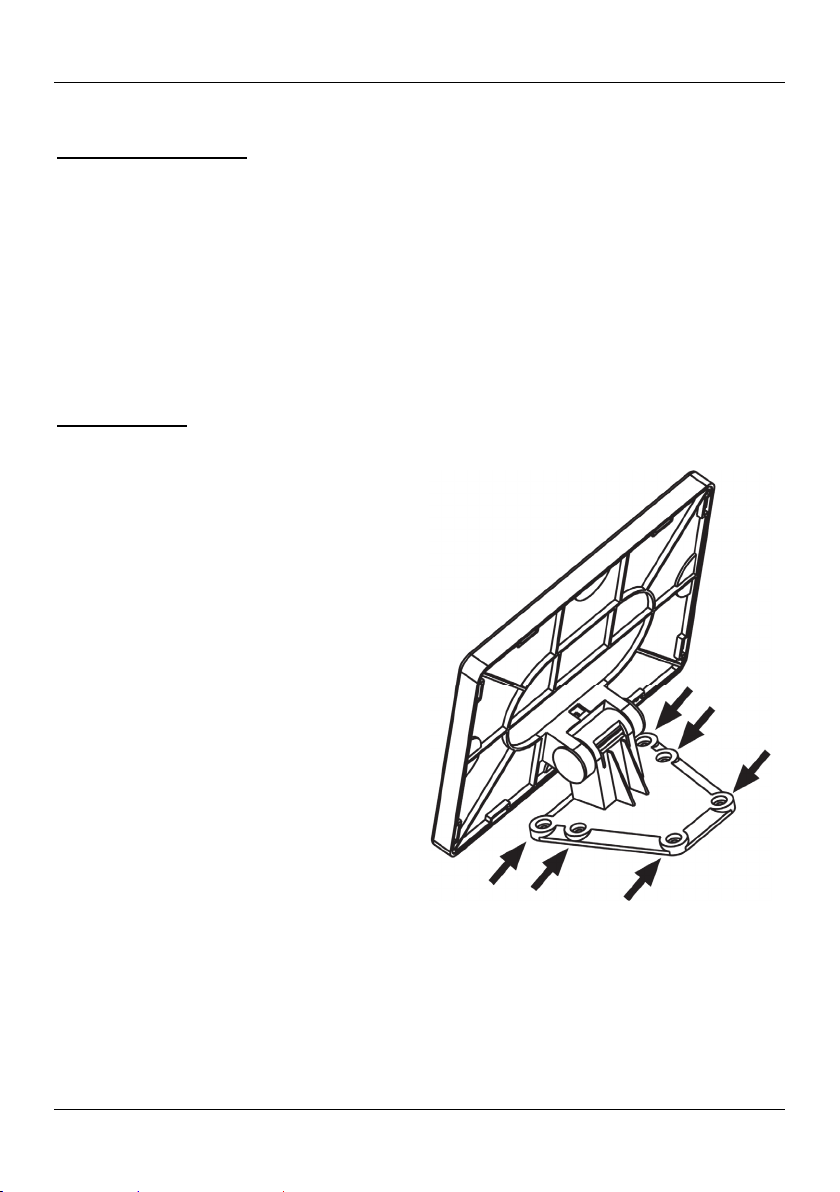
LIVARNO LUX LSS 520 A1
Assembly
Solar LED spotlight (1):
Detach the mounting bracket (3) from the solar LED spotlight (1).
Utilise the mounting bracket (3) as a template for marking the position of the two outer drill holes.
Then drill these holes and attach the mounting bracket (3) using the supplied large dowels and
screws.
Now attach the solar LED spotlight (1) to the mounting bracket (3) using the previously removed
screws, spring washers and flat washers. Please make sure that the spring washers are located
between the solar LED spotlight (1) and the mounting bracket (3). The flat washers must be located
between the screw head and the mounting bracket (3).
Solar panel (7):
A mounting plate with 6 drill holes for screws is located at the back of the solar panel (7).
Mount the solar panel at the designated
location using the 4 small screws and dowels.
Depending on the topography of the mounting
location, you can freely choose 4 of the drill
holes in the mounting plate; however, you
should ideally select 2 drill holes on the right
and left each. The solar panel (7) is connected
to the mounting plate via a swivel joint. Align
the mounting plate such that you can fasten
the 4 small screws with ease.
Then lay the cable (8) and connect the plug to
the cable (6) socket of the solar LED spotlight
(1).
The solar panel (7) is connected to the
mounting plate via a swivel joint. Orient the
solar panel in a manner that ensures maximum
exposure to sunlight.
52 - English

LIVARNO LUX LSS 520 A1
Initial start-up
Turn on the solar LED spotlight (1) using the On/Off switch (2) by putting it into the ‘ON’ position.
Configuring the motion sensor
Ensure that no places where traffic is common (e.g.,
sidewalks, streets) are located within the motion sensor’s (5)
range.
When setting the photosensitivity of the motion sensor (5), you
should do so at a time when the lighting conditions configured
to trigger the solar LED spotlight (1) are prevalent.
Align the motion sensor (5) so as to ensure maximum coverage of the area to be monitored. This means
that no obstructing objects should be present in the path.
You can change the horizontal position of the motion sensor (5) by pivoting it.
If you wish to change the vertical alignment of the motion sensor (5), first loosen the arresting screw (4).
Once the motion sensor (5) is aligned as desired, retighten the arresting screw (4).
Configuring the illumination time (TIME):
Use the TIME knob (11) at the bottom of the motion sensor (5) to adjust the illumination time (approx.
10 sec to 4 min). Turn the TIME knob (11) clockwise (+ direction) to increase the illumination time, or turn
it counter-clockwise (- direction) to reduce the illumination time.
Please note:
In order to minimise battery consumption, set the illumination time to as short a
duration as meets your needs.
The device is preset to an illumination time of approx. one minute.
Configuring the sensor sensitivity (SENS)
Use the SENS knob (10) at the bottom of the motion sensor (5) to adjust the sensor sensitivity. Turn the
SENS knob (10) clockwise (+ direction) to increase the sensitivity, or turn it counter-clockwise (- direction)
to reduce the sensitivity. The higher the sensitivity, the larger the detection range (max. 12 metres).
Configuring the photosensitivity (LUX)
Use the LUX knob (9) at the bottom of the motion sensor (5) to adjust the photosensitivity. This setting
determines what ambient light level will trigger the twilight sensor to turn the solar LED spotlight (1) on or
off.
English - 53

LIVARNO LUX LSS 520 A1
Turn the LUX knob (9) clockwise ( direction) to make the motion sensor (5) trigger in brighter ambient
conditions.
Turn the LUX knob (9) counter-clockwise (
ambient conditions.
direction) to make the motion sensor (5) trigger in darker
Maintenance/Cleaning
Maintenance
The lamp component of the solar LED spotlight (1) comprises 9 long-life LEDs. These cannot be replaced
and thus do not require maintenance.
Cleaning
Ensure that no liquids enter the housing of the solar LED
spotlight (1) as this might damage the solar LED spotlight (1).
Clean the solar LED spotlight (1) and the solar panel
agents or solvents that react with plastic. If the device is heavily soiled, slightly moisten the cloth before
cleaning.
Troubleshooting
The light does not go on
The On/Off switch (2) is set to ‘OFF’.
The motion sensor (5) is not properly aligned. Correct its alignment.
The built-in battery is fully discharged. Ensure that the solar panel (7) is properly aligned, and fully
charge the battery. If necessary, shorten the illumination time to reduce the power consumption. In
order to fully charge the battery, set the On/Off switch (2) to ‘OFF’ for the duration of the charging
process. After charging is complete, switch the On/Off switch (2) back to the ‘ON’ position.
(7)
using a soft, dry cloth, and never use cleaning
The duration of the charging process depends on the intensity of the solar radiation. In sunny
weather, charging takes approx. 3 days (given about 4 hours daily and approx. 60,000 lux).
The light goes on and off in rapid succession
The sensor is experiencing interference caused by an external light source or bright, reflecting
surfaces. Remove the external light source or the surfaces that cause interference.
54 - English

LIVARNO LUX LSS 520 A1
The light does not go off
There are persons or objects in the sensor range of the motion sensor (5). Remove these.
The solar LED spotlight (1) is swaying in the wind, causing the motion sensor (5) to trigger
continuously. Make sure the solar LED spotlight (1) is firmly attached to a sturdy surface.
Environmental and waste disposal information
Devices marked with this symbol are subject to the European Directive 2012/19/EU. All
electrical and electronic equipment must not be put in the household waste, but must be
disposed of via designated public disposal centres.
By properly disposing of the old device, you can avoid environmental damage and
hazards to your health. Further information regarding proper disposal of the old device
can be obtained from your local authority or the shop where you purchased the device.
The built-in battery cannot be removed for disposal!
Make sure the packaging is disposed of in an environmentally friendly manner. Cardboard packaging
can be put out for waste-paper collection or taken to public collection points for recycling. The plastic
packaging used for your device is collected by your local waste management company and disposed of
in an environmentally sound manner.
Conformity
This device complies with the basic and other relevant requirements of the EMC
Directive 2014/30/EU, the Low-voltage Directive 2014/35/EU, the ErP Directive
2009/125/EC and the RoHS Directive 2011/65/EU.
To obtain a complete EU Declaration of Conformity, send an e-mail to the following
e-mail address: ce@targa.de
English - 55

LIVARNO LUX LSS 520 A1
Guarantee and service
Warranty of TARGA GmbH
Dear Customer,
This device is sold with three years warranty from the date of purchase. In the event of product defects,
you have legal rights towards the seller. These statutory rights are not restricted by our warranty as
described below.
Warranty conditions
The warranty period commences upon the date of purchase. Please keep the original receipt in a safe
place as it is required as proof of purchase. If any material or manufacturing faults occur within three
years of purchase of this product, we will repair or replace the product free of charge as we deem
appropriate.
Warranty period and legal warranty rights
The warranty period is not extended in the event of a warranty claim. This also applies to replaced and
repaired parts. Any damage or defects discovered upon purchase must be reported immediately when the
product has been unpacked. Any repairs required after the warranty period will be subject to charge.
Scope of warranty
The device was carefully manufactured in compliance with stringent quality guidelines and subjected to
thorough testing before it left the works. The warranty applies to material and manufacturing faults. This
warranty does not cover product components which are subject to normal wear and which can therefore
be regarded as wearing parts, or damage to fragile components such as switches, rechargeable batteries
or components made of glass. This warranty is void if the product is damaged, incorrectly used or
serviced. To ensure correct use of the product, always comply fully with all instructions contained in the
user manual. The warnings and recommendations in the user manual regarding correct and incorrect use
and handling of the product must always be observed and complied with. The product is solely designed
for private use and is not suitable for commercial applications. The warranty is rendered void in the event
of incorrect handling and misuse, if it is subjected to force, and also if any person other than our
authorised service technicians interfere with the device. No new warranty period commences if the
product is repaired or replaced.
Submitting warranty claims
To ensure speedy handling of your complaint, please note the following:
- Before using your product for the first time, please read the enclosed documentation carefully.
Should any problems arise which cannot be solved in this way, please call our hotline.
- Always have your receipt, the product article number as well as the serial number (if available)
to hand as proof of purchase.
- If it is not possible to solve the problem on the phone, our hotline support staff will initiate further
servicing procedures depending on the fault.
56 - English

LIVARNO LUX LSS 520 A1
Service
E-Mail: service.GB@targa-online.com
E-Mail: service.IE@targa-online.com
E-Mail: service.MT@targa-online.com
E-Mail: service.CY@targa-online.com
Please note that the following address is not a service address. First contact the service point stated above.
TARGA GmbH
IAN: 275085
Manufacturer
Coesterweg 45
59494 SOEST
GERMANY
Phone: 020 – 70 49 04 03
Phone: 01 - 4370121
Phone: 027 78 11 03
Phone: 02 – 20 09 025
English - 57

 Loading...