

Page 1
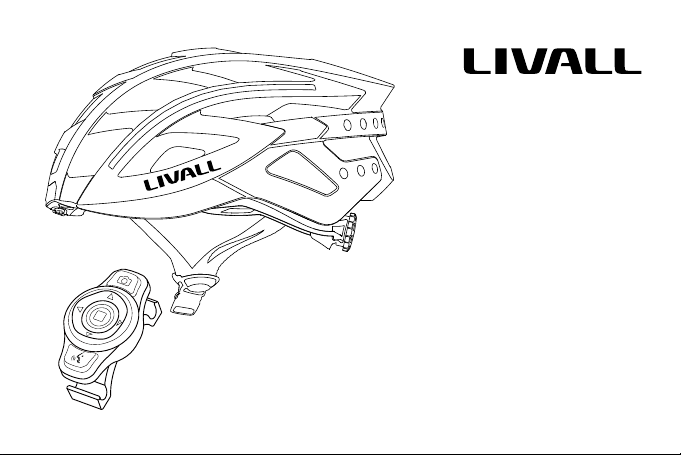
BH6X&MT
BH6X + MT Series
Quick Start Guide
www.livall.com
Page 2
I
.Introduction
Thank you for choosing the LIVALL Smart Helmet. This Guide will instruct you on how to use this product. LIVALL
follows the strategy of sustainable development. This Manual will be updated from time to time. If you need more
detailed instructions, please see the "Important Information and Warranty Card" annex. You can also learn more
about the helmet on LIVALL's ocial website.
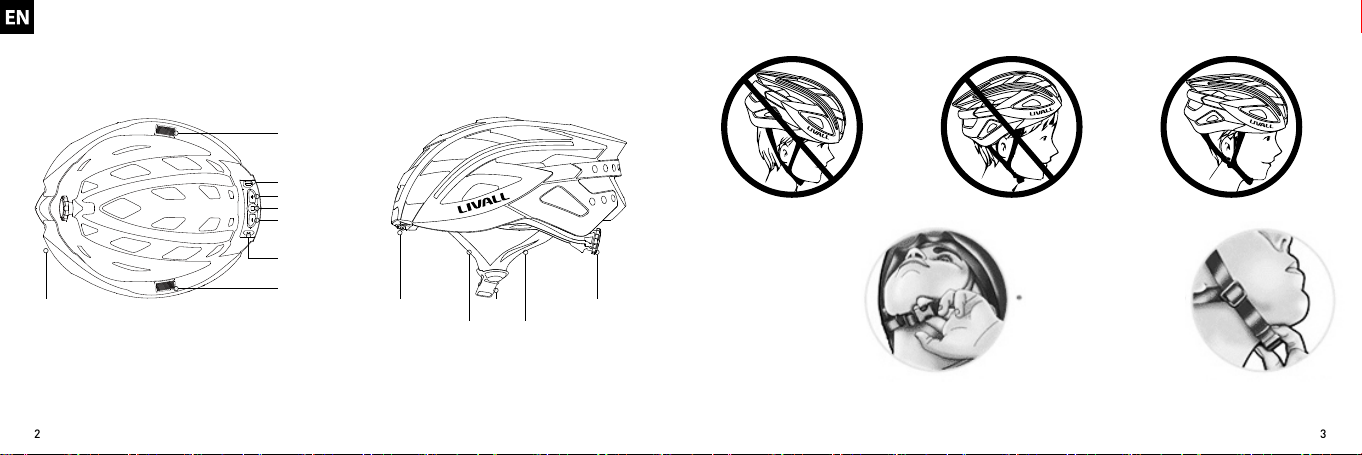
Speaker
Microphone
"+"Button
"□"Button
"-"Button
Charging port
Speaker
Tail light
Note:
The picture is for reference only. If the actual product appears dierent from the picture, the real product shall prevail.
Front
Main control
Front chinstrap Rear chinstrap
Adjustment knobBuckle
Back
II. Packing List
Helmet x 1 Quick Start Guide x 1 Bling remote controller x 1
Magnet USB charging cable x 1 Important Information and Warranty Card x 1
III. Wearing Instructions
Adjust the length of
the chinstrap
IncorrectIncorrect Correct
Leave a gap as thick
as one nger
Correctly position
the helmet
Check whether the
buckle is properly
fastened
32
Page 3
IV. Operating Instructions
Start-Up
(Please charge the battery before use.)
Connecting for the rst time or switching devices
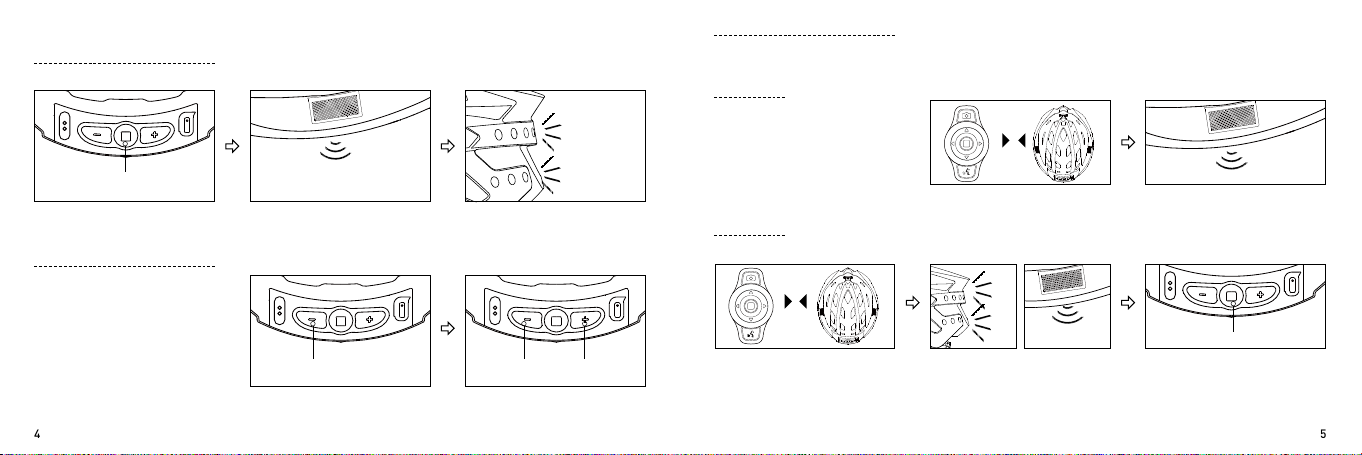
One helmet can be connected to up to three LIVALL-authorized devices at the same time. After the handlebar
remote control is connected, press the "left" or "right" button to control the helmet’s corresponding indicator light.
1. Connecting for the rst time
≤5m
Press the "□" button for
3-to-5 seconds
Change the language of the voice
prompt
(the default language is English)
To switch the language of the voice
prompt, follow the procedure below
when in normal standby mode and
disconnected from a phone(currently
only English and Chinese are
supported).
POWER ON"□" function button
You will hear a voice saying
"POWER ON".
"-" button "-" button "+" button
First hold the "-" button Then press the "+" button to
The orange tail light will blink
twice indicating Start-Up was
successful.
switch between languages.
Orange light
2. Replacing device
Place a device that is already ON
near the helmet's main control.
Turn on the device, which should
be within 5 meters of the helmet.
It will automatically connect the
helmet.
Two "beeps"
When the warming light flashes
and the helmet speakers emit two
"beeps", it indicates that there is a
device nearby requiring connection
to the helmet.
Two "beeps"
After the connection is established, it
will be conrmed with two "beeps".
"□" function button
Press the "□" button on the helmet
within 10 seconds after you hear
the beeps and conrm connection
to the device.
54
Page 4
Connect to the phone
the stability of the connection, please try to position your mobile phone in front of you.)
(Tip: Once connected, it can control the music player as well as make and receive calls. To ensure
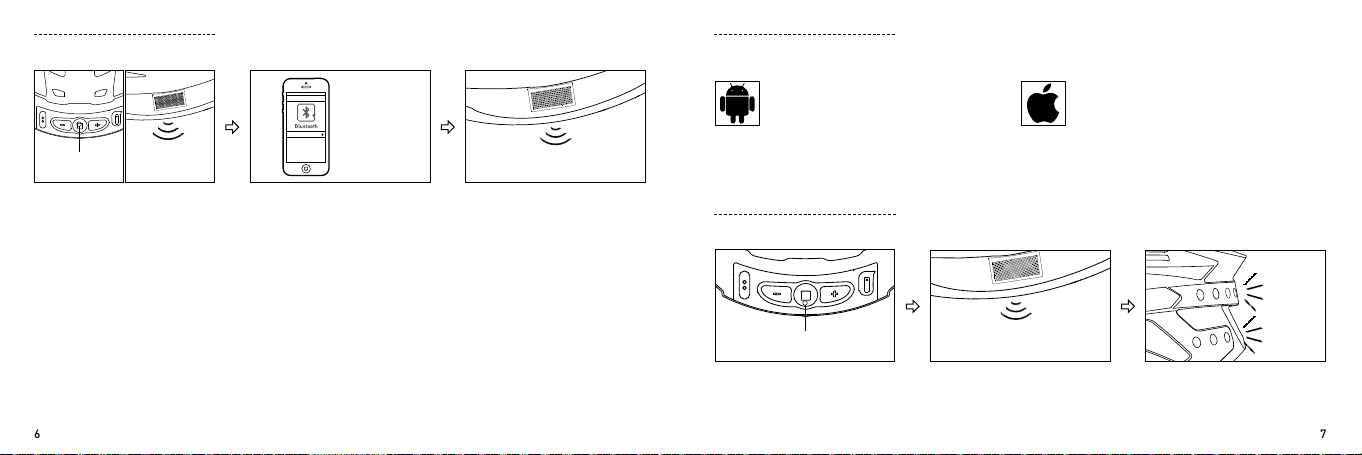
Connect LIVALL Riding phone App
(for use the Walkie-Talkie function and take photos)
"Click to
connect"
"Connected"
Click to connect. The speakers
on both sides will make the
"Connected" sound when the
connection is completed.
"□" function
button
When the device is o, press and
hold the "□" button until you hear
the "Pairing..." sound.
"Pairing..."
Helmet Headset
Swith on the Bluetooth on your
phone and scan for the "Helmet
Headset" device.
After the connection is completed, you can play music as well as make and answer calls as follows
To Play/Pause Music: Press the "□" button on the helmet or the handlebar remote control to play/pause music.
Adjust Volume: When calls are made or music is played, press the "+/-" buttons on the helmet to adjust the
speaker volume.
Previous Song/Next Song: Press the "up/down" buttons on the handlebar remote control or press and hold "+/-"
buttons on the helmet to cycle through the music.
Answer/Reject Calls: When there's an incoming call, press the "□" button to answer the call or press and hold to
hang up.
Dial Back: Two quick presses of the "□" button on the handlebar remote control or helmet to redial
the last outgoing call.
For Android: Start LIVALL Riding. The App
will automatically connect to the helmet;
For IOS: Follow LIVALL Riding guide to connect
to the helmet.
Only if the helmet is successfully connected to LIVALL APP, SOS alert feature and LED light indicators can work.
Power O
"□" function button
Press and hold the "□" function
button for 3 seconds.
"POWER OFF"
You will hear "POWER OFF". The tail light will flash once in
orange indicating the helmet is
POWERED OFF.
Orange
light
76
Page 5
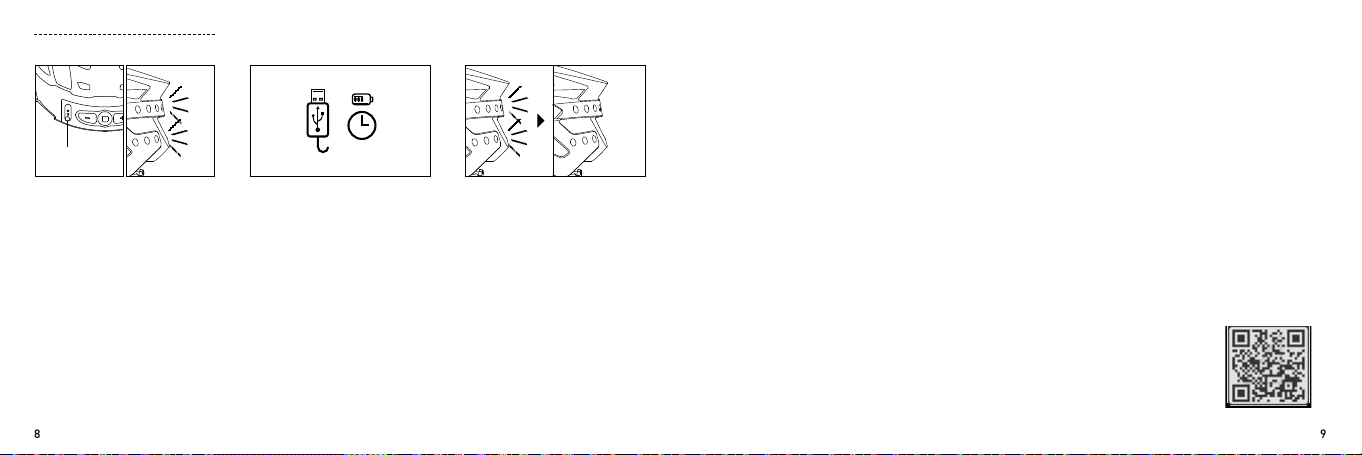
Charging
USB port
To charge
Plug the USB charging cable into
the USB port on the helmet. The
tail charging light is illuminated in
red, indicating that the helmet is
being charged.
Red light
0.5A 3 HRS
Charging time
It is recommended that the power
of the charger is no less than 0.5A.
Charging time takes about 3hours.
Charging complete
When the charging indicator light
turns o, it indicates that charging
is complete.
V. Considerations
1. The helmet contains electronic parts inside. Please do not take a long ride in the rain although the helmet can
prevent the rain from splashing.
2. After the helmet gets wet in the rain, the water droplets might occur in the chimney of tail LED lights. The water
droplets will disappear when you put the helmet under the ventilation environment for 1-2 days.
3. The helmet contains the battery of 3.7V/600mAh. The battery capacity varies with temperature change. The
battery life can decay when the helmet is used at low temperatures or below Zero degrees Celsius.
4. If the electronic functions do not work, please charge the helmet for 3 hours and then check if it works normally.
5. The helmet contains impact detection devices. Only if you connect your helmet with LIVALL APP, start ride mode
on the APP and your helmet suers from the heavy impact, SOS alert feature can be triggered. Your emergency
contacts set on LIVALL APP can accordingly receive your SOS messages.
VI. Technical Specications
Bluetooth : BT 4.1 + HFP/HSP/A2DP
Bluetooth distance : Max. 10 meters
Charging port : Magnet USB Charging cable
Electricity parameter : DC 5V/0.5A
Charging time : 3 hours
Battery life : The max. battery life of the light is 10 hours. Listening
time for music is 3-to-6 hours.
Standby duration: Max. 180 days
Temperature : Temperature for use: 0°C~40°C.
Recommended temperature for storage : -20~45°C
LIVALL Riding APP
LIVALL ON FACEBOOK
98
Page 6
LIVALL's website : www.livall.com
Performance standards:
USA: CPSC1203:1998, FCC Par t 15 Rules
•
Europe: EN 62479:2010, EN 301 489-1 V1.9.2 (2011-09), EN 301 489-17 V2.2.1 (2012-09),
•
EN 300 328 V1.8.1 2012-06, EN 60950-1:2006+A11:2009+A1:2010+A12:2011
Australia: AS/NZS 2063:2008+A1:2009, AS/NZS CISPR 22:2009+A1:2010, AS/NZS 4268:
•
2012+A1:2013, Radiation Protection Series Publication No. 3
That the helmet can only protect if it ts well and that the buyer should try dierent sizes and choose the size
•
which feels secure and comfortable on the head.
That the helmet should be adjusted to t the user e.g. the straps positioned so that they do not cover the ears,
•
the buckle positioned away from the jawbone and the straps and buckle adjusted to be both comfortable
and rm.
How the helmet should be position on the head to ensure the intended protection is provided (e.g. that it
•
should be placed so as to protect the forehead and not be pushed too far over the back of the head.
That a helmet cannot always protect against injury.
•
That a helmet subjected to a severe impact should be discarded and destroyed.
•
A statement of the danger of modifying or removing any of the original component parts of the helmet other
•
than as recommended by the manufacturer, and that helmets should not be adapted for the purpose of
tting accessories in a way not recommended by the manufacturer
设计制造 · 中国深圳
BH6X-QA-V2.0
LIVALL HELP CENTER
1110
 Loading...