

Page 1
LIMITED WARRANTY
The Little Tikes Company makes fun, high quality toys. We warrant the original purchaser that the frame of this product is free of defects for 1 year from the date of purchase, and all other parts
are free of defects in material or workmanship for 90 days* from the date of purchase (dated sales receipt is required for proof of purchase). At the sole election of The Little Tikes Company, the
only remedies available under this warranty will be either replacement of the defective part or replacement of the product. This warranty is valid only if the product has been assembled and
maintained per the instructions. This warranty does not cover abuse, accident, cosmetic issues such as fading or scratches from normal wear, or any other cause not arising from defects in
material and workmanship.
U.S.A and Canada: For warranty service or replacement part information, please visit our website at www.littletikes.com, call 1-800-321-0183 or write to:
Consumer Service, The Little Tikes Company, 2180 Barlow Road, Hudson OH 44236, U.S.A. Some replacement parts may be available for purchase after
warranty expires—contact us for details.
*Trampoline Warranty:
We warrant to the original purchaser that the frame in this product is free of defects in materials or workmanship for 1 year from the date of purchase, and all
other parts are free of defects in material or workmanship for 90 days from the date of purchase (dated sales receipt is required for proof of purchase). Outside
U.S.A and Canada: Contact place of purchase for warranty service.
This warranty gives you specic legal rights, and you may also have other rights, which vary from state to state. Some states do not allow the exclusion or
limitation of incidental or consequential damages, so the above limitation or exclusion may not apply to you.
SKU: 650635C
7FT TRAMPOLINE
WITH SAFETY ENCLOSURE
Assembly, Installation, Care,
Maintenance and User Instructions
ENG
1018-0-C
Please keep this manual as it contains important information.
© The Little Tikes Company, an MGA Entertainment company. L.O.L. SURPRISE!™ is a
trademark of MGA Entertainment, Inc. LITTLE TIKES® is a trademark of Little Tikes in the
U.S. and other countries. All logos, names, characters, likenesses, images, slogan, and
packaging appearance are the property of Little Tikes.
Little Tikes Consumer Service
2180 Barlow Road
Hudson, Ohio 44236 U.S.A.
1-800-321-0183
Printed in China
MGA Entertainment UK Ltd.
50 Presley Way, Crownhill, Milton
Keynes, MK8 0ES, Bucks, UK
+ 0800 521 558
MGA Entertainment (Netherlands) B.V.
Klipperaak 201, 2411 ND Bodegraven, NL
Tel: +31 (0) 172-758 038
E-mail: [email protected]
Visit our website at
www.littletikes.com
to register your product and
to enter our sweepstakes.
(No purchase necessary)
www.littletikes.com
www.littletikes.co.uk
WARNING
• Warning. Only for domestic use.
• Always close the net opening before jumping.
• Empty pockets and hands before jumping.
• Do not eat while jumping.
• Adult assembly and supervision required.
• You must thoroughly read these materials prior to assembling and using this trampoline / trampoline enclosure.
• Save this manual for future reference.
• Maximum weight of the user shall not exceed 105 lbs. (47.63 kgs)
• Do not allow more than one person on the trampoline (inside the trampoline enclosure) at any time.
• Do not allow young children to use unless supervised by an adult.
• This product is intended for domestic family use only.
• This product is intended for use by children ages 4 - 10 years.
• This product is recommended that at least 2 persons participate in the assembly of this product.
Page 2

IMPORTANT INFORMATION
Care, Maintenance and Use Instructions MUST be read carefully before using the trampoline!
Trampolines are great fun when used correctly. Most injuries
are caused during the use of the trampoline, not because of
their construction.
Read these instructions and warnings carefully and ensure
you follow them at all times. Follow all assembly and
maintenance instructions closely to ensure the equipment is
safe to use and lasts as long as possible.
WARNING - GENERAL
Read all instructions before using the trampoline and trampoline
enclosure. Warnings and instructions for the care, maintenance, and
use of this trampoline and trampoline enclosure are included to
promote safe, enjoyable use of this equipment.
• This trampoline is only suitable for domestic family use. For outdoor
use ONLY!
• The trampoline is not intended to be buried into the ground.
• Not recommended for use by children under 4 years or over 10
years of age. Max. weight limit: 105 lbs. (47.63 kgs).
• The trampoline is designed for installation on at surfaces with at
least 6'6" (2m) clear space around the trampoline.
• Do not place on a hard surface (i.e. concrete or asphalt) serious
injury may occur.
• Above the trampoline, ensure there is clear and free space to the
expected jumping height, it is strongly advised not to place the
trampoline under the canopy of surrounding trees.
• Inspect the trampoline and trampoline enclosure before use. Make
sure the frame padding is correctly and securely positioned.
Replace any worn, defective, or missing parts.
• For further information or additional instruction materials on skill
training, contact a competent trampoline instructor.
WARNING - USAGE
• Do not attempt or allow stunts including somersaults, these are
dangerous moves that should only be performed in the presence of
a skilled trainer, and with appropriate equipment, serious injury is
likely to occur if stunts are attempted on this trampoline. Landing on
the head or neck can cause serious injury, paralysis or death, even
when landing in the middle of the bed.
• Children and unpracticed users must always jump under supervision
by an experienced person, it is strongly recommended to use
spotters at all times.
• Do not allow more than one person on the trampoline (inside
trampoline enclosure). Use by more than one person at the same
time can result in serious injury.
• Use trampoline and trampoline enclosure only with mature,
knowledgeable supervision.
• Do not use if you are suering from an injury (i.e. ankle or knee
injury) or while pregnant.
• Remove glasses, watches, jewelry and chains, ornaments, clasps and
other sharp objects. Empty your pockets before starting to jump.
• Do not use the trampoline in the dark.
• Do not put any objects or toys on the trampoline and trampoline
enclosure.
• Animals are not allowed on the trampoline and trampoline
enclosure.
• Do not smoke while using the trampoline.
• Do not use when wet.
• Do not use the trampoline while under the inuence of alcohol or
drugs.
To assemble this trampoline, you need Phillips screwdriver (not
included) and our special spring loading tool provided with this
product.
During periods of non-use, this trampoline can be easily disassembled
and stored.
Please read the assembly instructions before beginning to assemble
the product.
It is recommended that at least 2 persons participate in the assembly
of this product.
• Jumpers must wear socks, gymnastic shoes, or be barefoot when using the
trampoline. Please be aware that street shoes or tennis shoes should NOT be
worn while using the trampoline.
• Jumpers should remove all sharp objects from their person prior to using the
trampoline. Any type of sharp or pointed objects should be kept o the
trampoline mat at all times.
• Initially, you should get accustomed to the feel and bounces of the
trampoline. The focus must be on the fundamentals of your body position
and you should practice each bounce (the basic bounces) until you can do
each with skill and control.
• To break a bounce, all you need to do is ex your knees sharply before they
come in contact with the mat of the trampoline. This technique should be
practiced while you are learning each of the basic bounces. The skill of
braking should be used whenever you lose balance or control of your jump.
• Always learn the simplest bounce rst and be consistent with the control of
your bounce before moving on to more dicult and advanced bounces. A
controlled bounce is one when your take “o ” point and landing point is the
same spot on the mat. lf you move up to the next bounce without rst
mastering the previous, you increase your chances of getting injured. Do not
bounce on the trampoline for extended periods of time because fatigue can
increase your chance of injury.
• Misuse and abuse of this trampoline is dangerous and can cause serious
injury! Trampolines being a rebounding device, propel the performer to
unaccustomed heights and into a variety of body movements.
• Always inspect the trampoline and trampoline enclosure before each use for
worn-out mat, loose or missing parts.
• Climbing on and o the trampoline. It is a dangerous practice to jump from
the trampoline to the oor or ground when dismounting, or to jump onto
the trampoline when mounting. Do not use the trampoline as a springboard
to other objects.
• Stop bouncing by exing knees as feet come in contact with the trampoline
bed. Learn this skill before attempting others.
• Avoid bouncing too high. Stay low until bounce control and repeated
landing in the center of the trampoline can be accomplished. Control is more
important than height.
• While keeping the head erect, focus eyes on the trampoline toward the
perimeter. This will help control bounce.
• Keep objects away which could interfere with the performer. Maintain a clear
area around the trampoline.
• Bounce only when the surface of the bed is dry. Wind or air movement
should be calm and gentle. The trampoline must not be used in gusty or
severe winds.
• Bounce in the center of the bed.
• Avoid bouncing when tired. Keep turns short.
• Properly secure the trampoline and trampoline enclosure when not in use.
Protect it against unauthorized use.
• For additional information concerning the trampoline equipment, contact
the manufacturer.
• Users may become entangled in or strangled by loose cords or in gaps
between trampoline and enclosure.
• Keep enclosure tightly fastened to the trampoline in accordance with the
manufacture’s instructions. Failure to properly assemble and maintain a
tight, secure trampoline/enclosure boundary may result in serious injury,
strangulation, or death.
• Do not attempt to jump over the trampoline enclosure.
• Do not attempt to crawl under the trampoline enclosure.
• Do not intentionally rebound o the trampoline enclosure.
• Do not hang from, kick, cut, or climb on the trampoline enclosure.
• Wear clothing free of drawstrings, hooks, loops or both.
• Do not attach anything to the trampoline enclosure that is not a
manufacturer-approved accessory or part of the enclosure system.
• Enter and exit the trampoline enclosure only at the opening
designated for that purpose.
1
Care and Maintenance
This trampoline and trampoline enclosure were designed and
manufactured with quality materials and craftmanship. If proper
care and maintenance is provided, it will provide all jumpers with
years of exercise, fun, and enjoyment as well as reduce the risk of
injury. Please follow the guidelines listed below:
• This trampoline is designed to a certain amount of weight and
use. Person should weigh less than 105 lbs. (47.63 kgs).
• Please make sure that only one person at any one time uses
the trampoline.
High Wind
Do not use or stand near the trampoline in windy or gusty
conditions. A trampoline can become airborne when exposed to
sustained wind or gusting wind conditions. This can result in
serious injury, paralysis, or death, as well as property damage. To
reduce these risks, disassemble the trampoline and enclosure
and store them until weather conditions improve.
Anchoring a trampoline frame may prevent the trampoline from
moving as a result of the wind, but even anchored trampolines
can become airborne or damaged. Consult a qualied contractor
to determine what type of anchor works best in your location.
• In order to prevent the trampoline mat from getting cut or
damaged please do not allow any pets onto the mat.
• Always inspect the trampoline and enclosure before each use
for worn, defective or missing parts. A number of conditions
could arise that may increase your chances of getting injured.
Please be aware of:
• Missing, improperly positioned, or insecurely attached
frame padding, trampoline enclosure or frame padding
and pole caps.
If you expect high winds, the trampoline should be moved to a
sheltered location, taken apart, or tied down to the ground with
ropes and stakes (not included). At least three ropes and three
stakes should be used. Make sure to attach the ropes to the top
of the frame; do not simply secure the legs or the bases to the
ground, as they can separate from the frame sockets. The top of
the stakes should be covered, if necessary, so that users will not
be injured by falling onto the stakes.
• Punctures, frays, tears, or holes worn in the bed, barrier or
support system (frame) padding.
• Deterioration in the stitching or fabric of the bed, barrier or
support system (frame) padding.
• Bent or broken frame.
• Ruptured springs.
• A sagging trampoline bed.
• Broken, missing, or damaged springs.
• Protrusions of any types (especially sharp) on the frame,
springs, or mat.
• In certain countries during winter period, the snow load
and the very low temperature can damage the trampoline.
It is recommended to remove the snow and store the mat
and the enclosure indoor.
• Replace the net after two years of use.
Moving the Trampoline
If the trampoline needs to be m
two persons, kept horizontal, and lifted slightly. All connector
points should be wrapped and secured with weather resistant
tape, such as duct tape. This will keep the frame intact during
the move and prevent the connector points from dislocating
and separating. If necessary, the trampoline can be taken apart
for moving. To take the trampoline apart, follow the assembly
steps in reverse order (steps 1-7). Do not attempt to take frame
sections, legs, or bases apart before the mat and springs have
been removed.
IF YOU FIND ANY OF THE PREVIOUS CONDITIONS, OR
ANYTHING ELSE THAT YOU FEEL COULD CAUSE HARM TO
ANY USER, THE TRAMPOLINE SHOULD BE DISASSEMBLED
OR SECURED FROM USE UNTIL THE CONDITION(S) HAS BEEN
RESOLVED.
Assembly and Moving Hints!
Select a location where you want the trampoline permanently
prior to assembly. Do not pick up the frame more than 2 inches
o the ground, picking it up too high can cause the frame to
Carry out checks and maintenance of the main parts (frame,
suspension system, bed, pads and enclosure) at regular intervals.
If these checks are not carried out the trampoline could become
dangerous.
warp.
If the frame does warp, put the trampoline down, press down on
the part that is warped, The tension of the springs will atten the
frame.
It is of particular importance that these be followed at the
beginning of each season, as well as at regular intervals during
the usage season.
Disassembly
• Check all nuts and bolts for tightness and tighten when
required.
• Check all spring loaded (pit-pin) joints are still intact and
cannot come undone during play.
• Check all coverings for bolts and sharp edges and replace
To disassemble the trampoline, follow assembly STEP 1 through
STEP 7 in rev
components before the springs and the mat have been removed.
Use gloves to protect your hands from pinch points during
disassembly.
when required.
• Check for evidence of wear or deterioration and replace if
needed in accordance with these instructions.
• Make sure dry enough for storage.
10
oved, it should be moved by
erse order. Do not attempt to disassemble any frame
Page 3
ASSEMBLY INSTRUCTIONS
Trampoline Placement
ECITON TNATROPMI
NEVER use the trampoline without attaching the frame pad.
Properly tie down the frame pad before each use!
Flip up the safety pad stitched with the trampoline mat. Tie the elastic straps over the frame, and make sure the
safety pad covers the frame and all springs.
DO NOT use the trampoline if even one spring or triangle-ring is damaged or missing.
Perform a complete inspection of the trampoline to make sure all parts are assembled and attached properly.
Read this entire manual and make sure all jumpers completely understand all of the safety rules printed in the
manual and on the various warning signs. Instruct all jumpers in the basic bounces described in the manual.
STEP 7 - Enclosure, Mat And Accessories Assembly
Enclosure netting
should wrap around
the outside of the
straight frame and
curve frame tubes.
Pull over the
enclosure evenly
all the way round
and work it down.
After all three “arches” are attached to the enclosure assembly,
pull the enclosure netting down and over the straight frame and
curve frame tubes as shown.
Adjust netting arch
down the two ends
of the pocket. Pockets
should be secured on
each of the 3 arches.
Velcro® the pockets shut,
securing the frame and
netting.
Please read the entire instruction booklet before you assemble or use this trampoline!
Make sure the assembled trampoline is on level ground.
WARNING-PLACEMENT-OUTDOOR USE ONLY
• Place the trampoline on a level surface before use.
• Lateral (sideways) clearance is also essential. Place the trampoline
away from walls, structures, fences and other play areas. Maintain a
clear space on all sides of the trampoline and trampoline enclosure.
• Use the trampoline and the trampoline enclosure in a well-lighted
area.
• Remove any obstructions from beneath the trampoline.
• Secure trampoline and trampoline enclosure against unauthorized
and unsupervised use.
Labeling
TRAMPOLINE SAFETY INSTRUCTIONS
WARNING:
ONLY ONE PERSON AT A
TIME IN THE TRAMPOLINE
ENCLOSURE. MULTIPLE
JUMPERS INCREASE THE
CHANCES OF LOSS OF
CONTROL AND THIS CAN
RESULT IN BROKEN HEAD,
NECK, BACK OR LEG.
A. NOTICE TO SUPERVISOR
1. Enforce all safety rules and be familiar with all the information provided in the manual prior to allowing any users
on the trampoline and use the trampoline and trampoline enclosure. To prevent and reduce the risk of injuries,
educate yourself with the basic jump and ensure that new jumpers learn the basic bounces before trying more
dicult and advanced jumps.
2. No trampoline users shall use the trampoline and trampoline enclosure unsupervised, regardless of skill level or
age.
3. To prevent unsupervised and unauthorized use, the trampoline should be secured. Secure the trampoline against
any unauthorized use.
4. Keep all objec ts away from the jumpers and the trampoline that may interfere with jumpers or be potentially
hazards. Be aware of what is overhead, underneath, and around the trampoline.
5. Not recommend for children under 4 years of age and over 10 years of age or any one weighing more than 105 lbs.
(47.63 kg).
6. Use only when the trampoline mat (bed) is clean and dr y. Inspect the trampoline and enclosure prior to each use
and replace any worn or damaged parts. Use only when the enclosure has no holes, pole clamps are tightly secured
to the poles and the support (frame), and the trampoline enclosure is properly suspended.
7. Do not use when trampoline is wet or in windy conditions.
8. Use only when the trampoline has no any worn, defective or missing parts.
This trampoline is intended for outdoor use only.
Adult supervision required.
Always close the net opening before jumping.
The net should be replaced every two years.
DO NOT LAND ON HEAD
OR NECK. PARALYSIS OR
DEATH CAN RESULT, EVEN
IF YOU LAND IN THE
MIDDLE OF THE
TRAMPOLINE MAT
(BED). DO NOT DO
SOMERSAULTS
(FLIPS).
ENG
• The trampoline enclosure is only to be used as an enclosure for a
trampoline of a size for which the enclosure is designed.
• The owner and supervisors of the trampoline are responsible to
Do not install trampoline on concrete, asphalt or any other hard
surface.
make all users aware of practices specied in this manual.
• Adequate overhead clearance is essential. A minimum of 24 ft from
ground level is recommended. Provide clearance from wires, tree
limbs, and other possible hazards. Please be aware of the following
when selecting a place for your trampoline:
• Make sure it is placed on a level surface at least 6'6" (2m) from any
structure or obstruction such as a fence, garage, house,
overhanging branches, laundry lines or electrical wires.
9. Users may become entangled in or strangled by loose cords or in gaps between trampoline and enclosure.
10. Use trampoline only with mature, knowledge supervision.
11. Keep enclosure tightly fastened to the trampoline in accordance with the manufacturer’s instructions. Failure to
properly assemble and maintain a tight, secure trampoline/enclosure boundary may result in serious injury,
strangulation or death.
B. NOTICE TO JUMPER
1. Do not use the trampoline and trampoline enclosure when under inuence of alcohol or drugs. Do not smoke while
using the trampoline and the trampoline enclosure.
2. Inspect before use. Keep frame padding in place.
3. Always have a supervisor watching you when you using the trampoline, do not jump unsupervised.
4. No more than one person should jump on the trampoline at one time.
5. Avoid jumping or bouncing for prolonged periods of time or too high for a number of jumps. Maintain control. Do
not try to jump over the barrier. Do not intentionally rebound o the barrier. Do not hang from, kick, cut, or climb
on the barrier while using product. While keeping the head erect, focus eyes on the trampoline toward the
perimeter. Avoid jumping or bouncing when tired.
6. Climb on and o the trampoline at the enclosure door or barrier opening in a control and careful manner. Never
jump on or o the trampoline and never use the trampoline as device to bounce into or onto another objects. Do
not crawl under the barrier. Do not use the trampoline as a springboard to other objects.
7. Always Learn fundamental bounces and body positions thoroughly before trying more dicult types of bounces.
Review the Basic Skills section to learn how to do the basics.
8. Always be in control when you are bouncing on the trampoline. A controlled jump is when you land at the same
spot that you took o from. If at any time you feel out of control, try to stop your bouncing.
9. Wear clothing free of drawstrings, hooks, loops, or anything that could get caught while using the
trampoline/enclosure and result in entanglement or strangulation, or both.
10. D o not attach anything to the barrier that is not a manufacturer approved accessory or part of the enclosure
system.
11. Stop bounce by exing knees as feet come in contact with the bed.
12. For equipment information, contact the manufacturer.
13. For skill training information, contact a trainer certication organization.
14. R ead the instructions before use.
15. B ounce in the center of the bed.
16. D o not jump from other objects, building, or surfaces, onto the trampoline, or into or over the trampolines
enclosure.
The Little Tikes Co.
650635C-0
1” 1”
Tie the elastic straps on trampoline mat (A) and enclosure netting
(B) to the top rail (G). Loop around the frame and secure with a
knot. Make it with 1” distance.
Tie the elastic straps on enclosure netting (B) to the corner top
rail with socket (E). Loop around the frame and secure with a
knot.
9
Attach elastic ties on shoe bag (V) by tying to the trampoline
frame.
WARNING • ATTENTION • ADVERTENCIA
ACHTUNG • WAARSCHUWING • OSTRZEŻENIE:
DO NOT ATTEMPT OR ALLOW SOMERSAULTS. LANDING ON THE HEAD OR NECK CAN CAUSE
SERIOUS INJURY, PARALYSIS, OR DEATH, EVEN WHEN LANDING IN THE MIDDLE OF THE BED.
N'ESSAYEZ PAS DE FAIRE DES CULBUTES. BONDIR SUR LA TÊTE OU LE COU PEUT CAUSER DE
GRAVES BLESSURES, LA PARALYSIE, VOIRE LA MORT, MÊME SI VOUS BONDISSEZ AU CENTRE
DE LA TOILE DE SAUT.
NO INTENTE REALIZAR SALTOS MORTALES NI LOS PERMITA. EL ATERRIZAJE CON LA CABEZA
O EL CUELLO PUEDE OCASIONAR GRAVES LESIONES, PARÁLISIS O LA MUERTE, INCLUSO SI
ATERRIZA EN EL CENTRO DE LA LONA.
SALTOSPRÜNGE SIND NICHT ERLAUBT! EIN LANDEN AUF DEM KOPF ODER NACKEN KANN ZU
SCHWERWIEGENDEN VERLETZUNGEN, ZU LÄHMUNG ODER TÖDLICHEN FOLGEN SELBST BEI
LANDUNG IN DER TRAMPOLINMITTE FÜHREN.
MAAK GEEN SALTO'S EN STA OOK NIET TOE DAT ANDEREN DIT PROBEREN. EEN LANDING OP
HOOFD OF NEK KAN ERNSTIG LETSEL, VERLAMMING OF ZELFS DE DOOD TOT GEVOLG
HEBBEN, ZELFS ALS U IN HET MIDDEN VAN DE TRAMPOLINEMAT LANDT.
NIE PRÓBOWAĆ WYKONYWANIA SALT, ANI NIE ZEZWALAĆ NA WYKONYWANIE SALT. PODCZAS
ODBICIA NIE LĄDOWAĆ NA GŁOWIE LUB SZYI. MOŻE TO DOPROWADZIĆ DO PARALIŻU,
ŚMIERCI, NAWET JEŻELI SKOCZEK WYLĄDUJE POŚRODKU MATY.
DO NOT ALLOW MORE THAN ONE PERSON ON THE TRAMPOLINE. USE BY MORE THAN ONE
PERSON AT THE SAME TIME INCREASES THE CHANCE OF INJURY.
PAS PLUS D'UNE PERSONNE À LA FOIS SUR LE TRAMPOLINE. L'UTILISATION PAR PLUS
D'UNE PERSONNE À LA FOIS ACCROÎT LE RISQUE DE BLESSURES.
NO PERMITA QUE LA CAMA ELÁSTICA SEA UTILIZADA POR MÁS UNA DE PERSONA AL
MISMO TIEMPO. EL USO DE LA CAMA ELÁSTICA POR MÁS DE UNA PERSONA AL MISMO
TIEMPO AUMENTA EL RIESGO DE SUFRIR LESIONES.
ES DARF SICH IMMER NUR EINE PERSON AUF DEM TRAMPOLIN BEFINDEN. DIE BENUTZUNG
DURCH ZWEI ODER MEHR PERSONEN GLEICHZEITIG ERHÖHT DIE VERLETZUNGSGEFAHR.
MAXIMAAL 1 PERSOON OP DE TRAMPOLINE. MEERDERE GEBRUIKERS TEGELIJKERTIJD
VERHOGEN DE KANS OP ONGELUKKEN.
NA TRAMPOLINIE MOŻE JEDNOCZEŚNIE PRZEBYWAĆ TYLKO JEDNA OSOBA. WIĘKSZA
LICZBA SKOCZKÓW ZWIĘKSZA RYZYKO POWSTANIA OBRAŻEŃ.
USE TRAMPOLINE ONLY WITH MATURE, KNOWLEDGEABLE SUPERVISION.
UTILISEZ LE TRAMPOLINE SEULEMENT SOUS LA SURVEILLANCE D’UN ADULTE
COMPÉTENT.
UTILICE LA CAMA ELÁSTICA ÚNICAMENTE BAJO LA SUPERVISIÓN DE UNA PERSONA
ADULTA Y BIEN INFORMADA.
DAS TRAMPOLIN DARF NUR UNTER AUFSICHT VON SACHKUNDIGEN ERWACHSENEN
BENUTZT WERDEN.
GEBRUIK DE TRAMPOLINE ALLEEN ONDER TOEZICHT VAN EEN ERVAREN VOLWASSENE.
UŻYWAĆ TRAMPOLINY WYŁĄCZNIE POD NADZOREM OSOBY ODPOWIEDZIALNEJ I
POSIADAJĄCEJ PEŁNĄ WIEDZĘ O PRODUKCIE.
THIS EQUIPMENT IS FOR USE BY
ONE PERSON AT A TIME.
REFER TO MANUFACTURER
INSTRUCTIONS
DO NOT ALLOW ACCESS
UNDERNEATH THE TRAMPOLINE
DO NOT USE IF WET
THE MAXIMUM USER WEIGHT FOR
THIS TRAMPOLINE IS 105 lbs (47.63 kgs).
1. DO NOT ATTEMPT OR ALLOW
SOMERSAULTS. LANDING ON
THE HEAD OR NECK CAN CAUSE
SERIOUS INJURY, PARALYSIS, OR
DEATH, EVEN WHEN LANDING
IN THE MIDDLE OF THE BED.
2. DO NOT ALLOW MORE THAN
ONE PERSON ON THE
TRAMPOLINE. USE BY MORE
THAN ONE PERSON
AT THE SAME TIME INCREASES
THE CHANCE OF INJURY.
3. USE TRAMPOLINE ONLY WITH
MATURE, KNOWLEDGEABLE
SUPERVISION.
650635C-0
WARNING
650635C
2
Page 4
IMPORTANT INFORMATION - LESSONS
ASSEMBLY INSTRUCTIONS
TIPS TO REDUCE THE RISK OF ACCIDENTS
All jumpers need to be supervised, regardless of skill level or age.
Jumpers role in accident prevention:
The key here is to stay in control of your jumps. DO NOT move onto
more complicated, more dicult maneuvers until you have mastered
the basic, fundamental bounce. Education is also key to safety and very
important. Read, understand, and practice all safety precautions and
warnings prior to using the trampoline. A controlled jump is when you
from the same location. For additional safety tips and
ed trampoline instructor.
Supervisor’s or owner’s role in accident prevention:
LESSONS
The following lessons are suggested in order to learn basic steps and
bounces before moving onto more dicult, complicated bounces.
Before actually getting on and using the trampoline, you should read
and understand all safety instructions. A complete discussion and
demonstration of body mechanics and trampoline guidelines should
occur between the supervisor and student as well.
Lesson 1
A. Mounting and Dismounting - Demonstration of proper techniques.
B. The Basic Bounce-Demonstration and practice.
C. Braking (Check the Bounce-Demonstration) and practice. Learn to
Supervisor’s need to understand and enforce all safety rules and
guidelines. It is the responsibility of the supervisor to provide
knowledgeable advice and guidance to all jumpers on the trampoline.
If supervision is unavailable or inadequate, the trampoline should be
stored in a secure place, disassembled to prevent unauthorized use,
or covered with a heavy tarp that can be locked or secured with locks
or chains.
Lesson 2
A. Review and practice of techniques learned in Lesson 1.
B. Knee Bounce-Demonstration and practice. Learn the basic, down
C. Seat Bounce-Demonstration and practice. Learn the basic, seat
ADDITIONAL TRAMPOLINE SAFETY INSTRUCTIONS
JUMPERS
• Remove all hard and sharp objects from person before using
Lesson 3
A. Review and practice skills and techniques learned in previous
.sgurd ro lohocla demusnoc evah uoy fi enilopmart eht esu ton oD •
B. Front Drop-To avoid mat burns and teach the front bounce
trampoline and trampoline enclosure.
• You Should climb on and o in a controlled and careful manner.
Never jump on or o the trampoline and never use the trampoline
as a device to bounce onto or into another object.
C. Start with a hands and knees bounce and then extend body into
• Always learn the basic bounce and master each type of bounce
before trying more dicult types of bounces. Review the Basic
D. Practice Routine Hands and knees Bounce, Front Bounce, back to
Trampoline Bounces Section to learn how to do the basics.
• To Stop your bounce, ex your knees when you land on the mat
with your feet.
Lesson 4
A. Review and practice skills and techniques learned in previous
.enilopmart eht no gnicnuob era uoy nehw lortnoc ni eb syawlA •
A controlled jump is when you land at the same spot that you
toof o from. lf at any time you feel out of control, try to stop your
bouncing.
• Do not jump or bounce for prolonged periods of time or too high
B. Half-turn
• Start from front drop position and as you make contact with
for a number of jumps.
• Keep your eyes on the mat to maintain control. If you do not, you
could lose balance or control.
• Never have more than one person on the trampoline at any one
time
• Always have a supervisor watching you when you are on the
trampoline
• During turn, be sure to keep back parallel to mat and head up.
• After completing turn, land in front drop position.
After completing this lesson, the student now has a basic foundation
of trampoline bounces. Jumpers should be encouraged to try and
develop their own routines with the emphasis on control and form.
SUPERVISORS
• Educate yourself with the basic jumps and safety rules. To prevent
and reduce the risk of injuries, enforce all safety rules and ensure
that new jumpers learn the basic bounces before trying more
dicult and advanced jumps.
• All jumpers need to be supervised, regardless of skill level or age.
• Never use the trampoline when it is wet, damaged, dirty, or wom
out. The trampoline should be inspected before any jumpers start
bouncing on it.
morf yawa repmuj eht htiw erefretni dluoc taht stcejbo lla peeK •
the trampoline. Be aware of what is overhead, underneath, and
around the trampoline.
• To prevent unsupervised and unauthorized use, the trampoline and
trampoline enclosure should be secured when not in use.
brake on command.
four-point landing and alignment.
to knee and back up before trying half twist to the left and r
ight.
bounce then add a knee bounce, hands and knees; repeat.
lessons
position. All students should be requested to assume the prone
position (face down on the ground) while the instructor checks for
faulty positions that could cause injury.
prone position, and on the mat and return to feet.
feel, Seat Bounce, back to feet, Seat Bounce, back to feel.
lessons.
mat, push o with arms in either the right or left direction and
turn head and shoulders in same direction.
STEP 5 - Spring Loading Instructions (cont.)
Attach a spring at every 3 holes and corresponding trianglerings. For even distribution of tension and ease of assembly,
springs should be placed on opposite side of the mat/
frame...i.e. 3 then 21, 33 then 15, etc. In addition to the
previously installed springs, you should have springs at 3, 9,
15, 21, 27 and 33 as shown.
ZERO
35
33
no eb dluohs ssertS .ecitcarp dna noitartsnomed-seenk dna sdnaH .D
30
29
27
24
23
3
5
6
9
15
17
21
18
CAUTION
If you notice that you have miscounted a hole and triangle-ring
connection, recount and remove or attach any springs required to
maintain the count of springs.
Then attach the remaining 18 springs by using the same theory of
counting equal holes as shown.
11
12
STEP 6 - Enclosure Frame Assembly
Secure the tubes
of the arch
together using a
self locking
screw (M).
Tighten with
screwdriver (W).
Insert a foam tube (S) and (T) over each horizontal tube (H)
Insert a foam tube (T) over each straight frame tube (I). All
straight frame tubes must have foam around them.
Make sure
curve frame
tubes with
horizontal
tube (H) tilt
inward.
Repeat assembly for the other 2 arch frames.
and curved frame tube (J).
Tight t
Assemble horizontal tube with foam (H) with two curved frame
tubes with foam (J).
Connect curve frame tubes (J) into the straight frame
tubes (I).
8
3
Page 5
ASSEMBLY INSTRUCTIONS
BASIC TRAMPOLINE BOUNCES
STEP 3 - Complete for all 6 corner top rails
Make sure the hole on the straight
frame tube (I) matches with the
Insert straight frame tubes into the socket of the corner top rails (E).
hole in the socket on corner top
rail (E). Slightly rotate the straight
frame tube to align holes if needed.
STEP 4 - Trampoline Mat Assembly
be underneath safety pad. Loop elastic on each corner over each of the straight frame tubes. Slide elastic down to
the base as shown.
Arc washer (O)
Arc washer (O)
Spring washer (P)
Spring washer (P)
Cap nut (N)Cap nut (N)
Insert bolt (L) through an arc washer (O) then through front opening hole in
straight frame tube. Secure back with an arc washer (O), a spring washer (P)
and cap nut (N). Tighten bolt assembly using wrench (Q) to hold cap nut in
place while tightening bolt with screwdriver (W).
Bolt (L)
Bolt (L)
SPRING LOADING CAUTIONS
of installation of springs.
step.
please do not put your hands, legs, or body
close to the connector points.
your hands.
loading tool (R).
elbmessa siht ni deriuqer era stluda owT •
,sgnirps eht gnihcatta nehW - LUFERAC •
tcetorp ot sevolg krow ytud yvaeh raeW •
gnirps laiceps esu ,ylbmessa fo esae roF •
The Basic Bounce
Knee Bounce
Seat Bounce
,noitisop gnidnats morf tratS .1
feet shoulder width apart and
with head up and eyes on mat.
circular motion.
ni elihw rehtegot teef gnirB .3
mid-air and point downward.
when landing on mat.
dna ecnuob cisab htiw tratS .1
keep it low.
kcab gnipeek seenk no dnaL .2
straight, body erect and use your
arms to maintain balance.
ecnuob cisab ot kcab ecnuoB .3
position by swinging arms up.
1. Start with basic bounce.
2. Land in a at sitting position.
3. Place hands on mat beside
hips, do not lock your elbows.
4. Return to erect position by
pushing with hands.
• Jumpers should wear T-shirt, shorts or sweats, and regulation
gymnastics shoes, heavy socks, or be barefoot. If you are just beginning,
you may want to wear long sleeve shirts and pants to protect against
scrapes and abrasions until you master correct landing positions
a ni ,pu dna drawrof smra gniwS .2
and form. Do not wear hard sole shoes, such as tennis shoes on the
trampoline, as this will cause excessive wear on the mat material.
• You should always mount and dismount properly to avoid injury.
• Do not bounce recklessly on the trampoline since this will increase
trapa htdiw redluohs teef peeK .4
your chances of getting injured. The key to safety and having fun on
the trampoline is control and mastering the various bounces. Never
try to out-bounce another bouncer in terms of height! Never use the
trampoline alone without supervision.
• Not recommended for use by children under 4 or over 10 years of age.
Mounting and Dismounting: Be very careful when getting on and the
trampoline. DO NOT mount the trampoline by grabbing the safety pad, stepping
onto the springs, or by jumping onto the mat of the trampoline from any object
(i.e. a deck, roof, or ladder). This will increase your chances of getting injured!
regardless of the makeup of the ground. If small children are playing on the
trampoline, they may need help dismounting.
Use of Alcohol and Drugs: DO NOT consume any alcohol or drugs when using
this trampoline! This will increase your chances of getting injured since these
foreign substances impair your judgment, reaction time, and overall physical
coordination.
Multiple Jumpers: Multiple jumpers (more than one person on the trampoline
at any one time) increase the chance of getting, injured. Injuries could occur
or land on the springs. Generally, the lightest person on the trampoline will get
injured. No more than one person at a time on the trampoline.
Striking the Frame or Springs: When playing on the trampoline, STAY in
the center of the mat. This will reduce your risk of getting injured by landing
on the frame or springs. Always keep the safety pad covering the frame of the
trampoline. DO NOT jump or step onto the safety pad directly since it was not
intended to support the weight of a person.
Loss of Control: DO NOT try maneuvers, or any maneuvers until you have
mastered the previous maneuver, or if you are just learning how to jump on a
trampoline. If you do, you will increase your risk of getting injured by landing
STEP 5 - Spring Loading Instructions
There are a total of 36 triangle-rings sewn on the mat and 36
holes on the top rail frame.
None are numbered so please follow the instructions carefully
to ensure proper installation. Now select an arbitrary point on
the top rail frame, call it ZERO.
ZERO
Attach springs at the corner top rails as shown in diagram below. For
even distribution of tension and ease of assembly, springs should
be placed on opposite side of the mat/frame...i.e. 5,6 then 23,24.
Complete spring installation for numbers below. You should now have
the following 12 springs installed: ZERO, 5, 6, 11, 12, 17, 18, 23, 24,
29, 30 and 35.
ZERO
35
30
29
24
23
5
6
11
12
17
18
Attaching Spring
Attach the R-hook galvanized spring (K) with “R”
hook end to the triangle-ring on the mat as shown.
Holding the spring at 45 degrees in relation to
the mat surface will be much easier to install into
triangle-ring. Hold the spring loading tool underhand
and pull spring hook towards the point on the top rail
frame. Drop hook into frame hole until it latches on
completely and tap it down if hook is not completely
in the hole.
Front Bounce
180° Degree Bounce
1. Start with a low bounce.
position and keep hand and
arms extended forward on mat.
return to standing position.
and arms (depending on which
way you wish to turn).
the same direction and keep back
parallel to mat and head up.
to standing position by pushing
up with hands and arms.
control of your jump. A controlled jump is considered landing on the same spot
bend your knees sharply when you land and this will allow you to regain control
)nwod ecaf( enorp ni dnaL .2
and stop your Jump.
Sumersaults (Flips): DO NOT PERFORM somersaults of any type (backwards or
forwards) on this trampoline. If you make a mistake when trying to perform a
somersault, you could land on your head or neck. This will increase your chances
of getting your neck or back broken, which could result in death or paralysis.
Foreign Objects: DO NOT use the trampoline if there are pets, other people, or
any objects underneath the trampoline. This will increase the chances of an injury
occurring. DO NOT hold any foreign objects in your hand and DO NOT place any
objects on the trampoline while anyone is playing on it. Please be aware of what
is overhead
when you are playing on the trampoline. Tree limbs, wires, or other
objects located over the trampoline will increase your chances of getting injured.
Poor Maintenance of Trampoline: A trampoline in poor condition will
increase your risk of getting injured. Please inspect the trampoline before
.noitisop ecnuob tnorf htiw tratS .1
each use for bent steel tubes, torn mat, loose or broken springs, and overall
stability of the trampoline.
Weather Conditions: Please be aware of the weather conditions when
using the trampoline. If the mat of the trampoline is wet, the jumper could
slip and injure him or herself. lf it is too windy, jumpers could lose control.
ni sredluohs dna daeh niatniaM .3
Use the trampoline only when the jumping mat is clean and dry. A wet
jumping mat is extremely slick and prevents a stable landing.
When the trampoline is not in use, store it in a secure place so that
nruter dna noitisop enorp ni dnaL .4
unsupervised children cannot play on the trampoline.
7
4
Page 6
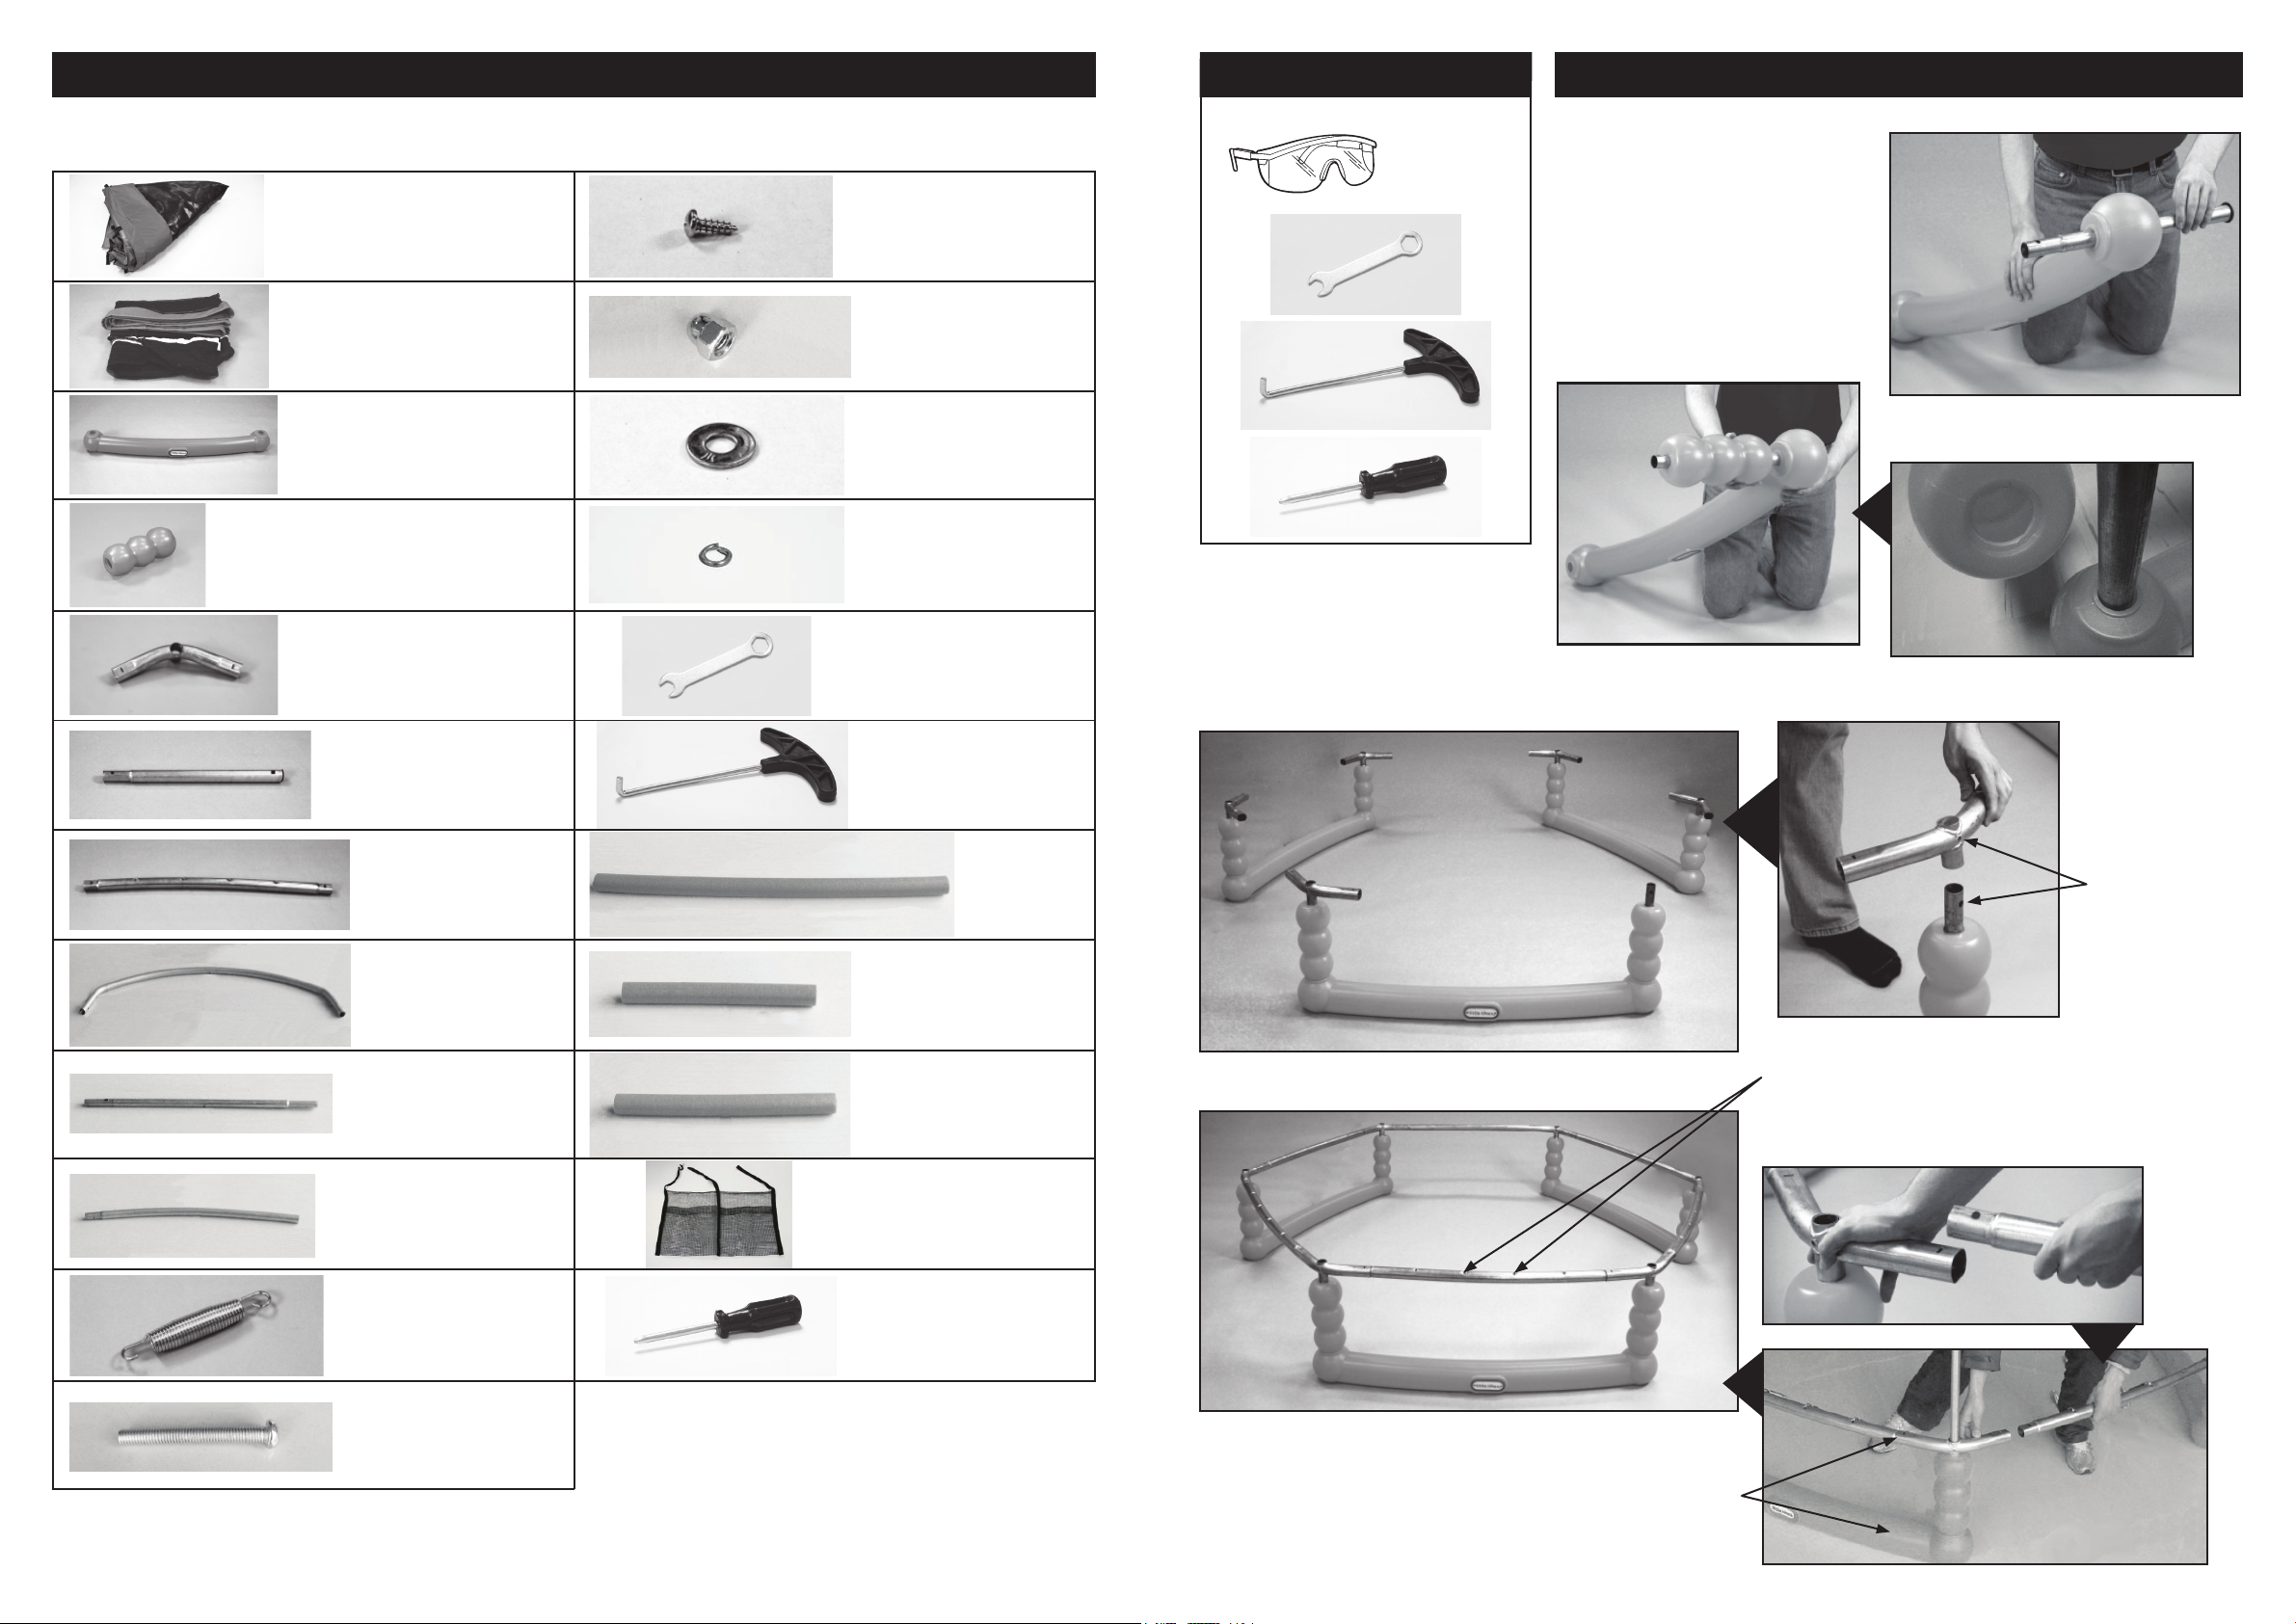
Parts List
Adult assembly required
ASSEMBLY INSTRUCTIONS
Please refer to this page for parts descriptions and letters. The assembly steps use these descriptions and letters as reference for your convenience.
Make sure that you have all parts listed.
Qty - 1
Trampoline Mat stitched with
A
Triangle-rings and safety pad
M
Qty - 1
Enclosure Netting
B
N
Qty - 3
Plastic Horizontal Leg Base
C
O
Qty - 6
Plastic Vertical Leg Extension
P
Qty - 6
Self-locking screw
Qty - 6
Cap Nut
Qty - 12
Arc Washer
Qty - 6
Spring Washer
D
Qty - 6
E
Corner Top Rail with Socket
Q
Qty - 6
Vertical Leg Extension
F
(with “Button Cap”)
R
Qty - 1
Wrench
Qty - 1
Spring Loading Tool
with Allen wrench
and screwdriver
Tools required
(not included)
Safety glasses should be worn during the assembly of trampoline.
STEP 2 - Frame Layout
STEP 1 - Support Assembly
Insert a plastic vertical leg extension (D) over each vertical
leg extension (F). Repeat for remaining 5 vertical leg
extensions (F).
Insert a vertical leg extension (F) through hole on each end of a
plastic horizontal leg base (C). Repeat for remaining 2 plastic
horizontal leg bases (C).
Recess on plastic vertical leg extension (D) must t into
leg base (C) as shown.
Insert the corner top rail with
socket (E) to the Support Assembly
as shown. Repeat this for all corner
top rails with sockets (E).
G
H
I
J
K
Qty - 6
Top Rail
Qty - 3
Horizontal Tube
Qty - 6
Straight Frame Tube
Qty - 6
Curved Frame Tube
Qty - 36
Galvanized Springs
S
T
U
V
W
Qty - 3
Foam Tube for
Horizontal Tube
Qty - 6
Foam Tube for
Straight Frame Tube
Qty - 6
Foam Tube for
Curved Frame Tube
Qty - 1
Shoe Bag
Qty - 1
Screwdriver
Layout 3 sets Support Assemblies (pre-assembled in STEP 1) as shown above.
IMPORTANT: hole in corner top
rail should align to the hole in
vertical leg extension.
Holes must face up.
Assemble top rail (G) into each end of corner top rail with socket (E). To connect parts,
simply slide the section of tubing that is smaller on one end into the adjacent section that
has a larger opening as shown.
Qty - 6
L
Bolt
Remember to use gloves during assembly to avoid pinching.
There are total of 12 pieces of tubing and 3 sets Support Assemblies (pre-assembled in STEP 1) that
are needed to assemble the frame.
IMPORTANT: be sure the curve side of the plastic
horizontal leg bases (C) and the curve of the top
rails (G) are facing outward.
At least 2 people are required to assemble the trampoline.
5
6
 Loading...