

Little Tikes Dino Bouncer Quick Start Manual
WARNING:
ADULT SUPERVISION AND SET UP REQUIRED. This product should be inated or deated by a competent adult.
1. Not for outdoor use.
2. Minimum clearance zones of 6.6 ft. (2 m) in any direction are required.
3. Keep the area around the product clean and clear of objects to prevent slips and falls.
4. DO NOT allow attachment of items such as jump ropes, pet leashes, cables, etc., to product as they may cause a strangulation hazard.
5. DO NOT drag the unit as doing so may cause irreparable damage.
6. Ensure the play area is free from hazards such as furniture, walls, sharp objects and other hard surfaces before inating the unit and playing in it.
7. DO NOT leave children unattended at any time.
8. DO NOT use the unit if it is wet as it may become slippery.
9. DO NOT allow children to play in the product until it is fully inated.
10. Children must remove helmets, loose clothing, scarves, headgear, shoes and glasses, as well as any sharp objects from their pockets, as they may puncture the
bouncing surface.
11. Toys and other objects should never be allowed inside the bouncer.
12. Keep pets away from the product.
13. Children should bounce away from others and stay away from openings and side walls.
14. DO NOT allow food, drink or gum inside unit.
15. Maximum user weight is 60 lbs. (27 kg). Total weight of children must not exceed 120 lbs. (54 kg).
16. No more than 2 children should play on the bouncer at the same time.
17. DO NOT use extension cords with this product.
18. THIS IS NOT A FLOTATION DEVICE. DO NOT USE IN OR NEAR WATER.
19. DO NOT allow children to play together who are unevenly matched in weight and height.
20. Prior to deating, remove all children.
21. Always deate product after use, and store indoors.
22. Users must be discouraged from attempting any unauthorized modication.
23. Remove the plug from the socket before use.
IMPORTANT PUMP INFORMATION
The pump is not serviceable. Do not attempt to service the pump. Doing so may cause the warranty to be voided.
· To reduce the risk of electric shock, use indoors only.
· Remove the bouncer plug from the electrical outlet before cleaning.
· Allow the unit to cool down for 3 minutes after 5 minutes of continuous pump operation.
· The pump containts a thermal switch that will automatically shut down the unit if it gets too hot. To reset, turn the pump switch to OFF and unplug the unit from
the AC outlet to allow it to cool. The pump will function properly once normal temperatures are reached.
WARNING:
· Do not use the electric pump near wet surfaces or if water has entered the pump.
· Do not immerse the bouncer pump in water or cleaning liquid.
· Always keep the power cord away from hot surfaces. If the power cord or plug is damaged, contact consumer service.
· This appliance has a polarized plug (one blade is wider than the other). This plug will t in a polarized outlet only one way. If the plug does not t fully in the
outlet, reverse the plug. Do not change the plug in any way.
· Do not place the power cord under the bed, funiture or carpet coverings.
· SERVICING OF A DOUBLE-INSULATED PRODUCT:
In a double-insulated product, two systems of insulation are provided instead of grounding. No grounding means is provided on a double-insulated product, nor
should a means for grounding be added to the product. Servicing of a double-insulated product requires extreme care and knowledge of the system, and should
be done only by qualified service personnel. Replacement parts for a double-insulated product must be identical to those parts in the product. A double-insulated
product is marked with the words "DOUBLE INSULATION" or "DOUBLE INSULATED.“ The symbol may also be marked on the product.
DOUBLE
INSULATION
LIMITED WARRANTY
The Little Tikes Company makes fun, high quality toys. We warrant to the original purchaser that this product is free of defects in materials or workmanship for 90
days from the date of purchase (dated sales receipt is required for proof of purchase). At the sole election of The Little Tikes Company, the only remedies available
under this warranty will be either replacement of the defective part or replacement of the product. This warranty is valid only if the product has been assembled
and maintained per the instructions. This warranty does not cover abuse, accident, cosmetic issues such as fading or scratches from normal wear, or any other cause
not arising from defects in material and workmanship. U.S.A. and Canada: For warranty service or replacement part information, please visit our website at
www.littletikes.com, call 1-800-321-0183 or write to: Consumer Service, The Little Tikes Company, 2180 Barlow Road, Hudson OH 44236, U.S.A. Some replacement
parts may be available for purchase after warranty expires - contact us for detail. Outside U.S.A. and Canada: Contact place of purchase for warranty service.
Indoor Bouncers Warranty: We warrant to the original purchaser that the material in this product is free of defects in materials or workmanship for 90 days from the
date of purchase, (dated sales receipt is required for proof of purchase). This warranty gives you specific legal rights, and you may also have other rights, which vary
from state/country to state/country. Some states/countries do not allow the exclusion or limitation of incidental or consequential damages, so the above limitation
or exclusion may not apply to you. *The warranty period is three months for daycare or commercial purchasers.
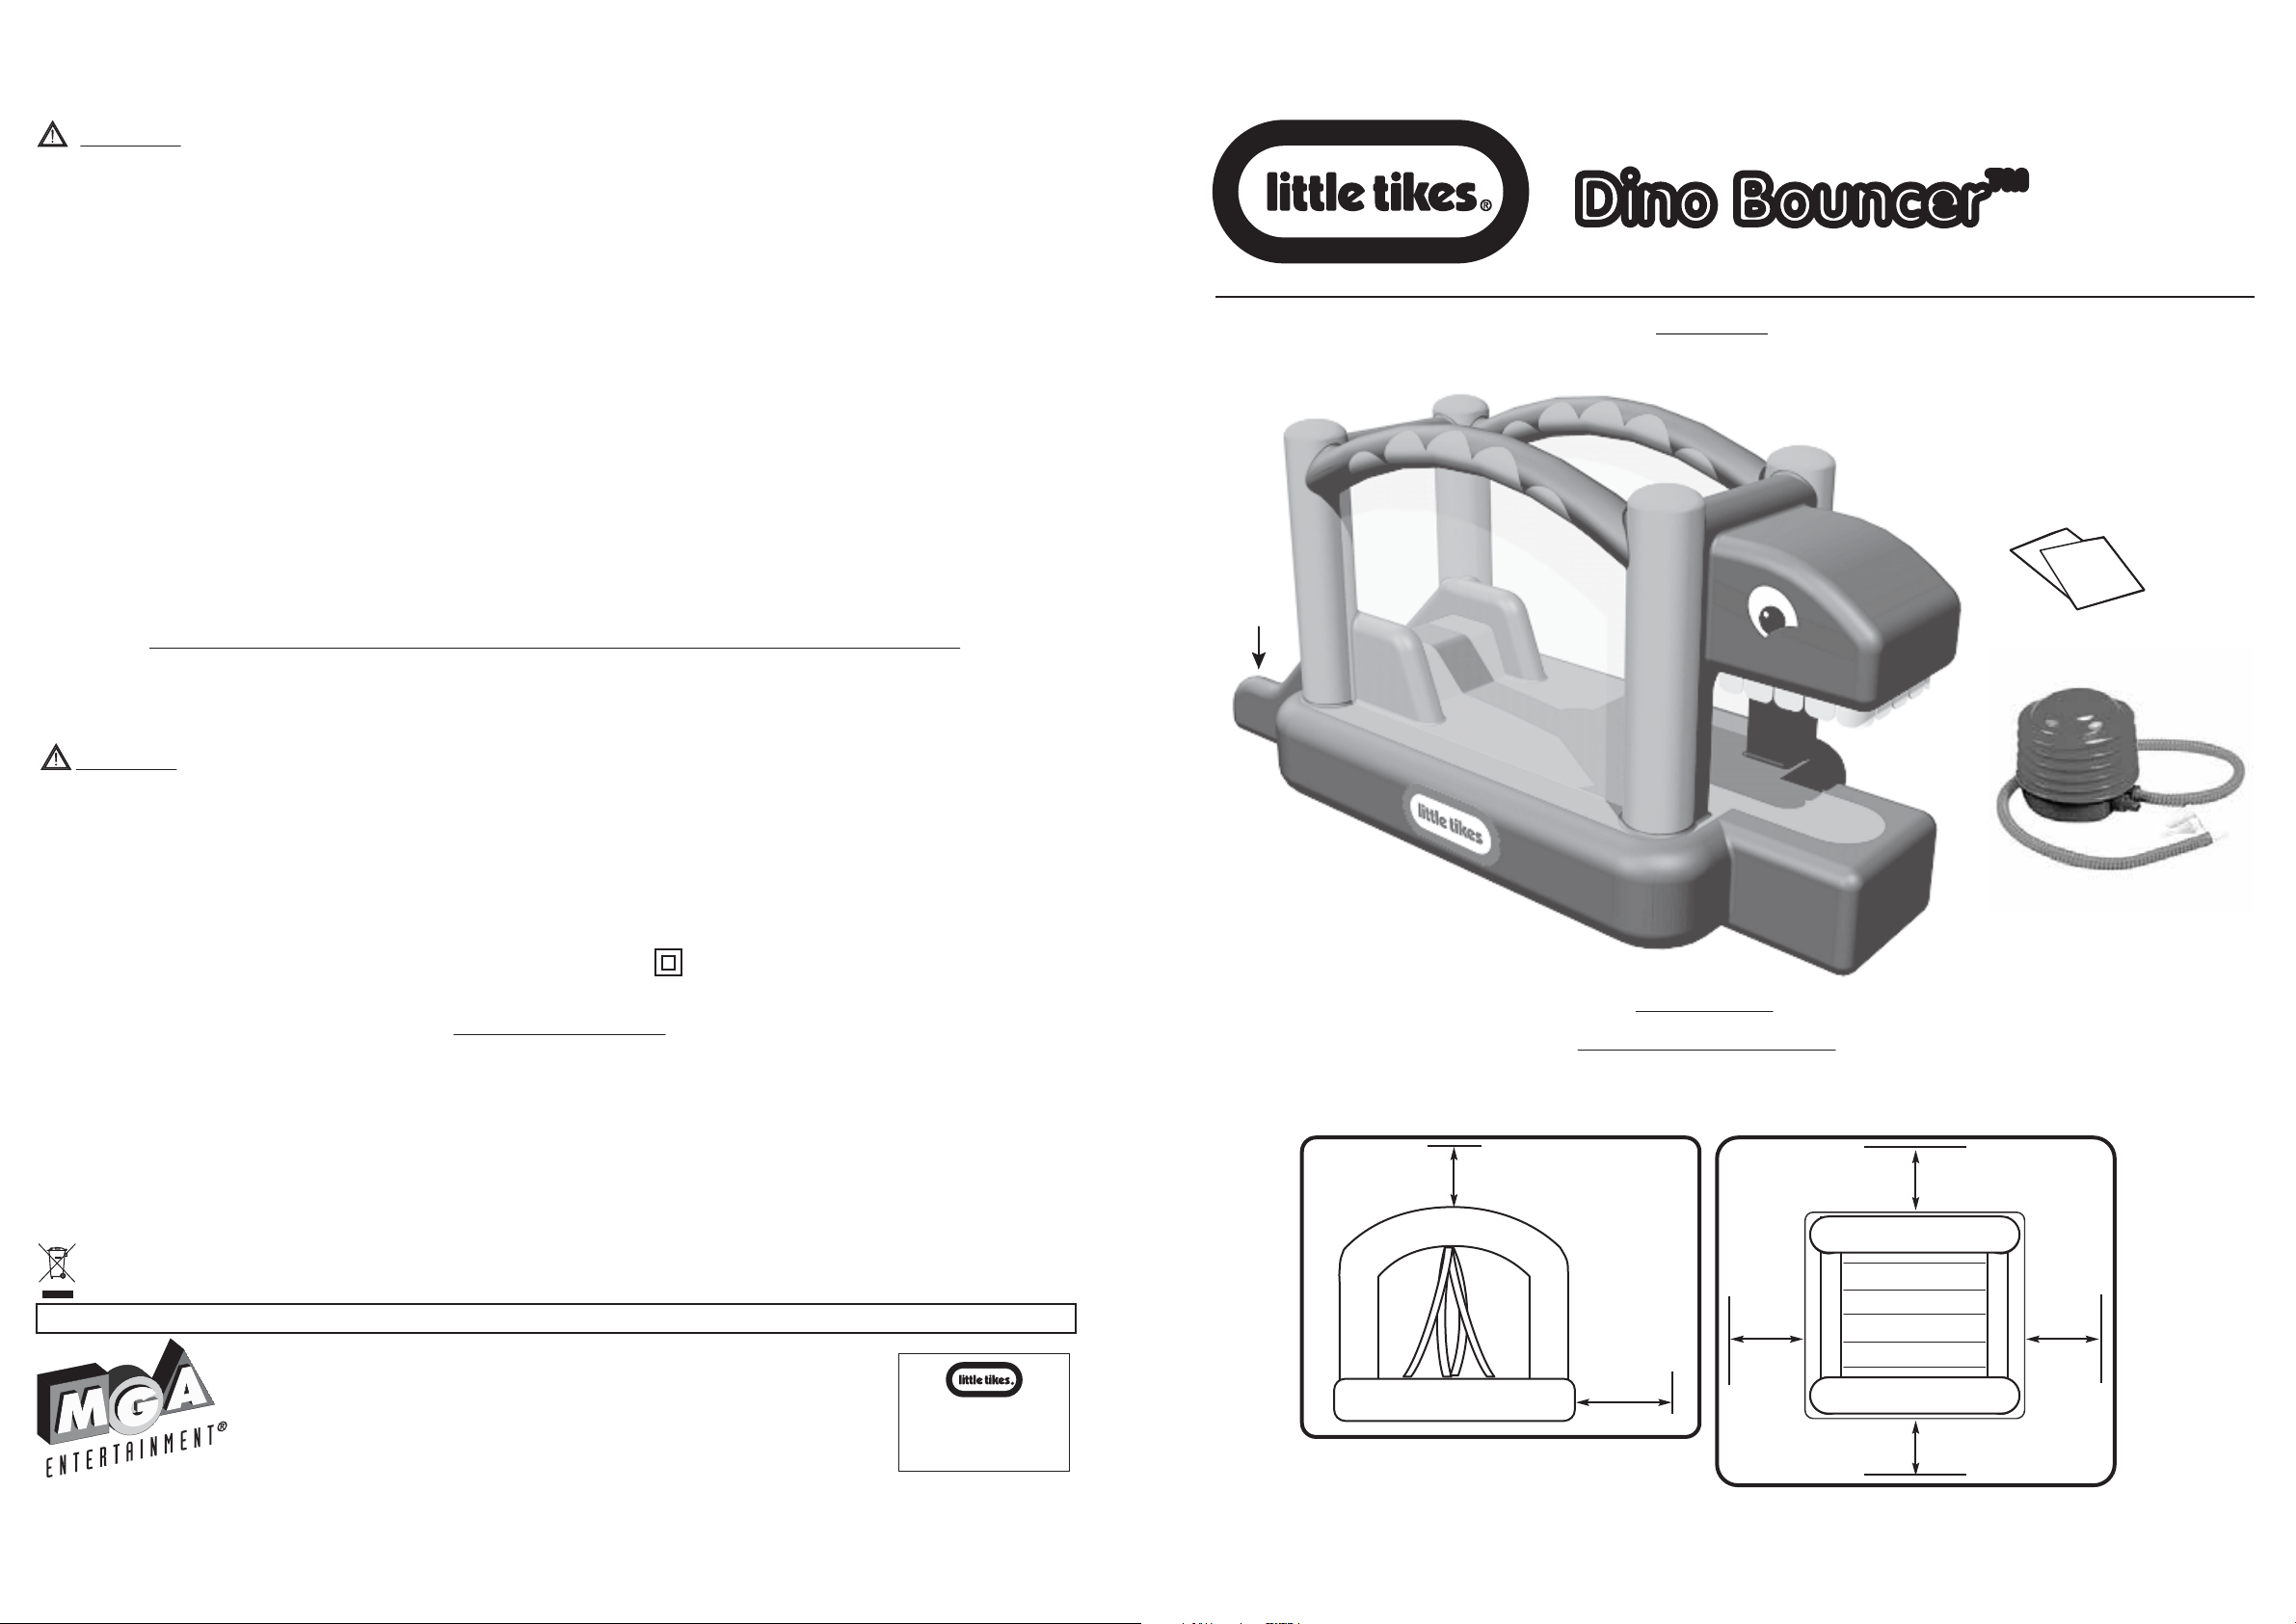
641145
A.
B.
Illustrations are for reference only.
Styles may vary from actual contents.
1. Clear an indoor area (see diagrams below) and place the folded Dino Bouncer™ inside the area.
2. Fully unfold the Dino Bouncer™ with the control panel near a 120 volt AC wall electrical outlet.
Dino Bouncer
Dino Bouncer
CONTENTS
A. 1 Dino Bouncer™
B. 1 Slide
C. 2 Repair Patches
D. 1 Foot Pump
QUICK START
SETTING UP THE BOUNCER
An adult must set up and inflate the unit. Here’s how:
2 m (6.6 ft.)
™
™
AGES 2-6 YEARS
ADULT ASSEMBLY AND SUPERVISION REQUIRED.
C.
D.
2 m (6.6 ft.)
‘Let’s care for the environment!’
The wheelie bin symbol indicates that the product must not be disposed of with other household waste. Please use designated collection points or
recycling facilities when disposing of the item. Do not treat old batteries as household waste. Take them to a designated recycling facility.
Please keep this manual as it contains important information.
MGA Entertainment UK Ltd
50 Presley Way
Crownhill
Milton Keynes
MK8 0ES
Bucks, UK
0800 521 558
www.littletikes.com
www.littletikes.co.uk
to register your product and
0316-1-E
© The Little Tikes Company,
an MGA Entertainment company.
LITTLE TIKES® is a trademark of Little Tikes in
the U.S. and other countries. All logos, names,
characters, likenesses, images, slogans, and
packaging appearance are the property of
Little Tikes.
Little Tikes Consumer Service
2180 Barlow Road Hudson, Ohio 44236 U.S.A.
1-800-321-0183
Printed in China
4
Visit our website at
www.littletikes.com
to enter our sweepstakes.
(No purchase necessary)
2 m (6.6 ft.)
MINIMUM CLEARANCE ZONES
Make sure that there is a 2 m (6.6 ft.) obstacle-free zone
around the product.
2 m
(6.6 ft.)
2 m
(6.6 ft.)
2 m (6.6 ft.)
1
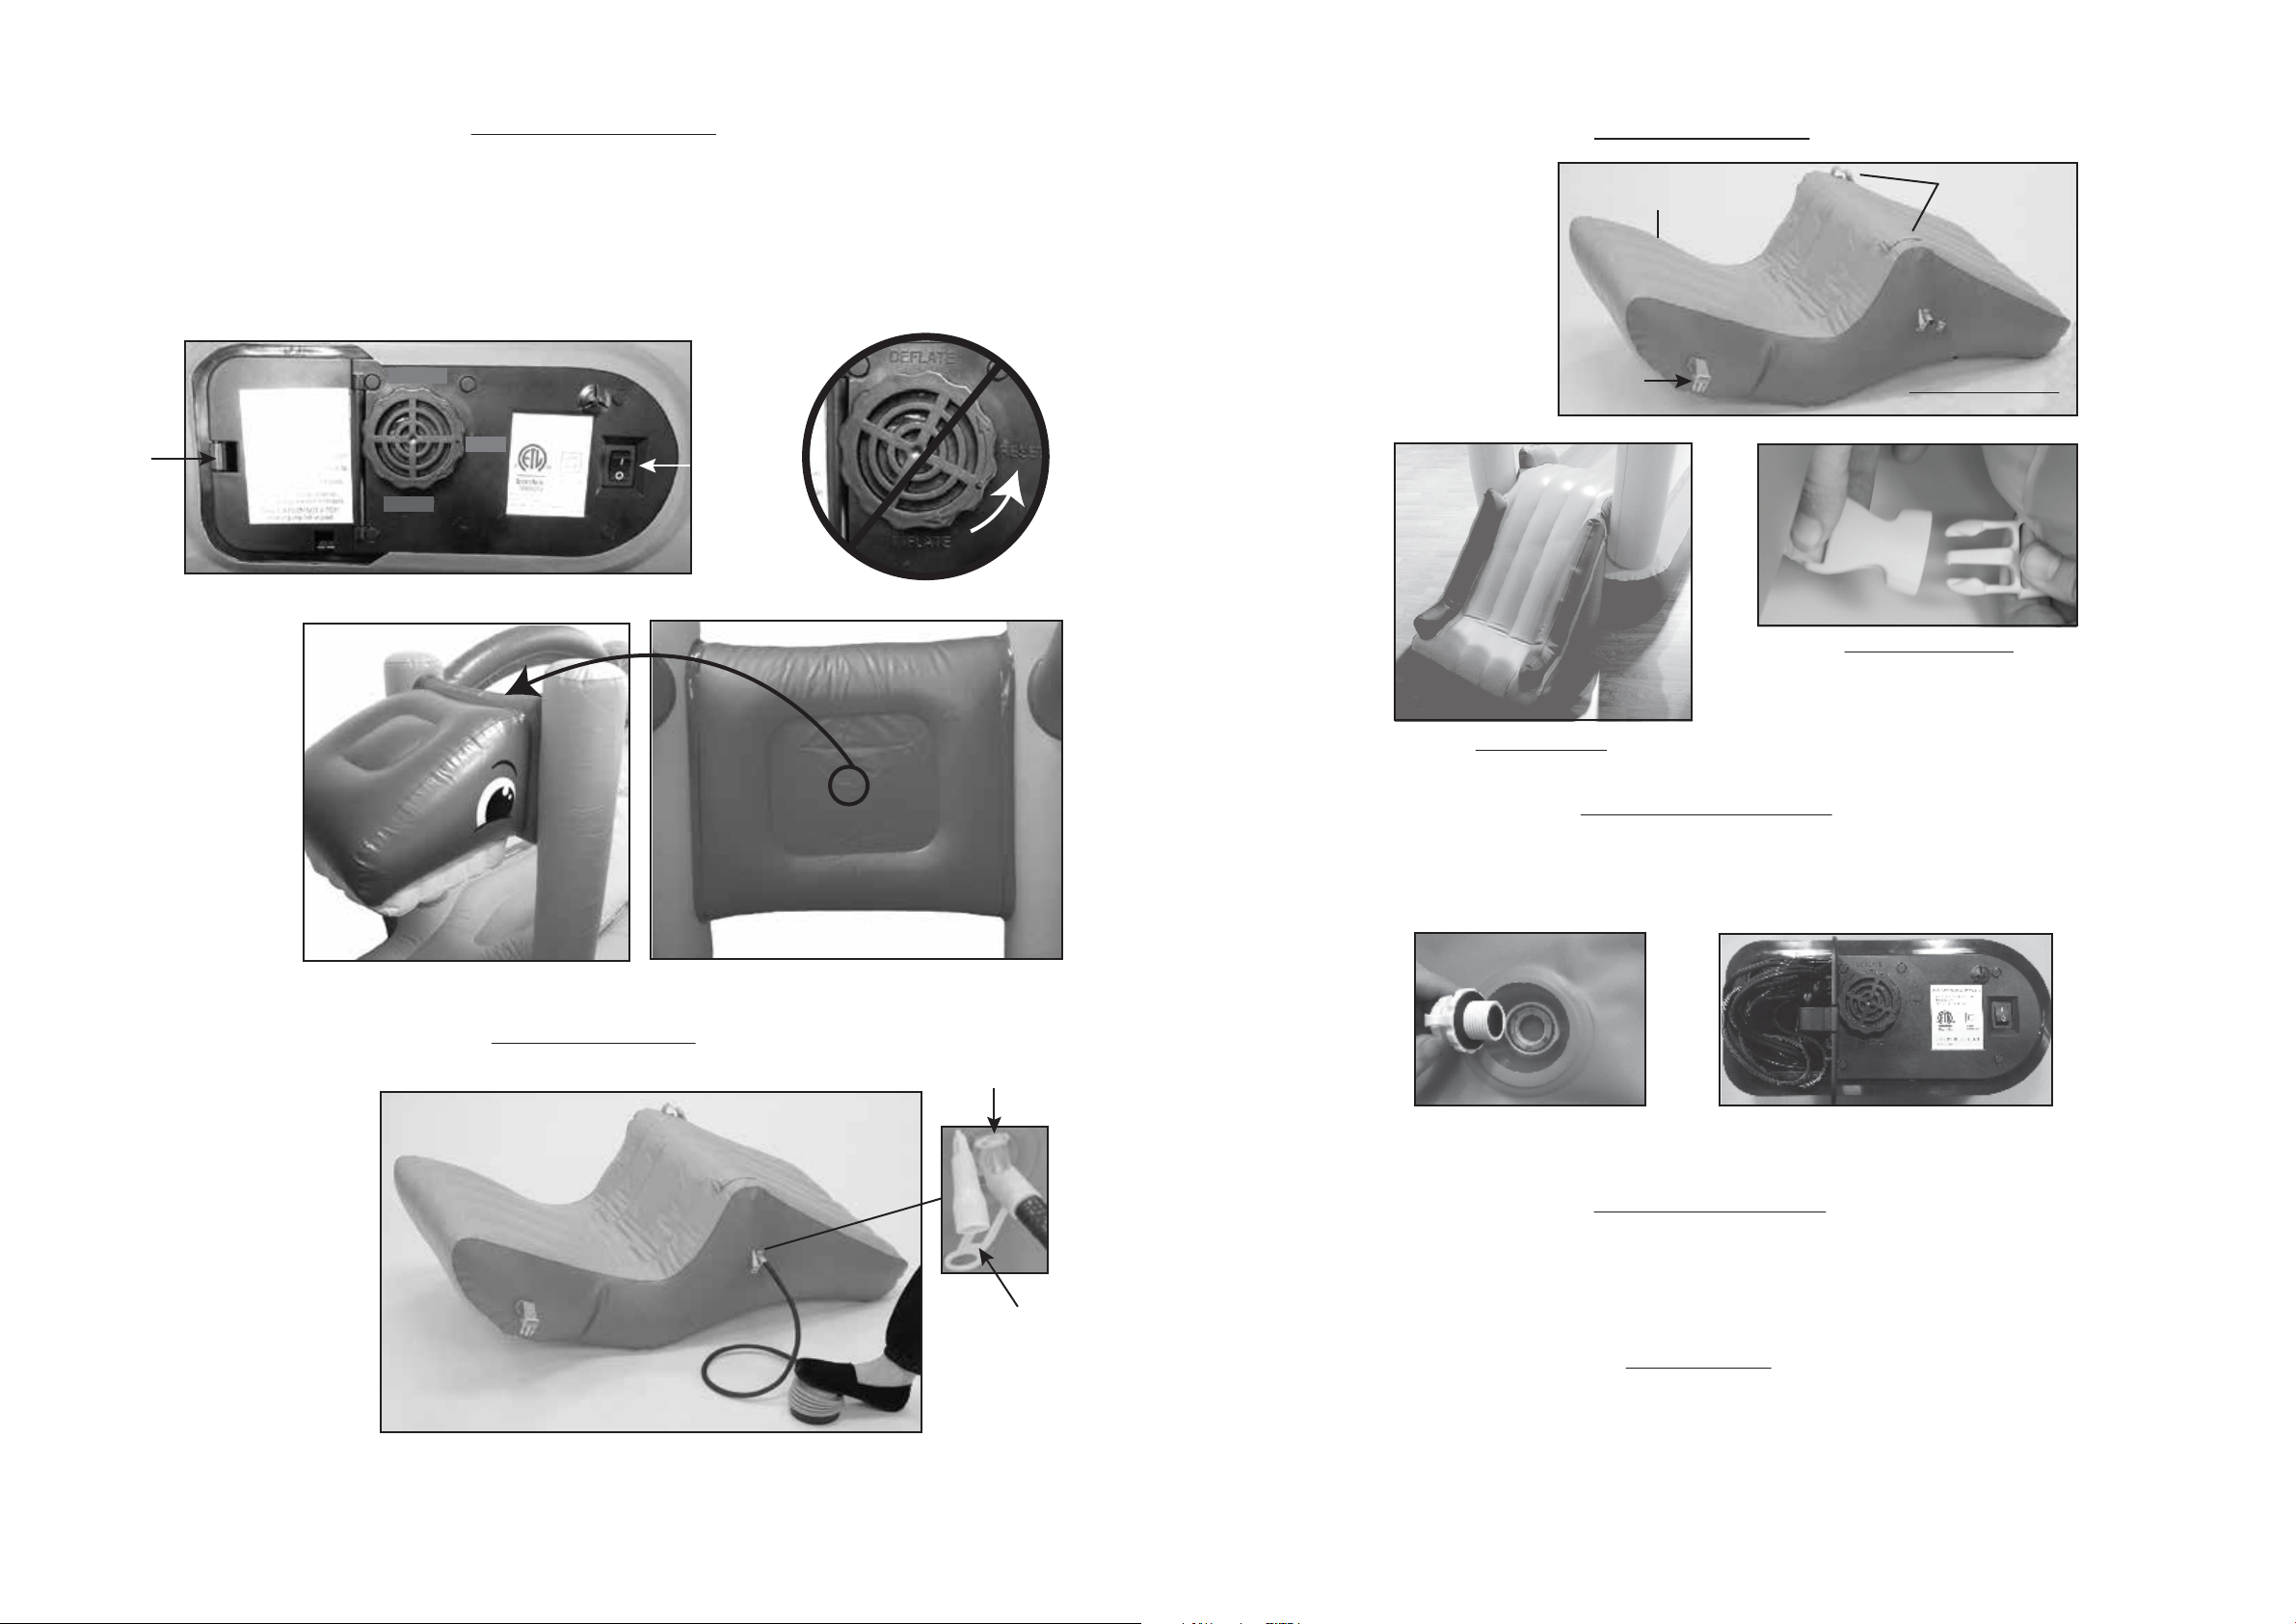
INFLATING THE BOUNCER
INSTALLING THE SLIDE
3. With the ON/OFF switch in the OFF (0) position, and the INFLATE/RESET/DEFLATE knob in the RESET position,
open the cord storage area door and carefully extend the cord. (Fig. 1)
4. Plug the cord into the wall outlet.
5. Turn the ON/OFF switch to ON and rotate the INFLATE/DEFLATE knob to INFLATE. (Fig. 1)
6. Allow the Bouncer to inflate until it is firm but the seams still show slight wrinkling then turn the knob to
RESET and turn the ON/OFF switch to OFF. (DO NOT over-inflate.)
NOTE: The knob must be completely centered at RESET to prevent deflation. (Fig. 1A)
7. Place the power cord in the control panel cord storage door prior to allowing children to play on the unit.
OPEN
FOR
CORD
STORAGE
Fi g. 1
A small pressure release opening
(Fig. 2A) is incorporated behind
the dinosaur’s head (Fig. 2). This
opening is not connected to the
main ination chamber and
poses no risk of deation. Do not
use the included repair patches
to cover this opening, as it is
important for maintaining
balance in the dinosaur head.
DEFLATE
INFLATE
RESET
ON (I)/OFF (O)
Fig. 1A
Once the slide is inflated it must be buckled to
the bouncer. To do so:
11. Flip the slide over and position it onto the
bouncer as shown. (Fi g. 4A)
12. Once positioned, lift slide slightly on one side
and connect two buckles as shown (Fi g. 4B)
then repeat for the other side.
Fi g. 4A
TOP SIDE OF SLIDE
To deate the bouncer:
13. Open the large air outlet near the control panel. (Fig. 5)
14. Turn the knob on the control panel to DEFLATE and the ON/OFF switch to ON.
15. Once deated, turn the ON/OFF switch to OFF, unplug the unit and store the cord inside the control panel door. (Fig. 6)
BUCKLE
BUCKLE
Fi g. 4
Fi g. 4B
DEFLATING THE BOUNCER
BUCKLE
UNDERSIDE OF SLIDE
CONNECTING A BUCKLE
Fi g. 2
8. Open the inflating plug cap in the airway
as shown (Fig. 3A).
9. Blow up slide by mouth or use hand or foot
pump (Fi g. 3).
10. Once inflated replace the plug cap
immediately and press firmly.
NOTE: To deflate the slide, remove the plug
cap and insert the deflater into the airway to
hold it open (Fig. 2A). Then press down on the
slide until all air has been expelled.
Fi g. 3
INFLATING THE SLIDE
Fig. 2A
INFLATING
Fi g. 3A
PLUG
DEFLATER
Fi g. 5
Fi g. 6
REPAIRING A PUNCTURE
In the event the bouncer is accidentally punctured, an adult must perform the following steps:
1. Deflate the item, clean the punctured area with water and allow it to dry.
2. Cut a portion of the patch allowing approximately 1
3. Remove the backing from the patch material, position the patch over the damaged area and smooth out any bubbles with a paper towel.
4. Allow the item to sit for 30 minutes before re-inflating.
1
/2 inches of excess patch material on all sides of the opening to be patched and round the corners.
MAINTENANCE
The product should be periodically examined for potentially unsafe conditions such as: damaged cord, plug, housing, etc. In the event such
damage is found, the product should not be used until properly repaired. Refer to the instructions for set-up, storage, maintenance and care.
To clean use mild detergent and water.
2
3
 Loading...