

Little Tikes ACTIVITY GARDEN 632624M User Manual

Place ball return (B) onto shutter door walls(D).
Poser le renvoi de la balle (B) sur la paroi de la porte à jalousie (D)
tel que montré.
Coloque el recipiente de bolas (B) sobre la pared de las contraventanas (D),
como se muestra en la foto.
setzen (D).
Plaats de balteruggave (B) op de muur (D) zoals wordt getoond.
Umieścić rynnę na kulki (B) na progu ściany (D), jak pokazano na ilustracji.
1. Place shutters (C) onto assembled window box (E) with
preferred face outward as show n.
2. Place small arch (A) onto shutters and shutter door wall (D).
Hold in place.
1. Poser les volets (C) sur la jardinière assemblée (E) avec
le côté préféré orienté vers l’extérieur comme montré.
2. Poser la
petite voûte (A) sur les volets et la paroi de la porte à
jalousie (D). La retenir en place.
1. Coloque las contraventanas (C) sobre el alfeizar (E) con el lado
preferido hacia fuera, como se muestra en la foto.
2. Coloque el arco pequeño (A) sobre las contraventanas y la
pared y manténgalo sujeto(D).
1. Die Fensterläden (C) wie dargestellt mit der bevorzugten (E)
Seite nach außen auf den montierten Fensterk asten setzen.
2. Den kleinen Bogen (A) a
uf die Fensterläden und die Wand mit
1. Plaats de luiken (C) op de in elkaar gezette vensterbank (E)
met de juiste kant naar voren.
2. Plaats de kleine boog (A) op de luiken en de muur (D). Houd
beide op hun plek.
1. Umieścić okiennice (C) na uprzednio przymocowanej skrzynce
na kwiaty (E) preferowaną stroną na zewnąt rz, jak pokazano
na ilustracji.
2. Umieścić łuk (A) mały na okiennicach i ścianie (D) i
przytrzymać .
Place threshold (M) onto front door wall (K).
Poser le seuil (M) s
ur la paroi de la porte avant (K).
Coloque el umbral (M) en la pared de la puerta front al (K).
Schwelle auf vordere Türwand (M) aufsetzen (K).
Umieścić próg (M) w ścianie frontowej (K).
Bevestig de drempel (M) aan de wand voor de voordeur (K).
Place window box (E) onto ball return (B).
Poser la jardinière (E) sur le renvoi de la balle (B) tel que montré.
Coloque el alfeizar (E) sobre el recipiente de bo las (B), como se
muestra en la foto.
Den Fensterkast
en (E) wie dargestellt auf die Ballrückgabe setzen (B).
Plaats de vensterbank (E) op de balteruggave (B) zoals wordt getoond .
Umieścić skrzynkę na kwiat y na (E) rynnie na kulki (B), jak pokazano
na ilustracji.
Secure using screws (X) x2 in locations sh own.
Le retenir à l’aide de 2 vis (X) aux endroits indiqués.
Fíjelo con 2 tornillos (X) en los lugares señalados .
Wie dargestellt mit den Schrauben (X) x 2 in der angegebenen Posi tion sichern.
Schroef de boo
g vast met behulp van 2 schroeven (X).
Zamocować za pomocą wkrętów (X) x 2 we wska zanych miejscach.
Secure using screws (X) x2 in location s shown.
La retenir à l’aide de 2 vis (X) aux endroits indiqués.
Fíjelo con 2 tornillos (X) en los lugares señalados.
Wie dargestellt mit den Schrauben (X) x 2 in der angege benen Position
sichern.
Schroef de delen aan elkaar met behulp van 2 schroeven (X).
Zamocować za pomocą wkrętów (X) x 2 we wskazanych miej s
cach.
Debe ser armado por un adulto / Zusammenbau durch erwachsene eforderlich
In elkaar te zetten door een volwassene / Konieczny jest monta przez osoby dorosłe
T (3)
U (4)
B
B
D
D
1
2
5
6
E
A
A
C
M
K
1
2
3
4
1
2
Wall with Front Door / Mur avec porte avant / Pared con puerta frontal / Wand mit Haustür / Muur met voordeur / Ściana z drzwiami frontowymi
Wall with Shutters / Mur avec volets / Pared con contraventanas / Wand mit Fensterläden / Muur met luiken
Ściana z okiennicami
1. Under threshold (M), place each bracket (Y) as shown
.
2. Secure using screws (W) x2 per bracket (Y) in locat ions shown.
1. Sous le seuil
(M)
, poser chaque support
(Y)
tel que montré.
2. Fixer au moyen des vis (W) x 2 par support (Y) aux emplacements indiqués.
1. Coloque cada una de las abrazaderas (Y) debajo del umbr al (M) tal y como se muestra.
2. Fije cada una de las abrazaderas (Y) con 2 torni llos (W) en los lugares indicados.
1. Unter die Sch
welle (M) wie dargestellt die Klammern einstecken (Y ).
2. Wie dargestellt mit 2 Schrauben (W) pro Klammer (Y) in der angegebenen Position sichern.
1. Umieścić każdy wspornik (Y) pod progiem (M), jak pokazano na ilustrac ji.
2. Zamocować za pomocą wkrętów (
W
) x2na wspornikwe (Y) wskaz anych miejscach.
1. Plaats elke beugel (Y) op de getoonde wijze onder de drempel (M).
2. Zet vast met schroeven (
W
) x2 per beugel (Y), zoals afgebeeld.
ENGLISH
ACTIVIT Y GARDEN™
Please save sales receipt for proof of purchase.
WARNING:
ADULT ASSEMBLY REQUIR ED.
• Keep these instr uctions for future refere nce.
• Prior to assembly, this package contains small parts: hardware which
is a choking hazard and may contain sharp edges and sharp point s.
Keep away from children until assembled.
• Never place product near a window where cords from blinds or
drapes can strangle a child. Also, never place the produc t near phone
cords, computer cords, or baby monitor cords.
• Adult supervision
required. Do not leave young children unattended.
• This product is intended for use by children ages 6 months and up.
BATTERY SAFET Y INFORMATION:
• Keep these instructions for futu re reference.
• Replace with 2 AAA “LR03” (3.0 volts) alkaline batteries (not
included). (Rechargeable batteries may be subs tituted.)
• The voltage of a fully-charged, rechargeable battery is ofte n lower
than that of a fresh alkaline battery. Therefore, it is re commended
that alkaline batteries be used instead of rec hargeable batteries for
best performance and longer play time.
• Install batteries with the correct polarity (+ and -).
• To avoid battery leakage:
1. Follow the toy and battery manufacturer’s installation ins tructions.
2. Do not mix old and new batter ies.
3. Do not mix standard (carbon-zinc), alkaline or rechargeable (nickel-
brands of batteries. Only batter ies of the same or equivalent type as
recommended are to be used.
4. When toy is not used for an extended period of time, remove
batteries to prevent possible leakage and damage to the un it.
5. Remove dead or exhausted bat teries from product.
6. Dispose of dead bat teries properly; do not bury. Do not dispose of
• Make sure cover is properly installed on unit at all times.
• Do not attempt to recharge non-rechargeable batteries.
• Rechargeable batteries are to be removed from the toy before
recharging.
• Charging of rechargeable batteries should be done only by an adult.
• The supply terminals are not to be short circuited.
NOTE: If the unit stops working or doesn’t work as it should, remove
the batteries for a few minutes and then re-insert them. If there is still a
problem, install new batteries.
FCC COMPLIA NCE:
NOTE: This equipment has been te sted and found to com ply with the limits f or a Class B digital
device, pursuant to Par t 15 of the FCC Rul es. These limits are designed to provide reasonable
protection against harmf ul interference i n a residential installat ion. This equipment generates,
uses and can radiate r adio frequency energy an d, if not installed and used in accordance with
the instructions, may caus e harmful interference to radio communications. However, there is
no guarantee that interferenc e will not occur in a par ticular installatio n. If this equipment does
cause harmful interfer ence to radio or television reception , which can be determined by t urning
of the following measures:
• Reorient or relocate the receiving antenna.
• Increase the separation betwe en the equipment and receiver.
•
is connected.
• Consult the dealer or an experienced radio/TV technician for help.
This device complies with Part 15 of the FCC Rules. Operation is subject to the following two conditions:
(1) This device may not cause harmful interference, and (2) this device must accept any interference
received, including interference that may cause undesired operation.
operate this device.
CAN ICES-3 (B)/NMB-3(B).
W x16
X x15
W x4
X x2
X x2
Tool required (not included) / Outil requis (non incluses) / Herramienta
necesaria (no incluidas) / Werkzeuge erforderlich (nicht enthaltene) / Benodigd
gereedschap (niet inbegrepen) / Narzędzia niezbędne (nie są objęte zestawem)
D
E
632624M
XIM632624-2 - 11/15
www.littletikes.com
www.littletikes.co.uk
www.littletikes.nl
www.littletikes.pl
A
A. Small arch /
Petite voûte
Arco pequeño /
Kleiner bogen
Kleine boog / Łuk mały
B
B. Ball return /
Renvoi de la balle
Recipiente de bolas /
Ballrückgabe
Balteruggave / Rynna na kulki
Wall with Shutters / Mur avec volets / Pare d con contraventanas / Wand mit Fensterläden / Muu r met luiken / Ściana z okiennica mi
Wall with Front Door / Mur avec porte avant / Pared con puerta frontal / Wand mit Haustür / Muur met voordeur /
Ściana z drzwiami frontowymi
Slide & Play Center Walls / Parois du toboggan et du centre récréatif / Paredes con tobogán y Centro de juegos / Rutsche und Spielcenterwand
Speelmuren / Przesuń & Play Ściany Center
E
E. Window box /
Jardinière
Alfeizar de la ventana /
Fensterkasten
Vensterbank / Skrzynka na kwiaty
D
D. Shutter door wall
Paroi de la porte à jalousie
Pared de las contraventanas
Muur / Ściana
F
F. Large arch / Grande voûte
Arco grande /
Großer Bogen
Grote boog / Łuk duży
M. Threshold / Seuil
Umbral / Schwelle
Drempel / Próg
K. Front door wall / Paroi de la porte avant
Marco de la puerta frontal / Wand mit Türönung
Muur voor voordeur / Ściana frontowa
J. (2) Arch supports / (2) Supports de voûte
Soportes del arco (2) /
Bogenstützen (2)
Boogsteunen (2) / Podpory łuku (2)
R.
Slide
/
Toboggan / Tobogán
Rutsche / Glijbaan / Zjeżdżalnia
S.
Play center base
/
Socle du centre récréatif
Base del centro de juegos
/
Spielcenterbasis
Basis speelunit / Centrum bazy
P.
Arch for slide
/
Voûte pour le toboggan
Arco de tobogán
/
Bogen für Rutsche
Glijbaanboog / Łuk nad zjeżdżalnią
Q.
Play center
/
Centre récréatif
Centro de juegos
/
Spielcenter
Speelunit / Centrum
M
I
I. Door with xylophone
Porte avec xylophone
Puerta con xilófono /
Tür mit Xylofon
Deur met xylofoon / Drzwi z cymbałkami
G. Mailbox
Boîte aux lettres
Buzón
Briefkasten
Brievenbus
Skrzynka na listy
H. Mailbox base
Socle de la boîte aux lettres
Base del buzón
Briefkastenbasis
Brievenbusbasis
Podstawa skrzynki na listy
L. Telescope
Télescope
Telescopio
Teleskop
Telescoop
Teleskop
V (4)
T.
(3) Letter blocks
/
(3) blocs avec lettre
Bloques de letras (3)
/
Sortierformen
für den Briefkasten (3)
Letterblokken (3) / Literki (3)
U.
(4) Ballscks
/
(4) balles / Bolas (4)
Bälle (4) / Kulki (4) / Ballen (4)
V.
(4) Wall knobs / (4) Boutons de paroi
(4) Pomos de las paredes / (4) Wandknöpfe
(4) Muurknoppen / (4) Nakrętki montażowe
N. Telescope nut / Écrou du télescope
Tuerca del telescopio /
Mutter für Teleskop
Telescoopmoer / Nakrętka mocująca teleskop
G
H
K
L
J J
Y. (2) Bracket / (2) support
(2)
Abrazadera / (2) Klammer
(2)
Beugel / (2) Wspornik
Y (2)
O
O. Telescope screw / Vis du télescope
Tornillo del telescopio /
Schraube für Teleskop
Telescoopbout / Śruba mocująca teleskop
N
2
1
1
2
Y
K
C (2)
C. Shutters (2) /
Volets (2)
Contraventanas (2) /
Fensterläden (2)
Luiken (2) / Okiennice (2)
Y x2
P Q
R
S
Ages 6 - 36 months
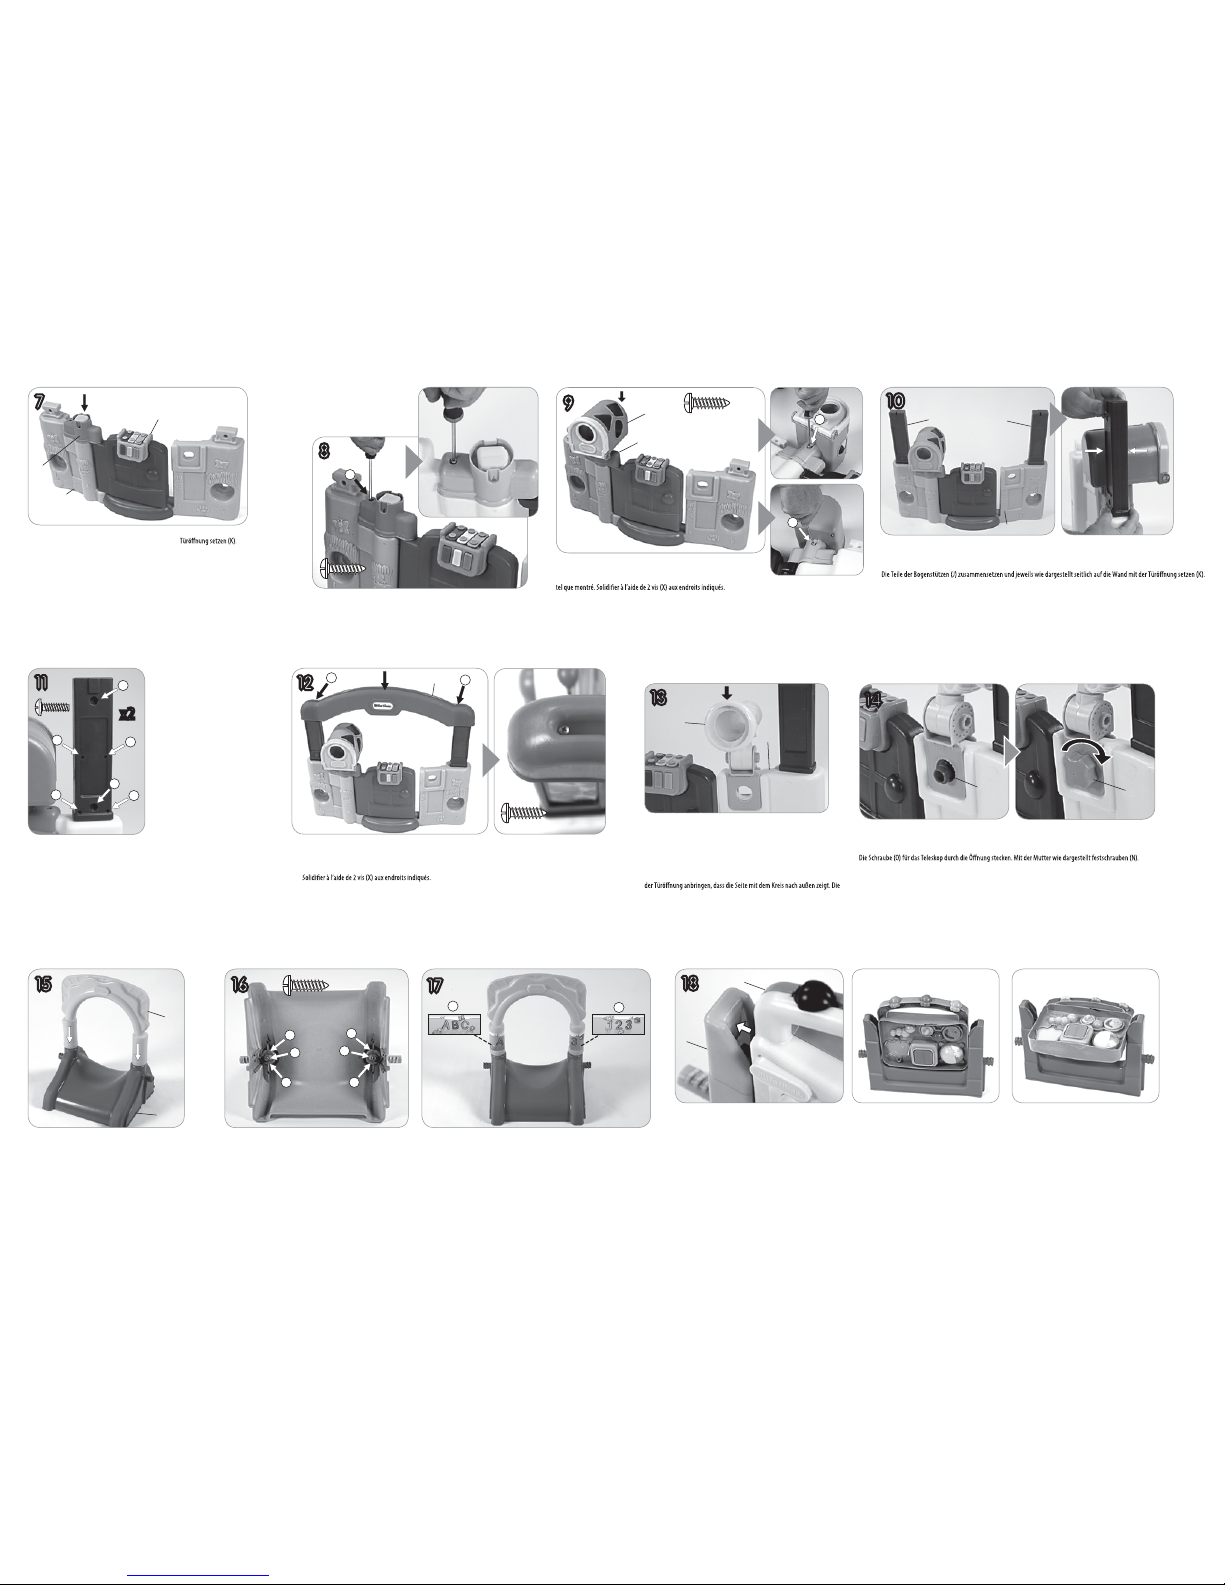
1. Place door with xylophone (I) onto front door
wall (K).
2. Place mailbox base (H) onto door and wall.
Hold in place.
1. Poser la porte avec le xylophone (I) sur la paroi
de la porte avant (K).
2. Poser la boîte aux lettres (H) sur la porte et le
mur. Maintenir en place.
1. Coloque la puerta con el xilófono (I) en la pared
de la puerta frontal (K).
2. Coloque la base del buzón (H) en la puerta y la
pared. Sosténgala en su lugar.
1. Die Tür mit
dem Xylofon (I) auf die Wand mit der
2. Briefkastenunterteil auf Tür und Wand setzen
(H). In Position halten.
1. Umieścić drzwi z cymbałkami (I) na ścianie
frontowej (K).
2. Umieścić podstawę skrzynki na listy (H) na
drzwiach i ścianie. Przyt rzymać na miejscu.
1. Plaats de deur met de xylofoon (I) in opening
van de muur (K).
2. Plaats de brievenbusbasis (H) op de deur en
wand. Houd alles op zijn plaats.
7
H
I
K
8
Secure using screws (X) x1 in locations shown.
Le retenir à l’aide de 1 vis (X) aux endroits indiqués.
Fíjelo con 1 tornillo (X) en el lugar señalado.
Wie dargestellt mit der Schraube (X) x 1 in der angegeb enen Position sichern.
Zamocować wkrętem (X) x 1 we wskazanym miejsc u.
Schroef de delen aan elkaar met behulp van 1 schroef (X).
X x1
1
Place mailbox (G) onto mailbox base (H) as shown.
Secure using screws (X) x2 in locations sh own.
Poser la boîte aux lettres (G) sur le socle de la boîte aux lettre s (H)
Coloque el buzón (G) en la base del buzón (H), como se muestra en
la foto. Fíjelo con 2 tornillos (X) en los lugares señalados.
Den Briefkasten (G) wie dargestell t auf die Briefkastenbasis set zen
(H). Wie dargestellt mit den Schrauben (X) x 2 in der angegebenen
Position sichern.
9
G
H
1
2
Umieścić skrzynkę (G) na listy na pods tawie skrzynki
na listy (H), jak pokazano na ilustracji. Zamocować za
pomocą wkrętów (X) x2 we wskaza nych miejscach.
Plaats de brievenbus (G) op de brievenbusbasis zoals
wordt getoond (H). Schroef de brievenbus vast met
behulp van 2 schroeven (X).
X x2
Place each piece of arch supports (J) and place arou nd notch on front door wall (K) as shown.
Poser chaque support de voûte (J) et les poser su r l’encoche de la paroi de porte (K) avant tel que montré.
Coloque los soportes del arco (J) en las hendidur as a cada lado de la pared de la puerta frontal (K ), como se muestra en la foto.
Każdy z elementów podpory łuk u (J) umieścić na ścianie frontowej (K), jak pokazano na ilustrac ji.
Plaats elk deel van de boogsteun (J) in de daarvoor voor ziene inkeping van de muur (K), zoals wordt getoond.
10
J
K
J
1. Place large arch (F) onto arch supports (J). Hold in place.
2. Secure using screws (X) x2 in locations shown.
1. Poser la grosse voûte (F) sur les supports de voûte (J). La
retenir en place.
2.
1. Coloque el arco grande (F) sobre los soportes del arco (J)
y manténgalo sujeto.
2. Fíjelo con 2 tornillos (X) en los lugares señalados.
1. Den großen Bogen (F) auf die Bogenstützen setzen. In
Position halten (J).
2. Wie dargestellt mit den Schrauben (X) x 2 in der
angegebenen Position sichern.
1. Umieścić łuk (F) duży na uprzednio zamocowanyc h
podporach łuku (J) i przyt rzymać.
2. Zamocować za pomocą wkrętów (X) x 2 we wskazanych
miejscach.
1.
Plaats de grote boog (F) op de boogsteunen (J). Houd ze
op hun plek.
2. Schroef de grote boog vast met behulp van
2 schroeven (X).
12
F
X x2
1
2
11
1
3
6
4
W x6
x2
Secure using screws (W) x6 in locations shown. Repeat for other arch support (J).
Poser 6 vis (W) aux endroits indiqués. Répéter pour chaque support de voûte (J).
Fije con 6 tornillos (W) en los lugares señalados. Repita este paso para el otro soporte del
arco (J).
Wie dargestellt mit den Schrauben (W) x 6 in der angegebenen Position sichern. Bei der
anderen Bogenstütze wiederholen (J).
Zamocować za pomocą wkrętów (W) x 6 we wskazanych miejscach. Czynności powtórzyć dla
drugiej podpory łuku (J).
Schroef de steun vast met behulp van 6 schroeven (W) op de getoonde plekken. Herhaal dit voor
de andere boogsteun (J).
2
5
Place assembled telescope (L), circle side facing outwar d, onto front door wall
(K) as shown. Align holes.
Poser le télescope assemblé (L), en orientant le cercle ver s l’extérieur sur la
paroi de la porte (K) avant tel que montré. Aligner les trous.
Coloque el conjunto del telescopio (L), con el lado del círculo mirando hacia
fuera, sobre la pared de la puerta front al (K), como se muestra en la foto. Alinee
los agujeros.
Das zusammengebaute Teleskop
wie dargestellt (L) so an der Wand (K) mit
Löcher zur Deckung bringen.
Umieścić zmontowany teleskop (L) skierowany okrągł ą „soczewką” na
zewnątrz na ścianie frontowej (K), jak pokazano na ilustrac ji. Ustawić, aby
otwory znajdowały się w je dnej linii.
Plaats de in elkaar gezette telescoop (L) met het rondje naar voren op de muur
(K) zoals wordt getoond. De gaten horen op één lijn te liggen.
Insert telescope screw (O) through opening. S ecure using telescope nut (N) as shown.
Insérer la vis (O) du télesco
pe dans l’ouverture. La retenir à l’aide d’un écrou de (N) télescope tel que montré.
Inserte el tornillo (O) del telescopio a través de la abert ura. Fije con la tuerca del telescopio (N), como se muestra en la foto.
Przełożyć śrubę mocującą (O) tele skop przez otwór. Zamocować za pomocą nakrę tki mocującej teleskop (N),
jak pokazano na ilustracji.
Steek de telescoopbout door de (O) opening. Draai de telescoopmo er vast (N), zoals wordt getoond.
13
14
L
O
N
Telescope Assembly / Ensemble de télescope / Ensamblaje del telescopio / Zusammenbau des Teleskops / De telescoop in elkaar zetten / Montaż teleskopu
K
Insert arch for slide (P) into slide (R) as shown.
Insérer la voûte pour toboggan (P) dans le toboggan (R) tel que montré.
Inserte el arco del tobogán (P) en el tobogán (R),
como se muestra en la foto.
Den Bogen für die Rutsche (P) wie dargestellt auf die Rut sche (R) setzen.
Umieścić łuk na (P) zjeżdżalni (R), jak pokazano na ilustracji.
Plaats de boog voor de glijbaan (P) op de glijbaan (R), zoals wordt getoond.
15
P
R
Slide & Play Center Wall Assembly / Ensemble de toboggan et de paroi du centre récréatif / Ensamblaje de la pared del centro de juegos deslizante / Zusammenbau der Rutsche und der Spielcenterwand / De glijbaan en speelunit in elkaar zetten / Przesuń & Play Center montażu na ścianie
Secure using screws (X) x6 in locations shown.
La retenir à l’aide de 6 vis (X) aux endroits indiqués.
Fije con 6 tornillos (X) en los lugares señalados.
Wie dargestellt mit den
Schrauben (X) x 6 in der angegebenen
Position sichern.
Schroef de delen met behulp van 6 schroeven (X) aan elk aar.
Zamocować za pomocą wkrętów (X) x 6 we wskaz anych miejscach.
16
X x6
1
2
5
64
3
17
21
22
Apply decals 21 & 22 as shown.
Appliquer les décalcomanies 21 et 22 tel que montré.
Coloque las pegatinas 21 y 22, como se muestra en la foto.
Die Aufkleber 21 und 22 wie dargestellt anbringe n.
Plak stickers 21 en 22 op de getoonde plekken.
Nakleić naklejki 21 i 22, jak pokazano na ilustracji.
Play center (Q) slides into play center base (S). To adjust position of play center, press tab in on both
sides of play center base and lift.
Le centre récréatif (Q) se glisse dans le socle du centre réc réatif (S). Pour régler la position du centre
récréatif, appuyer sur la patte des deux côtés du socl e du centre récréatif et soulever.
El centro de juegos (Q) se desliza en la base del mismo (S). Para regular la posición del cent ro de
juegos,
apretar la lengüeta a ambos lados de la base del mismo y levantar.
Das Spielcenter (Q) lässt sich auf die Basis des Spielcenter s schieben (S). Um die Position des
Spielcenters zu verändern, die Laschen auf beide n Seiten der Spielcenterbasis nach innen drücke n
und anheben.
Zagraj w centrum slajdy do gry (Q) centrum bazy (S). Aby dostosow ać położenie grać centrum,
naciśnij klawisz Tab w po obu stronach grać centrum bazy i winda.
De speelunit (Q) schuift
in de basis van de speelunit (S). Druk de pinnen aan beide zijden van de
basis in en til de speelunit omhoog om de stand aan te passen.
Position 1 / Position 1 / Posición 1 / Position 1
Stand 1 / Pozycja 1
Position 2 / Position 2 / Posición 2 / Position 2
Stand 2 / Pozycja 2
S
Q
18
 Loading...