

Little Tikes 641183C, 641183UK Instructions Manual
641183C
641183UK
XIM641183 - 6/16
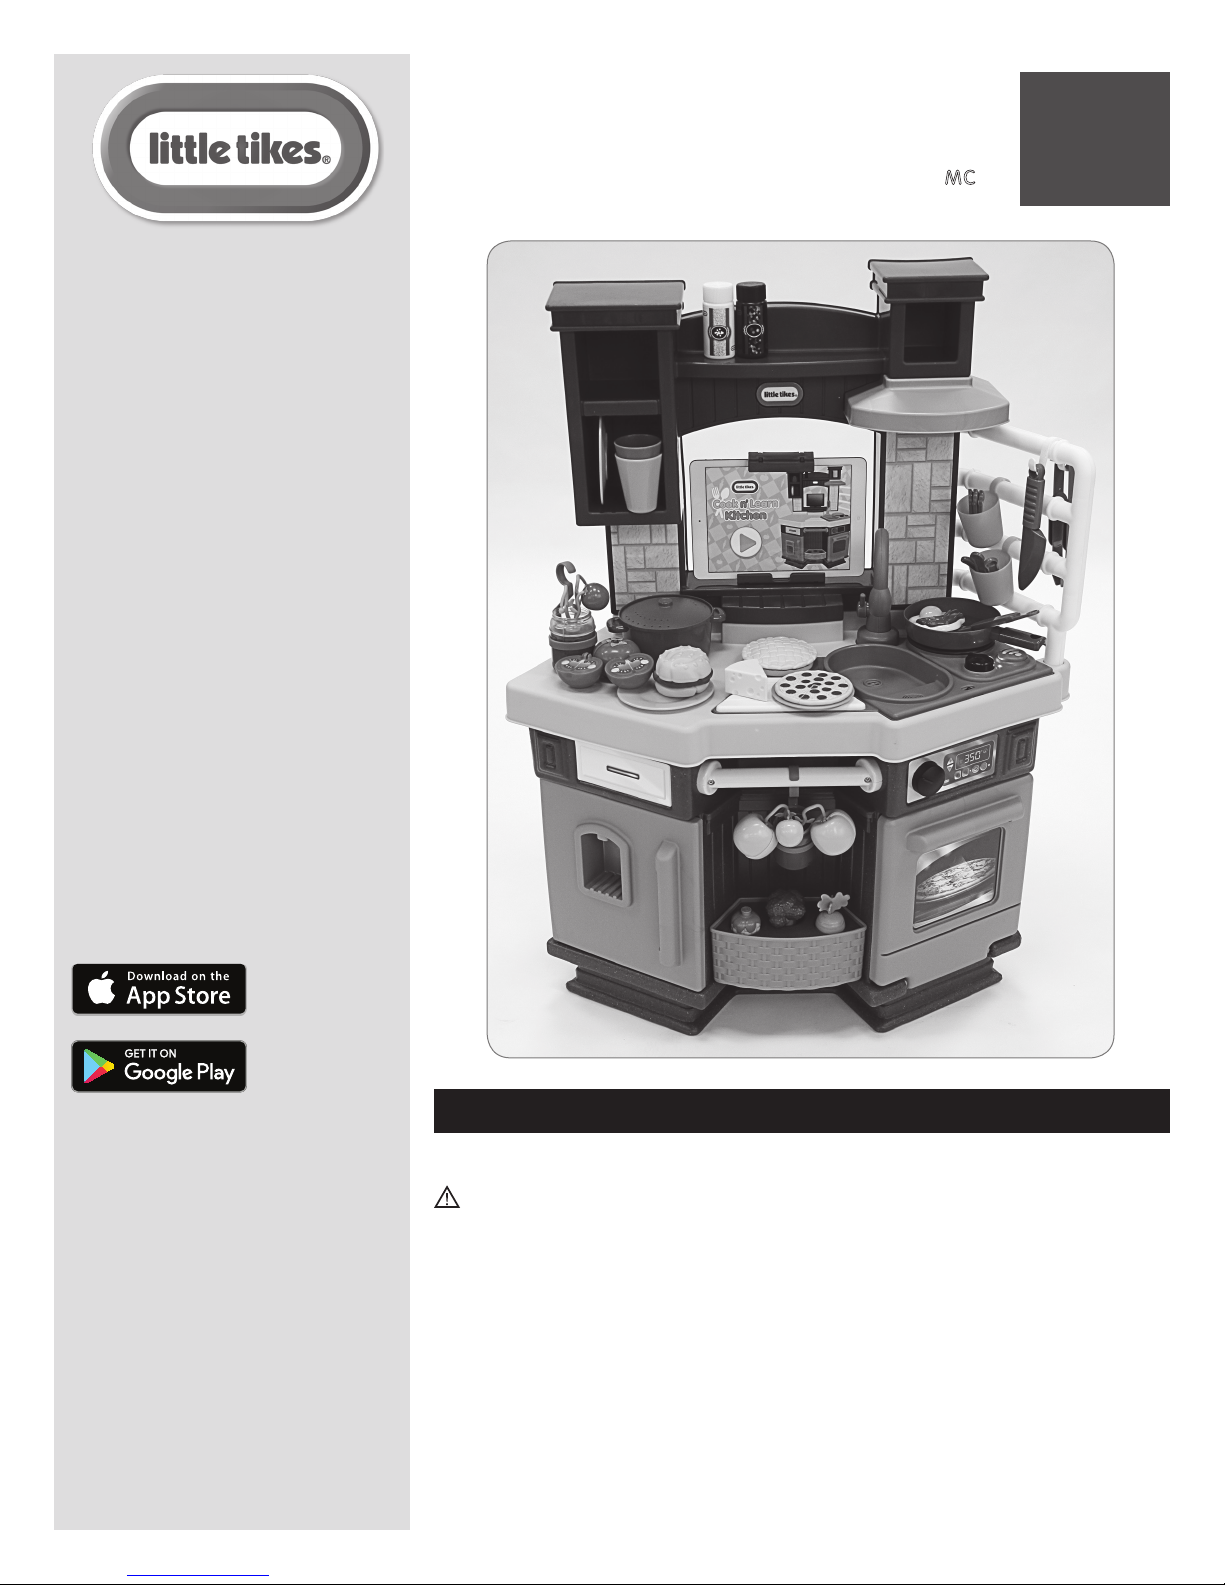
Cook ‘n Learn
Smart Kitchen
™
MC
2+
years
ans
The Cook ‘n Learn Smart Kitchen™ will
launch and run on all Android devices
4.3 or higher and all Apple devices
running iOS7 and above. Devices must
support Bluetooth LE for the app to sync
with the kitchen. For a complete list of
compatable devices, please go to
littletikes.com/cooknlearnkitchen
La cuisine Cook ‘n Learn Smart
KitchenMC se lance et fonctionnera avec
tous les appareils Androïd 4.3 ou plus
et tous les appareils Apple fonctionnant
sous iOS7 et plus. Les appareils doivent
avoir la fonction Bluetooth LE pour que
l’application puisse se synchroniser
avec la cuisine. Pour consulter la
liste complète de tous les appareils
compatibles, veuillez visiter le site
littletikes.com/cooknlearnkitchen
ENGLISH
COOK ‘N LEARN SMART KITCHEN™
Ages: 2 years & up
Please save sales receipt for proof of purchase.
WARNING:
ADULT ASSEMBLY REQUIRED.
• Keep these instructions for future reference.
• Prior to assembly, this package contains small parts:
hardware which is a choking hazard and may contain
sharp edges and sharp points. Keep away from children
until assembled.
• This product is intended for indoor family use only.
• This product is intended for use by children ages 2 years
and up.
• Do not allow children to sit, stand, play or climb on the
top surface. Failure to do so may cause the product to
become unstable.
• Protect your eyes. Always wear safety glasses when
using power tools.
• Thoroughly wash accessories before contact with food
or beverage.
• IMPORTANT: DO NOT immerse RFID CHIP items in
water. Wash with a damp cloth only.
• Clean kitchen with a slightly damp cloth (cold water)
and mild soap.
1
Tablet not included
Tablette non fournie
• Mobile devices to be installed and uninstalled by an
adult only.
BATTERY SAFETY INFORMATION:
• Keep these instructions for future reference.
• Requires 4 “AA” (LR6) alkaline batteries (not included).
(Rechargeable batteries may be substituted.)
• The voltage of a fully-charged, rechargeable battery
is often lower than that of a fresh alkaline battery.
Therefore, it is recommended that alkaline batteries
be used instead of rechargeable batteries for best
performance and longer play time.
• Install batteries with the correct polarity (+ and -).
• To avoid battery leakage:
1. Follow the toy and battery manufacturer’s installation
instructions.
2. Do not mix old and new batteries.
3. Do not mix standard (carbon-zinc), alkaline or
rechargeable (nickel-cadmium or nickel-metalhydride)
batteries. Do not mix dierent brands of batteries.
Only batteries of the same or equivalent type as
recommended are to be used.
4. When toy is not used for an extended period of time,
remove batteries to prevent possible leakage and
damage to the unit.
Adult assembly required / Le montage devra être effectué par un adulte
Tool required (not included)
Outil requis (non incluses)
O x8
1
/2" (1,27 cm )
P x21
11/2" (3,81 cm)
Q x2
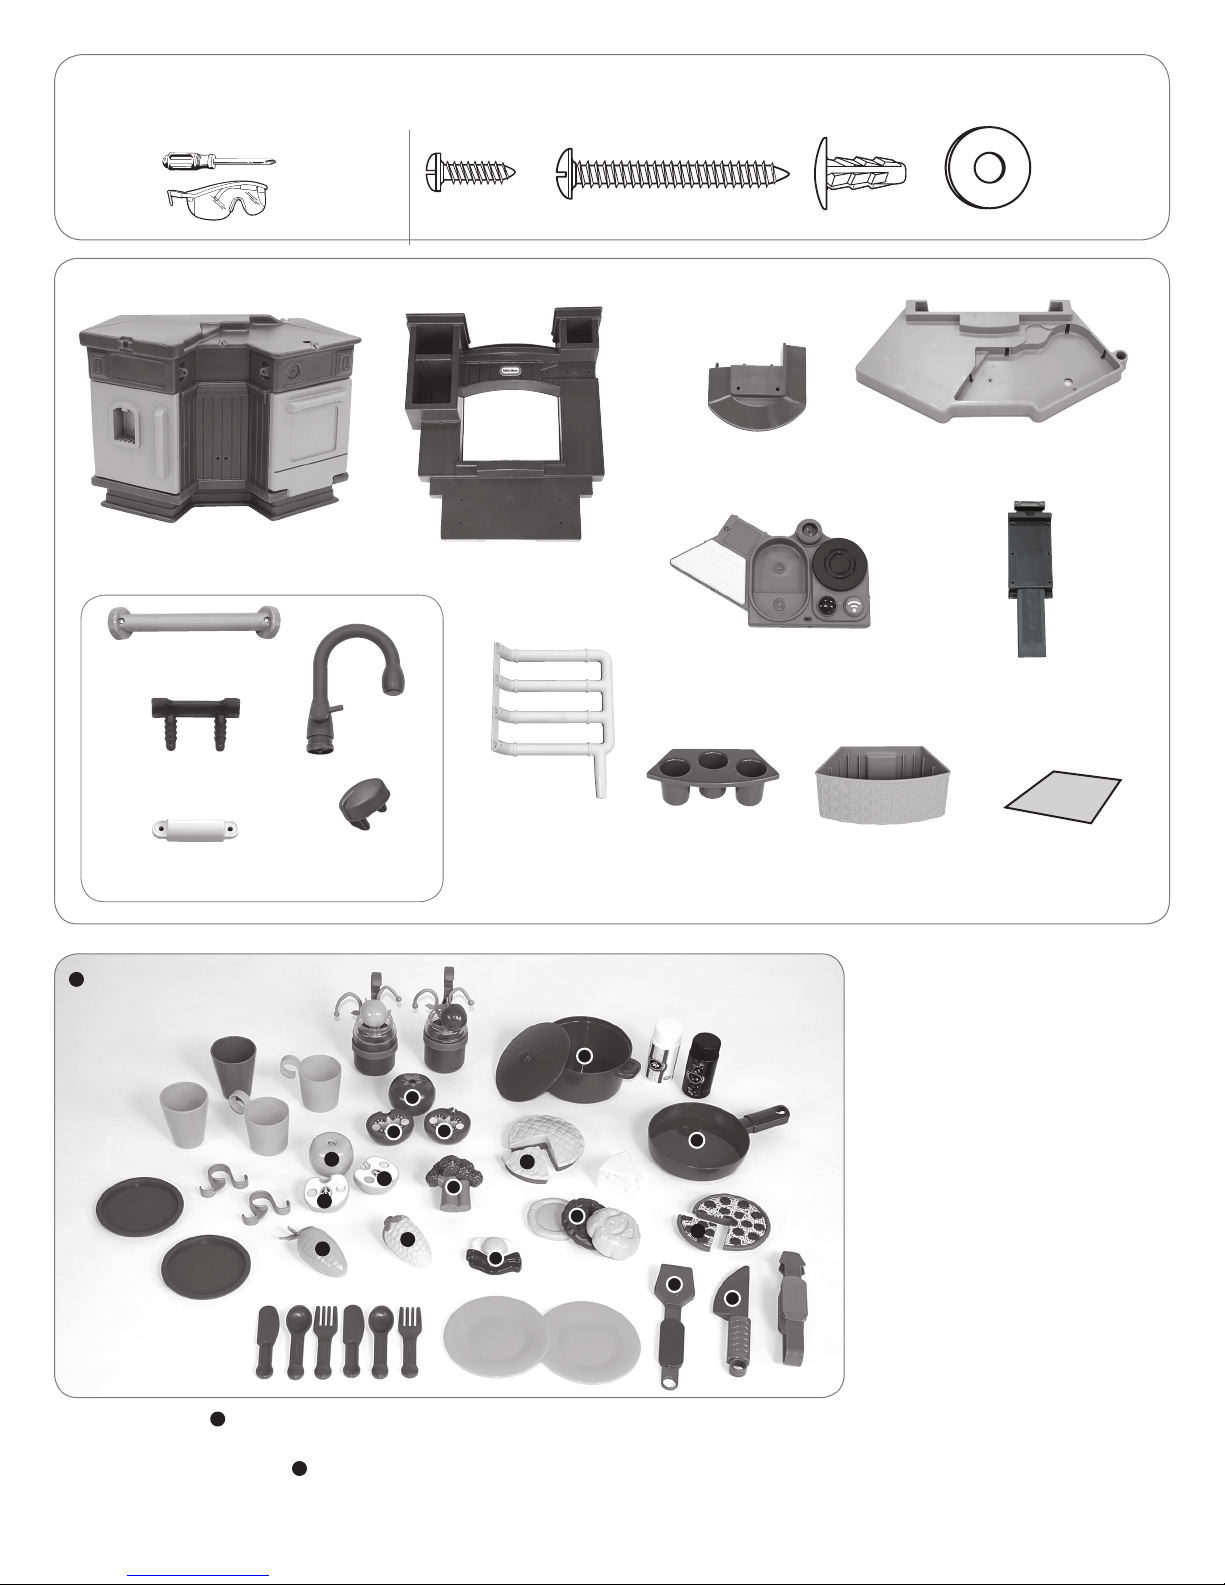
PARTS / PIÈCES
R x1
A. Oven/Refrigerator base
Base four/réfrigérateur
L. Towel bar
Porte serviettes
M. Basket clip
Clip pour panier
N. Magnet holder
Porte-aimant
RFID chip
Puce RFID
J. Faucet
Robinet
K. Knob
Bouton
B . Kitchen wall
Cloison de cuisine
H. Utensil bar
Barres pour
ustensiles
C. Hood
E. Electonic module
Module électronique
G. Basket insert
Insert pour panier
Hotte
I. Basket
Panier
D. Countertop
Plan de travail
F. Mobile device holder
Fixation pour appareil portable
(1) Decal sheet
(1) Planche de décalque
Accessories with the symbol contain a RFID chip and interact with the app. DO NOT immerse RFID CHIP items in water. Wash
with a damp cloth only.
Les accessoires avec le symbole contiennent un puce RFID et interagissent avec l’application. NE PAS mettre les éléments de
la PUCE RFID dans l’eau. Laver uniquement avec un chion humide.
2
Decals / Décalcomanies
1.5V AA/LR6
1.5V AA/LR6
1.5V AA/LR6
1.5V AA/LR6
Decals must be applied to a clean, dry surface. Wipe clean with a dry rag before application. Remove air from under decals by applying pressure to the
decals starting from the center, and work towards edges. NOTE: If decals bubble, prick with a pin to remove the air.
Les décalcomanies doivent être appliquées sur une surface propre et sèche. Pour nettoyer, essuyer avec un chion sec avant utilisation. Retirer l’air
en-dessous des décalcomanies avant d’appuyer dessus en partant du milieu et en appuyant vers les bords. REMARQUE : Si des bulles se forment, piquer
avec une aiguille pour enlever l’air.
2
3
5
1
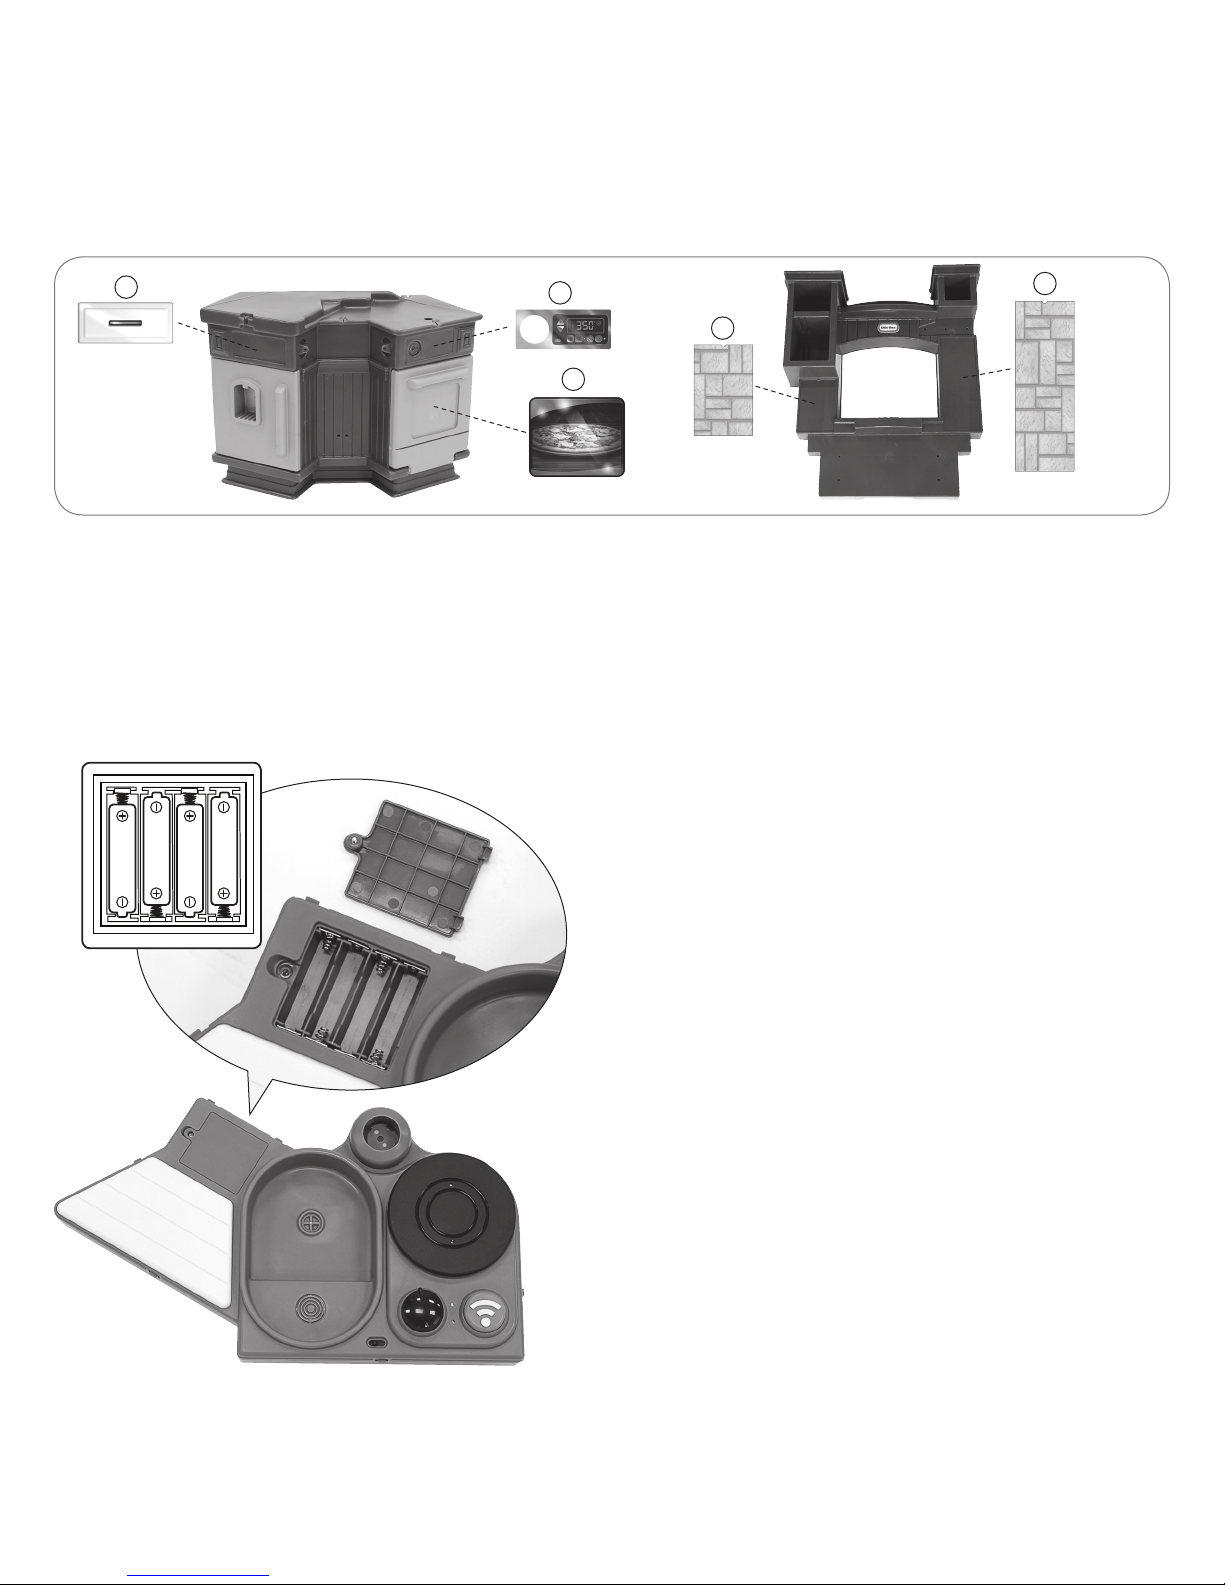
Electronic module / Module électronique
4
Battery installation MUST be completed by an adult:
1. Using a Phillips screwdriver (not included) remove the screw and
battery compartment cover located underneath the electronic module.
2. Install two (4) fresh AA alkaline batteries (not included) making sure the
(+) and (-) ends face the proper direction as indicated inside the battery
compartment.
3. Replace the compartment cover and tighten the screw.
L’installation des piles doit être eectuée par un adulte :
1. Retirer les vis et le couvercle des piles situés en-dessous du module
électronique à l’aide d’un tournevis Phillips (non fourni).
2. Installer quatre (4) piles alcalines AA (non fournies) en vériant
que les + et - sont dans le bon sens, comme indiqué à l’intérieur du
compartiment des piles.
3. Remettre en place le couvercle du compartiment et serrer les vis.
3
 Loading...