

Little Tikes 485121M, 485138M Instructions Manual
Adult assembly required / Le montage devra être eectué par un adulte
Debe ser armado por un adulto / Zusammenbau durch erwachsene eforderlich /
In elkaar te zetten door een volwassene / Konieczny jest monta przez osoby dorosłe
485121M
485138M
XIM485121-1 - 7/15
www.littletikes.com
www.littletikes.co.uk
www.littletikes.nl
www.littletikes.pl
ENGLISH
LITTLE TIKES KITCHEN & RESTAURANT™
Ages: 2 years & up
Please save sales receipt for proof of purchase.
WARNING:
ADULT ASSEMBLY REQUIRED.
• Keep these instructions for future reference.
• Prior to assembly, this package contains small parts:
hardware which is a choking hazard and may contain
sharp edges and sharp points. Keep away from children
until assembled.
• This product is intended for indoor family use only.
• This product is intended for use by children ages 2 years
and up.
• Do not allow children to sit, stand, play or climb on the
top surface. Failure to do so may cause the product to
become unstable.
• Protect your eyes. Always wear safety glasses when
using power tools.
• Thoroughly wash accessories before contact with food
or beverage.
BATTERY SAFETY INFORMATION:
• Keep these instructions for future reference.
• Requires 3 “AA” (LR6) alkaline batteries (not included).
(Rechargeable batteries may be substituted.)
• The voltage of a fully-charged, rechargeable battery
is often lower than that of a fresh alkaline battery.
Therefore, it is recommended that alkaline batteries
be used instead of rechargeable batteries for best
performance and longer play time.
• Install batteries with the correct polarity (+ and -).
• To avoid battery leakage:
1. Follow the toy and battery manufacturer’s installation
instructions.
2. Do not mix old and new batteries.
3. Do not mix standard (carbon-zinc), alkaline or
rechargeable (nickel-cadmium or nickel-metalhydride)
batteries. Do not mix dierent brands of batteries.
Only batteries of the same or equivalent type as
recommended are to be used.
4. When toy is not used for an extended period of time,
remove batteries to prevent possible leakage and
damage to the unit.
5. Remove dead or exhausted batteries from product.
6. Dispose of dead batteries properly; do not bury. Do not
dispose of batteries in re as they may leak or explode.
• Make sure cover is properly installed on unit at all times.
• Do not attempt to recharge non-rechargeable batteries.
• Rechargeable batteries are to be removed from the toy
before recharging.
• Charging of rechargeable batteries should be done only
by an adult.
• The supply terminals are not to be short circuited.
NOTE: If the unit stops working or doesn’t work as it
should, remove the batteries for a few minutes and then reinsert them. If there is still a problem, install new batteries.
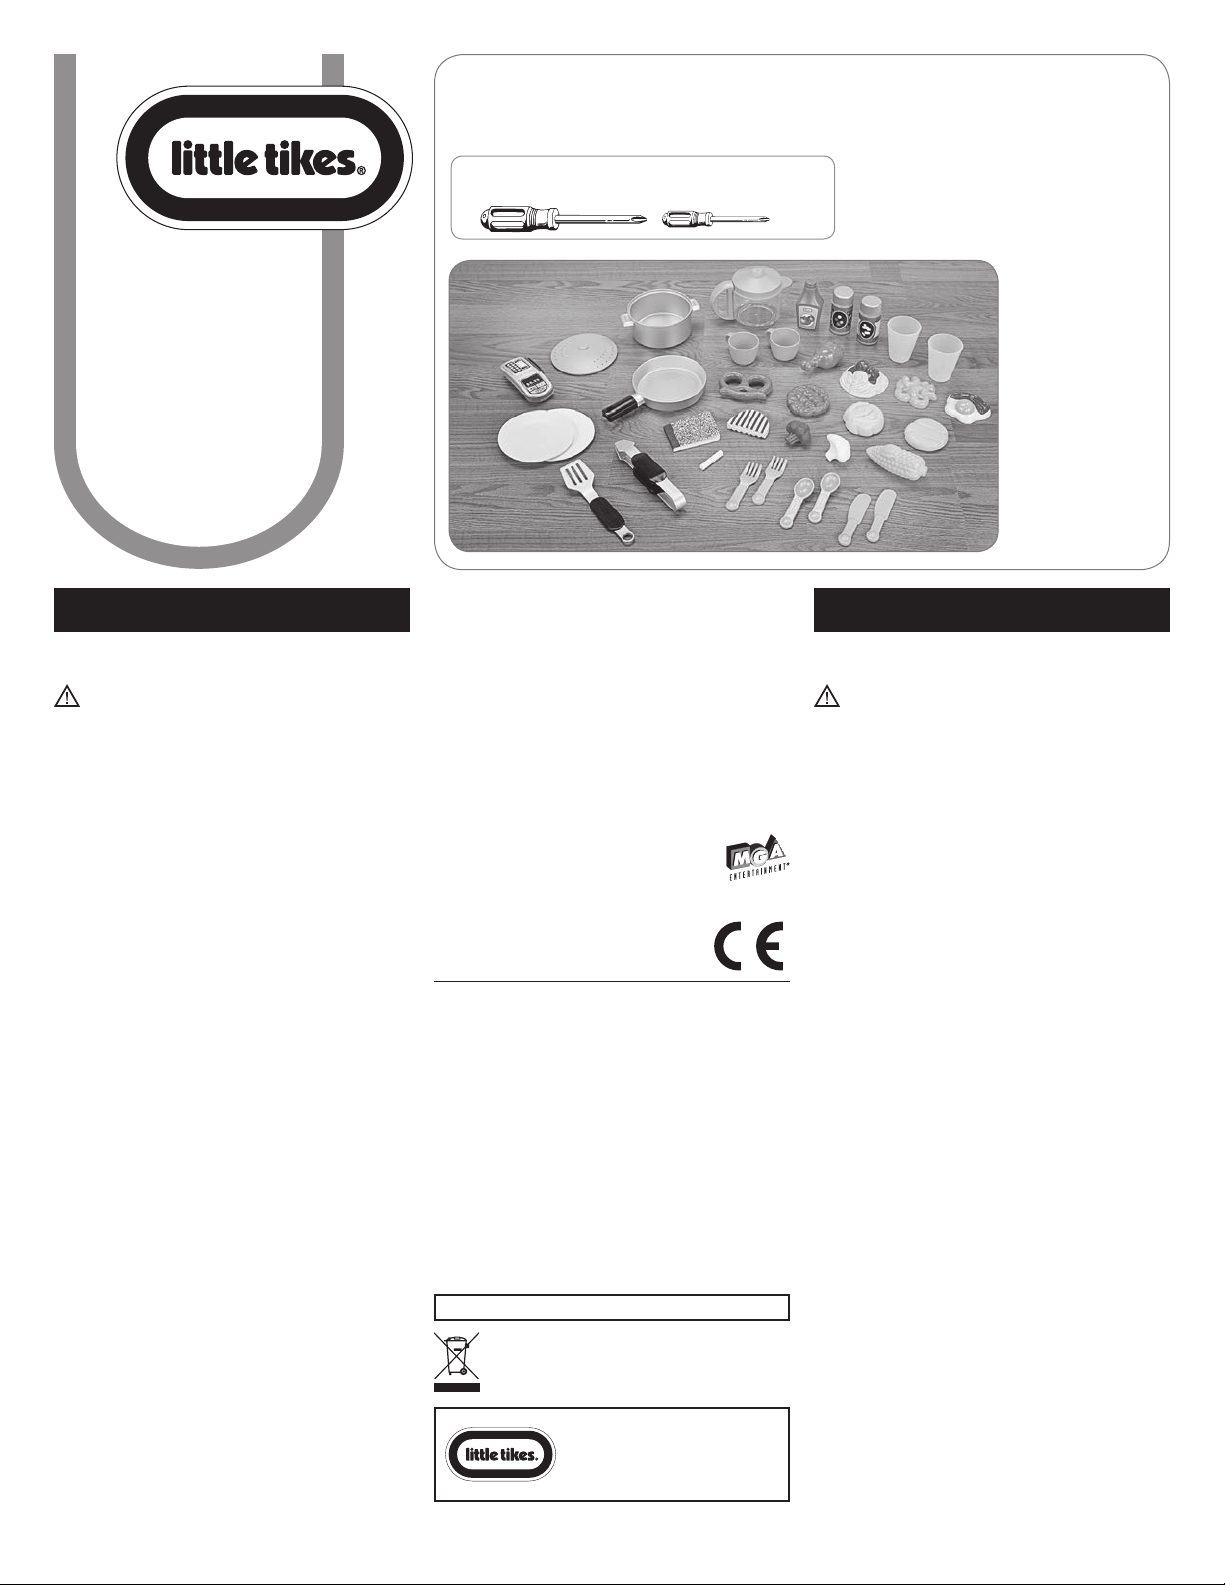
Tool Required (not included).
Outil Requis (non comprises).
Herramienta Requeridas (no incluidas).
Accessories / Accessoires
Accesorios / Zubehör
Akcesoria / Accessoires
DISPOSAL
• Disassemble and dispose of equipment in such a
manner that no hazardous conditions such as, but not
limited to, small parts and sharp edges exist at the time
equipment is discarded.
Werkzeug erforderlich (nicht enthalten).
Niezbędne narzędzia (nie są objęte zestawem).
Benodigd gereedschap (niet inbegrepen).
CONSUMER SERVICE
TOLLFREE NUMBER:
United States:
www.littletikes.com
1-800-321-0183 Monday - Friday
The Little Tikes Company
2180 Barlow Road
Hudson, OH 44236
E-mail: littletikes.cares@littletikescare.com
United Kingdom:
www.littletikes.co.uk
Little Tikes
MGA Entertainment (UK) Ltd
50 Presley Way
Crownhill
Milton Keynes MK8 0ES
Bucks, UK
E-mail: Info.LittleTikes@mgae.com
Printed in U.S.A. D.R.©2014 The Little Tikes Company
© The Little Tikes Company, an MGA Entertainment company. LITTLE TIKES® is a trademark of Little
Tikes in the U.S. and other countries. All logos, names, characters, likenesses, images, slogans, and
packaging appearance are the property of Little Tikes. Please keep this address and packaging for
reference since it contains important information. Contents, including specications and colors, may
vary from photos depicted on package. Instructions included. Please remove all packaging including
tags, ties & tacking stitches before giving this product to a child.
LIMITED WARRANTY
The Little Tikes Company makes fun, high quality toys. We warrant to the original purchaser
that this product is free of defects in materials or workmanship for one year * from the date of
purchase (dated sales receipt is required for proof of purchase). At the sole election of The Little Tikes
Company, the only remedies available under this warranty will be the replacement of the defective
part or replacement of the product. This warranty is valid only if the product has been assembled
and maintained per the instructions. This warranty does not cover abuse, accident, cosmetic issues
such as fading or scratches from normal wear, or any other cause not arising from defects in material
and workmanship. *The warranty period is three (3) months for daycare or commercial purchasers.
U.S.A and Canada: For warranty service or replacement part information, please visit our
website at www.littletikes.com, call 1-800-321-0183 or write to: Consumer Service, The Little Tikes
Company, 2180 Barlow Road, Hudson OH 44236, U.S.A. Some replacement parts may be available
for purchase after warranty expires—contact us for details.
Outside U.S.A and Canada: Contact place of purchase for warranty service. This warranty gives
you specic legal rights, and you may also have other rights, which vary from country/state to
country/state. Some countries/states do not allow the exclusion or limitation of incidental or
consequential damages, so the above limitation or exclusion may not apply to you.
Please keep this manual as it contains important information.
‘Let’s care for the environment!’
The wheelie bin symbol indicates that the product must not be disposed of with other
household waste. Please use designated collection points or recycling facilities when
disposing of the item. Do not treat old batteries as household waste. Take them to a
designated recycling facility.
Visit our website at
www.littletikes.com
to register your product online and
to enter our sweepstakes.
(No purchase nece ssar y)
1
FRANÇAIS
LITTLE TIKES KITCHEN & RESTAURANT™
Âge: de 2 ans et plus
Prière de conserver le reçu comme preuve d’achat.
AVERTISSEMENT:
UN ADULTE DOIT EFFECTUER
L’ASSEMBLAGE.
• Conserver ces instructions à titre de référence.
• Avant l’assemblage du produit, ce paquet contient des
petites pièces de matériel qui peuvent présenter un risque
d’étouement, et des bords et des arrondis tranchants.
Tenir hors de portée des enfants avant l’assemblage
complet.
• Ce produit n’est conçu que pour une utilisation
domestique et familiale, à l’intérieur.
• Ce produit est destiné à des enfants de 2 ans et plus.
• Ne laissez pas les enfants grimper, s’asseoir, jouer ou
se mettre debout sur la surface de la table. De tels
comportement peuvent rendre la table instable.
• Il est recommandé de se protéger les yeux lors du
montage en portant des lunettes de sécurité.
• Lavez soigneusement les accessoires avant tout contact
avec des aliments ou des boissons.
INFORMATIONS SUR LA SÉCURITÉ DES PILES :
• Conserver ces instructions à titre de référence.
• Nécessite 3 piles alcalines « AA » (LR6) (non incluses).
(Les piles peuvent être remplacées par des piles
rechargeables.)
• La tension d’une batterie rechargeable entièrement
chargée est souvent inférieure à celle d’une pile
alcaline neuve. Il est donc conseillé d’utiliser des piles
alcalines au lieu de batteries rechargeables pour un
fonctionnement optimal et une durée de jeu plus
longue.
• Installez les piles avec la polarité correcte (+ et -).
• Pour éviter les fuites de piles :
1. Respecter les instructions d’installation des piles
relatives au jouet et celles du fabricant de piles.
2. Ne pas mélanger de vieilles et de nouvelles piles.
3. Ne pas mélanger les piles standards (charbon-zinc),
alcalines et rechargeables (nickel-cadmium ou nickelmétalhydride). Il ne faut utiliser que des batteries du
type recommandé ou équivalentes.
4. Quand le jouet n’est pas utilisé pendant une longue
période, enlevez les piles pour éviter une fuite possible
et l’endommagement du produit.
5. Si les piles sont mortes ou vides, retirez-les du produit.
6. Mettez les piles vides au rebut en suivant les consignes
adéquates ; ne les enterrez pas. Ne jetez pas les piles au
feu, car elles peuvent fuir ou exploser.
• S’assurer que le couvercle soit toujours correctement en
place sur le dispositif.
• Ne tentez pas de recharger des piles non rechargeables.
• Les batteries rechargeables doivent être retirées du
jouet avant d’être rechargées.
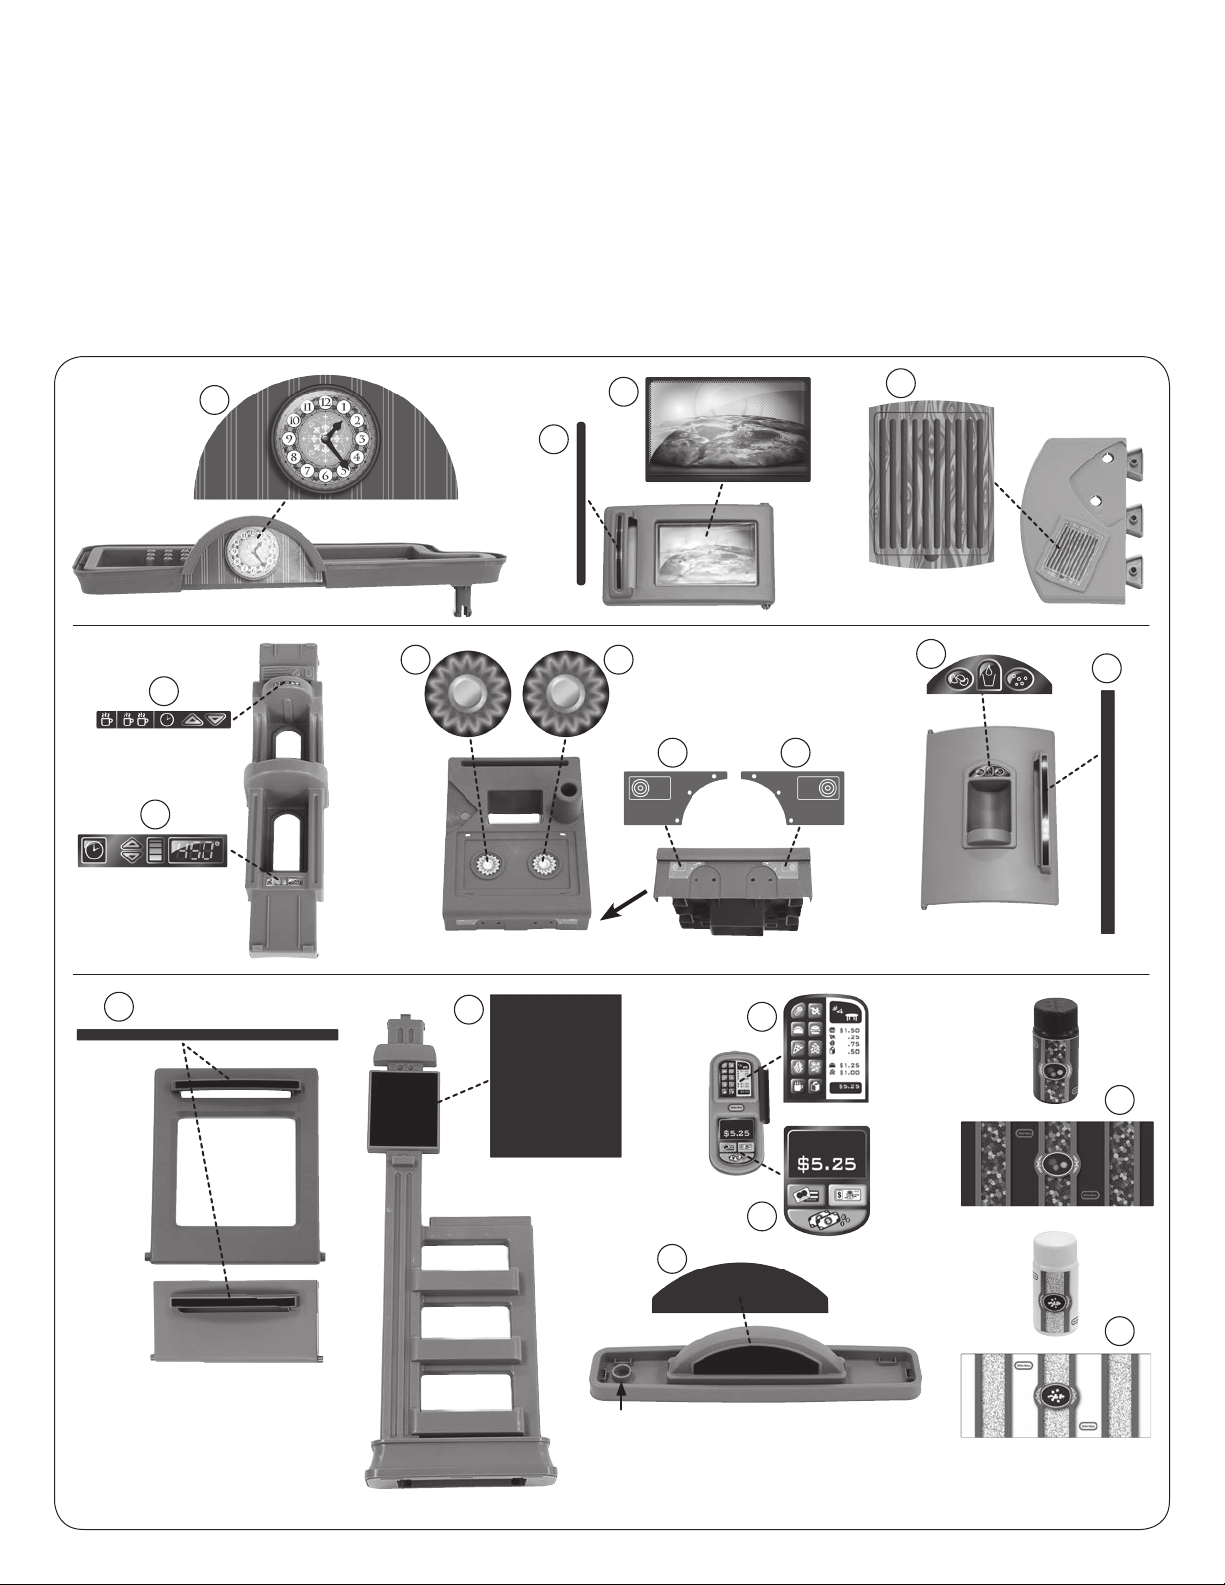
1. Decals
1. Autocollants
1. Calcomanías
1. Aufkleber
1. Naklejki
1. Stickers
Decals must be applied to a clean, dry surface. Wipe clean with a dry rag before application. Remove air from under decals by applying pressure to the decals
starting from the center, and work towards edges. NOTE: If decals bubble, prick with a pin to remove the air.
Les autocollants doivent être appliqués sur une surface propre et sèche. Essuyez avec un chion sec avant l’application. Pour retirer l’air sous les autocollants, appliquez-leur de la pression, en partant du centre et en allant vers les bords. REMARQUE : si des bulles se forment sous les autocollants, percez-les avec une aiguille
pour éliminer l’air.
Las calcomanías deben aplicarse en una supercie limpia y seca. Limpie la supercie con un trapo seco antes de colocarlas. Quite el aire atrapado debajo de las
calcomanías haciendo presión desde el centro hacia los bordes. NOTA: Si se forman burbujas en las calcomanías, pínchelas con un aller para quitarles el aire.
Die Aufkleber müssen auf sauberem, trockenem Untergrund angebracht werden. Reinigen Sie den Untergrund vor dem Anbringen der Aufkleber mit einem
trockenen Tuch. Lufteinschlüsse unter den Aufklebern lassen sich entfernen, indem Sie diese von der Mitte zu den Rändern hin herausdrücken. HINWEIS: Stechen
Sie Blasen in Aufklebern mit einer Nadel an, um die Luft austreten zu lassen.
Naklejki należy naklejać na czystą, suchą powierzchni ę. Przed naklejeniem należy wytrzeć powierzchnię suchą szmatką. Usunąć powietrze spod naklejek, dociska
jąc je od środka w stronę krawędzi. UWAGA: Jeżeli pod naklejkami znajdują się pęcherzyki powietrza, należy nakłuć je za pomocą szpilki w celu ich usunięcia.
tickers moeten worden aangebracht op een schoon en droog oppervlak. Veeg het oppervlak voor het aanbrengen schoon met een droge doek. Verwijder lucht
S
bellen onder de stickers door eerst op het midden te drukken en dan naar de rand toe te werken. OPMERKING: Prik bij luchtbellen met een naald in de sticker zodat
t kan ontsnappen.
de luch
-
-
10
1
3
5
2
6 6
8
7
4
13 14
9
18
15
11
16
17
12
Note: opening should be on left side.
Remarque : à ouvrir en partant de la gauche.
Nota: La abertura debe quedar en el lado izquierdo.
Hinweis: Die oene Stelle sollte sich auf der linken Seite benden.
Uwaga: Otwarcie powinno znajdywać się po lewej stronie.
Opmerking: de opening moet aan de linkerzijde worden geplaatst.
2
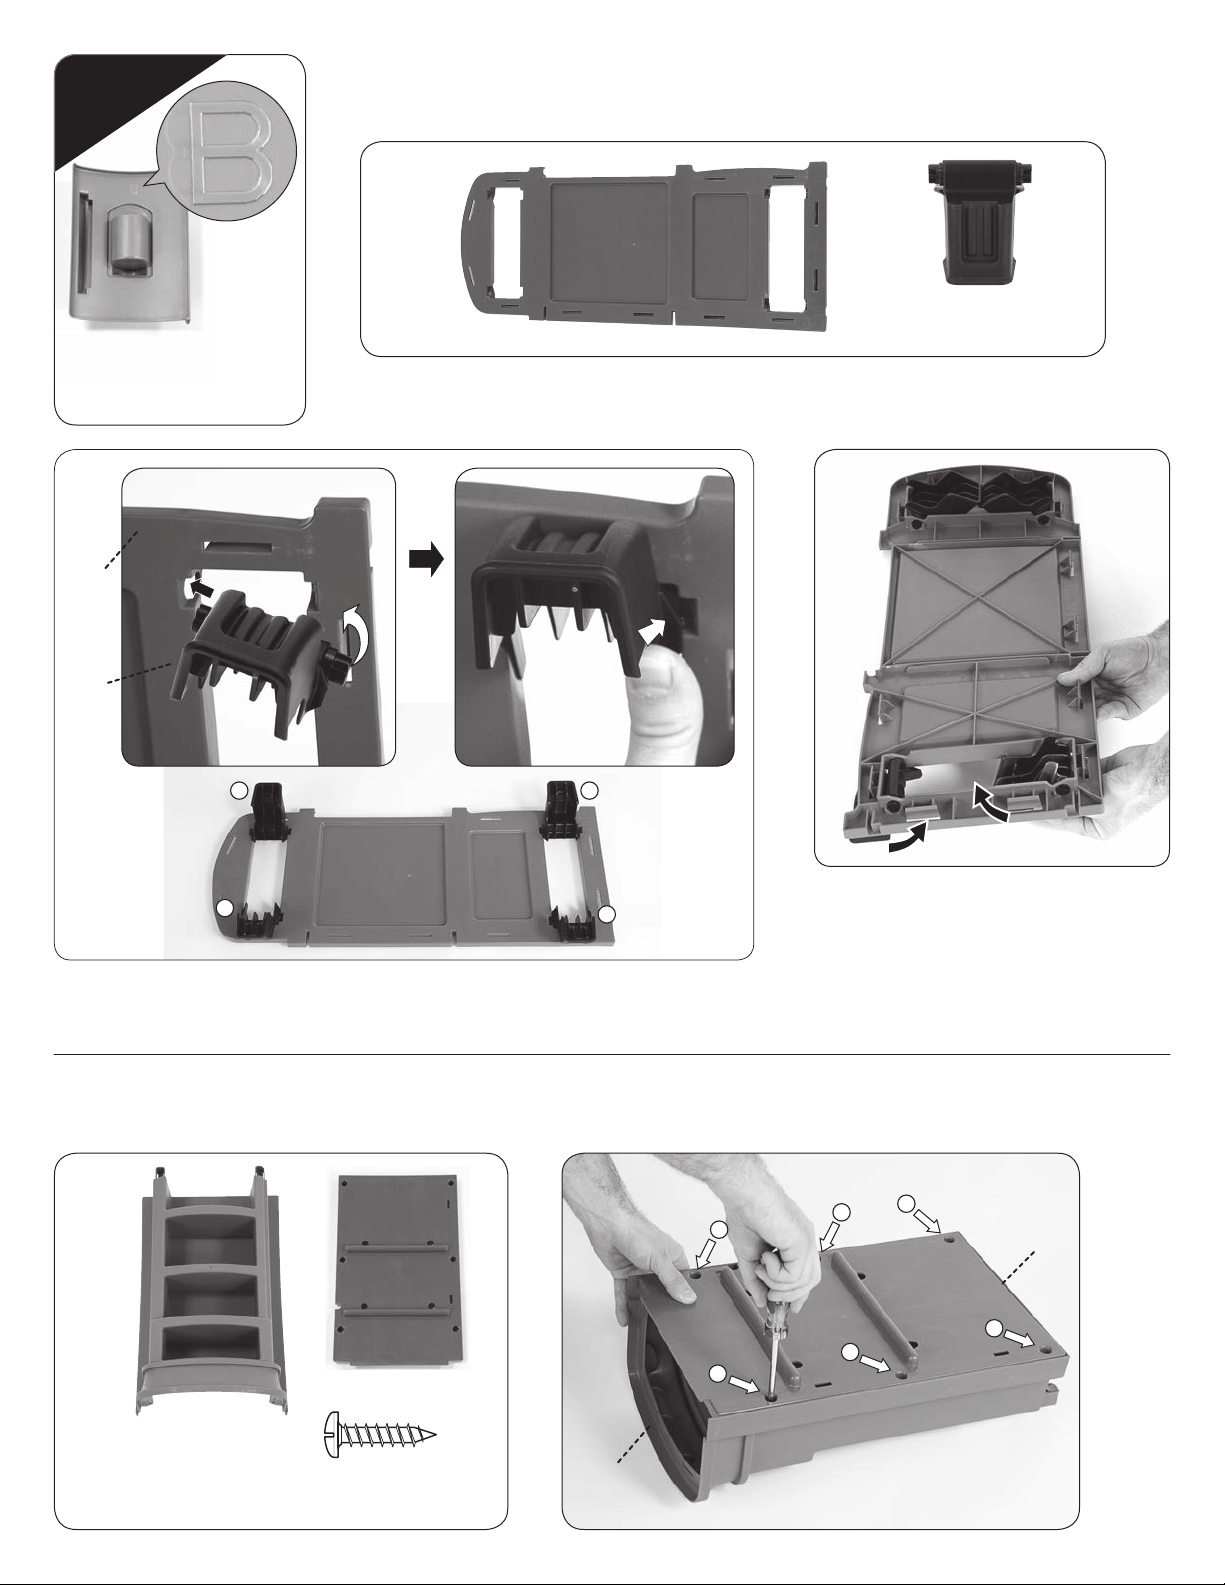
Leg assembly / Montage des pieds / Montaje de las patas /
Helpful hint
Conseil utile • Consej o útil
• Nützl icher Hinwe is
omocne wskazówki • Nuttige tips
P
B
Montage der Beine / Montaż nóg / Montage van poten
A
2
Part letter located on
the back
Lettre de la pièce au
dos de celle-ci
La letra de la pieza
está ubicada en el lado
Die Buchstaben zur Teilebezeichnung benden sich
auf der Rückseite
Litera oznaczająca część, znajduje się z tyłu
Onderdeelletter aan de achterzijde
2-1 2-2
A
posterior
AA
x4
Hardware pack A • Kit de matériel A
Piezas de montaje. Paquete A • Teilepackung A
Zestaw z częściami A • Bevestigingsmiddelenpakket A
AA
1 2
Fold legs under for remainder of assembly.
4
3
Repliez les pieds pour le reste du montage.
Pliegue las patas abajo hasta que nalice el montaje.
Die Tischbeine für den weiteren Zusammenbau einklappen.
Złożyć nogi przed rozpoczęciem kolejnego etapu montażu.
Vouw poten in voor rest van montage.
Refrigerator base assembly / Montage de la base du réfrigérateur / Montaje de la base del refrigerador /
Montage des Kühlschrank-Unterteils / Montaż podstawy lodówki / Montage voetstuk koelkast
C
3
D
3-1
6
5
4
D
x6
Hardware pack A • Kit de matériel A
Piezas de montaje. Paquete A • Teilepackung A
Zestaw z częściami A • Bevestigingsmiddelenpakket A
3
2
1
1
C
3
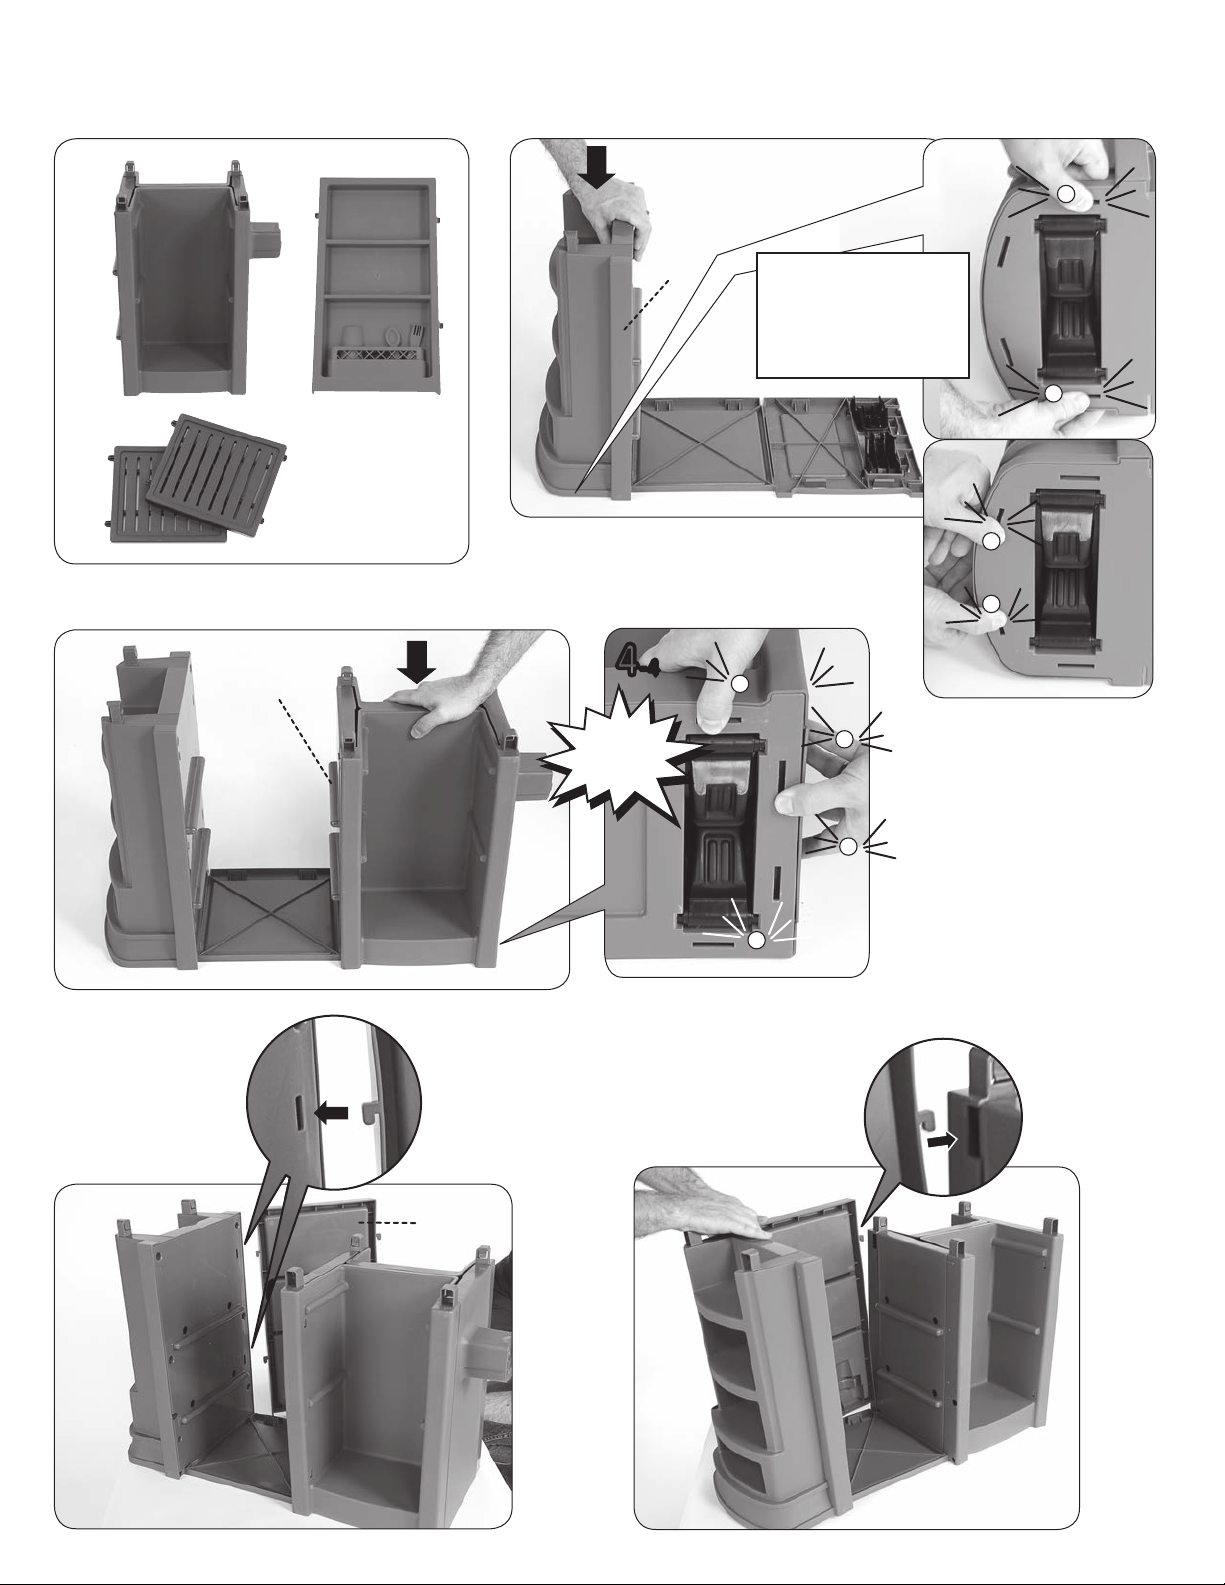
Kitchen base assembly / Montage de la base de la cuisine / Montaje de la base de la cocina /
Montage des Küchen-Unterteils / Montaż podstawy kuchni / Montage voetstuk keuken
N/O/P
Q
4
R
4-3 4-4
N/O/P
Hardware pack B
Kit de matériel B
Piezas de montaje. Paquete B
Teilepackung B
Zestaw z częściami B
Bevestigingsmiddelenpakket B
4-1
C/D
Press until SNAPS!
Exercez une pression jusqu’à entendre un CLAC.
Haga presión hasta que ENCAJE.
Drücken, bis es KLICKT
Nacisnąć do usłyszenia kliknięcia zatrzasku.
Druk totdat het VASTKLIKT.
1
4-2
1
2
3
4
4-5
Q
Snap! • Clac!
¡Encajar! • Klick!
Klik! • Klik!
4-6
2
3
4
4
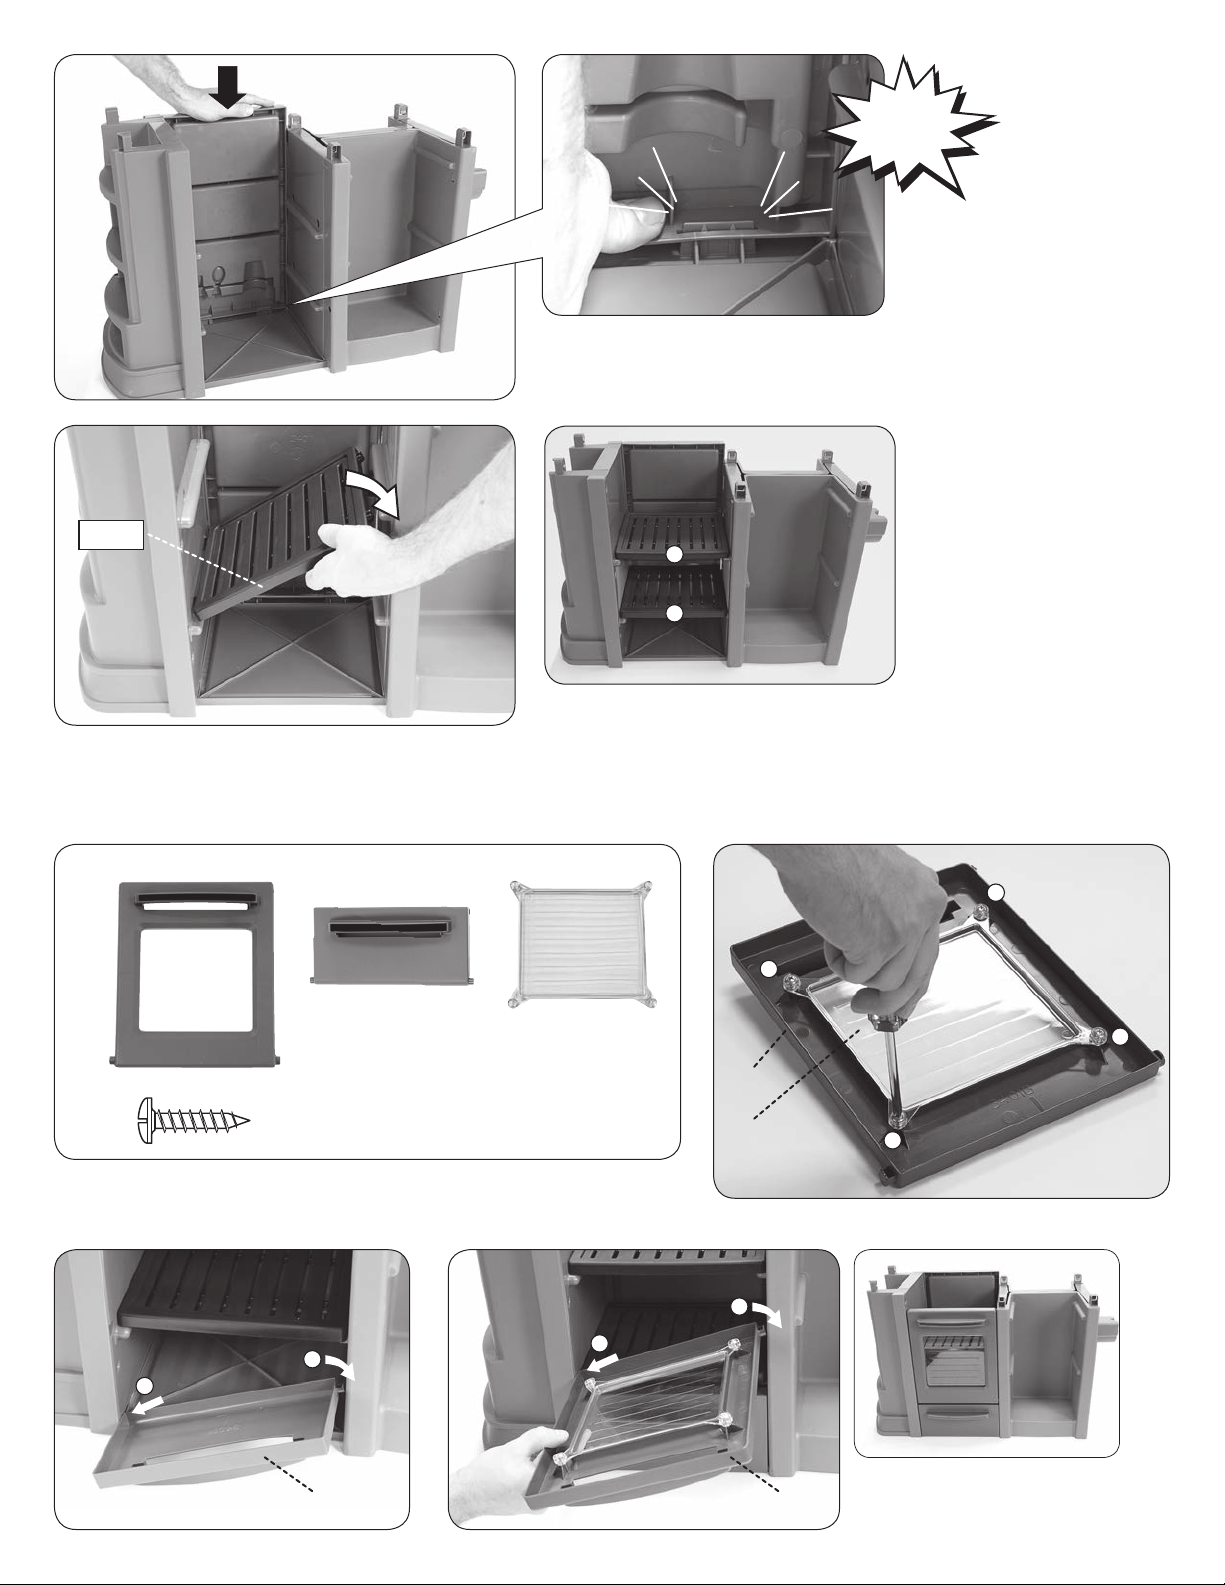
4-7
4-9
4-8
Snap! • Clac!
¡Encajar! • Klick!
Klik! • Klik!
x2
R x2
2
1
Door assemble / Montage de la porte / Montaje de la puerta /
Montage der Tür / Montaż drzwi / Montage van deurtje
5
J
x4
L
Hardware pack A
Kit de matériel A
Piezas de montaje. Paquete A
Teilepackung A
Zestaw z częściami A
Bevestigingsmiddelenpakket A
K
Hardware pack B
Kit de matériel B
Piezas de montaje. Paquete B
Teilepackung B
Zestaw z częściami B
Bevestigingsmiddelenpakket B
5-1
J
K
2
1
3
4
5-3
5-2
2
2
1
L
1
J/K
5
 Loading...