

Page 1
Installation Instructions
MRP LED
SAVE THESE INSTRUCTIONS AND DELIVER TO OWNER AFTER INSTALLATION
WARNING
T o reduce the risk of death, injury or property damage from fire, electric shock, cuts,
abrasions, falling parts, and other hazards:
• Service of the equipment must be performed by qualified service personnel.
• Installation and maintenance must be performed by a person familiar with the construction and
operation of this product and any hazards involved. All applicable codes and ordinances must
be followed.
• Read this document before installing, servicing, or maintaining this equipment or installing a
lamp. These instructions do not cover all installation, service, and maintenance situations. If
your situation is not covered, or if you do not understand these instructions or additional
information is required, contact Lithonia Lighting or your local Lithonia LIghting Distributor .
• Read and follow all warnings and instructions provided by the lamp manufacturer.
READ AND FOLLOW ALL SAFETY INSTRUCTIONS!
IMPORTANT SAFETY INSTRUCTIONS
WARNING
Before installing, servicing, or maintaining this equipment, follow these general precautions.
To reduce the risk of electrocution:
• Make sure the equipment is properly grounded.
• Always de-energize the circuit and/or equipment before connecting to, disconnecting
from, or servicing the equipment.
T o reduce the risk of fire:
• Use supply conductors with a minimum installation temperature rating as specified on
equipment.
T o reduce the risk of personal injury from cuts, abrasions, or falling p art s:
• Wear gloves to prevent cuts or abrasions from sharp edges when removing from carton,
handling and maintaining this equipment.
• Do not use abrasive materials, glass cleaners or other solvents on reflector or lens.
These substances may damage equipment and cause parts to eventually break and
fall.
• Do not install a damaged fixture.
Lithonia Lighting, a division of Acuity Brands Lighting, Inc., assumes no responsibility for claims arising out of
improper or careless installation or handling of this product.
SAVE THESE INSTRUCTIONS
Lithonia Lighting Outdoor
One Lithonia Way, Conyers, GA 30012
Phone: 800-279-8041 Fax: 770-918-1209
www.lithonia.com
Part Number: RJ521312LED Rev A
Revision Date: 03-31-10
Page 2
Installation Instructions
MRP LED
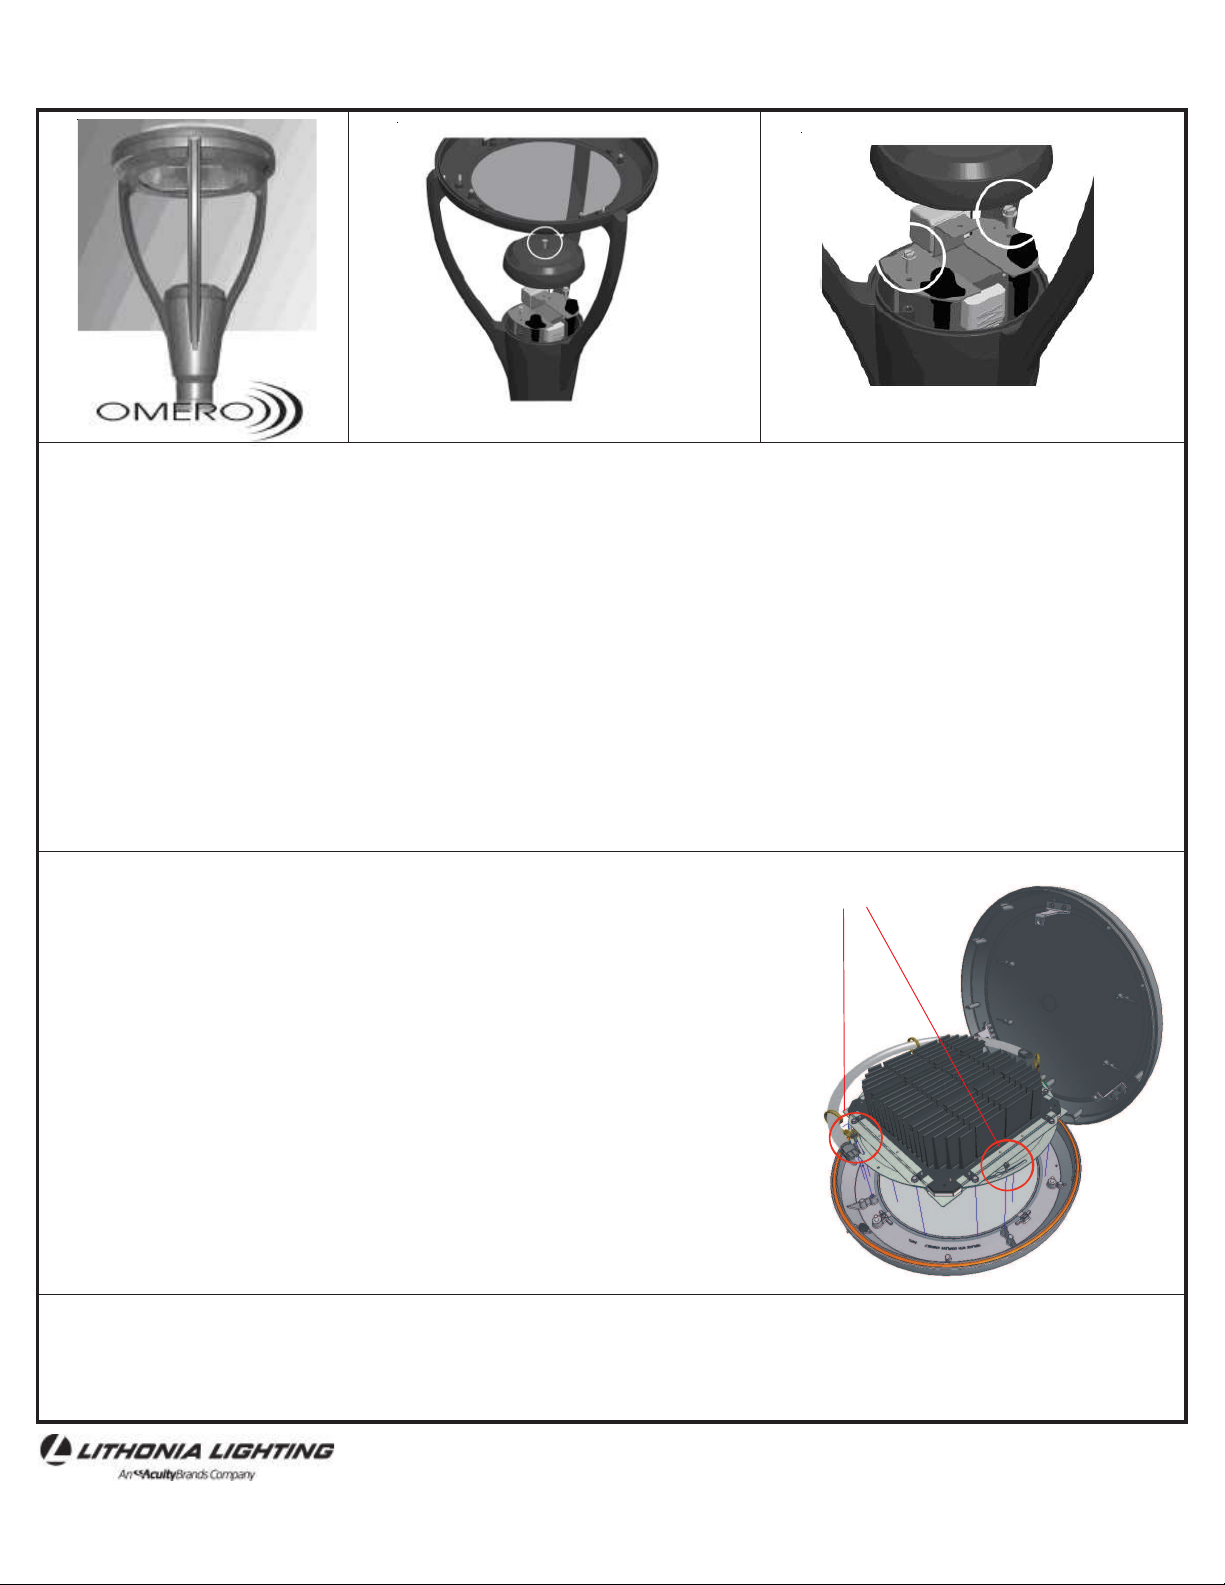
Figure 1
Tools Required: 5/32" hex wrench. 1/4" and 3/8" nut driver. 3/4" socket with extension.
1. Make electrical connections to the fixture before installing it into the pole. Make certain that all power is disconnected prior to
installing the fixture.
2. Using a 5/32" hex wrench, remove the driver compartment cover 1/4 - 20 screw (provided). Keep for re-installation. See Figure 1.
3. Using a 3/8" nut driver remove the (2) power door retaining screws and detach the reflector and power supply using the quickdisconnects. Keep the removed hardware for re-installation. See Figure 2.
4. With the power door removed, and the electrical connections made, slide the internal slipfitter and fixture into the pole. Using a 3/4"
socket with extension, tighten the internal slipfitter. Do not over tighten. Over tightening will cause stripping and void all warranties.
The fixture should be level on the pole and should not move or rotate.
5. Re-connect the reflector and power supply using the quick disconnects removed earlier in step 4. Using a 3/8" nut driver reinstall the
(2) power door retaining screws. Using a 5/32" hex wrench, re-install the driver compartment cover and tighten the (1) one driver
compartment 1/4 - 20 screw. Do not over tighten. Over tightening will cause stripping and void all warranties.
To access fixture for aiming the LED source:
Figure 2
Figure 3
1. Disconnect power.
2. Loosen the three optical door retaining screws.
3. Using a ¼” nut driver, remove the four optic ring retaining screws. See Figure 3.
4. Lift the optic ring, heat sink, and wiring harness as one assembly and rotate in
90 degree increments. The optic ring accommodates an additional 15 degree
slide adjustment to better direct light distribution based on application.
Note: The wiring harness is held in place by zip ties which can be removed if
required when rotating the assembly. All zip ties must be replaced and harness
secured to the optic ring prior to placing the fixture into service.
5. When aiming is complete, re-install the four optic retaining screws and tighten
them with a ¼” nut driver.
6. Close the optical top and re-tighten the three optical door retaining screws. Do
not over tighten. Over tightening will cause stripping and void all warranties.
TROUBLESHOOTING
If this fixture fails to operate properly, check to make sure:
• The fixture is wired correctly. • The fixture is grounded correctly. • The line voltage at the fixture is correct.
©2010 Acuity Brands Lighting, Inc.
All Rights Reserved. Rev. 04/10
Lithonia Lighting Outdoor
One Lithonia Way, Conyers, GA 30012
Phone: 800-279-8041 Fax: 770-918-1209
www.lithonia.com
Part Number: RJ521312LED Rev A
Revision Date: 03-31-10
 Loading...