

Page 1
Page 2

Luminaire Variant Mounting Kits
LDN4 Hangers bars (Included)
LDN4 SQ
LDN6
LDN6 SQ
These installation instructions are used for installing the following luminaires and kits
Identification of the downlight luminaire …………......…………………………………… Page 2
Installation of round variant ……………………………………………….………..……… Page 3
Installation of square variant ………………………………………………………………. Page 5
Installation of emergency battery pack …………………………………………………… Page 6
A) Identification of Downlight Luminaire Part
CJ5201053 Rev. E
Page 2
© Acuity Brands Lighting, Inc. 2016
All Rights Reserved.
LDN 4” and 6” Downlight
INSTALLATION INSTRUCTIONS
LDN 6”
Downlight
LDN 4”
Downlight
Lithonia Lighting
1400 Lester Road Conyers Georgia 30012
P 800 315 4935 F 770 860 3129
www.Lithonia.com
Page 3
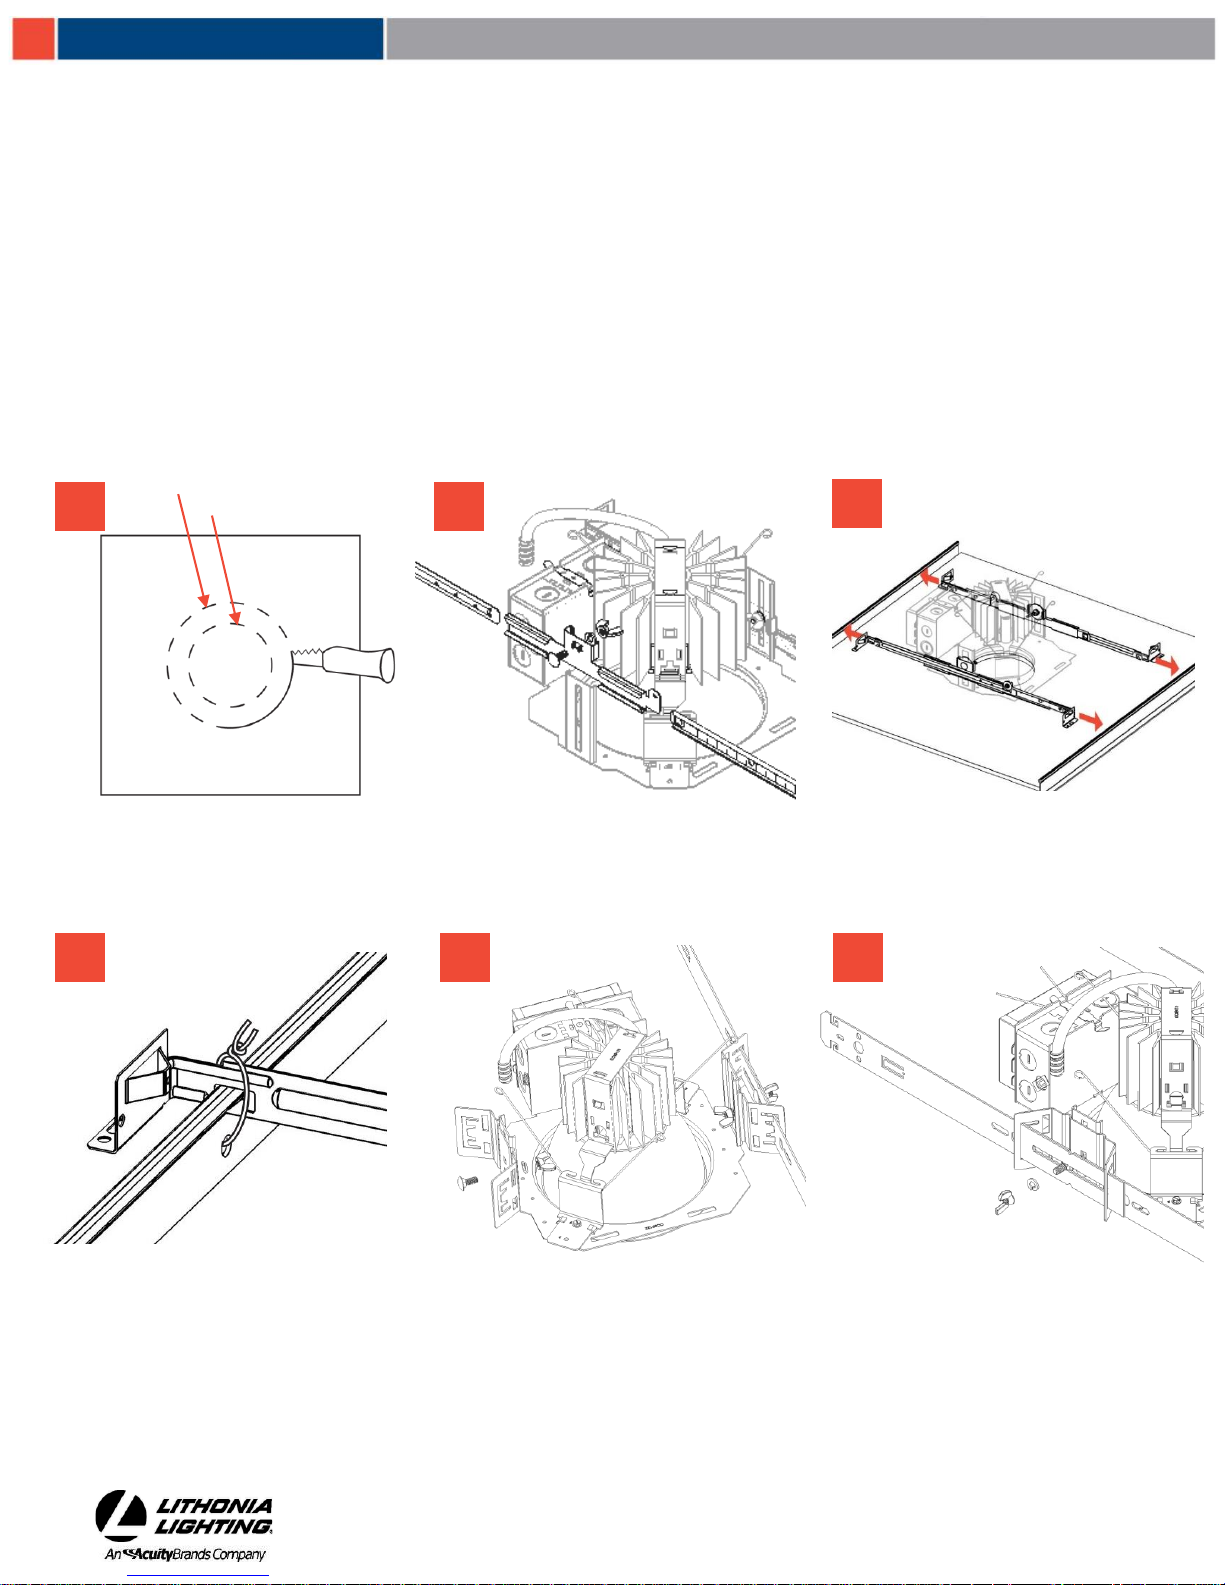
LDN 6” – 7” hole
LDN 4” – 4-3/4” hole
Cut ceiling opening slightly larger than the
outside diameter on the mounting frame.
4” Ceiling opening: 4-3/4” (12.1cm). 6”
Ceiling opening: 7” (17.8cm)
C) Lay-in Panel T-bar Ceiling Installation
CJ5201053 Rev E
Page 3
© Acuity Brands Lighting, Inc. 2016
All Rights Reserved.
B) Important Safety Information - For Your Protection, Read Carefully
Warning: Risk of fire. Do not install insulation within 3 inches of fixture sides or wiring compartment, nor above fixture in such a manner
as to entrap heat.
Electric current can cause painful shock or serious injury unless handled properly. For your safety, always remember the following:
• Turn off the supply power.
• Ground the fixture to avoid potential electrical shocks.
• Do not handle an energized fixture or energize any fixture with wet hands, when standing on a wet or damp surface, or in
water.
1
2
Adjust channel bars to the correct spacing
between T-bar. See Page 5 for procedure
for non-accessible ceiling installation.
3
Assemble the channel bars to each side of the
of the mounting frame with the included
hardware. Leave the hardware loose to adjust
the position of the frame in the ceiling.
Lithonia Lighting
1400 Lester Road Conyers Georgia 30012
P 800 315 4935 F 770 860 3129
www.Lithonia.com
4
6
5
Alternate bar hangers used for EL/ELR:
Attach the adjustable brackets to the fixture
using the hardware provided. Wing nuts
should face inward for adjustment through
the ceiling.
Place (2) hanger bars together so that the
formed tabs engage the slots to form one
long rigid hanger bar. Aligning the ”V”
cutouts in the hanger bar will set the
spacing for a 24” ceiling.
4
Secure channel bars to T-bar by means of a
fastener (wire ties, screws, etc.)
Page 4
C) Lay-in Panel T-bar Ceiling Installation (Cont.)
10
11
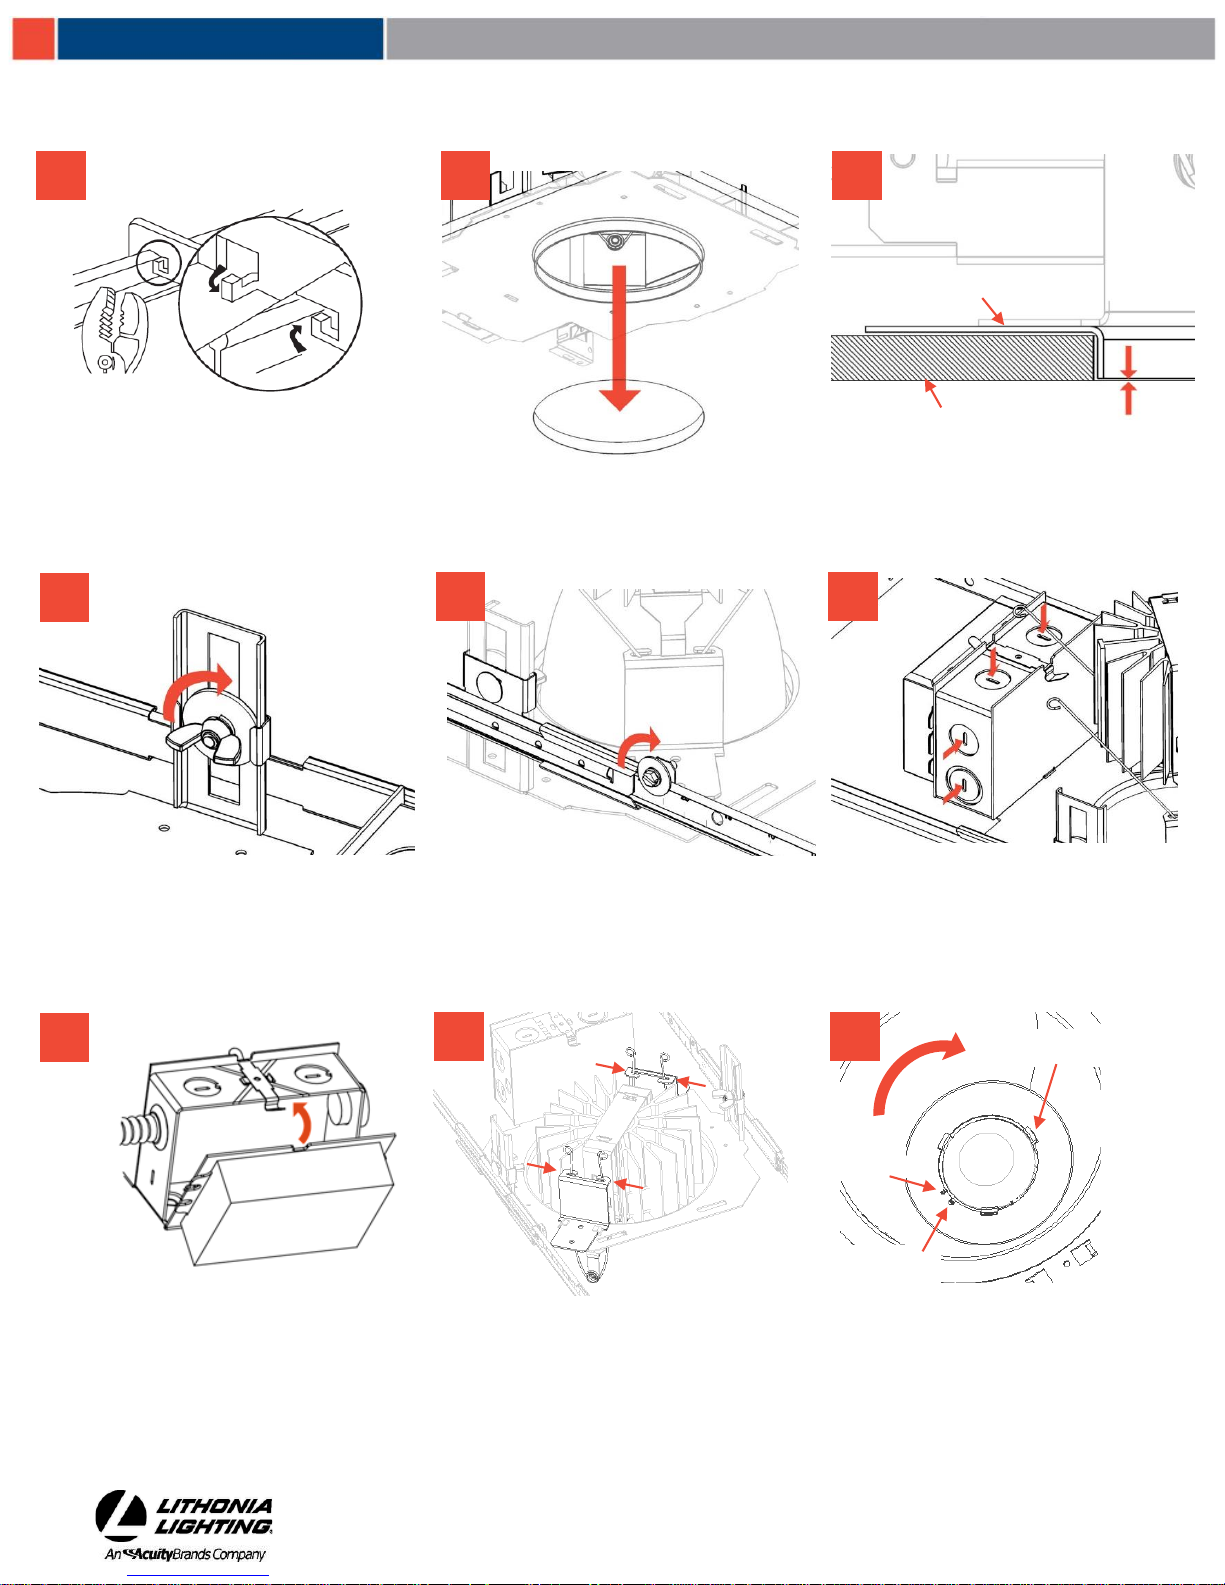
Re-tighten both vertical adjustment nuts.
12
Re-tighten both channel bar clamping
screws.
CJ5201053 Rev. E
Page 4
© Acuity Brands Lighting, Inc. 2016
All Rights Reserved.
13
Remove knockouts on junction box to feed
power supply to fixture. Supply wire must
meet applicable electrical codes and be
rated for a minimum of 90°C. Junction box
is thru-wire rated for 8-No. 12 AWG
conductors (4in-4out).
14
Complete necessary splices. Snap the
door/driver assembly onto the junction box.
15
Squeeze wire springs on the light engine and
insert each leg of the spring into the slots on
the brackets on either side of the opening in
the mounting frame. Pull the light engine
down so the looped end of the wire spring
rests on the top of the bracket.
Hole
Tab on Light Engine
Lithonia Lighting
1400 Lester Road Conyers Georgia 30012
P 800 315 4935 F 770 860 3129
www.Lithonia.com
Trim Slot
Align the opening in the trim with the tabs
on the light engine. Rotate the trim
clockwise until trim slot aligns with the
hole in the trim holder. Secure trim with
provided screw. Push the light engine up
so it flush with the ceiling.
8
9
Position mounting frame through opening
in ceiling.
Ceiling Line
Mounting Frame
Draw-down
Adjust the mounting frame vertically to align
the bottom edge of the draw-down to either
flush or slightly above the ceiling line.
7
Locate the T-bar slots near the ends of the
bar hangers, bend the tabs out at 45 degree
angle from the bar hanger at each end. Snap
the bar hangers over the ceiling T-bars for a
secure fit. Or the use of a fastener (wire tie,
screw, etc.) is acceptable as well.
Page 5

CJ5201053 Rev E
Page 5
© Acuity Brands Lighting, Inc. 2016
All Rights Reserved.
Lithonia Lighting
1400 Lester Road Conyers Georgia 30012
P 800 315 4935 F 770 860 3129
www.Lithonia.com
1
Mount to ceiling structure with flanges on
channel bars resting against the bottom faces
of the joists. Drive included nail into joist to
secure. Move vertical adjustment to lowest
point. For WALLWASH applications, ensure the
junction box is oriented either directly toward
or away from the washed wall. Trim rotates
only in 1800.
D) Non-accessible Ceiling Installation (e.g. plaster, drywall, etc.)
5
Bend (4) bar hangers per fixture at right
angles at the row of (3) holes 2 inches from
one end of the bar hangers to attach to
ceiling joists.
4
4
3
Alternate bar hangers used for EL/ELR:
Attach the adjustable brackets to the fixture
using the hardware provided. Wing nuts
should face inward for adjustment through
the ceiling.
Place (2) hanger bars together so that the
formed tabs engage the slots to form one
long rigid hanger bar. Aligning the ”V”
cutouts in the hanger bar will set the
spacing for a 24” ceiling.
6
Secure channel bars to Hat Channel by
means of a fastener (wire ties, screws, etc.)
2
Secure channel bars to Hatch Channel by
means of a fastener (wire ties, screws, etc.)
Page 6

CJ5201053 Rev E
Page 6
© Acuity Brands Lighting, Inc. 2016
All Rights Reserved.
F) Battery Pack Installation
1
Install battery pack across hanger bars engaging
the battery tray slots onto the hanger bars. The
battery tray is allowed to float to accommodate
different installation situations.
Lithonia Lighting
1400 Lester Road Conyers Georgia 30012
P 800 315 4935 F 770 860 3129
www.Lithonia.com
E) Ceiling Hole for Square Luminaire Variant
1
Using the square template, sketch the hole
on the ceiling.
2
READ SECTION C-1 PRIOR TO CONTINUING.
Use a laser or other accurate method to
ensure that your template marks are
aligned.
3
Drill a small hole at two corners of the
sketched template.
4
Using a keyhole saw, cut on sketched line.
Return to section C-2 to complete the
installation.
LDN4SQ 5 1/8 X 5 1/8”
LDN6SQ 6 11/16” X 6 11/16”
Page 7

Page 8

Variante du luminaire Ensemble de montage
LDN4 Barres de suspension (incluses)
LDN4 SQ
LDN6
LDN6 SQ
Ces instructions d’installations servent pour l’installation des luminaires et des ensembles suivants
Identification du plafonnier…………......……………………………………........................… Page 7
Installation de la variante ronde……….……………………………………….…………..…… Page 8
Installation de la variante carrée……….……………………………………….…………….… Page 10
Installation de la batterie d'urgence ……………………………………………………………. Page 11
A) Identification de pièces du plafonnier
CJ5201053 Rév. E
Page 7
© Acuity Brands Lighting, Inc. 2016
Tous droits réservés.
Plafonnier LDN 4 et 6 po
INSTRUCTIONS D’INSTALLATION
LDN 6 po
Plafonnier
LDN 4 po
Plafonnier
Luminaire Lithonia
1400 Lester Road Conyers Georgia 30012
P 800 315 4935 F 770 860 3129
www.Lithonia.com
Page 9

Orifice LDN 6 et 7 po
Orifice LDN4 po -de 4-3/4 po
Pratiquer une ouverture au plafond légèrement
plus grande que le diamètre extérieur du cadre
de montage. Ouverture au plafond de 4pouces :
4-3/4 pouces (12,1cm) Ouverture au plafond de
6 pouces : 7pouces (17,78 cm).
C) Installation de la barre en T dans le panneau du plafond
CJ5201053 Rév. E
Page 8
© Acuity Brands Lighting, Inc. 2016
Tous droits réservés.
B) Consignes de sécurité importantes – Pour votre protection, lire attentivement
Avertissement : Risque d’incendie. Ne pas installer d’isolation à moins de 3 pouces des côtés du luminaire ou du boîtier de câblage, ni
au-dessus du luminaire d’une manière qui capte la chaleur
Le courant électrique peut causer des décharges douloureuses ou des blessures graves en cas de manipulation inadéquate. Pour
votre sécurité, ne jamais oublier de :
• Couper l’alimentation électrique.
• Mettre le luminaire à la terre afin d’éviter d’éventuelles décharges électriques.
• Ne pas manipuler un luminaire sous tension ni activer un luminaire en ayant les mains mouillées, en vous tenant debout sur
une surface mouillée ou humide, ou dans de l’eau.
1
2
Ajuster les canaux à la barre avec
l’espacement adéquat entre la barre en T.
Voir la page 4 pour la procédure pour une
installation au plafond impossible.
3
Assembler les barres de canal à chaque côté du
cadre de montage avec le matériel de fixation
inclus. Laisser la fixation lâche afin d’ajuster la
position du cadre au plafond.
Luminaire Lithonia
1400 Lester Road Conyers Georgia 30012
P 800 315 4935 F 770 860 3129
www.Lithonia.com
6
5
Barres de suspensions alternatives utilisées
pour les luminaires EL/ELR : Fixez les
supports réglables au luminaire à l’aide du
matériel fourni. Les écrous papillons doivent
être orientés vers l’intérieur pour permettre
le réglage à travers le plafond.
Placez les (2) barres de suspension l’une sur
l’autre de sorte que les languettes ainsi
formées s’emboîtent dans les fentes pour
former une longue barre de suspension
rigide. Alignez les encoches en « V » dans la
barre de suspension pour régler l’espacement
entre les carreaux de plafond de 24 po
4
Fixer les canaux à la barre en T à l’aide de
ligatures.
Page 10

C) Installation de la barre en T dans le panneau du plafond (Suite)
10
11
Resserrer les deux écrous à réglage vertical.
12
Resserrer les deux vis de serrage du canal.
CJ5201053 Rév. E
Page 9
© Acuity Brands Lighting, Inc. 2016
Tous droits réservés.
13
Enlever les alvéoles défonçables sur le boîtier de
raccordement afin de raccorder l’alimentation
électrique au luminaire. Le fil d’alimentation doit
satisfaire aux codes d’électricité applicables et être
coté pour un minimum de 90° C. Le boîtier de
raccordement utilise un fil coté comme conducteurs
n°8 de 12AWG (4 entrants et 4 sortants).
14
Effectuer les épissures nécessaires.
Enclencher l’assemblage porte-conducteur
au boîtier de raccordement.
15
Presser les ressorts des câbles sur le moteur du
luminaire et insérer chaque jambe du ressort dans
les encoches sur les supports de chaque côté de
l’ouverture du cadre de montage. Tirer le boîtier
du moteur du luminaire pour que le ressort du
câble se retrouve sur le dessus du support.
Orifice
Languette au-dessus du
moteur du luminaire
Luminaire Lithonia
1400 Lester Road Conyers Georgia 30012
P 800 315 4935 F 770 860 3129
www.Lithonia.com
Encoche
Aligner l’ouverture de l’encoche avec les languettes
du moteur du luminaire. Faire tourner l’encoche
dans le sens des aiguilles d’une montre jusqu’à ce
que l’encoche s’aligne avec le trou dans le support
de l’encoche. Fixer l’encoche avec la vis fournie.
Pousser le boîtier du moteur du luminaire vers le
haut afin qu’il affleure le plafond.
8
9
Positionner le cadre de montage dans
l’ouverture au plafond.
Ajuster le cadre de montage verticalement
afin d’aligner le rebord inférieur du luminaire
pour qu’il affleure ou soit légèrement au-
dessus de la ligne de plafond.
Ligne de plafond
Cadre de montage
à tirer vers le
bas
7
Localisez les fentes de la barre en T aux
extrémités des barres de suspension et pliez
les languettes vers l’extérieur à un angle de
45 degrés par rapport à la barre de
suspension à chaque extrémité. Insérez les
barres de suspension sur les barres en T du
plafond pour un ajustement sécurisé.
Page 11

CJ5201053 Rev E
Page 5
© Acuity Brands Lighting, Inc. 2016
All Rights Reserved.
Lithonia Lighting
1400 Lester Road Conyers Georgia 30012
P 800 315 4935 F 770 860 3129
www.Lithonia.com
1
5
4
4
3
6
Fixez les barres de canal à Hat Channel au
moyen d'une attache (attaches de fil, vis, etc.)
2
Fixez les barres de canal à Hat Channel au
moyen d'une attache (attaches de fil, vis, etc.)
Monter aux poutrelles avec les brides des
canaux se trouvant à la surface arrière des
poutrelles. Utiliser le clou fourni pour fixer le
tout à la poutrelle. Ajuster verticalement au
niveau du point le plus bas.
Barres de suspensions alternatives utilisées
pour les luminaires EL/ELR : Fixez les
supports réglables au luminaire à l’aide du
matériel fourni. Les écrous papillons doivent
être orientés vers l’intérieur pour permettre
le réglage à travers le plafond.
Placez les (2) barres de suspension l’une sur
l’autre de sorte que les languettes ainsi
formées s’emboîtent dans les fentes pour
former une longue barre de suspension
rigide. Alignez les encoches en « V » dans la
barre de suspension pour régler l’espacement
entre les carreaux de plafond de 24 po
Pliez (4) barres de suspension par
luminaire à angle droit au niveau de la
rangée de (3) trous, à 2 po de l’extrémité
des barres de suspension.
D) Plafond inaccessible pour l’installation (plâtre, cloison sèche, etc.)
Page 12

CJ5201053 Rév. E
Page 11
© Acuity Brands Lighting, Inc. 2016
Tous droits réservés.
F) Installation du bloc-batterie
1
Installez la batterie sur les barres de suspension
en engageant les fentes du plateau de la
batterie sur les barres de suspension.
Luminaire Lithonia
1400 Lester Road Conyers Georgia 30012
P 800 315 4935 F 770 860 3129
www.Lithonia.com
E) Trou de plafond pour la variante de luminaire carré
1
À l’aide du gabarit carré, faire une esquisse
du trou sur le plafond.
2
LIRE LA SECTION C-1 AVANT DE CONTINUER.
Utiliser un laser ou une autre méthode précise
afin de garantir que les indications de votre
gabarit sont alignées.
3
Percer un petit trou aux deux coins du
gabarit esquissé.
4
À l’aide d’une scie à guichet, coupez le long
de la ligne esquissée. Retourner à la
section C-2 pour terminer l’installation
LDN4SQ 5 1/8 X 5 1/8”
LDN6SQ 6 11/16” X 6 11/16”
 Loading...