

Page 1
LED IMPORTANT SAFETY INSTRUCTIONS
MNSL LED Striplight
READ AND FOLLOW ALL SAFETY INSTRUCTIONS!
SAVE THESE INSTRUCTIONS AND DELIVER TO OWNER AFTER INSTALLATION
To reduce the risk of death, personal injury or property damage from fire, electric shock, falling parts, cuts/abrasions,
•
and other hazards please read all warnings and instructions included with and on the fixture box and all fixture labels.
Before installing, servicing, or performing routine maintenance upon this equipment, follow these general precautions.
•
Installation and service of luminaires should be performed by a qualified licensed electrician.
•
Maintenance of the luminaires should be performed by person(s) familiar with the luminaires’ construction and
•
operation and any hazards involved. Regular fixture maintenance programs are recommended.
It will occasionally be necessary to clean the outside of the refractor/lens. Frequency of cleaning will depend on
•
ambient dirt level and minimum light output which is acceptable to user. Refractor/lens should be washed in a
solution of warm water and any mild, non-abrasive household detergent, rinsed with clean water and wiped dry.
Should optical assembly become dirty on the inside, wipe refractor/lens and clean in above manner, replacing
damaged gaskets as necessary.
DO NOT INSTALL DAMAGED PRODUCT! This luminaire has been properly packed so that no parts should have
•
been damaged during transit. Inspect to confirm. Any part damaged or broken during or after assembly should be
replaced.
Recycle: For information on how to recycle LED electronic products, please visit www.epa.gov.
•
These instructions do not purport to cover all details or variations in equipment nor to provide every possible
•
contingency to meet in connection with installation, operation, or maintenance. Should further information be
desired or should particular problems arise which are not covered sufficiently for the purchaser’s or owner’s
purposes, this matter should be referred to Acuity Brands Lighting, Inc.
WARNING
RISK OF ELECTRIC SHOCK
Disconnect or turn off power before installation or
servicing.
Verify that supply voltage is correct by comparing it
with the luminaire label information.
Make all electrical and grounded connections in
accordance with the National Electrical Code (NEC)
and any applicable local code requirements.
All wiring connections should be capped with UL
approved recognized wire connectors.
CAUTION
RISK OF INJURY
Wear gloves and safety glasses at all times when
removing luminaire from carton, installing, servicing
or performing maintenance.
Avoid direct eye exposure to the light source while
it is on.
WARNING
RISK OF BURN
Allow lamp/fixture to cool before handling. Do not
touch enclosure or light source.
Do not exceed maximum wattage marked on
luminaire label.
Follow all manufacturer’s warnings, recommendations
and restrictions for: driver type, burning position,
mounting locations/methods, replacement and
recycling.
CAUTION
RISK OF FIRE
Keep combustible and other materials that can burn,
away from lamp/lens.
Do not operate in close proximity to persons,
combustible materials or substances affected by
heat or drying.
U0842 11/1/11 Page 1 of 4
Page 2
LED IMPORTANT SAFETY INSTRUCTIONS
MNSL LED Striplight
CAUTION: RISK OF PRODUCT DAMAGE
Never connect components under load.
Do not mount or support these fixtures in a manner that can cut the outer jacket or damage wire insulation.
Unless individual product specifications deem otherwise: Never connect an LED product directly to a dimmer
packs, occupancy sensors, timing devices, or other related control devices. LED fixtures must be powered
directly off a switched circuit.
Unless individual product specifications deem otherwise: Do not restrict fixture ventilation. Allow for some
volume of airspace around fixture. Avoid covering LED fixtures with insulation, foam, or other material that
will prevent convection or conduction cooling.
Unless individual product specifications deem otherwise: Do not exceed fixtures maximum ambient temperature.
Only use fixture in its intended location.
LED products are Polarity Sensitive. Ensure proper Polarity before installation.
Electrostatic Discharge (ESD): ESD can damage LED fixtures. Personal grounding equipment must be worn
during all installation or servicing of the unit.
Do not touch individual electrical components as this can cause ESD, shorten lamp life, or alter performance.
Some components inside the fixture may not be serviceable. In the unlikely event your unit may require service,
stop using the unit immediately and contact an ABL representative for assistance.
Always read the fixtures complete installation instructions prior to installation for any additional fixture specific
warnings.
Please see product specific installation instructions for additional warnings or any applicable FCC or
other regulatory statements.
Failure to follow any of these instructions could void product warranties. For a complete listing of
product Terms and Conditions, please visit www.acuitybrands.com.
Our Brands Indoor/Outdoor
LithoniaLighting
Carandini
Holophane
Reloc
Light Concepts
Acuity Brands Lighting, Inc. assumes no responsibility for claims arising out of improper orcareless installation or handling of its products.
Indoor Lighting
Gotham
Mark Architectural Lighting
Peerless
Renaissance Lighting
Winona Lighting
ABL LED General Warnings, Form No. 503.203
Outdoor Lighting
American Electric Lighting
Antique Street Lamps
Hydrel
Tersen
Controls
Dark To Light
LC&D
ROAM
Sensor Switch
Synergy
Daylighting
SunOptics
© 2010 Acuity Brands Lighting, Inc. All rights reserved. 12/01/10
U0842 11/1/11 Page 2 of 4
Page 3
REQUIRED TOOLS
HERRAMIENTAS REQUERIDAS
OUTILS REQUIS
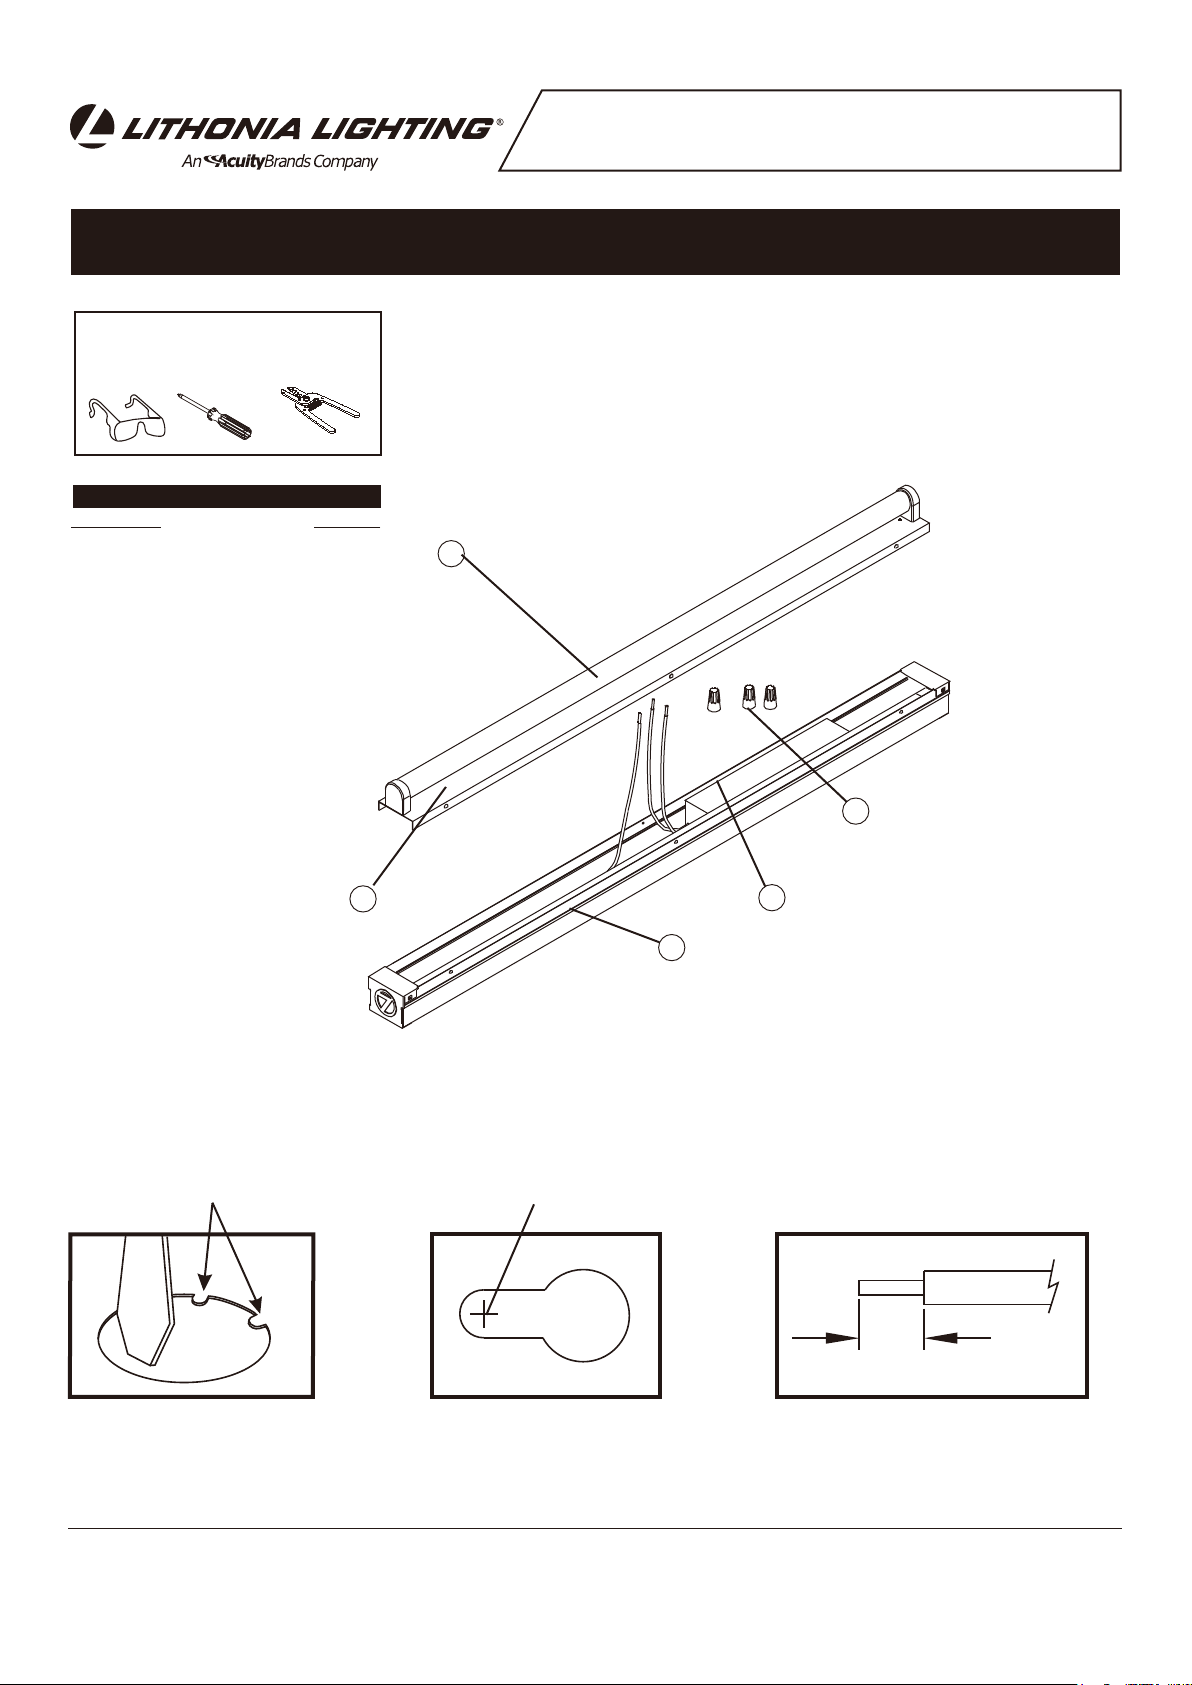
FIXTURE PACKING LIST
Description Quantity
1) Fixture Housing .................................1
2) Wireway Cover .................................. 1
3) Wirenuts* ...........................................3
4) Lamp ..................................................1
5) Ballast ................................................ 1
*Contained in Part Packs
LED IMPORTANT SAFETY INSTRUCTIONS
MNSL LED Striplight
INSTALLATION FIGURES
4
Retaining Tabs
Fixture Power
wires
Ground wire
3
2
1
6
FIGURE 1
Screw Hole Location
FIGURE 2
FIGURE 3
3/8” - 7/16” Strip Length
FIGURE 4
U0842 11/1/11 Page 3 of 4
Page 4
LED IMPORTANT SAFETY INSTRUCTIONS
STEP-BY-STEP
MNSL LED Striplight
1. Remove fixture components and parts pack(s).
Check that all parts are included. See Fig. 1.
Note: Turn off power at circuit breaker box!
*** Wireway cover with LED Lamp ***
2. Remove Wireway Cover (2) by lifting upward on ex-
posed edges of part. Start in the middle and work
outward.
3. Remove the parts pack and place it in a convenient
location during installation.
4. Determine appropriate knockout for removal in
relationship to incoming power supply. (Knockouts are
located on each end and back of the fixture.)
To remove knockouts:
Place standard screwdriver on edge of circle (on opposite
side from retaining tabs) and gently strike with hammer.
Grip edge with pliers and flex back and forth until removed.
See Fig. 2.
WIRING AND FIXTURE OPERATION CAUTION:
Connect fixture to supply wires rated for at least
90°C (194°F).
Do not use fixture on dimming circuits.
10. Cut supply cable to desired length. Strip black
and white wire leads with wire strippers to expose
3/8"-7/16" of bare metal. See Fig. 4.
11. Using Wirenuts (3) provided, connect supply
(house) wires to fixture wires - white to white, black
to black, and green to green or bare copper ground
wire.
12. Bundle wires in tight grouping to be out of the
way and reinstall Wireway Cover.
5. If using romex strain relief bushing, install the
bushing into the open hole.
6. Insert house power supply cable through open hole
or strain relief bushing.
7. Position the Fixture Housing (1) against the mount-
ing surface and with a pencil, mark the screw hole
locations to be located at the narrow section of the key-
holes. See Fig. 3.
8. Using a drill with a 1/16" drill bit
pilot holes at the marked screw hole locations. If drill bit
does not encounter a stud or wood surface, use toggle
bolts or suitable fastener depending on
conditions. If drill bit does encounter wood surface, use
#10 wood screw.
9. Partially install the Mounting Screws.
Fixture Housing against the mounting surface with the
screw heads through the keyhole mounting holes.
Slide the fixture until the screw heads are through the
narrow section of the key holes. Finish tightening the
screws to secure the fixture against the mounting
surface.
, make two small
structural
Position the
U0842 11/1/11 Page 4 of 4
 Loading...