


ISO 9001 CERTIFIED www.liteputer.com.tw
Lite-Puter
CX-12 [EUM-D]
CX-12
DMX 96 Control channel Dimming Controller
【User Manual】
Lite-Puter Enterprise Co., Ltd.
Website: www.liteputer.com.tw
E-mail: sales@liteputer.com.tw

ISO 9001 CERTIFIED www.liteputer.com.tw
Lite-Puter
CX-12 [EUM-D]
1
Introduction
CHAPTER 1. FUNCTION
1-1 Feature.......................................................................................................................2
1-2 Specification ............................................................................................................. 2
1-3 Dimension ................................................................................................................. 3
CHAPTER 2. SPECIFICATION
2-1 The feature function of control panel .....................................................................4
2-2 The feature function of rear panel .........................................................................5
CHAPTER 3. POWER SWITCH ...............................................................................6
CHAPTER 4. CHANNEL
4-1 Brightness of control channel ............................................................................... 7
4-2 Modification of brightness of control channel .....................................................8
4-3 Delete brightness of control channel ..................................................................8
CHAPTER 5. SCENE
5-1 SCENE setting........................................................................................................... 9
5-2 SCENE 1… SCENE 96 loading............................................................................... 10
CHAPTER 6. SEQUENCE
6-1 SEQUENCE Editing ................................................................................................ 12
6-2 SEQUENCE Modify.................................................................................................13
6-3 CHASE Loading ...................................................................................................... 13
6-4 CHASE Fade On/Off Setting...................................................................................14
6-5 To stop the CHASE execution...............................................................................15
CHAPTER 7. A/B CROSS FADERS SWITCHING
7-1 Save SEQUENCE into A/B CROSS FADER .......................................................... 16
7-2 Load A/B CROSS FADER .....................................................................................16
7-3 Pause A/B CROSS FADER..................................................................................... 16
CHAPTER 8. SET FUNCTION
8-1 LCD display / system default setting .................................................................. 17
8-2 output memory card loading / saving ................................................................. 18
8-3 Channel patch setting / warm up setting ............................................................19
8-4 Lock / Unlock setting .......................................................................................... 21

ISO 9001 CERTIFIED www.liteputer.com.tw
Lite-Puter
CX-12 [EUM-D]
2
Chapter 1. CX-12 Feature & Function
1-1 Feature
Dual control signal output
(1.) DMX512 / 1990 (2.) 24 channel analog signal output 0 - 10V
96 control channel, and able to control up to CH97 – CH512 by patch
4 set of PATCH editing function
96 set of scenes pre-set
( 24 set of scenes able to save on every single page function )
24 set of chase preset
Up to 64 scene step on each chase setting
2 set of individual control stick for scenes change (CROSS FADE)
Audio control available
output external memory card saving / loading ( option )
1-2 Specification
Power supply AC 90-240V, 45-63Hz
Digital control signal input / output DMX512 / 1990
Digital control channel 512channel by PATCH able to control
CH 97 – CH 512
Digital control connector XLR 5-pin
Audio input
Internal microphone MAX 120dB, output
max. value :AC 100mV
Gooseneck connector stand XLR 3 -pin, DC +12V 250mA
Memory card 64k*2
Dimension 19” 8U standard rack
482(w) x 352(h)x125(d)mm
Weight 5 Kg
Warning!
1. Recharge the battery at least 24 hours on before start running. ( power
switch turn to ON locate on rear panel )
2. After first use, the saving data may lost if without battery recharge in 7
days!

ISO 9001 CERTIFIED www.liteputer.com.tw
Lite-Puter
CX-12 [EUM-D]
3
1-3 Dimension
450
482
CX-12 96CH DMX DIMMING CONSOLE
CROSSFADER
10
9
7
5
6
8
3
4
2
1
2 2 2 2 2 2
1 1 1 1 1 1
52
76
4
28
9
7
5
6
8
3
4 6 4
3
5
10
7
8
9
6
4
3
5
10
7
8
9
10
25
1
49
73
26
2
50
74
27
3
51
75
6 6
4
3
5
4
3
5
7
8
9
10
7
8
9
10
6
4
3
5
10
7
8
9
29
5
53
77
30
6
54
78
31
7
55
79
2 2 2 2
1 1 1 1
LOAD
6
4
3
5
10
7
8
9
10
6 6
4
3
5
4
3
5
7
8
9
10
7
8
9
10
57
81
9
33
32
8
56
80
34
10
58
82
6
4
3
5
10
7
8
9
35
11
59
83
36
12
60
84
A
FADE
8
9
6
7
4
5
2
3
1
67666564636261
40
16
5 5 5
4
2
3
1
1
2
4
3
2
1
4
3
8
9
6
7
9
7
6
8
10
371338
14
9
7
6
8
10
39
15
10
5 5 5
2
1
4
3
2
1
4
3
2
1
4
3
9 9
7
6
8
7
6
8
10
10
41
17
9
7
6
8
10
421843
19
88
85 86 87 89 90 91
7271706968
5 5 5
2
1
4
3
2
1
4
3
2
1
4
3
45
21
9
7
6
8
10
44
20
10
9 9
7
6
8
7
6
8
10
10
46
22
5 5
2
1
4
3
AUDIO
2
1
4
3
9
7
6
8
10
472348
24
9
7
6
8
FADE
9392 94 95 96 SPEED
PUSH
355
32
3
3
0
MASTER
CLEAR
DIRECTOR PLUS
PAGE
LOAD
1 2
1-24
CLR
25-48
0
73-96
SC/CH
3 4
ENTER
49-72
78
415
2
B
LOAD
PAUSE
F1 F2
SET
PROG
CHASE9
6
3
F4
F3
2
1
6
4
3
5
7
8
9
10
96
86
LAMP 12VDC
POWER
BLANK
X-12
24 PROGRAM SEQUENCES
512 DIMMERS OUTPUT
96 SCENES MEMORIES
96 CONTROL CHANNELS
C
DMX
CHASER
PUSH
P
US
H
8
6
ISO 9001 CERTIFIED www.liteputer.com.tw
Lite-Puter
CX-12 [EUM-D]
4
CHAPTER 2. CX-12 SPECIFICATION
2-1 Introduction of control panel
467
91110
13
1
3
2
14
15
16
17
18
12
DIRECTOR PLUS
PROG
SC/CH
CHASE
4321
LOAD LOAD
8
PAGE
1 1 1 1 1 1 1
4 4
2 2
3 3
6 6
5 5
7 7
4 4 4 4 4
3
2 2 2
3 3
2 2
3 3
7
5
6 6 6
5 5
7 7
6 6
5 5
7 7
1 1 1 1
1-24 49-72
25-48
73-96
4 4 4 4
2 2 2
3 3 3 2 3
6 6 6
5 5 5
7 7 7
6
5
7
987
CLR ENTER0
456
CLEAR
1
4
2
3
6
5
7
DMX
8079787776757473
9 8 9
8
10 10
2625
12
49 50
9
10
8
9 8 9
8
10 10
9 8 9
8
10 10
292827
435
5251 53
323130
687
54 5655
83 848281
CROSSFADER
9 8 9 8 9
8
1010 10
9
8
10
3433
910
57 58
35 36
11 12 A
59 60
12 SET3
F1
B
F4F3F2
FADE
LOAD
PAUSE
5 5 5 5 5 5 5
1 1
3 3
2 2
4 4
1 1 1 1 1
4
2
3 3 3
2 2
4 4
3 3
2 2
4 4
8 8
6 6
7 7
1010
9 9
8 8 8 8 8
6
7
6 6
7 7
6 6
7 7
10 91010
9 9
1010
9 9
X-12
C
5 5 5 5 5
1 1 1
AUDIO
1
3 3 3
2 2 2
4 4 4
3
2
4
96 CONTROL CHANNELS
24 PROGRAM SEQUENCES
512 DIMMERS OUTPUT
96 SCENES MEMORIES
1
3
2
4
8 8 8 8
6 6 6
7 7 7 6 7
101010
9 9 910 9
8
6
7
10
9
CX-12 96CH DMX DIMMING CONSOLE
6261
371338
14
85 86
656463
401639
15
41
17
8887 89
686766
42
18
442043
19
90 9291
FADE
SPEED
7069
452146
22
93 94
7271
482447
23
9695 CHASER
5
8
9
10
MASTER
BLANK
POWER
LAMP 12VDC
PUSH
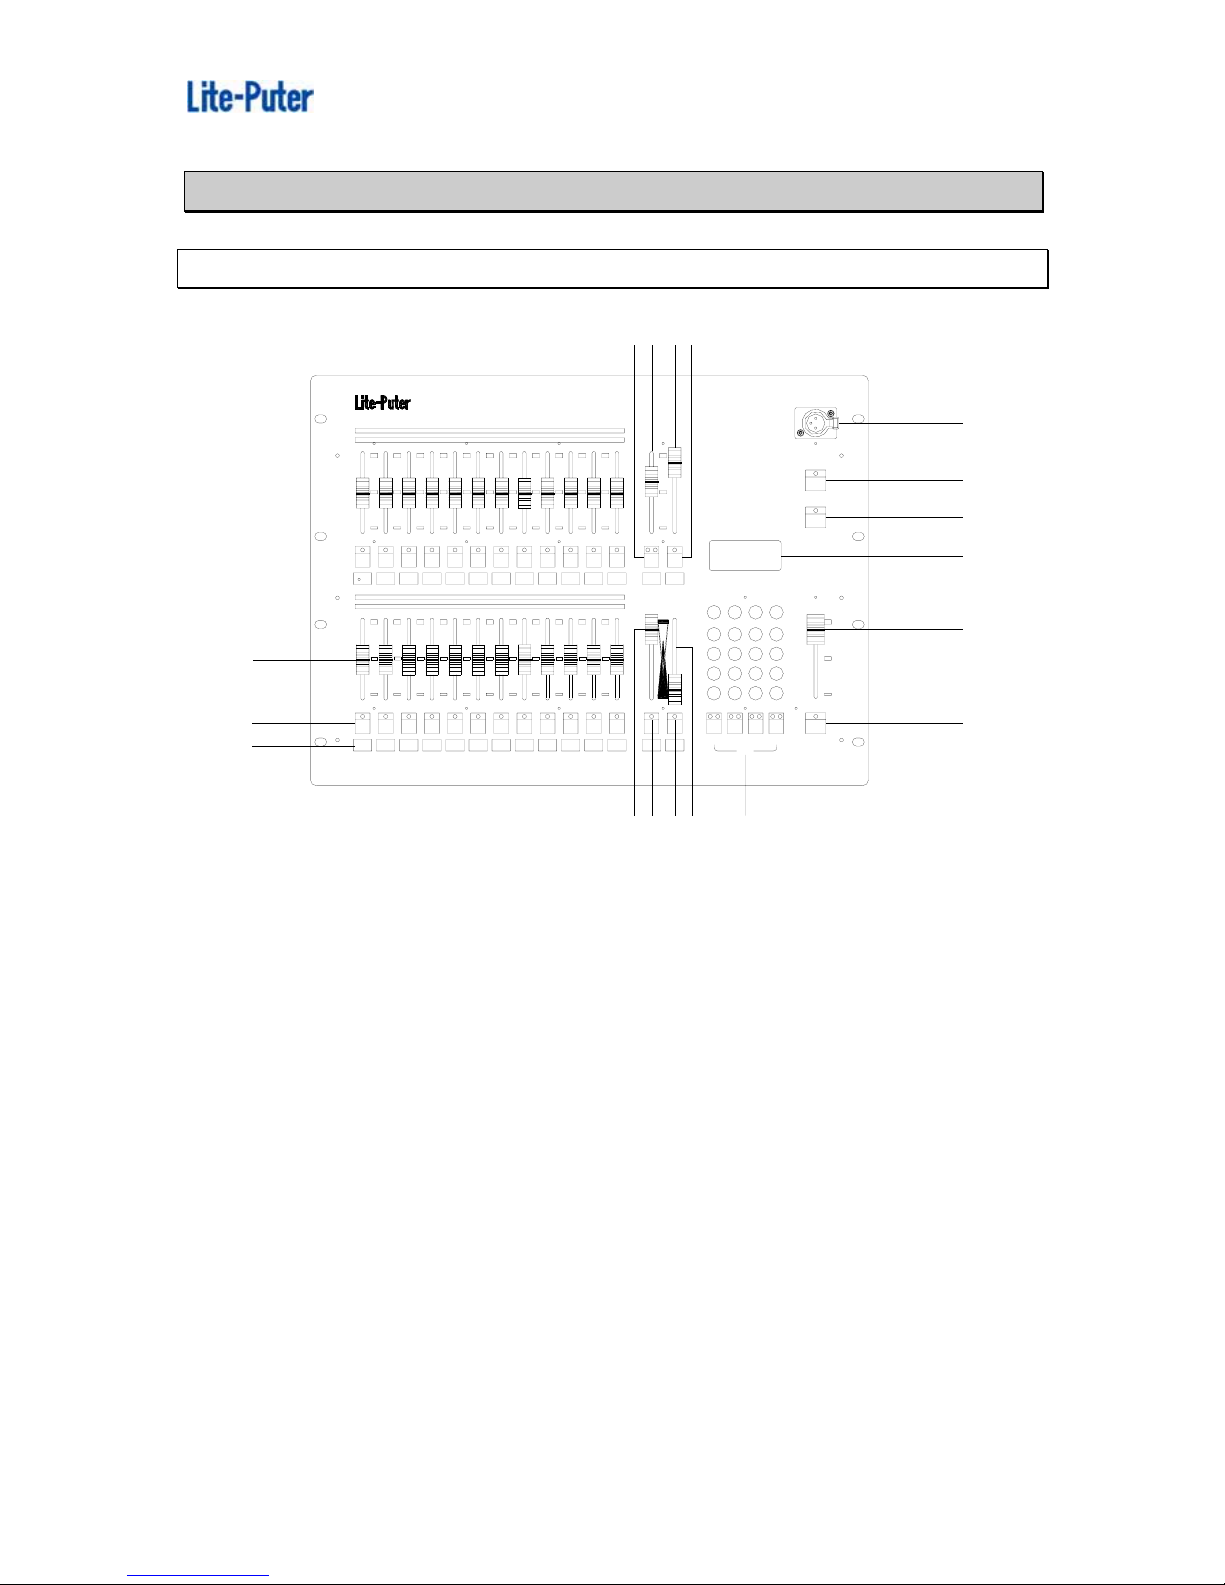
(1.) VR1 ~ VR24 VR.......................VR1 ~ VR24
(2.) P1 ~ P24 hot key......................P1 ~ P24
function 1 :The LED on function key display the channel status ( In channel
mode )
function 2:In SCENE mode, for SCENE selection
function 3:FLASH
function 4:LOAD + P1 - P24 hot key for chase function 可快速呼叫跳機程式
(3.) Blank.....................................indication / memo for user
(4.) SPEED / FADE VR ...............Adjustment of chase speeding / CROSS FADE
speeding
(5.) FADE save key ....................CROSS FADE mode use
(6.) CHASER VR .........................chase brightness value adjustment
(7.) LOAD / PAUSE.....................Load / Pause:auto chase mode use
(8.) A-CROSSFADER VR............Manual chase A execution mode
(9.) LOAD ....................................Load / Switch:Manual chase A mode use
(10.)B-CROSSFADER VR ........... Manual chase B execution mode use

ISO 9001 CERTIFIED www.liteputer.com.tw
Lite-Puter
CX-12 [EUM-D]
5
(11.)LOAD....................................Load / Switch:Manual chase B mode use
(12.)PAGE....................................PAGE 1~PAGE 4
(13.)Gooseneck............................ C+12V 250 Ma
(14.)POWER................................power switch
(15.)BLANK..................................Pause
(16.)LCD.......................................LCD display
(17.)MASTER VR.........................Master VR
(18.)CLEAR ................................output clear
(19.)F1..........................................function key
(20.)F2..........................................function key
(21.)F3..........................................function key
(22.)F4..........................................function key
(23.)SET.......................................function key
(24.)PROGRAM ...........................function key
(25.)CHASE .................................Chase execution
(26.)SC/CH...................................scene/channel switch
(27.)ENTER..................................enter key
(28.)0 ~ 9......................................0 ~ 9
(29.)CLR.......................................Clear
2-2 REAR PANEL
PUSH
H
SU
P
12 3 456 7 8 9
( 1) Power switch
( 2) fuse
( 3) AC 100-240V 50-60 Hz
( 4) goosenecks power switch
( 5) DMX 512 input
( 6) DMX 512 output
( 8) memory card
( 9) audio input
29
CLR
7
1
4
F1
2728
ENTER0
8 9
SC/CH
CHASE
26
25
3 SET2
5 6 PROG
F2 F3 F4
24
23
2019 21 22

ISO 9001 CERTIFIED www.liteputer.com.tw
Lite-Puter
CX-12 [EUM-D]
6
CHAPTER 3 Switch
Switch on
(1.) Plug into power source, and turn the power switch on rear panel
(2.) Turn the power switch on front panel, and check the LCD display status
(3.) Be sure that the LED on BLANK is off
Switch off
(1.) Turn off the power switch on front panel
★ Battery recharging mode
(2.) Turn off the power switch on rear panel
★ Battery un-recharge, 7 days duration of save data maintains only
Remark:The using status will keeping on after power off

ISO 9001 CERTIFIED www.liteputer.com.tw
Lite-Puter
CX-12 [EUM-D]
7
Chapter 4. CHANNEL
4-1 Brightness value
STEP-1 Adjust the【MASTER VR】to the top (MASTER VR adjust all control channel
brightness value)
STEP-2 press【SC/CH】key, to select the control channel mode (LED show green
light on page key)
STEP-3 press【PAGE 1】,adjust【VR 1 ~ VR 24】,to set CH. 01 ~ 24brightness value.
STEP-4 press【PAGE 2】,adjust【VR 1 ~ VR 24】to 0 value, and adjust【VR 1 ~ VR
24】to set CH. 25 ~ 48 of brightness value.
STEP-5 press【PAGE 3】,adjust【VR 1 ~ VR 24】to 0 value, and adjust 【VR 1 ~ VR
24】to set CH. 49 ~ 72 of brightness value.
STEP-6 press【PAGE 4】,adjust【VR 1 ~ VR 24】to 0 value, and adjust【VR 1 ~ VR
24】to set CH. 73 ~ 96 of brightness value.
p.s. when on page function, the VR should be adjust to 0 value, and move
the VR key to get the new dimming value
PAGE START CH01
CHASE FADE ON
F1/2:FADE ON/OFF
PAGE START CH25
CHASE FADE ON
F1/2:FADE ON/OFF
PAGE START CH49
CHASE FADE ON
F1/2:FADE ON/OFF
PAGE START CH73
CHASE FADE ON
F1/2:FADE ON/OFF

ISO 9001 CERTIFIED www.liteputer.com.tw
Lite-Puter
CX-12 [EUM-D]
8
4-2 Brightness modification
STEP-1 press【PAGE 1】(ch1-24)
STEP-2 adjust【VR 1】key to CH01=00 value, and adjust VR key to top CH01=FL,
then adjust the【VR 1】key to CH01=50 to change the setting.
4-3 setting delete
adjust 【VR 1 ~ VR 24】and【MASTER VR】key to the bottoms “0”, and press the
CLEAR key on below of ”MASTER VR” key to delete.
PAGE START CH01
CHASE FADE ON
F1/2:FADE ON/OFF

ISO 9001 CERTIFIED www.liteputer.com.tw
Lite-Puter
CX-12 [EUM-D]
9
Chapter 5 SCENE
5-1 SCENE setting
STEP-1 please refer to the chapter 4, adjust the dimming value on the control
channel.
STEP-2 press【PROG】
STEP-3 press【F1】,and select SCENE mode:
STEP-4 press【F2】,to save the SCENE
STEP-5 press【ENTER】to confirm the selection
STEP-6 for further SC2 --- SC96 setting, please refer to the setting procedure of
above
F1: Scene
F2: Sequence
SELECT [01….. 96]
SAVE SCENE 01
ARE YOU SURE ?F1
SAVE SCENE 01
Each【PAGE】 24 set of SCENE setting available
4 PAGE able to store 96 set of scene
F1: Load F3: Clear
F2: Save

ISO 9001 CERTIFIED www.liteputer.com.tw
Lite-Puter
CX-12 [EUM-D]
10
5-2 SCENE 1 … SCENE loading
5-2-1 use【PROG】key for SCENE loading
STEP-1 Set all dimming value to 0% (refer to 4-3 )
STEP-2 Adjust【MASTER VR】key for dimming value
STEP-3 Press【PROG】, and press【F1】to select the SCENE mode
STEP-4 Press【F1】key for SCENE loading
STEP-5 Press【0…9】key for number of SCENE loading
STEP-6 Press【ENTER】to confirmed the scene loading
5-2-2 use【SC/CH】key for SCENE loading (FLASH status)
STEP-1 Set all dimming value to 0%. (refer to 4-3 )
STEP-2 Adjust the【MASTER VR】key
STEP-3 Press【PAGE 1】
F1: Scene
F2: Sequence
F1: Load F3: Clear
F2: Save
SELECT [01….. 96]
LOAD SCENE 01
【PAGE】LED ● → SCENE mode
【PAGE】LED ● → CHANNEL mode

ISO 9001 CERTIFIED www.liteputer.com.tw
Lite-Puter
CX-12 [EUM-D]
11
STEP-4 Press【SC/CH】to select the SCENE mode.
STEP-5 Press【P 1】for SCENE loading. (Flash status)
5-2-3 Adjust the【VR 1 ~ VR 24】key for SCENEloading
STEP-1 Adjust all control channel dimming value to 0% (refer to 4-3)
STEP-2 Adjust the【MASTER VR】
STEP-3 Press【PAGE 1】
STEP-4 press【SC/CH】to select SCENE mode (LED light on RED on PAGE key )
STEP-5 Adjust【VR 1】key to for SCENE loading
【1】 5-2-1 or 5-2-2: SCENE speed loading
【2】 5-2-3:Adjust the VR key for dimming function
ISO 9001 CERTIFIED www.liteputer.com.tw
Lite-Puter
CX-12 [EUM-D]
12
Chapter 6. SEQUENCE / CHASE
"SEQUENCE"
meaning: 2 set of scene or more of scenes for chase setting
Function:Provide the " CHASE " & " A/B CROSS FADER " control
procedures
Data memory: up to 24 SEQUENCE of memory data,and up to 64 step per
SEQUENCE setting
6-1 SEQUENCE Editing
STEP-1 Press【PROG】key
STEP-2 Press【F2】key to select Sequence mode
STEP-3 Press【F3】key for Sequence editing
STEP-4 Use【0…9】key to select the SCENE, and press 【ENTER】key to confirmed
the selection
STEP-5 according to the STEP-3 procedures, to continues the SCENE setting, and
press【F4】key to complete the editing, and press【ENTER】to save
F1: Scene
F2: Sequence
F1: Load F3: Edit
F2: Save F4: Clear
F1 / 2/ 3/ 4=1/ + / - /E
SEQU.STEP01=S - -
p
ress【F1】back to STEP-01
p
ress【F2】forward
p
ress【F3】reward
p
ress【F4】to save
SELECT [01...24]
SAVE SEQUENCE01
F1 / 2/ 3/ 4=1/ + / - /E
SEQU.STEP01=S - -
ISO 9001 CERTIFIED www.liteputer.com.tw
Lite-Puter
CX-12 [EUM-D]
13
6-2 SEQUENCE Modification
STEP-1 Press【PROG】key
STEP-2 and press【F2】key to select Sequence mode
STEP-3 press【F1】key, and press【0…9】key to select Sequence
STEP-4 Press【ENTER】key to confirmed.
STEP-5 Press【F3】key for Sequence setting
6-3 CHASE Loading
6-3-1 CHASE loading
EX: to load the 1st set of chase
※ CHASE number = SEQUENCE number
STEP-1 press【CHASE】key
SELECT 01…24
CHASE: OFF 01
SELECT [ 01..24 ]
LOADSEQUENCE01
F1: Scene
F2: Sequence
F1: Load F3: Edit
F2: Save F4: Clear
F1: Load F3: Edit
F2: Save F4: Clear

ISO 9001 CERTIFIED www.liteputer.com.tw
Lite-Puter
CX-12 [EUM-D]
14
STEP-2 and press【0…9】to select the CHASE, and press【ENTER】to confirm the
selection
STEP-2 adjust the【CHASER FADER VR】to the top.(chase dimming value)
STEP-3 adjust【SPEED FADER VR】for chase speeding, for audio control, the VR
key should move to “ 0% “ value.
6-3-2 Use【P1-P24】for chase loading
STEP-1 press 【LOAD/PAUSE key on below of CHASER FADER VR】+【P 1】keys
together, for 1st set of chase loading, and press【P 2】key for the following chase
loading
Refer to 6-1& ~ 6-2 of setting procedures, for further chase setting, up to 24 set of
chase setting available. And refer to 6-1 for chase loading
6-4 CHASE Fade On/Off Setting
STEP-1 adjust the【CHASER FADER VR】or【SPEED FADER VR】
STEP-2 press【F1】key, to enter CHASE FADE ON MODE.
press【F2】key, to enter CHASE FADE OFF MODE.
Press 【LOAD/PAUSE key on below of CHASER FADER VR】again to pause
the chase function, and press the same keys again to continue
SELECT 01…24
CHASE: OFF 01
CHS=FL SPEED=FL
OFF Step=01
CHASE FADE ON
F1/2:FADE ON/OFF
CHS=FL SPEED=FL
OFF Step=01
CHASE FADE ON
F1/2:FADE ON/OFF
CHS=FL SPEED=FL
OFF Step=01
CHASE FADE OFF
F1/2:FADE ON/OFF

ISO 9001 CERTIFIED www.liteputer.com.tw
Lite-Puter
CX-12 [EUM-D]
15
6-5 to stop the CHASE execution
function 1.
Press twice【CHASE】key to stop
function 2.
Adjust the【CHASE FADER VR】key to the “ 0% “ value to stop

ISO 9001 CERTIFIED www.liteputer.com.tw
Lite-Puter
CX-12 [EUM-D]
16
Chapter 7 A/B CROSS FADERS Scene switching
"A/B CROSS FADER"
2 set of individual scene control VR
In SEQUENCE mode, use A/B CROSSFADER to execute the manual chase
function.
7-1 To save the SEQUENCE to A / B CROSS FADER
EX:To load the Sequence to A CROSS FADER
STEP-1 Press【LOAD key on below of A CROSS FADER 】+【P 1】keys together
to save the current sequence into A CROSS FADER.
7-2 To load A / B CROSS FADER data
Function 1: press the Load key on below of A/B CROSS FADER
The Fader time of A/B CROSS FADER control by SPEED VR key, according to 7-1,
to load the saving data from the SEQUENCE by A CROSS FADER.
STEP-1 Adjust【SPEED / FADE VR】key, and press【FADE】to confirmed the speed
setting, adjust the speed VR key, and press FADE key for modification
STEP-2 Press【A CROSS FADER VR】to the top, and press【LOAD】key for loading
Function 2: use A/B CROSS FADER VR
According to the setting procedures of above, use the【A CROSS FADER VR】key
for further setting
7-3 To pause the A / B CROSS FADER
Adjust the 【A CROSS FADER VR】key to the “0%” value, and press【LOAD】key
to pause / stop

ISO 9001 CERTIFIED www.liteputer.com.tw
Lite-Puter
CX-12 [EUM-D]
17
Chapter 8 Other function setting
8-1 LCD display / default setting
8-1-1 Power switch of LCD background lighting
STEP-1 Press【SET】
STEP-2 and press【F1】
STEP-3 and press【F1】
STEP-4 and press【F1】for brightness of LCD background lighting, press【F1】again
to save.
8-1-2 LCD contrast adjustment
STEP-4 refer to STEP-4,press【F2】key to adjust the contrast of LCD, and press
【F2】again to confirmed.
F1 : Setup F3 : Patch
F2 : Xio
F4 : Lock
F1 : Lcd
F2 : Reset system
F1 : Backlight
F2 : Concen
F1 : Backlight
F2 : Concen
F1 : Backlight
F2 : Concen

ISO 9001 CERTIFIED www.liteputer.com.tw
Lite-Puter
CX-12 [EUM-D]
18
8-1-3 DATA delete
STEP-1 press【SET】
STEP-2 and press【F1】
STEP-3 and press【F2】
STEP-4 and press【F1】to delete all data, the BLANK will be activate, press
【BLANK】key to continue the further setting.
8-2 External memory card save / load
STEP-1 Press【SET】
STEP-2 and press【F2】
Reset All Data!
Are You Sure? F1
* DESK BLACK OUT *
CX-12
V2.08 ( C ) 1997- 98
BY LITE PUTER
The display will be blinking
F1 : Lcd
F2 : Reset system
F1 : Read
F2 : Save
p
ress【F1】for external memory loading
p
ress【F2】for external memory saving
F1 : Setup F3 : Patch
F2 : Xio
F4 : Lock
F1 : Setup F3 : Patch
F2 : Xio F4 : Lock

ISO 9001 CERTIFIED www.liteputer.com.tw
Lite-Puter
CX-12 [EUM-D]
19
8-3 Channel patch setting / warm up setting
8-3-1 Channel patch setting ( up to 4 set of setting )
EX
:
To patch DIMMER097channel to CH01 of CX-12
STEP-1 Press【SET】
STEP-2 and press【F3】
STEP-3 and press【F2】
STEP-4 and press【F3】
STEP-5 Press【F4】,for DIM staring address
STEP-6 Press【F1】for DIMMER097<=CH--
p
ress【F1】to DIMMER 001
p
ress【F2】DIM to + 1
p
ress【F3】DIM to -1
p
ress【F4】DIM address selection
1:97 2:193 3:289
DIMMER001<=
p
ress【F1】DIMMER097
p
ress【F2】DIMMER193
p
ress【F3】DIMMER289
F3:DMXin
F2:DMXo F4:Wrmup
F1 : Setup F3 : Patch
F2 : Xio F4 : Lock
F1 : Load F3 : Edit
F2 : Save F4 : Clear
F1/ 2 / 3 / 4=1/ + / - /d
DIMMER001<=CH01
F1/ 2 / 3 / 4=1/ + / - /d
DIMMER097<=CH--

ISO 9001 CERTIFIED www.liteputer.com.tw
Lite-Puter
CX-12 [EUM-D]
20
STEP-7 key【0】,【1】for DIMMER097<=CH01, and press【ENTER】key to confirmed
the setting, the DIMMER097 had PATCH to CX-12之CH01
STEP-8 press【SET】to escape
STEP-9 press【F2】the save (4 set of setting available F1~F4 )
STEP-10 press【F1】to load the patch data from F1~F4
STEP-11 press【F4】to delete the date, and back to the default setting
8-3-2 Warm up setting 0~9%
STEP-1 press【SET】
STEP-2 and press【F3】
STEP-3 and press【F4】
F1/2/3/4=1/+/-/d
DIMMER097<=CH01
F1 : Load F3 : Edit
F2 : Save F4 : Clear
F1 : Setup F3 : Patch
F2 : Xio F4 : Lock
F1 : ALLCh
F2 : LoadSc F4 :Clr
F3:DMXin
F2:DMXo F4:Wrmup
1.【F1】: to select all channel warm up setting
2.【F2】: SCENES loading
3.【F4】: to delete the last step scene setting

ISO 9001 CERTIFIED www.liteputer.com.tw
Lite-Puter
CX-12 [EUM-D]
21
8-4 Lock / unlock function
8-4-1 password setting
STEP-1 press【SET】
STEP-2 and press【F4】
STEP-3 press【F1】,to lock【PROG】key
STEP-4 press【ENTER】key to confirmed the setting
8-4-2 unlock
press【SET】,and press 4 digit number of password【XXXX】and press【ENTER】
to unlock
F1 : Setup F3 : Patch
F2 : Xio F4 : Lock
F1 : Pgm.
F2 : Key
LOCK PROGRAM:
PASSWORD : 0000
Enter 4 digit number, or enter “6248” of default
p
assword setting
【F1】:SET, PROG key lock
【F2】:all function key lock
 Loading...