

Page 1

Getting Started
Page 2

Copyright and License
The only warranties for Hewlett-Packard products
and services are set forth in the express statements
accompanying such products and services.
Nothing herein should be construed as constituting
an additional warranty. HP shall not be liable for
technical or editorial errors or omissions contained
herein.
HP assumes no responsibility for the use or
reliability of its software on equipment that is not
furnished by HP.
This document contains proprietary information
that is protected by copyright. No part of this
document may be photocopied, reproduced, or
translated to another language without the prior
written consent of HP.
Hewlett-Packard Company
P.O. Box 4010
Cupertino, CA 95015-4010
USA
Copyright © 2000–2009 Hewlett-Packard
Development Company, L.P.
This product incorporates copyright protection
technology that is protected by U.S. patents and
other intellectual property rights. Use of this
copyright protection technology must be
authorized by Macrovision, and is intended for
home and other limited viewing uses only unless
otherwise authorized by Macrovision. Reverse
engineering or disassembly is prohibited.
Microsoft and Windows 7 are U.S. registered
trademarks of Microsoft Corporation. The
Windows logo and Windows 7 are trademarks or
registered trademarks of Microsoft Corporation in
the United States and/or other countries/regions.
HP supports lawful use of technology and does not
endorse or encourage the use of our products for
purposes other than those permitted by copyright
law.
The information in this document is subject to
change without notice.
Understanding hard disk drive space
The hard disk drive on the Hewlett-Packard and
Compaq computers with the Microsoft® Windows
operating system preinstalled may appear to be
smaller than the size stated in the product
specifications, in the documentation, or on the
box. Hard disk drives are described and
advertised by manufacturers in terms of decimal
(base 10) capacity. Microsoft Windows and other
programs, such as FDISK, use the binary (base 2)
numbering system.
In decimal notation, one megabyte (MB) is equal
to 1,000,000 bytes, and one gigabyte (GB) is
equal to 1,000,000,000 bytes. In the binary
numbering system, one megabyte is equal to
1,048,576 bytes, and one gigabyte is equal to
1,073,741,824 bytes. Because of the different
measuring systems, you may see a difference
between the size reported by Microsoft Windows
and the size advertised. The storage capacity of
the hard disk drive is as advertised.
Microsoft Windows reports smaller capacity in the
Windows Explorer tool and in the computer
window because it shows information about one
partition on the hard disk drive at a time. One of
the partitions contains the System Recovery
information.
Page 3

Table of contents
1 Getting information
2 Setting up your computer
Protecting your computer ......................................................................... 3
Guidelines for installing software and hardware devices ............................. 4
Connecting to the Internet ........................................................................ 4
Transferring files and settings to your new computer ................................... 5
3 Troubleshooting and maintenance
Computer does not start .......................................................................... 5
Power ................................................................................................... 6
Display (monitor) .................................................................................... 6
Keyboard and mouse (with cable) ............................................................ 7
Keyboard and mouse (wireless) ............................................................... 8
Speakers and sound ............................................................................... 9
Internet access ..................................................................................... 10
Software troubleshooting ....................................................................... 11
Maintenance ....................................................................................... 14
System Recovery .................................................................................. 16
Recovery discs ..................................................................................... 18
ENWW iii
Page 4

iv ENWW
Page 5

1 Getting information
Type of information Where to find
● Set up your computer. Setup poster included with your computer.
See how-to videos about using
●
the features of your computer.
Use the computer.
●
Connect to the Internet.
●
Recover factory settings.
●
Learn how to use the
●
Microsoft® Windows® 7
operating system.
● Find Windows 7 password
information.
Troubleshoot the most common
●
computer hardware and
software issues.
Find links to driver updates.
●
Read frequently asked
●
questions.
Find electronic user guides and
●
specifications for your
computer model.
Order parts and find additional
●
troubleshooting help.
Upgrade or replace
●
components of your computer.
Find computer warranty
●
information.
Get technical support.
●
● Get up-to-date information and
help from the Windows
community.
Connect to a TV. Watching and Recording TV
●
Visit www.hp.com/supportvideos (English only)
Getting Started (this guide)
Help and Support
Click the Start button, and then click Help and Support or visit
www.hp.com/go/win7.
Windows 7 troubleshooting tools
1. Click the Start button, click Control Panel, and then click System
and Security.
2. Under Action Center, click Find and fix problems
(troubleshooting).
HP Support Web site: www.hp.com/support
Upgrading and Servicing Guide
Click the Start button, click All Programs, and then click User Guides.
If the guide is not available there, visit www.hp.com/support
Limited Warranty and Support Guide or the Warranty and Support
Information included with your computer.
www.hp.com/support/consumer-forum
Click the Start button, click All Programs, and then click User Guides.
If the guide is not available there, visit www.hp.com/support
ENWW 1
Page 6

Type of information Where to find
● Get special utilities for
computer owners.
Maintain your computer.
●
Find ergonomic information. Safety & Comfort Guide
●
WARNING!
location away from water, dust, moisture, and soot. These can increase the inside temperature, or can cause fire or
electrocution.
WARNING!
outlet that is easily accessible at all times.
WARNING!
WARNING!
move, check the voltage requirements for your new location before plugging the computer into an AC power outlet.
WARNING!
drives.
To reduce the risk of electrical shock or damage to your equipment: Place the computer in a
Do not disable the power cord grounding plug. Plug the power cord in a grounded (earthed)
Disconnect power from the equipment by unplugging the power cord from the electrical outlet.
The power supply is preset for the country/region in which you purchased your computer. If you
To prevent direct exposure to laser beam, do not try to open the enclosure of the CD or DVD
PC Help & Tools folder
Click the Start button, click All Programs, and then click PC Help &
Tools.
HP Support Assistant — Maintains your computer performance and resolve
problems faster by using automated updates, onboard diagnostics, and
guided assistance.
Click the Start button, click All Programs, click HP, and then click
HP Support Assistant.
Click the Start button, click All Programs, and then click User Guides
www.hp.com/ergo.
or visit
NOTE:
Windows.
Some features might not be available on systems that are shipped without a version of Microsoft
2 Chapter 2 Setting up your computer ENWW
Page 7

2 Setting up your computer
❑
Follow the steps on the setup poster included with your computer.
Place the computer so that all ventilation openings are unobstructed and cabling is not in a walkway or where
❑
it can be stepped on or damaged by placing furniture on it.
Connect all power cords from the monitor, computer, and accessories to a power surge protection device that
❑
is specifically labeled as having surge protection, an uninterruptible power supply (UPS), or a similar device. If
the computer has a television tuner, or a modem or telephone connection, protect the computer by using surge
protection with these signal inputs as well. Connect the television cable or the telephone line cord to the surge
protection device, and then connect the device to the computer.
Download and install operating system updates.
❑
❑
Look in the computer box for additional printed details or updates.
Read the Safety and Regulatory Information document in the User Guides folder.
❑
Read the Safety & Comfort Guide for proper workstation setup, posture, health and work habits, and electrical
❑
and mechanical safety information. Click the Start button, click All Programs, and then click User
Guides or visit
Protecting your computer
Computer risk Computer feature
www.hp.com/ergo.
Unauthorized use of the
computer or user account
Unauthorized access to Setup
Utility, BIOS settings, and other
system identification
information
Computer viruses Antivirus software
Unauthorized access to data
and ongoing threats to the
computer
Windows 7 critical security updates
User password
A password is a group of characters that you choose to secure computer
information.
Administrator password
The free trial antivirus software that is preinstalled on your computer can detect most
viruses, remove them, and, in most cases, repair damage caused by viruses. For
protection against new viruses beyond the trial period, purchase an extended
update service.
Firewall software
Windows 7 includes firewall software preinstalled on the computer.
●
The antivirus software, which is preinstalled on the computer, includes firewall
●
software.
Microsoft continually updates the Windows 7 operating system.
ENWW
Protecting your computer
3
Page 8

NOTE:
Security solutions can deter theft, mishandling, and software attacks, but cannot prevent them.
Guidelines for installing software and hardware devices
After you complete the initial computer setup, you might want to install additional software programs or hardware
devices. Check the operating system, memory, and other requirements listed before purchasing new software or
hardware for your computer. Follow the software manufacturer's directions to install the new software.
NOTE:
infect the computer with a virus, or be illegal.
Use only licensed original software. Installing copied software could result in an unstable installation,
Connecting to the Internet
Steps to connect to the Internet:
1. Connect the hardware (might be sold separately).
For a modem, connect to a telephone line (DSL) or cable line and to your computer.
◦
For a wired network connection, connect an Ethernet cable to the computer and to a network router or
◦
LAN device.
For a wireless network connection, use a wireless router with the computer to connect to a WLAN with an
◦
Internet connection.
2. Get Internet service.
Sign up with an ISP. If you already have an account with an ISP, skip this step and follow the instructions
◦
provided by the ISP.
If you did not set up the computer for Internet service during the initial setup, do so now by using Online
◦
Services:
a. Click the Start button, click All Programs, click Online Services, and then click Get Online.
b. Follow the onscreen instructions to select an ISP and set up Internet service.
NOTE:
an existing account to this computer. To transfer existing accounts, follow the instructions provided
by the ISP.
3. Using your Internet connection through your ISP, open a Web browser and browse the Internet.
Online Services provides a list of ISPs; however, you might choose another ISP or transfer
NOTE:
If you have issues connecting to the Internet, see Internet access on page 10.
4 Chapter 2 Setting up your computer ENWW
Page 9

Transferring files and settings to your new computer
You can copy files from another computer to your new computer by using CDs or DVDs, memory sticks, and external
hard drives. You can also use Windows Easy Transfer software, which is included with Windows 7 (select models
only), to copy files and settings to a storage device or, using an Easy Transfer Cable, directly from another computer
to the new computer. The Easy Transfer Cable is a USB cable designed specifically to connect two computers and to
work with the Windows Easy Transfer software.
NOTE:
To transfer your files and settings:
1. Click the Start button, type Windows Easy Transfer into the Start Search box, and then click Windows
2. Follow the onscreen instructions in the Windows Easy Transfer wizard to transfer your files to your new computer.
The Easy Transfer Cable is sold separately. A standard USB cable does not work.
Easy Transfer.
NOTE:
Windows.
Some features might not be available on systems that are shipped without a version of Microsoft
3 Troubleshooting and maintenance
Refer to the documentation provided by the product manufacturer for information about peripheral-specific problems,
such as issues with a monitor or a printer. The following tables present some issues you might encounter while
installing, starting up, or using your computer and possible solutions.
For more information or for additional troubleshooting options, see
Computer does not start
Symptom Possible solution
Error message:
Hard disk drive
error.
Computer will not
turn on or start.
If the display (monitor) is blank, the monitor might not be properly connected. Connect the
Contact Support.
Ensure that the cables connecting the computer to the external power source are plugged in
properly. When the cables connecting the computer to the external power source are plugged
in properly, and the wall outlet is functioning, the green power supply light on the back of the
computer should be on; if it is not, contact Support.
monitor to the computer, plug it in, and turn it on. See
Getting information on page 1.
Display (monitor) on page 6.
ENWW
Transferring files and settings to your new computer
5
Page 10

Symptom Possible solution
Test the wall outlet by connecting a different electrical device to it.
Computer seems to
be locked up and is
not responding.
If closing programs does not work, restart the computer:
Use the Windows Task Manager to close any programs not responding, or restart the computer:
1. Press the Ctrl+Alt+Delete keys on the keyboard simultaneously.
2. Click Start Task Manager.
3. Select the program that is not responding, and then click End Task.
1. Press the Ctrl+Alt+Delete keys on the keyboard simultaneously.
2. Click the Arrow button next to the red Shut Down button, and then click Restart.
Or, press and hold the On button on the computer for 5 or more seconds to turn off the
computer, and then press the On button to restart the computer.
Power
Symptom Possible solution
Error message:
Invalid system disk
or Non-System disk
or Disk error.
Computer does not
turn off when the
On button is
pressed.
Computer shuts
down
automatically.
When drive activity stops, remove the disc and press the spacebar on the keyboard. The
computer should start up.
Press and hold the On button until the computer turns off. Check Power Settings.
The computer might be in an exceedingly hot environment. Let it cool down.
●
Ensure that computer air vents are not blocked and that the internal fan is running — see
●
Keeping the computer free of dust, dirt, and heat on page 15. (Your computer might
not have an internal fan.)
Display (monitor)
Symptom Possible solution
Screen is blank,
and monitor power
light is not lit.
Press the On button on the monitor.
6 Chapter 3 Troubleshooting and maintenance ENWW
Reconnect the power plug to the back of the monitor and to the wall outlet.
Page 11

Symptom Possible solution
Screen is blank. Press the space bar on the keyboard or move the mouse to make the screen display visible
Press the Sleep button (select models only), or the Esc key on the keyboard, to resume from
Press the On button to turn on the computer.
Inspect the monitor video connector for bent pins:
Images on the
screen are too
large or too small,
or the images are
fuzzy.
NOTE:
again.
Sleep mode.
● If any of the pins are bent, replace the monitor connector cable.
If no pins are bent, reconnect the monitor connector cable to the computer.
●
Adjust the monitor resolution setting in Windows 7:
1. Click the Start button, and then click Control Panel.
2. Under Appearance and Personalization, click Adjust Screen Resolution.
3. Adjust resolution as necessary, and then click Apply.
In addition to the information listed here, also refer to the documentation that came with your monitor.
Keyboard and mouse (with cable)
Symptom Possible solution
Keyboard
commands and
typing are not
recognized by the
computer.
Mouse (with cable)
does not work or is
not detected.
If the mouse is still not detected, turn off the computer, unplug and reconnect the mouse cable,
Cursor does not
move using the
arrow keys on the
number keypad.
Use the mouse to turn off the computer, unplug and reconnect the keyboard to the back of your
computer, and then restart your computer.
Unplug and reconnect the mouse cable to your computer.
and then restart the computer.
Press Num Lock on the keyboard to turn off Num Lock, so that the arrow keys on the number
keypad can be used.
ENWW
Keyboard and mouse (with cable)
7
Page 12

Symptom Possible solution
Cursor does not
respond to mouse
movement.
Cursor responds
slowly, moves only
vertically or
horizontally, or
does not track
smoothly.
For an optical mouse:
Use the keyboard to save changes in all open programs, and then restart your computer:
1. Press the Alt+Tab keys simultaneously to navigate to an open program.
2. Press the Ctrl+S key simultaneously to save your changes in the selected program (Ctrl
+S is the keyboard shortcut for Save on most—not all—programs).
3. Repeat step 1 and step 2 to save changes in all open programs.
4. After saving changes in all open programs, press the Ctrl+Esc keys on the keyboard
simultaneously to display the Windows Start menu.
5. Use the arrow keys to select the Arrow button that is next to Shut Down. Select Shut
Down, and then press Enter.
6. After the shutdown is complete, unplug and reconnect the mouse connector to the back
of your computer, and then restart your computer.
For a mouse with a roller ball:
Clean the roller ball: Remove the roller ball cover from bottom of mouse (rotate it
●
counterclockwise), remove the ball, and clean it by using a damp, lint-free cloth (not
paper). Also clean the rollers on which the ball moves.
Use a mouse pad or other rough surface under the mouse.
●
Clean the optical mouse: Gently wipe the light sensor lens on the bottom of the mouse by
●
using a lint-free cloth (not paper).
Use a mouse pad, white sheet of paper, or other less reflective surface under the mouse.
●
Keyboard and mouse (wireless)
Symptom Possible solution
Wireless
keyboard or
mouse does
not work or is
not detected.
● Ensure that you are using the wireless keyboard or wireless mouse within range of the receiver,
approximately 10 meters (32 feet) for normal use, and within 30 cm (12 inches) during initial
setup or for re-synchronization.
Ensure that the mouse is not in Suspend mode, which occurs after 20 minutes of inactivity.
●
Click the left mouse button to reactivate it.
Replace the batteries in the keyboard and mouse.
●
Re-synchronize the keyboard and mouse to the receiver using the following steps.
●
8 Chapter 3 Troubleshooting and maintenance ENWW
Page 13
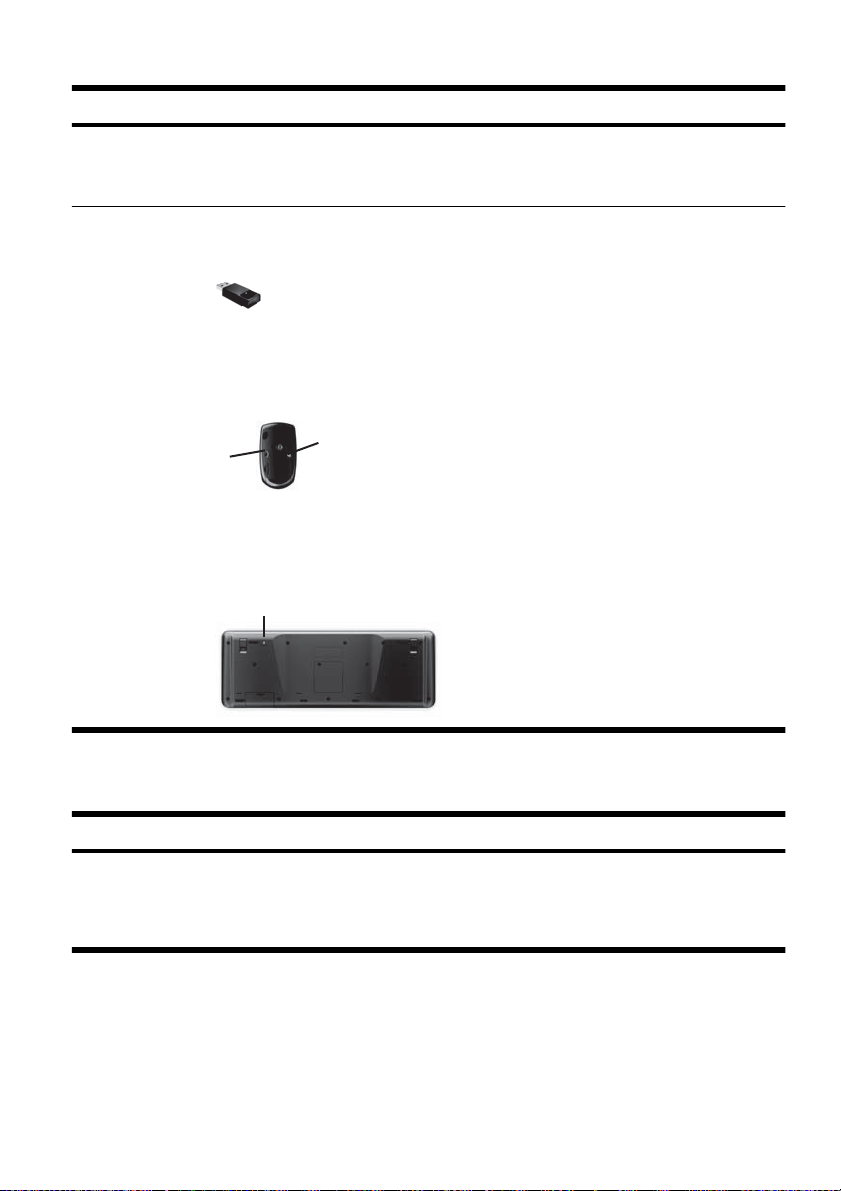
Symptom Possible solution
A
The receiver, wireless keyboard, and wireless mouse shown in the following illustrations are
examples; your models might vary. IMPORTANT: During these steps, place the wireless keyboard
and wireless mouse on the same level as the receiver, within 30 cm (12 inches) of the receiver, and
away from interference from other devices.
1. Unplug the receiver from a USB connector on the computer, and then reconnect it. Your
computer model might have a connector dedicated to the receiver. If you have a choice, use
a USB connector on the front of the computer.
2. Check that the mouse is on (A), and push and hold the Connect button (B) on the underside
of the mouse for 5 to 10 seconds until the LED on the receiver lights or stops flashing. The
receiver connection session times out after 60 seconds. To ensure that the connection was
established, and that the receiver did not time out instead, move the mouse and check for
response on the screen.
B
Off
Connect
On
3. After the mouse connection is established, continue by using the steps that follow to repeat the
procedure for the keyboard.
4. Push and hold the Connect button (C) on the underside of the keyboard for 5 to 10 seconds
until the LED on the receiver lights or stops flashing.
C
Speakers and sound
Symptom Possible solution
Volume is very
low or
unsatisfactory.
ENWW
Ensure that you connected the speakers to the Audio Out (lime green) connector on the back of
the computer. (Additional audio connectors are used for multiple-channel speakers.) Detached
non-powered speakers (speakers without a separate power source, such as batteries or a power
cord) do not produce satisfactory sound. Replace the non-powered speakers with powered
speakers.
Speakers and sound
9
Page 14

Symptom Possible solution
No sound is
produced.
If you use an HDMI connector on the graphics card (select models only) to connect your monitor
If you are using built-in monitor speakers, use the monitor front-panel Volume button to adjust
Ensure that you connected powered (active) speakers and that they are turned on.
Turn off your computer, and then unplug and reconnect the speakers. Ensure that the speakers
To resume from Sleep mode, press the Sleep button (select models only), or press Esc.
Unplug headphones if they are connected to your computer (or speaker system).
For Windows 7:
1. Click the Start button, click Control Panel, click Action Center, and then click
Troubleshooting.
2. Under Hardware and Sound, click Troubleshoot and audio playback.
to the computer, you should also connect analog speakers to the computer Audio Line Out
connector if you want to hear sound during the initial setup of the computer. Refer to the Setup
Poster to connect analog speakers.
volume. Use the front-panel buttons to enter the onscreen display (OSD) and ensure that audio is
enabled and that the volume is set appropriately.
are connected to an audio connector, not a Line In or headphone connector.
Internet access
Symptom Possible solution
Internet programs
do not start
automatically.
I cannot connect to
the Internet.
Verify that you are using the proper cables for your Internet connection type. Your computer
Log in to your ISP, and start the desired program.
For Windows 7:
1. Click the Start button, click Control Panel, click Action Center, and then click
Troubleshooting.
2. Under Network and Internet, click Connect to the Internet.
might have a dial-up modem and an Ethernet network adapter (also called a network interface
card, or NIC). A modem uses a standard telephone cable, whereas the network adapter uses
a network cable, to connect to a local area network (LAN). Do not connect a telephone cable
to the network adapter, and do not plug a network cable into a telephone service line; doing
so might damage the network adapter.
10 Chapter 3 Troubleshooting and maintenance ENWW
Page 15

Symptom Possible solution
Run the wireless setup wizard:
1. Click the Start button, click Control Panel, click Network and Internet, and then
click Network and Sharing Center.
2. In the Network and Sharing Center window, click Set up a connection or
network to open the wizard, and then follow the onscreen instructions.
If your system has an external antenna, try to move the antenna to a better position. If the
Try to connect again later, or contact your Internet service provider (ISP) for assistance.
antenna is internal, try to move the computer.
Software troubleshooting
Some software repairs are as simple as restarting your computer, and others require performing a System Recovery
from files on your hard disk drive.
To repair software problems, try these methods:
Turn the computer off completely and then turn it on again. This is the easiest (and sometimes the best) way.
●
Update the drivers (see
●
Use Microsoft System Restore (see
●
configuration that was in use before the software was installed.
Reinstall the software program or hardware driver. (See
●
on page 13) — Restores the software (if it came with the product) or hardware driver to factory defaults.
System Recovery (see
●
reinstall the operating system, programs, and drivers. This erases all data files you have created.
Updating drivers on page 12).
Microsoft System Restore on page 12) — Restore your computer to a
Software program and hardware driver reinstallation
System Recovery on page 16) — Erase and reformat the hard disk drive, and then
ENWW
Software troubleshooting
11
Page 16

Updating drivers
A driver is a software program that enables your computer to communicate with an attached device, such as a printer,
hard disk drive, mouse, or keyboard.
Complete the following procedure to update a driver, or to revert to an earlier version of the driver if the new one
does not solve your problem:
1. Click the Start button.
2. Type Device Manager into the Start Search box, and then click Device Manager to open the Device
Manager window.
3. Click the plus sign (+) to expand the type of device you want to update or rollback. (For example, DVD/CD-
ROM drives).
4. Double-click the specific item (for example, HP DVD Writer 640b).
5. Click the Driver tab.
6. To update a driver, click Update Driver, and then follow the onscreen instructions.
Or, to revert to an earlier version of a driver, click Rollback Driver, and then follow the onscreen instructions.
Microsoft System Restore
If you have a problem that might be due to software that was installed on your computer, use System Restore to return
the computer to a previous restore point. You can also set restore points manually.
NOTE:
Always use this System Restore procedure before you use the System Recovery program.
NOTE:
Windows.
To start a System Restore:
1. Close all open programs.
2. Click the Start button, right-click Computer, and then click Properties.
3. Click System protection, System Restore, click Next, and then follow the onscreen instructions.
Some features might not be available on systems that are shipped without a version of Microsoft
12 Chapter 3 Troubleshooting and maintenance ENWW
Page 17

To add restore points manually:
1. Close all open programs.
2. Click the Start button, right-click Computer, click Properties, and then click System protection.
3. Under Protection Settings, select the disk for which you want to create a restore point.
4. Click Create, and then follow the onscreen instructions.
Software program and hardware driver reinstallation
If any of your factory-installed software programs or hardware drivers are damaged, you can reinstall it by using the
Recovery Manager program (select models only).
NOTE:
included in the computer box. Reinstall these programs directly from the CDs or DVDs.
Before you uninstall a program, be sure you have a way to reinstall it. Check to be sure that it is still available from
where you initially installed it (for example, discs or the Internet). Or check to be sure that the program is in the list
of programs you can reinstall from the Recovery Manager.
Do not use the Recovery Manager program to reinstall software programs that came on CDs or DVDs
NOTE:
Windows.
To check the list of installable programs in the Recovery Manager:
1. Click the Start button, All Programs, Recovery Manager, and then click Recovery Manager. If
2. Under I need help immediately, click Software Program Reinstallation.
3. Click Next at the Welcome screen. A list of programs opens. Check whether your program is there.
To uninstall a program:
1. Close all software programs and folders.
2. Uninstall the damaged program:
Some features might not be available on systems that are shipped without a version of Microsoft
prompted, click Yes to allow the program to continue.
a. Click the Start button, and then click Control Panel.
b. Under Programs, click Uninstall a program.
c. Select the program you want to remove, and then click Uninstall.
d. Click Yes if you want to continue with the uninstall process.
ENWW
Software troubleshooting
13
Page 18

To reinstall a program using the Recovery Manager:
1. Click the Start button, click All Programs, click Recovery Manager, and then click Recovery
Manager.
2. Click Software Program Reinstallation, and then click Next at the Welcome screen.
3. Choose the program you want to install, click Next, and follow the onscreen instructions.
4. When you have finished reinstalling, restart the computer. Do not skip this last step. You must restart the
computer after recovering software programs or hardware drivers.
Maintenance
It is important that you perform simple maintenance of your computer to ensure that it works at peak performance.
Weekly
Software cleanup Use Disk Cleanup or safe third-party cleaning tools to remove junk files and temporary files
Defragmentation Run Disk Defragmenter to keep your hard disk in good condition and improve system
Virus scan Perform a full virus scan every week to catch viruses that might have slipped through
Monthly
Hardware cleanup Thoroughly clean the inside and outside of your computer.
Software updates Use Windows Updates to fix operating system bugs and improve performance. Also, be
Windows Update Run Windows Update monthly to install updates.
Hard disk diagnostic Sometimes a failing hard disk can be caught beforehand by using Hard Disk Diagnostic.
Yearly
System Recovery In time, your system might still get bogged down, depending on the computer usage. Use
that accumulate and slow down your system. Also, check for programs you no longer need
and uninstall them.
performance. Frequently performing this task does not harm your system.
unnoticed. Most antivirus products have a scheduling feature to keep track of this
automatically.
sure to check for driver updates for your hardware and new versions of your favorite
programs.
System Recovery to wipe your Windows operating system installation clean, restoring it to
the original configuration when you first started your system. Make a backup of
important data files before proceeding with a System Recovery. See
Recovery on page 16 for further details.
System
14 Chapter 3 Troubleshooting and maintenance ENWW
Page 19

As needed
Backing up your data Use CD or DVD recording software that is installed on your computer to create (or “burn”)
backup discs of important information, including personal files, e-mail messages, and Web
site bookmarks. You can also move data to an external hard disk drive.
Keeping the computer free of dust, dirt, and heat
Keeping your computer system free of dust, dirt, and heat will prolong its life. Dust, pet hair, and other particles can
build up, creating a blanket effect; as a result, components can overheat, or, in the case of the keyboard and mouse,
not work smoothly and effectively. Check your system once a month for visible signs of dust and debris, and clean it
about once every three months. Visit
Cleaning the computer vents
Cleaning the computer and
monitor
Cleaning the keyboard and
mouse
If you have a roller-ball mouse, clean the ball and rollers inside:
www.hp.com/support for additional cleaning instructions.
Air vents keep the computer and monitor cool. Keep these vents clean by using a small,
battery-powered vacuum cleaner. (A battery-powered vacuum cleaner eliminates the
risk of electric shock.)
1. Vacuum the vents on the computer case and the monitor case.
2. Remove any debris that has accumulated in and around the computer connectors
(for example, the Ethernet and USB connectors).
Follow these steps to clean the computer and monitor:
1. Unplug the power to the computer and the monitor.
2. To clean the monitor screen, use a clean, dry cloth. Do not use water on the
monitor screen. For more thorough cleaning, use a clean cloth and antistatic
screen cleaner.
3. Use a clean, dry cloth to dust the computer case and the monitor case.
NOTE:
use isopropyl (rubbing) alcohol and a lint-free cloth.
When cleaning the keyboard keys, use a low setting on a battery-powered vacuum
cleaner, to avoid removing key caps and springs.
1. Vacuum between the keys of the keyboard and along the grooves.
2. Use a clean, dry cloth and isopropyl (rubbing) alcohol to clean buildup on the
keyboard keys and along its edges.
3. Wipe the body of the mouse and the mouse cord by using cleaning wipes.
1. Turn the mouse upside down, and rotate the ball-cover ring counterclockwise to
remove the ring and release the roller ball.
2. Rinse the roller ball with soap and warm water.
3. Clean the rollers inside the mouse with a cotton swab dampened with isopropyl
(rubbing) alcohol.
4. After the roller ball and rollers are completely dry, replace the ball and ball-cover
ring.
To remove sticker residue or a spill on the computer or monitor case,
ENWW
Maintenance
15
Page 20

System Recovery
System Recovery completely erases and reformats the hard disk drive, deleting all data files you have created, and
then reinstalls the operating system, programs, and drivers. However, you must reinstall any software that was not
installed on the computer at the factory. This includes software that came on media included in the computer accessory
box, and any software programs you installed after purchase.
NOTE:
System Restore on page 12.
Always use the System Restore procedure before you use the System Recovery program — see Microsoft
NOTE:
Windows.
You must choose one of the following methods to perform a System Recovery:
●
●
Some features might not be available on systems that are shipped without a version of Microsoft
Recovery Image — Run the System Recovery from a recovery image stored on your hard disk drive. The recovery
image is a file that contains a copy of the original factory-shipped software. To perform a System Recovery from
a recovery image, see
NOTE:
Recovery Discs — Run the System Recovery from a set of recovery discs that you create from files stored on your
hard disk drive or purchased separately. To create recovery discs, see
The recovery image uses a portion of the hard disk drive that cannot be used for data storage.
System Recovery from the Windows 7 Start Menu on page 16.
Recovery discs on page 18.
System Recovery options
You should attempt a System Recovery in the following order:
1. Through the hard disk drive, from the Windows 7 Start menu.
2. Through the hard disk drive, by pressing the F11 key on the keyboard during system startup.
3. Through recovery discs that you create.
4. Through recovery discs purchased from HP Support. To purchase recovery discs, visit
System Recovery from the Windows 7 Start Menu
CAUTION:
data to a removable disc.
System Recovery deletes all data and programs you created or installed. Back up any important
www.hp.com/support.
16 Chapter 3 Troubleshooting and maintenance ENWW
Page 21

If the computer is working and Windows 7 is responding, use these steps to perform a System Recovery.
1. Turn off the computer.
2. Disconnect all peripheral devices from the computer except the monitor, keyboard, and mouse.
3. Turn on the computer.
4. Click the Start button, click All Programs, click Recovery Manager, and then click Recovery
Manager. If prompted, click Yes to allow the program to continue.
5. Under I need help immediately, click System Recovery.
6. Select Yes, and then click Next. Your computer restarts.
NOTE:
the disc, select Yes, and then click Next to restart the computer and run Recovery Manager from the recovery
disc. Under I need help immediately, click System Recovery, and then continue with step 7 below.
Insert the next system-recovery disc when prompted.
7. If you are prompted to back up your files, and you have not done so, select Back up your files first
(recommended), and then click Next. Otherwise, select Recover without backing up your files, and
then click Next.
8. System Recovery begins. After System Recovery is complete, click Finish to restart the computer.
9. Complete the registration process, and wait until you see the desktop.
10. Turn off the computer, reconnect all peripheral devices, and turn the computer back on.
If your system does not detect a recovery partition, it prompts you to insert a recovery disc. Insert
System Recovery at system startup
CAUTION:
data to a removable disc.
If Windows 7 is not responding, but the computer is working, follow these steps to perform a System Recovery.
1. Turn off the computer. If necessary, press and hold the On button until the computer turns off.
2. Disconnect all peripheral devices from the computer, except the monitor, keyboard, and mouse.
3. Press the On button to turn on the computer.
4. As soon as you see the initial company logo screen appear, repeatedly press the F11 key on your keyboard
until the Windows is Loading Files… message appears on the screen.
5. Under I need help immediately, click System Recovery.
6. If you are prompted to back up your files, and you have not done so, select Back up your files first
(recommended), and then click Next. Otherwise, select Recover without backing up your files, and
then click Next.
7. System Recovery begins. After System Recovery is complete, click Finish to restart the computer.
8. Complete the registration process, and wait until you see the desktop.
9. Turn off the computer, reconnect all peripheral devices, and turn the computer back on.
ENWW
System Recovery deletes all data and programs you created or installed. Back up any important
System Recovery
17
Page 22

System Recovery from recovery discs
CAUTION:
data to a removable disc.
To create recovery discs, see
To perform a System Recovery using recovery discs:
1. If the computer is working, create a backup DVD containing all the data files you want to save, and then remove
the backup disc from the drive tray.
2. Insert recovery disc #1 into the DVD drive tray, and close the tray.
3. If the computer works, click the Start button, click the Arrow button next to Shut Down, and then click Shut
Down. Or, if the computer is not responding, press and hold the On button for approximately 5 seconds, or
until the computer turns off.
4. Disconnect all peripheral devices from the computer except the monitor, keyboard, and mouse.
5. Press the On button to turn on the computer. If you are prompted to choose between running System Recovery
from disc or from hard drive, select Run program from disc, and then click Next.
6. Under I need help immediately, click Factory Reset.
7. If you are prompted to back up your files, and you have not done so, select Back up your files first
(recommended), and then click Next. Otherwise, select Recover without backing up your files, and
then click Next.
8. If you are prompted to insert the next recovery disc, do so.
9. When the Recovery Manager is finished, remove all recovery discs from the system.
10. Click Finish to restart the computer.
System Recovery deletes all data and programs you created or installed. Back up any important
Recovery discs on page 18.
Recovery discs
You should create a set of recovery discs from the recovery image stored on your hard disk drive. This image contains
the operating system and software program files that were originally installed on your computer at the factory. You
can create only one set of recovery discs for your computer, and the discs can be used only with this computer. Store
the recovery discs in a safe place.
NOTE:
Windows.
Some features might not be available on systems that are shipped without a version of Microsoft
18 Chapter 3 Troubleshooting and maintenance ENWW
Page 23

Choosing recovery discs
● To create recovery discs, your computer must have a DVD writer, and you must use only high-quality blank DVD
+R or DVD-R discs.
NOTE:
discs to create recovery discs.
Use high-quality discs to create your set of recovery discs. It is normal for discs to be rejected if they are not
●
defect-free. You will be prompted to insert a new blank disc to try again.
The number of discs in the recovery-disc set depends on your computer model (typically 1–3 DVD discs). The
●
Recovery Disc Creator program tells you the specific number of blank discs needed to make the set.
NOTE:
disc is correct. You can quit the process at any time. The next time you run the program, it resumes where it left
off.
You cannot use CDs or DVD+RW, DVD-RW, DVD+RW DL, DVD-RW DL, DVD+R DL, or DVD-R DL
The process of creating recovery discs takes some time to verify that the information written on the
Creating recovery discs
To create recovery discs:
1. Close all open programs.
2. Click the Start button, click All Programs, click Recovery Manager, and then click Recovery Disc
Creation. If prompted, click Yes to allow the program to continue.
3. Follow the onscreen instructions. Label each disc as you make it (for example, Recovery 1, Recovery 2).
ENWW
Recovery discs
19
Page 24

The power to make a change
Thank you for your purchase. HP is dedicated to producing the highest quality, best performing, and easiest to
How you can help
Recycle your old computer.
Disposing of electronic waste responsibly has been
an HP priority for more than 20 years. If this
computer is a replacement for an older computer
you no longer need, go to
www.hp.com/go/recycle to find out if HP
can help you dispose of your old computer with
minimum impact on the planet.
Don't use a screen saver.
Screen savers can prevent your HP computer from
going to sleep and thereby waste power. Screen
savers can also reduce the life of your monitor by
increasing the number of hours the LCD backlight is
on.
Don't disable the power settings.
The power management tools on this computer are
set to minimize energy use without impacting
performance. Please do not disable them.
use computers in the world. HP also designed this product with the environment in mind.
But to reduce its impact even further, we need your help.
Let’s work together to make a change.
What we do
We design with the environment in mind.
While we want you to enjoy this computer for many
years to come, we recognize that you will eventually
dispose of it. We have designed it so it can be easily
dismantled and recycled as much as possible. The
packaging that came with your computer is also
designed for maximum recyclability.
We design to be more energy efficient.
This computer has HP Power Management Technology,
which can reduce computer energy use up to 45%
compared to computers without power management.
HP computers keep energy needs to a minimum, saving
you money and reducing your carbon footprint.
We design our products to use better and fewer
materials.
Ensuring the health of you, your family, and our planet
is a key priority at HP. We are committed to using the
safest materials in the production of this and all our other
products.
Printed in
*517215-004*
*517215-004*
517215-004
Page 25

Safety and Regulatory Information
Desktops, Thin Clients, and Personal Workstations
Page 26

© Copyright 2006–2009 Hewlett-Packard
Development Company, L.P.
The information contained herein is subject
to change without notice.
The only warranties for HP products and
services are set forth in the express warranty
statements accompanying such products
and services. Nothing herein should be
construed as constituting an additional
warranty. HP shall not be liable for technical
or editorial errors or omissions contained
herein.
This document contains proprietary
information that is protected by copyright. No
part of this document may be photocopied,
reproduced, or translated to another
language without the prior written consent of
Hewlett-Packard Company.
Safety and Regulatory Information
Desktops, Thin Clients, and Personal
Workstations
Ninth Edition (August 2009)
Eighth Edition (March 2009)
Seventh Edition (September 2008)
Sixth Edition (July 2008)
Fifth Edition (June 2008)
Fourth Edition (December 2007)
Third Edition (September 2007)
Second Edition (July 2007)
First Edition (August 2006)
Document Part Number: 418213-009
Page 27

About This Book
This guide provides safety and regulatory information that is compliant with U.S., Canadian, and
International regulations for Desktops, Thin Clients, and Personal Workstations.
WARNING! Text set off in this manner indicates that failure to follow directions could result in bodily
harm or loss of life.
CAUTION: Text set off in this manner indicates that failure to follow directions could result in damage
to equipment or loss of information.
NOTE: Text set off in this manner provides important supplemental information.
ENWW iii
Page 28

iv About This Book ENWW
Page 29

Table of contents
1 Safety Notices
Important Safety Information ................................................................................................................ 1
Installation Conditions .......................................................................................................................... 2
Battery Replacement Notice ................................................................................................................. 2
Headset and Earphone Volume Level Notice ...................................................................................... 3
German Ergonomics Notice ................................................................................................................. 3
Laser Safety ......................................................................................................................................... 3
CDRH Regulations .............................................................................................................. 3
Compliance with International Regulations .......................................................................... 4
Laser Product Label ............................................................................................................. 4
Laser Information ................................................................................................................. 4
Power Supply and Power Cord Set Requirements .............................................................................. 4
Power Supply Class I Grounding Requirements ................................................................. 4
Denmark .............................................................................................................. 4
Norway ................................................................................................................ 4
Sweden ............................................................................................................... 5
Power Supply Requirements ............................................................................................... 5
For Use in Norway .............................................................................................. 5
Power Cord Set Requirements ............................................................................................ 5
Japanese Power Cord Requirements .................................................................................. 5
Pinch Hazard ........................................................................................................................................ 6
2 Regulatory Agency Notices
Regulatory Compliance Identification Numbers ................................................................................... 7
Modem Notices .................................................................................................................................... 7
Telecommunications Device Approvals ............................................................................... 7
U.S. Modem Statements ...................................................................................................... 8
Canadian Modem Statements ............................................................................................. 9
Japanese Modem Statements ............................................................................................. 9
New Zealand Modem Statements ....................................................................................... 9
Voice Support .................................................................................................... 10
TV Antenna Connectors Protection .................................................................................................... 11
External Television Antenna Grounding ............................................................................ 11
Lightning Protection ........................................................................................................... 11
ENWW v
Page 30

Note to CATV System Installer .......................................................................................... 12
Electromagnetic Compatibility Notices ............................................................................................... 12
Federal Communications Commission Notice ................................................................... 12
Modifications ..................................................................................................... 12
Cables ............................................................................................................... 12
Declaration of Conformity for Products Marked with the FCC Logo (United
States only) ....................................................................................................... 13
Products with Wireless LAN Devices ................................................................ 13
Australia Telecom Statement ............................................................................................. 13
Brazilian Notice .................................................................................................................. 14
Canadian Notice ................................................................................................................ 14
Avis Canadien .................................................................................................................... 15
European Union Regulatory Notice ................................................................................... 16
Products with 2.4-GHz Wireless LAN Devices .................................................. 17
France .............................................................................................. 17
European Telephone Network Declaration (European Union Only) ................. 17
European Network Compatibility Declarations (European Union Only) ............ 17
India Telegraph Act Notice ................................................................................................ 17
Japanese Notice ................................................................................................................ 18
Wireless LAN 802.11b devices ......................................................................... 18
Wireless LAN 802.11g devices ......................................................................... 18
Korean Notice .................................................................................................................... 18
NCC Notice ........................................................................................................................ 19
Environmental Agency Notices .......................................................................................................... 19
Disposal of Waste Equipment by Users in Private Household in the European
Union ................................................................................................................................. 19
ENERGY STAR Qualification (select models only) ........................................................... 20
Chemical Substances ........................................................................................................ 21
Mercury Statement ............................................................................................................ 21
Perchlorate Material—special handling may apply ............................................................ 21
Chinese Restriction of Hazardous Substances (RoHS) .................................................... 22
Chinese Safety Notices ..................................................................................................... 24
Japanese Restriction of Hazardous Substances (RoHS) .................................................. 24
Turkey EEE Regulation ..................................................................................................... 24
German Acoustics Notice ................................................................................................................... 25
vi ENWW
Page 31

1 Safety Notices
Important Safety Information
WARNING! To reduce the risk of serious injury, read the Safety & Comfort Guide. It describes proper
workstation setup, posture, and health and work habits for computer users, and provides important
electrical and mechanical safety information. This guide is located on the Web at www.hp.com/ergo and
on the Documentation CD that is included with the product.
To reduce the risk of electric shock or damage to your equipment:
• Do not disable the power cord grounding plug. The grounding plug is an important safety feature.
• Plug the power cord in a grounded (earthed) outlet that is easily accessible at all times.
• Disconnect power from the thin client by unplugging the power cord from the electrical outlet.
The computer may be heavy; be sure to use ergonomically correct lifting procedures when moving it.
Install the computer near an AC outlet. The AC power cord is your computer’s main AC disconnecting
device and must be easily accessible at all times. For your safety, the power cord provided with your
computer has a grounded plug. Always use the power cord with a properly grounded wall outlet, to avoid
the risk of electrical shock.
To reduce the possibility of an electric shock from the telephone network, plug your computer into the
AC outlet before connecting it to the telephone line. Also, disconnect the telephone line before
unplugging your computer from the AC power outlet.
Always disconnect the modem cord from the telephone system before installing or removing your
computer cover.
Do not operate the computer with the cover removed.
For your safety, always unplug the computer from its power source and from any telecommunications
systems (such as telephone lines), networks, or modems before performing any service procedures.
Failure to do so may result in personal injury or equipment damage. Hazardous voltage levels are inside
the power supply and modem of this product.
CAUTION: If your computer is provided with a voltage select switch for use in a 115 or 230 Vv power
system, the voltage select switch has been pre-set to the correct voltage setting for use in the particular
country/region where it was initially sold. Changing the voltage select switch to the incorrect position
can damage your computer and void any implied warranty.
This product has not been evaluated for connection to an “IT” power system (an AC distribution system
with no direct connection to earth, according to IEC 60950).
ENWW Important Safety Information 1
Page 32

Installation Conditions
See installation instructions before connecting this equipment to the input supply.
WARNING! The equipment must be provided with a proper AC protective earth (PE) ground
connection.
Energized and moving parts may be inside the computer. Disconnect power to the equipment before
removing the enclosure. Replace and secure the enclosure before re-energizing the equipment.
Battery Replacement Notice
WARNING! The product may contain an internal lithium manganese dioxide, vanadium pentoxide, or
alkaline battery or battery pack. There is risk of fire and burns if the battery pack is not handled properly.
To reduce the risk of personal injury:
• Do not attempt to recharge the battery.
• Do not expose to temperatures higher than 60° C (140° F).
• Do not disassemble, crush, puncture, short external contacts, or dispose of in fire or water.
• Risk of explosion if battery is replaced by an incorrect type. Dispose of used batteries according to the
instructions.
• Replace only with the HP spare designated for this product.
For information about removing a battery, refer to your computer documentation.
HP encourages customers to recycle used electronic hardware, HP original print cartridges, and
rechargeable batteries. For more information about recycling programs, go to
recycle.
Batteries, battery packs, and accumulators should not be disposed of together with the general household
waste. In order to forward them to recycling or proper disposal, please use the public collection system
or return them to HP, an authorized HP partner, or their agents.
The Taiwan EPA requires dry battery manufacturing or importing firms, in accordance with Article 15 of
the Waste Disposal Act, to indicate the recovery marks on the batteries used in sales, giveaways, or
promotions. Contact a qualified Taiwanese recycler for proper battery disposal.
http://www.hp.com/
2 Chapter 1 Safety Notices ENWW
Page 33

Headset and Earphone Volume Level Notice
WARNING! Listening to music at high volume levels and for extended durations can damage one’s
hearing. To reduce the risk of hearing damage, lower the volume to a safe, comfortable level and reduce
the amount of time listening at high levels.
For your own safety, before using headsets or earphones, always reset the volume. Some headphones
are louder than other headphones, even if the volume control setting is the same.
Changing the default audio or equalizer settings might lead to higher volume and should only be done
with caution.
For your own safety, headsets or earphones used with this product should comply with the headphone
limits in EN 50332-2.
If the computer includes a headset or earphones, this combination is in compliance to EN 50332-1.
German Ergonomics Notice
HP products which bear the "GS" approval mark, when forming part of a system comprising HP brand
products, keyboards and monitors that bear the "GS" approval mark, meet the applicable ergonomic
requirements. The installation guides included with the product provide configuration information.
Laser Safety
For products equipped with optical drives or fiber optic transceivers.
This product may be provided with an optical storage device (i.e., CD or DVD drive) and/or fiber optic
transceiver. Each of these devices contains a laser that is classified as a Class 1 Laser Product in
accordance with US FDA regulations and the IEC 60825-1. The product does not emit hazardous laser
radiation.
Each laser product complies with 21 CFR 1040.10 and 1040.11 except for deviations pursuant to Laser
Notice No. 50, dated May 27, 2001; and with IEC 60825-1:1993/A2:2001.
WARNING! Use of controls or adjustments or performance of procedures other than those specified
herein or in the laser product’s installation guide may result in hazardous radiation exposure. To reduce
the risk of exposure to hazardous radiation:
• Do not try to open the module enclosure. There are no user-serviceable components inside.
• Do not operate controls, make adjustments, or perform procedures to the laser device other than those
specified herein.
• Allow only HP Authorized Service technicians to repair the unit.
CDRH Regulations
The Center for Devices and Radiological Health (CDRH) of the U.S. Food and Drug Administration
implemented regulations for laser products on August 2, 1976. These regulations apply to laser products
manufactured from August 1, 1976. Compliance is mandatory for products marketed in the United
States.
ENWW Headset and Earphone Volume Level Notice 3
Page 34

Compliance with International Regulations
All systems equipped with CD-ROM drives comply with appropriate safety standards including IEC 825.
Laser Product Label
The following label or equivalent is located on the surface of laser products:
This label indicates that the product is
classified as a CLASS 1 LASER
PRODUCT. This label appears on a laser
device installed in the product.
If you have an LS-120 drive or an LS-260
drive, this label is located next to the Class
1 Laser Product label on the system.
Laser Information
Laser Type: Semiconductor GaAIAs
●
Wave Length: 780 +/- 35 nm
●
Divergence Angle: 53.5 Degrees +/- 0.5 degrees
●
Output Power: Less than 0.2 mW or 10,869 W·m-2 sr-1
●
Polarization: Circular 0.25
●
Numerical Aperture: 0.45 +/- 0.04
●
Power Supply and Power Cord Set Requirements
Power Supply Class I Grounding Requirements
For protection from fault currents, the equipment shall be connected to a grounding terminal. Plug the
system power cord into an AC outlet that provides a grounded outlet. Substitute cords may not provide
adequate fault protection. Only use the power cord supplied with this product or a Hewlett-Packard
authorized replacement.
Denmark
For tilslutning af de øvrige ledere, se medfølgende installationsvejledning.
Norway
Apparatet må kun tilkoples jordet stikkontakt.
4 Chapter 1 Safety Notices ENWW
Page 35

Sweden
Apparaten skall anslutas till jordat uttag, när den ansluts till ett nätverk.
Power Supply Requirements
The power supplies on some products have external power switches. The voltage select switch feature
on the product permits it to operate from any line voltage between 100-127 or 200-240 volts AC. Power
supplies on those products that do not have external power switches are equipped with internal circuits
that sense the incoming voltage and automatically switch to the proper voltage.
For safety reasons, use only the AC adapter provided with the unit or an authorized replacement adapter
from Hewlett-Packard. Replacement part numbers may be found at
hpsupport/index.pl.
For Use in Norway
This product is also designed for an IT power system with phase-to-phase voltage 230V.
Power Cord Set Requirements
The power cord set received with the product meets the requirements for use in the country where you
purchased the equipment. Use only the power cord provided with the unit or an authorized replacement
power cord from Hewlett-Packard or an approved HP source. Replacement part numbers may be found
http://www.hp.com/cgi-bin/hpsupport/index.pl.
at
http://www.hp.com/cgi-bin/
Power cord sets for use in other countries must meet the requirements of the country where you use
the product. For more information on power cord set requirements, contact your authorized HP dealer,
reseller, or service provider.
WARNING! Do not use power cords from other products.
Mismatched power cords may result in a shock and fire hazard.
The requirements listed below are applicable to all countries:
1. The power cord must be approved by an acceptable accredited agency responsible for evaluation
in the country where the power cord set will be installed.
2. The length of the power cord must be between 1.8 m (6 feet) and 3.6 m (12 feet). For a power cord
2.0 m (6.56 feet) or less, the diameter of the wire must be a minimum of 0.75 mm
the power cord is longer than 2.0 m (6.56 feet), the diameter of the wire must be a minimum of
1.0 mm
The power cord should be routed so that it is not likely to be walked on or pinched by items placed upon
it or against it. Particular attention should be paid to the plug, electrical outlet, and the point where the
cord exits from the product.
WARNING! Do not operate this product with a damaged power cord set. If the power cord set is
damaged in any manner, replace it immediately. Damaged cords may result in user exposure to hazards.
2
or 16AWG.
Japanese Power Cord Requirements
2
or 18AWG. If
For use in Japan, use only the power cord received with this product.
CAUTION: Do not use the power cord received with this product on any other products.
ENWW Power Supply and Power Cord Set Requirements 5
Page 36

Pinch Hazard
WARNING! Observe pinch hazard areas. Keep fingers away from closing parts.
6 Chapter 1 Safety Notices ENWW
Page 37

2 Regulatory Agency Notices
Regulatory Compliance Identification Numbers
For the purpose of regulatory compliance certifications and identification, your product has been
assigned a unique HP Regulatory Model Number (RMN). The RMN can be found on the product
nameplate label, along with all required approval markings and information. When requesting
compliance information for this product, always refer to this RMN. The RMN should not be confused
with the marketing name or model number of the product.
Modem Notices
WARNING! To reduce the risk of fire, electric shock, and injury to persons when using this device,
always follow basic safety precautions, including the following:
Do not use this product near water—for example, near a bathtub, wash bowl, kitchen sink or laundry
tub, in a wet basement, or near a swimming pool.
Avoid using this product during an electrical storm. There is a remote risk of electric shock from lightning.
Do not use this product to report a gas leak while in the vicinity of the leak.
Always disconnect the modem cable before opening the equipment enclosure or touching an
uninsulated modem cable, jack, or internal component.
If this product was not provided with a telephone line cord, use only No. 26 AWG or larger
telecommunication line cord.
Do not plug a modem or telephone cable into the RJ-45 (network) jack.
SAVE THESE INSTRUCTIONS
Telecommunications Device Approvals
The telecommunications device in the computer is approved for connection to the telephone network in
the countries and regions whose approval markings are indicated on the product label located on the
bottom of the computer or on the modem.
Refer to the user guide included with the product to ensure that the product is configured for the country
or region in which the product is located. Selecting a country or region other than the one in which it is
located may cause the modem to be configured in a way that violates the telecommunication regulations/
laws of that country or region. In addition, the modem may not function properly if the correct country
or region selection is not made. If, when you select a country or region, a message appears that states
that the country or region is not supported, this means that the modem has not been approved for use
in this country or region and thus should not be used.
ENWW Regulatory Compliance Identification Numbers 7
Page 38

U.S. Modem Statements
This equipment complies with Part 68 of the FCC Rules and the requirements adopted by the ACTA.
On the bottom of the computer or on the modem is a label that contains, among other information, a
product identifier in the format US:AAAEQ##TXXXX. Provide this information to the telephone company
if you are requested to do so.
Applicable certification jack USOC = RJ11C. A plug and jack used to connect this equipment to the
premises wiring and telephone network must comply with the applicable FCC Part 68 rules and
requirements adopted by the ACTA. A compliant telephone cord and modular plug is provided with this
product. It is designed to be connected to a compatible modular jack that is also compliant. See
installation instructions for details.
The REN is used to determine the number of devices that may be connected to a telephone line.
Excessive RENs on a telephone line may result in the devices not ringing in response to an incoming
call. In most but not all locations, the sum of RENs should not exceed five (5.0). To be certain of the
number of devices that may be connected to a line, as determined by the total RENs, contact the local
telephone company. For products approved after July 23, 2001, the REN for this product is part of the
product identifier that has the format US:AAAEQ##TXXXX. The digits represented by ## are the REN
without a decimal point (e.g., 03 is a REN of 0.3). For earlier products, the REN is separately shown on
the label.
If this HP equipment causes harm to the telephone network, the telephone company will notify you in
advance that temporary discontinuance of service may be required. But, if advance notice isn't practical,
the telephone company will notify you as soon as possible. Also, you will be advised of your right to file
a complaint with the FCC if you believe it is necessary.
The telephone company may make changes to its facilities, equipment, operations, or procedures that
could affect the operation of the equipment. If this happens, the telephone company will provide advance
notice in order for you to make necessary modifications to maintain uninterrupted telephone service.
If trouble is experienced with this equipment, call technical support. If the equipment is causing harm to
the telephone network, the telephone company may request that you disconnect the equipment until
the problem is resolved. You should perform repairs only to the equipment specifically discussed in the
“Troubleshooting” section of the user guide, if one is provided.
Connection to party line service is subject to state tariffs. Contact the state public utility commission,
public service commission, or corporation commission for information.
If your home has specially wired alarm equipment connected to the telephone line, ensure that the
installation of this HP equipment does not disable your alarm equipment. If you have questions about
what will disable alarm equipment, consult your telephone company or a qualified installer.
The Telephone Consumer Protection Act of 1991 makes it unlawful for any person to use a computer
or other electronic device, including a fax machine, to send any message unless such message clearly
contains in a margin at the top or bottom of each transmitted page, or on the first page of the
transmission, the date and time it is sent and an identification of the business, other entity, or other
individual sending the message, and the telephone number of the sending machine or such business,
other entity, or individual. (The telephone number provided may not be a 900 number or any other
number for which charges exceed local or long-distance transmission charges).
In order to program this information into your fax machine, you should complete the steps outlined in
the faxing software instructions.
8 Chapter 2 Regulatory Agency Notices ENWW
Page 39

Canadian Modem Statements
This equipment meets the applicable Industry Canada technical specifications.
The Ringer Equivalence Number, REN, is an indication of the maximum number of devices allowed to
be connected to a telephone interface. The termination on an interface may consist of any combination
of devices, subject only to the requirement that the sum of the RENs of all devices does not exceed 5.
The REN for this terminal equipment is 1.0.
Japanese Modem Statements
If the computer does not have the Japanese certification mark on the bottom of the computer, refer to
the appropriate certification marking below.
The Japanese certification mark for the Agere Systems PCI-SV92PP Soft modem is below:
The Japanese certification mark for the Agere Systems PCI-SV92EX Soft modem is below:
The Japanese certification mark for the Agere Systems AC'97 modem is below:
New Zealand Modem Statements
The grant of a Telepermit for any item of terminal equipment indicates only that Telecom has accepted
that the item complies with minimum conditions for connection to its network. It indicates no endorsement
of the product by Telecom, nor does it provide any sort of warranty. Above all, it provides no assurance
that any item will work correctly in all respects with another item of Telepermitted equipment of a different
make or model, nor does it imply that any product is compatible with all of Telecom's network services.
This equipment is not capable, under all operating conditions, of correct operation at the higher speeds
for which it is designed. Telecom will accept no responsibility should difficulties arise in such
circumstances.
If this device is equipped with pulse dialing, note that there is no guarantee that Telecom lines will always
continue to support pulse dialing.
ENWW Modem Notices 9
Page 40

Use of pulse dialing, when this equipment is connected to the same line as other equipment, may give
rise to bell tinkle or noise and may also cause a false answer condition. Should such problems occur,
the user should not contact the Telecom Faults Service.
Some parameters required for compliance with Telecom's Telepermit requirements are dependent on
the equipment (PC) associated with this device. The associated equipment shall be set to operate within
the following limits for compliance with Telecom's Specifications:
a. There shall be no more than 10 call attempts to the same number within any 30-minute period for
any single manual call initiation.
b. The equipment shall go on-hook for a period of not less than 30 seconds between the end of one
attempt and the beginning of the next attempt.
c. Where automatic calls are made to different numbers, the equipment shall be set to go on-hook
for a period of not less than 5 seconds between the end of one attempt and the beginning of the
next attempt.
d. The equipment shall be set to ensure that calls are answered between 3 and 30 seconds of receipt
of ringing (So set between 2 and 10).
Voice Support
All persons using this device for recording telephone conversations shall comply with New Zealand law.
This requires that at least one party to the conversation is aware that it is being recorded. In addition,
the Principles enumerated in the Privacy Act 1993 shall be complied with in respect to the nature of the
personal information collected, the purpose for its collection, how it is to be used, and what is disclosed
to any other party.
This equipment shall not be set to make automatic calls to the Telecom ‘111' Emergency Service.
10 Chapter 2 Regulatory Agency Notices ENWW
Page 41

TV Antenna Connectors Protection
External Television Antenna Grounding
If an outside antenna or cable system is connected to the product, be sure the antenna or cable system
is electrically grounded so as to provide some protection against voltage surges and built-up static
charges. Article 810 of the National Electrical Code, ANSI/NFPA 70, provides information with regard
to proper electrical grounding of the mast and supporting structure, grounding of the lead-in wire to an
antenna-discharge unit, size of grounding conductors, location of antenna-discharge unit, connection
to grounding electrodes, and requirements for the grounding electrode.
Lightning Protection
For added protection of any product during a lightning storm, or when it is left unattended and unused
for long periods of time, unplug the product from the wall outlet and disconnect the antenna or cable
system. This will prevent damage to the product from lightning and power line surges.
Table 2-1 Antenna Grounding
Reference Grounding Component
1 Electric Service Equipment
2 Power Service Grounding Electrode System (NEC Art 250, Part H)
3 Ground Clamps
4 Grounding Conductors (NEC Section 810–21)
5 Antenna Discharge Unit (NEC Section 810–20)
6 Ground Clamp
7 Antenna Lead-in Wire
ENWW TV Antenna Connectors Protection 11
Page 42

Note to CATV System Installer
This reminder is provided to call the CATV systems installer’s attention to section 820-93 of the National
Electric Code, which provides guidelines for proper grounding and in particular, specify that the Coaxial
cable shield shall be connected to grounding system of the building, as close to the point of cable entry
as practical.
Electromagnetic Compatibility Notices
This guide provides country- and region-specific nonwireless and wireless regulatory notices and
compliance information for the computer product. Some of these notices may not apply to your product.
One or more integrated wireless devices may be installed. In some environments, the use of wireless
devices may be restricted. Such restrictions may apply onboard airplanes, in hospitals, near explosives,
in hazardous locations, and so on. If you are uncertain of the policy that applies to the use of this product,
ask for authorization to use it before you turn it on.
Federal Communications Commission Notice
This equipment has been tested and found to comply with the limits for a Class B digital device, pursuant
to Part 15 of the FCC Rules. These limits are designed to provide reasonable protection against harmful
interference in a residential installation. This equipment generates, uses, and can radiate radio
frequency energy and, if not installed and used in accordance with the instructions, may cause harmful
interference to radio communications. However, there is no guarantee that interference will not occur
in a particular installation. If this equipment does cause harmful interference to radio or television
reception, which can be determined by turning the equipment off and on, the user is encouraged to try
to correct the interference by one or more of the following measures:
Reorient or relocate the receiving antenna.
●
Increase the separation between the equipment and the receiver.
●
Connect the equipment into an outlet on a circuit different from that to which the receiver is
●
connected.
Consult the dealer or an experienced radio or television technician for help.
●
Modifications
The FCC requires the user to be notified that any changes or modifications made to this device that are
not expressly approved by Hewlett-Packard Company may void the user's authority to operate the
equipment.
Cables
Connections to this device must be made with shielded cables with metallic RFI/EMI connector hoods
in order to maintain compliance with FCC Rules and Regulations.
12 Chapter 2 Regulatory Agency Notices ENWW
Page 43

Declaration of Conformity for Products Marked with the FCC Logo (United States only)
This device complies with Part 15 of the FCC Rules. Operation is subject to the following two conditions:
1. This device may not cause harmful interference, and
2. This device must accept any interference received, including interference that may cause
undesired operation.
For questions regarding the product, contact:
Hewlett-Packard Company P.O. Box 692000, Mail Stop 530113 Houston, Texas 77269-2000
Or, call 1-800-HP-INVENT (1-800-474-6836).
For questions regarding this FCC declaration, contact:
Hewlett-Packard Company P.O. Box 692000, Mail Stop 510101 Houston, Texas 77269-2000
Or, call (281) 514-3333.
To identify this product, refer to the part, series, or model number found on the product.
Products with Wireless LAN Devices
This product may be equipped with a wireless LAN device. This device must not be co-located or
operating in conjunction with any other antenna or transmitter.
WARNING! Exposure to Radio Frequency Radiation The radiated output power of this device is
below the FCC radio frequency exposure limits. Nevertheless, the device should be used in such a
manner that the potential for human contact is minimized during normal operation.
During normal operation: To avoid the possibility of exceeding the FCC radio frequency exposure limits,
human proximity to the antennae should not be less than 20 cm (8 inches), including when the computer
display is closed, if integrated into the unit. To identify the location of the wireless antennae, refer to the
documentation included with the computer.
CAUTION: When using IEEE 802.11a wireless LAN, this product is restricted to indoor use, due to its
operation in the 5.15- to 5.25-GHz frequency range. The FCC requires this product to be used indoors
for the frequency range of 5.15 GHz to 5.25 GHz to reduce the potential for harmful interference to
cochannel mobile satellite systems. High-power radar is allocated as the primary user of the 5.25- to
5.35-GHz and 5.65- to 5.85-GHz bands. These radar stations can cause interference with and/or
damage to this device.
Australia Telecom Statement
The computer must be connected to the Telecommunication Network through a line cord that meets the
requirements of ACA Technical Standard TS008.
WARNING! Modems without integral RJ-11 that are shipped with this computer must be installed only
in devices displaying the A-tick.
ENWW Electromagnetic Compatibility Notices 13
Page 44

Brazilian Notice
Este equipamento opera em caráter secundário, isto é, não tem direito a proteção contra interferência
prejudicial, mesmo de estações do mesmo tipo, e não pode causar interferência a sistemas operando
em caráter primário.
CAUTION: A alimentação de energia é predefinida para 220/230Vv. Se você possuir tomada elétrica
de 110/115Vv, por favor, altere a chave na parte traseira do seu computador para a tensão correta.
Canadian Notice
This Class B digital apparatus meets all requirements of the Canadian Interference-Causing Equipment
Regulations. Wireless operation is subject to 2 conditions. The first is that the wireless device may not
cause interference. The second is that the wireless device must accept any interference, including
interference that may cause undesired operation of the device.
CAUTION: When using IEEE 802.11a wireless LAN, this product is restricted to indoor use, due to its
operation in the 5.15- to 5.25-GHz frequency range. Industry Canada requires this product to be used
indoors for the frequency range of 5.15 GHz to 5.25 GHz to reduce the potential for harmful interference
to co-channel mobile satellite systems. High-power radar is allocated as the primary user of the 5.25to 5.35-GHz and 5.65- to 5.85-GHz bands. These radar stations can cause interference with and/or
damage to this device.
The antenna for this device is not replaceable. Any attempt at user modification may damage your
computer. For the Belkin Dual-Band Wireless A+G Desktop Card the maximum antenna gain permitted
as specified by the Canadian e.i.r.p. limit is 2 dBi. For the Intel 802.11 a/b/g/n WLAN mini-card the
maximum antenna gain permitted as specified by the Canadian e.i.r.p. limit is 6 dBi. For the Ralink
802.11 b/g/n WLAN PCIe 1x card the maximum antenna gain permitted as specified by the Canadian
e.i.r.p. limit is 3 dBi.
14 Chapter 2 Regulatory Agency Notices ENWW
Page 45

Avis Canadien
Cet appareil numérique de la classe B respecte toutes les exigences du Règlement sur le matériel
brouilleur du Canada. Le fonctionnement des périphériques sans fil est soumis à deux conditions. La
première est que le périphérique sans fil ne doit pas causer d'interférence. La seconde est que le
périphérique sans fil doit supporter toutes les interférences reçues, y compris les interférences qui
pourraient entraîner un mauvais fonctionnement.
CAUTION: Si vous utilisez un réseau local sans fil IEEE 802.11a, l'appareil ne doit être utilisé qu'à
l'intérieur d'un bâtiment, car il fonctionne dans une bande de fréquences allant de 5,15 à 5,25 GHz. Il
s'agit d'une réglementation d'Industrie Canada visant à réduire le risque d'interférences nuisibles aux
systèmes mobiles par satellite utilisant les mêmes canaux. Les bandes de fréquences allant de 5,25 à
5,35 GHz et de 5,65 à 5,85 GHz sont réservées aux stations radars très puissantes. Celles-ci peuvent
causer des interférences et/ou endommager l'appareil.
L'antenne de l'appareil ne peut pas être remplacée. Vous risquez d'endommager votre ordinateur si
vous essayez de modifier les paramètres par défaut. Le gain d'antenne maximal autorisé pour la carte
réseau sans fil bibande A+G Belkin pour ordinateur de bureau est de 2 dBi, conformément à la valeur
d'EIRP (puissance isotrope rayonnée équivalente) maximale canadienne. Le gain d'antenne maximal
autorisé pour la mini-carte réseau local sans fil Intel 802.11 a/b/g/n est de 6 dBi, conformément à la
valeur d'EIRP (puissance isotrope rayonnée équivalente. Le gain d'antenne maximal autorisé pour la
carte PCIe 1x réseau local sans fil Ralink 802.11 b/g/n est de 3 dBi, conformément à la valeur d'EIRP
(puissance isotrope rayonnée équivalente) maximale canadienne.
ENWW Electromagnetic Compatibility Notices 15
Page 46

European Union Regulatory Notice
Products bearing the CE marking comply with the following EU Directives:
Low Voltage Directive 2006/95/EC
●
EMC Directive 2004/108/EC
●
EuP Directive 2005/32/EC where applicable
●
CE compliance of this product is valid only if powered with the correct CE-marked AC adapter provided
by HP.
If this product has telecommunications functionality, it also complies with the essential requirements of
the following EU Directive:
R&TTE Directive 1999/5/EC
●
Compliance with these directives implies conformity to harmonized European standards (European
Norms) that are listed in the EU Declaration of Conformity issued by HP for this product or product family.
This compliance is indicated by one of the following conformity markings placed on the product.
The following CE marking is valid for non-telecommunications products and for EU harmonized
●
telecommunications products, such as Bluetooth®.
The following CE marking is valid for EU non-harmonized telecommunications products.
●
*If applicable, a notified body number is used. Refer to the regulatory label provided on this product.
The telecommunications functionality of this product may be used in the following EU and EFTA
countries:
Austria, Belgium, Bulgaria, Cyprus, Czech Republic, Denmark, Estonia, Finland, France, Germany,
Greece, Hungary, Iceland, Ireland, Italy, Latvia, Liechtenstein, Lithuania, Luxembourg, Malta,
Netherlands, Norway, Poland, Portugal, Romania, Slovak Republic, Slovenia, Spain, Sweden,
Switzerland, and United Kingdom.
The official EU CE declaration of conformity for this device may be found at
certificates.
The point of contact for regulatory matters is Hewlett-Packard GmbH, HQ-TRE, Herrenberger Strasse
140, 71034 Boeblingen, Germany.
http://www.hp.com/go/
16 Chapter 2 Regulatory Agency Notices ENWW
Page 47

Products with 2.4-GHz Wireless LAN Devices
France
For 2.4 GHz Wireless LAN operation of this product certain restrictions apply: This product may be used
indoors for the entire 2400-2483.5 MHz frequency band (channels 1-13). For outdoor use, only
2400-2454 MHz frequency band (channels 1-9) may be used. For the latest requirements, see
http://www.arcep.fr.
L'utilisation de cet équipement (réseau local sans fil 2,4 GHz) est soumise à certaines restrictions : cet
équipement peut être utilisé à l'intérieur d'un bâtiment en utilisant toutes les fréquences de
2400 à 2483,5 MHz (Chaînes 1-13). Pour une utilisation à l'extérieur, seules les fréquences de
2400 à 2454 MHz (Chaînes 1-9) peuvent être utilisées. Pour les dernières restrictions, voir
http://www.arcep.fr.
European Telephone Network Declaration (European Union Only)
The product herewith complies with the requirements of the R&TTE Directive 1999/5/EC (Annex II) and
carries the CE marking accordingly. However, due to differences between the individual PSTNs provided
in different countries/regions, the approval does not, of itself, give an unconditional assurance of
successful operation on every PSTN network termination point. In the event of problems, you should
contact your equipment supplier in the first instance.
European Network Compatibility Declarations (European Union Only)
This equipment has been designed to work with analogue DTMF Networks (TBR-21 compliant).
This equipment may have internetworking difficulties in PSTN networks that only support Pulse Dialing.
Please consult with your network operator for further assistance.
India Telegraph Act Notice
The India Telegraph Act of 1885 requires that an IEEE 802.11a wireless LAN end user obtain a license.
To obtain this license, please contact The Wireless Planning & Coordination Wing, Ministry of
Communications, Sanchar Bhavan New Delhi.
ENWW Electromagnetic Compatibility Notices 17
Page 48

Japanese Notice
この装置は、クラス B 情報技術装置です。この装置は、家 庭環境で使用することを目的としています
が、この装置が ラジオやテレビジョン受信機に近接して使用されると、受 信障害を引き起こすこと
があります。取扱説明書に従って 正しい取り扱いをして下さい。
VCCI-B
Wireless LAN 802.11b devices
Wireless LAN 802.11g devices
Korean Notice
18 Chapter 2 Regulatory Agency Notices ENWW
Page 49

NCC Notice
Environmental Agency Notices
Disposal of Waste Equipment by Users in Private Household in the European Union
This symbol on the product or on its packaging indicates that this product must not be disposed of with
your other household waste. Instead, it is your responsibility to dispose of your waste equipment by handing
it over to a designated collection point for the recycling of waste electrical and electronic equipment. The
separate collection and recycling of your waste equipment at the time of disposal will help to conserve
natural resources and ensure that it is recycled in a manner that protects human health and the
environment. For more information about where you can drop off your waste equipment for recycling,
please contact your local city office, your household waste disposal service or the shop where you
purchased the product.
ENWW Environmental Agency Notices 19
Page 50

ENERGY STAR Qualification (select models only)
NOTE: This section applies only to products bearing the Energy Star logo.
HP computers marked with the ENERGY STAR logo follow the applicable U.S. Environmental Protection
Agency (EPA) ENERGY STAR specifications for computers. The EPA ENERGY STAR logo does not
imply endorsement by the EPA. As an ENERGY STAR Partner, Hewlett-Packard Company has
determined the products marked with the ENERGY STAR logo are ENERGY STAR-qualified per the
applicable ENERGY STAR guidelines for energy efficiency. The following logo appears on all ENERGY
STAR-qualified computers.
The ENERGY STAR Computers Program was created by the EPA to promote energy efficiency and
reduce air pollution through more energy-efficient equipment in homes, offices, and factories. One way
products achieve this energy efficiency is by reducing power consumption when not being used through
the Microsoft Windows Power Management feature.
The Power Management feature enables the computer to enter a low-power (or “sleep”) mode after a
period of inactivity. When used with an external monitor that is ENERGY STAR-qualified, this feature
also supports the similar power management features of the external monitor.
To take advantage of this energy savings, the Power Management feature has been preset to power
down the computer and monitor after the following specified periods of inactivity:
Operating System Computer Monitor
Business Desktops XP 15 minutes 15 minutes
Vista 15 minutes 15 minutes
Windows 7 30 minutes 10 minutes
Consumer Desktops 15 minutes 10 minutes
Thin Clients Not applicable 15 minutes
Workstations 30 minutes 15 minutes
Both the computer and monitor can be woken from sleep mode through user interaction with any of the
computer input devices (mouse, keyboard, and so on). When configured with Wake On LAN (WOL)
enabled, the computer can also be woken by a network signal.
See the EPA ENERGY STAR Power Management Web site for more information about the energy and
financial savings potential of the Power Management Feature:
http://www.energystar.gov/
powermanagement.
See the EPA ENERGY STAR Web site for more information about the ENERGY STAR program and
its environmental benefits:
http://www.energystar.gov.
CAUTION: Using the Energy Save Monitor feature with monitors that are not ENERGY STAR-qualified
can cause video distortion when an Energy Save timeout occurs.
20 Chapter 2 Regulatory Agency Notices ENWW
Page 51

NOTE: ENERGY STAR is not supported on Linux or FreeDOS Desktop PCs.
ENERGY STAR is not supported on Linux workstations.
If it is necessary to restore the operating system, you must also reset the ENERGY STAR settings (if
applicable) after the restore.
To verify the factory default power settings for your computer, select Start > Control Panel, and then
double-click Power Options.
Chemical Substances
HP is committed to providing our customers with information about the chemical substances in our
products as needed to comply with legal requirements such as REACH (Regulation EC No. 1907/2006
of the European Parliament and the Council). A chemical information report for this product can be found
http://www.hp.com/go/reach.
at
Mercury Statement
This HP product may contain the following material that might require special handling at end-of-life:
Mercury in the fluorescent lamp in the display LCD
●
Disposal of mercury can be regulated because of environmental considerations. For disposal or
recycling information, please contact your local authorities or the Electronic Industries Alliance (EIA)
(
http://www.eiae.org).
Perchlorate Material—special handling may apply
The computer’s real-time clock battery may contain perchlorate and may require special handling when
recycled or disposed of in California. See
http://www.dtsc.ca.gov/hazardouswaste/perchlorate/.
ENWW Environmental Agency Notices 21
Page 52

Chinese Restriction of Hazardous Substances (RoHS)
ᴹ∂ᴹᇣ⢙䍘઼ݳ㍐৺ަ䟿㺘
ṩᦞѝഭⲴlj⭥ᆀؑӗ૱⊑ḃ᧗ࡦ㇑⨶࣎⌅NJ
ѱᶵ༺⨼ಞૂ
ᮙ✣ಞ
ᆎᶗ
I/O PCAs
⭫Ⓠ
䭤ⴎ
啖ḽ
ᵰެԌ
伄
䜞ཌ䜞։
䰻䈱䇴༽
ཌ䜞䇴༽
⭫㔼
⺢ⴎ傧ࣞಞ
ᱴ⽰ኅ
O: 㺞⽰䈛ᴿ∈ᴿᇩ⢟䍞൞䈛䜞Ԭᡶᴿൽ䍞ᶆᯏѣⲺ䠅ൽ൞SJ/T11363-2006
ḽ㿺ᇐⲺ䲆䠅㾷≸ԛсȾ
X: 㺞⽰䈛ᴿ∈ᴿᇩ⢟䍞㠩ቇ൞䈛䜞ԬⲺḆжൽ䍞ᶆᯏѣⲺ䠅䎻࠰
SJ/T11363-2006ḽ㿺ᇐⲺ䲆䠅㾷≸Ⱦ
㺞ѣḽᴿćXĈⲺᡶᴿ䜞Ԭ䜳ㅜ⅝ⴕRoHS⌋㿺ć⅝⍨䇤Րૂ⅝ⴕ⨼ӁՐ
2003ᒪ1ᴾ27ᰛީӄ⭫ᆆ⭫ಞ䇴༽ѣ䲆ֵ⭞Ḇӑᴿᇩ⢟䍞Ⲻ2002/95/EC
ԚĈȾ
⌞φ⧥ֵؓ⭞ᵕ䲆Ⲻ৸㘹ḽ䇼ߩӄӝ↙ᑮᐛ֒Ⲻᓜૂ⒵ᓜㅿᶗԬȾ
The Table of Toxic and Hazardous Substances/Elements and their Content as required by China's
Management Methods for Controlling Pollution by Electronic Information Products
22 Chapter 2 Regulatory Agency Notices ENWW
Page 53

Table 2-2 Toxic and Hazardous Substances and Elements
Part Name Lead
Motherboard, processor and heat sink X O O O O O
Memory X O O O O O
I/O PCAs X O O O O O
Power supply X O O O O O
Keyboard X O O O O O
Mouse X O O O O O
Chassis/Other X O O O O O
Fans X O O O O O
Internal/External Media Reading
Devices
External Control Devices X O O O O O
Cable X O O O O O
Hard Disk Drive X O O O O O
(Pb)
X O O O O O
Mercury
(Hg)
Cadmium
(Cd)
Hexavalent
Chromium
(Cr(VI))
Polybrominated
biphenyls
(PBB)
Polybrominated
diphenyl
ethers
(PBDE)
Display X X O O O O
O: Indicates that this toxic or hazardous substance contained in all of the homogeneous materials for
this part is below the limit requirement in SJ/T11363-2006.
X: Indicates that this toxic or hazardous substance contained in at least one of the homogeneous
materials used for this part is above the limit requirement in SJ/T11363-2006.
All parts named in this table with an “X” are in compliance with the European Union's RoHS Legislation –
“Directive 2002/95/EC of the European Parliament and of the Council of 27 January 2003 on the
restriction of the use of certain hazardous substances in electrical and electronic equipment”.
NOTE: The referenced Environmental Protection Use Period Marking was determined according to
normal operating use conditions of the product such as temperature and humidity.
ENWW Environmental Agency Notices 23
Page 54

Chinese Safety Notices
Japanese Restriction of Hazardous Substances (RoHS)
2008 年、日本における製品含有表示方法、JISC0950 が公示されました。製造事業者は、2006 年 7
月1日 以降に販売される電気・電子機器の特定化学物質の含有に付きまして情報提供を義務付けられ
ました。製品の部材表示に付きましては、
www.hp.com/go/jisc0950 を参照してください
A Japanese regulatory requirement, defined by specification JIS C 0950, 2008, mandates that
manufacturers provide Material Content Declarations for certain categories of electronic products
offered for sale after July 1, 2006.
To view the JIS C 0950 material declaration for this product, visit
www.hp.com/go/jisc0950.
Turkey EEE Regulation
Türkiye Cumhuriyeti: EEE Yönetmeliğine Uygundur
24 Chapter 2 Regulatory Agency Notices ENWW
Page 55

German Acoustics Notice
LpA is < 70dB(A)
Schalldruckpegel LpA = kleiner 70 dB(A)
Am Arbeitsplatz (operator position)
Normaler Betrieb (normal operation)
Nach ISO 7779:1999 (Typprüfung)
ENWW German Acoustics Notice 25
 Loading...