

Page 1
Norman Hub
4. Norman Hub Preparation Notes
1. Sync Network of each remotes. In this case, all the shutters assigning to the
remote can be controlled by APP via Hub. If you have some rooms don’t want
to control by APP via Hub, you can skip this step.
2. Finished shutter assignment of each room to corresponding Remote first.
3. Each room needs a Repeater installed. If the signal needs pass to different
floor, you will need Repeater installed around the stairs as well.
5. Norman Hub Installation
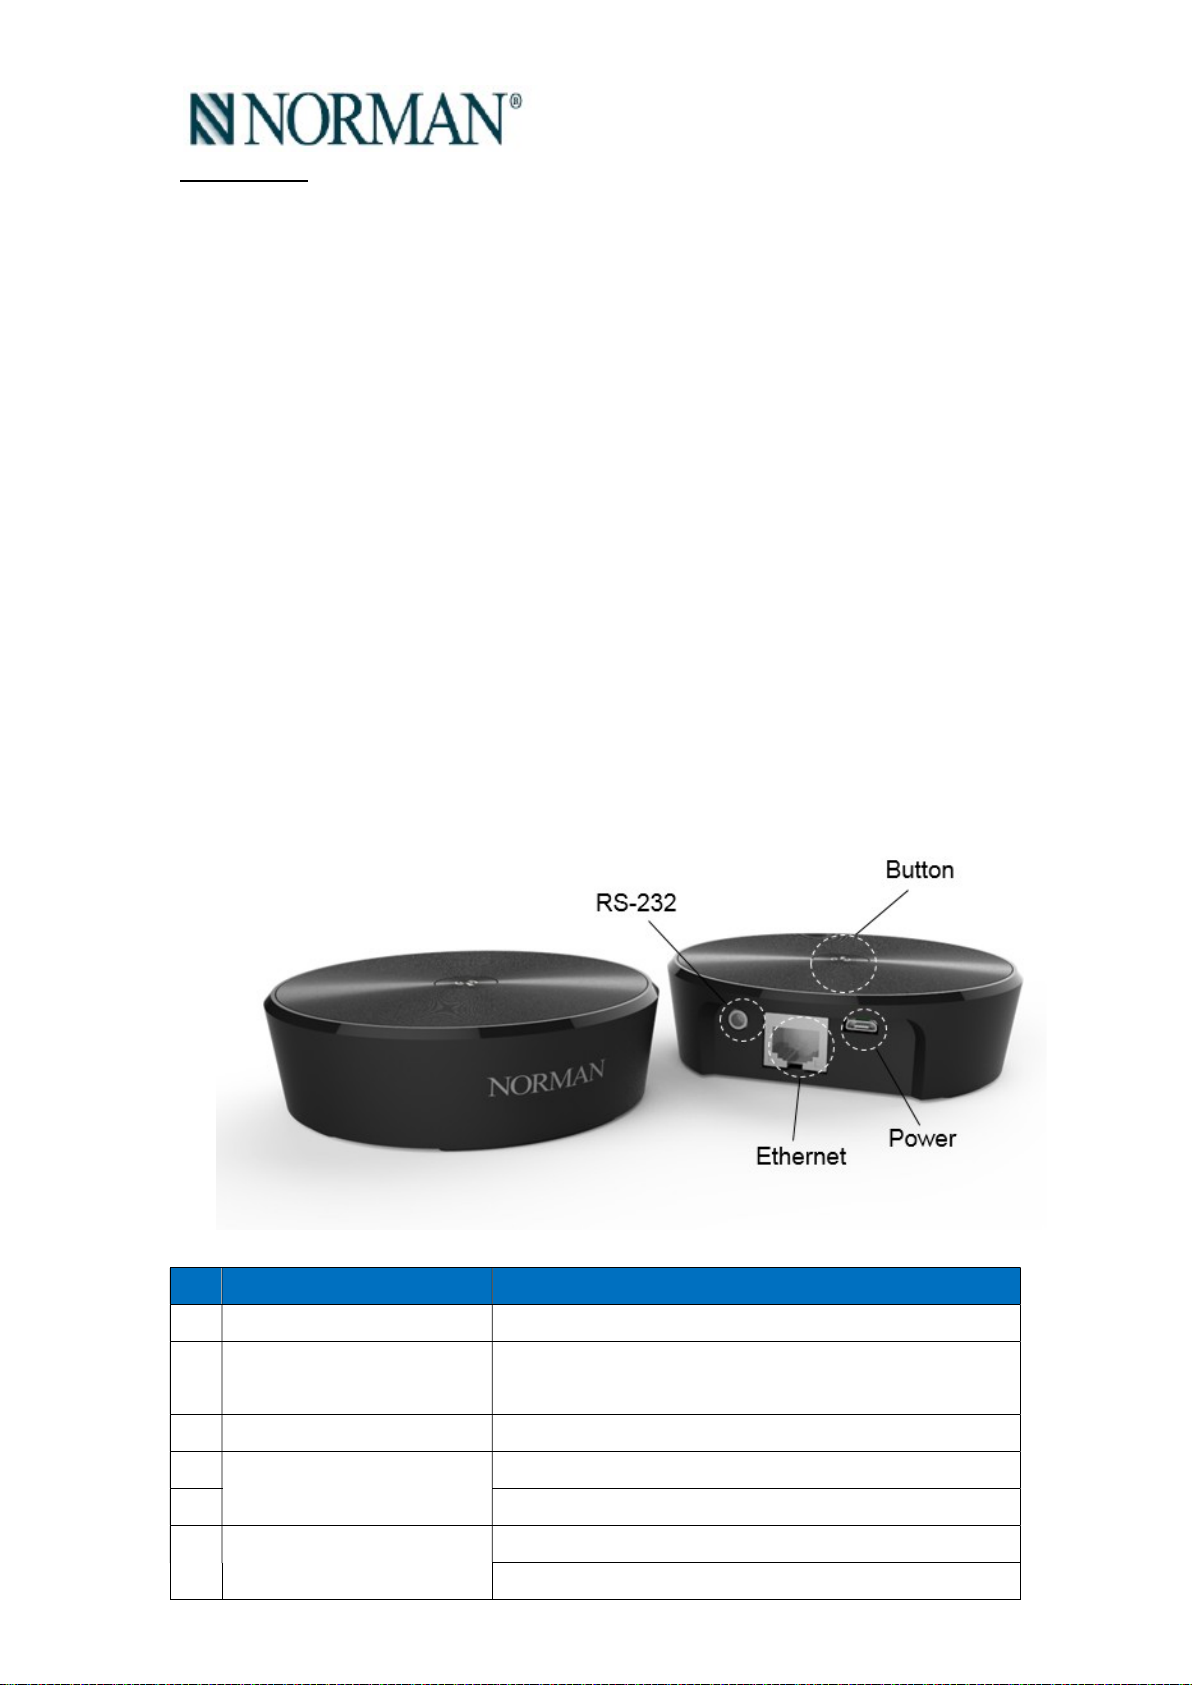
1. Connect Norman Hub to adaptor via micro USB cable.
2. Network connectivity settings:
Ethernet: Connect Norman Hub to home AP via Ethernet cable.
WiFi:
Find SSID “MBAHUB_XXXXXX(last 6 digital of MAC)” by your
smart phone.
Norman Hub WiFi password: “qwertypuiop”
Open Norman APP > Connect to Hub > Menu > Hub Info > Home
AP Settings > Follow the UI instruction connecting Norman Hub
to Home Wifi.
6. Norman Hub Specification
NO
1 Power source 5V, 1A, USB micro B type receptor
Item Specification
2 Radio type
3 WiFi standard IEEE. 802.11.b,g,n
4
Interface
5 USB micro B
6
Power consumption
Proprietary 2.4G RF
WiFi 2.4G
Ethernet 10Base-T/100Base-Tx
RS232
<1.5W
Page 2
Operation temperature 0°C~45°C
7 Storage temperature -30°C~70°C
8
Accessory
9 USB cable
Dimension
10
(mm)
Weight (g)
Ethernet cable
OD94 x H27.6 Black, 1M
176g Black, 1M, CAT.5E (100Mbps)
Power adapter
Input: 100V~240V
Output: 5V / 1A
7. Norman Hub Button Definition
No Name Description
1 Button 8. Press once: Join network.
9. Press for 3 seconds in to user setting mode:
1. Press one time: Search shutters.
2. Press two times: Station mode switch to AP mode.
3. Press three times: Norman Hub factory reset.
10. Norman Hub Functions
No
Function Description
1 Join Norman Hub to
network and search
shutters of the
environment
2 Manually trigger
searching function
3 Station mode to AP
mode
1. Power on Norman Hub, orange LED will blinking while boot up.
2. Once system up, LED will blinking in Red and Green as initial status.
3. Press SET of remote into setting mode.
4. Press Norman Hub.
5. Press Up of remote around Hub.
6. Norman Hub will blinking in White while join network.
7. Once Hub joined network, LED will blinking in Blue and White as
searching shutter status.
8. Once finished searching, LED will on in white as normal status.
1. Press Norman Hub for 3 seconds into user setting mode. The LED
will on in Blue.
2. Press one time in 5 seconds right after #1.
3. LED will blinking in Blue and White as searching shutter status.
4. Once finished searching, LED will on in white as normal status.
Station mode means Norman Hub connecting to home AP.
AP mode means Norman Hub worked as standalone AP.
1. Press Norman Hub for 3 seconds into user setting mode. The LED
will on in Blue.
2. Press two times in 5 seconds right after #1.
3. Norman Hub will switch to AP mode from Station mode.
4. Once AP mode working successfully, you will see MBAHUB_XXXXXX
Page 3

SSID by your smart phone.
4 Factory Reset 5. 1. Press Norman Hub for 3 seconds into user setting mode. The LED
will on in Blue.
6. Press three times in 5 seconds right after #1.
7. Norman Hub will reboot and factory reset.
8. Once system up, LED will blinking in Red and Green as initial status.
5 AP mode (can be found
by smart phone)
1. By default (without any setting) Norman Hub will be AP mode in
following situation:
Not connecting to Home AP.
No Ethernet cable connected.
2. Once AP mode working successfully, you will see MBAHUB_XXXXXX
SSID by your smart phone.
3. The default password will be "qwertyuiop".
6 Connecting to Home AP
via Ethernet cable
1. Connecting Norman Hub to Home AP by Ethernet cable.
2. With Ethernet connection, Norman Hub is working as Station
mode. No SSID will be found.
7 Reboot 1. Re-plug power cable.
2. Orange LED will blinking while boot up.
Federal Communication Commission Interference Statement
This device complies with Part 15 of the FCC Rules. Operation is subject to the
following two conditions: (1) This device may not cause harmful interference, and (2)
this device must accept any interference received, including interference that may
cause undesired operation.
This equipment has been tested and found to comply with the limits for a Class B
digital device, pursuant to Part 15 of the FCC Rules. These limits are designed to
provide reasonable protection against harmful interference in a residential
installation. This equipment generates, uses and can radiate radio frequency energy
and, if not installed and used in accordance with the instructions, may cause harmful
interference to radio communications. However, there is no guarantee that
interference will not occur in a particular installation. If this equipment does cause
harmful interference to radio or television reception, which can be determined by
turning the equipment off and on, the user is encouraged to try to correct the
interference by one of the following measures:
- Reorient or relocate the receiving antenna.
Page 4

- Increase the separation between the equipment and receiver.
- Connect the equipment into an outlet on a circuit different from that
to which the receiver is connected.
- Consult the dealer or an experienced radio/TV technician for help.
FCC Caution: Any changes or modifications not expressly approved by the party
responsible for compliance could void the user's authority to operate this
equipment.
This transmitter must not be co-located or operating in conjunction with any other
antenna or transmitter.
Radiation Exposure Statement:
This equipment complies with FCC radiation exposure limits set forth for an
uncontrolled environment. This equipment should be installed and operated with
minimum distance 20cm between the radiator & your body.
Note: The country code selection is for non-US model only and is not available to all
US model. Per FCC regulation, all WiFi product marketed in US must fixed to US
operation channels only.
Industry Canada statement:
This device complies with ISED’s licence-exempt RSSs. Operation is subject to the following two
conditions: (1) This device may not cause harmful interference, and (2) this device must accept
any interference received, including interference that may cause undesired operation.
Le présent appareil est conforme aux CNR d’ ISED applicables aux appareils radio exempts de
licence. L’exploitation est autorisée aux deux conditions suivantes : (1) le dispositif ne doit pas
produire de brouillage préjudiciable, et (2) ce dispositif doit accepter tout brouillage reçu, y
compris un brouillage susceptible de provoquer un fonctionnement indésirable.
Radiation Exposure Statement:
This equipment complies with ISED radiation exposure limits set forth for an
uncontrolled environment. This equipment should be installed and operated with
greater than 20cm between the radiator & your body.
Déclaration d'exposition aux radiations:
Cet équipement est conforme aux limites d'exposition aux rayonnements ISED
établies pour un environnement non contrôlé. Cet équipement doit être installé et
utilisé à plus de 20 cm entre le radiateur et votre corps.
 Loading...