

Page 1

Norman Dial (Remote) and Docking
Remote Battery Installation
1. Remove Remote color ring.
2. Open battery cover.
3. Insert CR2032 *2.
4. Put battery cover and color ring in place.
5. Remote LED will on after installation success.
Remote Docking Installation
1. Need components:
2. Dig two holes on the wall, and put two Anchors Conical inside the wall.
3. Remove the Magnet adhesive paper, then sticky in the Docking’s hole.
Page 2
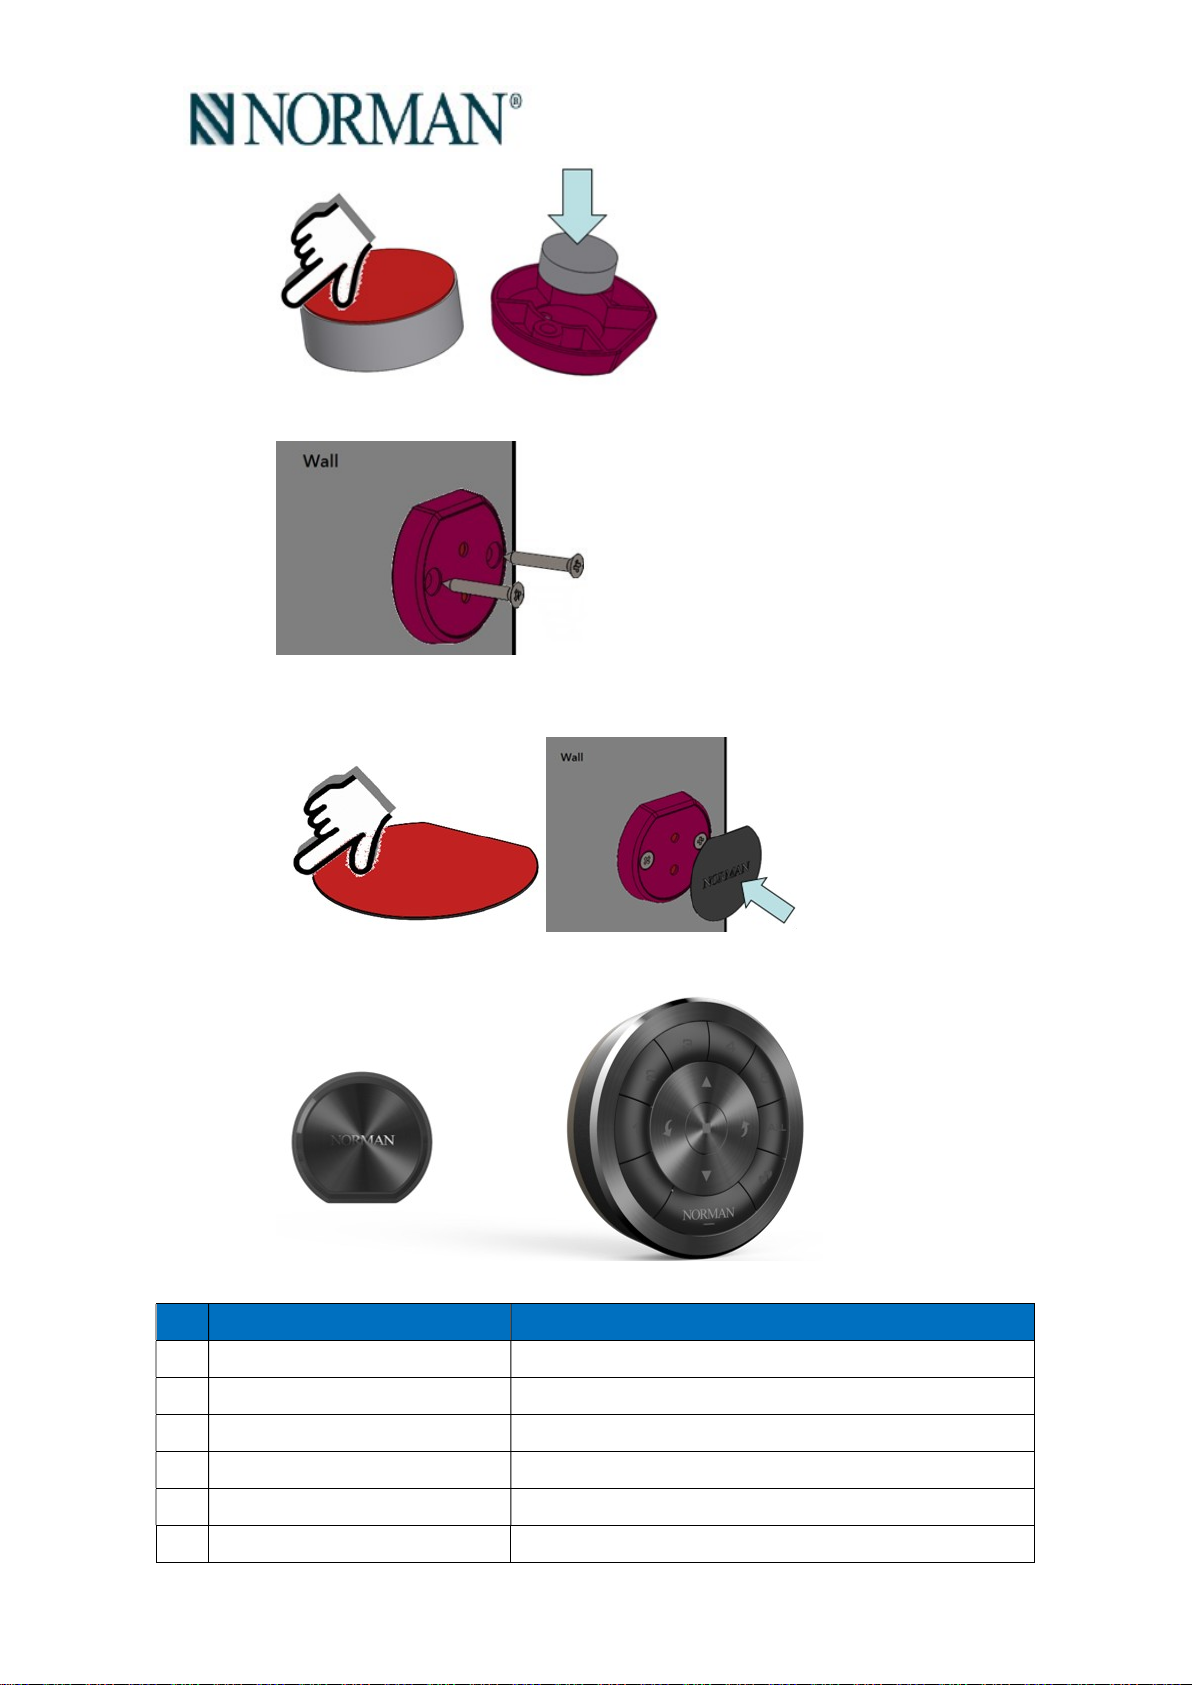
4. Then use two Screw to let Docking can fix on the wall.
5. Remove the Protection Film adhesive paper, and use the Protection Film to
cover Docking surface.
6. After then, we can put the Remote on the wall.
Remote Specification
NO
1 Power source 3V, 200mAh, CR2032 Lithium Coin battery x2 parallel
2 Battery operating voltage range 3.3V~3.0V
3 Radio type proprietary 2.4G RF
4 Button 14pcs
5 Rotary encoder Resolution 1pcs, 1.25 degree
Item Specification
6 Power consumption standby
Page 3

7 Operation
LED+radio <0.02mW
temperature
0°C~50°C <150mW
8 Storage temperature -30°C~70°C
9 Dimension (mm) OD33.8*H21.2
10 Weight (g) 74.5g
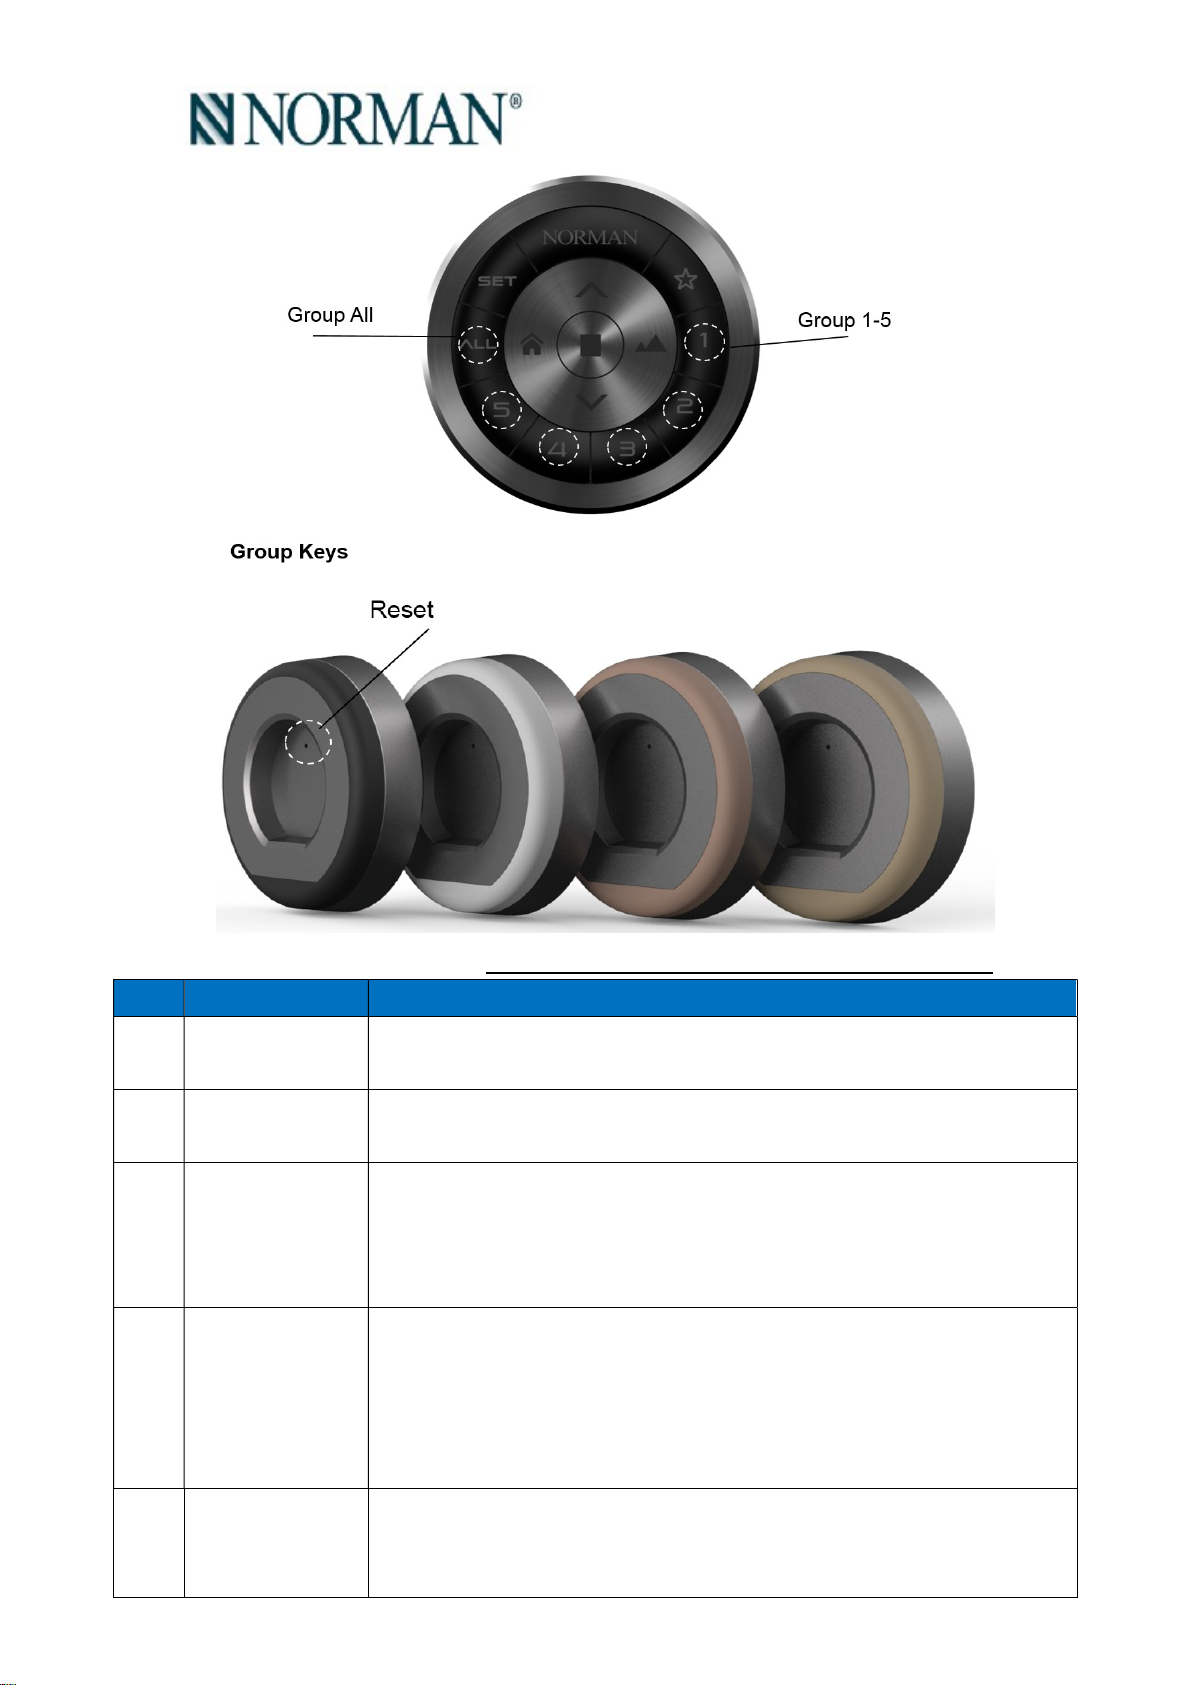
Remote Button Definition
No.
1 Group 1
2 Group 2
3 Group 3
4 Group 4
5 Group 5
6 All
7 Favorite
8 Set
9 Up
10 Down
Name Artwork Description
Select/Deselect group 1
Select/Deselect group 2
Select/Deselect group 3
Select/Deselect group 4
Select/Deselect group 5
Select/Deselect group ALL
Operate to favorite angle
Setting mode
Move up
Move down
11 Full Open
12 Full Close
13 Stop
14 Reset
Full open, to brightest
Full close, to darkest
Stop movement
Factory reset/copy information
15 Spin Right Spin Right Move down
16 Spin Left Spin Left Move up
Page 4
Remote – Setting Function (Please refer to Norman Hub preparation notes first)
No Function Description
1 Into Remote
setting mode
2 Quit Remote
setting mode
3 Factory Reset 1. Press Reset for 1 second.
4 Copy Remote 1. Press Reset of target remote for 1 second.
1. Press SET for 3 seconds.
2. Remote starts blinking after into setting mode.
1. Press SET for 3seconds while setting mode.
2. Or Remote will quit setting automatically after 20 seconds timeout.
2. Remote group key starts blinking.
3. Press ALL button.
4. Remote LED on for 3 seconds then back to normal mode.
2. Remote group key starts blinking.
3. Press SET of source remote for 3 seconds in to setting mode.
4. Press ALL of source remote to transmit data.
5. LED of target remote will on for 3 seconds and back to normal mode.
5 Sync Network (Please make sure you did the step for the remotes which you want to control
the shutters assigning to the remote by APP via Hub. If you have some
rooms don’t want to control by APP via Hub, you can skip this step)
Page 5

1. Press Reset of each target remotes for 1 second.
2. Remote group key starts blinking.
3. Press SET of source remote for 3 seconds in to setting mode.
4. Press UP of source remote to sync Network.
5. LED of target remote will on for 3 seconds and back to normal mode.
6 Back up Remote
from MS4 Module
1. Press Reset of target remote for 1 second, keep remote near the MS4
Module.
2. Remote group key starts blinking.
3. Power on MS4 Module. The LED of MS4 Module will blinking and send
out data for 2 seconds.
4. LED of target remote will on for 3 seconds and back to normal mode.
Remote – Operation Functions
No Function Description
1 Wake up Remote 1. Three way to wake up Remote:
Accelerator/Vibration
Press button
Spin the remote ring
2. Middle LED will on once wake up.
2 Select/Deselect Group 1. Press group key, the LED on means selected.
2. Press group key, the LED off means deselected.
3. User can select multi-groups for shutter operation.
3 Group assignment
check
1. Press group key for 1.5 seconds.
2. The shutters which assigning to the group will react.
Battery CAUTION
RISK OF EXPLOSION IF BATTERY IS REPLACED BY AN INCORRECT TYPE.
DISPOSE OF USED BATTERIES ACCORDING TO THE INSTRUCTIONS
** Warning Instructional safeguard
- Do not ingest battery, Chemical Burn Hazard" or equivalent wording.
- This product contains a coin / button cell battery. If the coin / button cell battery is
swallowed, it can cause severe internal burns in just 2 hours and can lead to death.
If the battery compartment does not close securely, stop using the product and keep it away
from children. If you think, the battery might have been swallowed or placed inside any part
of the body, seek immediate medical Attention.
Federal Communication Commission Interference Statement
This device complies with Part 15 of the FCC Rules. Operation is subject to the
following two conditions: (1) This device may not cause harmful interference, and (2)
this device must accept any interference received, including interference that may
cause undesired operation.
This equipment has been tested and found to comply with the limits for a Class B
digital device, pursuant to Part 15 of the FCC Rules. These limits are designed to
Page 6

provide reasonable protection against harmful interference in a residential
installation. This equipment generates, uses and can radiate radio frequency energy
and, if not installed and used in accordance with the instructions, may cause harmful
interference to radio communications. However, there is no guarantee that
interference will not occur in a particular installation. If this equipment does cause
harmful interference to radio or television reception, which can be determined by
turning the equipment off and on, the user is encouraged to try to correct the
interference by one of the following measures:
- Reorient or relocate the receiving antenna.
- Increase the separation between the equipment and receiver.
- Connect the equipment into an outlet on a circuit different from that
to which the receiver is connected.
- Consult the dealer or an experienced radio/TV technician for help.
FCC Caution: Any changes or modifications not expressly approved by the party
responsible for compliance could void the user's authority to operate this
equipment.
This transmitter must not be co-located or operating in conjunction with any other
antenna or transmitter.
Industry Canada statement:
This device complies with ISED’s licence-exempt RSSs. Operation is subject to the following two
conditions: (1) This device may not cause harmful interference, and (2) this device must accept
any interference received, including interference that may cause undesired operation.
Le présent appareil est conforme aux CNR d’ ISED applicables aux appareils radio exempts de
licence. L’exploitation est autorisée aux deux conditions suivantes : (1) le dispositif ne doit pas
produire de brouillage préjudiciable, et (2) ce dispositif doit accepter tout brouillage reçu, y
compris un brouillage susceptible de provoquer un fonctionnement indésirable.
 Loading...