

Page 1
Page 2

LASER SAFETY
CAUTION INVISIBLE LASER RADIATION WHEN POWER IS ON. AVOID EXPOSURE TO BEAM.
Laser Diode Properties
Materials: Ga-Al-As
Wavelength: 755-815 nm (25ºC)
Laser Output: Continuous Wave max. 0.7mW
INTRODUCTION
Congratulations on your purchase of the LITE CD-15 CD Player. This CD Player is designed
and manufactured to the highest specification and rigorously tested to offer you many years of
trouble-free pleasure.
Your CD-15 CD Player is at the heart of your hi-fi system. Its correct installation, set-up and
operation will have a profound influence on the sonic performance of the entire hi-fi installation.
Please read the contents of this manual thoroughly. It will help you to understand your hi-fi
equipment better and enhance your listening pleasure.
UNPACKING
Included in the packing of your CD-15 CD Player you will find:
‧ One LITE CD-15 CD player
‧ One mains lead fitted with the correct mains power plug for your country
‧ One remote control handset
‧ One user manual and warranty card
After removing these items please retain all packing materials. Correct packing is necessary
for transportation of your CD-15 CD Player.
MAINTENANCE
After disconnecting the amplifier from the mains supply, the cabinet and front panel may be
cleaned with a lightly dampened soft cloth or chamois leather.
Avoid using abrasives or solvents.
CAUTIONS
Your CD-15 CD Player is set to operate from a fixed supply voltage which is marked on a label
next to the mains input plug. Before connecting the mains lead please check that your mains
supply corresponds to this label as below:
230V Products ………………………………….Voltage Range: 220V – 240V
115V Products ………………………………….Voltage Range: 100V – 120V
Page 3

The mains lead supplied with this product has an IEC mains socket which plugs into the IEC
connector on the unit’s rear panel. The other end is normally attached to the appropriate mains
plug for your country.
Please observe correct mains polarity at all times.
The CD Player mains fuses are located on the rear panel next to the IEC mains connector.
These must only be replaced by the fuse type and rating as described on the fuse rating label
on the rear panel of the unit. If the equipment is likely to be unused for some time, unplug it
from the mains supply.
GENERAL CAUTIONS
FCC WARNING
This equipment may generate or use Radio Frequency energy. The user may lose the right to
operate this equipment if unauthorized modifications are made.
INTERFERENCE
Properly installed, this unit should not cause harmful interference to radio communications,
There is, however, no guarantee that such interference will not occur in a specific installation.
If interference arises (which you can determine by switching the unit off and on) you could try
to remedy this problem by the following:
‧ Re-orient or re-locate the receiving antenna
‧ Increase the distance between the CD Player and receiver
‧ Connect the unit to a different mains circuit from that of the receiver
‧ Consult your LITE appointed dealer for help and advice
LOCATION
Your CD-15 CD Player should be located in a well ventilated area and kept away from sources
of heat, dust, humidity and direct sunlight. The CD Player may be positioned either as a free
standing unit or alongside another audio/video product. Never place the CD Player on carpet
or any surface likely to hinder normal ventilation.
Never allow liquids or other objects to fall into the unit. This unit contains no user
serviceable parts. Do not remove any panels or attempt to service it yourself.
Unauthorized servicing will void the warranty.
Page 4
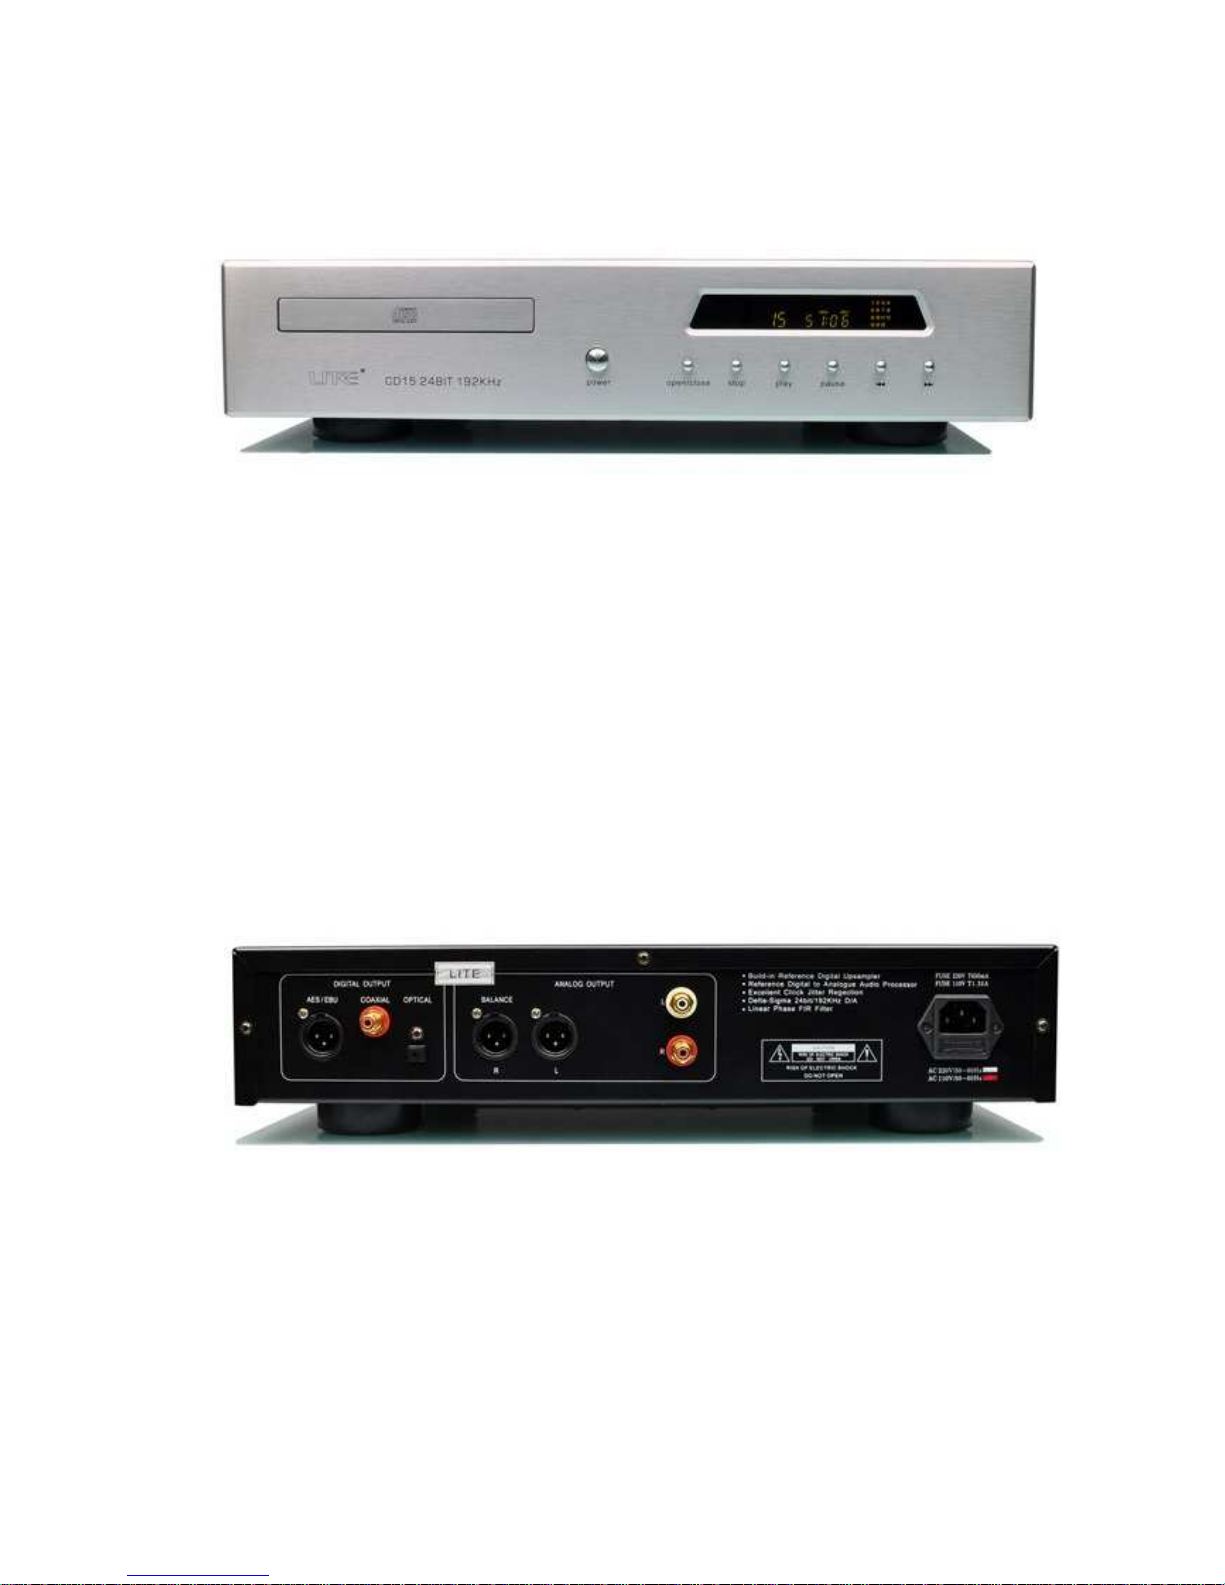
CD-15 CD Player- Front Panel View
1. Power Button
2. Open/Close Button
3. Stop Button
4. Play Button
5. Pause Button
6. Track Back Button
7. Track Forward Button
CD-15 CD Player - Rear Panel View
1. Digital Outputs (Optical: Toslink; Balanced: AES/EBU; Coaxial: RCA)
2. Analogue Output (Balanced: XLR; Unbalanced: RCA)
3. AC Mains Fuse Holder
4. IEC Mains Inlet Socket
Page 5

SETUP
CONNECTING MAINS POWER
Please refer to the rear panel view. The IEC connector of the supplied mains lead should be
plugged into the socket (4) on the rear of the unit first and then plugged into the mains supply.
The Mains power button is on the front panel of the CD Player. This button is normally pressed
ON . If the unit is likely to be unattended for a long period, switch it off and unplug the mains
lead from the wall.
SIGNAL CONNECTIONS
ANALOGUE OUTPUT:
The Analogue Output uses Gold plated RCA Phono sockets or XLR connectors and should be
connected to the CD or LINE input of your Preamplifier or Amplifier.
DIGITAL OUTPUT:
The Digital Output (1) uses a Gold plated RCA Phono socket for Coaxial SPDIF and Toslink
for Optical and XLR for Balanced AES/EBU output. Any of these could be connected to a
corresponding input of an amplifier with a digital input, or to an outboard Digital to Analogue
converter (DAC).
IMPORTANT NOTE:
For optimum performance it is recommended to use high quality inter-connect cables for HI
END audio.
OPERATION
Please refer to the front panel view.
SWITCHING ON
The Mains power button (1) is located on the front panel of the CD Player. This button should
be pressed ON for normal operation. If unattended for a long period, the Mains power should
be pressed OFF and the lead disconnected from the power supply. When prssed ON from the
front panel, your CD-15 CD Player Display will illuminate in few seconds.
USING THE CONTROLS
Please refer to the front panel view.
LOADING A DISC
Place the disc on the spindle. Then press the “close” button.
When a disc has been loaded, your
CD-15 CD Player will briefly spin the disc while it studies the data encoded on it in few
seconds .The disc will then stop and the display will indicate the number of tracks on the disc
and the total play time. To commence playing a disc, press Play Button (4) once. The disc will
play from the beginning. Press the Pause button (5) to pause the disc whilst it is playing.
Pressing the Play Button (4) again will resume playback from the point at which Pause mode
was entered. In Pause mode, the disc continues spinning and the laser will still be operational
Page 6
but locked. Please keep the CD player in Pause mode no longer than strictly necessary.
Warped discs should never be played. If a disc is not inserted or if the disc is damaged
or inserted upside down, the CD player will remain inoperative (Display will indicate: no
disc).
SELECTING A TRACK
Press the Track Forward Button (7) to go to the next track on the disc. Pressing the Track Back
Button (6) will take you to the previous track.
***** When the disc is playing, press the Track Back Button once to take you to the beginning
of the current track and a second time to take you to the start of the previous track. In Play
mode press the Track Forward Button (7) to take you forward to the start of the next track.
Once the procedure is complete the disc will commence playing from the selected track. When
a disc is first loaded, you can use these buttons to select your desired track. Having done so,
press the Play Button and your disc will commence playing from the selected track. You may
select a track when Pause is engaged. In this case, the disc will revert to Pause after the
procedure is complete and you will have to press Play Button to continue playing the disc.
REMOTE CONTROL
Your CD player is supplied with a Remote Handset. The Remote Control Handset is powered
by two 1.5V AAA batteries.
When inserting the batteries observe the correct polarity.
TROUBLESHOOTING
If you suspect your CD-15 CD Player is not operating properly, first check all the connections
carefully. Pay particular attention to input and output connections. Phono plugs should be fully
inserted-a frequent cause of problems is that Phono plug surrounds do not make proper
contact. Below are some commonly encountered problems with suggestions for possible cure.
The list is not exhaustive: If you have any unresolved problems, please consult your appointed
LITE dealer or distributor.
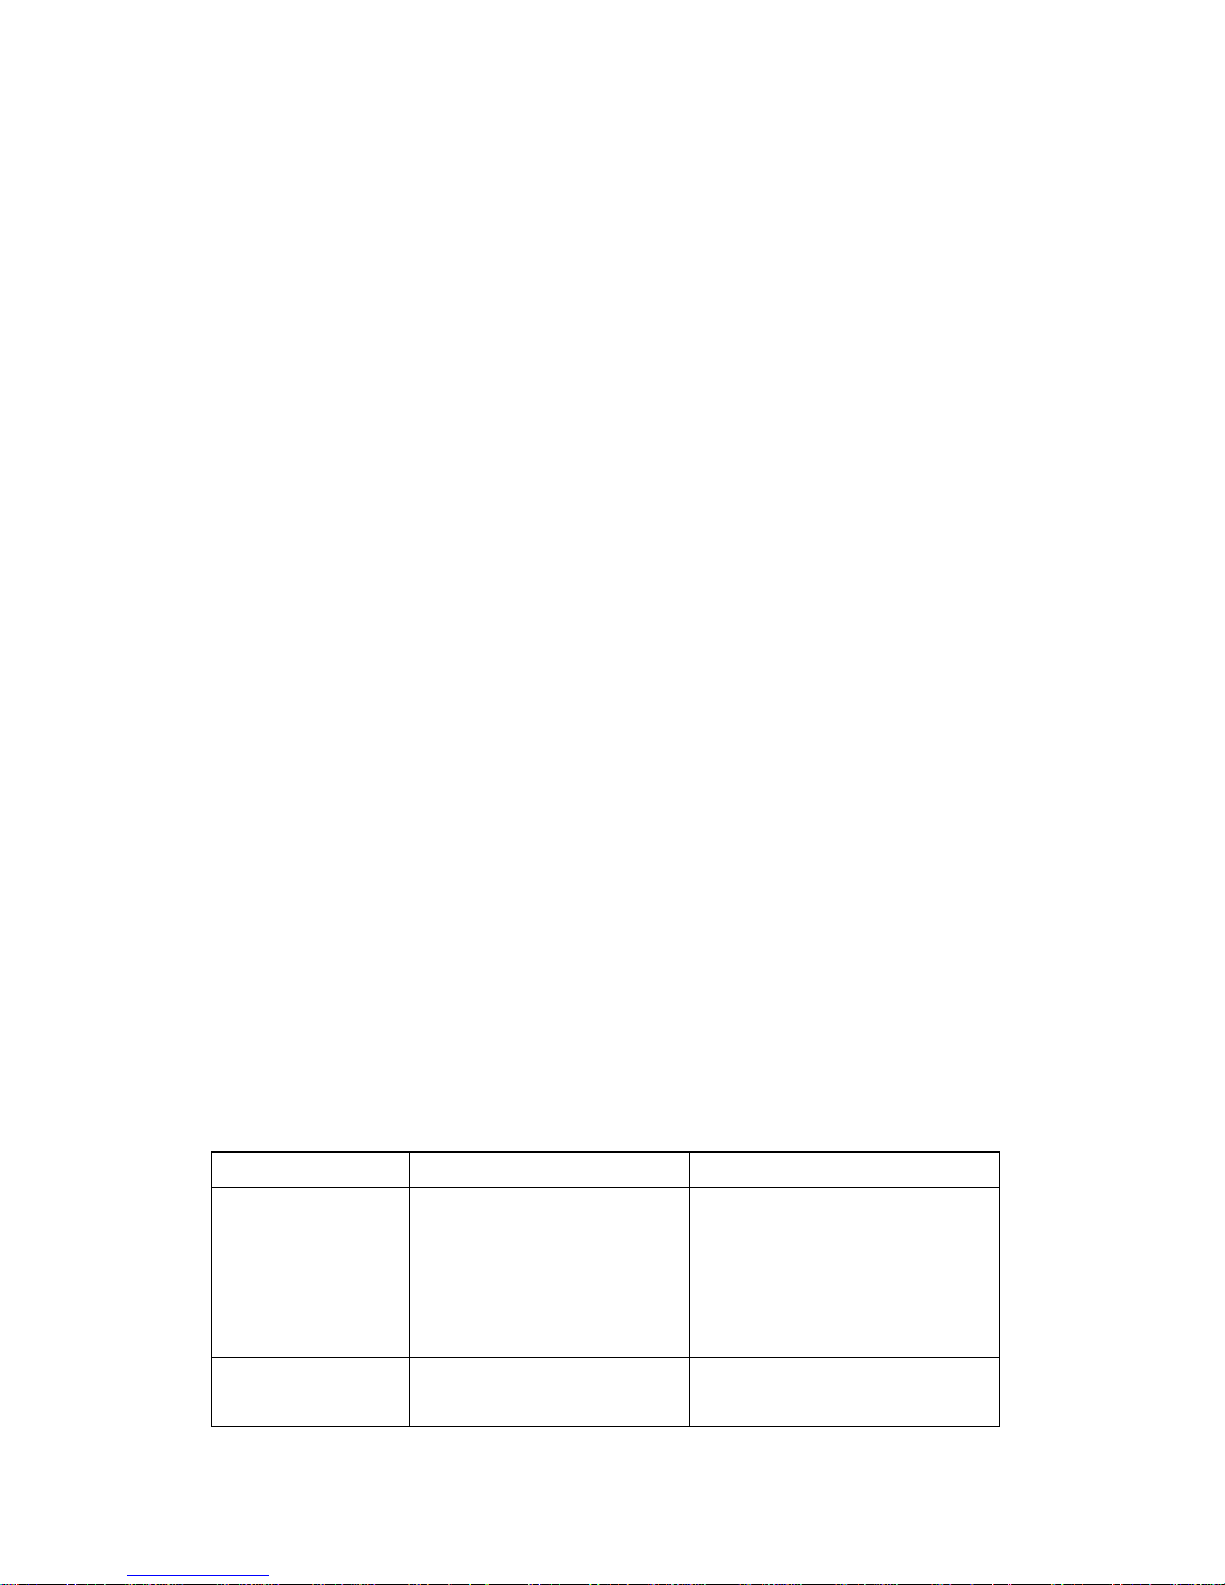
SYMPTOM LIKELY CAUSE SUGGESTED REMEDY
SYMPTOM LIKELY CAUSE SUGGESTED REMEDY
Disc inserts, display does
not show the number of
tracks and playing time
Disc inserted upside down
Disc is dirty or scratched
Condensation on the laser lens
Dirt on the laser lens
Re-insert disc label side up
Clean disc, discard scratched disc
Let CD player warm up and dry out lens
Refer to appointed dealer or service centre
DO NOT use CD lens cleaners
Skipping & mistracking
Excessive vibration
Disc is dirty or scratched
Ensure player is stable and vibration-free
Clean disc, discard scratched disc
Page 7

Excessive hum Connection loose, cable faulty Re-connect plugs, change interconnect
One channel inoperative Interconnect or amplifier faulty Change lead, try another line input on amp
Remote handset operation
erratic or not working
Batteries weak or wrongly inserted
Handset signal path is obstructed
Handset transmission angle too wide
Room lighting/sunlight excessive
Replace batteries, observe polarity
Remove obstruction, move handset
Operate handset in front of CD Player
Darken room
GUARANTEE
There are no user-serviceable parts inside your CD-15 CD Player. If a fault should develope,
refer any servicing to your appointed LITE dealer, distributor or LITE approved service agent.
Your LITE CD-15 CD Player is guaranteed against any defect in materials and workmanship
for a period of one year from the date of purchase.
This guarantee excludes:
1. Damage caused due to accident, misuse, neglect and incorrect installation, adjustment or
repair.
2. Liability for damage or loss during transit from the retailer or purchaser to LITE or its
authorized distributor for the purposes of repair or inspection.
Carriage costs to LITE shall be borne by the consignor.
All claims under this guarantee must be made through an authorised LITE retailer.
If equipment returned for repair to LITE is found on inspection to comply with the product
specification LITE reserves the right to make a charge for examination and return carriage.
Unauthorized servicing will void this guarantee.
SPECIFICATIONS
Operating System CD digital audio system (CD, CD-R)
Frequency Response 20Hz~20kHz
Harmonic Distortion < 0.005%
Dynamic Range >116 dB
S/N Ratio (IHF-A Wtd.) 118 dB
Digital Outputs 75 Ohm Coaxial, RCA/ 110 Ohm Balanced AES/EBU, XLR/ Optical, Toslink
D/A Conversion AD1853 Advance Segment, Balanced-Stereo DAC
Resolution/Sampling 24 bits / 192 kHz
Oscillation 3
rd
Overtone Oscillation
Dimension 425 x 355 x 110 (W x D x H) mm (including feet)
Weight 8.4Kg
Page 8

NOTES
Purchase Date Year .……… Month …….. Day ……..
LITE Retailer Name: …………………………………
Location: ………………………………
I Want DIY Audio Ltd.
No. 129, Meishu South 2
nd
Rd.
Kaohsiung, Taiwan
TEL: +886-7-5227096
FAX: +886-7-5228536
www.iwdiy.com
 Loading...