

Page 1

User’s Manual
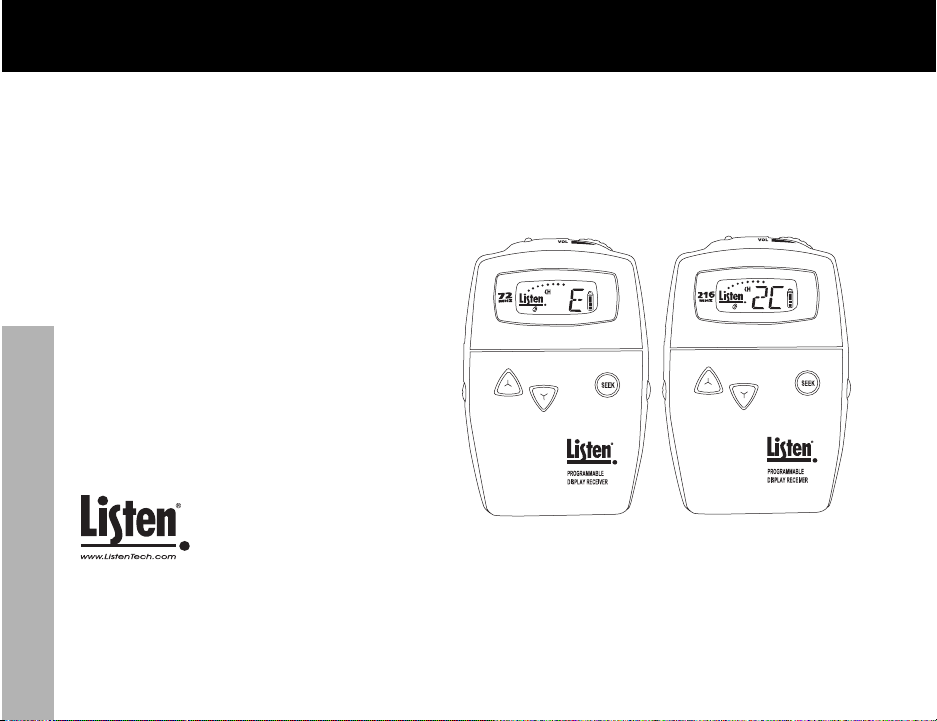
LR-500 Programmable Display Receiver
LR-400 Display Receiver
LR-300 Receiver
Don’t miss a single sound. Listen.
Listen Technologies Corporation
8535 South 700 West, Suite A
Sandy, Utah 84070-2515 USA
Telephone: +1.801.233.8992
Toll Free (North America): 1.800.330.0891
Fax: +1.801.233.8995
E-mail: info@ListenTech.com
Listen®and the Listen logo are registered trademarks of Listen Technologies Corporation
Page 2

Welcome to Listen!
i
Dear Valued Customer,
Thank you for choosing Listen! All of us at Listen are dedicated to providing you
the highest quality products and prompt, efficient customer care. Our products are
manufactured in an ISO-9000 factory that has been independently certified to the
highest quality standards. We stand ready to answer any questions you might have
during installation or in the operation of our products. Should there be any
problems with your Listen products, we are ready to help you in any way we can.
Should you have any comments on how we might improve our products or our
service, we’re here to listen. Here’s how to reach us:
Telephone: +1.801.233.8992
Fax: 1.801.233.8995
Toll Free (North America): 1.800.330.0891
E-Mail: support@listentech.com
Web: www.ListenTech.com
Thank you... and enjoy your listening experience!
Best regards,
The Listen Team
Listen™ and the Listen Logo are registered trademarks of Listen Technologies Corporation.
Receivers_2004_06_08 © 2004 Listen Technologies Corporation. All Rights Reserved.
Page 3

Table of Contents
1
LR-500 User’s Manual . . . . . . . . . . . . . . . . . . . . . . . . . . . . . . . . . . . . . . . . . . . . . .3
LR-500 Table of Contents . . . . . . . . . . . . . . . . . . . . . . . . . . . . . . . . . . . . . . . . . . . . . . . . . .5
LR-400 User’s Manual . . . . . . . . . . . . . . . . . . . . . . . . . . . . . . . . . . . . . . . . . . . . .23
LR-400 Table of Contents . . . . . . . . . . . . . . . . . . . . . . . . . . . . . . . . . . . . . . . . . . . . . . . . .25
LR-300 User’s Manual . . . . . . . . . . . . . . . . . . . . . . . . . . . . . . . . . . . . . . . . . . . . .41
LR-300 Table of Contents . . . . . . . . . . . . . . . . . . . . . . . . . . . . . . . . . . . . . . . . . . . . . . . . .43
Supplementary Information . . . . . . . . . . . . . . . . . . . . . . . . . . . . . . . . . . . . . . . . .55
Channel Selection . . . . . . . . . . . . . . . . . . . . . . . . . . . . . . . . . . . . . . . . . . . . . . . . . . . . . . . . .56
Listen SQ™ . . . . . . . . . . . . . . . . . . . . . . . . . . . . . . . . . . . . . . . . . . . . . . . . . . . . . . . . . . . . . .58
RF Reception Maximization Strategies . . . . . . . . . . . . . . . . . . . . . . . . . . . . . . . . . . . . . . . . .59
72 MHz Frequency Compatibility Table . . . . . . . . . . . . . . . . . . . . . . . . . . . . . . . . . . . . . . . .60
216 MHz Frequency Compatibility Table . . . . . . . . . . . . . . . . . . . . . . . . . . . . . . . . . . . . . . .62
Troubleshooting . . . . . . . . . . . . . . . . . . . . . . . . . . . . . . . . . . . . . . . . . . . . . . . . . . . . . . . . . . .64
Compliance Notice . . . . . . . . . . . . . . . . . . . . . . . . . . . . . . . . . . . . . . . . . . . . . . . . . . . . . . . .67
FCC Statement . . . . . . . . . . . . . . . . . . . . . . . . . . . . . . . . . . . . . . . . . . . . . . . . . . . . . . . . . . .68
Warranty . . . . . . . . . . . . . . . . . . . . . . . . . . . . . . . . . . . . . . . . . . . . . . . . . . . . . . . . . . . . . . . . .69
Optional Accessories . . . . . . . . . . . . . . . . . . . . . . . . . . . . . . . . . . . . . . . . . . . . . . . . . . . . . . .70
Receivers Table of Contents
Page 4

2
this page intentionally left blank
Page 5
3
User’s Manual
LR-500 Programmable Display Receiver
Don’t miss a single sound. Listen.
Listen Technologies Corporation
8535 South 700 West, Suite A
Sandy, Utah 84070-2515 USA
Telephone: +1.801.233.8992
Toll Free (North America): 1.800.330.0891
Fax: +1.801.233.8995
E-mail: info@ListenTech.com
Page 6
4
LR-500 Introduction
· LR-500 (72MHz or 216MHz)
· Warranty Card
· Receiver User Manual
LR-500 Package Contents
72 MHz: LR-500-072
216 MHz: LR-500-216
Listen Part Number
See pages 70-71.
Optional Accessories
Page 7

5
LR-500 Table of Contents
Architectural Specifications . . . . . . . . . . . . . . . . . . . . . . . . . . . . . . . . . . . . . . . . . . . . . . . . . .6
Specifications . . . . . . . . . . . . . . . . . . . . . . . . . . . . . . . . . . . . . . . . . . . . . . . . . . . . . . . . . . . . . .6
Quick Reference . . . . . . . . . . . . . . . . . . . . . . . . . . . . . . . . . . . . . . . . . . . . . . . . . . . . . . . . . . . .8
Setup Instructions . . . . . . . . . . . . . . . . . . . . . . . . . . . . . . . . . . . . . . . . . . . . . . . . . . . . . . . . .11
Operation Instructions . . . . . . . . . . . . . . . . . . . . . . . . . . . . . . . . . . . . . . . . . . . . . . . . . . . . .14
Programming Instructions . . . . . . . . . . . . . . . . . . . . . . . . . . . . . . . . . . . . . . . . . . . . . . . . . . .16
Squelch Information . . . . . . . . . . . . . . . . . . . . . . . . . . . . . . . . . . . . . . . . . . . . . . . . . . . . . . .17
Squelch Programming . . . . . . . . . . . . . . . . . . . . . . . . . . . . . . . . . . . . . . . . . . . . . . . . . . . . . .18
Charging Batteries . . . . . . . . . . . . . . . . . . . . . . . . . . . . . . . . . . . . . . . . . . . . . . . . . . . . . . . . .19
Wall Transformer Operation . . . . . . . . . . . . . . . . . . . . . . . . . . . . . . . . . . . . . . . . . . . . . . . . .21
Supplementary Information . . . . . . . . . . . . . . . . . . . . . . . . . . . . . . . . . . . . . . . . .55
Channel Selection . . . . . . . . . . . . . . . . . . . . . . . . . . . . . . . . . . . . . . . . . . . . . . . . . . . . . . . . .56
Listen SQ™ . . . . . . . . . . . . . . . . . . . . . . . . . . . . . . . . . . . . . . . . . . . . . . . . . . . . . . . . . . . . . .58
RF Reception Maximization Strategies . . . . . . . . . . . . . . . . . . . . . . . . . . . . . . . . . . . . . . . . .59
72 MHz Frequency Compatibility Table . . . . . . . . . . . . . . . . . . . . . . . . . . . . . . . . . . . . . . . .60
216 MHz Frequency Compatibility Table . . . . . . . . . . . . . . . . . . . . . . . . . . . . . . . . . . . . . . .62
Troubleshooting . . . . . . . . . . . . . . . . . . . . . . . . . . . . . . . . . . . . . . . . . . . . . . . . . . . . . . . . . . .64
Compliance Notice . . . . . . . . . . . . . . . . . . . . . . . . . . . . . . . . . . . . . . . . . . . . . . . . . . . . . . . .67
FCC Statement . . . . . . . . . . . . . . . . . . . . . . . . . . . . . . . . . . . . . . . . . . . . . . . . . . . . . . . . . . .68
Warranty . . . . . . . . . . . . . . . . . . . . . . . . . . . . . . . . . . . . . . . . . . . . . . . . . . . . . . . . . . . . . . . . .69
Optional Accessories . . . . . . . . . . . . . . . . . . . . . . . . . . . . . . . . . . . . . . . . . . . . . . . . . . . . . . .70
LR-500 Table of Contents
Page 8
6
LR-500 Specifications
LR-500 Specifications
Architectural Specifications
The FM receiver shall be capable of receiving on 57 wide and narrow band channels with a SNR of 80dB or greater.
The receiver shall be programmable to electronically lock out unneeded channels. The receiver shall be capable of seeking channels. The device shall have an adjustable squelch. The device shall have an audio frequency response of 63Hz
to 15KHz, ±3dB at 72MHz, or of 63Hz to 10kHz, ± 3dB at 216MHz. The device will incorporate a stereo headset jack
that allows the user to plug in either a mono or stereo headset. The device shall incorporate an LCD display that indicates channel, channel lock or lock status, battery level, low battery, battery charging, and RF signal strength. The
receiver shall incorporate automatic battery charging circuitry for recharging of NiMH batteries. The Listen LR-500 is
specified.
Specifications
Specification LR-500-072 LR-500-216
RF Frequency Range 72.025 - 75.950 MHz 216.025 - 216.975 MHz
Number of Channels 57 (17 wide, 40 narrow) 57 (19 wide, 38 narrow)
Sens itivity
Frequency Accuracy
Antenna
Antenna C onnector
Squelch
Complia nce
System Frequency Response 63Hz - 15kHz (±3dB) 63Hz - 10kHz (±3dB)
System Signal to Noise Ratio
(A-we ighted)
SQ enabled: 80dB; SQ disabled 60dB SQ enabled: 80dB; SQ disabled 50dB
System Distortion
Output
Uses earphone cable
<2% total harmonic distortion (THD) at 80% deviation
.6uV typical, 1 uV max imum for 12dB SINAD
3.5mm connector
3.5mm c onnector s, unbalanced, 0 dBu nominal output lev el,
16mW maximum, impedance 32 Ohms
** All s ystem spe cificat ions are w ireles s end-to -end
± .005% stability 0° to 50°C (32° to 122° F)
Programmable in 20 steps
FCC Part 15, Industry Canada
RF
Audio
continued on next page
Page 9

7
Set Up Controls
User Controls
Progr amming
LCD Display
LED
Battery Type
Battery Life (Liste n batter ies)
Battery C harging (NiMH only)
Power S upply Co nnector
Complia nce
Dimensio ns
Unit W eight
Unit Weight with batteries
Shipping We ight
Door
Temperature - Operation
Temperature - Storage
Humidity
Volume, c hannel UP/D OWN, SEEK. All c ontrols exce pt volume a re elec tronica lly lockable.
Indica tes channe l, RF signal s trength , lock sta tus, squelc h, battey po wer lev el and channe l
progr amming.
Fully automatic, 14 hours
-10° to 40°C (14° to 104° F)
-20° to 50°C (-4° to 122° F)
Unit can be pro grammed so that only des ired channels are displayed. Squelch can be
adjuste d for s ensitiv ity and signal ca pture co ntrol. Cha nnel selec tion can be locked by
holding the S EEK button 5 se conds.
Red, illuminat es when unit is on. Flas hes when b atteries are low . Flashes when char ging.
Flashes when locked and user attempts to seek to another channel
UL Listed
16mW maximum, impedance 32 Ohms
Two AA batteries, alkaline or NiMH
30 hours alkaline (LA-361), 15 hours NiMH rechargeable (LA-362)
0 to 9 5% relativ e humidity, non-conde nsing
Manually lockab le. UP, DOWN and S EEK through door , other
contr ols behind doo r (see C ontrols abo ve).
Indicators
Physical
3.0 in x 1.0 in x 5 in WxDxH (7.6cm x 2.5cm x 13.cm)
5.8 oz (164.4g)
2.3mm OD by 0.7mm ID, barrel type connector. 7.5VDC, center positive <250mA. Drop in
contact points for use with L iste n charging cases.
3.9oz (111g)
Environmental
Pro grammable c hannel sele ction (se e below), alk aline/NiMH bat teries
and sque lch, SQ enable /disable
Controls
1.0 lbs (453.6kg)
Power
LR-500 Specifications
LR-500 Specifications continued
Specification LR-500-072 LR-500-216
Page 10
8
LR-500 Quick Reference
Quick Reference
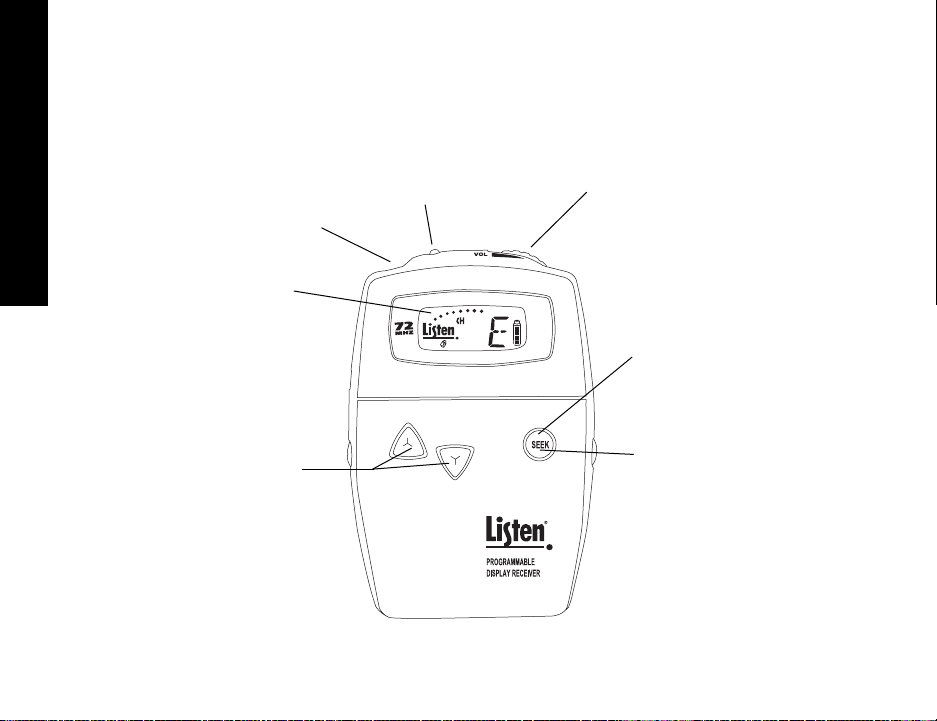
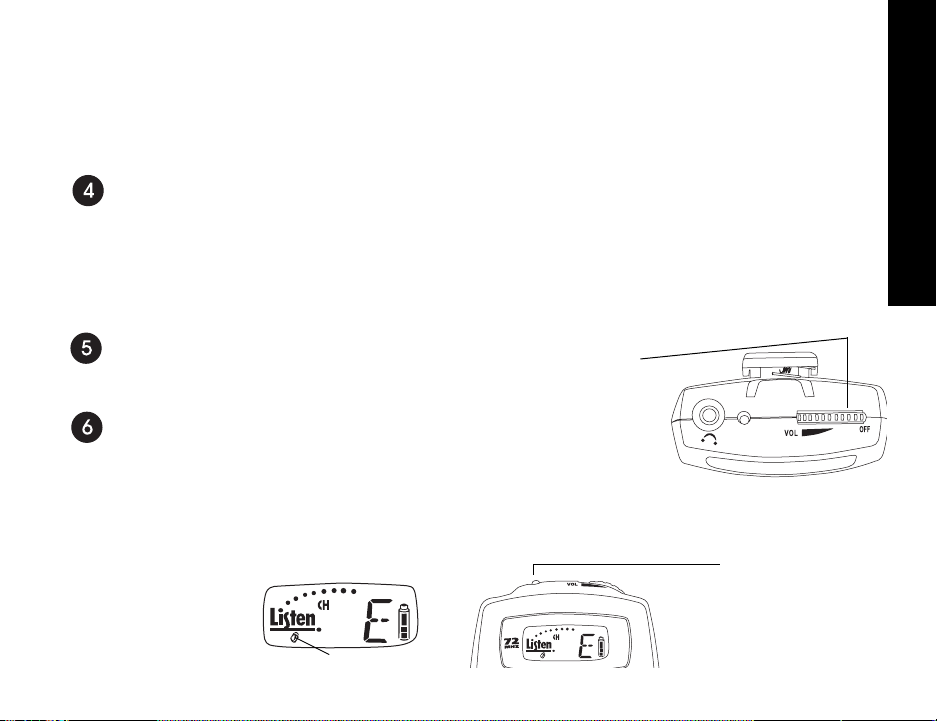
LR-500 Front
3.5mm Input Jack
A Listen earpiece or headset
connects here.
LED - when lit, indicates
unit has power.
ON/OFF & VOLUME control dial
Press and hold both buttons for 5 seconds
to enter PROGRAM mode. The PGM icon
will appear in the display. To exit PROGRAM,
let unit sit idle for 5 seconds.
Look & Listen™ display shows receive
level, channel, battery status, PROGRAM
mode, whether a channel is locked, and
whether a channel is locked out from
selection (PROGRAM mode). See closeup on page 10.
Use UP and DOWN buttons to select a
channel.
SEEK button allows the user
to change channels or to
lock on a channel
Adjustable Squelch:
The default factory preset for squelch
is 03.(See page 18 for Squelch
programming information)
Page 11
9
LR-500 Quick Reference
Quick Reference
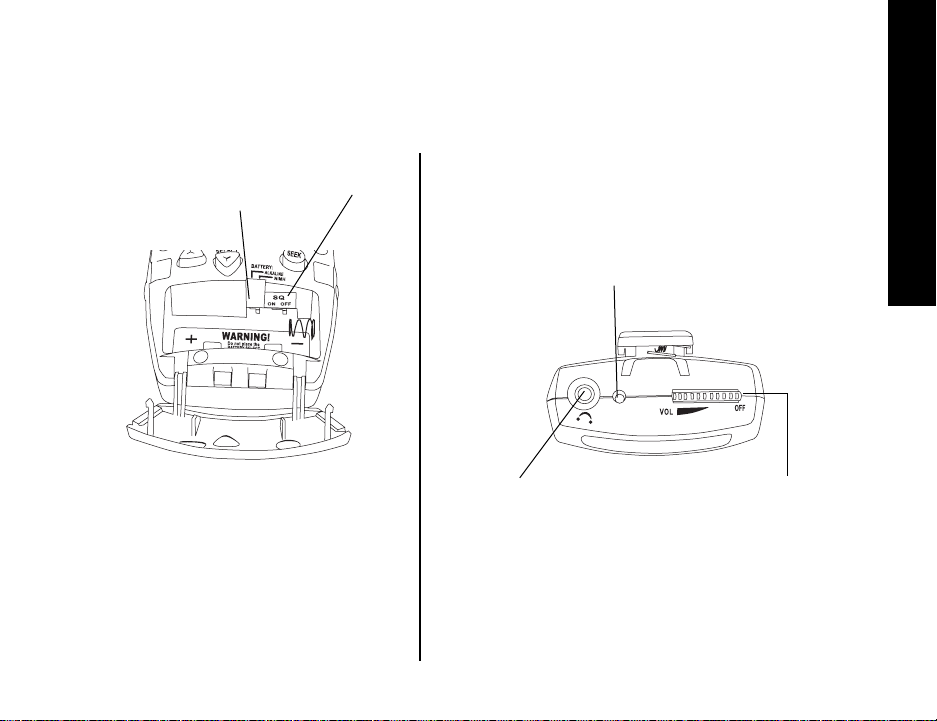
LR-500 Inside Access Door
Battery Select Switch - place in NiMH position ONLY if you
are using Nickel Metal Hydride batteries, otherwise, leave it
in the Alkaline position.
SQ Switch: shipped in the ON position, use a screwdriver
or pen to slide to the OFF position if needed. You should
turn SQ off if any of your receivers do not have SQ.
SQ Switch
Battery Select
Switch
3.5mm Input Jack
A Listen earpiece or headset
connects here.
LED indicators
· Steady Red: Normal operation
· Slow Flashing: Battery is low
· Slow Flashing while charging: Unit is charging
ON/OFF and VOLUME control dial rotate the dial counter-clockwise to
turn unit on and increase volume.
LR-500 Top of Unit
Page 12

10
LR-500 Quick Reference
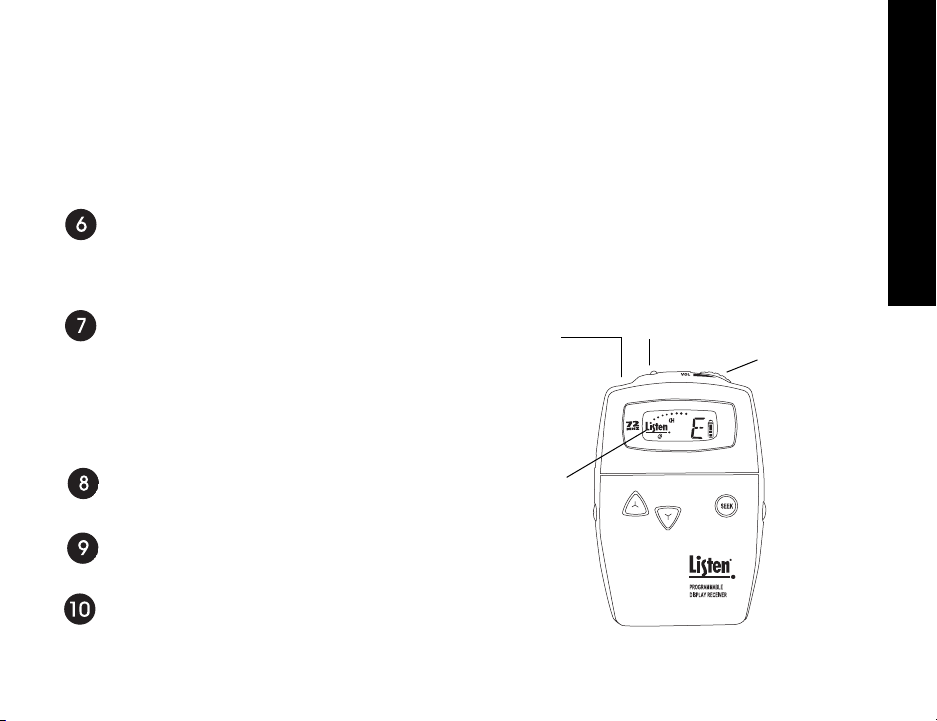
Quick Reference
LR-500 Look & Listen™ Display
Dots indicate the relative RF
signal strength.
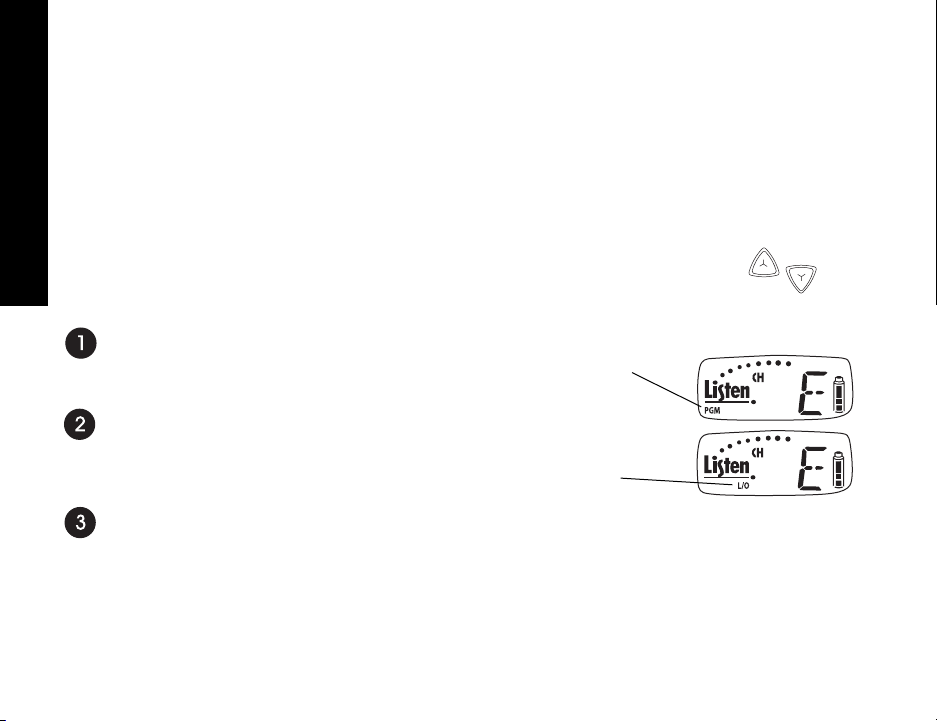
Indicates the currently
tuned channel
Indicates the unit is in PROGRAM mode.
To enter PROGRAM mode, press and hold
the UP and DOWN keys until the PGM icon
appears in the display. To exit PROGRAM
mode let unit sit idle for 5 seconds. See
page 16 for complete instructions.
When the padlock is visible the unit is
locked on channel currently displayed.
Press and hold SEEK for 5 seconds to
unlock or lock.
L/O: while in Program mode, this symbol
indicates that a channel is locked out and
will not be available to the user. Press
SEEK to toggle channels between Locked
Out and non-Locked Out modes.
Battery level indicator. The indicator flashes, along with the red
LED on top of the unit, to alert
you when the battery is low and
needs to be charged or
changed.
LR-500 Battery Indicator
All three segments showing:
The batteries are at 50% or
greater capacity.
One segment showing:
Your batteries less than 25% capacity. When
this segment begins flashing along with the
LED on top of the unit, you should immediately change your batteries or recharge them
(if using NiMH batteries).
Two segments showing:
The batteries are at 25-49%
capacity.
Page 13
11
LR-500 Setup Instructions
LR-500 Setup Instructions
Remove the product
Remove outer packaging and plastic cover. Inspect for physical damage. If damage is aparent,
please contact Listen Technologies Corporation technical support for assistance. See page 69 for contact information.
Open the front access door
If locked, use a pocketknife or small screwdriver to unlock the
door locks on both sides of the unit. To unlock the door, rotate
the lock ¼ turn counterclockwise.
Grip the two tabs with your thumb and index finger and pull
the door downward. Do NOT place batteries in the unit yet.
Select Battery Type
See diagram on page 9. You have two choices: NiMH and
Alkaline. The unit is shipped with the switch in the Alkaline
position. Use a pen or small screwdriver to select the battery
type.
CAUTION: If you are using any battery type other than
rechargeable Nickel Metal Hydride (NiMH) batteries, make sure the BATTERY selection
switch is in the alkaline position.
LockedUnlocked
WARNING: Do not place the BATTERY switch in the NiMH position if you are not using
Nickel Metal Hydride Batteries. The NiMH position will attempt to charge any batteries
in the unit, even if they are not the proper type. Charging non-Nickel Metal Hydride
(NiMH) batteries will result in physical harm, destruction of property and/or fire.
Page 14
12
LR-500 Setup Instructions
LR-500 Setup Instructions continued
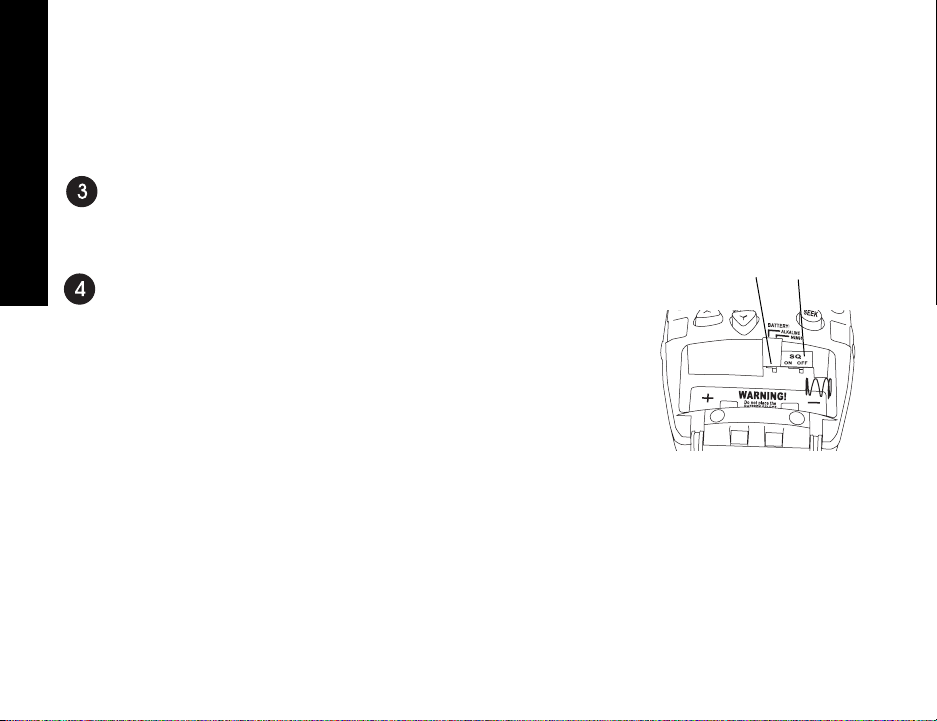
Set SQ switch
The SQ switch is inside the battery compartment next to the Battery Select switch. The unit
is shipped with SQ in the ON position. To turn it off, use a small screwdriver or pen to slide
the switch to the OFF position (to the right). See page 58 for more information on SQ.
Place Batteries in Unit
Place two AA batteries in the compartment, making note of the battery polarity
shown in the battery compartment, and again verifying that the BATTERY
SELECT switch is in the correct position for the batteries you are using. (ALK
should be selected for all battery types other than NiMH).
NOTE: Listen uses 1800mAh (milli-Amp-hour) constant current NiMH
(Nickel Metal Hydride) batteries. These may be purchased from your Listen
dealer (ask for part number LA-362).
Battery
Select Switch
SQ Select
Switch
Page 15
13
LR-500 Setup Instructions
LR-500 Setup Instructions continued
Connect an Earphone or Headset
Your headset or earphone will connect to the jack on the top of the unit. Either mono or
stereo connectors may be used with a Listen receiver. Make certain you push the plug all the
way into the jack.
Turn the Unit On
Receivers are turned on by rotating the volume
dial counterclockwise. The red LED on top of
the unit should activate and the LCD display
should illuminate. If they do not, make sure you
have installed the batteries correctly and that
you are using fully charged batteries.
Select Channel(s)
See page 56 for complete channel selection information.
Set Squelch
See pages 17 and 18 for squelch and programming information.
Program Channels
see page 16.
Red LED will illuminate
when on
Turn volume knob
counterclockwise
to turn on
LCD display will
activate when on
Earphone/Headset jack
Page 16

14
LR-500 Operation
LR-500 Operation Instructions
Make Sure the Unit is On
Rotate the volume knob counterclockwise with an earphone or headset connected to the unit.
Listen receivers use the cable of the earphone or headset as a receiving antenna.
Be careful when turning the unit on - if you turn the knob too far you might get too much volume in your earphone!
Select a Channel
Select the channel to match the transmission channel by pressing the UP and DOWN buttons
on the receiver.
At 72MHz:
72MHz receivers operate on 17 wide band channels and 40 narrow band channels. Channels
represented by letters on the display (i.e. A) are wideband channels ; channels represented by
numbers are narrowband channels.
At 216MHz:
216MHz receivers operate on 19 wide band channels and 38 narrow band channels. Channel
numbers starting with a “2” are wide band; channels beginning with a “1” or “3” are narrow
band channels.
Refer to the Frequency Compatibility Tables (pages 60-63) for specific frequencies and compatibility with other manufacturers.
Test the audio
If a transmitter is broadcasting on that channel, you will be able to hear the audio. If the signal is too weak, the audio will be muted (squelched).
NOTE: Listen
recommends the
use of wide band
transmitters.
Page 17
15
LR-500 Operation
LR-500 Operation Instructions continued
Find an audio transmission using SEEK
Another way to find a channel on the LR-500 is to use the SEEK button. When you do
this, the Listen receiver looks for the next active channel. Sometimes the unit will mistake
interference for a real broadcast signal. If you get interference, press the SEEK button again.
The unit may stop on a channel that is close to the actual broadcast channel, in which case
the channel will sound noisy or distorted. Simply press SEEK again until you find the clearest operating channel.
Adjust the volume control
Use the control dial on the top of the unit to adjust the volume to a comfortable
level.
To Lock into Only One Channel
Press and hold the SEEK button for 5 seconds to lock a receiver onto the currently
tuned channel. Press and hold the button again to unlock. When locked the LED
on top of the unit will flash when you press the SEEK button.
Is the Channel Locked on My Receiver?
On the LR-500, when the channel is locked, the padlock icon will appear on the display. If
the unit is locked, the red LED on the top of the
unit will flash when
you press the SEEK
button.
Padlock appears when locked
If locked, LED flashes on all
portable receivers when SEEK
button is pressed.
Page 18
16
LR-500 Programming
LR-500 Programming Instructions
The LR-500 Display Receiver has some special features not available in the other receivers:
you may lock out unwanted channels, and you can adjust the squelch in the unit.
Locking Out Unwanted Channels
For applications where users are required to select a channel (such as language interpretation or
classrooms), and you don’t want them to have to go through all 57 available channels to find
the appropriate channel, you can lock out all channels except the ones you are using in your
facility.
Enter the PROGRAM mode
Press the UP and DOWN buttons simultaneously for 5 seconds, until the PGM symbol
appears in the display.
Use the UP and DOWN keys to select channels
As channels are displayed on the unit, those channels that are locked out from user
access will be indicated by the L/O (Locked Out) symbol. When a channel is locked
out, the receiver will skip over that channel when a user is tuning the receiver.
Press the SEEK button to toggle channels between locked out and
non-locked out modes
Exiting PROGRAM mode
To exit the PROGRAM mode, let the receiver sit idle (don’t press any buttons) for 5 seconds.
The receiver will automatically return to normal operation. If you haven’t finished programming the unit and it automatically exits, press and hold the UP & DOWN buttons simultaneously for 5 seconds to re-enter the PROGRAM mode.
UP and DOWN buttons
on front of LR-500
Page 19

17
LR-500 Squelch
LR-500 Squelch
Squelch
The purpose of squelch is to mute the audio output of your receiver when the signal from the transmitter is turned off or is too weak to be received. Without squelch you would hear radio noise in
your earphone. The squelch on your receiver can be adjusted so that it will mute the audio on different RF signal strengths. This is useful as follows:
· To ensure that users don't hear transmissions from other transmitters, set the squelch setting to
the highest level that doesn't squelch the receiver.
· If the receiver is going to be close to the transmitter (i.e. in a classroom), setting the squelch
setting high so that when the transmitter is turned off it immediately squelches and ignores
transmitters in other rooms.
· If you are in an area that has a lot of inference, you may want to set the squelch setting to a
high setting to ensure the interference is not picked by the receiver.
· If you need the maximum amount of range, you may want to consider setting the squelch setting to a low level (0, 1 or 2). CAUTION: when setting the squelch level low the reliability
of squelch function is comprised. This will cause radio noise to be heard in the earphone and
there is a possibility of hearing damage.
Page 20

18
LR-500 Squelch
Squelch Programming
To enter Squelch programming mode
· Turn the unit off
· Press and hold the seek button; while still holding seek turn the ON/OFF dial to turn the unit on.
· Release the seek button when the Listen name disappears and a two digit display is seen.
To adjust the Squelch level
· Use the Channel UP and DOWN buttons to raise or lower the squelch sensitivity settings.
· Lower numbers mean that a less powerful and possibly noisy signal will be heard, but you can have a
longer range.
· Higher numbers mean that a more powerful signal with no noise will be heard, but you may have a
shorter range.
Squelch setting 00 is no squelch; this effectively disables Squelching capabilities of the receiver. Squelch
setting 20 is maximum squelch sensitivity; you must have a very strong and stable RF signal for the unit
to not engage the squelch feature.)
Adjusting the squelch setting will keep your LR-500 receiver from picking up noise when the transmitter
is not transmitting, or when you lose the signal by being out of range or if encountering interference.
Note: For squelch settings 1-3, the squelch function is slow which allows for maximum transmission
range. For squelch settings 4-20 the squelch function is fast to ensure little radio noise is heard during the
squelch function.
(The Listen SQ feature is not squelch, please refer to page 58 for information on Listen SQ).
Squelch Programming Instructions
Page 21
LR-500 Charging Batteries
19
LR-500 Charging Batteries
The LR-500 and all Listen receivers are unique because they have
SmartCharge™ chargers built in. When any of these units are connected
to an LA-202 wall transformer or dropped into a Listen charging case,
NiMH batteries will be charged.
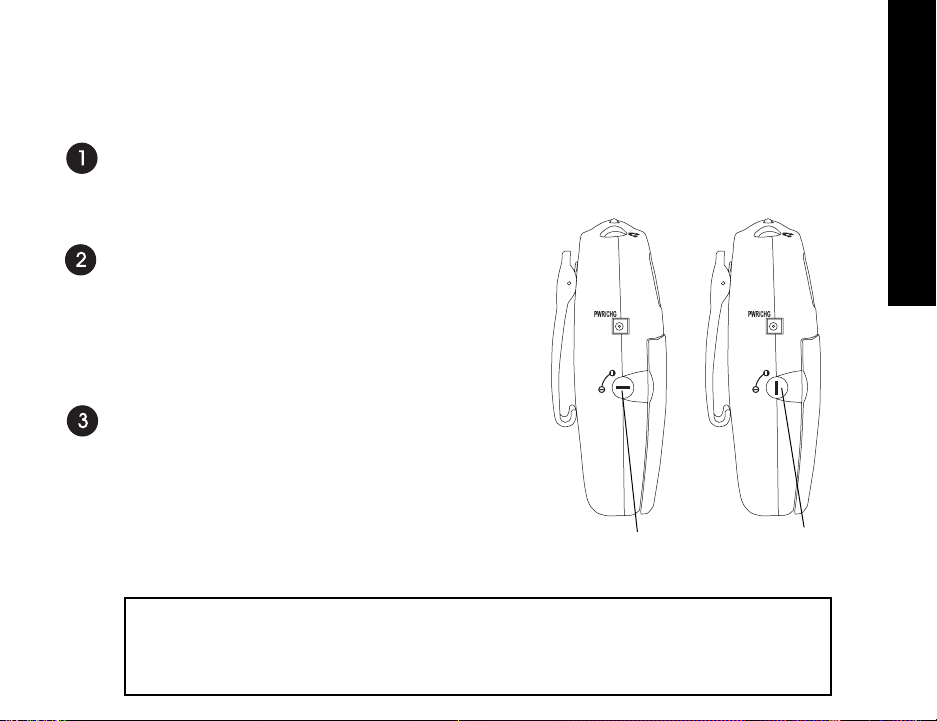
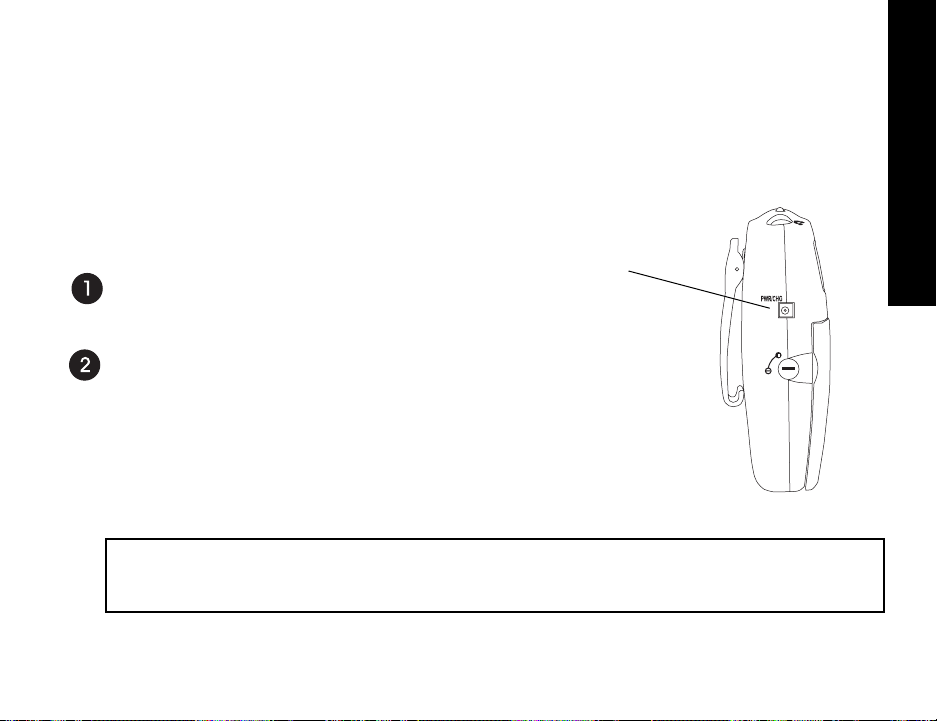
To charge the batteries using the LA-202 wall transformer, plug the transformer into the jack marked “PWR/CHG” on the side of the unit. The
unit can be operated while the batteries are charging.
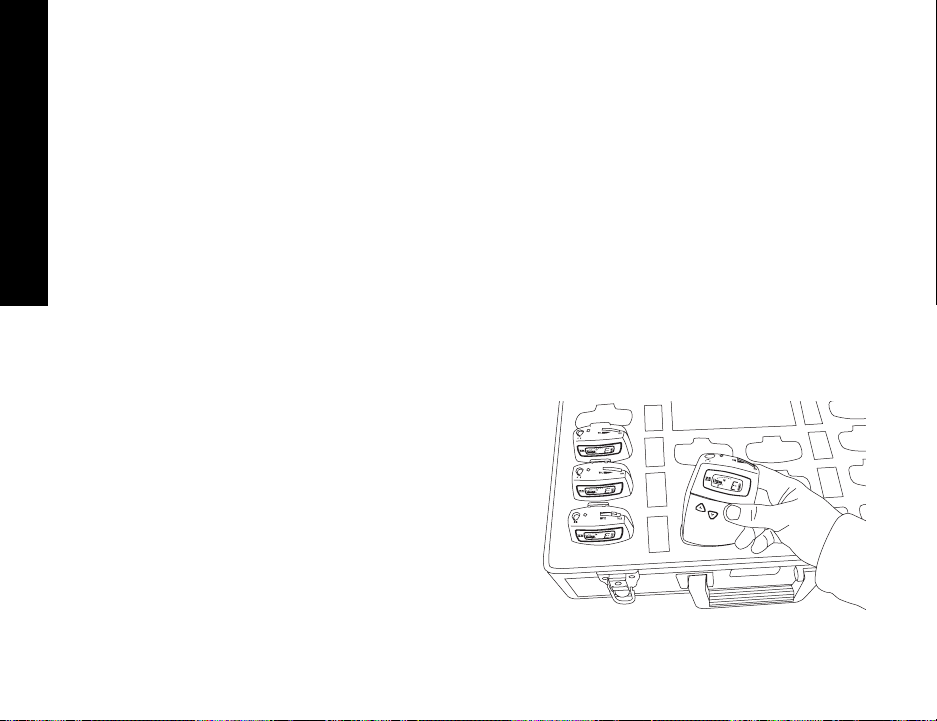
To charge the batteries using a drop-in charger, simply place the unit into
a slot in the charger and connect the charger to power. Make sure the
unit is fully seated in its slot.
One of several charging cases available from Listen. Check the Listen
website for more details.
SmartCharge™ uses a pulse charging, which greatly extends the life of
Nickel Metal Hydride (NiMH) batteries. The entire charging process
takes 13 hours. Listen recommends that you allow the charger to complete its full cycle every time for maximum battery life.
IMPORTANT: In order to charge NiMH batteries, the BATTERY SELECT switch in your
Listen product must be set to the NiMH setting. Use a pen or small screwdriver to move the
switch (located in the battery compartment) to the proper position.
Connect LA-202
here and plug it
into an AC wall
outlet.
IMPORTANT: DO NOT ATTEMPT TO CHARGE ANY TYPE OF BATTERY OTHER THAN NiMH (NICKEL METAL
HYDRIDE) with your Listen equipment. Alkaline batteries may explode when connected to a
charger. Other risks of charging non-NiMH batteries include destruction of property or fire.
Page 22
LR-500 Charging Batteries
20
LR-500 Charging Batteries continued
During the charge cycle, the red LED on top of the Listen product will flash slowly. When
charging is completed, the LED will turn off. It is not necessary to unplug the charger; however, if you unplug the unit from the charger and then plug it back in, it will begin the 13-hour
charge cycle over again.
When not using the LR-500, it is recommended to leave the unit on the charger. The charger
provides a “maintenance” charge that keeps the battery at 100%. If the unit is not on the
charger, the battery will lose up to 20% of its charge per month.
NOTE: Listen uses 1800mAh (milli-Amp-hour) constant current NiMH (Nickel Metal
Hydride) batteries. These may be purchased from your Listen dealer (ask for part number
LA-362).
One of several charging cases
available from Listen. See
www.ListenTech.com for more
options.
LA-311 - 16-unit Drop In Charging Case shown
Page 23
21
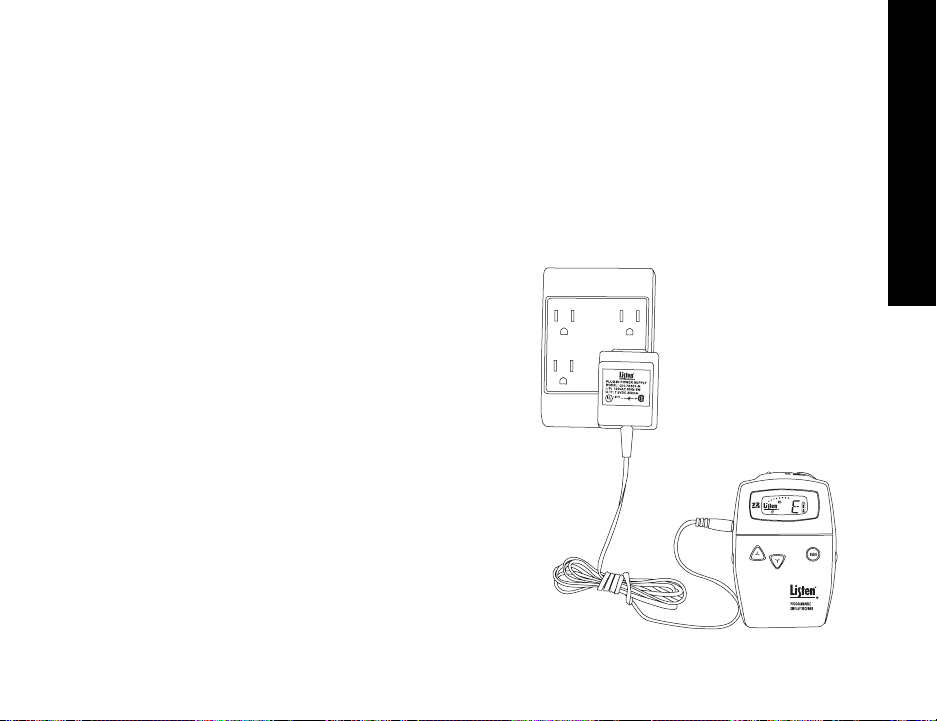
LR-500 Wall Transformer
LR-500 Wall Transformer Operation
The LR-500 will operate normally when connected to a wall transformer. Use Listen part number
LA-202, available from any Listen dealer. Connect the wall transformer to the jack on the side of
the LR-500 marked “PWR/CHG” and plug the wall transformer into a grounded AC outlet.
You do not need to have batteries installed in the LR-500 to
operate it with a wall transformer.
NOTE: If batteries are in the unit ensure that the battery
selection switch is set properly as shown on page 9. Please
review the information on page 19 for important information
regarding battery type and charging.
The LA-202 wall transformer
plugs into the side of your
portable transmitter or receiver.
Page 24

Notes
22
this page intentionally left blank
Page 25

23
User’s Manual
LR-400 Display Receiver
Don’t miss a single sound. Listen.
Listen Technologies Corporation
8535 South 700 West, Suite A
Sandy, Utah 84070-2515 USA
Telephone: +1.801.233.8992
Toll Free (North America): 1.800.330.0891
Fax: +1.801.233.8995
E-mail: info@ListenTech.com
Page 26

24
LR-400 Welcome to Listen!
· LR-400 (72MHz or 216MHz)
· Warranty Card
· Receiver User Manual
LR-400 Package Contents
72 MHz: LR-400-072
216 MHz: LR-400-216
Listen Part Number
See pages 70-71.
Optional Accessories
Page 27

25
LR-400 Table of Contents
Architectural Specifications . . . . . . . . . . . . . . . . . . . . . . . . . . . . . . . . . . . . . . . . . . . . . . . . .26
Specifications . . . . . . . . . . . . . . . . . . . . . . . . . . . . . . . . . . . . . . . . . . . . . . . . . . . . . . . . . . . . .26
Quick Reference . . . . . . . . . . . . . . . . . . . . . . . . . . . . . . . . . . . . . . . . . . . . . . . . . . . . . . . . . . .28
Setup Instructions . . . . . . . . . . . . . . . . . . . . . . . . . . . . . . . . . . . . . . . . . . . . . . . . . . . . . . . . .31
Operation Instructions . . . . . . . . . . . . . . . . . . . . . . . . . . . . . . . . . . . . . . . . . . . . . . . . . . . . .34
Squelch Information . . . . . . . . . . . . . . . . . . . . . . . . . . . . . . . . . . . . . . . . . . . . . . . . . . . . . . .36
Squelch Programming . . . . . . . . . . . . . . . . . . . . . . . . . . . . . . . . . . . . . . . . . . . . . . . . . . . . . .37
Charging Batteries . . . . . . . . . . . . . . . . . . . . . . . . . . . . . . . . . . . . . . . . . . . . . . . . . . . . . . . . .38
Wall Transformer Operation . . . . . . . . . . . . . . . . . . . . . . . . . . . . . . . . . . . . . . . . . . . . . . . . .40
Supplementary Information . . . . . . . . . . . . . . . . . . . . . . . . . . . . . . . . . . . . . . . . .55
Channel Selection . . . . . . . . . . . . . . . . . . . . . . . . . . . . . . . . . . . . . . . . . . . . . . . . . . . . . . . . .56
Listen SQ™ . . . . . . . . . . . . . . . . . . . . . . . . . . . . . . . . . . . . . . . . . . . . . . . . . . . . . . . . . . . . . .58
RF Reception Maximization Strategies . . . . . . . . . . . . . . . . . . . . . . . . . . . . . . . . . . . . . . . . .59
72 MHz Frequency Compatibility Table . . . . . . . . . . . . . . . . . . . . . . . . . . . . . . . . . . . . . . . .60
216 MHz Frequency Compatibility Table . . . . . . . . . . . . . . . . . . . . . . . . . . . . . . . . . . . . . . .62
Troubleshooting . . . . . . . . . . . . . . . . . . . . . . . . . . . . . . . . . . . . . . . . . . . . . . . . . . . . . . . . . . .64
Compliance Notice . . . . . . . . . . . . . . . . . . . . . . . . . . . . . . . . . . . . . . . . . . . . . . . . . . . . . . . .67
FCC Statement . . . . . . . . . . . . . . . . . . . . . . . . . . . . . . . . . . . . . . . . . . . . . . . . . . . . . . . . . . .68
Warranty . . . . . . . . . . . . . . . . . . . . . . . . . . . . . . . . . . . . . . . . . . . . . . . . . . . . . . . . . . . . . . . . .69
Optional Accessories . . . . . . . . . . . . . . . . . . . . . . . . . . . . . . . . . . . . . . . . . . . . . . . . . . . . . . .70
LR-400 Table of Contents
Page 28

26
LR-400 Specifications
LR-400 Specifications
Architectural Specifications
The FM receiver shall be capable of receiving on 57 wide and narrow band channels with a SNR of 80dB or greater.
The receiver shall be capable of seeking channels. The device shall have an adjustable squelch. The device shall have
an audio frequency response of 63Hz to 15KHz, ± 3dB at 72MHz, or of 63Hz to 10kHz, ± 3dB at 216MHz. The device
will incorporate a stereo headset jack that allows the user to plug in either a mono or stereo headset and listen to the
audio normally. The device shall incorporate an LCD display that indicates channel, battery level, low battery, battery
charging, RF signal strength and channel lock status. The receiver shall incorporate automatic battery charging circuitry
for recharging of NiMH batteries. The Listen LR-400 is specified.
Specifications
Specification LR-400-072 LR-400-216
RF Frequency Range 72.025 - 75.950 MHz 216.025 - 216.975 MHz
Number of Channels 57 (17 wide, 40 narrow) 57 (19 wide, 38 narrow)
Sens itivity
Frequency Accuracy
Antenna
Antenna C onnector
Squelch
Complia nce
System Frequency Response 63Hz - 15kHz (±3dB) 63Hz - 10kHz (±3dB)
System Signal to Noise Ratio
(A-we ighted)
SQ enabled: 80dB; SQ disabled 60dB SQ enabled: 80dB; SQ disabled 50dB
System Distortion
Output
RF
± .005% stability 0° to 50°C (32° to 122° F)
Programmable in 20 steps
FCC Part 15, Industry Canada
Audio
.6uV typical, 1 uV max imum for 12dB SINAD
Uses earphone cable
3.5mm connector
3.5mm c onnector s, unbalanced, 0 dBu nominal output lev el,
16mW maximum, impedance 32 Ohms
** All s ystem spe cificat ions are w ireles s end-to -end
<2% total harmonic distortion (THD) at 80% deviation
Page 29

27
LR-400 Specifications
Set Up Controls
User Controls
Progr amming
LCD Display
LED
Battery Type
Battery Life (Liste n batter ies)
Battery C harging (NiMH only)
Power S upply Co nnector
Complia nce
Dimensio ns
Unit W eight
Unit Weight with batteries
Shipping We ight
Door
Temperature - Operation
Temperature - Storage
Humidity
3.9oz (111g)
Alkaline /NiMH batte ries and S Q enable/disa ble and prog rammable s quelch se tting.
2.3mm OD by 0.7mm ID, barrel type connector. 7.5VDC, center positive <250mA.
Drop in contact points for us e with Listen charging/carrying cases.
Indicators
Power
-10° to 40°C (14° to 104° F)
Environmental
Physical
Fully automatic, 14 hours
0 to 9 5% relativ e humidity, non-conde nsing
Manually locka ble. UP, DOWN and SEEK protec ted by door.
16mW maximum, impedance 32 Ohms
Two AA batteries, alkaline or NiMH
30 hours alkaline (LA-361), 15 hours NiMH rechargeable (LA-362)
Volume, c hannel UP/D OWN, SEEK
(All co ntrols e xcept v olume are electr onically loc kable, and ar e behind the d oor)
Indicates channel, RF signal strength, lock status, and squelch setting.
Controls
3.0 in x 1.0 in x 5 in WxDxH (7.6cm x 2.5cm x 13.cm)
-20° to 50°C (-4° to 122° F)
Red, illuminat es when unit is on. Flas hes when b atteries are low . Flashes when
charg ing. Flashes whe n locked and us er attempt s to see k to another channel.
5.8 oz (164.4g)
1.0 lbs (453.6kg)
Squelc h can be adjus ted for sensit ivity and signa l capture contro l. Channel
sele ction can be loc ked by holding the S EEK button for 5 second s. Unit cannot be
progr ammed, however, it is c apable of entering sque lch mode.
UL Listed
LR-400 Specifications continued
Specification LR-400-072 LR-400-216
Page 30

28
LR-400 Quick Reference
Quick Reference
LR-400 Front
LED - when lit, indicates
unit has power.
3.5mm Input Jack
A Listen earpiece or headset
connects here.
ON/OFF & VOLUME control dial
Look & Listen™
Display shows receive
level, channel, battery
status, and whether a
channel is locked.
See close-up on page
30.
LR-400 Top of Unit
3.5mm Input Jack
A Listen earpiece or
headset connects
here.
LED indicators
· Steady Red: Normal operation
· Slow Flashing: Battery is low
· Slow Flashing while charging: Unit is charging
ON/OFF and VOLUME control dial rotate the dial counter-clockwise to
turn unit on and increase volume.
Page 31

29
LR-400 Quick Reference
Quick Reference
LR-400 Inside Access Door
Battery Select Switch - place in NiMH position ONLY if you
are using Nickel Metal Hydride batteries, otherwise, leave it
in the Alkaline position.
SQ Switch: shipped in the ON position, use a screwdriver or
pen to slide to the OFF position if needed. You should turn
SQ off if any of your receivers do not have SQ.
SQ Switch
Battery Select
Switch
SEEK button
allows the user to
change channels
or to lock on a
channel.
Adjustable Squelch:
The default factory preset for
squelch is 03.(See page 37
for Squelch programming
information)
Use UP and DOWN buttons
to select a channel.
Page 32

30
LR-400 Quick Reference
Quick Reference
LR-400 Look & Listen™ Display
Indicates the currently
tuned channel
When the padlock is visible, the channel is
locked. Press and hold SEEK for 5 seconds
to unlock or lock.
Dots indicate the relative RF signal
strength. When there is a full signal
the unit will display all 8 dots.
Battery level indicator.
The indicator flashes, along
with the red LED on top of the
unit, to alert you when the
battery is low and needs to be
charged or changed.
LR-400 Battery Indicator
All three segments showing:
The batteries are at 50% or
greater capacity.
One segment showing:
Your batteries less than 25% capacity. When
this segment begins flashing along with the
LED on top of the unit, you should immediately change your batteries or recharge them
(if using NiMH batteries).
Two segments showing:
The batteries are at 25-49%
capacity.
Page 33

31
LR-400 Setup Instructions
LR-400 Setup Instructions
Remove the product
Remove outer packaging and plastic cover. Inspect for physical damage. If damage is aparent,
please contact Listen Technologies Corporation technical support
for assistance. See page 69 for contact information.
Open the front access door
If locked, use a pocketknife or small screwdriver to unlock the door
locks on both sides of the unit. To unlock the door, rotate the lock
¼ turn counterclockwise.
Grip the two tabs with your thumb and index finger and pull the
door downward. Do NOT place batteries in the unit yet.
Select Battery Type
See diagram on page 29. You have two choices: NiMH and
Alkaline. The unit is shipped with the switch in the Alkaline position. Use a pen or small screwdriver to select the battery type.
CAUTION: If you are using any battery type other than
rechargeable Nickel Metal Hydride (NiMH) batteries, make sure the
BATTERY selection switch is in the alkaline position.
LockedUnlocked
WARNING: Do not place the BATTERY switch in the NiMH position if you are
not using Nickel Metal Hydride Batteries. The NiMH position will attempt to
charge the batteries. Charging non-Nickel Metal Hydride batteries may
result in physical harm, destruction of property and/or fire.
Page 34

32
LR-400 Setup Instructions
LR-400 Setup Instructions continued
Set SQ switch
The SQ switch is inside the battery compartment next to the Battery Select switch. The unit
is shipped with SQ in the ON position. To turn it off, use a small screwdriver or pen to slide
the switch to the OFF position (to the right). See page 58 for more information on SQ.
Place Batteries in Unit
Place two AA batteries in the compartment, making note of the battery polarity
shown in the battery compartment, and again verifying that the BATTERY
SELECT switch is in the correct position for the batteries you are using. (ALK
should be selected for all battery types other than NiMH).
NOTE: Listen uses 1800mAh (milli-Amp-hour) constant current NiMH
(Nickel Metal Hydride) batteries. These may be purchased from your Listen
dealer (ask for part number LA-362).
Connect an Earphone or Headset
Your headset or earphone will connect to the jack on the top of the unit. Either mono or
stereo connectors may be used with a Listen receiver. Make certain you push the plug all the
way into the jack.
Battery
Select Switch
SQ Select
Switch
Page 35

33
LR-400 Setup Instructions
LR-400 Setup Instructions continued
Turn the Unit On
Receivers are turned on by rotating the volume dial counterclockwise. The red LED on top of
the unit should activate and the LCD display should illuminate. If they do not, make sure you
have installed the batteries correctly and that you are using fully charged batteries.
Select Channel(s)
See page 56 for complete channel selection
information.
Set Squelch
See pages 36 and 37 for squelch and
programming information.
Red LED will illuminate
when on
Turn volume knob
counterclockwise
to turn on
LCD display will
activate when on
Earphone/Headset jack
Page 36

34
LR-400 Operation
LR-400 Operation Instructions
Make Sure the Unit is On
Rotate the volume knob counterclockwise with an earphone or headset connected to the unit.
Listen receivers use the cable of the earphone or headset as a receiving antenna.
Be careful when turning the unit on - if you turn the knob too far you might get too much volume in your earphone!
Select a Channel
Select the channel to match the transmission channel by pressing the UP and DOWN buttons
on the receiver.
At 72MHz:
72MHz receivers operate on 17 wide band channels and 40 narrow band channels. Channels
represented by letters on the display (i.e. A) are wideband channels ; channels represented by
numbers are narrowband channels.
At 216MHz:
216MHz receiversoperate on 19 wide band channels and 38 narrow band channels. Channel
numbers starting with a “2” are wide band; channels beginning with a “1” or “3” are narrow
band channels.
Refer to the Frequency Compatibility Tables (pages 60-63) for specific frequencies and compatibility with other manufacturers.
Test the audio
If a transmitter is broadcasting on that channel, you will be able to hear the audio. If the signal is too weak, the audio will be muted (squelched).
Page 37

34
LR-400 Operation
LR-400 Operation Instructions continued
Find an audio transmission using SEEK
Another way to find a channel on the LR-400 is to use the SEEK button. When you do
this, the Listen receiver looks for the next active channel. Sometimes the unit will mistake
interference for a real broadcast signal. If you get interference, press the SEEK button again.
The unit may stop on a channel that is close to the actual broadcast channel, in which case
the channel will sound noisy or distorted. Simply press SEEK again until you find the clearest operating channel.
Adjust the volume control
Use the control dial on the top of the unit to adjust the volume to a comfortable
level.
To Lock into Only One Channel
Press and hold the SEEK button for 5 seconds to lock a receiver onto the currently
tuned channel. Press and hold the button again to unlock. When locked the LED
on top of the unit will flash when you press the SEEK button.
Is the Channel Locked on My Receiver?
On the LR-400, when the channel is locked, the padlock icon will appear on the display. If
the unit is locked, the red LED on the top of the
unit will flash when
you press the SEEK
button.
If locked, LED flashes on all
portable receivers when SEEK
button is pressed.
Padlock appears when locked
Page 38

36
Squelch
The purpose of squelch is to mute the audio output of your receiver when the signal from the
transmitter is turned off or is too weak to be received. Without squelch you would hear radio
noise in your earphone. The squelch on your receiver can be adjusted so that it will mute the
audio on different RF signal strengths. This is useful as follows:
· To ensure that users don't hear transmissions from other transmitters, set the squelch setting to the highest level that doesn't squelch the receiver.
· If the receiver is going to be close to the transmitter (i.e. in a classroom), setting the
squelch setting high so that when the transmitter is turned off it immediately squelches and
ignores transmitters in other rooms.
· If you are in an area that has a lot of inference, you may want to set the squelch setting to a
high setting to ensure the interference is not picked by the receiver.
· If you need the maximum amount of range, you may want to consider setting the squelch
setting to a low level (0, 1 or 2). CAUTION: when setting the squelch level low the reliability of squelch function is comprised. This will cause radio noise to be heard in the earphone and there is a possibility of hearing damage.
LR-400 Squelch
LR-400 Squelch
Page 39

37
LR-400 Squelch
Squelch Programming
To enter Squelch programming mode
· Turn the unit off
· Press and hold the seek button; while still holding seek turn the ON/OFF dial to turn the unit on.
· Release the seek button when the Listen name disappears and a two digit display is seen.
To adjust the Squelch level
· Use the Channel UP and DOWN buttons to raise or lower the squelch sensitivity settings.
· Lower numbers mean that a less powerful and possibly noisy signal will be heard, but you can have a
longer range.
· Higher numbers mean that a more powerful signal with no noise will be heard, but you may have a
shorter range.
To save and exit the squelch programming mode press the seek button.
Squelch setting 00 is no squelch; this effectively disables Squelching capabilities of the receiver. Squelch
setting 20 is maximum squelch sensitivity; you must have a very strong and stable RF signal for the unit
to not engage the squelch feature.)
Adjusting the squelch setting will keep your LR-400 receiver from picking up noise when the transmitter
is not sending audio, or when you lose the signal by being out of range or if encountering interference.
Note: For squelch settings 1-3, the squelch function is slow which allows for maximum transmission
range. For squelch settings 4-20 the squelch function is fast to ensure little radio noise is heard during the
squelch function.
(The Listen SQ feature is not squelch, please refer to page 58 for information on Listen SQ).
Squelch Programming Instructions
Page 40

38
LR-400 Charging Batteries
LR-400 Charging Batteries
The LR-400 and all Listen receivers are unique because they have
SmartCharge™ chargers built in. When any of these units are connected to
an LA-202 wall transformer or dropped into a Listen charging case, NiMH
batteries will be charged.
To charge the batteries using the LA-202 wall transformer, plug the transformer into the jack marked “PWR/CHG” on the side of the unit. The unit
can be operated while the batteries are charging.
To charge the batteries using a drop-in charger, simply place the unit into a
slot in the charger and connect the charger to power. Make sure the unit is
fully seated in its slot.
One of several charging cases available from Listen. Check the Listen website for more details.
SmartCharge™ uses a pulse charging, which greatly extends the life of
Nickel Metal Hydride (NiMH) batteries. The entire charging process takes
13 hours. Listen recommends that you allow the charger to complete its full
cycle every time for maximum battery life.
IMPORTANT: In order to charge NiMH batteries, the BATTERY SELECT switch in your Listen
product must be set to the NiMH setting. Use a pen or small screwdriver to move the switch
(located in the battery compartment) to the proper position.
Connect LA-202
here and plug it
into an AC wall
outlet.
IMPORTANT: DO NOT ATTEMPT TO CHARGE ANY TYPE OF BATTERY OTHER THAN NiMH (NICKEL
METAL HYDRIDE) with your Listen equipment. Alkaline batteries may explode when connected
to a charger. Other risks of charging non-NiMH batteries include destruction of property or fire.
Page 41

39
LR-400 Charging Batteries
LR-400 Charging Batteries continued
During the charge cycle, the red LED on top of the Listen product will flash slowly. When charging is completed, the LED will turn off. It is not necessary to unplug the charger; however, if you
unplug the unit from the charger and then plug it back in, it will begin the 13-hour charge cycle
over again.
When not using the LR-400, it is recommended to leave the unit on the charger. The charger
provides a “maintenance” charge that keeps the battery at 100%. If the unit is not on the charger,
the battery will lose up to 20% of its charge per month.
NOTE: Listen uses 1800mAh (milli-Amp-hour) constant current
NiMH (Nickel Metal Hydride) batteries. These may be purchased
from your Listen dealer (ask for part number LA-362).
One of several charging cases
available from Listen. See the
www.ListenTech.com for more
options.
LA-311 - 16-unit Drop In Charging Case shown
Page 42

40
LR-400 Wall Transformer
LR-400 Wall Transformer Operation
The LR-400 will operate normally when connected to a wall transformer. Use Listen part number
LA-202, available from any Listen dealer. Connect the wall transformer to the jack on the side of
the LR-400 marked “PWR/CHG” and plug the wall transformer into a grounded AC outlet.
You do not need to have batteries installed in the
LR-400 to operate it with a wall transformer.
NOTE: If batteries are in the unit ensure that the
battery selection switch is set properly as shown on page
29. Please review the information on page 38 for
important information regarding battery type and
charging.
The LA-202 wall transformer
plugs into the side of your
portable transmitter or receiver.
Page 43

41
User’s Manual
LR-300 Receiver
Don’t miss a single sound. Listen.
Listen Technologies Corporation
8535 South 700 West, Suite A
Sandy, Utah 84070-2515 USA
Telephone: +1.801.233.8992
Toll Free (North America): 1.800.330.0891
Fax: +1.801.233.8995
E-mail: info@ListenTech.com
Page 44

42
LR-300 Introduction
· LR-300-072 (72MHz)
· Warranty Card
· Receiver User Manual
LR-300 Package Contents
72 MHz: LR-300-072
Listen Part Number
See pages 70-71.
Optional Accessories
Page 45

43
LR-300 Table of Contents
Architectural Specifications . . . . . . . . . . . . . . . . . . . . . . . . . . . . . . . . . . . . . . . . . . . . . . . . .44
Specifications . . . . . . . . . . . . . . . . . . . . . . . . . . . . . . . . . . . . . . . . . . . . . . . . . . . . . . . . . . . . .44
Quick Reference . . . . . . . . . . . . . . . . . . . . . . . . . . . . . . . . . . . . . . . . . . . . . . . . . . . . . . . . . . .46
Setup Instructions . . . . . . . . . . . . . . . . . . . . . . . . . . . . . . . . . . . . . . . . . . . . . . . . . . . . . . . . .48
Operation Instructions . . . . . . . . . . . . . . . . . . . . . . . . . . . . . . . . . . . . . . . . . . . . . . . . . . . . .50
Charging Batteries . . . . . . . . . . . . . . . . . . . . . . . . . . . . . . . . . . . . . . . . . . . . . . . . . . . . . . . . .52
Wall Transformer Operation . . . . . . . . . . . . . . . . . . . . . . . . . . . . . . . . . . . . . . . . . . . . . . . . .54
Supplementary Information . . . . . . . . . . . . . . . . . . . . . . . . . . . . . . . . . . . . . . . . .55
Channel Selection . . . . . . . . . . . . . . . . . . . . . . . . . . . . . . . . . . . . . . . . . . . . . . . . . . . . . . . . .56
Listen SQ™ . . . . . . . . . . . . . . . . . . . . . . . . . . . . . . . . . . . . . . . . . . . . . . . . . . . . . . . . . . . . . .58
RF Reception Maximization Strategies . . . . . . . . . . . . . . . . . . . . . . . . . . . . . . . . . . . . . . . . .59
72 MHz Frequency Compatibility Table . . . . . . . . . . . . . . . . . . . . . . . . . . . . . . . . . . . . . . . .60
216 MHz Frequency Compatibility Table . . . . . . . . . . . . . . . . . . . . . . . . . . . . . . . . . . . . . . .62
Troubleshooting . . . . . . . . . . . . . . . . . . . . . . . . . . . . . . . . . . . . . . . . . . . . . . . . . . . . . . . . . . .64
Compliance Notice . . . . . . . . . . . . . . . . . . . . . . . . . . . . . . . . . . . . . . . . . . . . . . . . . . . . . . . .67
FCC Statement . . . . . . . . . . . . . . . . . . . . . . . . . . . . . . . . . . . . . . . . . . . . . . . . . . . . . . . . . . .68
Warranty . . . . . . . . . . . . . . . . . . . . . . . . . . . . . . . . . . . . . . . . . . . . . . . . . . . . . . . . . . . . . . . . .69
Optional Accessories . . . . . . . . . . . . . . . . . . . . . . . . . . . . . . . . . . . . . . . . . . . . . . . . . . . . . . .70
LR-300 Table of Contents
Page 46

44
LR-300 Specifications
LR-300 Specifications
Architectural Specifications
The FM receiver shall be capable of receiving on 17 wide band channels and have a SNR of 80dB or greater. The
receiver shall be capable of seeking channels. The device shall have a squelch. The device shall have an audio frequency response of 63Hz to 15KHz, ± 3dB at 72MHz. The device shall incorporate a stereo headset jack that allows the user
to plug in either a mono or stereo headset and listen to audio normally. The receiver shall incorporate automatic battery
charging circuitry for recharging of NiMH batteries. The Listen LR-300 is specified.
Specifications
Specification LR-300-072
RF Frequency Ran ge 72.025 - 75.950 MH z
Number of Channels 17 (wide band)
Sensitivity .6uV typical, 1 uV maximum for 12dB SINAD
Frequency Accura cy ± .005% stab ility 0° to 50°C (32° to 122° F)
Antenna Uses earphone cable
Antenna Connector 3.5mm connector
Squelch Automatic on loss of RF signal
Compliance FCC Part 15, Industry Canada
System Frequency Respon se 63Hz - 15kH z (±3dB)
System Si gna l to Noi se Ratio
(A-weighted)
SQ enabled: 80d B; SQ disabl ed 60dB
System Distortion <2% total harmonic distortion (THD) at 80% deviation
Output
3.5mm connectors, unbalanced, 0dBu nominal output level,
16mW maximum, i mpedence 32 Ohms
Set Up Controls Alkaline/NiMH batteries, SQ enable/disable
User Controls Volume, SEEK (Channel SEEK is electronically lockable)
Progr amming
Channe l selectio n can be loc ked by holding the
SEEK button f or 5 se conds.
RF
** All system specifications are wireless end-to-end
Audio
Controls
Page 47

45
LR-300 Specifications
Specification LR-300-072
LR-300 Specifications continued
Indicators
LED
Red, illuminates when unit is on. Flashes when batteries are
low. Flashes when charging. Flashes when locked and user
attempts to seek to an other chann el.
Battery T ype Two AA batter ies, alk ali ne o r Ni MH
Battery Life (Li sten batteries) 30 hours alkal ine (LA -361), 15 ho urs Ni MH rechargeab le (LA-362)
Battery Charging (NiMH only) Fully automatic, 14 hours
Power Supply Connector
2.3mm OD by 0. 7mm ID, b arrel type co nnector.
7.5VDC , center posi tive <250mA. D rop i n contact poi nts for u se
with Listen charging cases.
Compli ance UL Listed
Dimensi ons 3.0 in x 1. 0 in x 5 in WxDxH (7.6cm x 2. 5cm x 13.cm)
Unit Weig ht 3.9oz (111g)
Unit Weig ht with ba tteries 5.8 oz (164.4g)
Shippi ng Weight 1.0 lbs (453.6kg )
Door Manually lockable. SEEK behind the door.
Temperature - Opera tion -10° to 40°C (14° to 104° F)
Temperature - Stora ge -20° to 50°C (-4° to 122° F)
Humi dity 0 to 95% relati ve humi tity, non -cond ensin g
Environmental
Power
Physical
Page 48

46
LR-300 Quick Reference
Quick Reference
LR-300 Front
LED - when lit, indicates
unit has power.
ON/OFF & VOLUME CONTROL dial
3.5mm Input Jack
A Listen earpiece or headset
connects here.
Page 49

47
LR-300 Quick Reference
Quick Reference
LR-300 Inside Access Door
Battery Select Switch - place in NiMH position ONLY if you
are using Nickel Metal Hydride batteries, otherwise, leave it
in the Alkaline position.
SQ Switch: shipped in the ON position, use a screwdriver
or pen to slide to the OFF position if needed. You should
turn SQ off if any of your receivers do not have SQ.
SQ Switch
Battery Select
Switch
LR-300 Top of Unit
SEEK button
allows the user to
change channels
or to lock on a
channel.
3.5mm Input Jack
A Listen earpiece or
headset connects
here.
LED indicators
· Steady Red: Normal operation
· Slow Flashing: Battery is low
· Slow Flashing while charging: Unit is charging
ON/OFF and VOLUME control dial rotate the dial counter-clockwise to
turn unit on and increase volume.
BATTERY SELECT
Page 50

48
LR-300 Setup
LR-300 Setup Instructions
Remove the product
Remove outer packaging and plastic cover. Inspect for physical damage. If damage is aparent,
please contact Listen Technologies Corporation technical support for assistance. See page 69 for contact information.
Open the front access door
If locked, use a pocketknife or small screwdriver to unlock the
door locks on both sides of the unit. To unlock the door, rotate
the lock ¼ turn counterclockwise.
Grip the two tabs with your thumb and index finger and pull the
door downward. Do NOT place batteries in the unit yet.
Select Battery Type
See diagram on page 47. You have two choices: NiMH and
Alkaline. The unit is shipped with the switch in the Alkaline
position. Use a pen or small screwdriver to select the battery
type.
CAUTION: If you are using any battery type other than
rechargeable Nickel Metal Hydride (NiMH) batteries, make sure the BATTERY selection
switch is in the alkaline position.
Set SQ switch
The SQ switch is inside the battery compartment next to the Battery Select switch. The unit
is shipped with SQ in the ON position. To turn it off, use a small screwdriver or pen to slide
the switch to the OFF position (to the right). See page 58 for more information on SQ.
LockedUnlocked
Page 51

49
LR-300 Setup
Place Batteries in Unit
Place two AA batteries in the compartment, making note of the battery polarity shown in the
battery compartment, and again verifying that the BATTERY SELECT switch is in the correct
position for the batteries you are using. (ALK should be selected for all battery types other
than NiMH).
NOTE: Listen uses 1800mAh (milli-Amp-hour) constant current NiMH (Nickel Metal
Hydride) batteries. These may be purchased from your Listen dealer (ask for part number
LA-362).
Connect an Earphone or Headset
Your headset or earphone will connect to the jack on the top of the unit. Either mono or
stereo connectors may be used with a Listen receiver. Make certain you push the plug all the
way into the jack.
Turn the Unit On
Receivers are turned on by rotating the volume dial counterclockwise. The red LED on top of
the unit should activate and the LCD display should illuminate. If they do not, make sure you
have installed the batteries correctly and that you are using fully charged batteries.
LR-300 Setup Instructions continued
Page 52

50
LR-300 Operation
LR-300 Operation Instructions
Make Sure the Unit is On
Rotate the volume knob counterclockwise with an earphone or headset connected to the
unit. Listen receivers use the cable of the earphone or headset as a receiving antenna.
Be careful when turning the unit on - if you turn the knob too far you might get too much
volume in your earphone!
Find an audio transmission using SEEK
To find a channel on the LR-300 use the SEEK button. When you do this, the Listen
receiver looks for the next active channel. Sometimes the unit will mistake interference
for a real broadcast signal. If you get interference, press the SEEK button again. The unit
may stop on a channel that is close to the actual broadcast channel, in which case the
channel will sound noisy or distorted. Simply press SEEK again until you find the clearest
operating channel.
Test the audio
If a transmitter is broadcasting on that channel, you will be able to hear the audio. If the
signal is too weak, the audio will be muted (squelched).
Adjust the volume control
Use the control dial on the top of the unit to adjust the volume to a
comfortable level.
Page 53

51
LR-300 Operation & Squelch
LR-300 Operation Instructions continued
To Lock into Only One Channel
Press and hold the SEEK button for 5 seconds to lock a receiver onto the currently tuned
channel. Press and hold the button again to unlock. When locked the LED on top of the
unit will flash when you press the SEEK button.
Is the Channel Locked on My Receiver?
On the LR-300, when the channel is locked the red LED on the top of the unit will flash
when you press the SEEK button.
If locked, LED flashes on all
portable receivers when SEEK
button is pressed.
Page 54

52
LR-300 Charging Batteries
LR-300 Charging Batteries
The LR-300 and all Listen receivers are unique because they have
SmartCharge™ chargers built in. When any of these units are connected to
an LA-202 wall transformer or dropped into a Listen charging case, NiMH
batteries will be charged.
To charge the batteries using the LA-202 wall transformer, plug the transformer into the jack marked “PWR/CHG” on the side of the unit. The unit
can be operated while the batteries are charging.
To charge the batteries using a drop-in charger, simply place the unit into a
slot in the charger and connect the charger to power. Make sure the unit is
fully seated in its slot.
One of several charging cases available from Listen. Check the Listen website for more details.
SmartCharge™ uses a pulse charging, which greatly extends the life of
Nickel Metal Hydride (NiMH) batteries. The entire charging process takes
13 hours. Listen recommends that you allow the charger to complete its full
cycle every time for maximum battery life.
IMPORTANT: In order to charge NiMH batteries, the BATTERY SELECT switch in your Listen
product must be set to the NiMH setting. Use a pen or small screwdriver to move the switch
(located in the battery compartment) to the proper position.
Connect LA-202
here and plug it
into an AC wall
outlet.
IMPORTANT: DO NOT ATTEMPT TO CHARGE ANY TYPE OF BATTERY OTHER THAN NiMH (NICKEL
METAL HYDRIDE) with your Listen equipment. Alkaline batteries may explode when connected
to a charger. Other risks of charging non-NiMH batteries include destruction of property or fire.
Page 55

53
LR-300 Charging Batteries
During the charge cycle, the red LED on top of the Listen product will flash slowly. When charging is completed, the LED will turn off. It is not necessary to unplug the charger; however, if you
unplug the unit from the charger and then plug it back in, it will begin the 13-hour charge cycle
over again.
When not using the LR-300, it is recommended to leave the unit on the charger. The charger
provides a “maintenance” charge that keeps the battery at 100%. If the unit is not on the charger,
the battery will lose up to 20% of its charge per month.
NOTE: Listen uses 1800mAh (milli-Amp-hour) constant current
NiMH (Nickel Metal Hydride) batteries. These may be purchased
from your Listen dealer (ask for part number LA-362).
LR-300 Charging Batteries continued
One of several charging cases
available from Listen. See the
www.ListenTech.com for more
options.
LA-311 - 16-unit Drop In Charging Case shown
Page 56

LR-300 Wall Transformer
54
LR-300 Wall Transformer Operation
The LR-300 will operate normally when connected to a wall transformer. Use Listen part number
LA-202, available from any Listen dealer. Connect the wall transformer to the jack on the side of
the LR-300 marked “PWR/CHG” and plug the wall transformer into a grounded AC outlet.
You do not need to have batteries installed in the LR-300 to
operate it with a wall transformer.
NOTE: If batteries are in the unit ensure that the battery
selection switch is set properly as shown on page 47. Please
review the information on page 52 for important information
regarding battery type and charging.
The LA-202 wall transformer
plugs into the side of your
portable transmitter or receiver.
Page 57

Supplementary Info
55
Supplementary Information
Channel Selection . . . . . . . . . . . . . . . . . . . . . . . . . . . . . . . . . . . . . . . . . . . . . . . . . . . . . . . . .56
Listen SQ™ . . . . . . . . . . . . . . . . . . . . . . . . . . . . . . . . . . . . . . . . . . . . . . . . . . . . . . . . . . . . . .58
RF Reception Maximization Strategies . . . . . . . . . . . . . . . . . . . . . . . . . . . . . . . . . . . . . . . . .59
72 MHz Frequency Compatibility Table . . . . . . . . . . . . . . . . . . . . . . . . . . . . . . . . . . . . . . . .60
216 MHz Frequency Compatibility Table . . . . . . . . . . . . . . . . . . . . . . . . . . . . . . . . . . . . . . .62
Troubleshooting . . . . . . . . . . . . . . . . . . . . . . . . . . . . . . . . . . . . . . . . . . . . . . . . . . . . . . . . . . .64
Compliance Notice . . . . . . . . . . . . . . . . . . . . . . . . . . . . . . . . . . . . . . . . . . . . . . . . . . . . . . . .67
FCC Statement . . . . . . . . . . . . . . . . . . . . . . . . . . . . . . . . . . . . . . . . . . . . . . . . . . . . . . . . . . .68
Warranty . . . . . . . . . . . . . . . . . . . . . . . . . . . . . . . . . . . . . . . . . . . . . . . . . . . . . . . . . . . . . . . . .69
Optional Accessories . . . . . . . . . . . . . . . . . . . . . . . . . . . . . . . . . . . . . . . . . . . . . . . . . . . . . . .70
Page 58

Channel Selection
56
Channel Selection
It is highly recommended that after channel selection has been achieved, you lock the channel so
that it cannot be changed by the user. To accomplish lock on receivers, press and hold seek for 5
seconds. Repeat the process to unlock. It is important to choose channels that are free from interference to achieve proper operation of your Listen equipment. This process is trial and error.
Before turning on the transmitter, listen to the wide band channels (lettered channels at 72MHz
and channels that start with a “2” for 216MHz). Listen to the audio through the headphone or via
the speaker. Choose a channel with the least amount of interface. Unless you are interfacing with
an existing narrowband transmission system, always use a wide band channel. If you are using multiple channels follow this process:
a. Same Space If you are using transmitters in the same space, the most number of channels that
will work simultaneously is six at 72MHz and three at 216MHz. With all of the transmitters
off, listen for interference on all the wide band channels via the headphone jack. Using the
frequency compatibility tables on pages 60-63, eliminate any channels that have noticeable
interference. Now choose the channels with the widest channel spacing. It is recommended
that adjacent channels be spaced at least 300KHz. If there is no interference the following
channels are recommended: A, C, E, I, J, and H for 72MHz and channels 2A, 2K and 2V at
216MHz.
b. Distributed Spacing If you are using transmitters that are spread out over space, you can
achieve more simultaneous broadcast channels. However, it is critical that your receiver(s) be
located as close to its transmitter as possible. You can use adjacent channels (see frequency
compatibility tables on pages 60-63) in this case as long as the adjacent channel transmitter is
at least 50% further away from the receiver as its transmitter. Example: The transmitter for
the receiver on channel E is 100 feet from the receiver. The adjacent channel transmitter on
channel D should be at least 150 feet away.
Page 59

57
Channel Selection
Channel Selection continued
Notes in regard to using 72MHz and 216MHz systems
i. 72MHz in a secondary frequency band. This means that other transmitters are licensed to use
these frequencies. Thus, you may experience interference from paging transmitters and other
type transmissions. You will need to find a clear channel by listening to all the wide band
channels.
ii. 216MHz is a primary frequency band and no other types of transmissions are authorized to use
it. Thus, you will find the highest probability of clear channels in this band. However, you may
experience intermodulation of the TV Channel 13 aural carrier if there is a channel 13 transmitter in your area and you are close to the transmitter. If you cannot find a clear channel in
216MHz band due to channel 13, it is recommended that you switch to a 72MHz system.
NOTE: The LR-300-072 can only be used with the 17 wide band 72MHz channels, if you are
using the LR-300 choose only lettered wide band frequencies on your transmitter.
Page 60

58
Listen SQ™
We are accustomed to listening to low noise, high fidelity audio (delivered via
CD, DVD, etc.). FM radio systems, such as those made by Listen, have more
inherent noise compared to most sound systems. To reduce noise of our systems, Listen now offers a noise reduction technology called ListenSQ™. Both
the transmitter and receiver must have SQ on to achieve the desired results.
SQ is now available on new Listen systems, including the system you received
in this shipment. If you are planning to use this product with older Listen systems or equipment not manufactured by Listen, you should disable SQ.
Your Listen equipment has been shipped to you with the SQ feature enabled.
You may need to disable the SQ function for one or more of the following reasons:
1. You are using your new Listen system with older version Listen equipment
that does not have the SQ function.
2. You are using your new Listen system with equipment supplied by other
manufacturers.
3. You expect that end users may bring and use their own receivers that don’t
have the SQ function.
SQ Summary
· Improves noise performance by at
least 20dB
· SQ is NOT compatible with older
version Listen products
· SQ is NOT compatible with other
manufacturers’ products
· SQ is NOT squelch
· To work properly, SQ must be
enabled for both the transmitter
and receivers
· SQ can be disabled to permit operation with older Listen products or
other manufacturers’ products
Listen SQ™
Page 61

59
RF Reception Strategies
For proper and dependable operation, Listen receivers should receive a strong and consistent signal
from the originating transmitter. The following strategies should be used maximize this signal:
a. When designing and installing your system, keep in mind that the location of both the
transmitter and receivers is critical to maximizing signal strength.
b. Eliminate or minimize obstructions between the transmitter and receivers.
c. Minimize the distance between the transmitter and receivers.
d. Move transmitter and receivers away from metal objects.
e. Place the transmitting antenna as high as possible (on stationary transmitters).
f. Orient both transmitting and receiving antennas vertically.
g. For 216MHz stationary LT-800 transmitter only, consider using a gain antenna such as a Yagi
type antenna or the LA-107 ground plane antenna.
h. On portable transmitters and receievers, the cable from the microphone or headset is the anten-
na; ensure that the cable is not coiled or laying horizontal.
CAUTION: When installing remote antennas, ensure the antenna is clear of power lines.
NOTE: If the RF signal to the 216MHz models is too high, the audio will be distorted. This may
happen if you are within 40 feet (12m) of the LT-800-216 transmitter or within 5 feet (1.5m) of the
LT-700-216 transmitter.
Coaxial cable, connectors, and optional antenna mounting kits are available from Listen. Visit
www.ListenTech.com or ask your dealer for details.
RF Reception Maximization Strategies
Page 62

60
72MHz Compatibility Chart
72MHz Compatibility Chart
Freque ncy
MHz
Listen
Phonic
Ear
Comtek Phonak Williams* Gentner Telex Drake
72.0250 1 1 1 A1 (11, 1)
72.0500 (2) 1
72.0750 2 2 2 A2 (12, 3)
72.1000 AAAAA, (13, 4)2A72.1
72.1250 3 3 3 A3 (14, 5)
72.1500 (6) 3
72.1750 4 4 4 A4 (15, 7)
72.2000 KKKKK, (8)4B72.2
72.2250 5 5 5 K5 (16, 9)
72.2500 (10) 5
72.2750 6 6 6 K6 (17, 11)
72.3000 BBBBB, (18, 12)6C72.3
72.3250 7 7 7 B7 (19, 13)
72.3500 (14) 7
72.3750 8 8 8 B8 (20, 15)
72.4000 NNNNN, (16)8 D72.4
72.4250 9 9 9 N9 (21, 17)
72.4500 (18) 9
72.4750 10 10 10 N0 (22, 19)
72.5000 CCCCC, (23, 20)10E72.5
72.5250 11 11 11 C1 (24, 21)
72.5500 (22) 11
72.5750 12 12 12 C2 (25, 33)
72.6000 OOOOO, (24)12F72.6
72.6250 13 13 13 O2 (26, 25)
72.6500 (26) 13
72.6750 14 14 14 4 (27)
72.7000 DDDDD, (28)14G72.7
72.7250 15 15 15 D5 (29)
Updated 03.16.04
*Parenthesis indicate T35 and T20
narrowband.
NOTE: Wideband frequencies in
highlighted rows.
Chart continued on next page
Page 63

61
72MHz Compatibility Chart
75.5000 FFFFF, (48, 58)28J75.5
75.5250 23 23 23 F3 (49, 59)
75.5500 (60) 29
75.5750 24 24 24 F4 (50, 61)
75.6000 SSSSS, (62)30K75.6
75.6250 25 25 25 S5 (51, 63)
75.6500 (64) 31
75.6750 26 26 26 S6 (52, 65)
75.7000 GGGGG, (53, 66)32L75.7
75.7250 27 27 27 G7 (54, 67)
75.7500 (68) 33
75.7750 28 28 28 G8 (55, 69)
75.8000 TTTTT, (70)34M75.8
75.8250 29 29 29 T9 (56, 71)
75.8500 (72) 35
75.8750 30 30 30 T0 (57, 73)
75.9000 HHHHH, (58, 74)36N75.9
75.9250 31 31 31 H1 (59, 75)
75.9500 (76) 37
75.9750 32 32 32 H2 (60, 77)
72MHz Compatibility Chart continued
Freque ncy
MHz
Listen
Phonic
Ear
Comtek Phonak Williams* Gentner Telex Drake
*Parenthesis indicate T35 and T20
narrowband.
NOTE: Wideband frequencies in
highlighted rows.
Page 64

Freque ncy
MHz
Listen
Phonic
Ear
Comtek Phonak Williams Gentner CSI AV R
Light
Speed
216.0125 1A 1 1 C01 N01
216.0250 2A 41 41 41 1 1
216.0375 3A 2 2
216.0625 1B 3 21
216.0750 2B 42 42 42 2 10
216.0875 3B 4 4
216.1125 1C 5 5 C05
216.1250 2C 43 43 43 A 3 6
216.1375 3C 6 22
216.1625 1D 7 23
216.1750 2D 44 44 44 B 4 14
216.1875 3D 8 8
216.2125 1E 9 9 C09 N09
216.2250 2E 45 45 45 C 5 2
216.2375 3E 10 24
216.2625 1F 11 25
216.2750 2F 46 46 46 D 6 11
216.2875 3F 12 12 C12 N12
216.3125 1G 13 13
216.3250 2G 47 47 47 E 7 7
216.3375 3G 14 26
216.3625 1H 15 27
216.3750 2H 48 48 48 F 8 15
216.3875 3H 16 16 C18 N18
216.4125 1J 17 17 C21
216.4250 2J 49 49 49 G 9 18
216.4375 3J 18 18
216.5125 1K 21 61
216.5250 2K 51 51 29 H 10 3
62
216MHz Compatibility Chart
Chart continued on next page
216MHz Compatibility Chart
Updated 03.16.04
*Parenthesis indicate T35
and T20 narrowband.
NOTE: Wideband frequencies in highlighted rows
.
Page 65

63
216MHz Compatibility Chart
216MHz Compatibility Chart continued
216.5125 1K 21 61
216.5250 2K 51 51 29 H 10 3
216.5375 3K 22 62
216.5625 1L 23 28
216.5750 2L 52 52 52 I 11 12
216.5875 3L 24 64 C24 N64
216.6125 1M 25 65 C25
216.6250 2M 53 53 53 J 12 8
216.6375 3M 26 81
216.6625 1N 27 82
216.6750 2N 54 54 54 K 13 16
216.6875 3N 28 68
216.7125 1P 29 69 C29
216.7250 2P 55 55 55 L 14 19
216.7375 3P 30 83
216.7625 1R 31 84
216.7750 2R 56 56 56 15 4
216.7875 3R 32 72 C32 N72
216.8125 1S 33 73 C33
216.8250 2S 57 57 57 13
216.8375 3S 34 76
216.8625 1T 35 85
216.8750 2T 58 58 58 9
216.8875 3T 36 86
216.9125 1U 37 77 C37 N77
216.9250 2U 59 59 59 17
216.9375 3U 38 88
216.9625 1V 39 79 C39
216.9750 2V 60 60 60 5
216.9875 3V 40 80 C40 N80
*Parenthesis indicate T35
and T20 narrowband.
NOTE: Wideband frequencies in highlighted rows
.
Freque ncy
MHz
Listen
Phonic
Ear
Comtek Phonak Williams Gentner CSI AV R
Light
Speed
Page 66

64
Receiver Troubleshooting - LR-300, LR-400, LR-500
The receiver has no power.
Make sure the unit has either fully charged batteries or a Listen approved wall transformer connected. Make sure the VOLUME knob has been rotated to the ON position. If this does not
work, try a different set of batteries. Make sure the batteries are installed properly.
There is no audio.
Make sure you have turned the volume control up. Make sure the earphone is plugged all the way
into the jack on the top of the unit. Make sure the transmitter is broadcasting an audio source.
Make sure you’re tuned to the same channel as the transmitter (see page 56). If the RF signal is
too weak, the receiver will squelch and mute the audio source; move closer to the antenna or make
sure the transmitter’s output RF power switch is set on “FULL” (LT-800).
The audio is distorted.
Make sure you’re receiving on the correct channel. Make sure the audio on the transmitter is not
turned up too loud; this will cause distortion. Make sure the earphone connector is pushed all the
way into the jack on top of the unit. If you’re using the LR-300, re-scan the channels to find the
clearest channel (see page 50). Make sure the SQ switch on your transmitter and receivers is
turned ON (or OFF, if some of your equipment is not SQ capable). Make sure you are not too
close to the transmitting antenna. If you can’t get farther away from the antenna, turn down the
RF output power on the stationary (LT-800) transmitter.
There is interference.
Try different frequencies on the transmitter and receivers until you find a clear channel. If this
does not work, try a different frequency band (i.e. if you are using 72MHz, try 216MHz or vice
versa). This is accomplished by returning the equipment to Listen (at no charge). Please contact
Liten technical support for assistance (see page 69 for information).
Receiver Troubleshooting
Page 67

65
Receiver Troubleshooting
Receiver Troubleshooting continued
I cannot pick up the signal on the receiver.
Check to make sure the receiver and the transmitter are on the same frequency and channel. Also
make sure the receiver is in broadcast range of the transmitter.
I can pick up the signal on the receiver, but it sounds like it’s not tuned in.
Check to make sure the transmitter and receiver are on exactly the same channel number/letter. If
you’re using the LR-300, re-scan the channels to find the clearest channel by pressing SEEK (see
page 50).
I’m using another brand of transmitter - how do I tell which channel to
use?
Refer to Listen’s Frequency Compatibility Tables (pages 60-63). Either adjust the transmitter or the
receiver to a common channel.
There is not sufficient range.
Make sure you are located as close as possible to the antenna of the transmitter. Try to place the
antenna as high as possible and free from obstacles. You can also check the squelch setting; perhaps
it is too sensitive. To change this setting, refer page 17 (LR-500) or to page 36 (LR-400).
Users keep changing channels.
You can prevent users from changing channels by locking in the channel selection. This is done by
pressing and holding the SEEK button for 5 seconds. When the channel is locked, the padlock
icon will appear on the LR-400 and LR-500 displays. On the LR-300, the LED will flash when the
channel is locked and seek is pressed. In addition, you can lock the access doors to the units.
Page 68

66
Receiver Troubleshooting continued
I cannot change channels when pressing the UP and DOWN buttons or
the SEEK button.
The unit is locked. Press the SEEK button for 5 seconds to unlock.
When I change channels, only certain channels are accessible.
The unit has been programmed to tune to only certain channels (LR-500 only). You can change
these channel lock-out selections by re-programming the unit (see page 16).
My batteries are not charging.
Make sure the battery switch is in the NiMH setting and that you are using NiMH (Nickel Metal
Hydride) batteries. Make sure you are using only a Listen supplied charging unit or transformer.
Never try to charge alkaline or NICAD batteries.
I want to run the unit from a wall transformer.
Simply plug a Listen approved transformer (LA-202) to the CHG/PWR connector on the side of
the unit. Batteries do not need to be installed when operating the unit with a wall transformer;
however, if you have NiMH batteries installed and the BATTERY select switch is set to NiMH, the
batteries will charge while the unit is being used.
It’s confusing for users to have 57 choices when switching between
channels.
Use the programming feature (only available in the LR-500) to limit the number of channels
accessible by users.
Receiver Troubleshooting
Page 69

67
Compliance Notice
Compliance Notice
This device complies with part 15 of the FCC Rules. Operation is subject to the following two
conditions: (1) These devices may not cause harmful interference, and (2) these devices must
accept any interference received, including interference that may cause undesirable operation.
Page 70

68
FCC Statement
This equipment has been tested and found to comply with the limits for a class B digital device,
pursuant to part 15 of the FCC Rules. These limits are designed to provide reasonable protection
against harmful interference in a residential installation. This equipment generates, uses and can
radiate radio frequency energy and if not installed and used in accordance with the instructions,
may cause harmful interference to radio communications. However, there is no guarantee that
interference will not occur in a particular installation. If this equipment does cause harmful
interference to radio or television reception, which can be determined by turning the equipment
off and on, the user is encouraged to try to correct the interference by one or more of the following
measures:
· Reorient or relocate the receiving antenna.
· Increase the separation between the equipment and receiver.
· Connect the equipment into an outlet on a circuit different from that to which the receiver is
connected.
· Consult the dealer or an experienced radio/TV technician for help.
This equipment has been certified to comply with the limits for a class B computing device,
pursuant to FCC and IC Rules. In order to maintain compliance with FCC and IC regulations,
shielded cables must be used with this equipment. Operation with non-approved equipment or
unshielded cables is likely to result in interference to radio and TV reception. The user is
cautioned that changes and modifications made to the equipment without the approval of
manufacturer could void the user’s authority to operate this equipment.
FCC Statement
Page 71

69
Warranty
Warranty
Listen Technologies Corporation (Listen) warrants its receivers (LR-300, LR-400, LR-500) to be
free from defects in workmanship and material under normal use and conditions for the useful
lifetime of the product from date of purchase. All other products and accessories are warranted for
ninety days from date of purchase. This warranty is only available to the original end purchaser of
the product and cannot be transferred. Warranty is only valid if warranty card has been returned
within 90 days of purchase. This warranty is void if damage occurred because of misuse or if the
product has been repaired or modified by anyone other than a factory authorized service
technician. Warranty does not cover normal wear and tear on the product or any other physical
damage unless the damage was the result of a manufacturing defect. Listen is not liable for
consequential damages due to any failure of equipment to perform as intended. Listen shall bear no
responsibility or obligation with respect to the manner of use of any equipment sold by it. Listen
specifically disclaims and negates any warranty of merchantability or fitness of use of such
equipment including, without limitation, any warranty that the use of such equipment for any
purpose will comply with applicable laws and regulations. The terms of the warranty are governed
by the laws of the state of Utah, USA. Listen will only accept returned products with prepaid
shipping and with a return authorization number. To receive a return authorization number call
1.800.330.0891 or +1.801.233.8992. Please see www.ListenTech.com or contact Listen for
complete warranty details.
Page 72

70
Optional Accessories
Ear Speaker
LA-164
Optional Accessories
Ear Speaker
LA-161
Dual Ear Speaker
LA-162
Stereo Headset
LA-165
Neckloop
LA-166
Earphone Options
Page 73

71
Optional Accessories
Optional Accessories
Consumer
Camcorder Cable
LA-265
Connector Options
Sacrificial Cable
LA-275
Professional
Camcorder Cable
LA-266
Page 74

72
Notes
Page 75

73
Notes
Page 76

Listen Technologies Corporation
8535 South 700 West, Suite A
Sandy, Utah 84070-2515 USA
Telephone: +1.801.233.8992
Toll Free (North America): 1.800.330.0891
Fax: +1.801.233.8995
E-mail: info@ListenTech.com
 Loading...