

Page 1
Page 2

Page 3
Dear Valued Customer,
Thank you for choosing Listen! All of us at Listen are dedicated to providing
you with the highest quality products available. We take great pride in their
outstanding performance because we care that you are completely
satisfi ed. That’s why we independently certify them to the highest quality
standards and back them with a limited lifetime guarantee. We stand ready
to answer any questions you might have during installation or in the operation
of our products. Should you experience any problems whatsoever with your
Listen products, we are ready to help you in any way we can with prompt,
effi cient customer care. Because at Listen, it’s all about you! And should you
have any comments on how we might improve our products or our
service, we’re here to listen.
Here’s how to reach us:
+1.801.233.8992
+1.800.330.0891
+1.801.233.8995
North America
fax
support@listentech.com
www.listentech.com
Thank you and enjoy your listening experience!
Best regards,
Russell Gentner and the Listen Team
• In the few instances where repairs were needed, 99% of all clients indicated that they were happy with
repair turn-around-times and 85% of the time, clients were without their product for less than 10 days!
• Overall client satisfaction of working with Listen was rated 4.8 out of 5.
• “ Please continue with your excellent attitude toward customer satisfaction. You guys are great!”
• “I’ve never had such good service from any company. Keep up the good work!”
• “You stand behind your product wonderfully.”
Assistive Listening • Language Interpretation • Soundfi eld • Tour Group • Conferencing
Page 4

Page 5

Receivers Table of Contents
LR-500 Manual 3
LR-500 Table of Contents 5
LR-400 Manual 19
LR-400 Table of Contents 21
Supplementary Information 32
Channel Selection 32
Listen SQ™ 33
RF Reception Maximization Strategies 34
150 MHz Frequency Compatibility Table 35
Troubleshooting 36
Warranty 38
Contacting Listen 38
Optional Accessories 39
Page 6

Page 7
Page 8

Page 9

LR-500 Table of Contents
Package Contents 6
Architectural Specifi cations 7
Specifi cations 7
Quick Reference 8
Setup Instructions 9
Operation Instructions 11
Programming Instructions 13
Squelch Information 14
Squelch Programming 14
Charging Batteries 15
Wall Transformer Operation 16
5
Page 10
LR-500 Package Contents
LR-500 Contents
• LR-500 Portable Programmable
Display FM Receiver (150 MHz)
Listen Part Number
•LR-500-150 (150 MHz)
3
6
Page 11
LR-500 Specifi cations
Architectural Specifi cations
The FM receiver shall be capable of receiving on 32 channels. The receiver shall have a SNR of 80 dB
or greater. The receiver shall be programmable to electronically lock out unneeded channels. The
receiver shall be capable of seeking channels locked on an active channel. The device shall have a
squelch. The unit shall have an audio frequency response of 50 Hz to 15 kHz (±3 dB). The device shall
incorporate a stereo headset jack that allows the user to plug in either a mono or stereo headset
and listen to audio normally. The device shall incorporate an LCD display. The receiver shall
incorporate automatic battery charging circuitry. The device shall be able to use of two (2) alkaline
or NiMH batteries. The Listen LR-500-150 is specifi ed.
Specifi cations*
RF Frequency Range 150.8000 MHz - 152.3500 MHz
Number of Channels 6 wide band, 26 narrow band
Sensitivity .6uV typical, 1 uV maximum for 12 dB sinad
Frequency Accuracy ± .005% stability 32 to 122 ºF (0 to 50 ºC)
Audio
Antenna Uses earphone cable
Squelch Programmable in 20 steps, automatic on loss of RF signal
System Frequency
Response
System Signal to Noise Ratio SQ enabled 80 dB, SQ disabled 60 dB
System Distortion <2% total harmonic distortion (THD) at 80% deviation
Output 3.5 mm (0.14 in.) connectors, unbalanced, 0 dBu nominal output level,
50 Hz - 15 kHz (±3 dB)
16 mW maximum, impedance 32 ohm
Controls &
Indicators
Power
Physical
User Controls Channel up/down, SEEK, volume
Set-up Controls
(Battery Compartment)
Programming Channel lock, squelch, channel lock out
LED Red, illuminated when unit is on, fl ashes when batteries are low or to indicate charging,
Display Channel designation,battery level, battery charging,
Battery Type Two (2) AA batteries, alkaline or NiMH
Battery Life (Listen Batteries) 30 hours alkaline (LA-361), 15 hours NiMH rechargeable (LA-362)
Battery Charging (NiMH only) Fully automatic, 13 hours
Power Supply I/P 120 VAC; O/P 7.5 VDC 250 mA, drop in contact points for use with charging cases,
Power Supply Connector 0.09 in. (2.3 mm) OD by 0.7 mm ID, barrel type connector 7.5 VDC, center positive <250 mA,
Power Supply Compliance RoHS, WEEE, UL, PSE, CE, CUL, TUV, CB
Dimensions (H x W x D)
Color
Unit Weight
Unit Weight with batteries
Shipping Weight
Door
Manually Lockable (on sides). Up, down, and power buttons through door.
Alkaline/NiMH batteries, SQ enable/disable
fl ashes when locked and SEEK is pushed
RF signal strength, programming and channel lock
power supply not included (LA-208)
drop in contact points for use with Listen charging cases
4.25 x 2.75 x 1.50 in. (10.8 x 7.0 x 3.8 cm)
Dark Grey with white silk screening
3.9 oz (111 g)
5.8 oz (164 g)
6.1 oz (173 g)
Environmental
Temperature-Operation
Temperature-Storage
Humidity
14 to 104 ºF (-10 to 40 ºC)
(-)4 to 122 °F (-20 to 50 °C)
0 to 95% relative humidity, non-condensing
*Speci cations are subject to change without noti cation
7
Page 12

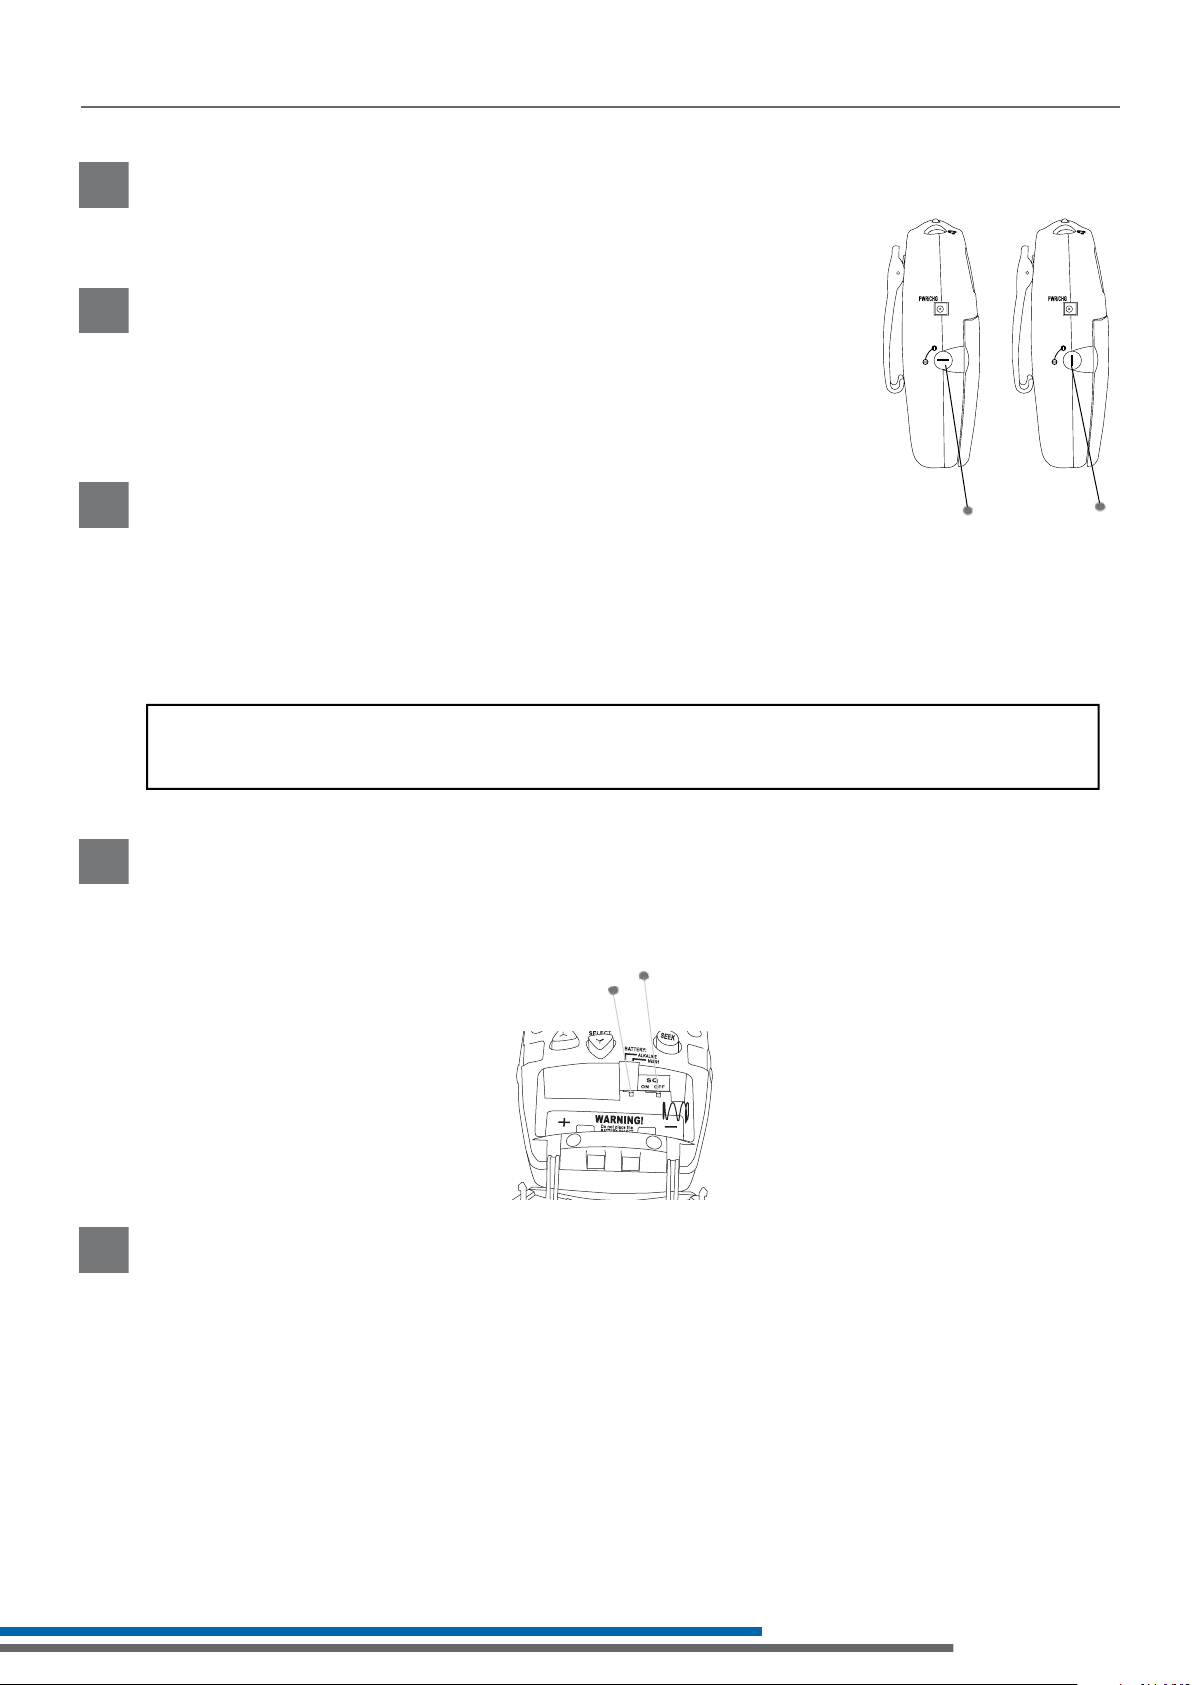
LR-500 Quick Reference
3.5 mm Output Jack:
Connect a Listen
earphone(s) here.
Power/Charging Port
Channel Select UP/DOWN
Front Door Lock
150
LED: When lit, unit is on. When batteries are
low or when charging the LED fl ashes.
On/Off and Volume Control Dial
Look&Listen™ Display: Shows
receive level, channel,
programming, battery status,
and lock status.
Seek Button: Allows the user to
search for or lock onto an
active channel
Battery Select Switch: Choose
the type of batteries being
used - Alkaline or NiMH.
RF Receive
Indicator: Indicates
the RF receive level.
SQ™ Switch: Turns SQ™ On/Off.
Battery Compartment:
Place two (2) AA batteries
in compartment. Be sure to
follow polarity pattern.
Channel Display: Displays the
current channel.
Battery Level Indicator
PGM: Program
function is in
process.
Lock Icon: Indicates the unit is
locked on current channel.
8
L/O: Indicates while in
programming mode the specifi c
channel has been locked out.
Page 13
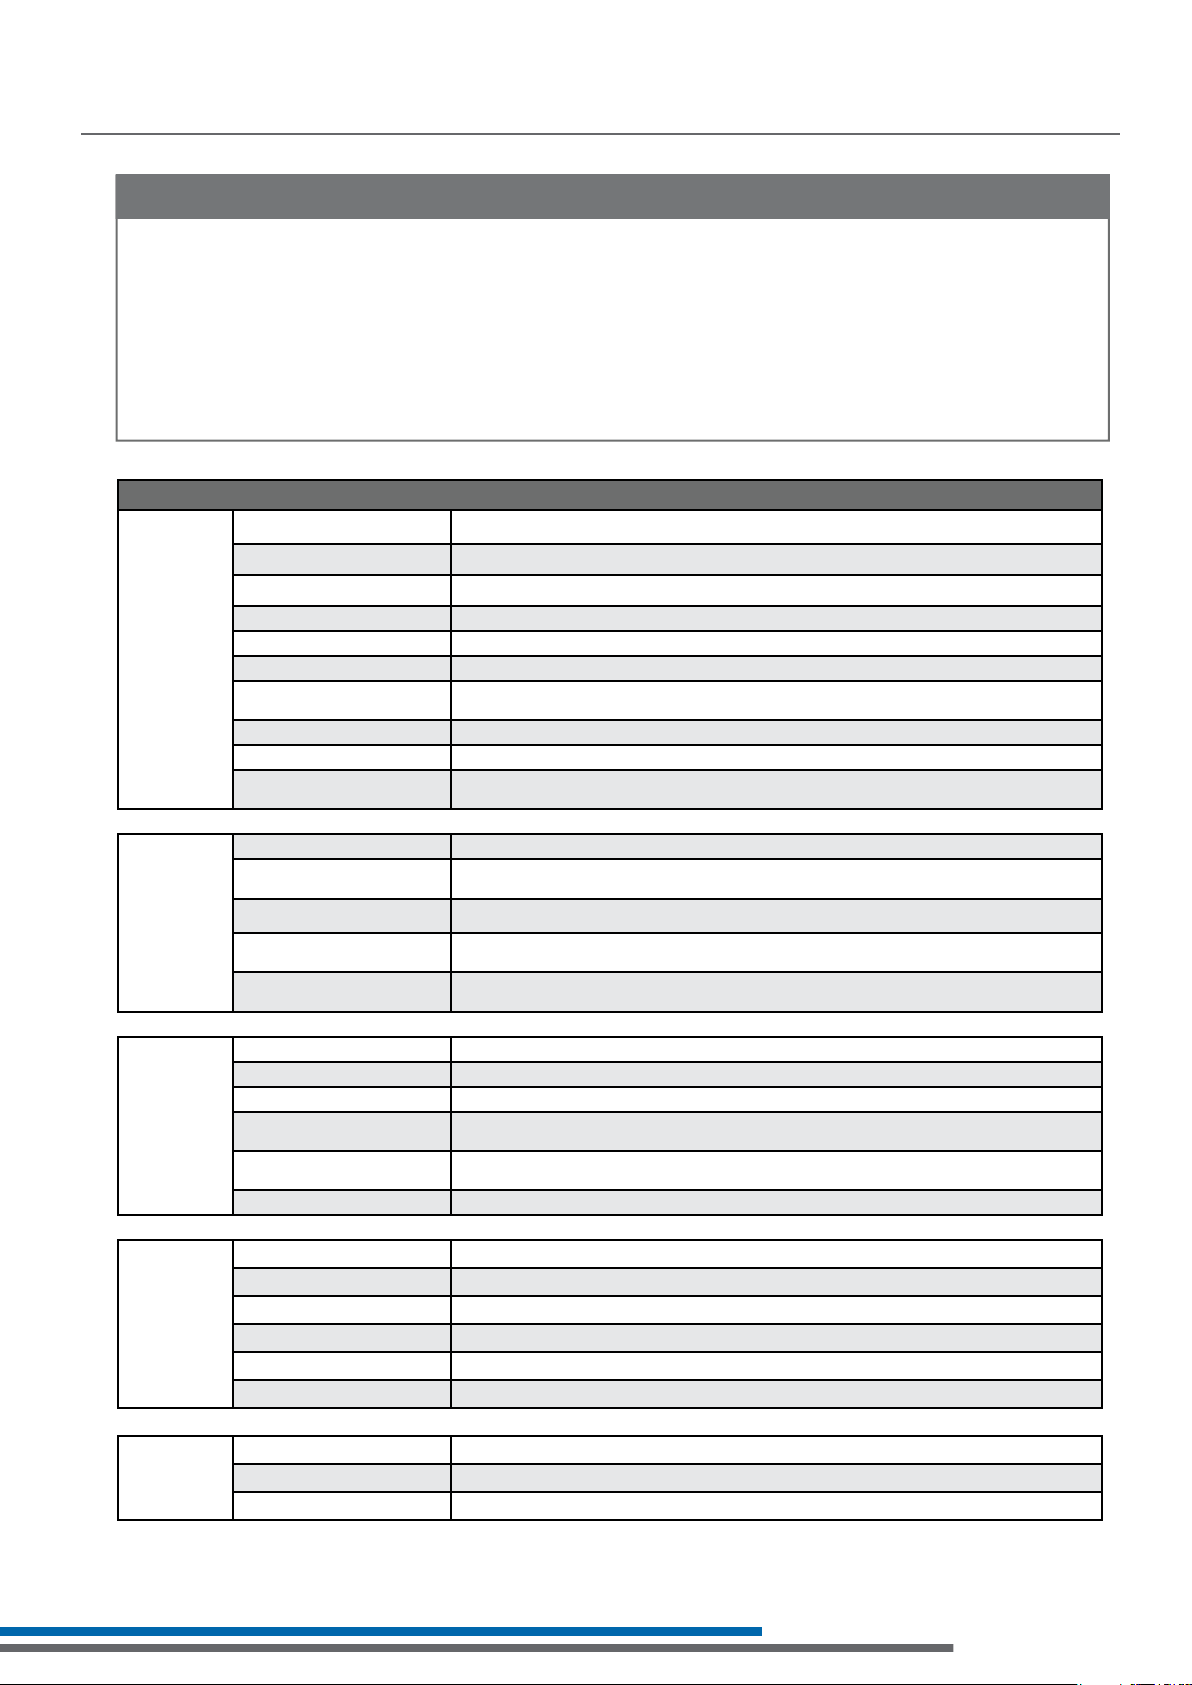
LR-500 Setup Instructions
Remove the product
1
Remove outer packaging and plastic cover. Inspect for physical damage.
If damage is apparent, please contact Listen Technologies Corporation
technical support for assistance.
Open the front access door
2
If locked, use a pocketknife or small screwdriver to unlock the door locks
on both sides of the unit. To unlock the door, rotate the lock 1/4 turn
counterclockwise.
Grip the two tabs with your thumb and index finger and pull the door
downward. Do NOT place batteries in the unit yet.
Select Battery Type
3
You have two choices: NiMH and Alkaline. The unit is shipped with the switch
in the Alkaline position. Use a pen or small screwdriver to select the battery
type.
CAUTION: If you are using any battery type other than rechargeable Nickel
Metal Hydride (NiMH) batteries, make sure the BATTERY selection switch is in
the alkaline position.
Unlocked
Locked
WARNING: Do not place the BATTERY switch in the NiMH position if you are not using Nickel Metal Hydride Batteries. The NiMH position
will attempt to charge any batteries in the unit, even if they are not the proper type. Charging non-Nickel Metal Hydride (NiMH) batteries
will result in physical harm, destruction of property and/or fire.
Set SQ switch
4
The SQ switch is inside the battery compartment next to the Battery Select switch. The unit is
shipped with SQ in the ON position. To turn it off, use a small screwdriver or pen to slide the switch to
the OFF position (to the right). See page 33 for more information on SQ.
Battery Select Switch
Place Batteries in Unit
5
Place two AA batteries in the compartment, making note of the battery polarity shown in the
battery compartment, and again verifying that the BATTERY SELECT switch is in the correct position
for the batteries you are using. (ALK should be selected for all battery types other than NiMH).
SQ™ Select Switch
NOTE: Listen provides industrial strength AA alkaline batteries (part number LA-361) and high
performance AA Nickel Metal Hydride batteries (part number LA-362). These may be
purchased from your Listen dealer.
9
Page 14
LR-500 Setup Instructions
150
Connect an Earphone or Headset
6
Your headset or earphone will connect to the jack on the top of the unit. Either mono or stereo
connectors may be used with a Listen receiver. Make certain you push the plug all the way
into the jack.
Turn the Unit On
7
Receivers are turned on by rotating the volume dial counterclockwise. The red LED on top of
the unit should activate and the LCD display should illuminate. If they do not, make sure you
have installed the batteries correctly and that you are using fully charged batteries.
Select Channel(s)
8
See page 35 for complete channel selection information.
Set Squelch
9
See page 14 for squelch and programming information.
Program Channels
10
see page 13.
Earphone/Headset jack
LCD display will activate
when on
Red LED will illuminate when on
Turn volume knob counterclockwise to
turn on
10
Page 15
LR-500 Operation Instructions
Make Sure the Unit is On
1
Rotate the volume knob counterclockwise with an earphone or headset connected to the unit.
Listen receivers use the cable of the earphone or headset as a receiving antenna.
Be careful when turning the unit on - if you turn the knob too far you might get too much
volume in your earphone!
Select a Channel
2
Select the channel to match the transmission channel by pressing the UP and DOWN buttons on
the receiver. Listen recommends the use of wide band channels.
150 MHz:
150 MHz receivers operate on 6 wide band channels and 26 narrow band channels.
Channels 1-6 are Wideband & channels 7-32 are Narrowband.
Refer to the Frequency Compatibility Table (page 35) for specific frequencies and
compatibility with other manufacturers.
Test the audio
3
If a transmitter is broadcasting on that channel, you will be able to hear the audio. If the signal is
too weak, the audio will be muted (squelched).
Find an audio transmission using SEEK
4
Another way to find a channel on the LR-500 is to use the SEEK button. When you do this, the Listen
receiver looks for the next active channel. Sometimes the unit will mistake interference for a real
broadcast signal. If you get interference, press the SEEK button again. The unit may stop on a
channel that is close to the actual broadcast channel, in which case the channel will sound noisy
or distorted. Simply press SEEK again until you find the clearest operating channel.
Adjust the volume control
5
Use the control dial on the top of the unit to adjust the volume to a comfortable level.
Volume Control Dial
11
Page 16

LR-500 Operation Instructions
To Lock into Only One Channel
6
Press and hold the SEEK button for 5 seconds to lock a receiver onto the currently tuned
channel. Press and hold the button again to unlock. When locked the LED on top of the unit
will flash when you press the SEEK button.
Is the Channel Locked on My Receiver?
On the LR-500, when the channel is locked, the padlock icon will appear on the display. If the
unit is locked, the red LED on the top of the unit will flash when you press the SEEK button.
If locked, LED fl ashes on all
portable receivers when SEEK
button is pressed
150
Padlock appears when locked
12
Page 17

LR-500 Programming Instructions
The LR-500 Display Receiver has some special features not available in the other receivers: you may
lock out unwanted channels, and you can adjust the squelch in the unit.
Locking Out Unwanted Channels
For applications where users are required to select a channel (such as language interpretation or
classrooms), and you don’t want them to have to go through all 32 available channels to find the
appropriate channel, you can lock out all channels except the ones you are using in your facility.
UP and DOWN buttons on front of LR-500
Enter the PROGRAM mode
1
Press the UP and DOWN buttons simultaneously for 5 seconds, until the PGM symbol appears in the
display.
Use the UP and DOWN keys to select channels
2
As channels are displayed on the unit, those channels that are locked out from user access will be
indicated by the L/O (Locked Out) symbol. When a channel is locked out, the receiver will skip over
that channel when a user is tuning the receiver.
Press the SEEK button to toggle channels between locked out and non-locked out modes
3
Exiting PROGRAM mode
To exit the PROGRAM mode, let the receiver sit idle (don’t press any buttons) for 5 seconds. The
receiver will automatically return to normal operation. If you haven’t finished programming the
unit and it automatically exits, press and hold the UP & DOWN buttons simultaneously for 5
seconds to re-enter the PROGRAM mode.
13
Page 18

LR-500 Squelch
Squelch
The purpose of squelch is to mute the audio output of your receiver when the
signal from the transmitter is turned off or is too weak to be received. Without squelch you
would hear radio noise in your earphone. The squelch on your receiver can be adjusted so that
it will mute the audio on different RF signal strengths. This is useful as follows:
• To ensure that users don’t hear transmissions from other transmitters, set the squelch setting to
the highest level that doesn’t squelch the receiver.
• If the receiver is going to be close to the transmitter (i.e. in a classroom), setting the squelch
setting high so that when the transmitter is turned off it immediately squelches and ignores
transmitters in other rooms.
• If you are in an area that has a lot of inference, you may want to set the squelch setting to a
high setting to ensure the interference is not picked by the receiver.
• If you need the maximum amount of range, you may want to consider setting the squelch
setting to a low level (0, 1 or 2).
CAUTION: When setting the squelch level low the reliability of squelch function is comprised.
This will cause radio noise to be heard in the earphone and there is a possibility of
hearing damage.
Squelch Programming Instructions
Squelch Programming
To enter Squelch programming mode
• Turn the unit off
• Press and hold the seek button; while still holding seek turn the ON/OFF dial to turn the
unit on.
• Release the seek button when the Listen name disappears and a two digit display is seen.
To adjust the Squelch level
• Use the Channel UP and DOWN buttons to raise or lower the squelch sensitivity settings.
• Lower numbers mean that a less powerful and possibly noisy signal will be heard, but you
can have a longer range.
• Higher numbers mean that a more powerful signal with no noise will be heard, but you may
have a shorter range.
• Once the desired squelch setting is found, press “seek” to exit the squelch programming
mode.
Squelch setting 00 is no squelch; this effectively disables Squelching capabilities of the receiver.
Squelch setting 20 is maximum squelch sensitivity; you must have a very strong and stable RF
signal for the unit to not engage the squelch feature.
Adjusting the squelch setting will keep your LR-500 receiver from picking up noise when the
transmitter is not transmitting, or when you lose the signal by being out of range or if
encountering interference.
Note: For squelch settings 1-3, the squelch function is slow which allows for maximum
transmission range. For squelch settings 4-20 the squelch function is fast to ensure little
radio noise is heard during the squelch function.
(The Listen SQ™ feature is not squelch, please refer to page 33 for information on Listen SQ™).
14
Page 19

LR-500 Charging Batteries
The LR-500 and all Listen receivers are unique because they have SmartCharge™ chargers built
in. When any of these units are connected to an LA-208 wall transformer or dropped into a Listen
charging case, NiMH batteries will be charged.
To charge the batteries using the LA-208 wall transformer, plug the transformer into the jack marked
1
“PWR/CHG” on the side of the unit. The unit can be operated while the batteries are charging.
To charge the batteries using a drop-in charger, simply place the unit into a slot in the charger and
2
connect the charger to power. Make sure the unit is fully seated in its slot.
SmartCharge™ uses a pulse charging, which greatly extends the life of Nickel Metal Hydride (NiMH)
batteries. The entire charging process takes 13 hours. Listen recommends that you allow the charger
to complete its full cycle every time for maximum battery life.
NOTE: In order to charge NiMH batteries, the BATTERY SELECT switch in your Listen product must be
set to the NiMH setting. Use a pen or small screwdriver to move the switch (located in the
battery compartment) to the proper position.
Connect LA-208 here and plug into an
DC wall outlet
IMPORTANT: DO NOT ATTEMPT TO CHARGE ANY TYPE OF BATTERY OTHER THAN NiMH (NICKEL
METAL HYDRIDE) with your Listen equipment. Alkaline batteries may explode
when connected to a charger. Other risks of charging non-NiMH batteries include
destruction of property or fire.
During the charge cycle, the red LED on top of the Listen product will flash slowly. When
charging is completed, the LED will turn off. It is not necessary to unplug the charger; however,
if you unplug the unit from the charger and then plug it back in, it will begin the 13-hour charge
cycle over again.
When not using the LR-500, it is recommended to leave the unit on the charger. The charger
provides a “maintenance” charge that keeps the battery at 100%. If the unit is not on the
charger, the battery will lose up to 20% of its charge
per month.
NOTE: Listen provides high performance constant current NiMH (Nickel Metal Hydride) batteries.
These may be purchased from your Listen dealer (ask for part number LA-362).
15
Page 20

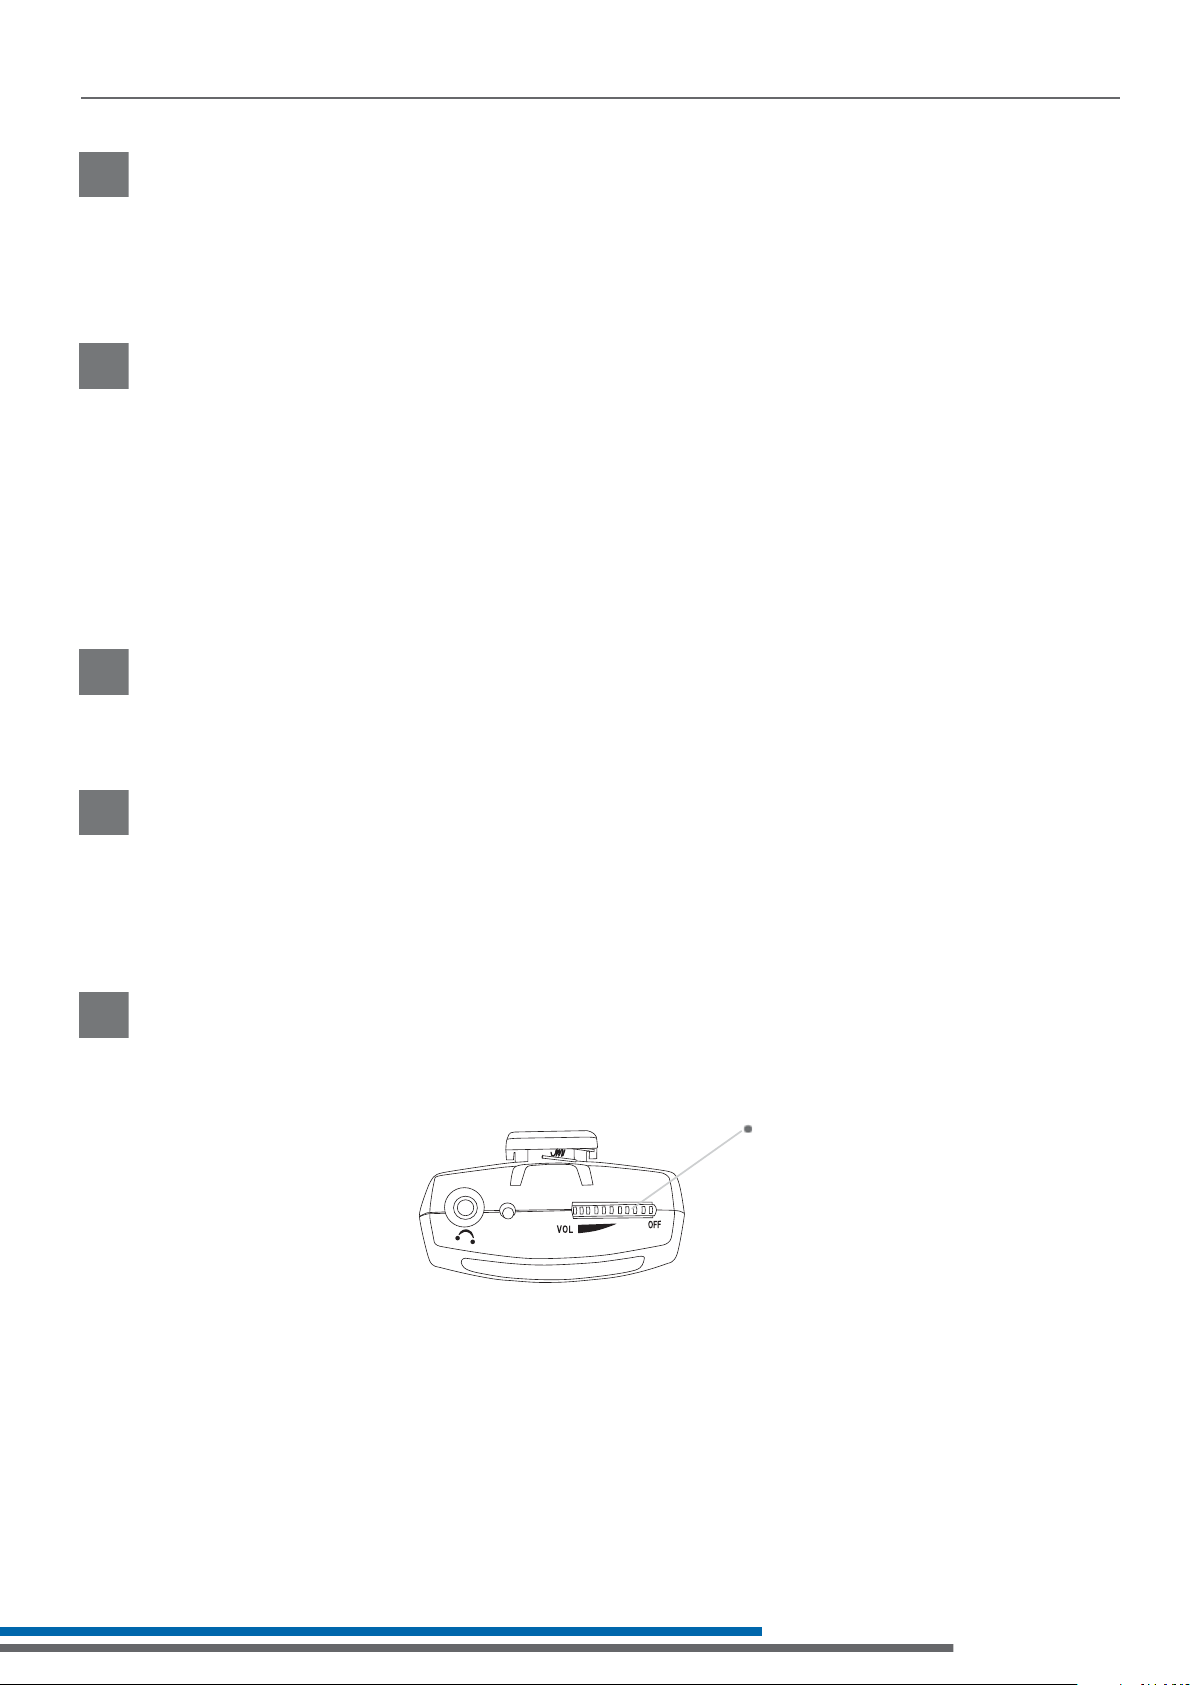
LR-500 Wall Transformer Operation
The LR-500 will operate normally when connected to a wall transformer. Use Listen part
number LA-208, available from any Listen dealer. Connect the wall transformer to the jack on
the side of the LR-500 marked “PWR/CHG” and plug the wall transformer into a grounded
AC outlet.
You do not need to have batteries installed in the LR-500 to operate it with a wall transformer.
NOTE: If batteries are in the unit ensure that the battery selection switch is set properly as
shown on page 9. Please review the information on page 15 for important information
regarding battery type and charging.
150
The LA-208 wall transformer plugs into the side
of your portable transmitter or receiver
16
Page 21

Page 22

Page 23

Page 24

Page 25

LR-400 Table of Contents
Package Contents 22
Architectural Specifi cations 23
Specifi cations 23
Quick Reference 24
Setup Instructions 25
Operation Instructions 27
Squelch Information 29
Squelch Programming 29
Charging Batteries 30
Wall Transformer Operation 31
21
Page 26

LR-400 Package Contents
LR-400 Contents
• LR-400 Portable Display FM
Receiver (150 MHz)
Listen Part Number
•LR-400-150 (150 MHz)
22
Page 27

LR-400 Specifi cations
Architectural Specifi cations
The FM receiver shall be capable of receiving on 32 channels. The receiver shall have a SNR of 80
dB or greater. The receiver shall be capable of seeking for open channels and locked on an active
channel. The device shall have a squelch. The unit shall have an audio frequency response of 50 Hz
to 15 kHz (±3 dB). The device shall incorporate a stereo headset jack that allows the user to plug in
either a mono or stereo headset and listen to audio normally. The device shall incorporate an LCD
display. The receiver shall incorporate automatic battery charging circuitry. The device shall be able
to use of two (2) alkaline or NiMH batteries. The Listen LR-400-150 is specifi ed.
Specifi cations*
RF Frequency Range 150.8000 MHz - 152.3500 MHz
Number of Channels 6 wide band, 26 narrow band
Sensitivity .6uV typical, 1 uV maximum for 12 dB sinad
Frequency Accuracy ± .005% stability 32 to 122 ºF (0 to 50 ºC)
Audio
Antenna Uses earphone cable
Squelch Programmable in 20 steps, automatic on loss of RF signal
System Frequency
Response
System Signal to Noise Ratio SQ enabled 80 dB, SQ disabled 60 dB
System Distortion <2% total harmonic distortion (THD) at 80% deviation
Output 3.5 mm (0.14 in.) connectors, unbalanced, 0 dBu nominal output level,
50 Hz - 15 kHz (±3 dB)
16 mW maximum, impedance 32 ohm
Controls &
Indicators
Power
Physical
User Controls Channel up/down, SEEK, volume
Set-up Controls
(Battery Compartment)
Programming Channel lock, squelch
LED Red, illuminated when unit is on, fl ashes when batteries are low or to indicate charging,
Display Channel designation,battery level, battery charging,
Battery Type Two (2) AA batteries, alkaline or NiMH
Battery Life (Listen Batteries) 30 hours alkaline (LA-361), 15 hours NiMH rechargeable (LA-362)
Battery Charging
(NiMH only)
Power Supply I/P 120 VAC; O/P 7.5 VDC 250 mA, drop in contact points for use with charging cases, power
Power Supply Connector 0.09 in. (2.3 mm) OD by 0.7 mm ID, barrel type connector 7.5 VDC, center positive <250 mA,
Power Supply Compliance RoHS, WEEE, UL, PSE, CE, CUL, TUV, CB
Dimensions (H x W x D)
Color
Unit Weight
Unit Weight with batteries
Shipping Weight
Door
Manually lockable (on sides), SEEK/channel select behind the door
Alkaline/NiMH batteries, SQ enable/disable
fl ashes when locked and SEEK is pushed
RF signal strength and channel lock
Fully automatic, 13 hours
supply not included (LA-208)
drop in contact points for use with Listen charging cases
4.25 x 2.75 x 1.50 in. (10.8 x 7.0 x 3.8 cm)
Dark Grey with white silk screening
3.9 oz (111 g)
5.8 oz (164 g)
6.1 oz (173 g)
Environmental
Temperature - Operation
Temperature - Storage
Humidity
14 to 104 ºF (-10 to 40 ºC)
(-)4 to 122 °F (-20 to 50 °C)
0 to 95% relative humidity, non-condensing
*Speci cations are subject to change without noti cation
23
Page 28

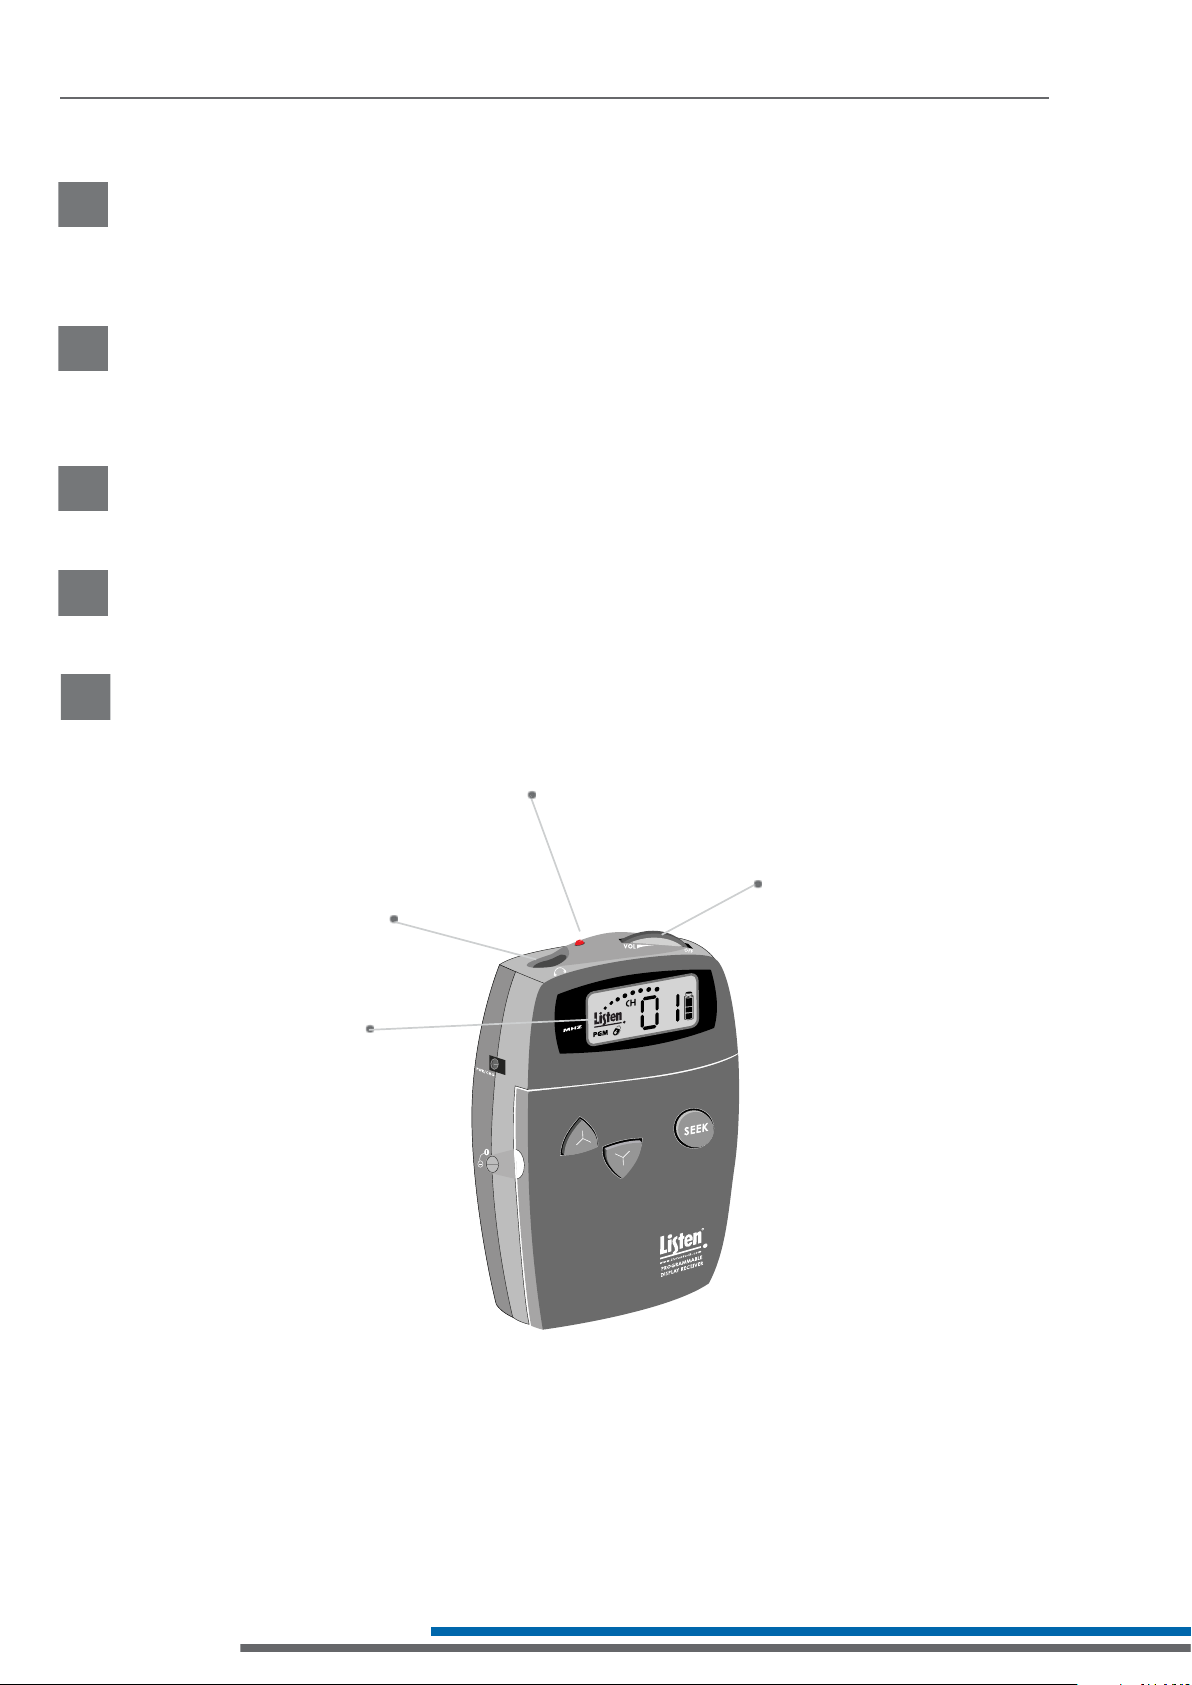
LR-400 Quick Reference
3.5 mm Output Jack:
Connect a Listen
earphone(s) here.
Power/Charging Port
150
LED: When lit, unit is on. When batteries are
low or when charging the LED fl ashes.
On/Off and Volume Control Dial
Look&Listen™ Display: Shows
receive level, battery status,
and lock status.
Channel Select UP/DOWN
Front Door Lock
Seek Button: Allows the user to
search for or lock onto an
active channel
Battery Select Switch: Choose
the type of batteries being
used - Alkaline or NiMH.
SQ™ Switch: Turns SQ™
(companding) On/Off.
Battery Compartment:
Place two (2) AA batteries
in compartment. Be sure to
follow polarity pattern.
24
RF Receive
Indicator: Indicates
the RF receive level.
Channel Display: Displays the
current channel.
Battery Level Indicator
Lock Icon: Indicates the unit is
locked on current channel.
Page 29

LR-400 Setup Instructions
Remove the product
1
Remove outer packaging and plastic cover. Inspect for physical damage.
If damage is apparent, please contact Listen Technologies Corporation
technical support for assistance.
Open the front access door
2
If locked, use a pocketknife or small screwdriver to unlock the door locks
on both sides of the unit. To unlock the door, rotate the lock 1/4 turn
counterclockwise.
Grip the two tabs with your thumb and index finger and pull the door
downward. Do NOT place batteries in the unit yet.
Select Battery Type
3
You have two choices: NiMH and Alkaline. The unit is shipped with the switch
in the Alkaline position. Use a pen or small screwdriver to select the battery
type.
CAUTION: If you are using any battery type other than rechargeable Nickel
Metal Hydride (NiMH) batteries, make sure the BATTERY selection switch is in
the alkaline position.
Unlocked
Locked
WARNING: Do not place the BATTERY switch in the NiMH position if you are not using Nickel Metal Hydride Batteries. The NiMH position
will attempt to charge any batteries in the unit, even if they are not the proper type. Charging non-Nickel Metal Hydride (NiMH) batteries
will result in physical harm, destruction of property and/or fire.
Set SQ switch
4
The SQ switch is inside the battery compartment next to the Battery Select switch. The unit is
shipped with SQ in the ON position. To turn it off, use a small screwdriver or pen to slide the switch to
the OFF position (to the right). See page 33 for more information on SQ.
Battery Select Switch
Place Batteries in Unit
5
Place two AA batteries in the compartment, making note of the battery polarity shown in the
battery compartment, and again verifying that the BATTERY SELECT switch is in the correct position
for the batteries you are using. (ALK should be selected for all battery types other than NiMH).
SQ™ Select Switch
NOTE: Listen provides industrial strength AA alkaline batteries (part number LA-361) and high
performance AA Nickel Metal Hydride batteries (part number LA-362). These may be
purchased from your Listen dealer.
25
Page 30

LR-400 Setup Instructions
150
Connect an Earphone or Headset
6
Your headset or earphone will connect to the jack on the top of the unit. Either mono or stereo
connectors may be used with a Listen receiver. Make certain you push the plug all the way
into the jack.
Turn the Unit On
7
Receivers are turned on by rotating the volume dial counterclockwise. The red LED on top of
the unit should activate and the LCD display should illuminate. If they do not, make sure you
have installed the batteries correctly and that you are using fully charged batteries.
Select Channel(s)
8
See page 33 for complete channel selection information.
Set Squelch
9
See page 29 for squelch and programming information.
Earphone/Headset jack
LCD display will activate
when on
Red LED will illuminate when on
Turn volume knob counterclockwise to
turn on
26
Page 31

LR-400 Operation Instructions
Make Sure the Unit is On
1
Rotate the volume knob counterclockwise with an earphone or headset connected to the unit.
Listen receivers use the cable of the earphone or headset as a receiving antenna.
Be careful when turning the unit on - if you turn the knob too far you might get too much
volume in your earphone!
Select a Channel
2
Select the channel to match the transmission channel by pressing the UP and DOWN buttons on
the receiver. Listen recommends the use of wide band channels.
150 MHz:
150 MHz receivers operate on 6 wide band channels and 26 narrow band channels.
Channels 1-6 are Wideband & channels 7-32 are Narrowband.
Refer to the Frequency Compatibility Table (page 35) for specific frequencies and
compatibility with other manufacturers.
Test the audio
3
If a transmitter is broadcasting on that channel, you will be able to hear the audio. If the signal is
too weak, the audio will be muted (squelched).
Find an audio transmission using SEEK
4
Another way to find a channel on the LR-400 is to use the SEEK button. When you do this, the Listen
receiver looks for the next active channel. Sometimes the unit will mistake interference for a real
broadcast signal. If you get interference, press the SEEK button again. The unit may stop on a
channel that is close to the actual broadcast channel, in which case the channel will sound noisy
or distorted. Simply press SEEK again until you find the clearest operating channel.
Adjust the volume control
5
Use the control dial on the top of the unit to adjust the volume to a comfortable level.
Volume Control Dial
27
Page 32

LR-400 Operation Instructions
To Lock into Only One Channel
6
Press and hold the SEEK button for 5 seconds to lock a receiver onto the currently tuned
channel. Press and hold the button again to unlock. When locked the LED on top of the unit
will flash when you press the SEEK button.
Is the Channel Locked on My Receiver?
On the LR-400, when the channel is locked, the padlock icon will appear on the display. If the
unit is locked, the red LED on the top of the unit will flash when you press the SEEK button.
If locked, LED fl ashes on all
portable receivers when SEEK
button is pressed
150
Padlock appears when locked
28
Page 33

LR-400 Squelch
Squelch
The purpose of squelch is to mute the audio output of your receiver when the
signal from the transmitter is turned off or is too weak to be received. Without squelch you
would hear radio noise in your earphone. The squelch on your receiver can be adjusted so that
it will mute the audio on different RF signal strengths. This is useful as follows:
• To ensure that users don’t hear transmissions from other transmitters, set the squelch setting to
the highest level that doesn’t squelch the receiver.
• If the receiver is going to be close to the transmitter (i.e. in a classroom), setting the squelch
setting high so that when the transmitter is turned off it immediately squelches and ignores
transmitters in other rooms.
• If you are in an area that has a lot of inference, you may want to set the squelch setting to a
high setting to ensure the interference is not picked by the receiver.
• If you need the maximum amount of range, you may want to consider setting the squelch
setting to a low level (0, 1 or 2).
CAUTION: When setting the squelch level low the reliability of squelch function is comprised.
This will cause radio noise to be heard in the earphone and there is a possibility of
hearing damage.
Squelch Programming Instructions
Squelch Programming
To enter Squelch programming mode
• Turn the unit off
• Press and hold the seek button; while still holding seek turn the ON/OFF dial to turn the
unit on.
• Release the seek button when the Listen name disappears and a two digit display is seen.
To adjust the Squelch level
• Use the Channel UP and DOWN buttons to raise or lower the squelch sensitivity settings.
• Lower numbers mean that a less powerful and possibly noisy signal will be heard, but you
can have a longer range.
• Higher numbers mean that a more powerful signal with no noise will be heard, but you may
have a shorter range.
• Once the desired squelch setting is found, press “seek” to exit the squelch programming
mode.
Squelch setting 00 is no squelch; this effectively disables Squelching capabilities of the receiver.
Squelch setting 20 is maximum squelch sensitivity; you must have a very strong and stable RF
signal for the unit to not engage the squelch feature.
Adjusting the squelch setting will keep your LR-400 receiver from picking up noise when the
transmitter is not transmitting, or when you lose the signal by being out of range or if
encountering interference.
Note: For squelch settings 1-3, the squelch function is slow which allows for maximum
transmission range. For squelch settings 4-20 the squelch function is fast to ensure little
radio noise is heard during the squelch function.
(The Listen SQ™ feature is not squelch, please refer to page 33 for information on Listen SQ™).
29
Page 34

LR-400 Charging Batteries
The LR-400 and all Listen receivers are unique because they have SmartCharge™ chargers built
in. When any of these units are connected to an LA-208 wall transformer or dropped into a Listen
charging case, NiMH batteries will be charged.
To charge the batteries using the LA-208 wall transformer, plug the transformer into the jack marked
1
“PWR/CHG” on the side of the unit. The unit can be operated while the batteries are charging.
To charge the batteries using a drop-in charger, simply place the unit into a slot in the charger and
2
connect the charger to power. Make sure the unit is fully seated in its slot.
SmartCharge™ uses a pulse charging, which greatly extends the life of Nickel Metal Hydride (NiMH)
batteries. The entire charging process takes 13 hours. Listen recommends that you allow the charger
to complete its full cycle every time for maximum battery life.
NOTE: In order to charge NiMH batteries, the BATTERY SELECT switch in your Listen product must be
set to the NiMH setting. Use a pen or small screwdriver to move the switch (located in the
battery compartment) to the proper position.
Connect LA-208 here and plug into an
DC wall outlet
IMPORTANT: DO NOT ATTEMPT TO CHARGE ANY TYPE OF BATTERY OTHER THAN NiMH (NICKEL
METAL HYDRIDE) with your Listen equipment. Alkaline batteries may explode
when connected to a charger. Other risks of charging non-NiMH batteries include
destruction of property or fire.
During the charge cycle, the red LED on top of the Listen product will flash slowly. When
charging is completed, the LED will turn off. It is not necessary to unplug the charger; however,
if you unplug the unit from the charger and then plug it back in, it will begin the 13-hour charge
cycle over again.
When not using the LR-400, it is recommended to leave the unit on the charger. The charger
provides a “maintenance” charge that keeps the battery at 100%. If the unit is not on the
charger, the battery will lose up to 20% of its charge
per month.
NOTE: Listen provides high performance constant current NiMH (Nickel Metal Hydride) batteries.
These may be purchased from your Listen dealer (ask for part number LA-362).
30
Page 35

LR-400 Wall Transformer Operation
The LR-400 will operate normally when connected to a wall transformer. Use Listen part
number LA-208, available from any Listen dealer. Connect the wall transformer to the jack on
the side of the LR-400 marked “PWR/CHG” and plug the wall transformer into a grounded
AC outlet.
You do not need to have batteries installed in the LR-400 to operate it with a wall transformer.
NOTE: If batteries are in the unit ensure that the battery selection switch is set properly as
shown on page 25. Please review the information on page 30 for important information
regarding battery type and charging.
150
The LA-208 wall transformer plugs into the side
of your portable transmitter or receiver
31
Page 36

Channel Selection
It is important to choose channels that are free from interference to
achieve proper operation of your Listen equipment. This process is trial
and error. Before turning on the transmitter, listen to the wide band
channels on the receivers (channels 1-6). Listen to the audio through
the headphone or via the speaker and choose a channel with the
least amount of interference. Unless you are interfacing with an
existing narrowband transmission system, always use a wide band
channel.
If you are using multiple channels follow this process:
1. Same Space: If you are using multiple transmitters in the same space,
the most number of channels that will work simultaneously is six at
150 MHz. With all of the transmitters off, listen for interference on
all the wide band channels via the headphone jack on a Listen
receiver. Using the frequency chart on page 35, eliminate any
channels that have noticeable interference. Now choose the
channels with the widest channel spacing. It is
recommended that adjacent channels be spaced at least 300kHz.
2. Distributed Spacing: If you are using transmitters that are spread out
over space, you can achieve more simultaneous broadcast
channels. However, it is critical that your receiver(s) be located as
close to its transmitter as possible. You can use adjacent
channels (see frequency chart on page 35) in this case as long as
the adjacent channel transmitter is at least 50% further away from
the receiver as its transmitter.
Wide Band Recommendation
Listen recommends that you always
use a wide band channel unless you
need to be compatible with existing
narrow band receivers from other
manufacturers. Wide band channels
have lower noise than their narrow
band counterparts.
150 MHz
The LT-800-150 MHz operates on 6
wide band channels and 26 narrow
band channels.
• 1 - 6 = Wide Band Channels
• 7 - 32 = Narrow Band Channels
It is highly recommended that after channel selection has been
achieved, you lock the channel so that it cannot be changed by the
user. To accomplish LOCK on the LT-800, press the “UP” button for 3
seconds. Repeat the process to unlock.
32
Page 37

Listen SQ™ (Super Quiet) - Improving Your Listening Experience
People are accustomed to listening to low noise, high fidelity audio
(delivered via CD, DVD, etc.). FM radio systems, such as those made
by Listen, have more inherent noise compared to most sound systems.
To minimize noise, Listen uses a noise reduction technology called
ListenSQ™. Both the transmitter and receiver must have the SQ
feature enabled to achieve the desired results. SQ is available on
new Listen systems, including the system you received in this shipment.
If you are planning to use this product with older Listen systems that
do not have Listen SQ, or equipment not manufactured by Listen, you
must disable Listen SQ.
Your Listen LT-800 has been shipped to you with the SQ feature
enabled. You may need to disable the SQ function for one or more of
the following reasons:
1
You are using your new Listen LT-800 with older version Listen
receivers that do not have the SQ function.
2
You are using your new Listen LT-800 with equipment supplied
by other manufacturers (Listen is the only manufacturer using SQ
Technology).
3
You expect that end users will bring and use their own receivers
that don’t have the SQ function.
NOTE: See page 8 to enable or disable SQ (Super Quiet).
SQ Summary
• SQ is NOT squelch
• SQ improves noise performance
by at least 20 dB
• SQ is NOT compatible with
older version Listen products
• SQ is NOT compatible with
other manufacturers’ products
• To work properly, SQ must be
enabled for both the transmitter
and receivers
• SQ can be disabled to permit
operation with older Listen
products or other
manufacturers’ products
Process Mode
Process mode is used for Audio Gain Control (AGC). With the process
mode enabled, the LT-800 will automatically adjust for inconsistent
signal input levels by raising or lowering the signal level accordingly to
provide a consistent sound output level. This feature should be used in
applications where a consistent sound level is important and the input
levels vary substantially. Typically you would not want to engage the
Process Mode when a speaker’s emphasis is critical to the message
they are conveying.
33
Page 38

RF Reception Maximization Strategies
For proper and dependable operation, Listen receivers need to receive a strong and consistent
signal from the originating transmitter. Note that on portable receivers the headset wire is the
receiving antenna. The following strategies should be used maximize to this signal:
1
When designing and installing your system, keep in mind that the location of both the
transmitting and receiving antennas is critical to maximize broadcast range.
2
Eliminate or minimize obstructions between the transmitting and receiving antenna.
3
Minimize the distance between the transmitting and receiving antennas.
4
Move transmitting and receiving antennas away from metal or conductive objects.
5
Place the transmitting antenna as high as possible.
6
Orient both transmitting and receiving antennas vertically.
7
Position the RF Power switch on the back of the LT-800 to full RF Power, unless lower power is
acceptable (see page 8).
8
Keep coaxial cable from transmitter to antenna as short as possible.
CAUTION: When installing antennas, ensure the antenna is clear of power lines.
Coaxial Cable
The antenna for the LT-800 can be mounted directly on the unit if desired. However, you may
find that the unit will provide better performance when the antenna is located elsewhere. If you
plan to mount the antenna in a different location other than the top of the unit, you must use
cable and connectors rated at 50 ohms. Although cable used for cable TV installations looks
similar to this cable, it will not work with your Listen system.
If you need to run cable over a length greater than 75 feet for 150 MHz applications or to maximize broadcast range, Listen recommends that you use RG-8 cable rather than RG-58. RG-8 is a
lower loss cable, meaning that more of your signal will reach the antenna.
Long cable runs can result in signal degradation due to the “loss” characteristics of the cable.
When using RG-58 with a 150 MHz transmitter, there is an average* loss of 6 dB per 100 feet of
cable (A 3 dB loss means half of your power has been lost.) However, it is better to suffer coaxial
power loss than to try to shoot your signal through obstacles! Obstacles, especially metal, can
create drop-outs or reflections of your signal that will result in poor listening conditions.
*NOTE: There are many varieties of 50 ohm, RG-58 and RG-8 cables. You may purchase a
cable that is better or worse than this value. Please check with the cable vendor or
manufacturer for exact specifications.
34
Page 39

150 MHz Compatibility Chart
Channel Frequency
01 150.900
02 152.400
03 151.500
04 152.100
05 151.200
06 151.800
07 150.850
08 150.950
09 151.000
10 151.050
11 151.100
12 151.150
13 151.250
14 151.300
15 151.350
16 151.400
17 151.450
18 151.550
19 151.600
20 151.650
21 151.700
22 151.750
23 151.850
24 151.900
25 151.950
26 152.000
27 152.050
28 152.150
29 152.200
30 152.250
31 152.300
32 152.350
35
Page 40

Troubleshooting LR-400, LR-500 Receivers
Troubleshooting
The receiver has no power.
Make sure the unit has either fully charged batteries or a Listen approved wall transformer
connected. Make sure the VOLUME knob has been rotated to the ON position. If this does not
work, try a different set of batteries. Make sure the batteries are installed properly.
There is no audio.
Make sure you have turned the volume control up. Make sure the earphone is plugged all the
way into the jack on the top of the unit. Make sure the transmitter is broadcasting an audio
source. Make sure you’re tuned to the same channel as the transmitter. If the RF signal is too
weak, the receiver will squelch and mute the audio source; move closer to the antenna or make
sure the transmitter’s output RF power switch is set on “FULL” (LT-800).
The audio is distorted.
Make sure you’re receiving on the correct channel. Make sure the audio on the
transmitter is not turned up too loud; this will cause distortion. Make sure the earphone
connector is pushed all the way into the jack on top of the unit. Make sure the SQ™ switch on
your transmitter and receivers is turned ON (or OFF, if some of your equipment is not SQ™
capable). Make sure you are not too close to the transmitting antenna. If you can’t get farther
away from the antenna, turn down the RF output power on the stationary (LT-800) transmitter.
There is interference.
Try different frequencies on the transmitter and receivers until you find a clear channel.
Please contact Listen technical support for assistance (see page 38 for information).
I cannot pick up the signal on the receiver.
Check to make sure the receiver and the transmitter are on the same frequency and
channel. Also make sure the receiver is in broadcast range of the transmitter.
I can pick up the signal on the receiver, but it sounds like it’s not tuned in.
Check to make sure the transmitter and receiver are on exactly the same channel
number/letter.
There is not sufficient range.
Make sure you are located as close as possible to the antenna of the transmitter. Try to place the
antenna as high as possible and free from obstacles. You can also check the squelch setting;
perhaps it is too sensitive. To change this setting, refer page 14 (LR-500) or to page 29 (LR-400).
36
Page 41

Troubleshooting
Troubleshooting
Users keep changing channels.
You can prevent users from changing channels by locking in the channel selection. This is done
by pressing and holding the SEEK button for 5 seconds. When the channel is locked, the padlock
icon will appear on the LR-400 and LR-500 displays. The LED will also flash when the channel is
locked and seek is pressed. In addition, you can lock the access doors to the units.
I cannot change channels when pressing the UP and DOWN buttons or the SEEK button.
The unit is locked. Press the SEEK button for 5 seconds to unlock.
When I change channels, only certain channels are accessible.
The unit has been programmed to tune to only certain channels (LR-500 only). You can change
these channel lock-out selections by re-programming the unit (see page 13).
My batteries are not charging.
Make sure the battery switch is in the NiMH setting and that you are using NiMH (Nickel Metal
Hydride) batteries. Make sure you are using only a Listen supplied charging unit or transformer.
Never try to charge alkaline or NICAD batteries.
I want to run the unit from a wall transformer.
Simply plug a Listen approved transformer (LA-208) to the CHG/PWR connector on the
side of the unit. Batteries do not need to be installed when operating the unit with a wall
transformer; however, if you have NiMH batteries installed and the BATTERY select switch is set to
NiMH, the batteries will charge while the unit is being used.
It’s confusing for users to have 32 choices when switching between channels.
Use the programming feature (only available in the LR-500) to limit the number of channels
accessible by users.
37
Page 42

Warranty & Contacting Listen
Warranty
Listen Technologies Corporation (Listen) warrants its transmitters and receivers (LT-82, LT-700, LT-800, LR-42,
LR-44, LR-400, LR-500) to be free from defects in workmanship and material under normal use and conditions for the
useful lifetime of the product from date of purchase.
Listen warrants its Stationary IR Radiators (LA-140) to be free from defects in workmanship and material under normal
use and conditions for three years from the date of purchase.
Listen warrants its Noise Canceling Microphone (LA-270) to be free from defects in workmanship and material under
normal use and conditions for one year from date of purchase.
Listen warrants its Charging/Carrying Cases (LA-306, LA-311, LA-313, LA-317, LA-318, LA-319, LA-320, LA-321, LA-322,
LA-323, LA-324, LA-325) to be free from defects in workmanship and material under normal use and conditions for
one year from date of purchase.
All other products and accessories are warranted for 90 days from date of purchase.
This warranty is only available to the original end purchaser of the product and cannot be transferred. Warranty is
only valid if warranty card has been returned within 90 days of purchase. This warranty is void if damage occurred
because of misuse or if the product has been repaired or modifi ed by anyone other than a factory authorized
service technician. Warranty does not cover normal wear and tear on the product or any other physical damage
unless the damage was the result of a manufacturing defect. Listen is not liable for consequential damages due to
any failure of equipment to perform as intended. Listen shall bear no responsibility or obligation with respect to the
manner of use of any equipment sold by it. Listen specifi cally disclaims and negates any warranty of merchantability
or fi tness of use of such equipment including, without limitation, any warranty that the use of such equipment for any
purpose will comply with applicable laws and regulations. The terms of the warranty are governed by the laws of the
state of Utah.
In the fi rst ninety days after purchase, any defective product will be replaced with a new unit. After 90 days, Listen
will, at its own discretion either repair or replace transmitters and receivers with a new unit or a unit of similar type
and condition. Product that is not covered under warranty shall be repaired or replaced with a unit of similar type
and condition based on a fl at fee. Contact Listen for details.
This limited warranty, prices and the specifi cations of products are subject to change without notice.
Contacting Listen
If technical service is needed, please contact Listen. Pre-authorization is required before returning Listen products.
If products were damaged in shipment, please contact the carrier, then contact Listen for replacement or repair
requirements payable by the carrier.
Listen’s corporate headquarters are located in Bluffdale, Utah U.S.A. and are open Monday through Friday, 8am to
5pm Mountain Time.
14912 Heritagecrest Way
Bluffdale, Utah 84065-4818
+1.801.233.8992
1.800.330.0891
+1.801.233.8995
support@listentech.com
www.listentech.com
North America
fax
38
Page 43

Optional Accessories
v
LA-164
Ear Speaker
LA-165
Stereo Headphones
Earphone Options
LA-161
Single Ear Bud
LA-166
LA-166
Neck Loop
LA-162
Stereo Ear Buds
LA-170
-
Behind-the-Head
Stereo Headphones
v
LA-265
Consumer
Camcorder Cable
Connector Options
LA-266
Professional
Camcorder Cable
LA-275
Sacrificial Cable
39
Page 44

Optional Accessories
Accessories
LA-311 16-Unit Portable Charging/Carrying Case
LA-313 16-Unit Portable Carrying Case
LA-317 4-Unit Portable Charging/Carrying Case
LA-318 4-Unit Portable Carrying Case
LA-320 Confi gurable Carrying Case
LA-321 8-Unit Portable Charging/Carrying Case
LA-322 8-Unit Portable Carrying Case
LA-323 4-Unit Portable Charging/Carrying Case w/Removable Lid
LA-324 8-Unit Portable Charging/Carrying Case w/Removable Lid
LA-325 16-Unit Portable Charging/Carrying Case w/Removable Lid
LA-361
High Capacity AA Alkaline
Batteries (2)
LA-362
Rechargeable AA NiMH
Batteries (2)
40
Page 45

Notes
41
Page 46

Notes
42
Page 47

Notes
43
Page 48

Listen Technologies Corporation
14912 Heritagecrest Way
Bluffdale, Utah 84065-4818, U.S.A.
+1.801.233.8992
1.800.330.0891
+1.801.233.8995
North America
fax
www.listentech.com
© 2009 Listen Technologies Corporation
®
All Rights Reserved 09162009
 Loading...