

Page 1

DIGITAL TV RECEIVER
User's manual
Page 2

•
for y our futu re reference.
Ple ase read t he manual carefully before use and keep it Safe
11
Important safety instructions:
• Tha nk you for p urchasing this product.
DV B- T RECEI VE R
•
•
•
•
• Design and specifications are subject to change without
notice.
• The illustrations in this manual may appear different from
the actual product due to printing conditions.
The power input is DC+10V~14V.
Do not place it near a heater.
Do not use liquid or aerosol cleaners.
Use a light damp cloth for cleaning.
Do not open or remove cover. Refer all servicing to qualified
service personnel.
Page 3

11
Table of Content:
Main Features:
Front and Rear Panel: . . . . . . . . . . . . . . . . . . . . . . . . . . 2
Remote Control Unit (RCU): . . . . . . . . . . . . . . . . . . . . .3
Basic Functions: . . . . . . . . . . . . . . . . . . . . . . . . . . . . . . 4
DIGITAL TV: . . . . . . . . . . . . . . . . . . . . . . . . . . . . . . . . . 10
USB MEDIA PLAY: . . . . . . . . . . . . . . . . . . . . . . . . . . . . 29
Games: . . . . . . . . . . . . . . . . . . . . . . . . . . . . . . . . . . . . . 31
Trouble Shooting: . . . . . . . . . . . . . . . . . . . . . . . . . . . 33
SPECIFICATIONS: . . . . . . . . . . . . . . . . . . . . . . . . . . . 34
. . . . . . . . . . . . . . . . . . . . . . . . . . . . . . . . 1
DV B- T RECEI VE R
Page 4

11
Main Features:
1
DV B- T RECEI VE R
•
•
•
•
•
•
•
•
•
•
•
•
Fully compliant with MPEG-2 and DVB-T standards.
PIG(Picture in Graphic) support.
Channel editing function (Favorite, Moving. Locking. Delete).
Automatic and manual search.
Stores over 1000 channels.
Provide electronic program guide (EPG) (option)
Easy software upgrade.
Timer function automatically turns on/off by setting function.
OSD Teletext and VBI Teletext support.
Support language options (English, Deutsche, French,
Swedish, Portuguese, Finland, Netherlandish, Czech, Greece,
Danish, Turkish, Italian and Spanish total 13 Languages).
USB Supports the play of JPGE/MP3/MP4 play (AVI/MPG/
DAT/VOB) and software upgrade.
Remark some special USB and MP4 format can not fully
support.
The following have been packed in your receiver box:
• User's manual x 1
• Remote control unit x 1 ( RCU)
• Extended R/C box x 1
• A/V wire x 1
• Power supply wire x 1
Features
Accessories
Page 5
11
2
DV B- T RECEI VE R
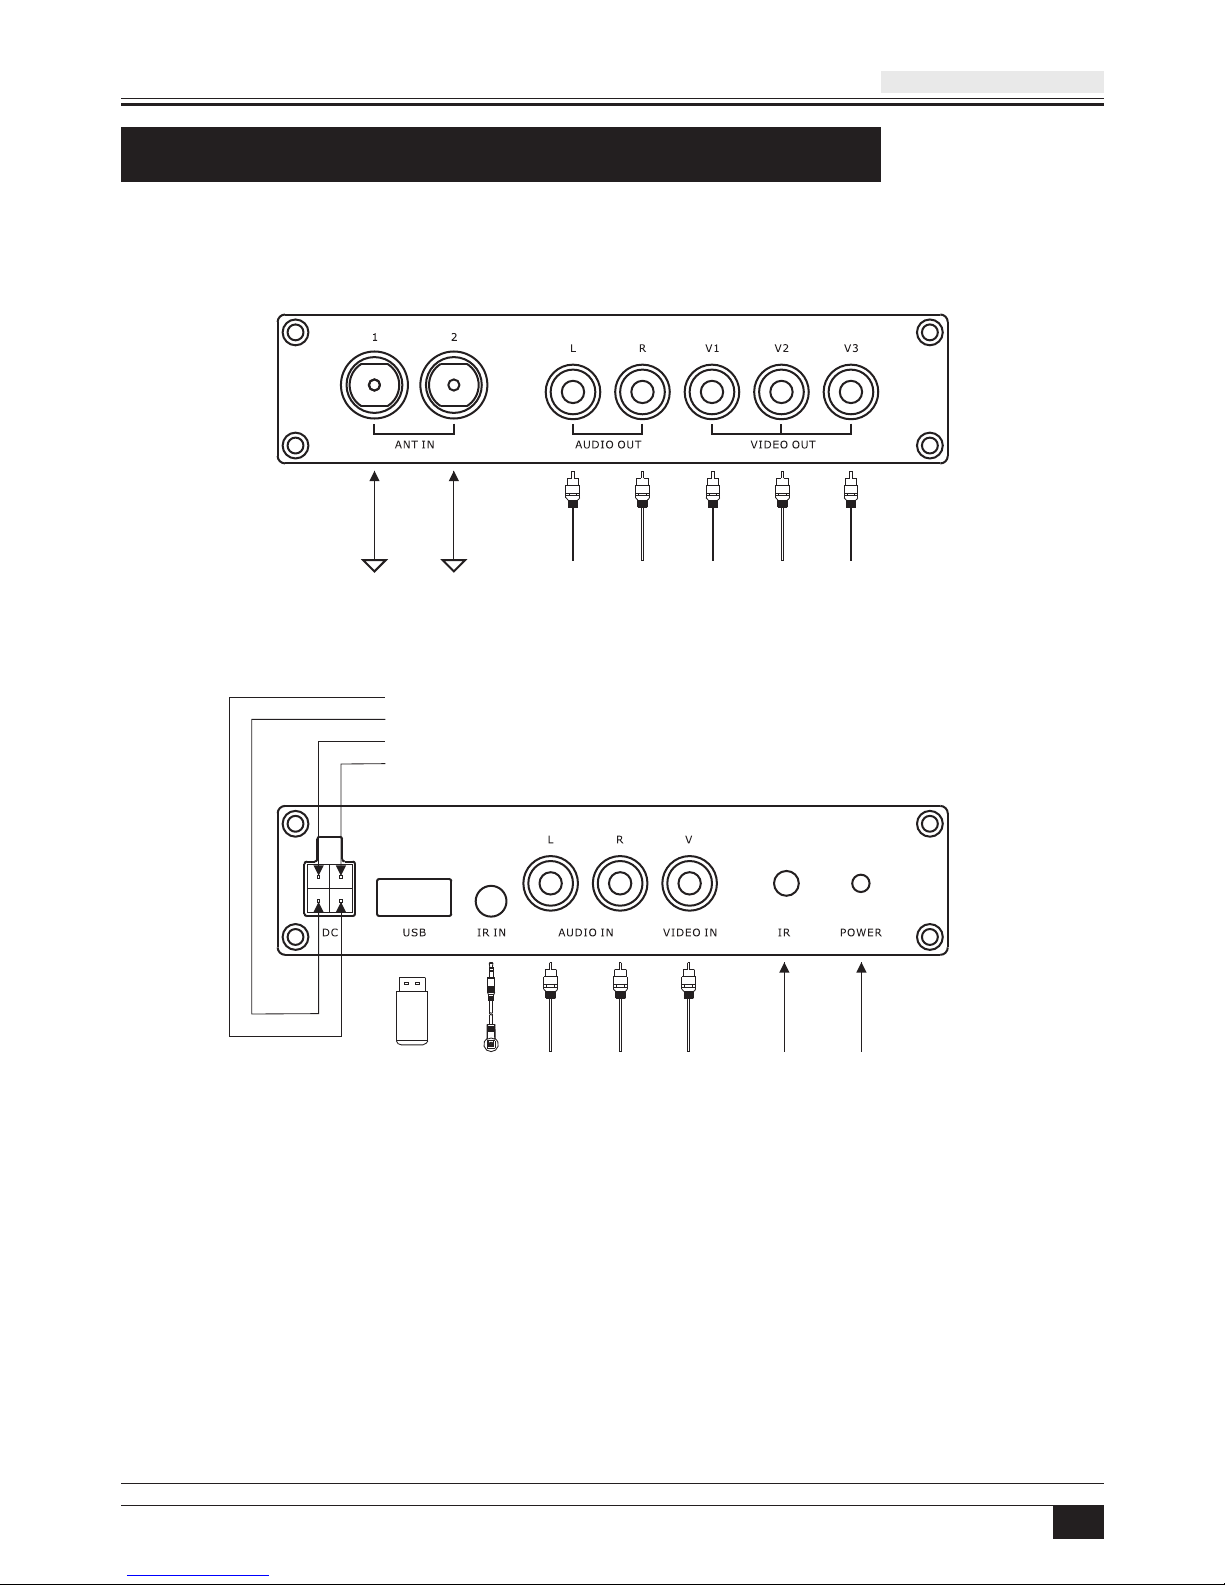
Front and Rear Panel:
EXTEN DED
R/C BOX
USB AUDIO L /R
INPUT
VIDEO
INPUT
IR
RECEI VER
POWER
LED
AC C: Car En gi ne Key ( Re d)
BATT: +10~ 14 V DC Pow er supp ly i nput (Ye llow)
STA NDBY: +10~ 14 V DC, 2.5 Am p outpu t (B lue)
GN D: Pow er supp ly g round ( Bl ack)
•
connect ACC wire to car ACC switch.
• For home use: Put BATT and ACC wire together and
connect to +10~14V DC.
• DC output ground, connect to the device GND with which use
the DC +10v~14V output.
For car use: Connect the BATT wire to car battery and
Page 6
11
3
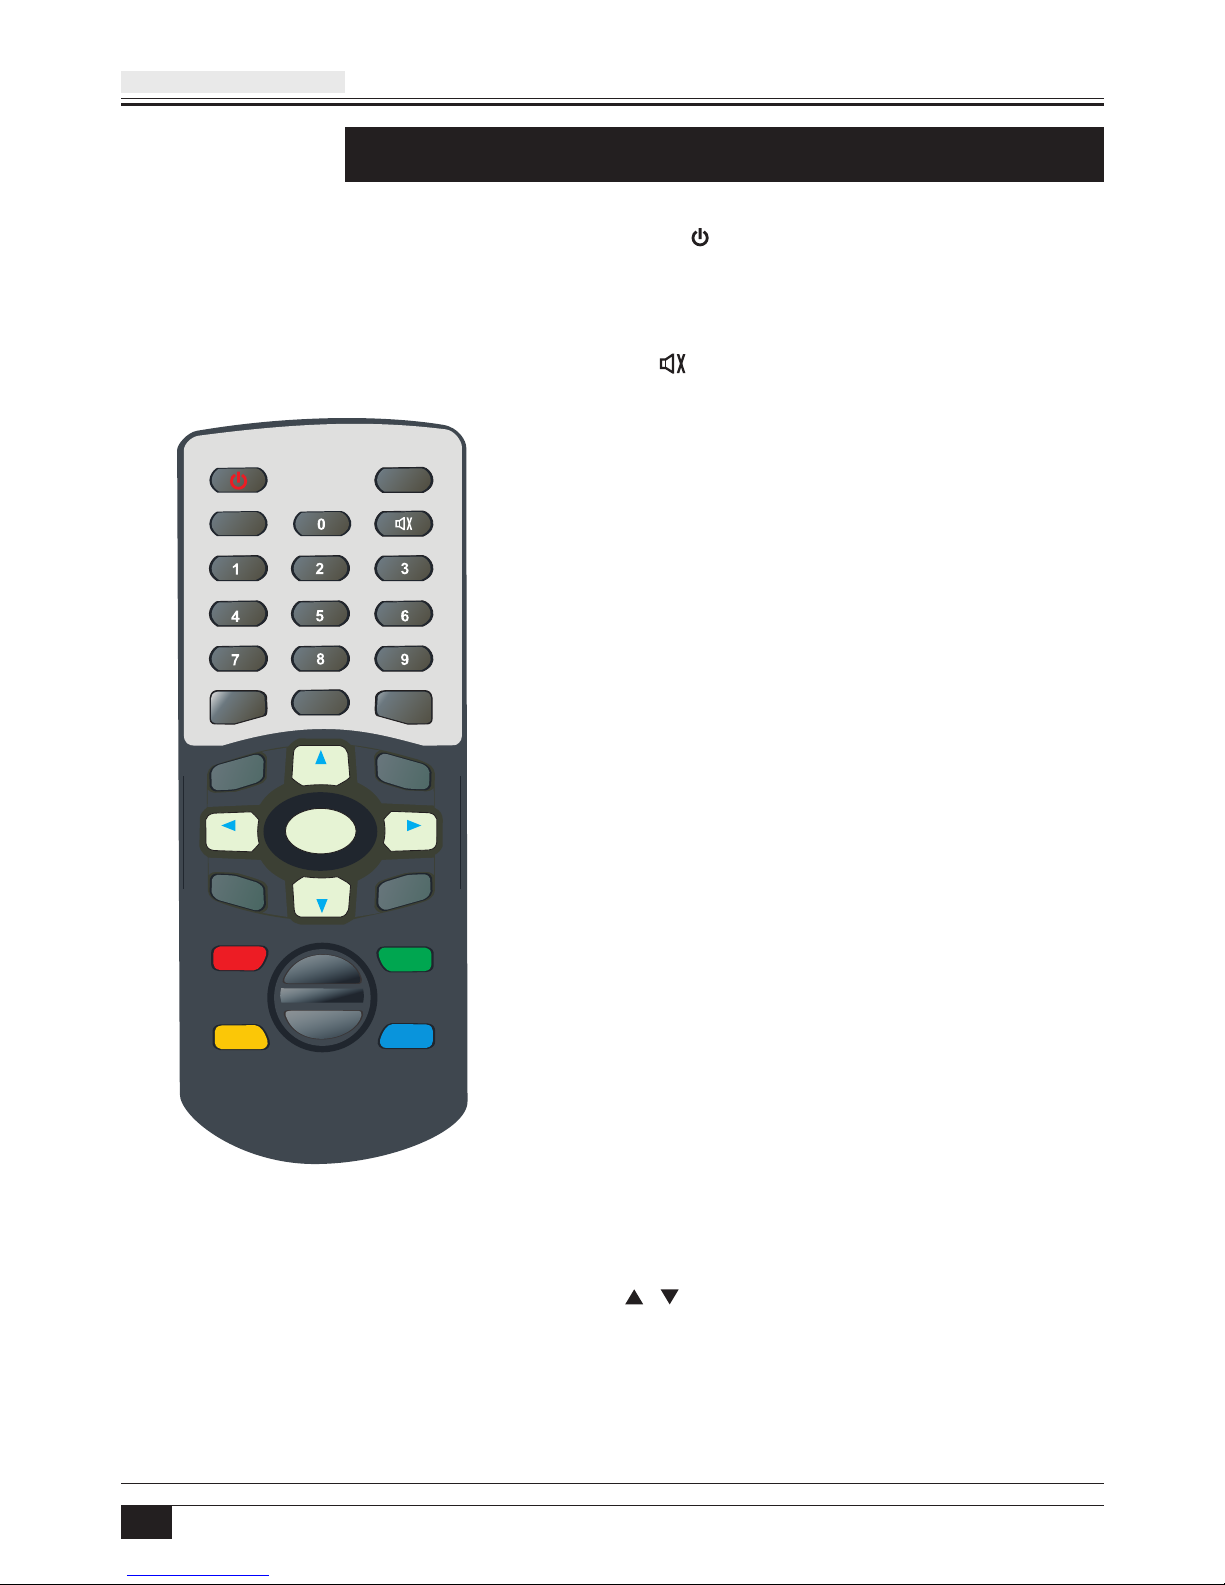
Remote Control Unit (RCU):
- POWER :
Switch the receiver between stand-by
& on modes
- MUTE :
Mute the audio output
- NUMERIC KEYS(0~9):
For direct entry of channel number or
input of alphanumeric characters
- TXT:
Display on the teletext contents of the
viewed channel, if teletext is transmitted
- TV/RADIO(GREEN):
Switch between TV and radio mode
- FAV (RED):
Select the favorite or all channels
- TV/AV:
No function
- MENU:
Access the main menu
- AUDIO:
Switch the audio language if
transmitting more then one language
and Select the different audio modes
- EXIT:
To return to previous status or exit
- CH( / ):
Change channels sequentially up or
down in viewing mode and move to the
next higher or lower item in the menu
SUB.
EPG
TXT
AUDIO
SCAN
FAV
PGDN
PGUP
TV-R AD IO
TV-AV
INF O
BAC K
MEN U
CH+
VOL +VOL -
CH -
PAUS E
EXI T
OK
DV B- T RECEI VE R
Page 7
11
4
Remote Control Unit (RCU):
SUB.
EPG
TXT
AUDIO
SCAN
FAV
PGDN
PGUP
TV-R AD IO
TV-AV
INF O
BAC K
MEN U
CH+
VOL +VOL -
CH -
PAUS E
EXI T
OK
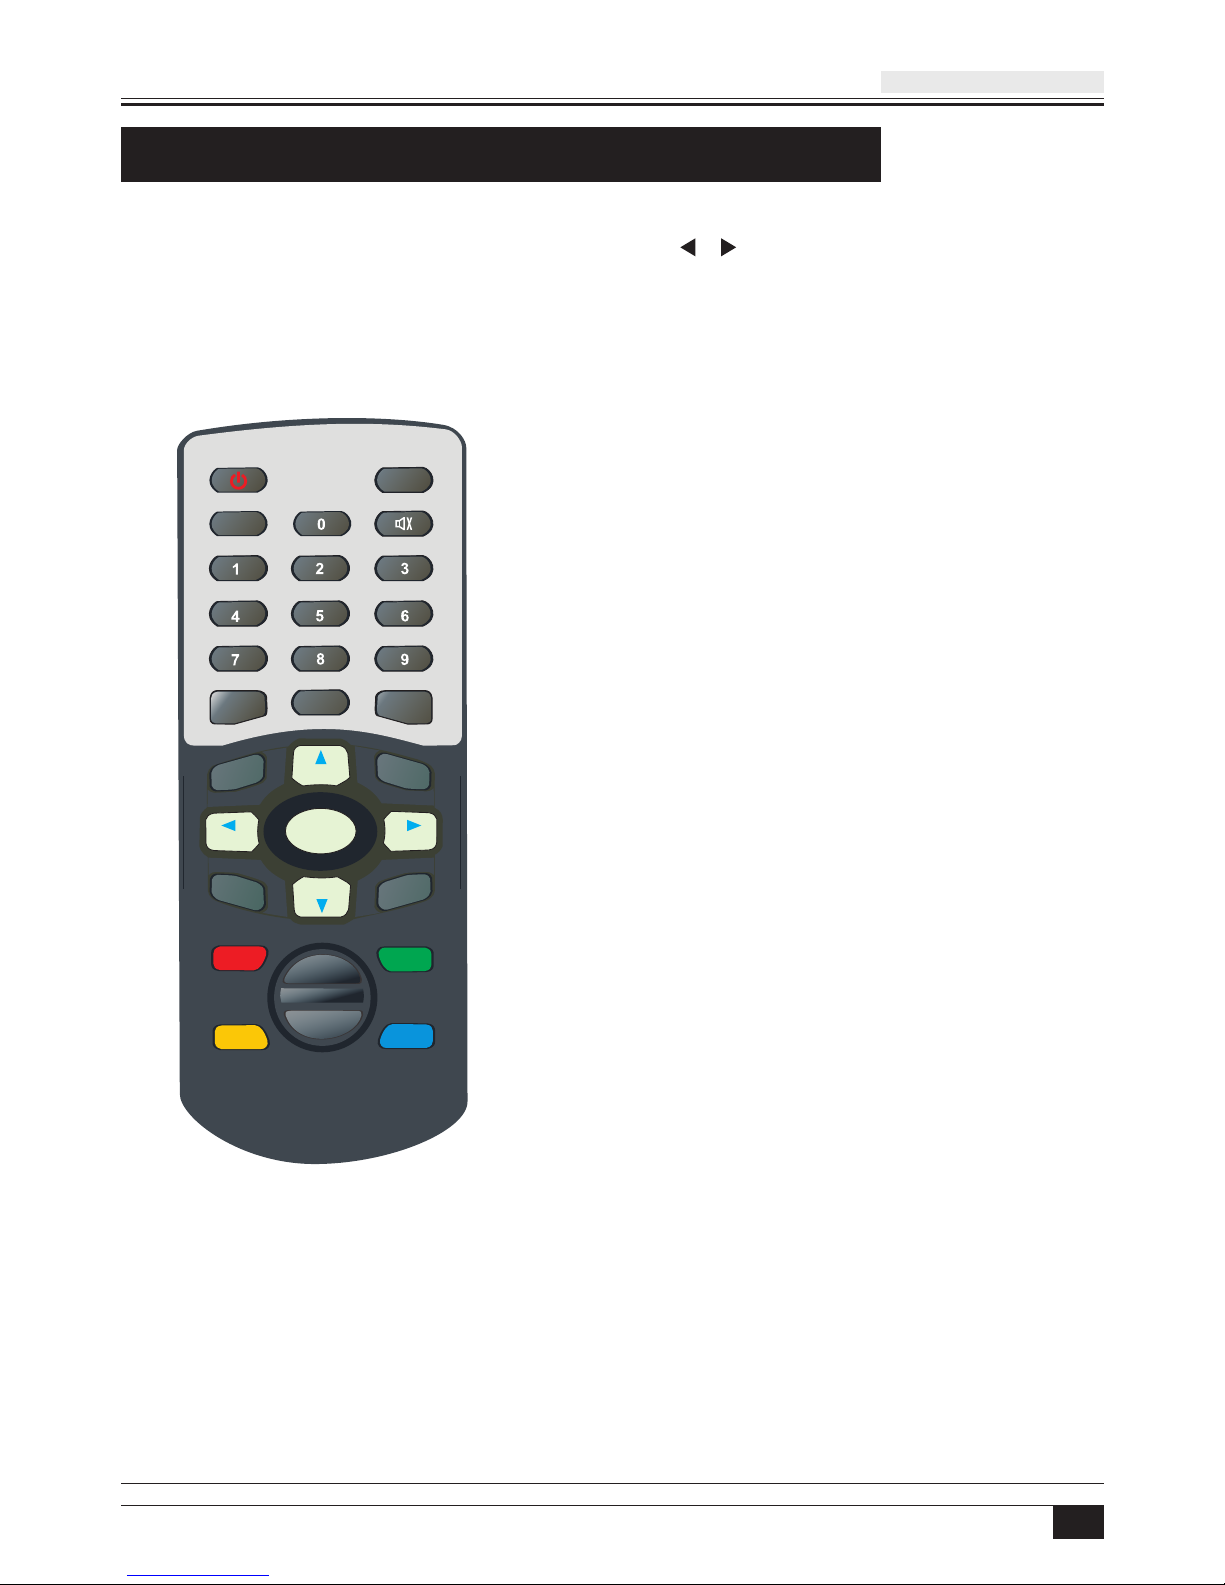
- VOL( / ):
Alter the Audio output level up or down
in viewing mode or move to the left or
right item in the menu
- OK/LIST:
Select an item or confirm a choice.
A list will enter the channel in viewing
mode
- EPG (Electronic Program Guide):
Call up the EPG function
- INFO:
Display information on viewed channel
- PgUP/ PgDN:
Move up/down a page in the channel
list. Shower movie playing speed while
playing .
- BACK(YELLOW):
Go back to the previously viewed
channel
- PAUSE(BLUE):
Press once to pause the screen
picture, press once again to go to
the normal mode
-SUB. :
Switch the subtitle on if the subtitle is
transmitted on this channel
-SCAN:
Searching all channel quickly
DV B- T RECEI VE R
Page 8

11
Basic Functions:
5
1. Enter into DVB system
It will enter DVB mode as soon as system power on, shows the
system interface while none TV/RADIO programs in the database.
Enter into system and power on-off
It will continue to play the last est program before previous
power off if the database having and TV. or RADIO program.
2. Power on
When it is “STANDBY” mode, press “POWER” to power on.
3. Power off
When it is running, press “POWER” will enter into “STANDBY”
mode.
Volume adjustment and Mute
1.Press “VOL+/-”to adjust volume when system is in normal playing
mode: and it will show volume bar on the image.
2.Press“MUTE”to enter into the mode when normally playing and
repress“MUTE”to back the normal state.
DV B- T RECEI VE R
TV/RADIO Programs switch
Press “TV/RADIO” to switch the programs when it is in full screen.
press key “INFO” to show the information of current programs
when it is in normal playing state. Press again to show more
detail information.
Display information of programs
Page 9

11
6
1. Press number keys to input program number.
2. If there are some favorite programs that been set up, just press
“FAV” to enter into the favorite program list:
Press “CH+/-” to select favorite program, Press “OK” affirm the
selection, press “EXIT” to hide menu.
1. Press “CH+/-” to switch to the previous or next program.
2. Press “OK” to switch to the speediness program list, press
“VOL+/-” to select different program class; press “ CH+/-” to
select program.
Press “OK” to affirm program Selection, press “EXIT” to hide
menu.
Station switch
Press key “RECALL” under state of full-screen to return to the
previous program played.
Program return
Basic Functions:
DV B- T RECEI VE R
Subtitle
1. Subtitle is defaulted to be off; to see the capitation information,
press the “SUB-TITLE” key on the remote controller to enter the
subtitle menu of the current programs.
2. Press “VOL+/-” key to choose whether to open Subtitle, press
“CH+/-” key move upward and downward to choose language.
Page 10

11
7
1. You can press key “EPG” on the remote controller to enter into the
EPG page the bottom Line shows hint information for keys,
corresponding to the colors on the remote controller:
RED, GREEN, YELLOW, BLUE;
Press “VOL+/-” to switch between Tab 4 and Tab 5 .
2. Press “GREEN” key to enter into Weekly Mode to display the
programs and program information in different time ranges of the
currently program list within one week.
Electronic programs guide(EPG)
Basic Functions:
DV B- T RECEI VE R
(1). Press “PGUP” & “PGDW” key to switch between Sunday—Saturday
in Tab 3;
(2). Press “CH+/-” key to move upward and downward to switch
between the different programs in Tab 5;
(3). Press “VOL+/-” key to choose to view the program information in
different time ranges in Tab 6.
(4). When the cursor stop in Tab 5. press the yellow key to choose the
detailed information corresponding to the current program.
(5). When the cursor stop on Tab 5 of Figure 3.6 and Tab 3.7 , press
the blue key to enter Wake up Timer menu to book programs.
(6). Press “EXIT” to exit from EPG.
Page 11

11
8
Basic Functions:
DV B- T RECEI VE R
Teletext
1. If you want to teletext, please press “TXT” on the remote controller
to enter into the teletext page.
2. Input three digits to go to correspondi ng page you want;
3. Press “CH+” to go to the previous page, while press “CH-” to go to
the next page;
4. Press “VOL-” to back for 100 pages, while press “VOL+” to advance
for 100 pages.
5. Press “TXT” or “EXIT” to exit from teletext.
Audio language switch and L/R
channel switch
1. Press “AUDIO” key to switch the language of current programs and
switch among “Stereo” - “Left” - “Right” (stereo- left channel- right
channel)
2. Press “VOL+/-” to switch among “Stereo” - “Left” - “Right”
(stereo- left channel- right channel), press “CH+/-” to switch the
language of sound.
3. Press “OK” key confirm the selection and return to full-screen play
mode, press “EXIT” to return to full -screen play mode but not
save the setting.
Page 12
11
9
DIGITAL TV:
DV B- T RECEI VE R
• In the main menu of the system, under Digital TV, there are
such as options as auto TV search or broad cast programs,
program management, system set up, software update and
software version information view etc.
• In Main Menu, press “CH+/-” key to choose Digital TV option
and then Press “OK” key once to enter Digital TV menu
INSTALLATION
There are three kinds of Installation mode as follow:
1. Area Search:
Searching programs by scan area;
2. Manual Search;
3. Auto Search:
You can enter into parameter “installation page” via input
password digital (default password is “0000” ).
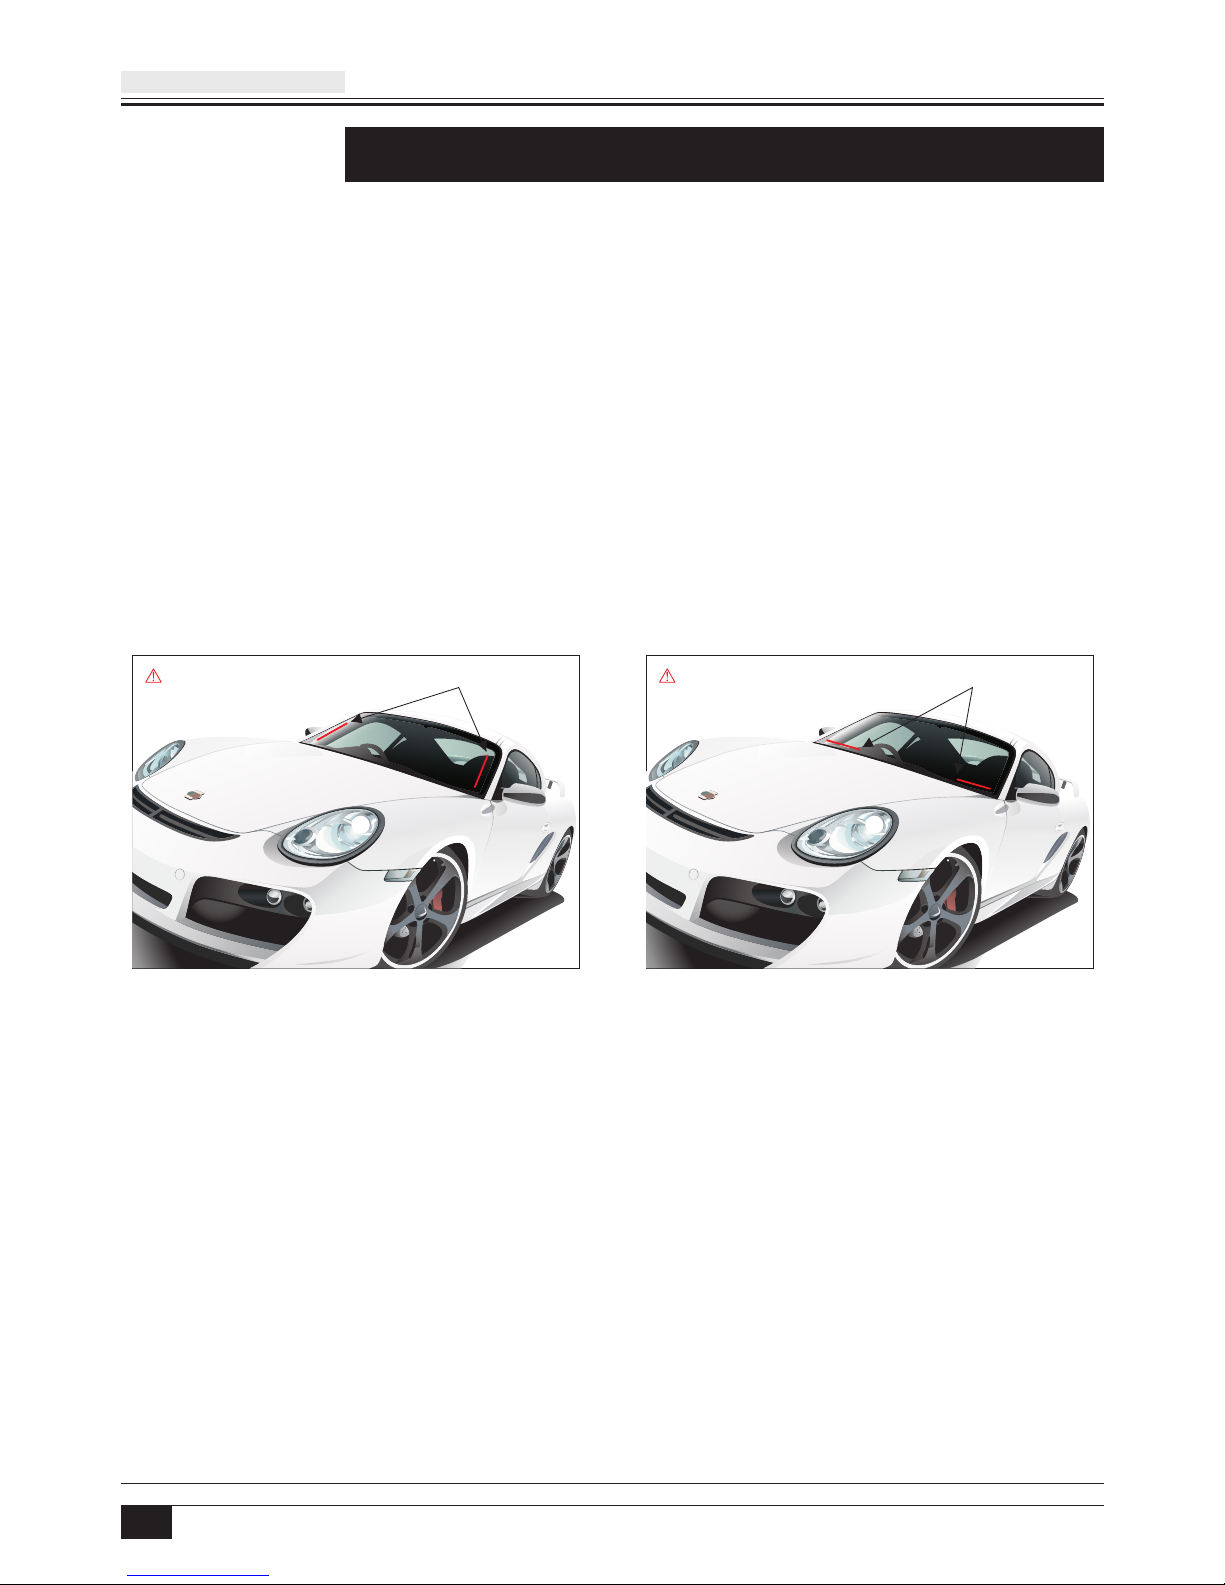
AC TIVE AN TE NNA ACTIVE ANTEN NA
RI GHT WR ONG
ANT INSTALLATION
Page 13

11
10
DV B- T RECEI VE R
Area Search
Area search is a kind of intelligent and convenient mode of
programs searching, which covers programs of all frequency
points of target countries and regions.
At present, this system covers many targets countri es and regions
including: Germany/ England/ Italy/ France/ Spain/ Holland/ Taiwan
/China/ Norway/ / Finland;
The default country (region) of system is Germany (you can select
target countri es you want under system setting scan Area).
1. You can move the cursor to “area search” via press “CH+/-” key
under “installation menu” , then press “ENTER” to enter into area
searching page.
2. After entering into area search page, system will scan all programs
one under frequency points of current countri es or regions selected
automatical ly.
3. During scanning, press “EXIT” key to stop and exit scanning.
4. If any program is detected and scanning process is finished, system
will exit the scanning page and to play them in window automatical ly.
Swedish
DIGITAL TV:
Page 14

11
11
DIGITAL TV:
DV B- T RECEI VE R
Manual Search
If you understan d much about digital TV and know the frequency
of the program or if you want to scan the program at any frequency
required, you can select manual scanning, which can save your
much time.
1. You can move the cursor to “area search” via press “CH+/-” key
under “installation menu”, then press “enter” to enter into area
searching page.
2. Prior manual scanning, you need to configure relevant parameters
including:
(1). Freq(KHz): the default frequency is 474000KHz, you can input
relevant digital to modify it.;
(2). Band Width: the default value of bandwidth is 8 MHz. while you
can set it to 6 MHz, 7 MHz, 8 Mhz. ;
3. Press “OK” key after configuration of start manual scan.
4. If any program is detected and the scanning process is finished,
system will exit the scanning page and save the program, at the
same time return to the “installation menu” and to play them
automatically. As shown in the figure below:
Page 15

11
12
DV B- T RECEI VE R
DIGITAL TV:
Auto Search
You can search the programs of any channel.
1. You can move the cursor to “area search” to enter into area
searching page, As shown in figure below:
2. Prior to auto scanning, you need to configure relevant parameters
including:
(1). Start Freq(KHz):the default frequency is 474000KHz, you can
input relevant digital to modify it.;
(2). End Freq(KHz):the default frequency is 474000KHz. While you can
input relevant digital to modify it;
(3). Band Width: the default value of bandwidth is 8 MHz. while you can
set it to 6 MHz, 7 MHZ, 8 MHZ .;
3. Press “OK” key after configuration of parameters to start manual
scan.
4. If any program is detected and the scanning process is finished,
system will exit the scanning page and save the program, at the
same time return to the “installation menu” and to play them
automatically. As shown in the figure below.
CHANNEL MANAGER
System offer an efficient function of channel management such as
channel deleting, marking, moving, locking, sorting and grouping.
There are two independent pages for channel management, TV
and RADIO. You can enter the page via “digital TV channel
manager” as shown in the figure below:
Page 16

11
13
DIGITAL TV:
DV B- T RECEI VE R
2. Channel organizer menu includes: Favorite Channel, Delete Channel,
Move Channel ,Lock Channel. Press “CH+/-” key to choose the line
where Favorite Channel is, then press the 4-color key on the remote
controll er: press the red key to set and cancel Favorite Channel, the
green key to set or cancel Delete Channel, the yellow key to set or
cancel Move Channe l, the blue key to set or cancel lock Channel;
After setting, corresponding figure will appear;
3. To rename channel, press “CH+/-” key to choose the line where the
channel to be renamed is, press “VOL+/-” key to enter the page to
renamed is, press “VOL+/-” key to enter the page to rename the
channel, as shown in Figure 4.10:
4. After program editing, to edit the program, press “OK” key; to set or
cancel Lock Program, the system will hint to input “0000”; to set
Delete program, the system will hint to choose dialogue box “Do you
want to delete the selected items?”, Press “VOL+/-” key to choose,
choose “YES” to delete the program chosen, “No” to cancel ;
5. Press “EXIT” key to exit Channel organi zer page.
Channel Organizer
Channel organizer page includes favorite channel deleting,
moving, locking and rename.
1. It will pop up and dialogue box prompting that “Channel not
available” when there are no channels in database to enter into,
and it will not enter into channel organizer page.
Page 17

11
14
DV B- T RECEI VE R
DIGITAL TV:
The channel is shall be listed according to certain sequence so
that the user can easily find them .
Channel Sorting
1. It will pop up and dialogue box prompting that “Channel not
available” when there are no programs in database to enter into,
and it will not enter into channel sorting page.
2. Before sorting, the type of sorting shall be set, including the
following items:
(1). First Option: choose the programs to be sorted via the selection
area;
(2). Second Option: Press FTA(free to air),Scramble(encrypted), ALL
Free and Encrypted Channels;
(3). Third Option: According to alphabetic order A-Z, or Z-A;
3. Press “CH+/-” key choose type , Press “VOL+/-” key to set Sorting
Parameters;
4. After sorting is set, to realize channel sorting, press “OK” key, then
the system will hint with dialogue box “Are you sure?”.
5. To choose “YES” to confirm, you can see the programs in the
program list; to choose “No” to cancel, you can return to Channel
Sorting page;
6. Press “EXIT” key to exit Channel Sorting page.
Page 18

11
15
DIGITAL TV:
DV B- T RECEI VE R
Edit Channel
Have such operation as add, Delete and Rename to channels.
1. It will pop up and dialogue box prompti ng that:“No Carrier” when
there are no programs in databa se to enter into, and it will not enter
into ADD-Edi t Channel page.
2.Press the red key of the remote controller to enter Add Channel
menu.
Under Add Channel menu, there are 6 parameters for adding one
channel as follows:
(1). Area Name: For Area Name, press the “VOL+” key of the remote
controller to enter the Area Name list on the right, then press
“CH+/-” key to choose area name, press “OK” key to confirm;
(2). Carrier: Press “VOL+/-” key to choose;
(3). Channel Name: Press “VOL+/-” key to enter Rename Channel
page as shown in Figure 4.10;
(4). Audio PID, Video PID, PCR PID, Press “0-9” number key to reviser
values;
(5). Press “OK” key to confirm the adding, the system will hint with
“Update succeed” and return to Edit Channel menu;
(6). Press “EXIT” key to return to Edit Channel page.
3. Press the yellow key to remote controller to enter Rename
Channel menu.
Page 19

DV B- T RECEI VE R
DIGITAL TV:
11
16
If you do not like one or some channel, you can delete it/them in
Channel Organizer menu, if you do not like all TV or Radio, you can
enter Delete All menu to choose to delete all TV, RADIO.
1. Under Channel Manager menu, press “CH+/-” key to choose Delete
All option, press “OK” key again, then the system will hint the
dialogue box of in putting password which is defaulted as “0000”,
input the proper password via the 0-9 number key of the remote
controller, then enter Delete All menu .
Press “VOL+/-” key to choose “Yes” or “No”, press “OK” key to
confirm.
3. All set up and operation are the same as in TV channel.
2. To delete all TV channels, press “CH+/-” key to move the cursor
to ALL TV Channels option, press “OK” key, then the system will hint
with “Delete All TV Channels?”
Delete
Group channels according to Movies, Sport, Music, Kids, Fashion etc.
Channel Grouping
1. It will pop up and dialogue box prompting that “Channel not
available” when there are no programs in database to enter into,
and it will not enter into channel grouping page.
2. Press “CH+/-” key to choose the line where the channel to be
grouped is in, then press the number keys 1-8 on the remote
controller to set different channel grouping.
3. After channel is edited, when “EXIT” key is pressed to exit the
menu, if actual channel editing action exists, the system will carry
out channel grouping renewal, with the hint of “Update succeeds”.
Page 20

11
17
DIGITAL TV:
DV B- T RECEI VE R
CONFIGURATION
Configuration provides individualized system setup function, you
can configure the system according to your own hobby and demand.
You can enter Configuration menu via the menu
(MENU-Digital TV-Configuration) .
TV set up provides convenient TV input mode, you can via menu
(MENU/ Digital TV/ Configuration/ TV), enter TV set .
All options are listed on the left of the menu, when the cursor moves to
the option on the left of the TV menu, the values corresponding to this
option can be display on the right of the menu.
TV
TV mode can change the mode of the on put video, you can adjust
TV mode according to the actual situation of you receiving equipment.
(1). Move the cursor to Display Mode option, press “VOL+/-” key to choose
circularly among the options, and the TV mode set can be effective
immediately;
(2). TV Mode can be set as Auto, PAL, NTSC;
(3). Default TV Mode: AUTO;
(4). Press “OK” key to save the setting, the system will hint with
“Update succeeds”.
Display Mode
Page 21

DV B- T RECEI VE R
DIGITAL TV:
11
18
Aspect Ratio
Video output mode can change the mode of video out put, you
can adjust TV mode according to actual situation of you receiving
equipment.
(1). Move the cursor to Aspect Ratio option, press “VOL+/-” key to move
circularly and choose options;
(2). Aspect Ratio can be set as 16:9, 4:3 Pan Scan, 4:3 Letter Box;
(3). Default Aspect Ratio 4:3 PS;
(4). Press “OK” key to save the setting, the system will hint with update
success.
Video Output
Video output mode can change the mode of video output, you can
adjust TV mode according to the actual situation of you receiving
equipment.
1. Move the cursor to Video Output option, press “VOL+/-” key to
move circularly and choose options and the setting can be effective.
2. Video Output mode can be set as CVBS, YC;
3. Default: CVBS;
4. Press “OK” key to save set, the system will hint with “Update
success”.
Adjust the system hue.
1. Move the cursor to HUE option Press “VOL+” key to move the
cursor into the Properties list on the right.
HUE
Page 22

2. Press “CH+/-” key to move upward and downward the cursor to
choose, press “ENTER” key to confirm; in this moment, move the
cursor onto the options on the left, and then values will become the
ones you want.
3. Brightness can be set as: 0%~100%;
4. Default: 80%;
5. Press “OK” key to save the setting, the system will hint with
“Update success”.
Contrast
You can set system via contrast option.
1. Move the cursor to contract option, press “VOL+” key to move the
cursor into the Properties list on the right.
2. Press “CH+/-” key to move upward and downward the cursor to
choose, press “OK” key to confirm, in this moment, move the cursor
onto the options on the left, and then values will become the ones
you want.
3. Contrast can be set as: 0%~100%;
4. Default:80%;
5. Press “OK” key to save the setting, the system will hint with
“Update succeeds”.
constant
If the brightness is not proper during watching, you can adjust the
current brightness to be a proper one.
1. Move the cursor to Brightness option, press “VOL+” key to move the
cursor into the Properties list on the right.
Brightness
11
19
DIGITAL TV:
DV B- T RECEI VE R
Page 23

DV B- T RECEI VE R
DIGITAL TV:
11
20
Saturation
Adjust the system Saturation.
1. Move the cursor to Saturati on option, Press “VOL+” key to move the
cursor into the Properties list on the right.
2. Press “CH+/-” key to move upward the cursor to choose and press
“OK” key to confirm, in this moment, move the cursor onto the
options on the left, and then values will become the ones you want.
3. Saturation can be set as: 0-12; “Update success”;
4. Default:0;
5. Press OK key to save set, the system will hint with “Update success”.
System Set up
System set up menu can provide convenient system set up, you
can via menu (MENU Configuration System Set up) enter System
Set up menu.
In System Set up menu,
(1). Press “CH+/-” key to move upward and downward the cursor to
choose option;
(2). When the cursor stays on the option: Press “VOL+/-” key to choose
circularly among the values in this option or press “VOL+” key to
move the cursor into the right list, press “CH+/-” key to move
upward and downward the cursor to the choose, press “OK” key to
confirm;
(3). To edit the option in the System Set up menu, press “OK” key to
save the information and return previous menu;
(4). Press “EXIT” key to return the previous menu.
Page 24

11
21
DIGITAL TV:
DV B- T RECEI VE R
EQ setup
To set output sound effect default: standard.
To set stage effect default: OFF.
Surround
Active Antenna
Select on to turn on the 5V supply to active antenna, if ANT
circuit short, the ANT power supply will turn off automatically
select OFF for Non-Active antenna.
LCN
If you turn on the LCN (logic channel NO.) function and the
DVB-T program included LCN information, then the channel NO.
will display the LCN channel NO. only after auto channel scan. LCN
channel list usually defined by program vender or broadcaster.
TO set scanning area and choose, choose area to download preset
channel Germany/England/Italy/France/Spain/Holand/Taiwan/
China/Norway/Swead/Finland supported, depending on different
version.
Area
JPEG Effect
You Can turn on the JPEG effect to improve picture Quality of JPEG.
Press “OK” to dear all programs from a memory before process,
you need enter password (Dlefault password is “0000”).
FACTORY DEFAULT
Page 25

DV B- T RECEI VE R
DIGITAL TV:
11
22
Software Upgrade
You can automatically update the software of the equipment. The
software of version can support more areas and more function or
solve more problems. Via menu(MENU/ Digital TV/ Software
Upgrade) enter Software Upgrade menu.
Via menu (MENU Digital TV Version), enter the page You can be
provided with system software information, including H/W Version,
S/W Version, Tuner Type, Date, Time, Press “EXIT” key to return
previous menu.
VERSION
Download update BIN file from USB
1. Copy the bin file into USB.
2. Plug the USB into.
3. Follow up the dialog information and select the root of bin file.
Then press “OK” for update.
4. If power off is during the update process, the unit can not recovery
and need send back for repair.
Page 26

11
23
DIGITAL TV:
DV B- T RECEI VE R
OSD
Via OSD option setup, you can set the user interface display mode
accordin g To your own demand. Via the menu ( MENU Digita TV
Configuration O SD), You can enter OSD menu.
/ /
/
All options are listed on the left of the OSD menu, when the cursor
moves on the option in OSD menu, the values corresponding to this
option on the right or the menu, press “CH+/-” key to move upward
and downward to choose the options in OSD menu, press “CH+/-” key
to move upward and downward to choose the options in OSD menu.
There are following options in OSD menu:
(1). OSD option sets system menu mode ;currently.
(2). Time on OSD Option sets whether to display system time in full-screen
play channel, Move the cursor to Time on OSD option, press “VOL+/-”
key to choose between on and off, the default is off.
(3). Trans option sets menu transparency, press “VOL+/-” key to adjust
between 0%-60%.
(4). Trans option sets menu transparency, press “VOL+/-” key to adjust
between 0%-60%.
1. OSD Language option: The system has the user interface supporting a
couple of languages, you can set language via OSD language option:
(1). Move the cursor onto OSD Language option, Press “RIGHT” key to enter
OSD Language List.
(2). Press “VOL+/-” key choose language;
(3). Press “OK” key to confirm system interface language selection, then the
setting is effective, and then the interface language turns into the
currently chosen language, the cursor can move onto OSD Language,
option on the left;
Page 27

DV B- T RECEI VE R
DIGITAL TV:
11
24
2. 1st Audio Language option: Press “VOL+” key to enter the currently
supported Audio Language list, in the Audio Language list, press
“CH+/-” key to choose language, press “OK” key to confirm;
3. 2nd Audio Language option: Press “VOL+” key to enter the
currently supported Audio Language list, in the Audio Language
list, in the Audio Language list, press “CH+/-” key to choose
language, press “OK” key to confirm;
4. Press “OK” key to confirm the editing action in OSD menu, the
system will hint with “Update succeeds” and then return to the
previous menu.
Parental Lock
You can revise system Password, you can via menu(MENU/DigitaTV/
Configuration/Parental Lock) to enter Parental Lock menu.
1. Press the “0-9” number key on remote controller to input Old Password,
the system defaults Password as “0000” .
2. If the password is input correctly, the cursor can move onto Input New
Password option, press “0-9” number key on the remote controller to
input new 4-digit Password;
3. The cursor move Confirm New Password option, press “0-9” number
key press on the remote controller to input new 4-digit Password; if it is
confirmed the new password is different from the new Password input,
the system will hint to input successfully, the system will hint the
success and save the setting, and the new password will come into
effect.
Page 28

11
25
DIGITAL TV:
DV B- T RECEI VE R
Via menu(MENU/ Digital TV/ Configuration time)
You can set Timer Mode in Time page: Timer Mode: set time mode,
Date: set date, Time: set time, GMT Off set: set GMT Off set,
Summer Time: set summer time.
In time menu, there are two time modes, one is Auto setting:
revise via setting GMT Offset, Summer Time options; the other is
Manual setting: revise via setting Date, Time options. When the
Cursor moves onto Timer Mode option, Press “VOL+/-” key to
choose time mode.
1. The system defaults the setting as Automatic, press “CH+/-” key to
move upward and downward the cursor to move only between Timer
Mode, GMT offset and Summer Time.
(1). Move the cursor to GMT offset option, press “VOL+” key to move the
cursor into the properties list on the right.
(2). Press “VOL+/-” key to move upward and downward the cursor to
choose, you can see corresponding change in time option, Press “OK”
key to confirm;
(3). Move the cursor to Summer Time option and then press “VOL+/-” key
to set Summer Time;
2. When the setting is Manual, press “CH+/-” key to move upward and
downward the cursor to move only between timer mode, Date and
Time.
(1). Set Date option, move the cursor upward and downward onto Date
option, press “VOL+/-” key to enter date setting menu. In date
setting menu, press “DISPLAY” key help inform ation .
Time
Page 29

DV B- T RECEI VE R
11
26
Wake up Timer
If you want to set channel playing at curtain time or giving hint
informati on . you can set via Wake up Timer/ menu .In Wake up
Timer menu, you can set Timer No: set Wake up event number, the
system can support at most 8 events, Timer Mode: set time mode,
Wake up Message: set wake up message, Wake up Channel: set
wake up channel name, Wake up Date: set wake up date, On Time:
set wake up time, Duration: set duration.
1. Hun it with some related message at certain time:
(1). Set Wake up Time Event Number: Move the cursor upward and
downward to Timer No. option, Press “VOL+” key to move the
cursor onto the right list, Press “CH+/-” key to choose event number,
Press “OK” key to confirm;
(2). Set Wake up mode: set as off, move the choose to Timer Mode
option, Press “VOL+/-” key to move circularly and choose among
options, time mode option include off, Once, Daily, Weekly, Yearly.
(3). Set Wake up mode: move the cursor to Wake up Mode option, this
option has 4 option as: Off, Message, Channel, On, press “VOL+/-”
key to choose Message.
(4). Move the cursor to Wake up Message option, Press “VOL+/-” key to
choose Wake up message information, the system will support
Birthday, Anniversary, General;
(
DIGITAL TV:
(2). Move the cursor upward and downward to Time option, press “0-9”
number key to revise values.
Page 30

11
27
DIGITAL TV:
DV B- T RECEI VE R
5). Set date: move the cursor to Wake up Date option, press “VOL+/-”
key to enter date setting menu as shown in Figure 4.30;
(6). Set time: move the cursor to On Time option, Press “0-9” number
key on the remote controller to revise time;
(7). Press “OK” key the system will hint with “Update succeeds”, Press
“EXIT” key to return previous menu.
2. Press Channel
(1). Set Wake up Time Event Number: Move the cursor onto Timer No.
Option, press “VOL+” key to move the cursor onto the list on the
right, press “CH+/-” key to choose event number, press “OK” key
to confirm;
(2). Set Wake up time mode: Default is Off, move the cursor to Timer
Mode options include Once, Daily, Weekly, Yearly.
(3). Set Wake up mode: This option has 4 options as OFF, Message,
Channel, On, Press “VOL+/-” keys to choose as Channel.
If there is no channel in the database, this option cannot choose
Channel;
(4). Move the cursor up word and downward to Wake up Channel option,
Press “VOL+” key to move the cursor onto the list on the right,
Press “CH+/-” key to choose Preset Channel, Press “ENTER” key to
confirm;
(5). Set Date: move the cursor to Wake up Date option, Press “VOL+/-”
key to enter date set menu.
(6). Set Time: move the cursor to On Time option, Press 0-9 number
key on the remote controller to revise time.
Page 31

DV B- T RECEI VE R
11
28
DIGITAL TV:
(7). Set Continuous Time: Move the cursor to Duration, Press “0-9”
number key on the remote controller to revise time;
(8). Press “OK” key, the system will hint with “Update succeeds”,
Press “EXIT” key to return the previous menu.
Page 32

11
29
USB MEDIA PLAY:
DV B- T RECEI VE R
The unit integrates powerful function to support USB and you can
connect Ex-equipmentsvia the USB. At present, system can
support usual USB media players and upgrade to system software.
This product supports the play of Mp3, JPEG and MPEG-4 (AVI).
It can support only the files displaying in the list and
the file format this product plays.
1. Copy media document to USB;
2. Plug in USB device;
3. Enter device in main menu.
USB Movie
1. In main menu, press “CH+/-” to choose USB Movie option, Press
“Ok” key to confirm, enter USB main directory.
2. Press “OK” key to enter next directory, every directory displays
only movie file and folder mane.
(1). Press “EXIT” key to return previous directory;
(2). Press “CH+/-” key to choose movie file name;
(3). Press “OK” key to play movies;
(4). Press “PGDW” key to play movie quickly( x2, x 4,x8,x20,x1);
(5). Press “PGUP” key to rewind movie(× 2, × 4,×8,×20,×1);
(6). Press “AUDIO” key to slow down movie(1/2,1/4,1);
(9). Press “PAUSE” key to pause or play;
(10).All movies can be replayed after paused during playing;
(11).Press “EXIT” exit movie play mode and return to the File directory.
Page 33

DV B- T RECEI VE R
11
30
USB MEDIA PLAY:
1. In main menu, press “CH+/-” to choose USB Music option, to
choose “OK” key to confirm, enter USB main directory.
2. Press “OK” key to enter next directory, every directory can show
music file and Folder name only.
(1). Press “EXIT” key to return previous directory;
(2). Press “CH+/-” key to choose movie file name;
(3). Press “OK” key to play music file, its interface is as shown
in Figure 5.4;
(4). Press “PGDW” key to play quickly( x 2, x 4,x8,x20,x1);
(5). Press “PGUP” key to rewind music(× 2, × 4,×8,×20,×1);
(6). Press “PAUSE” key to pause or play;
USB Music
USB Photo
1. In main menu, press “CH+/-” to choose USB Photo option, press
“OK” key to confirm, enter USB main directory.
2. Press “OK” key to enter next directory ,every directory can shown
photo file and folder name.
(1). Press “EXIT” key to return to the previous directory;
(2). Press “CH+/-” key to choose photo file name;
(3). Press “OK” key to play photo file;
(4). In full-screen play state:
Press “VOL+/-” key to rotate the photo clockwise/counter
clockwise/counter clockwise by 90 degrees.
Page 34

11
31
DV B- T RECEI VE R
Games:
If you want to have a rest or to relieve you self after hard working,
you can play some games attached in the system.
Play: press “MENU”. under normal playing mode and select
GAME/ Native Games/ BoxMan step to play the game.
1. There are six function selection menus on the left of the
interface for user:
Name Game: Restart game, Reset: reset map, Continue:
Continue game, Level: Display game level, Help: Offer help
information, Exit Game: Exit game;
2. In New Game option, press “OK” key to enter Game, the
function menu on the left, if turning into grey, can not be used;
3. Press direction keys up, down, left and right to move the
cartoon man here and there.
4. Press “OK” key Pause Game, you can reset game on the
function menu on the left of the interface.
Box Man
Play: press “MENU” under normal playing mode and select
GAME/ Native Games/ Teris step to play the game.
1. There are five function selection menu on the left of the interface
for user: Start Game: Setting: Set game speed and difficulty.
2. After game-setting,move cursor to “START GAME” parameter,
press “Ok” key enter into the game:
Tetris
Page 35

DV B- T RECEI VE R
11
32
Games:
3. Press “key” left and right to move the square left or right;
4. Press “key” up to change the direction;
5. Press “key” down to accelerate the square;
6. Press “OK” key to pause game, Continue Game Via the left function
key, Main Menu returns to the previous menu, reset Game or exit
Game.
Hit Rat
Play: press “menu” under normal playing mode and select GAME
Native Games Hit Rat by step to play the game.
1. There are five function selection menu on the left of the interface
for user: New Game: Restart Game; peed: Set Game Speed, Press
“VOL+/-” key to set; Score List: score list; Help information; Exit
the game;
2. After game-setting,move the cursor to “New Game” parameters,
press “OK” key enter into the game:
3. The direction keys compose 1,2,3,4,5,6,7,8,9 vs top left, top mid,
top right, mid left, mid right, down left, down mid, down right.
4. Press “OK” to pause the game.
Left button “OK” to continue the game.
Left button “OK” return to the previous menu and reset games.
Page 36
11
33
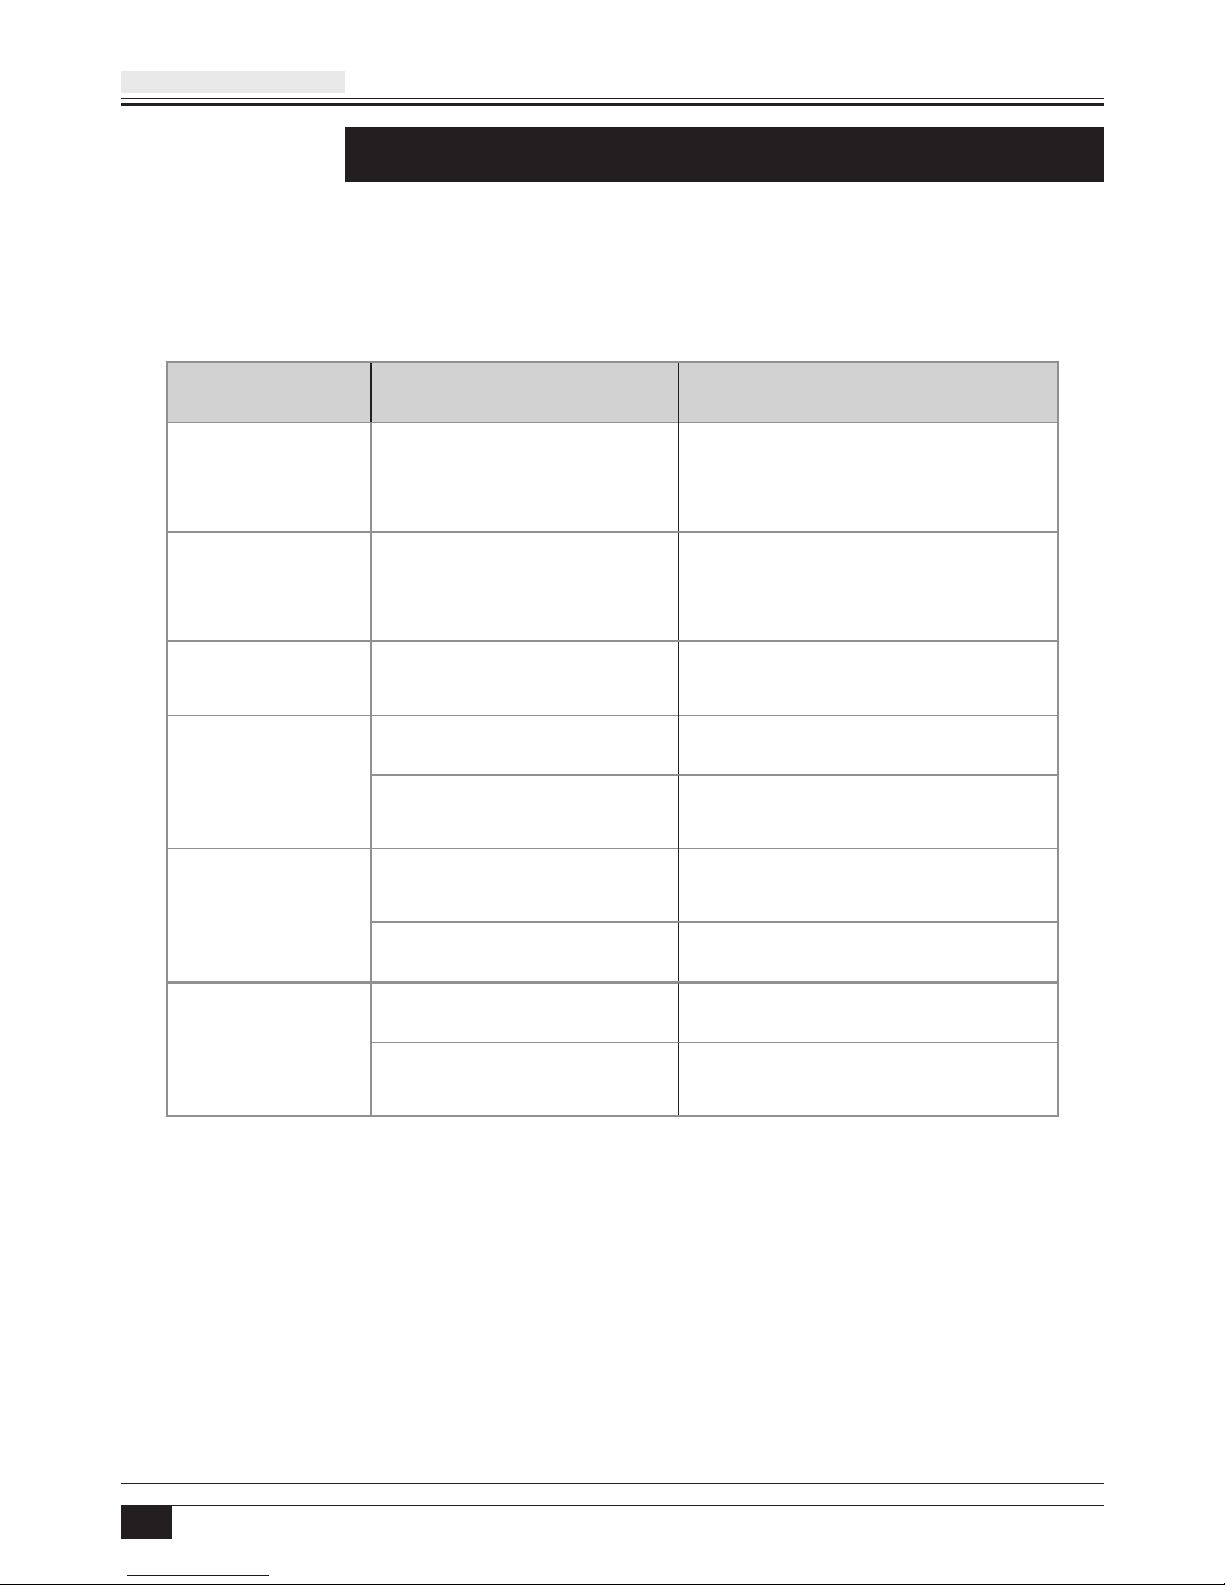
Trouble Shooting:
DV B- T RECEI VE R
Problem Possible Causes Solution
No power
and LED OFF
AC/DC adaptor
disconnected
Connect the plug of
AC/DC adaptor to power
input jack
No sound or
picture but
LED is on
In standby mode
Press power key on
remote to turn on
No sound or
picture
No signal or signal
too weak
Check antenna or cable
connection
Signal is too strong ADD an attenuator
Picture NG
Signal is too weak
Re-install antenna or
move antenna
Miss wirting/TV is
not on AV mode
Connect AV cable,
switch TV to AV mode
No picture
Above is OK Send for repair
Battery exhausted Replace battery Remote
control does
not operate
Something shield
the R/C signal
Keep the R/C window
clear in front
Page 37
11
34
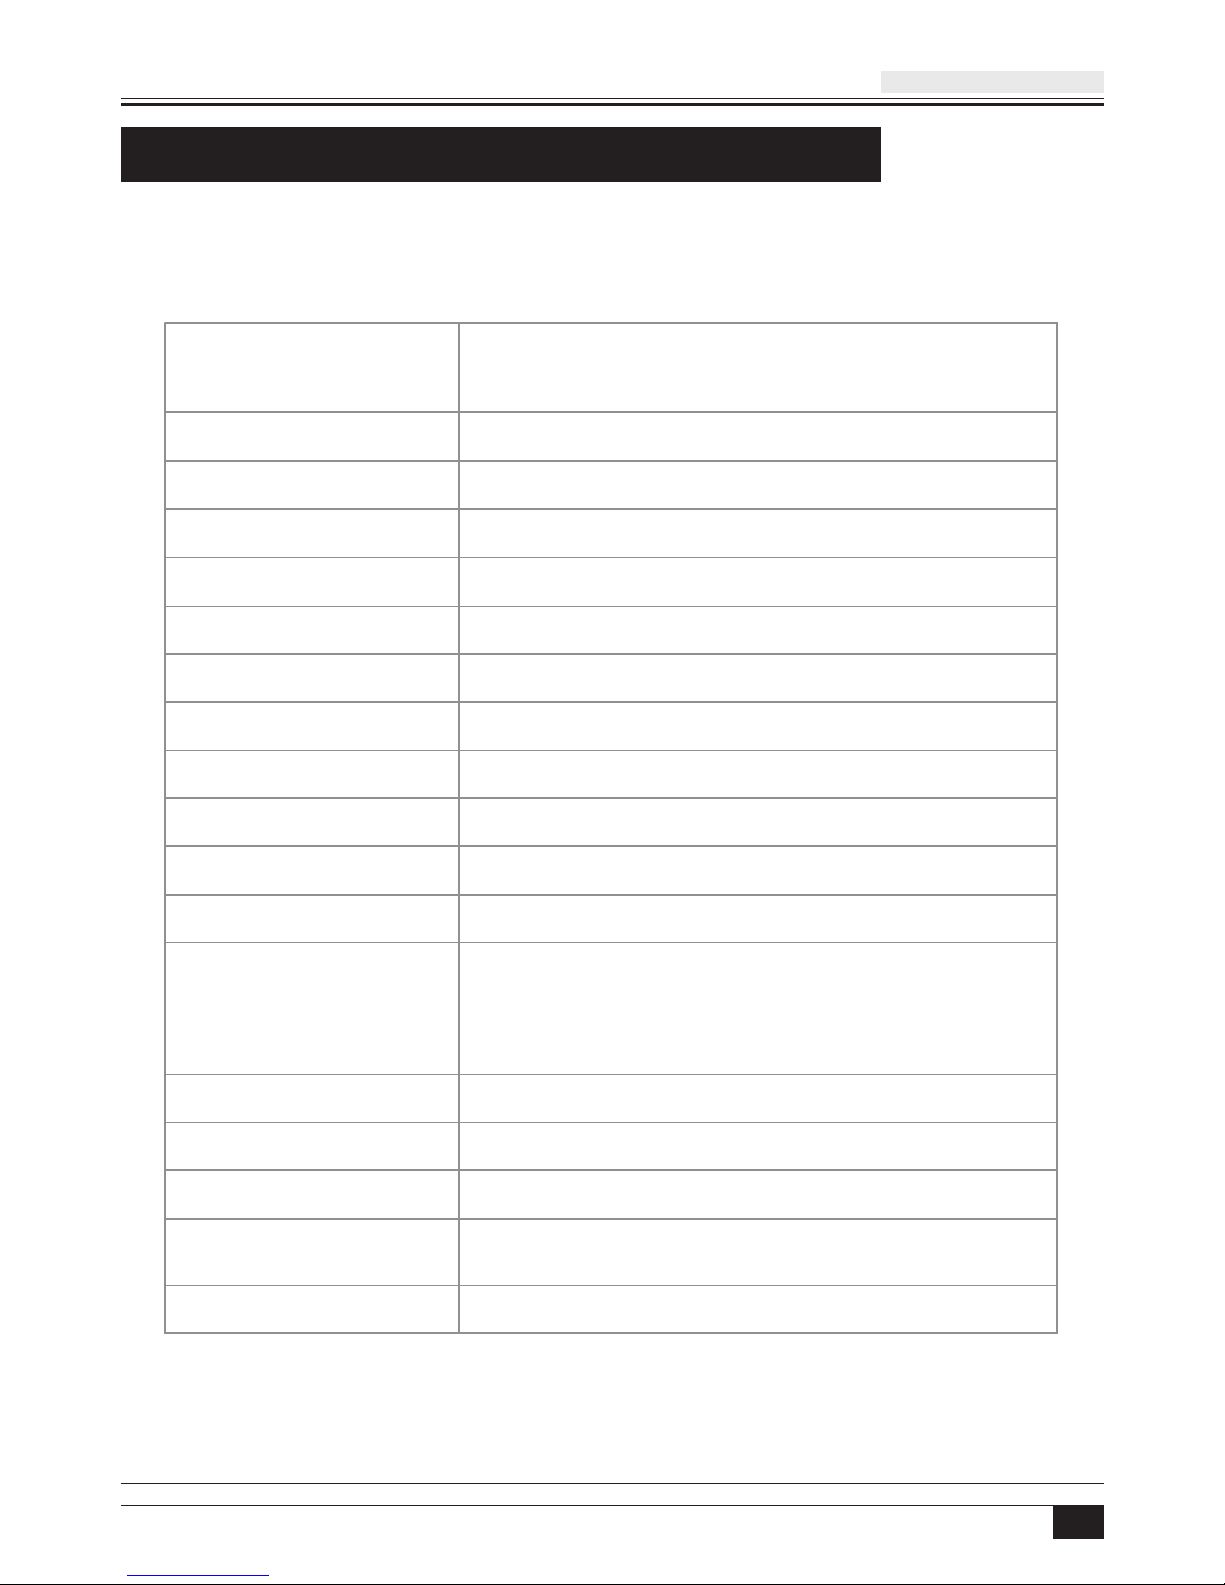
Specification:
DV B- T RECEI VE R
Frequency Range
VHF: 170MHz~230MHz
UHF: 470MHz~862MHz
RF input level -20dBm~-78dBm
ANT input impedance 75Ω
Band width 6/7/8 MHz
Demodulation COFDM
Transport Stream MPGE-II ISO/IEC 13818
Video output VIDEO 1±0.3Vp-p 75Ω
Audio output 2Vp-p adjustable
Video input 1±0.2Vp-p 75Ω
Audio input 1±0.2Vp-p 47K
Video formats 720x480x(NTSC) 720x576(PAL)pixels
Audio formats MPEG layer I & II, 32/44.1/48KHz
Upgrade/USB
USB 2.0 supports
The play of
JPGE/MP3/MP4/(AVI/MPG/DAT/VOB) and
software upgrade
Power input +12V
Power consumption 4.5W max
Weight 0.25KG(APP)
Operation
temperature
-10°C ~ +50 °C
Storage temperature -40 °C ~ +65°C
Page 38

 Loading...