

Page 1
2017KiteManual
Page 2
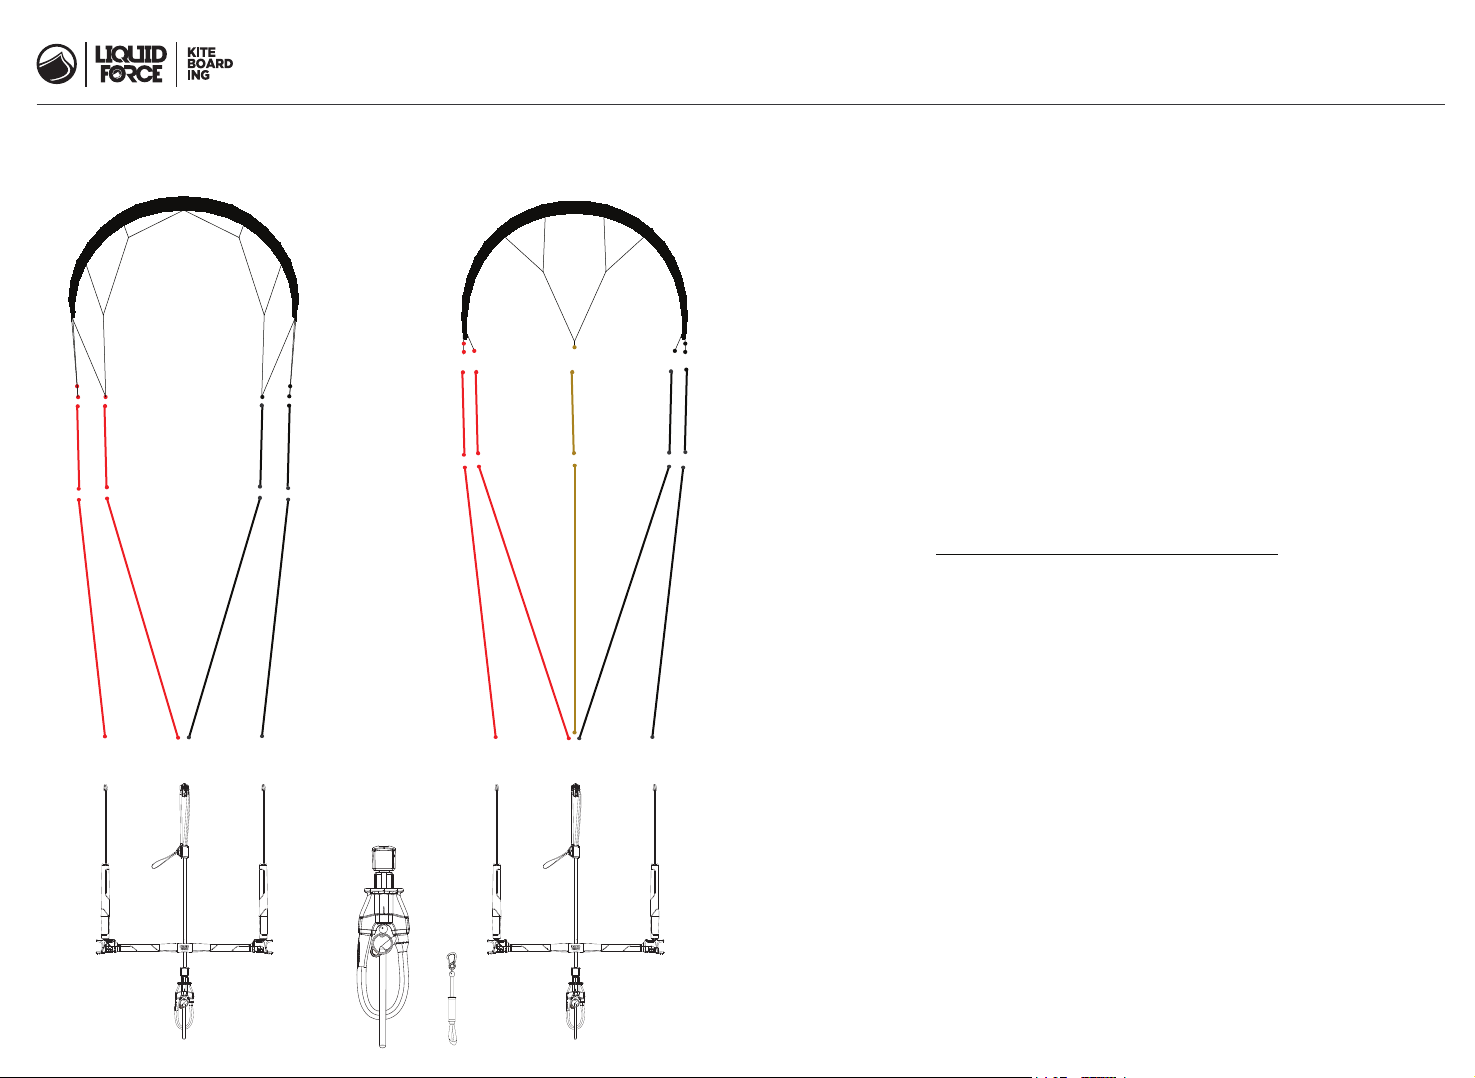
KiteSetupComponents
with Mission Control Bar
SLE 4 LINE KITE SETUP HYBRID-C 5 LINE KITE SETUP
A
B
C
E
D
G
F
I
H
J
K
L
N
O
M
R
U
Q
P
S
T
X
V
Y
W
A
B
C
D
G
F
H
J
Z
E
I
K
aa
L
N
M
O
R
Q
P
S
SLE 4 LINE KITE SETUP
Kite
A.
Static bridles system
B.
Front bridles attachment points
C.
Back bridles attachment points
D.
Wingtips
E.
Back line attachment points
F.
Front line attachment points
G.
Back line leader attachment points
H.
3m flying line extensions
I.
Back leader attachment points
J.
Front line leader attachment loops
K.
Pulley
L.
Depower Cleat
M.
HYBRID-C 5 LINE KITE SETUP
Kite
A.
5th line bridles system
B.
Front bridles attachment points
C.
Back bridles attachment points
D.
5th line pigtail
E.
Back line attachment points
F.
Front line attachment points
G.
Back line leader attachment points
H.
3m flying line extensions
I.
Back leader attachment points
J.
Front line leader attachment loops
K.
Pulley
L.
Depower Cleat
M.
Power adjustment mainline
N.
Depower Handle
O.
Control bar
P.
Side Control bar leaders and bar floats
Q.
Rear leader lines
R.
Line winders with bungees
S.
Chicken loop molded body
T.
Manual Swivel
U.
Push away quick release
V.
Removable security PIN
W.
Chicken loop
X.
Flag Line Ring
Y.
Leash system with quick release &
Z.
Power adjustment mainline
N.
Depower Handle
O.
Control bar
P.
Side Control bar leaders and bar floats
Q.
Rear leader lines
R.
Line winders with bungees
S.
Chicken loop molded body
T.
Manual Swivel
U.
Push away quick release
V.
Removable security PIN
W.
Chicken loop
X.
Flag Line Ring
Y.
Leash system with quick release &
Z.
5th line attachment points aa.
Page 3
KiteRelaunchTips
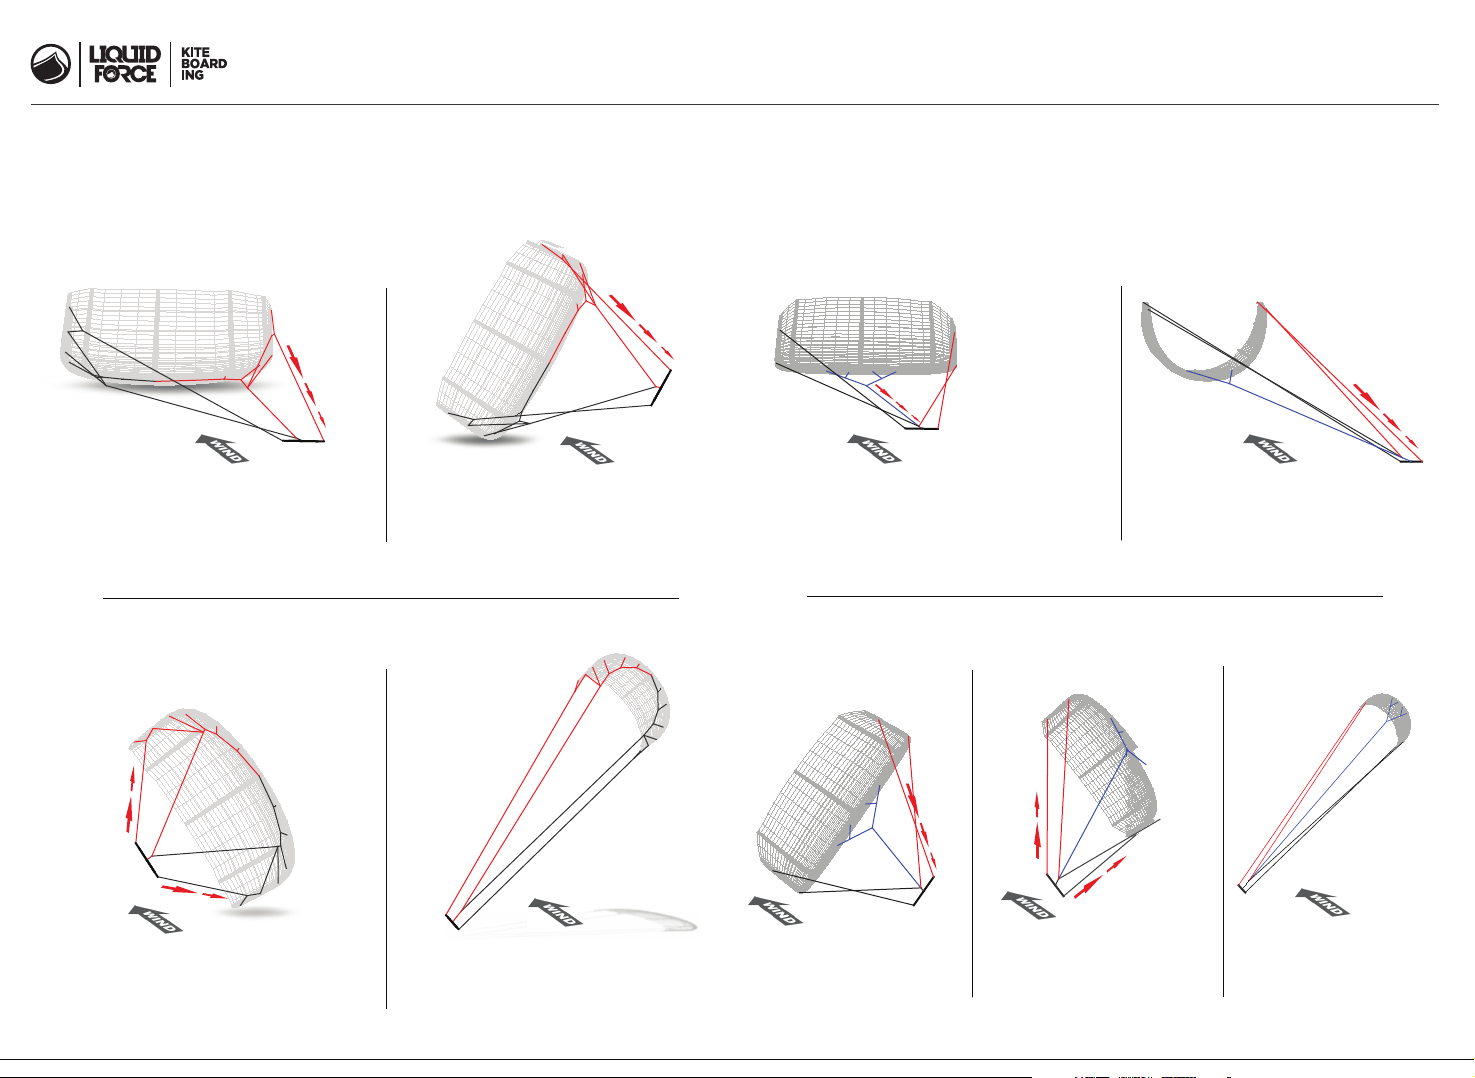
RELAUNCHING A LIQUID FORCE SLE BRIDLE KITE ON WATER, GROUND AND SNOW
SUPPORTED LEADING EDGE SETUP
STEP 1. STEP 2.
To relaunch our SLE Kites with the leading edge
down, start by allowing the kite to align and rest straight
downwind. Initiate relaunch by pulling in on one outside leader
line, about 1 arm length. Hold this leader line steady without
releasing it.
Continue holding leader line in tight as the SLE bridle rotates the
kite onto on wingtip and towards the edge of the wind window.
Continue to hold the same outside line as kite moves towards the
edge of the wind and into relaunch position.
STEP 3. STEP 4.
RELAUNCHING A LIQUID FORCE 5TH LINE KITE ON WATER, GROUND AND SNOW
HYBRID 5TH LINE SETUP
STEP 1. STEP 2.
In Light wind or on sheltered water, our 5th line kites uses the
5th line to initiate relaunch. With kite leading edge down, straight
downwind of rider, intitiate relaunch by pulling in on 5th line. Pull
in 5th line until kite comes to rest on it’s back.
STEP 3.
STEP 4.
With kite on it’s back, straight downwind, initiate relaunch by
pulling in on one outside leader line. Pull in 1 arm length of
leader line and hold while kite begins to rotate and move into
relaunch position at the edge of the wind window.
STEP 5.
With the kite rotated to flying position and at the edge of the
wind window, steer the kite upwards while pushing the bar
away from you and sheeting out (depowering) the kite. This will put
the tension onto the SLE bridle, allowing the kite to fly forward
Fly the kite up and out of the water along the edge of the window
into the neutral position. Check your gear, leash and depower
system, and continue kiteboarding!
Continue holding an arm length of leader
line as kite rotates up onto wingtip and
moves towards the edge of the window.
Keep holding constant tension and allow
kite to move completely to the edge of the
wind window.
With kite now at the edge of the wind
window and in flying position, push the bar
away to sheet out the kite and allow the
front and 5th lines to have tension, allowing
the kite to fly forward and into the air.
Fly the kite up and out of the water along
the edge of the window into the neutral
position. Check your gear, leash and
depower system, and continue kiteboarding!
Page 4
MaxFlowInflationSystemKiteWindRange
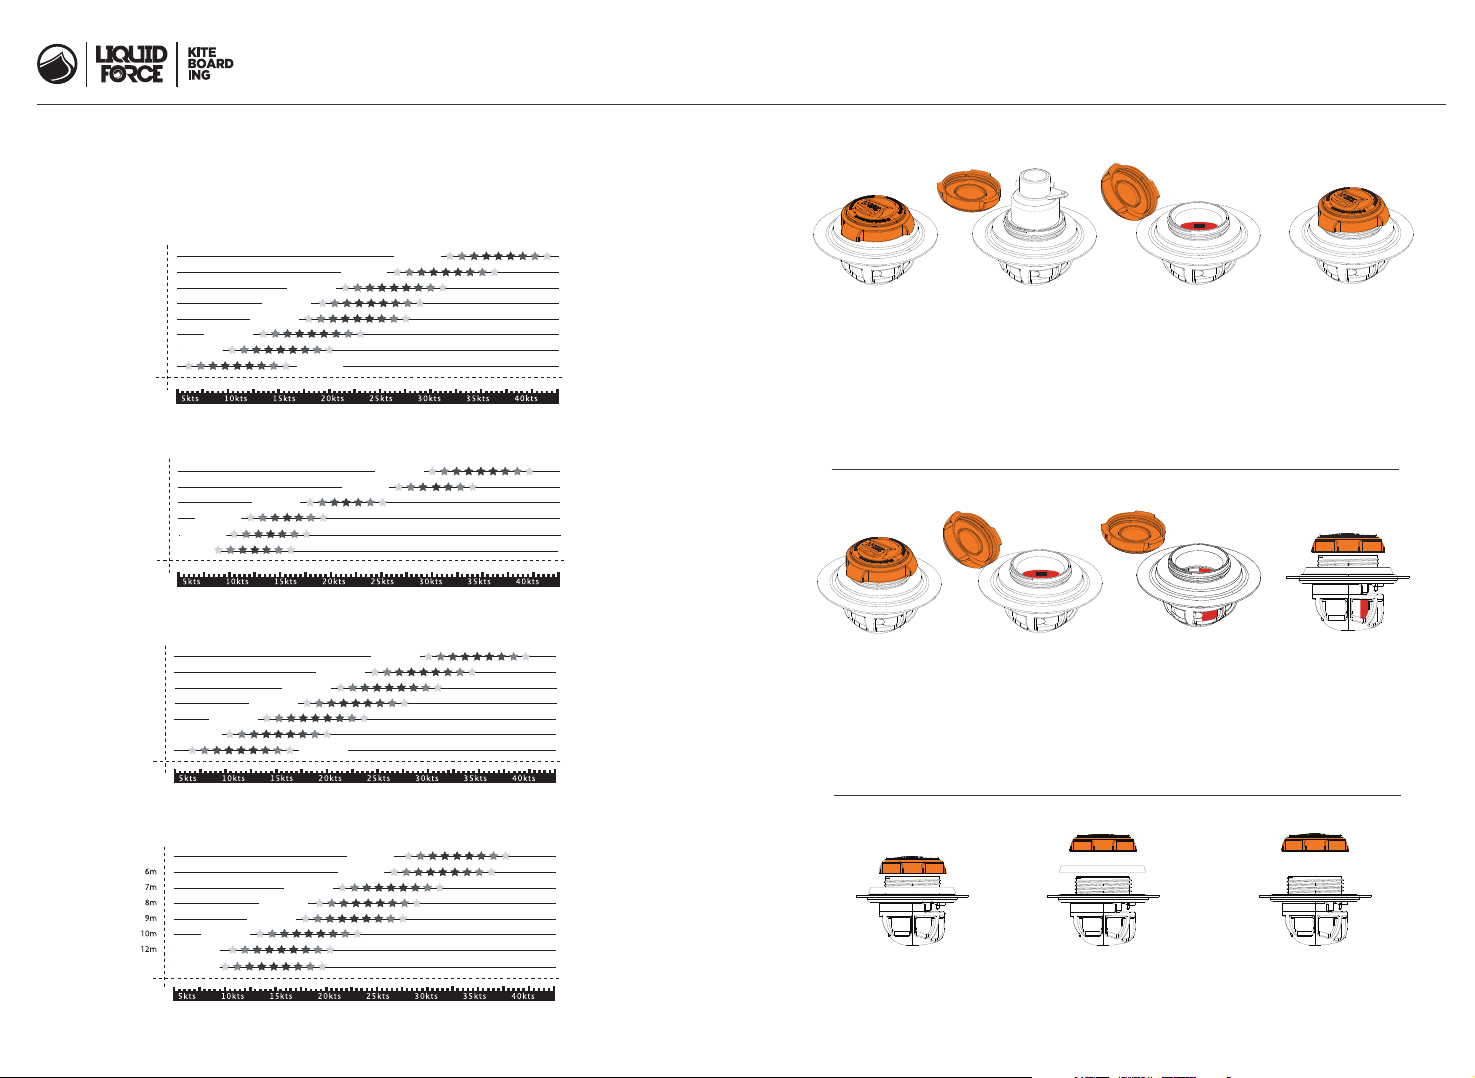
Wind range is highly subjective and based largely on rider weight and skill. The numbers on the kites represent the effective
POWER progression of the kites CLOSELY related to actual area. Kites come in different sizes for different windspeeds and rider
weights, so if you want to ride every windy day, you will have to buy a few kites to cover all the wind situations so you can ride
in any condition. Many kitesurfers have 2-3 kites to cover most situations.
NV WIND RANGE
35kts++
25kts++
Recommended Inflation Pressure 8-10 PSI
10.5m
12m
15m
5m
6m
7m
8m
9m
13-27kts
9-22kts
19-33kts
16-29kts
21-35kts
7-18kts
SOLO WIND RANGE
4.5M
6.5m
15.5m
12m
17.5
9m
7-13kts
6-12kts
9-18kts
14-24kts
32kts++
20-32kts
Recommended Inflation Pressure 8-10 PSI
HIFI-X WIND RANGE
32kts++
28kts++
Recommended Inflation Pressure 8-10 PSI
11m
12m
13m
15m
5m
7m
9m
12-24kts
10-22kts
14-26kts
18-33kts
8-15kts
WOW WIND RANGE
14m
5m
21-35kts
19-33kts
16-29kts
14-28kts
10-22kts
8-19kts
30kts++
25kts++
Recommended Inflation Pressure 10-12 PSI
INFLATION PROCESS
To inflate your kite using the
LF Max Flow Inflation System,
gently twist open the top cap
of the valve.
If the red flap is locked in the
open position, it is strongly
suggested to close it before
inserting the pump nozzle.
Do this by inserting one
finger into the valve and
pulling up on the yellow
rectangular tab to release the
red flap from the locked open
position.
Push inside, using gentle
pressure, the Liquid Force
dedicated wide nozzle included
with the Liquid Force pump.
When the nozzle is secured
inside, start pumping until you
the recommended pressure
indicated for your particular
model of LF kite. ** Please note,
DO NOT push the valve from the
bottom, this could cause possible
damage to your kite bladder.
Once you have reached the
recommended pressure range
for you particular LF kite model,
slowly remove the pump nozzle,
the inside red flap will seal the
Max Flow valve, preventing the
air from coming out. If for any
reason there you hear any
airflow noise, quickly push
down the red flap, it will then
properly re-seal the Max Flow
valve.
DEFLATION PROCESS
To deflate your kite using the
LF Max Flow Inflation System,
gently twist open the top cap
of the valve. At this point the
air is still locked inside the LE.
Press the red flap down into the
valve using your finger to break
the air seal. This will initiate the
release of the air.
Continue pressing the red flap
until approximately 25-50% of the
air is out of the kite. At this point
press the red flap into a vertical
position until you feel it “lock”. This
will secure it OPEN inside the cage
of the valve, and allow for easy air
flow out of the valve to ensure the
kite completely deflates. If the red
flap unlocks and returns to the
CLOSED position, thus blocking air
evacuation, push the flap back
down further to lock it in the OPEN
position.
REMOVING THE BLADDER WITH MAXFLOW FROM THE KITE
If the event of a slow leak or puncture in
your leading edge (LE) bladder, you will
have to remove the Max Flow valve from
the LE of the kite. First remove the cap from
the valve.
Next unscrew the threaded on security
ring of the Max Flow valve. Removal of the
threaded security ring will allow you to free
your valve from the kite LE. Then simply
push the valve into the LE for bladder
removal.
Make sure to securely tighten
your Max Flow valve cap so
that you engage the internal
foam seal to provide a
secondary air seal. This will
help prevent any air leaking
out of the Max Flow valve if
the red flap becomes
dislodged in any way. (e.g.
from a hard crash, or tumble
in a breaking wave)
Once your kite is rolled and
ready to back into the bag,
we suggest you loosely close
the valve CAP to prevent any
sand or undesirable objects
to enter your bladder.
Once you fix your bladder and place it
back into the LE, simply reverse this
process of the removal for replacement.
Simple and easy!
Page 5
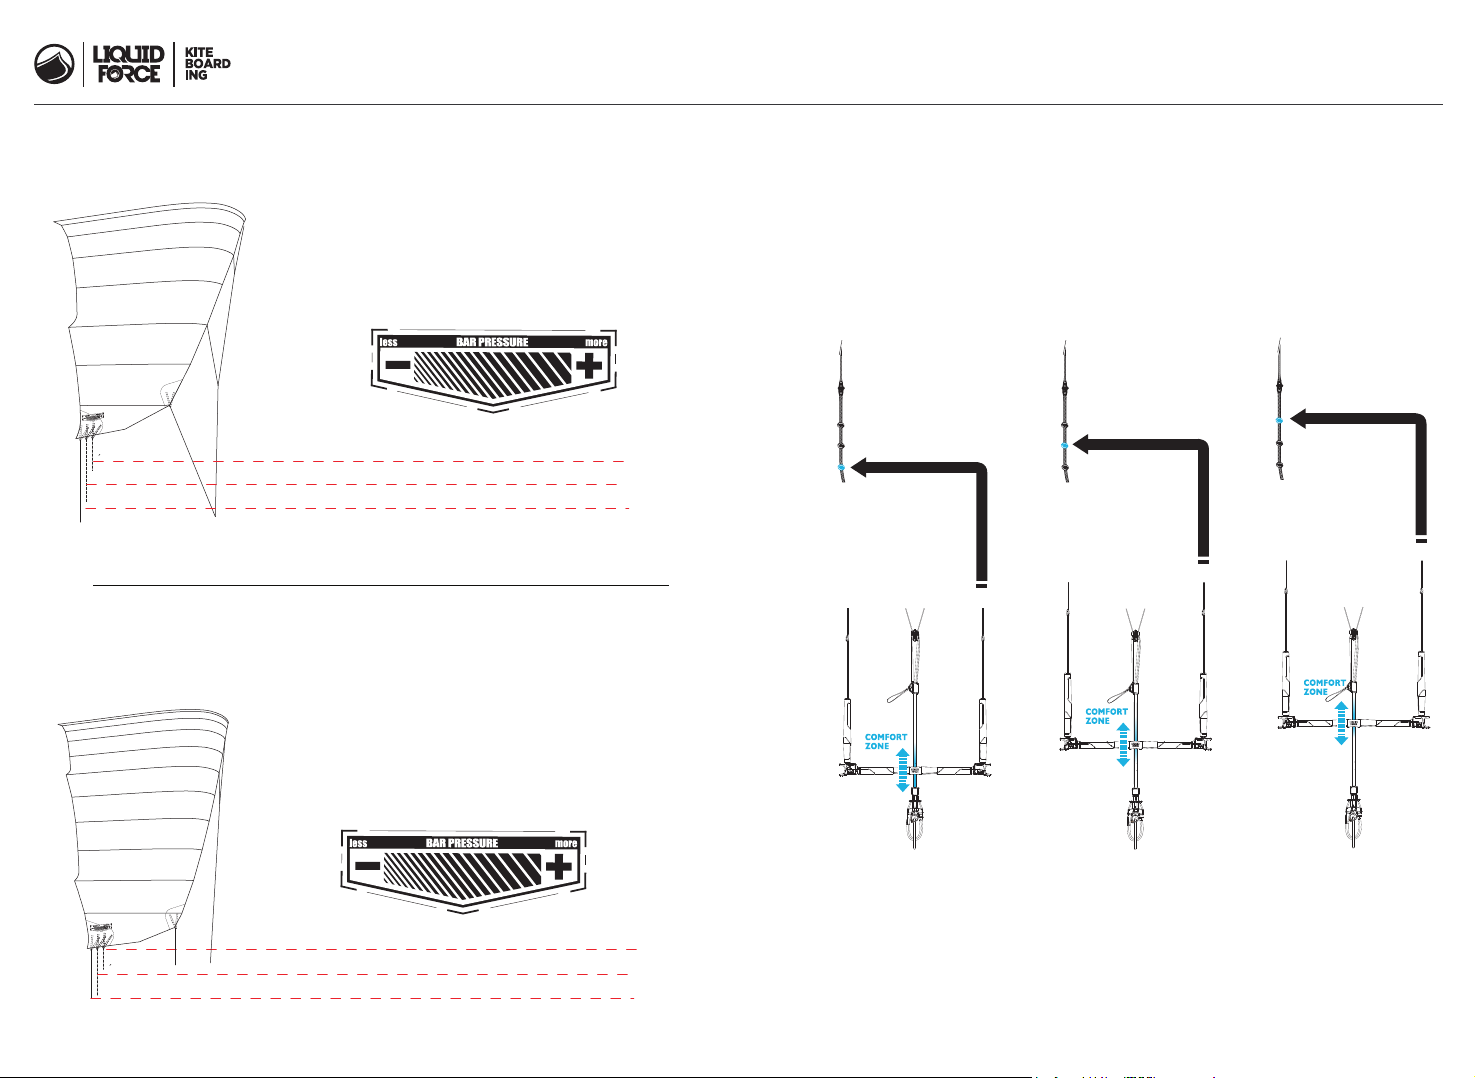
ComfortZoneSetup
BAR PRESSURE & SPEED TUNING GUIDE FOR SLE BRIDLE KITES.
Liquid Force Kites can be customized in both turning speed and bar pressure.
We offer 3 options of rear line attachment points to achieve this on
our SLE kites.
See bellow for details:
Front attachment point ---> Maximum Bar Pressure & Moderate Turning Speed
Rear attachment point ---> Light Bar Pressure & Max Turning Speed
Middle attachment point ---> Medium Bar Pressure & Standard Turning Speed
BAR PRESSURE & SPEED TUNING GUIDE FOR HYBRID C 5 LINE KITES
Liquid Force Kites can be customized in both turning speed and bar pressure.
We offer 3 options of rear line attachment points to achieve this on our
Hybrid C 5 Line kites.
EASY POWER ADJUSTMENT FOR OPTIMAL COMFORT AND PERFORMANCE.
While your Liquid Force kite comes completely tuned and ready to fly right out of the bag, we recognize
that every rider likes a slightly different feel. Our Comfort Zone power-band system is designed for easy
adjustment of the kite’s power delivery. Featuring three different attachment points on the rear pigtails, each
setting offers a unique profile so that the power will engage and disengage right where you like it.
TOP KNOT
MIDDLE KNOT
BOTTOM KNOT
See bellow for details:
Front attachment point ---> Maximum Bar Pressure & Moderate Turning Speed
Middle attachment point ---> Medium Bar Pressure & Standard Turning Speed
Rear attachment point ---> Light Bar Pressure & Max Turning Speed
• Power engages and disengages close
to the body.
• Best setting for high-end range of
the kite’s wind spectrum.
• Great for riders with a short reach.
• Power engages and disengages
in the middle of the bar throw.
• Suggested setting for most
conditions.
• Kite is tuned at this setting from
the factory.
• Power engages and disengages
towards the top of the throw.
• Best setting for lower-end range of
the kite’s wind spectrum.
• Great for riders with a long reach.
Page 6
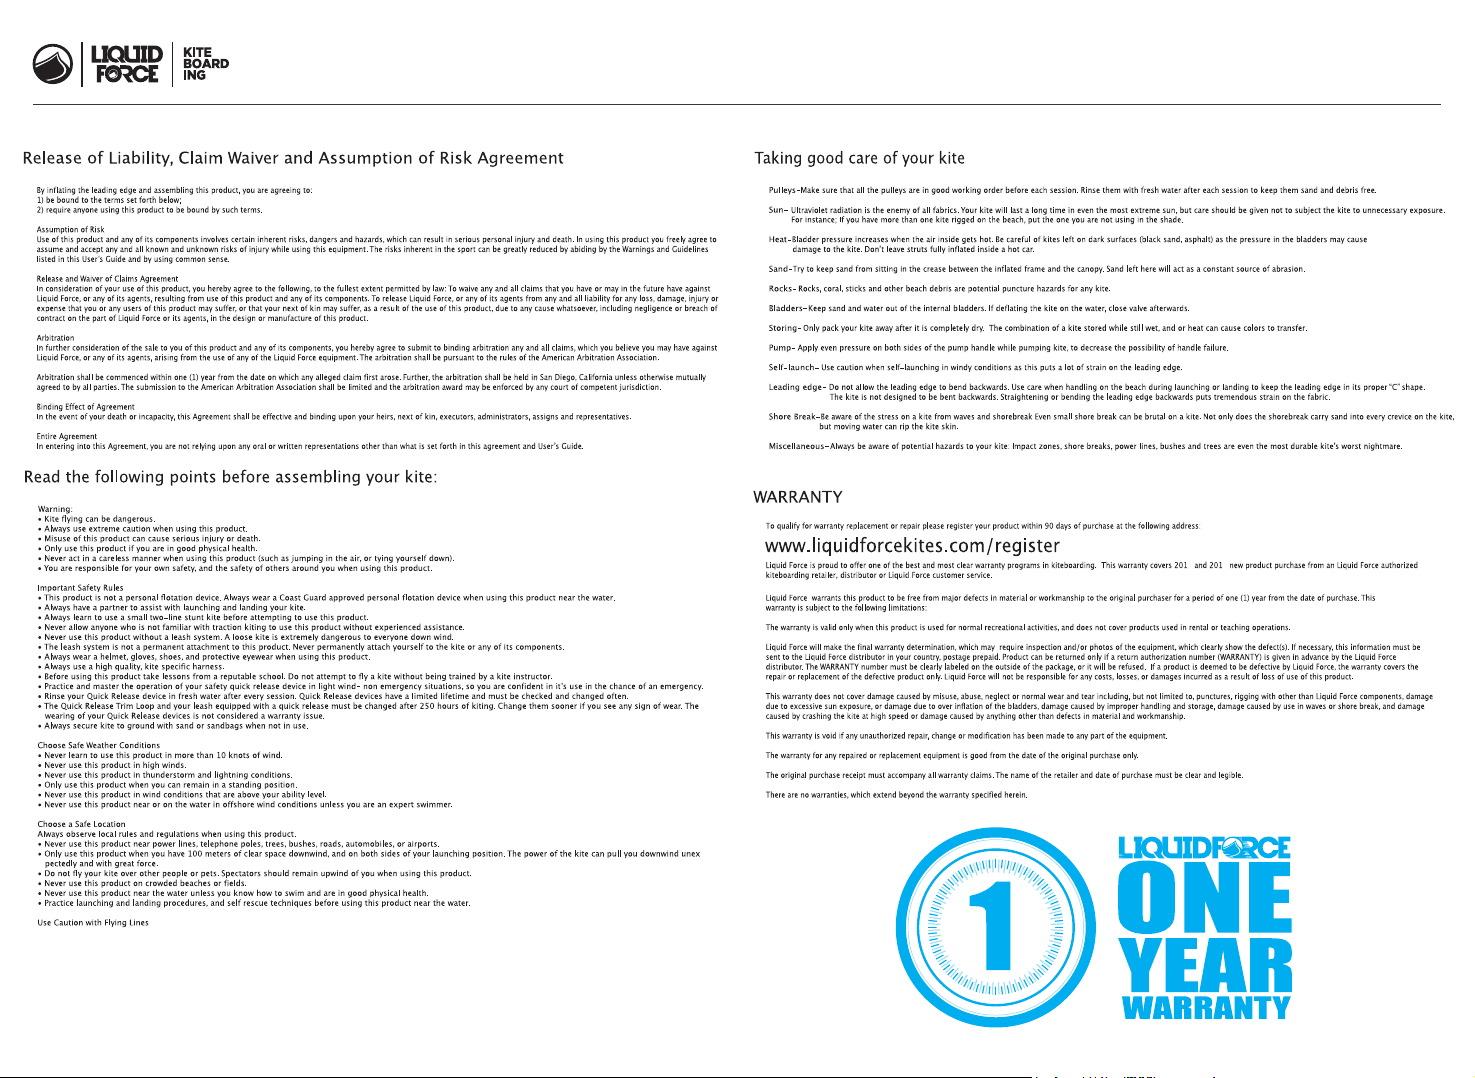
OneYea rWarranty
6 7
 Loading...