

Page 1
Page 2

LIPScan 3D Manual
Table of contents
SPECIFICATION & SYSTEM REQUIREMENTS ......................................... 1
FEATURES ................................................................................................... 2
LIPSCAN 3D PACKAGE .............................................................................. 3
HARDWARE DESCRIPTION AND SETUP .................................................. 4
INSTALLATION ............................................................................................ 6
UNINSTALLATION ....................................................................................... 9
LIPSCAN 3D OPERATION ......................................................................... 11
AFTER SOFTWARE INSTALLATION ................................................ 11
How to start it? .......................................................................... 11
BEFORE SCANNING ......................................................................... 13
What to set up? ......................................................................... 13
READY TO SCAN .............................................................................. 14
Online scanning ........................................................................ 14
Offline scanning......................................................................... 17
AFTER SCANNING, READY TO EDIT .............................................. 19
You can check the settings and make adjustment in advance. . 19
(1) Display ........................................................................ 19
(2) Light Setting ................................................................ 26
(3) Pen Brush ................................................................... 26
(4) Fill Hole Size ............................................................... 27
(5) Language .................................................................... 28
If you only want to edit part of the object .................................. 29
Step 1 Selection: Single Triangle/ Regional/ Box/ Continuous . 29
(1) Single Triangle ............................................................ 29
(2) Regional ..................................................................... 30
(3) Box ............................................................................. 30
(4) Continuous ................................................................. 31
Step 2 Edit : Delete/ Keep/ Fill/ Smooth ................................... 32
(1) With selected area: Delete/ Keep ............................... 32
(2) Without selected area: Fill/ Smooth ............................ 34
If you want to edit or transform the entire object ....................... 36
Edit : Smooth All/ Erode All/ Fill All ............................................ 36
(1) Smooth All .................................................................. 36
(2) Erode All ..................................................................... 37
(3) Fill All .......................................................................... 38
Transformation : Shift/ Rotation/ Scale ..................................... 39
(1) Shift ............................................................................ 40
(2) Rotation ...................................................................... 44
(3) Scale .......................................................................... 47
APPENDIX-LIPSCAN 3D PARAMETERS ................................................. 50
Page 3
1
LIPScan 3D Manual
Specification & System Requirements
Spec
-Depth Camera: LIPS M5 Depth Camera
-Power Consumption: 1.2W
-Light Source: VCSEL @ 850nm
-Maximum Scan Volume (WxDxH): 70cm x 70cm x 180cm
-Minimum Scan Volume (WxDxH): 8cm x 8cm x 8cm
-Operating Range: 30~60cm
-Scan Resolution: 2~4mm (1% of scanning distance)
-Depth Image Size: 592x440 @ 30FPS
-Color Image Size: 640x480 @ 30 FPS
-Camera Interface: USB 3.0
-Dimension: 76.5 x 17.5 x 6.3mm (device only)
-Weight: 30g (device only)
-Supported File formats: .tgl, .stl, .obj, .ply
-Bundled with 3D editing software: functions for example, smooth, fill, delete and more
-Operating System: Windows 10 (64-bit)
Minimum Hardware
Requirement
-CPU: 4th Generation Intel® Core™ i5 Processor
-RAM: 4G RAM or more
Recommended
Hardware
-CPU: Intel Core™ i7 7500U or above
-RAM: 8G RAM or more
Page 4

2
LIPScan 3D Manual
Features
LIPScan 3D is based on LIPS’ own tiny and portable depth camera “LIPSedge M5” with high speed USB3.0 interface and
extremely low power consumption design. On top of the hardware performance, it’s also bundled with a powerful editing 3D
editing software allowing user to conduct final finish or touchup before it’s sent for 3D printing or simply kept as your unique
3D digital copy of your favorite physical collectables.
M5 resembles the slimmest form factor and lightest body so camera mobility is significantly increased for any scenario
and objects the users would like to scan.
Compared to other existing 3D scanning systems, LIPScan 3D clearly offers much richer functions and more user-friendly
and intuitive interface based on extensive beta-test feedback and in-house UX tuning. As a result, it’s very easy to get
your hands around the system in minutes.
Moreover, the software effectively suits a great variety of users with different purposes with its built-in powerful 3D editing
capabilities. Users from entry level to the professional can all benefit from this added value usually not supported by similar
systems in the market.
The scanning process performs in near real-time speed with minimum latency. User basically sees the progress through
sub windows on the right along the way. Rather than automatically removing surface details compromised by low scan
quality as done by some other systems, LIPScan 3D keeps the original surface details. Users are free to use its powerful
3D editing function to further smoothen it as needed.
Unique offline scanning feature allows for low-power computer without compromising the scanning result.
Page 5
3
LIPScan 3D Manual
LIPScan 3D package
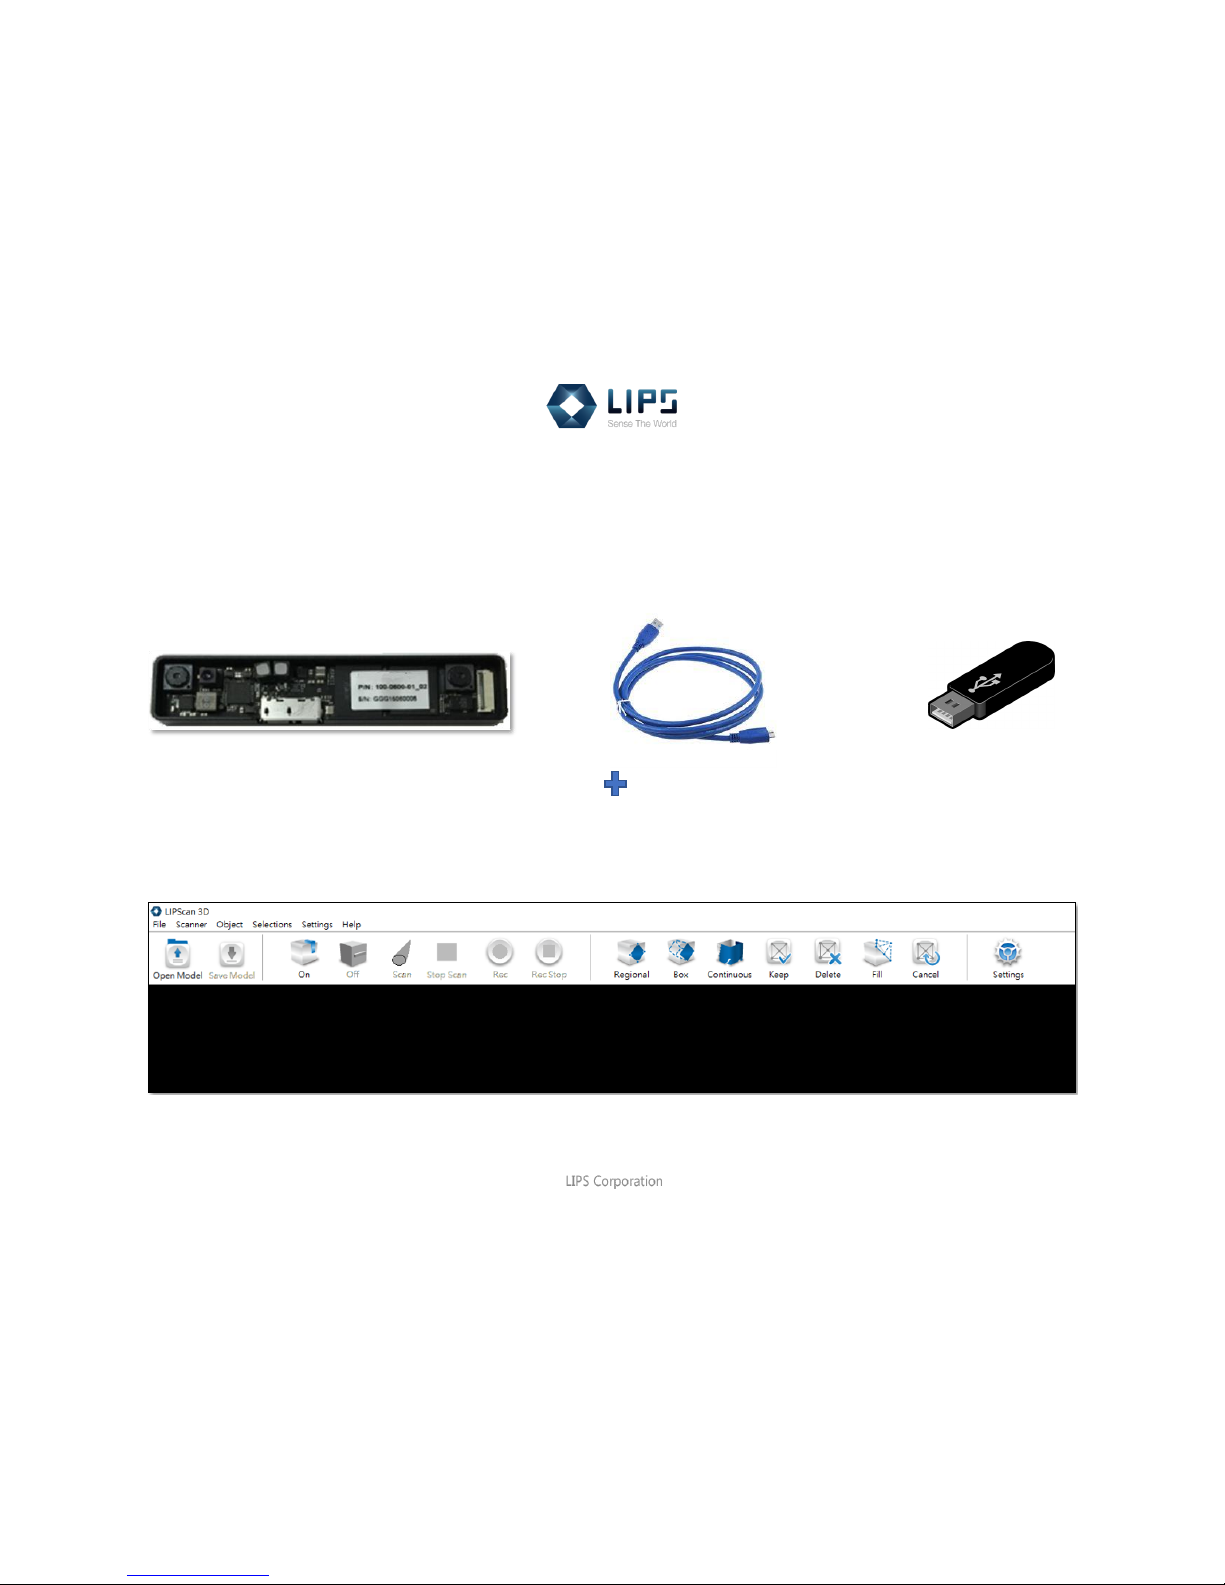
LIPS M5 USB3.0 Cable (Length: 2M) USB Storage
Application: LIPScan 3D
Page 6
4
LIPScan 3D Manual
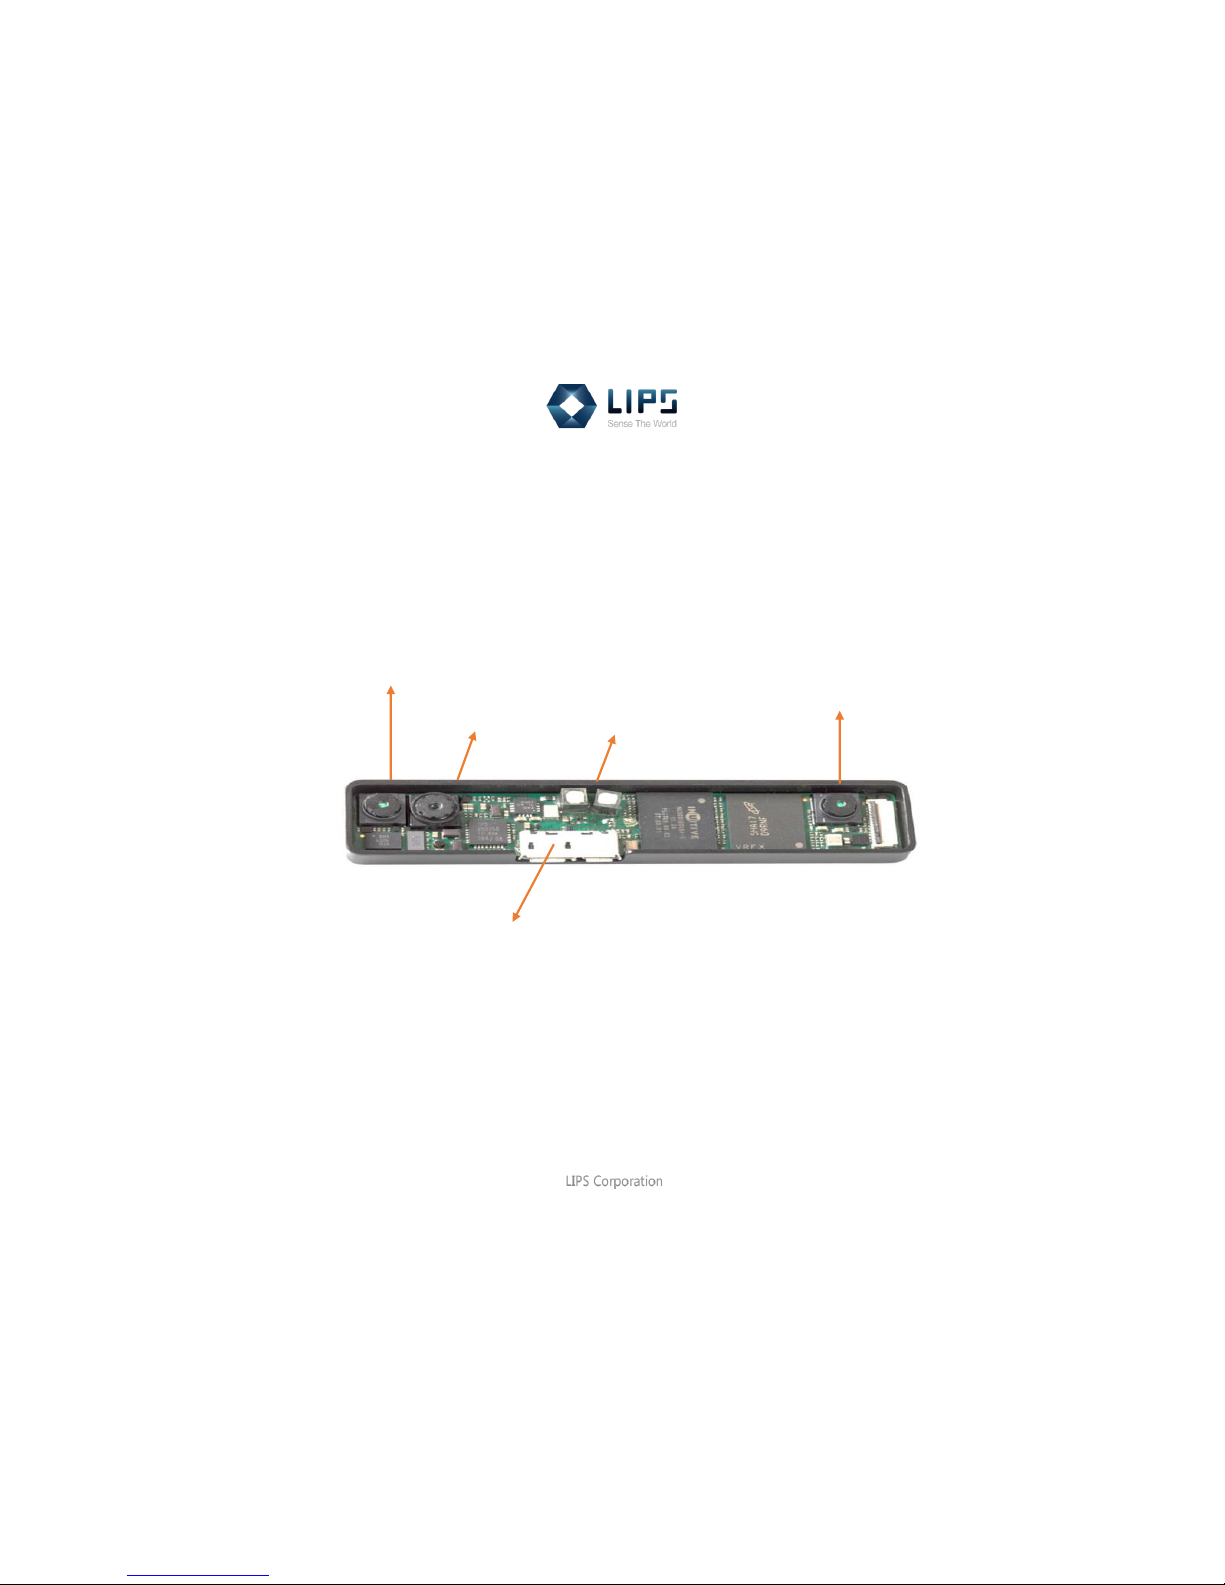
Hardware Description and Setup
RGB Camera
IR Camera
Projector
USB3.0 interface
IR Camera
Page 7
5
LIPScan 3D Manual
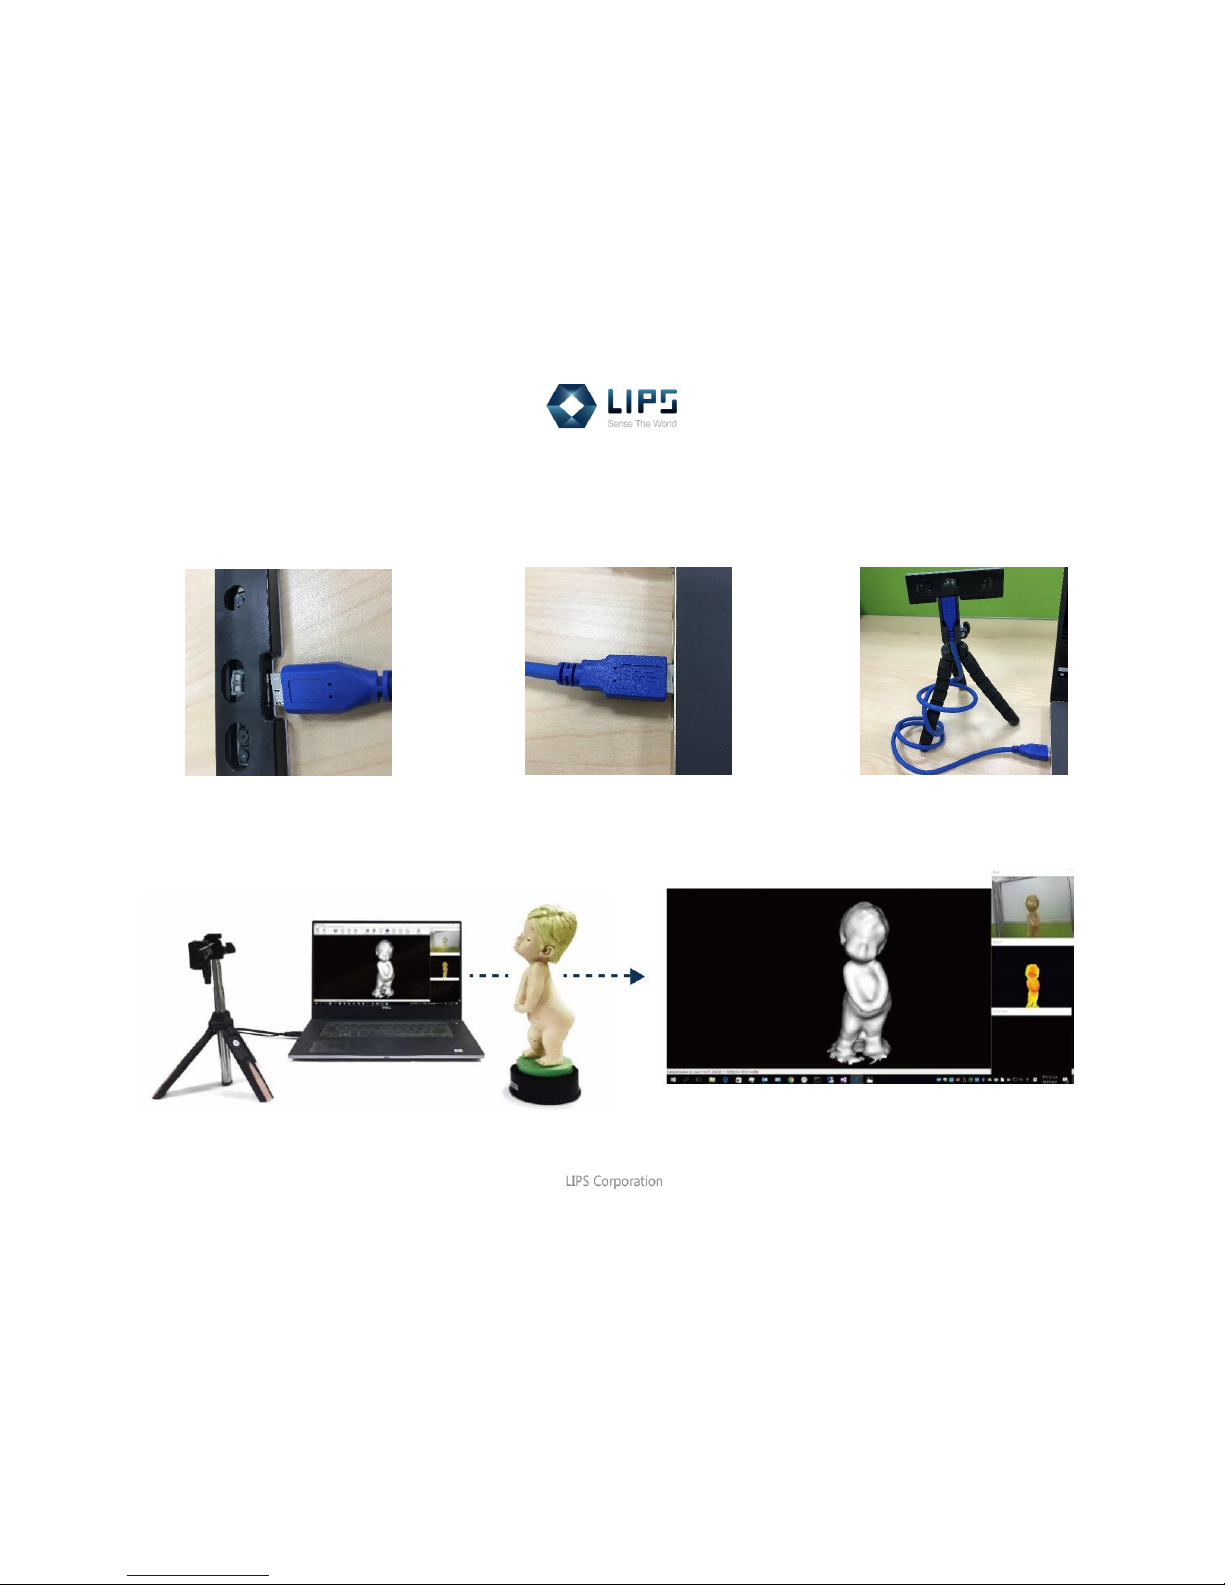
Step 1 Insert the micro USB connector to LIPS M5® depth camera.
Step 2 Insert the USB connector to your host computer.
○
1
○
2
Page 8
6
LIPScan 3D Manual
Installation
This section will guide you through the installation process.
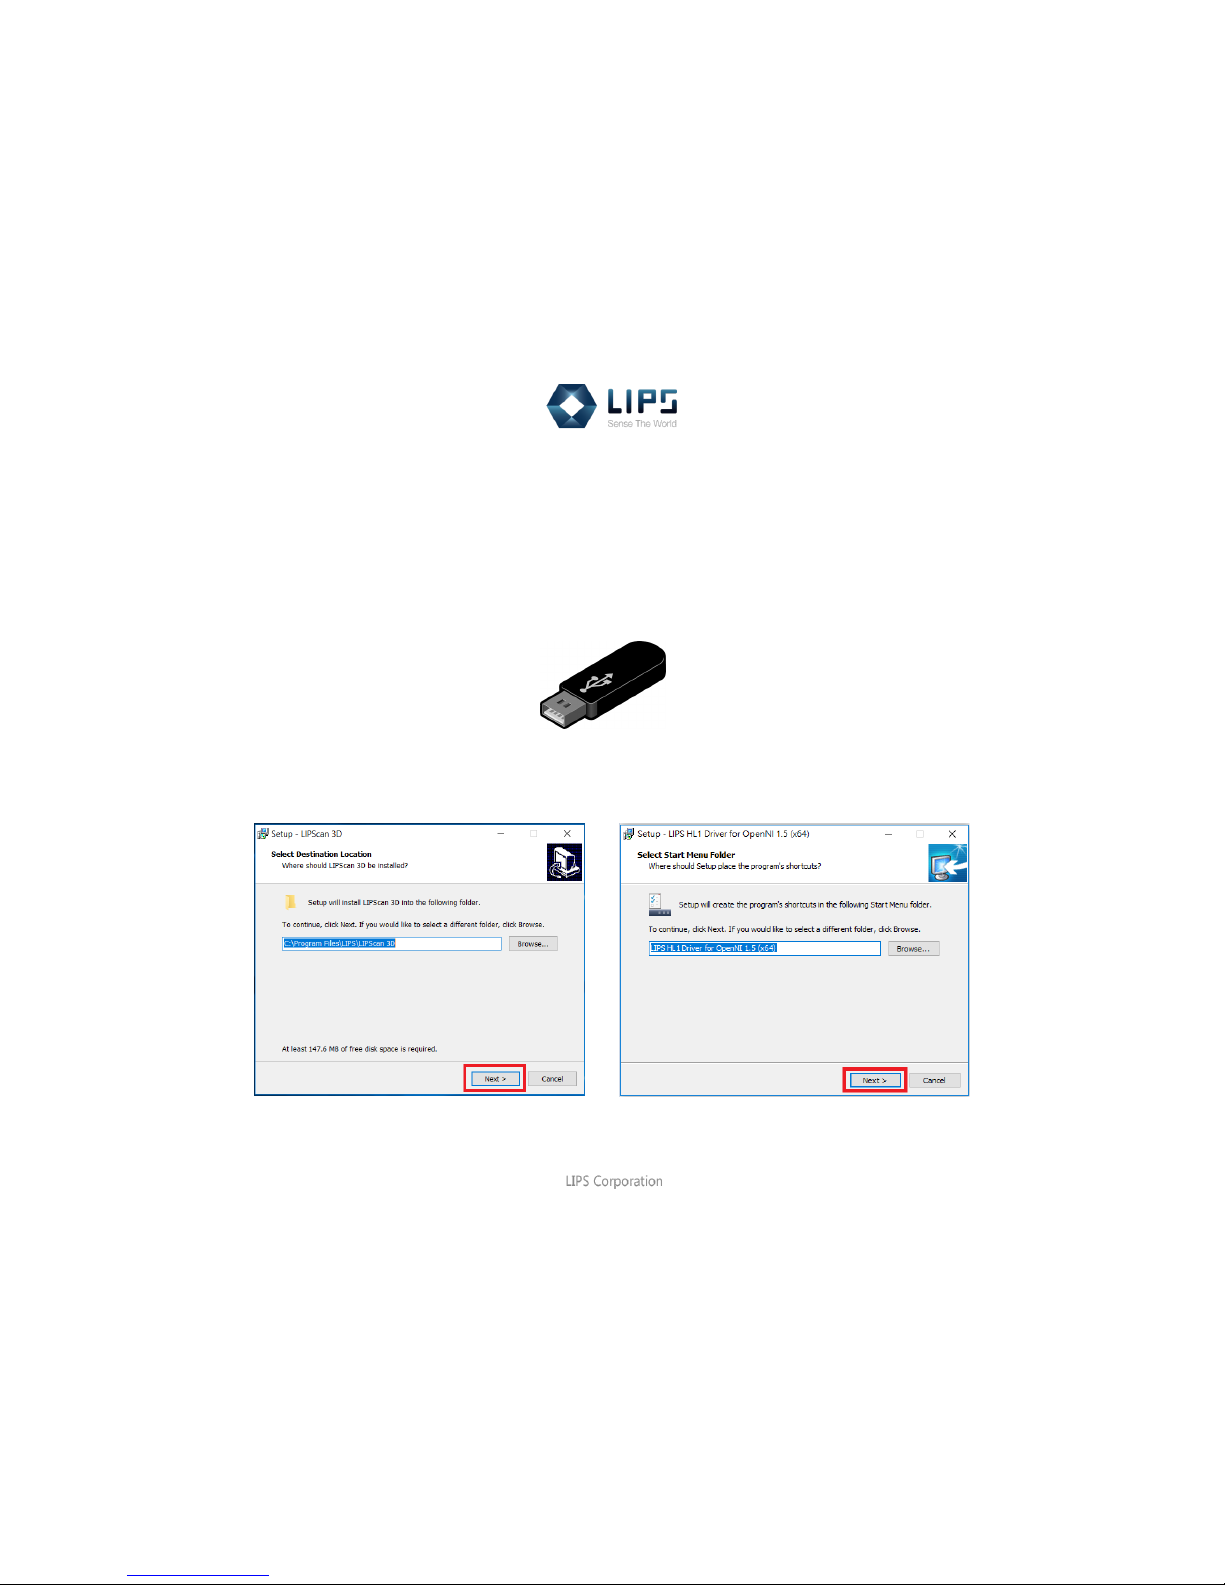
Step 1 We store the software in the USB, please plug in and double click the installer “<lips_3dscanner_setup>”.
Step 2 Click Next to install LIPScan 3D and LIPS HL1 Driver.
Page 9
7
LIPScan 3D Manual
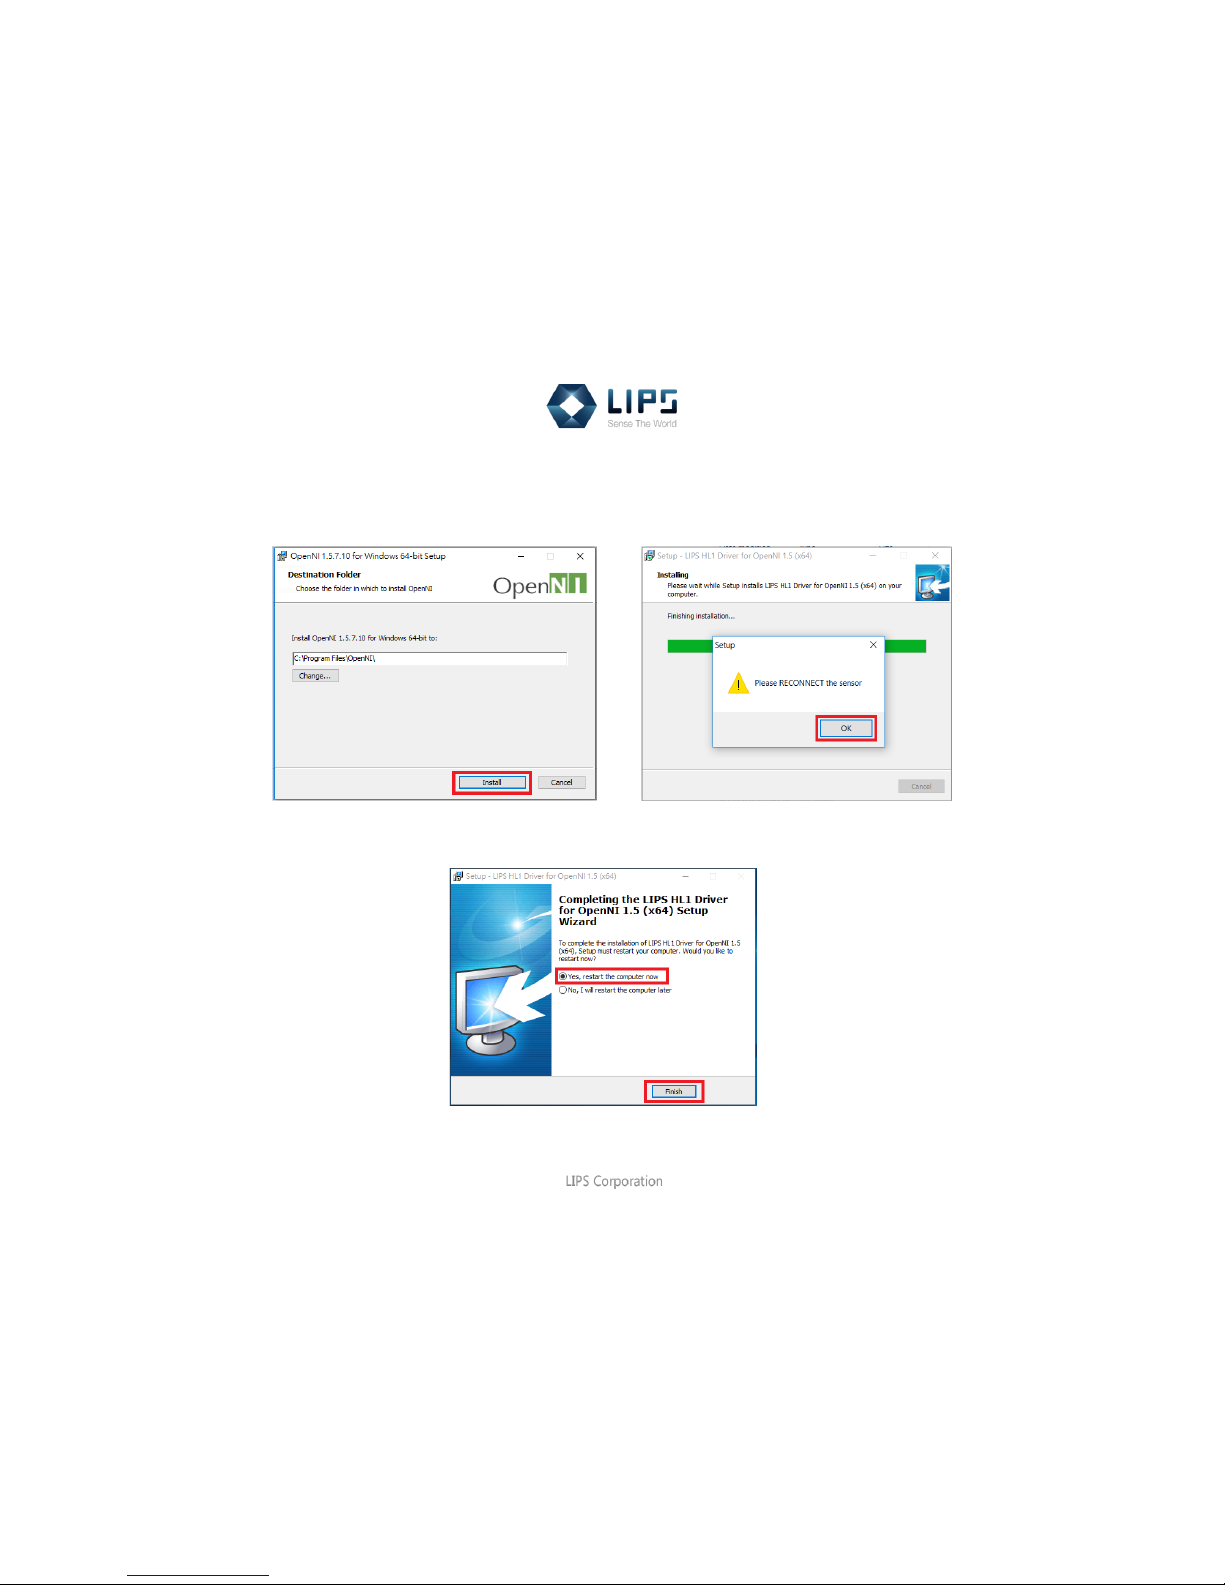
Step 3 Click Install to setup OpenNI 1.5. After installation, the pop-up window will remind you to reconnect the sensor.
Click OK then reconnect the USB connector of the camera to your computer.
Step 4 Successful installation must restart your computer. Click Yes, restart the computer now then Finish.
Page 10
8
LIPScan 3D Manual
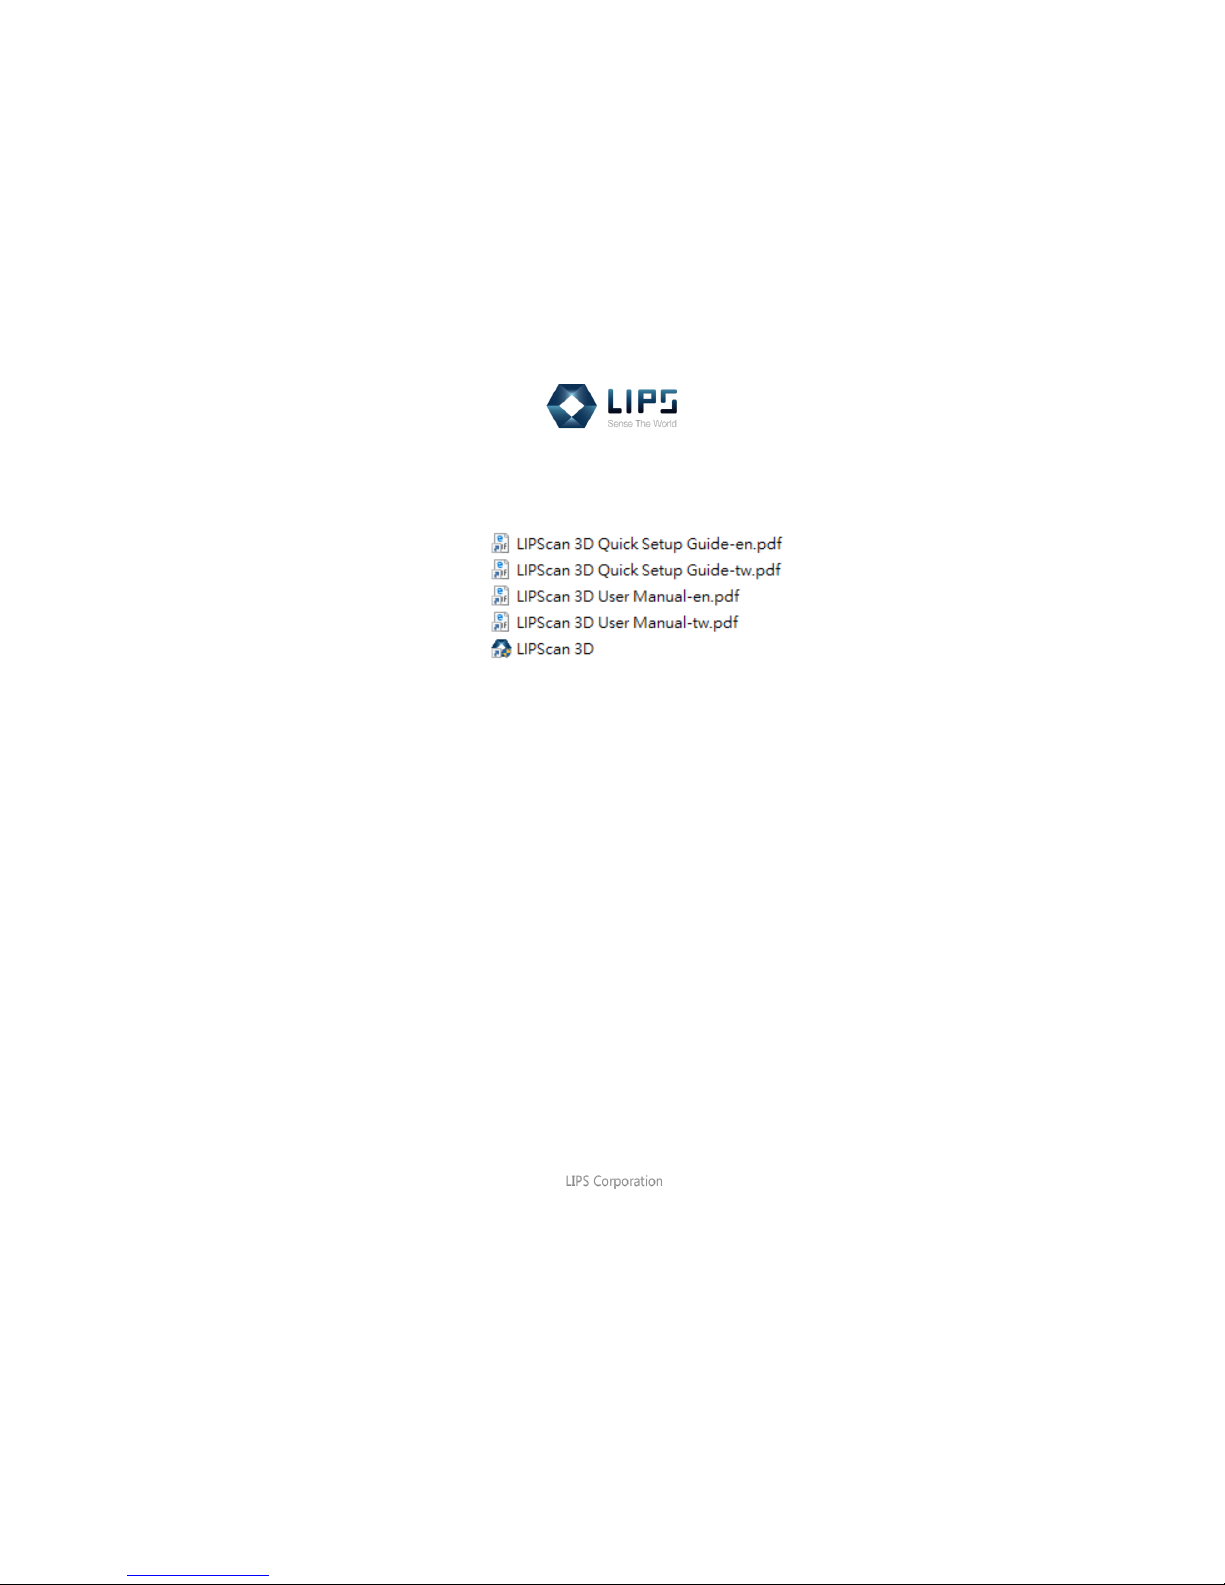
Step 5 Follow the folder structure as below then you can find links: C:\Program Files\LIPS\LIPScan 3D
Folder also on the desktop.
Page 11
9
LIPScan 3D Manual
Uninstallation
Once we release new version of LIPScan 3D, please remember to uninstall the previous one in your computer first, and then
you can install the latest version. This section will guide you through the uninstallation process.
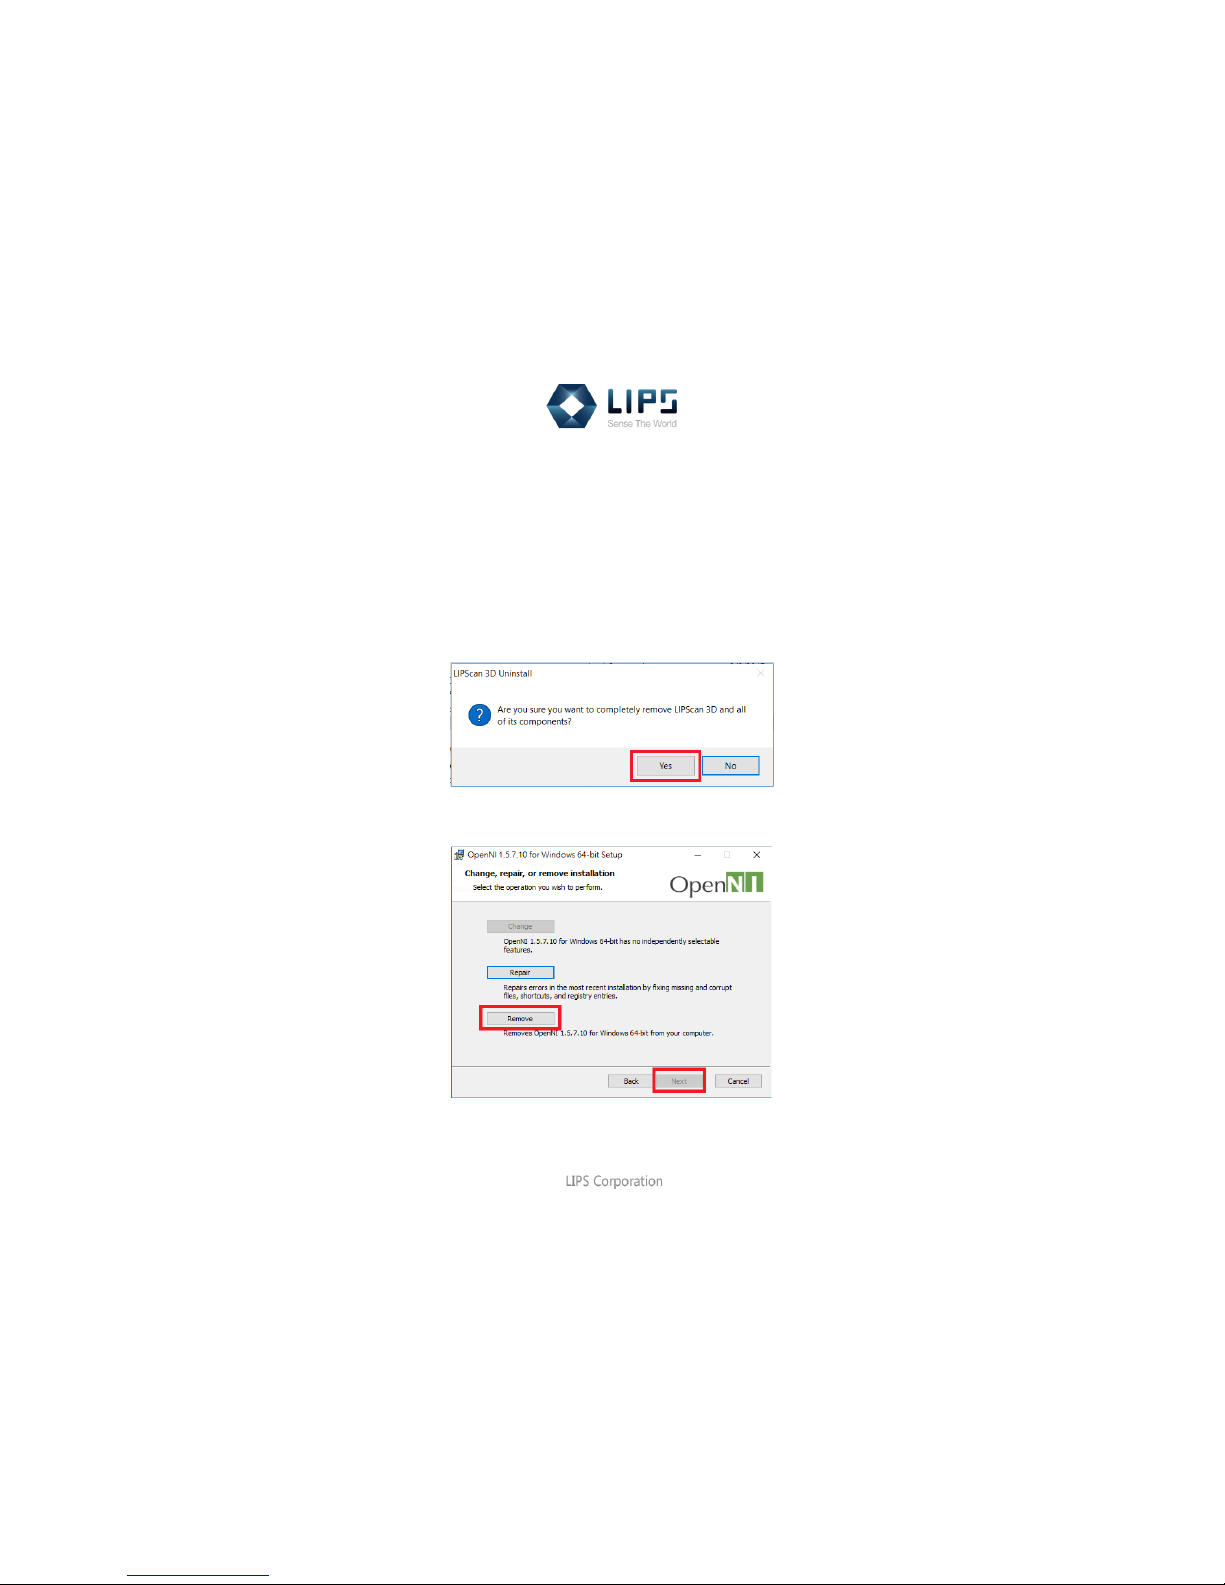
Step 1 Go to Control Panel > Programs > Programs and Features.
Choose LIPScan 3D and click the right mouse button to uninstall.
Step 2 Click Remove and Next to uninstall OpenNI 1.5
Page 12
10
LIPScan 3D Manual
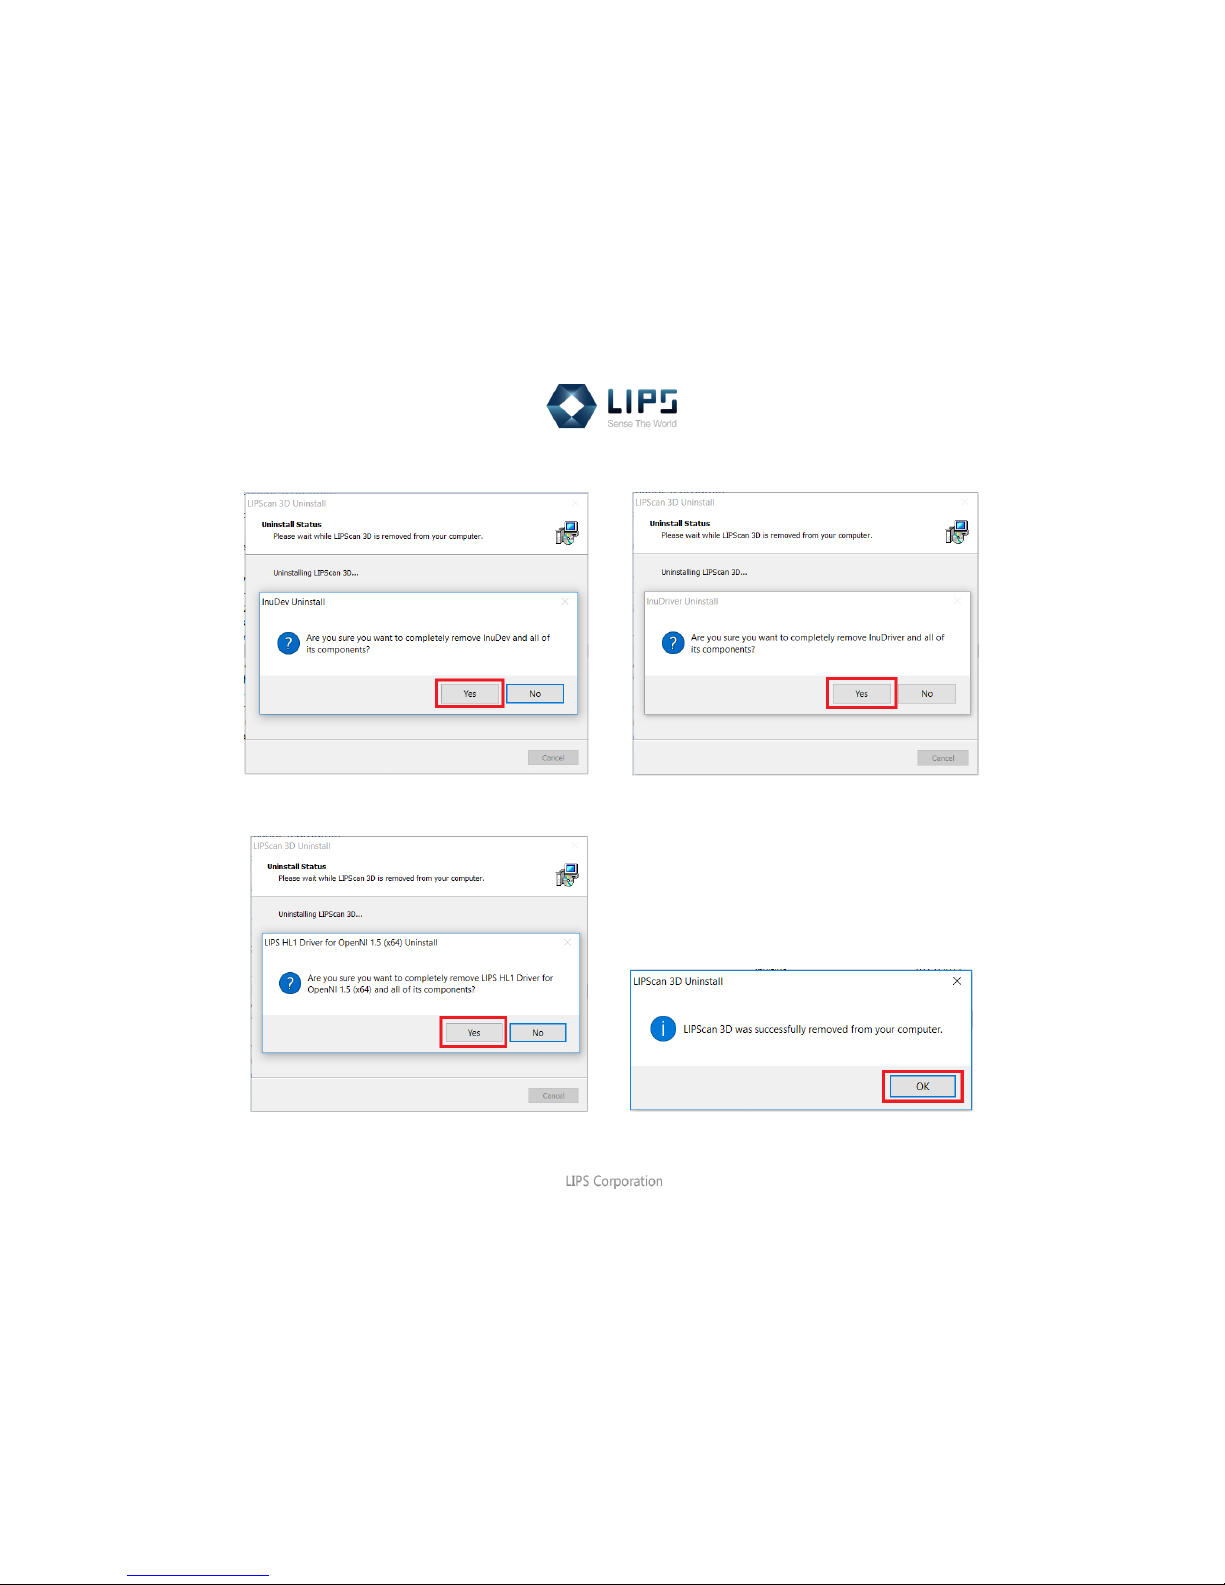
Step 3 Click Yes to remove InuDev and InuDriver.
Step 4 Click Yes to remove LIPS HL1 Driver. Finally, LIPScan 3D was successfully removed.
Page 13
11
LIPScan 3D Manual
LIPScan 3D Operation
This chapter describes how to use LIPScan 3D system to scan and edit, which allows you to configure and control all of 3D
scanner features and system parameters in a user-friendly UI.
AFTER SOFTWARE INSTALLATION
How to start it?
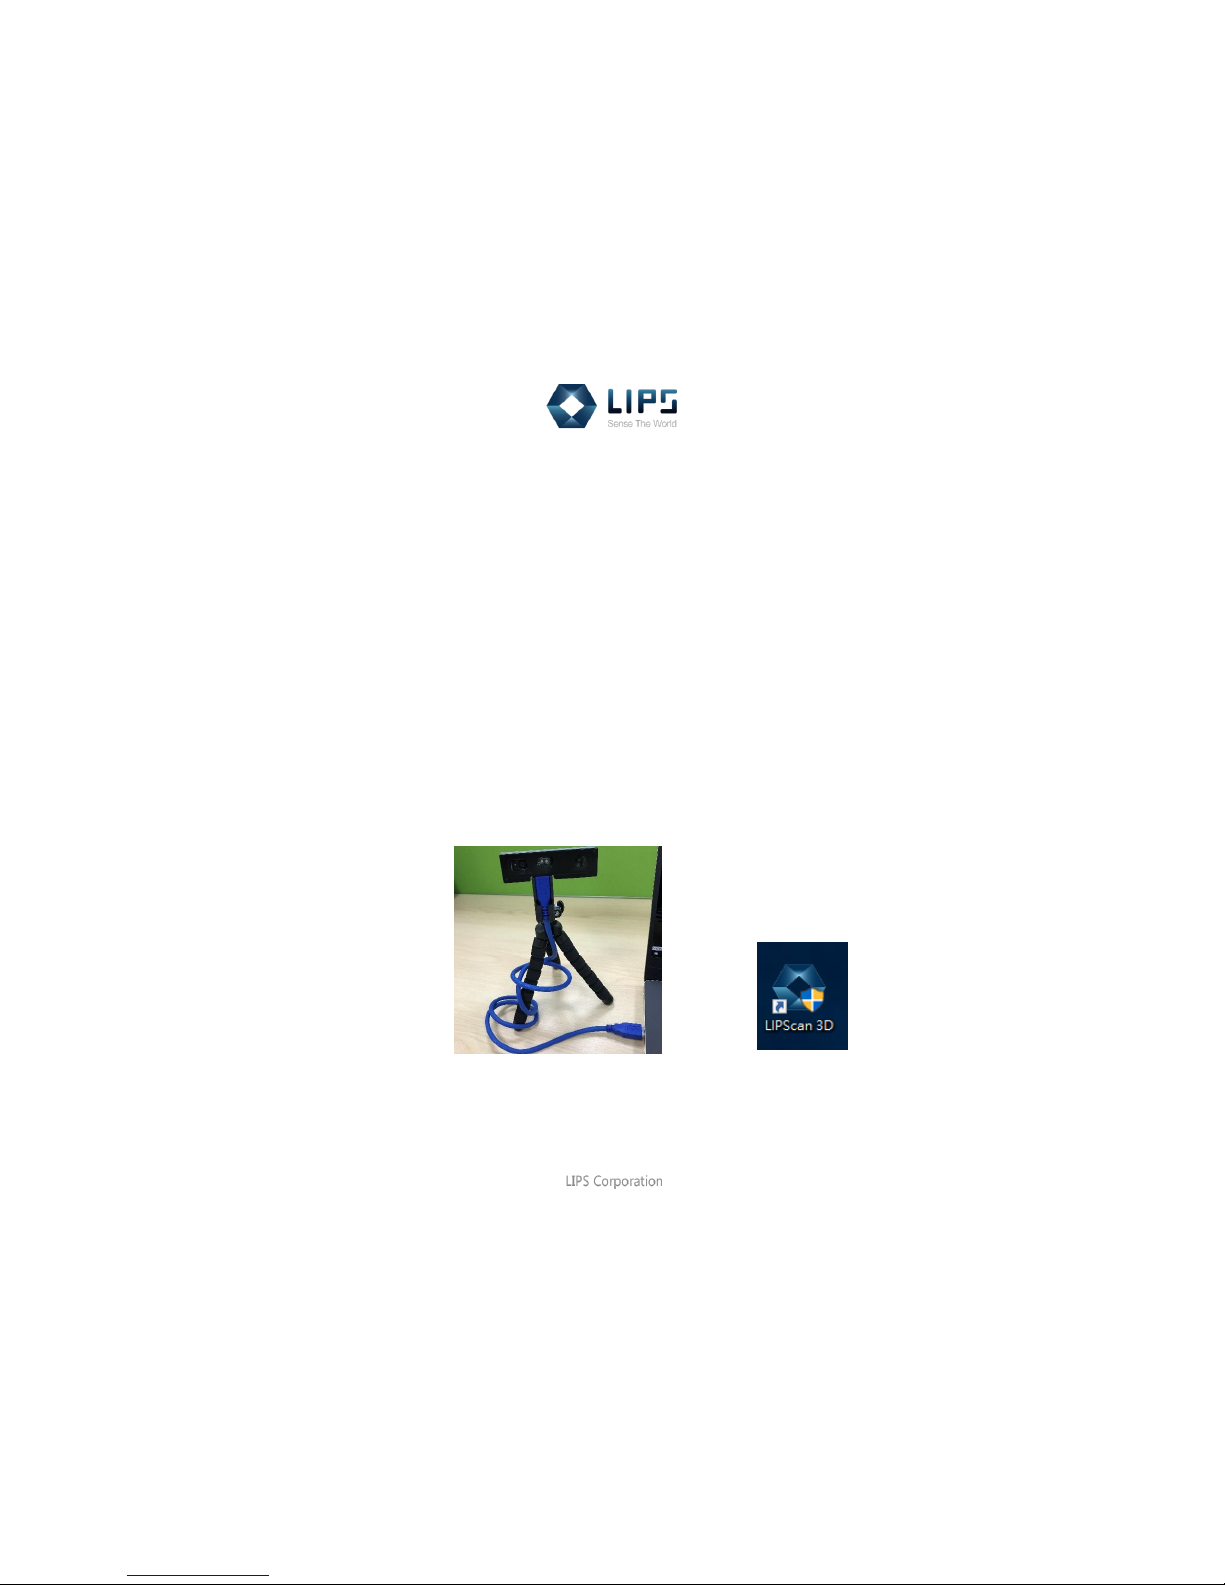
Step 1 Make sure you connect well your 3D depth camera to the computer.
Step 2 Open software LIPScan 3D.
○
1 ○2
Page 14
12
LIPScan 3D Manual
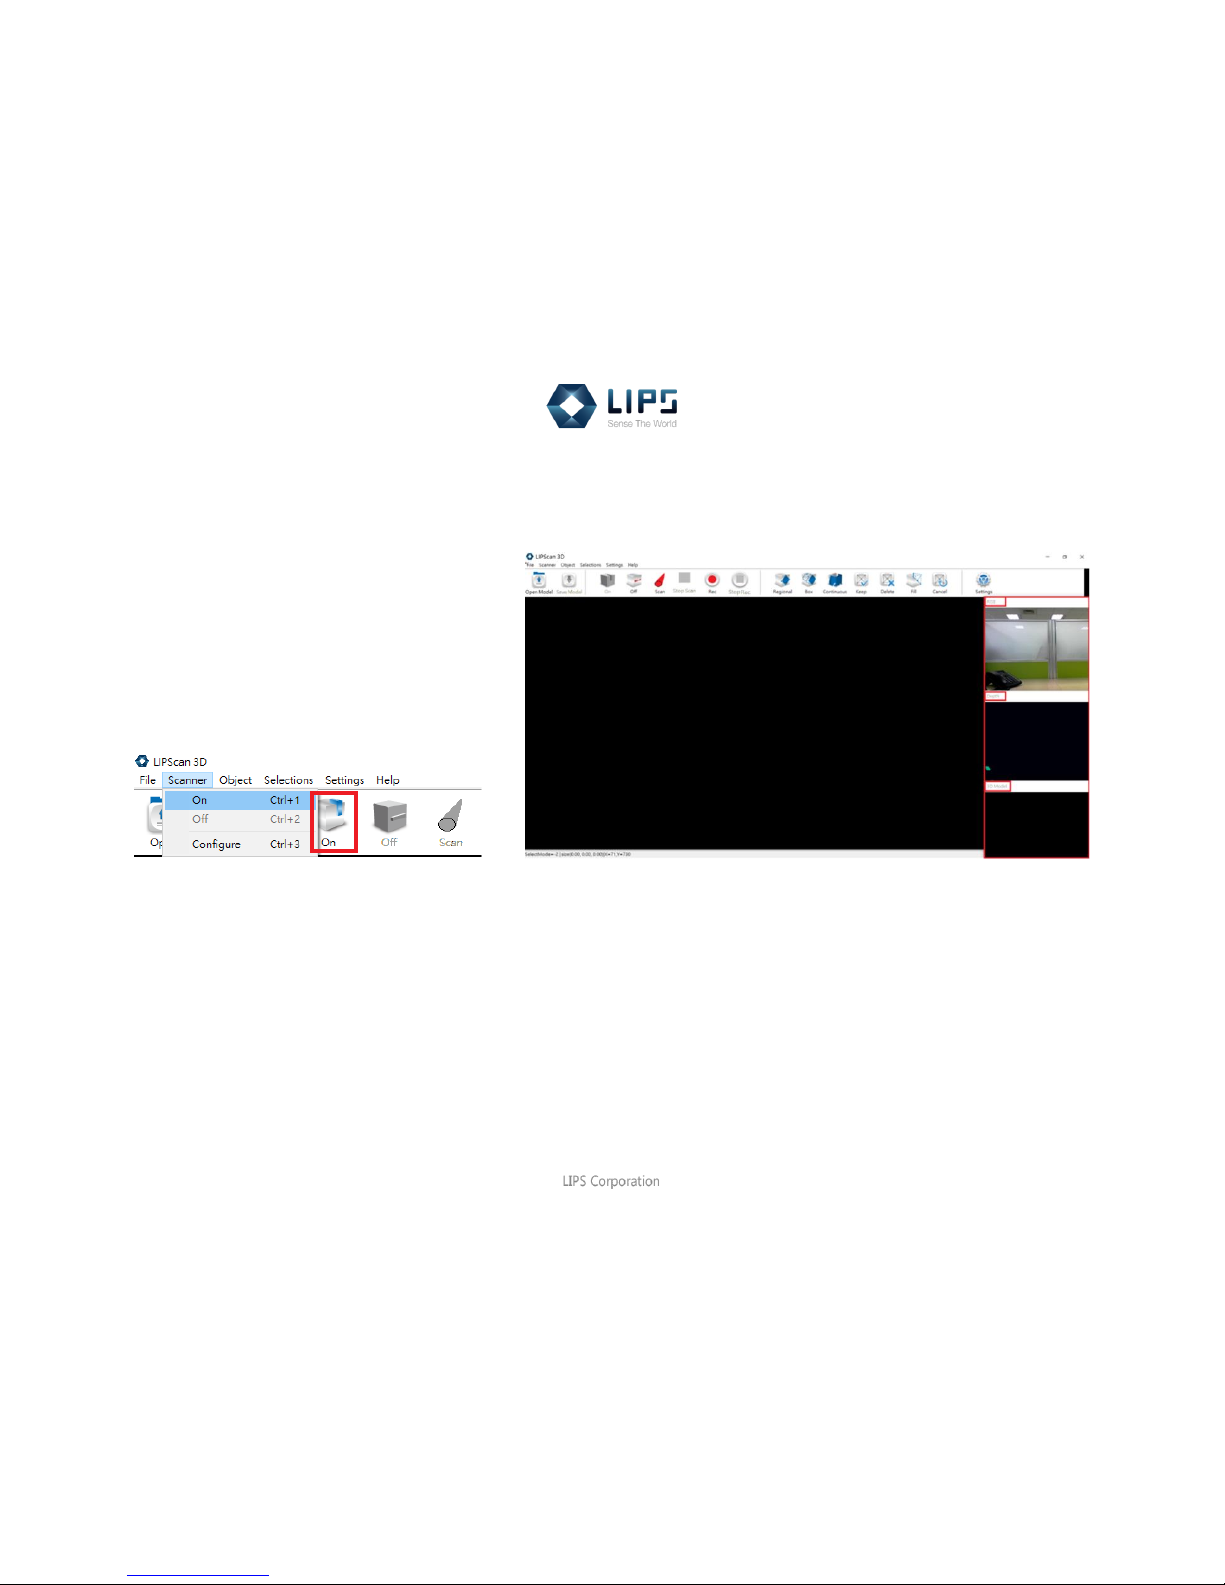
Step 3 Click graphic toolbar On or the upper toolbar Scanner > On (Ctrl+1) to turn on your 3D depth camera. In this page,
you will see 3 sub windows shown on the right side, from top to bottom are RGB, Depth and 3D Model.
Page 15
13
LIPScan 3D Manual
BEFORE SCANNING
What to set up?
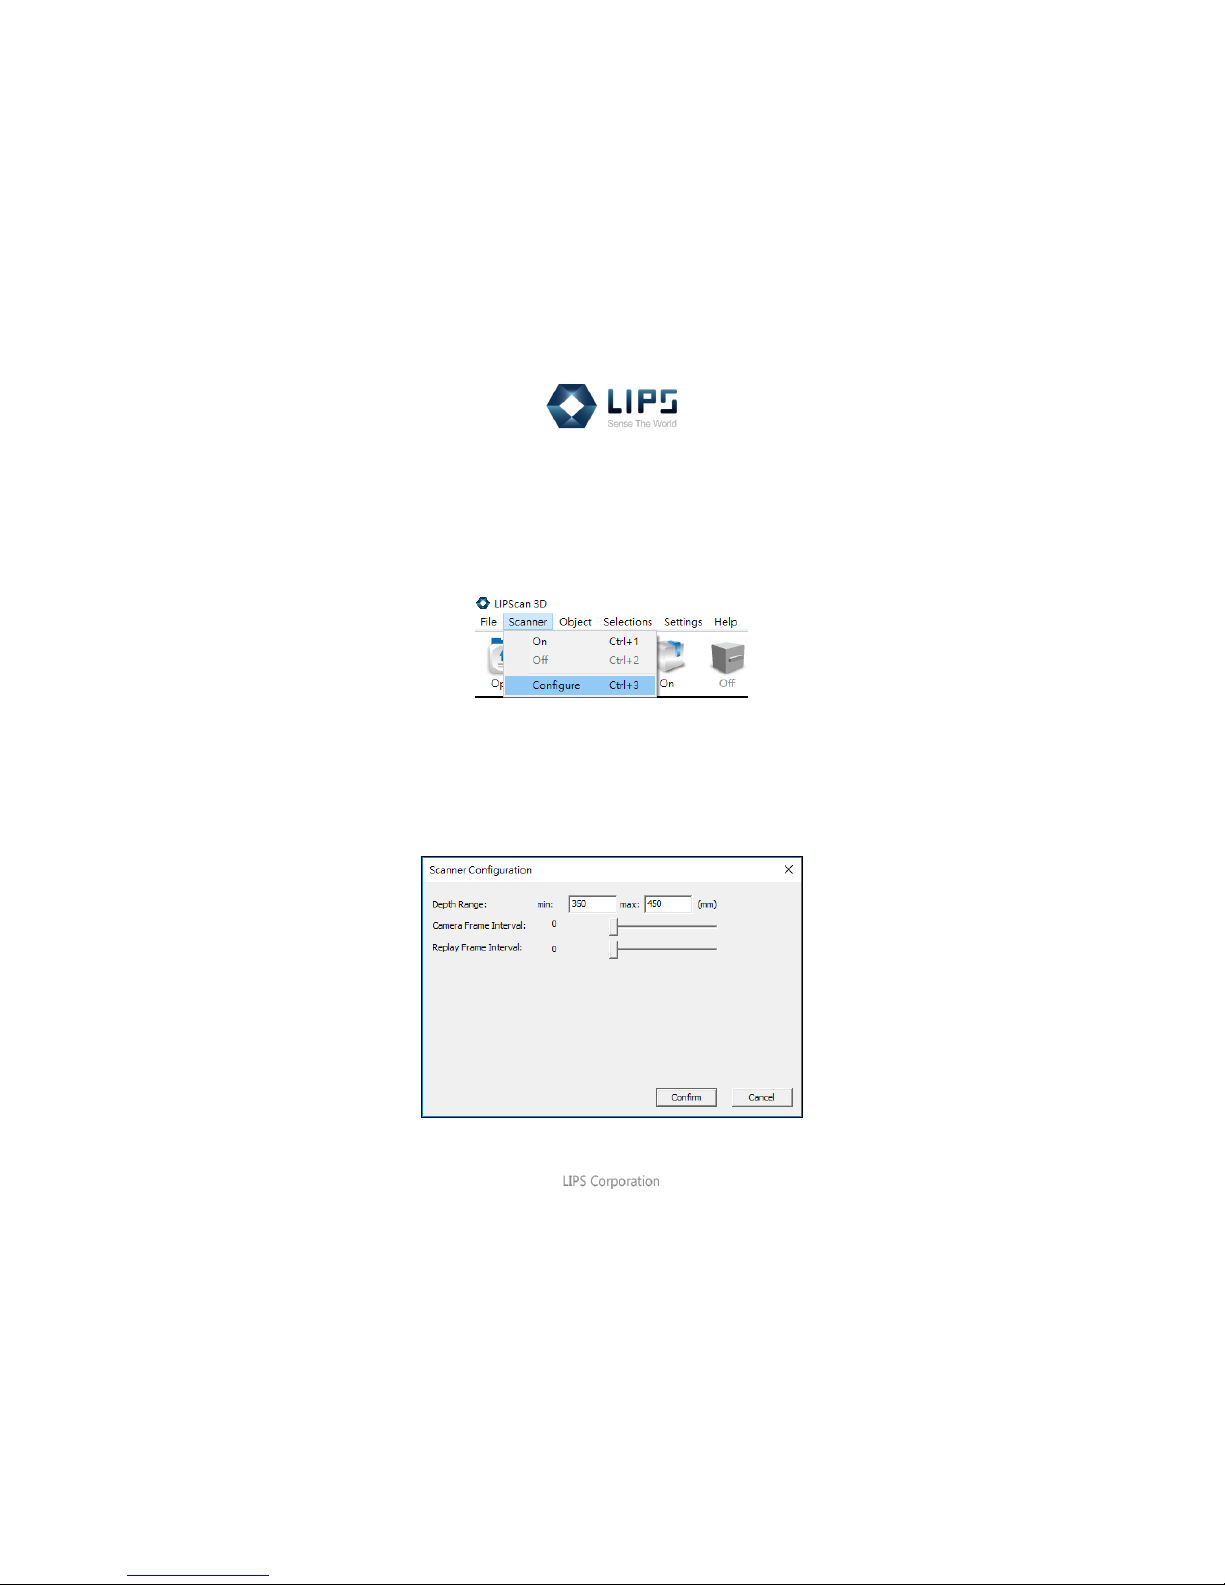
Click upper toolbar Scanner > configure (Ctrl+3) to know the current settings and also for specific alteration based on
individual requirements.
Scanner Configuration
Depth Range/ Camera Frame Interval/ Replay Frame Interval.
Depth Range is for you to define how far the object is away from the camera. Ensure your object is in your preset depth range.
The rest are Camera Frame Interval and Replay Frame Interval. The default settings are 0. (For more detail information
please refer to Appendix)
Page 16
14
LIPScan 3D Manual
READY TO SCAN
This section includes simple steps to do online and offline scanning.
Online scanning
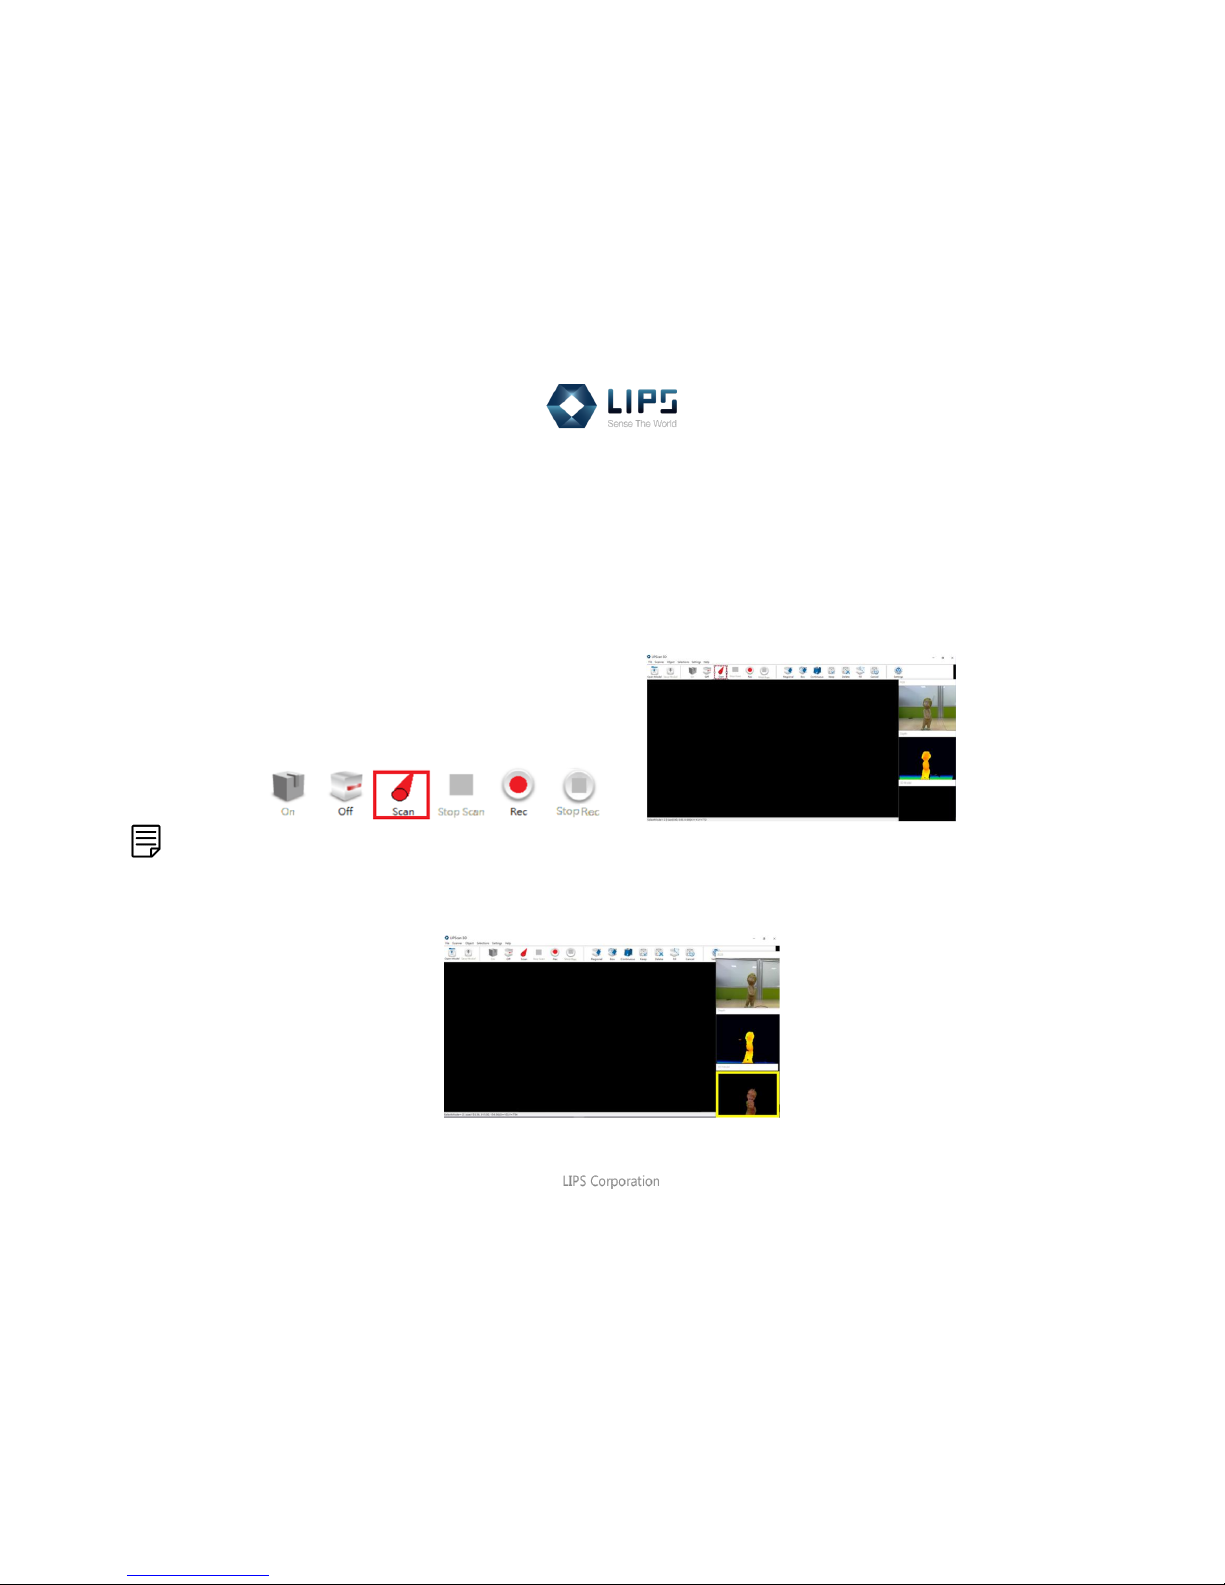
Step 1 Click graphic toolbar Scan and make the camera capture the whole figure. You can easily tell the depth from the color
shown in the depth window, the color warmer, the nearer.
Note:
If the “3D Model” sub window is surrounded by yellow square frame, it means the failure of surface matching. Sometimes it
happens when you hold the camera not that firm or the object moves, but it will disappear after the system estimates the
camera/ object is back on track.
Page 17
15
LIPScan 3D Manual
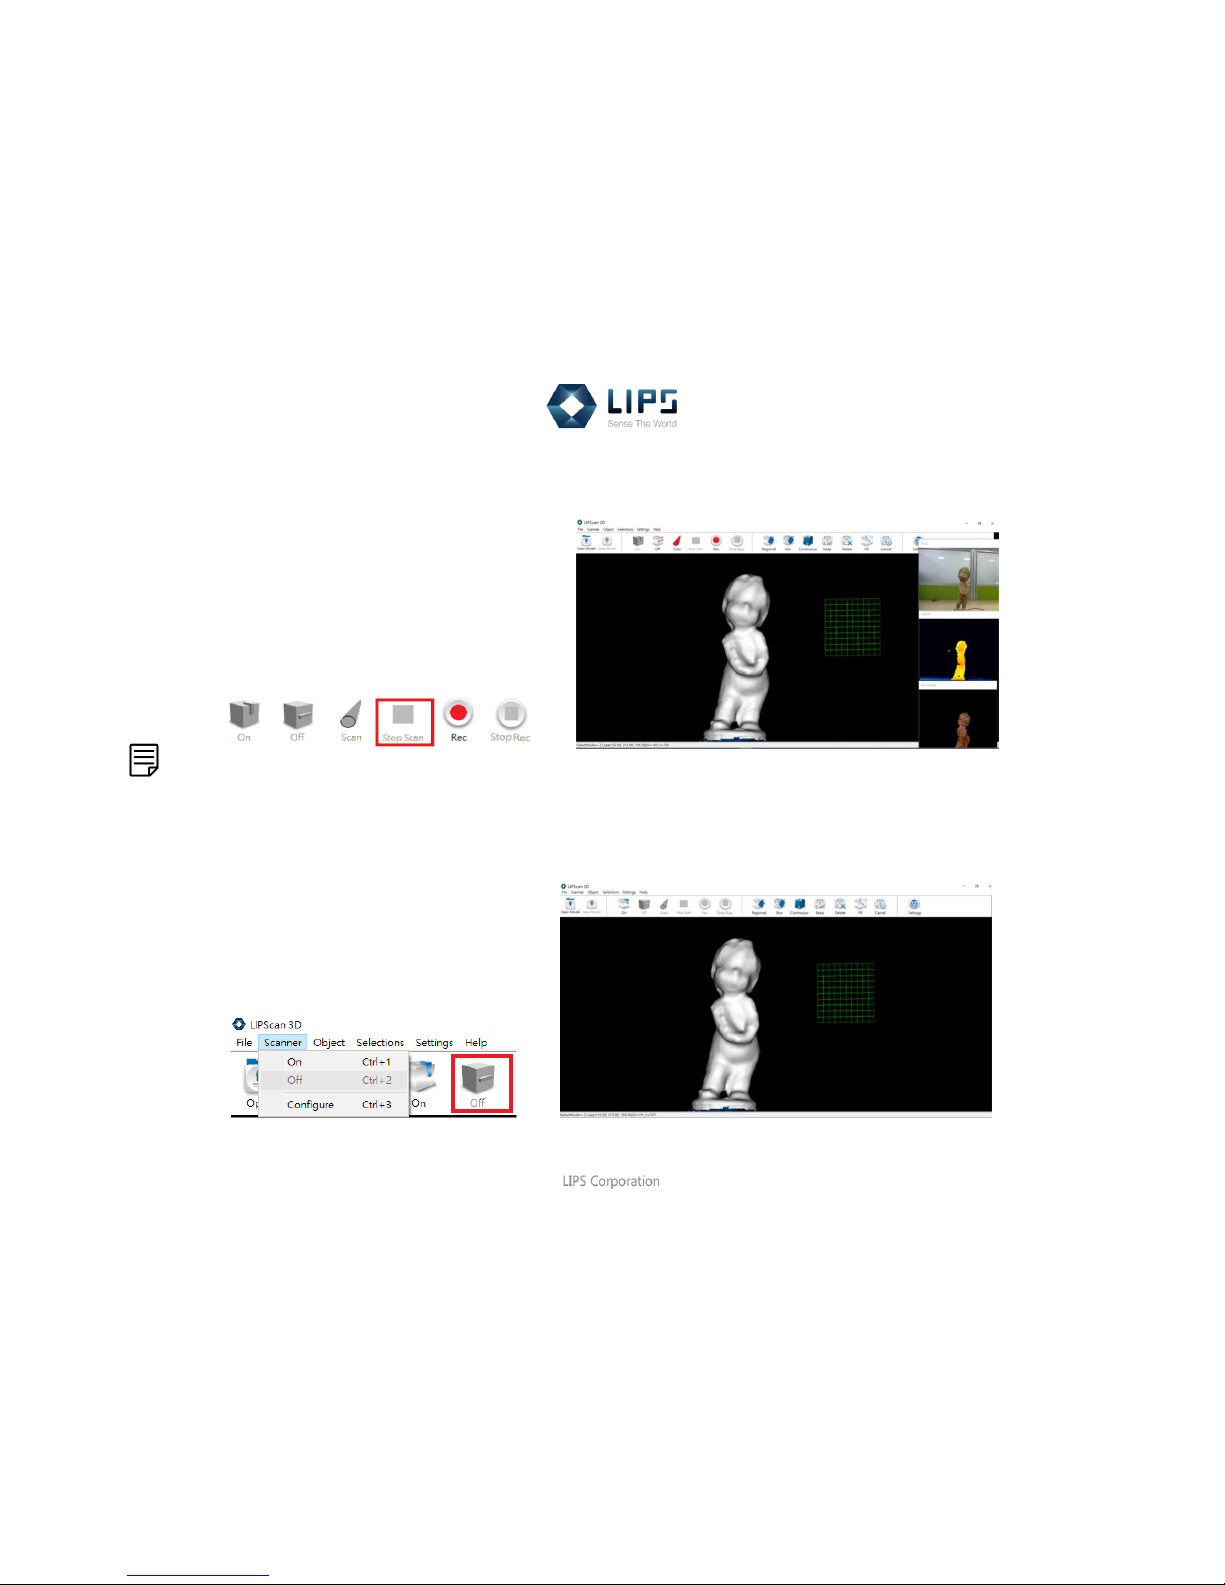
Step 2 Click Stop Scan to finish the process. If you want to take a new scan, click Scan and repeat the process. The object
automatically stored in preset folder.
Note:
You can also click File > Clear (Ctrl+E) to erase the object and then rescan.
Step 3 Click graphic toolbar Off or the upper toolbar Scanner > Off (Ctrl+2) to turn off the camera. All three sub windows
shown on the right side will be closed.
Page 18
16
LIPScan 3D Manual
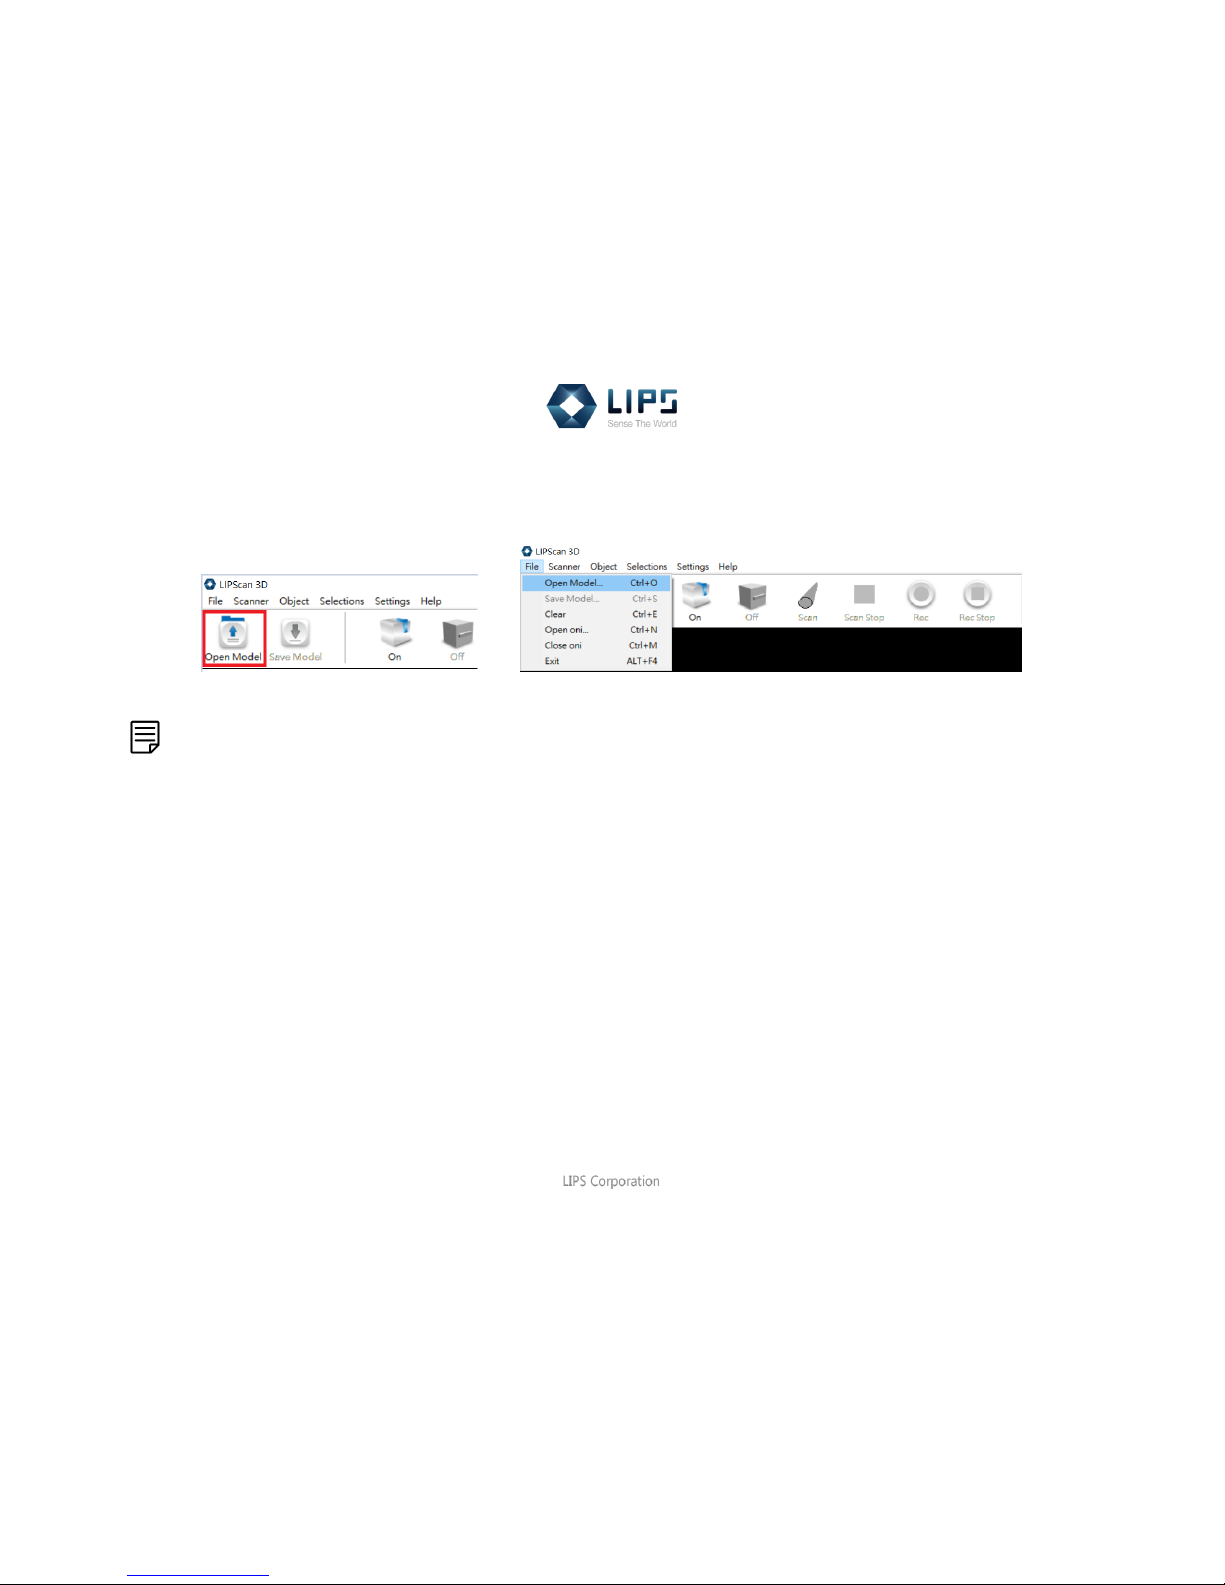
Step 4 The latest scanning file will be generated to overwrite the previous one, you can check the toolbar File > Open
Model (Ctrl+O) or just click the graphic toolbar Open Model. Find the file saved as default name “res.tgl”.
(C:\Program Files\LIPS\LIPScan 3D)
Note
If you have any scanning files to open just through the same way, the software supports 4 file formats: TGL, OBJ, STL and
PLY.
Page 19
17
LIPScan 3D Manual
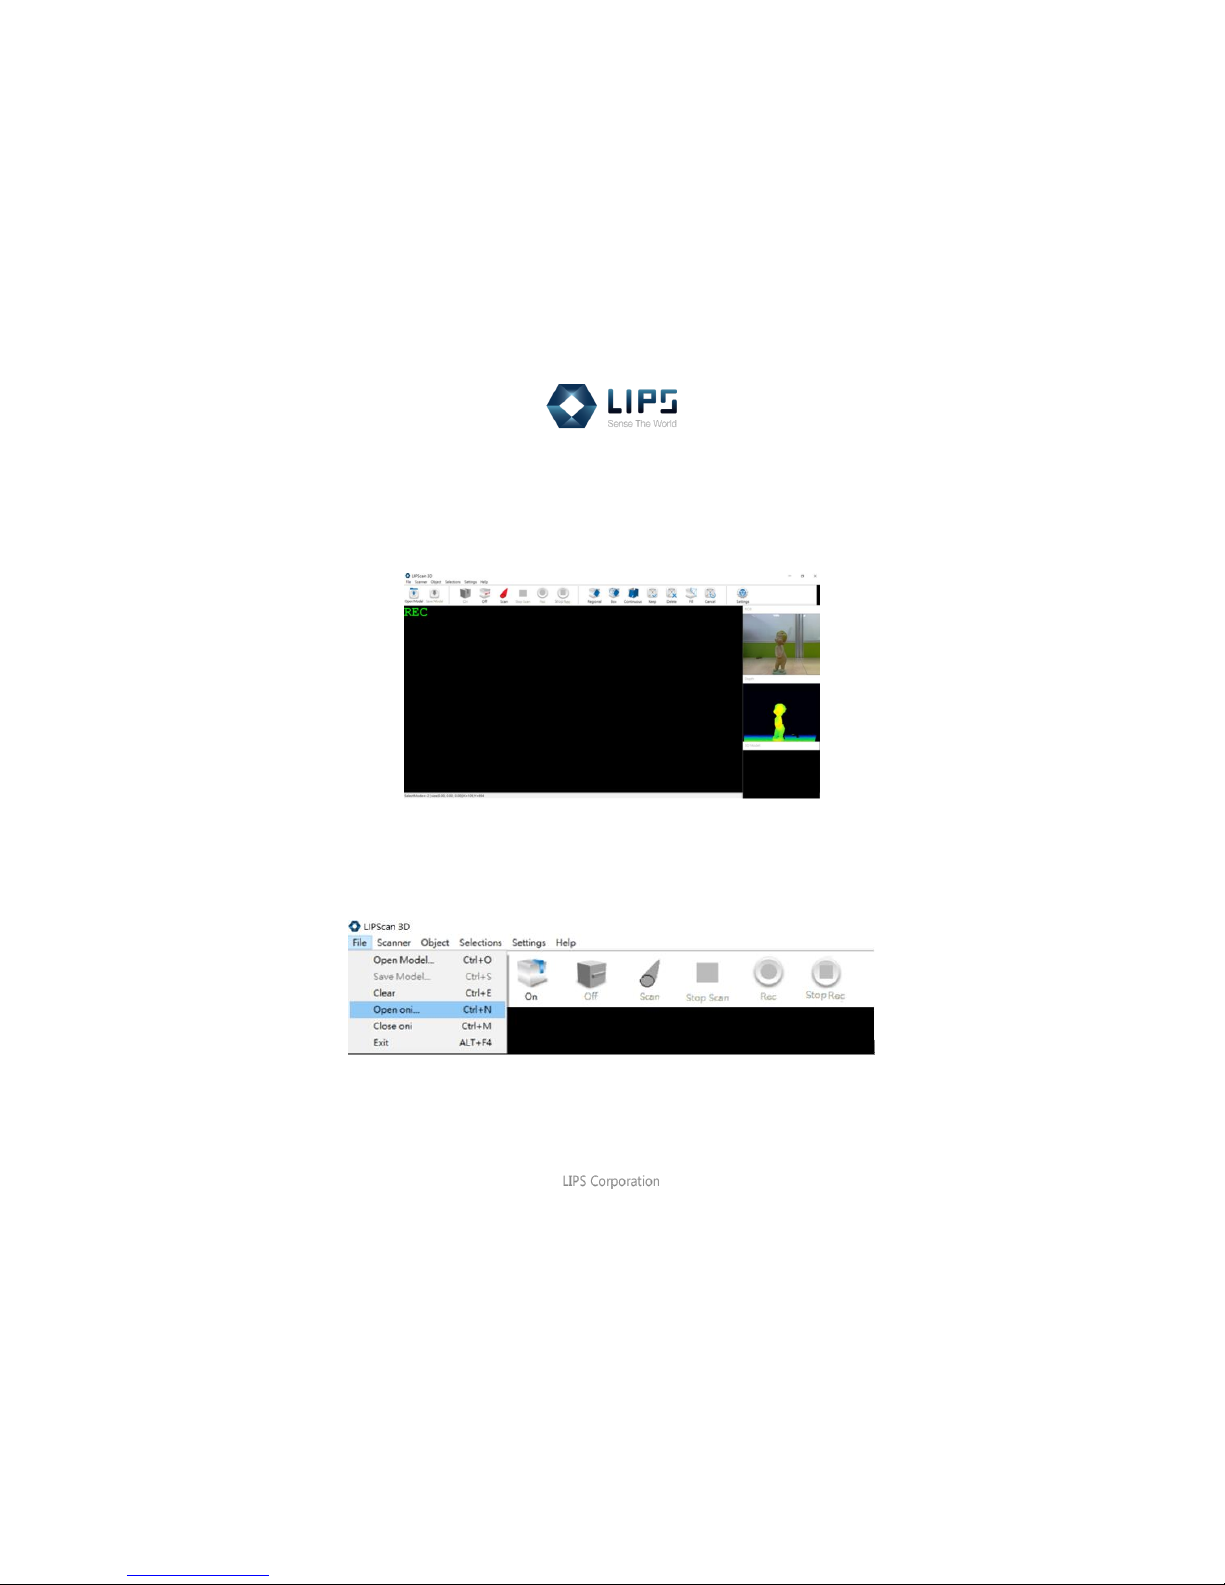
Offline scanning
Step 1 Click graphic toolbar Rec to start recording and click Stop Rec to finish. If you want to record a new one, just click Rec
and repeat the process.
Step 2 Click the upper toolbar File > Open Oni File (Ctrl+N) to check the file saved as default name “recoder.oni”.
(C:\Program Files\LIPS\LIPScan 3D)
Page 20
18
LIPScan 3D Manual
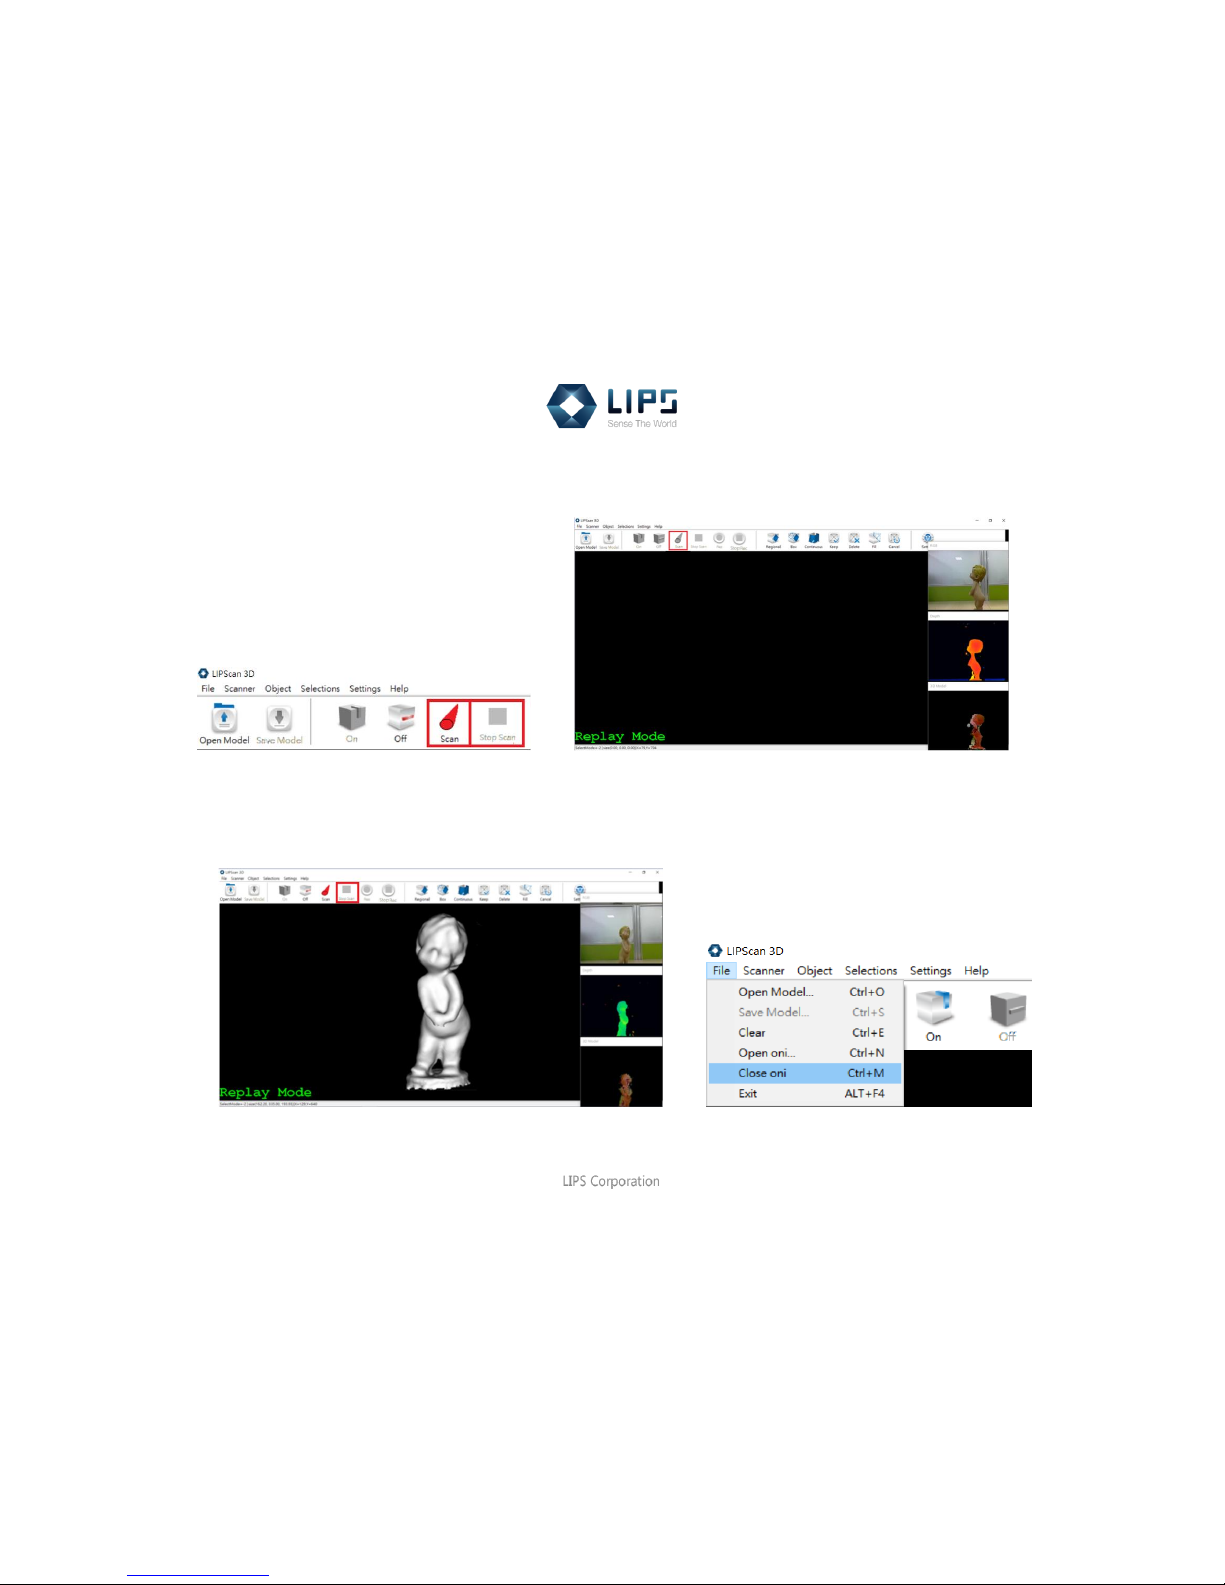
Step 3 During the replay mode, click graphic toolbar Scan to proceed and wait for the object formation, then click Stop Scan
to finish.
Step 4 After clicking Stop Scan, the main window will display the scanned object. Click the upper toolbar File > Close Oni
File (Ctrl+M) to close the replay mode and 3 sub windows shown on the right side.
Page 21
19
LIPScan 3D Manual
AFTER SCANNING, READY TO EDIT
You can check the settings and make adjustment in advance.
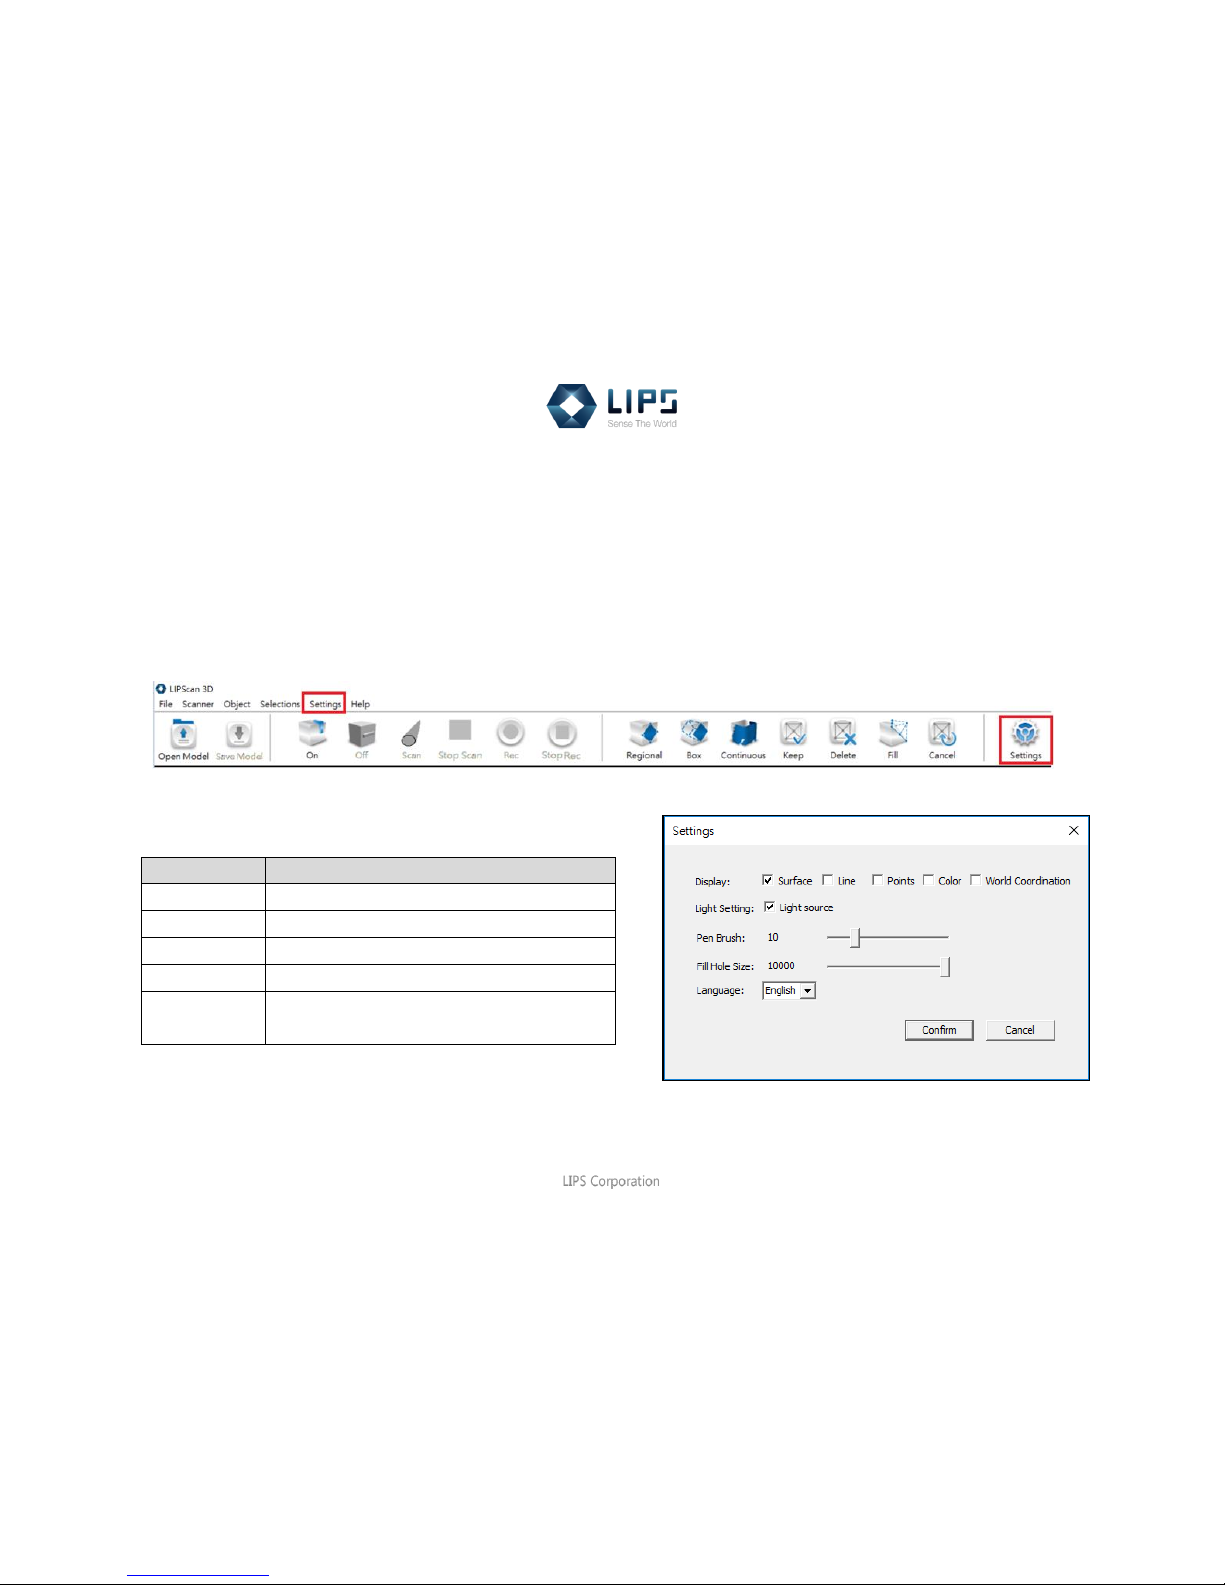
Click the graphic or upper toolbar Settings
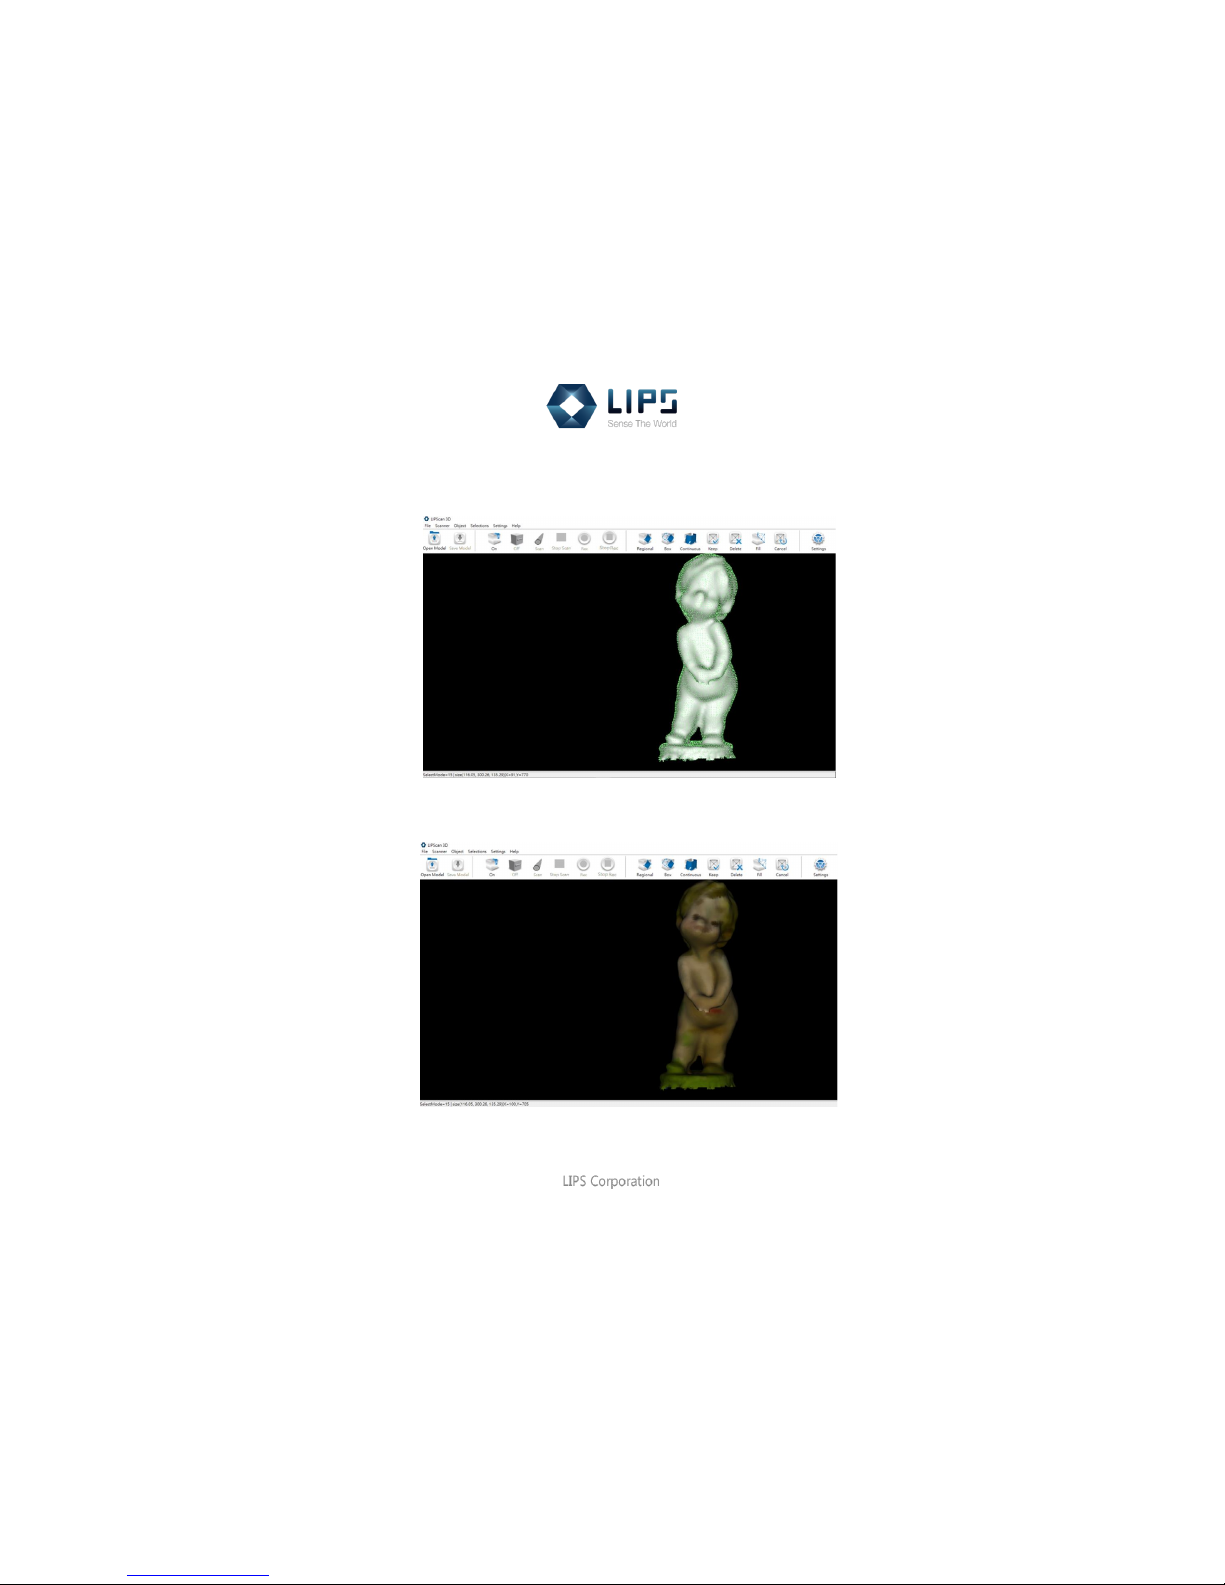
(1) Display
Description
Surface
The overall outline of the object.
Line
Object covered by triangle meshes.
Points
Object covered by point cloud.
Color
Shows real color captured by depth camera.
World
Coordination
The green lattice shown on the screen
represents the position of the camera.
Page 22
20
LIPScan 3D Manual
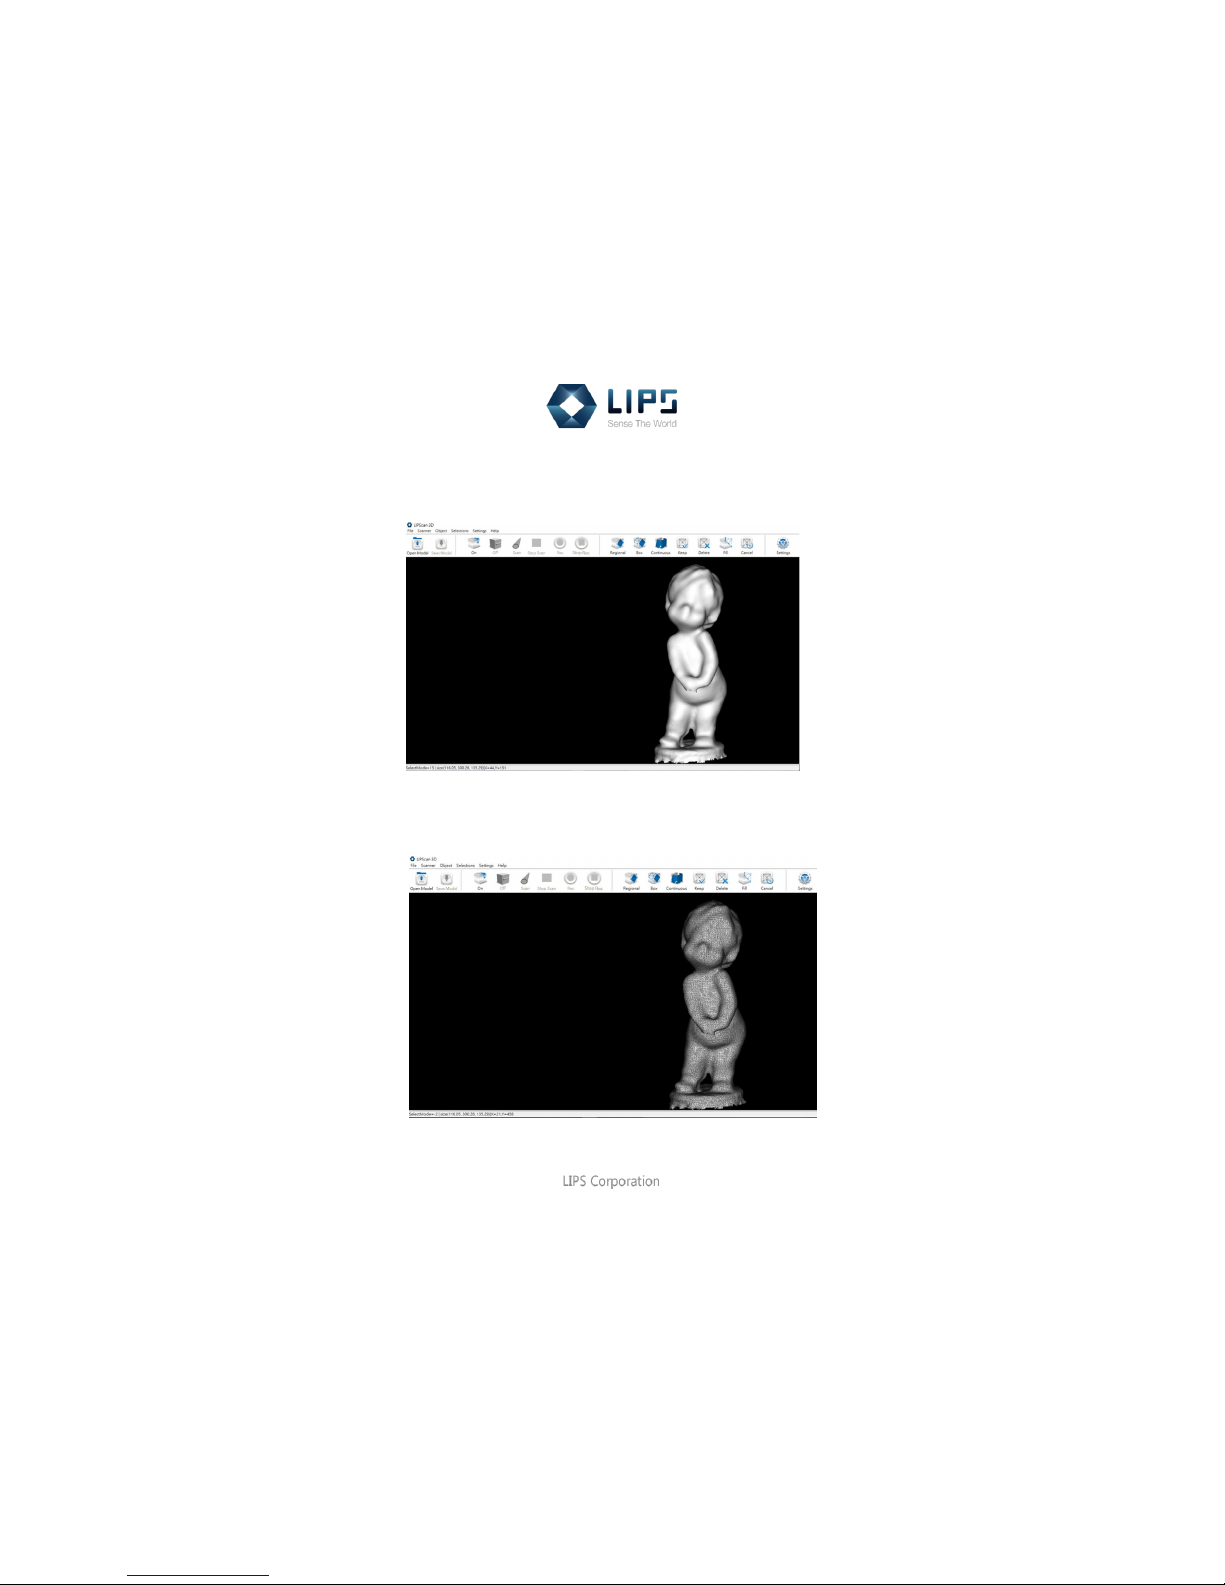
Surface
This is automatically set. You can show the overall outline of the object.
Line
The object is covered by triangle meshes.
Page 23
21
LIPScan 3D Manual
Points
The object is covered by point cloud.
Color
The depth camera capture from the object
Page 24
22
LIPScan 3D Manual
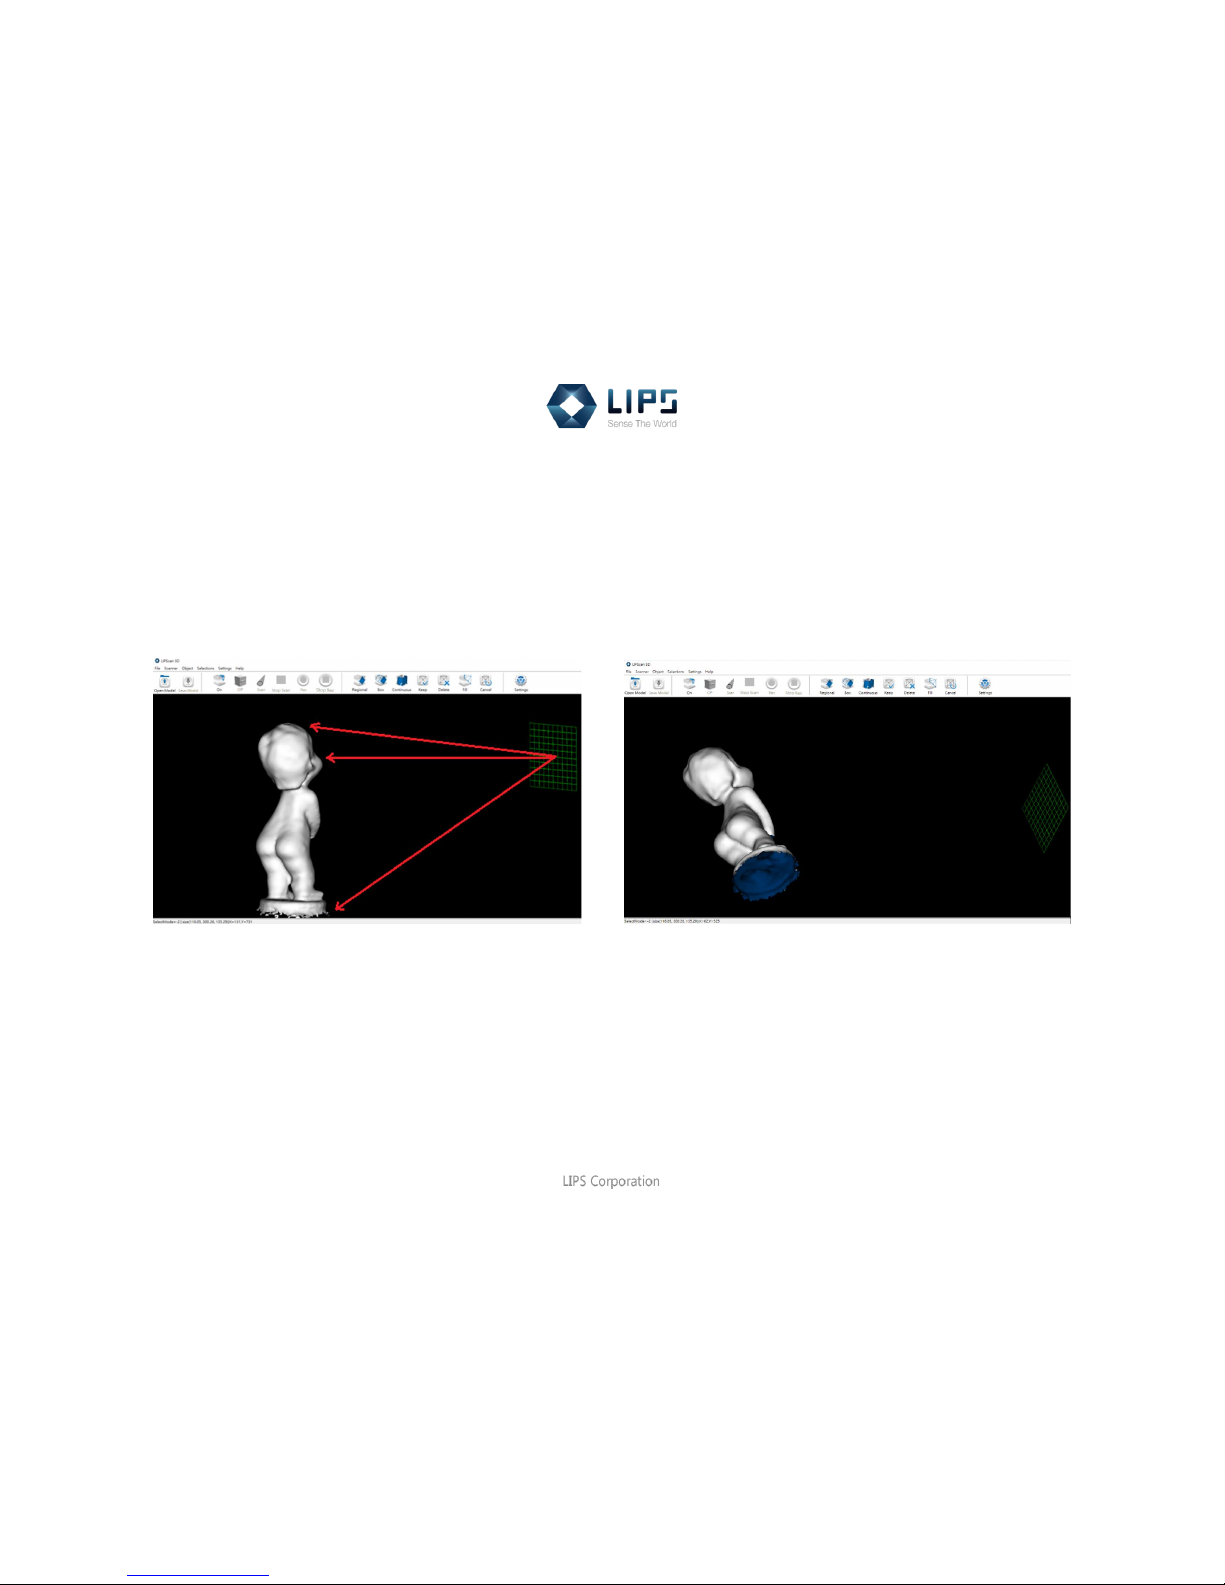
World coordination
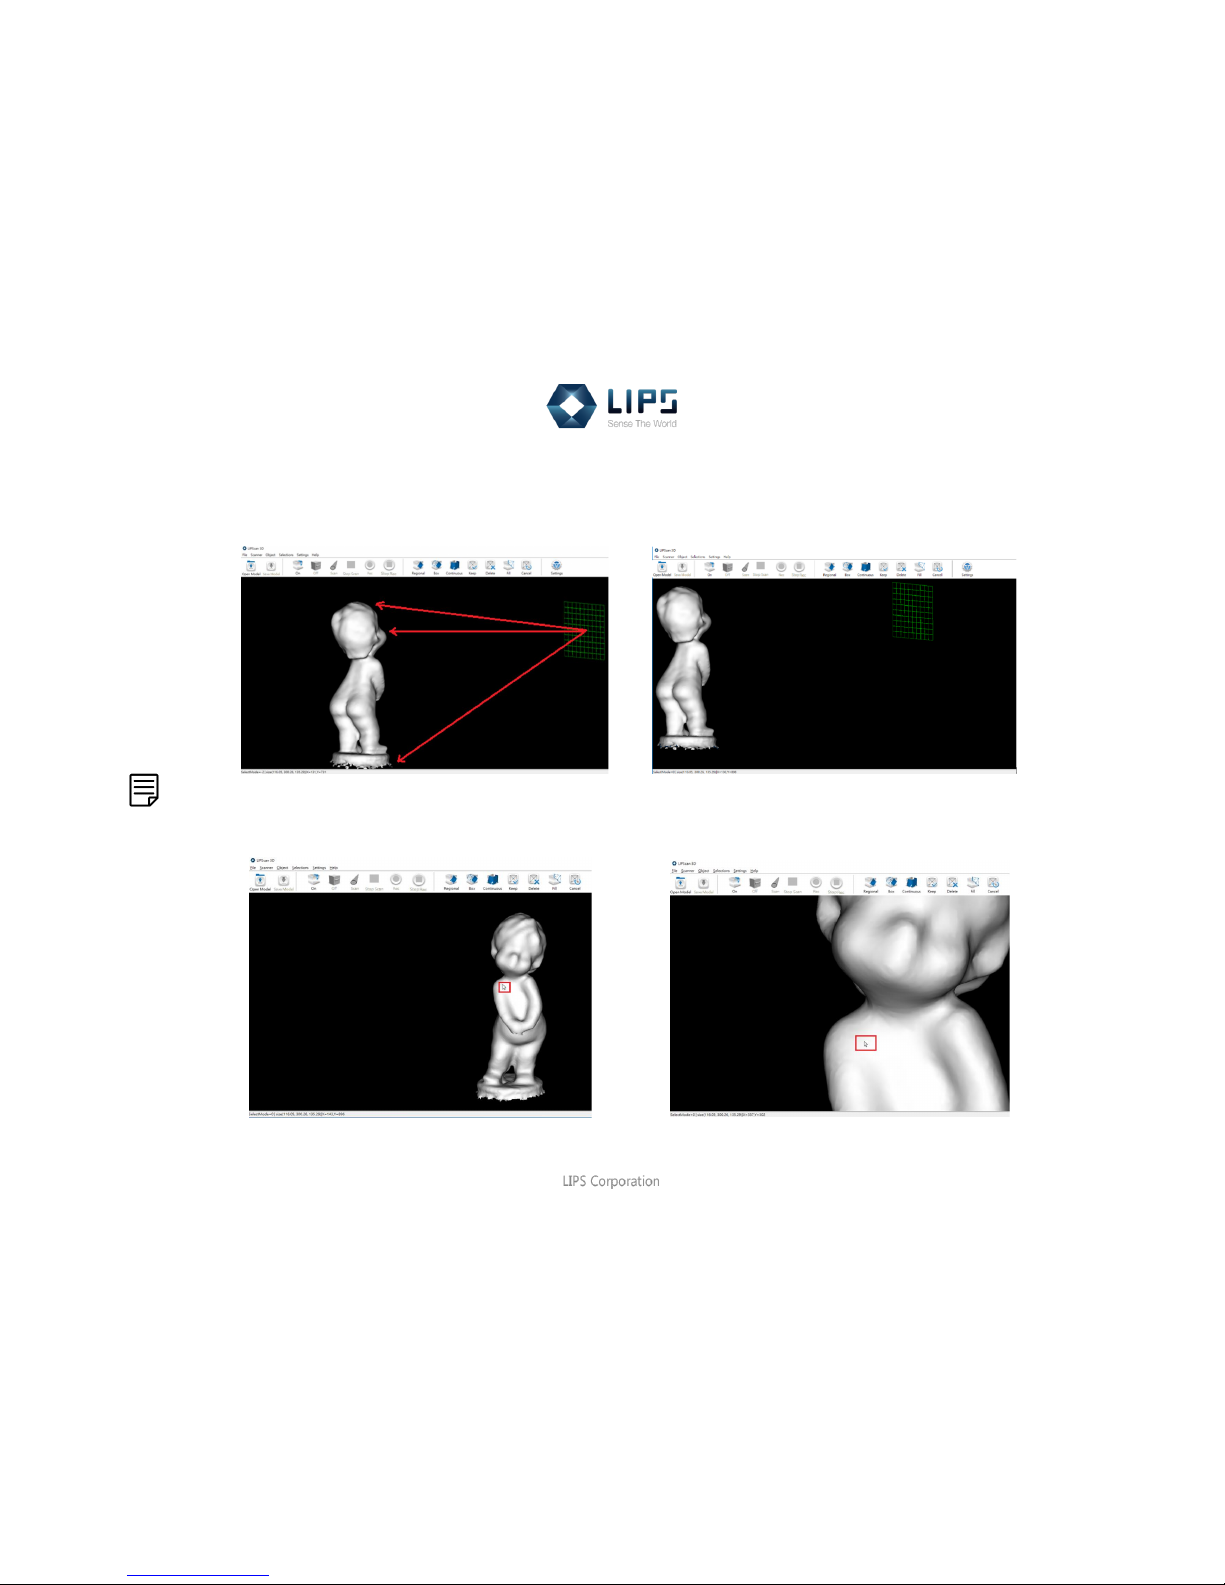
The green lattice shown on the screen represents the position of the camera.
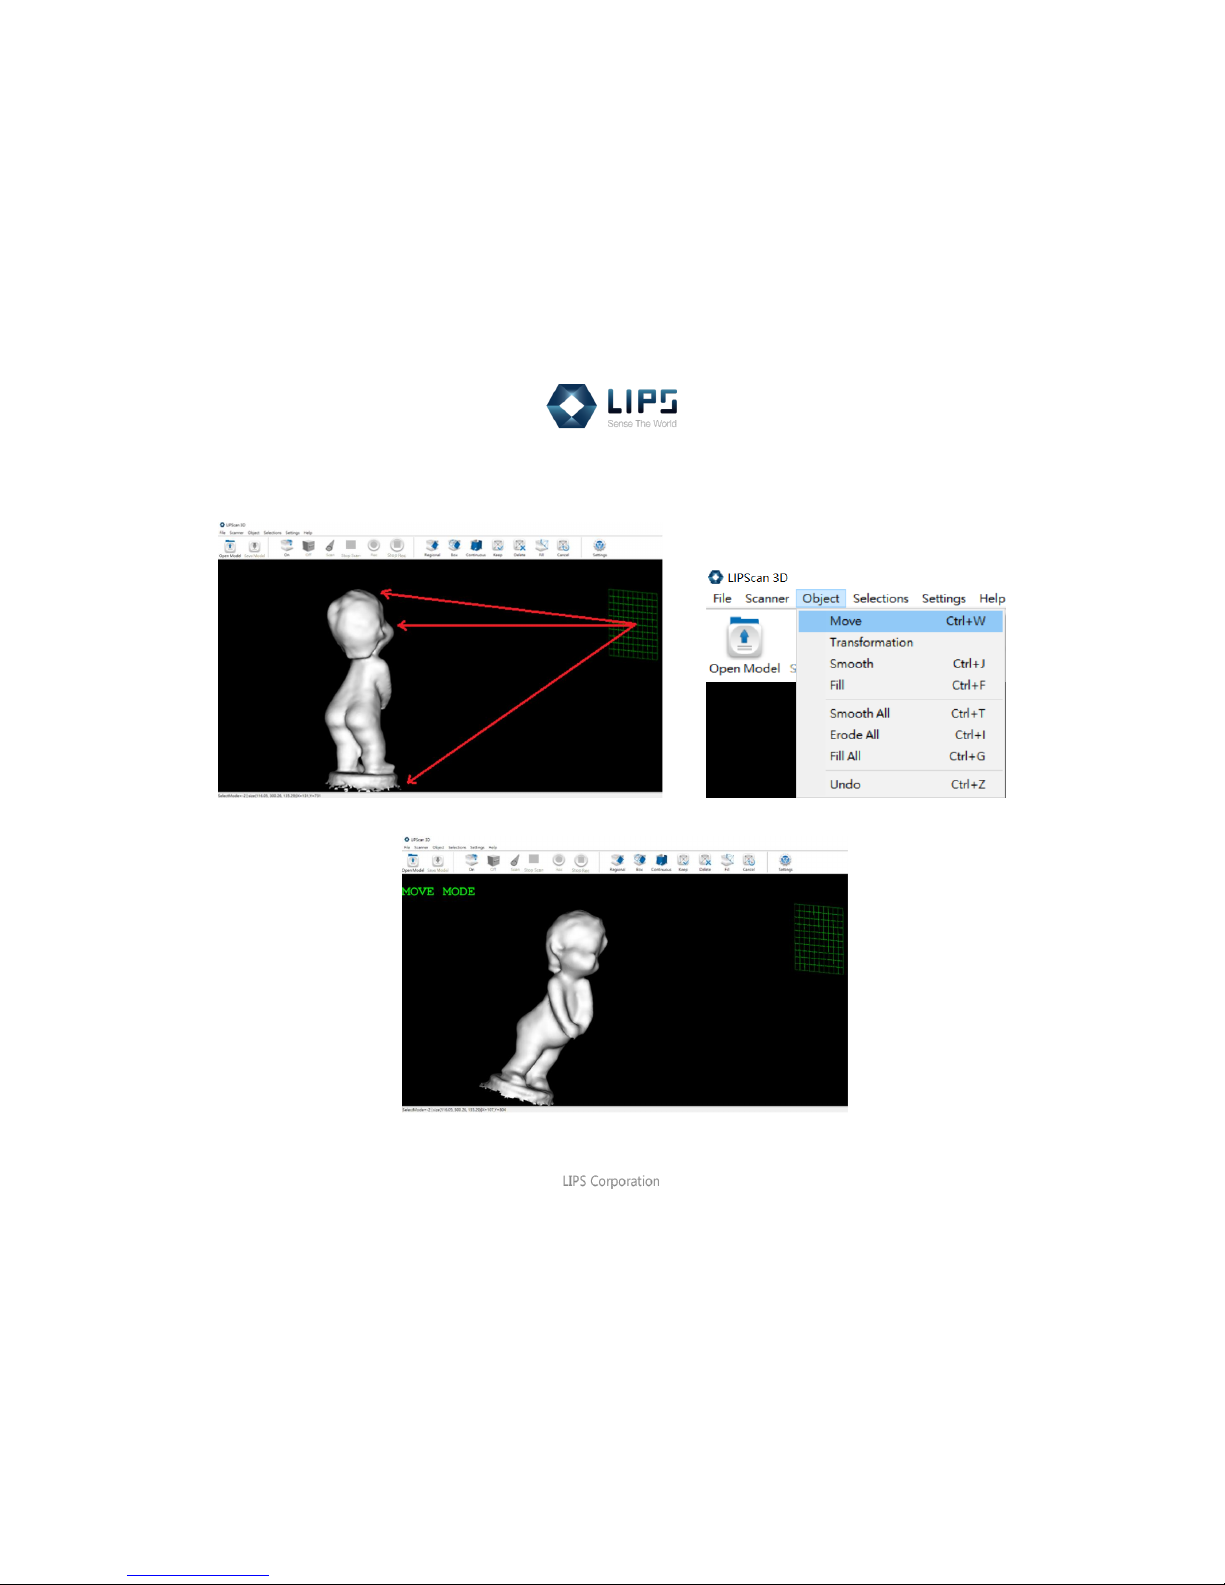
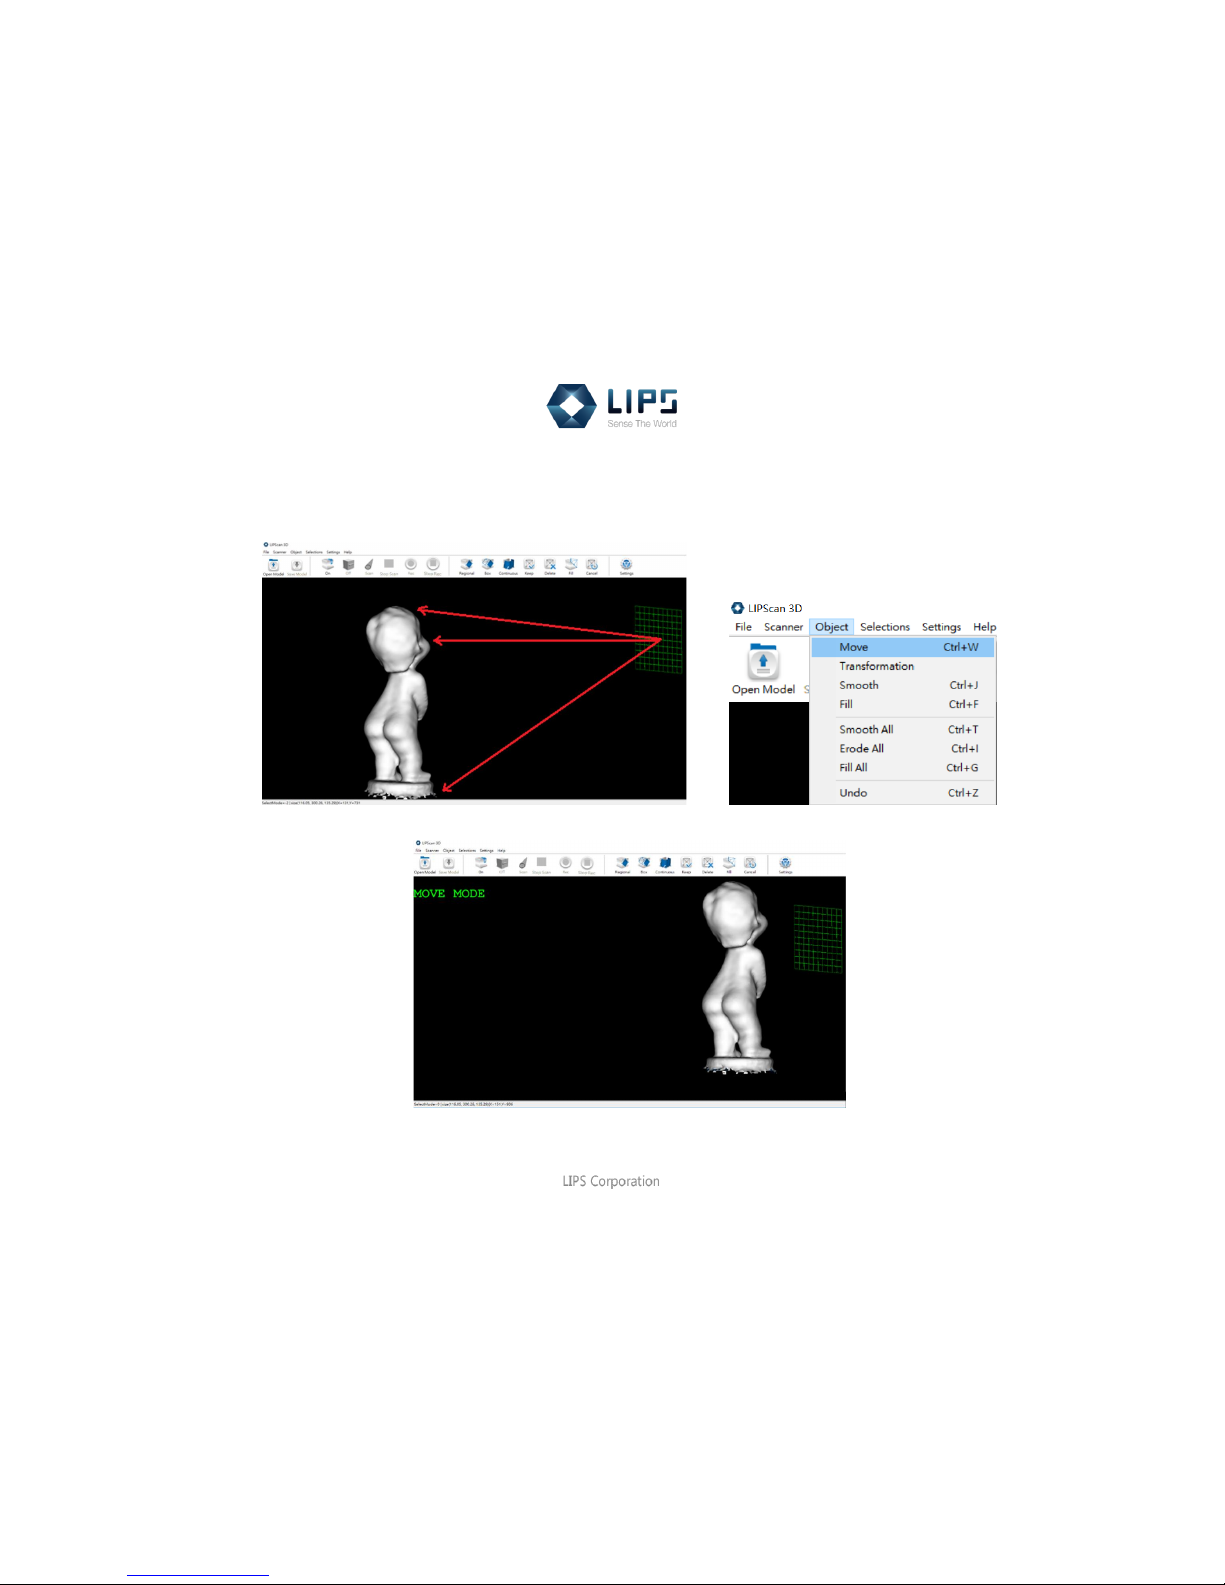
The followings are 4 circumstances, you can adjust the position of your object and green lattice (camera) accordingly.
A. Object rotates, green lattice rotates.
It is the normal mode in the system. Just use the mouse to drag the object to rotate, the green lattice will rotate accordingly.
Page 25
23
LIPScan 3D Manual
B. Object rotates, green lattice fixed.
Click Object > Move (Ctrl+W) to fix the position of the green lattice while you still can drag the object to rotate.
Page 26
24
LIPScan 3D Manual
C. Object shifts, green lattice fixed.
Click Object > Move (Ctrl+W) to fix the position of green lattice. Then press Shift and drag the object in the meantime.
Or press PgUp to drag, finish the function press Esc.
Page 27
25
LIPScan 3D Manual
D. Object shifts, green lattice shifts
Press Shift and drag the object in the meantime. Or press PgUp to drag, the green lattice will be shifted accordingly.
Finish the function press Esc.
Note:
Aside from dragging object by your mouse, you can also scroll the mouse wheel to zoom in/out the object. During the
zooming process, your cursor will stick to the point it originally aims at.
Page 28
26
LIPScan 3D Manual
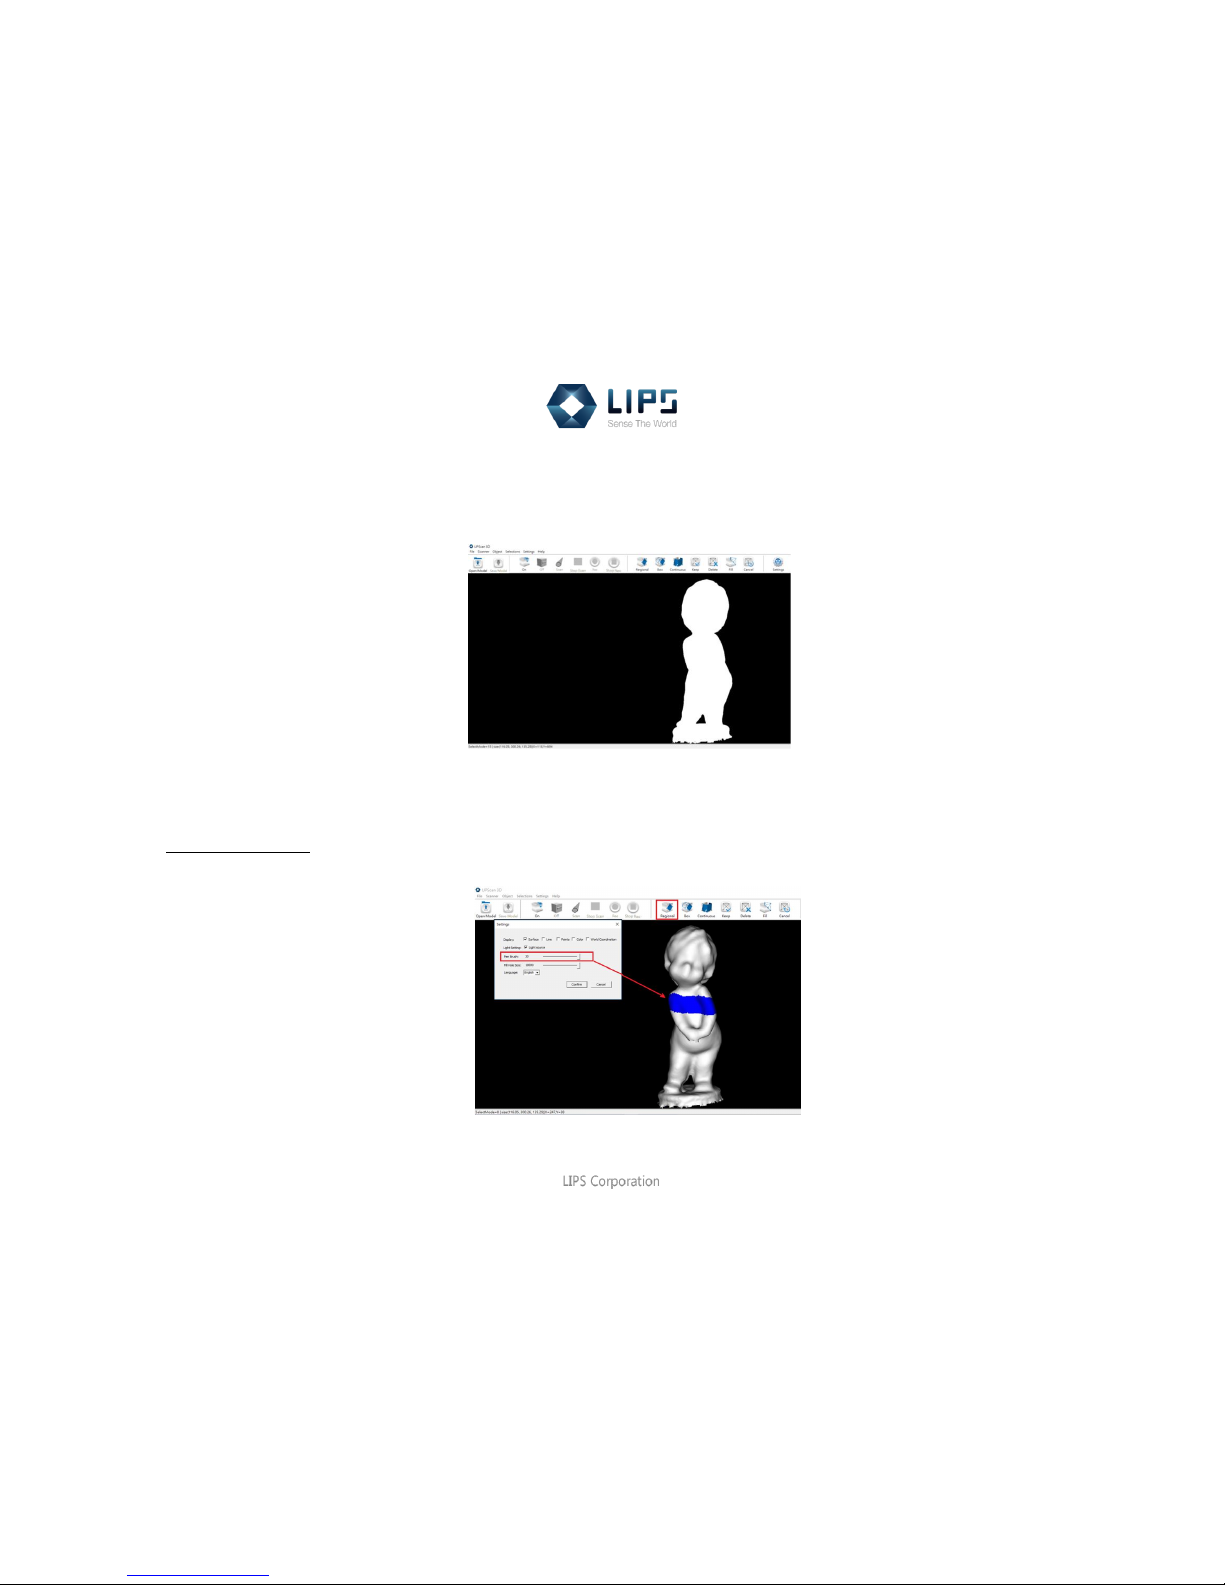
(2) Light Setting
Light source is automatically set to enable your object to look undulate with shadows. The page shown on the right is the
object displayed without light source.
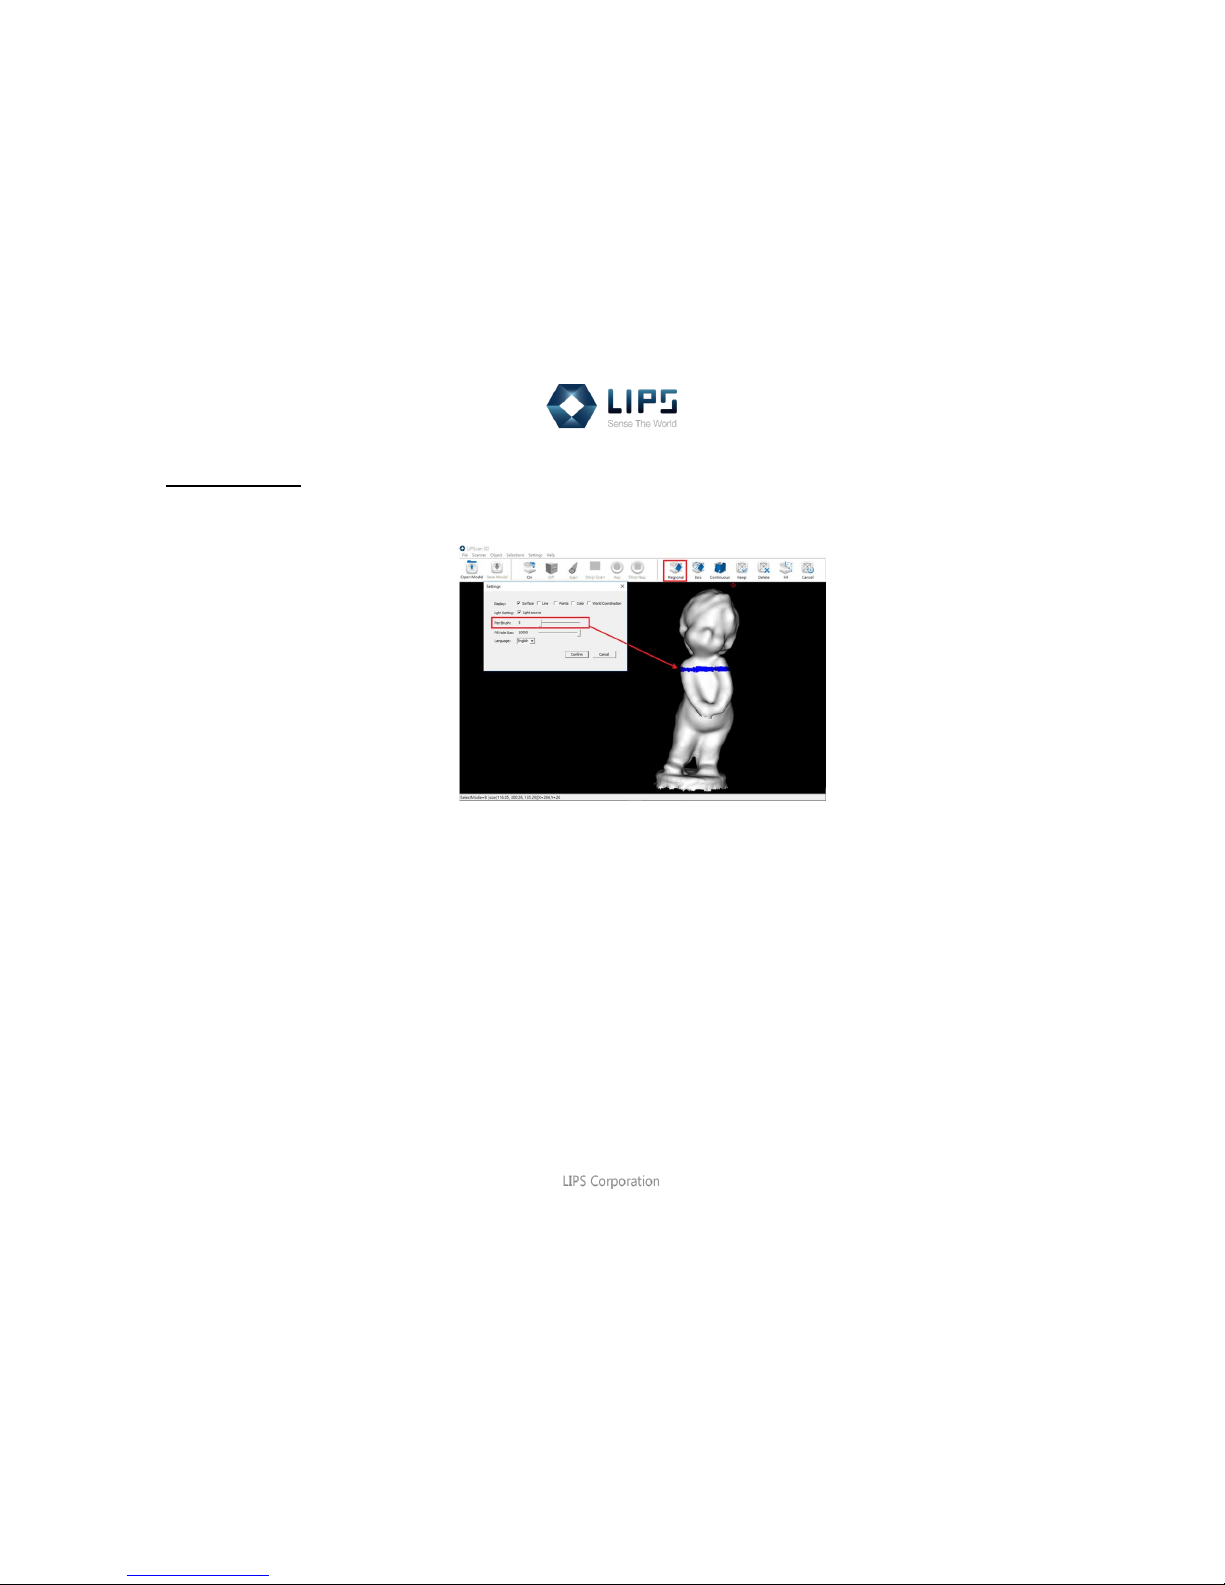
(3) Pen Brush
You can adjust the brush size here when you use your mouse as a pen brush to do regional selection.
Pen brush size: 30
By using thicker pen brush, you can easily select a larger area.
Page 29
27
LIPScan 3D Manual
Pen brush size: 5
By using thinner pen brush, you can also make a delicate selection.
(4) Fill Hole Size
This represents the number of pixels. Minimum 80, maximum 10000 which is the default setting. You can determine how
large the hole you would like to fill.
Page 30
28
LIPScan 3D Manual
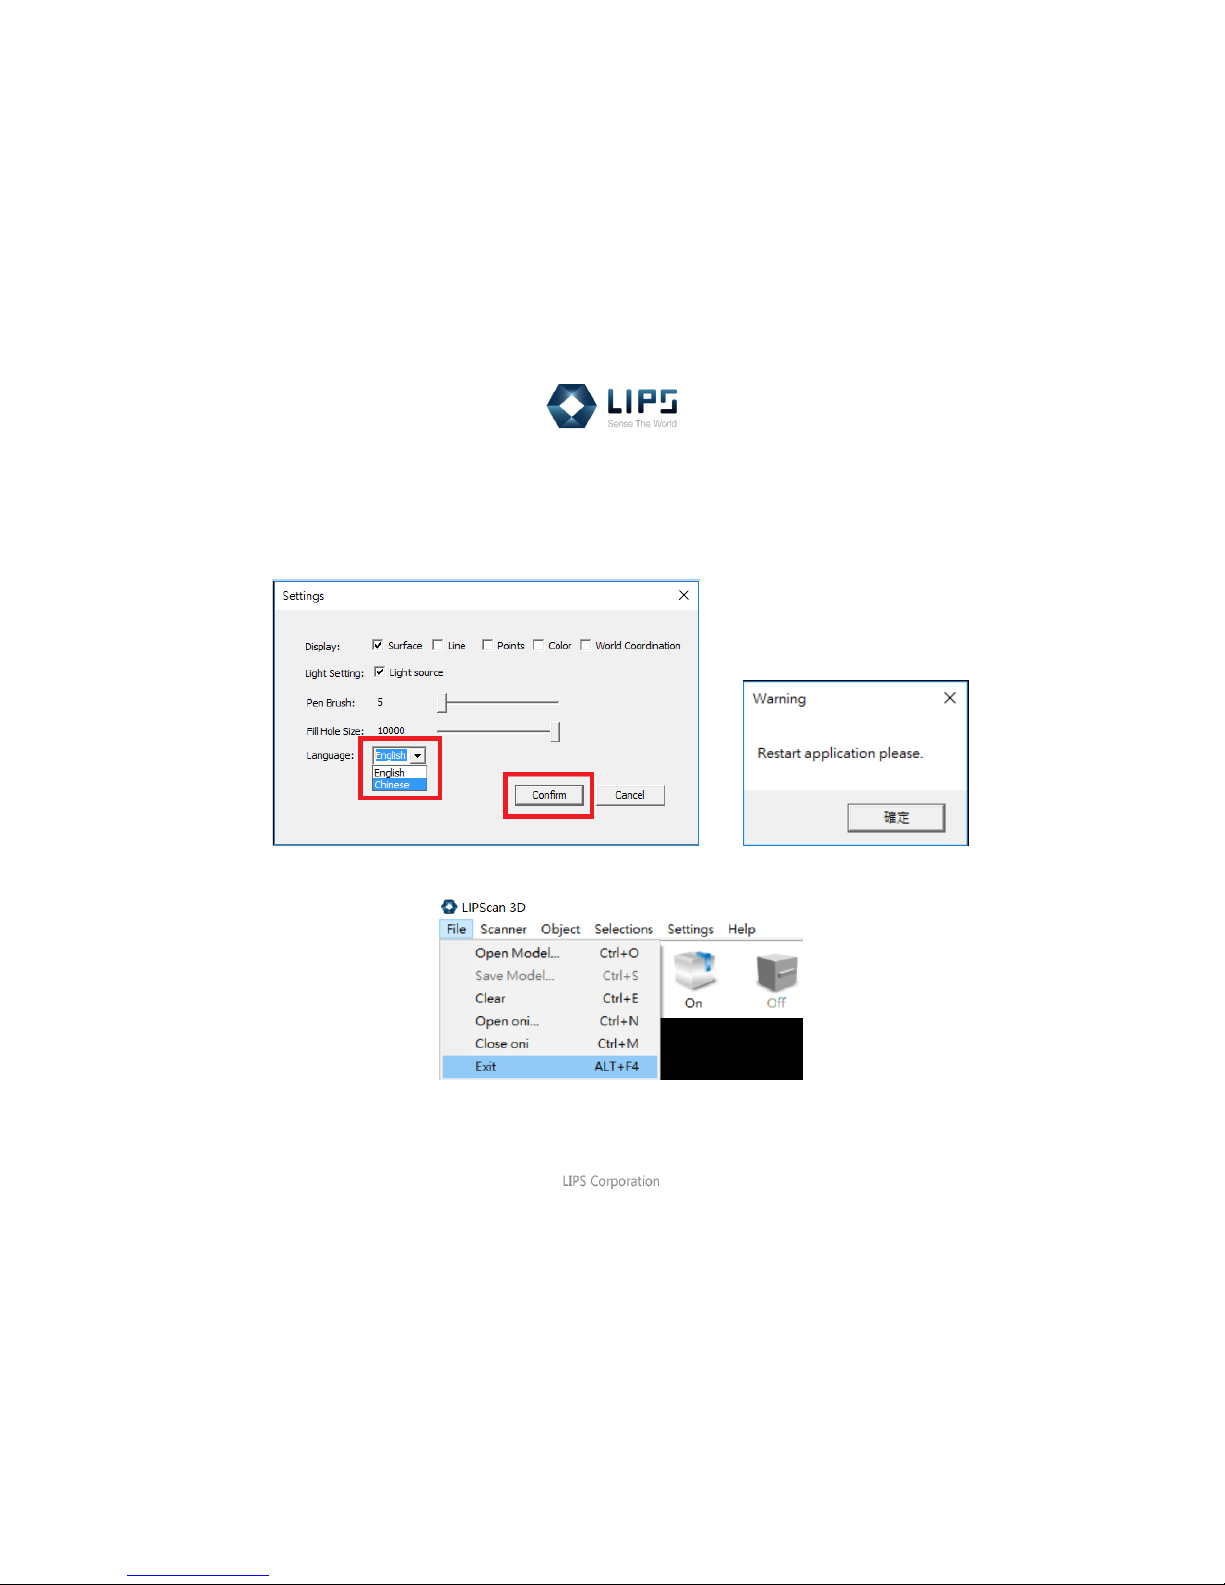
(5) Language
Choose the language and click Confirm. Once you switch to another language, the pop-up window will remind you to
restart the application. Click File > Exit (ALT+F4) to close the system and start it again.
Page 31
29
LIPScan 3D Manual
If you only want to edit part of the object
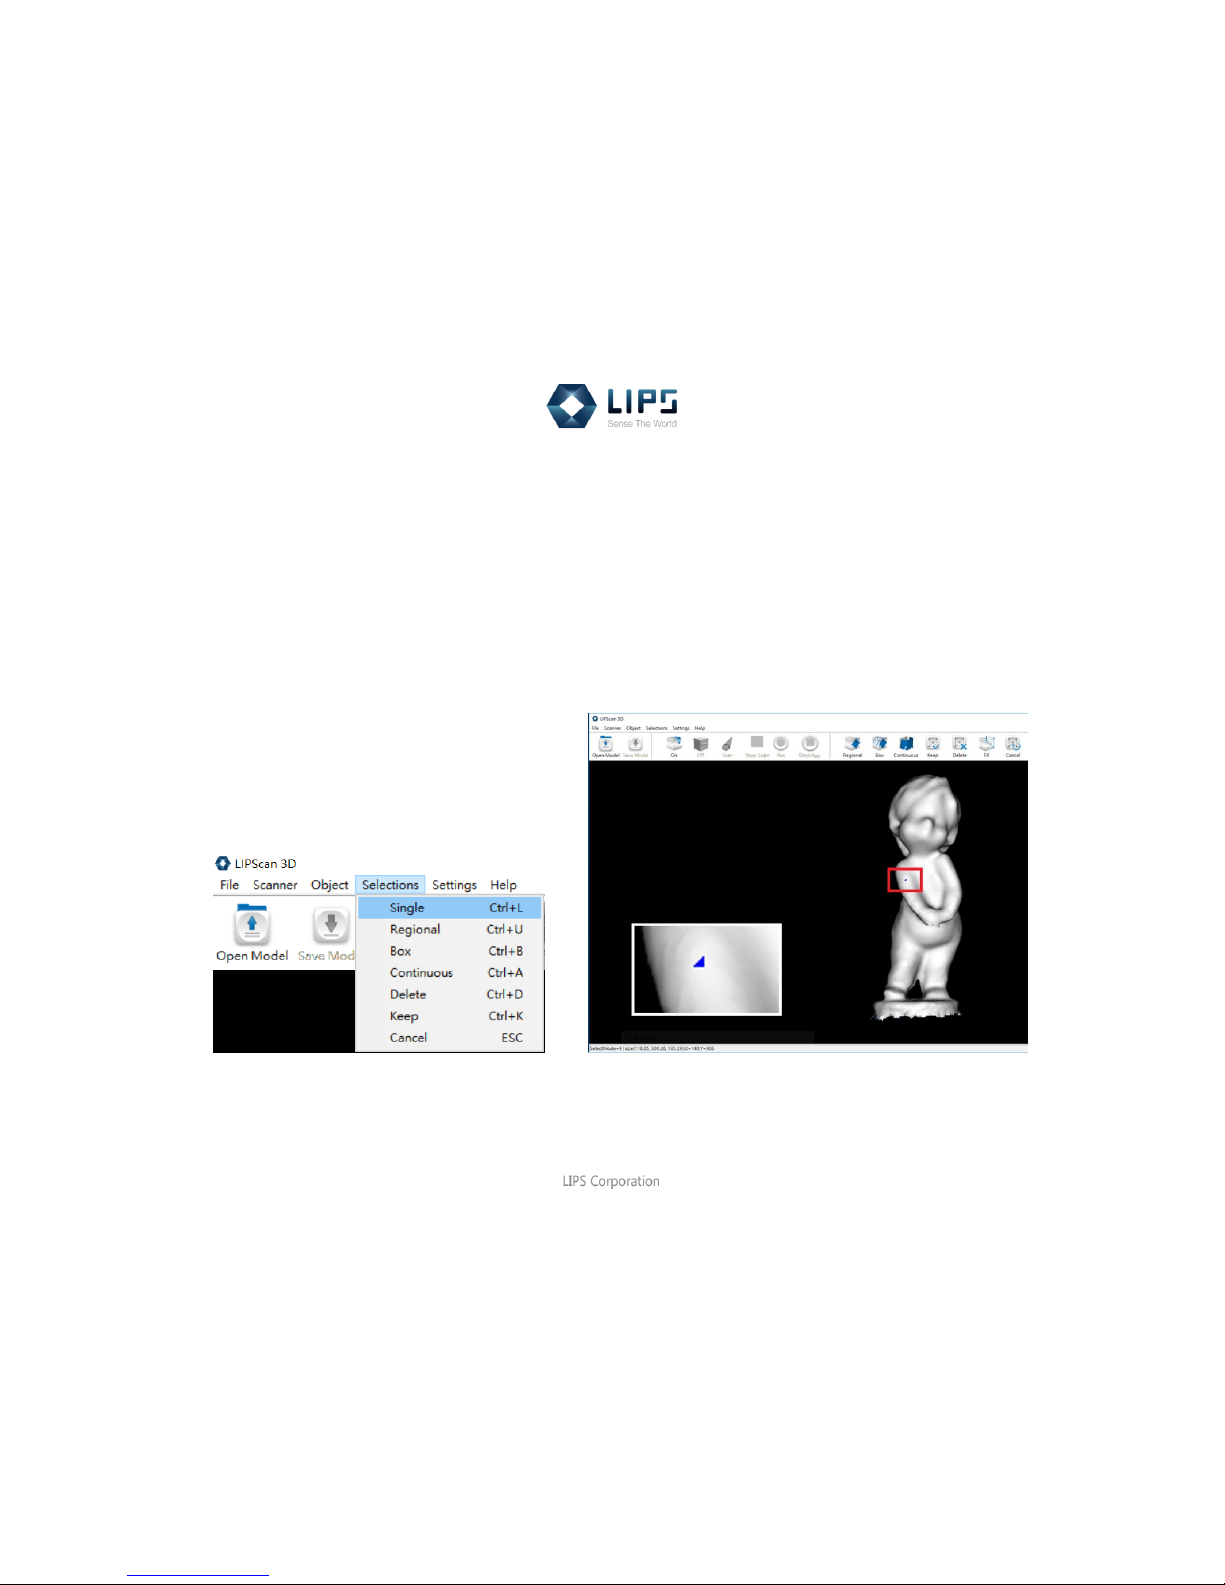
Step 1 Selection: Single Triangle/ Regional/ Box/ Continuous
Here are 4 types of selections. You can click from the upper and graphic toolbars.
(1) Single Triangle
Click Selections > Single (Ctrl+L), tap on the object as a small single triangle.
Page 32
30
LIPScan 3D Manual
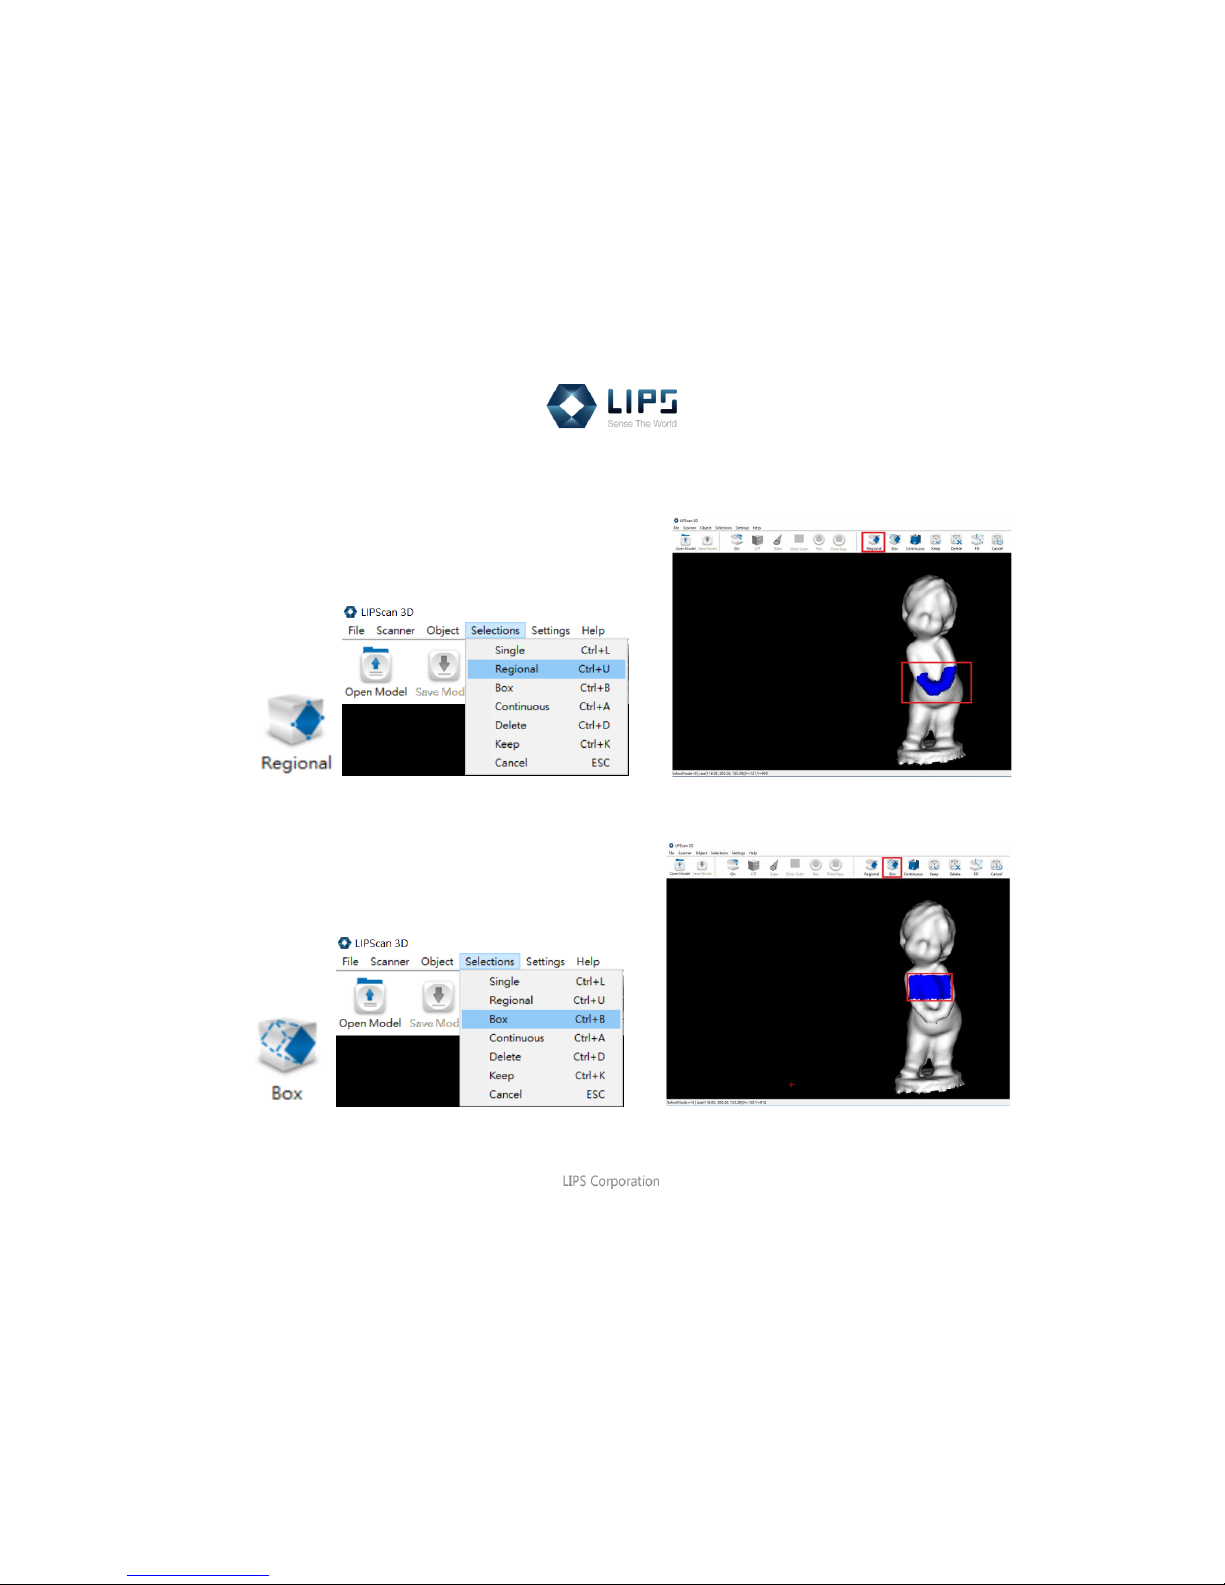
(2) Regional
Click Selections > Regional (Ctrl+U), your mouse is as a pen brush to paint the area you want to edit.
(3) Box
Click Selections > Box (Ctrl+B), click and drag on the object to generate a cubic area that you want to edit.
Page 33
31
LIPScan 3D Manual
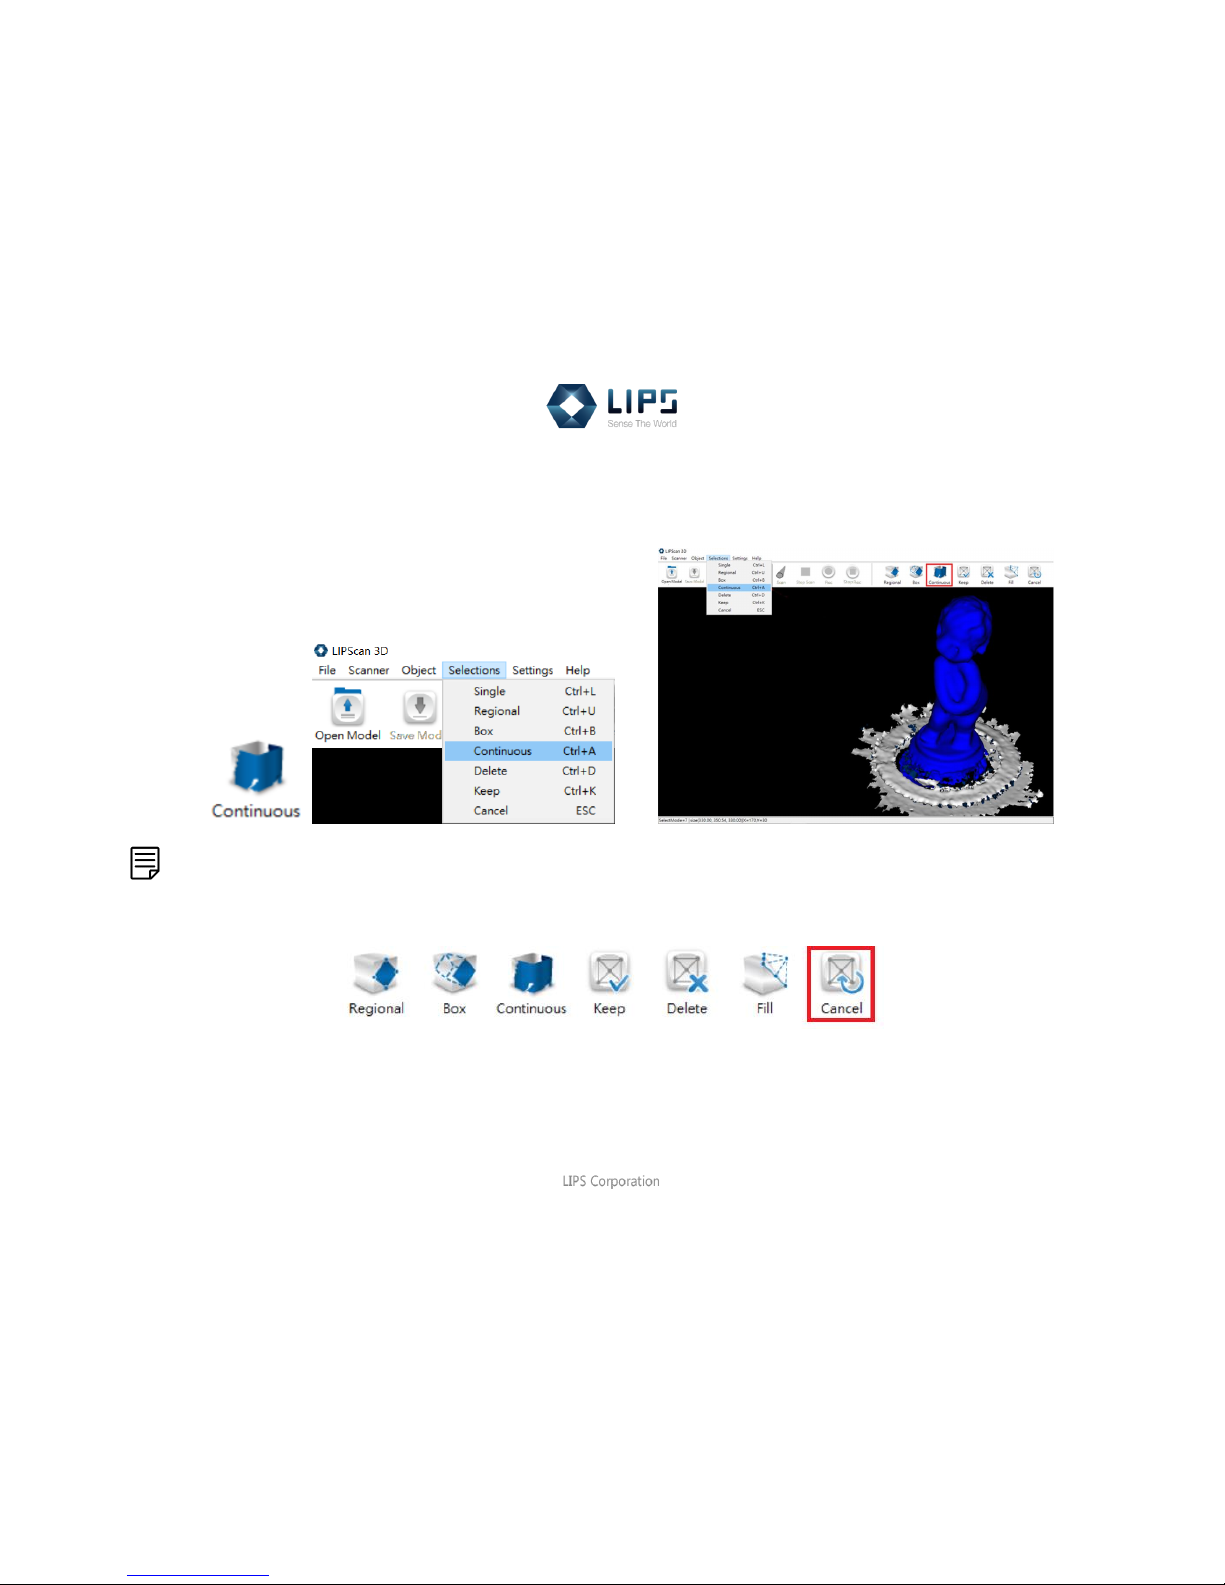
(4) Continuous
Click Selections > Continuous (Ctrl+A), if the object displays as two parts and you only want to select one of it to edit.
The part you choose will turn blue as the page shown on the right.
Note:
If you would like to finish the selection function or want to drag the object, click graphic toolbar Cancel (Esc) to end it.
Page 34
32
LIPScan 3D Manual
Step 2 Edit : Delete/ Keep/ Fill/ Smooth
(Introduce 2 ways to edit (1) with selected area (2) without selected area)
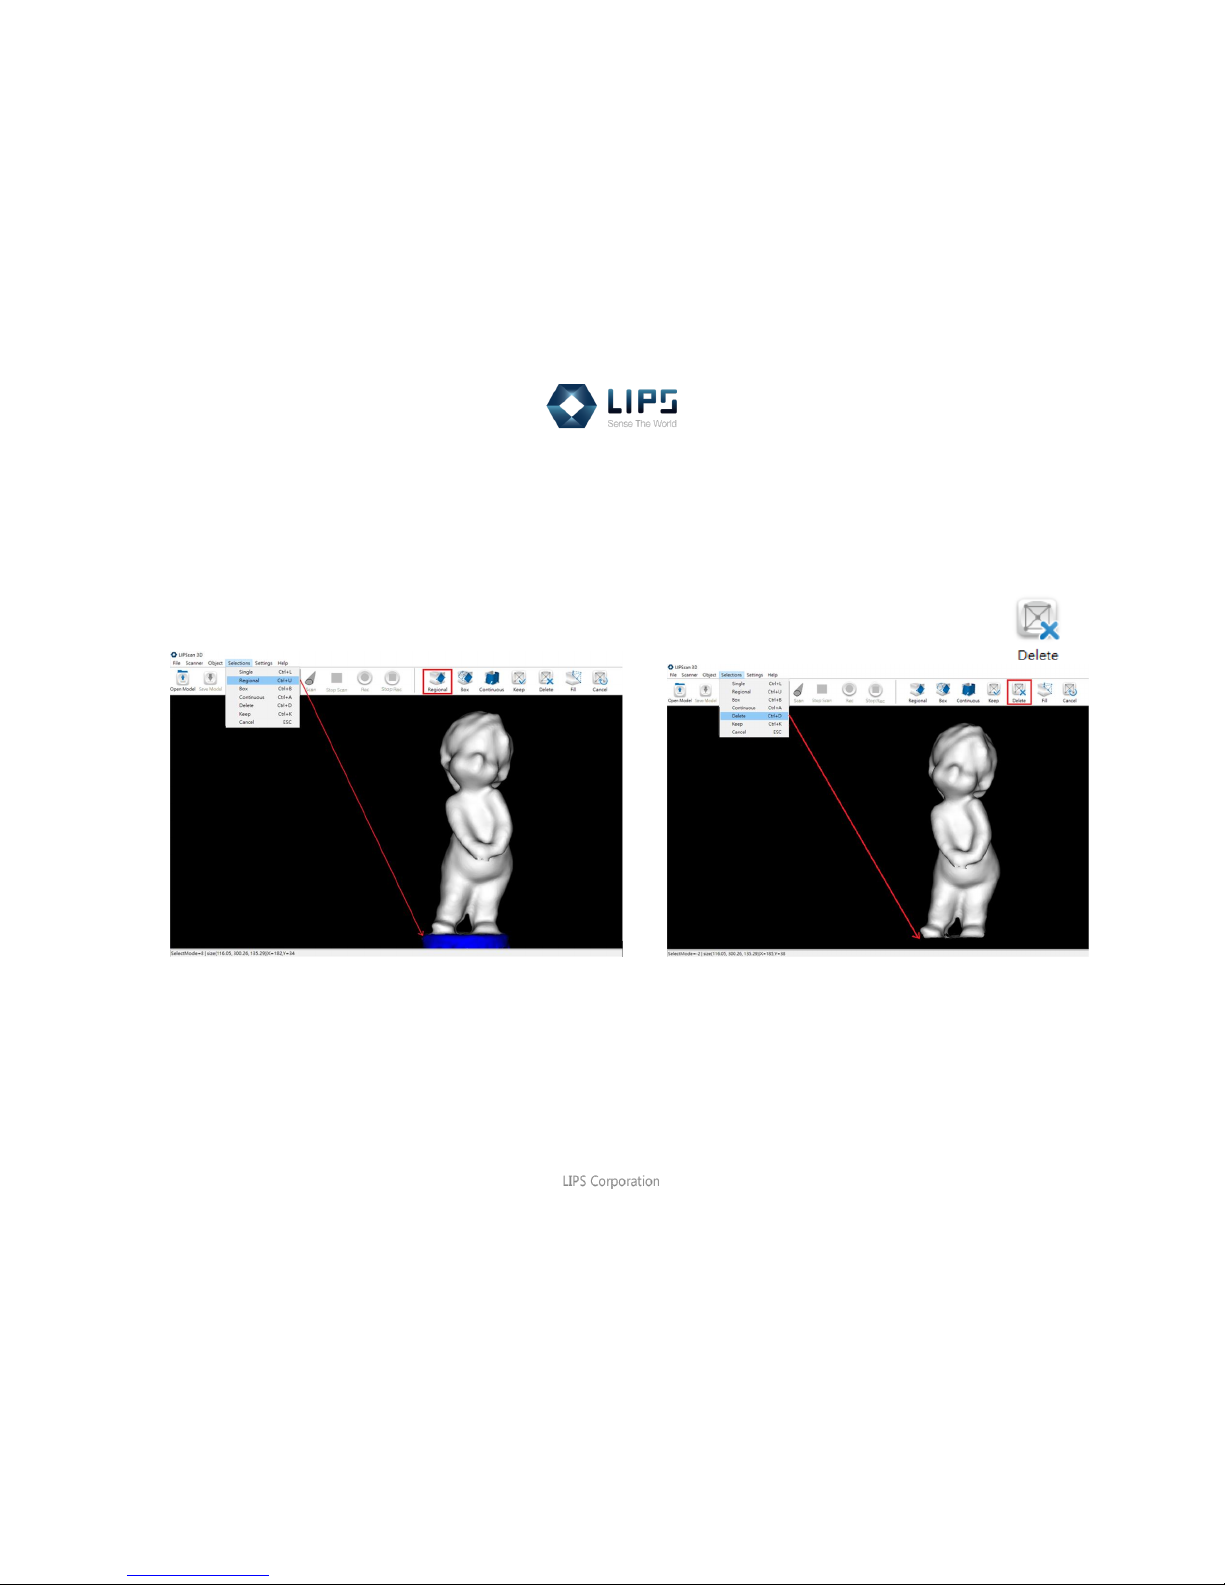
(1) With selected area: Delete/ Keep
A. After selecting area, click upper toolbar Selections > Delete (Ctrl+D), or graphic toolbar Delete to erase.
(The selected area in the example is made by Selections > Regional (Ctrl+U))
Page 35
33
LIPScan 3D Manual
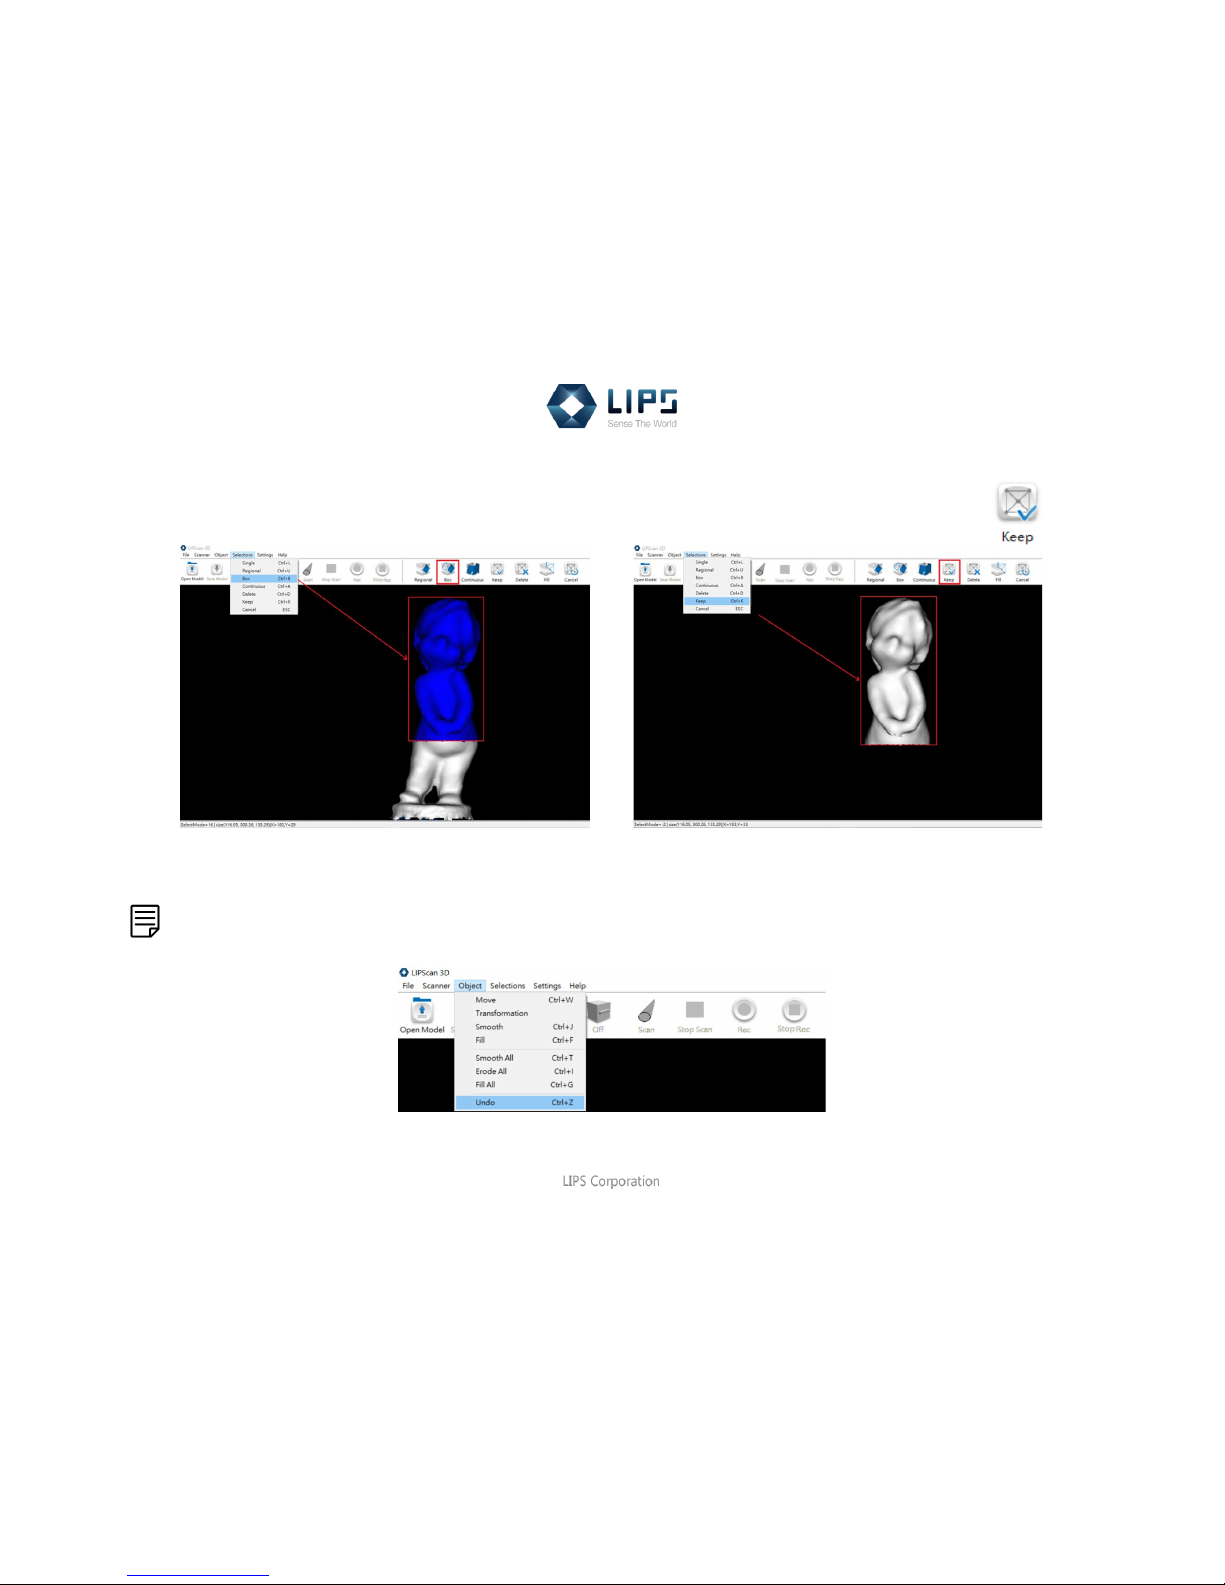
B. After selecting area, click upper toolbar Selections > Keep (Ctrl+K), or graphic toolbar Keep to save.
(The selected area in the example is made by Selections > Box (Ctrl+B))
Note:
If you want to re-edit or return back to the last step, click upper toolbar Object > Undo (Ctrl+Z). (Maximum 10 times.)
Page 36
34
LIPScan 3D Manual
(2) Without selected area: Fill/ Smooth
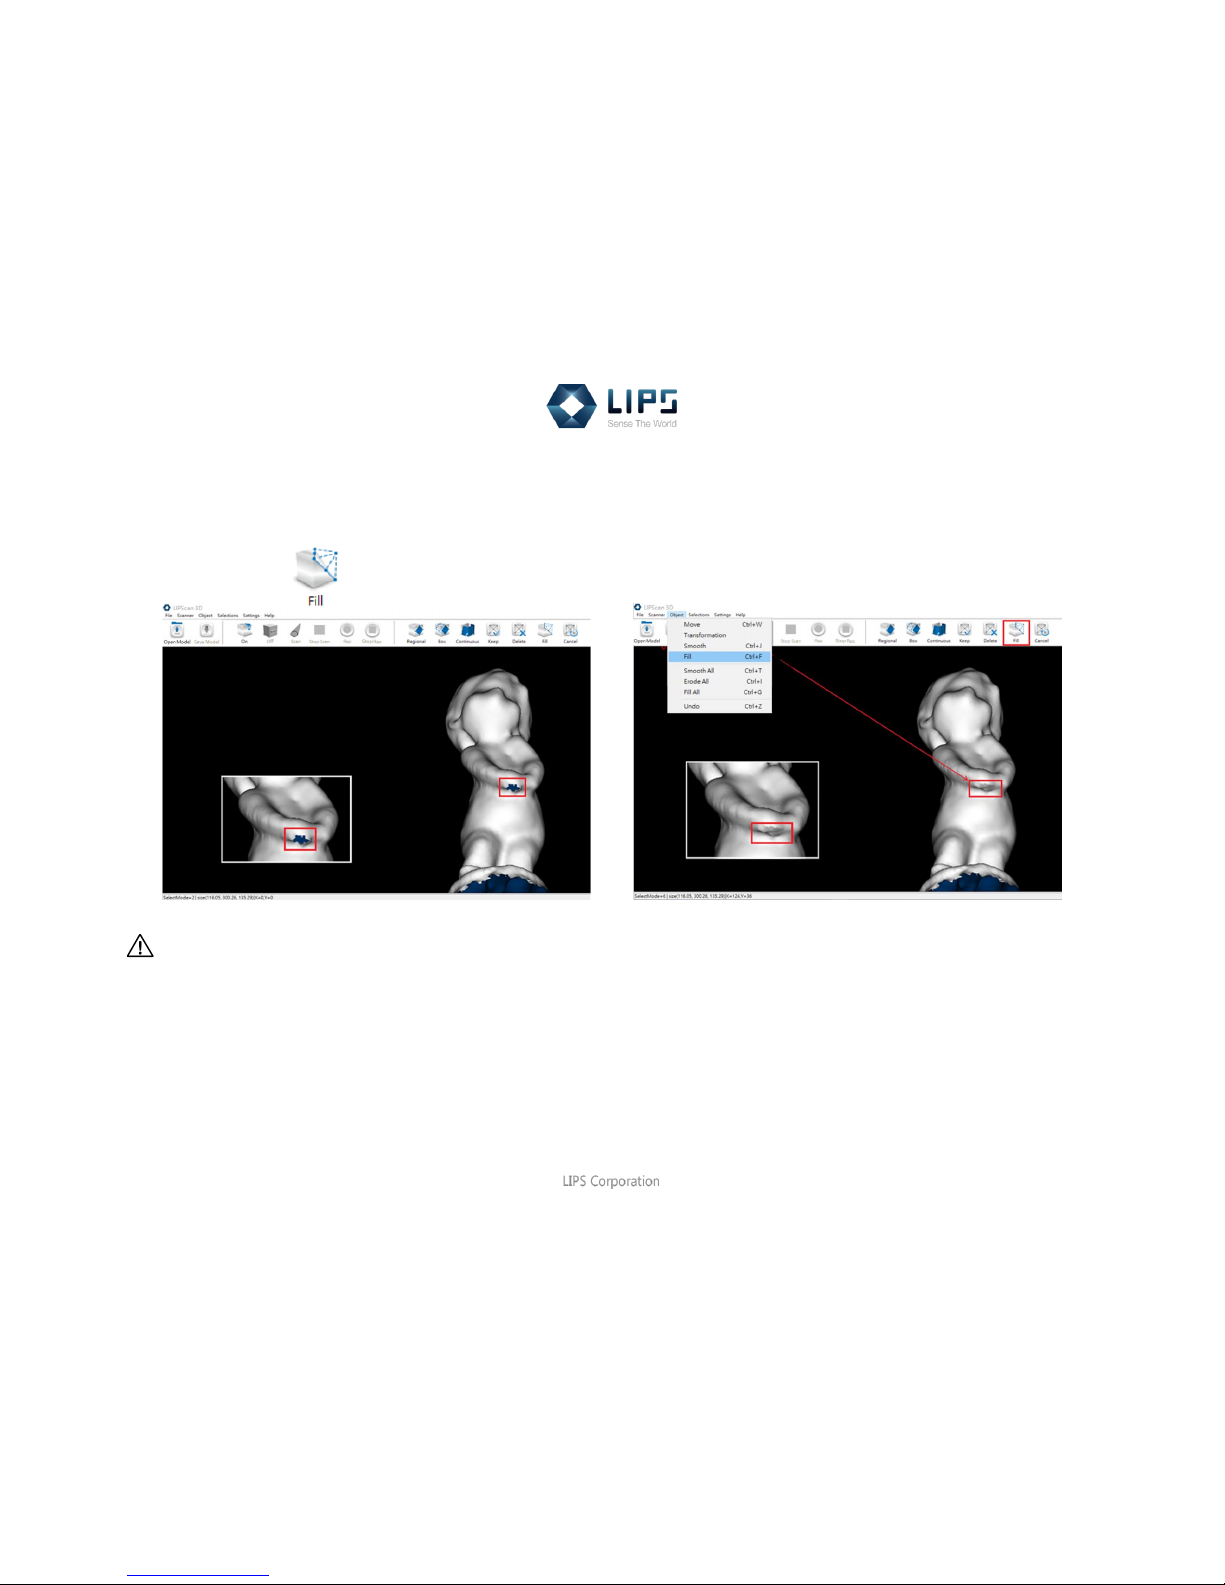
A. You can easily edit with your mouse as pen brush. Click upper toolbar Object > Fill (Ctrl+F) or graphic toolbar Fill to
fill the cracks.
Warning
The part chosen to be filled on the object should be a CLOSED AREA, or the edge will be erased.
Page 37
35
LIPScan 3D Manual
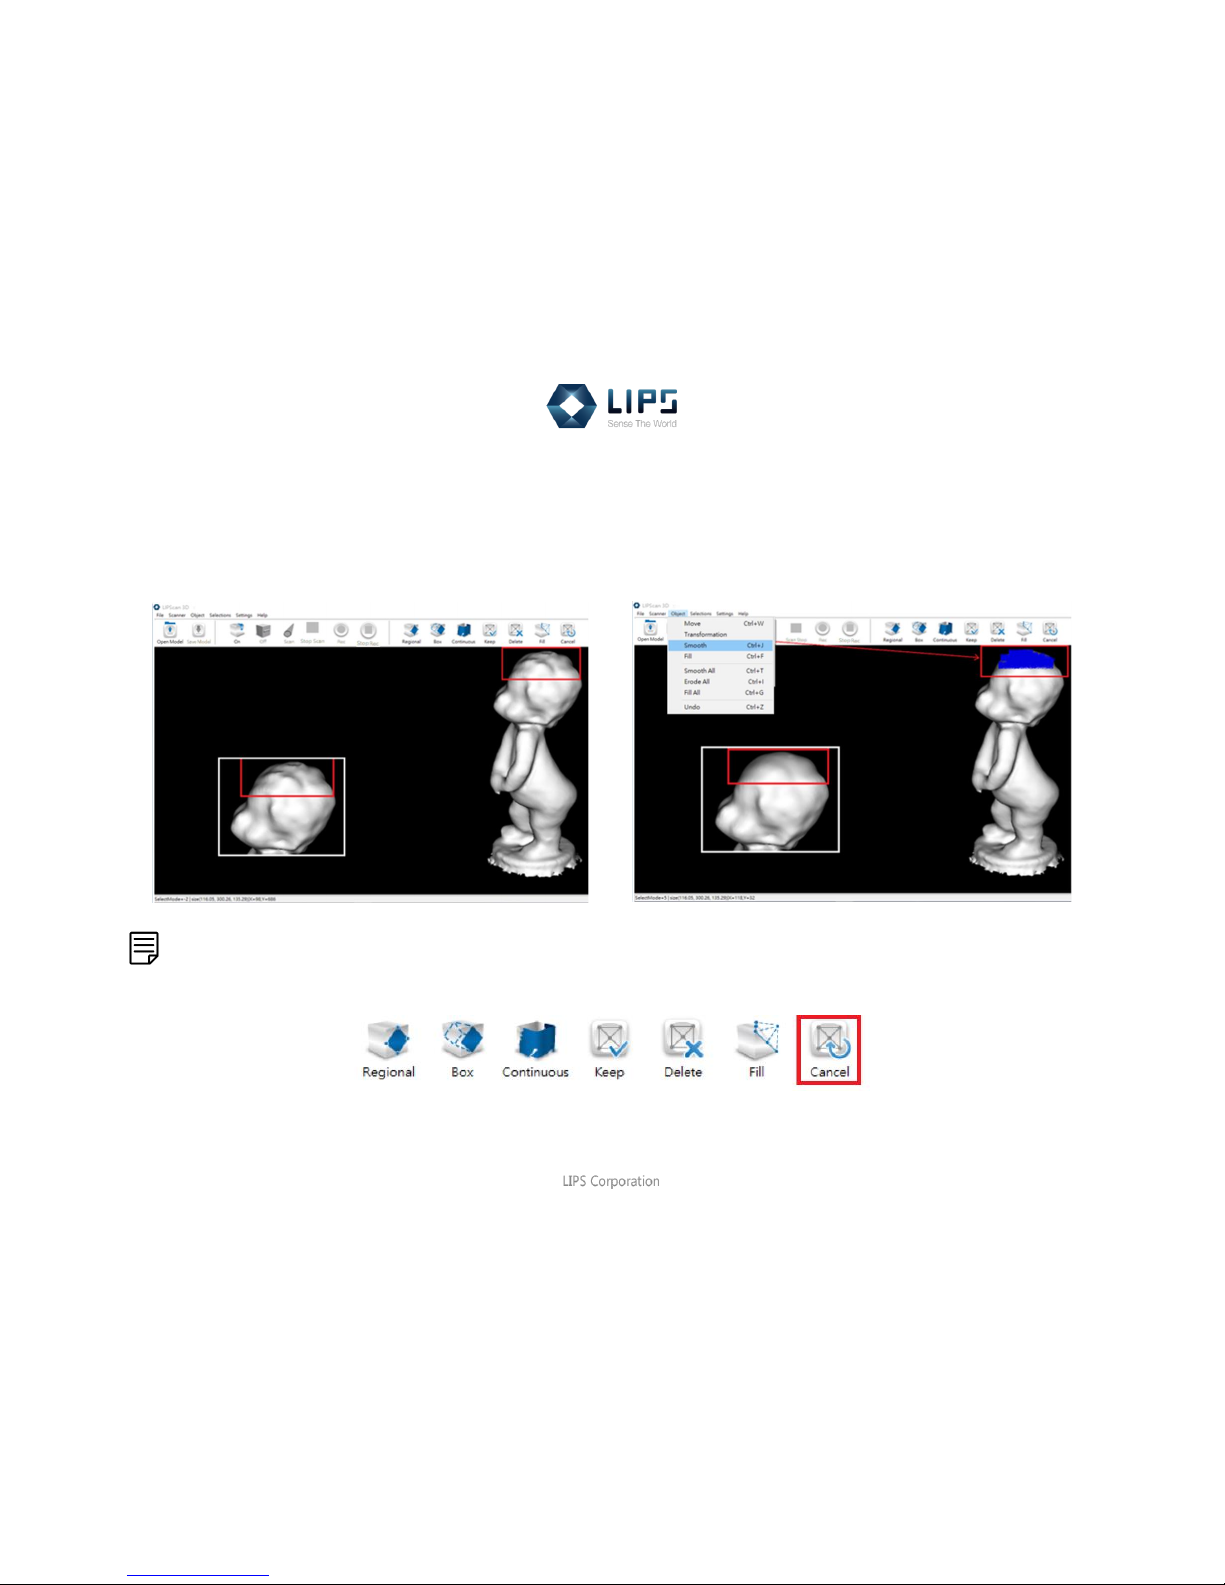
B. You can still easily edit with your mouse as a pen brush. Click upper toolbar Object > Smooth (Ctrl+J) to make the
edge smoother.
(The original one is on the left side. The doll’s head is edited to look smoother by this function on the right side.)
Note:
If you would like to finish the pen brush function or want to drag the object, click graphic toolbar Cancel (Esc) the function.
Page 38
36
LIPScan 3D Manual
If you want to edit or transform the entire object
Edit : Smooth All/ Erode All/ Fill All
Here are 3 types of editing. You can click from the upper toolbars.
(1) Smooth All
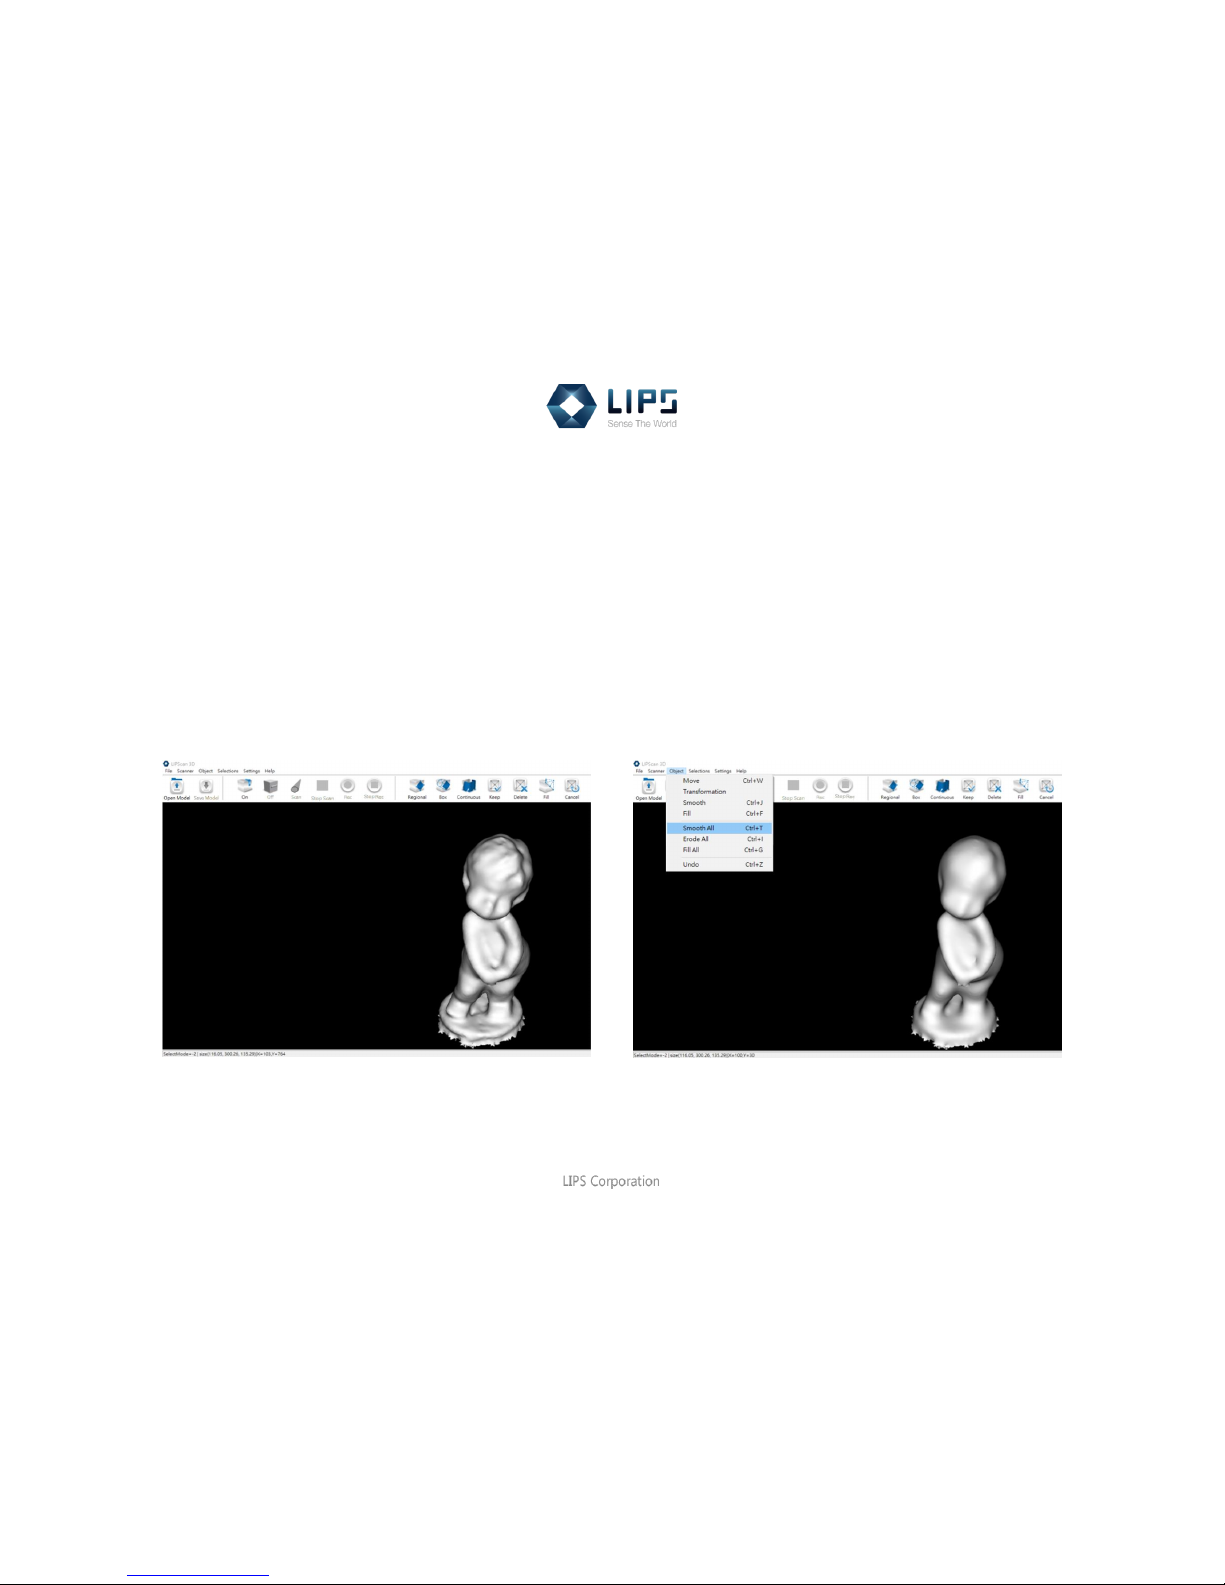
Click upper toolbar Object > Smooth All (Ctrl+T) to make the object overall smoother.
(The original one is on the left side. The entire doll body is edited to look smoother by this function on the right side.)
Page 39
37
LIPScan 3D Manual
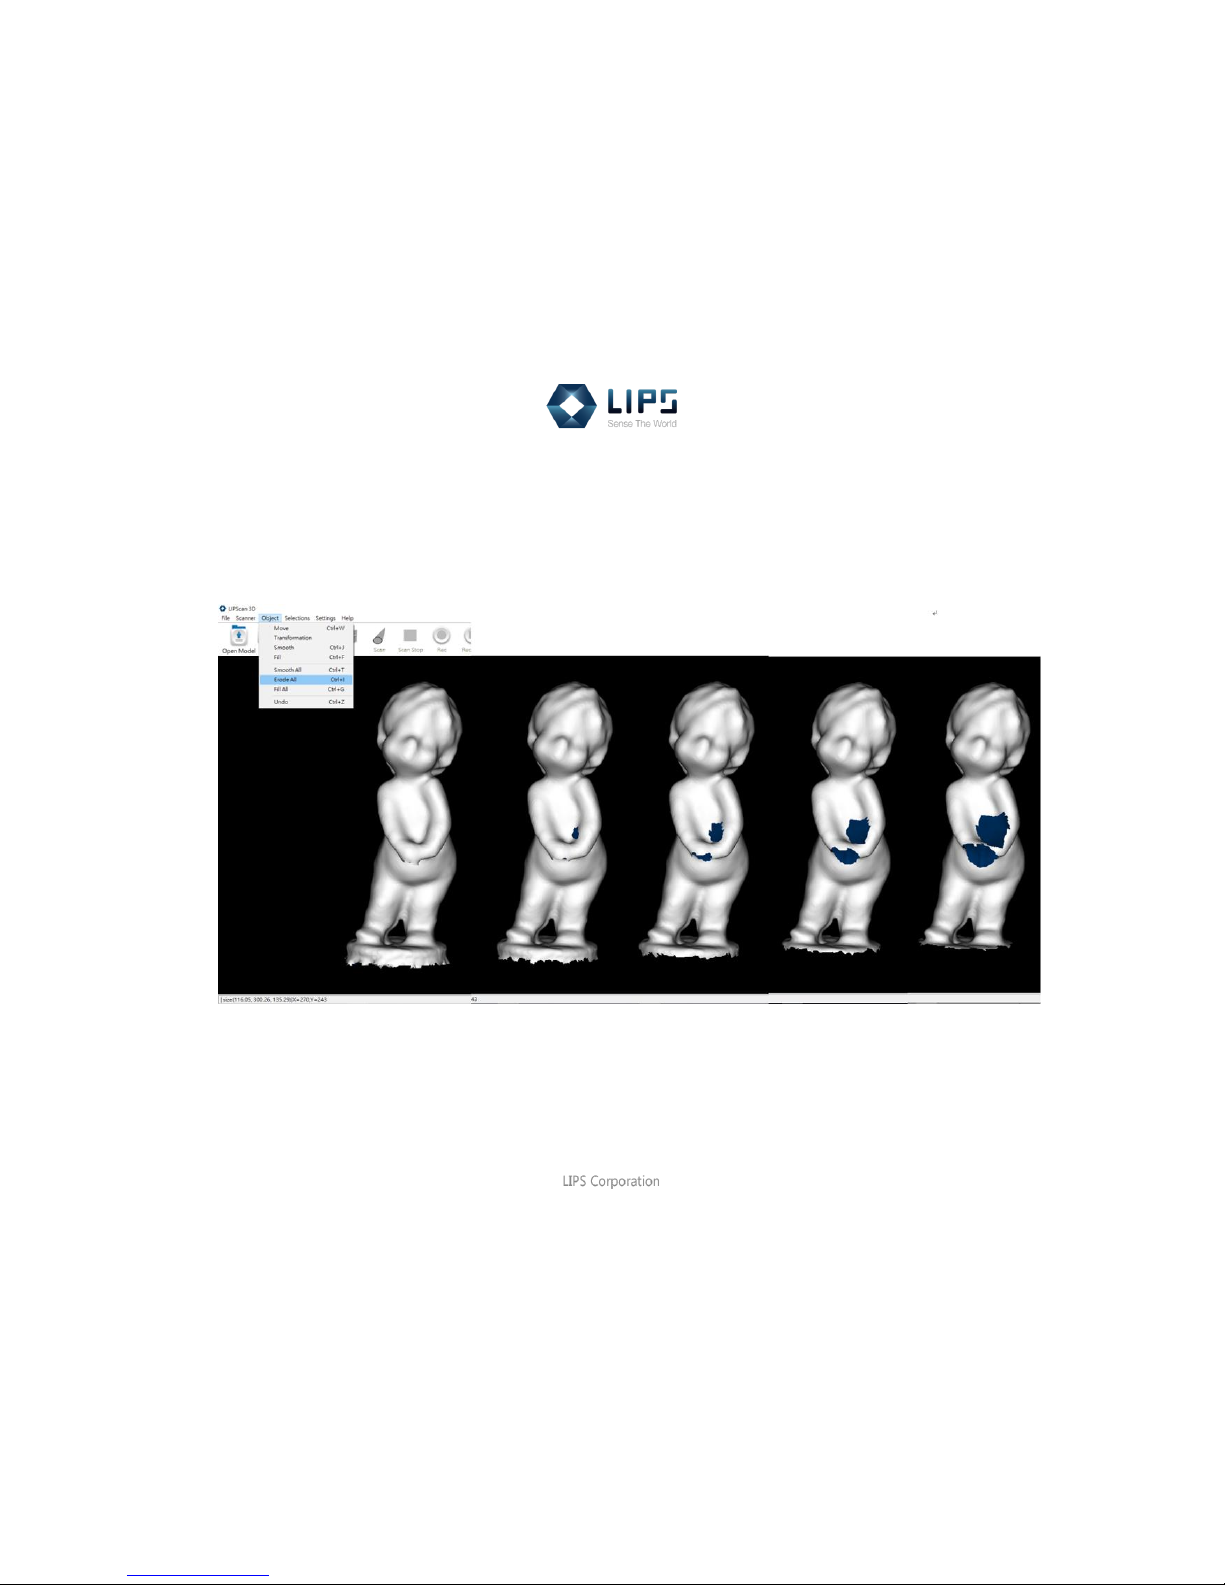
(2) Erode All
Click upper toolbar Object > Erode All (Ctrl+I) to break up the object gradually
(The original one is on the left side. From left to right, we increase the degree of erosion by this funtion.)
Page 40
38
LIPScan 3D Manual
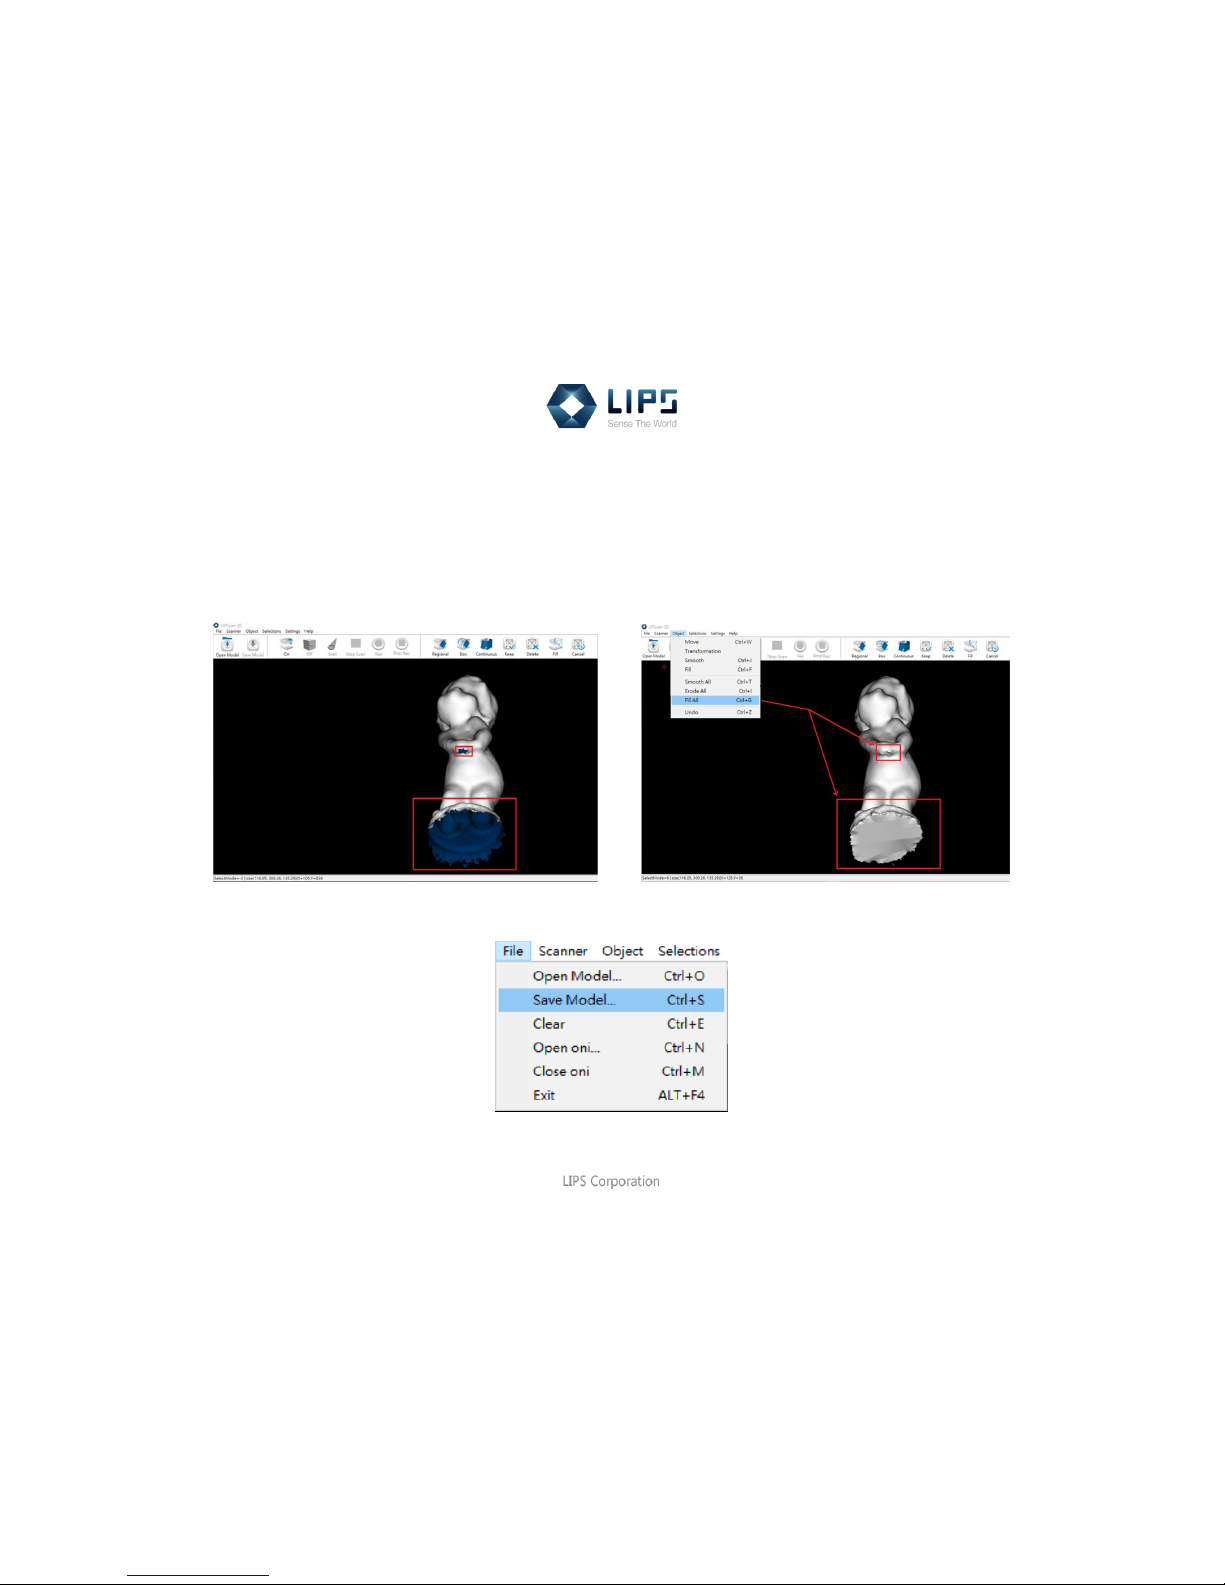
(3) Fill All
Click upper toolbar Object > Fill All (Ctrl+G) to seal up the empty bottom of the object.
The camera is unable to capture the whole figure because the bottom part cannot be scanned from the fixed shooting
angle. Thus, this function is designed to solve this problem in a simple way to be well-prepared for 3D printing or any other
purposes.
After editing, click File > Save Model (Ctrl+S) to save.
Page 41
39
LIPScan 3D Manual
Transformation : Shift/ Rotation/ Scale
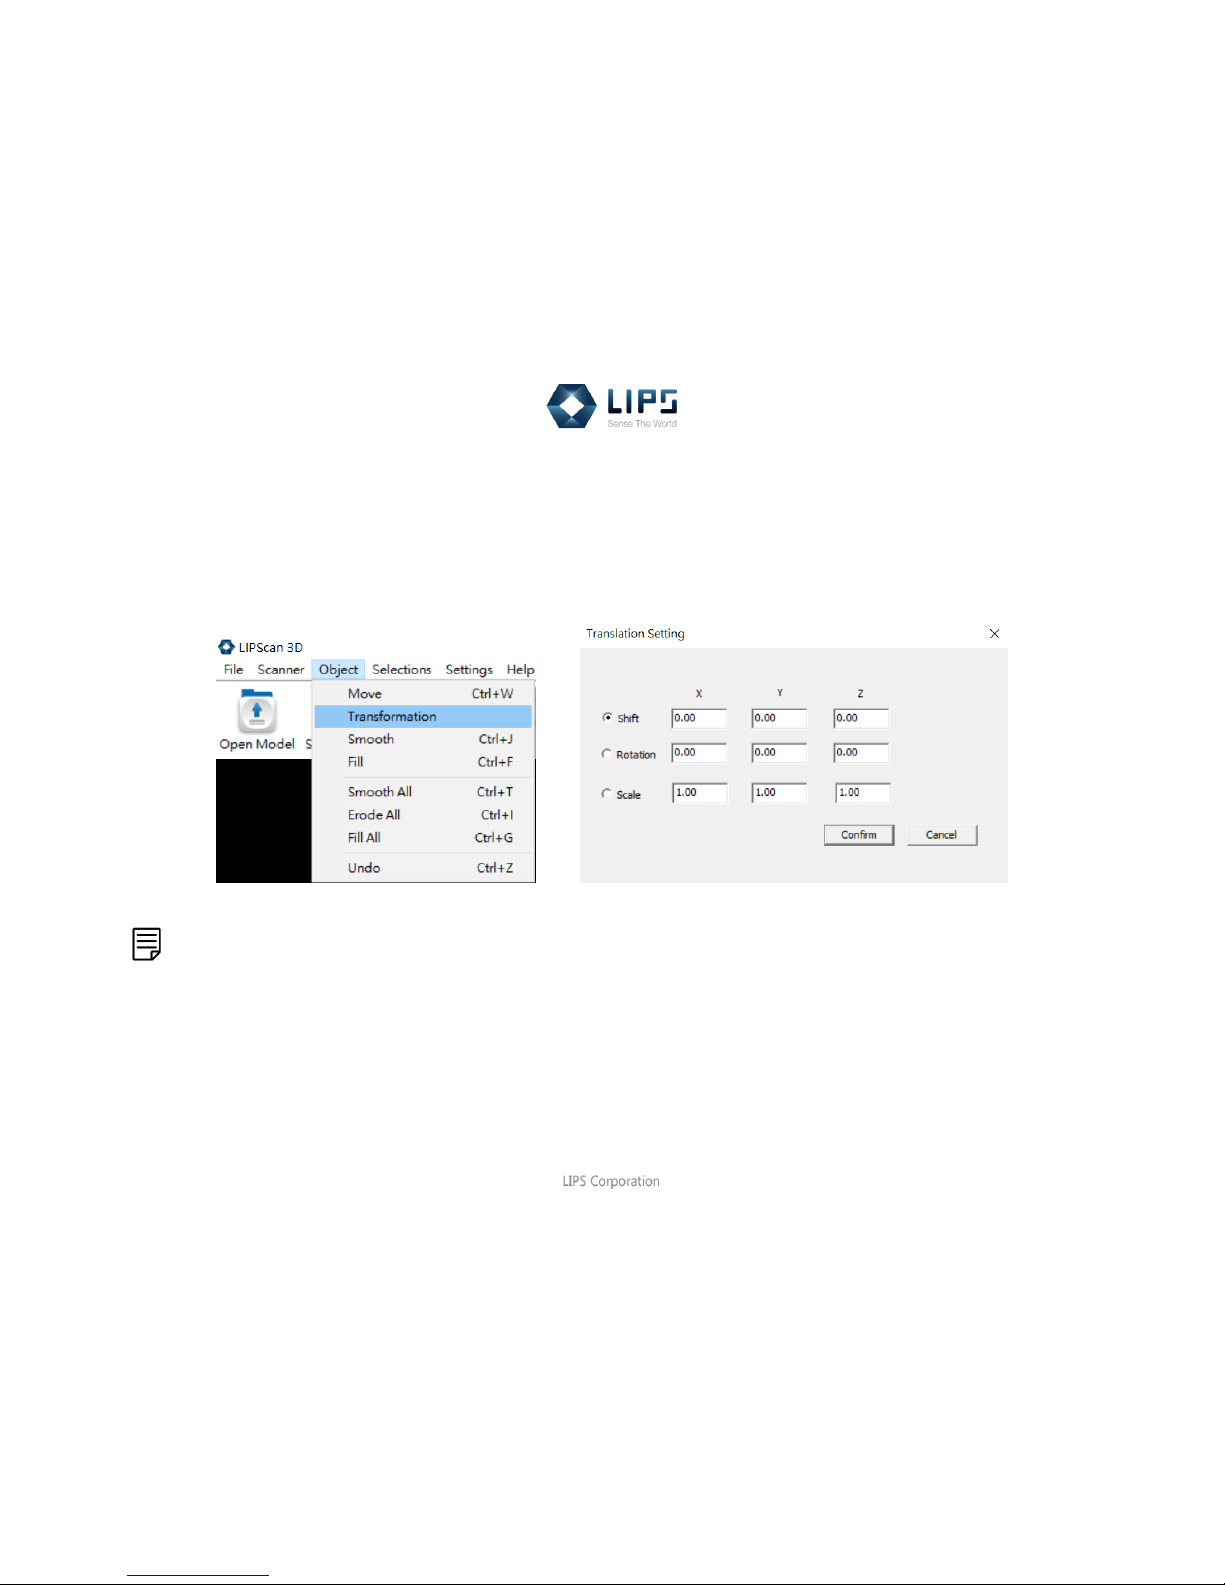
Click upper toolbar Object > Transformation
Here are 3 effects with 3 dimensions X, Y and Z which you can put in digits to customize.
Note:
For your better understanding, please kindly adjust the position of green lattice (camera) and the object same as the following.
Page 42
40
LIPScan 3D Manual
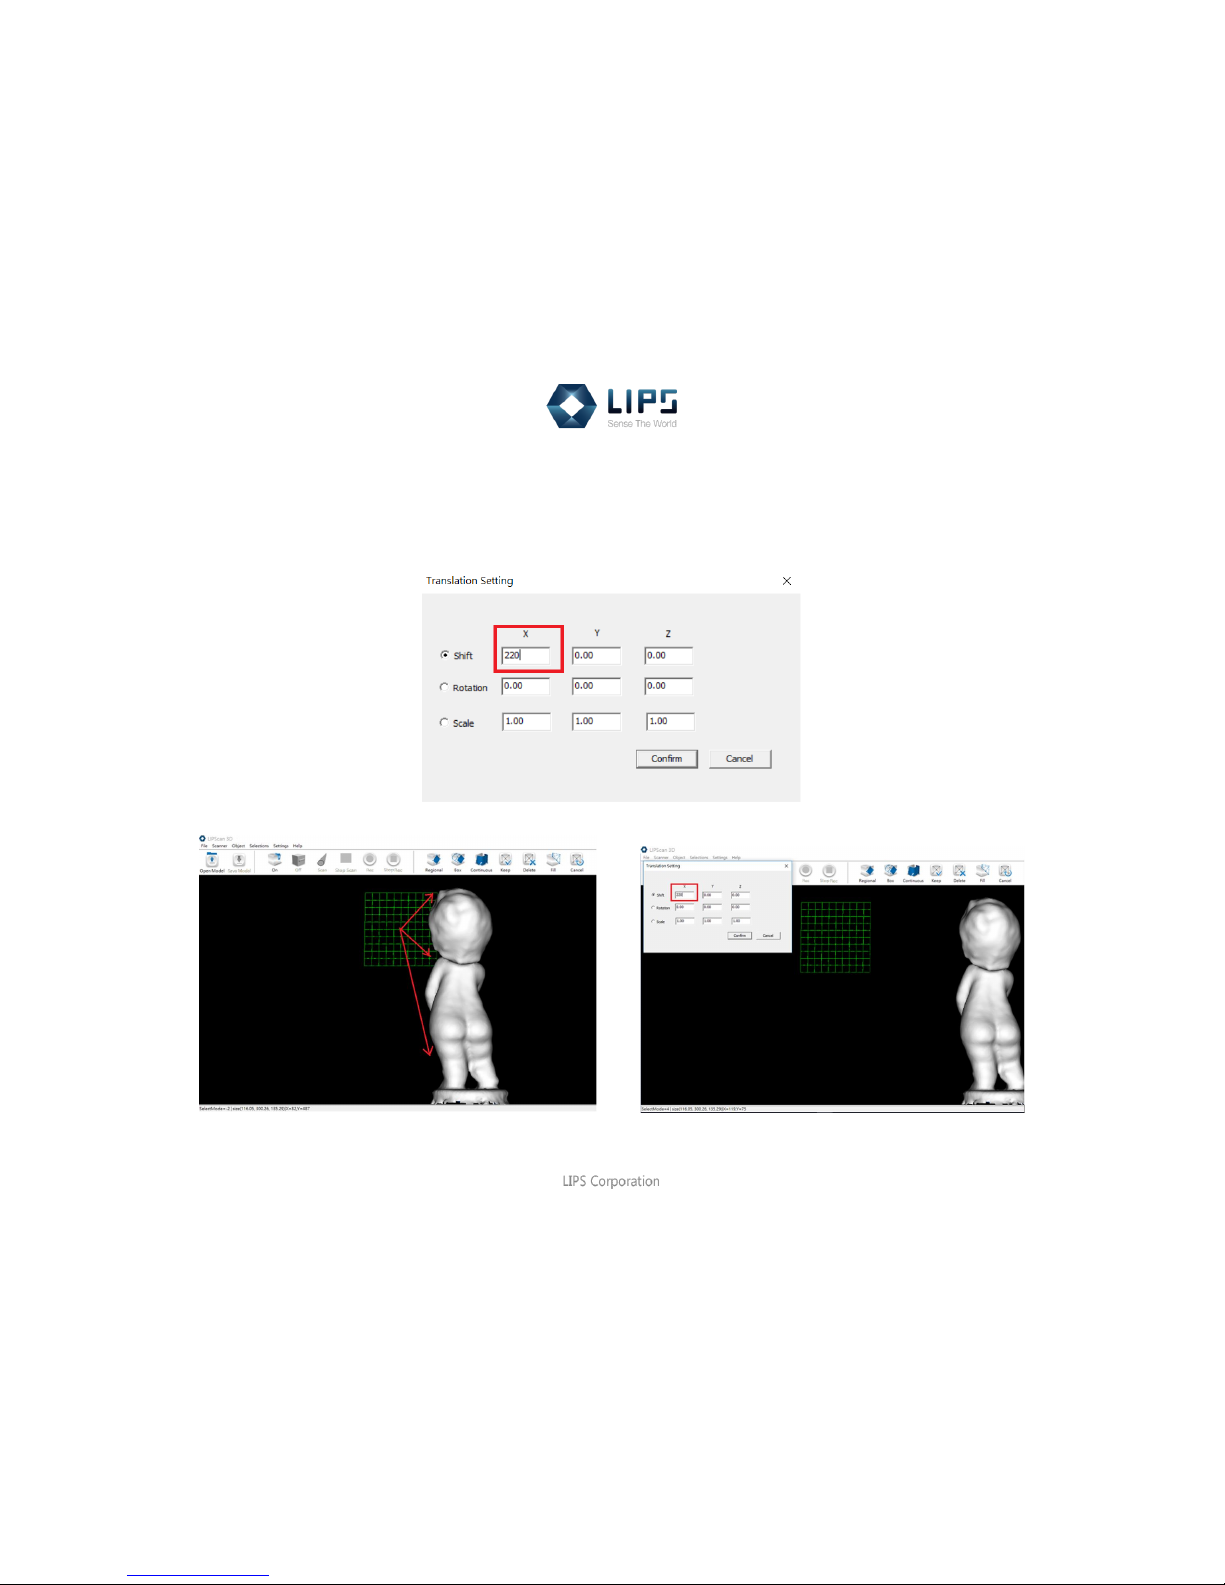
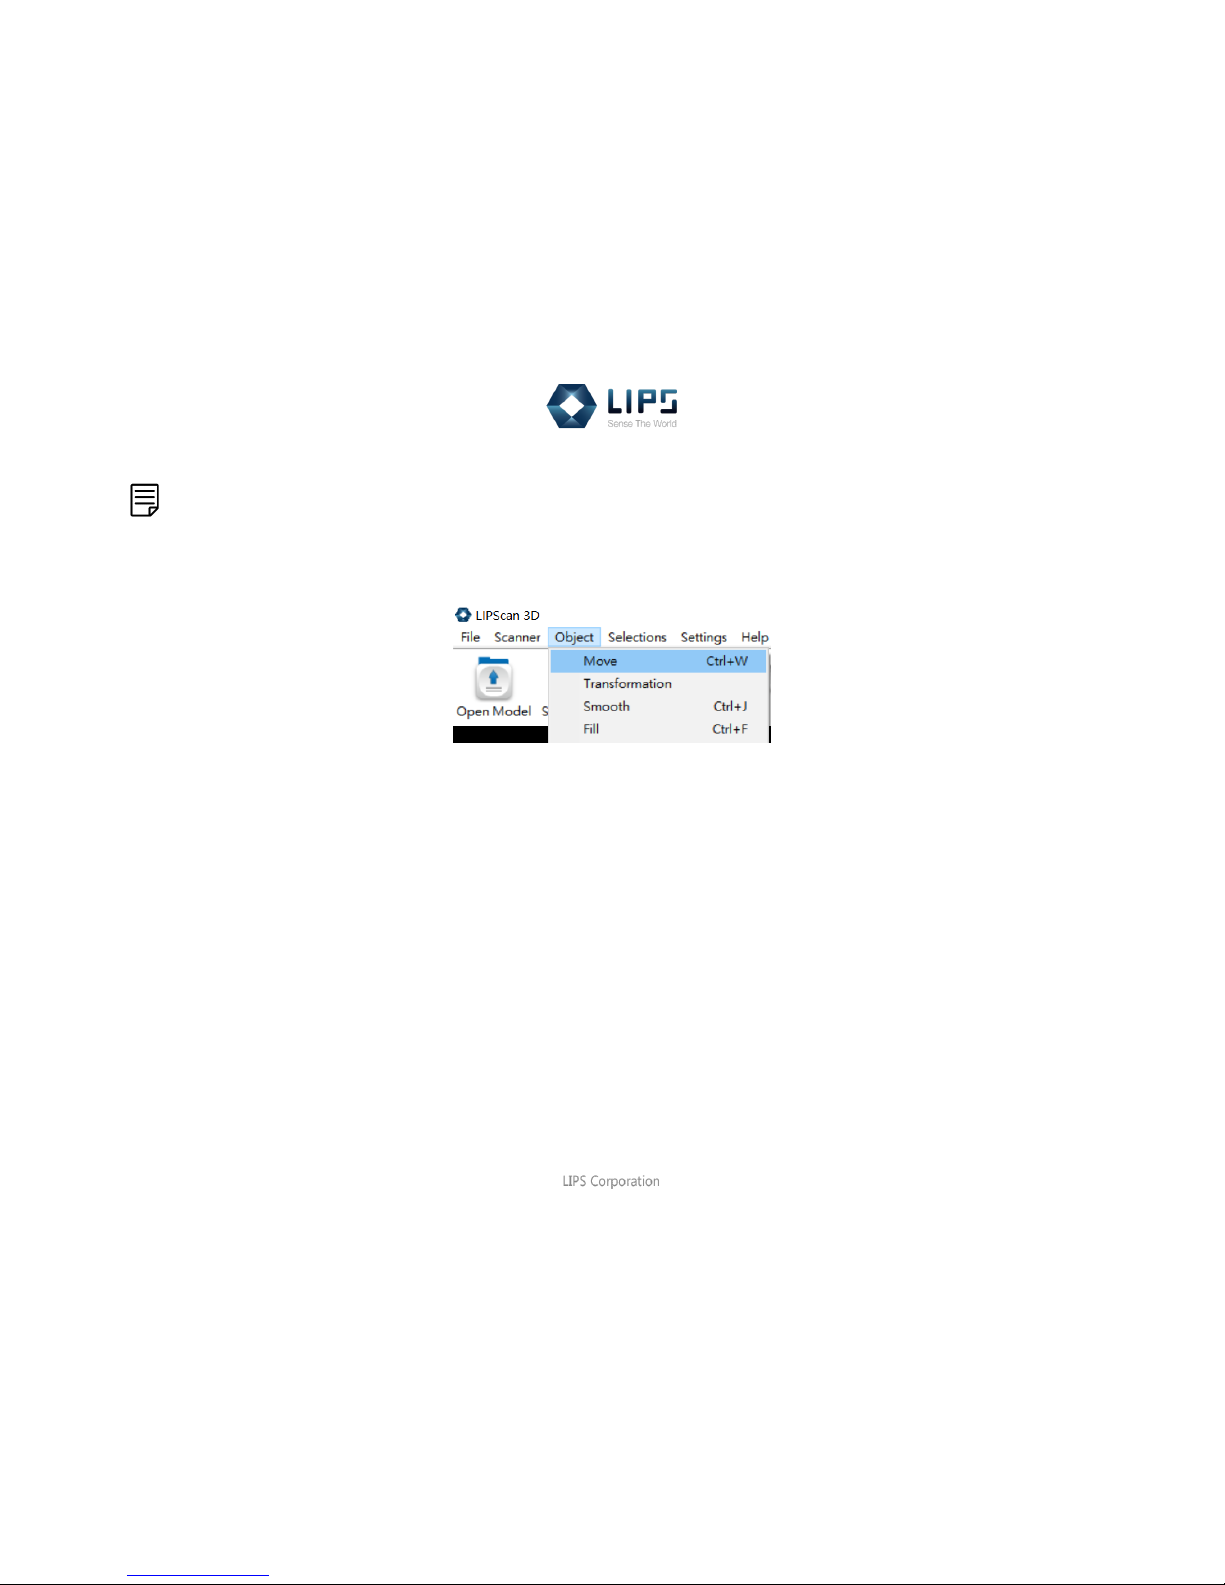
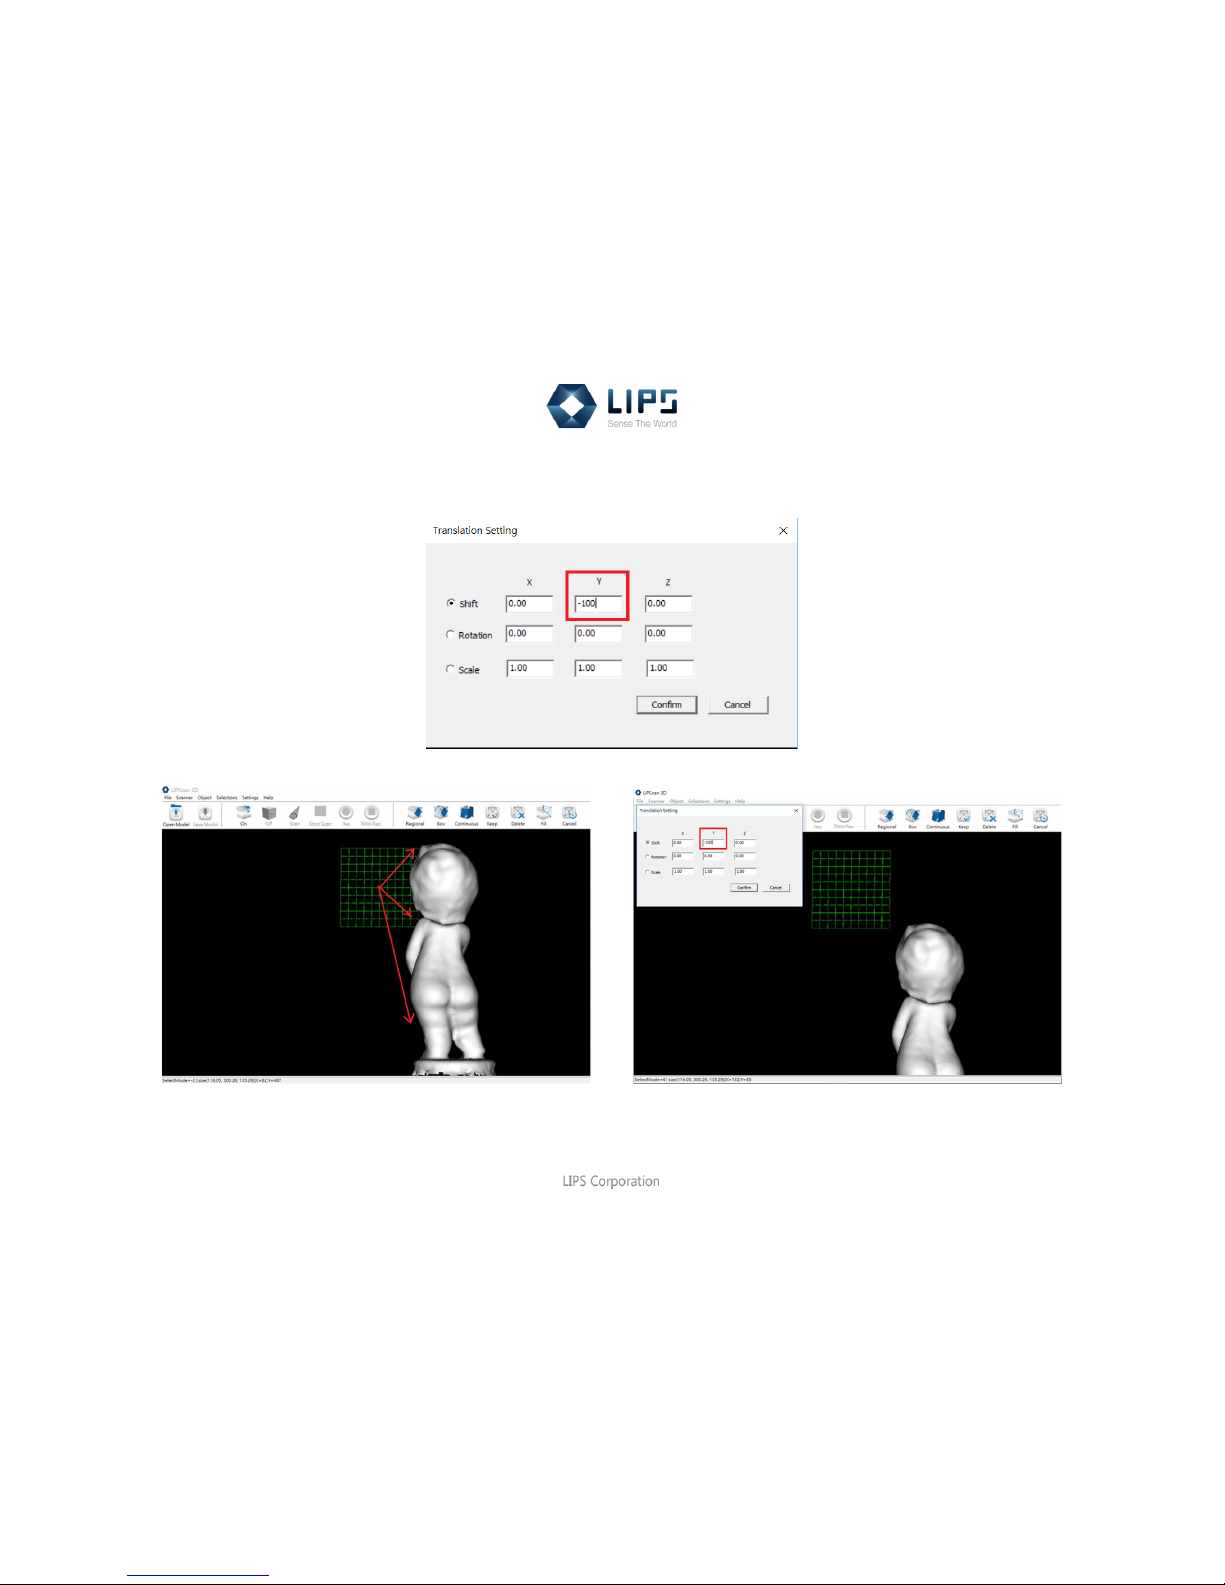
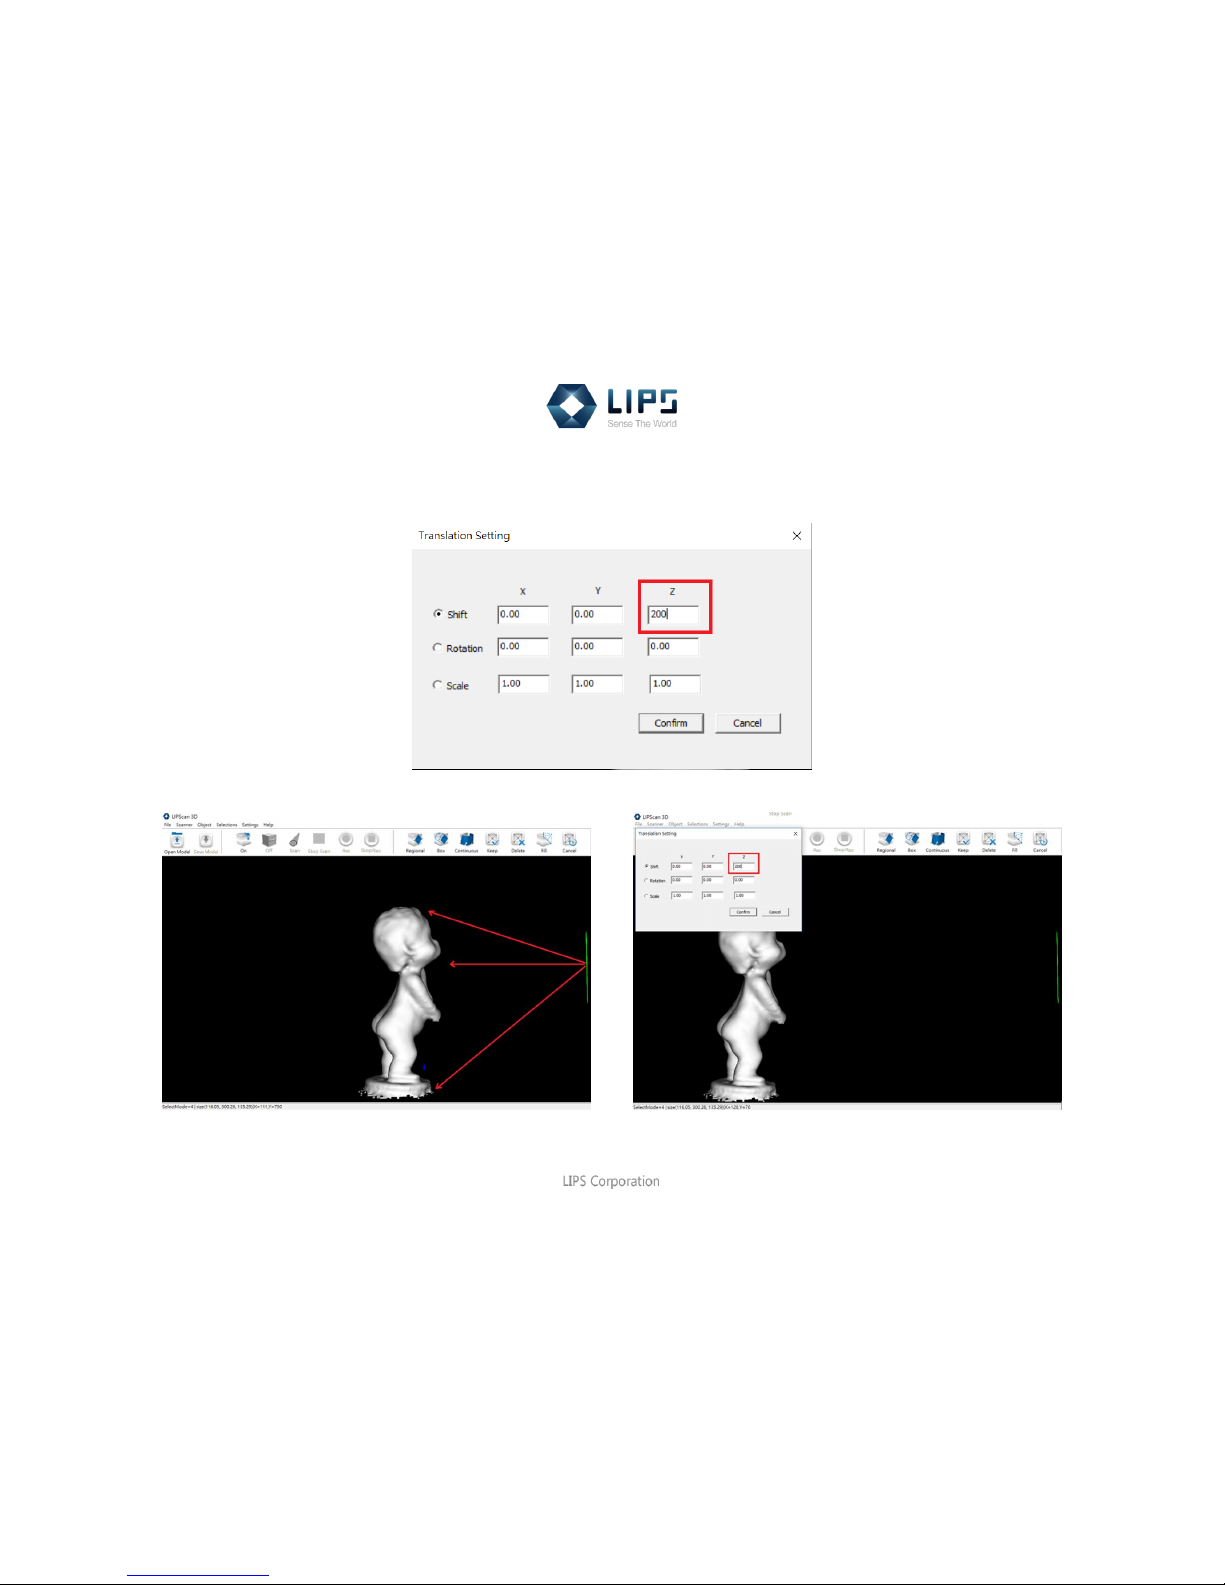
(1) Shift
The degree of the movement depends on the number.
For X axis, put a positive/negative number, the object will shift rightwards/ leftwards.
Page 43
41
LIPScan 3D Manual
Note:
There is another quick way to shift the object. Click Object > Move to make the position of the green lattice (camera) fixed
then press Shift and drag the object in the meantime. Or press PgUp to drag it, finish the function press Esc.
Page 44
42
LIPScan 3D Manual
For Y axis, put a positive/ negative number, the object will shift upwards/ downwards.
Page 45
43
LIPScan 3D Manual
For Z axis, put a positive/ negative number, the object will move backwards/ towards.
Page 46
44
LIPScan 3D Manual
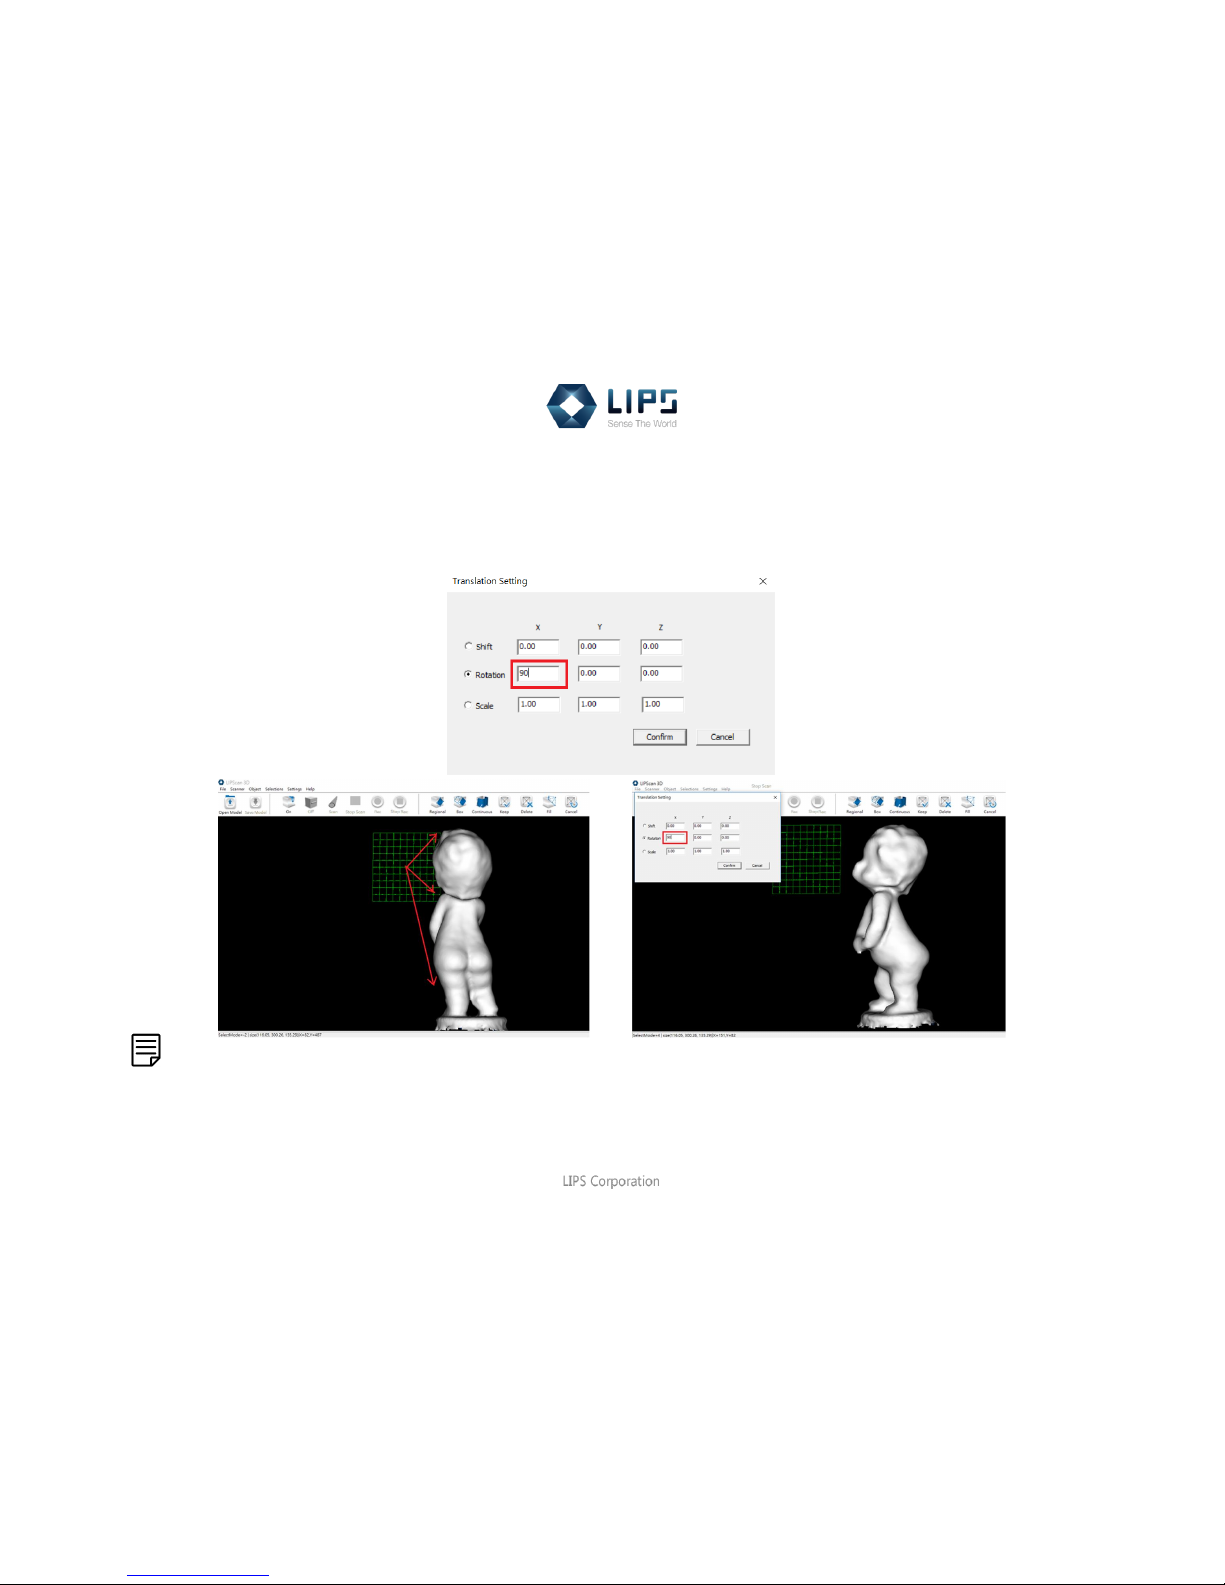
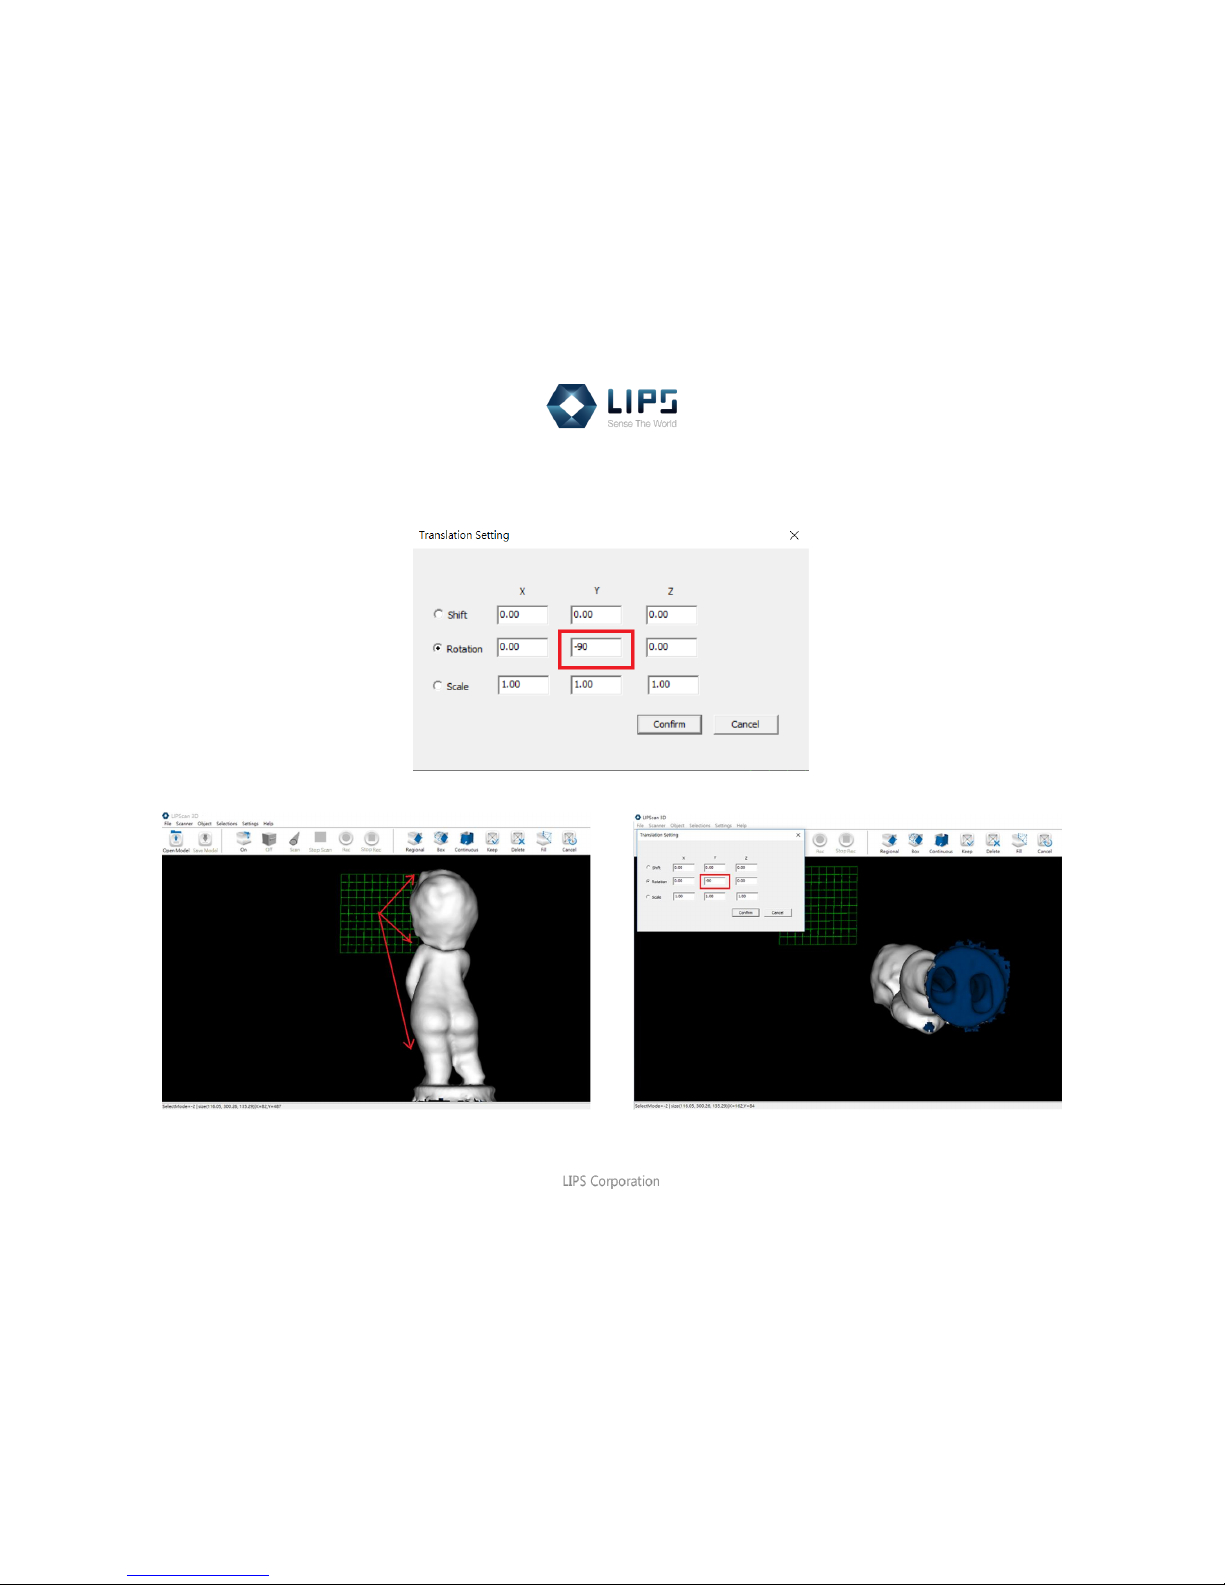
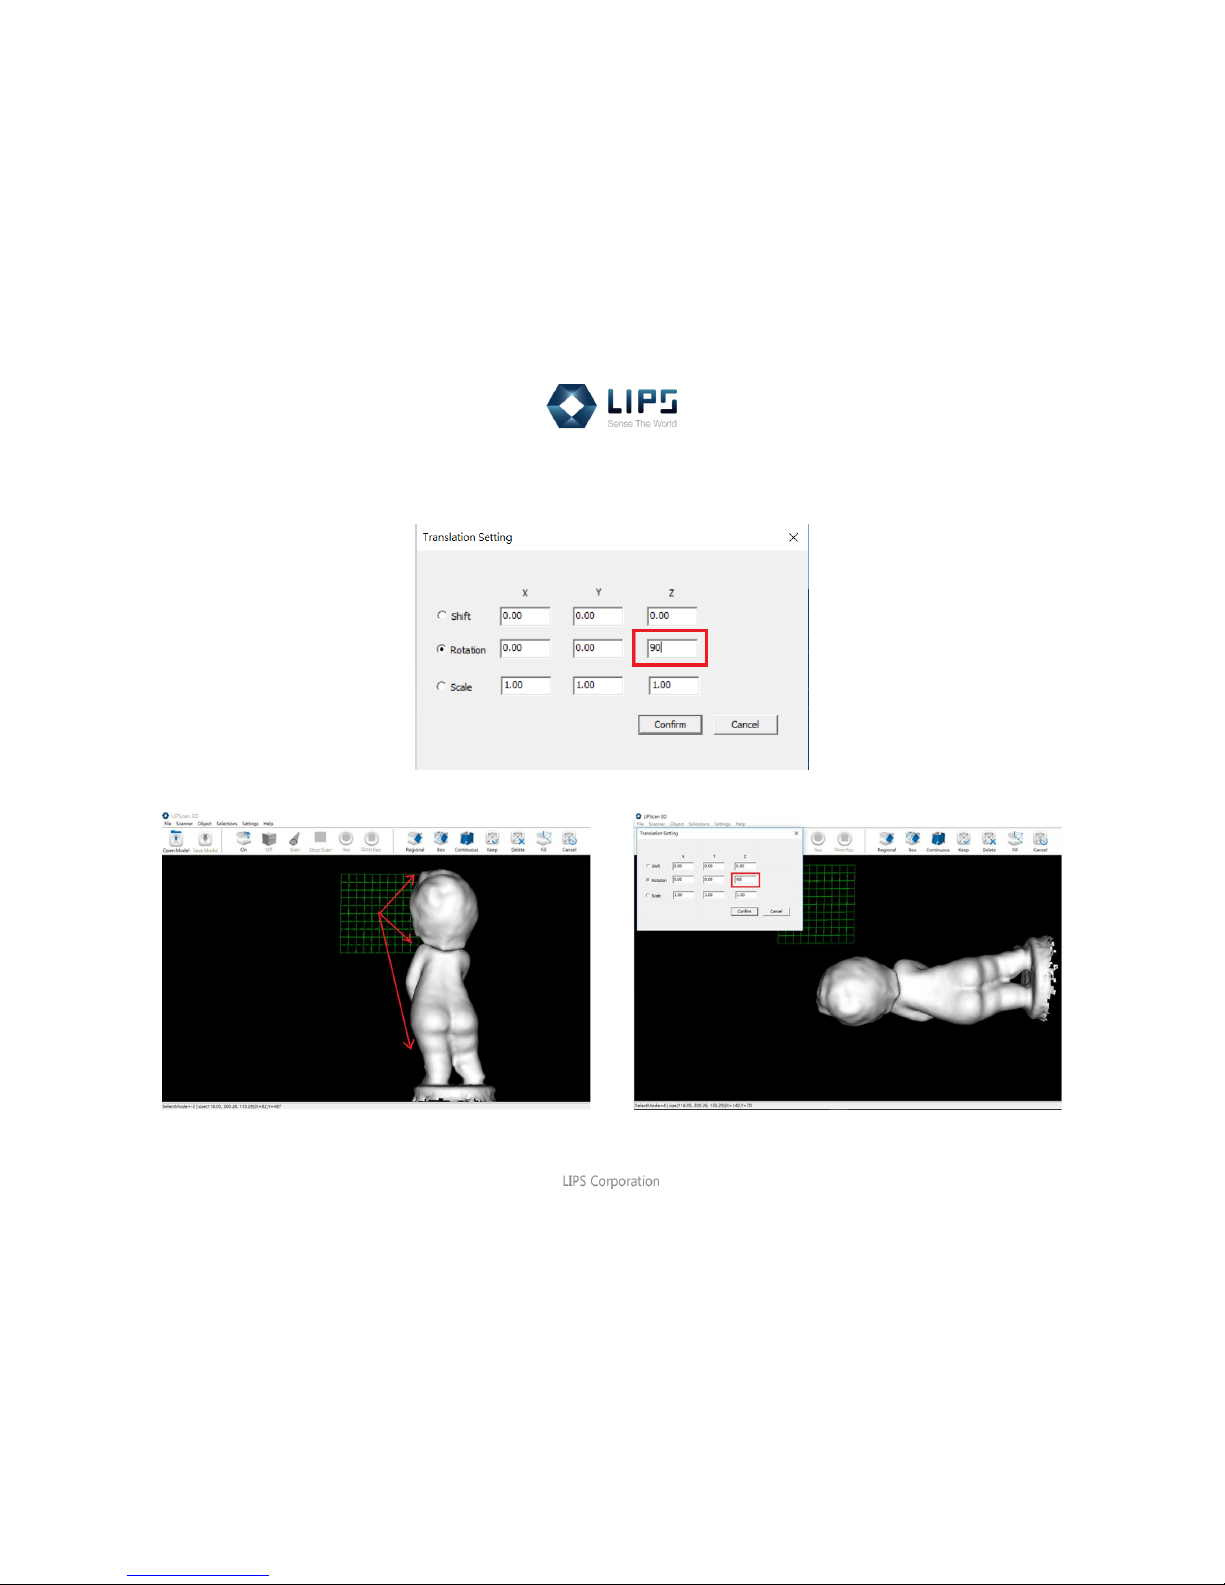
(2) Rotation
The extent of spin based on the degree. (±1~360 degree)
For X axis, put a positive/negative number, the object will spin leftwards/ rightwards.
Note:
There is another quick way to rotate the object. Click Object > Move to fixed the position of the green lattice (camera) then
drag the object.
Page 47
45
LIPScan 3D Manual
For Y axis, put a positive/ negative number, the object will rotate backwards/ forwards.
Page 48
46
LIPScan 3D Manual
For Z axis, put a positive/ negative number, the object will rotate counterclockwise/ clockwise.
Page 49
47
LIPScan 3D Manual
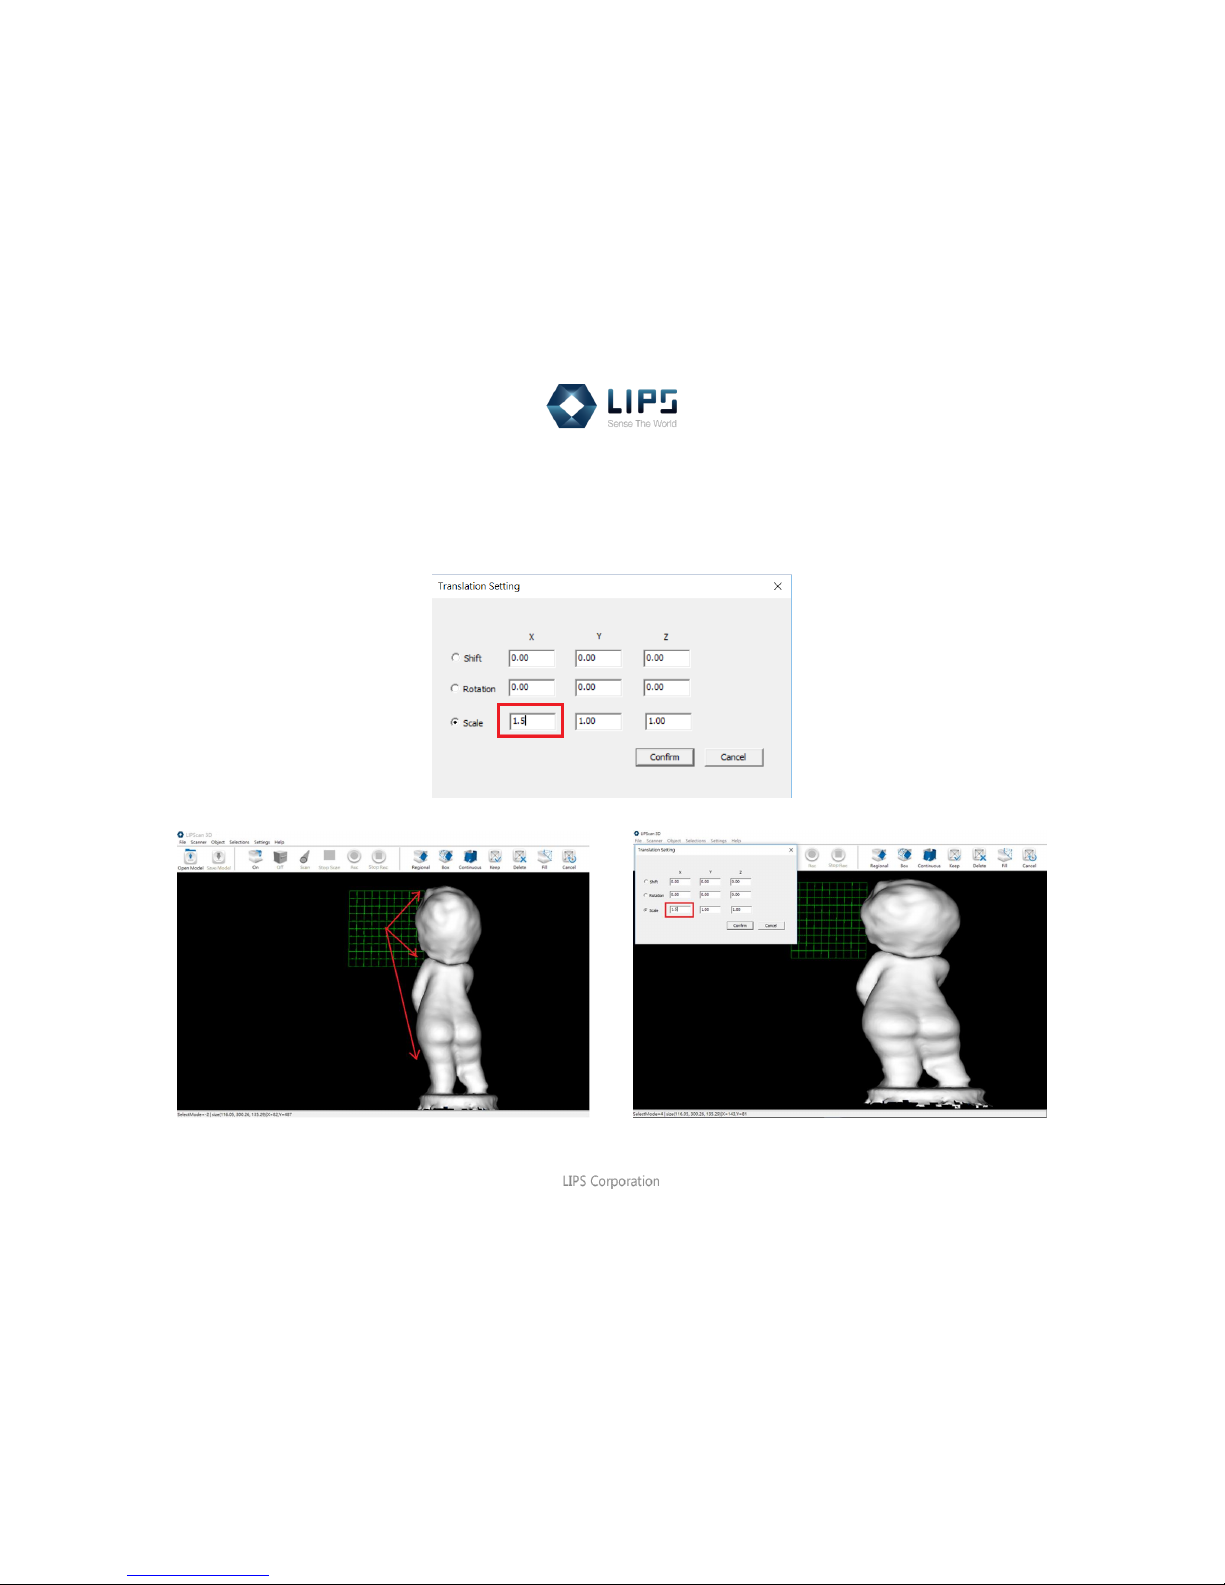
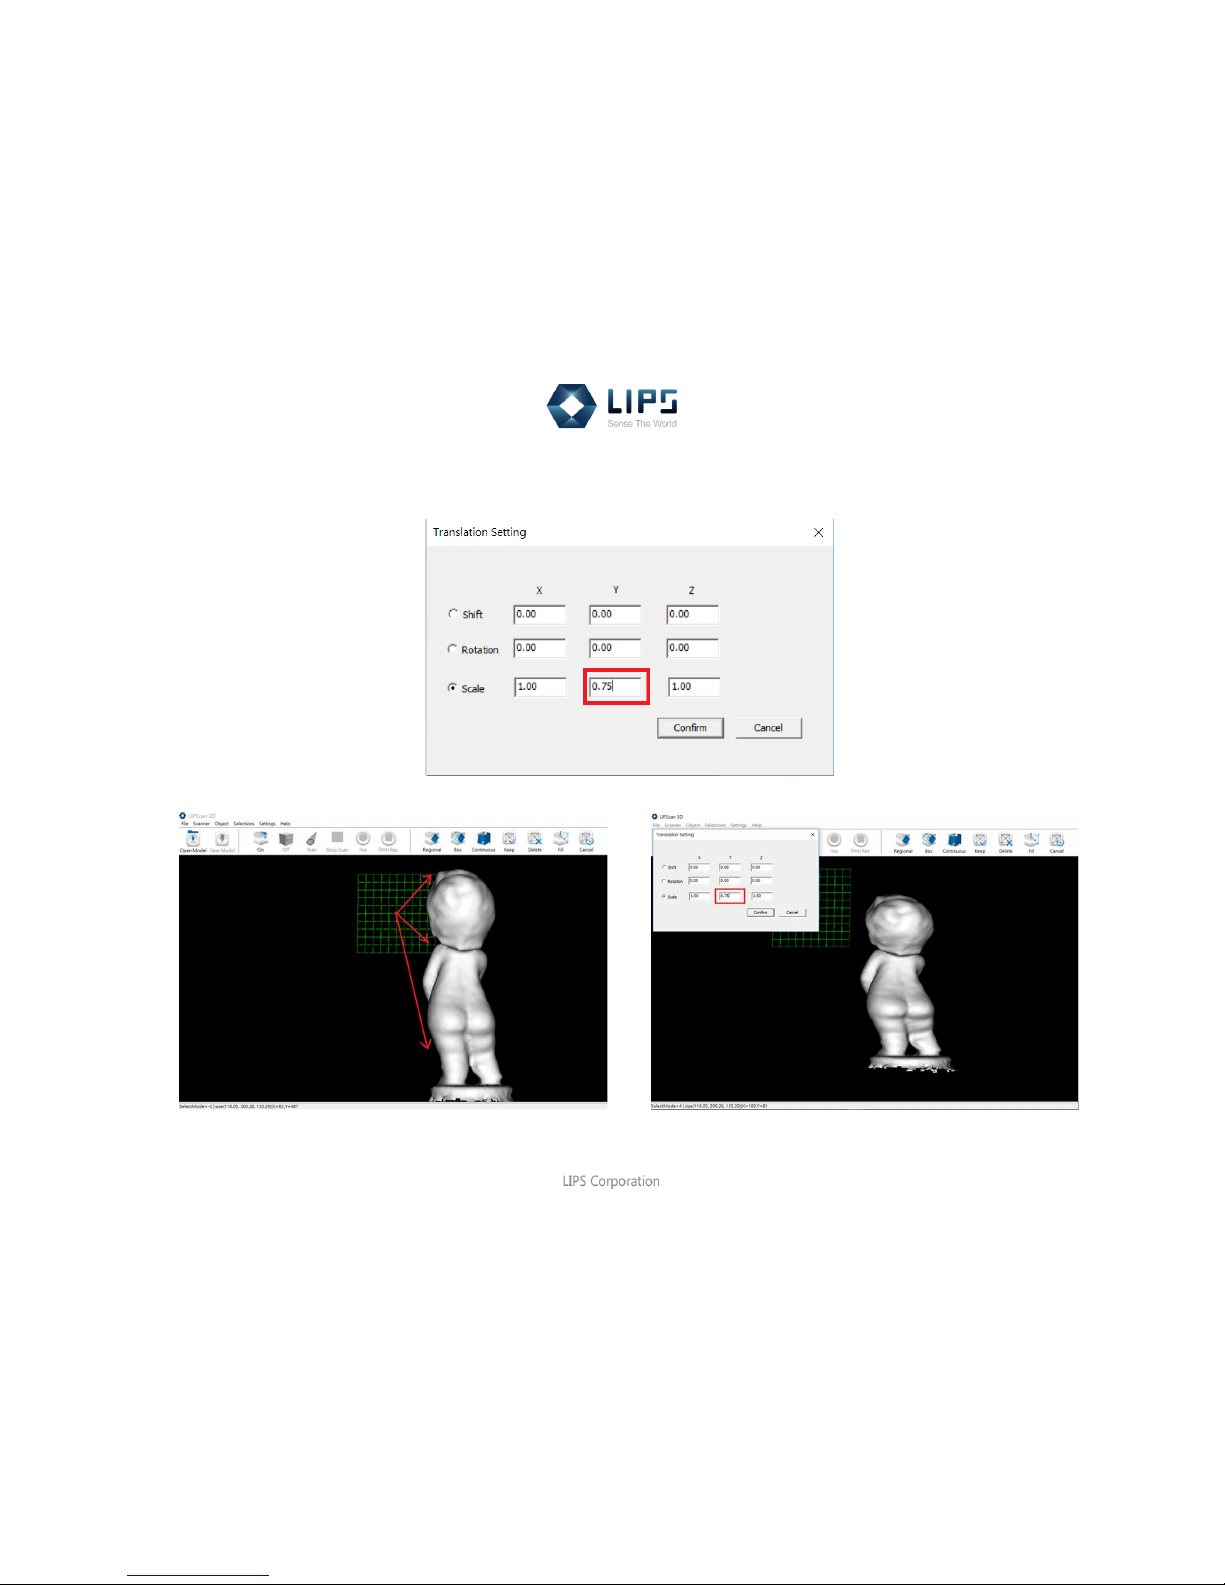
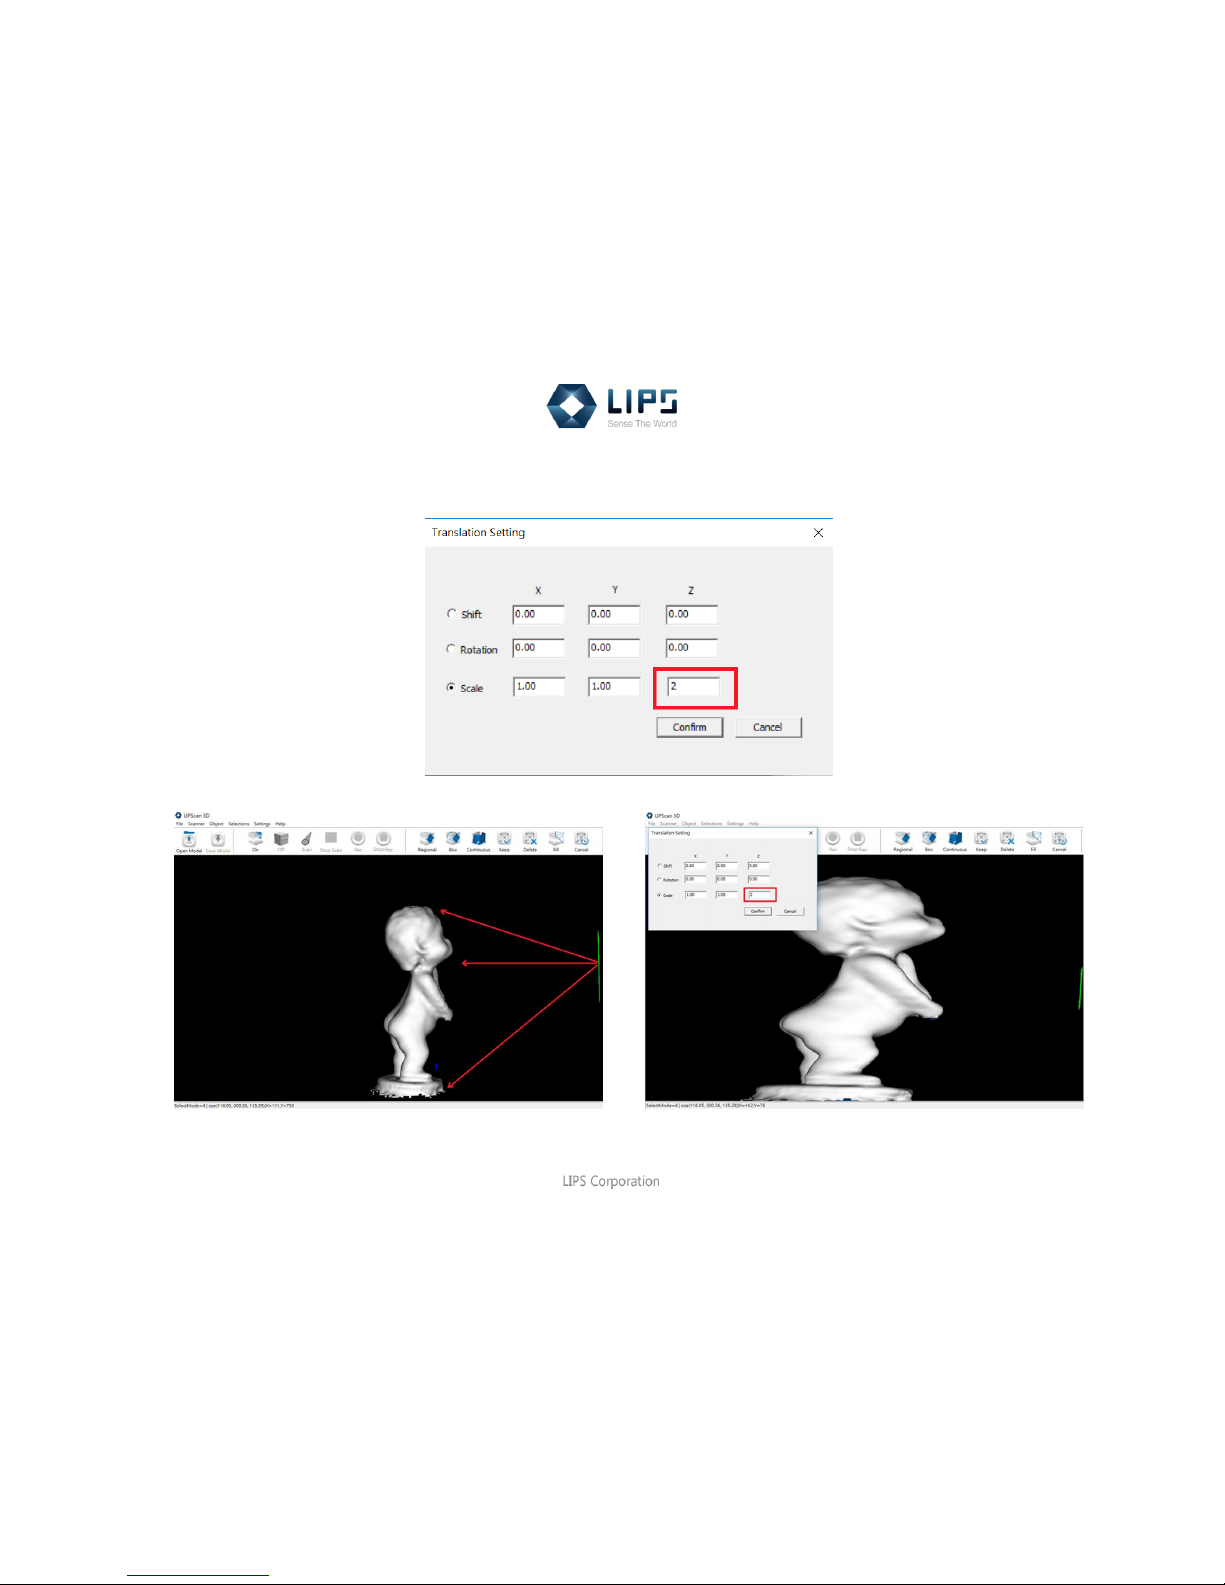
(3) Scale
You can put in numbers by three dimensions to customize respectively.
For X axis, put a Number>1/ 0>Number>1, the object will expand/ shrink parallelly with the X axis.
Page 50
48
LIPScan 3D Manual
For Y axis, put a Number>1/ 0>Number>1, the object will stretch/ shorten parallelly with the Y axis.
Page 51
49
LIPScan 3D Manual
For Z axis, put a Number>1/ 0>Number>1, the object will thicken/ thin parallelly with the Z axis.
Page 52

50
LIPScan 3D Manual
Appendix-LIPScan 3D Parameters
LIPScan 3D uses a set of 3D scanning parameters to optimize its overall performance. The “UI” notation next to some
parameters indicates a corresponding setting UI for the parameters is available. Those without setting UIs are for professional
purpose hence their changes are usually not recommended unless its purpose and meaning are fully understood. Users can
refer to C:\Program Files\LIPS\LIPScan 3D config file named “Scanner.cfg” to check if needed.
[WorkerThreads]
Set the number (> 0 in integer) of parallel-processing threads in the program for surface matching during scanning process.
Bigger number can be set for faster CPU.
[VolumePitch]
This is the grid resolution of the reconstructed 3D model of scanned object. The decimal value should be greater than 0. (e.g.
1 = 1mm)
[DepthAccuracy]
Set the accuracy of depth data (z-direction) which is a multiple of measured z distance. The decimal value should be greater
than 0.
[SearchRange]
Set the searching range of the surface matching in 3D space. The decimal value should be greater than 0 for the system to
be able to proceed with continuous surface registration.
Page 53

51
LIPScan 3D Manual
[ColorSpreadRange]
This is the color-spreading capability. The decimal value should be greater than 0. Smaller value indicates better color-
spreading capability.
[RenderingPitch]
This is only to set the real-time rendering size for the re-constructed 3D model inside the “3D Model” floating window located
at the lower-right corner of the screen. The decimal value should be greater than 0. The smaller the value, the closer the
object looks in the window.
[RegistrationMinimalPoints]
The surface matching will fail when the number of points cloud matching the previous frame is less than the setting.
[RegistrationMaxDeviation]
This is the maximum error of surface matching. Error during the scanning process greater than this threshold will be
considered matching failure. When this happens, the real-time registration window at the lower-right corner will display
yellow borders. The decimal value should be greater than 0.
[RegistrationMinDeviation]
This is the minimum error of surface matching. Error during the scanning process smaller than this threshold will be
considered invalid result hence skipped. The decimal value should be greater than or equal to 0.
[DepthRange] UI
The depth range (mm) set for 3D scanning operation. Depth values outside this range will be filtered out.
Page 54

52
LIPScan 3D Manual
[AverageTimes]
This is to set the number of times the system performs surface smoothening before surface matching is processed. Value is
integer greater than or equal to 0.
[PeelOffTimes]
This is to set the number of times the system performs surface erosion before surface matching is processed. Value is
integer greater than or equal to 0.
[RemoveExternalNoise]
This is to set a threshold value whereby the depth values will be removed if vertically accumulated depth sum lower than this
setting. Value is integer greater than or equal to 0 with 0 meaning ignored.
[SearchBiggerObjectReserve]
This is to set a threshold value whereby a block depth values will be removed if triangular mesh count in the block lower than
this setting. Value is integer greater than or equal to 0 with 0 meaning ignored.
[CameraFrameInterval] UI
This is to set the number of frames to be skipped for every frame processed during real-time scanning.
[RecoderFrameInterval] UI
This is to set the number of frames to be skipped for every frame processed during offline scanning.
 Loading...