

Lionel VISION Line Owner's Manual

72-7410-250
3/10
Featuring
Lionel VISION™ Line
Ethanol Tank Car
Owner’s Manual
Lionel VISION™ Line
Ethanol Tank Car
Owner’s Manual
72-7410-250 VL Ethanol Tankcar.indd 1 4/13/10 8:00 AM

Congratulations!
C
ongratulations on your purchase of the VISION Line™ Tank Cars! On the outside, these
cars are accurately detailed to match the prototype. The two sound cars are equipped
with the latest technology to bring you realistic tank sounds, and true-to-life freight car
sounds. Many of the sounds are activated through your cab control unit, and many of them
by the actual movement of the tank cars on your layout. They also come equipped with an
ElectroCoupler on one end, so you can activate the coupler by your remote control cab unit
anywhere on your layout. Enjoy the realistic freight and train brake sounds, and have lots of
fun loading and unloading your tank cars while you listen to the fluid rushing sounds! This
3-pack includes two sound equipped tank cars and one with out sound features.
2
e following Lionel marks are used throughout this catalog and are protected under law. All
rights reserved.
Lionel®, LEGACY™, TrainMaster®, Odyssey®, RailSounds®, CrewTalk™, TowerCom™,
DynaChuff™, StationSounds™, Pullmor®, ElectroCoupler™, Magne-Traction®, CAB-1® Remote
Controller, American Flyer®, Lionel ZW®, ZW®, MagniVision®, TMCC®, Lionelville®, Wireless
Tether™, Powerhouse™, LionMaster®, Conventional Classics™, Postwar Celebration Series™,
TruRail™, PH-1 Powerhouse®, Powermaster®, Powerstation-Powerhouse®, Accessory Motor
Controller™, AMC™, Accessory Switch Controller™, ASC™, Action Recorder Controller™, ARC™,
Track Power Controller 300™, TPC 300™, Track Power Controller 400™, TPC 400™, Block
Power Controller™, BPC™, Operating Track Controller™, OTC™, FatBoy™, Lionel Lines®,
Joshua Lionel Cowen Series™, Lockon®, TrainSounds™, MultiHorn™, MultiWhistle™, ChooChoo
™
All tank cars feature
• Die-cast metal sprung trucks and operating couplers.
• Hidden uncoupling tabs and rotating bearing caps.
• Metal framework.
• Metal ladders, rails, steps and platform.
• Opening fueling hatch cover.
• Minimum curve: O-31 min.
The two sound cars feature
• LEGACY Command Control operation including volume control, sound
activation, ON/OFF control.
• LEGACY Railsounds sound system with Tank car, Freight, Train brake, and Flat
wheel sounds.
• 1 ElectroCoupler on brakewheel end of car.
• Play sounds in reaction to movement and track layout.
• One sound car includes End of Train (EOT) illuminated light device with ON/
OFF control.
72-7410-250 VL Ethanol Tankcar.indd 2 4/13/10 8:00 AM

3
Table of contents
Switch Function Overview
Removing the end cap 4
Installing the battery 5
Mode Switch 6
EOT Light Switch 6
Sound Set Switch 6
Volume Pot 7
Securing the end cap 8
Quick Start
LEGACY Control operations 9
TrainMaster Command Control operations 10
Transformer operations 10
LEGACY Control System operations
Get Ready to Run 11
Assignment to train 11
The LEGACY CAB-2 Controller Version 1.2 software 12-13
Sounds Overview of Version 1.2 software:
Tank Car Sounds 13
Freight Sounds 13
Flat Wheel Sounds 13
Train Brake Sounds 13
The LEGACY CAB-2 Controller Version 1.3 software 14
TrainMaster Command Control operations
The CAB-1 Remote Controller 15
Limited Warranty/Lionel Service 16
72-7410-250 VL Ethanol Tankcar.indd 3 4/13/10 8:00 AM
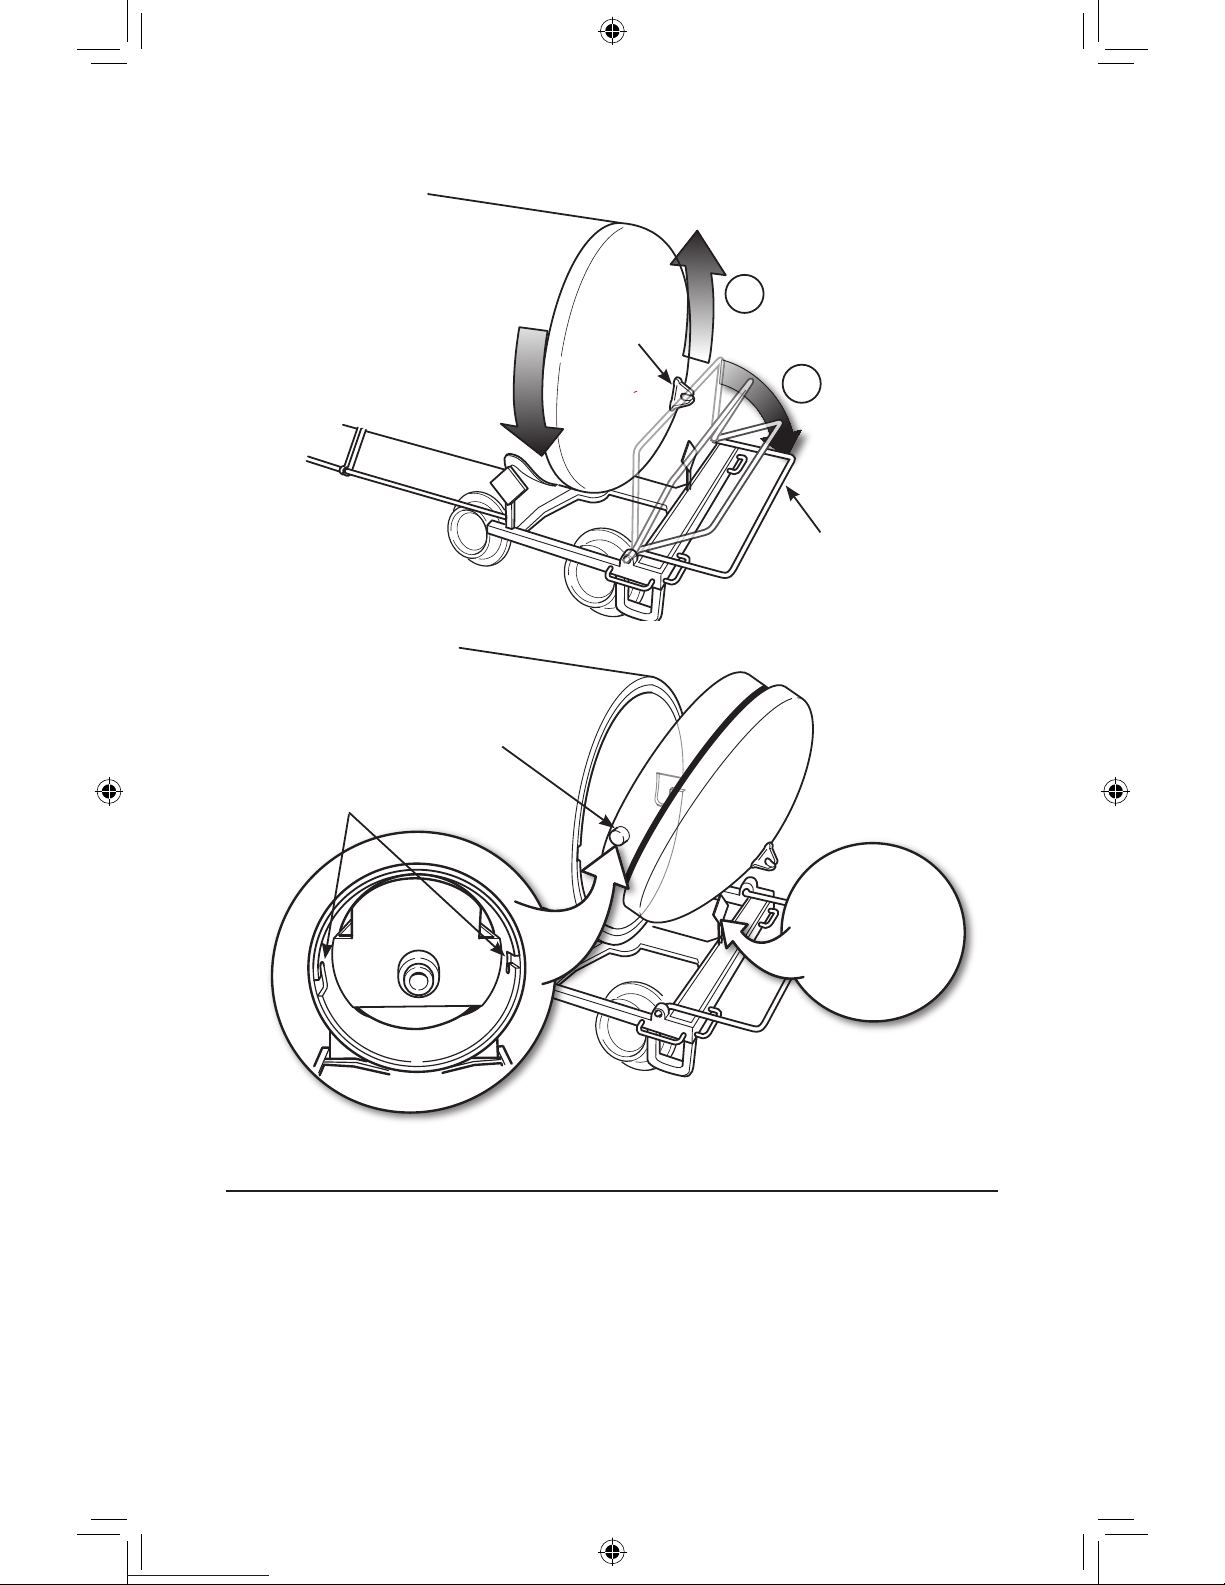
1.
2.
Fig 1
1.
2.
WARNING
Before removing end cap
lift off the die-cast
warning placard
carefully as it is fragile
Fig 1
Fig 2
4
Removing the end cap
To access the programming switches and/or to change the battery, you must first remove the
end cap from the tank car.
1. Gently detach the handrail by pulling it away from the clasp and lowering the handrail.
2. Pull the die-cast warning placard off the cross-bar.
3. Twist the end cap in a counter-clockwise motion to remove the end cap.
Switch Function Overview
End view of tank car
Locking tab
Locking slot
Handrail
Clasp
Figure 1
72-7410-250 VL Ethanol Tankcar.indd 4 4/13/10 8:01 AM
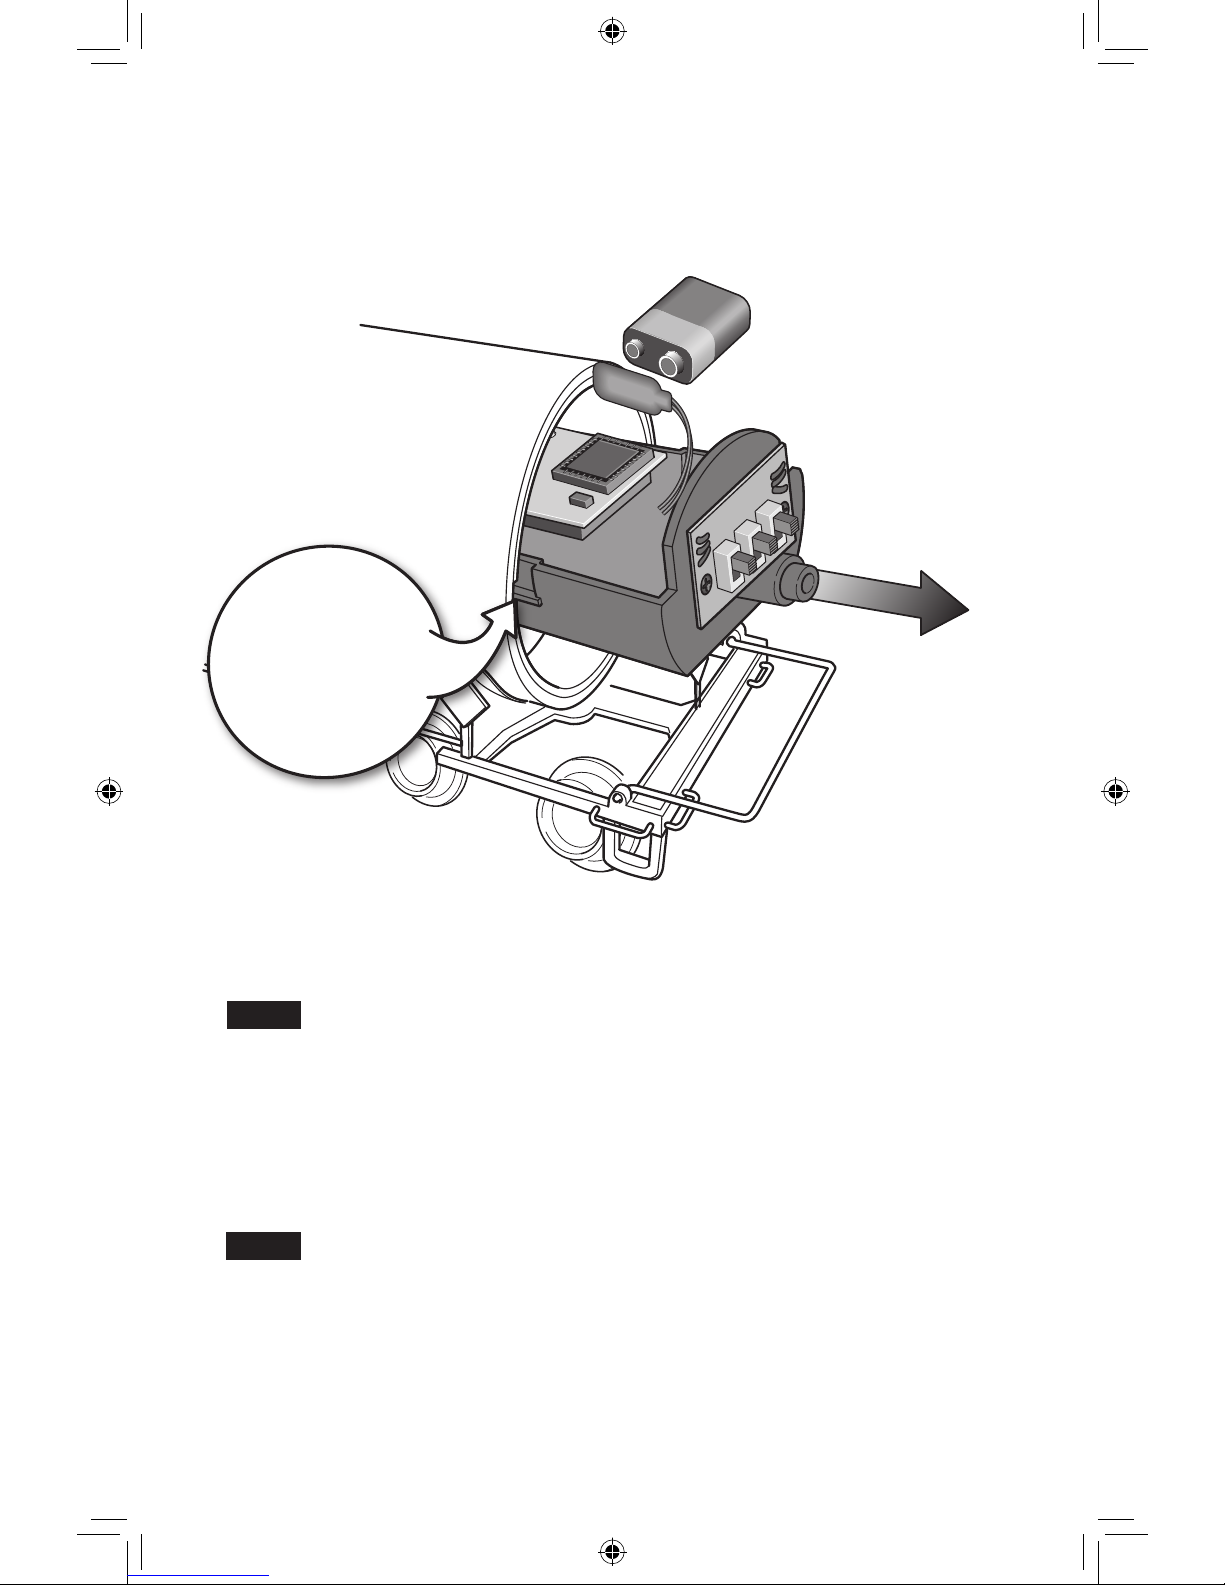
RUNONMAX
PROG
MODE
EOT
SND-SET
OFFMIN
NOTE
Do not pull the sled out
any farther than
the battery compartment.
It is very hard to line up
the sled guides if
it comes out to far
5
Battery Installation
End view of tank car
Figure 2
Installing the battery
1. Grab the electronics sled and pull it out. Be careful not to pull too far to avoid removing
the sled from it's guides on the inner walls of the tank cylinder.
If the sled is completely removed, be careful when reinstalling to align the sled
into the guides along the inner walls of the tank car. If the sled is not in the
guides, it can not be mated to the electrical connector in the rear of the cylinder.
2. Connect a 9V battery and place it in the sled.
3. Gently push the sled back into the cylinder until the sled snaps into the rear connector.
Do not force the sled into the cylinder as the sled should easily snap into the connector if
properly inserted into the guides along the inner walls of the cylinder.
Note!
Note!
Although the LEGACY RailSounds sound system is powered through the track,
we recommend that you install a nine-volt alkaline battery in the car to prevent
the sound system from shutting down during track power interruptions (for
example, at a switch or a dirty section of track). Follow these steps and see
above as you install the battery.
72-7410-250 VL Ethanol Tankcar.indd 5 4/13/10 8:01 AM
 Loading...