

Lionel VISION 4-6-6-4 Challenger Owner's Manual
71-1210-250
12/10
Featuring
Lionel VISION Line
4-6-6-4 Challenger
Locomotive and Tender
Owner’s Manual
Lionel VISION
Line
4-6-6-4 Challenger
Locomotive and Tender
Owner’s Manual

Congratulations!
A
s a VISION Line™ locomotive, this 4-6-6-4 Challenger is the most technically advanced
and realistic O gauge locomotive ever made. On the outside, this gold standard engine
features more realistic detail, decoration, and moving parts than ever before. Inside the
body, you'll find the highest caliber electronics and sounds ever to give you unprecedented
operational realism. In addition to all the great features found on Lionel Standard O
locomotives, your Challenger is equipped with an array of other realistic and dramatic
effects including dynamo steam, Dual Sound, and whistle steam effects synchronized
to the Legacy RailSounds sound system. More than ever before, you are in control of the
realistic effects and operation of your locomotive. The VISION Line 4-6-6-4 Challenger
steam locomotive is ready for duty on your layout.
Unpacking Your VISION Line locomotive
B
ecause of all the fine details and special features on your VISION Line Challenger, we
thought it best to pack it tightly, even better than our usual sturdy packing.
Inside the box, you will find two foam containers. Separate the containers and remove
your locomotive. Your VISION locomotive is now ready to be placed on the track. PLEASE
see the smoke fluid section on page 35 before you run your locomotive.
2
The following Lionel marks are used throughout this catalog and are protected under law. All rights
reserved.
Lionel®, LEGACY™, FasTrack™, TrainMaster®, Odyssey®, RailSounds®, CrewTalk™, TowerCom™,
DynaChuff™, StationSounds™, Pullmor®, ElectroCoupler™, Magne-Traction®, CAB-1® Remote
Controller, American Flyer®, Lionel ZW®, ZW®, MagniVision®, TMCC®, Lionelville®, Wireless
Tether™, Powerhouse™, LionMaster®, Conventional Classics™, Postwar Celebration Series™,
TruRail™, PH-1 Powerhouse®, Powermaster®, Powerstation-Powerhouse®, Accessory Motor
Controller™, AMC™, Accessory Switch Controller™, ASC™, Action Recorder Controller™, ARC™,
Track Power Controller 300™, TPC 300™, Track Power Controller 400™, TPC 400™, Block Power
Controller™, BPC™, Operating Track Controller™, OTC™, FatBoy™, Lionel Lines®, Joshua Lionel
Cowen Series™, Lockon®, TrainSounds™, MultiHorn™, MultiWhistle™, Choo-Choo™

3
VISION Line features of this locomotive
New Steam and Smoke Features! Lionel introduces TruRail Steam, a new CAB-controlled,
variable-intensity steam and smoke effect. See all the features operators can simulate:
• Dynamo steam effects
• New and accurate whistle steam effects
• Two fan-driven smoke units with adjustable smoke output deliver varying intensities of
smoke to the main stack and to the dynamo, injector, and whistle
• All steam effects are synchronized to the RailSounds sound system
Upgraded Sound Features! The LEGACY RailSounds sound system synchronizes realistic
sounds to nearly all aspects of locomotive operation. Just look at how many ways you can
enhance the sound experience:
• Dual Sounds system – The most realistic sound experience ever
• TruRail Steam – Control realistic sounds synchronized to features including dynamo,
injector, and whistle steam effects
• The independently adjustable volume control allows you to use the Remote Controller to
lower the level of background effects (such as chufng) while keeping operator
controlled effects (such as the whistle) at full volume
• TruRail Dialog – Activate our upgraded dialog features which boast the most
authentic railroad terminology possible. Also, dialog scenarios can change with engine
operation and user control
• TruRail Signals – Activate the “quilling” whistle and user-playable bell featuring
continuous or single strike sounds with variable intensity. There’s a dedicated CAB-2
slide lever control for both whistle and bell functions
• TruRail Laboring – Control the variable laboring sounds with 32 levels of simulated
dynamic load of the locomotive
• TruRail Chuff – Experience prototypical four-chuffs per revolution chufng sound
synchronized with linkage and drive wheel position.
The most detail on any steam locomotive we've ever made!
• Sliding cab windows
• Decorated cab interior with enhanced panel details
• Upgraded rebox lighting and new opening rebox door
• Improved realistic detail behind smokebox door
• Prototypical spacing between locomotive and tender
• Interchangeable scale pilot wheels (included with locomotive)
• Rule 17 lighting features – when the locomotive stops the headlight dims

4
Standard features for this locomotive
• LEGACY Control System – You can run the engine in LEGACY Control mode, in TrainMaster
Command Control mode, or in Conventional mode with a standard transformer
• Odyssey II Speed Control with ON/OFF switch
• High-torque motor with momentum ywheel
• Wireless Tether connection between locomotive and tender with wire connection for sound
• Swing-out scale front couple with interchangeable O-gauge coupler for double-heading
• ElectroCoupler on rear of tender
• Die-cast metal locomotive body, frame, and trucks
• Die-cast metal tender body and trucks
• Traction tires
• Accurate, separately-applied builder’s plates
• Engineer and reman gures
• Opening roof hatch on cab
• Cab window glass
• Enhanced realistic lighting in cab interior
• Directional lighting including operating headlight and tender back-up light
• Illuminated front classication lights on locomotive
• Illuminated rear marker lights on tender
• Illuminated number boards
• Movable scale apron, or deck plate, between locomotive and tender
• Variable ashpan glow
• Removable smoke deectors
• Four illuminated work lights under the boiler
• Flickering rebox in cab

5
Table of contents
Quick Start
LEGACY Control operations 7
TrainMaster Command Control operations 7
Transformer operations 7
Locomotive switch function overview
Locomotive switch locations 8
Tender volume control location 9
LEGACY RailSounds sound system operations
Installing the battery 10-11
LEGACY Control System operations
Get ready to run 12
Start ‘Er Up 12
The LEGACY CAB-2 Remote Controller 13
The Velocity Throttle 14
The Multi-Controller 14-15
The Train Brake Slider 15
The Warning Sound Controller 16
The Speed Bar 17
Dynamo steam effects 18
LEGACY RailSounds 19
Activating the CrewTalk dialog and TowerCom announcements 20
Assigning your locomotive a new ID# 21
Reprogramming your locomotive to restore features 21
TrainMaster Command Control operations
TrainMaster Command Control operations 22
Operating your locomotive in the Command Control environment 22
Using LEGACY RailSounds in the TMCC environment 23
CAB-1 Remote Controller commands 24
CAB-1 Remote Controller numeric keypad commands 25
Activating CrewTalk and TowerCom announcements 26
Assigning your locomotive a new ID# 27
Reprogramming your locomotive to restore features 27
Conventional transformer operations
Operating your locomotive in the conventional environment 28-29
Using the LEGACY RailSounds sound system in the conventional environment 30
Activating CrewTalk and TowerCom announcements 31
Locking your locomotive into a single direction 31
Uncoupling in the conventional environment 32
Odyssey II Speed Control system operations
Odyssey II Speed Control operations 33
Odyssey II Speed Control system LEGACY Control operation 33
Odyssey II Speed Control system TrainMaster Command Control operation 33
Odyssey II Speed Control system conventional transformer operation 33

6
Contents of your locomotive box
1 Locomotive
1 Tender
1 Smoke fluid bottle
1 Wrench
4 Replacement traction tires
1 Owner's manual
1 Engine memory module
1 Smoke fluid funnel
1 VISION Line Locomotive Warranty Card
VISION Line Enhancements
VISION Line features will be described in each section where it is relevant to the
operation of your locomotive and the system you use. Some LEGACY and VISION Line
features may not be available in the conventional or TMCC environment.
LEGACY RailSounds Sound System operations
Installing a Lionel Sound Activation Button for conventional operation 34
Maintaining and servicing your locomotive
Adding fluid to your locomotive’s smoke generators 35
Lubricating your locomotive 36
Maintaining your locomotive’s handrail antenna 37
Servicing your locomotive’s lamps 37
Tire-Traction 38
Removing the smoke deflectors 38
Installing the O gauge front coupler 39
Installing the scale pilot truck 39
Lionel VISION Line Locomotive Warranty 40
Quick Start
Power your locomotive with an alternating-current (50-60Hz AC) transformer only.
Powering your locomotive with a direct-current (DC) transformer, or in excess of
19 volts AC, may result in damage to sensitive electronic components.
LEGACY Control operations
F
or the finest operating experience, your locomotive is
fully compatible with the new LEGACY Control System.
To operate in LEGACY mode, you need a LEGACY
Command Base and LEGACY CAB-2 Remote Controller.
Both products are offered together in the LEGACY
Command Set, 6-14295.
1. Turn off track power and plug in the LEGACY Base.
2. Place your locomotive on Lionel or Lionel-compatible
O-72 or larger track and connect the drawbar between
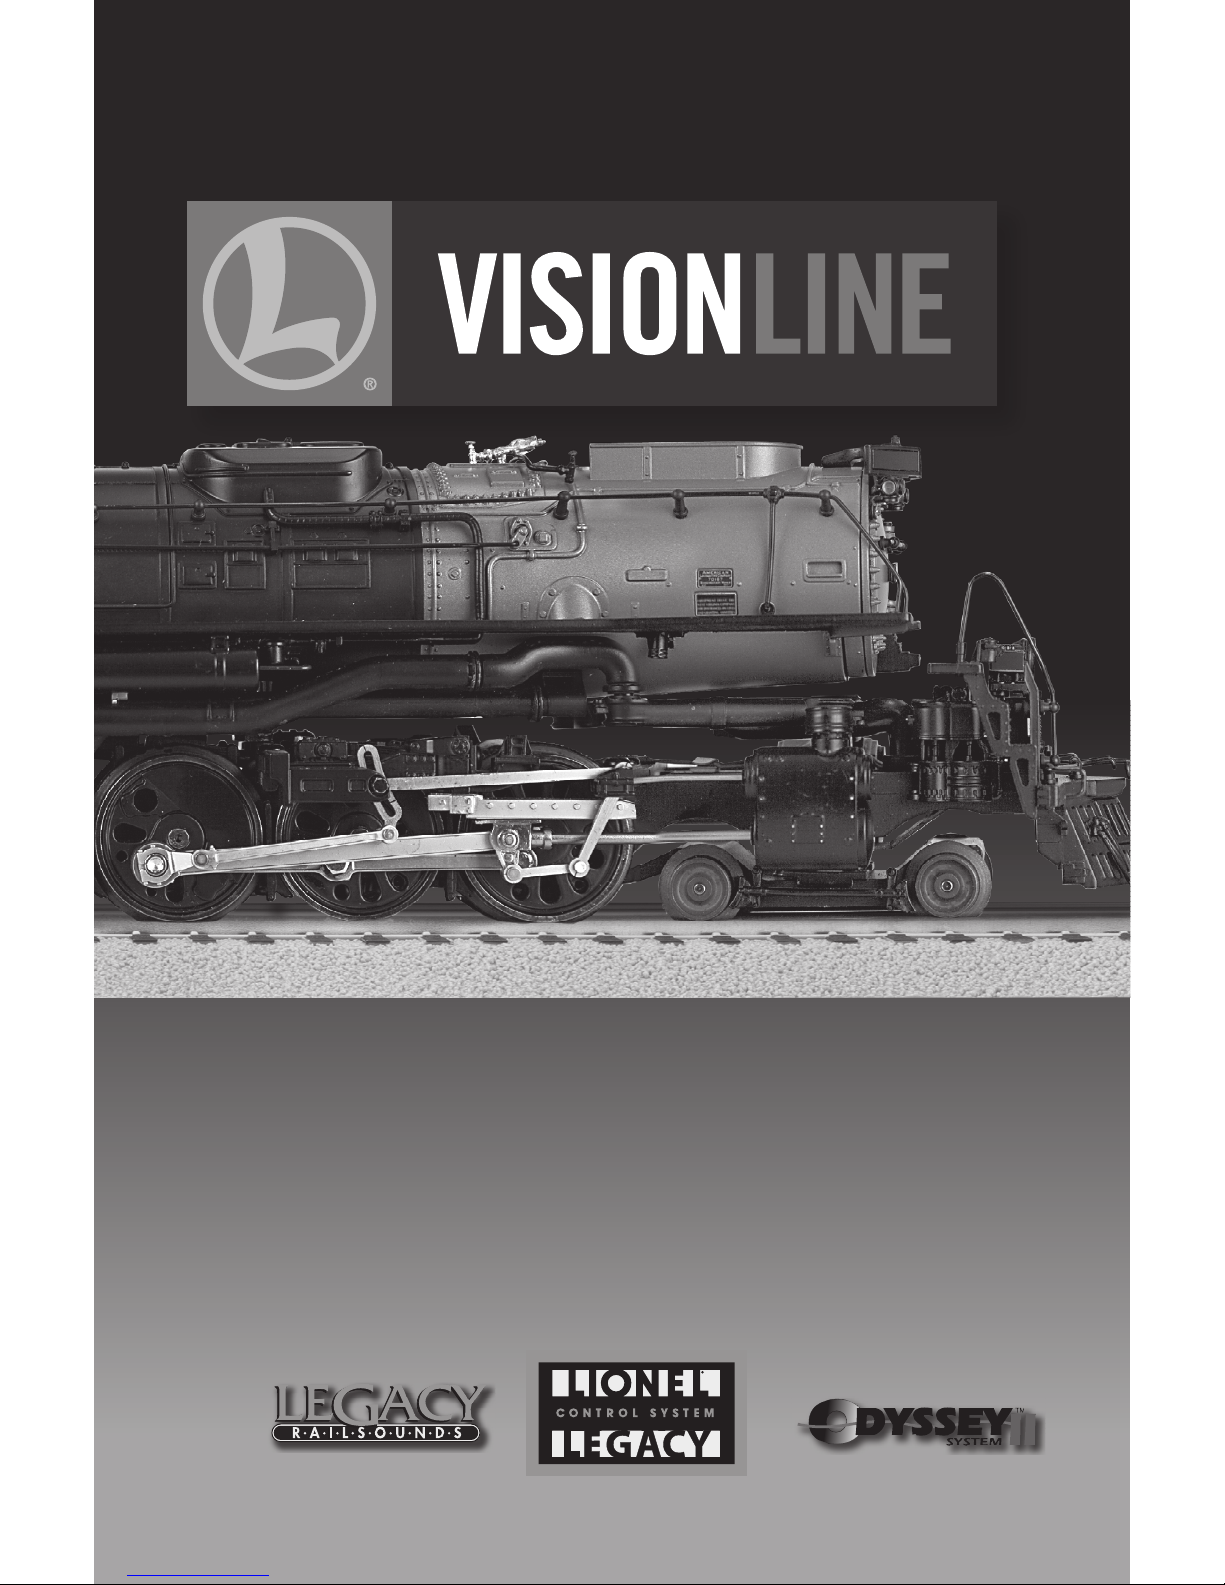
the locomotive and tender as illustrated in Figure 1.
3. Increase track power voltage to full power (no more than 19 volts AC).
4. Press ENG and 1 to address your locomotive with your LEGACY CAB-2 Remote Controller.
5. Throttle up and move ‘em out.
TrainMaster Command Control operations
T
o operate your locomotive in the Command Control environment, you need a Command Base
(6-12911) and a CAB-1 Remote Controller (6-12868).
1. Turn off track power and plug-in the Command Base.
2. Place your locomotive on Lionel or Lionel-compatible O-72 or larger track and connect
the drawbar between the locomotive and tender as illustrated in Figure 1.
3. Increase track voltage to full power (no more than 19 volts AC).
4. Press ENG and 1 to address your locomotive with your CAB-1 Remote Controller.
5. Throttle up and move ‘em out.
Transformer operations
1. Turn off track power.
2. Place your locomotive on Lionel or Lionel-compatible O-72 or larger track and connect
the drawbar between the locomotive and tender as illustrated in Figure 1.
3. Power your locomotive at 12-18 volts with your alternating current (AC)
transformer.
4. Wait three to eight seconds until the locomotive’s headlight illuminates and the
LEGACY RailSounds sound system starts up.
5. Move ‘em out! Press the DIRECTION button on your controller, then throttle up.
For conventional operation, a Command Base must not be powered up anywhere
in the area. The locomotive receives its signals through the airwaves. If a base is
detected, your locomotive will default to command mode.
7
Note!
Figure 1. Drawbar connection
Note!
PGM
ON
RUN
ODY
OFF
ON
OFF
ON
OFF
ON
OFF
MAIN SMK
WHISTLE
DYNAMO/INJECTOR
ON OFF
ON OFF
ON
RUN PGM
ODY
OFF
ON OFF
MAIN SMK
WHISTLE
DYNAMO/INJECTOR
8
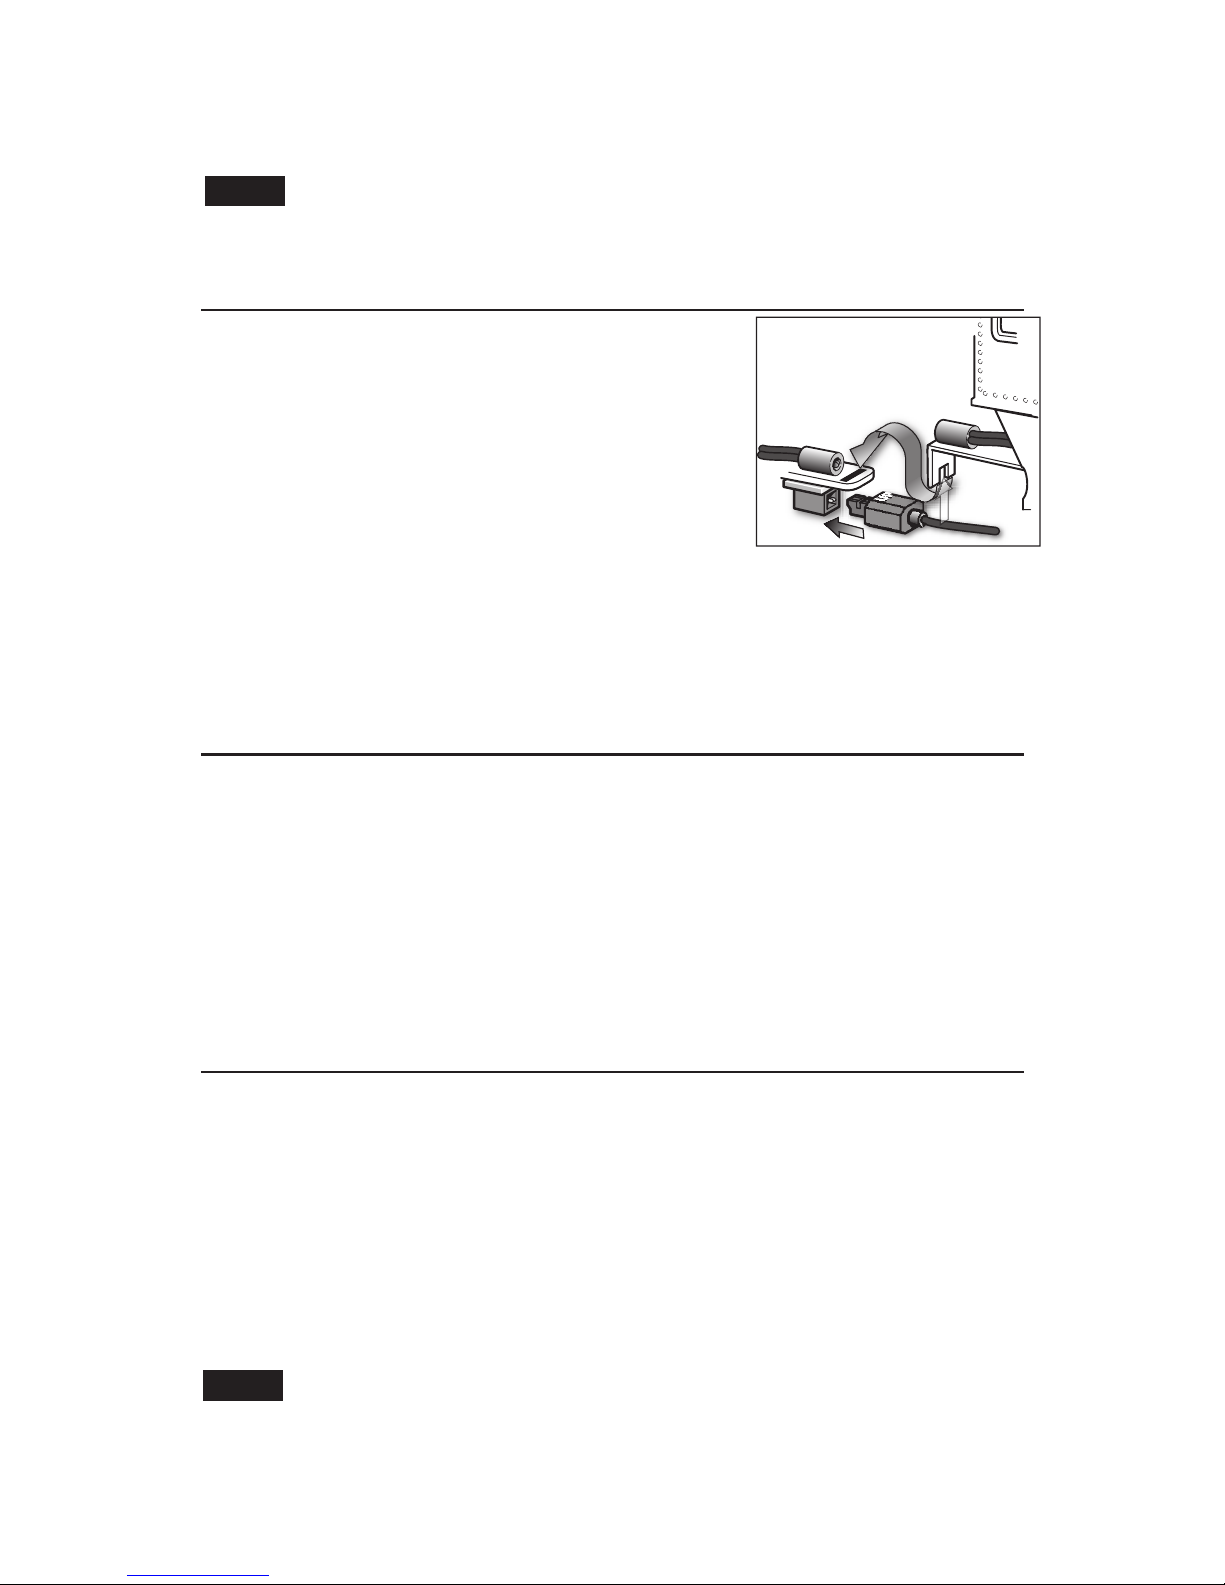
T
he switches that control the features and programing of your locomotive are located under
the sand dome hatch in front of the cab. When you lift up the hatch these switches are
visible with labels.
Looking down at the locomotive with the front facing to the right the switches are as follows:
Smoke Unit Switch (MAIN SMK)
Used to turn the main smoke stack unit function on and off. This switch is "read" by your engine at
start-up only. Switching it after start-up will have no effect.
Whistle Steam Switch (WHISTLE)
Used to turn the whistle steam effect on and off. This switch is "read" by your engine at start-up
only. Switching it after start-up will have no effect. NOTE: This switch does NOT control Sound!
Dynamo/Injector Steam Switch (DYNAMO/INJECTOR)
Used to turn the dynamo and injector steam effects on and off. This switch is "read" by your
engine at start-up only. Switching it after start-up will have no effect. NOTE: This switch does NOT
control Sound!
Program-Run Switch
Used to assign an ID# and reprogram the locomotive in LEGACY and Command operation when the
switch is in the PGM position. Also used to “lock” your locomotive in a single direction, or neutral, in
conventional operation when the switch is placed in the PGM position. See pages 21, 27, and 31.
Odyssey II Speed Control System Switch (ODY)
Used to turn the Odyssey II Speed Control System on and off.
Figure 2. Locomotive switch locations
Rear of Locomotive
Front of Locomotive
Rear sand dome hatch
Locomotive switch function overview
Locomotive switch locations
9
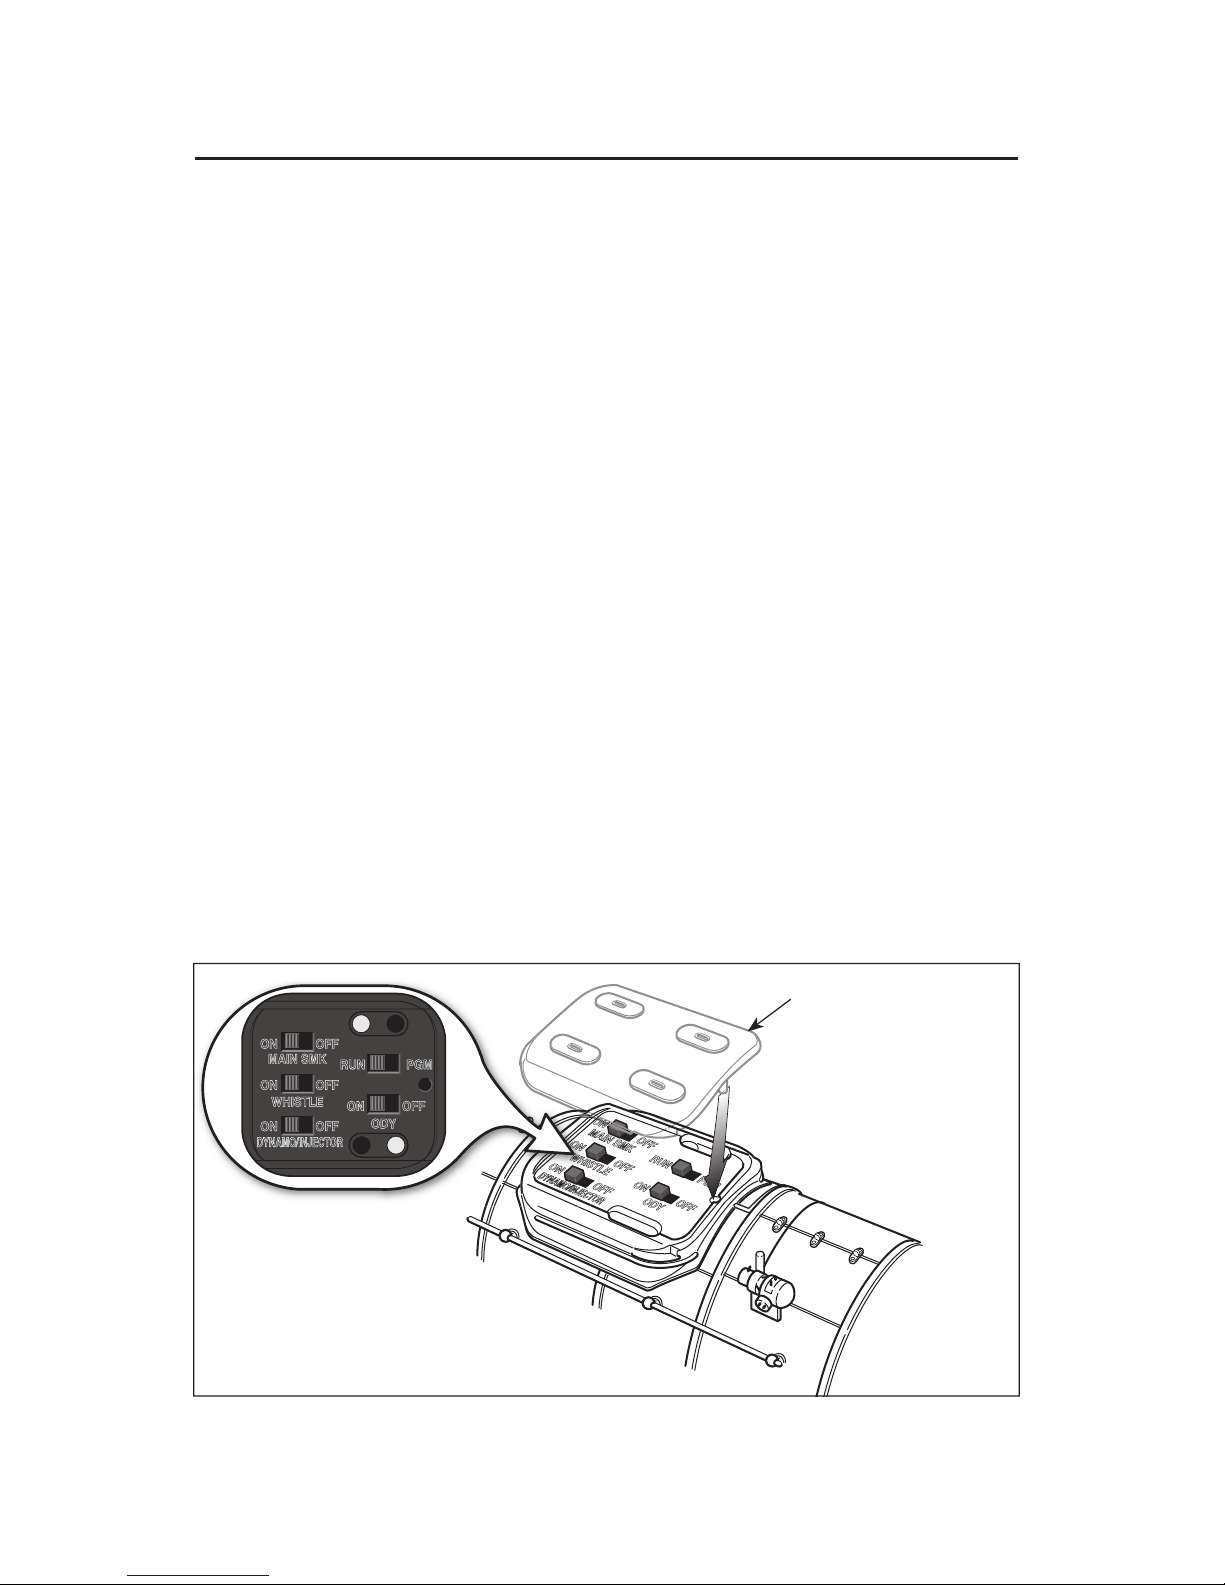
T
he RailSounds volume control is concealed on the tender deck as illustrated in Figure 3
below. Lift away the cover and then rotate the volume control to adjust the volume or to
silence the sounds.
Figure 3. Volume control location
Locomotive switch function overview
Tender volume control location
Volume control

10
LEGACY RailSounds sound system operations
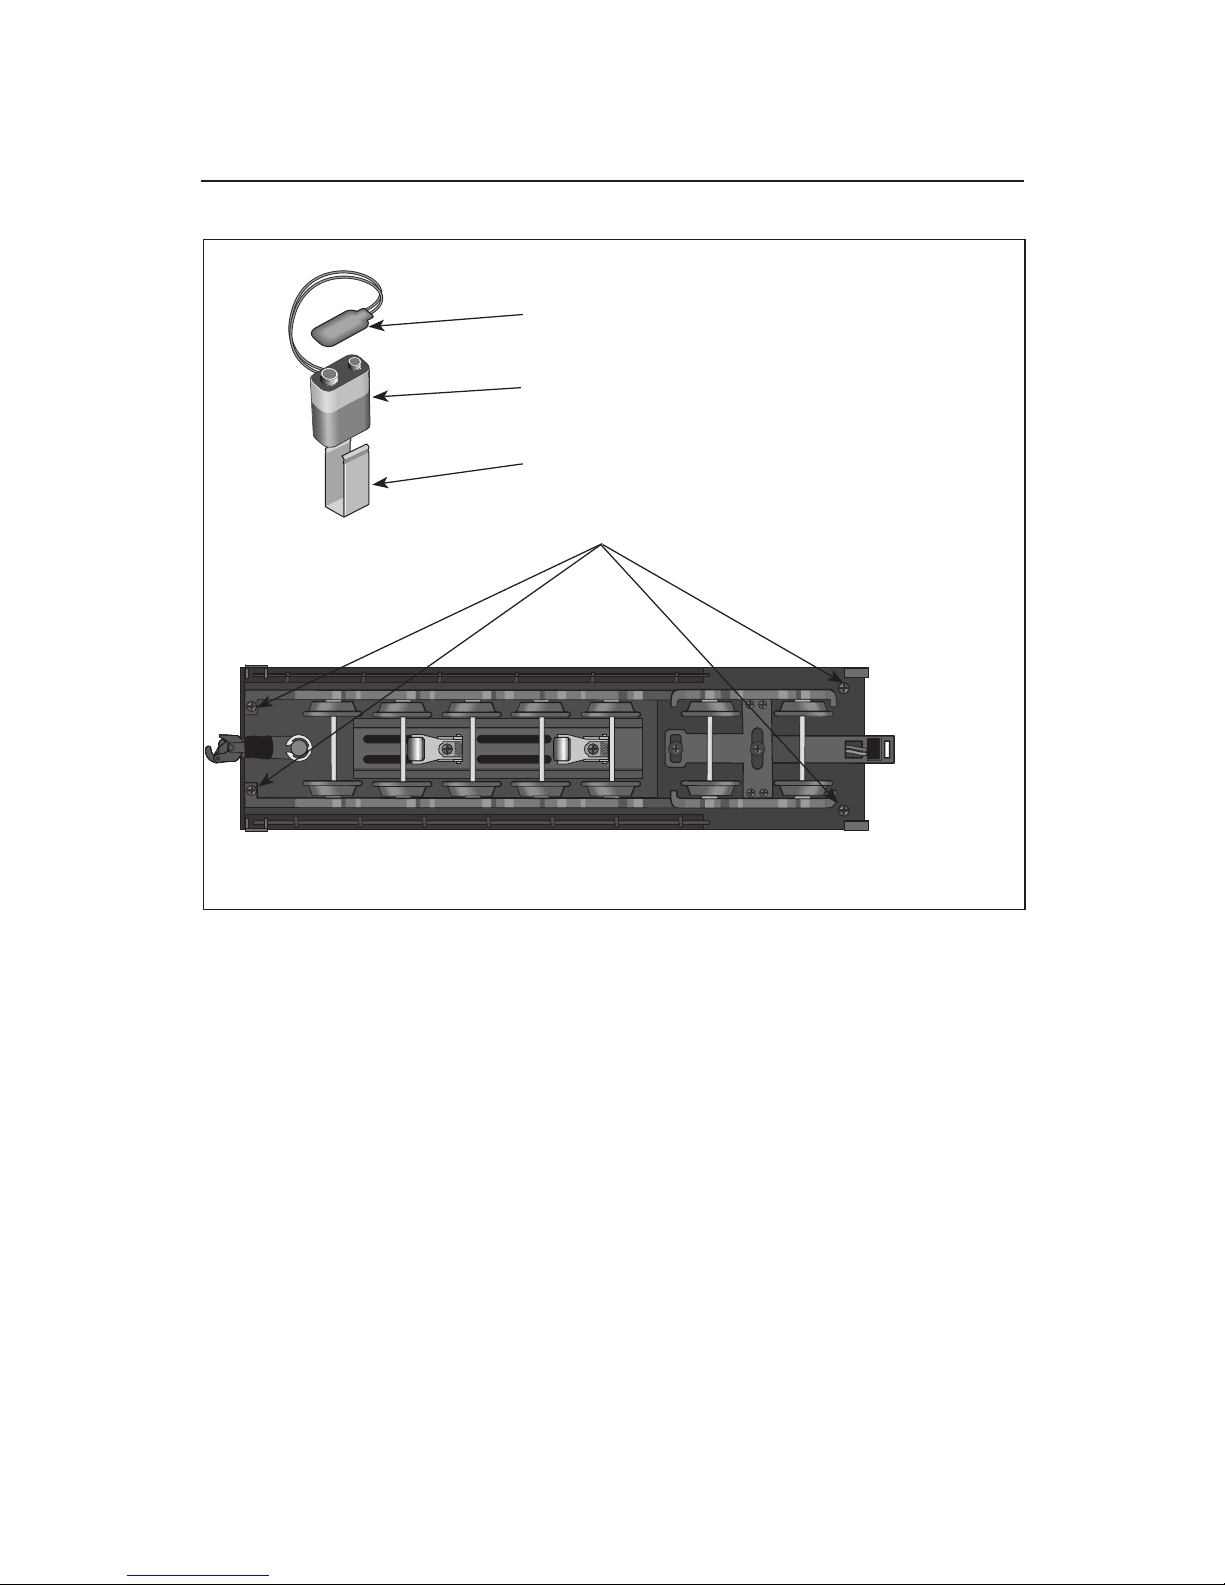
Installing the battery
A
lthough the LEGACY RailSounds sound system is powered through the track, we
recommend that you install a nine-volt alkaline battery in the tender to prevent the
sound system from shutting down during track power interruptions (for example, at a
switch or over a dirty section of track). Follow these steps and refer to Figure 4 page
11 as you install the battery.
If the RailSounds sound system turns off during interruptions in track power,
you may need to replace the battery. Use only alkaline batteries.
1. Remove the four body screw from the underside of the tender. Refer to Figure 4
page 11.
2. Lift the body off the frame.
3. Snap the battery harness onto the nine-volt alkaline battery’s terminals.
4. Slide the battery into the battery holder.
5. Replace the body and secure it with the four body screws. Be careful to avoid
pinching wires.
Note!
11
LEGACY RailSounds sound system operations
Installing the battery (continued)
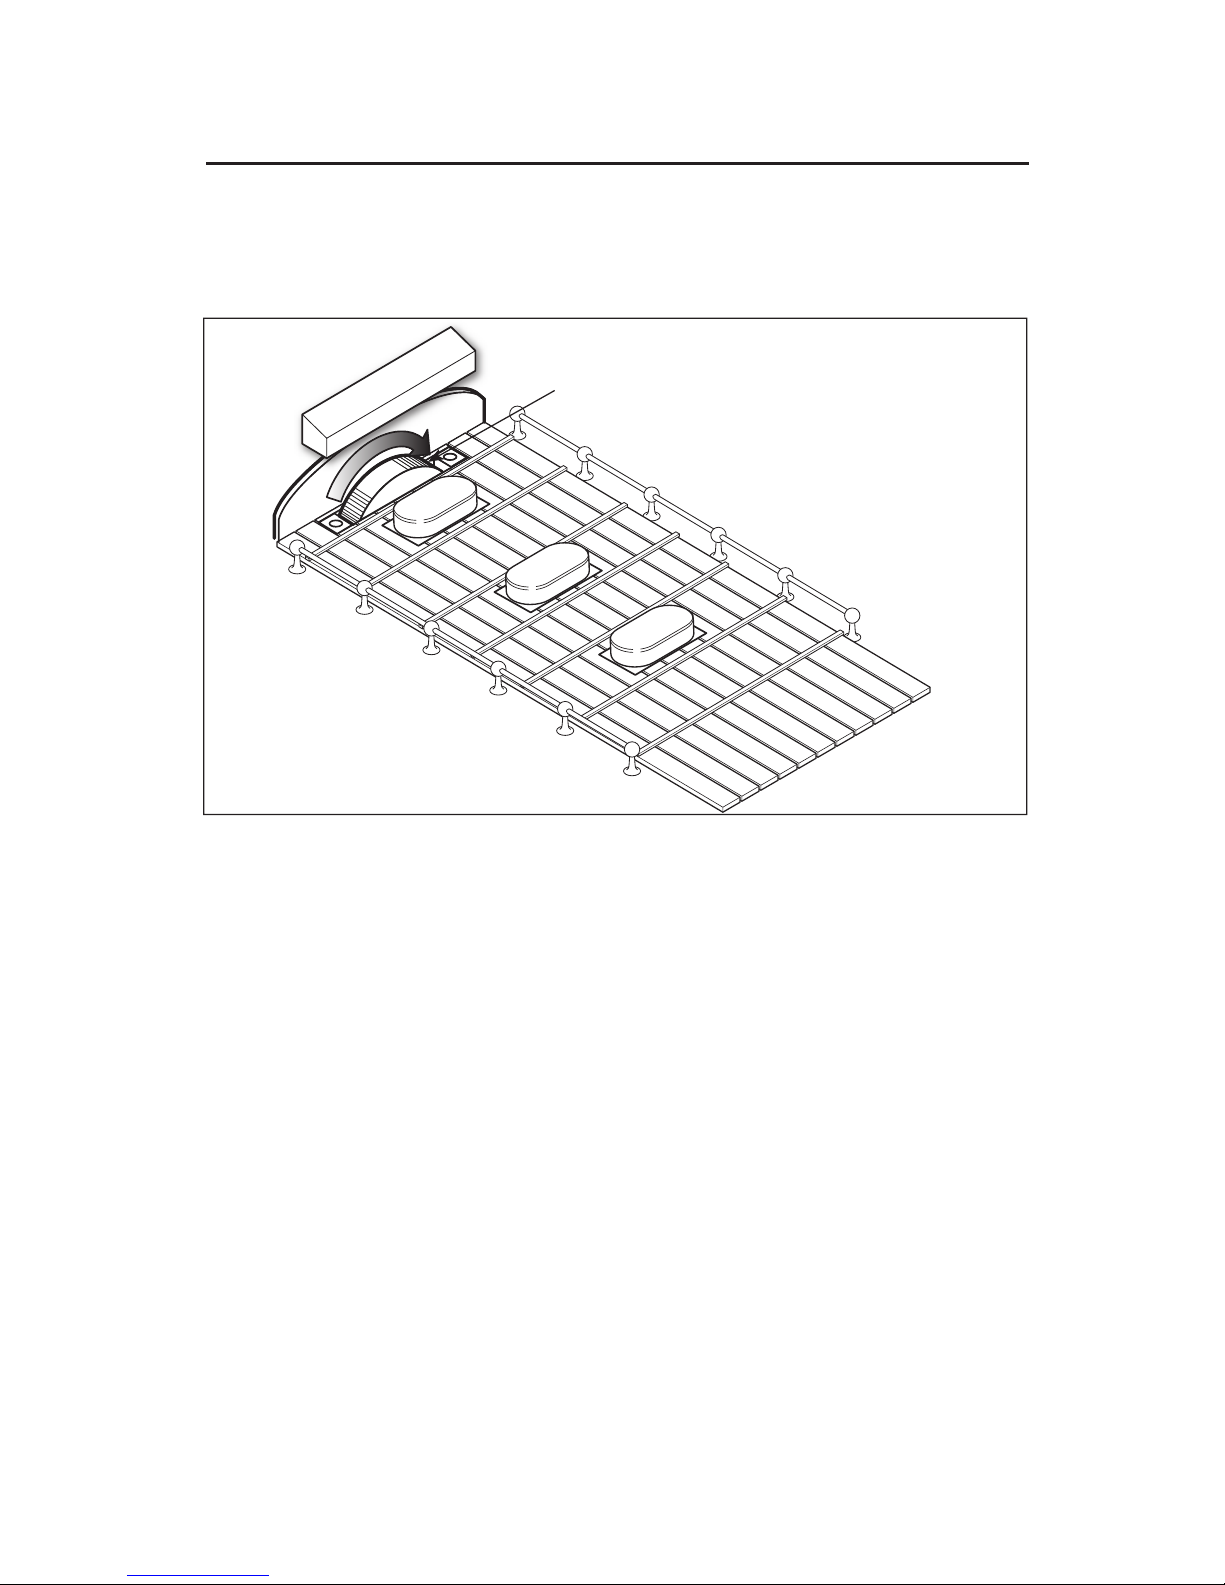
Figure 4. Installing the battery in the tender
Body screws
Nine-volt alkaline battery
Battery harness
Battery holder
Inside the tender
Underside of the tender
12
LEGACY Control System operations
This section is a brief overview of the LEGACY Control System. For a more in-depth
explanation of the LEGACY Control System features, please see your LEGACY Control
System Operations Manual.
Get Ready to Run
G
et your engine running now by following the instructions in this guide. We'll power up
the track, "address the engine" so it can be controlled by your CAB-2 remote, and learn
to use the Velocity Throttle, Whistle, Bell, Brake and Direction commands.
Power Up The Track
If using a PowerMaster, TPC, or ZW refer to the proper manual for the correct method
to power up. With your locomotive on the track and ready to roll, power up your track to a
constant 18 volts. If a circuit breaker trips when you turn on the Lionel power supply, check
the wheels of your locomotive to make sure they are all securely on the track. Check to
make sure the track is free of all metals that may cause a short circuit.
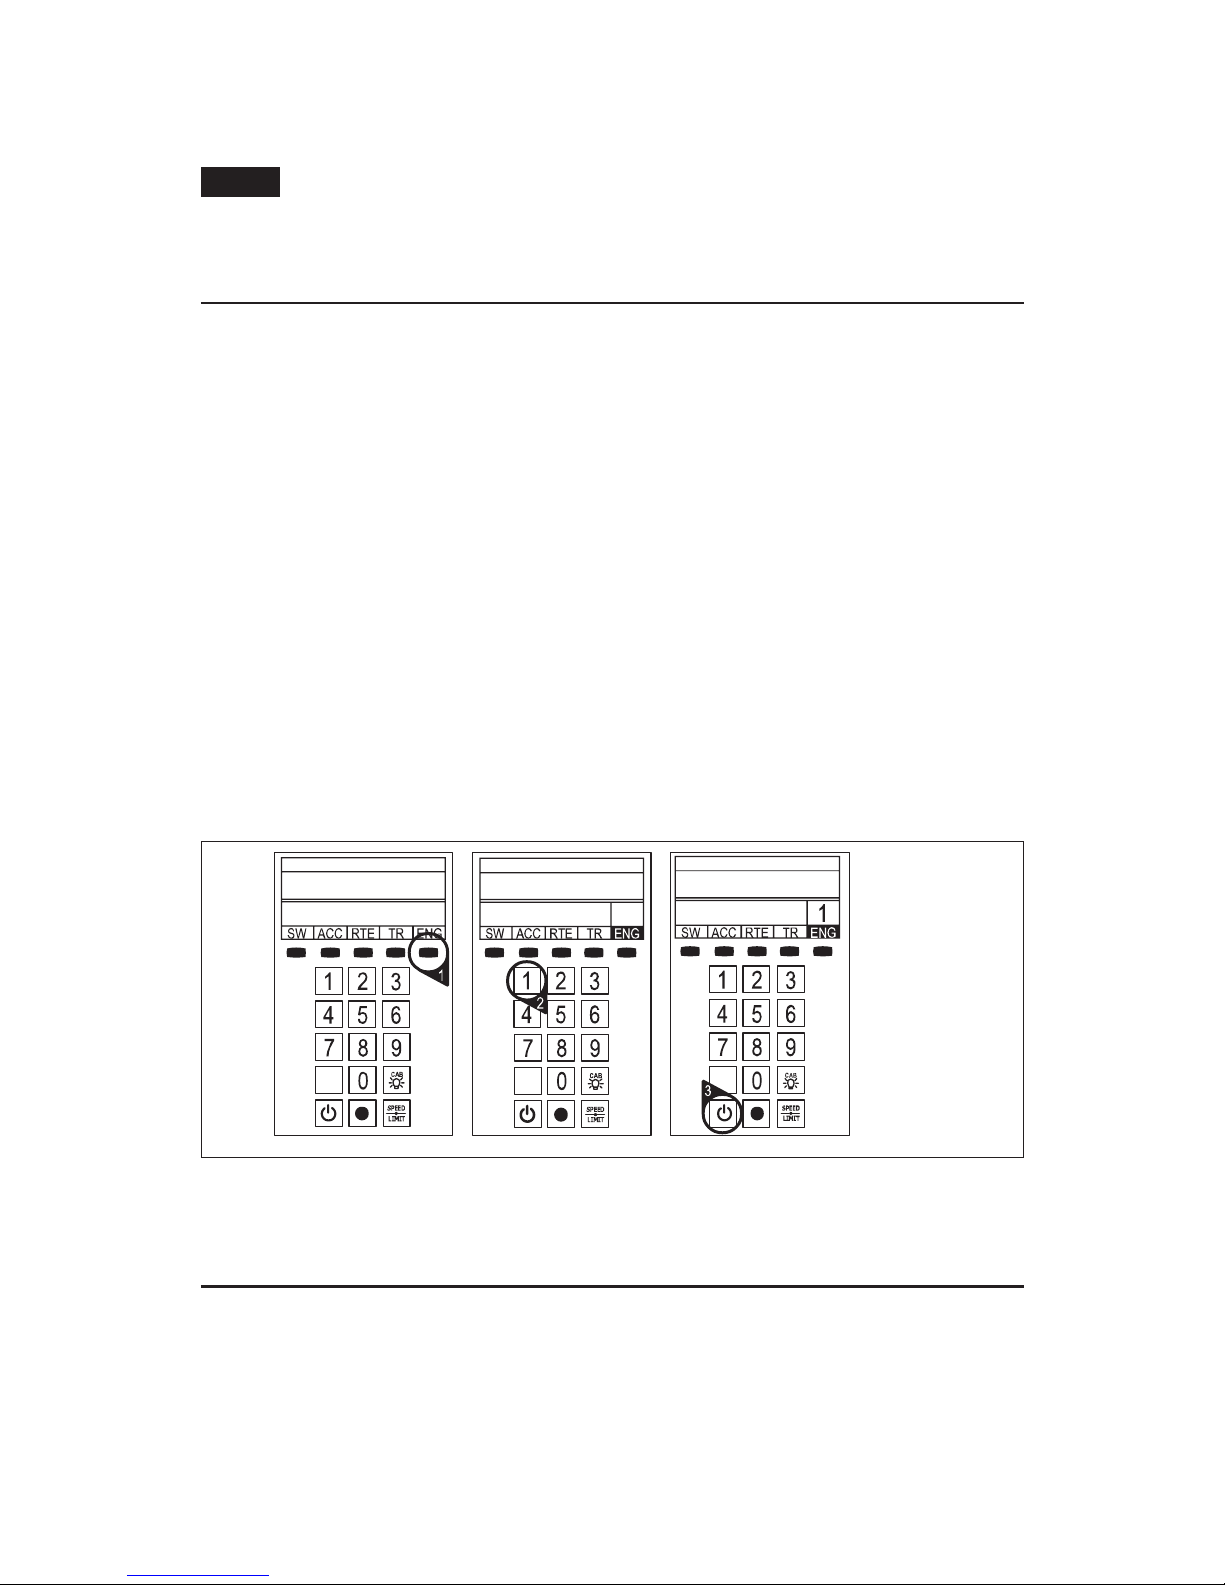
Address Your Engine
First, you must address the engine. This "tells" your CAB-2 which locomotive you want
to control. This is important when you have more than one engine on your layout.
To address an engine:
1. Press ENG
2. Press 1
See reference numbers 1, 2, and 3
Start 'Er Up
Now it is time to start up your engine's sound system.
3. Press Start Up
Your engine sound system will start up and the Touch-screen Control Panel will appear.
Note!
 Loading...