

Lionel Norfolk -Western A Class Owner's Manual
72-8052-250
2/00
®
featuring
and
I
N
S
T
R
U
C
T
I
O
N
S
H
E
E
T
Lionel Articulated
2-6-6-4 Norfolk & Western
‘A’ Class
Steam Locomotive and Tender
Owner’s Manual

2
Table of contents
Transformer operations
Running your Lionel ‘A’ Class with a Lionel transformer 3
Locking your ‘A’ Class into a single operational state 4
Using your ‘A’ Class’ tender-mounted ElectroCoupler 4
Your ‘A’ Class’ RailSounds system—the basics 5
Experiencing the range of your ‘A’ Class’ RailSounds system 6
Notes on RailSounds 6
Installing the Lionel Sound Activation Button 7
TrainMaster Command operations
Your ‘A’ Class in the TrainMaster Command environment 8
CAB-1 commands for your ‘A’ Class 9
RailSounds in the Command environment 10
CAB-1 numeric keypad commands for your ‘A’ Class 10
Tuning your ‘A’ Class’ performance 11
Maintaining your ‘A’ Class’ handrail antenna 11
Assigning your ‘A’ Class a new ID# 12
Reprogramming R2LC circuit board to restore features 12
Maintaining and servicing your ‘A’ Class
Lubricating your ‘A’ Class 13
Replacing your ‘A’ Class’ lamps 14
Adding fluid to your ‘A’ Class’ smoke generator 15
Installing ‘O’ gauge front coupler 15
Lionel Service 16
• Powerful Pittman®motor
• R2IR reverse unit for use with the
Lionel TrainMaster®Command
TM
model railroad control system
• Smoke generator that produces
clean, safe and realistic smoke
• Die-cast ElectroCoupler
(rear of tender)
• Wireless Tether
• Lighted cab interior
• RailSoundsTMdigital
sound system
• Brilliant Headlight and Marker
Lights
• CrewTalk (in Command)
• TowerCom (in Command)
• Tire Traction
• Directional lighting
• Fire Box Glow
Y
ou own one of the most sophisticated
model trains ever built—the Lionel
TrainMaster®Command-equipped ‘A’ Class.
From its hand-applied scale details to the
advanced technology found inside, your ‘A’
Class is ready for duty on your model railroad layout. Experience the superiority of
today’s Lionel.
Congratulations!
Transformer operations
3
Running your Lionel ‘A’ Class with a Lionel transformer
Place your ‘A’ Class on Lionel or
Lionel-compatible O-54 or larger track.
• With track power OFF, connect the drawbar between locomotive and tender.
That’s all you have to do with Lionel’s new Wireless Tether®, an infrared communication system that eliminates the plugs and wires of the past.
NOTE: Your ‘A’ Class is designed to operate on minimum 0-54 diameter track.
2
2
3
3
Power up your ‘A’ Class with your transformer.
• Your ‘A’ Class is designed to operate on 8-18 volts alternating current. Virtually all Lionel and Lionel-compatible alternating-current transformers
are suitable; we recommend the TrainMaster Command model railroad control
system.
• Do not power your ‘A’ Class with direct current (DC). Damage to sensi-
tive electronic components may occur.
• When you first power up your track, the ‘A’ Class will wait between
three and eight seconds as it “listens” for digital language from the
TrainMaster Command Base (available separately). When it’s determined that it’s
on a conventional (non-Command) railroad, the ‘A’ Class’ headlight will illuminate and RailSounds will start up. At this point, the ‘A’ Class is in neutral. (This
occurs when placing the locomotive on your railroad for the first time. Thereafter, it
starts in forward after every three-second power interrupt.)
Note!
Move ‘em out!
• Get your ‘A’ Class moving. Press the DIR button on your CAB-1 remote or
Lionel transformer. This sequences the R2IR to the next operating state.
• Adjust track voltage until your ‘A’ Class moves at your desired speed.
1
1
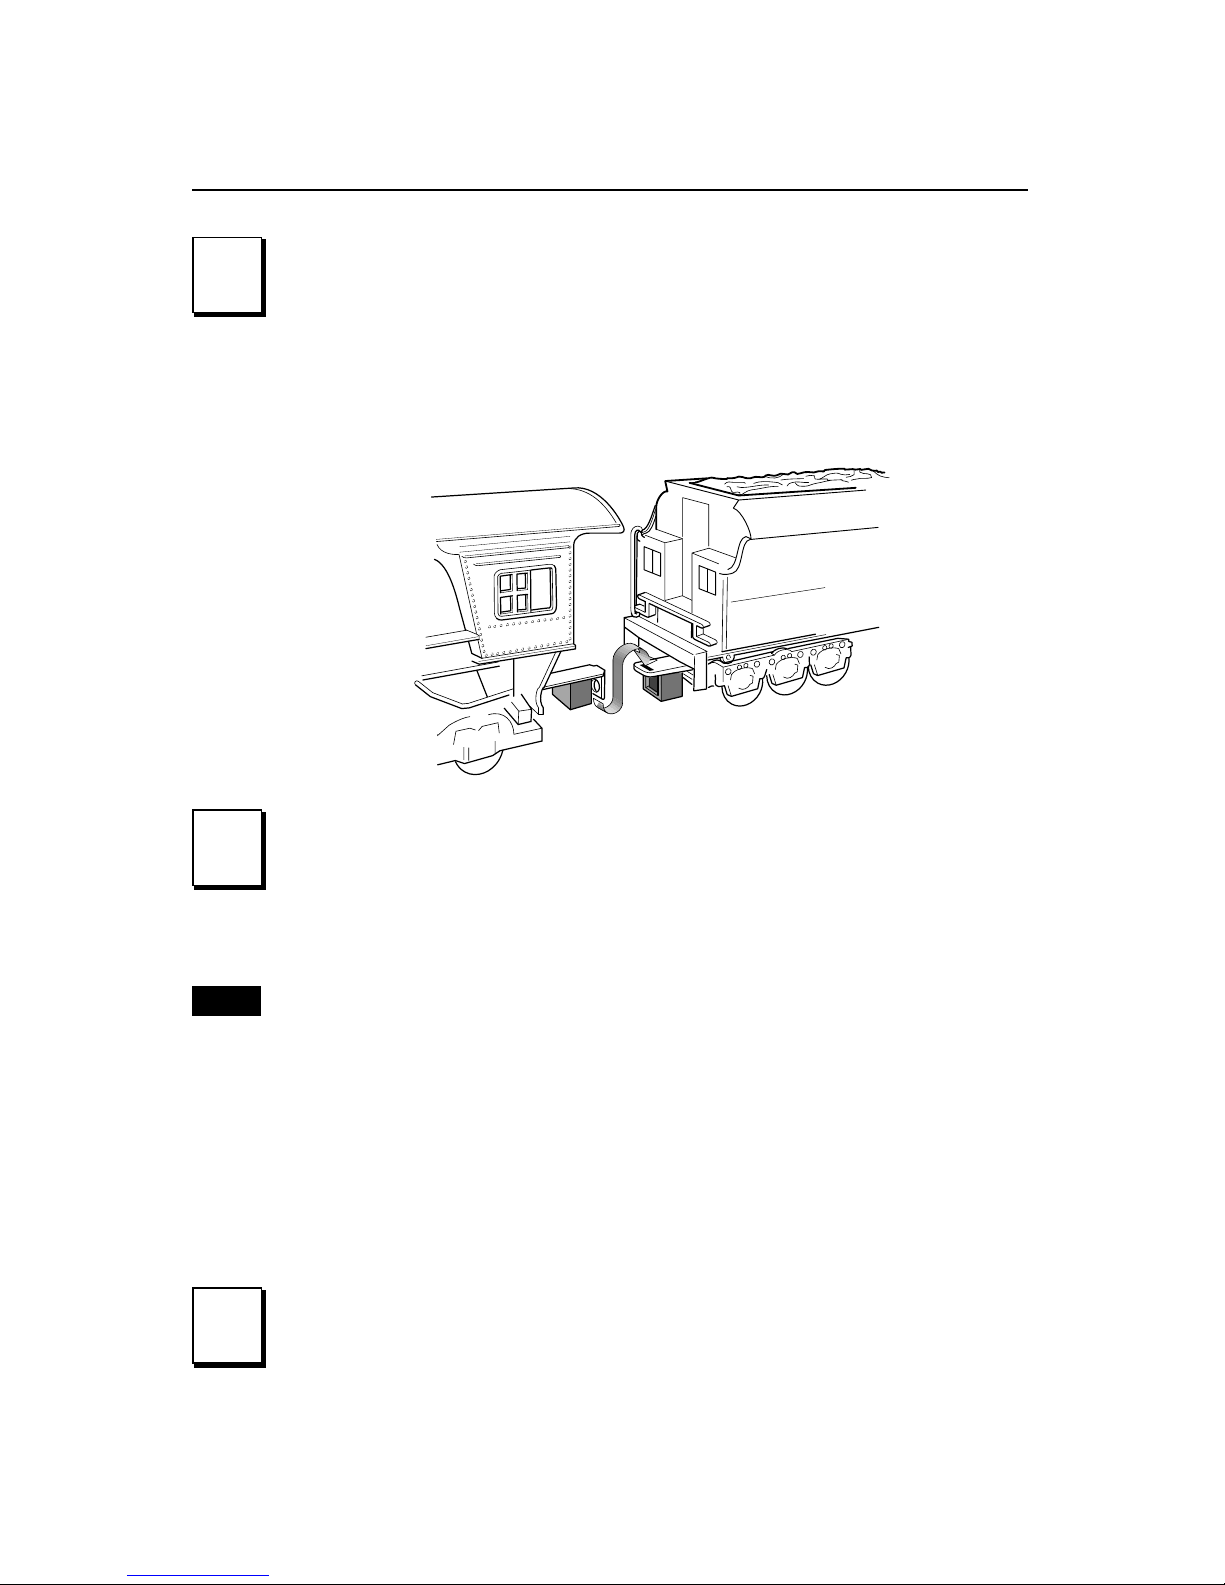
Using your ‘A’ Class tender’s ElectroCoupler
in the non-Command environment
T
o use your ‘A’ Class tender’s Electro-
Coupler in the non-Command environment, you must first couple a piece of rolling
stock equipped with Lionel magnetic couplers directly to your ‘A’ Class tender’s rear
ElectroCoupler. The magnetic coupler on the
rolling stock will then react to the magnetic
field generated by a Lionel remote-control
track section (available separately). Place
your rolling stock’s coupler “trigger disc”
over the central coil of a remote-control
track section and press uncouple on the controller. The magnetic field pulls the disc
downward, and the coupler opens.
Your ‘A’ Class tender’s
ElectroCoupler will NOT open
manually or by using a remotecontrol track section
Magnetic coupler on the rolling stock coupled
to the rear of your ‘A’ Class tender
Note!
Remote-control
track section
4
Transformer operations
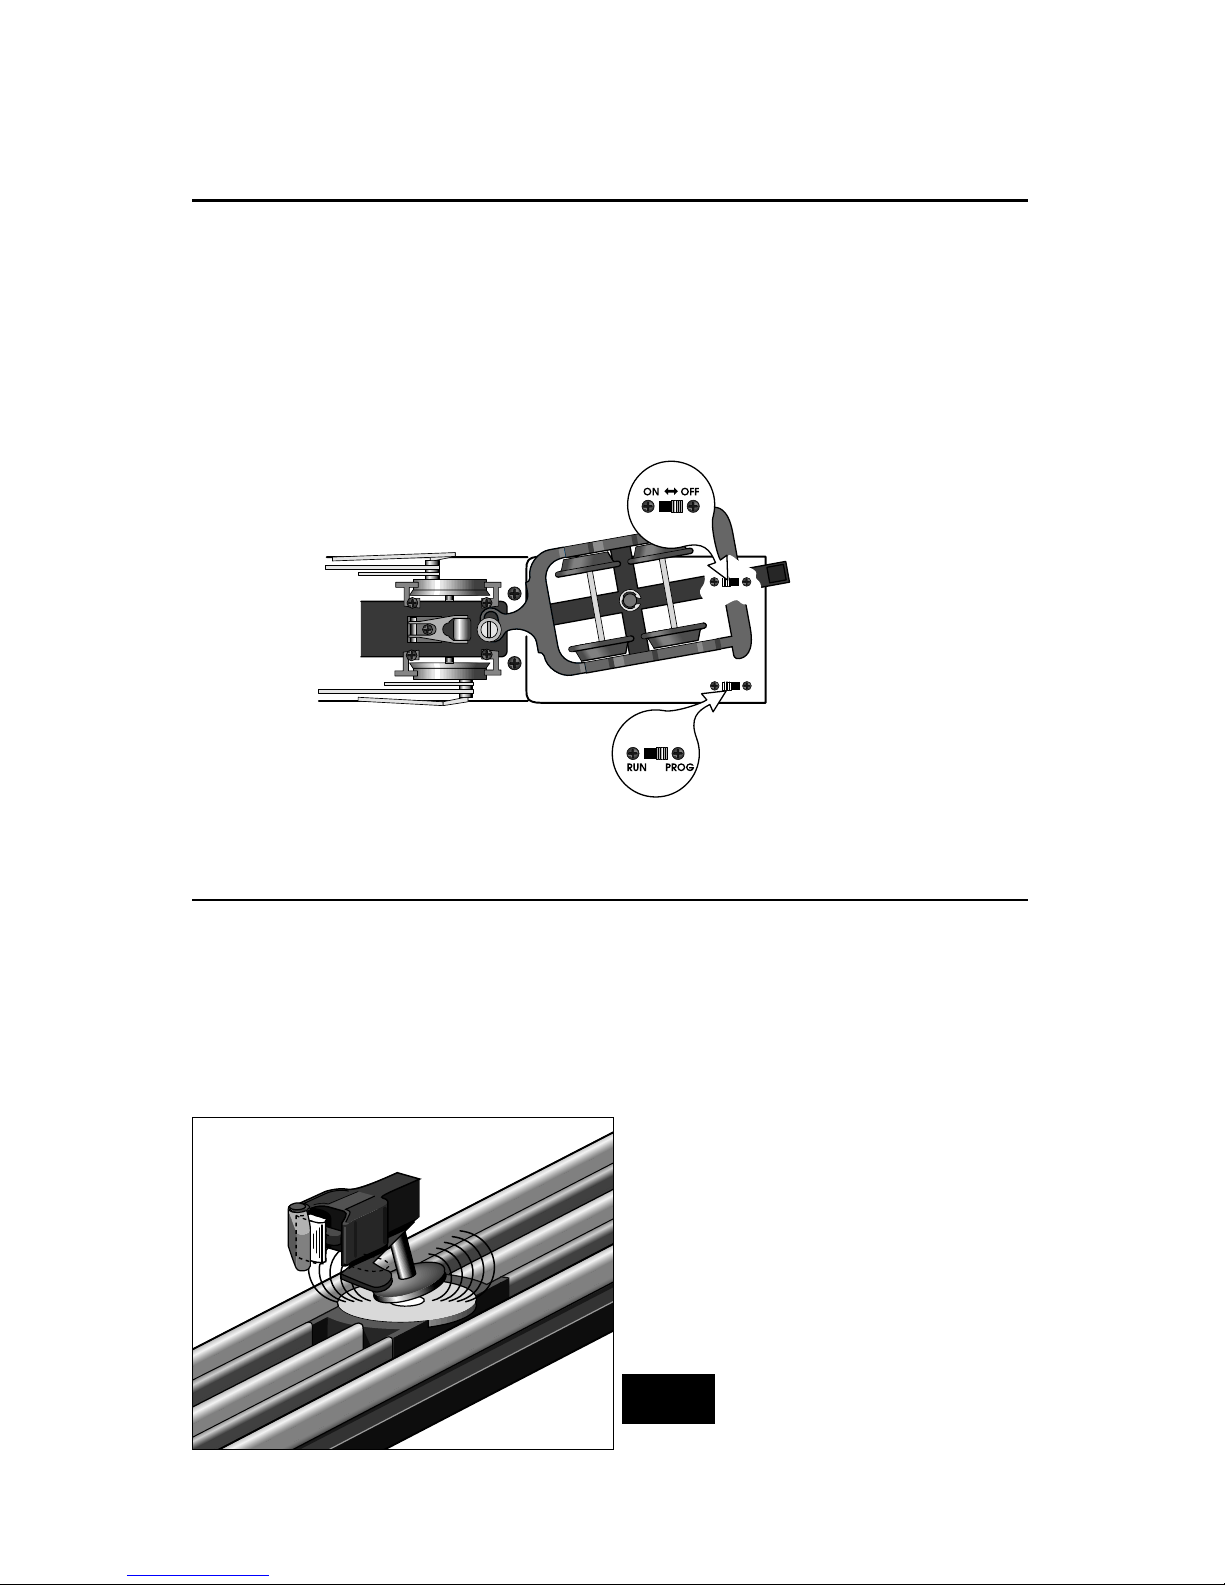
T
o select a single operational state for
your Lionel ‘A’ Class (example: forward
only), you can deactivate the R2IR’s
sequencing function with the Program/Run
switch, located on the right hand side, under
the boiler casting.
Get your locomotive moving in the desired
direction, then slow it down without stopping. Set the Program/Run switch to PROG.
The ‘A’ Class is now “locked” into your chosen direction.
When you no longer want single-direction
operation, just slide the Program/Run switch
back to RUN.
Locking your ‘A’ Class into a single operational state
Program/Run Switch
Smoke Unit Switch
(see page 15 for details)
5
Note!
Note!
Note!
Note!
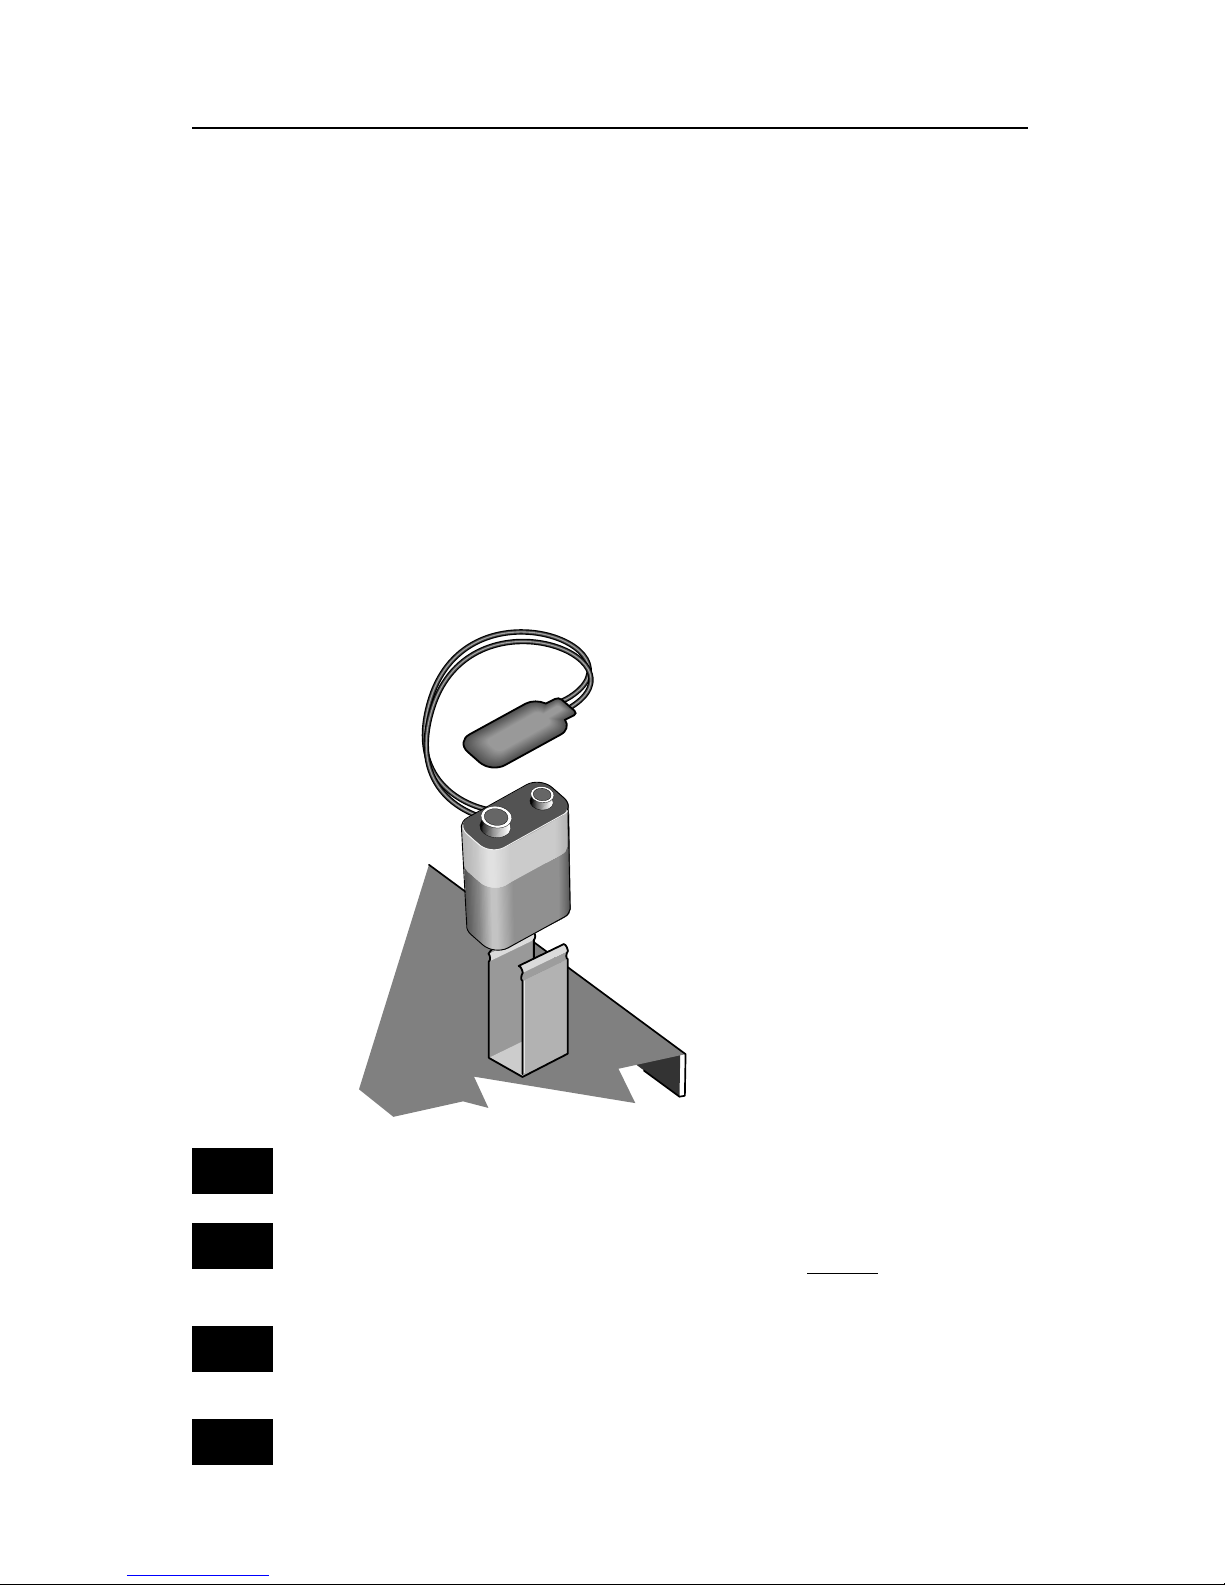
Your ‘A’ Class’ RailSounds system—the basics
L
ionel RailSounds is the most realistic
model railroad sound system in the
world. Your ‘A’ Class features digital samples
from real-life steam locomotives for the ulti-
mate in realism.
Begin by installing a 9-volt alkaline battery in the tender. This ensures interruptionfree operation of RailSounds. The battery clip
is located in the tender. To remove the tender
body, refer to the diagram on page 6 for location of mounting screws
When you first apply track power, the ‘A’
Class’ RailSounds system produces sounds of
the locomotive at rest. As the ‘A’ Class moves,
chuffing begins, increasing with the locomotive’s speed.
To silence the steam chuffing sound
(whistle/bell are unaffected), slide the
RailSounds switch, located on the underside
of the tender (see page 6 for location), to the
OFF position before powering up the loco-
motive. The whistle is activated by using the
lever or button on your transformer or CAB-
1. The volume control knob to raise or lower
the level of sound is located on the underside of the tender near the front truck (see
page 6).
Installing a 9-volt alkaline bat-
tery in your ‘A’ Class’ tender.
Please remove protective cover from battery clip
Although RailSounds is powered by track voltage, the battery is required for
uninterrupted operation and shutdown sequences. Use only alkaline batteries.
Discontinue locomotive power for 10 seconds before changing the RailSounds
ON
/OFF switch position.
If RailSounds “drops out” during track power interrupts (direction change),
replace the battery.
 Loading...