

Lionel 13150 Hudson Steam Freight, 6-31750, Hudson Steam 13150 Owner's Manual
Lionel
#13150 Hudson
Steam Freight
Owner’s Manual
73-1739-250
9/05
Rev. 1
®
featuring
and

Congratulations!
C
ongratulations on your purchase of the Lionel #13150 Hudson Steam Freight set! This train set
features a TrainMaster Command Control equipped 4-6-4 Hudson locomotive and the entire
compliment of carefully reproduced cars from the historical 1964 #13150 freight set.
Features of the locomotive
• TrainMaster Command Control equipped—able to run in the TrainMaster
Command Control environment or in the conventional environment with a
standard transformer
• RailSounds sound system with CrewTalk communication, TowerCom
announcements, and DynaChuff synchronized chuffing
• FatBoy speaker for the ultimate in sound reproduction
• Pullman motor
• Two traction tires
• Magna-Traction track gripping system
• Operating headlight
• Puffing, fan driven smoke unit
• ElectroCoupler on rear of tender
• Minimum Curve: O-42
Features of the passenger cars
• Die-cast metal trucks and operating couplers
• Postwar Celebration Series plaque and packaging
• #3356 horse car includes seven horse figures that move around corral and
through car
• #3662 milk car includes a figure that unloads milk cans at the touch of a
button (Remote control track section required)
• #3434 chicken car features an automatic opening door with sweeper
figure and interior illumination (Remote control track section required)
• #6361 flatcar includes a real wooden log load and metal chains
• #6437 caboose includes interior illumination
2
The following Lionel marks may be used throughout this instruction manual and are protected under law.
All rights reserved.
Lionel
®
, TrainMaster®, Odyssey®, RailSounds®, CrewTalk™, TowerCom™, DynaChuff™,
StationSounds
™
, Pullmor®, ElectroCoupler™, Magne-Traction®, CAB-1®Remote Controller,
PowerMaster
®
, Lionel ZW®, ZW®, PowerHouse®, TMCC®, Lionelville™, Lockon®, Wireless Tether™,
LionMaster
®
, FatBoy™, American Flyer®, TrainSounds
™
The name FasTrack®is used with permission from Pitsco, Inc.

Table of contents
Quick Start
Transformer operations 4
TrainMaster Command Control operations 4
Conventional transformer operations
Conventional operations 5
Operating your train set in the conventional environment 6
Locking your locomotive into a single direction 7
RailSounds sound system operations
RailSounds sound system operations 8
Installing the battery 9-10
Using the RailSounds sound system in the conventional environment 11
Installing a Lionel Sound Activation Button for conventional operation 12
Using the RailSounds sound system in the TrainMaster Command Control environment 13
TrainMaster Command Control operations
TrainMaster Command Control operations 14
Operating your locomotive in the Command Control environment 14
CAB-1 Remote Controller commands 15
CAB-1 Remote Controller numeric keypad commands 16
Tuning your locomotive’s performance 17-18
Assigning your locomotive a new ID# 19
Reprogramming your locomotive to restore features 20
Operating and servicing your train set
Adding fluid to your locomotive’s smoke generator 21
Lubricating your locomotive 22
Lubricating your locomotive’s Pullmor motor armature 23
Replacing your locomotive’s headlight 24
Maintaining your locomotive’s handrail antenna 25
Replacing the traction tires 25
Setting up the stockyard and OTC Contactor 26-29
Wiring your stockyard and OTC Contactor 30
Operating the Livestock Car 31
Adjusting the Livestock Car doors 32
Installing the Milk Car platform 33-34
Loading and unloading the Milk Car 35
Correcting james in the Milk Car 36
Operating your Poultry Dispatch Car 37
Replacing the lamps in the Poultry Dispatch Car 38
Replacing the lamp in the Porthole Caboose 39
Limited Warranty/Lionel Service 40
3

Quick Start
Transformer operations
1. Place your train set on Lionel or Lionel-compatible O-42 or larger track.
2. Connect the tether and drawbar between the locomotive and tender.
3. Power your locomotive at 8-18 volts with your alternating-current (AC)
transformer.
Do not power your locomotive with a direct-current (DC) transformer. Damage to
sensitive electronic components may occur.
4. Wait three to eight seconds as your locomotive determines whether it is in
a conventional environment or a TrainMaster Command Control
environment.
5. Move ‘em out! Press the DIRECTION button on your controller, then
throttle up.
TrainMaster Command Control operations
T
o operate your locomotive in the Command Control environment, you need a Command
Base (available separately, 6-12911) and a CAB-1 Remote Controller (available separately,
6-12868). Both products are offered together in the TrainMaster Command Set (6-12969).
1. Turn off track power and plug in the Command Base.
2. Connect the drawbar between the locomotive and tender.
3. Place your train set on Lionel or Lionel-compatible O-42 or larger track.
4. Increase track voltage to full power (no more than 19 volts AC).
Do not power your locomotive with a direct-current (DC) transformer. Damage to
sensitive electronic components may occur.
5. Press ENG and 1 to address your locomotive with your CAB-1 Remote
Controller.
6. Throttle up and move ‘em out.
4
Caution!
Caution!

Conventional transformer operations
Conventional operations
Y
our locomotive is capable of operating in the conventional environment, controlled by
nothing more than a standard Lionel alternating-current (AC) transformer.
In the conventional environment, your locomotive cycles through a repeating pattern of
operations: forward, neutral, reverse, neutral, and so on. To advance to the next operation, press
the DIRECTION button on your transformer. Alternately, you could use the throttle to briefly
turn off track power so that the locomotive advances to the next operation when power is
restored.
Once you cycle the locomotive into forward or reverse, you control your locomotive’s speed
by varying track voltage with the transformer’s throttle. To increase the speed of the locomotive,
you increase track voltage. To decrease the speed, you decrease track voltage. To stop the
locomotive and to change directions (or to enter neutral), track voltage is turned off or
interrupted.
Use the WHISTLE and BELLbuttons on your transformer (or separate buttons if your
transformer is not equipped with these controls, see page 12) to activate these features.
To experience all of your locomotive’s features, we recommend operating in the TrainMaster
Command Control environment. With a simple one-wire connection, you can use the CAB-1
Remote Controller to access all of the functions of your locomotive. Refer to pages 14-20 to see
how to operate your locomotive in the TrainMaster Command Control environment.
5
Conventional transformer operations
Operating your train set in the conventional environment
1. With your transformer turned off, place your train set on Lionel or Lionelcompatible O-42 or larger track.
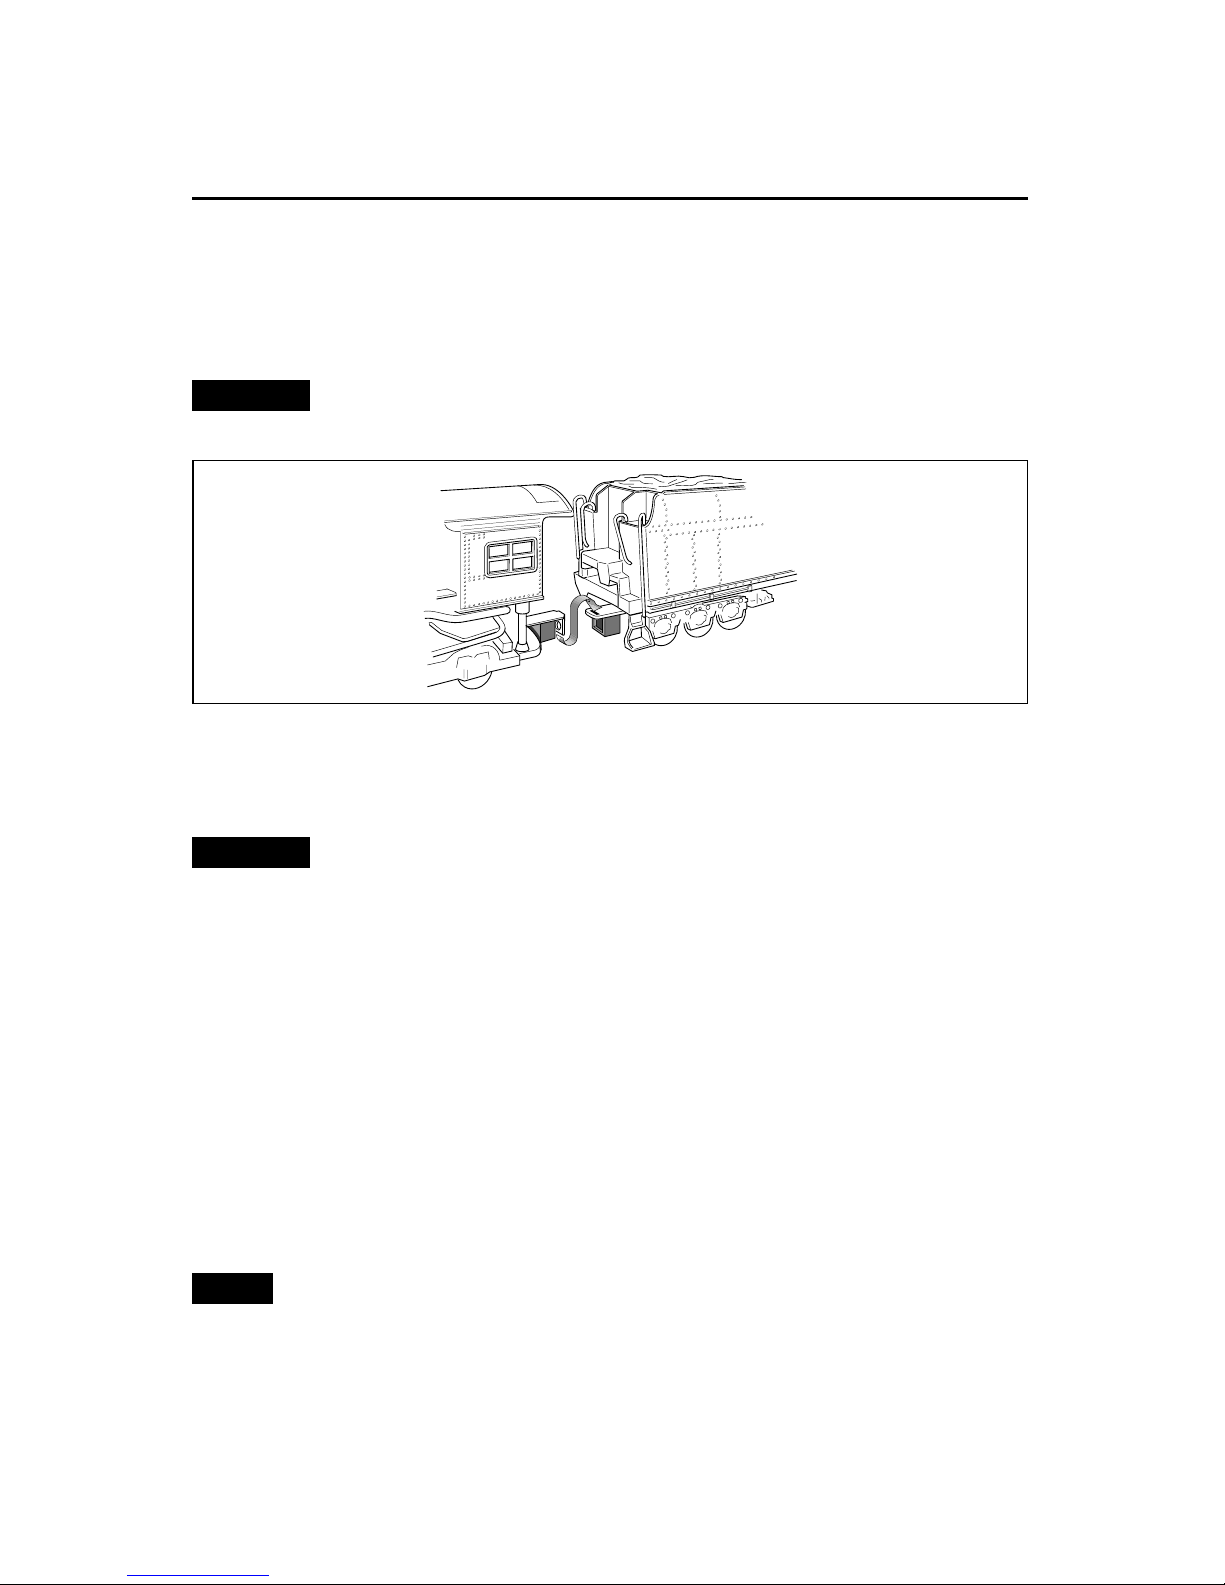
2. Connect the drawbar between the locomotive and tender as illustrated in
Figure 1.
If the smoke unit switch is in the ON position, add fluid to your locomotive’s stack
to prevent damage to the smoke unit. Refer to page 21 for additional information.
3. Power your locomotive at 8-18 volts with your alternating-current (AC)
transformer.
Power your locomotive with an alternating-current (AC) transformer only.
Powering your locomotive with a direct-current (DC) transformer may result in
damage to sensitive electronic components.
4. Wait three to eight seconds as your locomotive determines whether it is in
a conventional environment or a TrainMaster Command Control
environment. The headlight flickers as the locomotive searches for a signal from the
Command Base. When the locomotive has determined that a Command Base is not
connected to the track, the flickering will stop and the headlight will remain illuminated.
You are ready for operation in the conventional environment.
5. Move ‘em out! Press the DIRECTION button on your transformer to sequence your
locomotive through the repeating pattern of operations: forward, neutral, reverse, neutral,
and so on. You may also briefly turn off track power to advance the locomotive to the next
operating state. Adjust the throttle until your locomotive moves at your desired speed.
When placing your locomotive on your layout for the first time, it will start out in
neutral. Thereafter, it will start in forward after every power interruption lasting five
seconds or longer.
Use the WHISTLE and BELLbuttons on your transformer to activate those features. Refer
to page 12 if your transformer is not equipped with those buttons.
Note!
6
Figure 1. Drawbar connection
Caution!
Caution!
Conventional transformer operations
Locking your locomotive into a single direction
W
hen the Command reverse unit switch is in the RUN position, your locomotive sequences
through a repeating pattern of operations: forward, neutral, reverse, neutral, and so on.
To “lock” your locomotive into a single direction (for example, to operate in forward only),
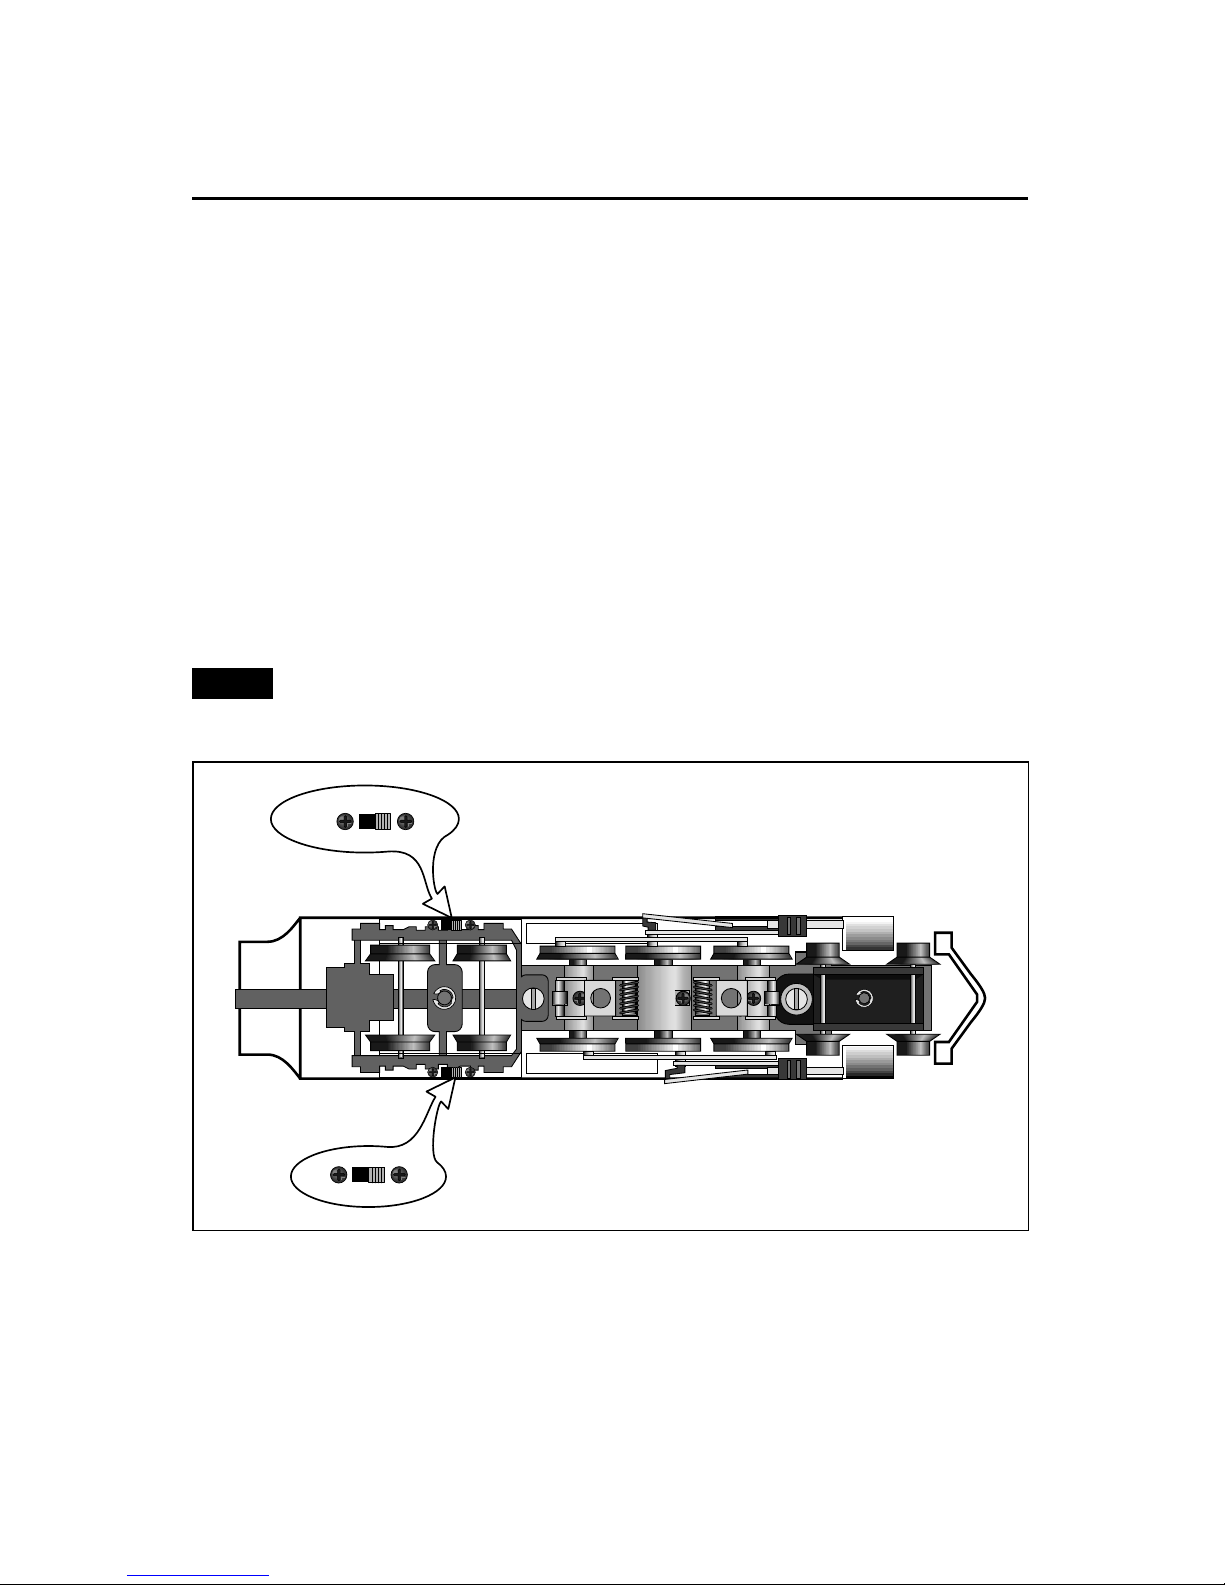
you can deactivate the Command reverse unit’s sequencing function. Refer to Figure 2 for the
location of the Command reverse unit switch.
1. Use your transformer’s DIRECTION button or interruptions in track power to get your
locomotive moving in the desired direction.
2. Slow the locomotive down without stopping (reduce the throttle without turning off track
power).
3. Slide the Command reverse unit switch to the PGM position. At this point, the locomotive is
“locked” into your chosen direction. To restore the forward-neutral-reverse sequence, just
slide the Command reverse unit switch back to the RUN position.
Your locomotive will “reset” to forward after any power interruption lasting five
seconds or longer, regardless of the direction you set.
7
Note!
Figure 2. Switch locations
GREASE
GREASE
GREASE
NO
SMK
SMK
NO
SMK
SMK
RUN PGM
RUNPGM
Command reverse
unit switch
Smoke
ON/OFF switch
OFF

8
RailSounds sound system operations
RailSounds sound system operations
Y
our locomotive is equipped with the Lionel RailSounds sound system, the most realistic
model railroad sound system in the world. The RailSounds sound system brings the sounds
of the railroad to your layout through high quality recordings of real locomotives.
When you operate your locomotive in the conventional environment, you get realistic
chuffing sounds, which automatically increase through four levels as the speed of the
locomotive increases. You can sound the locomotive’s whistle or activate the ringing of the bell.
When you are through with operations and power down the track, your locomotive’s RailSounds
sound system starts a realistic steam shutdown sequence (a nine-volt alkaline battery is
required, see pages 9-10).
When you operate your locomotive in the TrainMaster Command Control environment, you
get full control of the RailSounds sound system, including the whistle and bell sounds. The
locomotive’s chuffing sounds automatically increase. In the Command Control environment,
the release of the ElectroCoupler is accompanied by a coupler release sound. Use the BRAKE
button, and listen for the sound of squealing metal. You can also trigger CrewTalk
communication and TowerCom announcements, which simulate the interaction between the
locomotive crew and the dispatcher. Whenever you choose to shutdown your locomotive, the
realistic shutdown sequence commences (a nine-volt alkaline battery is required if track power
is turned off, see pages 9-10).

RailSounds sound system operations
Installing the battery
W
hile the RailSounds sound system is powered through the track, we recommend that you
install a nine-volt alkaline battery in the tender to prevent the sound system from
shutting down during track power interruptions (for example, at a switch or a dirty section of
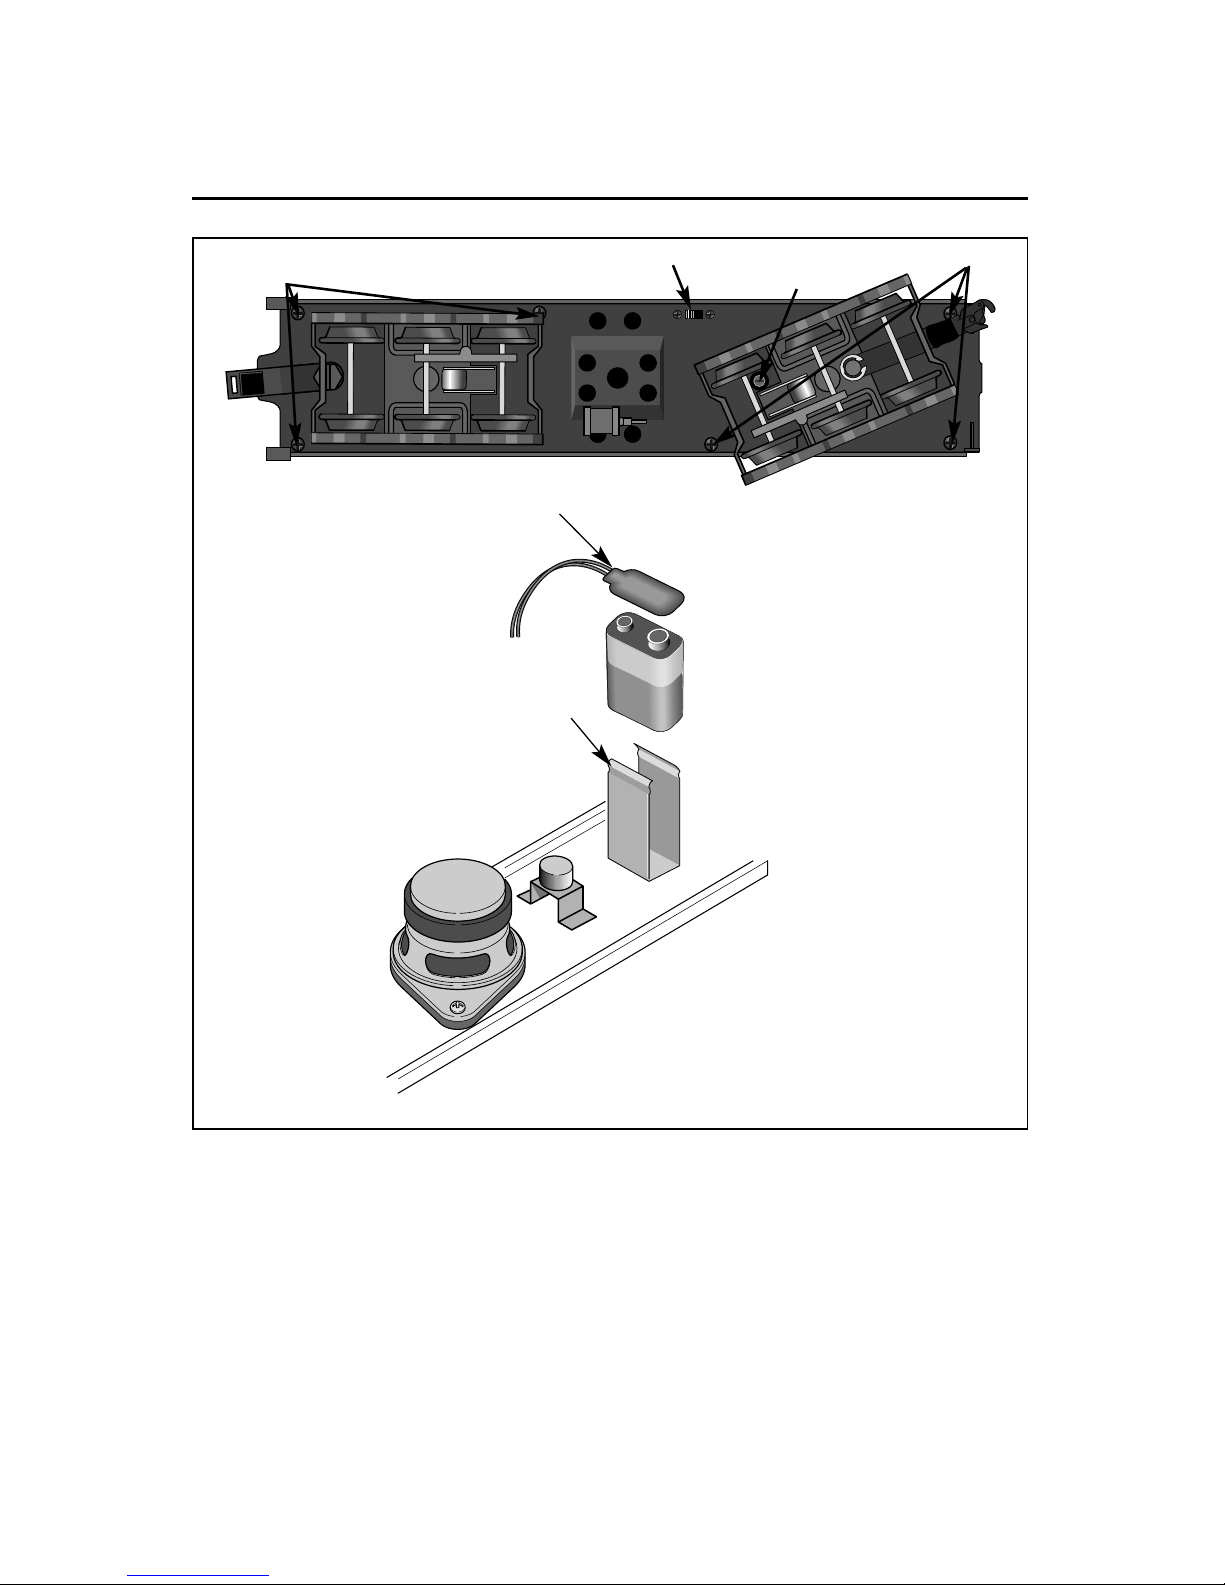
track). Follow these steps and refer to Figure 3 on page 10 as you install the battery.
If the RailSounds sound system turns off during interruptions in track power, you
may need to replace the battery.
1. Remove the body screws from the underside of the tender. Refer to Figure 3 on page 10 for
the location of the screws.
2. Lift the body off the frame. Be careful to avoid pulling on the wires that connect the body to
the frame.
3. Remove the protective cover from the battery harness.
4. Snap the battery harness onto the nine-volt alkaline battery’s terminals.
5. Slide the battery into the battery clip.
6. Replace the body on the frame and secure it with the body mounting screws. Be careful to
avoid pinching any wires between the body and the frame.
9
Note!
10
Figure 3. RailSounds controls and battery installation
RailSounds sound system operations
Installing the battery (continued)
SIGNAL
SOUNDS
RAIL
SOUNDS
Body screws
Front
Body screws
Volume control
knob
RailSounds switch
Inside the tender
Battery harness
Battery holder
Rear

RailSounds sound system operations
Using the RailSounds sound system in the conventional environment
W
hen you first power up your locomotive, you will hear the sounds of the locomotive at
rest. As the locomotive moves, the chuffing sounds automatically increase with the
locomotive’s speed. In the conventional environment, the whistle and bell sounds are activated
by your transformer controls or sound activation buttons.
To silence the chuffing sounds, slide the RailSounds sound system switch located on the
underside of the tender to the OFF position before you power up the locomotive or after the
locomotive has been powered down for a minimum of ten seconds. The whistle and bell sounds
will still be active. To adjust the volume, use the volume control knob located on the underside
of the tender.
For proper operation of the RailSounds sound system during track power
interruptions and for the locomotive shutdown sequence, you must install a nine-volt
alkaline battery. See pages 9-10.
In the conventional environment, you will experience several features of the RailSounds
sound system.
• DynaChuff. Your locomotive’s speed automatically determines the level of chuffing
sounds. At low speeds, the chuffing is relaxed. When you highball down the mainline, the
chuffing is labored.
• MultiWhistle. A different whistle sound at different speeds—a RailSounds sound system
exclusive.
• Authentic bell. Press BELL on your transformer to begin the effect, then press BELLa
second time to discontinue the effect.
• Reverse unit reset sound. Power down your track, wait three seconds, and listen for
the air-release sound—that’s the locomotive telling you that its Lionel Command reverse
unit has reset to forward.
• Shutdown sequence. When you turn off track power, you have two seconds to power up
again after you hear the reverse unit reset sound. If you do not restore power, you will hear
the realistic steam shutdown sequence. Because track power is off, a battery is required for
this sequence to function.
11
Note!
RailSounds sound system operations
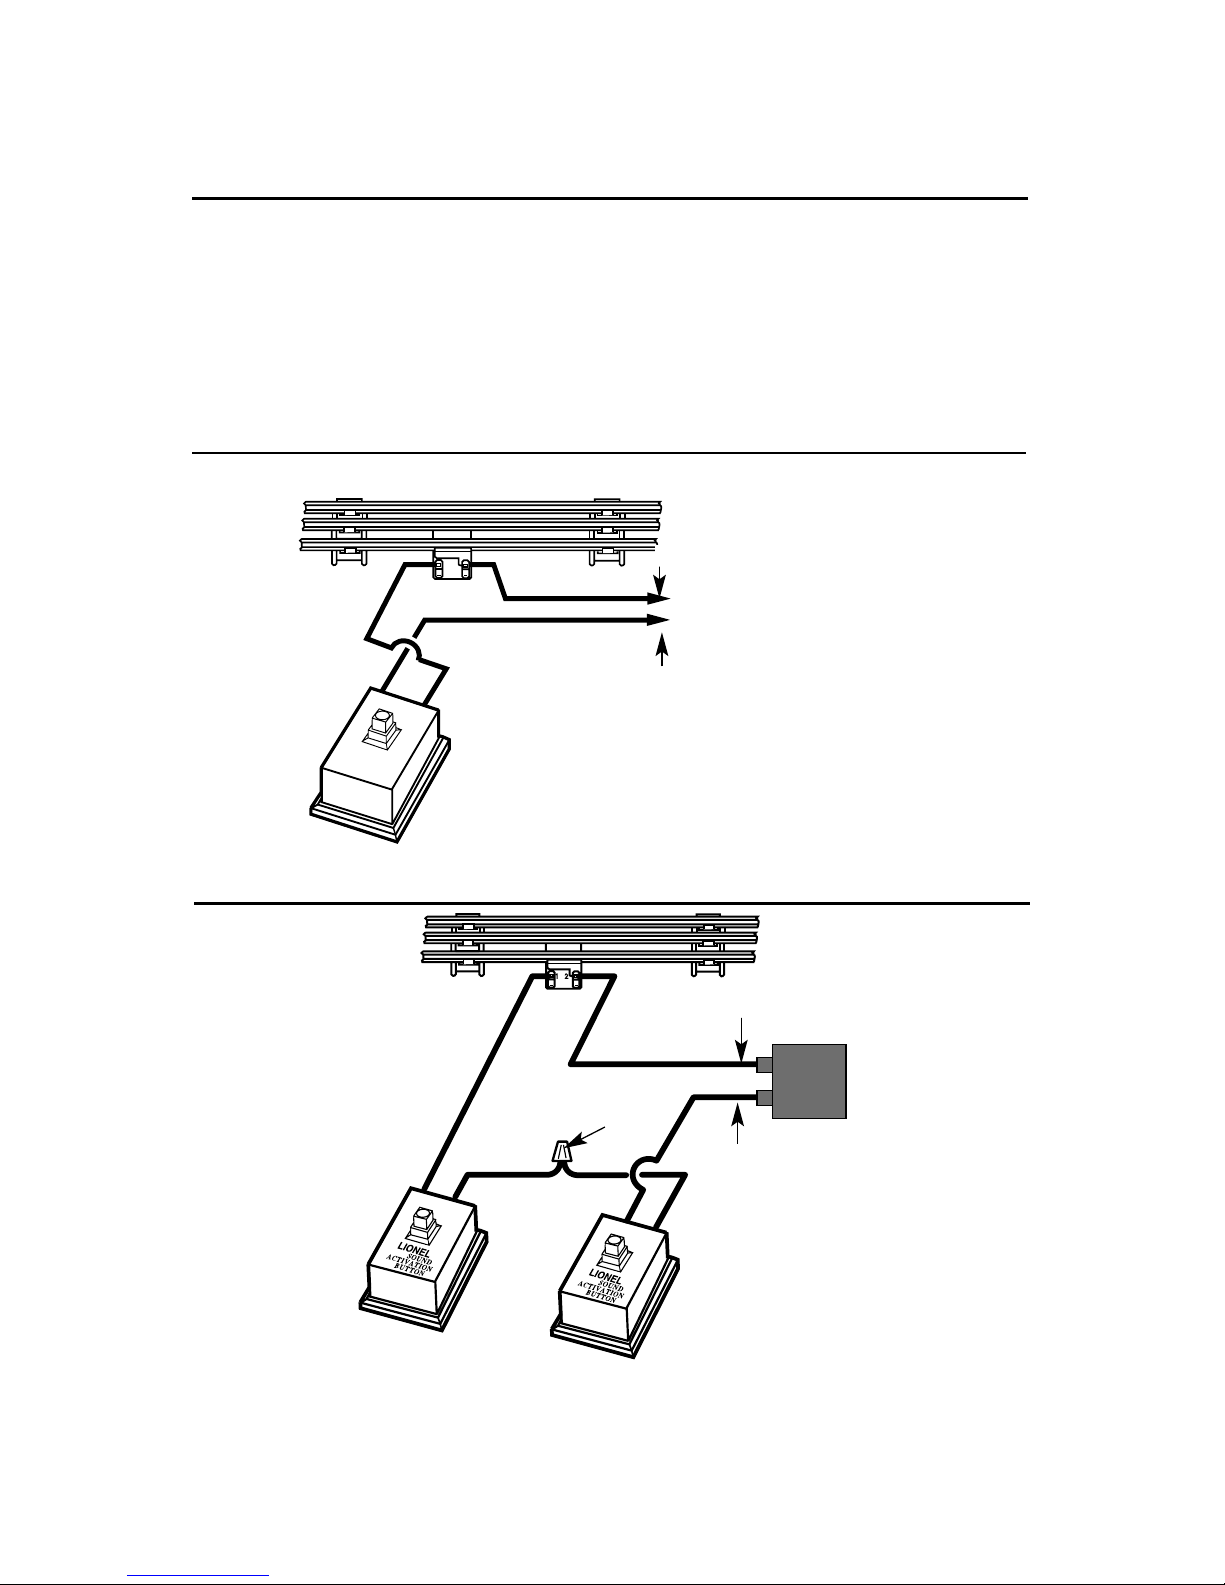
Installing a Lionel Sound Activation Button for conventional operation
I
f your transformer lacks WHISTLE and BELLbuttons, you will need to install Lionel
no. 610-5906-001 Sound Activation Buttons (available separately) to activate the locomotive’s
whistle and bell sounds.
Connect the buttons as shown below. Be sure that all track power passes through the Sound
Activation Button(s). Do not bypass the buttons.
12
LIONEL
SOUND
ACTIVATION
BUTTON
12
POWER
SUPPLY
For AC transformers lacking a bell button
For AC transformers lacking bell and horn/whistle buttons
Existing wire
Black
wire
Red wire
Lionel no. 610-5906-001
Sound Activation Button for
activating the bell
Lionel no. 610-5906-001
Sound Activation Button
for activating the
whistle
Lionel no. 610-5906-001
Sound Activation Button for
activating the bell
Black wire
Black wire
Wire
nut
Red
wire
Red wire
Existing wire
Common/Ground/U
Power/A
Common/Ground/U
Power/A
 Loading...