

Lionel HO Veranda Owner's Manual
™
75-8100-250
3/04
Lionel
HO Veranda
Owner’s Manual

C
ongratulations on your purchase of the Lionel HO Veranda! This locomotive is equipped
with QSI Quantum Sound and DCC decoder for analog or digital operation. Featuring
authentic turbine sounds, constant speed control, and directional lighting, the HO Veranda is
powered by two 5-pole can motors with a flywheel on each motor.
Locomotive and tender features
• Die-cast metal locomotive with metal frame and body
• Die-cast metal tender body with stamped metal frame
• Equipped with QSI Quantum Sounds and DCC decoder for analog or digital
operation
• Dual powerful five-pole motors with flywheels
• Constant speed control
• Constant intensity directional lighting including back-up light
• Illuminated number boards
• Flashing Mars light
• Illuminated market lights
• Illuminated cab interior with engineer and fireman figures
• RP-25 contour on all wheels
• Kadee®-compatible couplers
• Dual speakers
• Realistic turbine sounds, digitized bell and horn sounds, squealing
brakes, Doppler effect
2
The following Lionel marks may be used throughout this instruction manual and are protected under law.
All rights reserved.
Lionel
®
, TrainMaster®, Odyssey®, RailSounds®, CrewTalk™, TowerCom™, DynaChuff™,
StationSounds
™
, Pullmor®, ElectroCoupler™, Magne-Traction®, CAB-1 Remote Controller®,
PowerMaster
®
, Lionel ZW®, ZW®, PowerHouse®, TMCC®, Lionelville™, Lockon®, Wireless Tether
™

3
Table of contents
Running your locomotive in the analog environment
Running your locomotive with an HO transformer 4-5
Sounding the horn 6
Activating the bell 6
Creating the Doppler effect 6
Changing directions without turning off the sound 7
Setting your locomotive’s inertia or momentum 7
Programming your locomotive in the analog environment 8-10
Example: Setting V-Start (programming option 8) 11
Example: Setting V-Max (programming option 9) 12
Running your locomotive in the DCC environment
DCC operation 13
Using the DCC controller 14
Light operation 14
Activating the coupler sounds 15
Sound of Power 15
Setting your locomotive to respond to the throttle 15
Setting your locomotive’s cruise control 16
Activating the horn and bell sounds (F2 and F1) 16
Dynamic brakes (F5) 17
Creating the Doppler effect with DCC (F6) 17
Squealing brakes (F7) 17
Adjusting the diesel engine cooling fans (F4) 18
Shutting down your locomotive (F9) 19
Start up (F6) 20
Neutral sounds 20
Programming your locomotive in the DCC environment
DCC programming 21
Changing the system volume electronically (CV 51.0) 21
Enable/disable Doppler shift from horn signal interrupt (CV 51.2) 21
Changing individual sound volumes (CV 52.X) 22
Reset CV’s to factory default values (CV 56.128.255) 23
Special ID programming (CV 56.129) 23
Standard throttle control, speed control, and regulated throttle control options (V 56.4) 24
Disable/enable verbal announcements (CV 62) 24
CV Inquiry with verbal feedback in Ops mode (CV 64) 25
Special Operation and Troubleshooting
Doppler effect 26
Manual volume adjustment 26
High voltage circuit breaker 27
Program track operation 27
Using the reset jumper block to return your locomotive to factory default values 27
Lubricating your locomotive 28
Reasons why your locomotive is silent or will not start 29
License agreement 30
Notes 31
Limited Warranty/Lionel Service 32
Running your locomotive in the analog
environment
Running your locomotive with an HO transformer
We recommend using the MRC Control Master 20, MRC Tech 4 Series, or the
Bridgewerks Magnum Series transformers. These transformers will best complement
your locomotive’s operation. If you are using other transformers, you may need to
change some CV’s to obtain optimal performance.
1. Set the direction switch on the transformer so that your locomotive will
move in your desired direction.
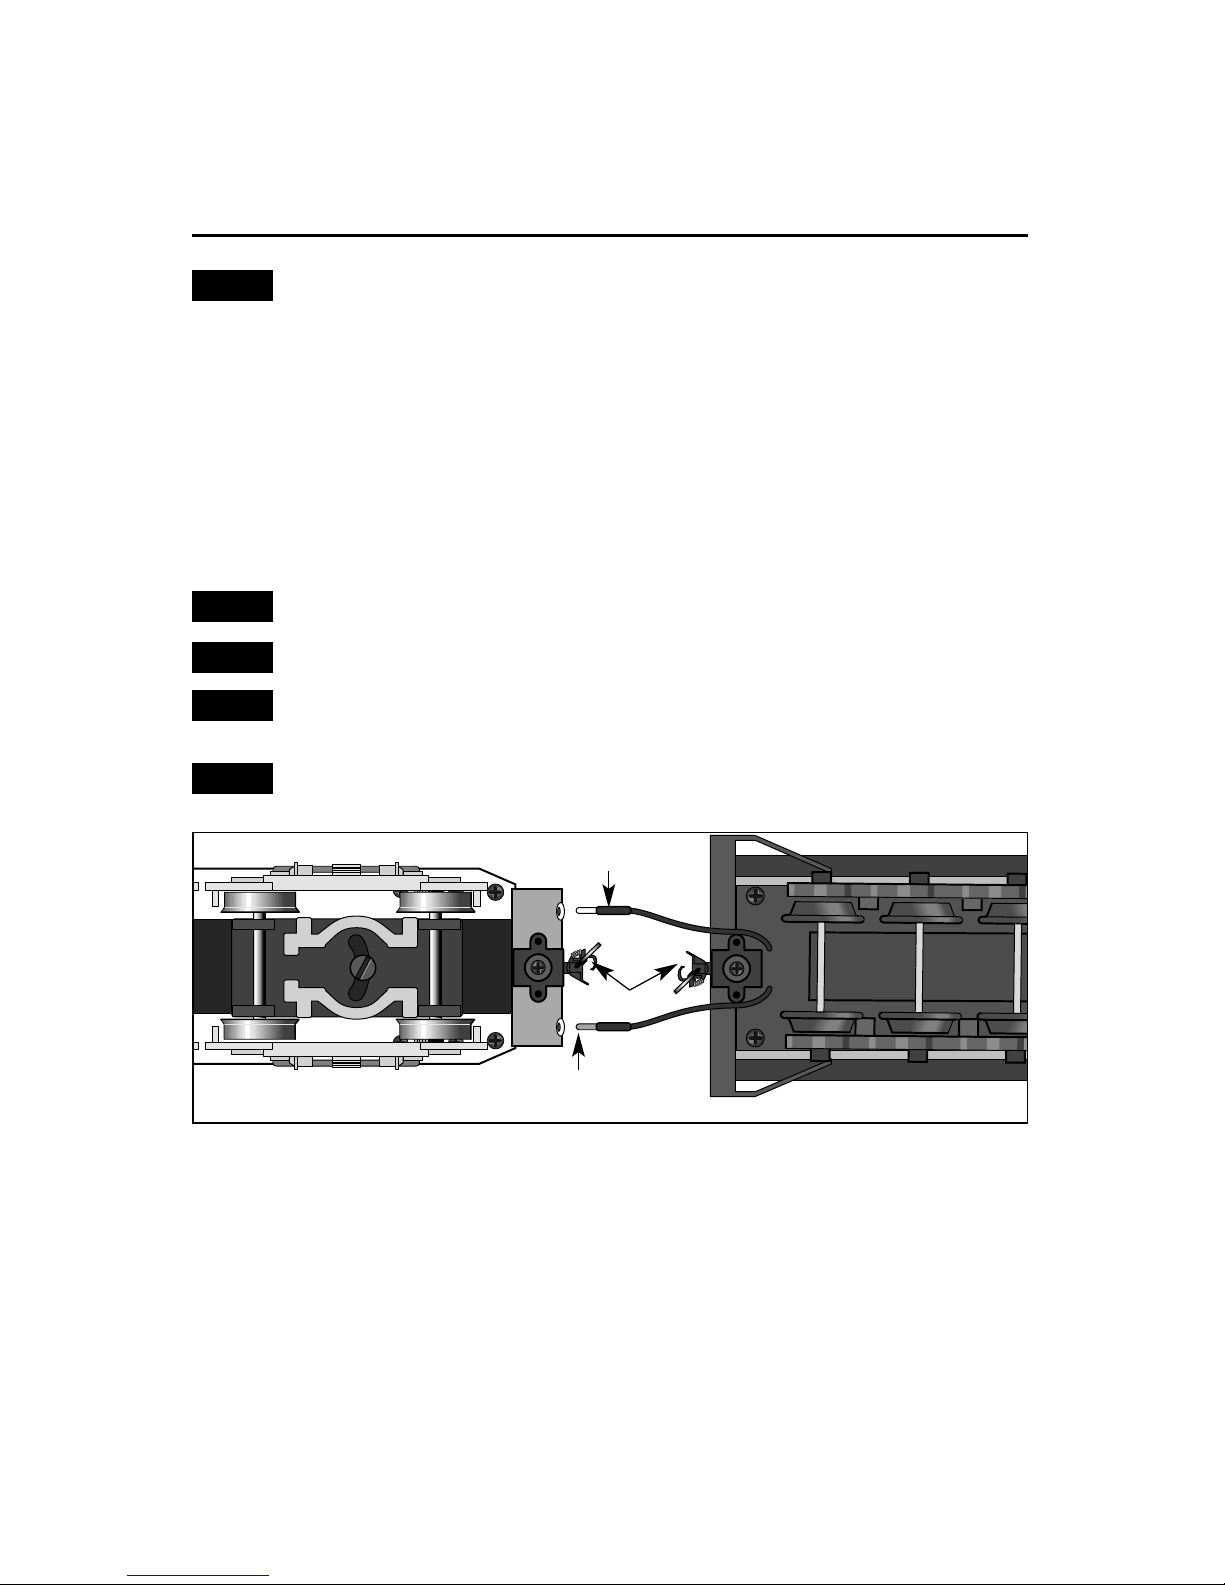
2. With track power off, place your locomotive and tender on the track.
Insert the two pins on the leads from the tender into the receptacles on the locomotive.
Couple the tender to the locomotive
Be sure to insert the two pins if you are operating with the tender.
The Veranda will operate without the tender.
No damage will result if the pins are plugged into the wrong receptical, but tender
lighting will only operate when the pins are inserted into the correct receptacles.
While your locomotive requires curves with a minimum radius of 18”, we
recommend a minimum radius of 22”.
3. Slowly turn the throttle up until you hear the Quantum system sounds
activate.
The Mars light will illuminate.
4. Continue to turn up the throttle and move the locomotive out.
When the locomotive begins to move, the headlight will illuminate and the Mars light will
flash. As you increase or decrease the speed of the locomotive, the revving sounds will
correspond with the speed of the locomotive. The headlight will illuminate brighter.
As you bring the locomotive to a stop by reducing the throttle, you will hear the locomotive’s
squealing brake sounds.
4
Figure 1. Coupler and tether connections
Note!
Note!
Note!
Note!
Note!
Locomotive
Tender
Pin
Pin
Couplers

Running your locomotive in the analog
environment
If you find that you need to turn your throttle up quite high to start your locomotive,
you may choose to adjust the operation of your locomotive for use with your
particular transformer (see “Setting V-Start” on page 11).
Transitioning between diesel and turbine sounds
Your locomotive is equipped with both diesel and turbine sounds. To simulate the operation of
the prototype, the locomotive’s maximum speed in diesel mode is 25 scale miles per hour. To
transition between diesel and turbine modes, reduce the throttle until the locomotive stops
moving, but do not completely turn off track power. At this point, th Mars light will turn off. Use
the direction switch to sound the horn four times, and the diesel-turbine transition will
commence. The transition lasts for about 30 seconds. The Mars light will turn on when the
transition is complete. Repeat this procedure to transition back to the other mode.
When you power down the locomotive, the locomotive will remember its current mode of
operation. For example, if the locomotive is in turbine mode when it is powered down, the
locomotive will be in turbine mode when it is powered up again.
Reversing the locomotive
Follow these steps to operate your locomotive in reverse.
1. Bring the locomotive to a stop and reduce power until the headlight turns
off and the Mars light stops flashing.
2. Flip the direction switch on the transformer to the opposite position, then
increase the throttle.
At this point, the back-up light on the rear of the locomotive and the rear of the tender
illuminates while the headlight on the locomotive switches to dim.
Entering “neutral”
Enter “neutral” by simply turning the throttle down until the locomotive comes to a stop, but
do not turn the track power completely off. At this point, the headlight will turn off, the Mars
light will stop flashing, and the locomotive’s idle sounds will start. You will initially hear a short
air release when the locomotive stops moving and enters neutral, and then a longer air release
sound about five seconds later. The other background sounds will start. After the third air
release sound, you can also use the direction switch to blow the horn or turn the bell on or off.
In neutral, the locomotive sits motionless on the track. Because track power is not turned
off, the locomotive will continue to make prototypical sounds appropriate to its resting state.
The Mars light will remain illuminated.
If you experience any difficulties as you attempt to enter neutral, you may need to program
your locomotive for optimal use with your particular transformer (see “Programming your
locomotive in the analog environment” on pages 8-10).
5
Note!
Running your locomotive with an HO transformer (continued)

Running your locomotive in the analog
environment
Sounding the horn
U
se your transformer’s direction switch to sound the horn for short or long blasts. While the
locomotive is moving, slide the direction switch to the opposite position to turn on the
horn. Return the switch to the initial position to discontinue the horn sounds. The locomotive
will not change directions when you blow the horn.
If you flip the direction switch too slowly from one position to the other, you can
loose track power momentarily.
Activating the bell
U
se your transformer’s direction switch to activate the bell sounds. You can activate the bell
and leave it on while you operate other functions on the locomotive.
Turn the bell on by flipping the direction switch back and forth quickly. Flip the switch back
and forth again to discontinue the sounds. When you discontinue the bell sounds, it will
continue ringing for a few seconds to simulate the slowing of the bell mechanism.
If you flip the direction switch back and forth too slowly, you will get a short blast of
the horn instead of the bell.
Creating the Doppler effect
Y
ou will find that a real locomotive’s horn seems to change pitch as it passes by. Follow these
steps to simulate this effect.
1. While the locomotive is moving toward the observer, slide the direction
switch to the opposite position to sound the horn.
2. Wait at least one second while the horn is blasting.
3. Flip the direction switch back and forth quickly so the horn does not shut
off. You will hear the horn and other sounds shift in pitch as the
locomotive passes by.
This will not turn on the bell.
4. Either slide the direction switch back to its initial position to shut off the
horn, or continue with long or short blasts.
The locomotive sounds will automatically return to normal after a few seconds. If the bell
sounds were activated, they will be discontinued automatically.
6
Note!
Note!
Note!

Running your locomotive in the analog
environment
Changing directions without turning off the sound
F
ollow these steps to use your transformer’s direction switch while the locomotive is in
“neutral” to change the locomotive’s direction.
1. Put the locomotive in “neutral” by bringing the locomotive to a stop. Do
not completely turn off the throttle.
2. Slide the direction switch on the transformer to the opposite position after
you hear the short air release, but before you hear the longer air release
and the pump sounds turn on.
During this five-second interval, the horn will not blow when you flip the direction switch.
3. Turn up the throttle to resume locomotive operations in the opposite
direction.
If you miss the five-second interval, changing directions will momentarily
discontinue the sounds. To change directions, you now have two options. First, you
may turn the power all the way off, slide the direction switch, and turn the power
back on. Alternately, you may slide the direction switch to the opposite position (the
horn will come on) and then turn up the throttle. When the locomotive starts to
move in the opposite direction, the horn will stop.
Setting your locomotive’s inertia or momentum
W
ith Regulated Throttle Control (RTC), your locomotive is capable of operating as though
it has massive inertia. For example, your locomotive will resist changes in speed once it is
moving and will resist starting up quickly if it is at rest. If your locomotive encounters a grade,
it will eventually slow down. Increasing the throttle will slowly accelerate it back to speed.
You can set your locomotive to have any of 16 different inertia or momentum levels (see
“Programming your locomotive in the analog environment” on pages 8-10). Level 0 is the default,
which is no inertia. At this setting, your locomotive will accelerate or stop as quick as the internal
flywheel will allow. For any inertia from 1-15, your locomotive will take longer to change speed. At
Level 1, it will take a few seconds to achieve full speed at max throttle or come to a stop; at Level 15,
it will take a few minutes, depending on your transformer and the conditions of your layout.
Bringing the throttle down quickly will trigger the braking sounds. Adjust the
locomotive’s inertia to fine-tune the sounds.
If you have selected any of the inertia settings from Level 2 to 15, the locomotive will
produce Sound of Power effects while the locomotive is accelerating or decelerating. Once the
locomotive has achieved its final speed, it will produce standard turbine sounds appropriate to
its throttle setting.
Note!
Note!
7

Running your locomotive in the analog
environment
Programming your locomotive in the analog environment
A
ll advanced operations are easily programmed via your standard HO transformer. After
entering programming (see Table 1 on page 10), features are selected and operated by
using the direction switch. Follow these steps to enter programming using the transformer’s
direction switch.
1. Apply power and turn up the throttle to hear the sound system come on.
2. Within five seconds of powering up, turn on the bell by flipping the
direction switch back and forth quickly three times.
If you delay too long after power has been first applied, the opportunity to enter
programming will time out. You will need to start again by shutting off and
reapplying track power.
Once you perform the three bell operations after applying power, the bell will shut off, the
lights will flash, and you will hear “Enter Programming”. After you enter programming
mode, you will hear an announcement of the first programming option, “System Volume”.
3. To access other options, simply slide the direction switch to the opposite
position and leave it there. Listen as each option number is announced in
order. Refer to Figure 1 on page 10.
4. Slide the switch back when you wish to stop at a particular option.
After you stop at an option you will hear the option’s name announced. When you are
scrolling through and stopping at program options, you are not making any changes. To
make changes, you must actually enter the option as discussed in Step 6.
If you accidentally go to a higher number programming option other than the one
you wanted, simply turn the power off, re-enter programming, and start again.
Alternately, you can “scroll” forward until the counter starts again at the beginning.
5. After the verbal announcement of a program option, you can enter that
option by flipping the direction switch back and forth once.
Upon entering an option, you will hear the current setting for that option. For unused
options, you will hear “Reserved”. For any volume option, you will hear “Volume equals X”
(where “X” is its present level setting). After a moment, you will hear the sound playing at
its current volume.
Entering a programming option does not change the settings for that option; it only
provides information about its current value.
8
Note!
Note!
Note!

Running your locomotive in the analog
environment
6. After entering the option, flipping the direction switch back and forth once
to program the new settings as described in Table 1 on page 10.
•To decrease the setting by one level, flip the direction switch back and forth one time
quickly.
•To increase the setting by one level, slide the direction switch to the opposite position,
listen for the locomotive’s hiss, and then flip the switch back to the other position.
Since “System Volume” is the first option, you can flip the switch back and forth or
simply slide it to the opposite position immediately after entering programming to
change the volume.
7. Flip the direction switch anytime to the opposite position and leave it
there to exit an option.
8. Exit Programming mode at anytime by turning the power off and back on
again.
9
Note!
Programming your locomotive in the analog environment (continued)

10
Running your locomotive in the analog
environment
Programming your locomotive in the analog environment (continued)
Program Option Message when Option
Option Name Entering Option Description
Number
1 System Volume “Volume equals X” Sets the volume (17 levels),where level 16
(16,Max) is maximum volume and level 0 is off
2 Inertia “Inertia equals X” Select the starting and stopping
(0,No Inertia) momentum and enables Regulated
Throttle Control. Level 0 (no inertia),
Level 1 (RTC only),Level 1-15
(RTC with increasing inertia
from 5 seconds to 200 seconds).
3 Helper (Normal) “Helper equals Selects Normal, Lead, Mid or End helper
Normal, Lead, in consists. Normal Locomotive has all
Mid,or End” sounds and lights enabled.
Lead locomotive has rear light disabled. Mid
Helper has horn and bell and lights disabled.
End Helper has horn and bell and front
light disabled.
4-7 Reserved Reserved
8 V-Start (8.5v) “V-Start equals X” Sets track voltage that locomotive will
leave neutral. (See Example below)
9 V-Max (12v) “V-Max equals X” Sets track voltage where full power is
applied to motor.
10 Reserved Reserved
11 Programming Reset“Warning – The next time the direction switch changes
about to reset” positions,the bell rings followed by a
horn blast to indicate that the locomotive
has returned to factory default.
12 About “Model number” Each time the direction switch changes
position,the locomotive will announce
additional information about the Quantum
model number, software version,and date.
13 Horn Volume (11) “Volume equals X” Customizes horn volume (16 levels). Max is 15.
14 Bell Volume (13) “Volume equals X” Customizes bell volume (16 levels). Max is 15.
15 Motor Volume (7) “Volume equals X” Customizes motor sounds volume
(16 levels). Max is 15.
16 Fan Volume (8) “Volume equals X” Customizes the fan sounds volume
(16 levels). Max is 15.
17 Reserved “Reserved”
18 Whoosh Volume “Volume equals X” Customizes the turbine “whoosh”volume
(12) “whoosh”volume (16 levels). Max is 15.
19 Whine volume (8) “Volume equals X” Customizes the turbine “whoosh” volume
(16 levels). Max is 15.
“X”is the current value of the Program Option.
Defaults are shown in parenthesis next to the option name.
Table 1. Analog programming
 Loading...