

Lionel Hot Rod GP-9 Owner's Manual
71-8881-250
11/98
®
featuring
and
Lionel
CUSTOM SERIES
#
2
Hot Rod GP-9
diesel locomotive
Owner’s Manual

Congratulations!
2
2
C
ongratulations! You now own one of
the most sophisticated model trains
ever built—the Lionel TrainMaster
Command-equipped CS #2 GP-9 diesel
locomotive.
From the crisp detail and Hot Rod
decoration on the outside to the
advanced technology and brute power
under its hood, your Lionel CS #2 GP-9
is ready for duty on your model railroad.
Read this instruction manual thoroughly for important tips on operating
and maintaining your CS #2 GP-9 locomotive. When properly cared for, it will
last a lifetime. Experience the superiority
of today’s Lionel.
• Powerful Lionel Pullmor®motor
• Liontech CommandTMR2LC control unit for
use with the Lionel TrainMaster
®
CommandTMmodel railroad control system
• RailsoundsTMHot Rod diesel sound system— digital samples from
The Strip
• Die-cast Electrocouplers
TM
• Directional headlights, strobe light, and
interior illumination
• CrewTalk™and TowerCom
™
(in command mode)
• Magne-Traction
®
Table of contents
Transformer operations
Running your CS #2 GP-9 with a Lionel transformer 3
Using your CS #2 GP-9’s Electrocouplers
TM
4
A note on Magne-Traction 5
Your CS #2 GP-9’s Railsounds system—the basics 5
Experiencing the range of your CS #2 GP-9’s Railsounds system 6
Notes on Railsounds 6
Installing the Lionel no. 610-5906-001 sound activation button 7
TrainMaster Command operations
The Command control environment 8
Running your CS #2 GP-9 in the TrainMaster Command environment 9
CAB-1 commands for your CS #2 GP-9 9
CAB-1 numeric keypad commands for your CS #2 GP-9 10
Tuning your CS #2 GP-9’s performance 11
Assigning your CS #2 GP-9 a new ID# 12
Maintaining and servicing your
CS #2 GP-9 diesel locomotive
Lubricating your CS #2 GP-9 13
Lubricating your CS #2 GP-9’s Pullmormotor armature 14
Reprogramming R2LC circuit boards to restore features 14
Replacing your CS #2 GP-9’s lamps 15
Lionel Service 16
Transformer operations
3
3
Running your CS #2 GP-9 with a Lionel transformer
Place your CS #2 GP-9 locomotive on Lionel or
Lionel-compatible O gauge track.
• Note the pull of Magne-Traction between your CS #2 GP-9 and
the steel track. Magnetized wheels and axles increase your pulling
power (more than 25 cars on straight and level track) and keep
your CS #2 GP-9 on track while passing swiftly through curves.
2
2
Power up your CS #2 GP-9 with your transformer.
• Your CS #2 GP-9 is designed to operate on 7-18 volts alternating
current. Virtually all Lionel and Lionel-compatible alternating-cur-
rent transformers are suitable; we recommend the TrainMaster
Command model railroad control system.
• D
O NOT POWER YOUR
CS #2 GP-9 WITH DIRECT CURRENT
(DC).
Damage to sensitive electronic components may occur.
• When you first power up your track, the CS #2 GP-9 will wait
between 3 and 8 seconds as it “listens” for digital language from
the TrainMaster Command Base (available separately). When it’s
determined that it’s on a conventional (nonCommand) railroad,
the CS #2 GP-9’s headlights will illuminate and Railsounds will
fire up. At this point, the locomotive is in neutral. (This occurs
when placing the CS #2 GP-9 on your railroad for the first time.
Thereafter, it starts in forward after every three-second power
interrupt.)
Note!
3
3
Move ‘em out!
• Get your CS #2 GP-9 moving. Press the DIR button on your CAB-
1 remote or Lionel transformer. This sequences the Lionel
Command reverse unit (R2LC) to the next operating state. The
R2LC alternates between three states: forward, neutral, and
reverse.
• Adjust track voltage until your CS #2 GP-9 moves at your desired
speed. To increase speed, increase track voltage. To decrease
speed, reduce voltage. To stop the locomotive, cut track power.
• To select a single operating state (example: forward only), you
can deactivate the R2LC’s sequencing function. Get your CS #2
GP-9 moving in the desired direction, then slide the reverse unit
control switch on the locomotive’s underside to PROGRAM. See
page 12 for the switch location and positioning.
1
1
Transformer operations
4
4
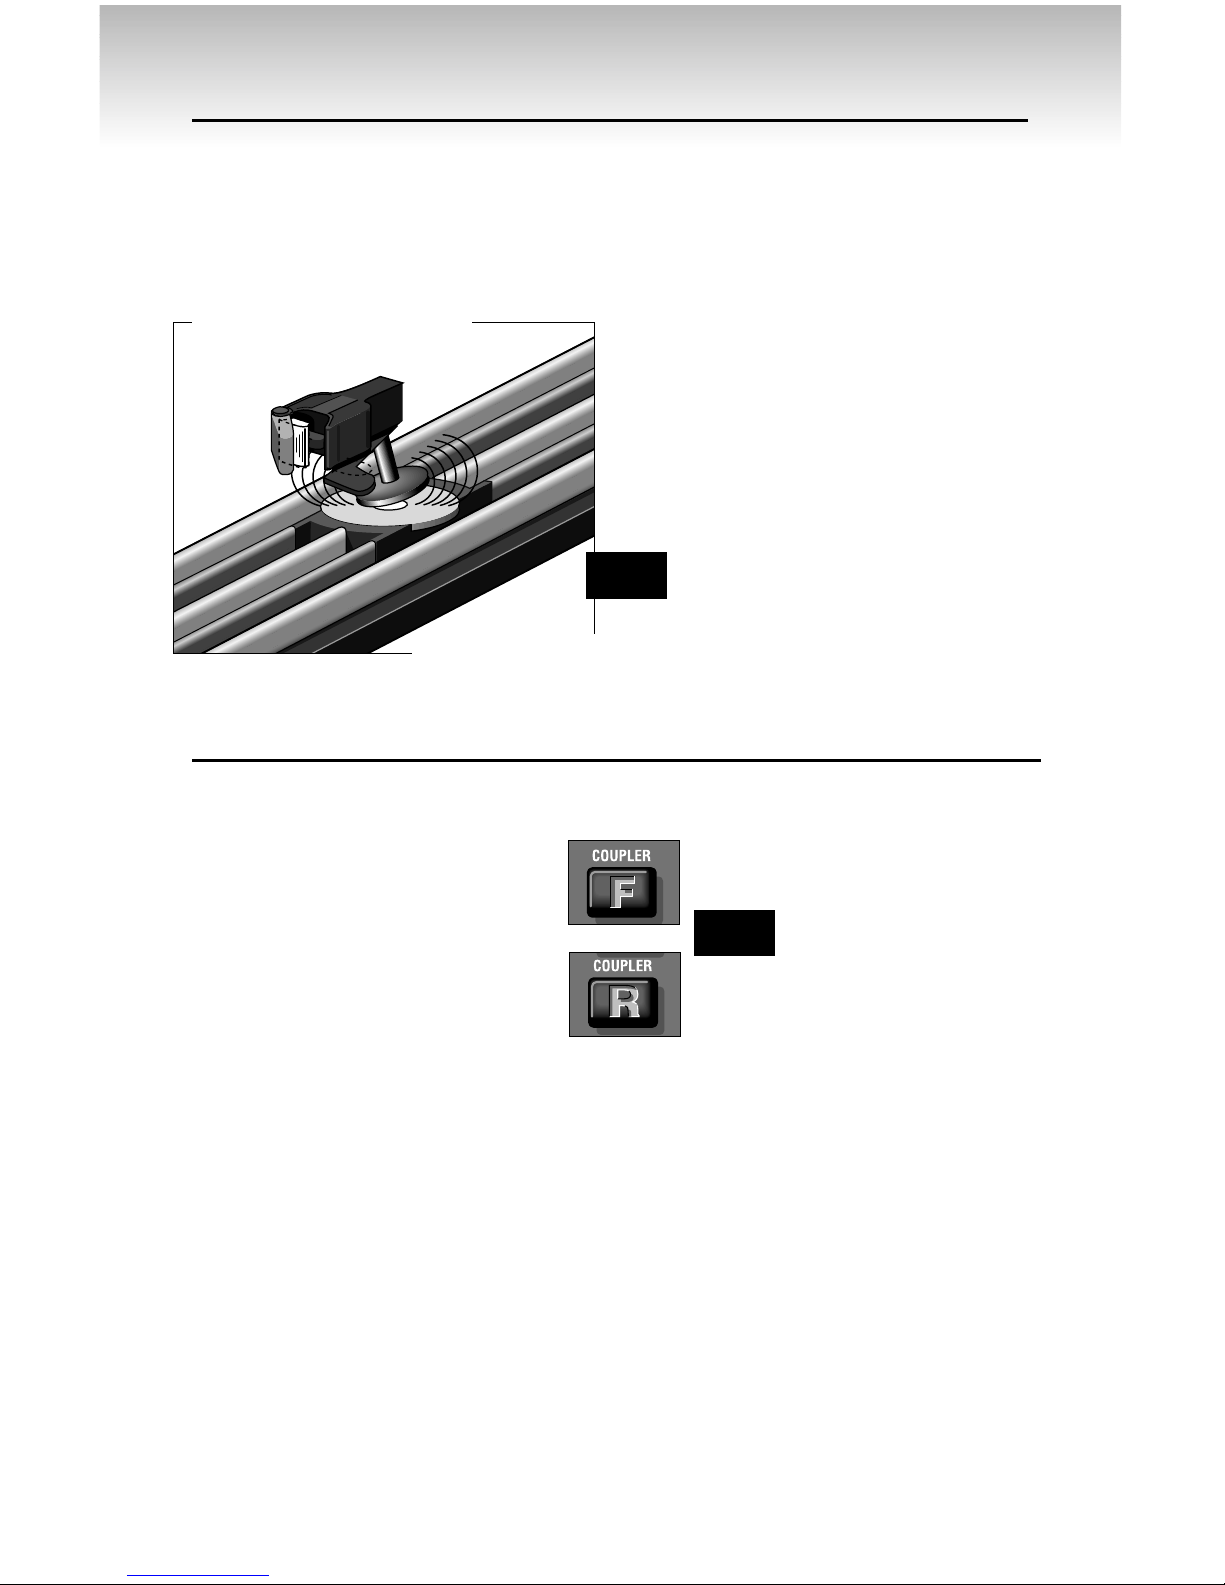
Using your CS #2 GP-9’s Electrocoupler in the non-Command environment
Y
our CS #2 GP-9 is equipped with
front and rear Electrocouplers,
when in the non-Command environment, you must first couple a piece of
rolling stock equipped with Lionel magnetic couplers directly to your CS #2
GP-9. The magnetic coupler on the
rolling stock will then react to the magnetic field generated by a Lionel remotecontrol track section (available separately). Place your rolling stock’s coupler
“trigger disc” over the central coil of a
remote-control track section and press
uncouple on the controller. The magnetic
field pulls the disc downward, and the
coupler opens.
Your CS #2 GP-9s Electrocouplers will
NOT open manually or by using a
remote-control track section
Magnetic coupler on the rolling
stock coupled to your CS #2 GP-9
Note!
Remote-control track section
Using your CS #2 GP-9’s Electrocoupler in the TrainMaster Command environment
Y
our Lionel CS #2 GP-9 is equipped
with front and rear
Electrocouplers and it will
respond to the C
OUPLER F (front)
and C
OUPLER R (rear) button on
your CAB-1 remote when operated in the Trainmaster Command
environment. Simply press either but-
ton on your CAB-1 remote, and
that coupler opens.
YourCS #2 GP-9’s
Electrocoupler is
NOT
designed to be opened
manually.
Note!
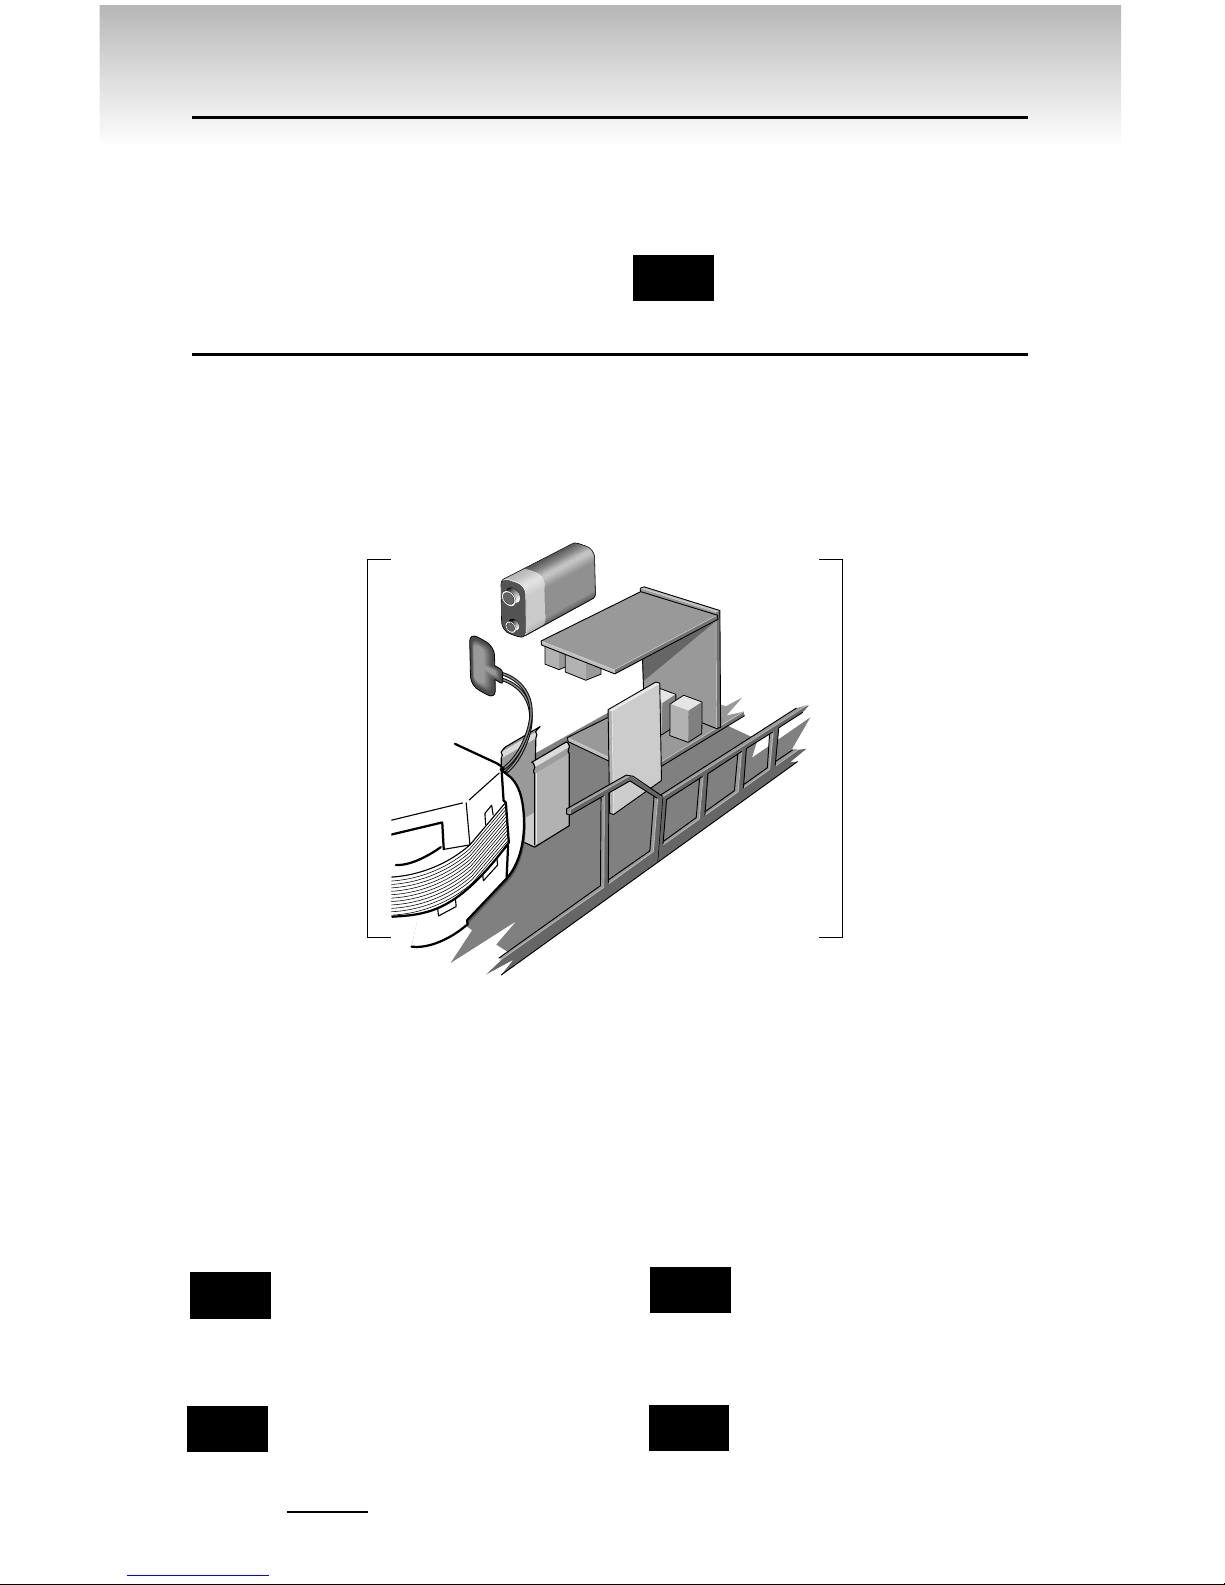
L
ionel Railsounds is the most realistic
model railroad sound system in the
world. Your CS #2 GP-9 features digitally
recorded sounds for an earth shaking
effect, giving your CS #2 GP-9 the ultimate
in creative
sounds.
Begin by
installing a 9volt alkaline
battery. This
ensures
interuption
free operation
of Railsounds.
Remove the
four cab
mounting
screws (see the
illustration on
page 13 for
their location),
lift off the CS #2
GP-9’s body.
Connect the 9-volt battery to the battery
clip and place the battery into the holder.
Replace the body and reinsert the four
screws.
Apply track power and the CS#2 GP-9’s
Railsounds system delivers an authentic
start-up sequence, followed by sounds of
the locomotive at idle. As the CS #2 GP-9’s
speed increases, the RPMs move through
four levels of roar.
Sounds return to
idle only after the
locomotive has
come to a complete halt (conventional control
only, in command
control throttle
must be retarded).
To silence diesel
RPM roar (horn
and bell remain
unaffected), slide
the Railsounds
switch to its SIGNAL position
before powering up
the locomotive. See
page 12 for the switch location and positioning. To return to the diesel RPM roar,
return the switch to the FULL position
before powering up the locomotive.
Note!
Note!
Note!
Discontinue locomotive power for
10 seconds before changing the
Railsounds on/off switch.
Note!
In conventional mode to experience the most from your CS#2 GP9s RailSounds please install the
battery
If Railsounds “drops out” during
track power interrupts, replace the
battery.
Although track voltage powers
Railsounds, the battery is required
for uninterrupted operation and
shutdown sequences. Use only
alkaline
batteries; do not use
“heavy duty” batteries.
Install a 9-volt alkaline battery in your CS #2 GP-9. Remove
the four mounting screws, lift off the body, connect the battery
to the power cord, and place the battery into the holder.
5
5
A note on Magne-Traction
Y
our CS #2 GP-9 is equipped with
Lionel Magne-Traction, magnetized wheelsets and axles that help
increase tractive effort during operation. Because the wheelsets are magnetized, take care to prevent small
metallic objects from attaching to the
wheel sets and working their way
into the CS #2 GP-9’s motor assembly.
They can damage your locomotive.
Magne-Traction is not effective
on nonferrous track.
Note!
Your CS #2 GP-9’s Railsounds system—the basics
 Loading...