

Lionel Empire State Express Hudson Owner's Manual
Lionel
Empire State Express Hudson
Steam Locomotive and
Tender
Owner’s Manual
Lionel
Empire State Express Hudson
Steam Locomotive and
Tender
Owner’s Manual
73-8000-250
8/05
SYSTEM
featuring
and

Congratulations!
C
ongratulations on your purchase of the Lionel Empire State Express Hudson steam
locomotive and tender! On the outside, this locomotive features numerous prototypical
details and expert decoration in your favorite livery. Inside the body, this locomotive is equipped
with some of the most advanced sounds and controls in model railroading. This powerful
locomotive is ready for duty on your layout.
Features of this locomotive
• TrainMaster Command Control equipped—able to run in the TrainMaster
Command Control environment or in the conventional environment with
only a standard transformer
• Odyssey System for speed control with ON/OFF switch
• Refined Conventional Transformer Control Mode with lower starting
speeds, improved smoke output, and simplified Odyssey System controls
• RailSounds 5.0 sound system with intelligible CrewTalk dialog and
TowerCom announcements
• Dual FatBoy speakers for the ultimate in sound reproduction
• High torque Pittman motor with momentum flywheel
• Wireless Tether connection between locomotive and tender
• Directional lighting with operating headlights and back-up light on rear of
tender
• ElectroCoupler on rear of tender
• Flickering firebox in cab
• Glowing ashpan
• Synchronized fan-driven smoke unit with adjustable output
• Minimum radius: O-54
2
The following Lionel marks may be used throughout this instruction manual and are protected under law.
All rights reserved.
Lionel
®
, TrainMaster®, Odyssey®, RailSounds®, CrewTalk™, TowerCom™, DynaChuff™,
StationSounds
™
, Pullmor®, ElectroCoupler™, Magne-Traction®, CAB-1®Remote Controller,
PowerMaster
®
, Lionel ZW®, ZW®, PowerHouse®, TMCC®, Lionelville™, Lockon®, Wireless Tether™,
LionMaster
®
, FatBoy™, American Flyer®, TrainSounds
™
The name FasTrack®is used with permission from Pitsco, Inc.

Table of contents
Quick Start
Transformer operations 4
TrainMaster Command Control operations 4
Conventional transformer operations
Conventional transformer operations 5
Operating your locomotive in the conventional environment 6
Locking your locomotive into a single direction 7
Coupling your locomotive in the conventional environment 8
RailSounds 5.0 sound system operations
RailSounds 5.0 sound system operations 9
Installing the battery 10
Using the RailSounds 5.0 sound system in the conventional environment 11
Installing a Lionel Sound Activation Button for conventional operation 12
Activating the CrewTalk dialog and TowerCom announcements
in the conventional environment 13
Using the RailSounds 5.0 sound system in the TrainMaster Command Control environment 14
Activating the CrewTalk dialog and TowerCom announcements
in the Command Control environment 15
RailSounds 5.0 sound system dialog on a round trip 16
Odyssey System operations
Odyssey System operations 17
Odyssey System conventional transformer environment 17
Odyssey System Command Control operation 18
TrainMaster Command Control operations
TrainMaster Command Control operations 19
Operating your locomotive in the Command Control environment 19
CAB-1 Remote Controller commands 20
CAB-1 Remote Controller numeric keypad commands 21
Tuning your locomotive’s performance 22-23
Assigning your locomotive a new ID# 24
Reprogramming your locomotive to restore features 25
Maintaining and servicing your locomotive
Adding fluid to your locomotive’s smoke generator 26
Adjusting the smoke unit 26
Installing the O gauge coupler head 27
Lubricating your locomotive 28
Maintaining your locomotive’s handrail antenna 29
Servicing your locomotive’s lamps 29
Replacing your tender’s lamps 30
Removing the side skirting 30
Replacing the traction tires 31
Limited Warranty/Lionel Service 32
3

Quick Start
Transformer operations
1. Place your locomotive on Lionel or Lionel-compatible O-54 or larger
track.
2. Power your locomotive at 8-18 volts with your alternating-current (AC)
transformer.
Do not power your locomotive with a direct-current (DC) transformer. Damage to
sensitive electronic components may occur.
3. Wait three to eight seconds until the headlight stops flickering.
4. Move ‘em out! Press the DIRECTION button on your transformer, then
throttle up.
TrainMaster Command Control operations
T
o operate your locomotive in the Command Control environment, you need a Command
Base (available separately, 6-12911) and a CAB-1 Remote Controller (available separately,
6-12868). Both products are offered together in the TrainMaster Command Set (6-12969).
1. Turn off track power and plug in the Command Base.
2. Place your locomotive on Lionel or Lionel-compatible O-54 or larger
track.
3. Increase track voltage to full power (no more than 19 volts AC).
Do not power your locomotive with a direct-current (DC) transformer. Damage to
sensitive electronic components may occur.
4. Press ENG and 1 to address your locomotive with your CAB-1 Remote
Controller.
5. Throttle up and move ‘em out.
4
Caution!
Caution!

Conventional transformer operations
Conventional transformer operations
Y
our locomotive is capable of operating in the conventional environment, controlled by
nothing more than a standard Lionel alternating-current (AC) transformer.
In the conventional environment, your locomotive cycles through a repeating pattern of
operations: forward, neutral, reverse, neutral, and so on. To advance to the next operation, press
the DIRECTION button on your transformer. Alternately, you could use the throttle to briefly
turn off track power so that the locomotive advances to the next operation when power is
restored.
Once you cycle the locomotive into forward or reverse, you control your locomotive’s speed
by varying track voltage with the transformer’s throttle. To increase the speed of the locomotive,
you increase track voltage. To decrease the speed, you decrease track voltage. To stop the
locomotive and to change directions (or to enter neutral), track voltage is turned off or
interrupted.
Use the WHISTLE and BELL buttons on your transformer (or separate buttons if your
transformer is not equipped with these controls, see page 12) to activate these features.
To experience all of your locomotive’s features, we recommend operating in the TrainMaster
Command Control environment. With a simple one-wire connection, you can use the CAB-1
Remote Controller to access all of the functions of your locomotive. Refer to pages 19-23 to see
how to operate your locomotive in the TrainMaster Command Control environment.
5
Conventional transformer operations
Operating your locomotive in the conventional environment
1. With your transformer turned off, place your locomotive on Lionel or
Lionel-compatible O-54 or larger track.
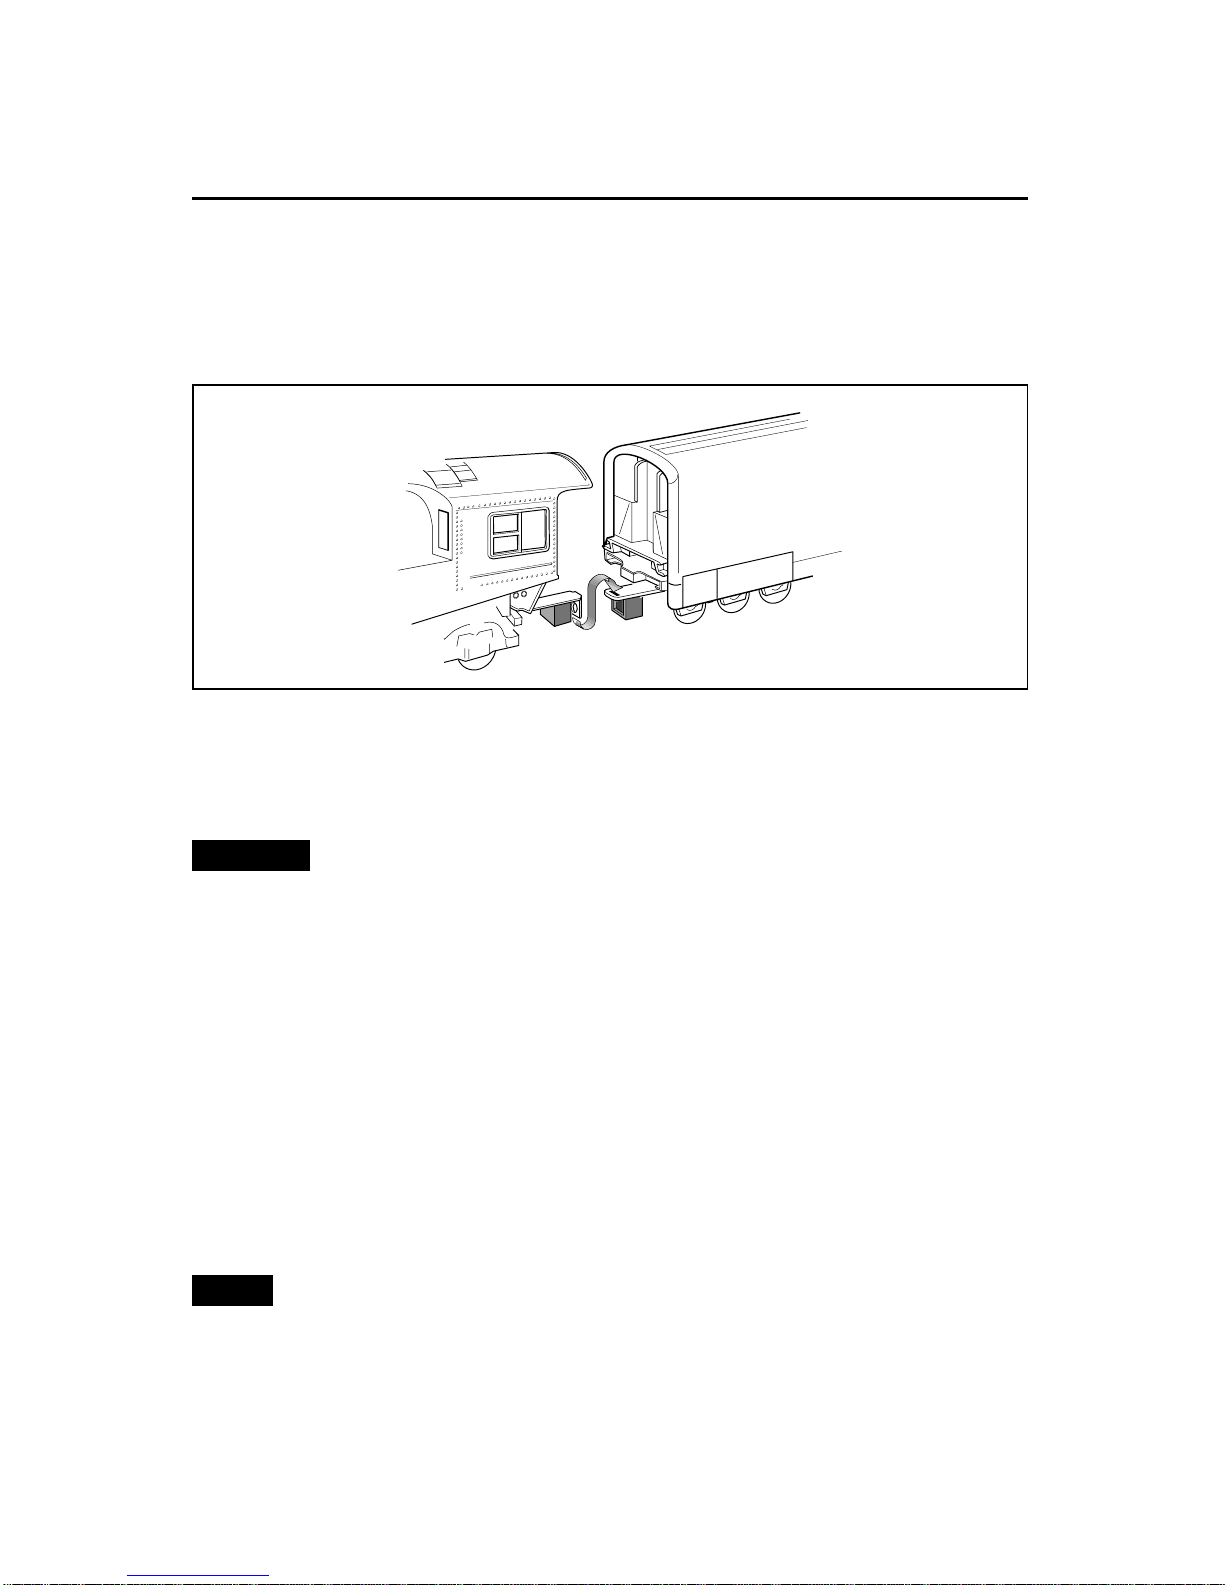
2. Connect the drawbar between the locomotive and tender as illustrated in
Figure 1.
6
Figure 1. Drawbar connection
3. Power your locomotive at 8-18 volts with your alternating-current
transformer.
Power your locomotive with an alternating-current (AC) transformer only.
Powering your locomotive with a direct-current (DC) transformer may result in
damage to sensitive electronic components.
4. Wait three to eight seconds as your locomotive determines whether it is in
a conventional environment or a TrainMaster Command Control
environment. The headlight flickers as the locomotive searches for a signal from the
Command Base. When the locomotive has determined that a Command Base is not
connected to the track, the flickering will stop and the headlight will remain illuminated.
You are ready for operation in the conventional environment.
5. Move ‘em out! Press the DIRECTION button on your transformer to sequence your
locomotive through the repeating pattern of operations: forward, neutral, reverse, neutral,
and so on. You may also briefly turn off track power to advance the locomotive to the next
operating state. Adjust the throttle until your locomotive moves at your desired speed.
When placing your locomotive on your layout for the first time, it will start out in
neutral. Thereafter, it will start in forward after every power interruption lasting five
seconds or longer.
Use the WHISTLE and BELL buttons on your transformer to activate those features. Refer
to page 12 if your transformer is not equipped with those buttons.
Caution!
Note!
Conventional transformer operations
Locking your locomotive into a single direction
W
hen the Command reverse unit switch is in the RUN position, your locomotive sequences
through a repeating pattern of operations: forward, neutral, reverse, neutral, and so on.
To “lock” your locomotive into a single direction (for example, to operate in forward only),
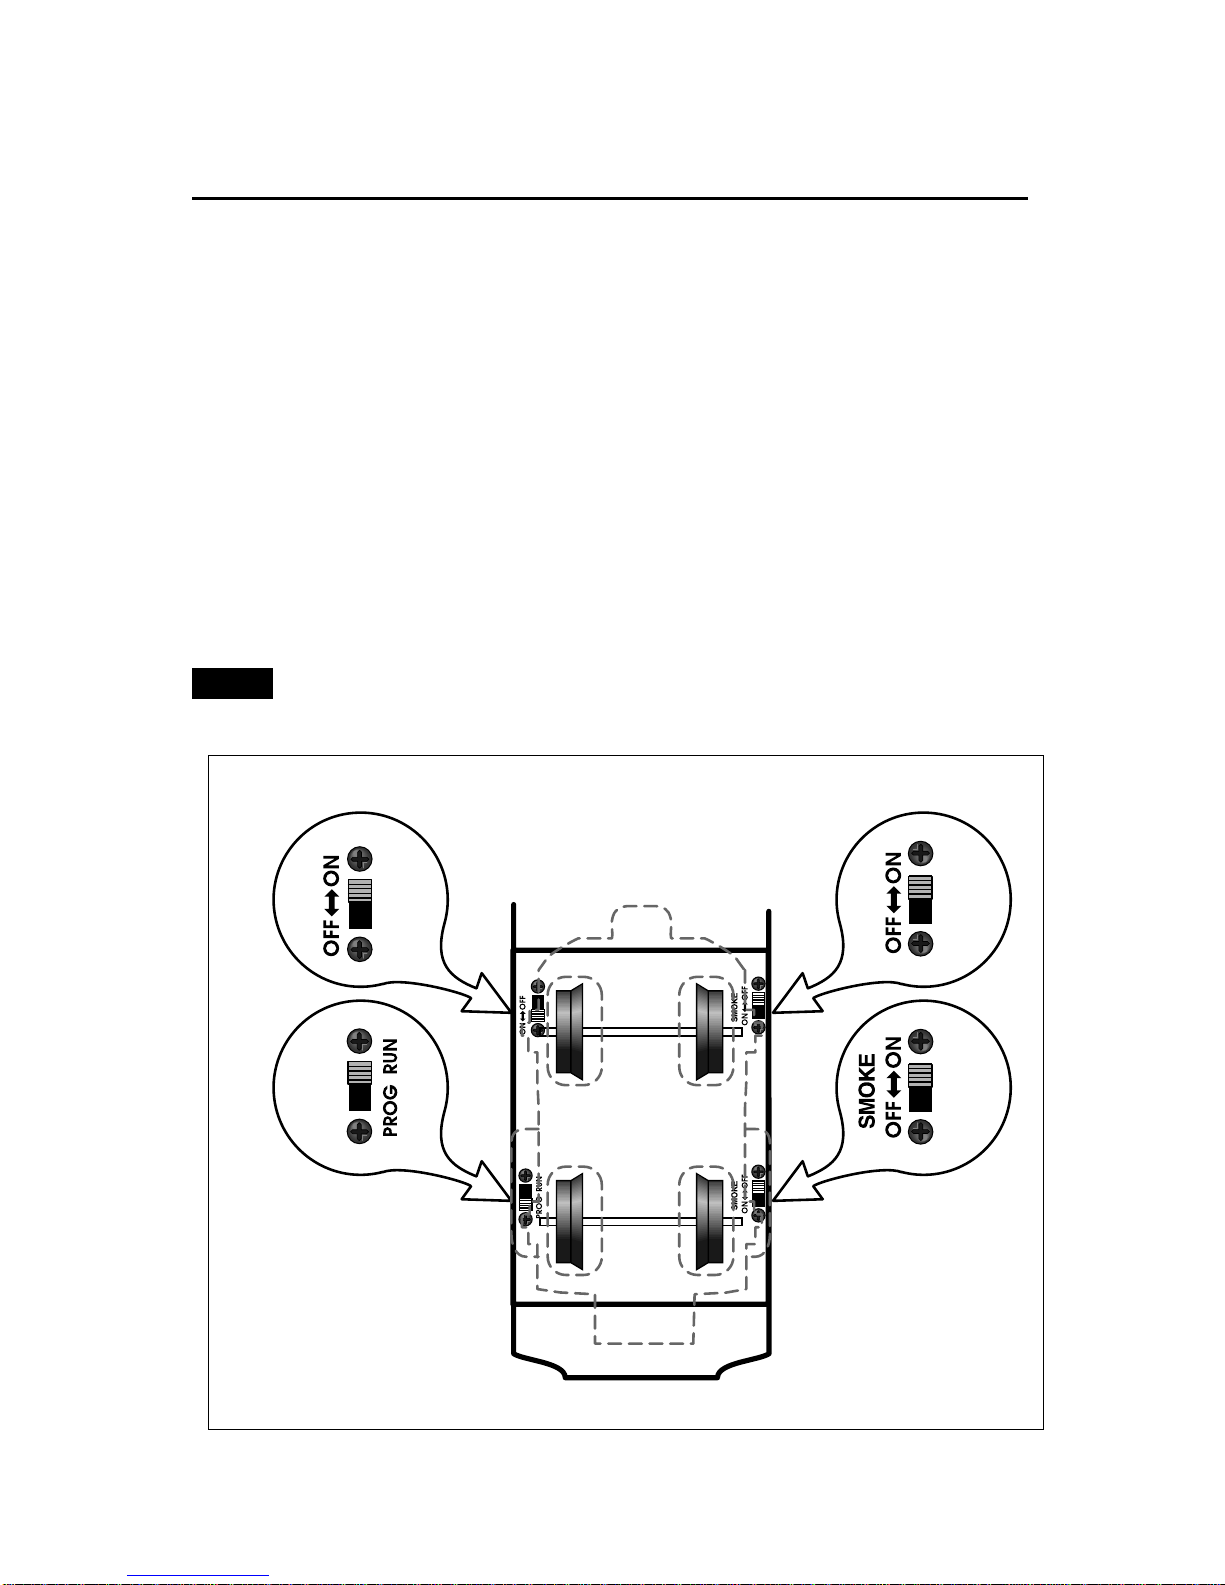
you can deactivate the Command reverse unit’s sequencing function. Refer to Figure 2 for the
location of the Command reverse unit switch.
1. Use your transformer’s DIRECTION button or interruptions in track power to get your
locomotive moving in the desired direction.
2. Slow the locomotive down without stopping (reduce the throttle without turning off track
power).
3. Slide the Command reverse unit switch to the PROG position. At this point, the locomotive is
“locked” into your chosen direction. To restore the forward-neutral-reverse sequence, just
slide the Command reverse unit switch back to the RUN position.
Your locomotive will “reset” to forward after any power interruption lasting five
seconds or longer, regardless of the direction you set.
7
Note!
ODYSSEY
ODYSSEY
WORK LIGHTS
Command reverse unit
switch
Odyssey ON/OFF switch
Worklight
switch
Smoke unit switch
(see page 26 for details)
Rear
Figure 2. Locomotive switch locations
Conventional transformer operations
Coupling your locomotive in the conventional environment
T
he rear of the tender features an ElectroCoupler that is released by remote control at any
point around your layout in the TrainMaster Command Control environment.
In the conventional environment, the ElectroCoupler will not open manually or by using a
Remote-Control Track section. To couple your locomotive in the conventional environment, you
must rely on a piece of rolling stock equipped with a magnetic coupler. Simply release the
magnetic coupler and couple the rolling stock to the locomotive, even if the ElectroCoupler is
closed.
Keep in mind that you may still make use of Lionel Remote-Control Track sections (6-65530
for O gauge; 6-12746 and 6-65149 for O-27 gauge; and 6-12020 for FasTrack layouts) with the
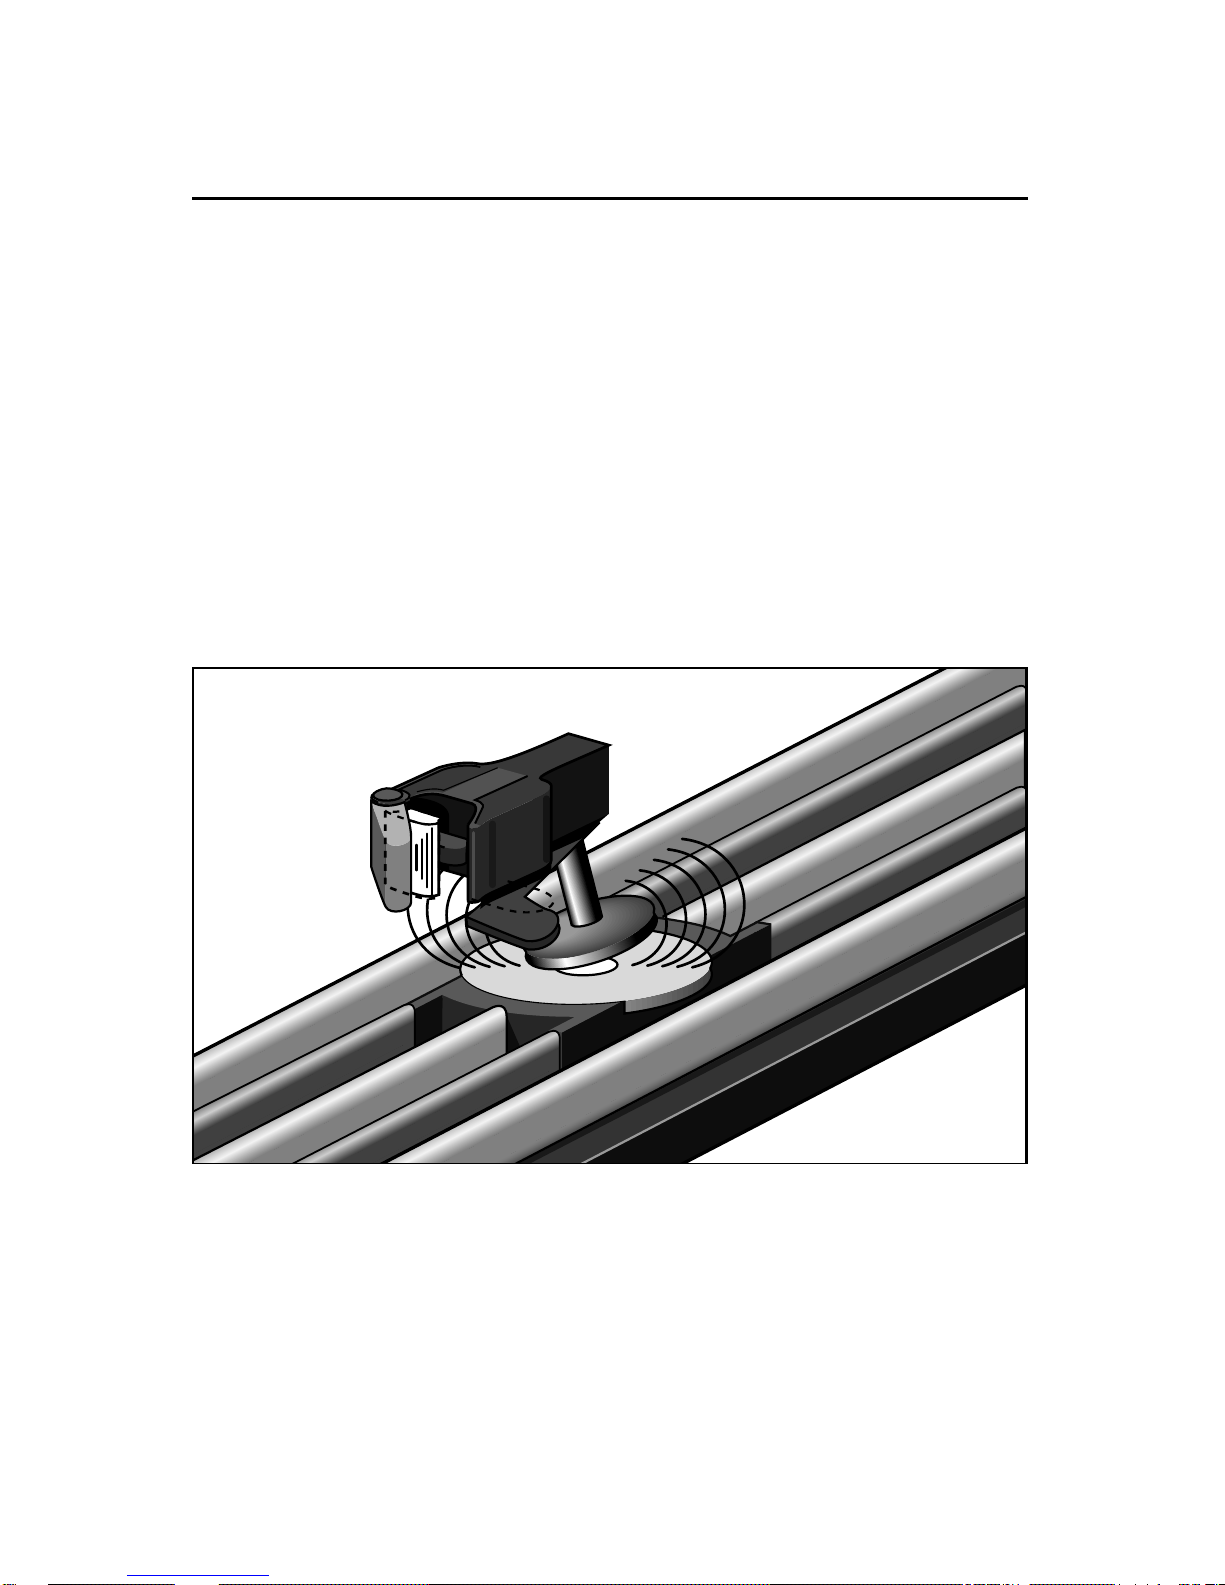
magnetic couplers on the rolling stock. Place the trigger disc on the magnetic coupler over the
central coil on the Remote-Control Track section, then press UNCOUPLE on the track section’s
controller. As illustrated in Figure 3, the magnetic field pulls the disc downward, releasing the
coupler.
8
Figure 3. Magnetic coupler operation
Remote-Control
Track Section

9
RailSounds 5.0 sound system operations
RailSounds 5.0 sound system operations
Y
our locomotive is equipped with the Lionel RailSounds 5.0 sound system, the most realistic
model railroad sound system in the world. The RailSounds 5.0 sound system brings the
sounds of the railroad to your layout through high quality sound recordings of real locomotives.
When you operate your locomotive in the conventional environment, you get realistic
chuffing sounds, which automatically increase through 15 levels as the speed of the locomotive
increases. You can sound the locomotive’s whistle or activate the ringing of the bell. When you
are through with operations and power down the track, your locomotive’s RailSounds 5.0 sound
system starts a realistic steam shutdown sequence (a nine-volt battery is required for the
operation of the RailSounds 5.0 sound system when the track is powered down).
When you operate your locomotive in the TrainMaster Command Control environment, you
get full control of the RailSounds 5.0 sound system, including the whistle and bell sounds. The
locomotive’s chuffing sounds automatically increase, but you can also set a particular chuff
intensity level using your CAB-1 Remote Controller. In the Command Control environment, the
release of the ElectroCoupler is accompanied by a coupler release sound. Use the BRAKE
button, and listen for the sound of squealing metal. You can also trigger CrewTalk dialog and
TowerCom announcements, which simulate the interaction between the locomotive crew and
the dispatcher. Whenever you choose to shutdown your locomotive, the realistic shutdown
sequence commences (a nine-volt battery is required for the operation of the RailSounds 5.0
sound system when the track is powered down).
RailSounds 5.0 sound system operations
Installing the battery
A
lthough the RailSounds 5.0 sound system is powered through the track, we recommend
that you install a nine-volt alkaline battery in the tender to prevent the sound system from
shutting down during track power interruptions (for example, at a switch or a dirty section of
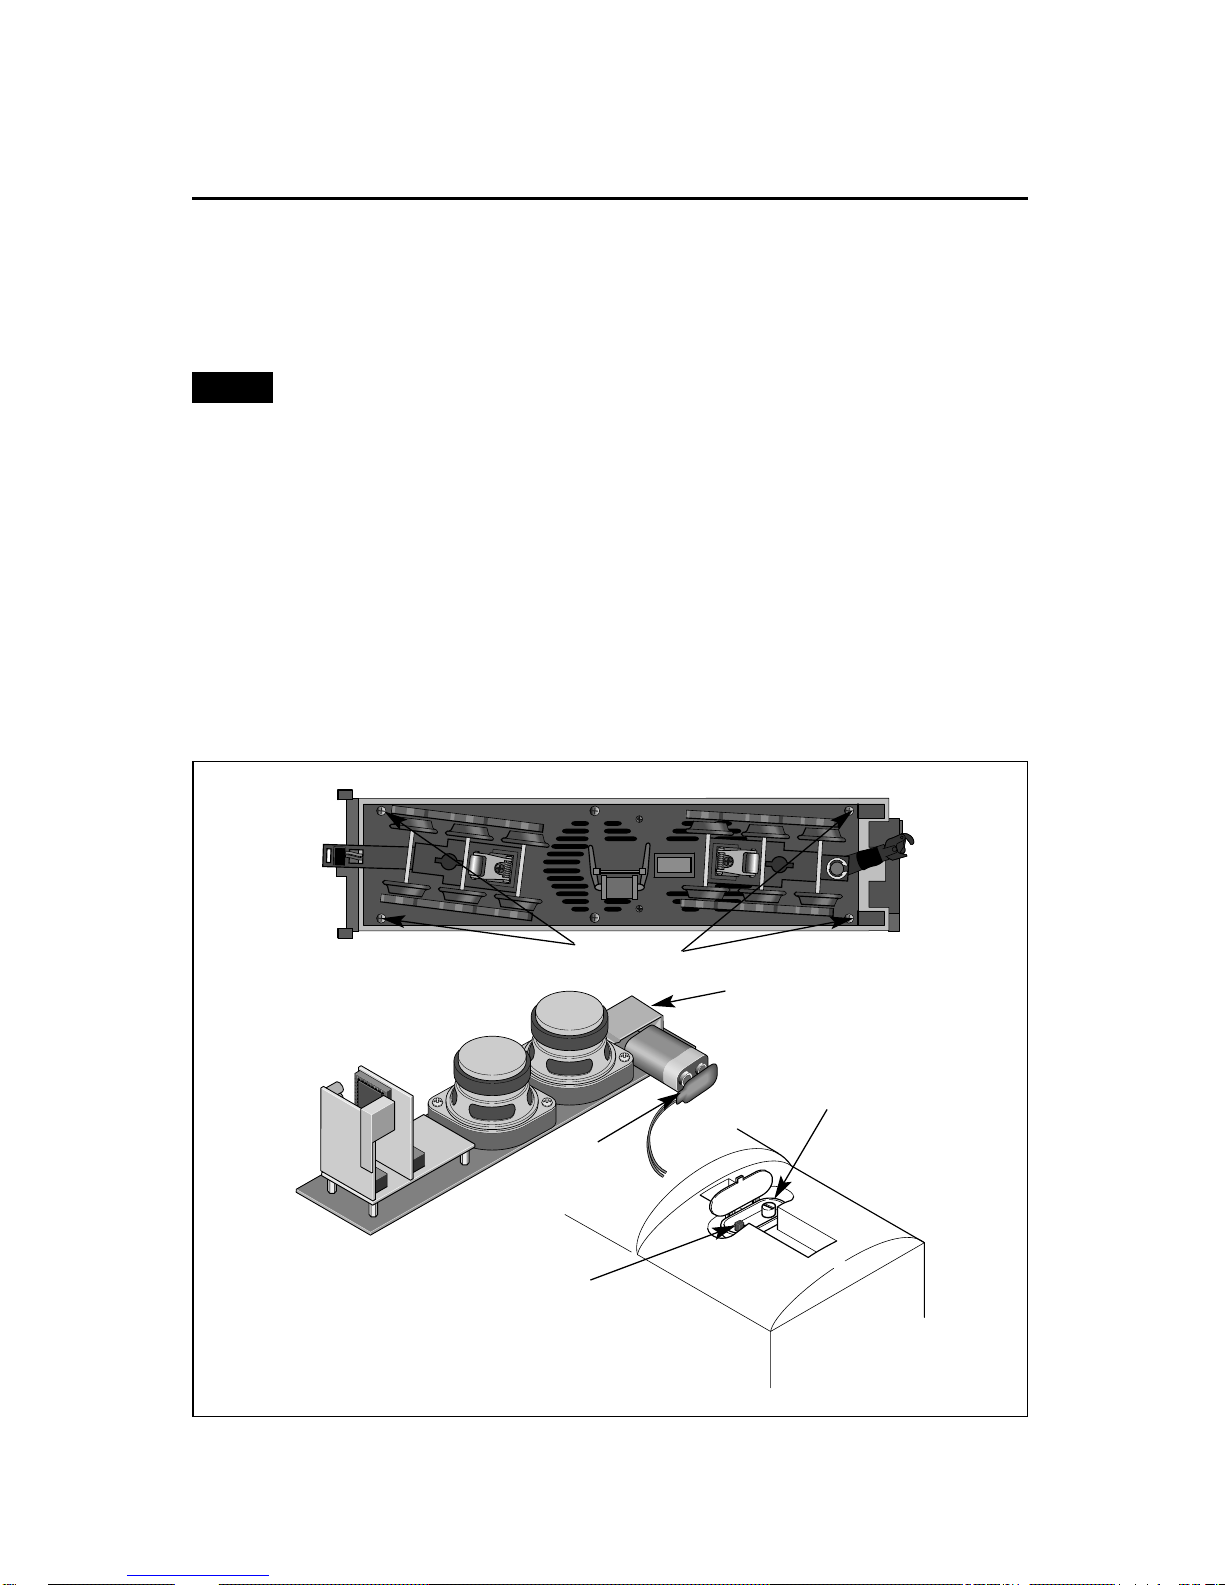
track). Follow these steps and refer to Figure 4 as you install the battery.
If the RailSounds sound system turns off during interruptions in track power, you
may need to replace the battery.
1. Remove the body screws from the underside of the tender. Refer to Figure 4 for the location
of the screws.
2. Lift the body off the frame. Be careful to avoid pulling on the wires that connect the body to
the frame.
3. Remove the protective cover from the battery harness.
4. Snap the battery harness onto the nine-volt alkaline battery’s terminals.
5. Slide the battery into the battery holder.
6. Replace the body on the frame and secure it with the body mounting screws. Be careful to
avoid pinching wires between the body and the frame.
Note!
Figure 4. Battery installation
RailSounds
switch
Volume control knob
Body screws
Inside the tender
REAR
Bottom of tender
FRONT
10
Battery
harness
Battery holder
 Loading...