

Lionel F7 A-B-A, U30C, U33C, E7 Texas Special Diesel Set, GP30 Owner's Manual
Lionel
F7 A-B-A Diesel
Locomotive Set
Owner’s Manual
73-4513-250
11/07
Featuring

2
Congratulations!
C
ongratulations on your purchase of the Lionel E7 ABA Diesel Locomotive set! This set
features a powered A-unit, a non-powered B-unit, and a non-powered A-unit. On the
outside, these locomotives feature numerous prototypical details and expert decoration in
your favorite livery. Inside the bodies, these locomotives are equipped with some of the most
advanced sounds and controls in model railroading. This set is ready for duty on your layout.
Features of this locomotive set
• LEGACY Control System equipped—able to run with the new LEGACY
Control system, in the TrainMaster Command Control environment, or in
the conventional environment with only a standard transformer
• LEGACY RailSounds sound system with intelligible CrewTalk dialog and
TowerCom announcements, each with different scenarios depending on
whether the locomotive is in motion or stopped
• Odyssey II speed control with ON/OFF switch(powered A-unit only)
• Directional lighting including operating LED headlights
• Diretional bi-color marker lights (A-units only)
• ElectroCouplers
• Dual powerful maintenance-free motors with momentum flywheels
(powered A-unit only)
• Four traction tires (powered A-unit only)
• Fan-driven smoke units
• Lighted number boards
• Lighted cab interior
• Minimum curve: O-31
The following Lionel marks may be used throughout this instruction manual and are protected under
law. All rights reserved.
Lionel®, TrainMaster®, Odyssey®, RailSounds®, CrewTalk™, TowerCom™, DynaChuff™,
StationSounds™, Pullmor®, ElectroCoupler™, Magne-Traction®, CAB-1® Remote Controller,
PowerMaster®, Lionel ZW®, ZW®, PowerHouse®, TMCC®, Lionelville™, Lockon®, Wireless Tether™,
LionMaster®, FatBoy™, American Flyer®, TrainSounds™, PowerMax™, LEGACY
™
The name FasTrack® is used with permission from Pitsco, Inc.
Special thanks to the Niles Canyon Railway, The Pacific Locomotive
Association and Five Chime Consultants for their assistance in the recording
of the beautifully restored WP 918 EMD F7 locomotive.

3
Table of contents
Quick Start
LEGACY Control operations 4
TrainMaster Command Control operations 4
Transformer operations 4
LEGACY Control Systems operations
Get ready to run 5
Start ‘Er Up 5
The velocity throttle 6
The multi-controller 6-7
The train brake slider 7
The warning sound controller 8
The speed bar 9
Assigning a new ID# to your locomotives 10
Lash-ups 11
Locomotive switch function overview
Switch overview 12
TrainMaster Command Control operations
TrainMaster Command Control operations 13
Operating your locomotive set in the Command Control environment 13
CAB-1 Remote Controller commands 14
CAB-1 Remote Controller numeric keypad commands 15
CAB-1 numeric keypad table 16
Tuning your locomotive’s performance 17-18
Assigning a new ID# to your locomotives 19
Building a lash-up 20
Reprogramming your locomotives to restore features 21
Conventional transformer operations
Operating your locomotive set in the conventional environment 22-23
Locking your powered A-unit locomotive into a single direction 24
Uncoupling in the conventional environment 25
Odyssey II Speed Control system operations
Odyssey II Speed Control system operations 26
Odyssey II Speed Control system LEGACY Control operation 26
Odyssey II Speed Control system TrainMaster Command Control operation 26
Odyssey II Speed Control system conventional transformer operation 26
LEGACY RailSounds sound system operations
LEGACY RailSounds sound system operations 27
Installing the battery 28
Using the LEGACY RailSounds sound system in the conventional environment 29
Installing a Lionel Sound Activation Button for conventional operation 30
Activating the CrewTalk dialog and TowerCom announcements in the conventional environment 31
Using the LEGACY RailSounds sound system in the TrainMaster Command Control environment 32
Activating the CrewTalk dialog and TowerCom announcements in the Command Control environment 33
LEGACY RailSounds on a round trip 34
Maintaining and servicing your locomotive
Lubricating your locomotive set 35-37
Adding fluid to your locomotive’s smoke generator 38
Adjusting the smoke output 39
Replacing your locomotive’s LEDs and lamps 39
Replacing the traction tires 39
Limited Warranty/Lionel Service 40
4
Quick Start
Power your locomotive set with an alternating-current (AC) transformer only.
Powering your locomotive set with a direct-current (DC) transformer, or in excess of
19 volts AC, may result in damage to sensitive electronic components.
LEGACY Control operations
Your F-7 A-B-A Diesel Locomotives are factory programmed as ENG 1.
F
or the finest operating experience, your F-7 A-B-A Diesel Locomotive set is fully compatible
with the new LEGACY Control System.
To operate in LEGACY mode, you need a LEGACY Command Base and LEGACY CAB-2
Remote Controller. Both products are offered together in the LEGACY Command Set, 6-14295.
1. Turn off track power and plug in the LEGACY Base.
2. Place your locomotive set on Lionel or Lionel-compatible O-31 or larger track.
3. Increase track power voltage to full power (no more than 19 volts AC).
4. Press ENG and 1 to address your locomotive set with your LEGACY CAB-2
Remote Controller.
5. Throttle up and move ‘em out.
TrainMaster Command Control operations
Your F-7 A-B-A Diesel Locomotives are factory programmed as ENG 1.
T
o operate your locomotive set in the Command Control environment, you need a Command Base
(available separately, 6-12911) and a CAB-1 Remote Controller (available separately, 6-12868).
1. Turn off track power and plug-in the Command Base.
2. Place your locomotive set on Lionel or Lionel-compatible O-31 or larger track.
3. Increase track voltage to full power (no more than 19 volts AC).
4. Press ENG and 1 to address your locomotive set with your CAB-1 Remote
Controller.
5. Throttle up and move ‘em out.
Transformer operations
1. Place your locomotive set on Lionel or Lionel-compatible O-31 or larger
track.
2. Power your locomotive set at 12-18 volts with your alternating current
(AC) transformer.
3. Wait three to eight seconds until the locomotive’s headlight illuminates
and the LEGACY RailSounds sound system starts up.
4. Move ‘em out! Press the DIRECTION button on your controller, then
throttle up.
Note!
Note!
Note!
5
LEGACY Control System operations
This section is a brief overview of the LEGACY Control System. For a more in depth
explanation of the LEGACY Control System features, please see your LEGACY Control
System Operations Manual.
GET READY TO RUN
G
et your engine running now by following the instructions in this guide. We'll power up
the track, "address the engine" so it can be controlled by your CAB-2 remote and learn to
use the Velocity Throttle, Whistle, Bell, Brake and Direction commands.
Power Up The Track
Refer to PowerMaster, TPC, or ZW manual for correct method. With your engine on the track
and ready to roll, power-up your track to a constant 18 volts. If a circuit breaker trips when you turn
on the Lionel power supply, check the wheels of your locomotive to make sure they are all securely
on the track. Check to make sure the track is free of all metals that may cause a short circuit.
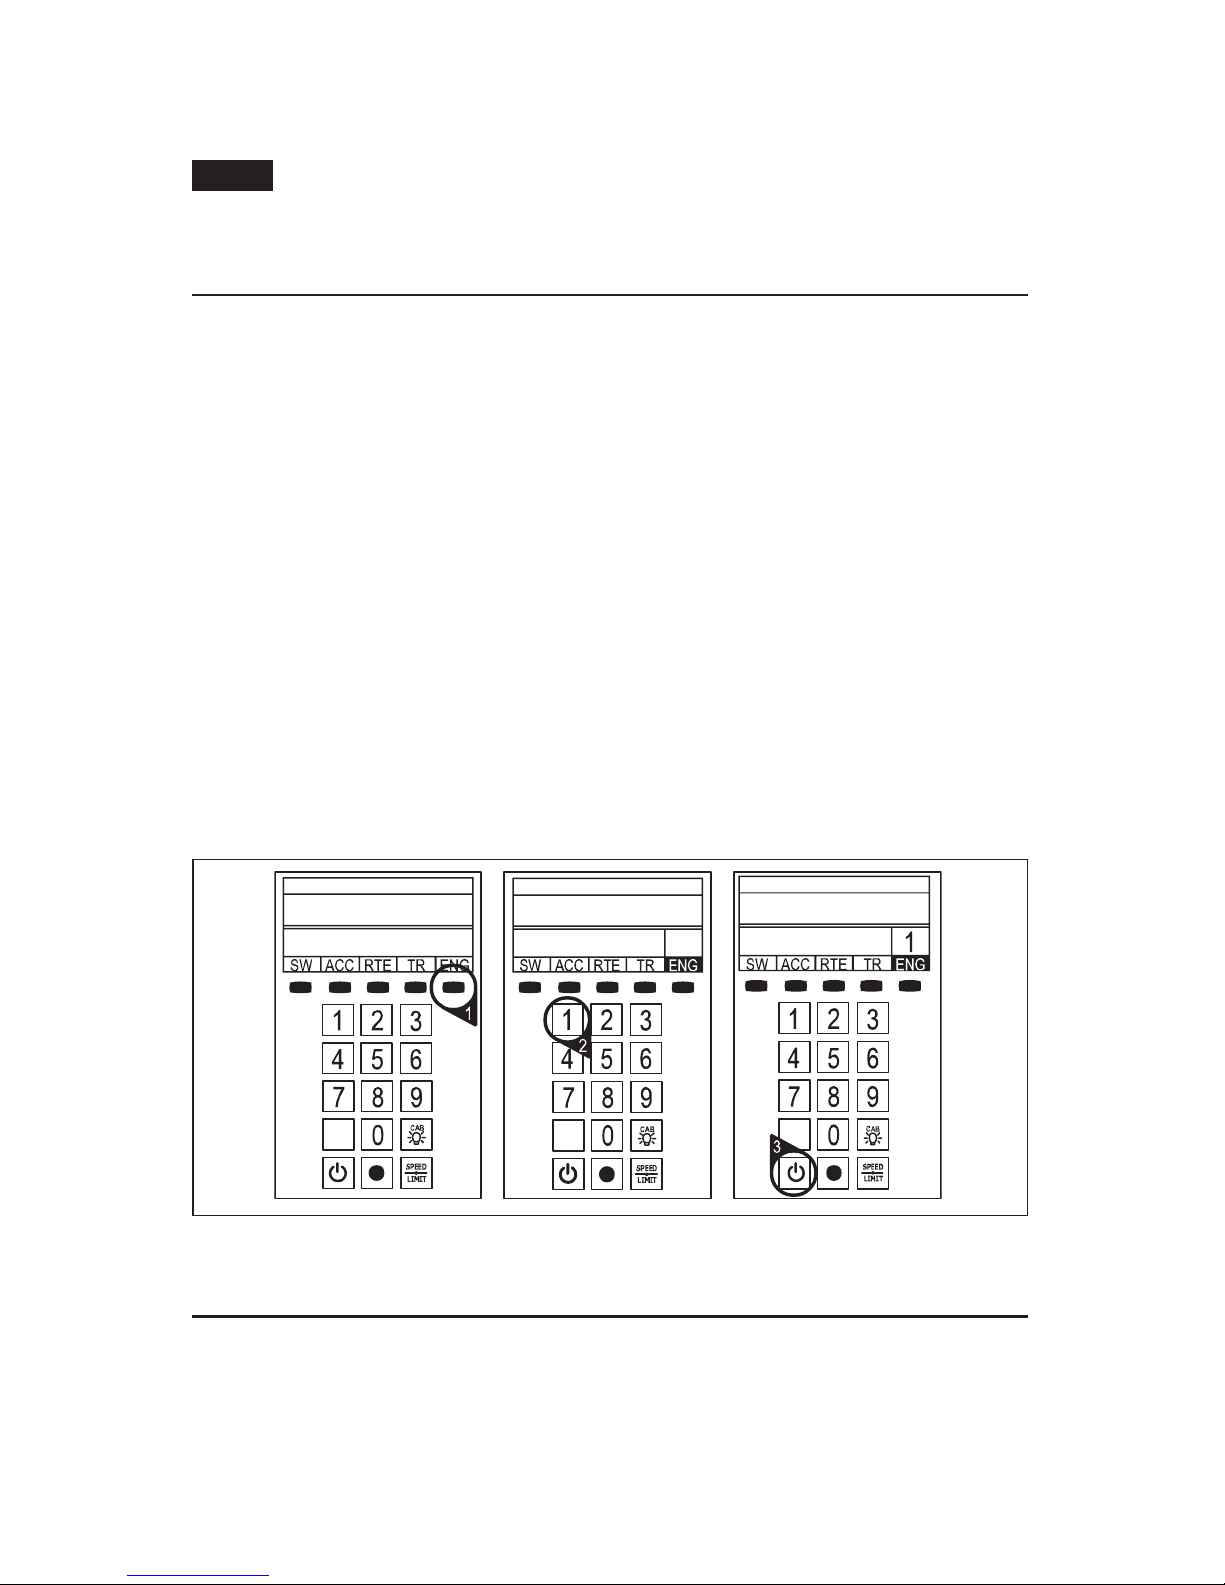
Address Your Engine
First, you must address the engine. This "tells" your CAB-2 which locomotive you want to
control. This is important when you have more than one engine on your layout.
To address an your locomotive set:
1. Press ENG
2. Press 1
3. Press Start Up
See reference numbers 1, 2, and 3
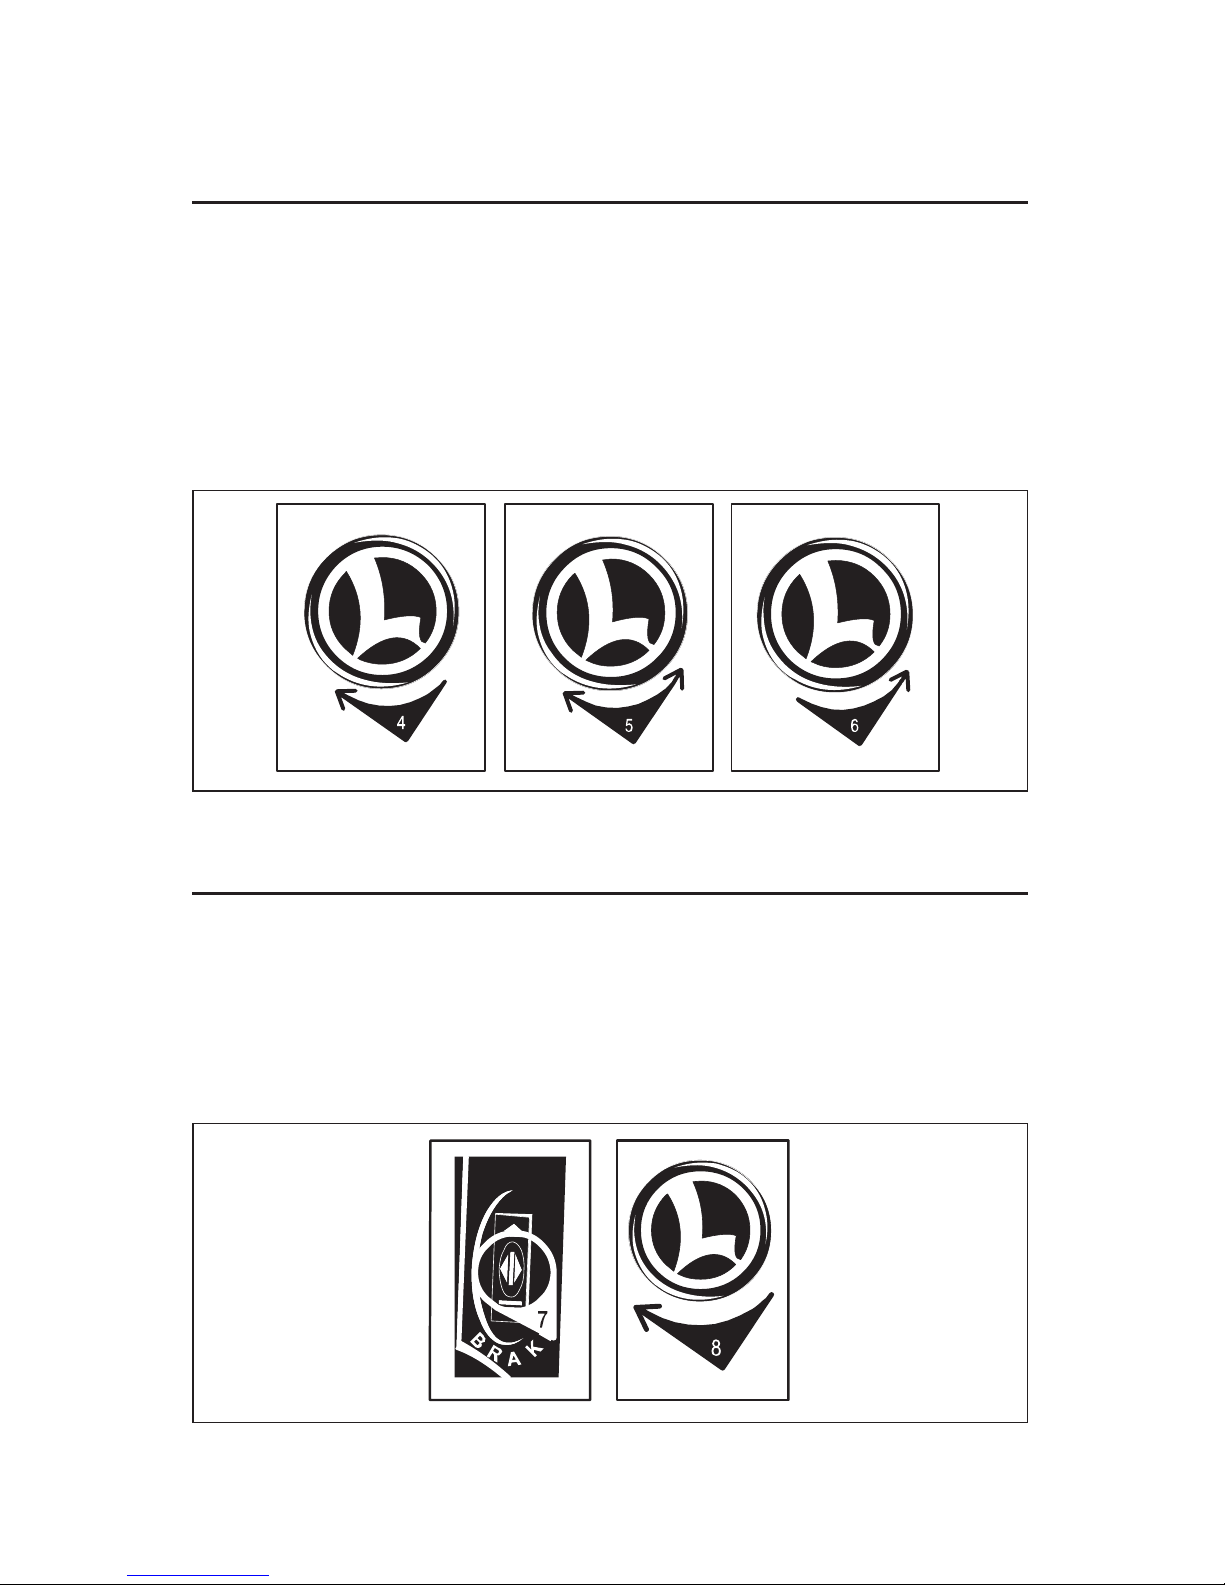
Start 'Er Up
Now it is time to start up your engine's sound system.
To start the engine's Railsounds system, press Start on the touch-screen or any action key
(Whistle, Bell, Velocity Throttle, etc.).
Your engine sound system will start up and the Touch-screen Control Panel will appear.
Note!
6
LEGACY Control System operations
THE VELOCITY THROTTLE
T
he Velocity Throttle (that big red rotary knob in the middle of your Lionel remote) is
used to start your engine moving, slow it down or speed it up. Use it simply by turning it
clockwise (speed up) or counter-clockwise (slow down).
4. Turn the Velocity Throttle clockwise a small amount. Your engine will begin to move.
5. Experiment with the engine’s response to the Velocity Throttle. Turn the Velocity Throttle
clock-wise and counter-clock-wise.
6. Slow and stop your engine by turning the Velocity Throttle counter-clockwise.
See reference numbers 4, 5, and 6
See reference numbers 7, and 8
THE MULTI-CONTROLLER
Direction
The direction of your engine toggles between forward and reverse at the touch of the MultiController.
7. Press the Multi-Controller once. Your engine's lights will change directions.
8. Turn the Velocity Throttle clockwise a small amount. Your Engine will reverse directions
and travel in the opposite direction.

7
LEGACY Control System operations
THE MULTI-CONTROLLER (continued)
Boost & Brake
Boost and brake give you another way to
control the speed of your train. Boost gives your
loco a temporary increase in tractive power, and
returns to the previous speed when you release the
control, while the brake command slows you down
quicker than the Velocity Throttle alone and holds
your speed at the adjusted level.
9. Experiment with Boost and Brake. Notice how
your engine responds to the Multi-Controller.
See reference number 9
THE TRAIN BRAKE SLIDER
A
Train Brake is used to slow down and limit the top speed of your train by adding a load.
The more the Train Brake is applied by pulling the Train Brake Slider down, the more
laboring is heard from the engine. Eventually Train Brake application will slow down the train
and it is even possible to stop a train by pulling the Train Brake Slider all the way down. A
tremendous amount of laboring can be heard whenever you apply the Train Brake in a large
amount.
10. Experiment with the Train Brake. Try a small amount of the Train Brake when your
engine is moving down the rails at a medium speed. Notice the effect the Train Brake has
on sound and speed. Try adding more Train brake and notice that the Train Brake can
limit the top speed available to your engine.
Try adding even more Train Brake and notice that the Engine sounds like it is working
harder and harder as the Train Brake is applied more.
See reference number 10
8
LEGACY Control System operations
THE WARNING SOUND CONTROLLER
W
arning sounds are an important part of Lionel Railroading. Your Lionel Legacy Control
System equipped engines have a real-time variable "quilling" whistle and horn, while
Lionel TMCC engines do not have this feature.
11. Blow the Horn/Whistle by pulling down on the Warning Sound Controller.
12. Try pulling down the Warning Sound Controller various amounts and listen. Notice the
difference in intensity of the Whistle or Horn.
13. Push the Warning Sound Controller up once and quickly release. Notice that the bell rings
once.
14. Push the Warning Sound Controller up and hold it for 1.5 seconds. Notice that the Bell is
sounding continuously.
15. Push the Warning Sound Controller up once. Notice that the continuous Bell stops.
16. Experiment with ringing the Bell in your own rhythm or continuously, depending on how
you push the Warning Sound Controller
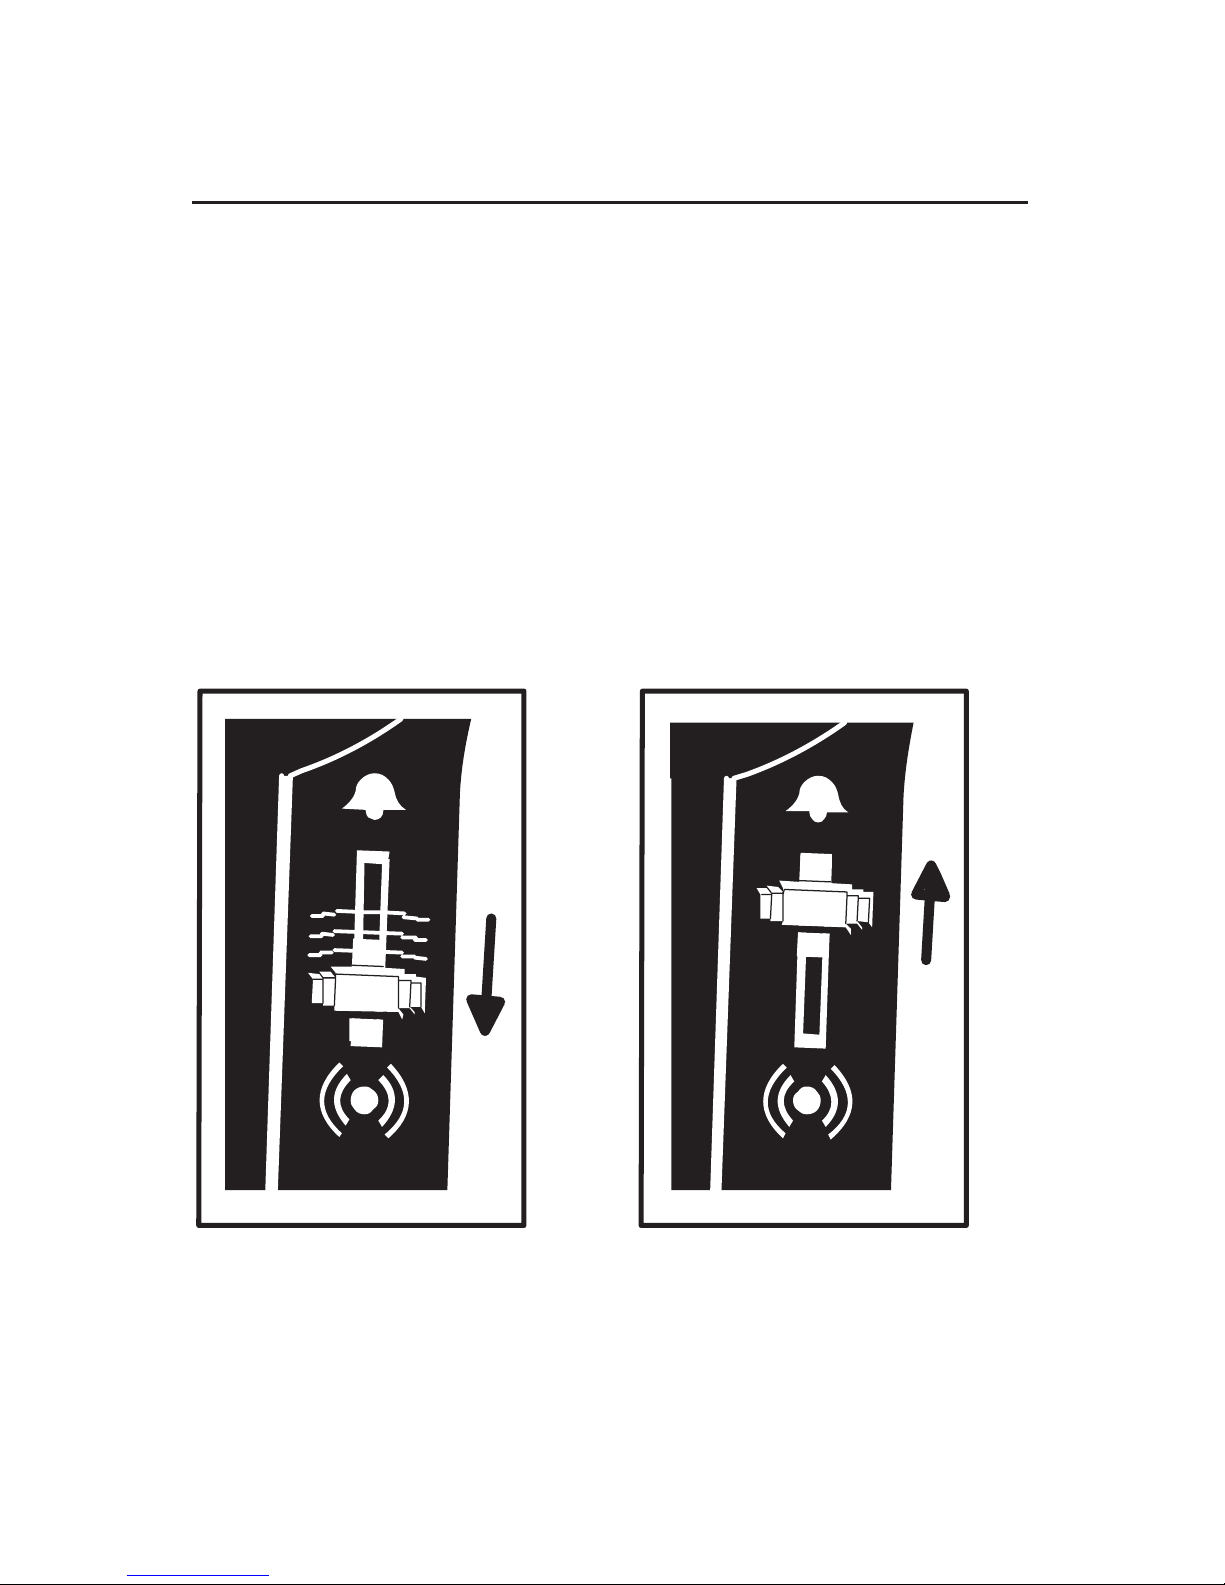
See reference numbers 11, and 12 See reference numbers 13, 14, 15, and 16
9
LEGACY Control System operations
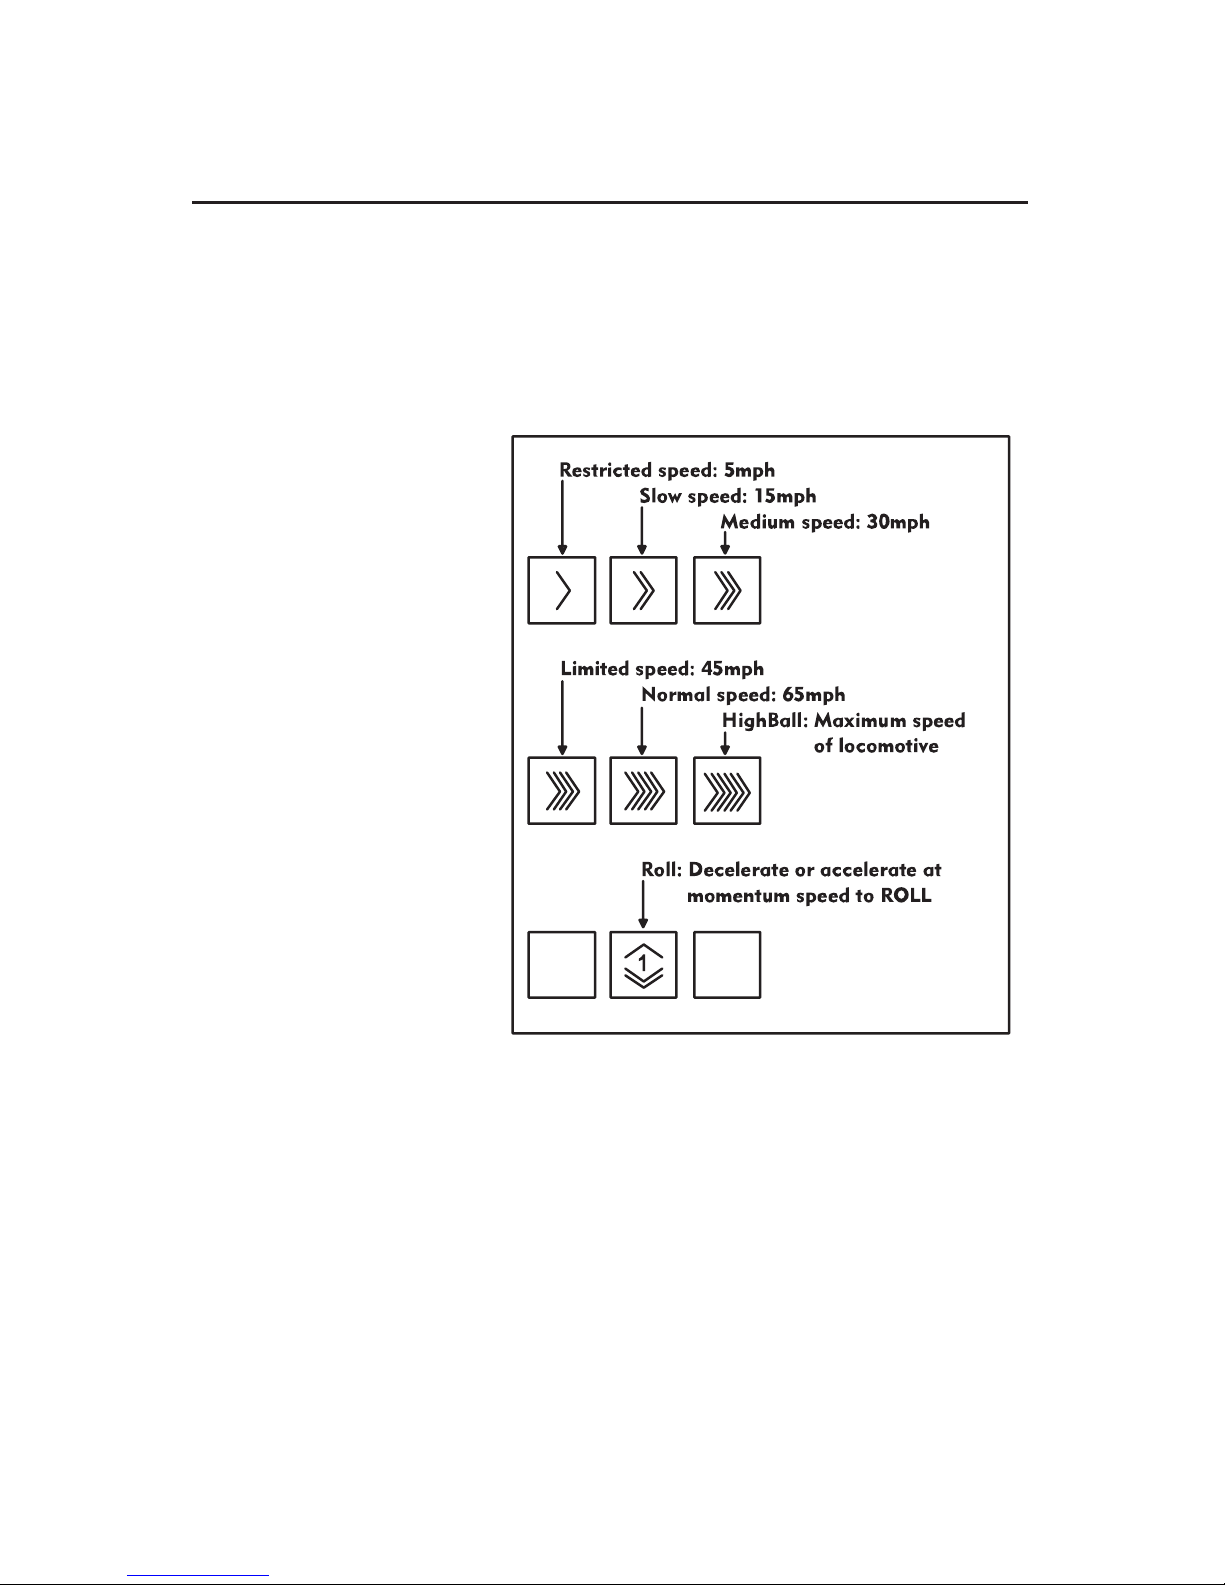
THE SPEED BAR
Selection of Official Rail Road Speeds
T
he Speed Bar is used to select a new touch-screen Icon Control set. This set of touch-
screen keys is used to select official Railroad Speeds. Two additional controls, "High Ball,"
(Top Speed) and "Brake to Roll," (speed step one) are possible with this Touch-Screen set of
controls. Pressing AUX-1 returns you to the standard control panel.
17. Press, hold and release the
RR Speed icons one by one.
Experiment.
18. The speed of the engine
changes with each press and
release of a different RR
Speed key.
19. TowerCom dialog occurs each
time you press and hold a RR
speed key.
20. The Engineer dialog
responds and the speed of the
engine changes as soon as
you release the RR speed key.
21. If you touch a RR speed
key and release it quickly, a
speed change is enabled with
no dialog scene.
22. You can also use the Velocity
Throttle and other action
controls in this mode and
continue to use Official RR
speeds at the same time.
23. Repeat step 17.
24. Press AUX-1 to leave the RR speed mode and return to the standard mode and return to
the standard control panel.
25. Press the speed bar to toggle between the Official RR Speed Control Panel and the
Standard Control Panel.
At this point you know the basics of how to operate. There is a lot of fun waiting as you
experience the interaction of the controls and the touch-screen.
Be sure to read the entire Lionel Legacy Control System Manual to get the most from your
Lionel products.
See reference numbers 17, 18, 19, 20, 21, 22, 23, 24, and 25
10
LEGACY Control System operations
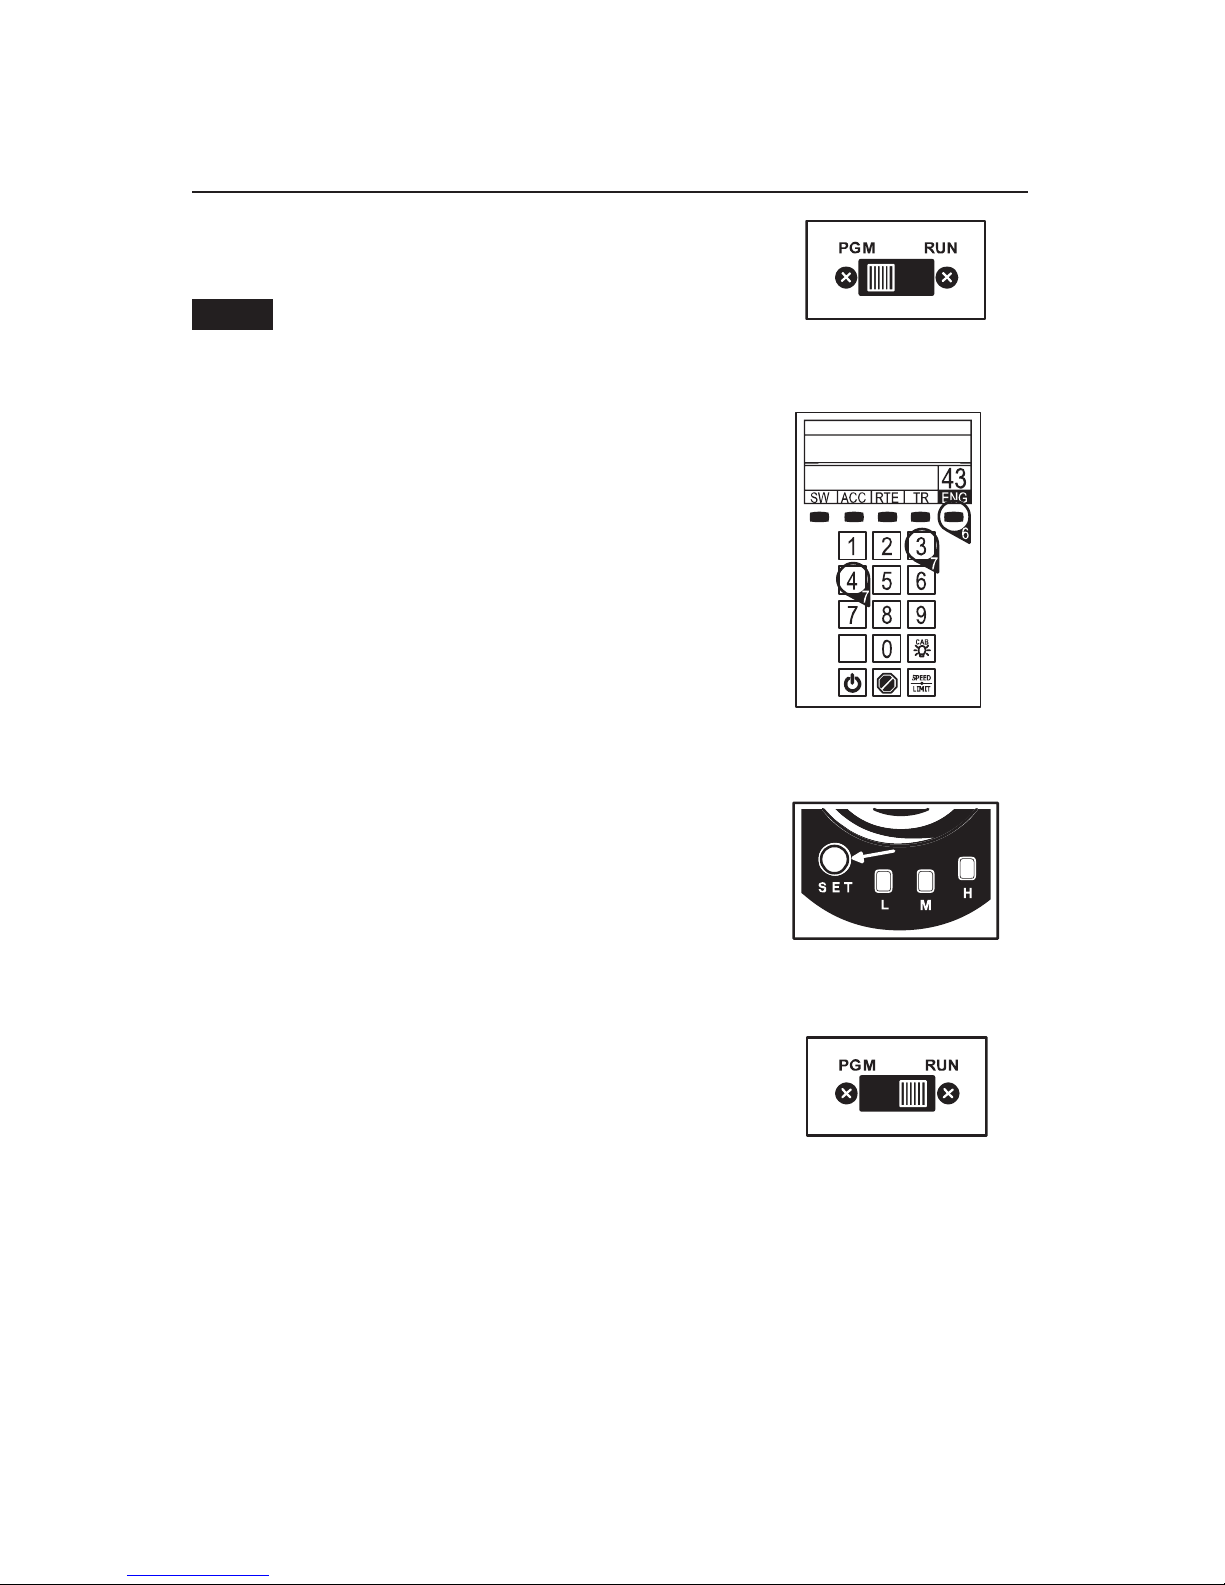
Assigning a new ID# to your locomotives
1. Make sure no other CABs are in use.
2. Slide the engine’s PGM/RUN switch to PGM
Work with only one locomotive at a time.
3. Power down your track.
4. Put the engine on the track.
5. Power up your track.
6. Press ENG on the remote.
7. Enter a unique engine ID# 1 to 99.
8. Press SET.
9. The horn should blow, the headlight pulse, or both.
10. Power down your track.
11. Take the engine off the track (if needed to access the PGM/
RUN switch).
12. IMPORTANT! Slide the engine’s PGM/RUN switch back to
RUN right away.
13. Put the engine on the track (if needed).
14. Power up your track.
15. You are ready to operate.
Note!
See reference numbers 1-5
See reference number 12
See reference numbers 8 & 9
See reference numbers 6 & 7
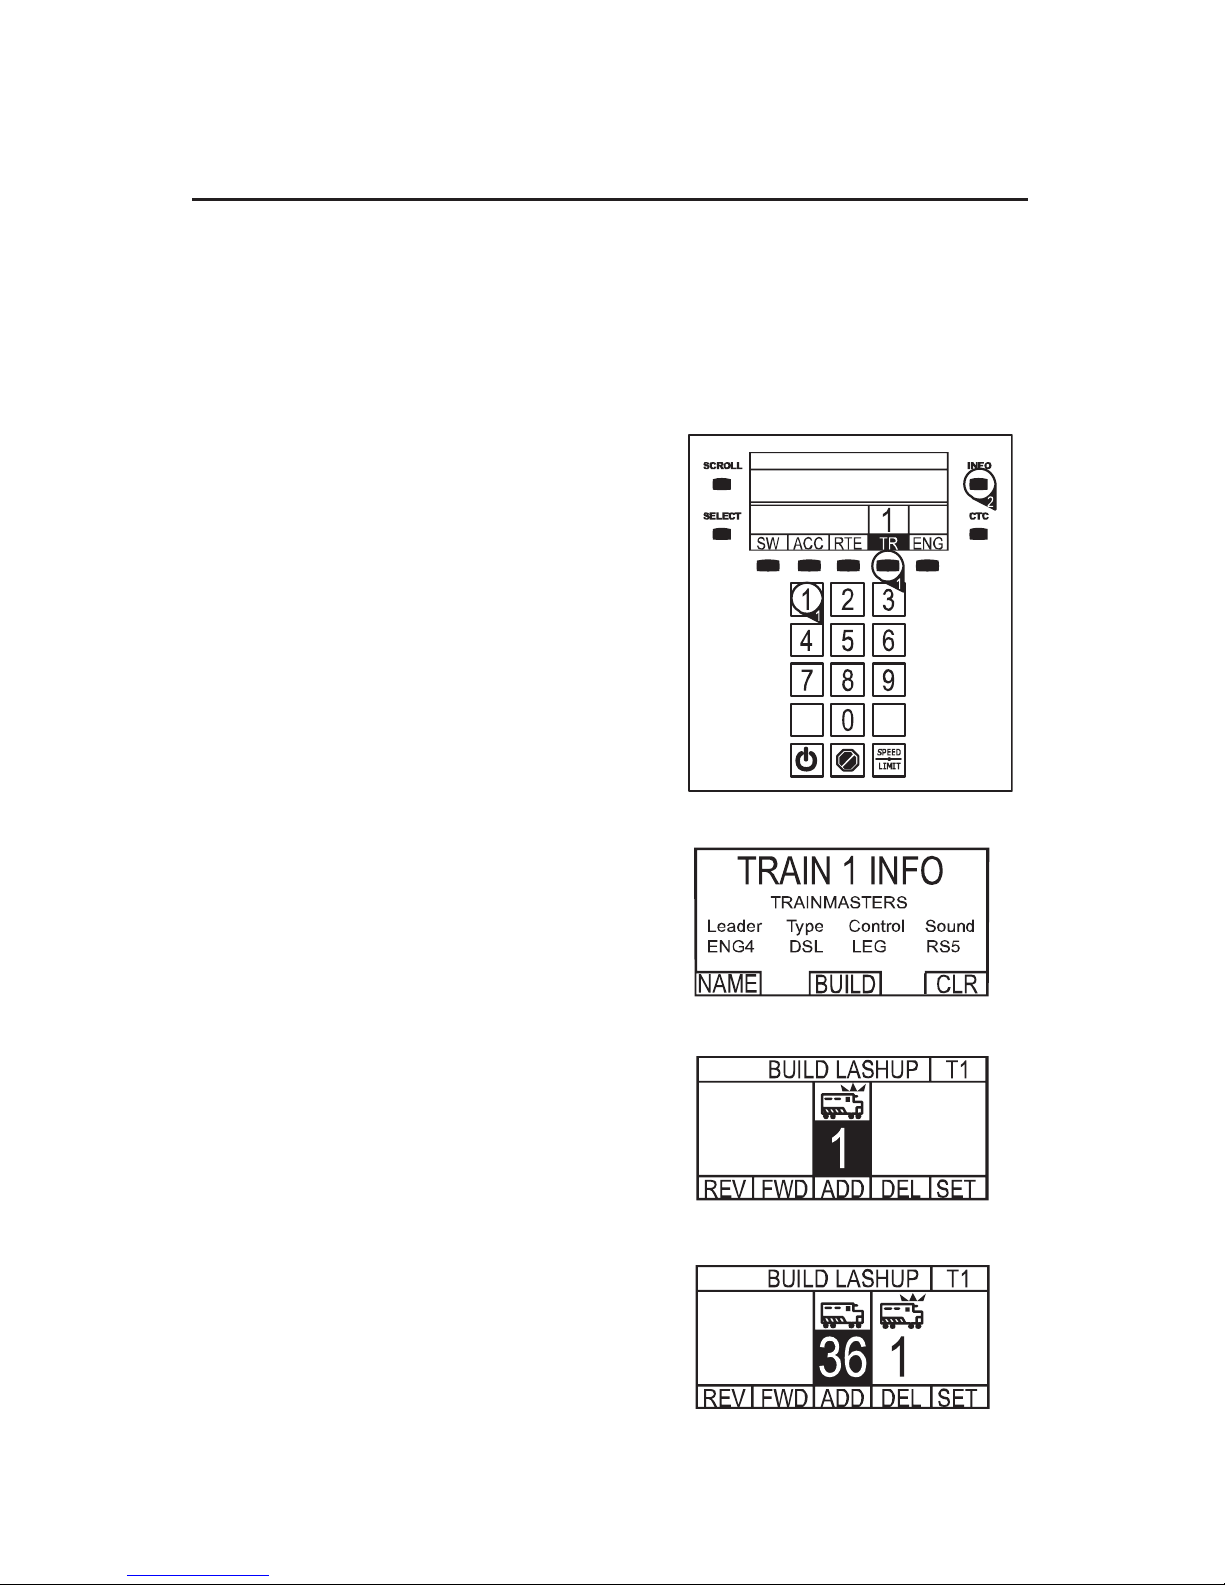
LEGACY Control System operations
Lash-ups
B
uilding a lash-up allows you to control your locomotive set as one in a prototypical
manner. It is still possible to control any of the engines in the lash-up individually. When
you issue a train command, the individual engine you were controlling will return to the
group. If there is a difference in speed, the individual Engine will return to the speed of the
lash-up at the rate set in the train momentum.
To build a lash-up, assign a unique engine (ENG) ID# to each unit. See page 10 for details.
Build a Lashup
1. Address the train ID# you wish to create or
change, 1 to 99.
2. Press INFO.
3. Press BUILD softkey (button directly under
BUILD).
4. Enter the front engine number. It is not
necessary to enter ENG, just enter the #. It will
appear in the blinking box.
5. Press ADD to add the front engine. The engine
will move to the right and the blinking box will
be ready for your next engine to be added.
6. Enter the second engine ID# in the blinking box.
7. Press ADD to add the second engine. The engine
will move to the right and the blinking box will be
ready for your next engine to be added.
8. Add all the engines you want in your lash-up in
this matter.
9. To change the direction of an engine in your lash-
up, turn the Velocity Throttle to move the engine
you want into the blinking box. Then press FWD
or REV to change the direction of the engine.
10. To delete an engine in your lash-up, turn the
Velocity Throttle to move the engine you want to
delete into the blinking box. Then press DEL.
11. To save your lash-up, press SET. Watch the
onscreen prompts and wait until you see the
message TRAIN CREATED.
12. Press CTC to exit to the operating screen.
See reference numbers 1, and 2
See reference number 4
See reference number 3
See reference numbers 6 and 7
11
Locomotive switch function overview
Switch overview
Command Reverse Unit Switch
Used to assign an ID# and reprogram the locomotive in LEGACY and Command operation
when the switch is in the “PGM” position. Also used to “lock” your locomotive in a single
direction, or neutral, in conventional operation when the switch is placed in the “PGM”
position. See pages 19, 20, 21, 36 and 37.
Smoke Unit Switch
Used to turn the smoke unit function “on” and “off”. See pages 36 and 37.
LEGACY RailSounds Sound System Switch
Used to turn the LEGACY RailSounds sound system “on” and “off”. When the switch is in the
“NO SND” postion, the horn and bell are still active. See page 29.
Odyssey II Speed Control System Switch
Used to turn the Odyssey II Speed Control System “on” and “off”. See pages 23 and 26.
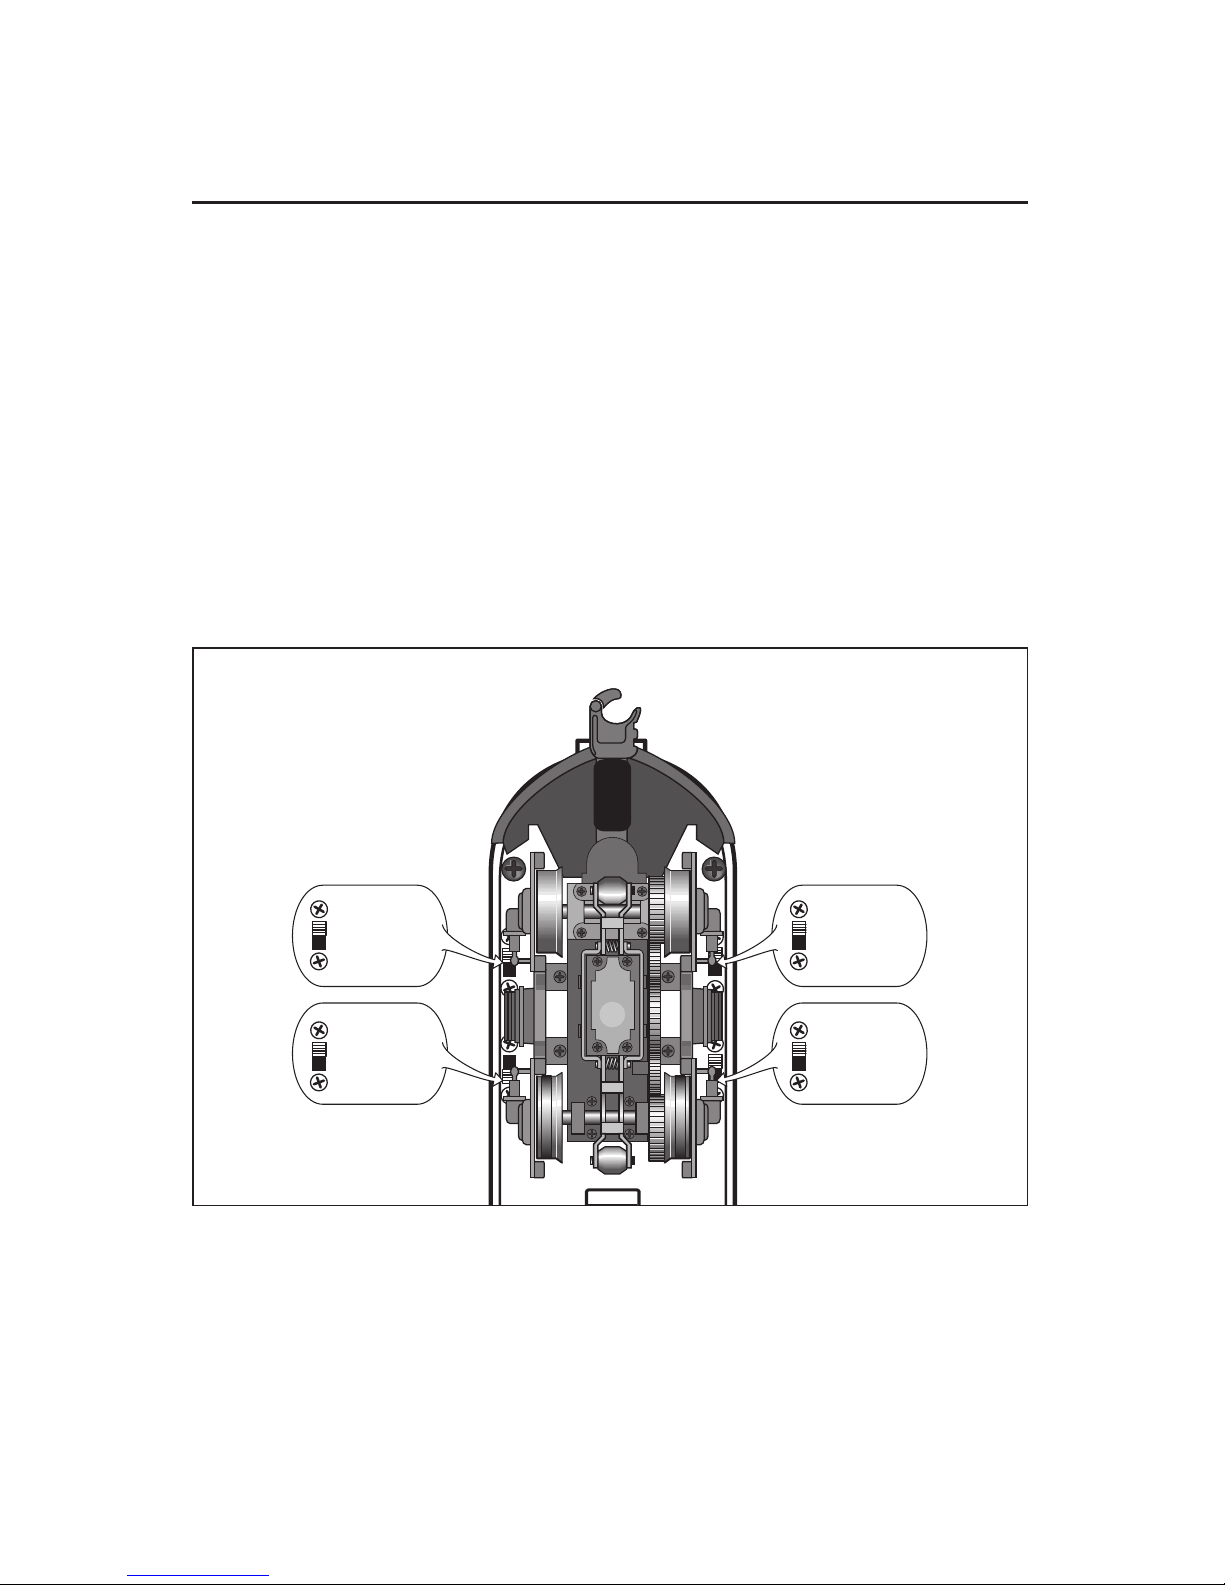
12
RUN
PGM
SMK
NO SMK
SND
NO SND
ODY
NO ODY
Figure 1. Switch locations
Smoke unit switch
Command reverse
unit switch
LEGACY RailSounds sound
system switch
Odyssey II Speed Control
System switch
FRONT
Powered A-unit
 Loading...