

Lionel Dash 9 Owner's Manual
Instructions Included to Upgrade
your Dash 9 with These available Kits,
Railsounds: part No. 6- 22964
Command Control: part No. 6-22960
Electrocouplers: part No. 6-22958
71-8233-250
01/99
LIONEL
I
N
S
T
R
U
C
T
I
O
N
S
H
E
E
T
Lionel Dash 9
Diesel Locomotive
Owner’s Manual

2
2
Table of contents
Transformer operations
Running your Dash 9 with a Lionel transformer 3
Using your Dash 9’s magnetic couplers 4
A note on Magne-Traction 4
Experiencing the range of your Dash 9’s Signalsounds 4
Your Dash 9’s 104E reverse units operation 5
Installing the Lionel no. 610-5906-001 sound activation button 6
Maintaining and servicing your Dash 9
Lubricating your Dash 9 7
Lubricating your Dash 9’s Pullmor motor armatures 7
Replacing your Dash 9’s lamps 8
Attaching the snowplow and hydraulic hose parts 8
Upgrades to your Dash 9
Railsounds upgrade 9
Your Dash 9’s Railsounds™system—the basics 10
Notes on Railsounds
™
10
Experiencing the range of your Dash 9’s Railsounds™system 11
CommandControl upgrade 12
Coilcoupler upgrade 13
Ocillating ditch lights upgrade 13
TrainMaster®Command operations
The Command™control environment 14
Running your Dash 9 in the TrainMaster®Command environment 15
CAB-1 commands for your Dash 9 15
CAB-1 numeric keypad commands for your Dash 9 16
Tuning your Dash 9’s performance 17
Assigning your Dash 9 a new ID# 18
Reprogramming LCRU circuit boards to restore or change features 19
Lionel Service 20
• Two powerful Lionel Pullmor
®
motors
• Lionel electronic reversing unit
•SignalSounds horn and bell
• Magne-Traction
®
• Die-cast magnetic couplers
• Iluminated headlights and interior
• Iluminated ditch lights
•Upgrade Ready
Y
ou purchased a tough, durable
legendary locomotive—the Dash 9
diesel locomotive built here at Lionel. From
the crisp detail and expert decoration on the
outside to the brute power under the hood,
the Lionel Dash 9 is ready for duty on your
model railroad. Experience the superiority
of today’s Lionel. Your Dash 9 is also
upgradable to include the latest Command
Control and Railsounds features
Congratulations!
3
3
Running your Lionel Dash 9 with a Lionel transformer
Transformer operations
Place your Dash 9 locomotive on Lionel or Lionelcompatible O gauge track.
• Note the pull of Magne-Traction between your Dash 9 and the
steel track. Magnetized wheels and axles increase your pulling
power (more than 25 cars on straight and level track) and keep
your Dash 9 on track while passing swiftly through curves.
2
2
Power up your Dash 9 with your transformer.
• Your Dash 9 is designed to operate on 10-16 volts alternating current. Virtually all Lionel and Lionel-compatible alternating-current
transformers are suitable.
• D
O NOT POWER YOUR DASH 9 WITH DIRECT CURRENT (DC). Damage
to sensitive electronic components may occur.
• When you first power up your track, your Dash 9’s headlights
will illuminate. At this point, the locomotive is in neutral. This
occurs when placing the Dash 9 on your railroad for the first time.
When your train is first powered up, the default state will be neutral and the default direction is forward. This means whenever
you power up your engine the engine will remain in neutral, and
when the power is removed and again applied, the train will
move forward. This condition holds true if the engine is being
powered up for the first time or if the engine has been powered
down longer than five seconds.
Note!
3
3
Move ‘em out!
• Get your Dash 9 moving. Press the DIR button on your CAB-1
remote or Lionel transformer. This sequences the Lionel 104 E
reverse unit to the next operating state. The 104 E unit alternates
between three states: forward, neutral, and reverse.
• Adjust track voltage until your Dash 9 moves at your desired
speed. To increase speed, increase track voltage. To decrease
speed, reduce voltage. To stop the locomotive, cut track power.
• See table on page 5 for information on locking your Dash 9 in a
single operating state
1
1

4
4
Transformer operations
A note on Magne-Traction
Y
our Dash 9 is equipped with
Lionel Magne-Traction, magnetized wheelsets and axles that help
increase tractive effort during operation. Because the wheelsets are magnetized, take care to prevent small
metallic objects from attaching to the
wheel sets and working their way
into the Dash 9’s motor assembly.
They can damage your locomotive.
Magne-Traction is not effective
on nonferrous track.
Note!
Y
our Lionel Dash 9 is equipped
with operating magnetic knuckle
couplers, a revolutionary design first
introduced by
Lionel in 1945.
Lionel magnetic
couplers react to the
magnetic field generated by a Lionel
remote-control
track section (available separately).
Place your locomotive’s coupler trigger disc
over the central
coil of a remote-control track section
and press U
NCOUPLE on the controller.
The magnetic
field pulls the disc
downward, and the knuckle opens.
One operating
technique favored
by Lionel railroaders
is the “moving
uncouple.” Press the
U
NCOUPLE button as
the
Dash 9
passes
over a remote-control section. The
magnetic field will
open the coupler; the
consist remains
behind as the locomotive moves on.
But be careful—the
speed of a newly uncoupled and moving
locomotive can increase dramatically.
Position your Dash 9’s trigger disc over
the remote-control section, then press
“uncouple.” The coupler opens.
W
ith SignalSounds, you experience
the sounds of real railroading
like never before. Simply put, it delivers
realistic, and authentic sounds to your
model railroad. To adjust the volume of
signalsounds see page 10 for location of
adjustment knob
• Diesel Horn. Press horn to produce
an authentic diesel horn blast.
• Mechanical bell. Press BELL on your
CAB-1 or transformer to begin the
effect; again to discontinue.
Experiencing the range of your Dash 9’s SignalSounds system
Using your Dash 9’s magnetic couplers
Summary Table of Engine Directions
Condition Direction Change Cycle
Case #1: First power up or without power longer than 5 sec.
E unit off (switch in PROGposition) N, F, N, F, etc.
E unit on (switch in RUN position) N, F, N, R, etc.
Case #2: Engine without power for less than 2.5 seconds
E unit off (switch in PROGposition) N, Last-Dir, N, Last-Dir, etc.
E unit on (switch in RUN position) N, F, N, R, etc.
With your 104 E reversing unit, position-
ing the switch in the PROG position locks
your engine into its last moving direction
plus neutral. Positioning the switch in the
RUN position resumes normal sequencing
operation.
Your Dash 9’s 104 E Reverse unit
The New E-Series Reversing Unit controls the direction of the engine. When
the reversing unit senses an interruption
in track power, it will cycle into the next
direction in the sequence. The sequence
is neutral, forward, neutral, reverse....
Track power interruptions are created
using the direction control on your
transformer or Cab-1, or by turning the
throttle to zero.
When power is first applied (or after a
5 second power interruption), the
engine will power up in neutral, always
before forward. A single press of the
direction button will set your engine in
forward motion. This will help eliminate unexpected start ups, derailments,
and crashes. Listed in the table below is
the direction sequence pattern that your
104 E unit will follow under the given
conditions.
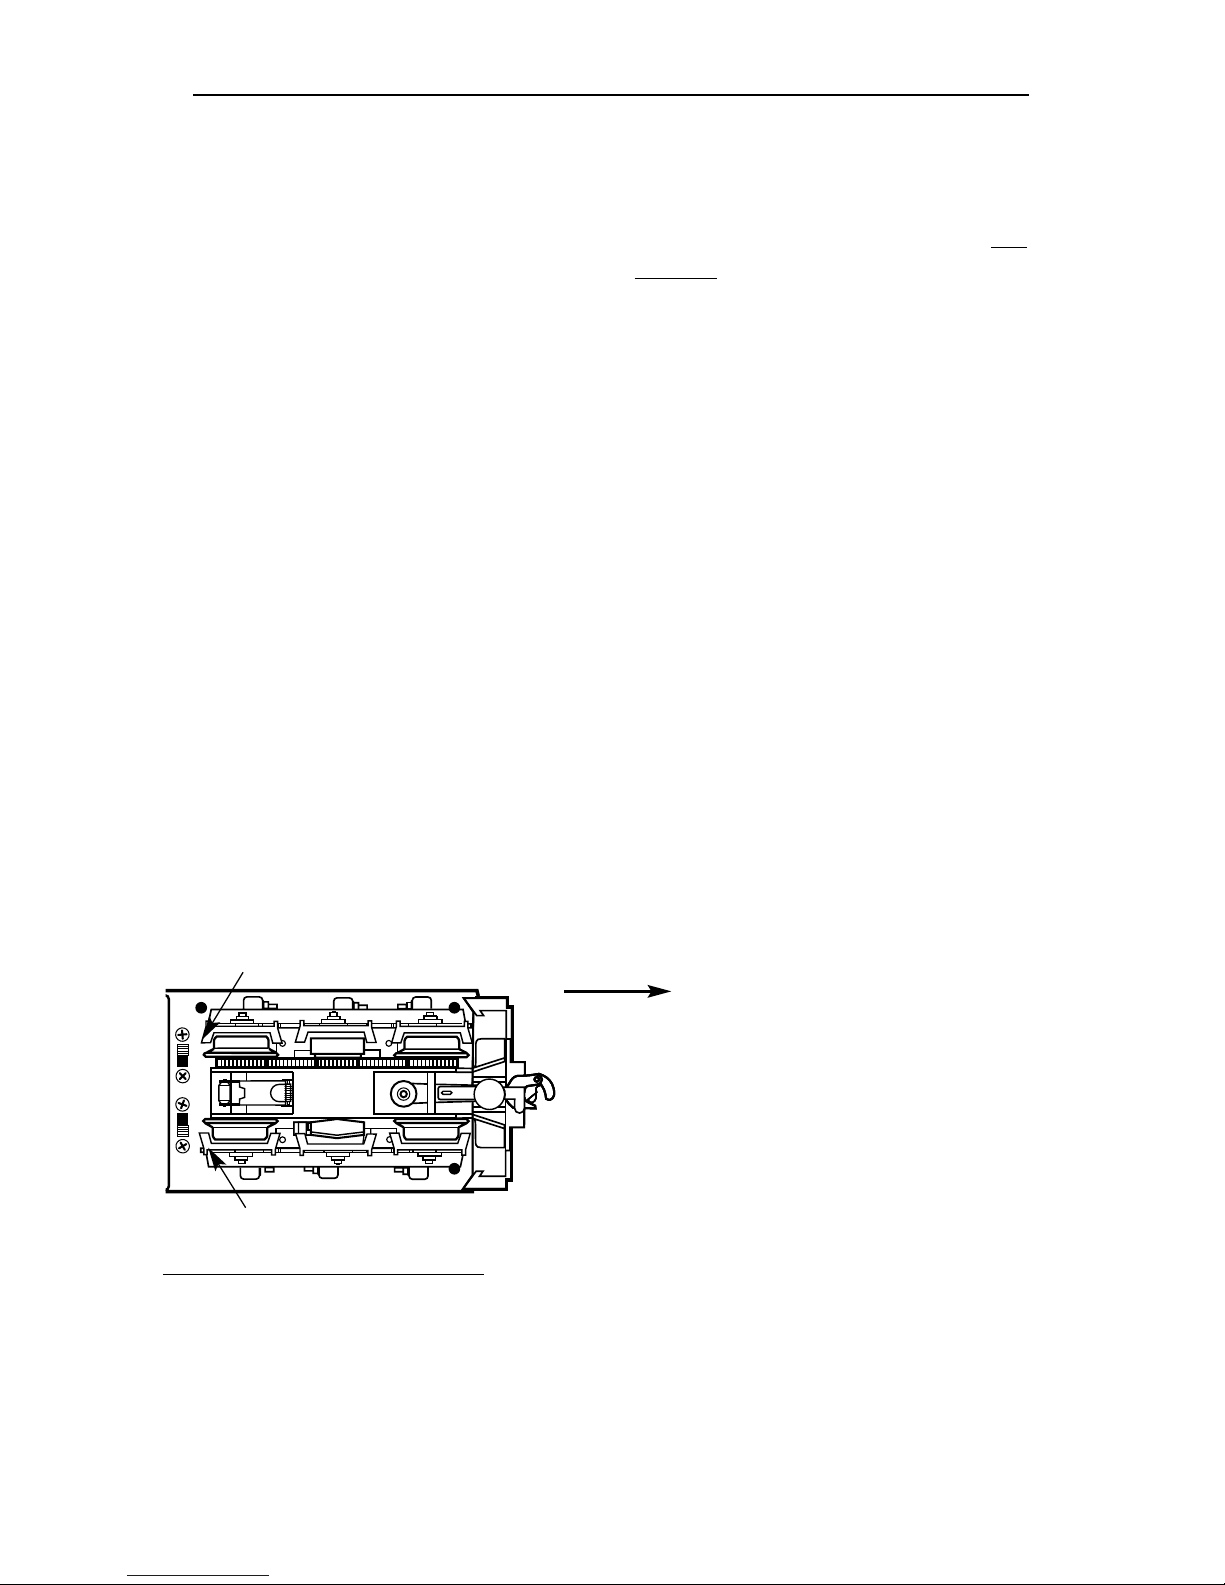
As always, a lockout switch is included to deactivate the 104 E’s sequencing
function. (for switch location see illustration below) A new feature is that now
you will have a neutral available even
when the reversing unit is “off”. In
addition, you no longer have to slow the
engine by hand to turn off the reversing
unit while the train is moving. Simply
stop the engine, and throw the switch.
The 104 E unit will be locked into its last
moving direction, plus neutral. Even
simpler, just put the switch in the
“PROG” position and keep power off
for 5 seconds. When you start, you will
be locked in neutral/forward. If you
want to lock your engine in reverse for
any length of time, it is recommended
that you reverse the spade connections
(blue and yellow) on the top of the
motors (see page 7). Otherwise, your
“reverse” lock will become a “forward”
lock after any 5 second power off.
NOTE: Due to limitations of the electronic components, it is hard to predict
how each engine will function when
power is interrupted between 2.5 seconds and 5 seconds. Engines will function either as in case #1 or case #2. This
solely depends on the tolerances of the
installed electronics and is not affected
or caused by your power supply.
5
5
Reverse unit control switch
Railsounds
ON/OFF switch (has no function until Railsounds upgrade is installed).
FOR
PGM
OFF
ON
FRONT OF ENGINE
Underside
of Dash 9

6
6
Transformer operations
Installing the Lionel no. 610-5906-001 sound activation button
T
o operate the bell and horn sounds
when operating your Dash 9 with
conventional transformers, you’ll need to
install the Lionel no. 610-5906-001 sound
activation button (available separately).
Connect the button(s) as shown below.
For AC transformers lacking a horn/whistle button (two no. 5906s required)
Lionel no. 610-5906-001
sound activation button
for activating the bell
Lionel no.
610-5906-001
sound activation button
(for horn)
Lionel no.
610-5906-001
sound activation button
(for bell)
Black wire
Red wire
Red wire
ATTACH TO GROUND TERMINAL
ATTACH TO POWER TERMINAL
TO YOUR TRANSFORMER
The no. 610-5906-001 sound activation button (available separately)
works with any Lionel AC transformer except no. 6-4690 Type MW.
Transformers made by other manufacturers may not be compatible
with Railsounds.
Note!
ATTACH TO GROUND TERMINAL
ATTACH TO POWER TERMINAL
Red wire
TO YOUR TRANSFORMER
C
USTOMER’S WIRE
BLACK WIRE
Note!
All track power must
feed through “Sound
Activation Button”
Do not bypass button
For AC transformers with a horn/whistle button
 Loading...