

Lionel Baldwin Sharknose Diesel Locomotive Set, E8 A-A, E9 A-A, F7 A-A, F3 A-A Owner's Manual
Featuring
73-4701-250
2/12
Lionel
Baldwin Sharknose
Diesel Locomotive Set
Owner’s Manual
Lionel
Baldwin Sharknose
Diesel Locomotive Set
Owner’s Manual

2
Congratulations!
C
ongratulations on your purchase of this Lionel LEGACY diesel locomotive set! On the outside,
this locomotive set features numerous details and expert decoration in your favorite livery.
Inside the body, this locomotive set is equipped with some of the most advanced sounds and controls
in model railroading. This powerful locomotive set is ready for duty on your layout.
The following Lionel marks are used throughout this catalog and are protected under law. All rights
reserved.
Lionel®, LEGACY™, FasTrack™, TrainMaster®, Odyssey®, RailSounds®, CrewTalk™, TowerCom™,
DynaChuff™, StationSounds™, Pullmor®, ElectroCoupler™, Magne-Traction®, CAB-1® Remote
Controller, American Flyer®, Lionel ZW®, ZW®, MagniVision®, TMCC®, Lionelville®, Wireless
Tether™, Powerhouse™, LionMaster®, Conventional Classics™, Postwar Celebration Series™,
TruRail™, PH-1 Powerhouse®, Powermaster®, Powerstation-Powerhouse®, Accessory Motor
Controller™, AMC™, Accessory Switch Controller™, ASC™, Action Recorder Controller™, ARC™,
Track Power Controller 300™, TPC 300™, Track Power Controller 400™, TPC 400™, Block Power
Controller™, BPC™, Operating Track Controller™, OTC™, FatBoy™, Lionel Lines®, Joshua Lionel
Cowen Series™, Lockon®, TrainSounds™, MultiHorn™, MultiHorn™, Choo-Choo™
Contents of your locomotive set boxes
1 Powered locomotive
1 Non-powered locomotive
4 Replacement traction tires
1 Owner's manual
1 Engine memory module (powered A unit only)
1 Smoke fluid funnel

3
Table of contents
Running your locomotive set
LEGACY Control operations 4
TrainMaster Command Control (TMCC) operations 5
Conventional transformer operations 6
Locomotive set basics
Adding smoke fluid to your locomotive set's smoke generators 7
Locomotive set switch locations 8
Installing the battery in the powered A-unit 9
Assigning your locomotive set a new ID# (LEGACY and TMCC) 10
Lash-ups (for LEGACY operation only) 11
LEGACY Control System operations
The LEGACY CAB-2 Remote Controller 12
The Velocity Throttle 13
The Multi-Controller 13
The Train Brake Slider 13
The Warning Sound Controller 14
The Speed Bar 14
EFX Trim and EFX Bar Graph 15
Leaving the Preset Speed Screen 15
LEGACY RailSounds Sound System operations
LEGACY RailSounds sound system 16
LEGACY RailSounds Sequence Control 17
CrewTalk dialog and TowerCom announcements in the LEGACY
environment 18
LEGACY RailSounds sound system dialog on a round trip 19
TrainMaster Command Control operations
CAB-1 Remote Controller commands 20
CAB-1 Remote Controller numeric keypad commands 21-22
Setting the smoke level 22
Conventional transformer operations
Using the LEGACY RailSounds sound system in the conventional
environment 23
Activating CrewTalk dialog and TowerCom announcements 24
Locking your locomotive set into a single direction 25
Odyssey II Speed Control system operations
Odyssey II Speed Control operations 26
Odyssey II Speed Control LEGACY Control operation 26
Odyssey II Speed Control TrainMaster Command Control operation 26
Odyssey II Speed Control conventional transformer operation 26
Maintaining and servicing your locomotive set
Reprogramming your locomotive set to restore features 27
Lubricating your locomotive set 28-29
Servicing your locomotive set’s LEDs 30
Replacing the traction tires 30
Locomotive set diagnostics 31
Lionel Warranty 32
4
Power your locomotive set with an alternating-current (50-60Hz AC) transformer only.
Powering your locomotive set with a direct-current (DC) transformer, or in excess of
19 volts AC, may result in damage to sensitive electronic components.
Your locomotive set requires Lionel or Lionel-compatible O-36 or larger track curves.
Both of the locomotives in this set are factory programmed as ENG 1.
1. Turn off track power, and then plug in the
LEGACY Base and connect it to the track.
2. Place your locomotive set on the track.
3. Increase track power voltage to full power (no
more than 19 volts AC). If a circuit breaker trips
when you turn on the Lionel power supply, check the
wheels of your locomotive set to make sure they are all
securely on the track. Check to make sure the track is free
of all metals that may cause a short circuit.
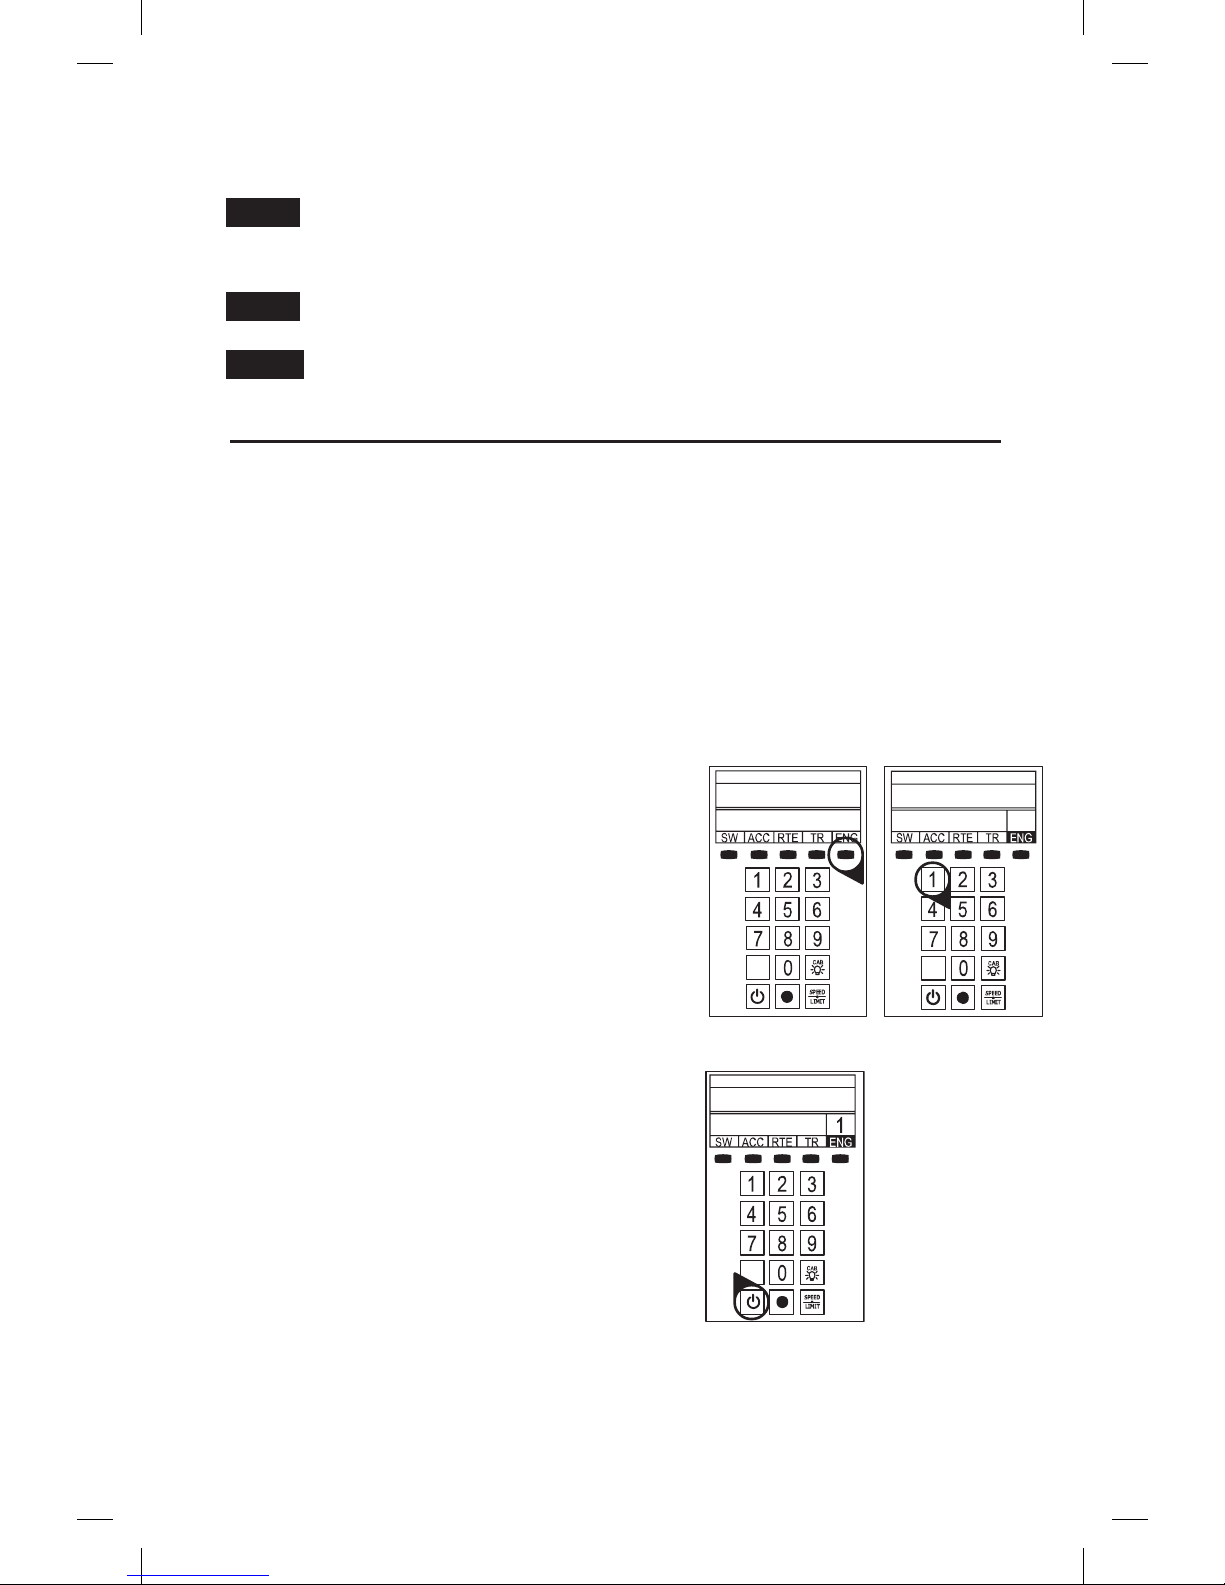
4. As illustrated in Figure 1, press ENG and 1
(or your selected ENG ID#) to address the
locomotive set with your LEGACY CAB-2 Remote
Controller.
5. Press the Start Up button on your LEGACY
CAB-2 Remote, shown in Figure 2. Then,
throttle up and move 'em out! Your engine sound
will start up, and the locomotive set-specific touch screen
buttons will populate the remote. For more information
on operating your locomotive set with the LEGACY
system, please refer to the LEGACY section of this manual.
Additional information is also found in the LEGACY
System Manual, available online at www.lionel.com.
.
Note!
Note!
Running your locomotive set
Figure 1. LEGACY engine selection
Figure 2. LEGACY start-up
LEGACY Control operations
F
or the finest operating experience, your locomotive set is fully compatible with the LEGACY
Control System. To operate in LEGACY mode, you need a LEGACY Command Base and LEGACY
CAB-2 Remote Controller (6-14295).
Your commands are sent by the CAB-2 Remote Controller to the Command Base, which sends
a digital code through the rails to your locomotive set. Your locomotive set will not respond until it
recognizes its unique ID#, so you can operate multiple Command-equipped locomotive sets on the
same track at the same time.
Note!
5
Running your locomotive set
Power your locomotive set with an alternating-current (50-60Hz AC) transformer only.
Powering your locomotive set with a direct-current (DC) transformer, or in excess of
19 volts AC, may result in damage to sensitive electronic components.
Your locomotive set requires Lionel or Lionel-compatible O-36 or larger track curves.
Both of the locomotives in this set are factory programmed as ENG 1.
TrainMaster Command Control (TMCC) operations
F
or operation in the TrainMaster Command Control environment, you need a TrainMaster
Command Base (6-12911) and a CAB-1 Remote Controller (6-12868). Refer to your TMCC
System Manual for complete information. To access all the locomotive's features, you
must operate in the LEGACY environment, as discussed on the previous page.
Your commands are sent by the CAB-1 Remote Controller to the Command Base, which
translates the command into digital code. That code is sent through the outside rails to your
locomotive set, which will not respond until it recognizes its unique ID#. TrainMaster Command
Control gives you the power to operate multiple Command-equipped locomotive sets on the same
track at the same time.
1. Turn off track power, and then plug in the Command Base and connect it to the
track.
2. Place your locomotive set on the track.
3. Increase track voltage to full power (no more than 19 volts AC). If a circuit
breaker trips when you turn on the Lionel power supply, check the wheels of your locomotive set
to make sure they are all securely on the track. Check to make sure the track is free of all metals
that may cause a short circuit.
4. Press ENG and 1 (or the ENG ID# you set) to address your locomotive set with
your CAB-1 Remote Controller.
5. Throttle up and move ‘em out.
For more information, please refer to the TrainMaster Command Control operations section of
this manual or the TMCC System Manual, available online at www.lionel.com.
Note!
Note!
Note!
6
Running your locomotive set
Conventional transformer operations
For Conventional operation, a Command Base must not be powered up anywhere in
the area, even if it is not connected to the track. If a base is detected, your
locomotive set will default to Command mode.
Power your locomotive set with an alternating-current (50-60Hz AC) transformer only.
Powering your locomotive set with a direct-current (DC) transformer, or in excess of
19 volts AC, may result in damage to sensitive electronic components.
Your locomotive set requires Lionel or Lionel-compatible O-36 or larger track curves.
1. With track power off, place your locomotive set on the track.
2. Power up the track. If a circuit breaker trips when you turn on the Lionel power supply,
check the wheels of your locomotive set to make sure they are all securely on the track. Check to
make sure the track is free of all metals that may cause a short circuit.
3. Move ‘em out! When the locomotive set’s headlight illuminates and the LEGACY RailSounds
sound system starts, press the DIRECTION button on your transformer to sequence your
locomotive set through the repeating pattern of operations: neutral, forward, neutral, reverse,
neutral, and so on. You may also briefly turn off track power to advance the locomotive set to
the next operating state. Adjust the throttle until your locomotive set moves at your desired
speed.
When placing your locomotive set on your layout for the first time and after power
interruptions lasting longer than five seconds, it will start out in neutral.
We recommend that you operate your LEGACY locomotive set with Odyssey
II Speed Control turned on. You may choose to operate your locomotive set without speed
control by placing the Odyssey II Speed Control System switch to the NO ODY position. See Figure 4
on page 8 for the location of the switch.
Use the HORN and BELL buttons on your transformer to activate those features. Adjust the
volume using the volume control knob, which is located under the rear rooftop hatch on the
powered unit. Refer to Figure 4 on page 8. For more information, please refer to the Conventional
transformer operations section of this manual.
Note!
Note!
Note!
Note!
7
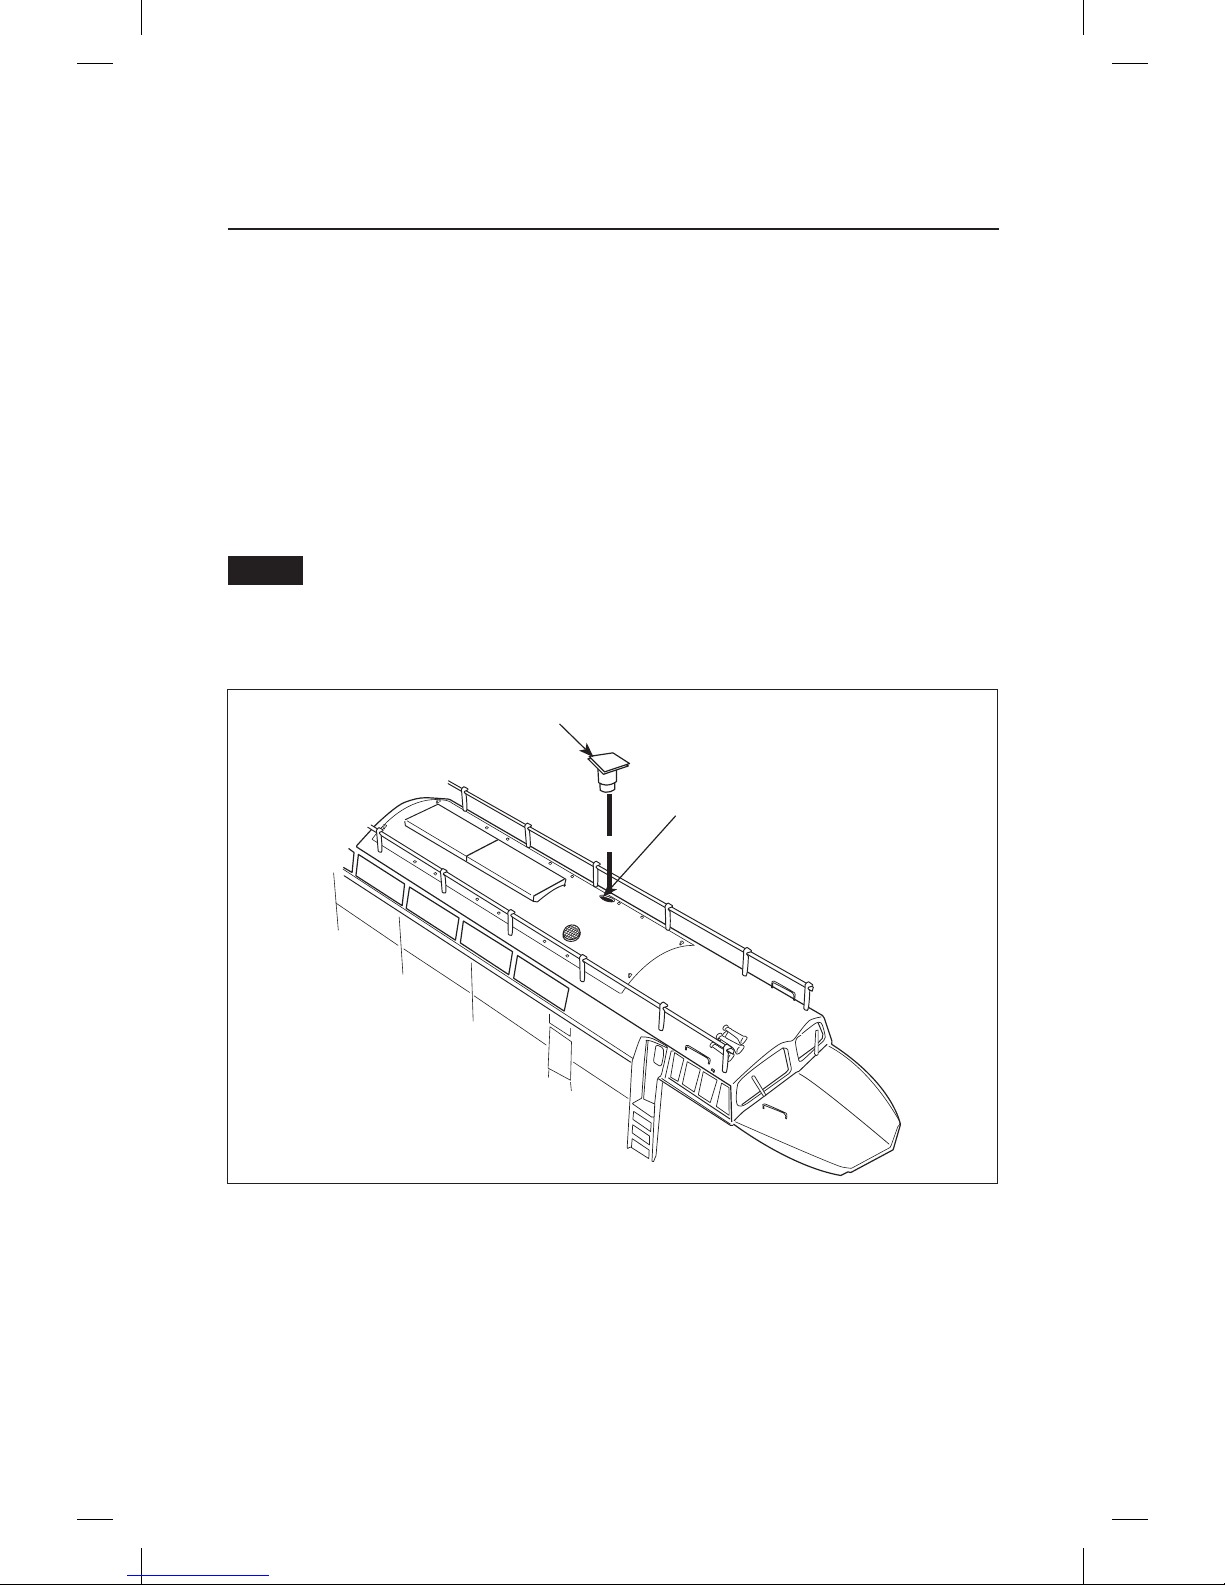
Locomotive set basics
B
oth locomotives are equipped with a smoke generator that produces safe, clean, white smoke
during operation. Add 10-20 drops to the duct (shown in Figure 3) to prime the units the first
time you run the locomotive set or after being stored for an extended period of time, and then add
10 to 20 drops to refill when smoke production decreases. When refilling, DO NOT EXCEED 20
DROPS as this can cause your smoke units to become oversaturated allowing leakage onto the electronics. Note that operating your locomotives’ smoke units without smoke fluid will cause damage
to the heating element.
If you prefer to operate your locomotive set without smoke, locate the smoke unit switch on each
locomotive and slide it to the NO SMK position. Refer to Figure 4 on page 8 for the location of these
switches.
For best performance, we recommend using Lionel smoke fluid only.
Adding smoke fluid to your locomotive set’s smoke generators
Figure 3. Smoke fluid location
Note!
Front
Rear
Add smoke fluid here
(no more than 10-15 drops)
Vent
8
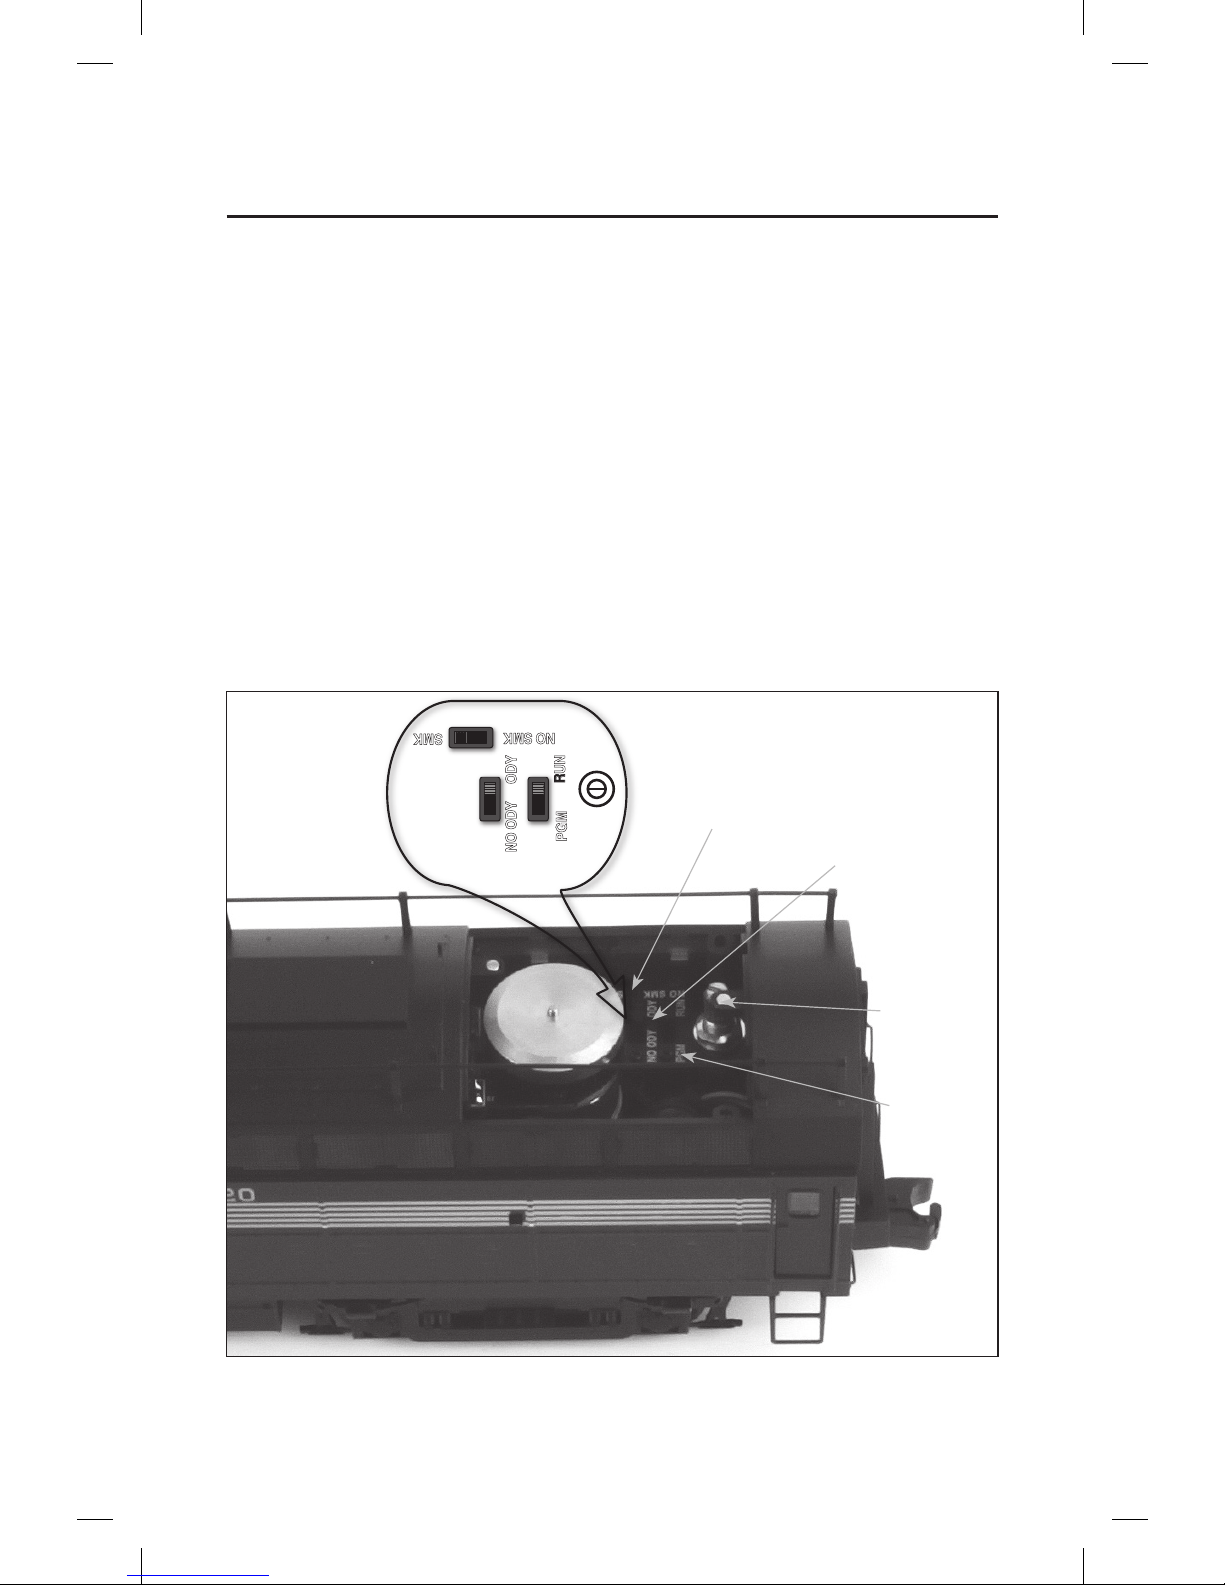
T
he functions of your locomotive set's switches are outlined below. Refer to Figure 4 for the location of the switches. The instructions below are specific to this particular loco-
motive set; note that available features (and switches) may differ from other
locomotives and sets.
Smoke Unit Switch (SMK/NO SMK)
Used to turn the smoke unit function on and off.
Program-Run Switch (RUN/PGM)
Used to assign an ID# and to reprogram each locomotive in this set for LEGACY and Command
operation when the switch is in the PGM position. Also used to “lock” your powered locomotive
in a single direction, or neutral, in conventional operation when the switch is placed in the PGM
position.
Odyssey II Speed Control System Switch (ODY)
Used to turn the Odyssey II Speed Control System on and off (powered unit only).
Figure 4. Locomotive set switch locations
Smoke unit
On/Off switch
Locomotive set basics
Locomotive set switch locations
Command
reverse
unit switch
Odyssey II
On/Off switch
(powered unit only)
Volume
control knob
(powered unit
only)
REAR
PGM
RUN
ODYNO ODY
SMK
NO SMK
9
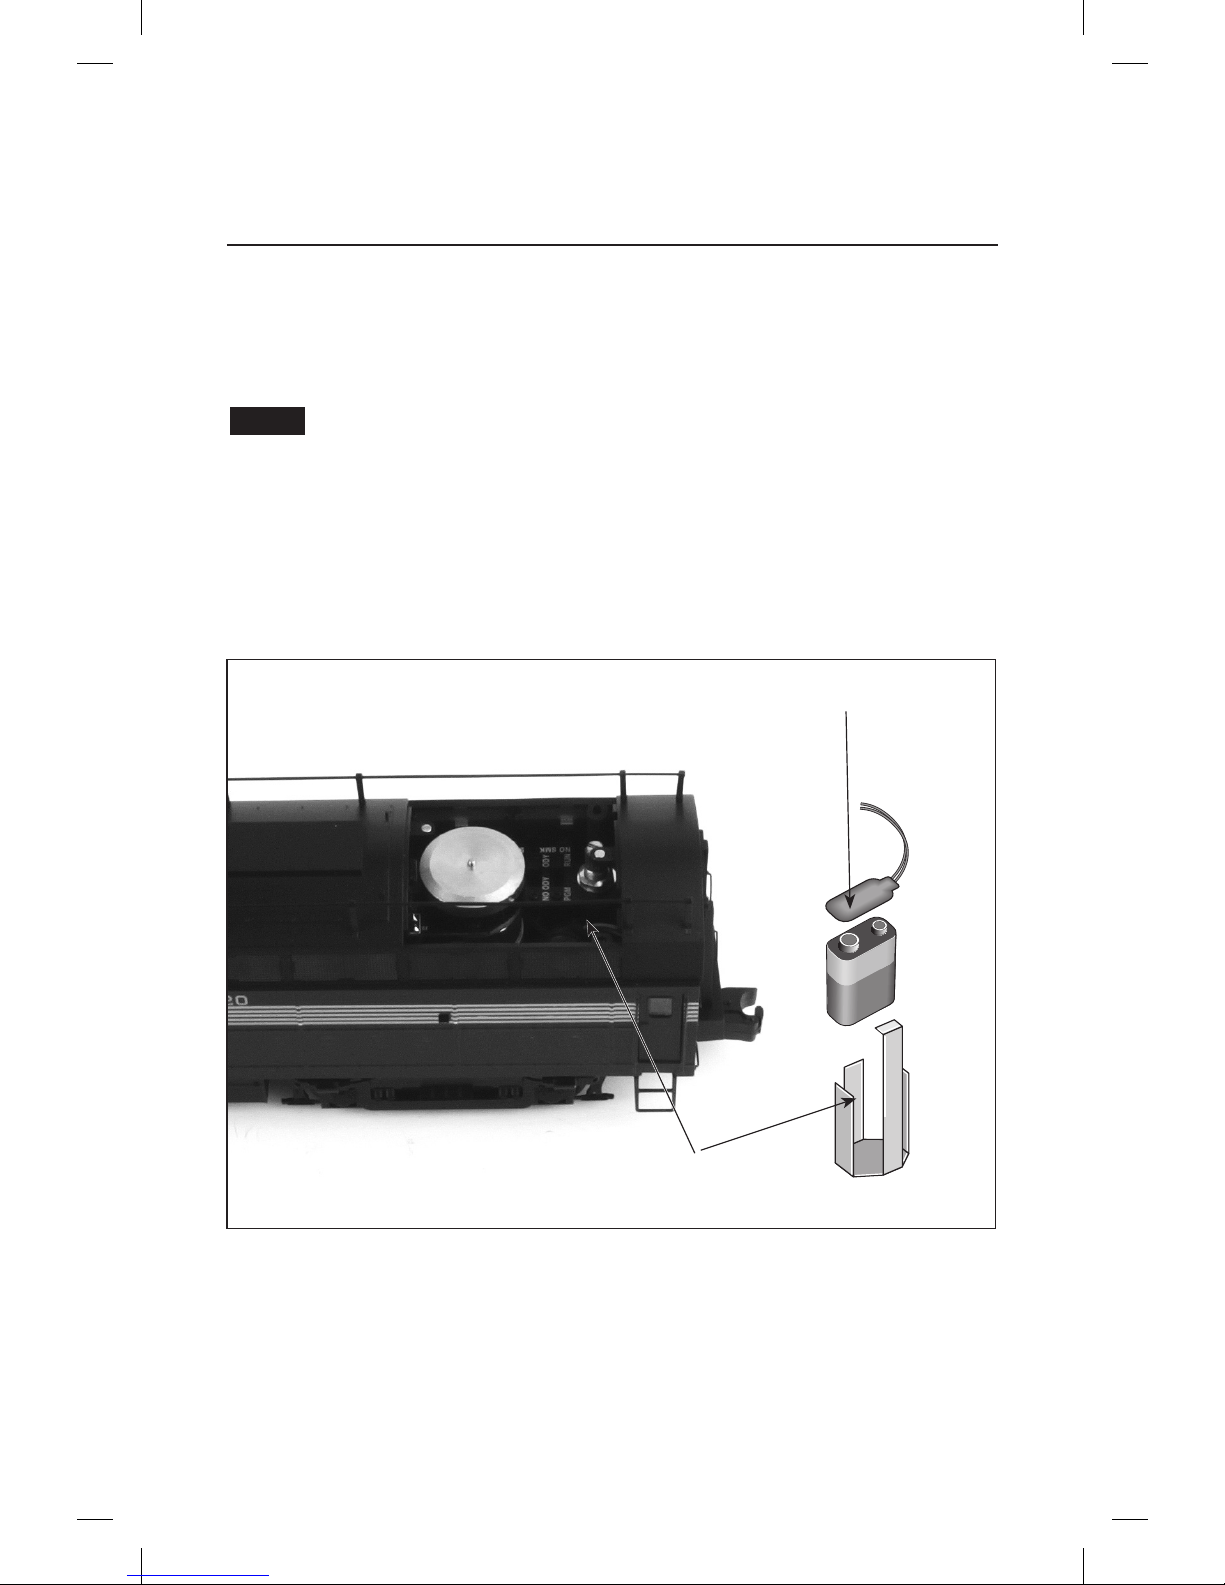
Locomotive set basics
Installing the battery in the powered A-unit
A
lthough the LEGACY RailSounds sound system is powered through the track, you may choose
to install a nine-volt alkaline battery if you find that the sound system shuts down during
track power interruptions (for example, at a switch or over a dirty section of track). Follow these
steps to install the battery.
If the RailSounds sound system turns off during interruptions in track power, you may
need to replace the battery. Use only alkaline batteries.
1. As illustrated in Figure 5 below, carefully lift up and remove the rear rooftop
hatch to access the battery harness.
2. Snap the battery harness onto the nine-volt alkaline battery’s terminals.
3. Slide the battery into the battery holder.
4. Replace the rooftop hatch, which is held in place by two magnets.
Note!
POWERED UNIT ONLY
Battery harness
Battery holder
Figure 5. Battery installation (powered unit only)
10
F
or operation in the LEGACY or TMCC environment, you will want to give each unit a unique
ID#. The locomotive set will respond to commands associated with its ID# while all other units
will disregard these commands. This procedure is not necessary for conventional
(non-Command) operation.
Program each locomotive's ENG ID# separately.
1. Slide the Command reverse unit switch on your locomotive to the PGM
position. See Figure 4 on page 8.
2. Place the locomotive on the track.
3. Connect the Command Base and plug it in.
4. Power up the track.
5. Press ENG on the CAB-1 or CAB-2 remote.
6. Enter the unique ID#. Choose any number from 1 to 98 that has not been
assigned to another locomotive (ENG). We recommend using a part of your
locomotive set’s road number.
All LEGACY locomotives respond to ENG 99. We recommend that you reserve ID# 99 as a
"universal" ID#.
7. Press SET. On the powered unit, the locomotive's horn will sound, or the
headlights will flash if the RailSounds sound system is off. On the nonpowered unit, the headlight will flash.
8. Slide the Command reverse unit switch back to the RUN position.
The locomotive set’s ID# has been set. Be sure to record the new ID# for your reference.
Locomotive set basics
Assigning your locomotive set a new ID# (LEGACY and TMCC)
Note!
Note!
 Loading...