

Page 1

1
Linx ViewHub
Set up.
Quick Guide.
Page 2

2
Page 3

3
Thank You.
Thank You for purchasing the
Linx ViewHub.
This quick-start manual will help
you to get to know your new
product and explain how to get
the most out of all of its great
features.
Page 4

4
Contents.
Important safety information. 5
Product overview. 6
Instructions for use. 8
Check the package contents 8
Assembly Instructions 8
Installing the Universal Monitor Mount and
Arm 8
Connecting the Arm to the Base Unit 8
Installing the Cable Tidy Clip 9
Connecting to the Power Supply 9
Connecting to a Monitor 9
Inserting a USB 10
Docking your Tablet 10
Driver Installation Instructions 10
Connecting to your Tablet 10
Default display mode 11
Changing your display style 11
Display Style 11
Display Settings 12
Use taskbars on all of your screens 12
Using Windows 10 12
Technical information. 13
General information. 14
Guarantee 14
Disclaimer 14
Trademarks 14
Recycling 14
Disposal of Waste Electrical & Electronic
Equipment (WEEE) 14
Digital Rights Management 15
Power Adaptor Safety 15
Small children 15
Medical devices 15
Implanted medical devices 15
Hearing 15
Page 5

5
Important safety information.
When using your tablet with the Linx ViewHub, it should be treated with care. The information
below has been provided in the interest of safety and will help you to enjoy this product and
the benefits it brings for many years.
• DO NOT press down hard on the tablet PC screen when
docked, as this may damage the Pogo Pin Connector or Tablet
Mount Points.
• DO NOT use or press down on the tablet PC screen with any
sharp objects, they may scratch the LCD screen.
• DO NOT place the tablet PC or ViewHub on uneven or
unstable work surfaces.
• DO NOT shove any foreign objects into the Tablet PC or
Linx ViewHub.
• DO NOT expose the tablet PC or ViewHub to strong
magnetic or electrical fields
• DO NOT expose the tablet to direct sunlight, or leave the
Tablet PC facing the sun for long periods of time as it can
damage the LCD Screen.
• SAFE TEMP: This tablet PC should only be used in
environments with ambient temperatures between 0°C and
40°C
• CAUTION: Risk of explosion if battery is replaced by an
incorrect type. Dispose of used batteries according to the
instructions.
• DO NOT throw the tablet PC or ViewHub in municipal waste.
Check local regulations for disposal of electronic products.
• DO NOT use harsh chemicals, cleaning solvents or
detergents to clean the product. Wipe with a dry soft cloth or
tissue paper to clean.
• The underneath and sides of the tablet PC may become
warm after a long period of use. This is normal.
• INPUT RATING: Refer to the rating label on the tablet PC
and ViewHub and be sure that the Power Adapter complies
with the rating. Only use attachments or accessories specified
by the manufacturer.
• Checking the connections between the main unit and
attachments before turning on the Tablet PC.
• DO NOT insert anything into the Tablet PC or Linx ViewHub
that may result in short circuit or damage the circuit.
• Disconnect the Tablet PC from the electrical outlet and
remove any installed batteries before cleaning.
• Keep the product and all of its part out of the reach of
children.
• This product is not intended for use by persons (including
children) with reduced physical, sensory or mental capabilities,
or lack of experience and knowledge, unless they have been
given supervision or instruction concerning the use of the
appliance by a person responsible for their safety.
• NEVER use the tablet near emergency/ intensive care
medical equipment, if you have a pacemaker fitted or during an
electrical storm.
• CAUTION: Tablet PC’s have some metal parts to disperse
heat.
• DO NOT block or cover slots, holes or openings on the
products by placing on soft furnishings such as carpets, rugs or
beds as these are provided for functionality and/or ventilation to
ensure safe operation of the products.
• To prevent possible hearing damage, do not listen at high
volume levels for long periods.
• DO NOT leave in low temperatures as moisture can form
inside the products, which may damage the circuit board.
• DO NOT leave in high temperatures as electronic devices and
plastic parts may warp in heat.
• Disconnect your tablet and Linx ViewHub from the mains
power supply during thunderstorms.
• Only use the power supply that came with the products.
Using an unauthorised power supply will invalidate your
guarantee and may irrecoverably damage the products.
• CAUTION: When the mains power plug or an appliance
coupler is used and then disconnected, the products shall
remain with an electronic charge until power is drained.
• DO NOT attempt to open the products. These products do
not contain any user serviceable parts. Unauthorised handling
of either product may damage it and will void your warranty.
Page 6
6
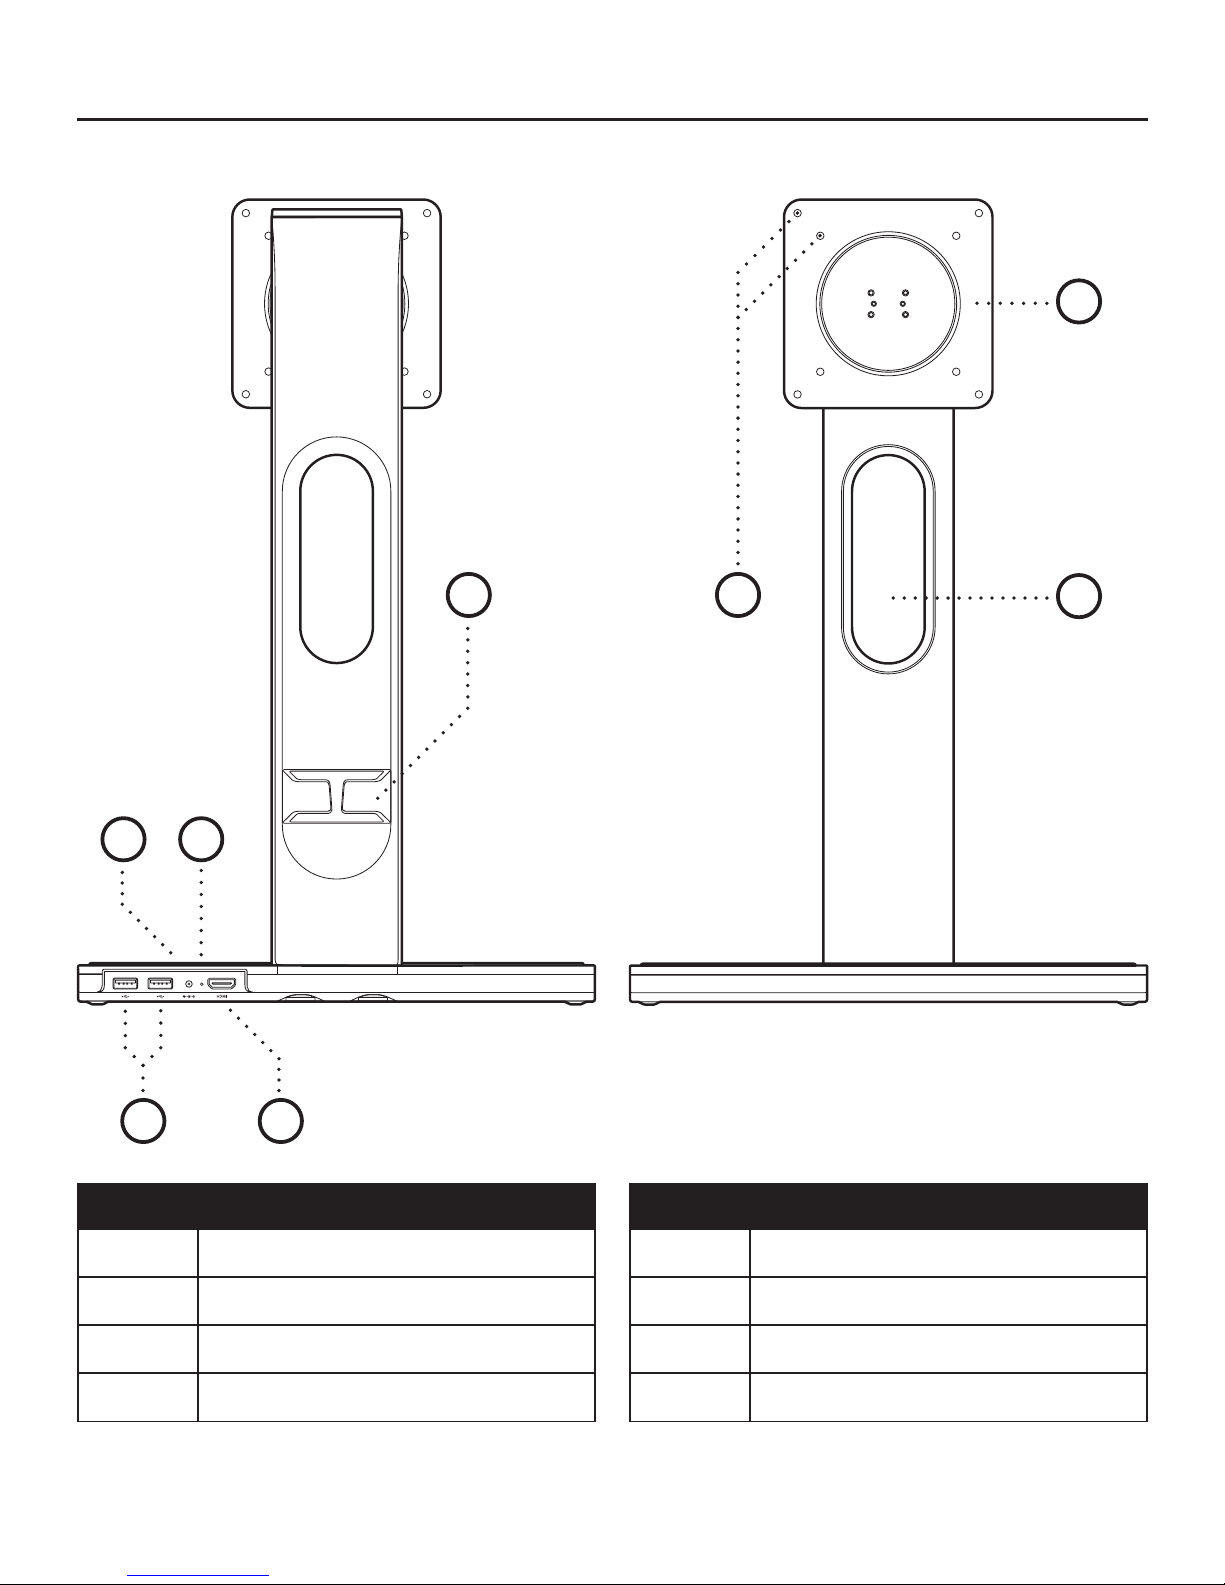
Product overview.
E
Cable Tidy Clip
F
Monitor Mount
G
Monitor Mount screw holes
H
Port
Specification.
C
G
A
Power - DC 12V IN
B
LED Status Light
C
2 x Full-size USB 2.0 (Type-A)
D
HDMI 1.4
D
A B
E
H
F
Page 7
7
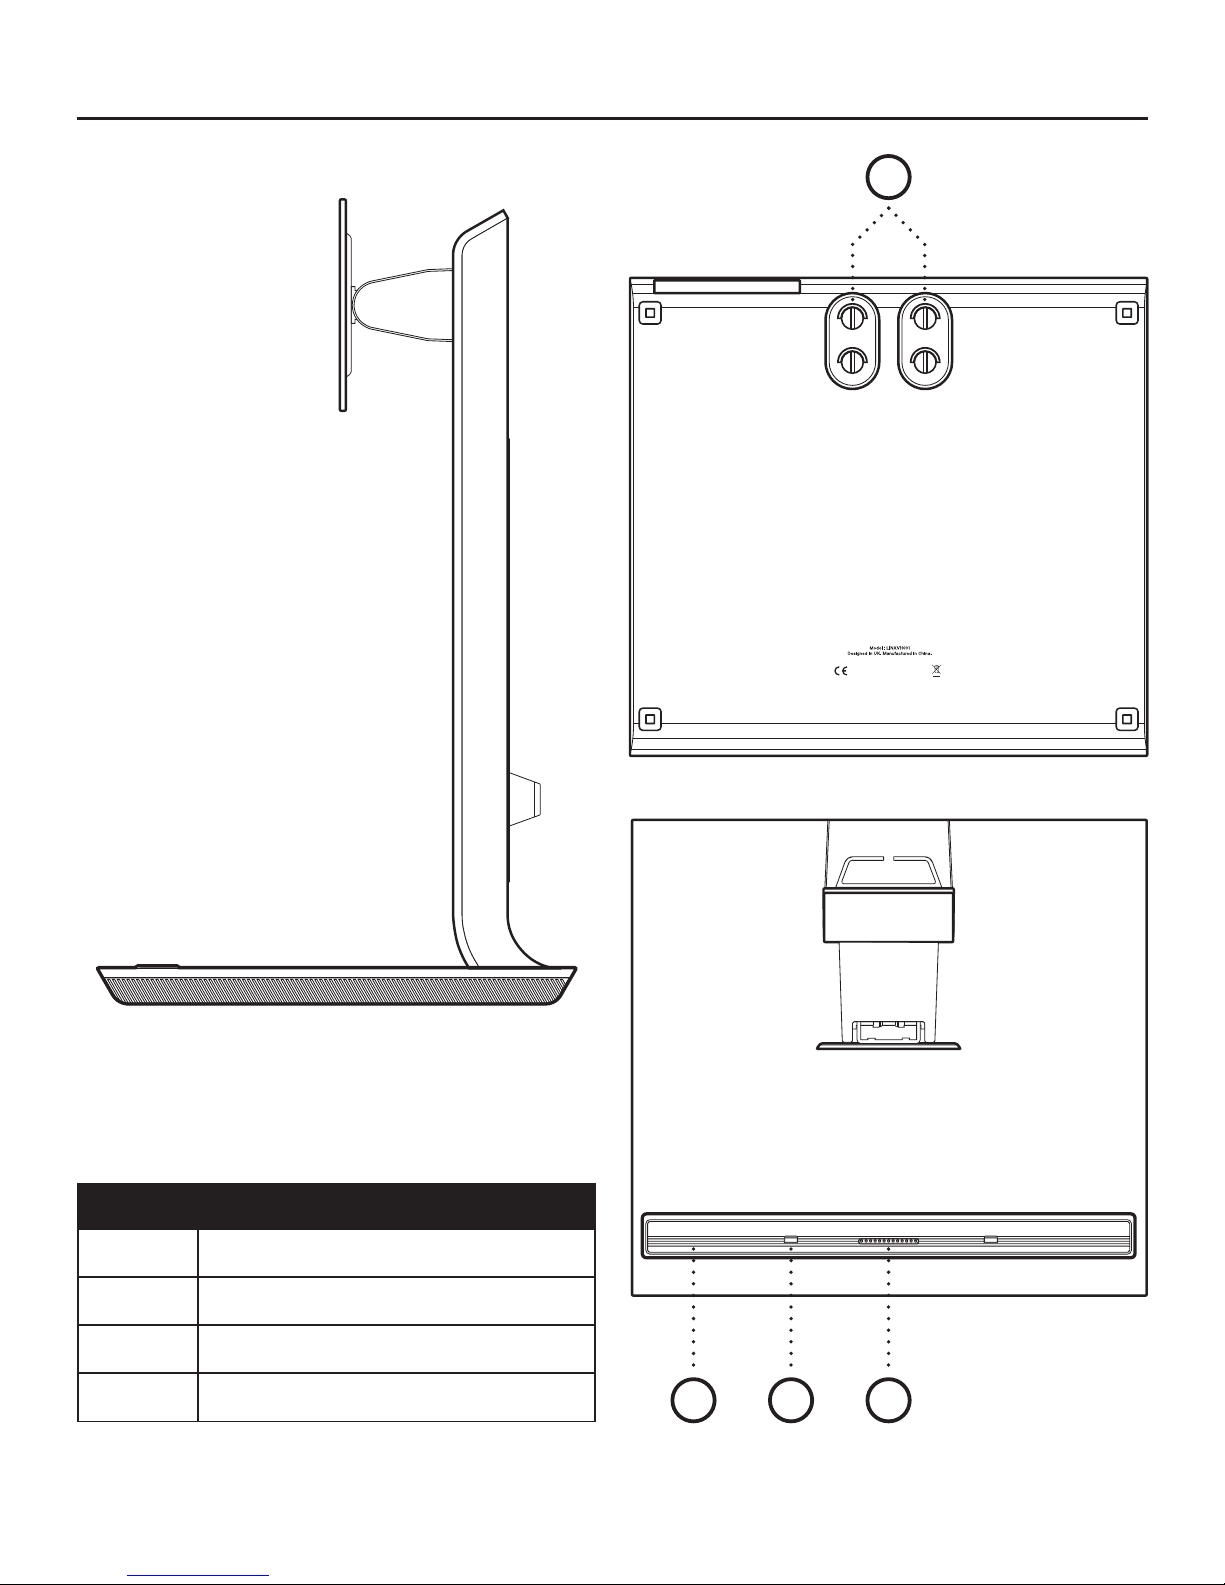
Product overview.
I
D-Screws
J
Dock Inlay
K
Tablet Mount Point
L
Linx Connector
K L
I
J
Page 8
8
Instructions for use.
Check the package contents.
The package contains:
• 1 x Linx ViewHub Base Unit
• 1 x Linx ViewHub Arm
• 1 x Cable Tidy Clip
• 1 x Power Supply Unit with Mains Plug Adaptor
• 1 x HDMI Cable
• 4 x D-Screws
• 4 x Mount Screws
• 1 x User Guide
Assembly Instructions
NOTE: When assembling the Linx ViewHub some
processes may require two people.
Installing the Universal Display Mount and Arm
Caution: Please take care when fixing the
Universal Display Mount to your Monitor. Only use
the screws provided, using any other screws can
cause irreversible damage to your monitor.
DO NOT use a drill to fix the screws in place,
excessive force can cause irreversible damage to
your monitor.
Note: Some monitors have unique stand hinges and
may require a wall mount bracket to be pre-installed.
In this scenario users will need to attach that plate
first and then attach that to the arm of Linx View
Hub.
Note: Illustrations in this document represent typical
procedures, so they may look different from the
actual product.
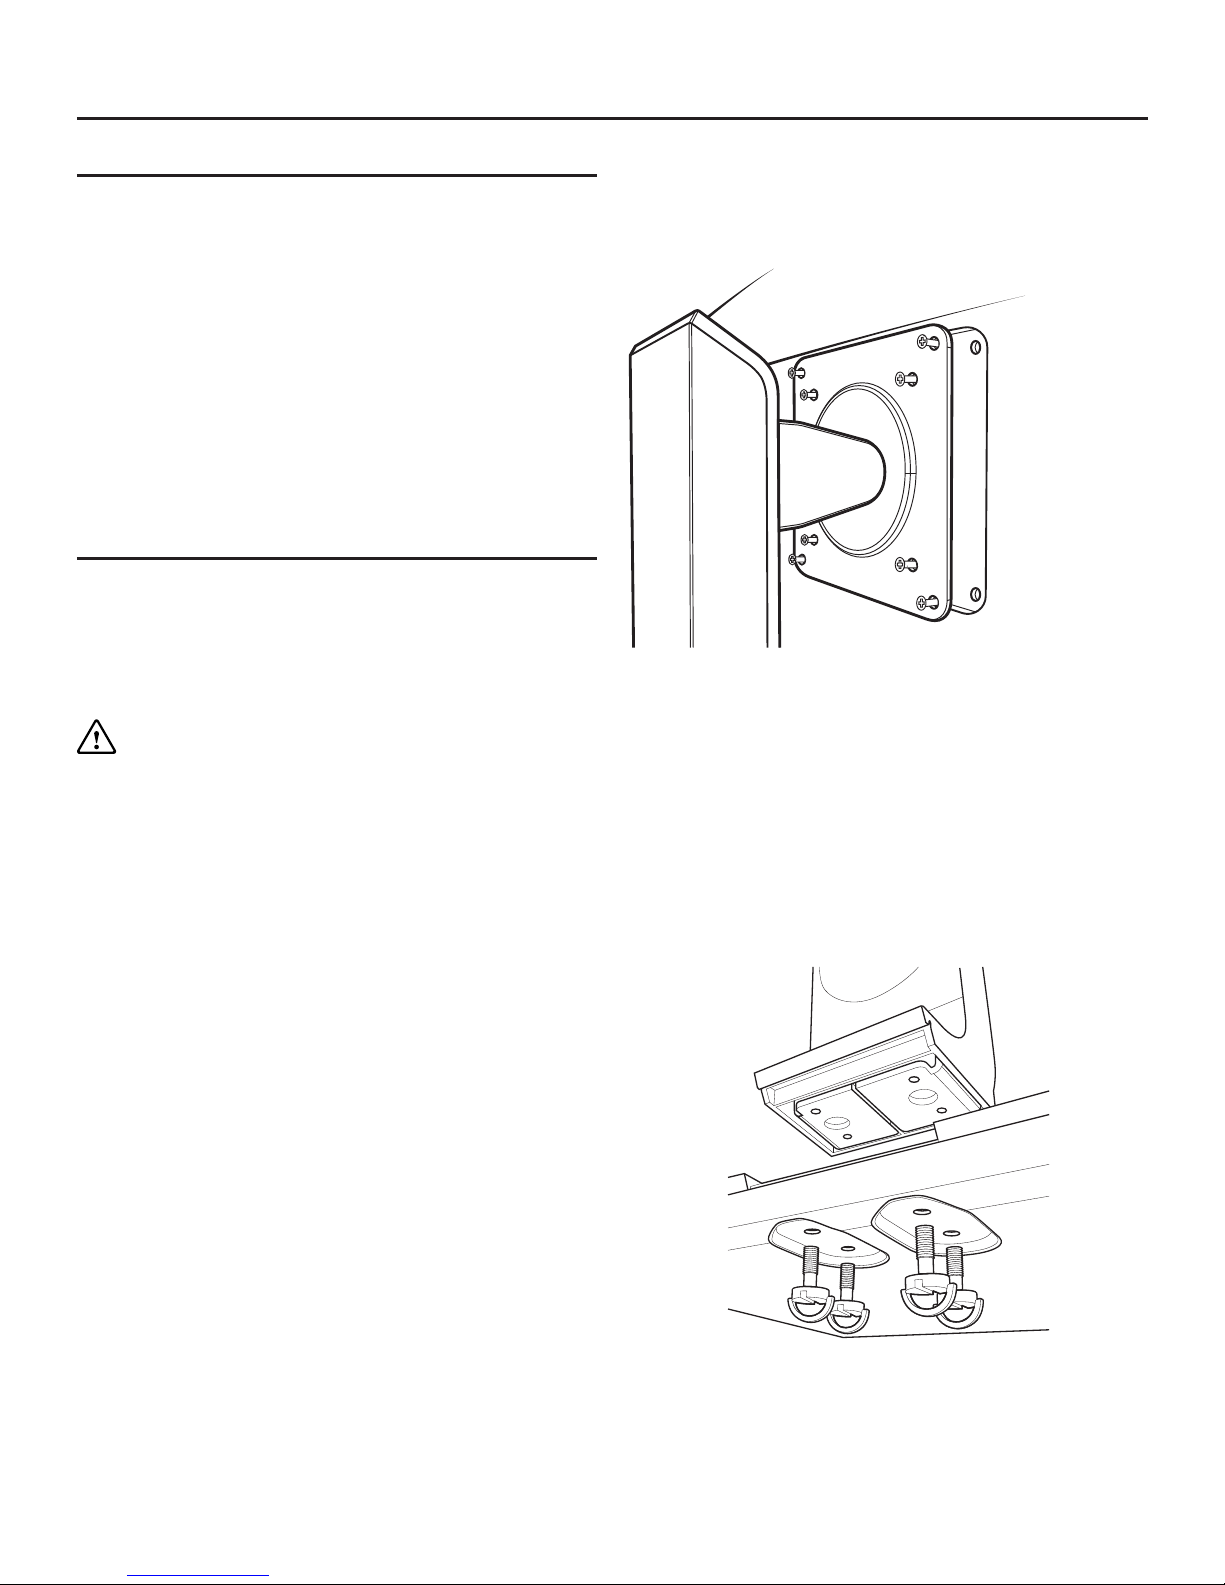
1. To start, carefully place the monitor on a flat
surface, screen face down.
2. Using a screwdriver and the screws provided,
insert the 4 screws into the 75mm x 75mm or
100mm x 100mm mount holes, turning clockwise
until tight.
3. The Linx ViewHub Arm should now be attached.
Please ensure the screws are tight, failure to do so
could result in the monitor falling and breaking.
Connecting the Arm to the Base Unit
1. With the Monitor still on a flat surface and with
the Linx ViewHub Base Unit in hand, align the Linx
ViewHub Arm with the Base Unit recess, and join
together.
Page 9
9
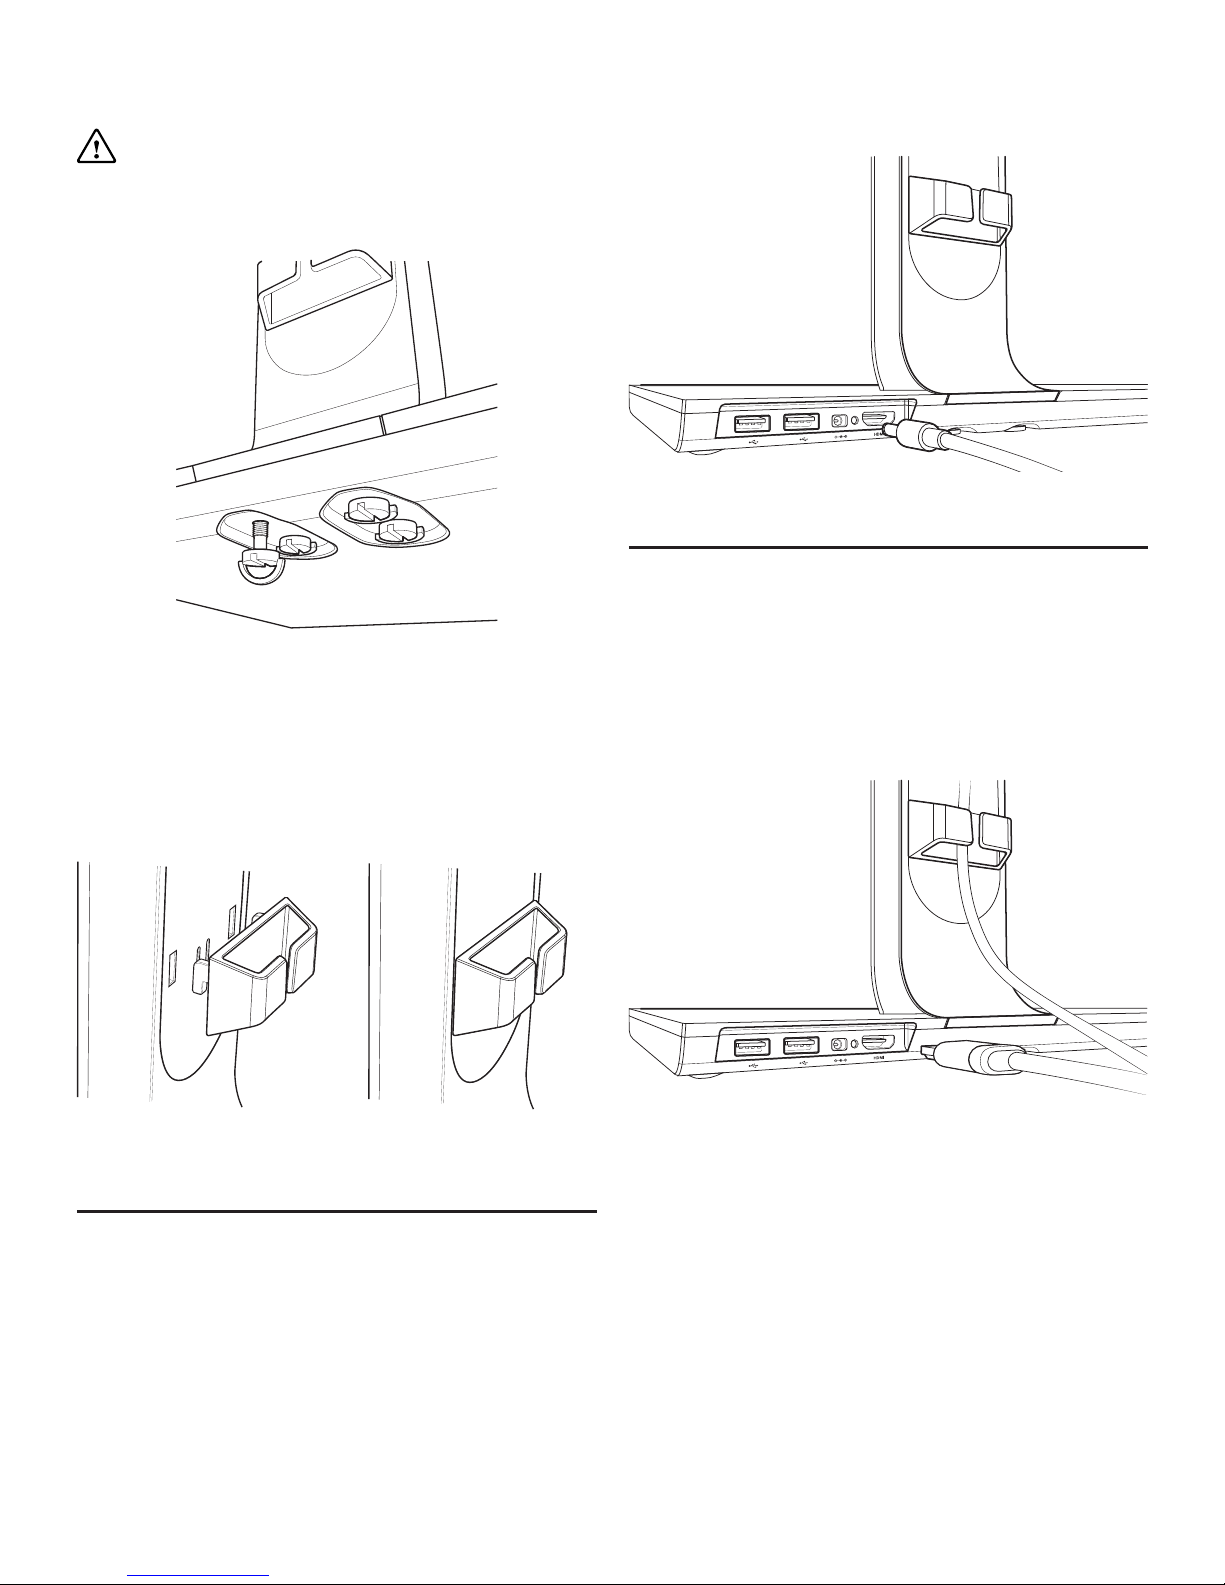
2. Attach the Base Unit to the Arm by turning the
screws clockwise until tight. This can be done by
hand by using the D-Screws provided.
CAUTION: Using any other screws other than
those provided can cause irreversible damage to
the product.
Installing the Cable Tidy Clip
To install, simply locate the holes on the back of
the Linx ViewHub Arm and insert the two hooks on
the Cable Tidy Clip. Click in and pull down gently to
secure in place.
Connecting to the Power Supply
Power is supplied though the provided power
adapter, one end is connected to the DC 12V IN jack
on the rear of the Base Unit, the other end to the AC
100~240V wall outlet.
If the LED status light on the back of the Linx
ViewHub turns to green, it means that you have
successfully connected to the power supply, you can
move on to other operations.
Connecting to a Monitor
1. Using the HDMI Cable provided insert one end
to your displays HDMI out port. (This may vary in
position depending on your display model.)
2. You can now feed the HDMI Cable through the
Linx ViewHub Arm port and the Cable Tidy.
3. Lastly, you can connect the other end to the Linx
ViewHub HDMI port. (Located next to the LED Status
Light on the rear of the Base Unit.)
Page 10
10
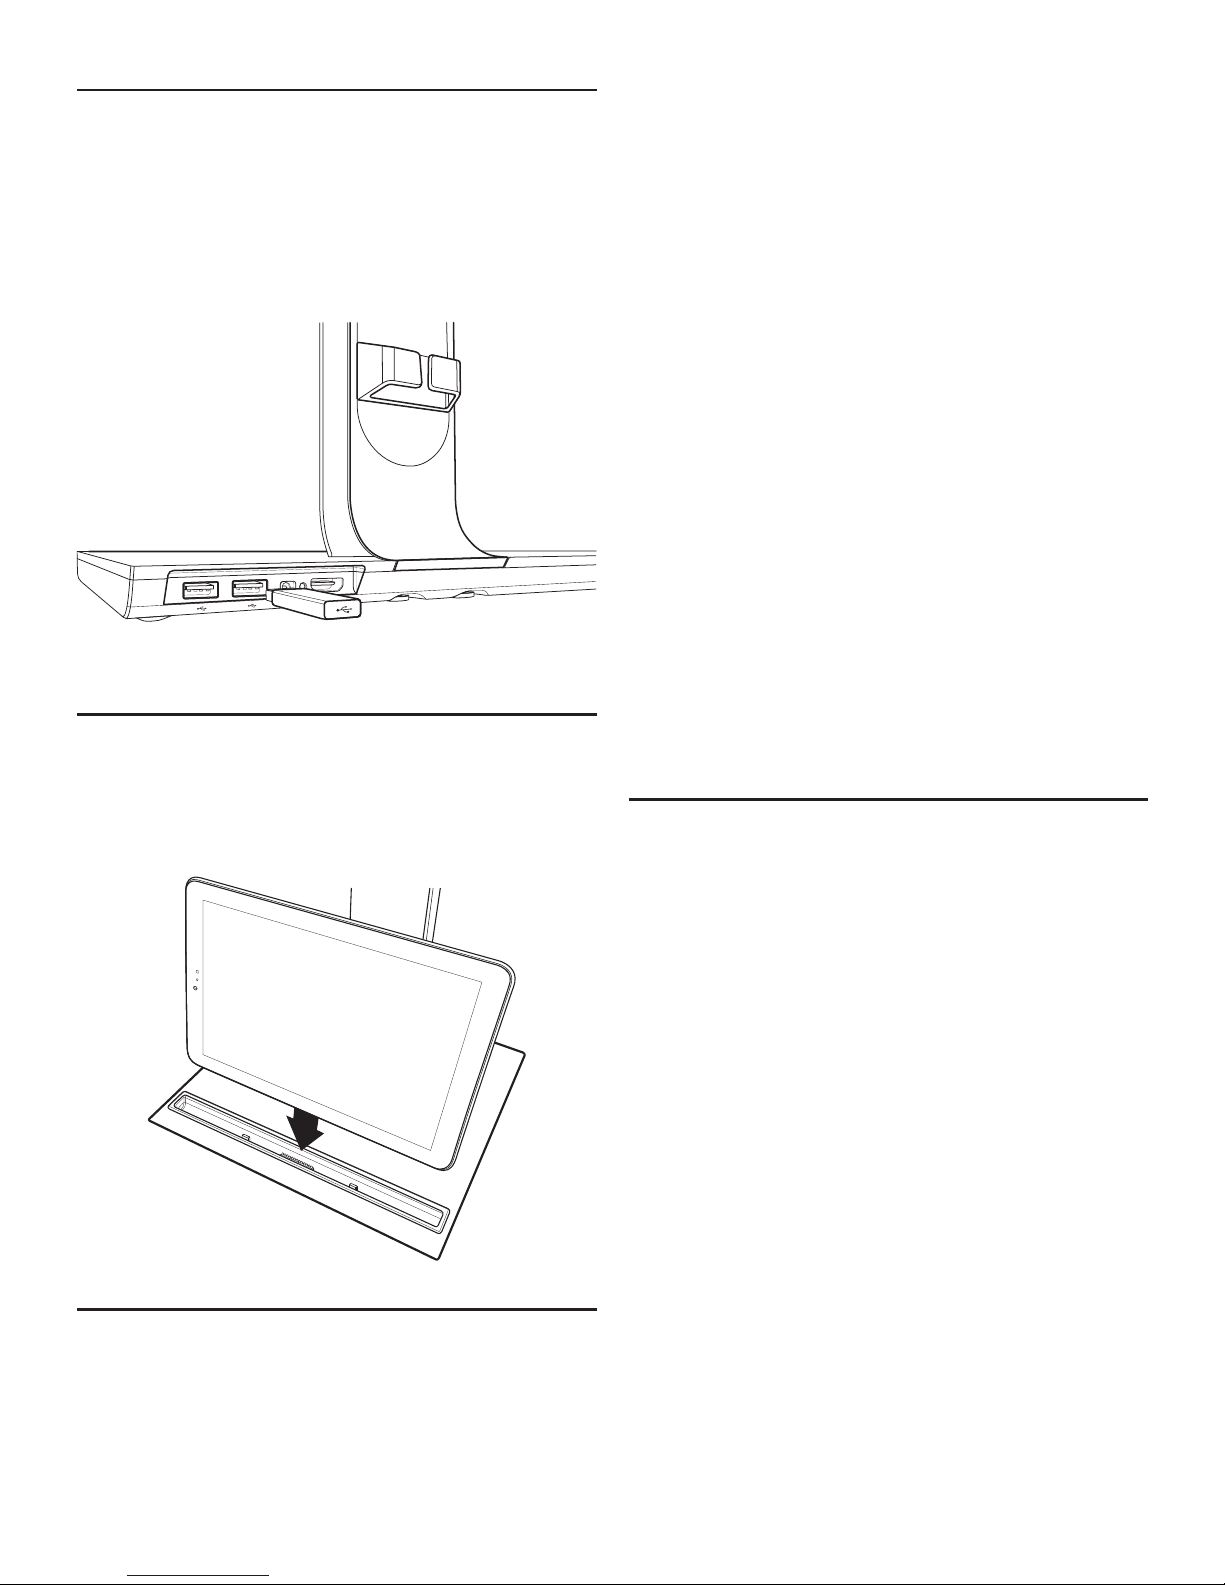
Inserting a USB
This unit is equipped with two full-size USB 2.0
(Type-A) ports.
To Connect a USB storage device to the Linx
ViewHub, find and locate the USB ports on the rear
of the Base Unit, as shown in the picture below.
Docking Your Tablet
To dock, simply insert your tablet into the tablet dock
inlay, taking care to successfully match the Linx
Connector and Dock Mounts so that they are in line
with the tablet.
Driver Installation Instructions
Please update your Linx Tablet to the most recent
ViewHub drivers to ensure you have the best
experience.
Driver downloads can be found at:
http://support.linxtablets.com/Products/ViewHub
1. Click on the latest DisplayLink driver listed on the
Support web page.
2. Once the download and security scan has
completed press Run.
4. A prompt will ask “Do you want to allow this
app to make changes to your PC?” Click Yes Your
tablet will now install the DisplayLink Software for
DisplayLink Graphics.
5. A System Compatibility Check window will appear,
click Install to continue.
6. First Connect: When prompted, dock your tablet
in the Linx ViewHub.
7. After the First Connect the tablet will proceed to
the Final Setup step and then Finish.
Note: You must now reboot your tablet to allow the
configuration changes to take effect.
Connecting to your Tablet
You can connect your Linx tablet to the ViewHub is
different ways:
• When your tablet is on, simply dock into the
ViewHub. The tablet display will go blank, and,
after a few seconds both the tablet and TV/
monitor display will turn on.
• When your Linx tablet is turned off, docked into
the ViewHub and then powered on, the start-up
screen will only be displayed on the tablet at
first. After start up, the display will be on both the
tablet and TV/monitor.
Note: At first, the interface displayed on the TV/
monitor will be different from your tablet display.
Note: If your Linx tablet is powered down, connect
to the dock and this will charge for your tablet.
During charging, the charge indicator light of the
tablet is on. If the tablet PC is fully charged, the
indicator light will be off.
Page 11
11
Default display mode
Note: When docking your Linx tablet to the ViewHub
for the first time, you will find the monitor working in
Extend mode. A prompt window will automatically
appear to remind you to choose your display style.
Changing your display style
With your Linx tablet docked and the Linx ViewHub
connected to the monitor, you can then choose how
you want that content to appear. You can customise
the display settings such as Display Style, and
Screen Resolution.
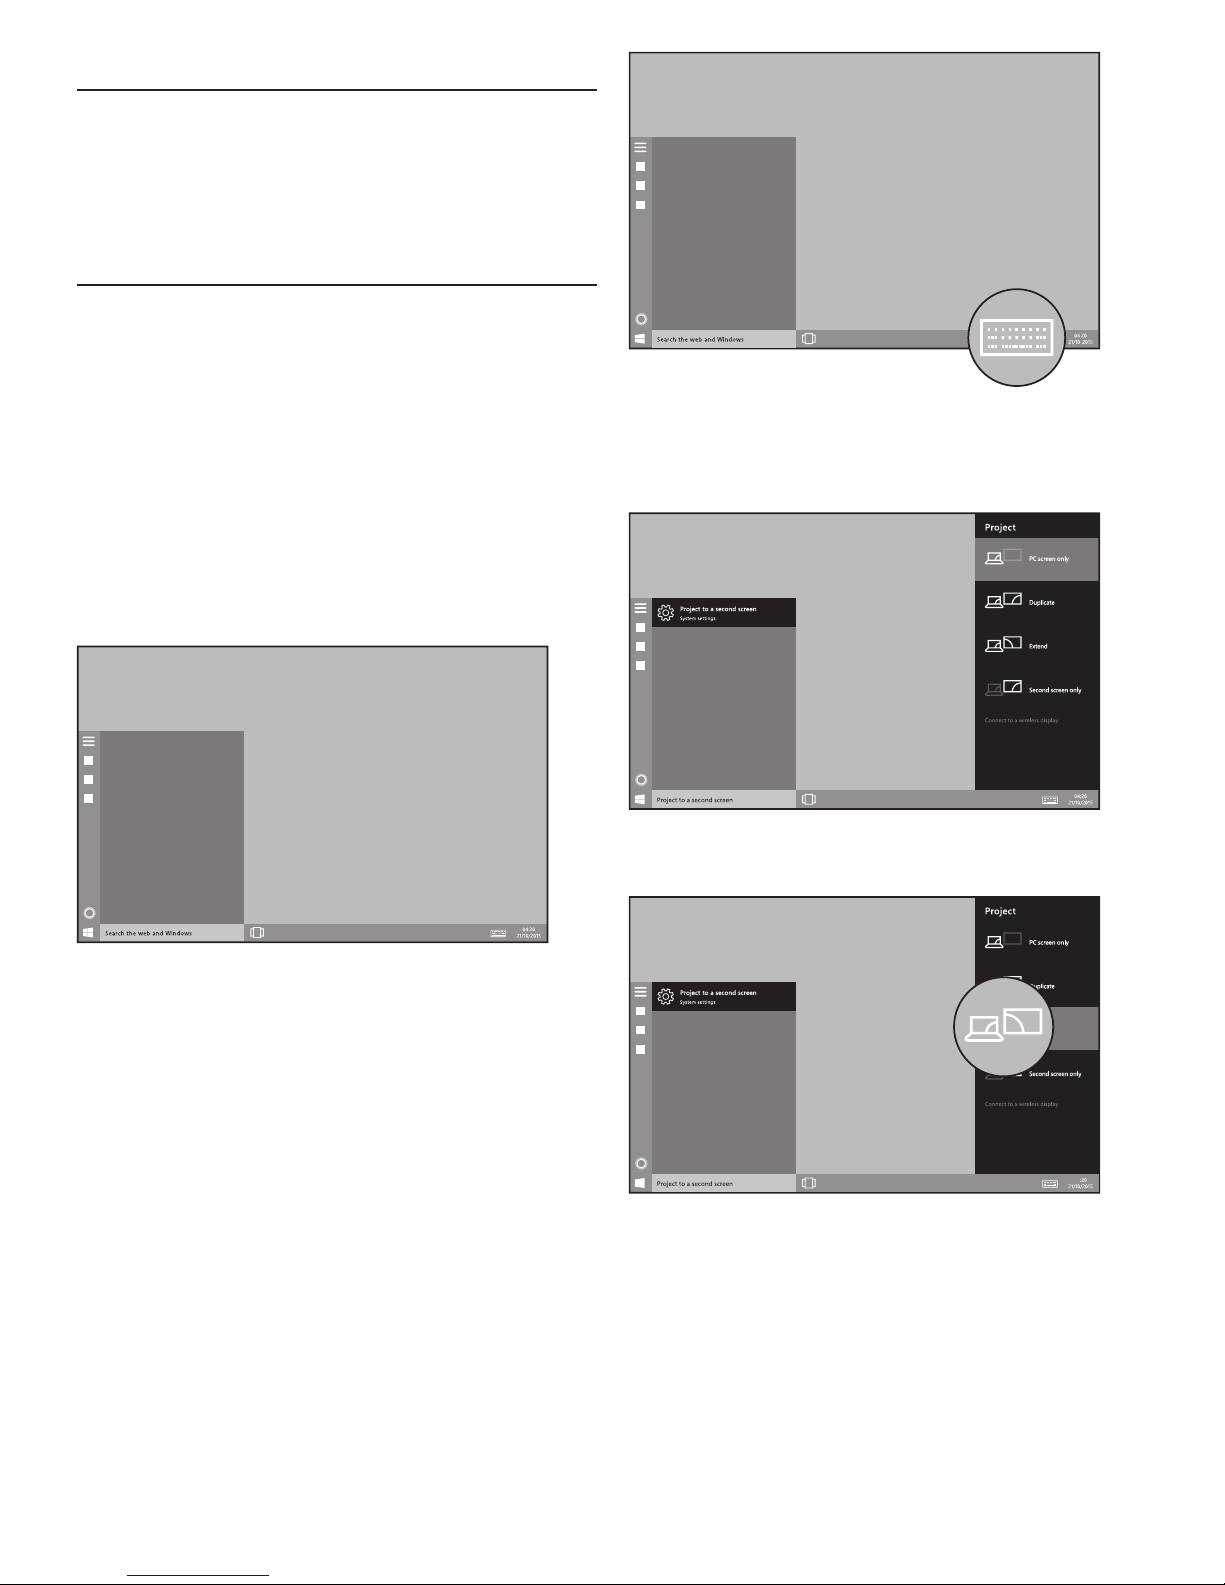
Display Style
1. Once connected to the monitor, select the search
box in the taskbar, located in the bottom left of the
screen, this will say ‘Search the web and Windows’.
2.You will now need to open the keypad, to do this
simply locate and press the keypad icon located in
the bottom right of the screen.
3. Now enter the following:
Project to a second screen, and in the search
results select Project to a second screen.
4. You can now choose one of the following options:
PC Screen only: You’ll see everything on your Linx
tablet screen. (When you’re connected to a wireless
projector this option changes to Disconnect.)
Duplicate: You’ll see the same things on both
screens.
Extend: You’ll see everything spread over all
Page 12

12
easier on the desktop. Here’s how to get taskbars on
all of your displays and change how buttons appear
on them.
1. Select the search box in the taskbar, located in
the bottom left of the screen and enter Taskbar
and Navigation, and in the search results, select
Taskbar and Navigation.
2. Under Multiple displays, select Show taskbar
on all displays.
3. From the Show taskbar buttons on list, choose
one of the following options:
All Taskbars: The taskbar buttons for all of your
open windows will be duplicated on the taskbars on
both tablet and monitor.
Main taskbar and taskbar where window is
open: A taskbar button will appear on your tablet
and in the taskbar on the display where the window
is open.
Taskbar where window is open: A taskbar button
will appear only on the display where the window
is open. None of the buttons will be duplicated on
other taskbars.
4. Select Apply > OK.
Using Windows 10
For additional support and useful links for using
Windows 10 please visit:
http://www.linxtablets.com/manuals
screens, and you can drag and move items between
them.
Second screen only: You’ll see everything on the
connected screen, and your Linx tablet screen will
be blank.
NOTE: Once you have changed your Display
Settings you may be prompted whether to keep
these display settings, click “Keep changes” to save,
otherwise, the system will automatically revert to
previous display settings in 12 seconds.
Display Settings
Note: Before changing your display settings we
recommend you close all open programmes.
To access the screen display settings go to Settings
> System, select Display from the menu, and scroll
down to Advanced display settings.
You can now customise the display on both tablet
and monitor simply by selecting the screen you want
to change.
If you cannot see the second monitor listed, click
Detect. If this does not work, undock and dock the
tablet once more and try to reconnect the cables
between the Linx ViewHub and your monitor, restart
your Linx tablet and try again.
Click Identify to see which monitor is number 1
(Primary Monitor) and number 2 (Secondary Monitor).
Click Keep Changes if you are prompted to save
the changes made to the display settings.
From here you can change the screen resolution
by selecting the required resolution from the drop
down menu.
You can also change Related settings such as:
Colour calibration, ClearType text, Advanced sizing of
text and other items and Display adapter properties.
Use taskbars on all of your screens.
NOTE: This feature only works in Extend mode.
Once you have your monitor connected and set up
to your liking, you might want to have more than one
taskbar to make switching between apps and files
Page 13

13
Technical information.
Note: Specifications and external appearance are subject to change without notice.
Physical Properties.
Dimensions (HWD) 285 × 264 × 442.5mm
Weight Approx. 3kg
System Hardware Configuration.
Chipset DisplayLink DL-3500
Input Connectivity Linx Connector
Output Connectivity
HDMI 1.4 (Type-A ) (Output to display)
2 × Full-size USB 2.0 (Type-A )
Included Accessories.
Power Adaptor
Mains Charger with male DC Connector (12V / 2A)
ICP30-120-2000
HDMI Cable 1m Male HDMI to Male HDMI Cable ( Type-A)
Display Compatibility Guidelines.
Maximum Screen Size up to 29” Ultrawide
Maximum Weight up to 7kg
Mount Support
Universal Display Mount:
100mm × 100mm
75mm × 75mm
Page 14

14
General information.
Guarantee
Exertis (UK) Limited warrants to the end user that
this product will be free from defects in materials
and workmanship in the course of normal use
for a period of 12 months (1 year) from the date
of purchase. This guarantee covers breakdowns
due to manufacturing or design faults. If a genuine
manufacture fault is found Exertis (UK) Limited will
arrange the collection of the faulty device and issue a
‘like for like’ replacement.
The guarantee is subject to the following provisions:
• The guarantee does not cover accidental
damage, however caused, wear and tear, or
negligence.
• It must be solely used for domestic purposes.
• The guarantee will be rendered invalid if the
product is re-sold or is damaged through any
adjustment, modification or repair not authorised
by us.
• Specifications are subject to change without
notice.
• The manufacturer disclaims any liability for the
incidental or consequential damages.
• The guarantee is in addition to and does not
diminish your statutory or legal right.
Should you have a problem with your unit please
contact your supplier or contact Customer Support
at:
+44 (0)1282 858 893
Or email us at:
[email protected]
Guarantor:
Exertis (UK) Limited,
Shorton Brook Way,
Altham Business Park,
Altham,
Accrington,
Lancashire,
BB5 5YJ
Disclaimer
Exertis (UK) Limited makes no representation
or warranties with respect to the content of this
document and specifically disclaims any implied
warranties of merchantability or fitness for any
particular purpose. Further, Exertis (UK) Limited
reserves the right to revise this, or any other,
publication and to make changes to the contents
from time to time without the obligation of Exertis
(UK) Limited to notify any person or organisation of
such revision or changes.
Trademarks
Linx, the Linx logo, Exertis, and the Exertis logo are
trademarks or registered trademarks of Exertis (UK)
Limited.
Recycling
Always return your used electronic products,
batteries, and packaging materials to dedicated
collection points. This way you help to prevent
uncontrolled waste disposal and promote the
recycling of materials. All materials of the device can
be recovered as material and energy.
Disposal of Waste Electrical & Electronic
Equipment (WEEE)
This symbol on the product or on its packaging
indicates that this product should not be treated
as household waste. Instead it should be handed
over to a suitable collection point for the recycling of
electrical and electronic equipment. By ensuring this
product is disposed of correctly, you will help prevent
potential negative consequences for the environment
and human health, which could otherwise be caused
by inappropriate waste handling of this product. The
recycling of materials will help to conserve natural
resources. For more information about the recycling
of this product, please contact your local council
office, your household waste disposal service or the
Page 15

15
shop where you purchased the product.
Digital Rights Management
When using this device, obey all laws and respect
local customs, privacy and legitimate rights of others,
including copyrights. Copyright protection may
prevent you from copying, modifying, or transferring
photos, music, and other content.
Power Adaptor Safety
To unplug the mains power adaptor or a powered
accessory, hold and pull the plug, not the cord.
When your power adaptor is not in use, unplug it.
Do not power your device during a lightning storm.
Only use the power adaptor indoors.
Small Children
Your device and its accessories are not toys. They
may contain small parts. Keep them out of the reach
of small children.
Medical Devices
Operation of radio transmitting equipment, including
wireless phones, may interfere with inadequately
shielded medical devices’ function. Consult a
physician or the medical device’s manufacturer to
determine if it is adequately shielded from external
radio energy.
Implanted Medical Devices
To avoid potential interference, manufacturers of
implanted medical devices recommend a minimum
separation of 6 inches (15.3 centimeters) between a
wireless device and the medical device. Persons who
have such devices should:
• Always keep the wireless device more than
6 inches (15.3 centimeters) from the medical
device.
• Turn the wireless device off if there is any reason
to suspect that interference is taking place.
• Follow the manufacturer directions for the
implanted medical device.
If you have any questions about using your wireless
device with an implanted medical device, consult
your health care provider.
Hearing
Warning: When you use a headset or
earphones, your ability to hear outside sounds may
be affected. Do not use the headset where it can
endanger your safety.
To prevent possible hearing damage, do not listen
to audio at high volume levels for extended periods
of time.
October 2016/Issue No. 1
Page 16

16
 Loading...