


Link You can Me by Wireless
1
WP635
GSM Fixed Wireless Phone
User Manual
Link You and Me by Wireless
2
CONTENT
1. GENERAL INFORMATION ....................................................5
1.1 PREFACE .............................................................................5
1.2 SAFETY PRECAUTIONS.....................................................6
2. GETTING STARTED ..............................................................7
2.1 CHECKING THE PACKAGE ...............................................7
2.2 TECHNICAL PARAMETERS...............................................8
2.3 SIM CARD INSTALLATION.................................................8
2.4 TURNING PHONE’S POWER ON/OFF...............................9
2.5 APPEARANCE ...................................................................10
2.6 INSTALLATION..................................................................12
2.6.1 HANDSET ........................................................................12
2.6.2 ANTENNA........................................................................12
2.6.3 EXTERNAL POWER ADAPTER ....................................12
2.6.4 DATA PORT ....................................................................13
2.6.5 WALL-HANGING.............................................................13
3. SERVICE INDICATION ........................................................14
3.1 FULL SERVICE ..................................................................14
3.2 NO SERVICE ......................................................................14
3.3 LIMITED SERVICE .............................................................14
4. BASIC PHONE OPERATION...............................................15
4.1 MAKING A CALL ...............................................................15
4.1.1 MAKING A DOMESTIC CALLING..................................15
4.1.2 DIALING A NUMBER IN THE PHONEBOOK................15
4.1.3 USING SPEED DIAL .......................................................15

Link You and Me by Wireless
3
4.1.4 MAKING IDD................................................................... 15
4.2 ANSWERING A CALL....................................................... 16
4.3 REJECTING A CALL......................................................... 16
4.4 REDIALING........................................................................ 16
4.5 VOLUME ADJUSTMENT .................................................. 16
5. FUNCTION MENU ............................................................... 16
5.1 USER MENU ...................................................................... 16
5.2 PHONEBOOK .................................................................... 18
5.2.1 BASIC OPERATIONS OF PHONEBOOK ..................... 18
5.2.2 OTHER FUNCTIONS OF PHONEBOOK....................... 21
5.3 SHORT MESSAGES ......................................................... 22
5.3.1 WRITE A NEW MESSAGES .......................................... 22
5.3.2 READ RECEIVED TEXT MESSAGES........................... 24
5.3.3 READ TEXT MESSAGES SENT.................................... 25
5.3.4 MESSAGE SETTINGS ................................................... 25
5.4 PHONE MENUS................................................................. 26
5.4.1 CALL ............................................................................... 26
5.4.2 DIVERTS ......................................................................... 28
5.4.3 FIREWALL ...................................................................... 28
5.5 SETTINGS.......................................................................... 30
5.5.1 PHONE SETTINGS......................................................... 30
5.5.2 DISPLAY SETTINGS...................................................... 30
5.5.3 AUDIO SETTINGS.......................................................... 31
5.5.4 CLOCK SETTINGS......................................................... 32
5.5.5 CALL SETTINGS............................................................ 32
5.5.6 NETWORK SETTINGS................................................... 33
5.5.7 SELECT MODE .............................................................. 33
Link You and Me by Wireless
4
5.5.8 SECURITY SETTINGS ....................................................33
5.5.9 FACTORY SETTINGS.....................................................35
5.6 TOOLKIT.............................................................................35
5.6.1 ALARM CLOCK ..............................................................35
5.6.2 CALCULATOR ................................................................37
5.7 STK .....................................................................................37
6. ADDITIONAL FUNCTIONS..................................................37
APPENDIX I: COMMON TROUBLESHOOTING..................43

Link You and Me by Wireless
5
1. GENERAL INFORMATION
1.1 Preface
FCC Interference Statement
The device complies with Part 15 of FCC rules. Operation is subject
to the following two
conditions:
(1) This device may not cause harmful interference.
(2) This device must accept any interference received, including
interference that may cause undesired operations.
This device has been tested and found to comply with the limits for
a Class B digital device pursuant to Part 15 of the FCC Rules.
These limits are designed to provide reasonable protection against
harmful interference in a residential installation. This device
generates, uses, and can radiate radio frequency energy, and if not
installed and used in accordance with the instructions, may cause
harmful interference to radio communications. However, there is no
guarantee that interference will not occur in a particular installation.
If this device does cause harmful interference to radio/television
reception, which can be
determined by turning the device off and on, the user is encouraged
to try to correct the
interference by one or more of the following measures:
– Reorient or relocate the receiving antenna.
– Increase the separation between the equipment and the receiver.
– Connect the equipment into an outlet on a circuit different from
that to which the
Link You and Me by Wireless
6
receiver is connected.
– Consult the dealer or an experienced radio/TV technician for help.
WARN ING :
Changes or modifications to this unit not expressly approved by the
party responsible for compliance could void the user ’s authority to
operate the equipment.
FCC Radiation Exposure Statement
• This transmitter must not be co-located or operating in conjunction
with any other antenna or transmitter.
• This equipment complies with FCC RF radiation exposure limits
set forth for an uncontrolled environment. This equipment should be
installed and operated with a minimum distance of 20 centimeters
between the radiator and your body.
Thank you for using LINKTOP WP635 GSM Fixed Wireless Phone.
To guarantee your phone is always in its best condition, please follow
the instructions in this manual.
1.2 Safety Precautions
z Please do not to turn around the antenna at will, in order to avoid
create the damage of antenna.
z The phone requires about 20 seconds to initialize while
Power-On, it is processing the Network Searching, Cell ID
Searching, during this process please do not press any key,
otherwise the FWP will cause a unexpectable result.
z Do not try to take out the SIM card of this phone. This S IM card is
Link You and Me by Wireless
7
a special encrypt card, it cannot be used in other mobile phones.
It’s the warranty of the product, if you try to rip or remove, The
warrant will be not valid and your product will not be warranty in
any case.
z Keep the phone away from water and damp areas. Water or
other liquids may cause overheating, electrical leakage, and
failure of the phone.
z Do not try to disassemble the phone. This can cause electric
shock and failure of the phone. Tampering will also void the
phone’s warranty.
z Put the phone in a safe and stable place.
z Keep away from dust and heat radiation (i.e. microwaves, stoves,
etc.)
z Try to use the phone away from ordinary telephones, television
sets, radios, and automated office equipment to avoid
interference between the devices.
z Use clean, soft, dry cloth to wipe the phone. Do not use any
chemical agents.
z Do not put the phone near explosive or inflammable materials.
z Use the phone only within the temperature range of -30°C~50°C
and humidity range of 25%~85%.
2. GETTING STARTED
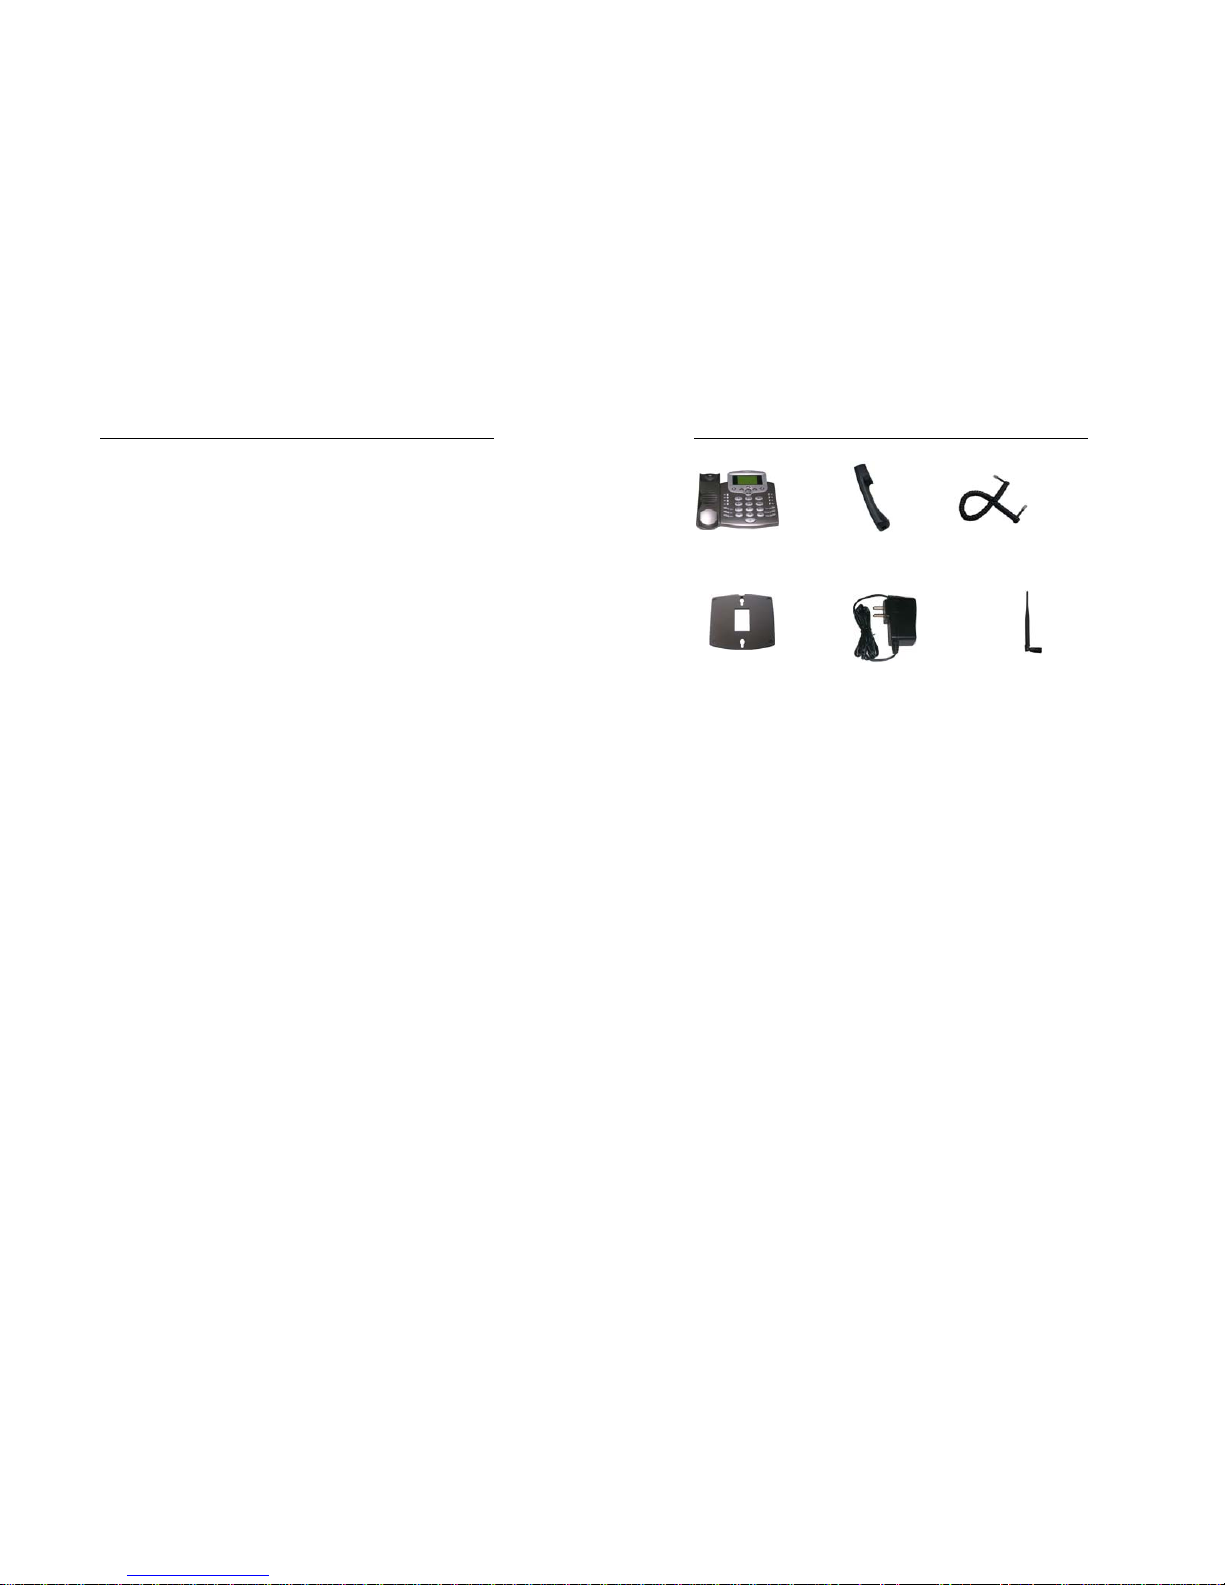
2.1 Checking the Package
Please check all the parts shown below and make sure no piece is
missing or broken. (The appearance of the parts in your package may
be different from those in this manual.)
Link You and Me by Wireless
8
2.2 Technical Parameters
z Frequency range: 824-849 MHz (Uplink)
869-894 MHz (Downlink)
z LCD display: Large dot matrix LCD / dialing number / dialing time
/status / time / date / signal strength / battery grade / short
message indicator.
z External interfaces: External power socket/Data port
z Power supply: AC 100V-300V
2.3 SIM Card Installation
The phone requires a Subscriber Identification Module (SIM) for
normal operation. The service provider supplies the SIM card, which
carries the account information needed to operate the phone. The
SIM compartment is on the back of the phone. Remember always
switch power off before you insert or remove the SIM Card.
Otherwise, you may lose information stored on the card or even
damage the card. The card is easily damaged by static electricity and
Main Unit (1) Handset (1) Handset Cord (1)
Antenna (1)
External power adapter (1)
Wall-hanging (1)

Link You and Me by Wireless
9
mechanical scratched, so be careful when handling it.
Note: If you don’t have a SIM card, contact your network
service provider.
1. Remove the power supply if it has already been connected. The
power supply must be removed whenever a SIM Card is
removed or installed.
2. Remove the SIM compartment cover by removing the screw.
3. The SIM compartment is underneath the battery, put up the
battery and open the SIM compartment holder.
4. Line up the SIM card with the arrow on the SIM card holder and
Insert the SIM card.
5. Close the SIM card holder and replace the battery.
6. Reattach the SIM compartment cover with the screw.
2.4 Turning Phone’s Power On/Off
After installing the handset correctly, turn on the power toggle switch
to “I” which located at the bottom of the phone’s housing and then
press the
key (the power key) which is on the right of the panel for
several seconds, the phone will then automatically test whether the
SIM Card is inserted and valid. Wait for the antenna icon to display
indicator bars before you make a call.
1. When the battery icon is empty, connect the external power
adapter’s barrel connector to the external power input on back
panel of unit.
2. Plug the external power adapter into the power socket. The unit
will power up automatically.
3. Check the cellular signal strength and move the unit until the
best signal possible is achieved.
Link You and Me by Wireless
10
4. In state of power-on, press and hold button
key, LCD screen
closes or turn off the power toggle switch to “0” directly.
Note: When using the phone for the first time, charge it for
over 8 hours to ensure optimum battery charge.
2.5 Appearance
Key Instructions
(1) Left key
z The button on the left side of the Call key.
z Means OK or Select and is used to access the main
menus.
(2) M1 to M8 keys
z Used to store up to 8 speed dial numbers.
z To use speed dial, lift the handset or press the Handfree
key then press and hold down the desired speed dial key
to call stored speed dial numbers.
(3) Clear key
z Let you clear your last entry.
(4) Set key
z It is the shortcut key to access Audio Settings menu
Link You and Me by Wireless
11
(5) Menu key
z It is the shortcut key to access menu.
(6) * Key
z It has different functions in different modes or function
menus.
(7) HANDS-FREE key
z If you are using the handset to call and you want to
transfer the call to the speakerphone. Press the
HANDS-FREE button and hang up the receiver to transfer
the call to the speakerphone.
(8) # key
z It has different functions in different modes or function
menus.
z This key is used to switch between the different writing
styles when writing an SMS or Text message.
(9) 0~9 number keys
z Used to enter numbers and characters.
(10)
key
z Switch On/Off the phone.
(11) Reject key
z Refuse or Reject an incoming call.
z If you are in a Menu screen, this key is used to go back to
the main standby screen.
(12) Msg key
z It’s the shortcut key to enter into short messages menu.
(13) Right key
z The button on the right side of the Call key. Means Exit or
Back and is used to access the Phonebook.
(14) Call/Redial key
Link You and Me by Wireless
12
z Press to make a call after dialing the desired number or
redial the last number called.
(15) ◄ ► and ▲ ▼ keys
z Press to move the cursor left, right, up and down when
entering letters or choosing items.
2.6 Installation
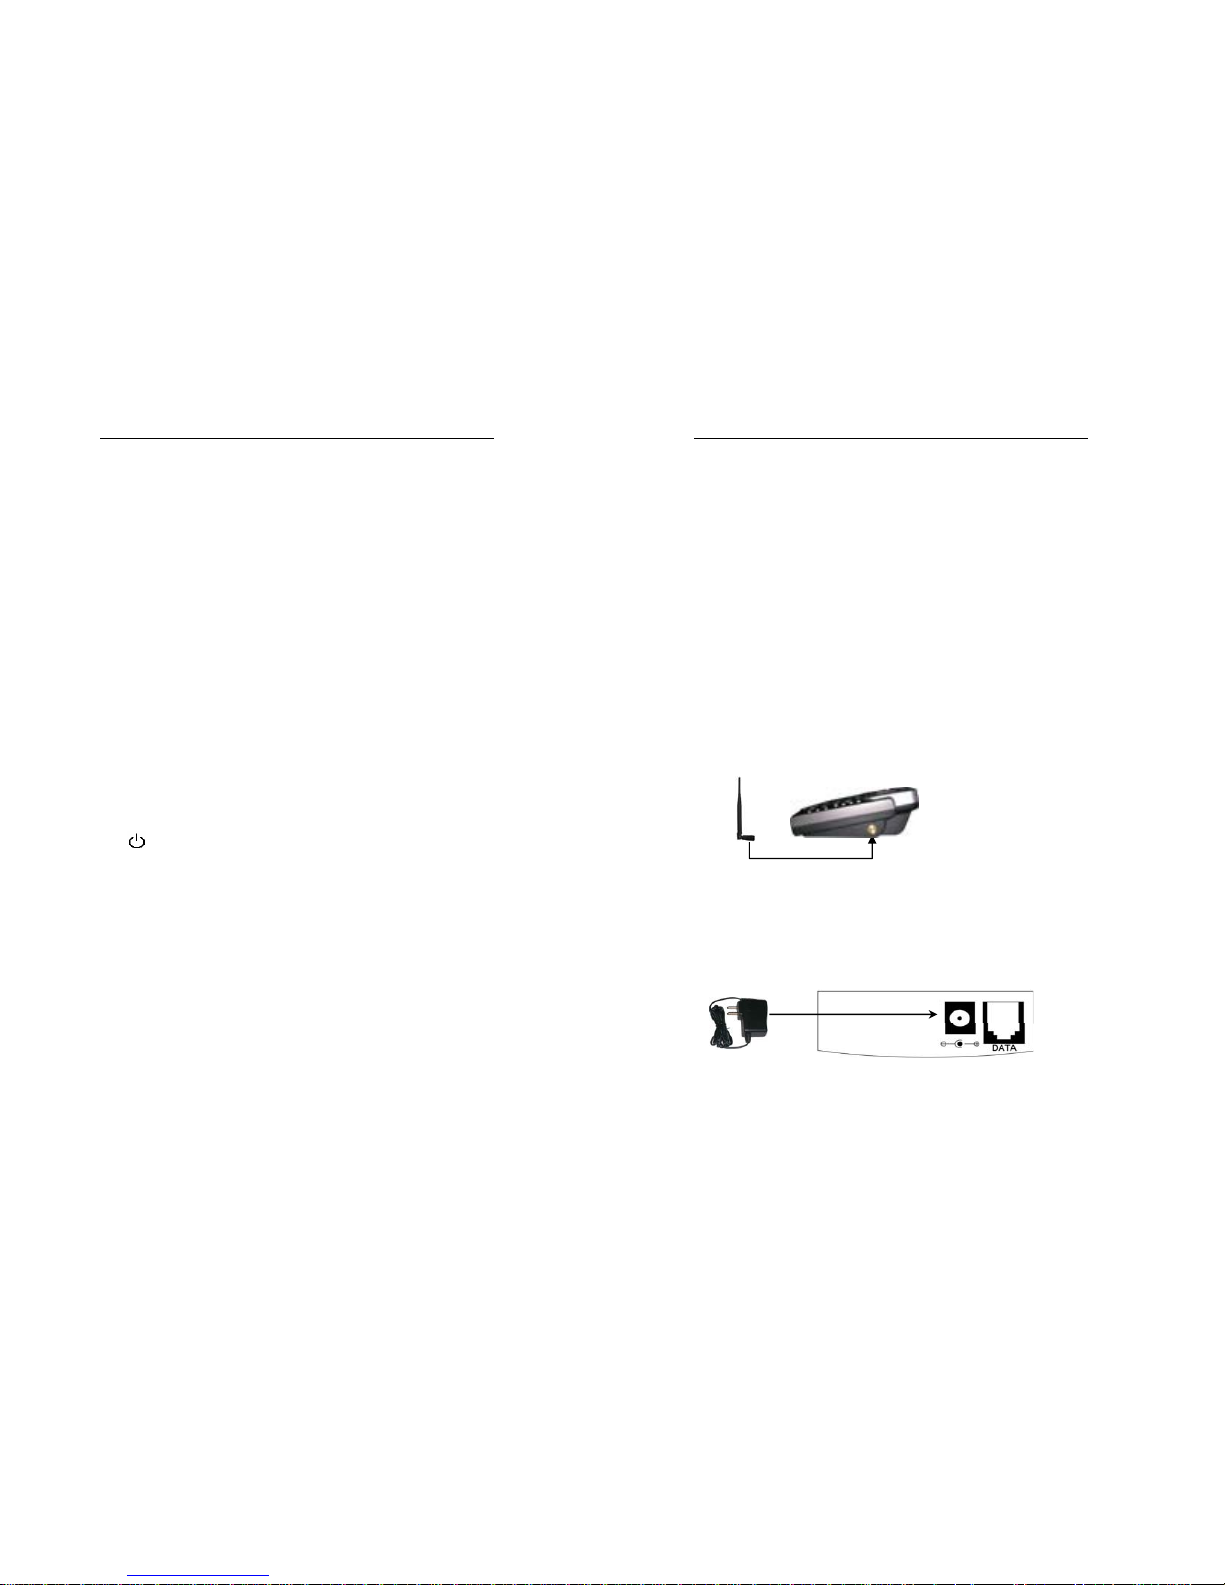
2.6.1 Handset
Connect the main unit and the handset with the handset cord; plug
the cord into the handset socket on the left side of the main unit.
2.6.2 Antenna
Install the antenna to the antenna connector. Hold the plastic portion
of the antenna and turn the metal screw clock-wise.
2.6.3 External Power Adapter
Plug the external power adapter into an appropriate wall outlet. This
power adapter supports both in 110V and 300V.
(Apply for phones with no GPRS)
Link You and Me by Wireless
13
(Apply for phones with GPRS)
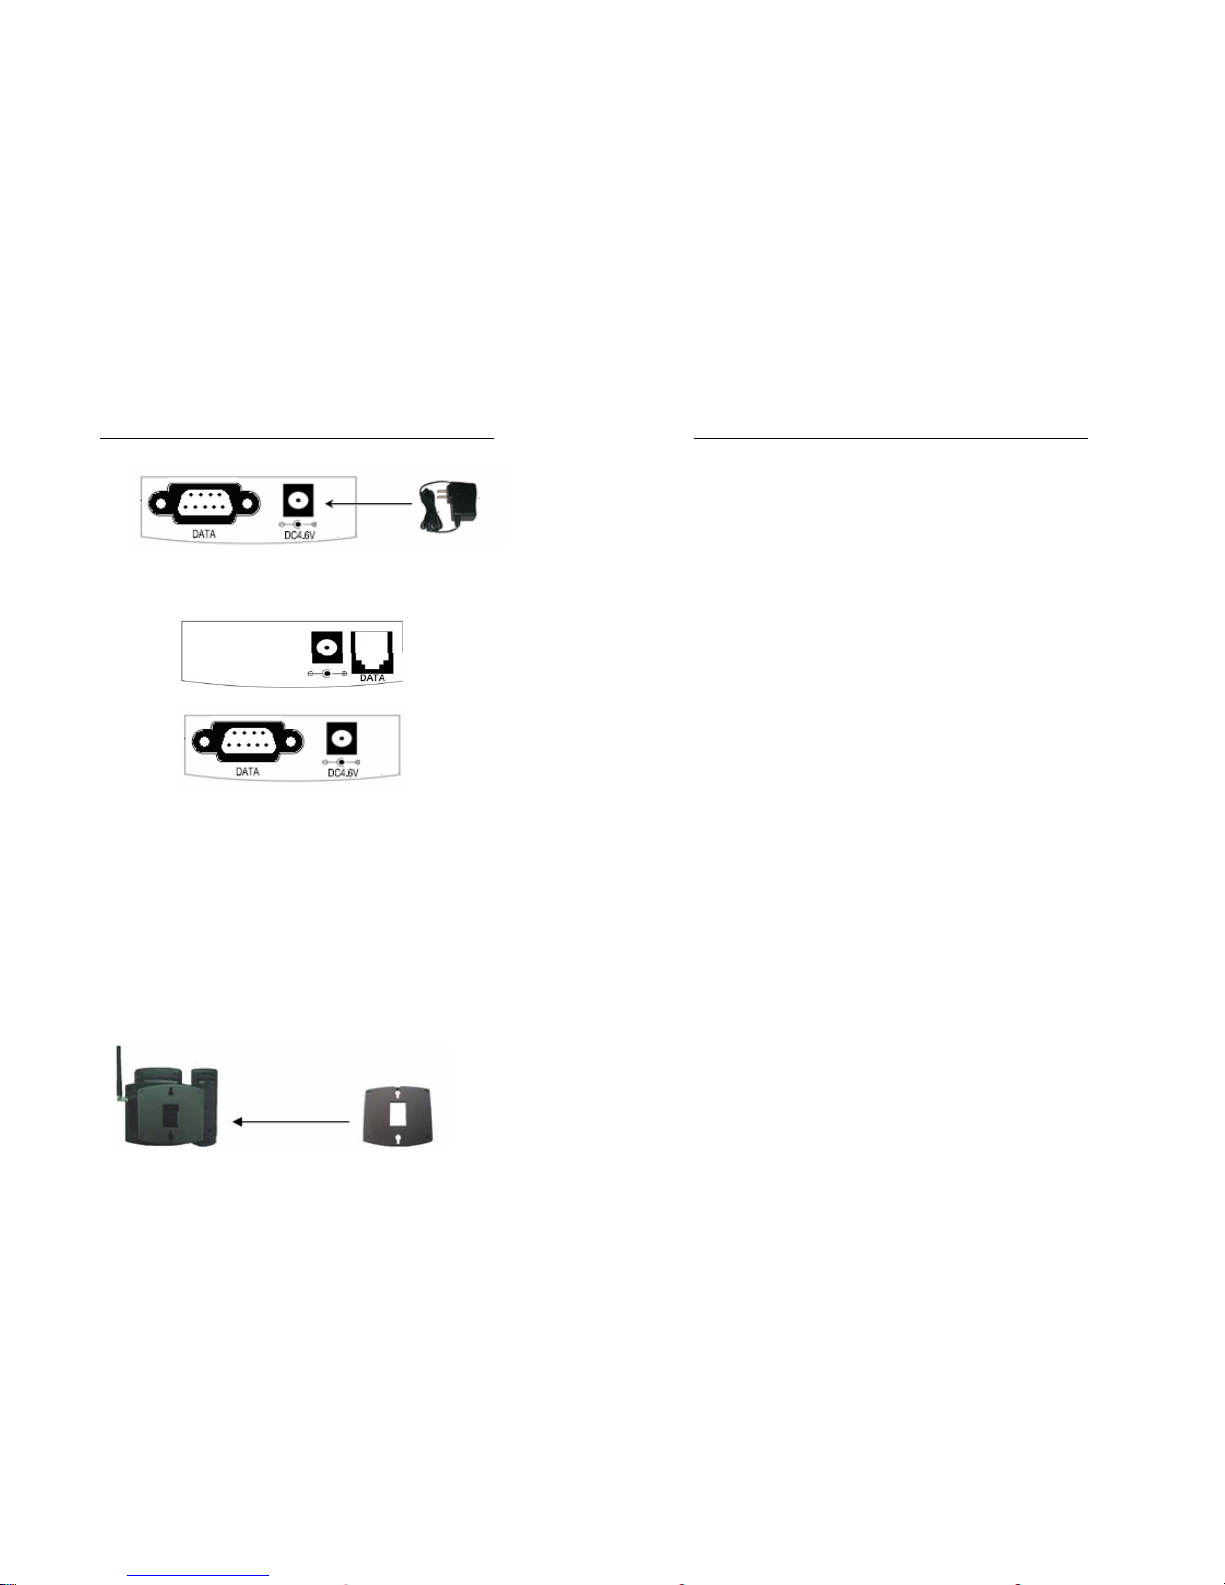
2.6.4 DATA Port (optional)
(Apply for phones with no GPRS)
(Apply for phones with GPRS)
DATA port is used for upgrading the firmware and GPRS.
Warning: Do Not insert a normal PHONE line or any object
into these ports. It may damage the phone and doing so will
void the phone’s warranty.
2. 6. 5 Wall-hanging (optional)
The wall-hanging can install in the phone bottom shell,connects with
the phone, enables the phone to be allowed to hanging on the wall or
other fixtures, it is advantageous for the user to use under different
environment
Link You and Me by Wireless
14
(Apply for the phone with wall-hanging)
Installs method:
On the phone bottom shell has four hollow slot, the wall-hanging has
four prominent angles, put each angles insert into each hollow slot,
after the wall-hanging connecting with the phone, the gradient of the
phone shall maintain the level.
3. SERVICE INDICATION
3.1 Full Service
When powered on, the service provider’s name will be displayed on
the LCD. If service is available, the antenna icon will display signal
strength indicator bars.
3.2 No Service
When no service is available, the antenna icon will not display any
indicator bars. Contact your service provider to verify cellular service
is activated in your area. No call can be made using the phone in this
condition.
3.3 Limited Service
If there is a signal, but full service with the system is blocked, only
emergency calls will be allowed. Contact your service provider for
more information.

Link You and Me by Wireless
15
4. BASIC PHONE OPERATION
4.1 Making a Call
4.1.1 Making a Domestic Calling
Pick up the handset or press the Handfree key. Then enter the
telephone number by using the Number keys (add area code when
making a long distance call) and then press the Call key to make the
call. Call status will be displayed when the network is connected.
If you are using the handset and you want to transfer the call to the
speakerphone, press the Handfree key then hang up the handset to
transfer the call to the speakerphone.
4.1.2 Dialing a Number in the Phonebook
All numbers in the phonebook can be directly dialed. To do so, view
the phonebook list then select the name of the phonebook entry that
you wish to call. The screen will then display the phone number of
the phonebook entry. Press the Call key to dial the number.
4.1.3 Using Speed Dial
You may assign eight speed dial numbers to the keys M1 to M8.
After picking up the handset or pressing the Handfree key, press the
desired speed dial key (M1~M8) for more than 4 seconds to call the
assigned speed dial number.
4.1.4 Making IDD
Method: (After you pick up the handset or press Handfree key) +
Country code → Complete telephone number → Call key.
Before you make an international distance call, enter the code of the
country you want to dial and the complete telephone number. Country
Link You and Me by Wireless
16
codes follow the conventions.
4.2 Answering a Call
When the phone rings, the LCD will display the number of the calling
party. Pick up the handset or press the Handfree key to answer the
call.
Note: Displaying the number of the incoming call requires
network support. The incoming call number may also be
displayed if it is stored in the Phonebook.
4.3 Rejecting a Call
When the phone rings, press the Reject key to end the incoming call.
4.4 Redialing
Pick up the handset or press the Handfree button then press the Call
button to call the latest dialed number.
4.5 Volume Adjustment
When connecting or during a conversation, press ◄Vol- or ►Vol+
button to adjust the volume of handset.
5. FUNCTION MENU
5.1 User Menu
1. Press Left key or Menu key to enter into main menu.
2. Press Right key to enter into Phone Book (Names).
3. Press ▲ or ▼ key to select.
4. Left key means OK or Select, Right key means Exit or Back.

Link You and Me by Wireless
17
The default structure of the function menu is as follows:
1. Phone Book
1.1 Search
1.2 Edit
1.3 Delete
1.4 Add New Name
1.5 Settings
1.6 Batch Operation
2. Short Messages
2.1 New Msg
2.2 Inbox
2.3 Outbox
2.4 Msg Settings
3. Phone Menus
3.1 Call
3.2 Diverts
3.3 Firewall
4. Setting
4.1 Phone Settings
4.2 Display Settings
4.3 Audio Settings
4.4 Clock Settings
4.5 Call Settings
4.6 Network Settings
4.7 Select Mode
Link You and Me by Wireless
18
4.8 Security Settings
4.9 Factory Settings
5. Toolkit
5.1 Alarm Clock
5.2 Calculator
6. STK
5.2 Phonebook
You can save your contacts info in Phonebook so that you can search
or dial conveniently.Enter into the Phone Book menu in the standby
mode by pressing the Right key. If the Phone book is empty, a
prompt “List empty” will be shown on the LCD screen, press Left key
which corresponding to Options you can Add New Names
. Press
Select
to choose SIM card or Phone to save the new contact, then
press
OK to enter the number and the contact’s name. After doing
these, scrolling the cursor through ▲ or ▼ key to select a group that
relative to the contact and press OK, then the new contact is saved.
Press Right key to Exit to the upper layer menu.
If the Phone Book list is not empty, select one contact and press Left
key to enter into phonebook menu you can do operations as shown
in 5.2.1.
5.2.1 Basic Operations of Phonebook
5.2.1.1 Find a Phonebook Entry
1. Select Search, enter the name or first letter of the name
you want to search and press OK.

Link You and Me by Wireless
19
2. Press Right key to cancel searching and Exit to the upper
layer menu.
5.2.1.2 Edit a Phonebook Entry
1. Select Edit.
2. Press Right key to clear the current number and edit a
new number then press OK.
3. The same operations as above to edit the name and to
choose a group to save the contact.
4. Press OK to save.
5.2.1.3 Delete a Phonebook Entry
Delete one contact in either the SIM or Phone memory.
5.2.1.4 Add a Phonebook Entry
1. Select Add New Name then select the location where the
entry will be saved (either in the SIM or Phone’s memory).
2. Input the entry’s phone number and then press the Left
key once.
3. Then input name of the entry and press the Left key to
save.
If you entered the wrong letter/number, press the
Right key
or Clear key to delete.
5.2.1.5 Settings
Select Settings can do the following functions:
1. Choose Ringing Tone you can set the ringing tone which
you like of this contact when he/she calls to you
according to the group the contact locates.
2. Choose Save No. to… can change the save location of
Link You and Me by Wireless
20
this contact.
3. Choose Used Space you can view the total content and
free content of your SIM card and the phone. The phone
can save 300 contacts, content of your SIM card decided
by the network provider.
4. Choose Speed Dial List you can view the keys list that
set speed dial whether or not. There are eight
keys ”1-8” to let you set this function, if you select some
keys to set the function, the corresponding contacts info
will be shown after the keys, if you don’t set the function it
will be shown “is empty” after the keys.
5.2.1.6 Batch Operation
Copy or move the contacts either from SIM to Phone memory or
Phone memory to SIM.
• Copy SIM to mem.
- Copy all the contacts from SIM to Phone memory.Thus
these contacts are saved both in SIM and Phone memory.
• Copy mem. to SIM
- Copy all the contacts from Phone memory to SIM.Thus
these contacts are saved both in SIM and Phone memory.
• Move SIM to mem.
- Move all the contacts from SIM to Phone memory.
• Move mem. to SIM
- Move all the contacts from Phone memory to SIM.
• Delete All in SIM
- Delete all SIM records.
• Delete All in Phone
- Delete all phone records.

Link You and Me by Wireless
21
If the Phone Book list is not empty, select one contact and press
►Vol+ key you can view the details of the contact including name,
number, locating and group, and press Options you can do
operations as shown in 5.2.2.
5.2.2 Other Functions of Phonebook
5.2.2.1 Send Message
You can edit a message text and send it to the contact, how to
write a message please refer to 5.3.1.
5.2.2.2 Edit the contact
Please refer to 5.2.1.2.
5.2.2.3 Delete the contact
Delete the contact.
5.2.2.4 Add to Speed
There are eight items ”M1-M8” that can be set to speed keys.You
can choose an item from “M1” to “M8” and assign it to the speed
key of the contact. Through ▲ or ▼ key selecting an item that you
want to set and press Select then you will see the contact’s name
shown after the item you selected, that means the speed key is
successfully set, if you press Delete then,the function will be
canceled, and “is empty” will be shown after the item.
To call using the speed dial keys, take the handset off the hook or
press the Handfree button.Then press and hold down the desired
programmed M1 to M8 key.
5.2.2.5 Copy to MS or Copy to SIM
Copy the contact from phone memory to SIM or from SIM to
phone menory.
Link You and Me by Wireless
22
5.2.2.6 Move to MS or Move to SIM
Move the contact from phone memory to SIM or from SIM to
phone menory.
5.2.2.7 Add to Blacklist
Add the contact to blacklist, then the calling from the contact is
forbidden.
5.2.2.8 Add to Friendlist
Add the contact to friendlist.
5.3 Short Messages
The phone is capable of sending and receiving SMS text messages.
Upon receipt of a new SMS message, the message icon (envelope)
will be displayed. SMS messages can be generated using the phone
keypad. Press Msg key or through ▲ or ▼ key to select Short
Messages item in the main menu to enter into Short messages
menu.
5.3.1 Write a New Messages
You can edit a new text message by choosing this.
1. Select New Message to enter into message texts.
2. There are multiple ways to write texts in the phone. You
will see in the top right hand side of the screen what the
current writing style is. The different writing styles are:
- abc – to type in English in lower case letters
- ABC – to type in English in upper case letters
- 123 – to type in numeric characters

Link You and Me by Wireless
23
- En – Predictive writing
- The predictive text input is based on a built-in
dictionary.
- To write the word “Hello” press 4, 3, 5, 5, 6 and
the Left key to input the word “Hello”
3. To cycle thru the different writing styles, press the #
button.
4. Press the Left key you can insert various prewritten
phrases into the message.
5. Input the content that you want to send. If you input the
wrong word, press the CLEAR key or Right key to delete
the last character entered.
6. After you complete the text, press the Left key. You will
then get the following options:
• Send to One
-Send the message to one recipient by manually
inputting the number or using the phonebook.
• Send to Many
-Send the message to multiple recipients by
manually inputting the number or using the
phonebook.
• Save
-Store the message in the “Outbox” folder by
manually inputting the number or using the
phonebook so that you can check or send it later on.
7. Input the destination number by either pressing the number
keys or selecting it from the phonebook. Press OK to send out
the message. If you enter the wrong number, press the Right
Link You and Me by Wireless
24
key or Clear key to delete the last digit entered.
8. Press the Right key can cancel the operations and exit to the
upper layer menu.
5.3.2 Read Received Text Messages
1. Press ▲ or ▼ key to select Inbox in messages menu.
2. Then press the Left key to view received short messages. If
there are no messages, it will be a prompt “Inbox is empty”.
In the message list, you can select one message you would like to
read by scrolling thru the list using ▲ or ▼ buttons or select
Delete all to delete all messages saved.
Choose Read to view the message. At this time press Options
to do the following operations:
• Text Reply
- write a new message to reply to the person who
sent you the SMS.
• Delete
- delete the message.
• Forward
- forward the selected message to a different person.
• Voice Reply
- dial the number
.
• Extract No.
- see the number and save it or to send a new
message to it.
3. Press the Right key can cancel the operations and exit to the
upper layer menu.

Link You and Me by Wireless
25
5.3.3 Read Text Messages Sent
1. Press ▲ or ▼ key to select Outbox in messages menu.
2. Then press the Left key to view short messages that have not
been sent. If there are no messages, it will be a prompt
“Outbox is empty”.
In the message list, you can select one message you would like
to read by scrolling thru the list using ▲ or ▼ buttons or select
Delete all to delete all messages saved.
Choose Read to view the message. Meanwhile press Options
to do the following operations:
• Delete
- delete the message.
• Forward
- forward the selected message to a different
person.
• Extract No.
- see the number and save it or to send a new
message to it..
3. Press the Right key can cancel the operations and exit to the
upper layer menu.
5.3.4 Message Settings
You have to make necessary settings before using SMS service.
You can set Valid Period, Server Centre, Insert Word and Status
Report.
1. Press ▲ or ▼ key to select Msg Settings in messages menu.
2. Then press the Left key to enter into the settings menu.
Several functions you can set:
Link You and Me by Wireless
26
• Templates
- you can edit several phrases and save them so
that you can use them conveniently when edit a
message.
• Msg Centre
- it’s decided by the network, you can save the
number but don’t change it.
• Msg Validity
- set the longest valid time to send a message if the
recipient can’t receive it temporary.
• Status Report
- choose on you can receive a prompt whether the
message is sent successfully, choose off don’t
have prompt.
• Used Space
- indicate the memory status of the SIM card and
phone
3. Press the Right key you can cancel the operations and exit to
the upper layer menu.
5.4 Phone Menus
The phone can record history callings in Phone Menus, and the
relative settings to callings can be set in this menu also. Enter into
the Phone Menus the standby mode by pressing the Left key first
then press ▲or▼ key to select Phone Menus.
5.4.1 Call
1. Press ▲ or ▼ key to select Call in Phone Menus.

Link You and Me by Wireless
27
2. Then press the Left key to enter, you can see several items:
• All Calls
-the records that including missed calls, received
calls and dialed calls.
• Missed Calls
- the calls that you didn’t answer.
• Received Calls
- the calls that you answered.
• Dialed Calls
- the calls that you dialed out .
• Call Duration
- display the total time spent on the Last Call and
All Calls Info. To reset the time for all the timers
select Reset.
• Calls Costs
- indicate the money you spent on calls.
3. Choose All Calls or Missed Calls or Received Calls or Dialed
Calls and press “Select or Left Key” in you can see several
callings records and an item Delete All at the bottom of the menu.
Select Delete All can erase all records. If the list is empty there
will be a prompt “List Empty”.
4. Select one calling record by scrolling thru the list using ▲ or ▼
keys and press Options you can do as below:
• Send Messages
- you can edit a new message to this number or
select receipt from phonebook or save this
message.
• Detail
Link You and Me by Wireless
28
- show details of the calling including addresser’s
name, number and called time.
• Save
- save the calling number.
• Add to Backlist
- add this number to backlist that the number can’t
call you again.
5. Press the Right key you can cancel the operations and exit to
the upper layer menu.
5.4.2 Diverts
Press ▲ or ▼ key to select in “Divert” menu.
Call divert service allows you to transfer incoming calls to a preset
number.
One can set calls to be diverted to another preset number in
different cases:
z Divert Always – all the calls will automatically be
diverted.
z When Busy – calls will be diverted when your phone is
in use.
z No Reply – calls will be diverted when no one answers.
z Unreachable – call will be diverted when the phone is
turned off or has no signal.
z Cancel All – cancel the call divert. (Note: When you
cancel the call divert function, the divert icon on the LCD
will not disappear until you make a call.)
5.4.3 Firewall
Press ▲ or ▼ key to select in “Divert” menu.

Link You and Me by Wireless
29
You can have the phone automatically reject incoming calls from
specific numbers.
To do this:
1. In the Phone Menus select Firewall, then press the Left key.
2. Then select Incoming Calls Bar, three items will be shown:
z Friend List –you can add your friend info to this list.
z Black List –it’s the list consists of the contacts that you
don’t want to answer the callings from them, each time
when they call your number, they will receive a busy
tone. You can select specific settings to set the function.
z Current Settings – you can select the list type that
rejected by the phone thru this function.
3. Select Friend List or Black List you can enactment the lists. If
the list is empty, a prompt “List Empty” will be shown in the
screen, press OK to add, you can add contacts by manually
inputting the number or using the phonebook. If the list is not
empty, thru ▲ or ▼ keys select one contact you can do as
follows:
z Add – add a new contact to this list.
z Edit – edit prefix of this number.
z Delete– delete this number from the list.
In list menu, select Clear prefix list to delete all numbers in this
list.
4. Select Current Settings you can do:
z Bar All – reject all numbers in the phone.
z Bar Blacklist – numbers in the blacklist can’t call.
z Friend Only – only numbers in the friend list can call.
z Cancel All – delete all numbers in lists.
Link You and Me by Wireless
30
5. Press the Right key can cancel the operations and exit to the
upper layer menu.
5.5 Settings
5.5.1 Phone Settings
5.5.1.1 Contrast
You can adjust the Contrast of LCD according to your will.Press
Left key to change the number, different number represents
different contrast, the bigger the figure, the stronger the contrast.
The adjustment range is from “10” to “30”.
5.5.1.2 Language
The phone’s default language is English.
5.5.1.3 Own Number
This displays your number, you can add by manually inputting.
5.5.1.4 Fastkey Settings
Left, Right, ▲ and▼ keys can be set shortcut keys to some
specific functions like Missed Calls, Received Calls, Dialled
Calls, New Msg and Inbox. If you don’t want to set fastkeys,
select Empty
.
5.5.2 Display Settings
You can open or close Backlight functon in this menu.Select On
to open bachlight that when you press any key the LCD screen will
be lighted, thus the screen display is clearer to view especially at
night. Select Off to close backlight that the LCD screen won’t be
lighted when pressing any key.

Link You and Me by Wireless
31
5.5.3 Audio Settings
5.5.3.1 Ringing Tone
This is the ring tone that will play when you have an incoming call.
There are 20 ring tones to choose from.
5.5.3.2 Ringing Volume
This is to adjust the volume of the ring tone that will play when you
have an incoming call. To adjust the volume, press Left key and
adjust accordingly by using the ◄Vol - or ►Vol + buttons.
5.5.3.3 Speaker Volume
This is to adjust the incoming volume. To adjust the volume, press
Left key and adjust accordingly by using the ◄Vol - or ►Vo l+
buttons.
This can also be adjusted during a call.
5.5.3.4 Handfree Volume
This is to adjust the incoming volume when you answer a call thru
Handfree. To adjust the volume, press Left key and adjust
accordingly by using the ◄Vo l- or ►Vo l+ buttons.
5.5.3.5 Key Tone
This is to adjust the volume of the tone that will play when you
press any button. Select On to open the function that when you
press keys you will hear key tones, select Off to close the function
that you won’t hear key tones when you press keys.
5.5.3.6 Warn Tone
Set the phone alert “On” while active the warn tone function, Set
the Phone alert ”Off” while keep in silence.
Link You and Me by Wireless
32
5.5.3.7 Missed Alert
You have the option of having the phone warn you if you have
missed calls. Select On to open the function and select Off to
close the function.
5.5.3.8 Message Alert
This is the ring tone that will play when you receive an SMS or
Tex t. There are 3 ring tones to choose from. You can also choose
Off to cancel the function that no tone will play when you receive
an SMS or Text.
5.5.3.9 Power On/Off Ring
You have the option of having the phone warn you when you
power on or power off the phone. Select On to open the function
and select Off to close the function.
5.5.4 Clock Settings
5.5.4.1 Date &Time
This is to set the time and date. The date is in the format of
Month/Date/Year or other formats. And the time is in 24 hour
format.
5.5.4.2 Date Format
You have there options to set the Data format, Year/Month/Date,
Date/ Month/Year and Month/Date /Year.
5.5.5 Call Settings
5.5.5.1 Minute Minder
This feature will only work during a call. During a conversation, it
will beep 5 or 15 seconds before the end of each minute. This is

Link You and Me by Wireless
33
very useful especially when making international calls as you can
easily monitor the length of the conversation and end a call before
a minute is reached.
5.5.5.2 Call Waiting
Allow an incoming call to wait to be answered while you are
engaged in an earlier call.
Note: Call Divert, Call Waiting and Firewall require ne twork
support.
5.5.5.3 IP Setting
Select IP Enable to be “On” or “Off” to activate or deactivate IP
function, and key in IP Code, e.g. access IP Number 17951, and
then press Left key to confirm.
After setting of IP Code, the phone can add the access IP Number
automatically before the phone number selected from Names or
Calls to send a call.
5.5.6 Network Settings
Allow you to automatically or manually select the network to use.
5.5.7 Select Mode
There are two options for band selection.
z G/D
z GSM850/PCS
5.5.8 Security Settings
Introduction to phone’s security options preventing others to avoid
illegal use or acquire your phone’s personal information.
The default lock code is “1234”. Press the code “1234” to enter
Link You and Me by Wireless
34
into submenu.
• SIM password: Select “On” or “Off” to activate PIN
Code or not. Or enter new PIN Code by your own to
change the old PIN Code.
z Phone Lock: Select “On” or “Off” to activate phone lock
or not. Or enter new Phone Lock Code by your own to
Change Code.
z Network Call Bar: Set any of call bar(s) in the following
to promote security, please contact to the service
provider for details. The service provider will offer you a
4-digit Network Code to activate Network Call Bar.
Press Select to enter in:
¾ International Calls
: Bar international call(s).
¾ Al l Except Home:
Bar all calls except for home number.
¾ Incoming Calls
: Bar incoming call(s).
¾ Incoming If Abroad:
Bar incoming call(s) overseas.
¾ Outgoing Calls: Bar sending call(s).
Select any of above mentioned bar(s), and then scroll to set
barring options:
- All Services:
Bar all services, such as incoming call, voice
call, and message, etc.
- Voice Calls:
Bar voice call only.
- Data: Bar data only.
- Fax:
Bar fax only.
- Message:
Bar message only.
- All except Msgs:
Bar all services except for message.
After setting bar and service type, you can do as follows:
- On: Activate bar after registration.

Link You and Me by Wireless
35
- Off: Close the bar.
- Status: Check whether bar is activated or not.
z Cancel All: Cancel barring call(s) setting.
Note: Set or cancel network call bar acquires network code
offered by the service provider. Three consecutive inputting
wrong codes can cause locking of barring servic e. To unlock,
please contact with network provider.
5.5.9 Factory Settings
This is to restore all the settings to its original state.
5.6 Toolkit
5.6.1 Alarm Clock
Press ▲ or ▼ key to select in “Toolkit ”menu.
This is an additional feature of the phone where you can set
custom alarms on your phone.
5.6.1.1 Set Alarm
Press ▲ or ▼ key to select in “Alarm Clock”menu.
You have four options to choose: Set Alarm, List Alarm, Clear All,
Define Rest Day;
Under Set Alarm menu there are:
• Normal Alarm– enter the date and time you want the
alarm to go off. After inputting select Normal to select
the alarm tone, there are 20 tones can choose. Select
Power off to make the alarm available even if the phone
is power off, select Power on just to make the alarm
available when the phone is power on.
Link You and Me by Wireless
36
Note: This is in 24 hour format. For example, to set the alarm
to go off at 2pm you must enter 14:00.
• Daily Alarm – make the alarm available everyday, the
detailed settings operations refer to above.
•
Weekl y Alar m –make the alarm available at the day you
selected in a week, the detailed settings operations refer
to Normal Alarm.
• Workday Alarm –make the alarm available only at
workday, so you should select Monday, Tuesday,
Wednesday, Thursday and Friday, the detailed settings
operations refer to Normal Alarm.
5.6.1.2 List Alarms
Press ▲ or ▼ key to select in “Alarm Clock”menu.
Show the details of all alarms, thru ▲ or ▼ keys can view all the
alarms. Choose one alarm and press Left key you can do:
• Edit –change the type of this alarm to Daily Alarm,
Weekly Alarm or Workday Alarm, and select the
ringing tone, make the alarm available when Power on
or Power off.
• Disable–make this alarm unavailable.
• Delete –erase this alarm.
5.6.1.3 Clear All
Press ▲ or ▼ key to select in “Alarm Clock”menu.
Delete all alarms that you set.
5.6.1.4 Define Rest Day
Press ▲ or ▼ key to select in “Alarm Clock”menu.
Thru ▲ or ▼ keys to select the days you rest then press ►Vol+

Link You and Me by Wireless
37
key to mark them, press Left key complete OK.
5.6.2 Calculator
Press ▲ or ▼ key to select in “Toolkit”menu.
This is a basic calculator that supports adding, subtracting,
multiplying and dividing. Press Left key to cycle thru the different
math functions.
Ex. To add 1+1, press 1, Left key, 1 and then press the Left key
to show the answer.
5.7 STK
The content of STK is provided by the network provider.
6. ADDITIONAL FUNCTIONS
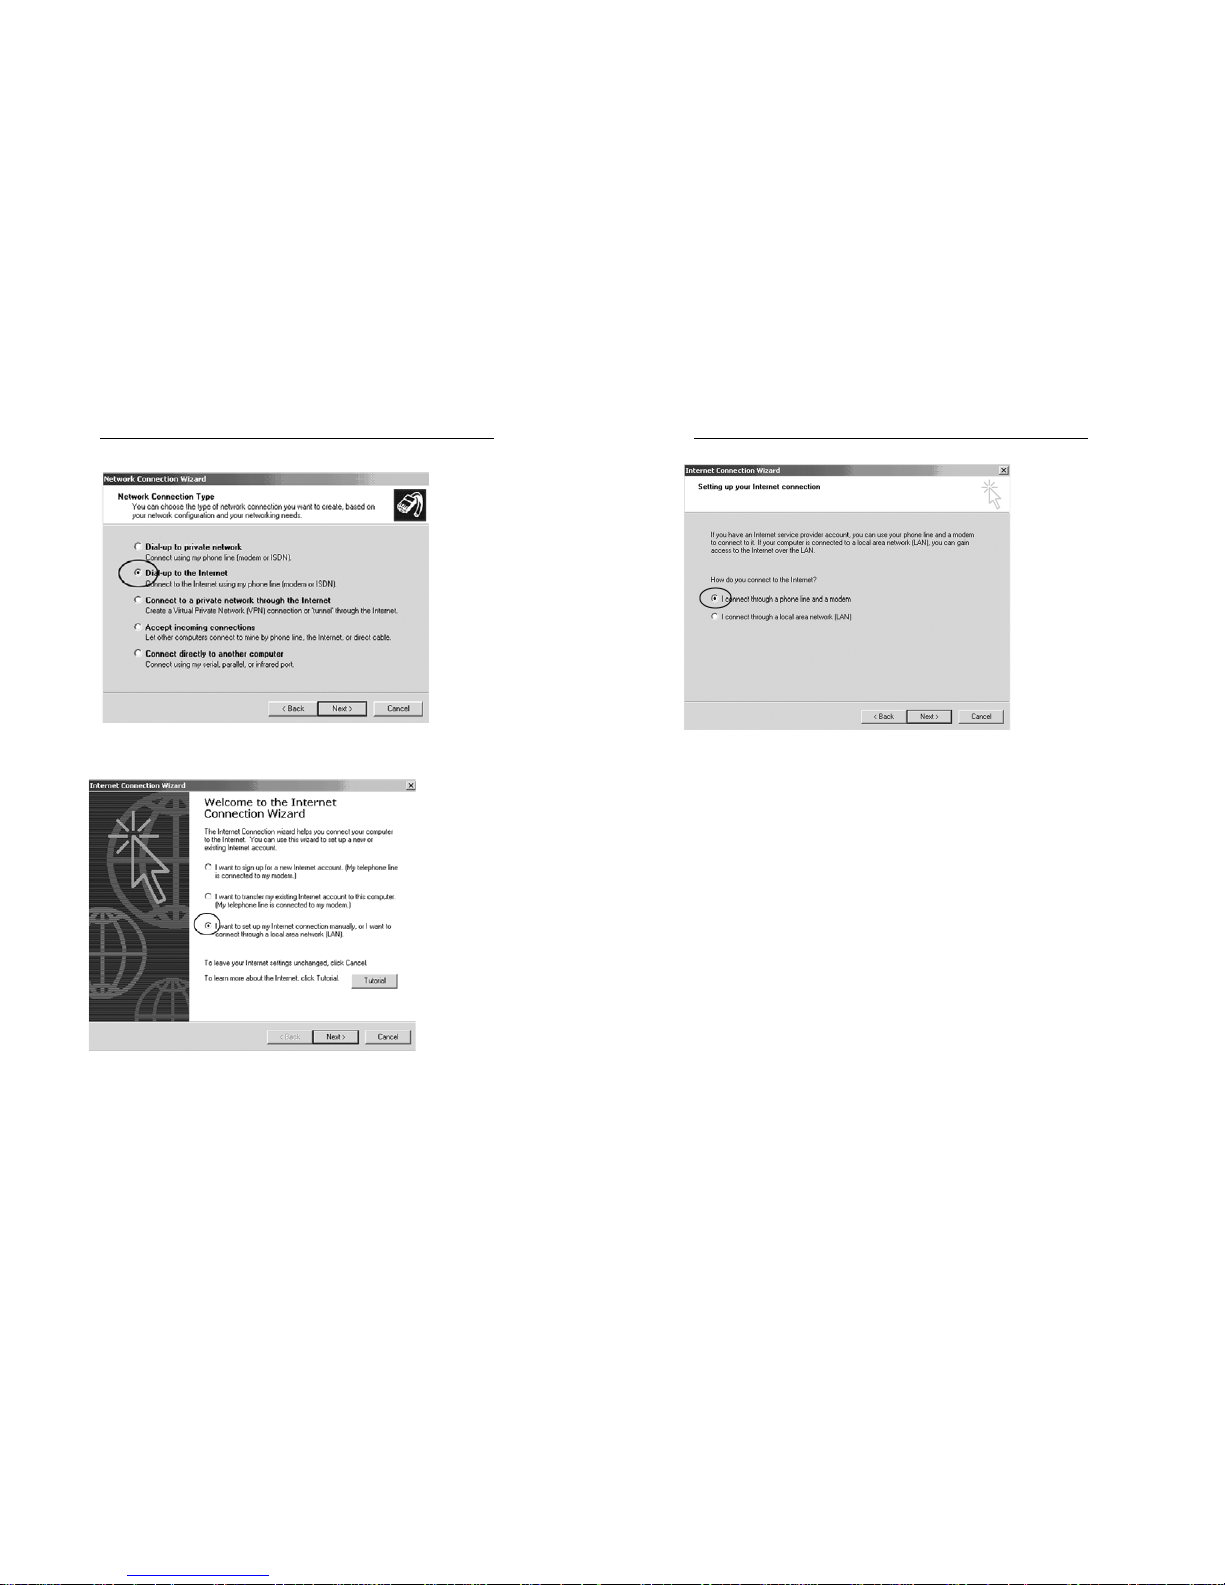
GPRS
This function must be supported by service providers. Connect the
port cable to your computer and do as following, you can use this
function:
1. Create a standard 33,600 bps Modem on the PC. Select
“Control Panel -> Modems”, and then click “Add”.
2. Click “Next”, and select “Don’t detect my modem; I will select it
from a list.
Link You and Me by Wireless
38
3. Select “Standard Modem Type” as the Manufacturers and
“Standard 33600 bps Modem” as the Models.

Link You and Me by Wireless
39
4. Click “Next”, select the Communication Port, for example:
COM1.
5. Click “Next” to finish.
6. Select the newly created Modem in “Modems”, as shown in the
interface, select “Properties”, and then select “Maximum
speed” as “115200” in the “General” tab.
Link You and Me by Wireless
40
7. Click “Advanced” tab, add “AT+CGDCONT=1, “IP”, “CMNET”” to
the Extra setting, and click “Change Default Preferences..”, then
select “None” in the “Data flow control” tab.
Note: “CMNET” is Chinese Network Access Code, the code is
different in different countries, please refer to your service
provider to get the code.
8. Create the dial-up network. Enter “Network and Dial-Up
Connection”, and double-click “New Connection”.
9. Click “Next”, and select “Dial-up to the Internet”.
Link You and Me by Wireless
41
10. Click “Next”, and select “I want to set my Internet connection
manually, or I want to connect through a local area network”.
11. Click “Next”, and select “I connect through a phone line and a
modem”.
Link You and Me by Wireless
42
12. Click “Next”, and select the newly created Modem.
13. Click “Next”, fill in the phone number, which vary with the areas.
14. Fill in the user name and password.
15. Click “Next”, and enter the connection name.
16. Click “Next”, and select “Do not create Internet account”.
17. Click “Next” to finish.
18. Select the newly created connection in “Network and Dial-up
Connection”, and right click to select “Properties”, cancel use
dialing rules.
19. Click “Configure”, and select the speed as 115200, and cancel
“Enable hardware flow control”.
20. Click “OK”.
21. Double-click the newly created connection, and enter the user
name and password for connection.
22. Open the web page in IE for Internet access with successful
dial-up.

Link You and Me by Wireless
43
Note: Local service provider should provide the user name and
password and connection name, no calling permitted when
surfing the Internet.
APPENDIX I: COMMON TROUBLESHOOTING
Fault Solution
No dial tone after off-hook Hook on, and then hook off or press
hook
No response in the key system
interface (after several
attempts)
Power off and then on to try once
more
No display in the system
interface after disconnection of
the external power source
Check whether the battery has
electricity, or check whether the
battery is damaged, or power on the
phone again
No display in the system
interface after power-on
Check whether the power source is
well connected, or check whether
the battery has electricity, and then
connect the power source or battery
reliably
Display of Searching or No
service
The phone currently is not in the
service area qualified by the
network service provider or the
GSM signal is too weak.
Link You and Me by Wireless
44
Fault Solution
No response or incorrect
response of the system after
pressing Call/ Redial key
when making a call
There may be problem with the
network, please make another
attempt; or you must have set an
incorrect IP number, local area
number or NMC number, etc., by
yourself. Please contact the network
service provider.
Unable to send the number
after pressing Call/Redial key
Check whether you have hooked off
(Note: Be sure to hook off before
sending the number when
making a call.)
The system stops sending
dialing tone and returns to the
main interface 20 seconds
after hook-off
Hook on, and then hook off to make
a call
Other abnormalities First refer to the User’s Manual, and
then check whether the parts such
as power source. If there are no
such problems, power off and then
power on the phone again.
 Loading...