

Page 1

A Division of Cisco Systems, Inc.
®
GHz
4
2
,
802.11g
Wireless
Wireless
Model No.
Model No.
Model No.
Wireless-G
Notebook Adapter
with SpeedBooster
Quick Installation Guide
WPC54GS (EU/UK)
Package Contents
• Wireless G Notebook Adapter
• Setup CD-ROM
• User Guide on CD-ROM
• Quick Installation
Quick Installation Guide
1
Page 2

Installing the Wireless-G
1
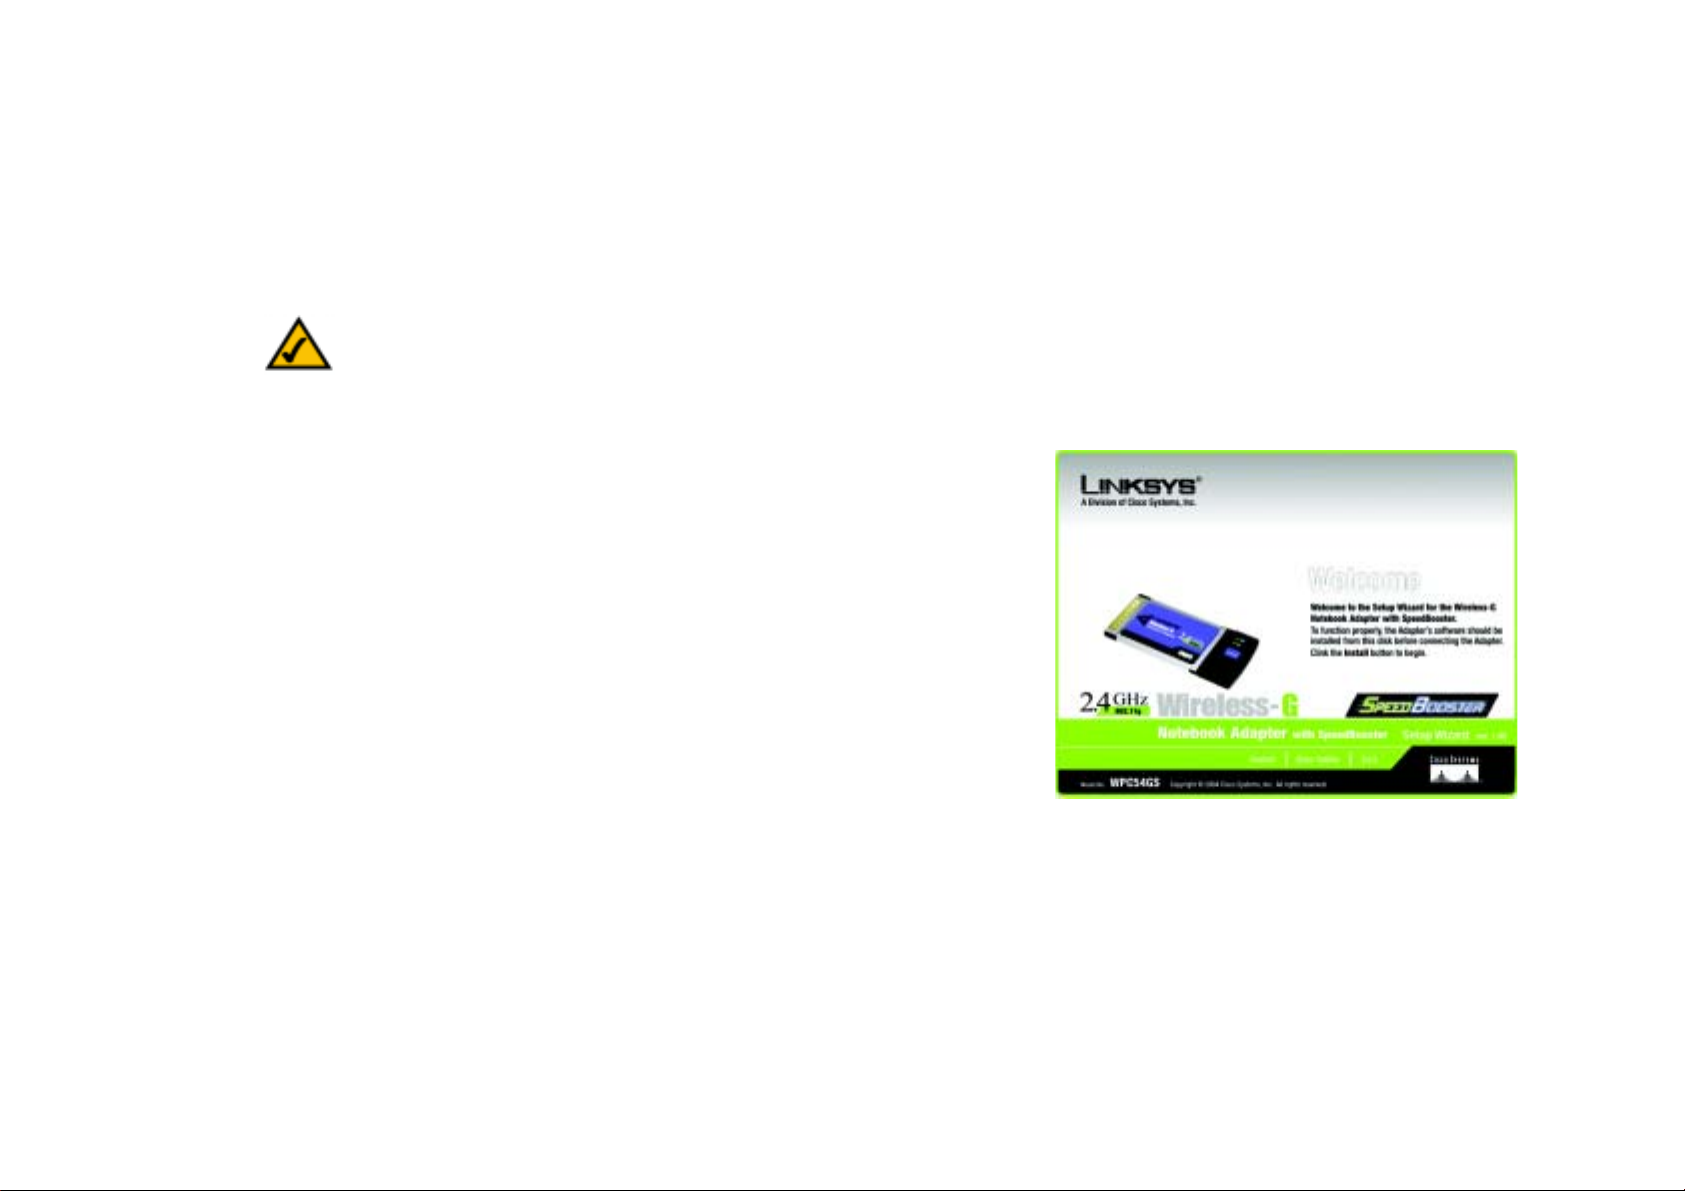
A Insert the Setup CD-ROM into your
Notebook Adapter Software
CD-ROM drive. The Setup Wizard
should run automatically, and the
Welcome screen should appear.
If it does not, click Start and
choose Run. In the field that
appears, enter D:\setup.exe (if “D”
is the letter of your CD-ROM drive).
Click the Install button.
B After reading the License Agree-
ment, click Next to continue the
installation.
C Next you will choose a wireless
mode for your network. Click the
Infrastructure Mode radio button if
you want your wireless computers
to network with computers on your
wired network using an access
point. Click the Ad-Hoc Mode
radio button if you want multiple
wireless computers to network
directly with each other.
In the SSID field, enter the SSID of
your wireless network. The SSID
must be identical for all devices in
the network. The default setting is
linksys (all lowercase). Click Next.
D If you chose Infrastructure Mode,
go to Step E now. If you chose AdHoc Mode, select the correct
operating channel for your network.
A
B
C
If you have Wireless-G (802.11g)
and Wireless-B (802.11b) devices
in your network, then keep the
default Network Mode setting,
Mixed Mode. If you have only
2
D
Page 3
Wireless-G devices, select G-Only
Mode. Click Next.
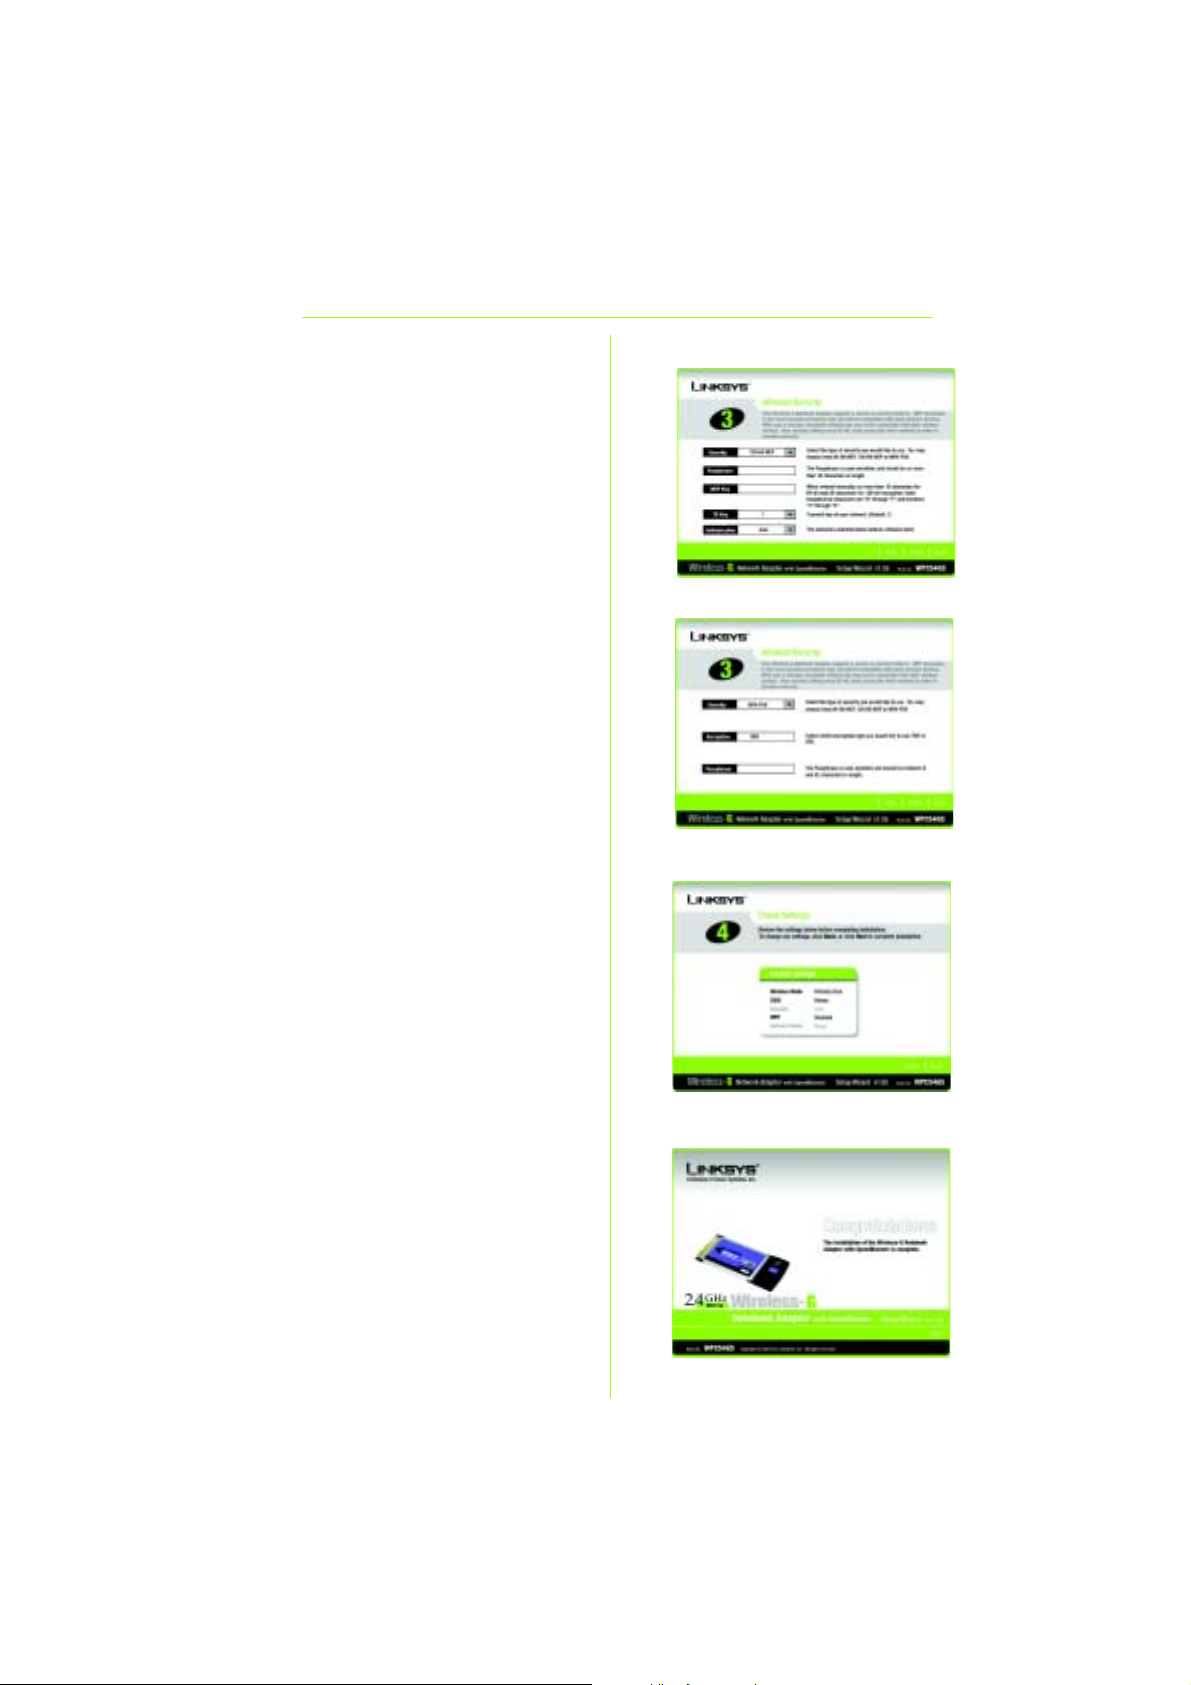
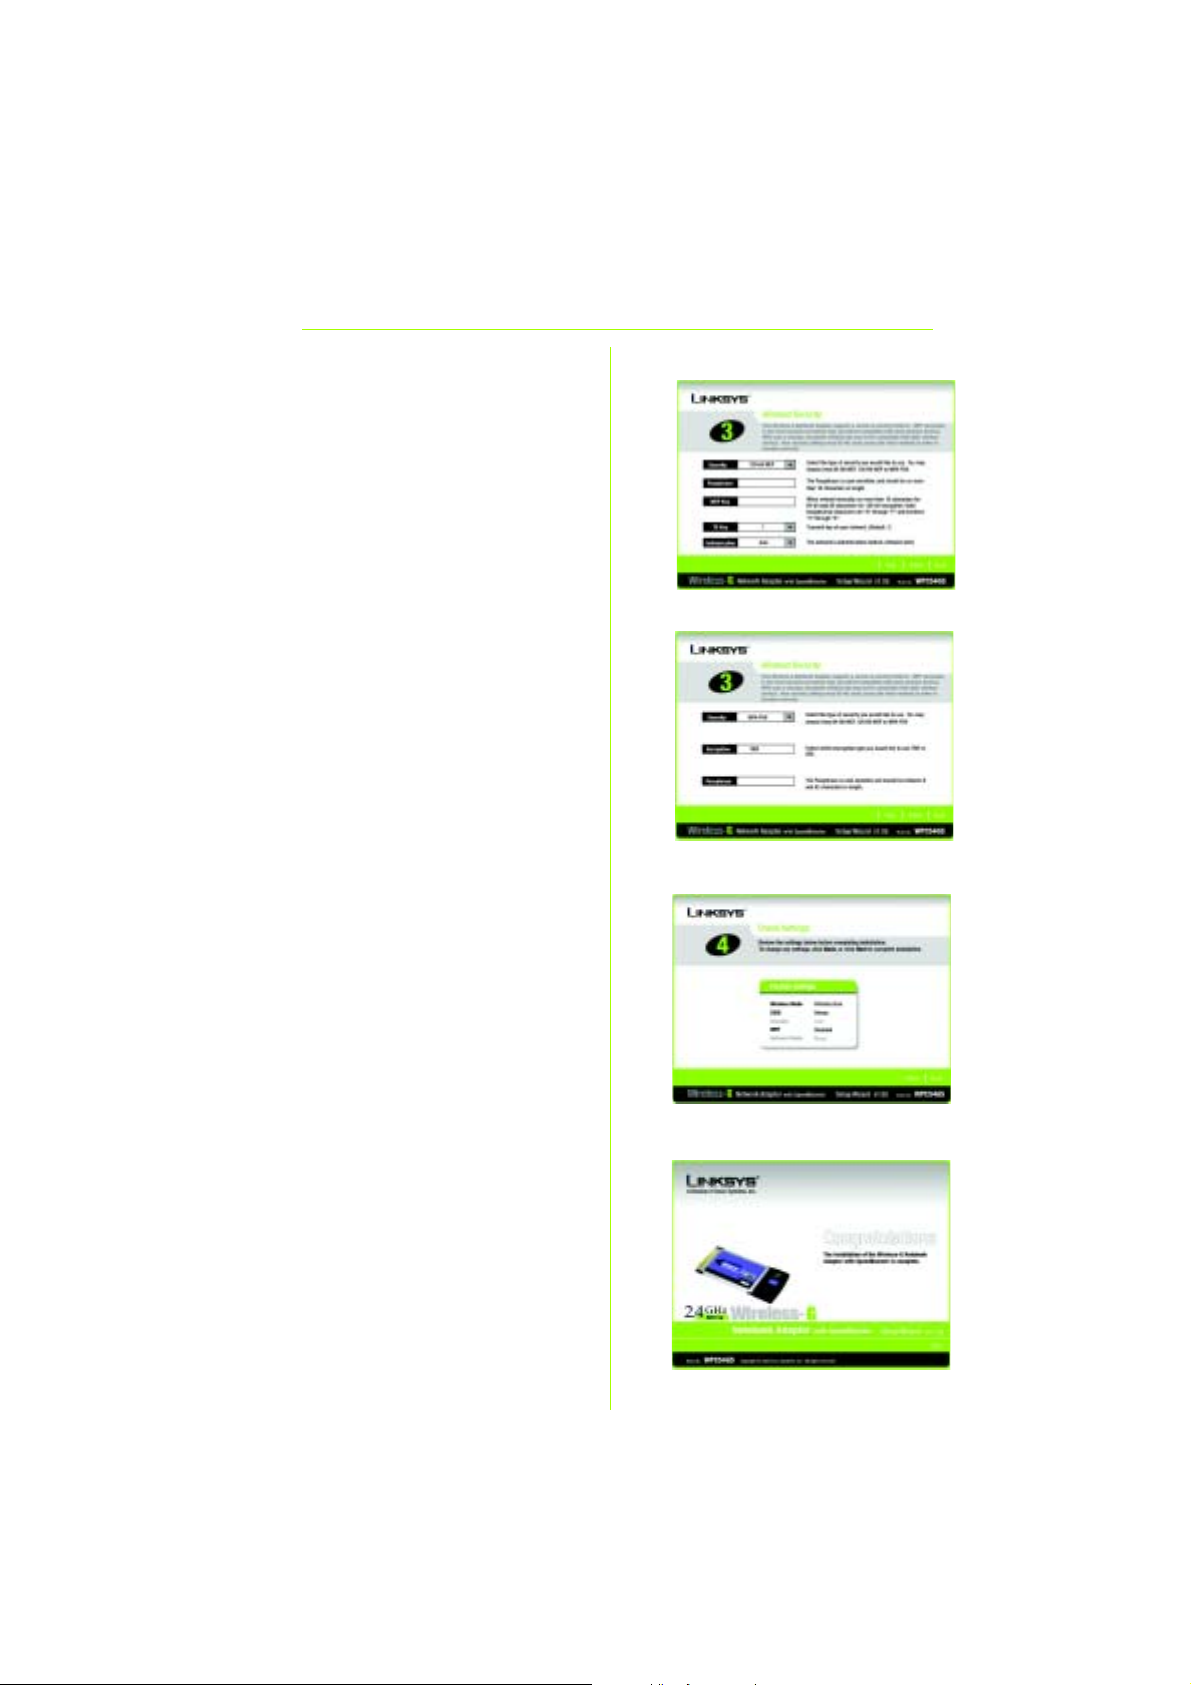
E Select your type of security: 64-bit
WEP, 128-bit WEP, or WPA-PSK. All
devices in a network must use the
same type.
WEP
The Passphrase is used to generate one or more WEP keys. It is
case-sensitive and should not be
longer than 16 alphanumeric
characters.
If you are using 64-bit WEP encryption, then the key must be exactly
10 hexadecimal characters. If you
are using 128-bit WEP encryption,
then the key must be exactly 26
hexadecimal characters.
Select the TX key and Authentication method of your network.
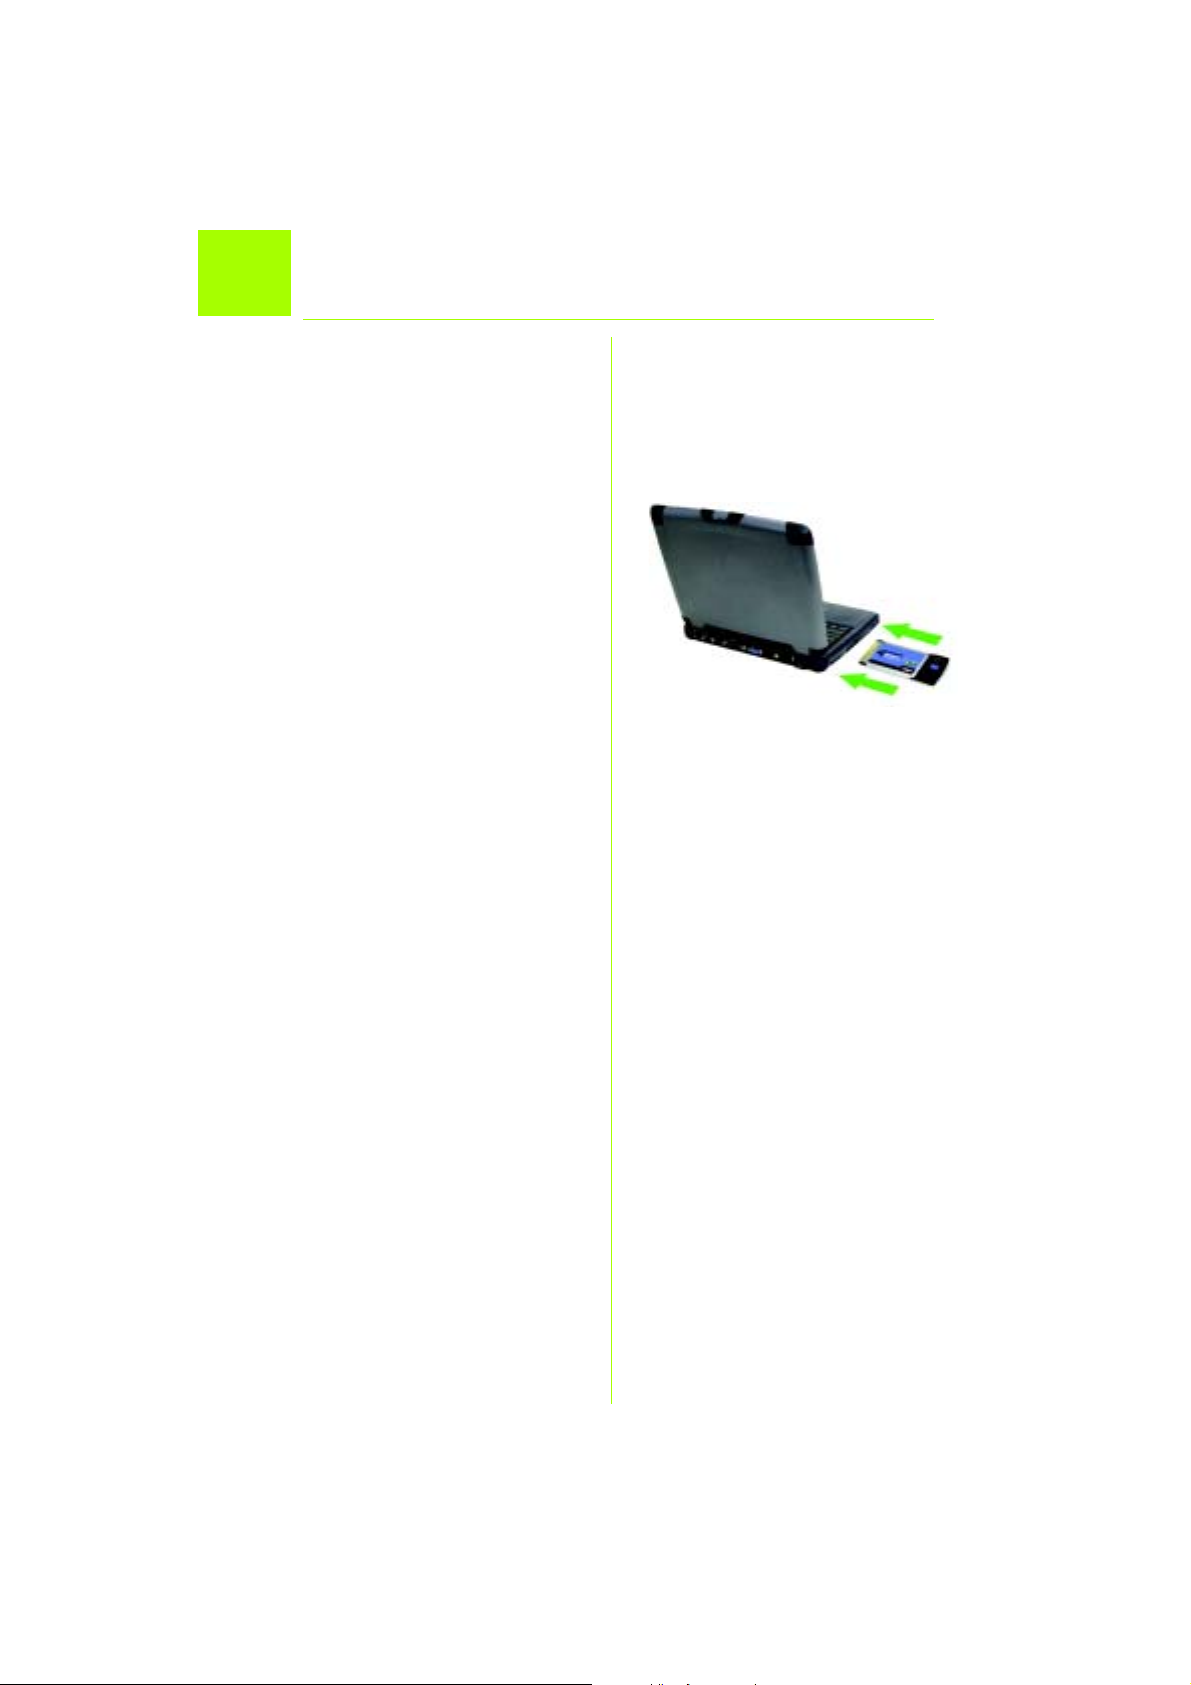
WPA-PSK
Select TKIP or AES encryption.
Then, choose a passphrase
between 8-63 characters.
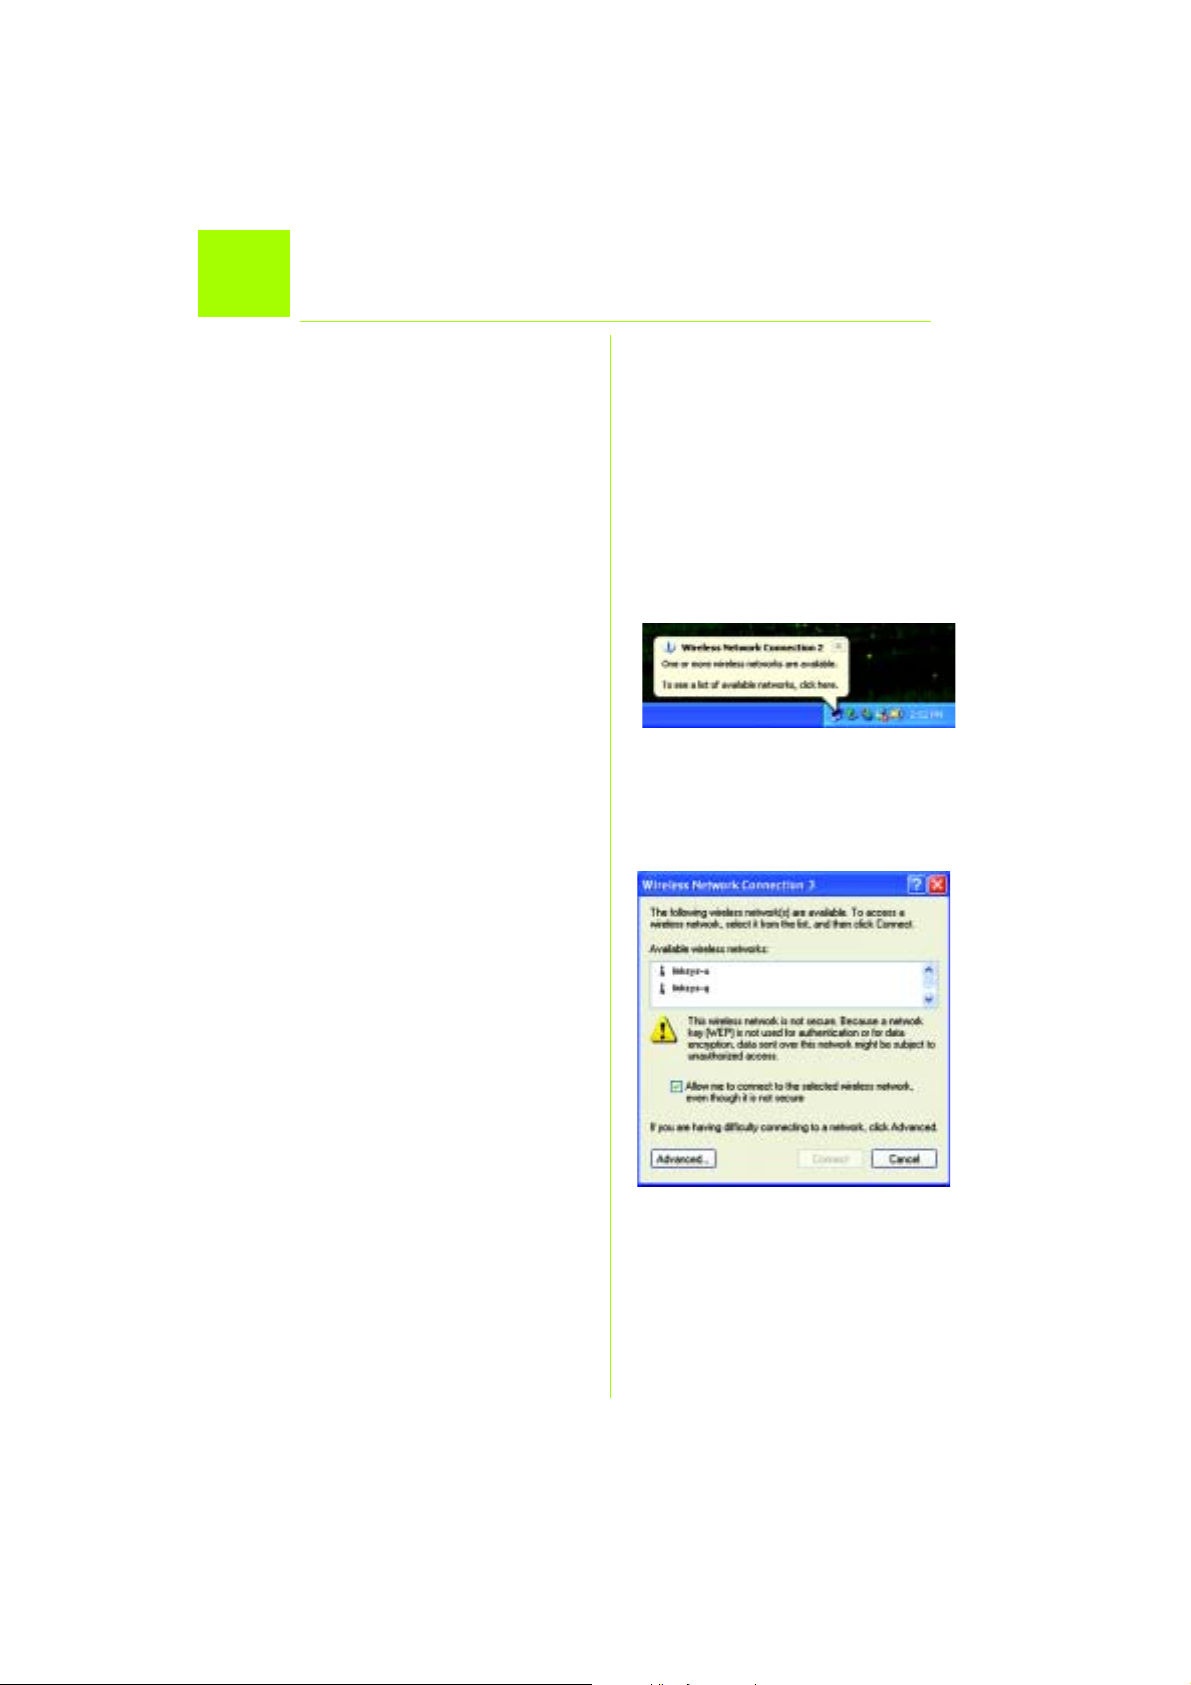
F The Setup Wizard will ask you to
review your settings before it starts
to install files. Click Next if you are
satisfied with your settings, or click
Back to change any settings.
E1
E
F
2
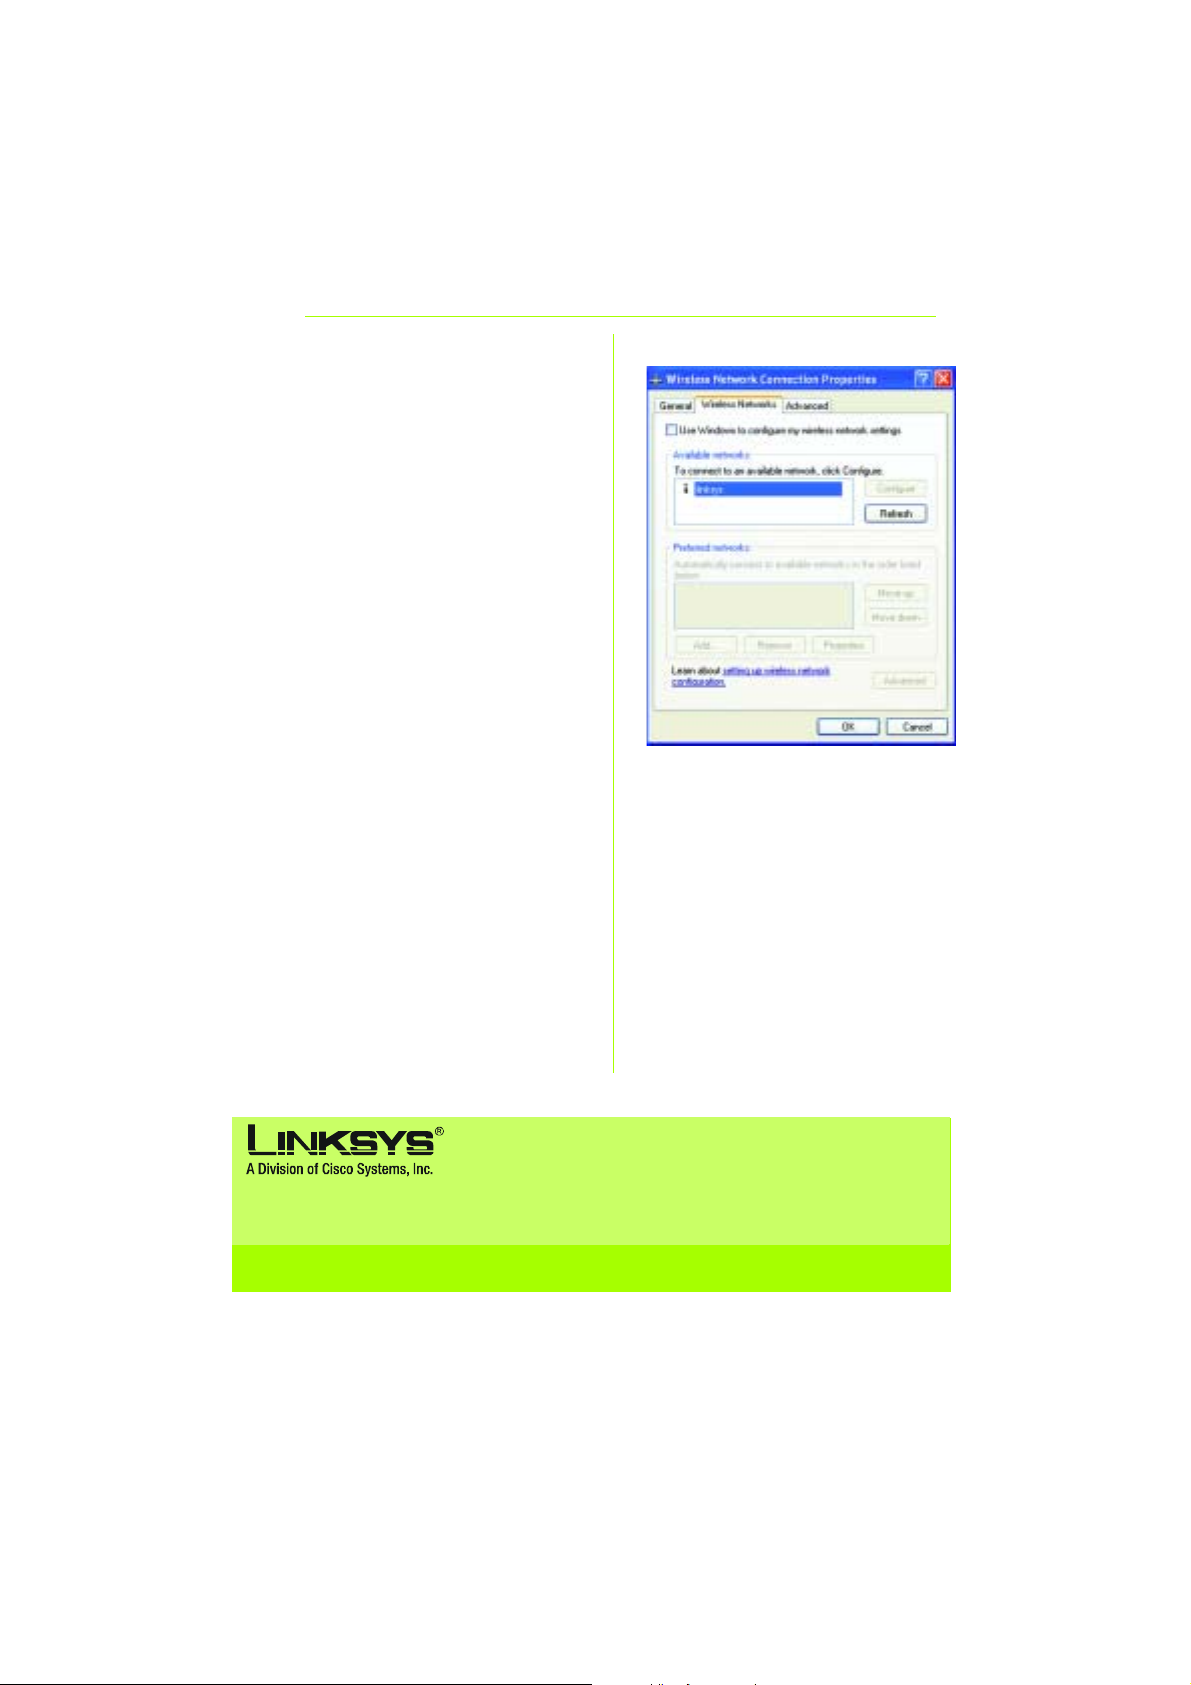
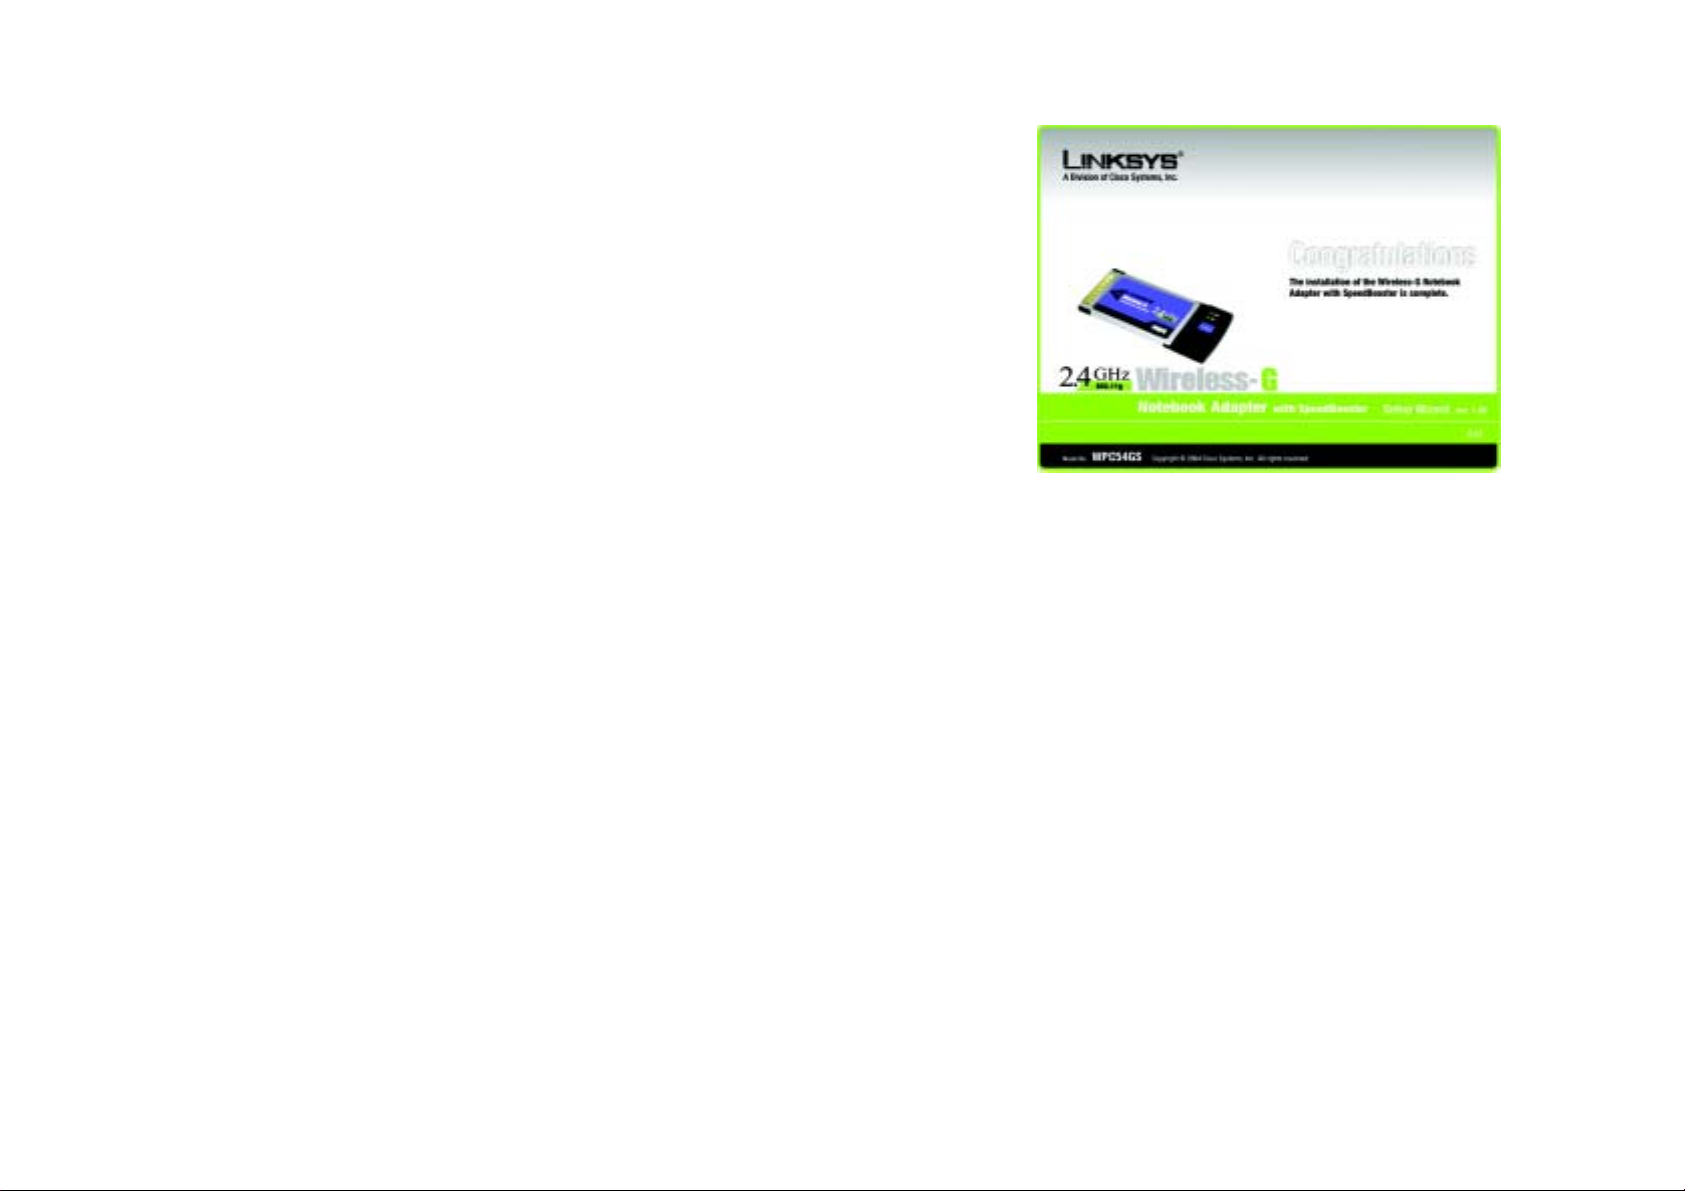
G After the software has been suc-
cessfully installed, click Exit.
G
3
Page 4
Installing the Wireless-G
2
A Turn off your notebook PC.
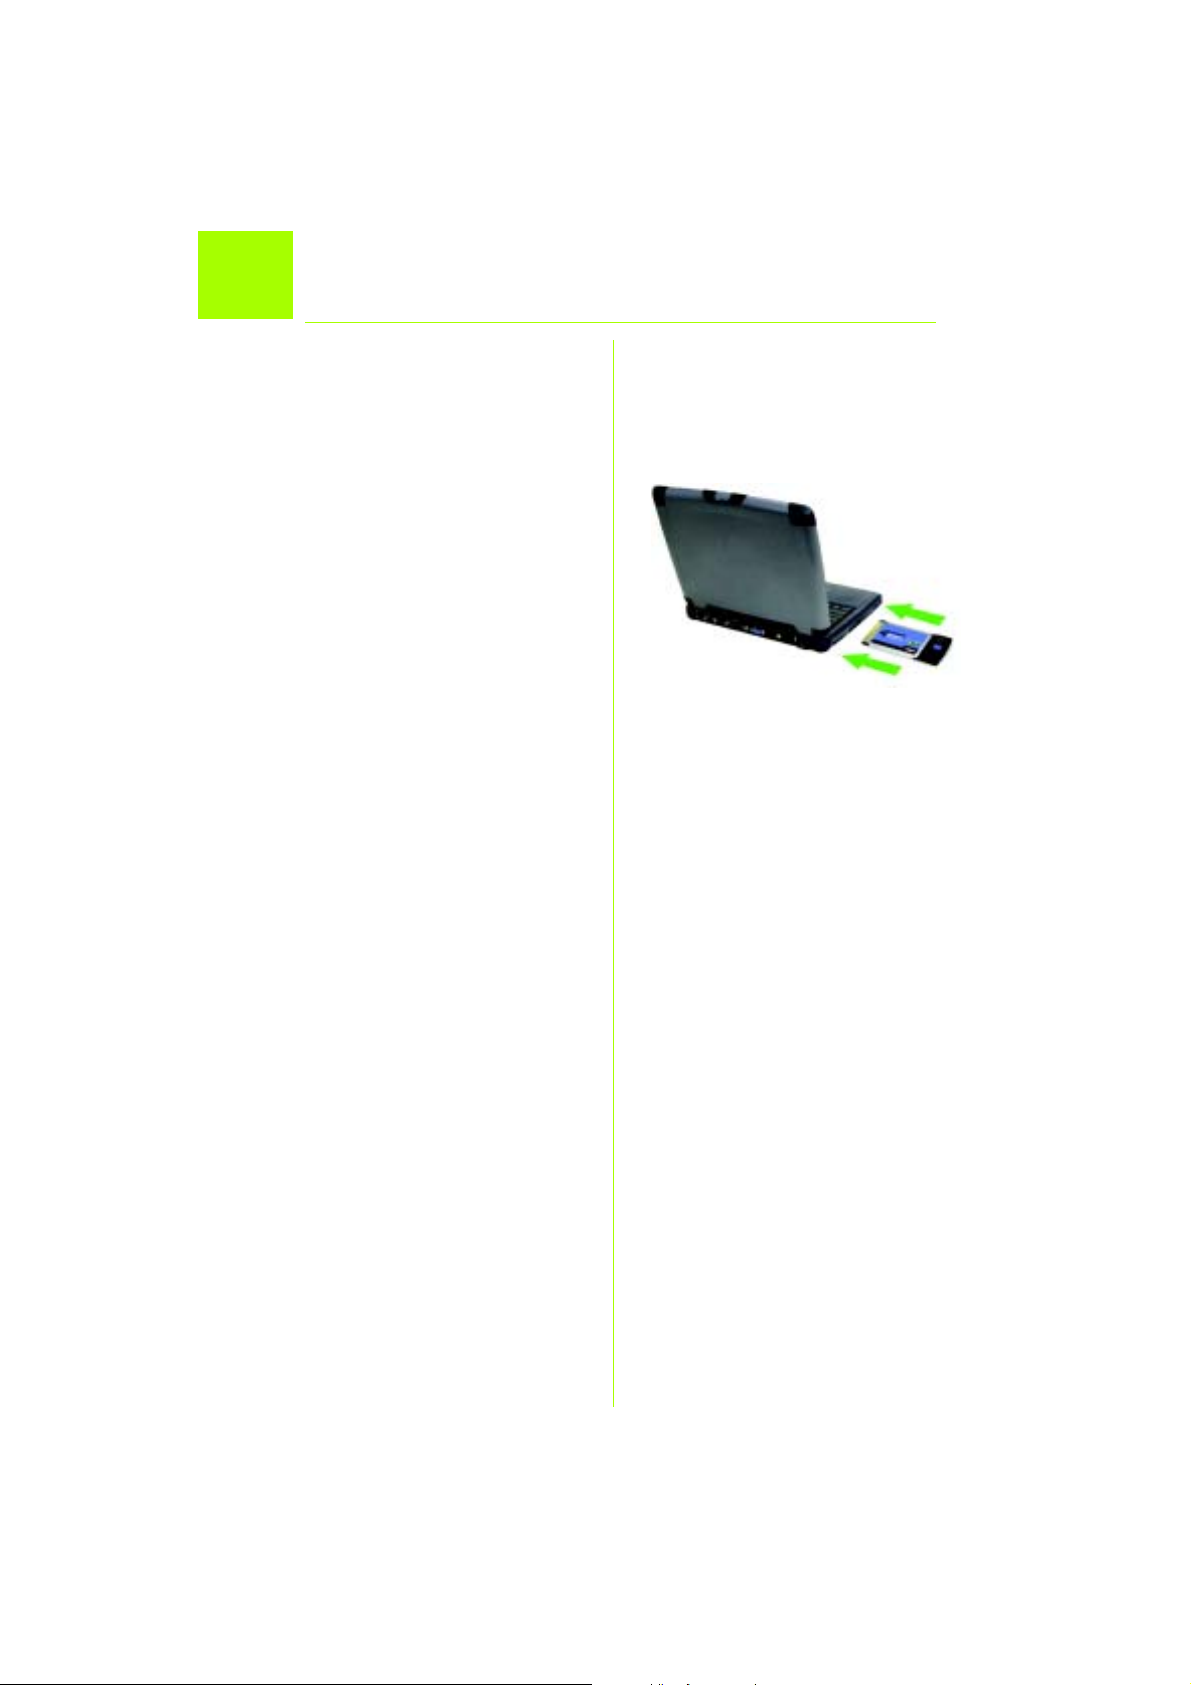
B Locate an available PC card
C With the Adapter’s label fac-
D Turn on your notebook PC.
E Windows will begin copying
Notebook Adapter into Your PC
slot on your notebook PC.
ing up, as shown in Figure C ,
slide it completely into the
CardBus slot.
the driver files to your com-
puter. If Windows asks you for
the original Windows CD-ROM,
insert the CD-ROM, and direct
Windows to its location (e.g.,
D:\).
C
F After installing the Adapter, the
Wireless-G Notebook Adapter
Wireless Network Monitor icon
will appear in the system tray,
which is located at the bottom
right corner of your screen.
If you want to use the Wireless
Network Monitor to check the
link information, search for
available wireless networks, or
make additional configuration changes, then doubleclick the icon.
Windows XP users: Go to Step 3.
Windows 98, Me, and 2000 users:
Congratulations! The installation of
the Wireless-G Notebook Adapter
is complete.
4
Page 5
Disabling Windows XP
3
Windows XP has a built-in configuration tool. To configure the Adapter
using the Wireless Network Monitor,
you need to disable Windows XP
Wireless Zero Configuration. Follow
the instructions in Steps A-C.
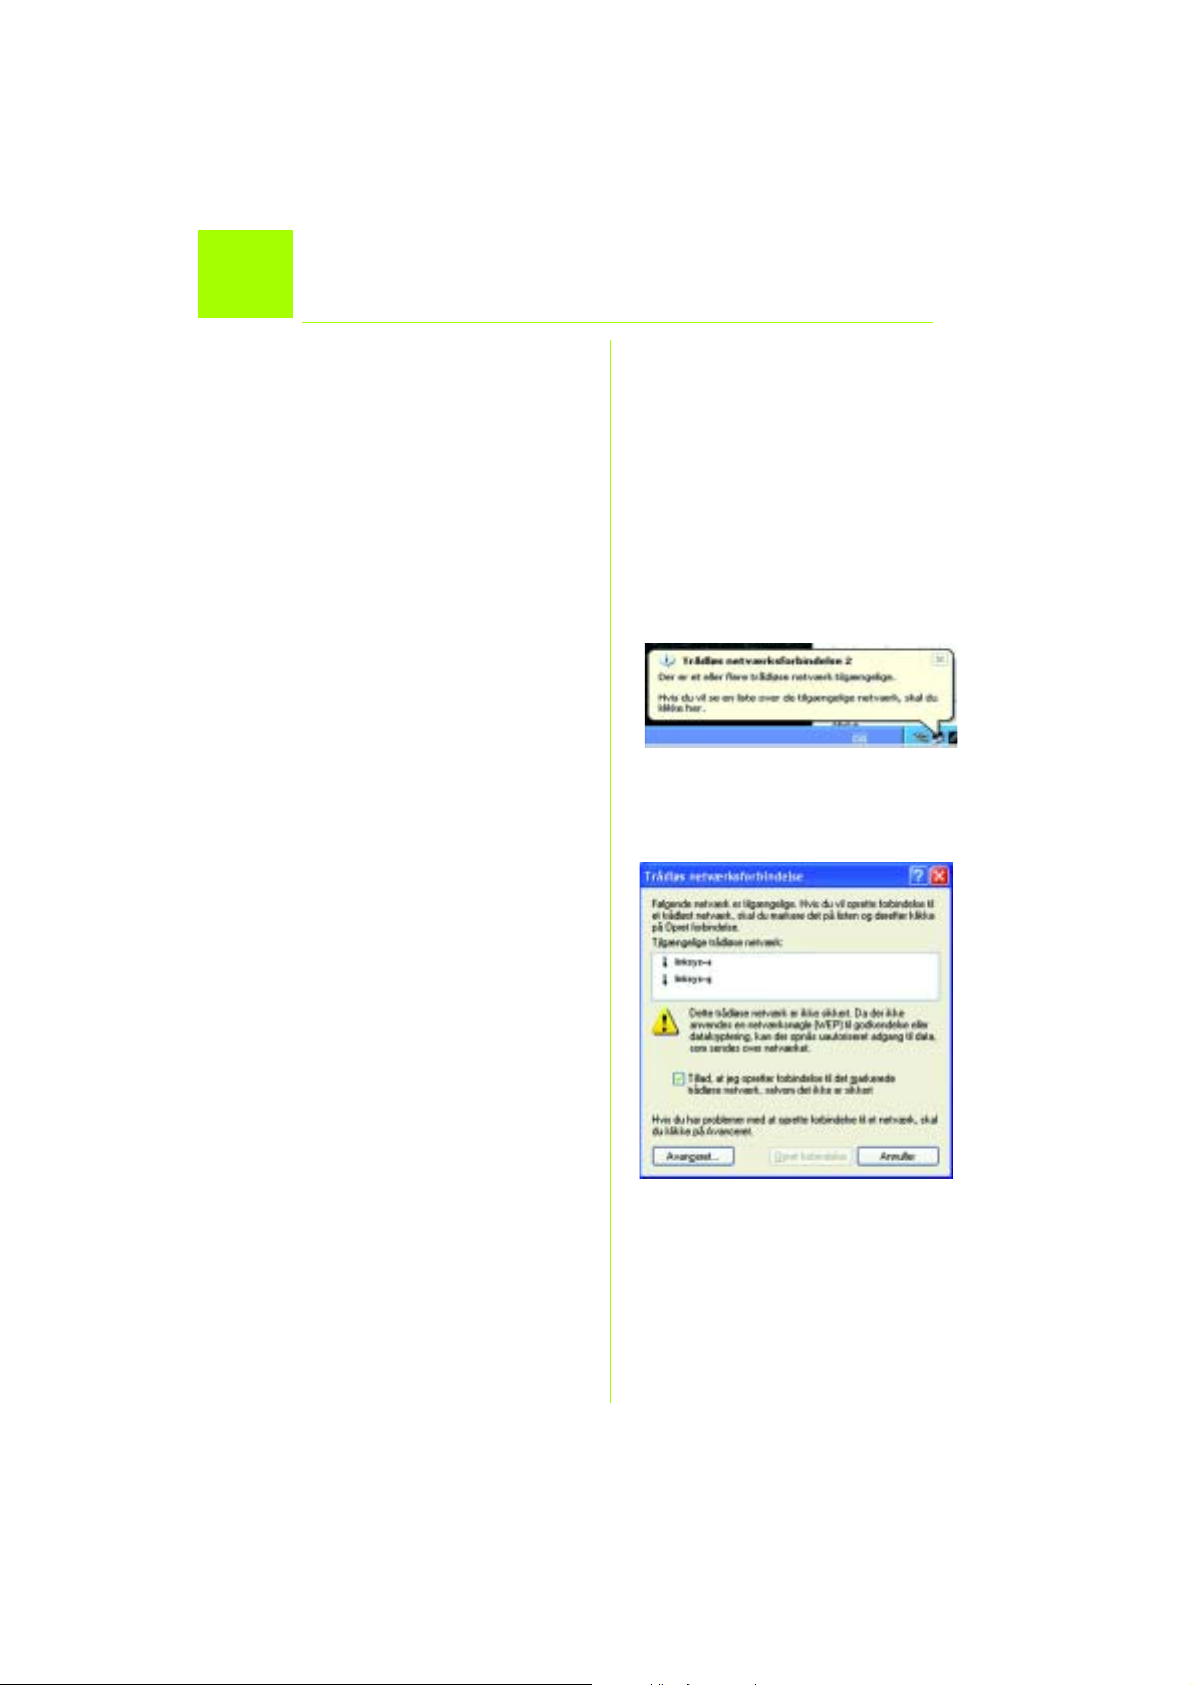
A The Windows XP Wireless Zero
Wireless Zero Configuration
Configuration icon will appear
in your computer’s system tray .
Double-click the icon.
A
B The screen that appears will
show any available wireless
network. Click Advanced.
B
5
Page 6
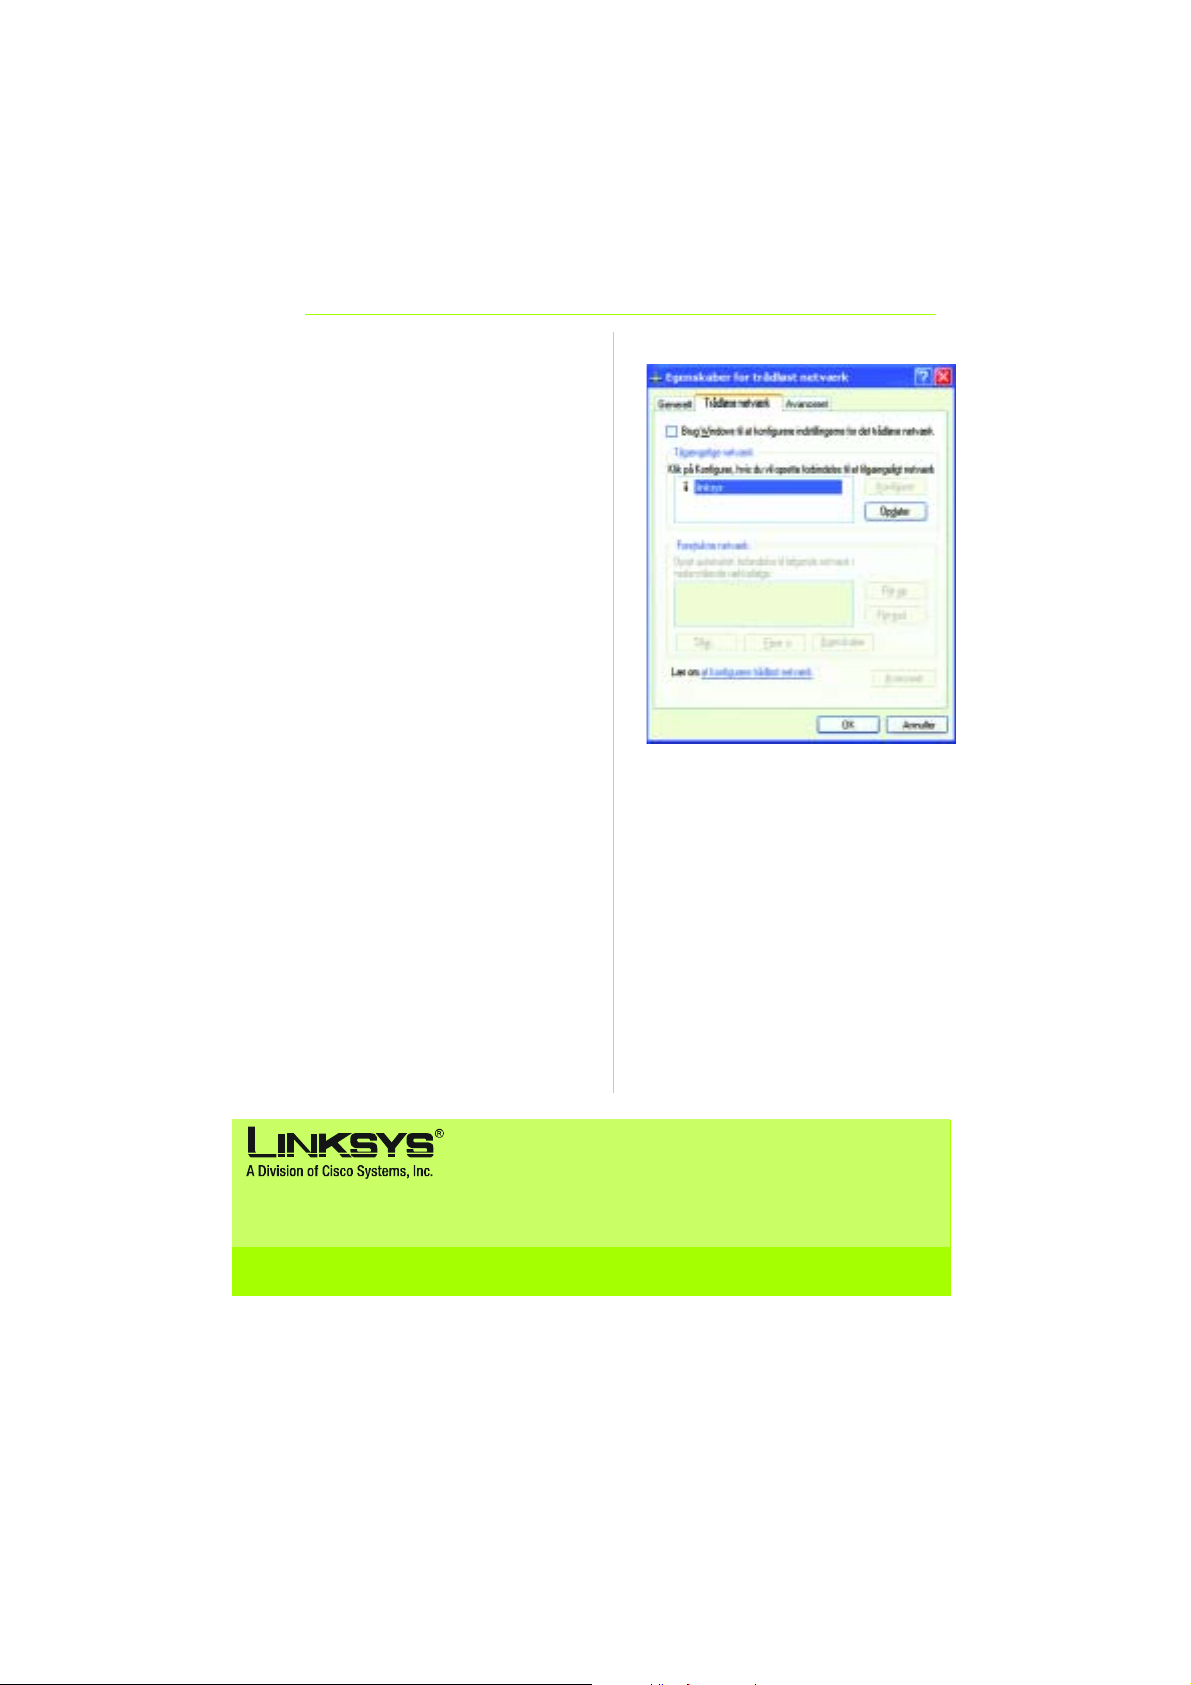
C
On the Wireless Networks
screen, uncheck the box next
to Use Windows to configure
my wireless network settings.
Then click OK.
Windows XP Wireless Zero Configu-
ration users: Congratulations! The
installation of the Wireless-G
Notebook Adapter is complete.
C
For additional information or troubleshooting help, refer to the User Guide on the CD-ROM or the
Technical Support Insert. You can also e-mail for further support.
Website http://www.linksys.com/international
Linksys is a registered trademark or trademark of Cisco Systems, Inc. and/or its affiliates in the U .S. and certain other
countries. Copyright © 2004 Cisco Systems, Inc. All rights reserved.
WPC54GS-UK-EU-QIG-404014 JL
6
Page 7

A Division of Cisco Systems, Inc.
®
GHz
4
2
,
802.11g
Wireless
Trådløs
Model No.
Model No.
Modelnr.
Trådløs-G
Notebook-adapter
med SpeedBooster
WPC54GS (DK)
Pakkens indhold
• Trådløs G Notebook-adapter
• Installations-cd-rom
• Brugervejledning på cd-rom
• Installationsvejledning
Quick Installation Guide
Installationsvejledning
1
Page 8

Installation af softwaren til Trådløs-G
1
Notebook-adapteren
A Placer installations-cd-rom'en i cd-
rom-drevet. Den guidede
konfiguration køres automatisk, og
skærmbilledet Welcome
(Velko mmen) vises. Hvis det ikke er
tilfældet, skal du klikke på Start og
vælge Run (Kør). Indtast D:\setup.exe
i det felt, der vises (hvis "D" er
bogstavet for cd-rom-drevet).
Klik på knappen Install (Installer).
B Klik på Next (Næste), når du har læst
licensaftalen, for at fortsætte
installationen.
C Derefter skal du vælge en trådløs
tilstand for dit netværk. Klik på
alternativknappen Infrastructure Mode
(Infrastrukturtilstand), hvis dine trådløse
computere skal oprette
netværksforbindelse til computere i det
kabelbaserede netværk ved hjælp af et
access point. Klik på alternativknappen
Ad-Hoc Mode
(Ad-hoc-tilstand), hvis flere trådløse
computere skal oprette
netværksforbindelse direkte til hinanden.
Indtast SSID'et for det trådløse netværk i
feltet SSID. SSID'et skal være identisk for
alle enheder i det trådløse netværk.
Standardindstillingen er linksys (små
bogstaver). Klik på Next (Næste).
D Hvis du vælger Infrastructure Mode
(Infrastrukturtilstand), skal du gå til trin
E nu. Hvis du vælger Ad-Hoc Mode
(Ad-hoc-tilstand), skal du vælge den
korrek te kanal ti l n etværket.
A
B
C
Hvis du har trådløs-G- (802.11g) og
trådløs-B-enheder (802.11b) i
netværket, skal du beholde
standardindstillingen for Network
Mode (Netværkstilstand): Mixed Mode
(Blandet tilstand). Hvis du kun har
2
D
Page 9
trådløs-G-enheder, skal du vælge
G-Only Mode (Kun-G-tilstand). Klik
på Next (Næste).
E Vælg s ikk erhed stype: 64-bit WEP,
128-bit WEP eller WPA-PSK. Alle
enheder i et netværk skal være af
samme type.
WEP
Adgangsordet bruges til at generere
en eller flere WEP-nøgler. Der er forsk el
på store og små bogstaver i ordet, og
det må ikke være længere end 16
alfanumeriske tegn.
Hvis du bruger 64-bit WEP-kryptering,
skal nøglen være præcis 10
hexadecimale tegn. Hvis du bruger
128-bit WEP-kryptering, skal nøglen
være præcis 26 hexadecimale tegn.
Vælg den TX-nøgle og
godkendelsesmetode, der bruges i dit
netværk.
WPA-PSK
Vælg TKIP- eller AES-kryptering. Vælg
derefter et adgangsord på 8-63 tegn.
F Den guidede konfiguration giver dig
mulighed for at gennemse dine
indstillinger, før filerne installeres . Klik
på Next (Næste), hvis du er tilfreds
med indstillingerne, eller på Back
(Tilbage) for at ændre indstillingerne.
E1
E
F
2
G Når softwaren er installeret korrekt,
skal du klikke på Exit
(Afslut).
G
3
Page 10
Installation af softwaren til Trådløs-G
2
A
Notebook-adapteren i pc'en
Sluk notebook-pc'en.
B Find et tilgængeligt PC Card-stik på
din notebook-pc .
C Skub adapteren helt ind i CardBus-
stikket med mærkatsiden opad, som
vist i figur C.
D Tænd notebook-pc'en.
E Windows begynder at kopiere
driverfilerne til din computer. Hvis du
bliver bedt om at placere den
originale Windows-cd-rom i cd-romdrevet, skal du gøre dette og derefter
angive, hvor Windows kan finde filerne
(f.eks. D:\).
F Når du har installeret adapteren, vises
ikonet for overvågningsprogrammet til
trådløse netværk til Trådløs-G
Notebook-adapteren på proceslinje n
i nederste højre hjørne af skærmen.
C
Hvis du vil kontrollere linkoplysningerne,
søge efter tilgængelige trådløse
netværk eller foretage yderligere
konfigurationsændringer ved hjælp
af overvågningsprogrammet til
trådløse netværk, skal du
dobbeltklikke på ikonet.
Windows XP-brugere: Gå til trin 3.
Windows 98-, Me- og 2000-brugere:
Tillykke! Installationen af Trådløs-G
Notebook-adapteren er færdig.
4
Page 11
Deaktivering af Windows XP
3
Windows XP har et indbygget
konfigurationsværktøj. Hvis du vil konfigurere
adapteren ved hjælp af
overvågningsprogrammet til trådløse
netværk, skal du deaktivere Windows XP
Wireless Zero Configuration (Automatisk
konfiguration af trådløse enheder). Følg
instruktionerne i trin A-C.
Wireless Zero Configuration
A Ikonet for Windows XP Wireless Zero
Configuration (Automatisk
konfiguration af tråd løse enheder)
vises på computerens proceslinje.
Dobbeltklik på ikonet.
A
B I det skærmbillede, der vises, kan du
se alle tilgængelige trådløse netværk.
Klik på Advanced (Avanceret).
B
5
Page 12
C I skærmbilledet for det trådløse
netværk skal du fjerne afkrydsningen i
feltet Use Windows to configure my
wireless network settings (Brug Windows
til at konfigurere indstillingerne for det
trådløse netværk).
Klik derefter på OK.
Windows XP Wireless Zero Configuration-
brugere (Automatisk konfiguration af
trådløse enheder): Tillykke! Installationen af
Trådløs-G Notebook-adapteren er færdig.
C
Yderligere oplysninger eller hjælp til fejlfinding finder du i brugervejledningen på cd-rom'en eller ved
at kontakte Teknisk support (se arket om teknisk support).
Websted http://www.linksys.com/international
Linksys er et registreret varemærke tilhørende Cisco Systems, Inc. og/eller Cisco Systems associerede selskaber i
USA og visse andre lande. Copyright © 2004 Cisco Systems, Inc. Alle rettigheder forbeholdes.
WPC54GS-DK-QIG-40415NC JL
6
Page 13

A Division of Cisco Systems, Inc.
®
2
GHz
4
,
802.11g
WirelessSans fil
Model No.
Model No.
Modèle
WPC54GS (FR)
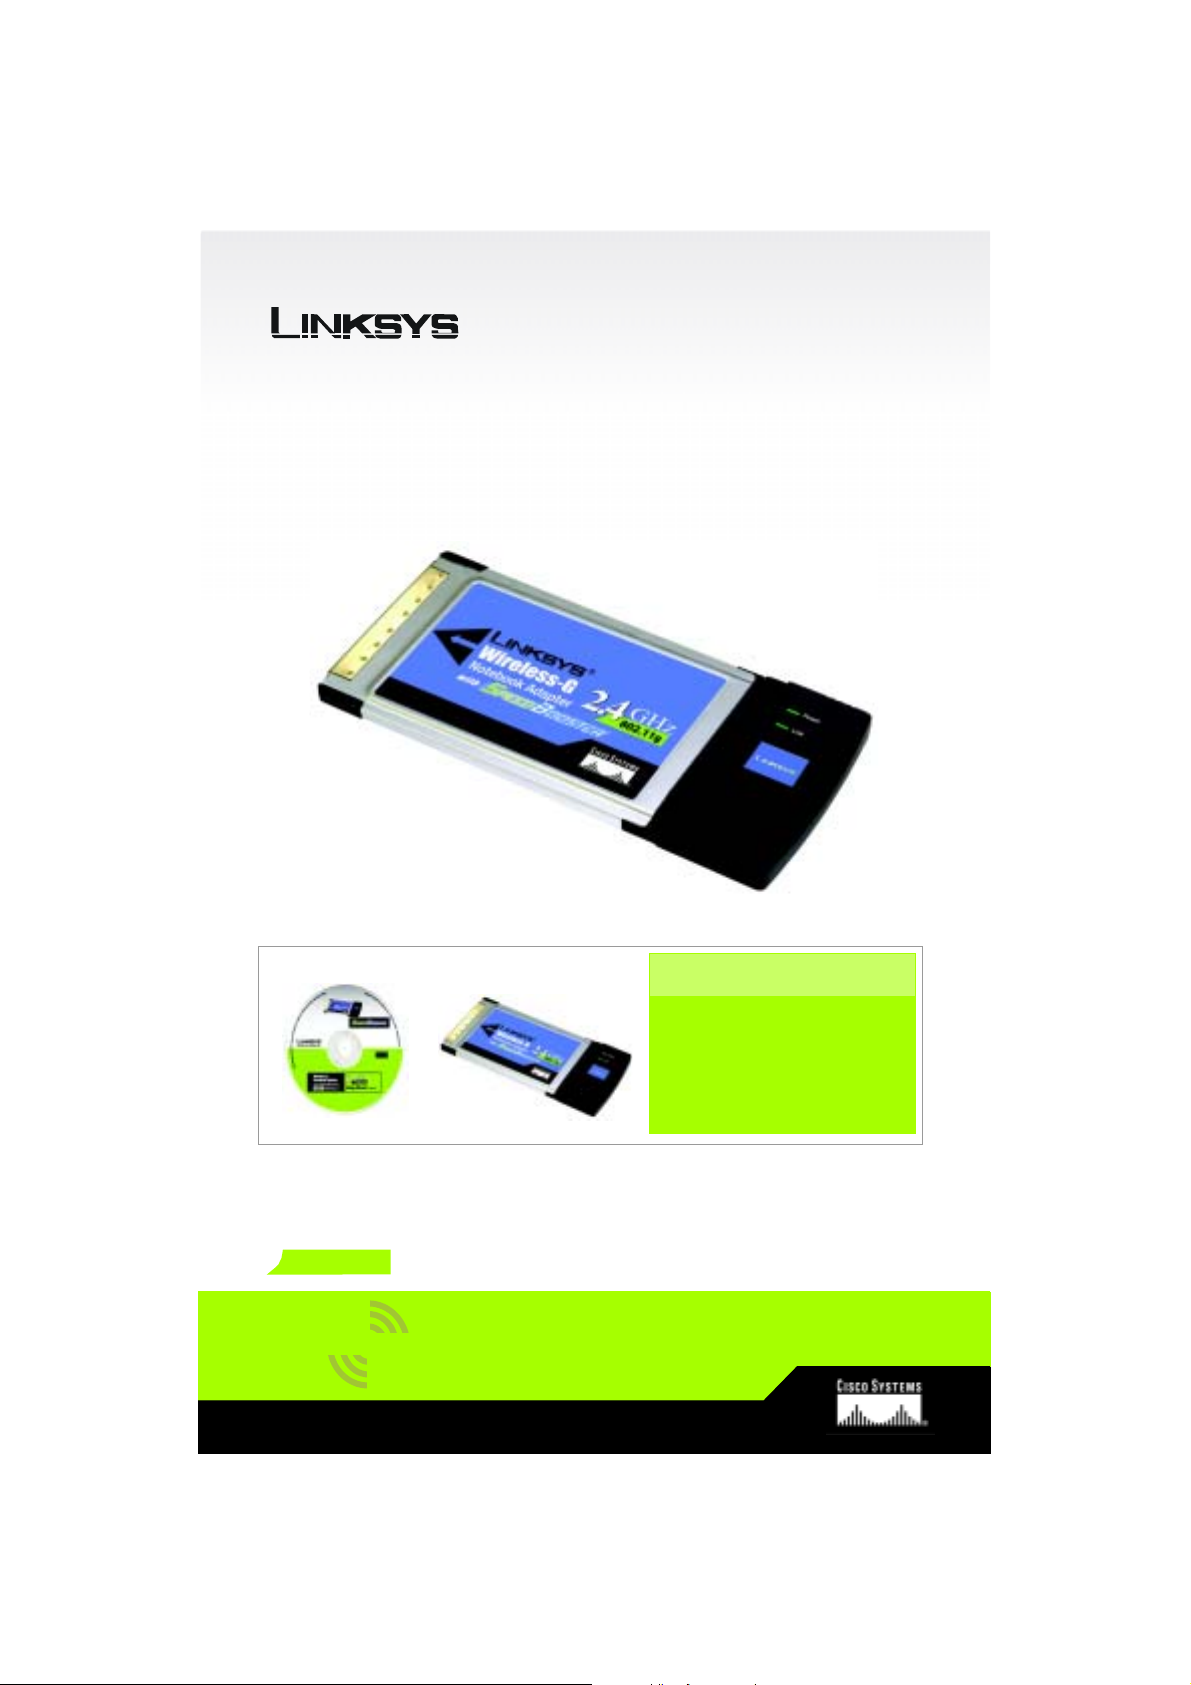
Contenu de l'emballage
• Carte pour ordinateur portable sans
fil G
• CD-ROM d'installation
• Guide de l'utilisateur
sur CD-ROM
• Guide d'installation rapide
Sans fil G
Carte pour ordinateur portable
avec SpeedBooster
Guide d’installation rapide
1
Page 14

Installation de la carte pour
1
ordinateur portable
A Insérez le CD-ROM d'installation dans le
lecteur de CD-ROM. L'Assistant de
configuration s'exécute
automatiquement et l'écran Welcome
(Bienvenue) s'affiche. Si ce n'est pas le
cas, cliquez sur Démarrer, puis sur
Exécuter. Dans le champ qui apparaît,
entrez D:\setup.ex e («D » représentant
votre lecteur de CD-ROM).
Cliquez sur le bouton Installer.
B Après avoir pris connaissance de
l'accord de licence, cliquez sur le bouton
Next (Suivant) pour continuer l'installation.
C Sélectionnez ensuite un mode de
communication sans fil pour votre
réseau. Cliquez sur la case d'option
Insfrastucture Mode (Mode
d'infrastructure) si vous voulez que vos
ordinateurs sans fil soient connectés
avec les ordinateurs de votre réseau
câblé à l'aide d'un point d'accès.
Cliquez sur la case d'option Ad-Hoc
Mode (Mode Ad-Hoc) si vous voulez
que plusieurs ordinateurs sans fil puissent
communiquer directement entre eux.
Dans le champ SSID (Nom SSID), entrez
le nom SSID de votre réseau sans fil. Le
nom SSID doit être identique pour tous
les périphériques du réseau. Le
paramètre par défaut est linksys
(entièrement en minuscules). Cliquez
sur Next (Suivant).
A
B
C
D Si vous sélectionnez Infrastructure
Mode (Mode infrastructure), passez
directement à l'Etape E. Si vous
avez sélectionné Ad-Hoc Mode
(Mode Ad hoc), sélectionnez le
canal de fonctionnement correct
pour votre réseau.
Si vous utilisez des périphériques sans
fil G (802.11g) et sans fil B (802.11b)
2
D
Page 15

sur votre réseau, conservez la
configuration du mode réseau par
défaut, Mixed (Mixte). Si vous utilisez
uniquement des périphériques sans
fil G, sélectionnez G-Only Mode
(G uniquement). Cliquez sur Next
(Suivant).
E Sélectionnez votre type de sécurité :
64-bit WEP (WEP 64 bits), 128-bit WEP
(WEP 128 bits) ou WPA-PSK. Dans un
réseau, tous les périphériques doivent
utiliser le même type.
WEP
La phrase mot de passe permet de
générer une ou plusieurs clés WEP. Elle
est sensible à la casse et ne doit pas
comporter plus de 16 caractères.
Si vous utilisez un cryptage WEP
64 bits, la clé doit être constituée de
10 caractères hexadécimaux. Si vous
utilisez un cryptage WEP 128 bits, la
clé doit être constituée de
26 caractères hexadécimaux.
Sélectionnez la clé TX et la méthode
d'authentification de votre réseau.
WPA-PSK
Sélectionnez le cryptage TKIP ou AES.
Puis, choisissez une phrase mot de
passe comportant 8 à 63 caractères.
F L'Assistant de configuration vous
demandera de vérifier vos
paramètres avant d'installer les
fichiers. Cliquez sur Next (Suivant) si les
paramètres vous conviennent ou sur
Back (Précédent) pour les modifier.
E1
E
F
2
G Un fois que le logiciel a été
correctement installé, cliquez sur le
bouton Exit (Quitter).
G
3
Page 16
Installation de la carte pour ordinateur
2
portable sans fil G sur votre ordinateur
A Mettez votre ordinateur portable hors
tension.
B Repérez un connecteur PC Card sur
votre ordinateur portable.
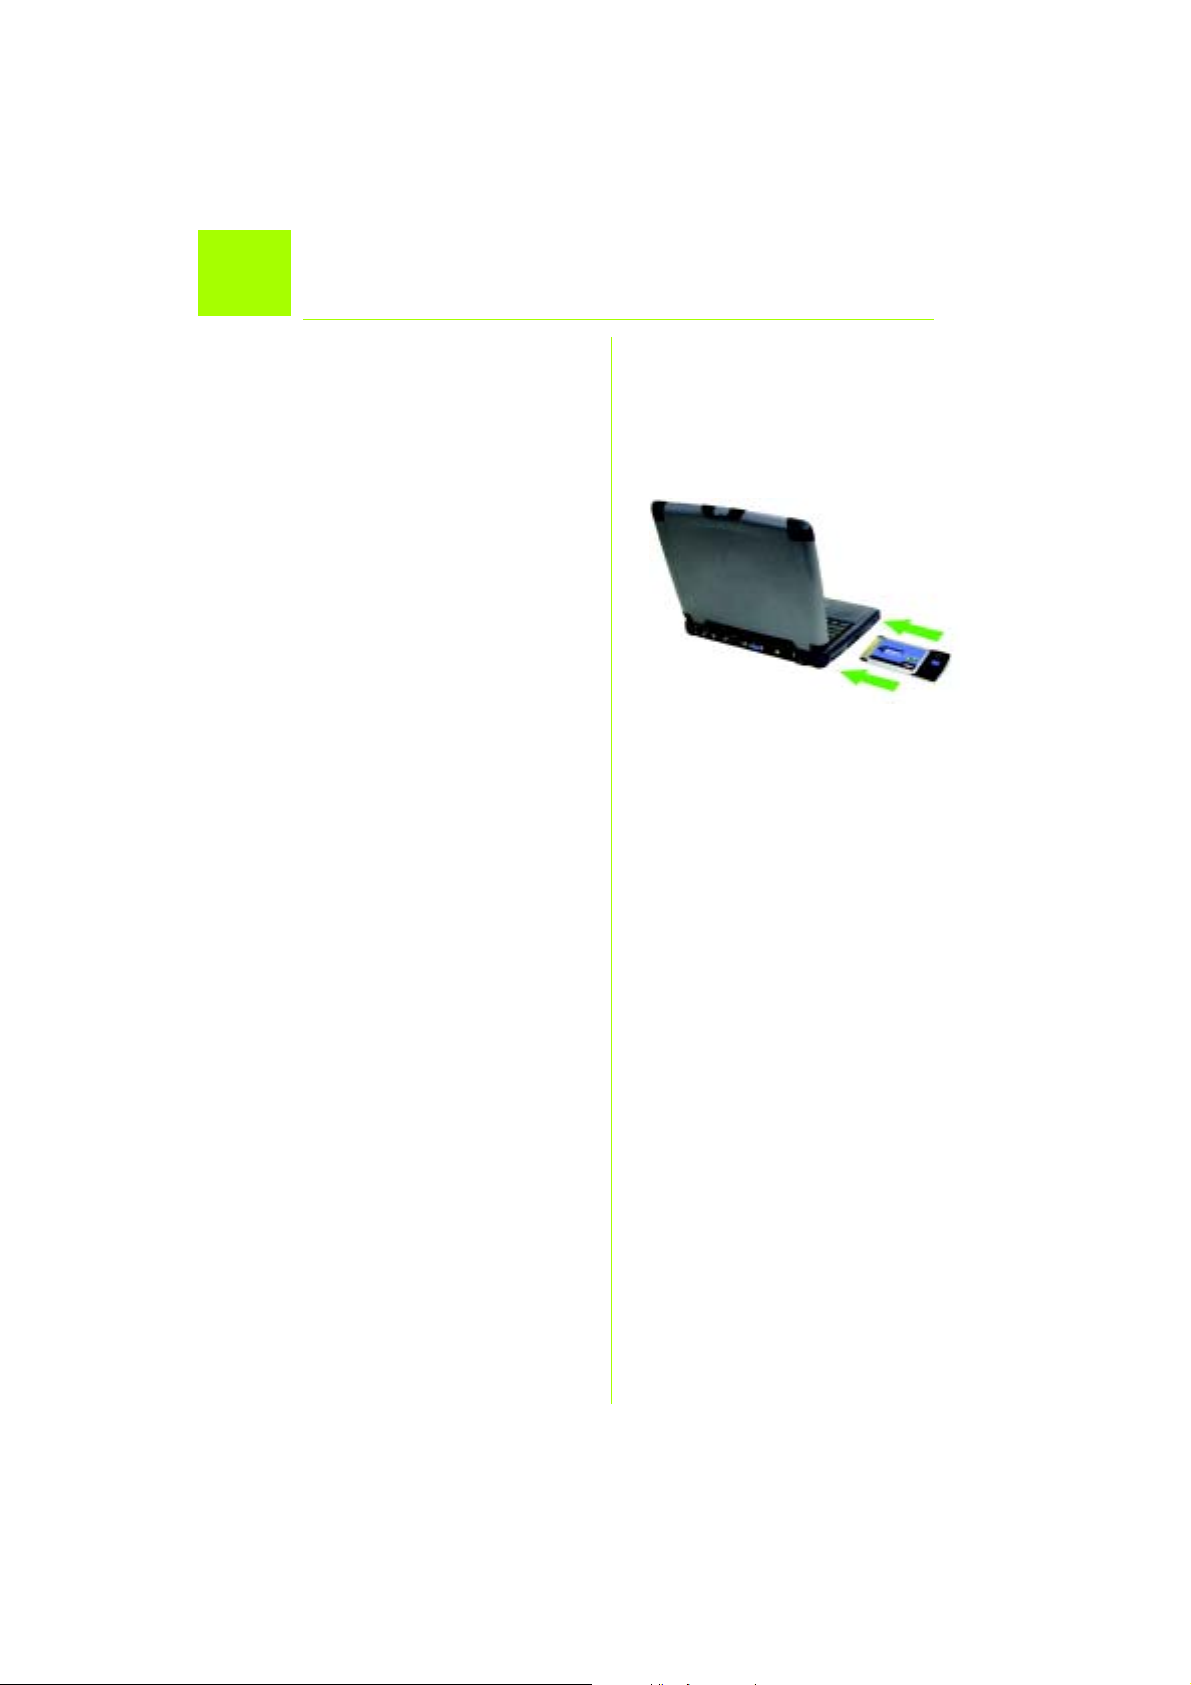
C Enfoncez complètement la carte
dans le connecteur CardBus, la face
portant une étiquette tournée vers le
haut (voir Figure C).
D Mettez votre ordinateur portable
sous tension.
E Windows commence à copier les
fichiers de pilotes sur votre
ordinateur . Si Windows vous
demande d'insérer le CD-ROM de
Windows d'origine, insérez celui-ci,
puis indiquez à Windows le chemin
d'accès approprié (par exemple
D:\).
C
F Une fois la carte installée, l'icône de
la fonction de contrôle du réseau
sans fil avec carte pour ordinateur
portable sans fil G apparaît dans la
barre d'état système, située dans le
coin inférieur droit de l'écran.
Si vous souhaitez utiliser la fonction de
contrôle du réseau sans fil pour vérifier
les données propres aux liens,
rechercher des réseaux sans fil
disponibles ou modifier d'autres
configurations, double-cliquez sur
cette icône.
Utilisateurs de Windows XP :
Passez à l'étape 3.
Utilisateurs de Windows 98, Me et 2000 :
Félicitations ! L'installation de la carte
pour ordinateur portable sans fil G est
4
terminée.
Page 17
Désactivation de la configuration
3
Windows XP intègre un outil de
configuration. Po ur configurer la carte au
moyen de la fonction de contrôle du
réseau, vous devez désactiver la
configuration automatique de réseau sans
fil de Windows XP. Suivez les instructions des
étapes A à C.
automatique de réseau sans fil de Windows XP
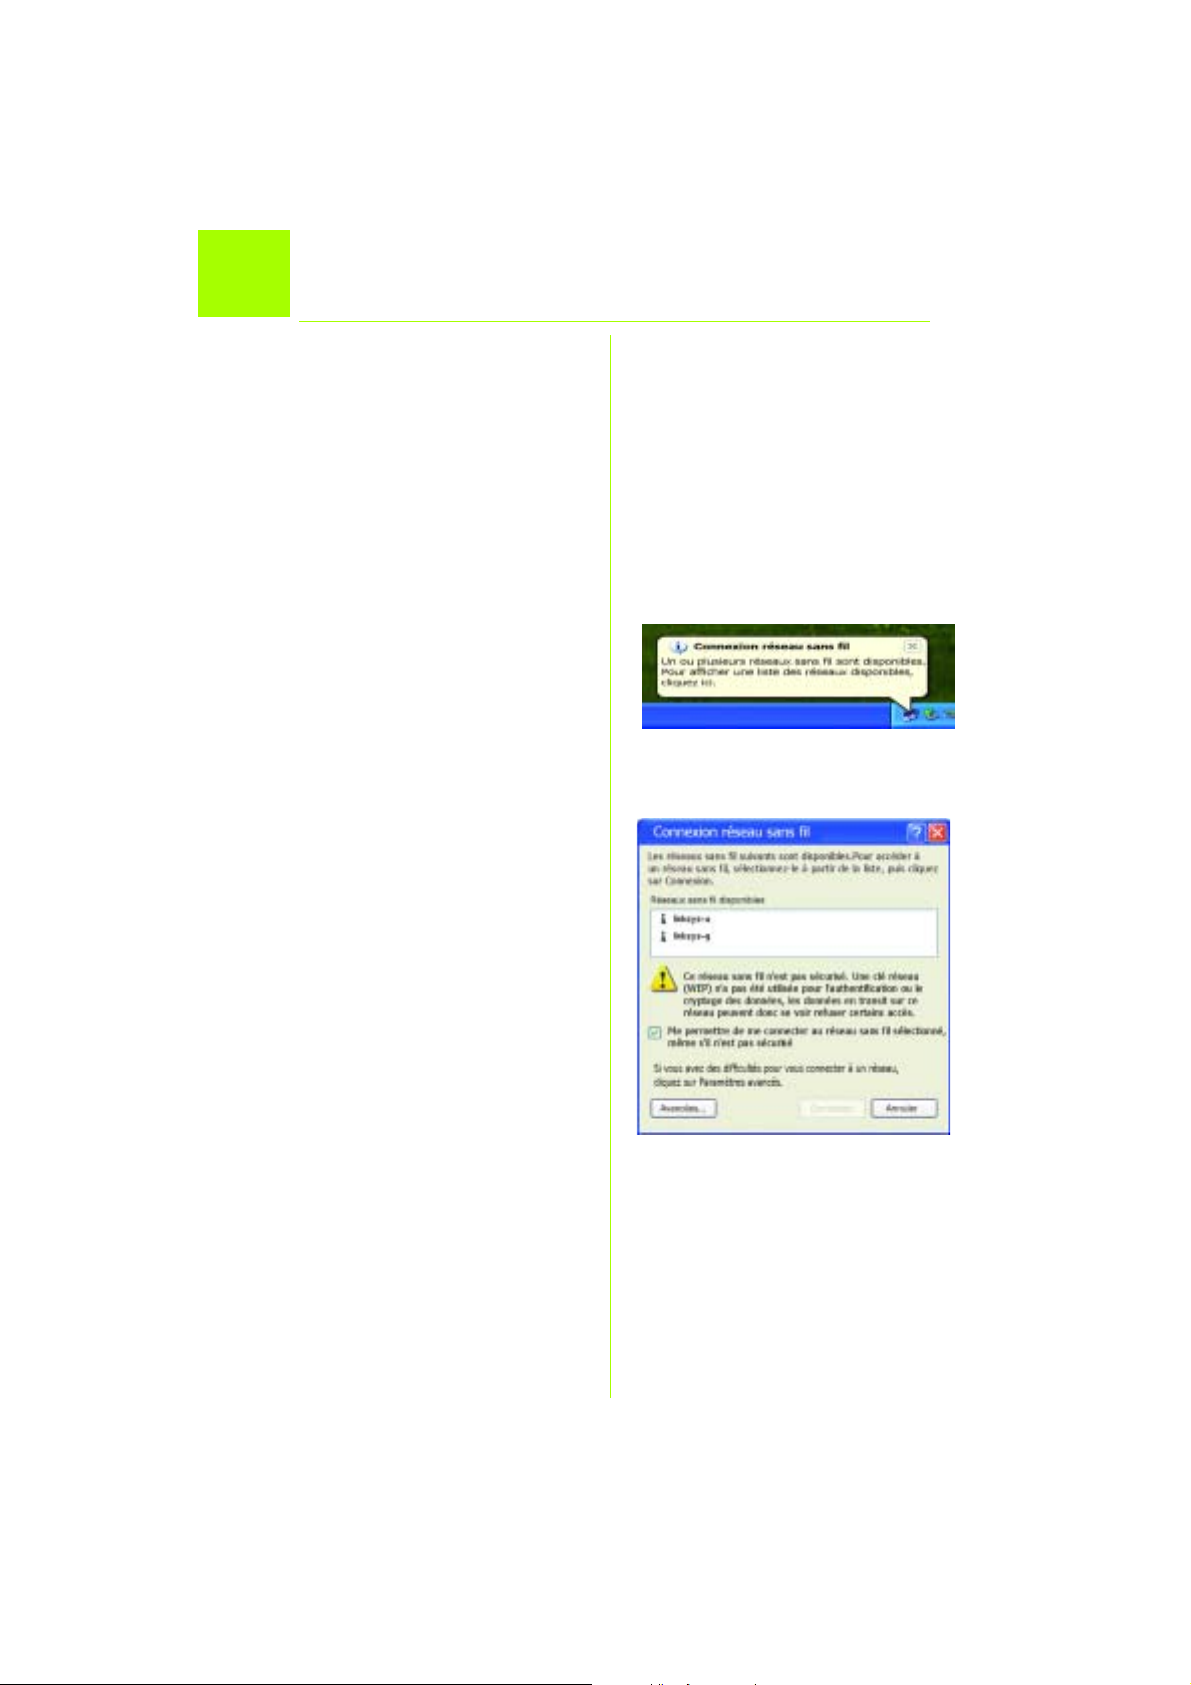
A L'icône de configuration sans fil sous
Windows XP apparaît dans la barre
d'état système de l'ordinateur.
Cliquez deux fois sur cette icône.
B L'écran qui apparaît indique tous les
réseaux sans fil disponibles. Cliquez
sur Paramètres avancés.
A
B
5
Page 18
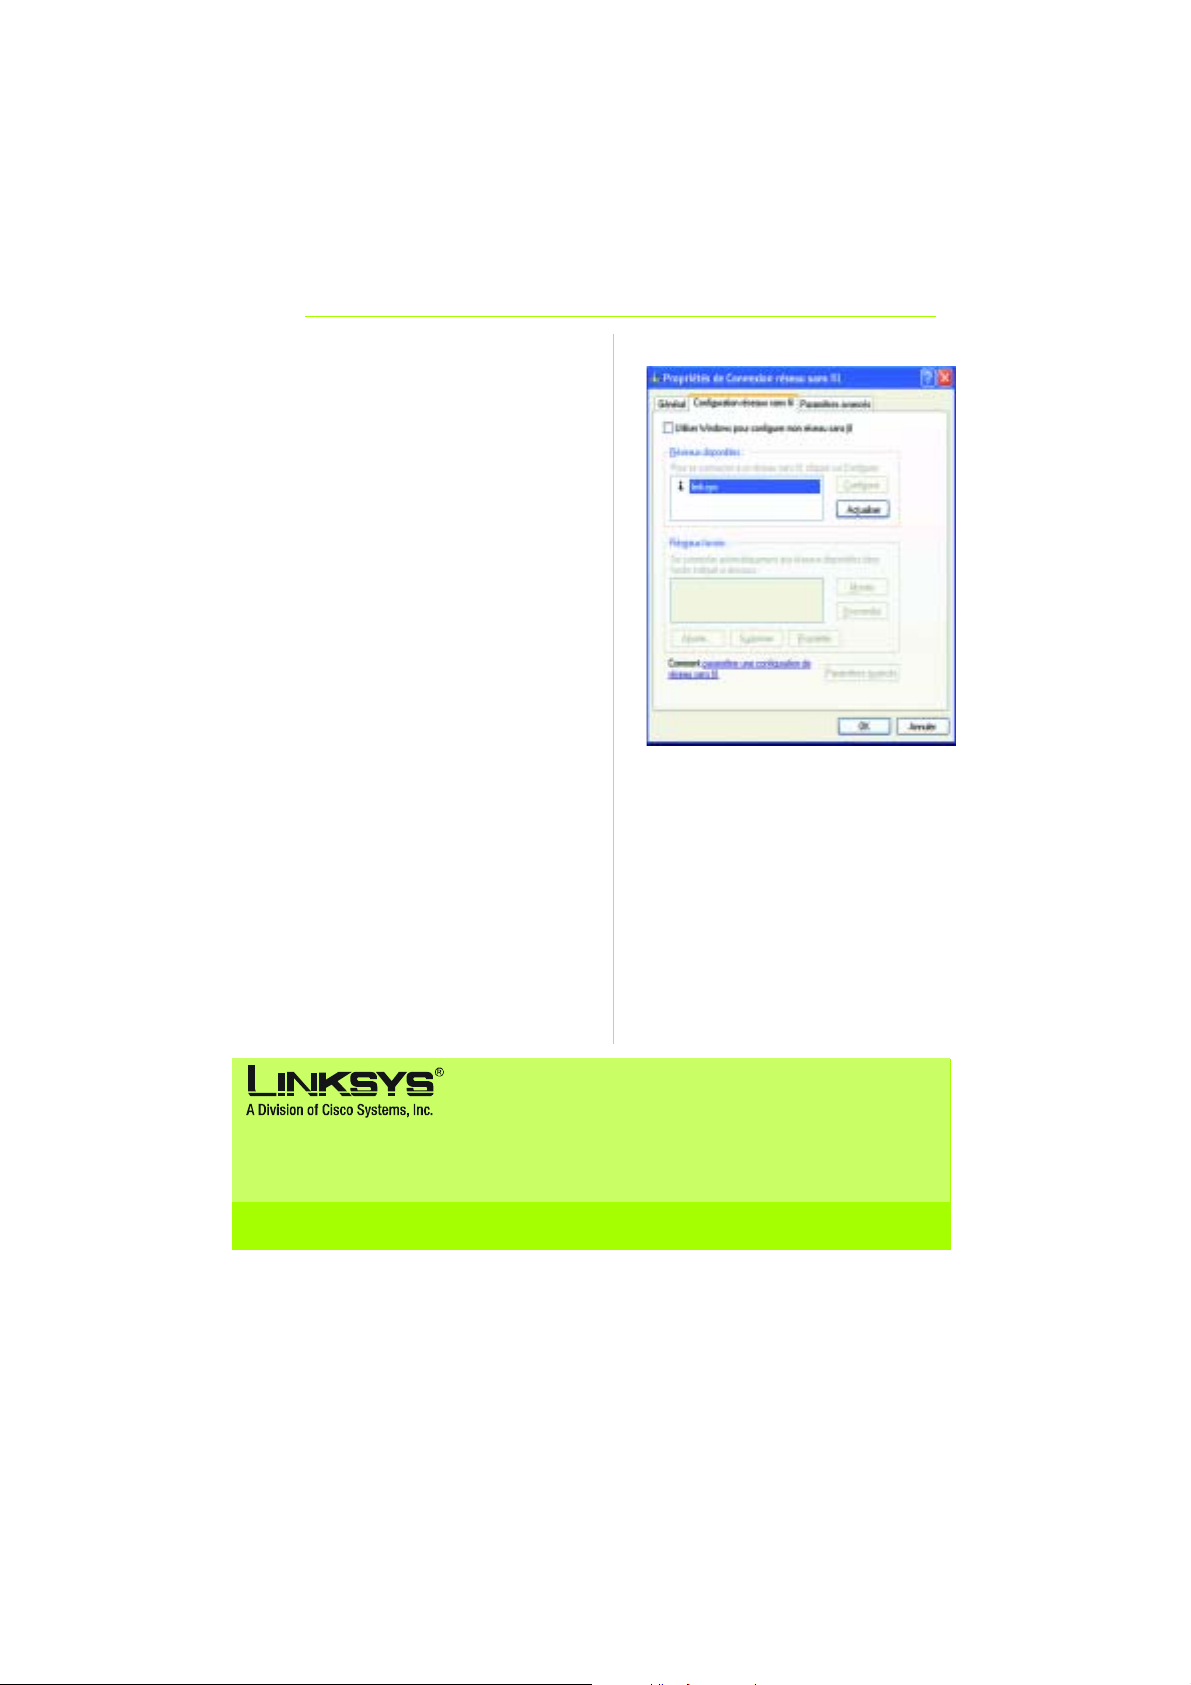
C Dans l'écran Configuration réseaux
sans fil, désélectionnez la case en
regard de Utiliser Windows pour
configurer mon réseau sans fil.
Cliquez ensuite sur OK.
Utilisateurs de Configuration sans fil sous
Windows XP : Félicitations ! L'installation de
la carte pour ordinateur portable
sans fil G est terminée.
C
Pour obtenir plus d'informations ou une aide technique, reportez-vous au Guide de l'utilisateur qui
figure sur le CD-ROM ; pour prendre contact avec le service d'assistance technique, reportez-vous à
la Fiche d'assistance technique.
Site Web http://www.linksys.com/international
Linksys est une marque déposée ou une marque commerciale de Cisco Systems, Inc. et/ou ses filiales aux Etats-Unis
et dans certains autres pays. Copyright © 2004 Cisco Systems, Inc. Tous droits réservés.
WPC54GS-FR-QIG-40415NC JL
6
Page 19
A Division of Cisco Systems, Inc.
®
2
GHz
4
,
802.11g
WirelessWireless
Model No.
Model No.
Modell
WPC54GS (DE)
Lieferumfang
• Wireless-G Notebook-Adapter
• Installations-CD-ROM
• Benutzerhandbuch
auf CD-ROM
• Kurzanleitung
Wireless-G
Notebook-Adapter
mit SpeedBooster
Kurzanleitung
1
Page 20

Installieren der Wireless-G
1
Notebook-Adapter-Software
A Legen Sie die Installations-CD-ROM in Ihr
CD-ROM-Laufwerk ein. Der SetupAssistent sollte automatisch gestartet
und das Willkommensfenster angezeigt
werden. Wenn dies nicht der Fall ist,
klicken Sie auf Start und wählen Sie
Ausführen aus. Geben Sie im daraufhin
angezeigten Feld D:\setup.exe ein
(wobei „D“ für den Buchstaben Ihres
CD-ROM-Laufwerks steht).
Klicken Sie auf die Schaltfläche Install
(Installieren).
B Lesen Sie die Lizenzvereinbarung und
klicken Sie auf Next (Weiter), um die
Installation fortzusetzen.
C Nun wählen Sie einen drahtlosen Modus
für Ihr Netzwerk aus. Klicken Sie auf die
Optionsschaltfläche Infrastructure
Mode (Infrastrukturmodus), wenn Ihre
drahtlosen Computer mit Hilfe eines
drahtlosen Zugriffspunkts mit Computern
in einem verdrahteten Netzwerk vernetzt
werden sollen. Klicken Sie auf die
Optionsschaltfläche Ad-Hoc Mode
(Ad-Hoc-Modus), wenn mehrere
drahtlose Computer direkt miteinander
vernetzt werden sollen.
A
B
Geben Sie in das Feld SSID (SS-ID) die
SS-ID Ihres drahtlosen Netzwerks ein. Die
SS-ID muss für alle Geräte im Netzwerk
identisch sein. Die Standardeinstellung
ist linksys (Kleinbuchstaben). Klicken Sie
auf Next (Weiter).
D Wenn Sie die Option Infrastructure
Mode (Infrastrukturmodus) ausgewählt
haben, fahren Sie jetzt mit Schritt E fort.
Wenn Sie die Option Ad-Hoc Mode
(Ad-Hoc-Modus) ausgewählt haben,
bestimmen Sie den richtigen
Betriebskanal für Ihr Netzwerk.
Wenn Ihr Netzwerk sowohl Wireless-G
(802.11g)- als auch Wireless-B (802.11b)Geräte umfasst, behalten S ie di e
2
C
D
Page 21

Standardeinstellung für Network Mode
(Netzwerkmodus) bei, d. h. Mixed Mode
(Gemischter Modus). Wenn ausschließlich
Wireless-G-Geräte vorhanden sind,
wählen Sie den Modus G-Only (Nur G).
Klicken Sie auf Next (Weiter).
E Wählen Sie einen Sicherheitstyp: 64-bit
WEP, 128-bit WEP oder WPA-PSK. Für alle
Geräte im Netzwerk muss der gleiche
Typ verwendet werden.
WEP
Mit der Passphrase können Sie
mindestens einen WEP-Schlüssel
erstellen. Hierbei wird zwischen Großund Kleinschreibung unterschieden. Die
Länge von 16 alphanumerischen
Zeichen darf nicht überschritten werden.
Wenn Sie die 64-Bit-WEP-Verschlüsselung
verwenden, muss die Schlüssellänge
genau 10 hexadezimale Zeichen
betragen. Wenn Sie die 128-Bit-WEPVerschlüsselung verwenden, muss die
Schlüssellänge genau 26 hexadezimale
Zeichen betragen.
E1
E
2
Wählen Sie den TX-Schlüssel und die
Authentifizierungsmethode des
Netzwerks aus.
WPA-PSK
Wählen Sie entweder die
Verschlüsselungsoption TKIP oder AES aus .
Wählen Sie anschließend eine Passphrase
mit einer Länge von 8 bis 63 Zeichen aus.
F Der Setup-Assistent fordert Sie auf, Ihre
Einstellungen zu überprüfen, bevor mit
dem Installieren von Dateien begonnen
wird. Wenn Sie mit der Auswahl der
Einstellungen zufrieden sind, klicken Sie
auf Next (Weiter). Andernfalls klicken Sie
auf Back (Zurück), um die Einstellungen
zu ändern.
G Klicken Sie nach erfolgreicher
Installation auf Exit (Beenden).
F
G
3
Page 22

Einsetzen des Wireless-G
2
Notebook-Adapters in den PC
A Schalten Sie das Notebook aus.
B Suchen Sie nach einem verfügbaren
PC-Karten-Steckplatz auf dem
Notebook.
C Setzen Sie den Adapter vollständig in
den CardBus-Steckplatz ein, wobei die
Beschriftung nach oben zeigt (siehe
Abbildung C).
D Schalten Sie das Notebook ein.
E Windows beginnt mit dem Kopieren
der Treiberdateien auf den Computer.
Legen Sie bei Aufforderung die
Original-CD-ROM von Windows ein,
und geben Sie den entsprechenden
Speicherort an (z. B. D:\).
F Nach der Installation des Adapters wird
das Symbol für den Wireless-G
Notebook-Adapter Wireless-NetzwerkMonitor in der Taskleiste in der unteren
rechten Ecke Ihres Bildschirms
angezeigt.
C
Doppelklicken Sie auf das Symbol,
wenn Sie mit Hilfe des WirelessNetzwerk-Monitors die
Verbindungsdaten überprüfen, nach
verfügbaren drahtlosen Netzwerken
suchen oder Änderungen in der
Konfiguration vornehmen möchten.
Benutzer von Windows XP: Fahren Sie mit
Benutzer von Windows 98, ME und 2000:
Herzlichen Glückwunsch! Die Installation des
Wireless-G Notebook-Adapters ist hiermit
Schritt 3 fort.
abgeschlossen.
4
Page 23
Deaktivieren der konfigurationsfreien
3
Windows XP verfügt über ein integriertes
Konfigurations-Tool. Sie müssen die
konfigurationsfreie drahtlose Verbindung unter
Windows XP deaktivieren, um den Adapter mit
dem Wireless-Netzwerk-Monitor konfigurieren
zu können. Folgen Sie den Anweisungen in
Schritt A-C.
drahtlosen V erbindung unter Windows XP
A Das Symbol von Windows XP für die
konfigurationsfreie drahtlose
Verbindung wird in der Taskleiste des
Computers angezeigt. Doppelklicken
Sie auf das Symbol.
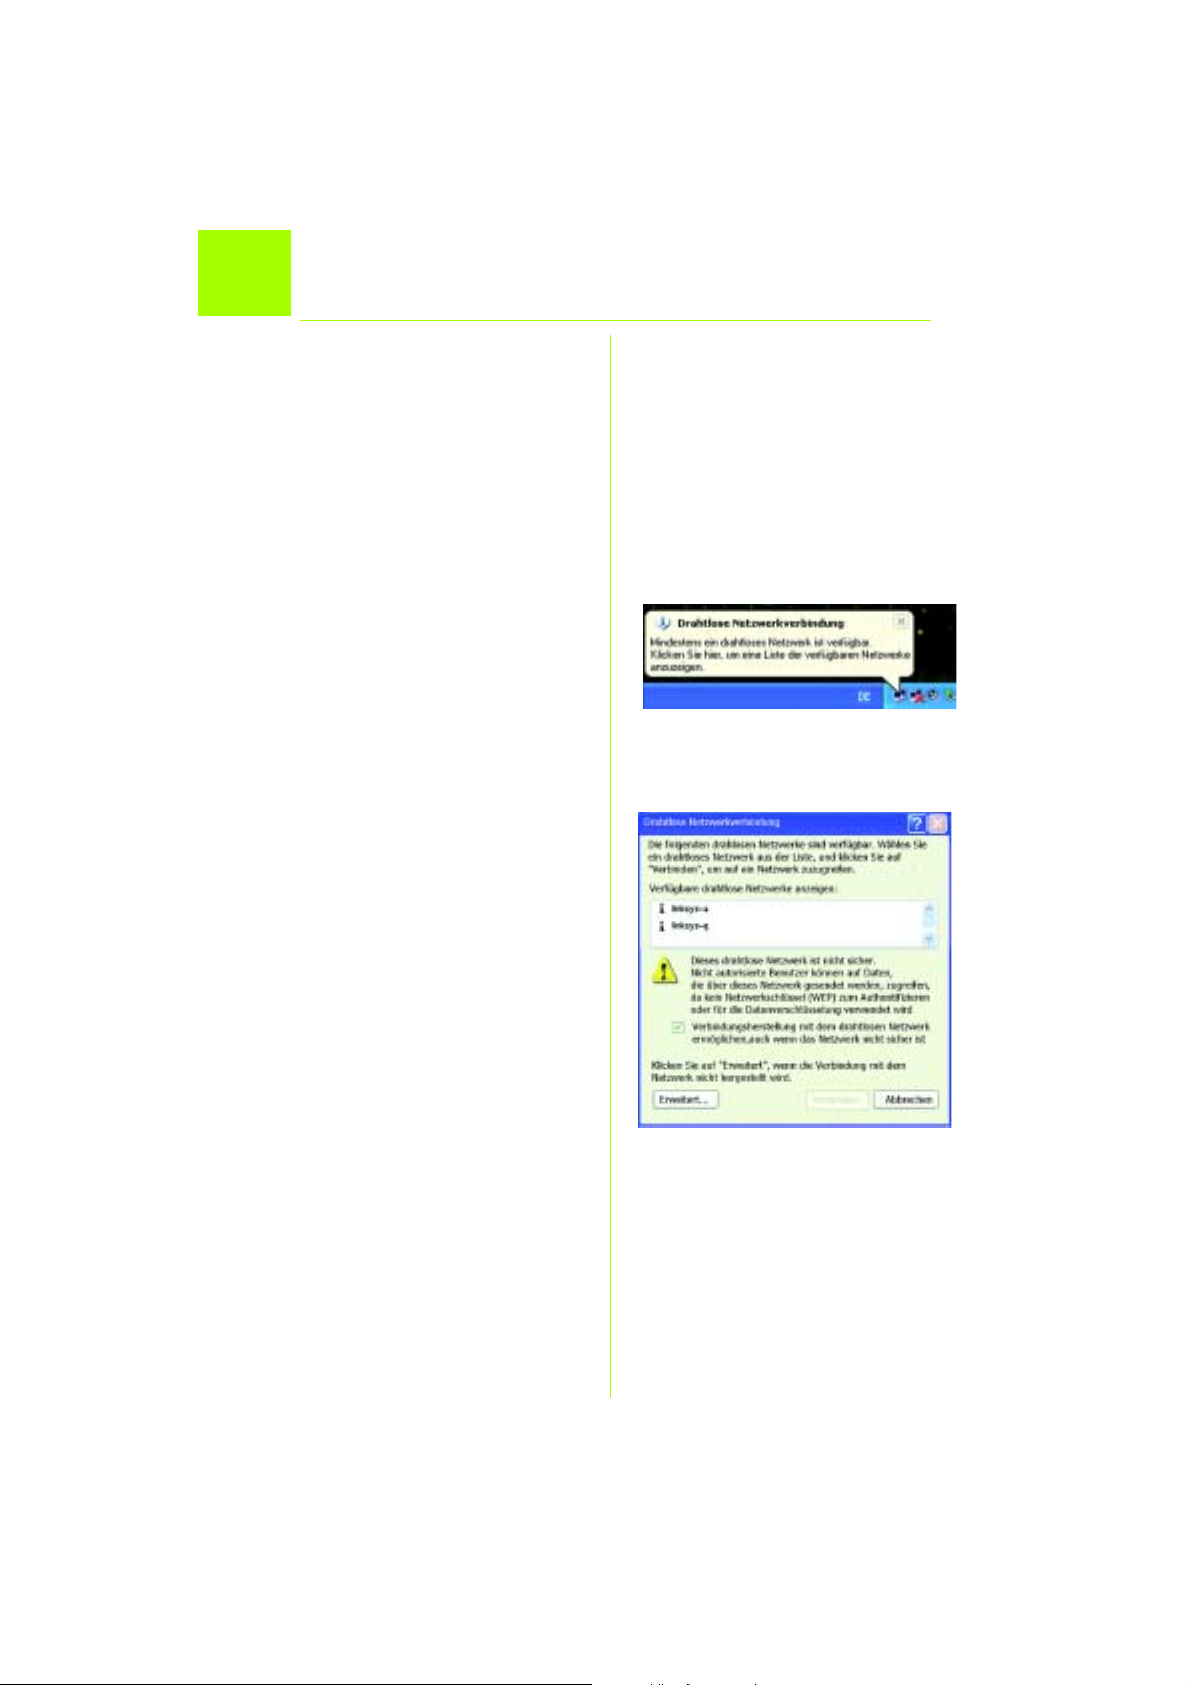
B Im folgenden Fenster werden alle
verfügbaren drahtlosen Netzwerke
angezeigt. Klicken Sie auf Erweitert.
A
B
5
Page 24

C Deaktivieren Sie im Fenster Eigenschaften
von Drahtlose Netzwerkverbindungen
das Kontrollkästchen neben Windows
zum Konfigurieren der Einstellungen
verwenden.
Klicken Sie anschließend auf OK.
Benutzer der konfigurationsfreien drahtlosen
Verbindung unter Windows XP: Herzlichen
Glückwunsch! Die Installation des Wireless-G
Notebook-Adapters ist abgeschlossen.
C
Weitere Informationen und Anleitungen zur Fehlerbehebung finden Sie im Benutzerhandbuch auf der
Installations-CD-ROM. Informationen zur Kontaktaufnahme mit dem technischen Kundendienst
finden Sie in der technischen Support-Beilage.
http://www.linksys.com/international
Linksys ist eine eingetragene Marke bzw. eine Marke von Cisco Systems, Inc. und/oder deren Zweigunternehmen in
den USA und anderen Ländern. Copyright © 2004 Cisco Systems, Inc. Alle Rechte vorbehalten.
WPC54GS-DE-QIG-404015NC JL
6
Page 25
A Division of Cisco Systems, Inc.
®
2
GHz
4
,
802.11g
Wireless
Wireless
Model No.
Model No.
Modello
WPC54GS (IT)
Contenuto della confezione
• Adattatore per notebook Wireless G
• Setup CD-ROM (CD per
l'installazione guidata)
• User Guide (Guida per l'utente) su
CD-ROM
• Guida di installazione rapida
Wireless-G
Adattatore per notebook
con SpeedBooster
Guida di installazione rapida
Quick Installation Guide
1
Page 26

Installazione del software
1
dell'adattore per notebook Wireless-G
A Inserire il Setup Wizard CD-ROM (CD per
l'installazione guidata) nell'apposita
unità. L'installazione guidata dovrebbe
avviarsi automaticamente
visualizzando la schermata Welcome
(Benvenuti). In caso contrario, fare clic
sul pulsante Start e scegliere Esegui.
Immettere D:\setup.exe (dove "D" è la
lettera dell'unità CD-ROM) nel campo
visualizzato.
Fare clic sul pulsante Install (Installa).
B Dopo aver letto il contratto di licenza,
fare clic su Next (Avanti) per
proseguire l'installazione.
C Scegliere quindi una modalità wireless
per la rete. F are clic s ul pulsante di
opzione Infrastructure Mode (Modalità
infrastruttura) per collegare i computer
wireless ai computer connessi alla rete
via cavo usando un punto di accesso.
Fare clic sul pulsante di opzione Ad-Hoc
Mode (Modalità ad hoc) per collegare
direttamente più computer wireless tra
di loro.
A
B
Nel campo SSID, immettere l'SSID
della rete wireless che deve essere
identico per tutte le periferiche
installate nella rete. L'impostazione
predefinita è linksys (tutto in
minuscolo). Fare clic su Next (Avanti).
D Se si sceglie l'opzione Infrastructure
Mode (Modalità infrastruttura), passare
direttamente alla Fase E. Se si sceglie
l'opzione Ad-Hoc Mode (Modalità ad
hoc), selezionare il canale operativo
corretto per la propria rete.
Se nella rete sono presenti periferiche
Wireless-G (802.11g) e Wireless-B
(802.11b), mantenere l'impostazione
predefinita per Network Mode
2
C
D
Page 27

(Modalità di rete), ovvero Mixed Mode
(Modalità mista). Se sono presenti solo
periferiche Wireless-G, selezionare
G-Only Mode (Modalità Solo G). Fare
clic su Next (Avanti).
E Selezionare il tipo di sicurezza
utilizzato: 64-bit WEP, 128-bit WEP o
WPA-PSK. T utte le periferiche collegate
in rete devono utilizzare lo stesso tipo
di sicurezza.
WEP
La passphrase viene utilizzata per
generare una o più chiavi WEP. È
sensibile alla distinzione tra maiuscole
e minuscole e non deve essere più
lunga di 16 caratteri alfanumerici.
Se si utilizza una cifratura WEP a 64 bit,
la chiave deve essere composta
esattamente da 10 caratteri
esadecimali. Se si utilizza una cifratura
WEP a 128 bit, la chiave deve essere
composta esattamente da 26
caratteri esadecimali.
E1
E
2
Selezionare la chiave TX e il metodo
di autenticazione della rete.
WPA-PSK
Selezionare la cifratura TKIP o AES.
Quindi, scegliere una passphrase
composta da un numero di caratteri
compreso tra 8 e 63.
F Prima di avviare l'installazione dei file,
l'installazione guidata chiederà di
confermare le impostazioni. Fare clic
su Next (Avanti) per confermare le
impostazioni oppure selezionare Back
(Indietro) per modificarle.
G Se l'installazione del software è stata
portata a termine correttamente, fare
clic su Exit (Esci).
F
G
3
Page 28

Installazione dell'adattatore
2
per notebook Wireless-G sul PC
A Spegnere il notebook.
B Individuare uno slot per PC Card nel
notebook.
C Inserire completamente l'adattatore
nello slot CardBus con l'etichetta
rivolta verso l'alto, come mostrato
nella figura C.
D Accendere il notebook.
E Windows inizia a copiare i file del
driver sul computer. Se richiesto,
inserire il CD-ROM originale di
Windows nell'unità CD-ROM e
specificarne la posizione (ad
esempio, D:\).
F Quando l'adattatore è stato installato,
nell'angolo inferiore destro dello
schermo, sulla barra delle
applicazioni, viene visualizzata l'icona
del monitor Wireless Network
dell'adattatore per notebook WirelessG.
C
Se si desidera utilizzare il monitor
Wireless Network per controllare le
informazioni relative alla
connessione, ricercare le reti wireless
disponibili oppure apportare ulteriori
modifiche alla configurazione, quindi
fare doppio clic sull'icona.
Per gli utenti di Windows XP: continuare
con la Fase 3.
Utenti di Windows 98, Me e 2000:
congratulazioni! L'installazione
dell'adattatore per notebook Wireless-G è
completata.
4
Page 29
Disattivazione del servizio Zero
3
Windows XP dispone di uno strumento di
configurazione incorporato. Per
configurare l'adattatore utilizzando il
monitor Wireless Network, è necessario
disattivare il servizio Zero Configuration reti
senza fili di Windows XP. Attenersi alle
istruzioni riportate nelle Fasi A-C.
Configuration reti senza fili di Windows XP
A L'icona Zero Configuration reti senza
fili di Windows XP appare nella barra
delle applicazioni del computer . Fare
doppio clic su questa icona.
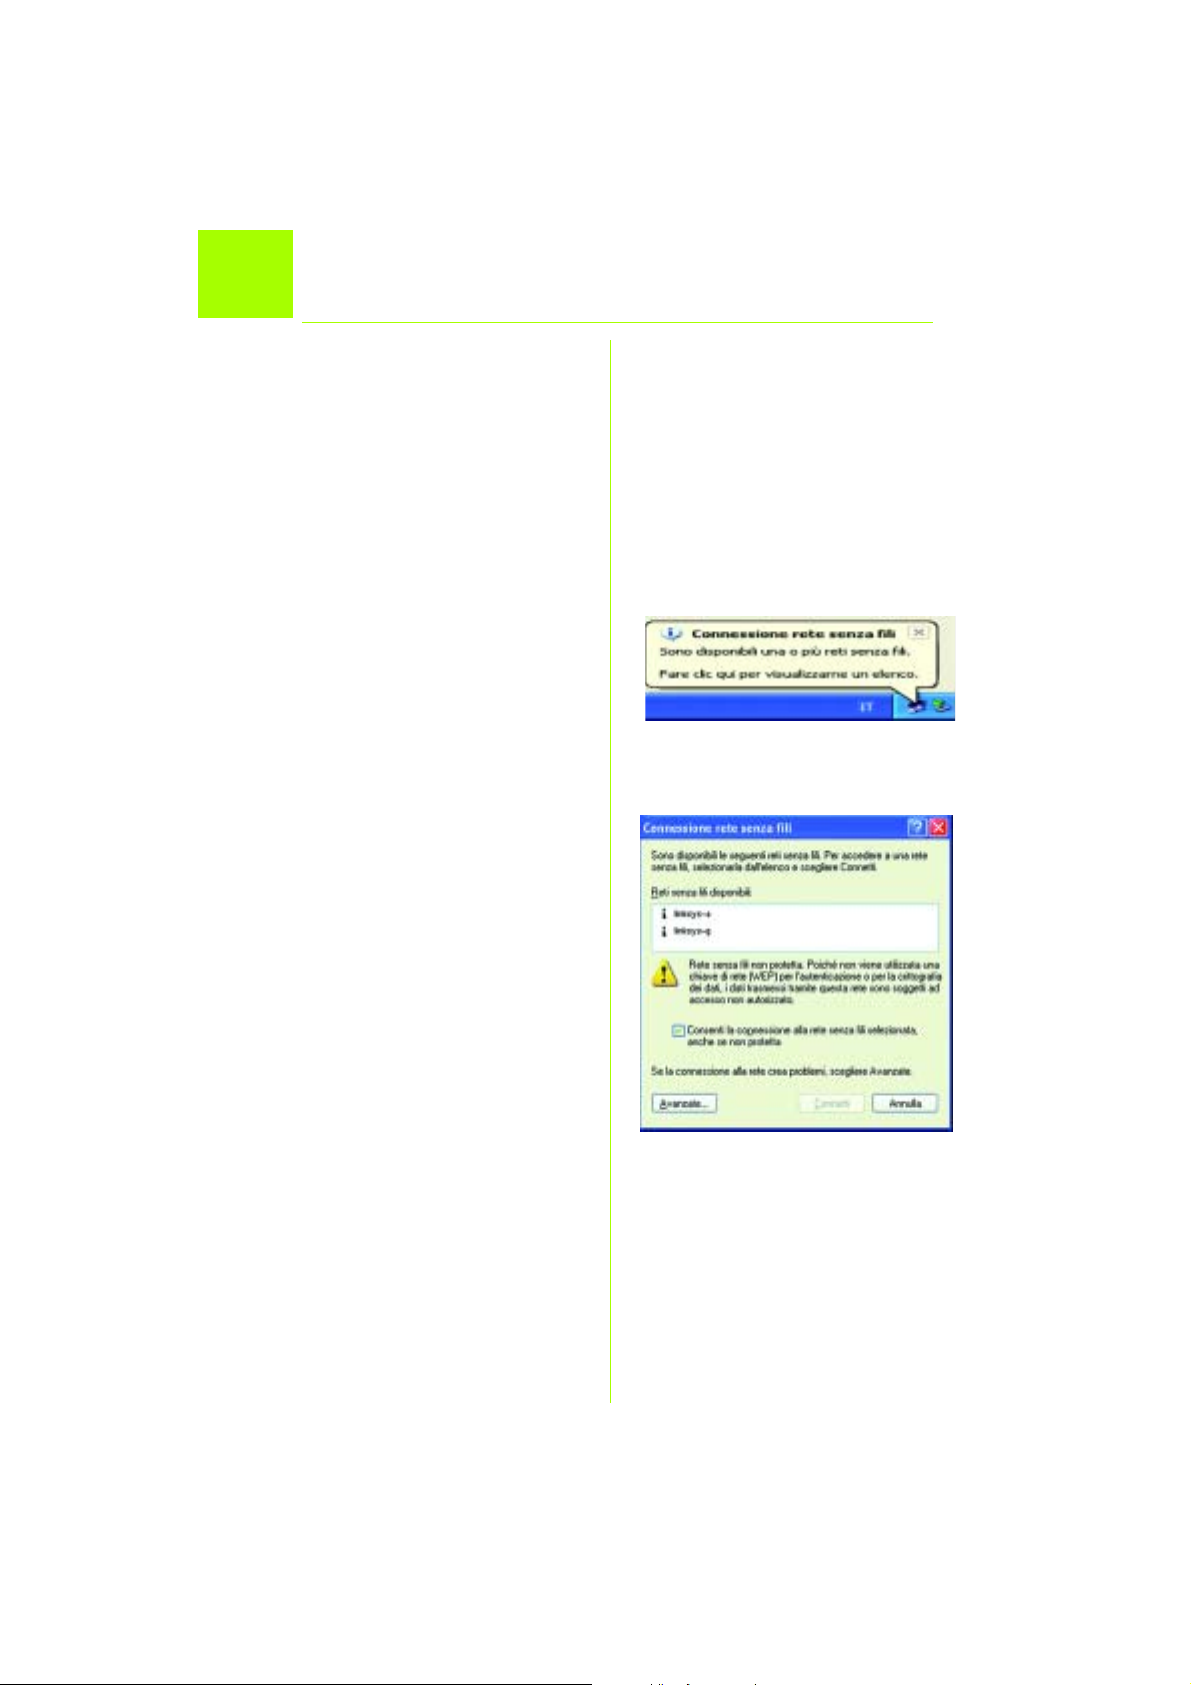
B Viene visualizzata una schermata
con le reti wireless disponibili. Fare
clic su Avanzate.
A
B
5
Page 30

Nella schermata Reti senza fili,
C
deselezionare la casella visualizzata
accanto all'opzione Usa Windows per
configurare le impostazioni della rete
senza fili.
Fare clic su OK.
Utenti del servizio Zero Configuration reti
senza fili di Windows XP: congratulazioni!
L'installazione dell'adattatore per
notebook Wireless-G è completata.
C
Per ulteriori informazioni o istruzioni relative alla risoluzione dei problemi, consultare la User Guide (Guida per
l'utente) contenuta nel CD-ROM o il Supplemento per l'assistenza tecnica per contattare l'Assistenza tecnica.
Sito Web http://www.linksys.com/international
Linksys è un marchio registrato o un marchio di Cisco Systems, Inc. e/o dei relativi affiliati negli Stati Uniti e in altri
paesi. Copyright © 2004 Cisco Systems, Inc. Tutti i diritti riservati.
WPC54GS-IT-QIG-40415NC JL
6
Page 31
A Division of Cisco Systems, Inc.
il
®
2
GHz
4
,
802.11g
WirelessWireless
Model No.
Model No.
Modelo
WPC54GS (PT)
Conteúdo da embalagem
• Placa sem fios G para computador
portátil
• CD-ROM de configuração
• Manual do Utilizador (disponível
apenas em inglês) em CD-ROM
• Instalação Rápida
Sem fios G
Placa para computador portát
com SpeedBooster
Instalação rápida
1
Page 32

Instalar o software da Placa sem
1
A Coloque o CD-ROM de configuração
B Depois de ler o Contrato de licença,
C Em seguida, escolherá um modo
fios G para computador portátil
na unidade de CD-ROM. O assistente
de configuração deverá ser
executado automaticamente e
deverá ser apresentado o ecrã
Welcome (Bem-vindo). Caso
contrário, clique em Iniciar e
seleccione Executar. No campo
apresentado, introduza D:\setup.exe
(se “D” corresponder à letra da
unidade de CD-ROM).
Clique no botão Install (Instalar).
clique em Next (Seguinte) para
continuar a instalação.
sem fios para a rede. Clique no
botão de opção Infrastructure Mode
(Modo de infra-estrutura) se pretender
que os computadores sem fios sejam
ligados a computadores da rede
com fios utilizando um ponto de
acesso. Clique no botão de opção
Ad-Hoc Mode (Modo ad hoc), se
pretender que vários computadores
sem fios sejam ligados directamente
uns aos outros.
A
B
No campo SSID, introduza o SSID da
rede sem fios. O SSID tem de ser
idêntico para todos os dispositivos na
rede. A predefinição é linksys (em
minúsculas). Clique em Next (Seguinte).
D Se escolher Infrastructure Mode
(Modo de infra-estrutura), vá para o
Passo E. Se escolher Ad-Hoc Mode
(Modo ad hoc), seleccione o canal
de funcionamento da rede correcto.
Se existirem dispositivos Sem fios G
(802.11g) e Sem fios B (802.11b) na
rede, mantenha a predefinição do
Network Mode (Modo de rede), Mixed
2
C
D
Page 33

Mode (Modo misto). Se existirem
apenas dispositivos Sem fios G,
seleccioneG-Only Mode (Modo só G).
Clique em Next (Seguinte).
E Seleccione o tipo de segurança:
WEP de 64 bits, WEP de 128 bits ou
WPA-PSK. Todos os dispositivos na
rede têm de utilizar o mesmo tipo.
WEP
A Passphrase (Frase-passe) é utilizada
para gerar uma ou várias chaves
WEP. É sensível a maiúsculas e
minúsculas e não pode ter mais de
16 caracteres alfanuméricos.
Se estiver a utilizar encriptação WEP
de 64 bits, a chave tem de ter
exactamente 10 caracteres
hexadecimais. Se estiver a utilizar
encriptação WEP de 128 bits, a
chave tem de ter exactamente 26
caracteres hexadecimais.
Seleccione a chave TX e o método
de Autenticação da rede.
E1
E2
WPA-PSK
Seleccione encriptação TKIP ou AES.
Em seguida, escolha uma frasepasse entre 8 e 63 caracteres.
F O Setup Wizard (Assistente de
configuração) solicitará que reveja as
definições antes de começar a
instalar os ficheiros. Clique em Next
(Seguinte) se estiver satisfeito com as
definições ou em Back (Anterior) para
alterar as definições.
G Depois de o software ter sido instalado
com êxito, clique em Exit (Sair).
F
G
3
Page 34

Instalar a Placa sem fios G para
2
A Desligue o computador portátil.
B Localize uma ranhura PC Card
C Com a etiqueta da Placa virada
D Ligue o computador portátil.
E O Windows começará a copiar os
F Depois de instalar a Placa, o ícone
computador portátil no computador
disponível no computador portátil.
para cima, conforme ilustrado na
Figura C, introduza-a totalmente na
ranhura CardBus.
ficheiros do controlador para o
computador. Se o Windows solicitar
o CD-ROM original do Windows,
coloque o CD-ROM e indique ao
Windows a respectiva localização
(por exemplo, D:\).
Wireless Network Monitor (Monitor
de redes sem fios) da Placa sem
fios G para computador portátil
será apresentado no tabuleiro do
sistema, localizado no canto
inferior direito do ecrã.
C
Se pretender utilizar o Wireless
Network Monitor (Monitor de redes
sem fios) para verificar as
informações da ligação, procure as
redes sem fios disponíveis ou
efectue alterações adicionais à
configuração e, em seguida, faça
duplo clique no ícone.
Utilizadores do Windows XP:
Avançar para o Passo 3.
Utilizadores do Windows 98, Me e 2000:
Parabéns! A instalação da Placa sem fios-
G para computador portátil está
concluída.
4
Page 35

Desactivar a Configuração nula
3
O Windows XP tem uma ferramenta de
configuração incorporada. Para configurar
a Placa utilizando o Wireless Network
Monitor (Monitor de redes sem fios), é
necessário desactivar a Configuração nula
sem fios do Windows XP. Siga as instruções
dos Passos A a C.
A O ícone Configuração nula sem fios
B O ecrã apresentado mostrará as
sem fios do Windows XP
do Windows XP será apresentado no
tabuleiro do sistema do computador.
Faça duplo clique no ícone .
redes sem fios disponíveis. Clique em
Avançadas.
A
B
5
Page 36

C No ecrã Redes sem fios, desmarque
a caixa junto a Utilizar o Windows para
configurar as definições de rede sem
fios.
Em seguida, clique em OK
Utilizadores da Configuração nula sem fios
do Windows XP: Parabéns! A inst alação da
Placa sem fios G
para computador portátil está concluída.
C
Para obter informações adicionais ou ajuda para resolução de problemas, consulte o Manual do
Utilizador no CD-ROM, ou para contactar o Suporte técnico, consulte a Folha de suporte técnico.
Web site http://www.linksys.com/international
Linksys é uma marca registada ou marca comercial da Ci sco Systems, Inc. e/ou das respectivas afiliadas nos E.U .A. e
noutros países. Copyright © 2004 Cisco Systems, Inc. Todos os direitos reservados.
WPC54GS-PT-QIG-40415NC JL
6
Page 37

A Division of Cisco Systems, Inc.
®
2
GHz
4
,
802.11g
Wireless
Model No.
Model No.
Modelo
WPC54GS (ES)
Contenido del paquete
• Adaptador para ordenador portátil
Wireless-G
• CD-ROM de configuración
• Guía del usuario (sólo en inglés) en
CD-ROM
• Guía de instalación rápida
Wireless-G
Adaptador para ordenador portátil
con SpeedBooster
Instalación rápida
Quick Installation Guide
1
Page 38

Instalación del software del adaptador
1
para ordenador portátil Wireless-G
A Inserte el CD-ROM de configuración
en la unidad de CD-ROM. El asistente
de configuración se debe ejecutar
de forma automática y debe
aparecer la pantalla Welcome
(pantalla de bienvenida). Si no es así,
haga clic en el botón Inicio y
seleccione Ejecutar. En el campo
que aparece, escriba D:\setup.exe
(donde “D” es la letra de la unidad de
CD-ROM).
Haga clic en el botón Install (Instalar).
B Una vez leído el acuerdo de licencia,
haga clic en Next (Siguiente) para
continuar la instalación.
C A continuación, seleccione el modo
inalámbrico de la red. Haga clic en
el botón de radio Infrastructure Mode
(Modo de infraestructura) si desea
conectar los ordenadores
inalámbricos a ordenadores de la
red con cables mediante un punto
de acceso. Haga clic en el botón de
radio Ad-Hoc M ode (Modo ad-hoc) si
desea conectar varios ordenadores
inalámbricos en red.
A
B
En el campo SSID, introduzca el SSID
(Identificador del conjunto de servicios)
de la red inalámbrica. Debe ser el
mismo para todos los dispositivos de la
red. El parámetro predeterminado es
linksys (todo minúsculas). Haga clic en
Next (Siguiente).
D Si selecciona Infrastructure Mode
(Modo de infraestructura), vaya al
paso E ahora. Si selecciona Ad-Hoc
Mode (Modo ad-hoc), elija el canal
operativo adecuado para la red.
Si dispone de dispositivos Wireless-G
(802.11g) y Wireless-B (802.11b) en la
red, mantenga Mixed Mode (Modo
2
C
D
Page 39

mixto), el parámetro predeterminado
de Network Mode (Modo de red). Si
sólo tiene dispositivos Wireless-G,
seleccione G-Only Mode (Modo sólo
G). Haga clic en Next (Siguiente).
E Seleccione el tipo de seguridad que
utilice: 64-bit WEP, 128-bit WEP o
WPA-PSK. Todos los dispositivos de la
red deben utilizar el mismo tipo.
WEP
La frase de paso se utiliza para
generar una o más claves WEP.
Distingue entre mayúsculas y
minúsculas y no debe tener una
longitud superior a los 16 caracteres.
Si utiliza encriptación WEP de 64 bits,
la clave debe contener exactamente
10 caracteres hexadecimales. Si
utiliza encriptación WEP de 128 bits, la
clave debe contener exactamente
26 caracteres hexadecimales.
Seleccione la clave TX (TX Key) y el
método de autenticación
(Authentication method) de la red.
E1
E
2
WPA-PSK
Seleccione la encriptación TKIP o AES.
A continuación, seleccione una frase
de paso que contenga entre 8 y 63
caracteres.
F El asistente de configuración le
solicita que revise los parámetros
antes de comenzar a instalar
archivos. Haga clic en Next
(Siguiente) si está satisfecho con los
parámetros o en Back (Atrás) para
cambiarlos.
G Una vez instalado correctamente el
software, haga clic en Exit (Salir).
F
G
3
Page 40

Instalación del software del adaptador
2
para ordenador portátil Wireless-G
A Apague el ordenador portátil.
B Localice una ranura de tarjeta PC
disponible en el ordenador portátil.
C Introduzca el adaptador, con la
etiqueta hacia arriba (como
aparece en la figura C), hasta que
encaje completamente en la ranura
CardBus.
D Encienda el ordenador portátil.
E Windows comienza a copiar los
archivos del controlador en el
ordenador . Si Windows soli cita el CDROM original de Windows, insértelo e
indique al sistema operativo la
ubicación del mismo (por ejemplo,
D:\).
F Una vez instalado el adaptador,
aparece el icono del monitor de red
inalámbrico del adaptador para
ordenador portátil Wireless-G en la
bandeja del sistema, situada en la
parte inferior derecha de la pantalla.
C
Si desea utilizar el monitor de red
inalámbrico para comprobar la
información sobre enlaces, buscar
redes inalámbricas disponibles o
realizar cambios adicionales en la
configuración, haga doble clic en
el icono.
Usuarios de Windows XP: vaya al paso 3.
Usuarios de Windows 98, Me y 2000:
enhorabuena. Ha finalizado la instalación
del adaptador para ordenador portátil
Wireless-G.
4
Page 41

Desactivación de la configuración
3
Windows XP incorpora una herramienta de
configuración. Para configurar el
adaptador mediante el monitor de red
inalámbrico, debe desactivar la
configuración inalámbrica rápida de
Windows XP. Siga las instrucciones de los
pasos A-C.
inalámbrica rápida en Windows XP
A El icono de configuración
inalámbrica rápida en Windows XP
aparece en la bandeja del sistema
del ordenador. Haga doble clic en
dicho icono.
A
B La pantalla que aparece muestra
todas las redes inalámbricas
disponibles. Haga clic en Opciones
avanzadas.
B
5
Page 42

C En la pantalla Redes inalámbricas,
desactive la casilla que aparece
junto a Usar Windows para establecer
mi config. de red inalámbrica.
A continuación, haga clic en
Aceptar.
Usuarios de la configuración inalámbrica
rápida en Windows XP: Enhorabuena. La
instalación del adaptador para ordenador
portátil Wireless-G ha finalizado.
C
Para obtener información adicional o ayuda sobre solución de problemas, consulte la guía del usuario en
CD-ROM o consulte el suplemento de asistencia técnica para obtener asistencia.
Página Web http://www.linksys.com/international
Linksys es una marca comercial registrada o marca comercial de Cisco Systems, Inc. y/o sus filiales de EE.UU. y otros
países. Copyright © 2004 Cisco Systems, Inc. Todos los derechos reservados.
WPC54GS-ES-QIG-4015NC JL
6
Page 43
A Division of Cisco Systems, Inc.
®
GHz
4
2
,
802.11g
Wireless
Trådlöst
Model No.
Model No.
Modellnr
Wireless-G
Adapter för bärbar dator
med SpeedBooster
Snabbinstallationshandbok
WPC54GS (SE)
Innehåll i förpackningen
• Wireless G Adapter för bärbar dator
• Installations-cd
• Användarhandbok på cd-skiva
• Snabbinstallation
Quick Installation Guide
1
Page 44

Installera programvaran för
1
A Sätt in installations-cd:n i cd-
Wireless-G Adapter för bärbar dator
enheten. Guiden startas och
skärmen Welcome (Välkommen)
visas automatiskt. Om skärmen
inte visas klickar du på knappen
Start och väljer Kör. I det fält som
visas anger du D:\setup.exe (om
"D" är cd-enhetens beteckning).
Klicka på Install (Installera).
B Läs igenom licensavtalet och
klicka på Next (Nästa) om du vill
fortsätta installationen.
C Du ska sedan välja ett trådlöst
läge för nätverket. Klicka på
Infrastructure Mode
(Infrastrukturläge) om du vill att de
trådlösa datorerna ska bilda
nätverk med datorer på det
trådanslutna nätverket med hjälp
av en accesspunkt. Klicka på
Ad-Hoc Mode (Ad-hoc-läge) om
du vill att flera trådlösa datorer ska
kopplas till varandra.
Skriv det trådlösa nätverkets SSID i
fältet SSID. SSID:t måste vara
identiskt för alla enheter i
nätverket . Standardinställningen är
linksys (med små bokstäver).
Klicka på Next (Nästa).
A
B
C
D Om du valde infrastrukturläget ska
du gå vidare till steg E. Om du
valde ad-hoc-läget ska du välja
korrekt driftskanal för nätverket.
Behåll standardinställningen Mixed
Mode (Blandat läge) för
nätverksläget om enheter av typen
Wireless-G (802.11g) och Wireless-B
2
D
Page 45

(802.11b) ingår i nätverket. Välj
G-On ly Mo d e (Endast G-läge) om
alla enheter är av typen Wireless-G.
Klicka på Next (Nästa).
E Välj säkerhetstyp: 64-bit WEP,
128-bit WEP eller WPA-PSK.
Alla enheter i nätverket måste
använda samma typ.
WEP
Lösenordet används till att
generera en eller flera WEP-nycklar.
Lösenordet är skiftlägeskänsligt och
får inte överstiga 16 alfanumeriska
tecken.
Om du använder 64-bitars WEPkryptering måste nyckeln bestå av
exakt 10 hexadecimala tecken.
Om du använder 128-bitars WEPkryptering måste nyckeln bestå av
exakt 26 hexadecimala tecken.
Välj nätverkets TX-nyckel och
verifieringsmetod.
E1
E2
WPA-PSK
Välj TKIP- eller AES-kryptering. Välj
sedan ett lösenord med 8 – 63
tecken.
F I Installationsguiden blir du
ombedd att läsa igenom dina
inställningar innan filerna börjar
installeras. Klicka på Next (Nästa)
om du är nöjd med
inställningarna, eller på Back
(Tillbaka) om du vill ändra dem.
G När programvaran har installerats
klickar du på Exit (Avsluta).
F
G
3
Page 46

Installera programvaran för
2
A Stäng av den bärbara datorn.
B Leta rätt på en ledig PC Card-
C Håll adaptern med etikettsidan
D Starta den bärbara datorn.
E Drivrutinsfilerna börjar kopieras
F När du har installerat adaptern
Adapter för bärbar dator i datorn
kortplats på datorn.
upp, enligt bild C, och för in
den ordentligt i CardBuskortplatsen.
till datorn. Om du blir ombedd
att sätta in originalskivan för
Windows sätter du in cd-skivan
och anger sökvägen (till
exempel D:\).
visas ikonen Wireless Network
Monitor (övervakare för trådlösa
nätverk) för Wireless-G Adapter
för bärbar dator.
C
Dubbelklicka på ikonen om du
vill använda Wireless Network
Monitor (övervakare för trådlösa
nätverk) för att kontrollera
länkinformation, söka efter
tillgängliga trådlösa nätverk
eller göra ytterligare ändringar i
konfigurationen.
Windows XP-användare: Gå till steg
3.
Användare av Windows 98, Me och
2000: Grattis! Installationen av
Wireless-G Adapter för bärbar dator
är klar.
4
Page 47

Avaktivera Windows XP
3
Windows XP har ett inbyggt
konfigureringsverktyg. Om du vill
konfigurera adaptern genom att
använda Wireless Network Monitor
(övervakare för trådlösa nätverk)
måste du avaktivera Windows XP
Wireless Zero Configuration. Följ
instruktionerna i steg A
A Ikonen Windows XP Wireless Zero
Wireless Zero Configuration
-C.
Configuration visas i systemfältet
på skrivbordet. Dubbelklicka på
ikonen.
A
B Alla tillgängliga trådlösa nätverk
visas på skärmen. Klicka på
Avancerat.
B
5
Page 48

På skärmen för trådlösa nätverk
C
avmarkerar du rutan bredvid
Konfigurera trådlöst nätverk.
Klicka därefter på OK.
Användare av Windows XP Wireless
Zero Configuration: Grattis!
Installationen av Wireless-G
Adapter för bärbar dator är klar.
C
Mer information och felsökningshjälp finns i användarhandboken på cd-skivan. Information om hur du
kontaktar vår tekniska supportavdelning finns i den särskilda bilagan.
Webbplats http://www.linksys.com /international
Linksys är ett registrerat varumärke eller ett varumärke som tillhör Cisco Systems, Inc. och/eller dess
samarbetspartner i USA och vissa andra länder. Copyright © 2004 Cisco Systems, Inc. Med ensamrätt.
WPC54GS-SE-QIG-40415NC JL
6
Page 49

A Division of Cisco Systems, Inc.
®
Model No.
GHz
4
2
,
802.11g
WIRELESS
WPC54GS
Wireless-G
Notebook Adapter
User Guide
with SpeedBooster
Page 50

Wireless-G Notebook Adapter with SpeedBooster
Copyright and Trademarks
Specifications are subject to change without notice. Linksys is a registered trademark or trademark of Cisco
Systems, Inc. and/or its affiliates in the U.S. and certain other countries. Copyright © 2004 Cisco Systems, Inc. All
rights reserved. Other brands and product names are trademarks or registered trademarks of their respective
holders.
This User Guide
The User Guide to the Wireless-G Notebook Adapter with SpeedBooster has been designed to make
understanding networking easier than ever. Look for the following items when reading this guide:
This checkmark means there is a note of interest and
is something you should pay special attention to while
using the Adapter.
This exclamation point means there is a caution or
warning and is something that could damage your
property or the Adapter.
This question mark provides you with a reminder about
something you might need to do while using the Adapter.
In addition to these symbols, there are definitions for technical terms that are presented like this:
word: definition.
Also, each figure (diagram, screenshot, or other image) is provided with a figure number and description, like
this:
Figure numbers and descriptions can also be found in the "List of Figures" section in the “Table of Contents”.
WPC54GS-EU-UG-40410NC KL
Figure 0-1: Sample Figure Description
Page 51

Wireless-G Notebook Adapter with SpeedBooster
Chapter 1: Introduction 1
Welcome 1
What’s in this Guide? 2
Chapter 2: Planning your Wireless Network 4
Network Topology 4
Roaming 4
Network Layout 5
Chapter 3: Getting to Know the Wireless-G Notebook Adapter 6
The LED Indicators 6
Chapter 4: Software Installation and Configuration 7
The Installation Procedure 8
Chapter 5: Hardware Installation 12
Connecting the Adapter 12
Chapter 6: Using the Wireless Network Monitor 13
Accessing the WLAN Monitor 13
Link Information 13
Site Survey 16
Profiles 17
Creating a New Profile 18
Appendix A: Troubleshooting 30
Common Problems and Solutions 30
Frequently Asked Questions 31
Appendix B: Wireless Security 34
Security Precautions 34
Security Threats Facing Wireless Networks 34
Appendix C: Windows Help 37
Appendix D: Glossary 38
Appendix E: Specifications 45
Appendix F: Warranty Information 46
Appendix G: Regulatory Information 47
Appendix H: Contact Information 53
Page 52

Wireless-G Notebook Adapter with SpeedBooster
Figure 3-1: Front Panel 6
Figure 4-1: The Setup Wizard’s Welcome Screen 7
Figure 4-2: The Setup Wizard’s License Agreement 8
Figure 4-3: The Setup Wizard’s Wireless Mode Screen 8
Figure 4-4: The Setup Wizard’s Ad-Hoc Mode Screen 9
Figure 4-5: The Setup Wizard’s WEP Screen 9
Figure 4-6: The Setup Wizard’s WPA-PSK Screen 10
Figure 4-7: The Setup Wizard’s Check Settings Screen 10
Figure 4-8: The Setup Wizard’s Congratulations Screen 11
Figure 5-1: How the Adapter installs into your notebook 12
Figure 6-1: Link Information 13
Figure 6-2: More Information-Network Settings 14
Figure 6-3: More Information-Network Statistics 15
Figure 6-4: Site Survey 16
Figure 6-5: Profiles 17
Figure 6-6: Importing a Profile 17
Figure 6-7: Exporting a Profile 17
Figure 6-8: Creating a New Profile 18
Figure 6-9: Enter Profile Name 18
Figure 6-10: Wireless Mode for New Profile 19
Figure 6-11: Ad-Hoc Mode Settings 19
Figure 6-12: Netowork Settings 20
Figure 6-13: Wireless Security for New Profile 21
Figure 6-14: WEP Setting for New Profile 21
Figure 6-15: WPA-PSK Settings 22
Figure 6-16: TKIP Settings 22
Figure 6-17: WPA RADIUS Settings 23
Figure 6-18: Encryption Type 23
Figure 6-19: EAP-TLS Authentication 24
Figure 6-20: EAP-TTLS Authentication 24
Figure 6-21: EAP-MD5 Authentication 25
Figure 6-22: EAP-PEAP Authentication 25
Figure 6-23: EAP-LEAP Authentication 25
Page 53

Wireless-G Notebook Adapter with SpeedBooster
Figure 6-24: RADIUS Settings 26
Figure 6-25: EAP-TLS Authentication 26
Figure 6-26: EAP-TTLS Authentication 27
Figure 6-27: EAP-MD5 Authentication 27
Figure 6-28: EAP-PEAP Authentication 28
Figure 6-29: LEAP Authentication 28
Figure 6-30: TKIP Settings 29
Figure 6-31: EAP-TLS Authentication 29
Page 54

Wireless-G Notebook Adapter with SpeedBooster
Chapter 1: Introduction
Welcome
Thank you for choosing the Wireless-G Notebook Adapter with SpeedBooster. With this Adapter, your wireless
networking experience will be faster and easier than ever.
Like all wireless products, the Adapter allows for greater range and mobility within your wireless network. This
adapter communicates over the 54Mbps 802.11g wireless standard, which is almost five times faster than
802.11b. But since they share the same 2,4GHz radio band, the Adapter can also communicate with the widely
used 11Mbps 802.11b standard.
PCs equipped with wireless cards and adapters can communicate without cumbersome cables. By sharing the
same wireless settings, within their transmission radius, they form a wireless network.
network: a series of computers or devices
connected for the purpose of data sharing,
storage, and/or transmission between users.
adapter: a device that adds network functionality
to your PC.
The included Setup Wizard will walk you through configuring the adapter to your network's settings, step by step.
Then just slide it into your notebook's PC Card slot and enjoy network access with your notebook computer, while
retaining true mobility.
Once you're connected, you can keep in touch with your e-mail, access the Internet, and share files and other
resources such as printers and network storage with other computers on the network. At home, you can surf the
web or use instant messaging to chat with friends while sitting out on the patio. Your wireless connection is
protected by up to 128-bit WEP encryption.
You'll also be able to connect with any of the growing number of public wireless hotspots springing up in coffee
shops, airport lounges, hotels and convention centers. And as those hotspots upgrade to the new high-speed
Wireless-G standard, you'll be ready to take advantage of the increased speeds.
Get connected to current-standard 802.11b networks today, and be prepared for the future with the Wireless-G
Notebook Adapter with SpeedBooster from Linksys.
Chapter 1: Introduction
Welcome
802.11b: an IEEE wireless networking standard
that specifies a maximum data transfer rate of
11Mbps and an operating frequency of 2,4GHz.
802.11g an IEEE wireless networking standard that
specifies a maximum data transfer rate of 54Mbps
and an operating frequency of 2,4GHz.
1
Page 55

Wireless-G Notebook Adapter with SpeedBooster
What’s in this Guide?
This user guide covers the steps for setting up and using the Wireless-G Notebook Adapter with SpeedBooster.
• Chapter 1: Introduction
This chapter describes the Adapter’s applications and this User Guide.
• Chapter 2: Planning Your Wireless Network
This chapter discusses a few of the basics about wireless networking.
• Chapter 3: Getting to Know the Wireless-G Notebook Adapter
This chapter describes the physical features of the Adapter.
• Chapter 4: Software Installation and Configuration
This chapter instructs you on how to install the Adapter’s Setup Wizard and Configure the Adapter
• Chapter 5: Hardware Installation
This chapter shows you how to connect the Adapter to your PC.
• Chapter 6: Using the WLAN Monitor
This chapter show you how to use the Adapter’s WLAN Monitor.
• Appendix A: Troubleshooting
This appendix describes some problems and solutions, as well as frequently asked questions, regarding
installation and use of the Adapter.
• Appendix B: Wireless Security
This appendix discusses security issues regarding wireless networking and measures you can take to help
protect your wireless network.
• Appendix C: Windows Help
This appendix describes how you can use Windows Help for instructions about networking, such as installing
the TCP/IP protocol.
• Appendix D: Glossary
This appendix gives a brief glossary of terms frequently used in networking.
• Appendix E: Specifications
This appendix provides the Adapter’s technical specifications.
• Appendix F: Warranty Information
This appendix supplies the Adapter’s warranty information.
Chapter 1: Introduction
What’s in this Guide?
2
Page 56

Wireless-G Notebook Adapter with SpeedBooster
• Appendix G: Regulatory Information
This appendix supplies the Adapter’s regulatory information.
• Appendix H: Contact Information
This appendix provides contact information for a variety of Linksys resources, including Technical Support.
Chapter 1: Introduction
What’s in this Guide?
3
Page 57

Wireless-G Notebook Adapter with SpeedBooster
Chapter 2: Planning your Wireless Network
Network Topology
A wireless network is a group of computers, each equipped with one wireless adapter. Computers in a wireless
network must be configured to share the same radio channel. Several PCs equipped with wireless cards or
adapters can communicate with one another to form an ad-hoc network.
Linksys wireless adapters also provide users access to a wired network when using an access point or wireless
router. An integrated wireless and wired network is called an infrastructure network. Each wireless PC in an
infrastructure network can talk to any computer in a wired network infrastructure via the access point or wireless
router.
An infrastructure configuration extends the accessibility of a wireless PC to a wired network, and can double the
effective wireless transmission range for two wireless adapter PCs. Since an access point is able to forward data
within a network, the effective transmission range in an infrastructure network can be doubled.
Roaming
Infrastructure mode also supports roaming capabilities for mobile users. Roaming means that you can move your
wireless PC within your network and the access points will pick up the wireless PC's signal, providing that they
both share the same channel and SSID.
topology: the physical layout of a network.
ad-hoc: a group of wireless devices
communicating directly with each other (peerto-peer) without the use of an access point.
infrastructure: a wireless network that is
bridged to a wired network via an access point.
roaming: the ability to take a wireless device
from one access point's range to another without
losing the connection.
Before enabling you consider roaming, choose a feasible radio channel and optimum access point position.
Proper access point positioning combined with a clear radio signal will greatly enhance performance.
Chapter 2: Planning your Wireless Network
Network Topology
ssid: your wireless network's name.
4
Page 58

Wireless-G Notebook Adapter with SpeedBooster
Network Layout
Linksys wireless access points and wireless routers have been designed for use with 802.11a, 802.11b, and
802.11g products. With 802.11g products communicating with the 802.11b standard and some products
incorporating both “a” and “g”, products using these standards can communicate with each other.
Access points and wireless routers are compatible with 802.11a, 802.11b and 802.11g adapters, such at the PC
Cards for your laptop computers, PCI Card for your desktop PC, and USB Adapters for when you want to enjoy
USB connectivity. Wireless products will also communicate with the wireless PrintServer.
When you wish to connect your wired network with your wireless network, network ports on access points and
wireless routers can be connected to any of Linksys's switches or routers.
With these, and many other, Linksys products, your networking options are limitless. Go to the Linksys website at
www.linksys.com/international for more information about wireless products.
Chapter 2: Planning your Wireless Network
Network Layout
5
Page 59

Wireless-G Notebook Adapter with SpeedBooster
Chapter 3: Getting to Know the Wireless-G Notebook
Adapter
The LED Indicators
The Network Adapter's LEDs display information about network activity.
Figure 3-1: Front Panel
Power Green. The Power LED lights up when the Adapter is powered on.
Link Green. The Link LED lights up when the Adapter has an active connection.
Chapter 3: Getting to Know the Wireless-G Notebook Adapter
The LED Indicators
6
Page 60
Wireless-G Notebook Adapter with SpeedBooster
Chapter 4: Software Installation and Configuration
The Wireless Wireless-G Notebook Adapter Setup Wizard will guide you through the installation procedure. The
Setup Wizard will install the WLAN Monitor and driver, as well as configure the Adapter.
NOTE: You must run the Setup Wizard to install the software before installing
the hardware. On the first screen you must choose a languge to continue.
Insert the Setup Wizard CD-ROM into your CD-ROM drive. The Setup Wizard should run automatically, and the
Welcome screen should appear. If it does not, click the Start button and choose Run. In the field that appears,
enter D:\setup.exe (if “D” is the letter of your CD-ROM drive).
On the Welcome screen, you have the following choices:
Install - Click the Install button to begin the software installation process.
User Guide - Click the User Guide button to open the PDF file of this User Guide.
Exit - Click the Exit button to exit the Setup Wizard.
Chapter 4: Software Installation and Configuration
Figure 4-1: The Setup Wizard’s Welcome Screen
7
Page 61

Wireless-G Notebook Adapter with SpeedBooster
The Installation Procedure
1. To install the Adapter, click the Install button on the Welcome screen.
2. After reading the License Agreement, click the Next button if you agree, or click the Cancel button to end the
installation.
3. The Setup Wizard will ask you to choose a network mode. Click the Infrastructure Mode radio button if you
want your wireless computers to network with computers on your wired network using a wireless access
point. Click the Ad-Hoc Mode radio button if you want multiple wireless computers to network directly with
each other.
Figure 4-2: The Setup Wizard’s License Agreement
In the SSID field, enter the SSID of your wireless network. The SSID must be identical for all devices in the
network. The default setting is linksys (all lowercase). Click the Next button.
NOTE: Network SSIDs should be unique to your network and identical for all
devices within the network.
Chapter 4: Software Installation and Configuration
The Installation Procedure
Figure 4-3: The Setup Wizard’s Wireless Mode Screen
8
Page 62

Wireless-G Notebook Adapter with SpeedBooster
4. If you chose Infrastructure Mode, go to Step 5 now. If you chose Ad-Hoc Mode, select the correct operating
channel for your network. Then, select the Network Mode from the drop-down menu. Click the Next button,
and go to Step 5. Click the Back button to change any settings.
Channel - The channel you choose should match the channel set on the other devices in your wireless
network. If you are unsure about which channel to use, select the default channel.
Network Mode - Select Mixed Mode, and both Wireless-G and Wireless-B computers will be allowed on the
network, but the speed will be reduced. Select G-Only Mode for maximum speed, but no Wireless-B users
will be allowed on the network.
5. Select the type of security you want to use: 64-bit WEP, 128-bit WEP, or WPA-PSK. All devices in a network
must use the same type.
WEP
WEP - To use WEP encryption, select 64-bits or 128-bit characters from the drop-down menu, and enter a
passphrase or WEP key.
Passphrase - Instead of manually entering a WEP key, you can enter a passphrase in the Passphrase field, so
a WEP key is automatically generated. It is case-sensitive and should not be longer than 16 alphanumeric
characters. This passphrase must match the passphrase of your other wireless network devices and is
compatible with Linksys wireless products only. (If you have any non-Linksys wireless products, enter the
WEP key manually on those products.)
WEP Key - The WEP key you enter must match the WEP key of your wireless network. If you are using 64-bit
WEP encryption, then the key must consist of exactly 10 hexadecimal characters. If you are using 128-bit
WEP encryption, then the key must consist of exactly 26 hexadecimal characters. Valid hexadecimal
characters are “0” to “9” and “A” to “F”.
Transmit Key - The default transmit key number is 1. If your network’s access point or wireless router uses
transmit key number 2, 3, or 4, select the appropriate number from the Transmit Key drop-down box.
Authentication -The default is set to Auto, where it auto-detects for Shared Key or Open system. Shared
Key is when both the sender and the recipient share a WEP key for authentication. Open key is when the
sender and the recipient do not share a WEP key for authentication. All points on your network must use the
same authentication type.
Chapter 4: Software Installation and Configuration
The Installation Procedure
Figure 4-4: The Setup Wizard’s Ad-Hoc Mode Screen
Figure 4-5: The Setup Wizard’s WEP Screen
9
Page 63

Wireless-G Notebook Adapter with SpeedBooster
Click the Next button to continue.s. Click the Back button to return to the previous screen. Click the Help
button for more information.
WPA-PSK
WPA-PSK offers two encryption methods, TKIP and AES, with dynamic encryption keys.
Select the type of algorithm, TKIP or AES, for the Encryption Type. Enter a WPA Shared Key of 8-63 characters
in the Passphrase field..
Click the Next button to continue.s. Click the Back button to return to the previous screen. Click the Help
button for more information.
Figure 4-6: The Setup Wizard’s WPA-PSK Screen
6. The Setup Wizard will ask you to review your settings before it starts to install files. Click Next if you are
satisfied with your settings, or click Back to change any settings.
Chapter 4: Software Installation and Configuration
The Installation Procedure
Figure 4-7: The Setup Wizard’s Check Settings Screen
10
Page 64
Wireless-G Notebook Adapter with SpeedBooster
7. After the software has been successfully installed, the Congratulations screen will appear. Click the Exit
button.
Proceed to “Chapter 5: Hardware Installation.”
Figure 4-8: The Setup Wizard’s Congratulations Screen
Chapter 4: Software Installation and Configuration
The Installation Procedure
11
Page 65

Wireless-G Notebook Adapter with SpeedBooster
Chapter 5: Hardware Installation
NOTE: You must run the Setup Wizard to install the software before installing
the hardware.
Connecting the Adapter
1. Turn off your notebook PC.
2. Locate an available CardBus slot on your notebook PC.
3. With the connector pin end facing the CardBus slot and the label facing up, slide the Adapter into the CardBus
slot until it locks in place.
4. Restart your notebook PC. The Power LED should light up when the Adapter is installed correctly.
5. Windows will begin copying the driver files to your computer. If Windows asks you for the original Windows
CD-ROM, insert the CD-ROM, and direct Windows to its correct location (e.g., D:\).
The installation of the Wireless-G Notebook Adapter is complete.
If you want to check the link information, search for available wireless networks, or make additional
configuration changes, go to “Chapter 6: Using the Wireless Network Monitor.”
Chapter 5: Hardware Installation
Connecting the Adapter
Figure 5-1: How the Adapter installs into your notebook
12
Page 66

Wireless-G Notebook Adapter with SpeedBooster
Chapter 6: Using the Wireless Network Monitor
Use the WLAN Monitor to check the link information, search for available wireless networks, or create profiles
that hold different configuration settings.
Accessing the WLAN Monitor
After installing the Adapter, the Wireless-G Notebook Adapter WLAN Monitor icon will appear in your system tray.
Double-click the icon.
The Link Information screen will appear. From this screen, you can find out how strong the current wireless signal
is and how good the connection’s quality is. You can also click the More Information button to view additional
status information about the current wireless connection. To search for available wireless networks, click the
Site Survey tab. To perform configuration changes, click the Profiles tab.
Link Information
The Link Information screen displays network mode, signal strength, and link quality information about the
current connection. It also provides a button to click for additional status information.
Ad-Hoc Mode or Infrastructure Mode - The screen indicates whether the Adapter is currently working in adhoc or infrastructure mode.
Signal Strength - The Signal Strength bar indicates signal strength.
Link Quality - The Link Quality bar indicates the quality of the wireless network connection.
Click the More Information button to view additional information about the wireless network connection.
Chapter 6: Using the Wireless Network Monitor
Accessing the WLAN Monitor
Figure 6-1: Link Information
13
Page 67

Wireless-G Notebook Adapter with SpeedBooster
Clicking the More Information button displays more information about the Adapter’s connection, as shown
below:
Wireless Network Status
The Networks Settings screen provides information on your current network settings.
Wireless Network Status
Status - The status of the wireless network connection.
SSID - This is the unique name of the wireless network.
Wireless Mode - The mode of the wireless network currently in use is displayed here.
Transfer Rate - The data transfer rate of the current connection is shown here.
Channel - The channel to which the wireless network devices are set.
Encryption- The status of the security feature.
Authentication - This is your wireless network’s authentication method.
Network Mode - The wireless mode currently in use.
IP Address - The IP Address of the Adapter.
Subnet Mask - The Subnet Mask of the Adapter.
Default Gateway - The Default Gateway address of the Adapter.
DNS - The DNS address of the Adapter.
DHCP Client- This displays the status of the DHCP client.
MAC - The MAC address of the wireless network’s access point.
Signal Strength - The Signal Strength bar indicates the signal strength.
Link Quality - The Link Quality bar indicates the quality of the wireless network connection.
Chapter 6: Using the Wireless Network Monitor
Link Information
Figure 6-2: More Information-Network Settings
14
Page 68

Wireless-G Notebook Adapter with SpeedBooster
Click the Statistics button to go to the Network Statistics screen. Click the Back button to return to the initial
Link Information screen. Click the Save to Profile button to save the currently active connection to a profile.
Wireless Network Statistics
The Networks Statistics screen provides statistics on your current network settings.
Transmit Rate - The data transfer rate of the current connection.(In Auto mode, the Adapter dynamically shifts to
the fastest data transfer rate possible at any given time.)
Receive Rate - The rate that data is received.
Packets Received - This shows the packets received by the Adapter, in real time, since connecting to the
Wireless Network or since the Refresh button was last pressed.
Packets Transmitted - This shows the packets transmitted from the Adapter, in real time, since connecting to
the Wireless Network or since the Refresh button was last pressed.
Bytes Received - This shows the bytes received by the Adapter, in real time, since connecting to the Wireless
Network or since the Refresh button was last pressed.
Bytes Transmitted - This shows the bytes transmitted from the Adapter, in real time, since connecting to the
Wireless Network or since the Refresh button was last pressed.
Noise Level - This is your wireless network’s authentication method.
Signal Strength - This shows the Adapter’s IP Address.
Driver Version - This shows the version of the Adapter’s driver.
Signal Strength - The Signal Strength bar indicates the signal strength.
Link Quality - The Link Quality bar indicates the quality of the wireless network connection.
Click the Back button to return to the initial Link Information screen. Click the Status button to go to the
Network Status screen. Click the Save to Profile button to save the currently active connection to a profile. Click
the Refresh Stats button to refresh the screen.
Chapter 6: Using the Wireless Network Monitor
Link Information
Figure 6-3: More Information-Network Statistics
15
Page 69
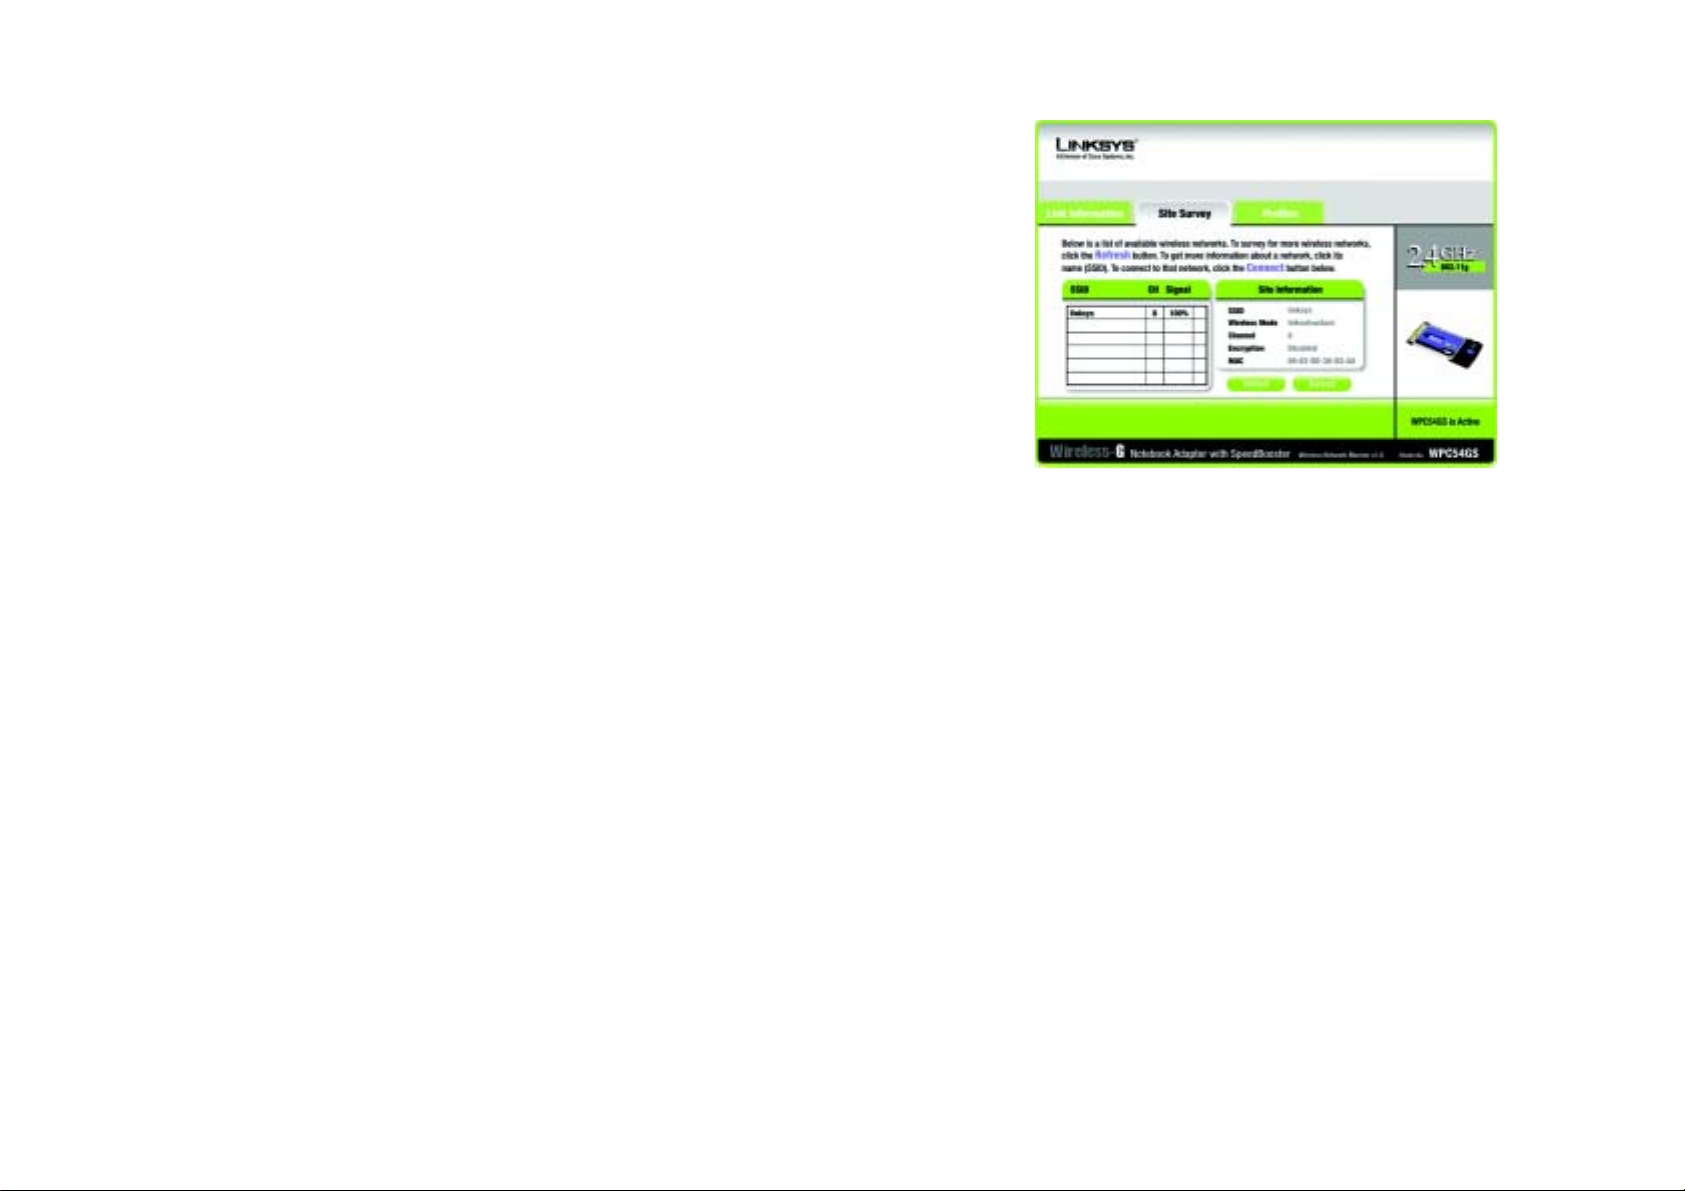
Wireless-G Notebook Adapter with SpeedBooster
Site Survey
The Site Survey screen displays a list of infrastructure and ad-hoc networks available for connection in the table
on the right. This table shows the network’s SSID, Channel, and the quality of the wireless signal the Adapter is
receiving. You may click SSID, CH (Channel), or Signal, to sort by that field.
SSID - The SSID or unique name of the wireless network.
CH - The channel upon which the network broadcasts.
Signal - The percentage of signal strength, from 0 to 100%.
Site Information
For each network selected, the following settings are listed:
SSID - The SSID or unique name of the wireless network.
Wireless Mode - The mode of the wireless network currently in use.
Channel - The channel to which the wireless network devices are set.
Encryption- The status of the encryption security feature.
MAC - The MAC address of the wireless network’s access point.
Refresh - Click the Refresh button to perform a new search for wireless devices.
Connect - To connect to one of the networks on the list, select the wireless network, and click the Connect
button.
Figure 6-4: Site Survey
Chapter 6: Using the Wireless Network Monitor
Site Survey
16
Page 70

Wireless-G Notebook Adapter with SpeedBooster
Profiles
The Profiles screen lets you save different configuration profiles for different network setups. The table on the
right displays a list of infrastructure and ad-hoc networks available for connection This table shows the network’s
profile name and the wireless network’s SSID, as set in the connection profile.
Profile Information
For each profile selected, the following are listed:
Wireless Mode - The mode of the wireless network currently in use.
Transfer Rate - The Adapter is set to Auto mode, so it will dynamically shift to the fastest data transfer rate
possible at any given time.
Channel - The channel to which the wireless network devices are set.
Encryption- The status of the encryption security feature.
Authentication - The authentication setting for the network.
Connect - To connect to a wireless network using a specific profile, select the profile, and click the Connect
button.
New - Click the New button to create a new profile. See the next section, “Creating a New Profile,” for detailed
instructions.
Edit - Select a profile, and click the Edit button to change an existing profile.
Import - Click the Import button to import a profile that has been saved in another location. Select the
appropriate file, and click the Open button.
Export - Select the profile you want to save in a different location, and click the Export button. Direct Windows to
the appropriate folder, and click the OK button.
Delete - Click the Delete button to delete a profile.
NOTE: If you want to export more than one profile, you have to export them one at a time.
Chapter 6: Using the Wireless Network Monitor
Profiles
Figure 6-5: Profiles
Figure 6-6: Importing a Profile
Figure 6-7: Exporting a Profile
17
Page 71

Wireless-G Notebook Adapter with SpeedBooster
Creating a New Profile
1. On the Profiles screen, click the New button to create a new profile.
2. Enter a name for the new profile, and click the OK button. Click the Cancel button to return to the Profiles
screen without entering a name.
Figure 6-8: Creating a New Profile
Chapter 6: Using the Wireless Network Monitor
Creating a New Profile
Figure 6-9: Enter Profile Name
18
Page 72

Wireless-G Notebook Adapter with SpeedBooster
3. The Wireless Mode screen shows a choice of two wireless modes. Click the Infrastructure Mode radio
button if you want your wireless computers to communicate with computers on your wired network via a
wireless access point. Click the Ad-Hoc Mode radio button if you want multiple wireless computers to
communicate directly with each other. Enter the SSID for your network.
Click the Next button to continue or the Back button to return to the previous screen.
Infrastructure Mode - This mode allows wireless and wired networks to communicate through an access
point.
Ad-Hoc Mode - This mode allows wireless-equipped computers to communicate directly with each other. No
access point is used.
SSID - The network name. It must be used for all the devices in your wireless network. It is case sensitive. It
should be a unique name to help prevent others from entering your network.
4. The Ad-Hoc Mode Settings screen will appear. If you chose Infrastructure Mode, go to Step 5 now. If you
chose Ad-Hoc Mode, select the correct operating channel for your network from the Channel drop-down
menu. Then, select the Network Mode from the drop-down menu. Click the Next button, and go to Step 5.
Click the Back button to change any settings.
Figure 6-10: Wireless Mode for New Profile
Channel - The channel you choose should match the channel set on the other devices in your wireless
network. If you are unsure about which channel to use, select the default channel.
Network Mode - Select Mixed Mode, and both Wireless-G and Wireless-B computers will be allowed on the
network, but the speed may be reduced. Select G-Only Mode for maximum speed, but no Wireless-B users
will be allowed on the network. Select B-Only Mode for Wireless-B users only.
Chapter 6: Using the Wireless Network Monitor
Creating a New Profile
Figure 6-11: Ad-Hoc Mode Settings
19
Page 73

Wireless-G Notebook Adapter with SpeedBooster
5. The Network Settings screen will appear next. If your network has a DHCP server, click the radio button next
to Obtain an IP address automatically (DHCP). Click the Next button to continue, or click the Cancel button
to return to the Profiles screen.
If your network does not have a DHCP server, click the radio button next to Specify the IP Setting. Enter an IP
Address, Subnet Mask, Default Gateway, and DNS appropriate for your network. You must specify the IP
Address and Subnet Mask on this screen. If you are unsure about the Default Gateway and DNS address,
leave these fields empty. Click the Next button to continue, or click the Cancel button to return to the Profiles
screen.
IP Address - This IP Address must be unique to your network.
Subnet Mask - The Adapter’s Subnet Mask must be the same as your wired network’s Subnet Mask.
Default Gateway - Enter the IP address of your network’s Gateway here.
DNS 1 and DNS 2 - Enter the DNS address of your (wired) Ethernet network here
Figure 6-12: Netowork Settings
Chapter 6: Using the Wireless Network Monitor
Creating a New Profile
20
Page 74
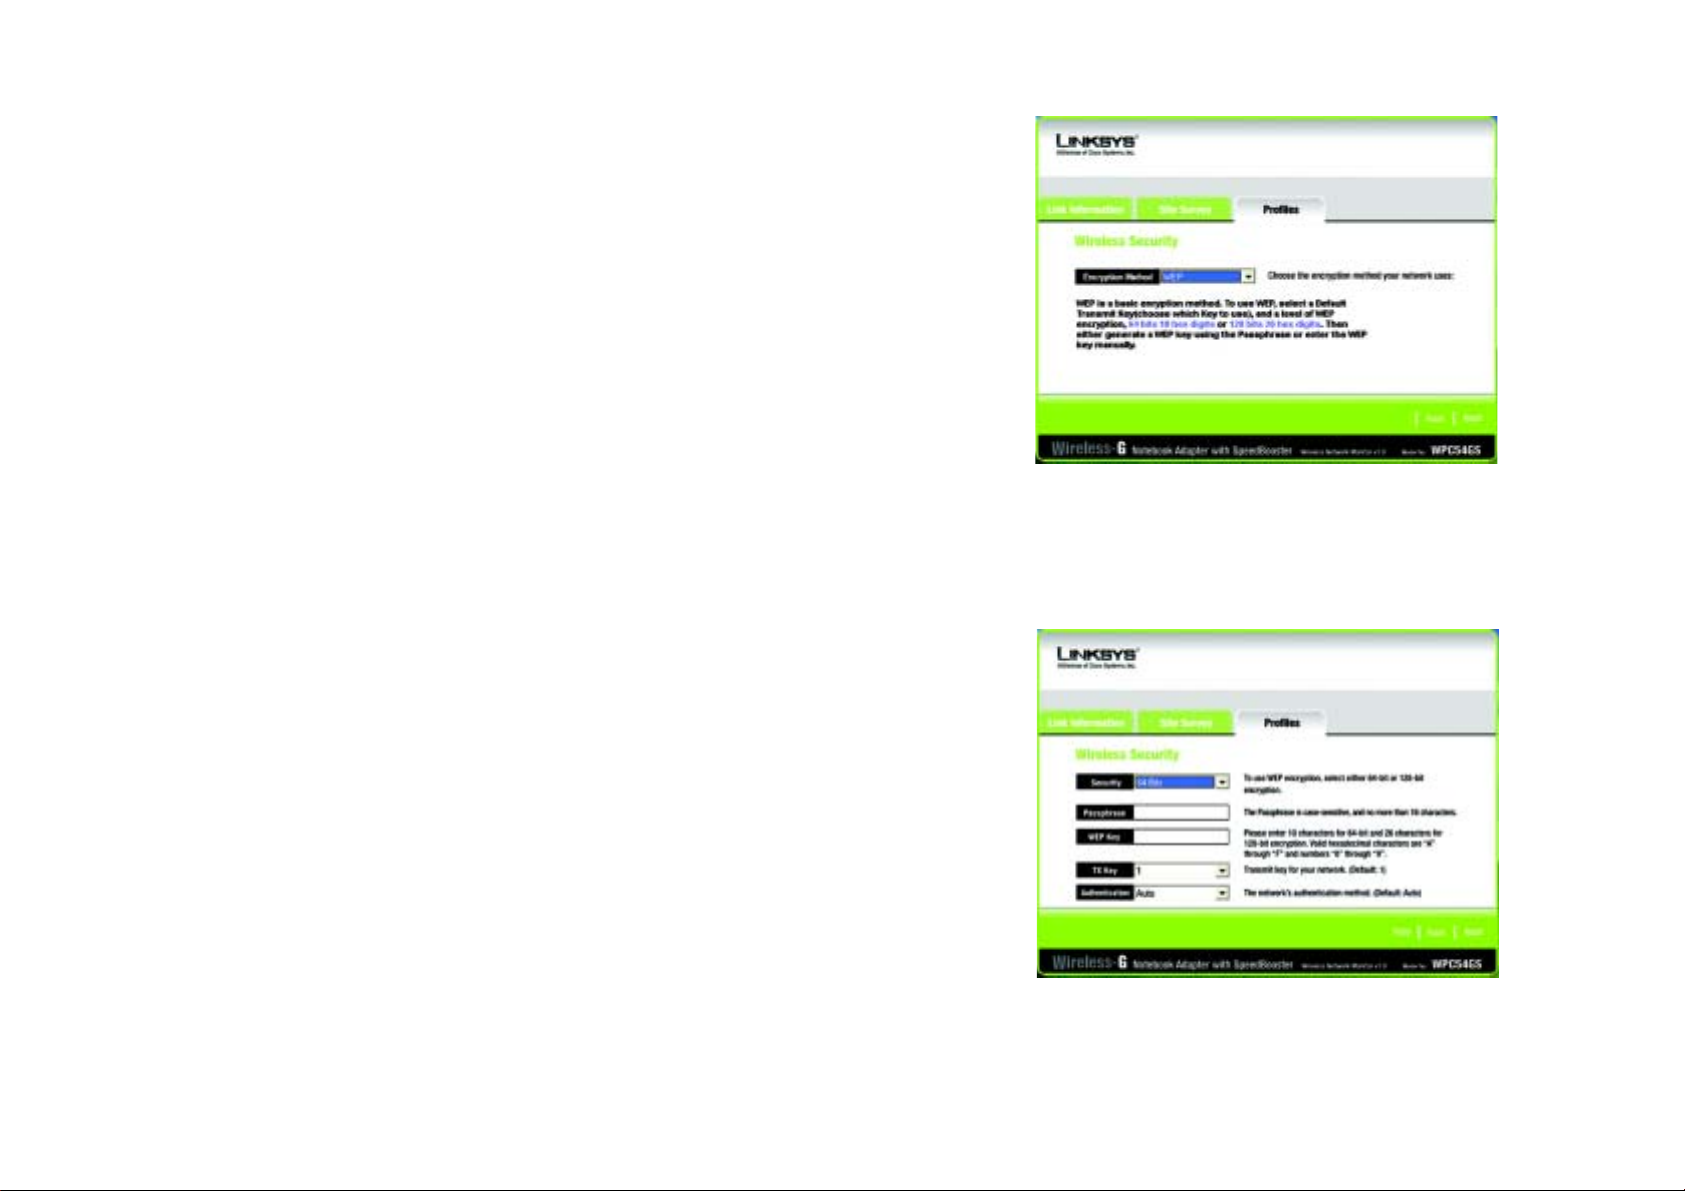
Wireless-G Notebook Adapter with SpeedBooster
6. The Wireless Security screen will appear. Select WEP, WPA-PSK, WPA Radius, or Radius for the Encryption
Method. WEP stands for Wired Equivalent Privacy, WPA-PSK stands for Wi-Fi Protected Access Pre-Shared
Key, which is a security standard stronger than WEP encryption, and RADIUS stands for Remote
Authentication Dial-In User Service. If you don’t want to use encryption, select Disabled. Then, click the Next
button to continue or the Back button to return to the previous screen.
WEP
WEP - To use WEP encryption, select 64-bits or 128-bit characters from the drop-down menu, and enter a
passphrase or key.
Authentication -The default is set to Auto, where it auto-detects for Shared Key or Open system. Shared
Key is when both the sender and the recipient share a WEP key for authentication. Open key is when the
sender and the recipient do not share a WEP key for authentication. All points on your network must use the
same authentication type.
Passphrase - Instead of manually entering a WEP key, you can enter a passphrase in the Passphrase field,
so a WEP key is automatically generated. It is case-sensitive and should not be longer than 16 alphanumeric
characters. This passphrase must match the passphrase of your other wireless network devices and is
compatible with Linksys wireless products only. (If you have any non-Linksys wireless products, enter the
WEP key manually on those products.)
Figure 6-13: Wireless Security for New Profile
Transmit Key - The default transmit key number is 1. If your network’s access point or wireless router uses
transmit key number 2, 3, or 4, select the appropriate number from the Transmit Key drop-down box.
Key 1- The WEP key you enter must match the WEP key of your wireless network. If you are using 64-bit WEP
encryption, then the key must consist of exactly 10 hexadecimal characters. If you are using 128-bit WEP
encryption, then the key must consist of exactly 26 hexadecimal characters. Valid hexadecimal characters
are “0” to “9” and “A” to “F”.
Chapter 6: Using the Wireless Network Monitor
Creating a New Profile
Figure 6-14: WEP Setting for New Profile
21
Page 75
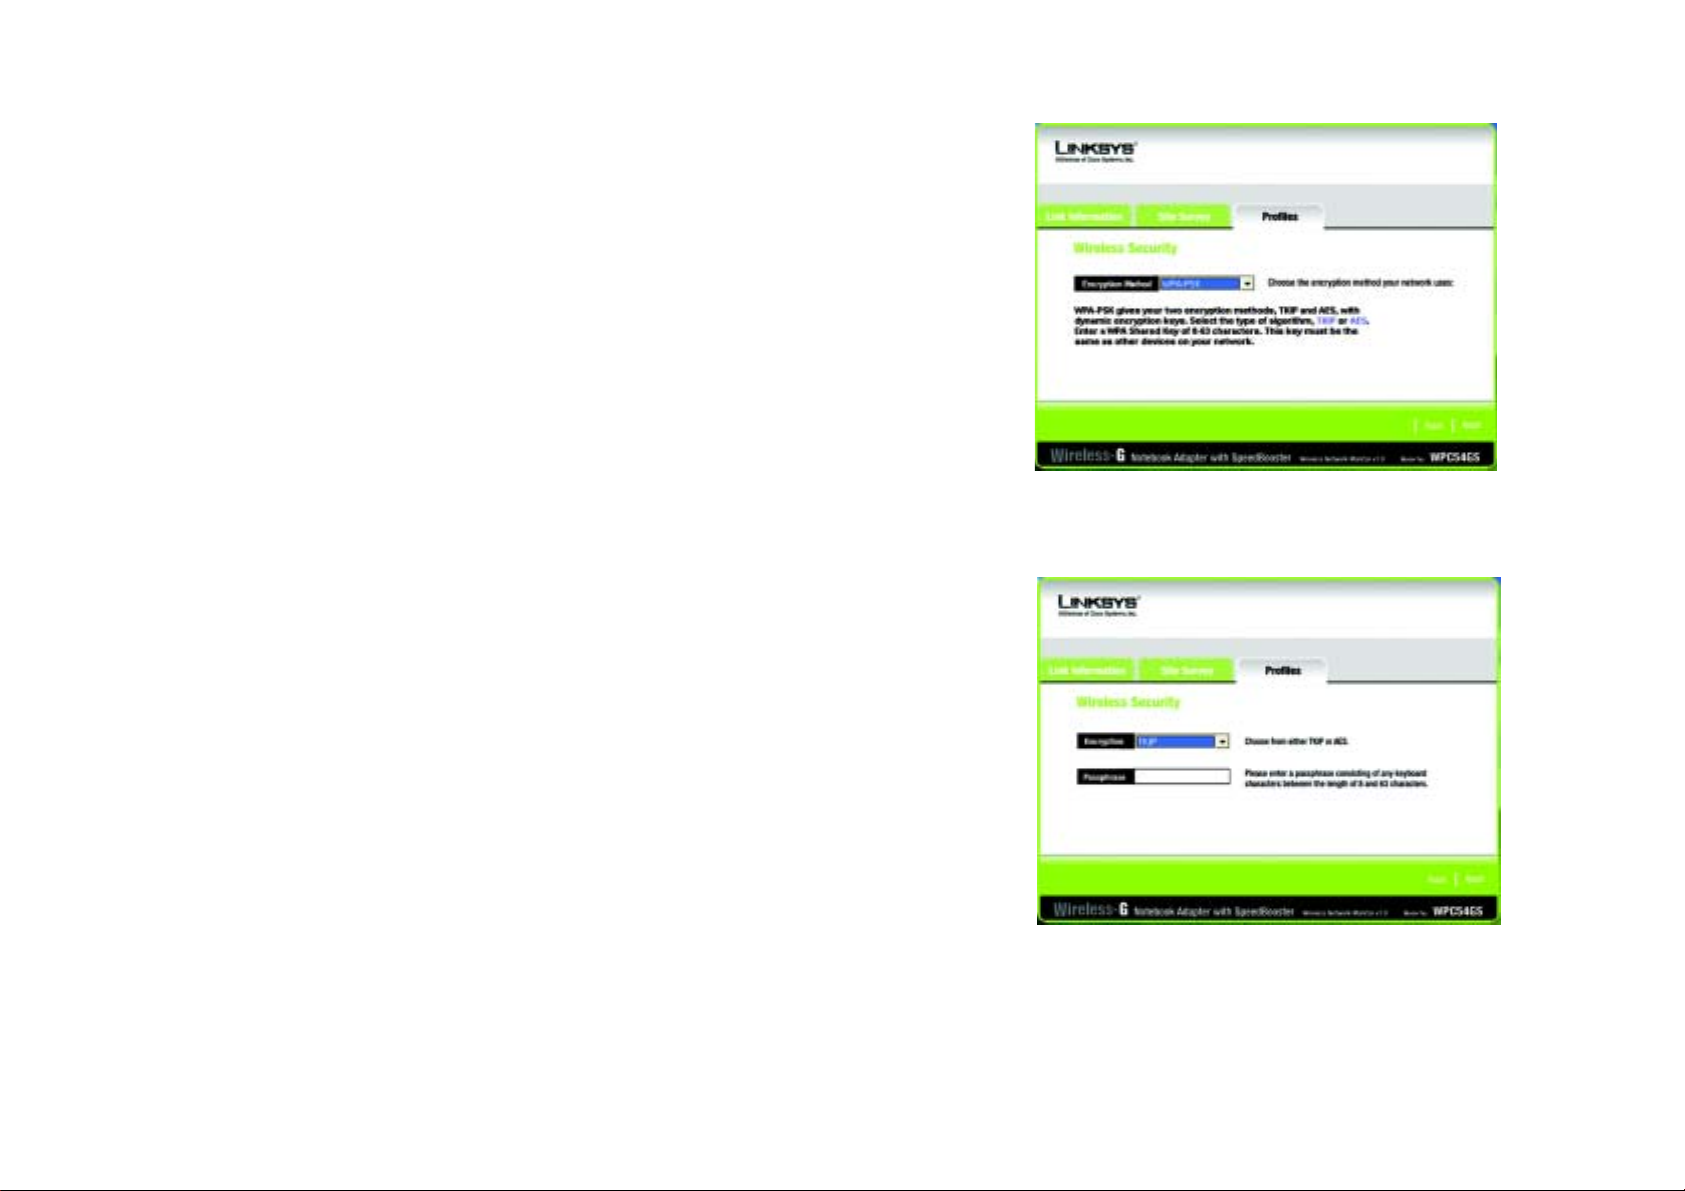
Wireless-G Notebook Adapter with SpeedBooster
WPA-PSK
WPA-PSK offers two encryption methods, TKIP and AES, with dynamic encryption keys. Click the Next button
to continue . Click the Back button to return to the previous screen.
Select the type of algorithm, TKIP or AES, for the Encryption Type. Enter a WPA Shared Key of 8-63 characters
in the Passphrase field.
Figure 6-15: WPA-PSK Settings
Chapter 6: Using the Wireless Network Monitor
Creating a New Profile
Figure 6-16: TKIP Settings
22
Page 76

Wireless-G Notebook Adapter with SpeedBooster
WPA RADIUS.
WPA RADIUS features WPA used in coordination with a RADIUS server. (This should only be used when a
RADIUS server is connected to the Router.) WPA Radius offers two encryption methods, TKIP and AES, with
dynamic encryption keys. It offers five authentication methods: EAP-TLS, EAP-TTLS, EAP-MD5, EAP-PEAP, and
LEAP.
Click the Next button to continue. Click the Back button to return to the previous screen.
Select the type of algorithm, TKIP or AES, for the Encryption Type.
Click the Next button to continue. Click the Back button to return to the previous screen.
Figure 6-17: WPA RADIUS Settings
Chapter 6: Using the Wireless Network Monitor
Creating a New Profile
Figure 6-18: Encryption Type
23
Page 77

Wireless-G Notebook Adapter with SpeedBooster
From the next screen, select the Authentication Method from the drop-down menu. The options are described
below.
EAP-TLS
Enter the Login name of your wireless network in the Login Name field. From the Certificate drop-down menu,
select the certificate you have installed to authenticate you on your wireless network. Select Validate server
cerificate to make sure that the certificate for the server is valid.
Click the Next button to continue. Click the Back button to return to the previous screen.
EAP-TTLS
Enter the Login name of your wireless network in the Login Name field. Enter the password of your wireless
network in the Password field. Select Validate server cerificate to make sure that the certificate for the
server is valid. Select the TTLS Protocol from the drop-down menu.
Figure 6-19: EAP-TLS Authentication
Click the Next button to continue. Click the Back button to return to the previous screen.
Chapter 6: Using the Wireless Network Monitor
Creating a New Profile
Figure 6-20: EAP-TTLS Authentication
24
Page 78

Wireless-G Notebook Adapter with SpeedBooster
EAP-MD5
Enter the Login name of your wireless network in the Login Name field. Enter the password of your wireless
network in the Password field.
Click the Next button to continue. Click the Back button to return to the previous screen.
EAP-PEAP
Enter the Login name of your wireless network in the Login Name field. Enter the password of your wireless
network in the Password field. Select Validate server cerificate to make sure that the certificate for the
server is valid. Then, select the Peap Inner EAP from the drop-down menu.
Click the Next button to continue. Click the Back button to return to the previous screen.
LEAP
Enter the Login name of your wireless network in the Login Name field. Enter the password of your wireless
network in the Password field.
Click the Next button to continue. Click the Back button to return to the previous screen.
Figure 6-21: EAP-MD5 Authentication
Figure 6-22: EAP-PEAP Authentication
Chapter 6: Using the Wireless Network Monitor
Creating a New Profile
Figure 6-23: EAP-LEAP Authentication
25
Page 79

Wireless-G Notebook Adapter with SpeedBooster
RADIUS
RADIUS features WPA used in coordination with a RADIUS server. (This should only be used when a RADIUS
server is connected to the Router.) It offers five authentication methods: EAP-TLS, EAP-TTLS, EAP-MD5, EAPPEAP, and LEAP.
Click the Next button to continue. Click the Back button to return to the previous screen.
From the next screen, select the Authentication Method from the drop-down menu. The options are described
below.
EAP-TLS
Enter the Login name of your wireless network in the Login Name field. From the Certificate drop-down menu,
select the certificate you have installed to authenticate you on your wireless network. Select Validate server
cerificate to make sure that the certificate for the server is valid.
Figure 6-24: RADIUS Settings
Click the Next button to continue. Click the Back button to return to the previous screen.
Chapter 6: Using the Wireless Network Monitor
Creating a New Profile
Figure 6-25: EAP-TLS Authentication
26
Page 80

Wireless-G Notebook Adapter with SpeedBooster
EAP-TTLS
Enter the Login name of your wireless network in the Login Name field. Enter the password of your wireless
network in the Password field. Select Validate server cerificate to make sure that the certificate for the
server is valid. Select the TTLS Protocol from the drop-down menu.
Click the Next button to continue. Click the Back button to return to the previous screen.
EAP-MD5
Enter the Login name of your wireless network in the Login Name field. Enter the password of your wireless
network in the Password field.
Figure 6-26: EAP-TTLS Authentication
Click the Next button to continue. Click the Back button to return to the previous screen.
Chapter 6: Using the Wireless Network Monitor
Creating a New Profile
Figure 6-27: EAP-MD5 Authentication
27
Page 81

Wireless-G Notebook Adapter with SpeedBooster
EAP-PEAP
Enter the Login name of your wireless network in the Login Name field. Enter the password of your wireless
network in the Password field. Select Validate server cerificate to make sure that the certificate for the
server is valid. Then, select the Peap Inner EAP from the drop-down menu.
Click the Next button to continue. Click the Back button to return to the previous screen.
LEAP
Enter the Login name of your wireless network in the Login Name field. Enter the password of your wireless
network in the Password field.
Figure 6-28: EAP-PEAP Authentication
Click the Next button to continue. Click the Back button to return to the previous screen.
Chapter 6: Using the Wireless Network Monitor
Creating a New Profile
Figure 6-29: LEAP Authentication
28
Page 82
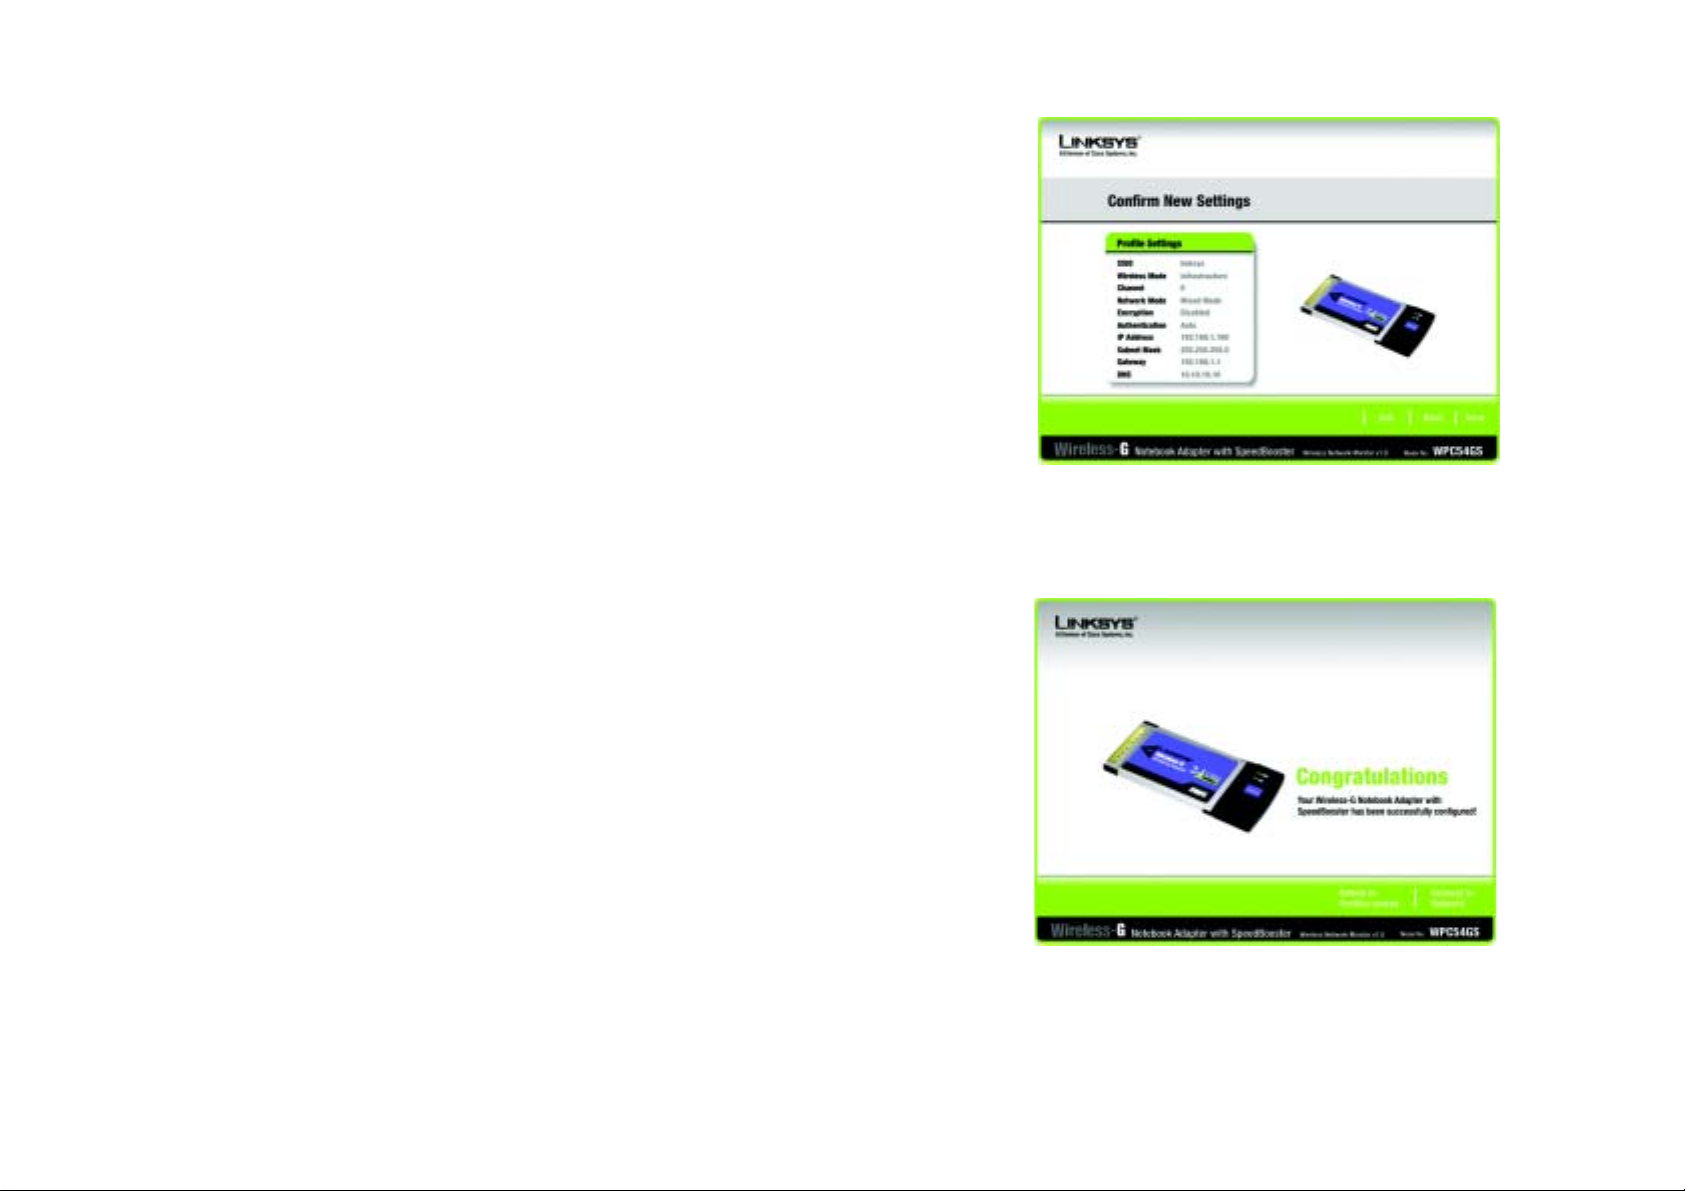
Wireless-G Notebook Adapter with SpeedBooster
7. The Confirm New Settings screen will appear next showing the new settings. To save the new settings, click
the Save button. To edit the new settings, click the Back button. To exit the Wireless Network Monitor, click
Exit.
8. The Congratulations screen will appear next. Click Activate new settings now to implement the new
settings immediately and return to the Link Information screen. Click Activate new settings later to keep
the current settings active and return to the Profiles screen.
Figure 6-30: TKIP Settings
You have successfully created a connection profile.
Chapter 6: Using the Wireless Network Monitor
Creating a New Profile
Figure 6-31: EAP-TLS Authentication
29
Page 83

Wireless-G Notebook Adapter with SpeedBooster
Appendix A: Troubleshooting
This appendix consists of two parts: “Common Problems and Solutions” and “Frequently Asked Questions.” This
appendix provides solutions to problems that may occur during the installation and operation of the Wireless-G
Notebook Adapter. Read the description below to solve your problems. If you can't find an answer here, check the
Linksys website at www.linksys.com/international or www.linksys.com.
Common Problems and Solutions
1. My computer does not recognize the Wireless-G Notebook Adapter.
Make sure that the Wireless-G Notebook Adapter is properly inserted into the PC Card slot.
2. The Wireless-G Notebook Adapter does not work properly.
Reinsert the Wireless-G Notebook Adapter into the notebook or desktop’s USB port.
For Windows 98SE or Me, right-click on My Computer, and select Properties. Select the Device Manager
tab, and click on the Network Adapter. You will find the Wireless-G Notebook Adapter if it is installed
successfully. If you see a yellow exclamation mark, the resources may be conflicting and you must follow the
steps below:
• Uninstall the driver software from your PC.
• Restart your PC and repeat the hardware and software installation as specified in this User Guide.
3. I cannot communicate with the other computers linked via Ethernet in the Infrastructure
configuration.
Make sure that the notebook or desktop is powered on.
Make sure that the Wireless-G Notebook Adapter is configured with the same SSID and security settings as
the other computers in the Infrastructure configuration.
Appendix A: Troubleshooting
Common Problems and Solutions
30
Page 84

Wireless-G Notebook Adapter with SpeedBooster
Frequently Asked Questions
Can I run an application from a remote computer over the wireless network?
This will depend on whether or not the application is designed to be used over a network. Consult the
application’s user guide to determine if it supports operation over a network.
Can I play computer games with other members of the wireless network?
Yes, as long as the game supports multiple players over a LAN (local area network). Refer to the game’s user
guide for more information.
What is the IEEE 802.11b standard?
It is one of the IEEE standards for wireless networks. The 802.11b standard allows wireless networking hardware
from different manufacturers to communicate, provided that the hardware complies with the 802.11b standard.
The 802.11b standard states a maximum data transfer rate of 11Mbps and an operating frequency of 2,4GHz.
What is the IEEE 802.11g standard?
It is one of the IEEE standards for wireless networks. The 802.11g standard allows wireless networking hardware
from different manufacturers to communicate, provided that the hardware complies with the 802.11g standard.
The 802.11g standard states a maximum data transfer rate of 54Mbps and an operating frequency of 2,4GHz.
What IEEE 802.11b features are supported?
The product supports the following IEEE 802.11b functions:
• CSMA/CA plus Acknowledge protocol
• Multi-Channel Roaming
• Automatic Rate Selection
• RTS/CTS feature
• Fragmentation
• Power Management
What IEEE 802.11g features are supported?
The product supports the following IEEE 802.11g functions:
• CSMA/CA plus Acknowledge protocol
• OFDM protocol
• Multi-Channel Roaming
• Automatic Rate Selection
• RTS/CTS feature
• Fragmentation
• Power Management
Appendix A: Troubleshooting
Frequently Asked Questions
31
Page 85

Wireless-G Notebook Adapter with SpeedBooster
What is ad-hoc mode?
When a wireless network is set to ad-hoc mode, the wireless-equipped computers are configured to
communicate directly with each other. The ad-hoc wireless network will not communicate with any wired
network.
What is infrastructure mode?
When a wireless network is set to infrastructure mode, the wireless network is configured to communicate with
a wired network through a wireless access point.
What is roaming?
Roaming is the ability of a portable computer user to communicate continuously while moving freely throughout
an area greater than that covered by a single access point. Before using the roaming function, the workstation
must make sure that it is the same channel number with the access point of dedicated coverage area.
To achieve true seamless connectivity, the wireless LAN must incorporate a number of different functions. Each
node and access point, for example, must always acknowledge receipt of each message. Each node must
maintain contact with the wireless network even when not actually transmitting data. Achieving these functions
simultaneously requires a dynamic RF networking technology that links access points and nodes. In such a
system, the user’s end node undertakes a search for the best possible access to the system. First, it evaluates
such factors as signal strength and quality, as well as the message load currently being carried by each access
point and the distance of each access point to the wired backbone. Based on that information, the node next
selects the right access point and registers its address. Communications between end node and host computer
can then be transmitted up and down the backbone.
As the user moves on, the end node’s RF transmitter regularly checks the system to determine whether it is in
touch with the original access point or whether it should seek a new one. When a node no longer receives
acknowledgment from its original access point, it undertakes a new search. Upon finding a new access point, it
then re-registers, and the communication process continues.
What is ISM band?
The FCC and their counterparts outside of the U.S. have set aside bandwidth for unlicensed use in the ISM
(Industrial, Scientific and Medical) band. Spectrum in the vicinity of 2,4 GHz, in particular, is being made available
worldwide. This presents a truly revolutionary opportunity to place convenient high-speed wireless capabilities in
the hands of users around the globe.
What is Spread Spectrum?
Spread Spectrum technology is a wideband radio frequency technique developed by the military for use in
reliable, secure, mission-critical communications systems. It is designed to trade off bandwidth efficiency for
reliability, integrity, and security. In other words, more bandwidth is consumed than in the case of narrowband
transmission, but the trade-off produces a signal that is, in effect, louder and thus easier to detect, provided that
Appendix A: Troubleshooting
Frequently Asked Questions
32
Page 86

Wireless-G Notebook Adapter with SpeedBooster
the receiver knows the parameters of the spread-spectrum signal being broadcast. If a receiver is not tuned to
the right frequency, a spread-spectrum signal looks like background noise. There are two main alternatives,
Direct Sequence Spread Spectrum (DSSS) and Frequency Hopping Spread Spectrum (FHSS).
What is DSSS? What is FHSS? And what are their differences?
Frequency-Hopping Spread-Spectrum (FHSS) uses a narrowband carrier that changes frequency in a pattern that
is known to both transmitter and receiver. Properly synchronized, the net effect is to maintain a single logical
channel. To an unintended receiver, FHSS appears to be short-duration impulse noise. Direct-Sequence SpreadSpectrum (DSSS) generates a redundant bit pattern for each bit to be transmitted. This bit pattern is called a chip
(or chipping code). The longer the chip, the greater the probability that the original data can be recovered. Even if
one or more bits in the chip are damaged during transmission, statistical techniques embedded in the radio can
recover the original data without the need for retransmission. To an unintended receiver, DSSS appears as low
power wideband noise and is rejected (ignored) by most narrowband receivers.
Would the information be intercepted while transmitting on air?
WLAN features two-fold protection in security. On the hardware side, as with Direct Sequence Spread Spectrum
technology, it has the inherent security feature of scrambling. On the software side, WLAN offers the encryption
function (WEP) to enhance security and access control.
What is WEP?
WEP is Wired Equivalent Privacy, a data privacy mechanism based on a shared key algorithm, as described in the
IEEE 802.11 standard.
Appendix A: Troubleshooting
Frequently Asked Questions
33
Page 87

Wireless-G Notebook Adapter with SpeedBooster
Appendix B: Wireless Security
Linksys wants to make wireless networking as safe and easy for you as possible. The current generation of
Linksys products provide several network security features, but they require specific action on your part for
implementation. So, keep the following in mind whenever you are setting up or using your wireless network.
Security Precautions
The following is a complete list of security precautions to take (at least steps 1 through 5 should be followed):
1. Change the default SSID.
2. Disable SSID Broadcast.
3. Change the default password for the Administrator account.
4. Enable MAC Address Filtering.
5. Change the SSID periodically.
6. Use the highest encryption algorithm possible. Use WPA if it is available. Please note that this may reduce
your network performance.
7. Change the WEP encryption keys periodically.
Security Threats Facing Wireless Networks
Wireless networks are easy to find. Hackers know that in order to join a wireless network, wireless networking
products first listen for “beacon messages”. These messages can be easily decrypted and contain much of the
network’s information, such as the network’s SSID (Service Set Identifier). Here are the steps you can take:
Change the administrator’s password regularly. With every wireless networking device you use, keep in
mind that network settings (SSID, WEP keys, etc.) are stored in its firmware. Your network administrator is the
only person who can change network settings. If a hacker gets a hold of the administrator’s password, he, too,
can change those settings. So, make it harder for a hacker to get that information. Change the administrator’s
password regularly.
SSID. There are several things to keep in mind about the SSID:
Appendix B: Wireless Security
Security Precautions
Note: Some of these security features are
available only through the network router or
access point. Refer to the router or access
point’s documentation for more information.
34
Page 88

Wireless-G Notebook Adapter with SpeedBooster
1. Disable Broadcast
2. Make it unique
3. Change it often
Most wireless networking devices will give you the option of broadcasting the SSID. While this option may be
more convenient, it allows anyone to log into your wireless network. This includes hackers. So, don’t broadcast
the SSID.
Wireless networking products come with a default SSID set by the factory. (The Linksys default SSID is “linksys”.)
Hackers know these defaults and can check these against your network. Change your SSID to something unique
and not something related to your company or the networking products you use.
Change your SSID regularly so that any hackers who have gained access to your wireless network will have to
start from the beginning in trying to break in.
MAC Addresses. Enable MAC Address filtering. MAC Address filtering will allow you to provide access to only
those wireless nodes with certain MAC Addresses. This makes it harder for a hacker to access your network with
a random MAC Address.
WEP Encryption. Wired Equivalent Privacy (WEP) is often looked upon as a cure-all for wireless security
concerns. This is overstating WEP’s ability. Again, this can only provide enough security to make a hacker’s job
more difficult.
There are several ways that WEP can be maximized:
1. Use the highest level of encryption possible
2. Use “Shared Key” authentication
3. Change your WEP key regularly
WPA. Wi-Fi Protected Access (WPA) is the newest and best available standard in Wi-Fi security. Three modes are
available: WPA-PSK, WPA Radius, and Radius. WPA-PSK gives you a choice of two encryption methods: TKIP
(Temporal Key Integrity Protocol), which utilizes a stronger encryption method and incorporates Message
Integrity Code (MIC) to provide protection against hackers, and AES (Advanced Encryption System), which utilizes
a symmetric 128-Bit block data encryption. WPA RADIUS offers two encryption methods, TKIP and AES, with
dynamic encryption keys. RADIUS (Remote Authentication Dial-In User Service) utilizes a RADIUS server for
authentication.
Appendix B: Wireless Security
Security Threats Facing Wireless Networks
Important: Always remember that each
device in your wireless network MUST use
the same encryption method and encryption
key or your wireless network will not function
properly.
35
Page 89

Wireless-G Notebook Adapter with SpeedBooster
WPA-PSK. If you do not have a RADIUS server, Select the type of algorithm, TKIP or AES, and enter a
password in the Passphrase field of 8-63 characters.
WPA RADIUS. WPA used in coordination with a RADIUS server. (This should only be used when a RADIUS
server is connected to the Router or other device.) WPA Radius offers two encryption methods, TKIP and AES,
with dynamic encryption keys.
RADIUS. WEP used in coordination with a RADIUS server. (This should only be used when a RADIUS server is
connected to the Router or other device.)
Implementing encryption may have a negative impact on your network’s performance, but if you are transmitting
sensitive data over your network, encryption should be used.
These security recommendations should help keep your mind at ease while you are enjoying the most flexible
and convenient technology Linksys has to offer.
Appendix B: Wireless Security
Security Threats Facing Wireless Networks
36
Page 90

Wireless-G Notebook Adapter with SpeedBooster
Appendix C: Windows Help
All wireless products require Microsoft Windows. Windows is the most used operating system in the world and
comes with many features that help make networking easier. These features can be accessed through Windows
Help and are described in this appendix.
TCP/IP
Before a computer can communicate with an access point or wireless router, TCP/IP must be enabled. TCP/IP is a
set of instructions, or protocol, all PCs follow to communicate over a network. This is true for wireless networks
as well. Your PCs will not be able to utilize wireless networking without having TCP/IP enabled. Windows Help
provides complete instructions on enabling TCP/IP.
Shared Resources
If you wish to share printers, folder, or files over your network, Windows Help provides complete instructions on
utilizing shared resources.
Network Neighborhood/My Network Places
Other PCs on your network will appear under Network Neighborhood or My Network Places (depending upon the
version of Windows you're running). Windows Help provides complete instructions on adding PCs to your
network.
Appendix C: Windows Help
37
Page 91

Wireless-G Notebook Adapter with SpeedBooster
Appendix D: Glossary
802.11a - An IEEE wireless networking standard that specifies a maximum data transfer rate of 54Mbps and an
operating frequency of 5GHz.
802.11b - An IEEE wireless networking standard that specifies a maximum data transfer rate of 11Mbps and an
operating frequency of 2,4GHz.
802.11g - An IEEE wireless networking standard that specifies a maximum data transfer rate of 54Mbps, an
operating frequency of 2,4GHz, and backward compatibility with 802.11b devices.
Access Point - A device that allows wireless-equipped computers and other devices to communicate with a
wired network. Also used to expand the range of a wireless network.
Adapter - A device that adds network functionality to your PC.
Ad-hoc - A group of wireless devices communicating directly with each other (peer-to-peer) without the use of
an access point.
AES (Advanced Encryption Standard) - A method that uses up to 256-bit key encryption to secure data.
Backbone - The part of a network that connects most of the systems and networks together, and handles the
most data.
Bandwidth - The transmission capacity of a given device or network.
Beacon Interval - Data transmitted on your wireless network that keeps the network synchronized.
Bit - A binary digit.
Boot - To start a device and cause it to start executing instructions.
Bridge - A device that connects different networks.
Broadband - An always-on, fast Internet connection.
Browser - An application program that provides a way to look at and interact with all the information on the
World Wide Web.
Appendix D: Glossary
38
Page 92

Wireless-G Notebook Adapter with SpeedBooster
Buffer - A shared or assigned memory area that is used to support and coordinate different computing and
networking activities so one isn't held up by the other.
Byte - A unit of data that is usually eight bits long
Cable Modem - A device that connects a computer to the cable television network, which in turn connects to the
Internet.
CSMA/CA (Carrier Sense Multiple Access/Collision Avoidance) - A method of data transfer that is used to prevent
data collisions.
CTS (Clear To Send) - A signal sent by a wireless device, signifying that it is ready to receive data.
Daisy Chain - A method used to connect devices in a series, one after the other.
Database - A collection of data that is organized so that its contents can easily be accessed, managed, and
updated.
DDNS (Dynamic Domain Name System) - Allows the hosting of a website, FTP server, or e-mail server with a
fixed domain name (e.g., www.xyz.com) and a dynamic IP address.
Default Gateway - A device that forwards Internet traffic from your local area network.
DHCP (Dynamic Host Configuration Protocol) - A networking protocol that allows administrators to assign
temporary IP addresses to network computers by "leasing" an IP address to a user for a limited amount of time,
instead of assigning permanent IP addresses.
DMZ (Demilitarized Zone) - Removes the Router's firewall protection from one PC, allowing it to be "seen" from
the Internet.
DNS (Domain Name Server) - The IP address of your ISP's server, which translates the names of websites into IP
addresses.
Domain - A specific name for a network of computers.
Download - To receive a file transmitted over a network.
DSL (Digital Subscriber Line) - An always-on broadband connection over traditional phone lines.
DSSS (Direct-Sequence Spread-Spectrum) - Frequency transmission with a redundant bit pattern resulting in a
lower probability of information being lost in transit.
Appendix D: Glossary
39
Page 93

Wireless-G Notebook Adapter with SpeedBooster
DTIM (Delivery Traffic Indication Message) - A message included in data packets that can increase wireless
efficiency.
Dynamic IP Address - A temporary IP address assigned by a DHCP server.
EAP (Extensible Authentication Protocol) - A general authentication protocol used to control network access.
Many specific authentication methods work within this framework.
EAP-PEAP (Extensible Authentication Protocol-Protected Extensible Authentication Protocol) - A mutual
authentication method that uses a combination of digital certificates and another system, such as passwords.
EAP-TLS (Extensible Authentication Protocol-Transport Layer Security) - A mutual authentication method that
uses digital certificates.
Encryption - Encoding data transmitted in a network.
Ethernet - IEEE standard network protocol that specifies how data is placed on and retrieved from a common
transmission medium.
Finger - A program that tells you the name associated with an e-mail address.
Firewall - A set of related programs located at a network gateway server that protects the resources of a
network from users from other networks.
Firmware - The programming code that runs a networking device.
Fragmentation -Breaking a packet into smaller units when transmitting over a network medium that cannot
support the original size of the packet.
FTP (File Transfer Protocol) - A protocol used to transfer files over a TCP/IP network.
Full Duplex - The ability of a networking device to receive and transmit data simultaneously.
Gateway - A device that interconnects networks with different, incompatible communications protocols.
Half Duplex - Data transmission that can occur in two directions over a single line, but only one direction at a
time.
Hardware - The physical aspect of computers, telecommunications, and other information technology devices.
HTTP (HyperText Transport Protocol) - The communications protocol used to connect to servers on the World
Wide Web.
Appendix D: Glossary
40
Page 94

Wireless-G Notebook Adapter with SpeedBooster
IEEE (The Institute of Electrical and Electronics Engineers) - An independent institute that develops networking
standards.
Infrastructure - A wireless network that is bridged to a wired network via an access point.
IP (Internet Protocol) - A protocol used to send data over a network.
IP Address - The address used to identify a computer or device on a network.
IPCONFIG - A Windows 2000 and XP utility that displays the IP address for a particular networking device.
IPSec (Internet Protocol Security) - A VPN protocol used to implement secure exchange of packets at the IP layer.
ISM band - Radio bandwidth utilized in wireless transmissions.
ISP (Internet Service Provider) - A company that provides access to the Internet.
LAN - The computers and networking products that make up your local network.
LEAP (Lightweight Extensible Authentication Protocol) - A mutual authentication method that uses a username
and password system.
MAC (Media Access Control) Address - The unique address that a manufacturer assigns to each networking
device.
Mbps (MegaBits Per Second) - One million bits per second; a unit of measurement for data transmission.
mIRC - An Internet Relay Chat program that runs under Windows.
Multicasting - Sending data to a group of destinations at once.
NAT (Network Address Translation) - NAT technology translates IP addresses of a local area network to a different
IP address for the Internet.
Network - A series of computers or devices connected for the purpose of data sharing, storage, and/or
transmission between users.
NNTP (Network News Transfer Protocol) - The protocol used to connect to Usenet groups on the Internet.
Node - A network junction or connection point, typically a computer or work station.
Appendix D: Glossary
41
Page 95

Wireless-G Notebook Adapter with SpeedBooster
OFDM (Orthogonal Frequency Division Multiplexing) - Frequency transmission that separates the data stream
into a number of lower-speed data streams, which are then transmitted in parallel to prevent information from
being lost in transit.
Packet - A unit of data sent over a network.
Passphrase - Used much like a password, a passphrase simplifies the WEP encryption process by automatically
generating the WEP encryption keys for Linksys products.
Ping (Packet INternet Groper) - An Internet utility used to determine whether a particular IP address is online.
POP3 (Post Office Protocol 3) - A standard mail server commonly used on the Internet.
Port - The connection point on a computer or networking device used for plugging in cables or adapters.
Power over Ethernet (PoE) - A technology enabling an Ethernet network cable to deliver both data and power.
PPPoE (Point to Point Protocol over Ethernet) - A type of broadband connection that provides authentication
(username and password) in addition to data transport.
PPTP (Point-to-Point Tunneling Protocol) - A VPN protocol that allows the Point to Point Protocol (PPP) to be
tunneled through an IP network. This protocol is also used as a type of broadband connection in Europe.
Preamble - Part of the wireless signal that synchronizes network traffic.
RADIUS (Remote Authentication Dial-In User Service) - A protocol that uses an authentication server to control
network access.
RJ-45 (Registered Jack-45) - An Ethernet connector that holds up to eight wires.
Roaming - The ability to take a wireless device from one access point's range to another without losing the
connection.
Router - A networking device that connects multiple networks together.
RTS (Request To Send) - A networking method of coordinating large packets through the RTS Threshold setting.
Server - Any computer whose function in a network is to provide user access to files, printing, communications,
and other services.
SMTP (Simple Mail Transfer Protocol) - The standard e-mail protocol on the Internet.
SNMP (Simple Network Management Protocol) - A widely used network monitoring and control protocol.
Appendix D: Glossary
42
Page 96

Wireless-G Notebook Adapter with SpeedBooster
Software - Instructions for the computer. A series of instructions that performs a particular task is called a
"program".
SOHO (Small Office/Home Office) - Market segment of professionals who work at home or in small offices.
SPI (Stateful Packet Inspection) Firewall - A technology that inspects every incoming packet of information
before allowing it to enter the network.
Spread Spectrum - Wideband radio frequency technique used for more reliable and secure data transmission.
SSID (Service Set IDentifier) - Your wireless network's name.
Static IP Address - A fixed address assigned to a computer or device that is connected to a network.
Static Routing - Forwarding data in a network via a fixed path.
Subnet Mask - An address code that determines the size of the network.
Switch - 1. A data switch that connects computing devices to host computers, allowing a large number of
devices to share a limited number of ports. 2. A device for making, breaking, or changing the connections in an
electrical circuit.
TCP (Transmission Control Protocol) - A network protocol for transmitting data that requires acknowledgement
from the recipient of data sent.
TCP/IP (Transmission Control Protocol/Internet Protocol) - A set of instructions PCs use to communicate over a
network.
Teln et - A user command and TCP/IP protocol used for accessing remote PCs.
TFTP (Trivial File Transfer Protocol) - A version of the TCP/IP FTP protocol that has no directory or password
capability.
Throughput - The amount of data moved successfully from one node to another in a given time period.
TKIP (Temporal Key Integrity Protocol) - a wireless encryption protocol that provides dynamic encryption keys for
each packet transmitted.
Topology - The physical layout of a network.
TX Rate - Transmission Rate.
Appendix D: Glossary
43
Page 97

Wireless-G Notebook Adapter with SpeedBooster
UDP (User Datagram Protocol) - A network protocol for transmitting data that does not require acknowledgement
from the recipient of the data that is sent.
Upgrade - To replace existing software or firmware with a newer version.
Upload - To transmit a file over a network.
URL (Uniform Resource Locator) - The address of a file located on the Internet.
VPN (Virtual Private Network) - A security measure to protect data as it leaves one network and goes to another
over the Internet.
WAN (Wide Area Network)- The Internet.
WEP (Wired Equivalent Privacy) - A method of encrypting network data transmitted on a wireless network for
greater security.
WINIPCFG - A Windows 98 and Me utility that displays the IP address for a particular networking device.
WLAN (Wireless Local Area Network) - A group of computers and associated devices that communicate with
each other wirelessly.
WPA (Wi-Fi Protected Access) - a wireless security protocol using TKIP (Temporal Key Integrity Protocol)
encryption, which can be used in conjunction with a RADIUS server.
Appendix D: Glossary
44
Page 98

Wireless-G Notebook Adapter with SpeedBooster
Appendix E: Specifications
Standards IEEE 802.11g, IEEE 802.11b
Channels 11 Channels (most of Western Hemisphere)
13 Channels (most of Europe)
LEDs Power, Link
Transmit Power 18 dBm
Protocols 802.11b: CCK (11 Mbps), DQPSK (2 Mbps), DBPSK (1 Mbps); 802.11g: OFDM
Security Features WEP, AES, TKIP, 802.1x
WEP Key Bits 64, 128 Bit
Dimensions 115 mm x 54 mm x 7,5 mm
Unit Weight 0,047 kg.
Certifications FCC, IC-03, CE
Operating Temp. 0ºC to 55ºC
Storage Temp. -25ºC to 70ºC
Operating Humidity 5% to 95%, Non-Condensing
Storage Humidity 5% to 95%, Non-Condensing
Appendix E: Specifications
45
Page 99

Wireless-G Notebook Adapter with SpeedBooster
Appendix F: Warranty Information
LIMITED WARRANTY
Linksys warrants to You that, for a period of three years (the “Warranty Period”), your Linksys Product will be substantially
free of defects in materials and workmanship under normal use. Your exclusive remedy and Linksys' entire liability under
this warranty will be for Linksys at its option to repair or replace the Product or refund Your purchase price less any rebates.
This limited warranty extends only to the original purchaser.
If the Product proves defective during the Warranty Period call Linksys Technical Support in order to obtain a Return
Authorization Number, if applicable. BE SURE TO HAVE YOUR PROOF OF PURCHASE ON HAND WHEN CALLING. If You are
requested to return the Product, mark the Return Authorization Number clearly on the outside of the package and include a
copy of your original proof of purchase. RETURN REQUESTS CANNOT BE PROCESSED WITHOUT PROOF OF PURCHASE. You
are responsible for shipping defective Products to Linksys. Linksys pays for UPS Ground shipping from Linksys back to You
only. Customers located outside of the United States of America and Canada are responsible for all shipping and handling
charges.
ALL IMPLIED WARRANTIES AND CONDITIONS OF MERCHANTABILITY OR FITNESS FOR A PARTICULAR PURPOSE ARE LIMITED
TO THE DURATION OF THE WARRANTY PERIOD. ALL OTHER EXPRESS OR IMPLIED CONDITIONS, REPRESENTATIONS AND
WARRANTIES, INCLUDING ANY IMPLIED WARRANTY OF NON-INFRINGEMENT, ARE DISCLAIMED. Some jurisdictions do not
allow limitations on how long an implied warranty lasts, so the above limitation may not apply to You. This warranty gives
You specific legal rights, and You may also have other rights which vary by jurisdiction.
This warranty does not apply if the Product (a) has been altered, except by Linksys, (b) has not been installed, operated,
repaired, or maintained in accordance with instructions supplied by Linksys, or (c) has been subjected to abnormal physical
or electrical stress, misuse, negligence, or accident. In addition, due to the continual development of new techniques for
intruding upon and attacking networks, Linksys does not warrant that the Product will be free of vulnerability to intrusion or
attack.
TO THE EXTENT NOT PROHIBITED BY LAW, IN NO EVENT WILL LINKSYS BE LIABLE FOR ANY LOST DATA, REVENUE OR PROFIT,
OR FOR SPECIAL, INDIRECT, CONSEQUENTIAL, INCIDENTAL OR PUNITIVE DAMAGES, REGARDLESS OF THE THEORY OF
LIABILITY (INCLUDING NEGLIGENCE), ARISING OUT OF OR RELATED TO THE USE OF OR INABILITY TO USE THE PRODUCT
(INCLUDING ANY SOFTWARE), EVEN IF LINKSYS HAS BEEN ADVISED OF THE POSSIBILITY OF SUCH DAMAGES. IN NO EVENT
WILL LINKSYS’ LIABILITY EXCEED THE AMOUNT PAID BY YOU FOR THE PRODUCT. The foregoing limitations will apply even if
any warranty or remedy provided under this Agreement fails of its essential purpose. Some jurisdictions do not allow the
exclusion or limitation of incidental or consequential damages, so the above limitation or exclusion may not apply to You.
This Warranty is valid and may be processed only in the country of purchase.
Please direct all inquiries to: Linksys, P.O. Box 18558, Irvine, CA 92623.
Appendix F: Warranty Information
46
Page 100

Wireless-G Notebook Adapter with SpeedBooster
Appendix G: Regulatory Information
FCC Statement
•Federal Communication Commission Interference Statement
FCC Statement
•This equipment has been tested and found to comply with the limits for a Class B digital device, pursuant to Part 15 of the FCC Rules.
This product has been tested and complies with the specifications for a Class B digital device, pursuant to Part 15 of the
These limits are designed to provide reasonable protection against harmful interference in a residential installation. This equipment
FCC Rules. These limits are designed to provide reasonable protection against harmful interference in a residential
generates, uses and can radiate radio frequency energy and, if not installed and used in accordance with the instructions, may cause
installation. This equipment generates, uses, and can radiate radio frequency energy and, if not installed and used
harmful interference to radio communications. However, there is no guarantee that interference will not occur in a particular installation.
according to the instructions, may cause harmful interference to radio communications. However, there is no guarantee
If this equipment does cause harmful interference to radio or television reception, which can be determined by turning the equipment off
that interference will not occur in a particular installation. If this equipment does cause harmful interference to radio or
television reception, which is found by turning the equipment off and on, the user is encouraged to try to correct the
and on, the user is encouraged to try to correct the interference by one of the following measures:
interference by one or more of the following measures:
•-•Reorient or relocate the receiving antenna.
•-•Increase the separation between the equipment and receiver.
• Reorient or relocate the receiving antenna
•-•Connect the equipment into an outlet on a circuit different from that
•to which the receiver is connected.
• Increase the separation between the equipment or devices
•-•Consult the dealer or an experienced radio/TV technician for help.
• Connect the equipment to an outlet other than the receiver's
•This device complies with Part 15 of the FCC Rules. Operation is subject to the following two conditions: (1) This device may not cause
harmful interference, and (2) this device must accept any interference received, including interference that may cause undesired operation.
• Consult a dealer or an experienced radio/TV technician for assistance
•FCC Caution: Any changes or modifications not expressly approved by the party responsible for compliance could void the user's
FCC Radiation Exposure Statement
authority to operate this equipment.
•IMPORTANT NOTE:
This equipment complies with FCC radiation exposure limits set forth for an uncontrolled environment. This equipment
•FCC Radiation Exposure Statement:
should be installed and operated with minimum distance 20cm between the radiator and your body.
•This equipment complies with FCC radiation exposure limits set forth for an uncontrolled environment. End users must follow the
Industry Canada (Canada)
specific operating instructions for satisfying RF exposure compliance.
•
This Class B digital apparatus complies with Canadian ICES-003.
•This transmitter must not be co-located or operating in conjunction with any other antenna or transmitter.
Cet appareil numérique de la classe B est conforme à la norme NMB-003 du Canada.
The use of this device in a system operating either partially or completely outdoors may require the user to obtain a license
Buffalo declared that WLI2-CB-G54L is limited in CH1~11 by specified firmware controlled in USA.
for the system according to the Canadian regulations.
IC Statement
"Operation is subject to the following two conditions: (1) this device may not cause interference, and (2) this device must accept any
interference, including interference that may cause undesired operation of the device."
"To prevent radio interference to the licensed service, this device is intended to be operated indoors and away from windows to provide
maximum shielding. Equipment (or its transmit antenna) that is installed outdoors is subject to licensing."
Appendix G: Regulatory Information
47
 Loading...