

Page 1

HomeLink®Series
Phoneline10M
Network
Use this guide to install these Linksys products:
HPN200
HomeLink
®
Phoneline 10M Network Card
HPN200SK
HomeLink® Phoneline 10M Network In a Box
User Guide
Page 2

COPYRIGHT & TRADEMARKS
Copyright © 2001 Linksys, All Rights Reserved. Instant Broadband is a registered
trademark of Linksys. Microsoft, Windows, and the Windows logo are registered trademarks of Microsoft Corporation. All other trademarks and brand names are the property of their respective proprietors.
LIMITED WARRANTY
Linksys guarantees that every HomeLink
®
Phoneline 10M Network Card will be free
from physical defects in material and workmanship for one year from the date of purchase, when used within the limits set forth in the Specification section of this User
Guide. If the product proves defective during this warranty period, call Linksys
Customer Support in order to obtain a Return Authorization number. BE SURE TO
HAVE YOUR PROOF OF PURCHASE ON HAND WHEN CALLING. When returning a
product, mark the Return Authorization number clearly on the outside of the package
and include your original proof of purchase. RETURN REQUESTS CANNOT BE
PROCESSED WITHOUT PROOF OF PURCHASE. All customers located outside of the
United States of America and Canada shall be held responsible for shipping and handling charges.
IN NO EVENT SHALL LINKSYS’ LIABILITY EXCEED THE PRICE PAID FOR THE PRODUCT FROM DIRECT, INDIRECT, SPECIAL, INCIDENTAL, OR CONSEQUENTIAL DAMAGES RESULTING FROM THE USE OF THE PRODUCT, ITS ACCOMPANYING SOFTWARE, OR ITS DOCUMENTATION. LINKSYS OFFERS NO REFUNDS FOR ITS PRODUCTS. Linksys makes no warranty or representation, expressed, implied, or statutory,
with respect to its products or the contents or use of this documentation and all accompanying software, and specifically disclaims its quality, performance, merchantability,
or fitness for any particular purpose. Linksys reserves the right to revise or update its
products, software, or documentation without obligation to notify any individual or entity.
Please direct all inquiries to:
Linksys P.O. Box 18558, Irvine, CA 92623.
FCC STATEMENT
The HomeLink
®
Phoneline 10M Network Card has been tested and complies with the
specifications for a Class B digital device, pursuant to Part 15 of the FCC Rules. These
limits are designed to provide reasonable protection against harmful interference in a
residential installation. This equipment generates, uses, and can radiate radio frequency energy and, if not installed and used according to the instructions, may cause
harmful interference to radio communications. However, there is no guarantee that
interference will not occur in a particular installation. If this equipment does cause
harmful interference to radio or television reception, which is found by turning the
equipment off and on, the user is encouraged to try to correct the interference by one
or more of the following measures:
• Reorient or relocate the receiving antenna
• Increase the separation between the equipment or device
• Connect the equipment to an outlet other than the receiver’s
• Consult a dealer or an experienced radio/TV technician for assistance
UG HPN200 10607A AC
Page 3

Introduction
The Linksys HomeLink®Phoneline Network Card
Congratulations on your purchase of the Linksys HomeLink
®
Phoneline
Network Card (or Network in a Box)–the second generation Network Card of
the Linksys HomeLink®series! Now able to transfer data at the same speed as
a standard Ethernet network, the HomeLink
®
Phoneline 10M Network Card is
the simplest way to build a network in your home or small office. Connect
directly to your first-generation HomeLink®or home phoneline network, print
from any PC to any printer, and play multi-player games at top speeds without
installing a switch, a hub, or even network cables.
By allocating certain frequencies for certain types of data transfer, the Linksys
HomeLink®Network 10M Card allows your phone line to simultaneously
carry computer data along with your voice. You can talk on the telephone,
download files from the Internet, and share data between PCs all at the same
time (assuming that you are using a cable or DSL modem). Every standard telephone jack in the home is capable of hosting a PC. You can transform your telephone wiring into an easily expandable network.
Features
• Build a network using your existing telephone line
• Up to 10Mbps transfer rate
• Play multi-player games at top speeds
• Enable file, data and printer sharing between your PCs
• Connect up to 30 PCs with up to 1000 feet of telephone cabling
• Data transfer rate is over 30 times faster than a 56K modem
• Compatible with Windows 95, 98, ME, NT 4.0, and 2000
• Frequency division multiplexing for uninterrupted simultaneous voice serv-
ice and network data transmissions
• Free technical—24 hours a day, 7 days a week for North America only
Phoneline 10M Network Card
1
Table of Contents
Introduction 1
The Linksys HomeLink®Phoneline Network Card 1
Features 1
Package Contents 2
System Requirements 3
Hardware Setup 4
Installing the 10M Phoneline Network Card 4
Installing the RJ-11 (Telephone) Cabling 4
Software Pre-install 5
Windows 95 Installation and Setup 6
Installing the Driver in Windows 95 6
Preparing Windows 95 For Use on a Network 7
Setting Up File and Printer Sharing 9
Enabling File Sharing 9
Windows 98 & ME Installation and Setup 11
Installing the Driver in Windows 98 & ME 11
Windows NT 4.0 Installation and Setup 15
Installing Windows NT Networking and
the HomeLink
®
Card’s Driver 16
Installing the HomeLink® Network Driver
if Networking is Already Installaed 22
Windows 2000 Installation and Setup 23
Installing the Driver in Windows 2000 23
Troubleshooting 26
Appendix 29
Manually Installing the Network Components in Windows 29
Windows 95 Version A Setup 30
Removing Installed Components 33
The Driver Interface 34
Glossary 35
Specifications 40
Environmental Specifications 41
Warranty Information 42
Contact Information 43
Page 4
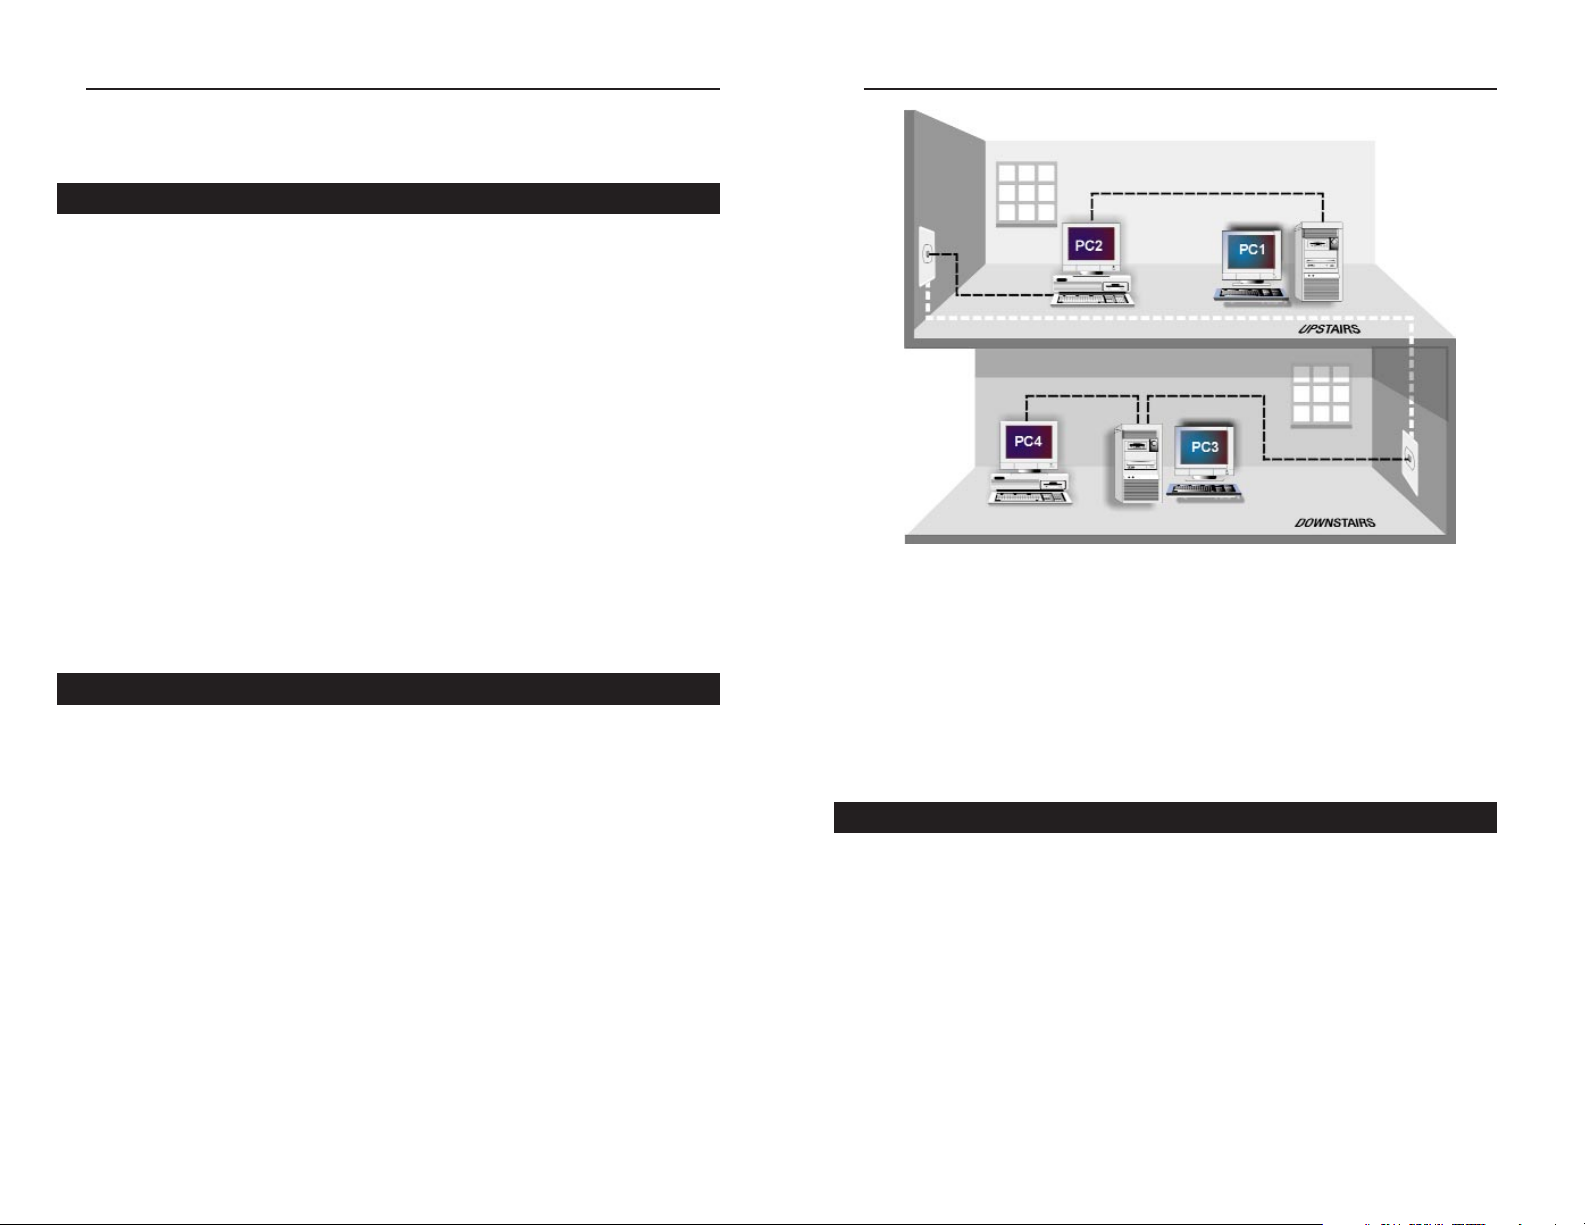
Network in a Box Package Contents
• Tw o HomeLink®Phoneline 10M Network Cards
• Two Standard Modular Telephone Cables
• One User Guide and Registration Card
• One Installation CD-ROM
System Requirements
• PCI 2.2 compliant PC
• Windows 95, 98, ME, NT, or 2000
• CD-ROM drive
Phoneline 10M Network Card
3
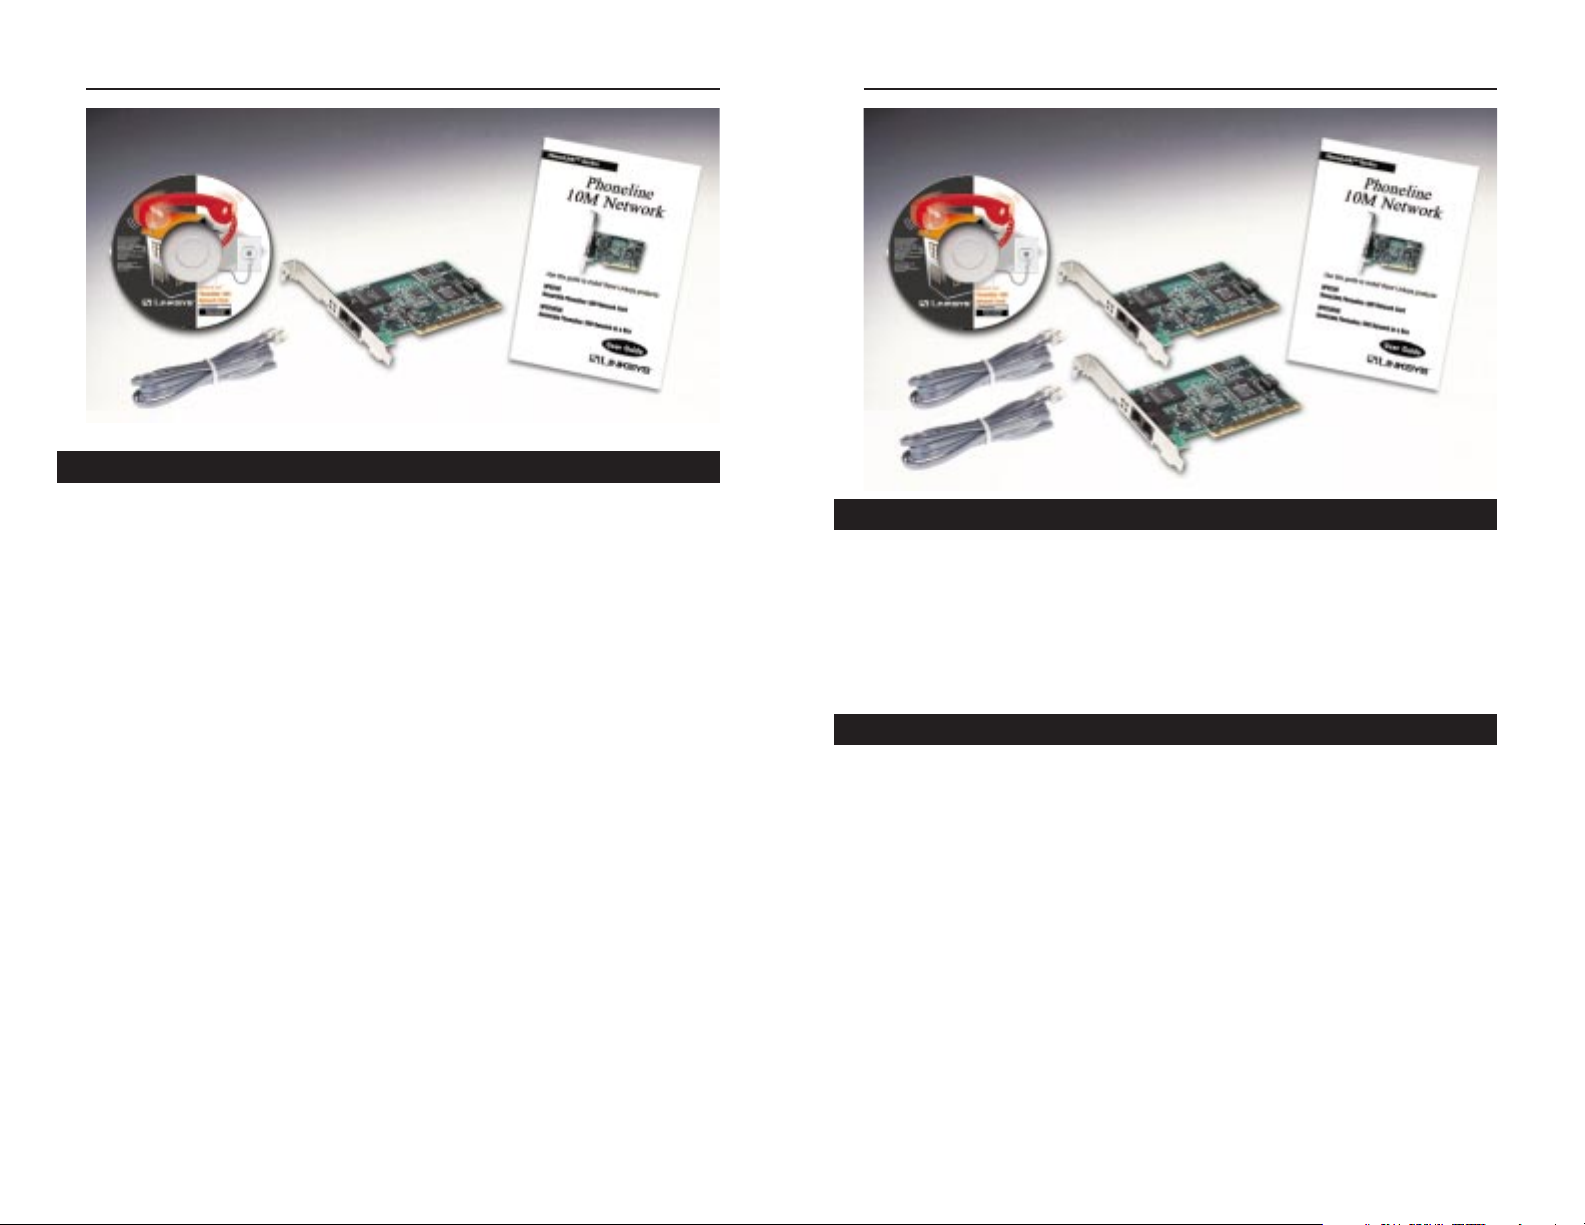
Network Card Package Contents
• One HomeLink®Phoneline 10M Network Card
• One Standard Modular Telephone Cable
• One User Guide and Registration Card
• One Installation CD-ROM
Linksys HomeLink® Series
2
Page 5
in the wall, then plug the other phone cable port on the card to your second PC
with a standard phone cable. You can connect up to thirty PCs on one chain. If
you want to use your telephone or fax machine, add a two-way splitter on your
wall’s phone jack or connect the device to the open telephone port on the last
card in your daisy chain. If you are daisy chaining more than 2 PCs, you
should connect your modem to a different wall phone jack, or obtain a 2-way
splitter.
Software Pre-install
Setting up the HomeLink
®
card's software involves installing a network driv-
er onto your PC, which will allow your card to communicate with Windows.
Windo ws 95, 98, ME, NT, or 2000 must be installed on all of your PCs in order
to install the software. The HomeLink®Phoneline 10M Network Card driver
setup program will not work properly under any other operating systems.
You will need a CD-ROM drive installed on each PC you wish to network.
Because there are several important questions about your PC that you must
answer during the installation, we recommend that you read through the User
Guide.
Phoneline 10M Network Card
5
Linksys HomeLink® Series
4
A Typical HomeLink Network
Hardware Setup
Installing the 10M Phoneline Network Card
1. Tur n off your PC and any peripheral equipment attached to it.
2. Remove your PC's outside cover.
3. Open up your computer and locate the PCI expansion slot(s). Next, deter-
mine which of your PC's PCI slots is the master slot (In newer PCs, the PCI
slots are usually all master slots. Older PCs may have both master and slave
slots. The HomeLink card must be inserted into a master slot). Your PC vendor can help you determine which slots are designed for 32-bit cards.
4. Carefully slide the HomeLink®card into the PCI slot. Make sure that all of
its pins are touching the slot's contacts. After the card is firmly in place,
secure its fastening tab to your PC's chassis with a mounting screw.
5. Replace your PC's cover and turn on your PC. If your computer has a plugand-play BIOS and a Plug-and-Play operating system such as Windows 95,
98, ME, or 2000, it will automatically reco gnize the card and assign a unique
IRQ ("interrupt") and I/O address to it. If not, refer to the apropriate installation section.
Installing the RJ-11 (Telephone) Cabling
Attach one end of the telephone wire to the HomeLink
®
card's RJ-11 telephone
port. There are two RJ-11 ports. Connect the other end of the cable into a telephone jack in your wall.
If you are using an analog telephone, you can either connect the de vice to a second phone jack (recommended), or you can connect your telephone directly to
the second port on your HomeLink card.
If you hav e onl y one phone jack in y our room and you want to use your modem
or fax, it is recommended that you purchase a two-way adapter that can tur n
your single phone jack into a double phone jack. Plug your telephone or fax
into one phone jack, and your HomeLink®card into the other.
If you hav e tw o or three PCs in one room with onl y one telephone jack, y ou can
connect several of the PC together using the Daisy Chain method. To daisy
chain your PCs, plug your first PC with a Phoneline card into the phone jack
Page 6

Windows 95 Installation and Setup
OInstallingverview
After installing the HomeLink
®
hardware in your
computer, follow these instructions for installing
the network driver in Windows 95 version B, the
more common version of Windows 95. If you
have Windows 95 version A, go to the version A
installation section in the Appendixnow. The
installation procedure for the network driver will
vary slightly depending on the version of
Windows 95 you are using and your current system configuration.
1. With the Card installed, start up your PC.
After Windows 95 is loaded, Windows will display an "Update Device
Driver" window. Click the Next button.
2. Windows will try to find the software driver for your HomeLink®card. If
Windows locates the driver, click the Finish button. If Windows fails to find
the driver, insert your CD-ROM and click on Other Locations. Direct the
setup to your CD-ROM drive. If the correct file is found, click the Finish
button when you return to the Update Device Driver Wizard. If your PC
fails to f ind the cor rect file, go to the Troubleshooting section.
3. Windows may now prompt you to insert your Phoneline 10M Network
Card Installation CD-ROM. Make sure the CD is in the drive if you haven’t
already inserted it. Click the OK button. Windows will begin copying files
onto your PC.
4. Windows 95 will copy the appropriate network drivers onto your com-
puter. If Windows 95 asks you to supply your original Windows 95 installation CD-ROM or setup files, enter the appropriate path for those f iles (i.e.,
a:\, d:\win95, c:\windows\options\cabs, etc.). Linksys only provides two
types of files on the Installation: CD-ROM—PCM200HA.inf and
bcm**.* (or mfc*.*, in certain circumstances). All other files are pro-
vided by Microsoft.
5. Next,you will be asked to restart your PC. Click on the Yes button. If you
do not restart your PC, the installation will be incomplete.
Preparing Windows 95 For Use on a Network
Make sure that the following network components are installed by clicking on
your Windows taskbar’s Start button, click on Settings, and then Control
Panel. When the Control Panel appears, click the Netw or kicon. The Netw ork
window will appear. Click on the Configuration tab. The following components must be listed.
• Client for Microsoft Networks
• Linksys Phoneline 10M Network Card
• TCP/IP
Phoneline 10M Network Card
7
Linksys HomeLink® Series
6
Overview
Note: If you receive any
"Version Conflict" or similar
messages during the driver
installation, and you are given
a choice of over-writing any of
your existing files, it is recommended that you keep the
existing files. You may receive
these messages many times,
or you may not receive them
at all depending on your system configuration and software.
Note: If the
window that
pops up
says New
Hardware
Found, and
it asks for
Driver from
disk provided by manufacturer,
then you are
using
Version A of
Windows 95.
Go to the
Appendix for
version A
installation
instructions.
Preparing Windows 95 For Use on a Network
Page 7

1. Start up Windows 95. If you are asked to log in, be sure to give your correct
username and password.
2. To set up sharing for the first time on a computer, click on Start and select
Settings and Control Panel. Then, double-click on Network.
3. Select the Configuration tab, followed by the File and Printer Sharing
button. The File and Printer Sharing window will appear.
4. Decide what types of resources you’d like to make available on the network.
• If you'd like others to be able to access the files on your PC's hard drive,
select I want to be able to give others access to my files.
• If you'd like to share your printer with other users on the network, select I
want to be able to allow others to print to my printer.
5. Click on the OK button. File and Printer Sharing for Microsoft Networks
should now appear in the list of installed components. Click on the OK button. When asked to restart your PC, click on the Yes button.
Enabling File Sharing
After following the steps on the previous page, double-click on your My
Computer icon. A window of available disk drives will appear. Using your
right mouse button, click once on the drive that you want to make available to
other users. Click on Sharing, follow ed b y the Sharingtab. Click on Share As.
In the Share Name box, give your computer a name (you can call it whatever
you want as long as there are no spaces—MaryComputer, Tardis, etc.). Next,
decide on the type of access that you want to give other users.
• Read-Only access lets other users view the f iles on your PC.
• Full access lets users create, change, or delete files on your PC.
• Depends on P ass w or dlets users have Read-Only and/or Full access, depend-
ing on the password that you decide to give them.
Phoneline 10M Network Card
9
There may be other components listed in addition to the ones shown above,
which is fine. If any of the components shown above are missing, however,
you’ll need to manually install them. For instructions on how to do this, skip to
the section titled Manually Installing Network Components.
When you're finished, restart your computer. The instructions on the next page
explain how to enab le file and printer sharing in W indows 95 so that your computer can be accessed by others and vice-versa.
Linksys HomeLink® Series
8
Setting Up File and Printer Sharing
Enabling File Sharing
Page 8

Windows 98 & ME
Installation and Setup
Overview
After physically installing the HomeLink®card in your notebook computer,
follow these instructions to install the device driver. The installation procedure
for the device driver will vary slightly depending on which version of Windows
98 or ME you are using, and on your current system configuration. Please have
your Windows 98 or ME Installation CD or diskettes available during installation. If at any time during the installation you encounter problems, consult the
Troubleshooting section.
Installing the Device Driver
1. If you haven’t already, star t up your computer.
2. Windows 98 or ME will automatically detect the presence of the Phoneline
10M Network Card in your computer.
3. When the Add New Hardwar e W izardwindow appears, insert the Phoneline
10M Network Card Driver CD into your CD-ROM drive. Click the Next
button.
Phoneline 10M Network Card
11
Select the type of file sharing access that you want other users to have. If you
want to assign access password(s), type them into the Password box(es). When
you're done, click on the Apply button, followed by the OK button. Your
drive(s) can now be accessed from other users whenever they click on their
Windows Network Neighborhood icons. If a user tries to access one of your
drives that's password-protected, he or she will be asked for the appropriate
Read-Only or Full Access password.
Linksys HomeLink® Series
10
O Overview
Installing the Driver in Windows 98 & ME
Page 9

6. A window will open saying that Windows is now ready to install the Linksys
Phoneline 10M Network Card driver. Click the Next button.
7. Windows will begin copying the HomeLink
®
card’s driver f iles to your PC.
Refer to the chart below to help guide you through the process.
Phoneline 10M Network Card
13
4. Select Search for the best driver for your device (Recommended). Click
the Next button.
5. Select CD-ROM drive and click the Next button to continue.
Linksys HomeLink® Series
12
• If your PC asks for the Linksys
Setup or Driver Disk
• If you are asked to supply
your Windows 98 Installation
Files or Disks
• If you are asked for a file that
includes “HPN200” in its
name
• If you receive a Version
Conflict error
1. Click
OOKK
.
2. Ensure that the
DDrriivveerr DDiisskk
is in your PC’s flop-
py drive.
3. Type “a:\” in the “Copy files from:” box.
4. Click
OOKK
.
1. Click
OOKK
.
2. If you have a
WWiinnddoowwss 9988 CCDD--RROOMM
, type
“d:\win98” in the “Copy files from:” box, where
“d:” is your CD-ROM drive.
3. If you
don’t
have a
WWiinnddoowwss 9988 CCDD--RROOMM
,
type: “c:\windows\options\cabs”.
4. Click
OOKK
.
1. Insert the
DDrriivveerr DDiisskk
into your PC’s floppy
drive.
2. Type “a:\” in the “Copy files from:” box.
3. Click
OOKK
1. Choose to keep the newest version of the file
by clicking
YYeess
.
If you press Skip or Cancel,the drivers will not be installed!
Page 10

Windows NT4.0
Installationand Setup
Overview
After installing the HomeLink®hardware in your computer, follow these
instructions for installing the network driver in Windows NT 4.0. The installation procedure for the network driver may vary slightly depending on the version of Windows NT you are using, the service packs you have installed, and
your current system conf iguration.
1. From the Windows NT desktop, click on Start, and select Settings and
Control Panel. Double-click on the Network icon.
2. If you have not installed Windows NT networking on your computer, a message appears that reads, Windows NT Networking is not installed. Do you
want to install it now?
• If you see this message, click the Yes button to install NT networking along
with the HomeLink®card’s network driver, and continue with step 1 on the
next page.
• If you don’t see this message, NT networking is already installed. Continue
on with Step 1 in this section’s Installing the Network Driver.
Installing Windows NT Networking (Along with the Driver)
Phoneline 10M Network Card
15
8. Windows will finish installing the software onto your PC. Click the
Finish button.
9. When asked if you want to restart your PC, remove the Driver CD and
click the Yes button.
10. If Windows does not ask you to restart your PC, click the Start button,
choose Shut Down, Restart, then click the Yes button.
The Windows 98/ME driver installation is complete.
Consult your network administrator for your
network configuration information if necessary.
Linksys HomeLink® Series
14
Page 11

4. A new window will appear that shows a long list of adapters from different
manufacturers. Since the HomeLink®card is a new product, it is not listed
here. Select Have Disk.
5. A message that sa ys “Insert Disk” will appear . Put the HomeLink®CD-ROM
in the CD-ROM driv e and type D:\ (or y our CD-R OM Drive letter). Click the
OK button.
Phoneline 10M Network Card
17
1. A message will appear that says, “Windows NT networking is not installed.
Install now?” Click the Yes button.
2. The Network Setup Wizard will appear. In the choices box, select Wired to
the Network and click the Next button.
3. Windows NT will now ask you to pick a network adapter. Choose the Select
From List option.
Linksys HomeLink® Series
16
Installing Windows NT Networking and
the HomeLink®Card’s Driver
Page 12

9. Verify that your network services are correct. If you are unsure as to how
your services should be set up, consult your NT documentation. Click the
Next button.
10. The setup wizard will tell you that it’s ready to install your networking
components. Click the Next button.
11. Windows NT may tell you that it needs to copy some NT system files onto
your hard drive. If this is the case, remove the Linksys HomeLink
®
CD-
from your CD-ROM drive and insert your Windows NT CD-ROM. Type
D:\i386 (where D is the letter of your CD-ROM) and click the Continue
button.
Phoneline 10M Network Card
19
6. A window will appear verifying that the Linksys HomeLink®Phoneline
Network Adapter has been detected. Click the OK button.
7. Now you will be back at the setup wizard. You will see the HomeLink®card
listed in the Network Adapters window. Click the Next button.
8. Select your protocols for the card.
Linksys HomeLink® Series
18
Note: If you are using a
service pack in Windows
NT, you may be required
to re-install it after
installing the HomeLink
®
Card and driver.
Page 13

15. NT will ask you to enter a Workgroup or Domain name. If you are unsure
as to what your Workgroup or Domain name should be, consult your network administrator or your Windows NT documentation. Enter the correct
information and click the Next button.
16. Click the Finish button, and when you are asked to restart your computer,
click the Yes button.
17. Your PC will reboot. Login to NT when the login window appears. The
installation is complete
To make sure that your network is functioning, click on the Network
Neighborhood icon on the Windows desktop of any netw ork ed PC. You should
see the names of all of the PCs on the network. If any of the names are missing, refer to the Troubleshooting section in the back of this guide.
10M Phoneline Network Card
21
Linksys HomeLink® Series
20
12. If you use TCP/IP, a window will ask you if you would like to use DHCP.
If you are unsure as to whether or not DHCP should be set up, consult your
Windows NT documentation. Choose Yes or No to continue.
13. NT will copy files onto your computer. This may take a minute. If you
receive an error that says your PC is unable to open a file, put the Linksys
HomeLink CD back in the CD-ROM drive. Wait a few seconds and click
the Retry button.
14. The Bindings window will appear. If you are unsure as to how your bindings should be setup, consult your NT documentation. If your bindings look
correct, click Next, then Next again.
Page 14

Windows 2000
Installation and Setup
Overview
After physically installing the Phoneline 10M
Network Card in your computer, follow these
instructions to install the network driver. The
installation procedure for the network driver will
vary slightly depending on which version of
Windows 2000 you are using, and on your current system configuration. If at any time during
the installation you encounter problems, consult
the Troubleshooting section.
1. Start your computer and Windows 2000. Log in if you are asked to with
administrator’s rights.
2. Windows will displa y the Found New Hardw are W izard bo x. Click the Next
button. Insert the HomeLink
®
Card CD into your CD-ROM drive.
Installing the Driver in Windows 2000
Overview
NNoottee::
Prior to
proceeding,
make sure that
you are operating Windows
2000 with administrative
rights. If you log into Windows
2000 without administrative
rights, you may run into problems during the installation.
23
Phoneline 10M Network Card
Since NT Networking is already installed, you'll only need to install the
HomeLink
®
Card driver and configure your network settings to get NT net-
working up and running. To do this:
1. Click on the Start button, select Settings, Control Panel, and then double-
click on the Network icon.
2. When the networking window appears, click on the Adapters tab. Click on
the Add button.
3. When the list of av ailab le netw ork adapters appears, click the Have Diskbut-
ton.
4. Put the HomeLink
®
Installation CD into your CD-ROM drive. Type D:\ into
the box on your screen and click the OK button. NT will copy the necessary
network drivers to your computer.
5. When Linksys Phoneline 10M Network Card Driver appears in the adapter
box, click the OK button.
6. NT will probably ask you to supply your original Windows NT CD-ROM or
setup disks. Supply them as needed.
7. NT may ask you to choose a media type or type of cab ling for the HomeLink
card. If so, choose the AutoDetect option and click on the Continue button.
8. When the Network window reappears, click on the Bindings tab. Choose
your bindings. Click on the Protocols tab and select your settings. Do the
same for the Services tab. After your bindings, settings, and services are set,
click the Close button. Choose to restar t your PC.
After your computer restarts, the network setup is complete. To see the rest of
the network, double-click on the Network Neighborhood icon that resides on
your NT desktop.
Linksys HomeLink Series
22
Installing the HomeLink®Network Driver
if Networking is Already Installed
Page 15

5. The Driver File Search Results dialog box will appear. Click the Next
button.
6. The Completing the Found New Hardware Wizard dialog box will
appear. Click the Finish button.
7. Remove the CD from the CD-ROM drive. NOTE: Windows 2000 will not ask
you to restart your computer but it is recommended that you do so.
The Windows 2000 driver installation is complete.
If you want to share files or printers,
refer to your Windows 2000 documentation.
25
Phoneline 10M Network Card
Linksys HomeLink® Series
3. The Install Hardware Device Drivers dialog box will appear. When
Ethernet Controller is displayed, select Search for a suitable driver for my
device (Recommended). Click the Next button.
4. The Locate Driver Files dialog box will appear. Select the CD-ROM
drive option. Click the Next button.
24
Page 16

10M Phoneline Network Card
2726
4. In Network Neighborhood I can only see myself and no other computers on the
network.
• Make sure that the cables are connected correctly. Make sure you are getting Link or Activity lights on both the HomeLink®Card. Try changing to
a new cable that you know is working.
• Verify that the HomeLink®Card’s Phoneline conf iguration is set to Auto
Configuration.
• Try connecting your PCs using only the phone wire provided with the
HomeLink card. Disconnect your PCs from any phone jacks and remove
any telephone, modem, or other device that you have connected to the
HomeLink cards.
• If the PCs are far away from each other, bring them close to each other and
try connecting them directly together. This test will determine whether
your phone line or your HomeLink hardware is causing your network to
malfunction.
5. I’ve decided that I don’t want to share a drive or printer anymore, or I have
decided to physically remove a drive or printer from my network.
• You’re going to have to reconfigure your File and Printer Sharing settings
manually. To do so, double-click on your My Computer icon. Click on the
Printers folder. A window of available printers will appear. Using your
right mouse button, click once on the printer that you want to disable on
the network. Click on Sharing, followed b y the Sharingtab. Click on Not
Shared. When you're done, click on the Apply button, followed by OK.
• You can disable drives in the same way. Right-click on the drive you want
to stop sharing. Click on Sharing, followed by the Sharing tab. Click on
Not Shared. When you're done, click on the Apply button, followed by
OK.
6. In Network Neighborhood, you can only see computers running the same operating system as you. For example,if you are running Windows 95,you can only
see other Windows 95 computers and not any computer running Windows 98.
• Click Start, Find, then Computer and type the name of any other computer in the window that comes up. Click Find Now.
• Make sure that you are using the same protocols and workgroup names on
the 95 and 98 computers. To do this, click on Star t, Settings, Control
Panel, then double-click on the Network icon. Click on the
Configuration tab, then click on the Identification tab for Workgroup
settings. If any protocols are missing, add any needed protocol(s) using
Linksys HomeLink® Series
Troubleshooting
General Troubleshooting Tips
Use only the telephone wires included in the package.
Use the Diagnostics tool in the Driver Interface (iLine10 icon in the Control
Panel).
Common Question and Answers
1. Windows doesn't detect new hardware with the HomeLink Card hardware
installed, or it continues to detect the card each time I restart the PC.
• You might not have inserted the PCI card correctly or securely into the
appropriate slot of your computer. Check that the card is securely inserted
into the appropriate slot.
• The motherboard in your system might not be Plug-and-Play compatible,
your PC's Plug-and-Play settings may not be enabled, or the motherboard
may ha v e Plug-and-Play options not supported by Windows. If you are not
sure, contact your PC's manufacturer.
2. Windows can't locate the driver for the HomeLink®Card device.
• You may have inserted the wrong CD-ROM into your PC's drive.
• The CD-ROM may be defective or files may be missing, or you may be
pointing Windows to the wrong directory or drive. Check your PC’s user
guide.
• The path in the “Copy File From...” bar may be incorrect. Try the Find File
function in your Start Menu to find the file on your CD.
3. The Windows Logon screen doesn't appear after I restart my computer.
• Click on Start, Shut Down, then Close All Programs and Logon as a
Different User. If this doesn't solve the problem, your PC's manufacturer
may have disabled Windows' networking. Contact your computer's manufacturer for help.
• You may have your Primary Network Logon set to your Windows Logon.
General Troubleshooting Tips
Common Questions and Answers
Page 17

2928
Appendix
There may be times when y ou might need to manuall y install missing Windo ws
networking components.
1. Click on the Start button, select Settings, Control Panel, and then double-
click on the Network icon.
2. Click on the Configuration tab. Make sure that the following netw ork components are installed.
• Client for Microsoft Networks
• Linksys Phoneline 10M Network Card
There may be other components listed in addition to the ones shown above. If
any of the above components are missing, add them as follows.
Client for Microsoft Networks
If you plan on connecting to an NT file server or peer-to-peer network, click on
the Add button. Highlight Client and click on the Add button. Choose
Microsoft as the manufacturer in the Network Client box. Highlight Client for
Microsoft Networks and click the OK button.
Client for NetWare Networks
If you plan on connecting to a Novell NetWare server, click on the Addbutton.
Highlight Client and click on the Add button. In the Network Client window,
select Manufacturer and choose Microsoft. Highlight Client for Microsoft
Networks. Click the OK button.
IPX/SPX-compatible Protocol
Click on the Add button. Choose Protocol and click on the Add button. Select
Manufacturer and choose Microsoft. Under the Network Protocol box, high-
light IPX/SPX-compatible protocol. Click the OK button.
TCP/IP Protocol
Click on the Add button. Select Protocol, then click the Add button again.
Under Manufacturer, highlight Microsoft. Under Network Protocol, highlight
TCP/IP. Click the OK button.
Manually Installing the Network Components in Windows
Phoneline 10M Network Card
the Add button in the Network window.
• If all computers are using the same protocol(s) and Workgroup name, and
Windo ws 95 computers can't see W indows 98 computers, enable NetBIOS
on all the computers using Windows 95 and 98. IPX/SPX-compatible
Protocol should be installed on all computers.
• Bring up the properties of the IPX/SPX-compatible Protocol. To do this,
click on Start, Settings, Control Panel, then open Network and click on
the Configuration tab. Highlight IPX/SPX-compatible Protocol (only one
of them) and click on Properties.
• Click on the NetBIOS tab. Put a check next to I want to enable NetBIOS
over IPX/SPX and click OK. Click OK again.
• After Windows finishes copying the appropriate f iles, restart your computer. When you’ve returned to the desktop, open Network
Neighborhood and look for the other PCs on your network.
7. The workgroup,protocols,cabling and driver are all working properly,but the PC
uses an AMD processor and it can only see itself in Network Neighborhood.
• In some instances with PCs using AMD processors, the IRQ assigned to
the card by the BIOS (as it gets listed on the bootup screens of most PCs)
doesn't correspond to the IRQ assigned by Windows. This can be fixed by
disabling the IRQ holder for PCI Steering in the Windows Device
Manager. Refer to your PC's documentation for instructions or you can
follow the suggested instructions below. Keep in mind that this procedure
will vary depending on your computer’s conf iguration.
• Click on Start, Settings, Control Panel, and open System. Click on the
Device Manager tab. Open System Devices, then double-click PCI Bus.
• Click on the IRQ Steering tab. Remove the check from Use IRQ Holder
for PCI Steering and click OK. Windows will ask you to restart the PC (if
it doesn’t ask you, reboot the PC at this time).
• After the computer boots up, Windows will try to redetect the PCI
Steering. Continue rebooting the PC until Windows stops detecting new
hardware and settings for PCI Steering. This normally takes a total of four
reboots.
Linksys HomeLink® Series
Page 18

3130
After following the preparation instructions, double-click on your My
Computer icon. A window of available disk drives will appear. Using your
right mouse button, click once on the drive or folder that you want to make
available to other users. Click on Sharing, followed by the Sharing tab. Click
on Share As. In the Share Name box, enter a name for the drive or folder you
are sharing. You can create any name, as long as the name doesn’t have spaces
(e.g.: CDrive, CD-ROM, Leela, etc.).
Next, decide on the type of access that you want to give other users.
• Read-Only access lets other users view the files on your PC.
• Full access lets users create, change, or delete files on your PC.
• Depends on P ass w or dlets users have Read-Only and/or Full access, depend-
ing on the password that you decide to give them.
Use your mouse to select the type of file sharing access that you want other
users to have. If you want to assign access password(s), type them into the
Password box(es).
When you're done, click on the Apply button, followed by OK. Your dri v e(s)
or folder(s) can now be accessed by other users whenever they click on their
Windows Network Neighborhood icons. If a user tries to access one of your
drives or folders that's password-protected, he or she will be asked for the
appropriate Read-Only or Full access password.
How To Share Printers
Enabling File Sharing
Phoneline 10M Network Card
1. W indo ws 95 will detect the HomeLink®Phoneline Network card and displa y
a New Hardware Found window.
2. Make sure the HomeLink CD is in your CD-ROM drive. Using your mouse,
select the Driver from disk provided by hardware manufacturer option on
the screen, then click the OK button. When asked for the location of the
files, type D:\ (where D is your CD-ROM drive) and click the OK button.
3. Windows 95 will copy the appropriate network drivers to your computer. If
95 asks you to supply your original Windows 95 installation CD-ROM or
setup files, enter the appropriate path for those f iles (e.g.:
A:\, D:\WIN95,
c:\WINDOWS\OPTIONS\CABS, where D is your CD-ROM drive). Linksys only
provides two types of files, PCM200HA.inf and bcm*.*. All other f iles
are provided by Microsoft.
After Windows 95 is finished copying the necessary f iles to your computer, it
may ask you to restart your computer. Choose to do so. After your system
restarts, Click on the Start button, select Settings, Control Panel, and then
double-click on the Network icon.
Click on the Identification tab. Make sure that the workgroup name is
Workgroup, and that your computer name is unique.
The instructions below explain how to turn on f ile and printer sharing in
Windows 95 so that your computer can be accessed by others and vice-versa.
Start up Windows 95. If you are asked to log in, be sure to give your correct
username and password. To set up sharing for the first time on a computer, click
on Start, Settings, Control Panel, then double-click on Networ k. Click on the
Configuration tab, followed by the File and Printer Sharingbutton. The File
and Printer Sharing window will appear.
If you'd like others to be able to access the files on your PC's hard drive, select
I want to be able to give others access to my files.
If you'd like to share your printer with other users on the network, select I want
to be able to allow others to print to my printer.
Click on the OK button. File and Printer Sharing for Microsoft Networks
should now appear in the list of installed components. Click the OK button.
When asked to restart your PC, choose to do so.
Windows 95 Version A Setup
Preparing to Use File and Printer Sharing
Linksys HomeLink® Series
Page 19

33
After following the steps on the previous pages, double-click on your My
Computer icon. Click on the previous pages, a window of available printers
will appear.
Using your right mouse button, click once on the printer that you want to share
with other users. Click on Sharing, followed by the Sharing tab. Click on
Share As. In the Share Name box, give a name to the printer you're about to
share (Jack's HP4, for example). If you want to assign a password to the printer so only certain users can access it, type a password in the Password box.
When you're done, click on the Apply button, followed by OK. Your printer(s)
are now shared.
When you're finished, restart your PC, log into your network, and double-click
on Network Neighborhood. You should be able to see the other computers on
your network. The installation is complete.
Note: Not all printers may be shared on the netw ork or you may require special
instructions. Refer to your printer’s user guide or contact the manufacturer.
32
There may be cases when you need to remove the network card from the
computer and make a fresh start. In order to do this, follow these instructions
carefully.
1. Click on the Start button, select Settings, Control Panel, and then double-
click on the Network icon.
2. Highlight the Linksys driver, and choose to Remove it. If asked to reboot
your computer, click the Nobutton.
3. Click on the Start button, select the Find option, and click on Files or
Folders. Search your hard drive for a file named PCM200HA.INF.
Delete all instances of this file by browsing each subdirectory where the
file is located (e.g.: C:\WINDOWS\INF, C:\WINDOWS\INF\OTHER).
Sharing Your Resources
The HomeLink
®
card brings the advantages of inexpensive networking to your
home or office. Any device on the network, including CD-ROM drives, hard
drives, and printers, can be used by any of the PCs that you hook up to the network. The installation CD-ROM that came with your HomeLink Card will
automatically set up your networked PCs so that all of their available resources
can be shared. Of course, you hav e control over the sharing rights, so y ou will
be able to isolate devices or drives that you do not want to be accessible from
the rest of the network.
It is important to note that if you want to use a networked device on a PC other
than the one that the device is attached to, you must configure the PC to handle the device.
Phoneline 10M Network Card
Removing the Installed Components in Windows 95 & 98
Sharing Your Resources
Linksys HomeLink® Series
How To Share Printers
Page 20

34
Glossary
Daisy Chain - Connected in series, one after the other. Transmitted signals go
to the first device, then to the second and so on.
DHCP (Dynamic Host Configuration Protocol) - A protocol that lets network
administrators manage centrally and automate the assignment of Internet
Protocol (IP) addresses in an organization's network. Using the Internet's set of
protocol (TCP/IP), each machine that can connect to the Internet needs a
unique IP address. When an organization sets up its computer users with a connection to the Internet, an IP address must be assigned to each machine.
Without DHCP, the IP address must be entered manually at each computer and,
if computers move to another location in another part of the network, a new IP
address must be entered. DHCP lets a network administrator supervise and distribute IP addresses from a central point and automatically sends a new IP
address when a computer is plugged into a different place in the network.
DHCP uses the concept of a "lease" or amount of time that a given IP address
will be valid for a computer. The lease time can vary depending on how long a
user is likely to require the Internet connection at a particular location. It's especially useful in education and other environments where users change frequently. Using very short leases, DHCP can dynamically reconfigure networks
in which there are more computers than there are available IP addresses.
DHCP supports static addresses for computers containing Web servers that
need a permanent IP address.
DMZ - A DMZ (demilitarized zone) is a computer host or small network
inserted as a "neutral zone" between a company's private network and the outside public network. It prevents outside users from getting direct access to a
server that has company data.
DNS - The domain name system (DNS) is the way that Internet domain name
are located and translated into Internet Protocol (IP) addresses. A domain name
is a meaningful and easy-to-remember "handle" for an Internet address.
Dynamic IP Address - An IP address that is automatically assigned to a client
station in a TCP/IP network, typically by a DHCP server. Network devices that
serve multiple users, such as servers and printers, are usually assigned static IP
addresses.
Phoneline 10M Network Card
35
Linksys HomeLink® Series
The HomeLink®Card Driver comes with a diagnostic user
interface. To reach the driver’s interface, click on your Start
button, then Settings, then Control Panel.
Once the Driver has been installed on your PC, an iLine10
icon should be visible in your Control Panel menu. Double
click on the iLine10 icon (seen on the left).
The driver’s Diagnostic Interface has three separate function screens.
General The General screen displays the most basic driver and card informa-
tion for the user. There is also a check box on the bottom of the General screen.
Checking the box will place a shortcut to the Driver Interface directly in the
system tray, which occupies the bottom right corner of your desktop, directly
beside the time. Placing the iLine10 icon in the system tray makes accessing
the Interface a double-click away.
Diagnostics The Diagnostics screen provides the user with a simple card-test-
ing utility. Pressing the Test Chip button will cause the utility to scan the
HomeLink Card’s chip. If there are any problems with the chip, the user will be
informed in the white text box.
Statistics The Statistics screen provides more detailed information to the
User. Incidents such as collisions, packets received or transmitted, and errors
are tabulated here.
The Driver Interface
Page 21

IPCONFIG - A utility that provides for querying, defining and managing IP
addresses within a network. A commonly used utility for configuring networks
with static IP addresses.
IPSec - IPSec (Internet Protocol Security) is a developing standard for security at the network or packet processing layer of network communication. A big
advantage of IPSec is that security arrangements can be handled without
requiring changes to individual user computers.
ISP - An ISP (Internet service provider) is a company that provides individuals
and companies access to the Internet and other related services such as W eb site
building and virtual hosting.
LAN - A local area network (LAN) is a group of computers and associated
devices that share a common communications line and typically share the
resources of a single processor or server within a small geographic area (for
example, within an office building).
MAC Address - The MAC (Media Access Control) address is your computer's
unique hardware number.
mIRC - mIRC runs under Windows and provides a graphical interface for logging onto IRC servers and listing, joining and leaving channels.
NAT - NAT (Network Address Translation) is the translation of an Internet
Protocol address (IP address) used within one network to a different IP address
known within another network. One network is designated the inside network
and the other is the outside.
Packet Filtering - Discarding unwanted network traffic based on its originating address or range of addresses or its type (e-mail, file transfer, etc.).
PCMCIA - The PCMCIA (Personal Computer Memory Card International
Association) is an industry group organized in 1989 to promote standards for a
credit card-size memory or I/O device that would fit into a personal computer,
usually a notebook or laptop computer.
Ping - (Packet INternet Groper) An Internet utility used to determine whether
a particular IP address is online. It is used to test and debug a network by sending out a packet and waiting for a response.
3736
Phoneline 10M Network Card
Linksys HomeLink® Series
Dynamic Routing - The ability for a router to forward data via a dif ferent route
based on the current conditions of the communications circuits. For example,
it can adjust for overloaded traffic or failing lines and is much more flexible
than static routing, which uses a fixed forwarding path.
Firewall - A firewall is a set of related programs, located at a network gateway
server, that protects the resources of a netw ork from users from other networks.
(The term also implies the security policy that is used with the programs.) An
enterprise with an intranet that allows its workers access to the wider Internet
installs a firewall to prevent outsiders from accessing its own private data
resources and for controlling what outside resources to which its own users
have access.
Basically, a firewall, working closely with a router, examines each network
packet to determine whether to forward it toward its destination.
Firmware - Programming that is inserted into programmable read-only memory (programmable read-only memory), thus becoming a permanent part of a
computing device.
HPNA (Home Phoneline Networking Alliance) - An industry standard for
interconnecting computers within a home using existing telephone lines. Using
HPNA (also known as HomePNA), multiple computer users in a home can
share a single Internet connection, open or copy files from different computers,
share printers, and play multiuser computer games. The latest version, HPNA
2.0, allows data transmission at a rate of 10 Mbps over a home’s standard telephone line wiring system using the Ethernet CSMA/CD framing and transmission protocol. HPNA can be used without interrupting normal voice or fax
services. One user can talk on the phone at the same time other users are sharing the same line to access the Web or share other computer resources.
IP Address - In the most widely installed level of the Internet Protocol
(Internet Protocol) today, an IP address is a 32-binary digit number that identifies each sender or receiver of information that is sent in packet across the
Internet. When you request an HTML page or send e-mail, the Internet
Protocol part of TCP/IP includes your IP address in the message (actually, in
each of the packets if more than one is required) and sends it to the IP address
that is obtained by looking up the domain name in the Uniform Resource
Locator you requested or in the e-mail address you're sending a note to. At the
other end, the recipient can see the IP address of the Web page requestor or the
e-mail sender and can respond by sending another message using the IP address
it received.
Page 22

UTP - Unshielded twisted pair is the most common kind of copper telephone
wiring. Twisted pair is the ordinary copper wire that connects home and many
business computers to the telephone company. To reduce crosstalk or electromagnetic induction between pairs of wires, two insulated copper wires are
twisted around each other. Each signal on twisted pair requires both wires.
Since some telephone sets or desktop locations require multiple connections,
twisted pair is sometimes installed in two or more pairs, all within a single
cable.
Virtual Server - Multiple servers that appear as one server, or one system
image, to the operating system or for network administration
WAN - A communications network that covers a wide geographic area, such as
state or country.
WINIPCFG - Configuration utility based on the Win32 API for querying,
defining and managing IP addresses within a network. A commonly used utility for configuring networks with static IP addresses.
39
PPPoE(Point to Point Protocol o v er Ethernet) - A method used mostly by DSL
providers for connecting personal computers to a broadband modem for
Internet access. It is similar to how a dial-up connection works but at higher
speeds and quicker access.
PPTP (Point-to-Point Tunneling Protocol) - A protocol (set of communication
rules) that allows corporations to extend their own corporate network through
private "tunnels" over the public Internet. Effectively, a corporation uses a
wide-area network as a single large local area network. A company no longer
needs to lease its own lines for wide-area communication but can securely use
the public networks. This kind of interconnection is known as a virtual private
network.
RJ-11 (Registered Jack-11) - A telephone connector that holds up to four
wires. The RJ-11 the common connector used to plug the handset into the telephone and the telephone into the wall.
RJ-45 (Registered Jack-45) - A connector similar to a telephone connector that
holds up to eight wires, used for connecting Ethernet devices.
Static IP Address - A permanent IP address that is assigned to a node in a
TCP/IP network.
Static Routing - Forwarding data in a network via a fixed path. Static routing
cannot adjust to changing line conditions as can dynamic routing.
Subnet Mask - The method used for splitting IP networks into a series of subgroups, or subnets. The mask is a binary pattern that is matched up with the IP
address to turn part of the host ID address field into a field for subnets.
TCP/IP - Transmission Control Protocol/Internet Protocol (TCP/IP) is the
basic communication language or protocol of the Internet. It can also be used
as a communications protocol in a private network (either an intranet or an
extranet). When you are set up with direct access to the Internet, your computer is provided with a copy of the TCP/IP program just as every other computer
that you may send messages to or get information from also has a copy of
TCP/IP.
38
Phoneline 10M Network Card
Linksys HomeLink®Series
Page 23

Dimensions: 4.75” x 2.56”x 0.5”
(120mm x 65mm x 13mm)
Unit Weight: 3 oz. (85.05 g)
Power: 2W Maximum
Certifications: FCC Class B,CE Mark Commercial
Operating Temperature: 0°C - 50°C (32°F - 122°F)
Storage Temperature: -20°C - 70°C (-4°F - 158°F)
Operating Humidity: 10% - 85% Non-Condensing
Storage Humidity: 5% - 90% Non-Condensing
41
Specifications
Model Number: HPN200
System: PCI 2.2 compliant PC; Windows 95,Windows
98,Windows ME,Windows NT or Windows 2000
Standards: HomePNA 1.1 and 2.0 compatible
Protocol: CSMA/CD
Ports: Two RJ-11
Speed: 1Mbps, 10 Mbps
Cabling: Standard Telephone Wire
Topology: Daisy Chain
LED Status Lights: Transmit, Link, Receive, Collision
40
Phoneline 10M Network Card
Environmental
Linksys HomeLink®Series
Page 24

Contact Information
For help with the installation or operation of this product, contact Linksys
Customer Support at one of the phone numbers or Internet addresses below.
Sales Information 800-546-5797 (LINKSYS)
Tech Support 888-793-4632
RMA Issues 949-261-1288
Fax 949-261-8868
Email support@linksys.com
Web http://www.linksys.com
FTP Site ftp.linksys.com
43
Warranty Information
BE SURE TO HAVE YOUR PROOF OF PURCHASE AND A BARCODE
FROM THE PRODUCT'S PACKAGING ON HAND WHEN CALLING.
RETURN REQUESTS CANNOT BE PROCESSED WITHOUT PROOF OF
PURCHASE.
IN NO EVENT SHALL LINKSYS’LIABILITY EXCEED THE PRICE PAID
FOR THE PRODUCT FROM DIRECT, INDIRECT, SPECIAL, INCIDENTAL, OR CONSEQUENTIAL DAMAGES RESULTING FROM THE USE
OF THE PRODUCT, ITS ACCOMPANYING SOFTWARE, OR ITS DOCUMENTATION. LINKSYS DOES NOT OFFER REFUNDS FOR ANY PRODUCT.
LINKSYS OFFERS CROSS SHIPMENTS, A FASTER PROCESS FOR PROCESSING AND RECEIVING YOUR REPLACEMENT. LINKSYS PAYS
FOR UPS GROUND ONLY. ALL CUSTOMERS LOCATED OUTSIDE OF
THE UNITED STATES OF AMERICA AND CANADA SHALL BE HELD
RESPONSIBLE FOR SHIPPING AND HANDLING CHARGES. PLEASE
CALL LINKSYS FOR MORE DETAILS.
42
Phoneline 10M Network Card
Linksys HomeLink®Series
Page 25

© Copyright 2001 Linksys, All Rights Reserved.
Printed in the USA.
http://www.linksys.com
 Loading...