

Linksys EZXS55W v4.2, EZXS88W v3.4, EZXS16W v2.3 User Manual
USER GUIDE
EtherFast 10/100
5-/8-/16-Port
Workgroup Switch
Models: EZXS55W v4.2, EZXS88W v3.4, EZXS16W v2.3 (EU)
EN
English
BG
Български
CZ
Česky
DE
Deutsch
ES
Español
FI
Suomi
FR
Français
GR
Ελληνικά
HU
Magyar
IT
Italiano
NL
Nederlands
PL
Polski
PT
Português
RU
Русский
SE
Svenska
SI
Slovenščina
About This Guide
Icon Descriptions
While reading through the User Guide you may see
various icons that call attention to specific items. Below is
a description of these icons:
NOTE: This check mark indicates that there is
a note of interest and is something that you
should pay special attention to while using the
product.
WARNING: This exclamation point indicates
that there is a caution or warning and it is
something that could damage your property or
product.
About This Guide
WEB: This globe icon indicates a noteworthy
website address or e-mail address.
Online Resources
Website addresses in this document are listed without
http:// in front of the address because most current web
browsers do not require it. If you use an older web browser,
you may have to add http:// in front of the web address.
Resource Website
Linksys www.linksysbycisco.com
Linksys
International
Glossary www.linksysbycisco.com/glossary
Network
Security
www.linksysbycisco.com/international
www.linksysbycisco.com/security
Copyright and Trademarks
Linksys, Cisco and the Cisco Logo are
registered trademarks or trademarks of
Cisco Systems, Inc. and/or its affiliates in
the U.S. and certain other countries. Other
brands and product names are trademarks
or registered trademarks of their respective
holders. Copyright © 2009 Cisco Systems,
Inc. All rights reserved.
EtherFast 10/100 5/8/16-Port Workgroup Switch
i

Table of Contents
EN — Chapter 1: Connecting the Switch 3
BG — Глава 1: Свързване на превключвателя 4
CZ — Kapitola 1: Připojení přepínače 5
DE — Kapitel 1: Anschließen des Switch 6
DK — Kapitel 1:Tilslutning af switchen 7
ES — Capítulo 1: Conexión del conmutador 8
FI — Luku 1: Kytkimeen liittäminen 9
FR — Chapitre 1:
Connexion du commutateur 10
GR — Κεφάλαιο1: Σύνδεση μεταγωγέα 11
HU — 1. fejezet: A kapcsoló csatlakoztatása 12
IT — Capitolo 1: Collegamento dello switch 13
NL — Hoofdstuk 1: De switch aansluiten 14
PL — Rozdział 1: Podłączanie przełącznika 15
PT — Capítulo 1: Ligar o comutador 16
RU — Глава 1: Подключение коммутатора 17
SE — Kapitel 1: Ansluta switchen 18
SI — 1. poglavje: Priključitev stikala 19
Appendix A: Troubleshooting 20
Appendix B: Specications 21
Appendix C: Regulatory Information 22
FCC Statement . . . . . . . . . . . . . . . . . . . . . . . . . . . . . . . . . . . . . . . . . . . . . . .22
Safety Notices. . . . . . . . . . . . . . . . . . . . . . . . . . . . . . . . . . . . . . . . . . . . . . . .22
Industry Canada Statement . . . . . . . . . . . . . . . . . . . . . . . . . . . . . . . . . . . . . . .22
Avis d’Industrie Canada. . . . . . . . . . . . . . . . . . . . . . . . . . . . . . . . . . . . . . . . . .22
EC Declaration of Conformity (Europe) . . . . . . . . . . . . . . . . . . . . . . . . . . . . . . . .22
User Information for Consumer Products Covered by EU Directive 2002/96/EC on Waste
Electric and Electronic Equipment (WEEE) . . . . . . . . . . . . . . . . . . . . . . . . . . . . . .23
EtherFast 10/100 5/8/16-Port Workgroup Switch
ii

Chapter 1
Connecting the Switch
EN — Chapter 1:
Connecting the Switch
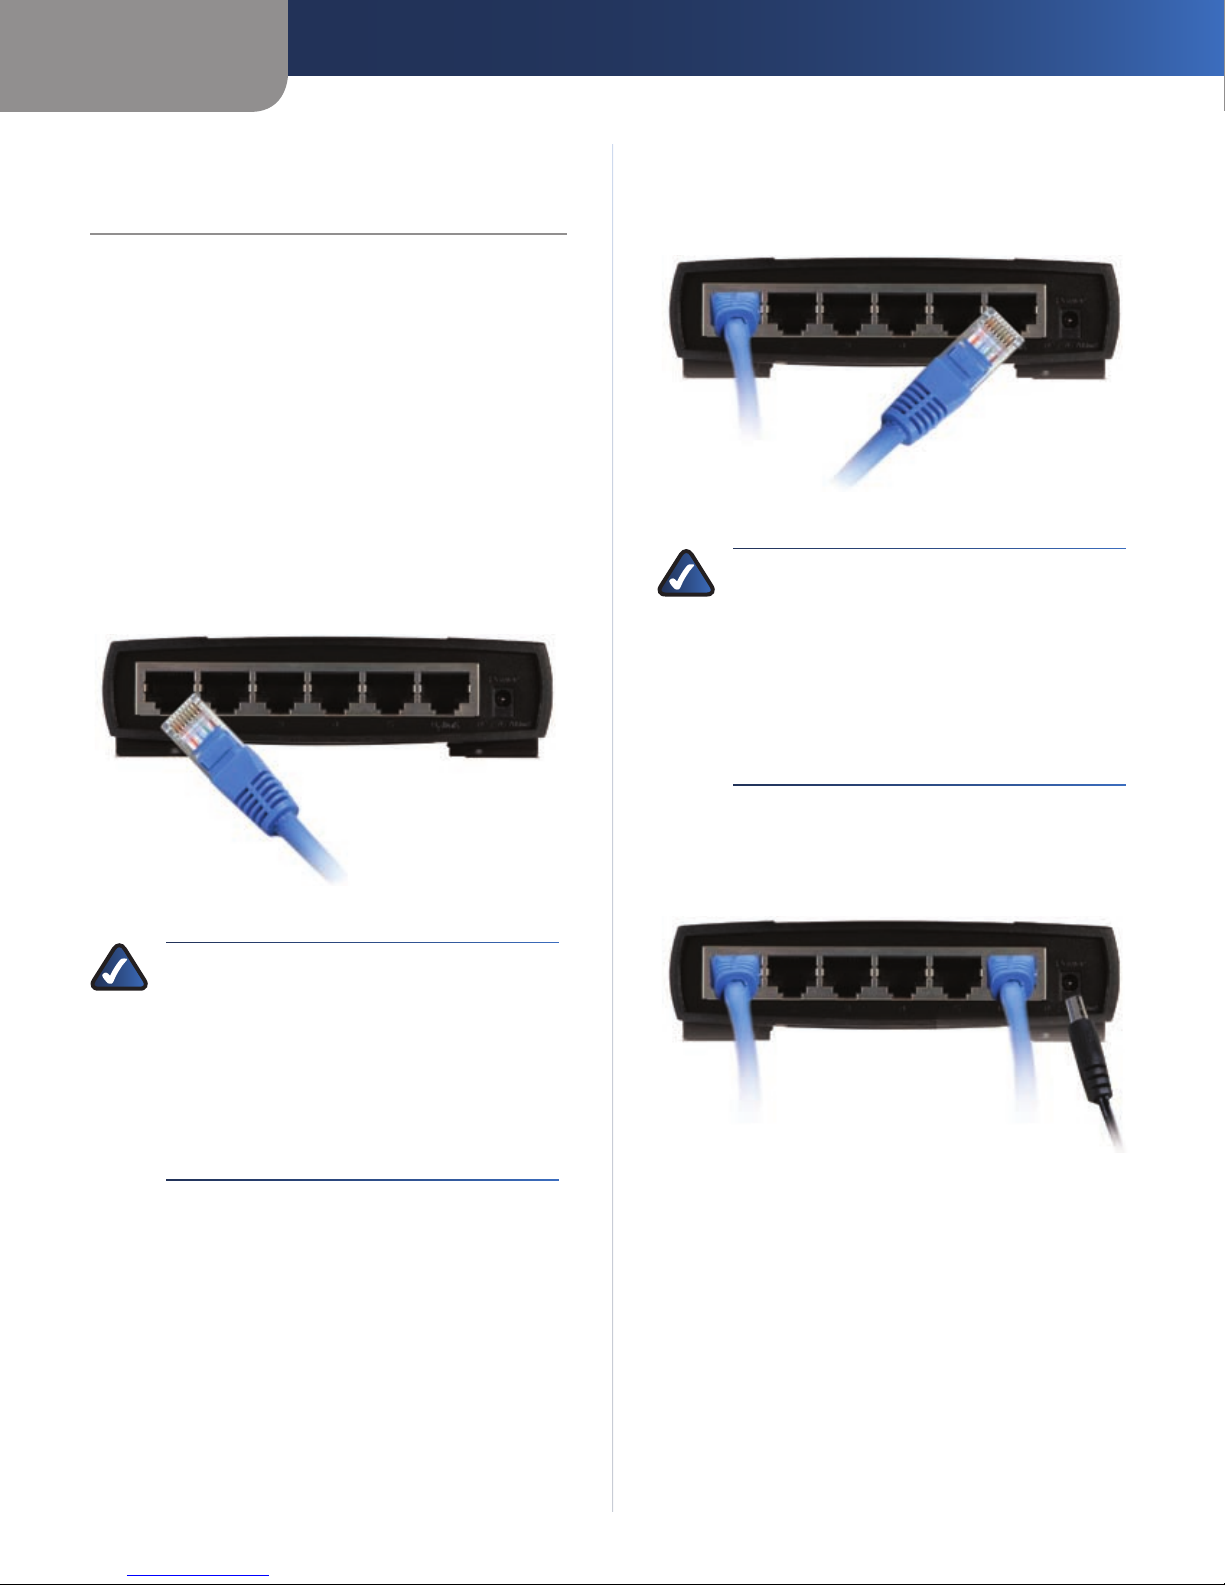
This chapter explains how to connect devices to the
Switch. You will connect computers to the Switch before
connecting a router or additional switch to the Uplink
port. (The 10/100 5-Port Switch is shown in the connection
pictures.)
Instructions
Make sure all of the devices you will connect to the 1.
Switch are powered off.
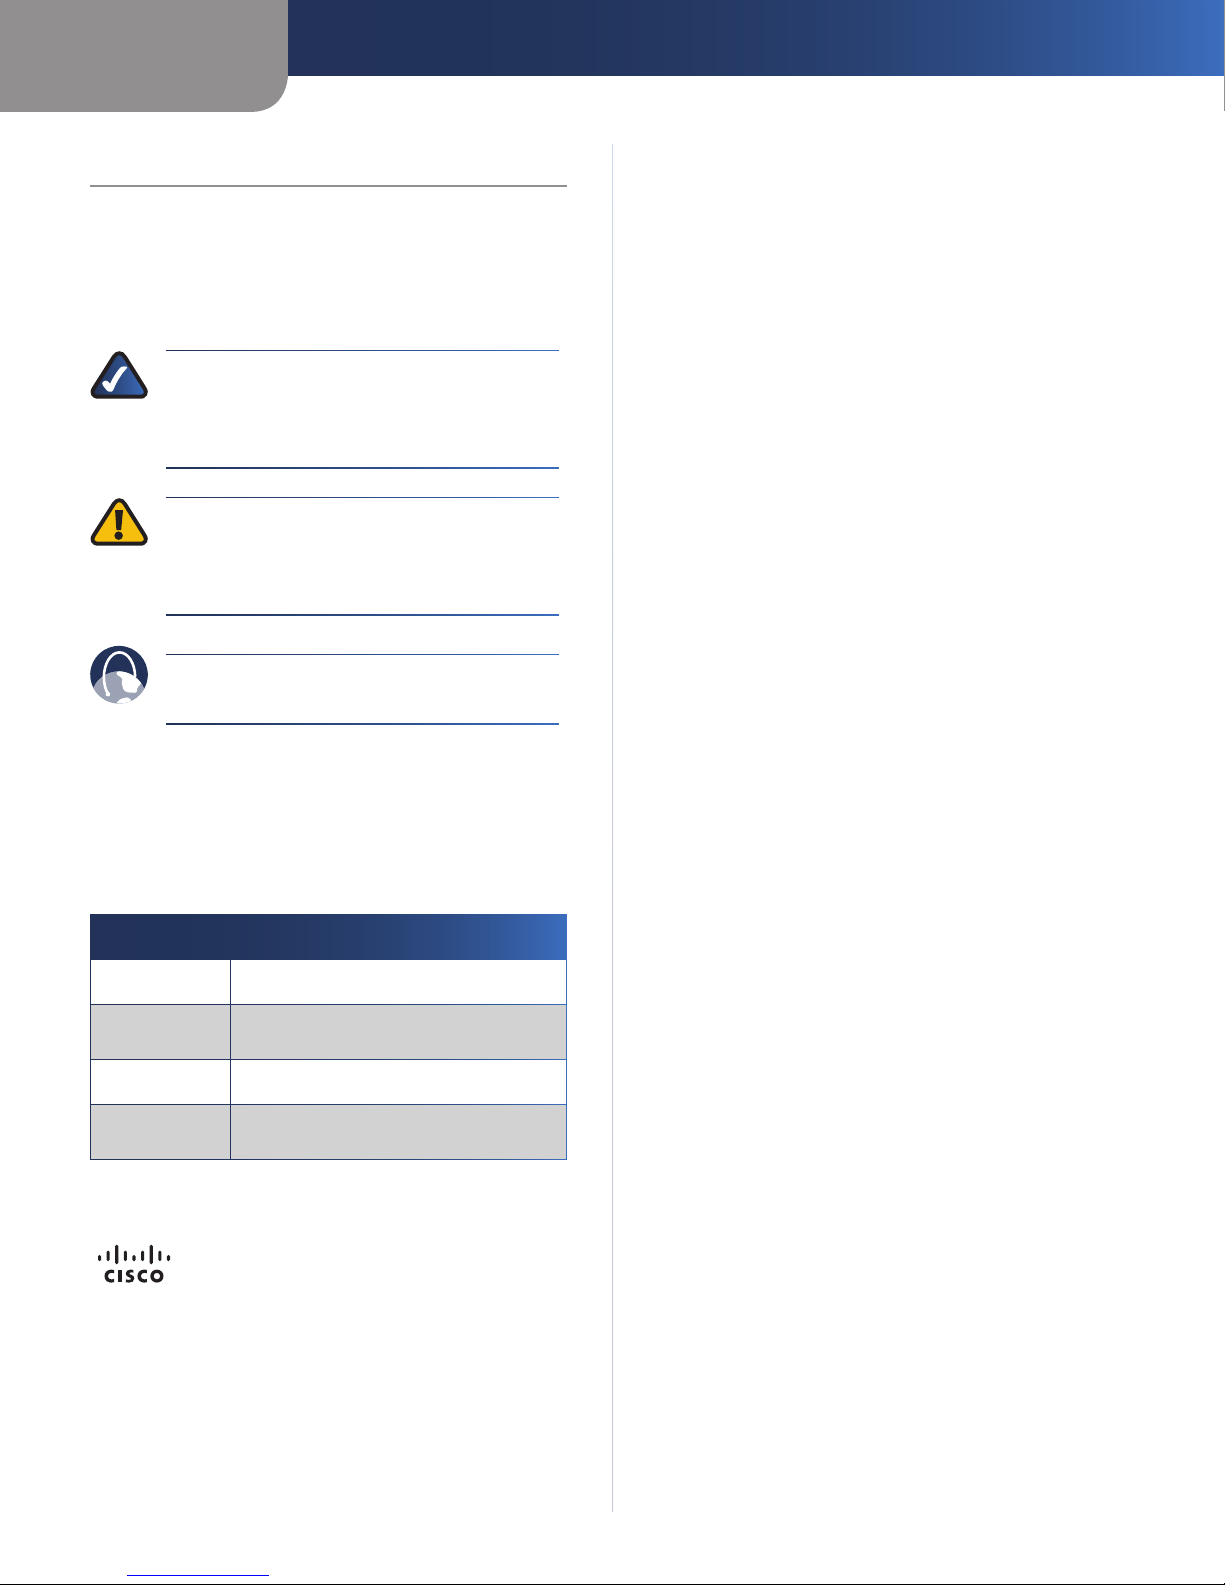
Connect a Category 5 Ethernet network cable to one 2.
of the numbered ports on the Switch. Then connect
the other end to a computer.
NOTE TO USERS OF THE 10/100 16-PORT
SWITCH: The 10/100 16-Port Switch is equipped
with a crossover button labeled MDI/MDIX. This
enables port 16 to be used as the Switch’s uplink
port. The MDI/MDIX button must be pressed
in if you want to use port 16 as an uplink port.
Otherwise, port 16 will function as a normal
10/100 port.
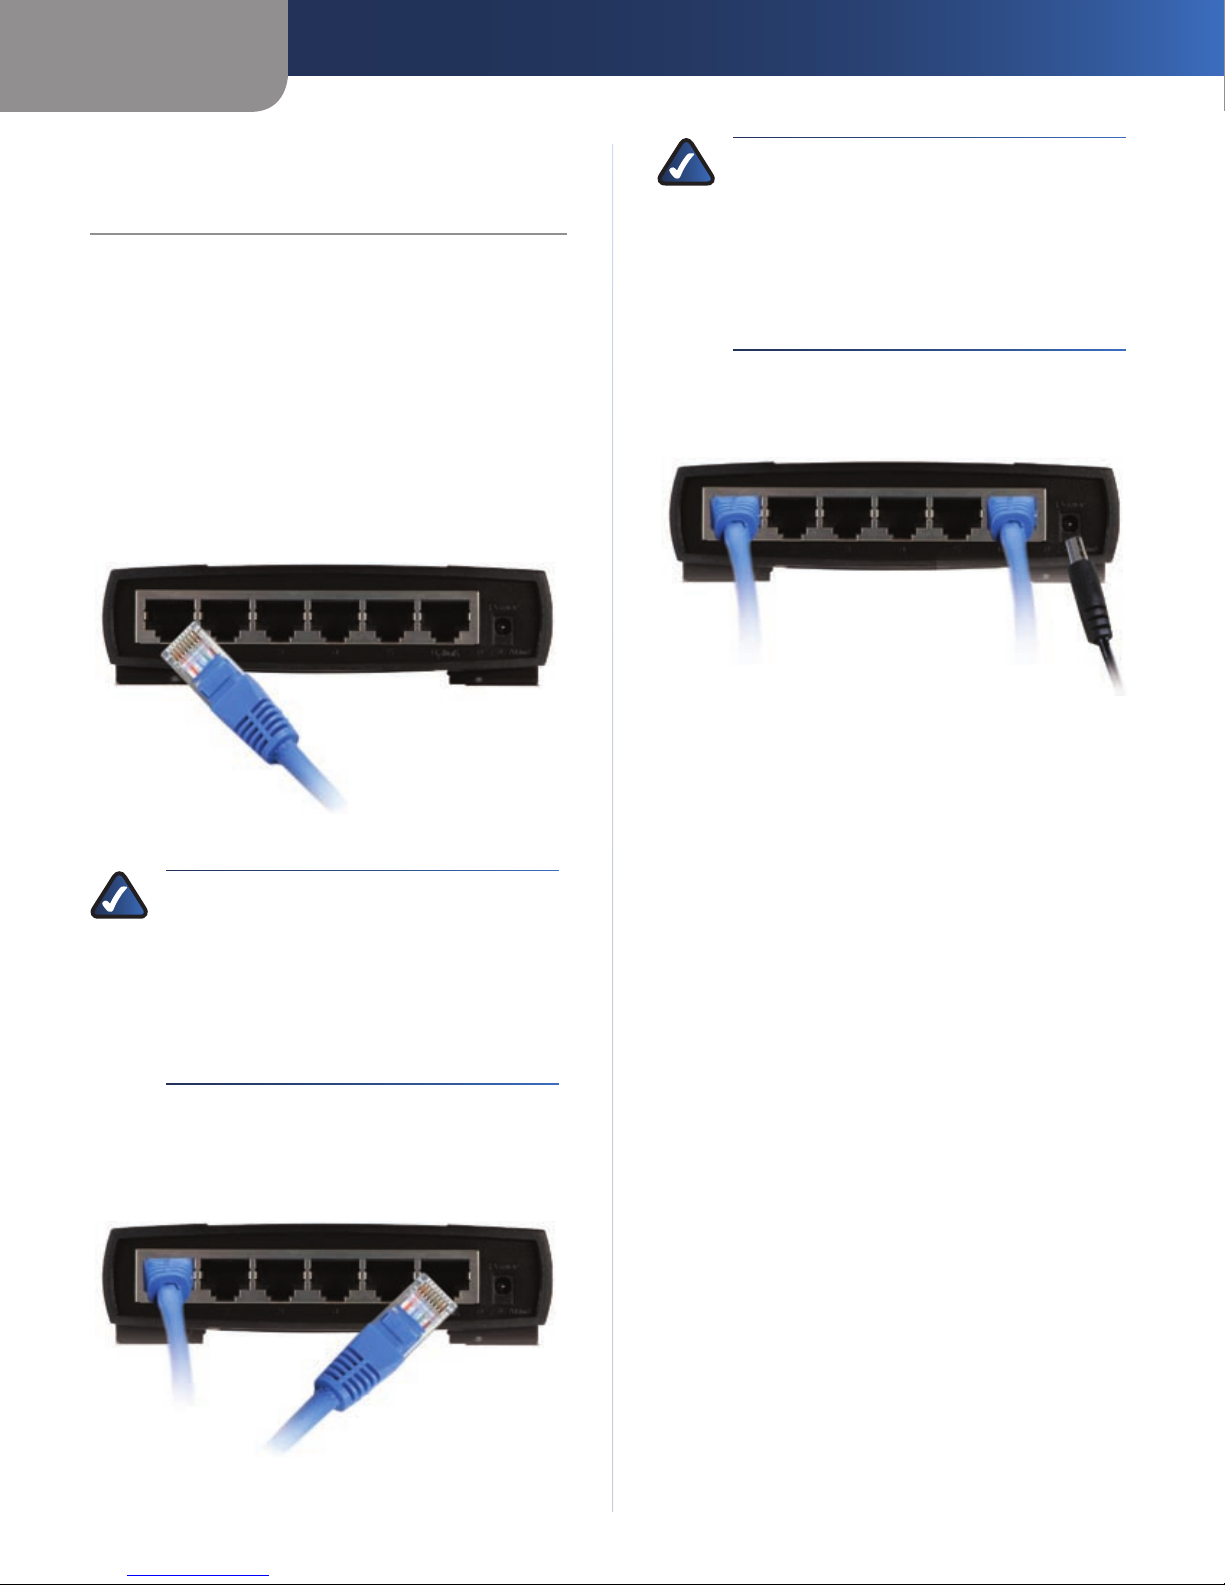
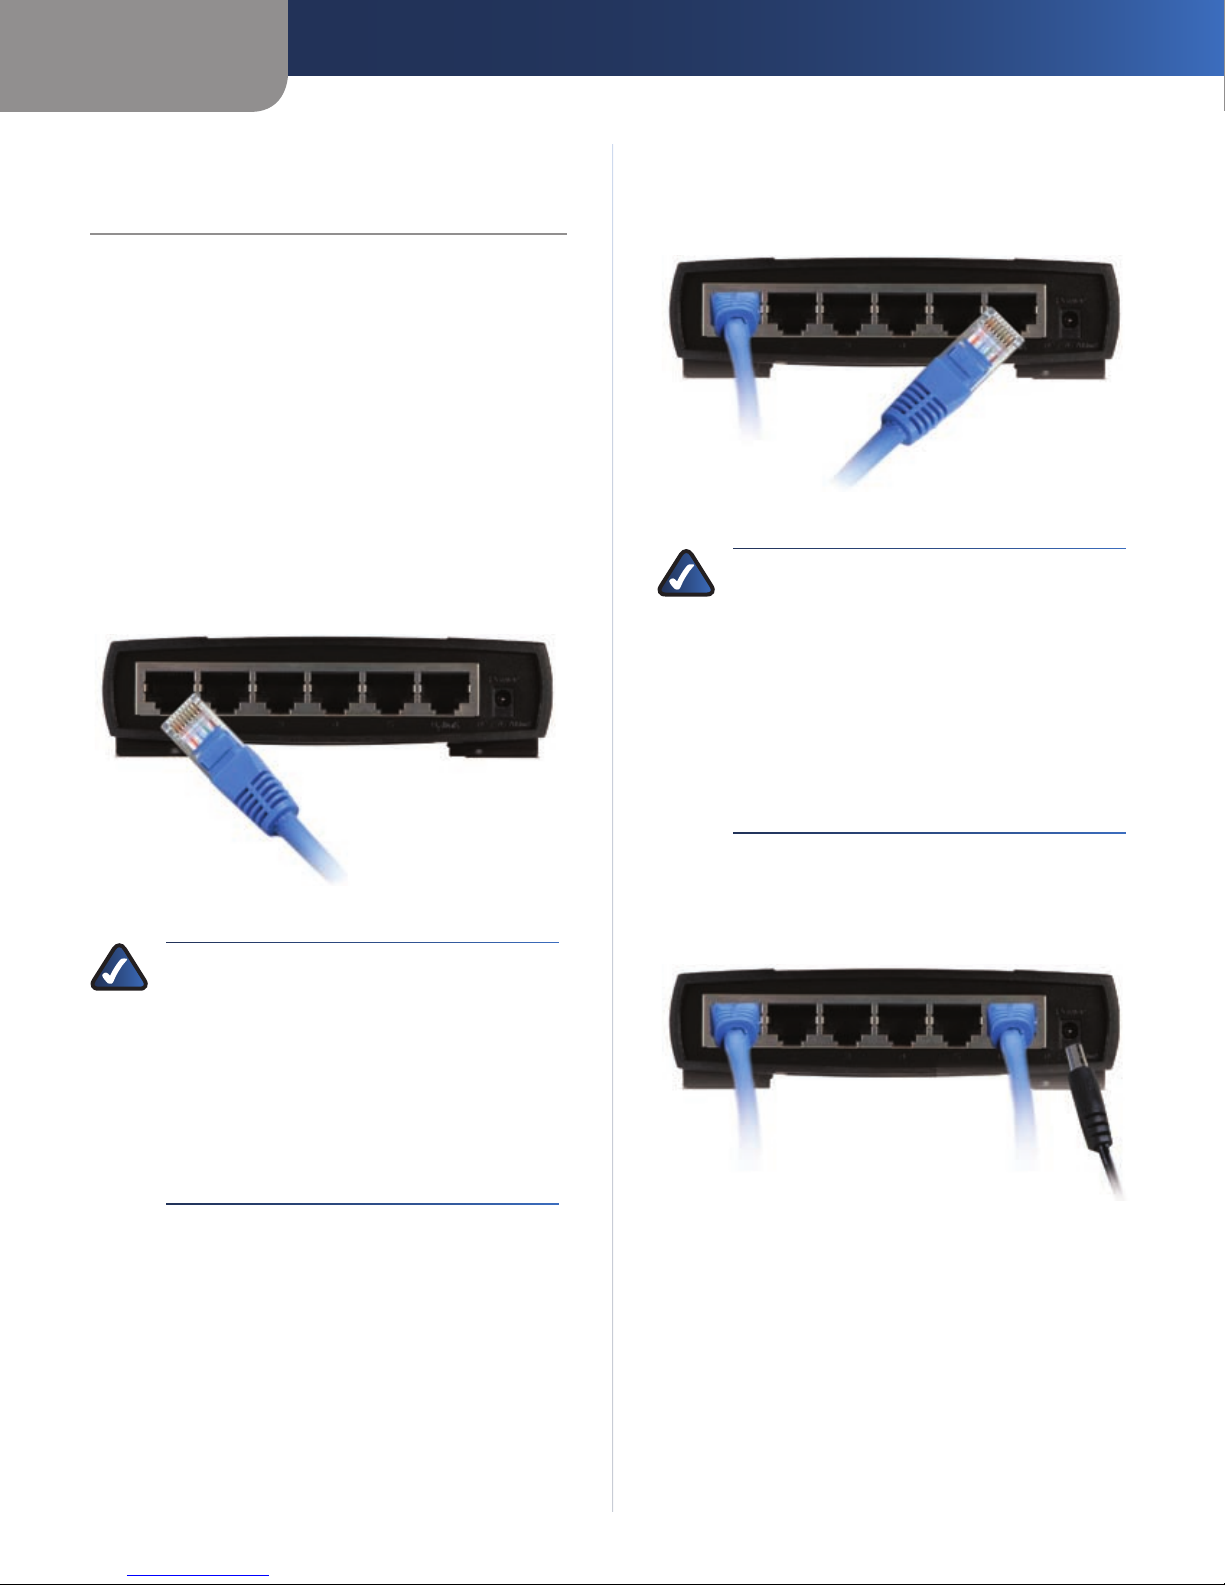
Connect the supplied power adapter to the power 5.
port on the Switch. Then plug the other end into an
electrical outlet.
Connect the Power
Connect to a computer
NOTE TO USERS OF THE 10/100 5- OR 8-PORT
SWITCH: If you connect a router or additional
switch to the Uplink port, then you cannot use
the numbered port next to the Uplink port
(port 5 on the 5-Port Switch or port 8 on the
8-Port Switch will be inactive). The two ports
are wired together, so they cannot be used
simultaneously.
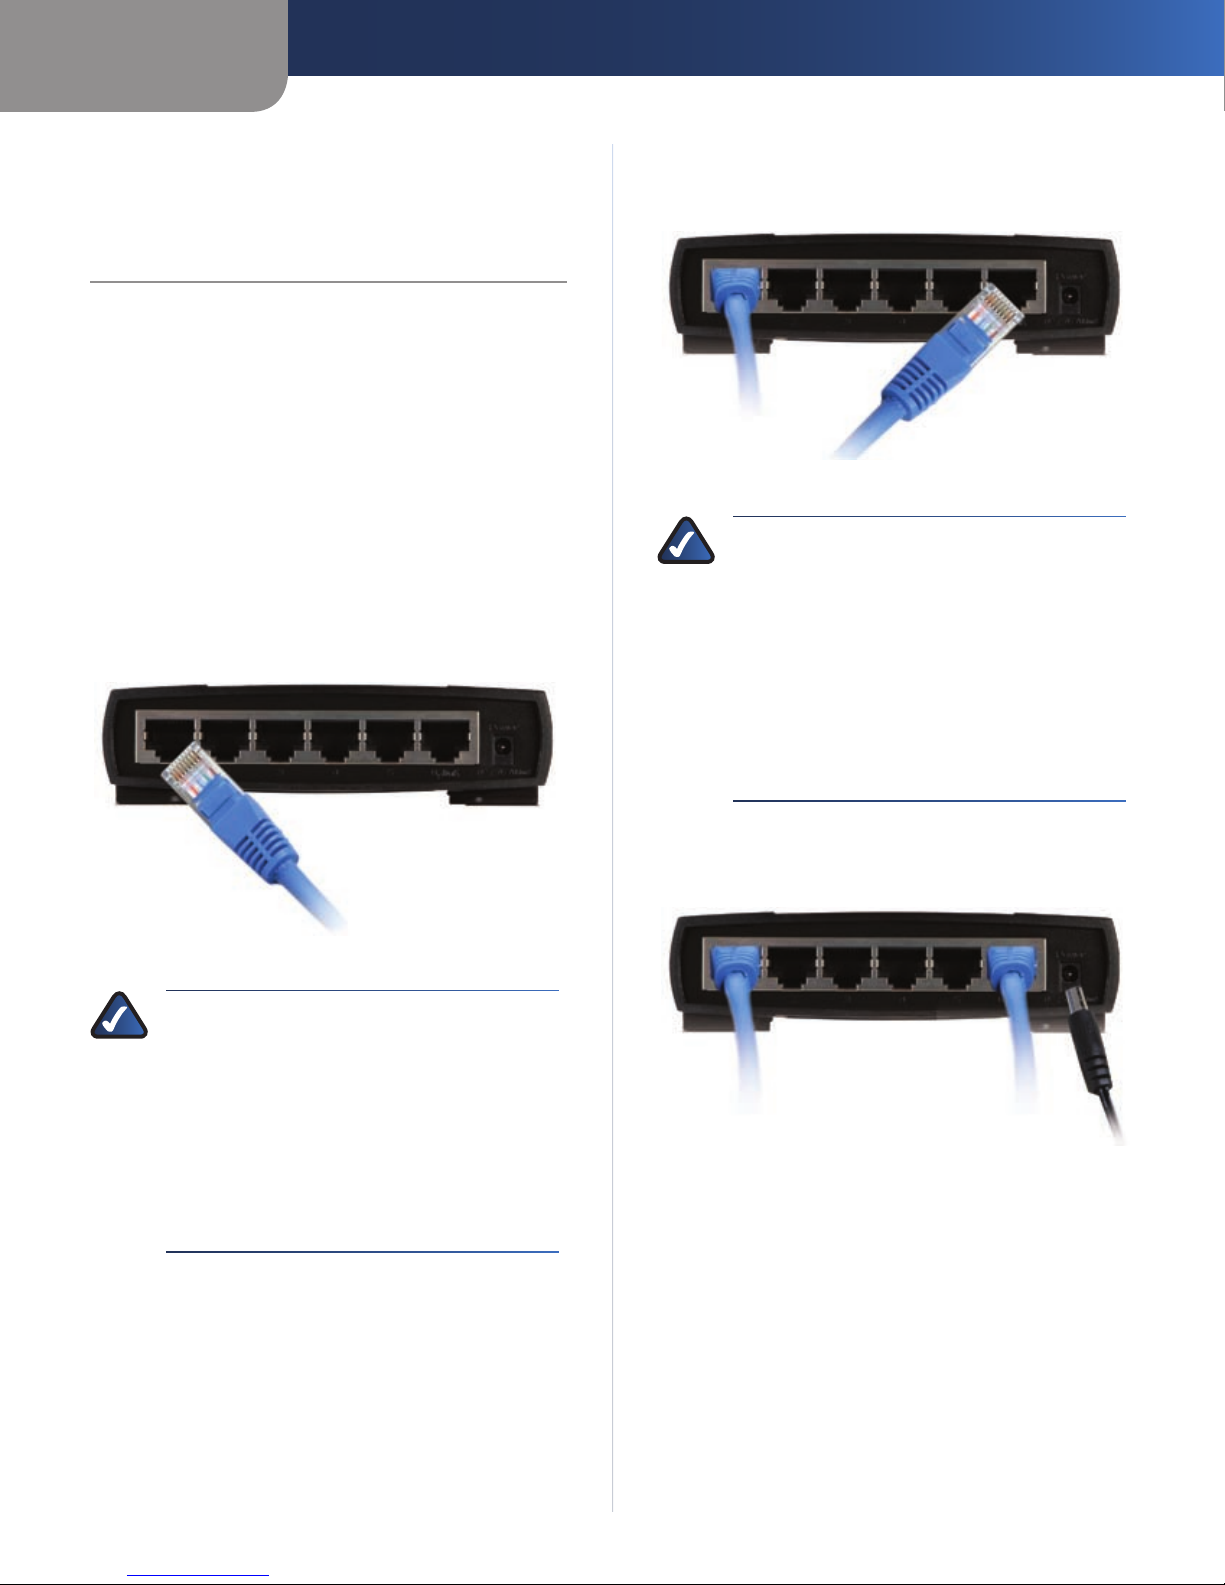
Repeat step 2 to connect additional computers.3.
Connect a Category 5 Ethernet network cable to the 4.
Uplink port. Then connect the other end to a router or
additional switch.
Power on the devices connected to the Switch. Each 6.
active port’s corresponding LED will light up on the
Switch’s front panel.
Congratulations! The installation of the Switch is
complete.
Connect a Router or Switch
EtherFast 10/100 5/8/16-Port Workgroup Switch
3
Глава 1
Свързване на превключвателя
BG — Глава 1:
Свързване на
превключвателя
Тази глава обяснява как се свързват устройства към
превключвателя. Би трябвало да свързвате компютри
към превключвателя преди свързването на рутер
или допълнителен превключвател към порта за
разширяване на мрежата (Uplink). (На илюстрациите за
свързване е показан 5-портов превключвател 10/100.)
Инструкции
Проверете дали са изключени всички устройства, 1.
които ще свържете към превключвателя.
Свържете мрежов Ethernet кабел от категория 5 2.
към един от обозначените с цифра портове на
превключвателя. След това свържете другия край
към компютър.
Свържете мрежов Ethernet кабел от категория 5 4.
към порта “Uplink”. След това свържете другия край
към рутер или допълнителен превключвател.
Свързване на рутер или превключвател
БЕЛЕЖКА ЗА ПОТРЕБИТЕЛИТЕ НА
16-ПОРТОВ ПРЕВКЛЮЧВАТЕЛ 10/100:
16-портовият превключвател 10/100 е
снабден с бутон за кръстосване, обозначен
“MDI/MDIX”. Това дава възможност порт
16 да се използва като порт “Uplink” на
превключвателя. Бутонът “MDI/MDIX” трябва
да е натиснат, ако желаете да използвате
порт 16 като порт “Uplink”. В противен случай
порт 16 ще функционира като нормален порт
10/100.
Свързване на компютър
БЕЛЕЖКА ЗА ПОТРЕБИТЕЛИТЕ НА 5- ИЛИ
8-ПОРТОВ ПРЕВКЛЮЧВАТЕЛ 10/100:
Ако свържете рутер или допълнителен
превключвател към порта “Uplink”, тогава
няма да можете да ползвате обозначения с
цифра порт до него (порт 5 на 5-портовия
превключвател или порт 8 на 8-портовия
превключвател няма да са активни). Двата
порта са свързани заедно и затова не могат
да се използват едновременно..
Повторете стъпка 2, за да свържете още компютри.3.
Свържете приложения захранващ адаптер към 5.
порта за захранване на превключвателя. След това
свържете другия край в електрически контакт.
Свързване на захранването
Включете свързаните към превключвателя 6.
устройства. Ще светнат светодиодите на предния
панел на превключвателя, съответстващи на всеки
от активните портове.
Поздравления! Инсталирането на превключвателя
е завършено.
EtherFast 10/100 5/8/16-Port Workgroup Switch
4
Kapitola 1
Připojení přepínače
CZ — Kapitola 1:
Připojení přepínače
Tato kapitola vysvětluje, jak připojit zařízení k přepínači.
Před připojením směrovače nebo přídavného přepínače k
portu Uplink připojte počítače k přepínači. (Na obrázcích
připojení je zobrazen 5portový přepínač 10/100.)
Pokyny
Ujistěte se, že jsou všechna zařízení, která chcete 1.
připojit k přepínači, odpojena z elektrické sítě.
Kabel sítě Ethernet kategorie 5 připojte k jednomu z 2.
očíslovaných portů na přepínači. Potom připojte druhý
konec k počítači.
POZNÁMKA PRO UŽIVATELE 16PORTOVÉHO
PŘEPÍNAČE 10/100: 16portový přepínač 10/100
je vybaven převodovým tlačítkem označeným
MDI/MDIX. To umožňuje použití portu 16 jako
port Uplink přepínače. Pokud chcete používat
port 16 jako port Uplink, stiskněte tlačítko
MDI/MDIX. V opačném případě bude port 16
fungovat jako běžný port 10/100.
Připojte dodávaný napájecí adaptér k napájecímu 5.
portu na přepínači. Druhý konec pak připojte do
elektrické zásuvky.
Připojení napájení
Připojení k počítači
POZNÁMKA PRO UŽIVATELE 5- NEBO
8PORTOVÉHO PŘEPÍNAČE 10/100: Pokud
připojíte směrovač nebo přídavný přepínač k
portu Uplink, není možné používat očíslovaný
port vedle portu Uplink (port 5 na 5portovém
přepínači nebo port 8 na 8portovém přepínači
bude neaktivní). Tyto dva porty jsou propojeny,
takže je nelze používat souběžně.
Pro připojení dalších počítačů zopakujte krok 2.3.
Připojte kabel sítě Ethernet kategorie 5 k portu Uplink. 4.
Potom připojte druhý konec ke směrovači nebo
přídavnému přepínači.
Zapněte zařízení připojená k přepínači. Na předním 6.
panelu přepínače se rozsvítí diody LED odpovídající
všem aktivním portům.
Blahopřejeme! Instalace přepínače je dokončena.
Připojte směrovač nebo přepínač
EtherFast 10/100 5/8/16-Port Workgroup Switch
5
Kapitel 1
Anschließen des Switch
DE — Kapitel 1:
Anschließen des Switch
In diesem Kapitel wird erklärt, wie Sie Geräte an den Switch
anschließen. Sie schließen Computer an den Switch an,
bevor Sie einen Router oder einen zusätzlichen Switch
an den Uplink-Port anschließen. (In den Abbildungen
zur Verbindung wird der 10/100-Switch mit 5 Ports
dargestellt.)
Anweisungen
Vergewissern Sie sich, dass alle an den Switch 1.
anzuschließenden Geräte ausgeschaltet sind.
Schließen Sie ein Ethernet-Netzwerkkabel der 2.
Kategorie 5 an einen der nummerierten Ports am
Switch an. Schließen Sie anschließend den Stecker am
anderen Ende an einen Computer an.
Schließen Sie ein Ethernet-Netzwerkkabel der 4.
Kategorie 5 an den Uplink-Port an. Schließen Sie
dann das andere Ende an einen Router oder an einen
weiteren Switch an.
Anschließen eines Routers bzw. eines Switch
HINWEIS FÜR BENUTZER DES 10/100-SWITCH
MIT 16 PORTS: Der 10/100-Switch mit 16 Ports
ist mit einer Crossover-Taste ausgerüstet, die mit
MDI/MDIX beschriftet ist. Dadurch kann Port 16
als Uplink-Port des Switch verwendet werden.
Die MDI/MDIX-Taste muss gedrückt sein, wenn
Sie Port 16 als Uplink-Port verwenden möchten.
Andernfalls wird Port 16 als normaler 10/100Port verwendet.
Anschließen eines Computers
HINWEIS FÜR BENUTZER DES 10/100-SWITCH
MIT 5 BZW. 8 PORTS: Wenn Sie einen Router
oder einen zusätzlichen Switch an den UplinkPort anschließen, können Sie den nummerierten
Port neben dem Uplink-Port nicht verwenden
(Port 5 auf dem Switch mit 5 Ports bzw. Port
8 auf dem Switch mit 8 Ports ist inaktiv). Die
beiden Ports sind verdrahtet und können daher
nicht gleichzeitig verwendet werden.
Zum Anschließen von weiteren Computern 3.
wiederholen Sie Schritt 2.
Schließen Sie den im Lieferumfang enthaltenen 5.
Netzstromadapter an den Stromanschluss am Switch
an. Stecken Sie anschließend den Stecker am anderen
Ende in eine Steckdose.
Anschließen des Netzstroms
Schalten Sie die an den Switch angeschlossenen 6.
Geräte ein. Die LEDs der aktiven Ports leuchten an der
Vorderseite des Switch auf.
Herzlichen Glückwunsch! Die Installation des Switch
ist abgeschlossen.
EtherFast 10/100 5/8/16-Port Workgroup Switch
6

Kapitel 1
Tilslutning af switchen
DK — Kapitel 1:
Tilslutning af switchen
I dette kapitel beskrives, hvordan enheder tilsluttes
til switchen. Computere tilsluttes til switchen, før der
tilsluttes en router eller en ekstra switch til Uplink-porten.
(10/100 5-ports switchen vises på tilslutningsbillederne).
Vejledning
Kontroller, at alle de enheder, der skal tilsluttes til 1.
switchen, er slukket.
Tilslut et kategori 5-Ethernet-kabel til en af de 2.
nummererede porte på switchen. Tilslut derefter den
anden ende af kablet til en computer.
BEMÆRKNING TIL BRUGERE AF 10/100
16-PORTS SWITCHEN: 10/100 16-ports
switchen er udstyret med en crossover-knap,
mærket MDI/MDIX. Dette gør det muligt at
bruge port 16 som switchens uplink-port. MDI/
MDIX-knappen skal være nedtrykket, hvis port
16 skal bruges som uplink-port. I modsat fald vil
port 16 fungere som en normal 10/100-port.
Tilslut den medfølgende strømforsyning til strømstikket 5.
på switchen. Tilslut derefter den anden ende til en
stikkontakt.
Tilslutning af strøm
Tilslutning af en computer
BEMÆRKNING TIL BRUGERE AF 10/100 5ELLER 8-PORTS SWITCHEN: Hvis der tilsluttes
en router eller en ekstra switch til Uplinkporten, kan den nummererede port ved siden
af Uplinkporten ikke benyttes (port 5 på 5
ports-switchen eller port 8 på 8-ports switchen
vil være inaktiv). De to porte er forbundet, så de
kan ikke benyttes samtidigt.
Gentag trin 2 for at tilslutte yderligere computere.3.
Tilslut et kategori 5-Ethernet-kabel til Uplink-porten. 4.
Tilslut derefter den anden ende af kablet til en router
eller en ekstra switch.
Tænd de enheder, der er tilsluttet til switchen. 6.
Lysdioderne på de aktive porte lyser på switchens
frontpanel.
Tillykke! Installationen af switchen er færdig.
Tilslutning af en router eller switch
EtherFast 10/100 5/8/16-Port Workgroup Switch
7
Capítulo 1
Conexión del conmutador
ES — Capítulo 1:
Conexión del conmutador
En este capítulo se explica cómo conectar dispositivos
al conmutador. Debe conectar los ordenadores al
conmutador antes de conectar un ruteador o un
conmutador adicional al puerto de enlace ascendente.
(En las imágenes de conexión se muestra el conmutador
10/100 de 5 puertos.)
Instrucciones
Asegúrese de que todos los dispositivos que vaya a 1.
conectar al conmutador estén apagados.
Conecte un cable de red Ethernet de categoría 5 2.
a uno de los puertos numerados del conmutador.
A continuación, conecte el otro extremo a un
ordenador.
Conecte un cable de red Ethernet de categoría 5 al 4.
puerto de enlace ascendente. A continuación, conecte
el otro extremo a un ruteador o un conmutador
adicional.
Conexión de un ruteador o un conmutador
NOTA PARA USUARIOS DEL CONMUTADOR
10/100 DE 16 PUERTOS: El conmutador 10/100
de 16 puertos está equipado con un botón de
conexión cruzada marcado con las palabras
MDI/MDIX. Ello permite que el puerto 16 se
utilice como el puerto de enlace ascendente
del conmutador. El botón MDI/MDIX debe estar
pulsado si desea utilizar el puerto 16 como
puerto de enlace ascendente. De lo contrario,
el puerto 16 funcionará como un puerto 10/100
normal.
Conexión de un ordenador
NOTA PARA USUARIOS DEL CONMUTADOR
10/100 DE 5 U 8 PUERTOS: Si conecta un
ruteador o un conmutador adicional al puerto
de enlace ascendente, no podrá utilizar el
puerto numerado situado junto al puerto de
enlace ascendente (estará inactivo el puerto
5 en el conmutador de 5 puertos o el 8 en el
conmutador de 8 puertos). Los dos puertos
están cableados entre sí, por lo que no se
pueden utilizar simultáneamente.
Repita el paso 2 para conectar ordenadores 3.
adicionales.
Conecte el adaptador de corriente suministrado 5.
al puerto de alimentación del conmutador. A
continuación, enchufe el otro extremo en una toma de
corriente.
Conexión de la alimentación
Encienda los dispositivos conectados al conmutador. 6.
La luz correspondiente de cada puerto activo se
iluminará en el panel frontal del conmutador.
Enhorabuena. La instalación del conmutador ha
finalizado.
EtherFast 10/100 5/8/16-Port Workgroup Switch
8
 Loading...