

Linkskey LKV-S02SK User Manual
Quick Installation Guide
Å
P
C
Æ
Applicable models: LKV-S02SK/LKV-S04SK
LKV-S02SK/LKV-S04SK
2/4-port Super Slim Desktop KVM Switch
QUICK INSTALLATION GUIDE
Thank you for purchasing the LKV-S02SK/LKV-S04SK Super
Slim Desktop KVM Switch ! With our highly reliable and
quality product, user can enjoy countless benefits from using it.
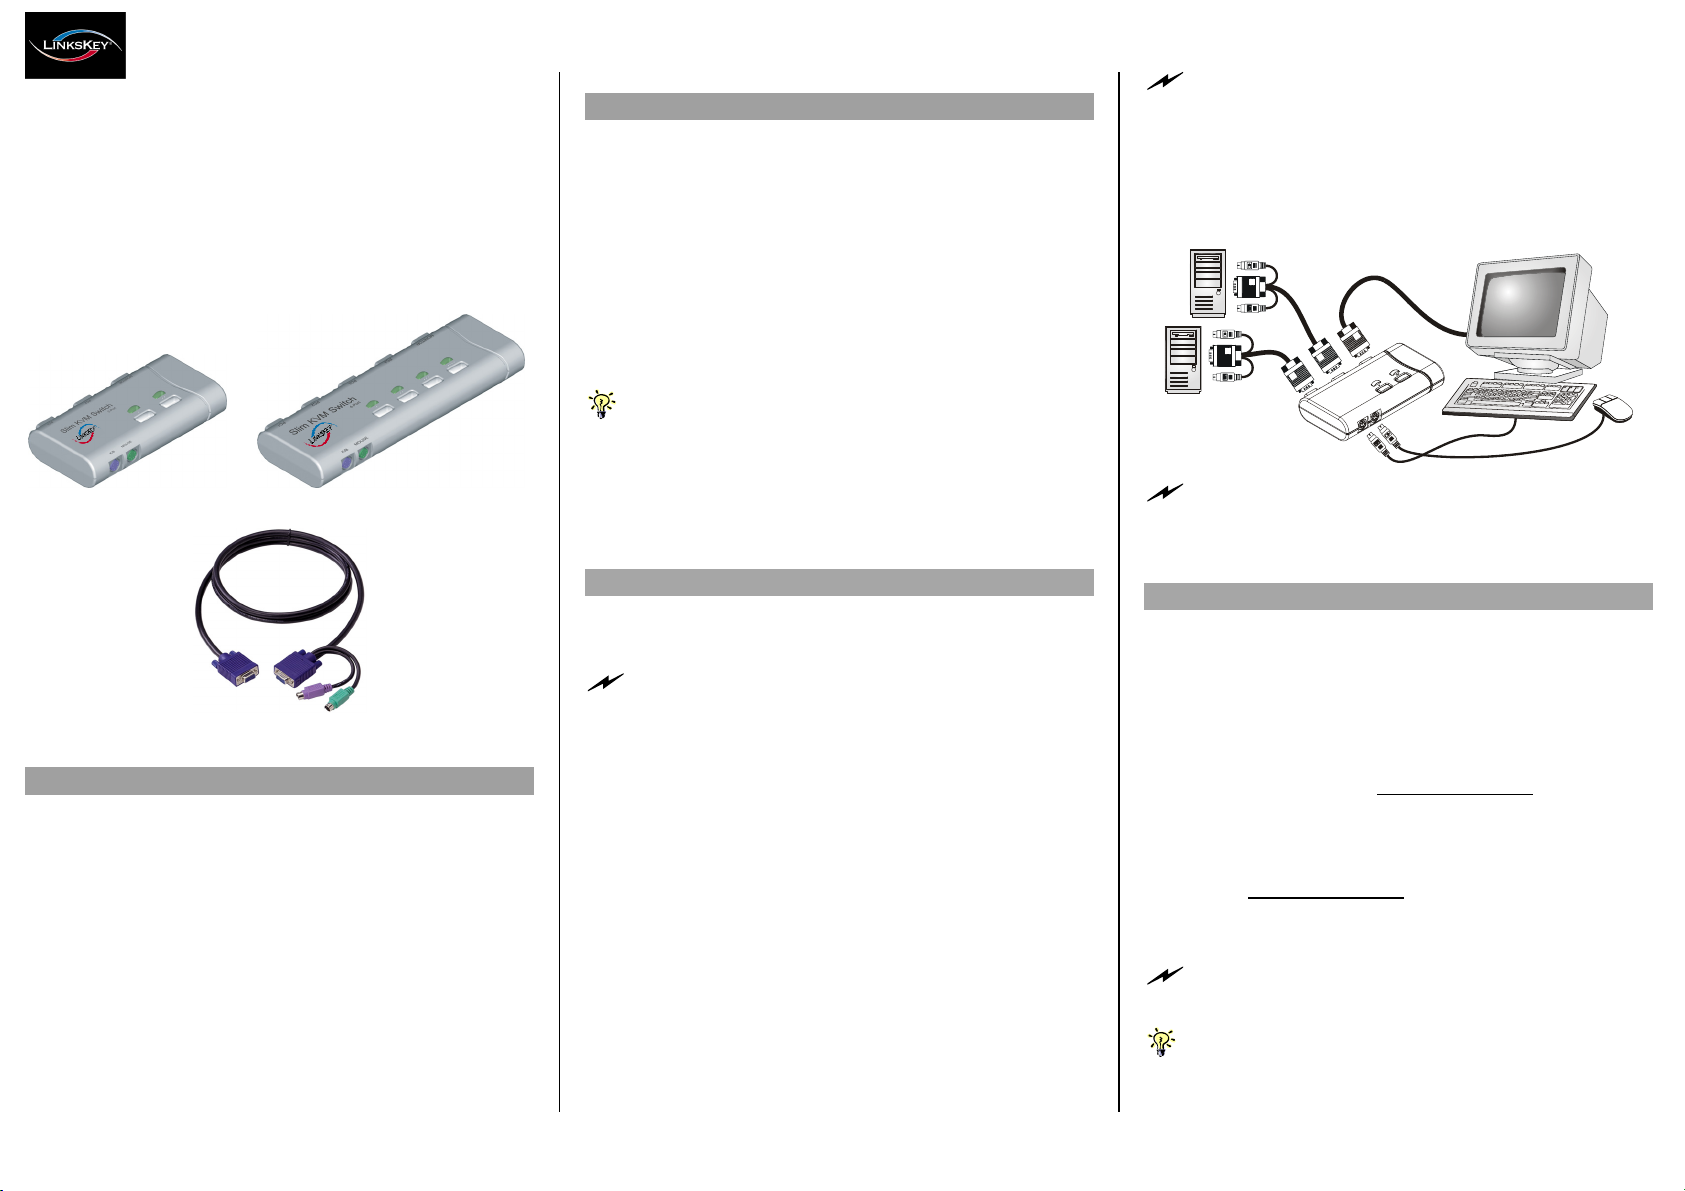
LKV-S02SK LKV-S04SK
Switch side
(with integrated all-in-one connector on Switch side)
The Slim 3-in-1 KVM Combo Cable *
Introduction
The
LKV-S02SK/LKV-S04SK SuperSlimDesktopKVMSwitch is
a 2-/4-port PS/2 type KVM Switch that provides compact and
integrated all-in-one KVM connectors on the Switch side. It
enables user to access, control, boot and reboot multiple
computers using only one keyboard, video and mouse. LKV-
S02SK/LKV-S04SK is of a slim form factor to save your
space from over-cluttering with all sorts of cable connectors.
The slim 3-in-1 combo KVM cable is tailored-made to integrate
keyboard, video and mouse interfaces all into one connector,
thus saving a lot of clumsy movements to make all connectors
within good order. It can be your best companion for the
management of 2 ~ 4 computers on either SOHO or corporate
desktop.
side
Before you install
The default setting of the
Slim Desktop KVM Switch
LKV-S02SK/LKV-S04SK Super
is appropriate for most systems.
you do not need to configure the KVM Switch before
installation. It’s a Plug-and-Play device: First, connect the
shared keyboard, video and mouse to your KVM Switch and
then connect PCs to your KVM Switch using the slim 3-in-1
combo KVM cables. Then boot up your PCs one by one, and
you can start to operate the KVM Switch immediately!
For a quick start on installation and operation, please follow
the instructions below.
The
correct setup sequence is ……
(1) Connect the shared keyboard, mouse and monitor to the
KVM Switch and then connect the KVM Switch to the
computers using the slim 3-in-1 combo KVM cable (with
integrated all-in-one connector on Switch side).
(2)
Power up your connected computers one by one …
Since the KVM Switch receives power from the computer’s PS/2
interface, it is powered up when you connect the KVM cables to a PC.
Out-of-the-box Installation
Take the Super Slim Desktop KVM Switch out of the box and
begin installation….
sure all of your computers and their peripherals have been powered off.
Otherwise, the Switch system might not be set up properly.
Step 1. Make sure all the computers that are to be connected
Step 2. Connect the shared keyboard, monitor and mouse to
Step 3. Connect each of your computers to the KVM Switch
Before connecting any cable to your KVM Switch, please make
to the KVM Switch and their peripherals are in
powered-off state. If not, power them off before you
proceed with the following steps.
the corresponding connectors on the rear of your
KVM switch.
using the slim 3-in-1 combo KVM cable. You can use
individual standard keyboard, mouse and video
cables for extension. Depending on the cable you use,
the maximum cable distance is limited to 5 ~ 7 meters
(15.5 ~23 feet).
Since the KVM Switch is powered th
powered on immediately when connected to the PS/2 keyboard/mouse
port of your PC (nonetheless when the PC being in powered off state).
Step 4
. (
Now your KVM Switch should have been powered-
) Power up the connected computers, and the
up….
rough the PS/2 in
terface, it is
keyboard and mouse should be recognized. Now you
can begin operating the KVM switch.
DO NOT TRY
while the computers are still in powered-on states. Otherwise, the
computer will have difficulty recognizing your shared keyboard and
mouse.
to connect the KVM Switch to the computers
Easy Operation
There are two methods to select
push buttons or
a keyboard
Push buttons
The push buttons let you have di
operation and channel switching. Simply press the button to
switch to a specific channel.
Keyboard hotkeys
A keyboard hotkey sequence consists of three specific
Quick Reference Sheet
See
keystrokes:
Hotkey sequence = ScrLk + ScrLk + Command key
Keystrokes of a hotkey sequence should follow one another
within 2 seconds. Otherwise, the hotkey sequence will not be validated.
For detailed Hotkey sequences and their corresponding functional
commands, please refer to the Quick reference sheet.
a specific computer: using the
hotkey sequence.
rect control over KVM switch
See Quick Reference Sheet
* Note that the length of the Slim 3-in-1 KVM combo cable could vary according to your package.
Rev. 1.4 Copyright© All rights reserved. Oct 8, 2003
Quick Reference Sheet
Applicable Models: LKV-S02SK/LKV-S04SK
Quick Reference Sheet
QUICK REFERNCE SHEET
LKV-S02SK/LKV-S04SK Super Slim Desktop KVM Switch
Keyboard Hotkeys/ Push Buttons Operation Command Set
Command Hotkeys Front-panel Button Description
1
Select PC
ScrLk + ScrLk + (x)
(x is a top-row number key)
x = 1 ~ 2 or 1~ 4 for PC channel number
Press button x for channel x.
Select the active channel, e.g. ScrLk + ScrLk +
1 => select port 1 as active channel
Next lower channel
Next higher channel
Autoscan Beep Sound
On/Off
Reset Console Mouse
Autoscan
Stop Autoscan
Notes:
1 Note that (x) denotes a number key for the selected port number (x = 1 ~ 2 or X = 1 ~ 4). Use only the number keys on the upper row of the keyboard.
Hotkey convention: The hotkey notation ScrLk + ScrLk + (key) , denotes that you should hit the individual key consecutively one at a time, not simultaneously.
ScrLk + ScrLk +
ScrLk + ScrLk + ↓
ScrLk + ScrLk + B
ScrLk + ScrLk + End
ScrLk + ScrLk + S
Any key on keyboard -- Terminate Autoscan activity
↑
(arrow up)
(arrow down)
-- Select the next lower connected channel
-- Select the next higher connected channel
--
-- Reset mouse on the console side
--
Toggle on/off the beep sound for switching
confirmation while autoscanning
Autoscan through every connected channel for
quick screen browsing of each channel
Technical Support
E-mail : btitech@linkskey.com
Website : www.linkskey.com
Rev. 1.4 Copyright© All rights reserved. Oct 8, 2003
 Loading...