

Page 1
Quick Installation Guide Applicable model: LKV-M02
do not have to make any configuration before installation.
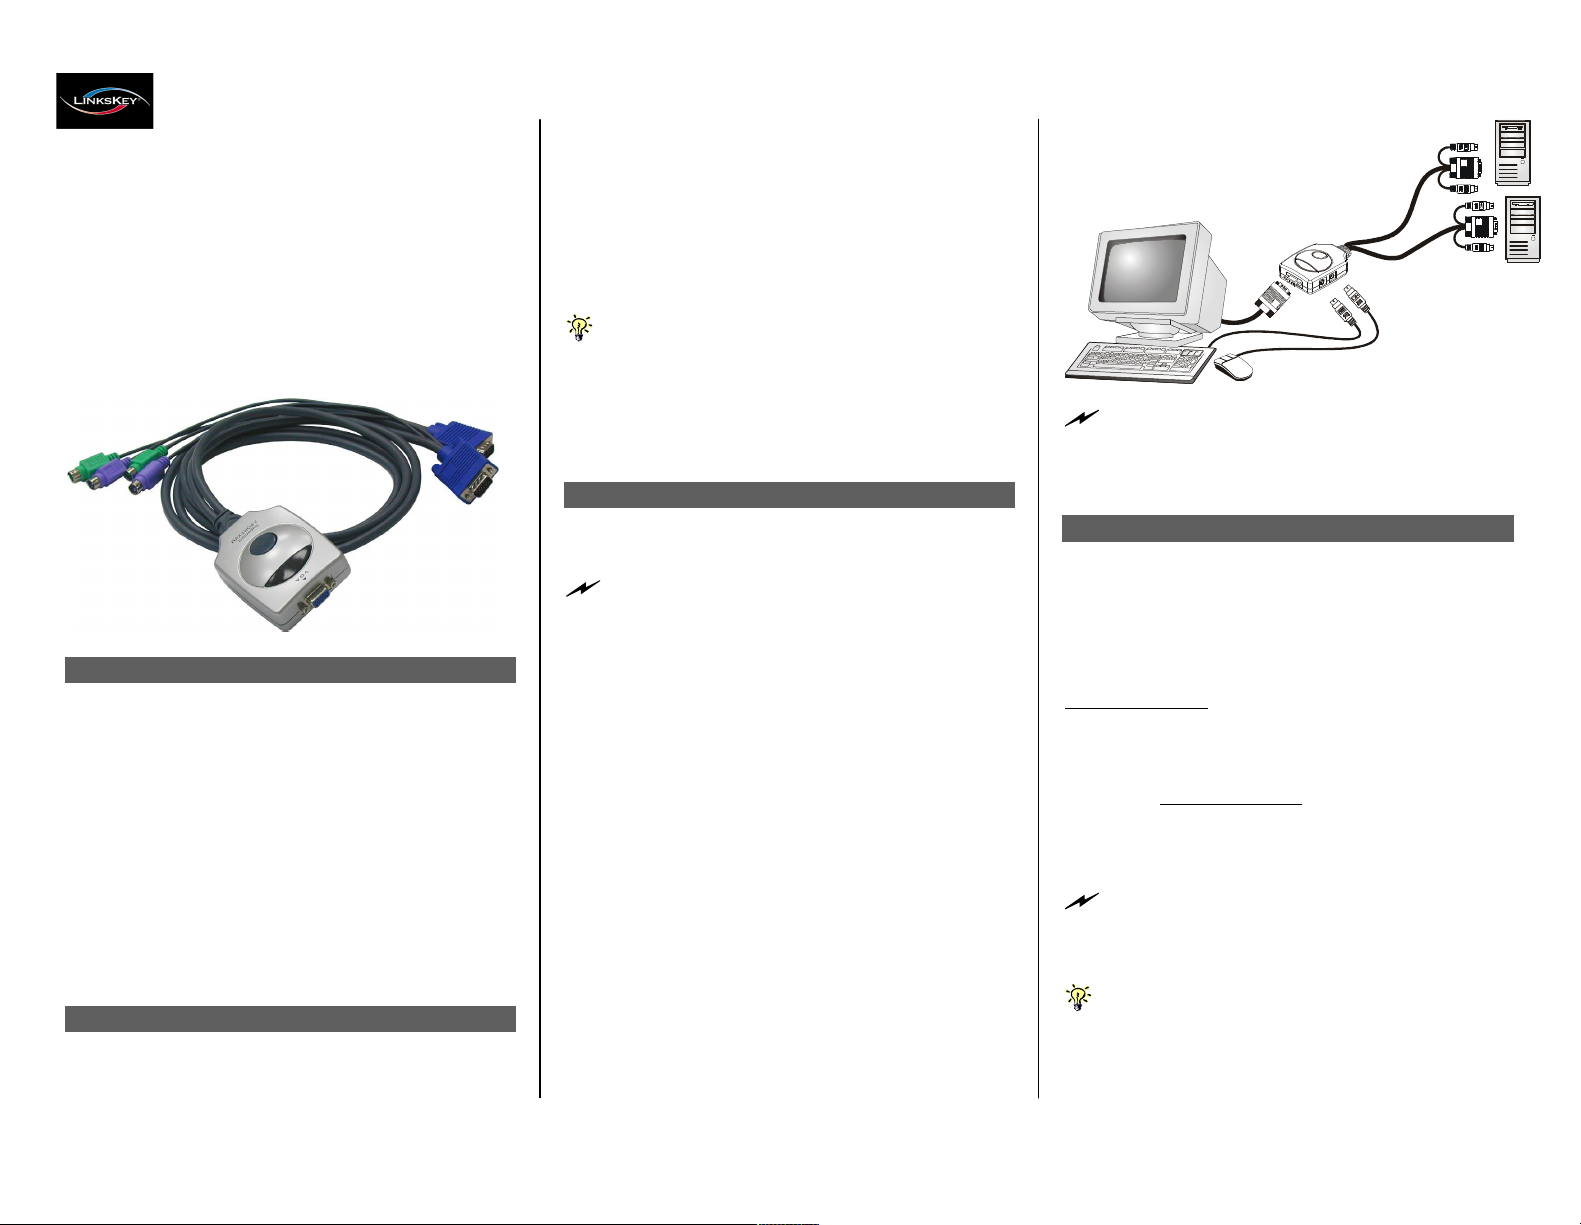
LKV-M02
2-port Super Mini Desktop KVM
Switch
w/ built-in 1.5M Cables
Quick Installation Guide
It’s a Plug-and-Play device: Just connect keyboard, monitor
and mouse to the KVM Switch, and then connect the KVM
cables to connectors on your computers, and then boot up
the computer one at a time, and you can start to switch
between the two computers.
For a quick start on installation and operation, please follow
the instructions below.
Thank you for purchasing the LKV-M02 Super Mini
Desktop KVM Switch! With our highly reliable and quality
product, user can enjoy countless benefits from using it.
Introduction
The LKV-M02 Super Mini Desktop KVM Switch is a 2port PS/2 type KVM Switch that comes with two sets of
built-in 1.5M cables to save you cabling troubles. It enables
the users to access, control, boot and reboot two
computers using only one keyboard, video and mouse.
Its one-piece design of KVM Switch and cabling
accessories offers more portability and convenience to
KVM Switch users who want to save cabling troubles.
Though compact and integrated in one-piece design, you
can nevertheless expect every function of a decent KVM
Switch from LKV-M02. It is your best desktop partner for
KVM switching in the office or at home.
Before you install
The default setting of the LKV-M02 Super Mini Desktop
KVM Switch is appropriate for most systems. In fact, you
T h e
corr e ct se t up seq u e n ce
is … …
(1 ) Con n e ct th e sh a r e d k ey b oa rd , m on ito r a nd m ou se to
th e KV M Sw it c h fi r st, a nd t h e n co nn ect o ne se t of
bu il t - in cable t o t h e c om pu t e rs .
( 2 ) P ow er up your con n e c te d com p uter
…
Si n c e t h e KV M S w it c h r e c ei v e s p o w er f r om t he c o m p u te r ’s PS / 2
in ter f a ce , it is p o w e r ed u p w h en y ou co nn e c t t h e K V M c a b les to a
PC.
Out-of-the-box Installation
Ta ke t h e Su p e r M in i D es k t o p KV M S wi t ch o ut o f t h e b o x
an d b e gin in sta lla tio n … .
Befo re c o nn ecti n g a ny c a b l e t o y o u r K V M S wi tc h, ple a se m a k e
s u re al l o f y o u r c om p u t e r s a n d t h eir pe r ip h e r als h a ve b e e n
pow e r e d off . O therw is e , th e K V M Sw itc h m i g h t n ot be s e t u p
prop e r l y .
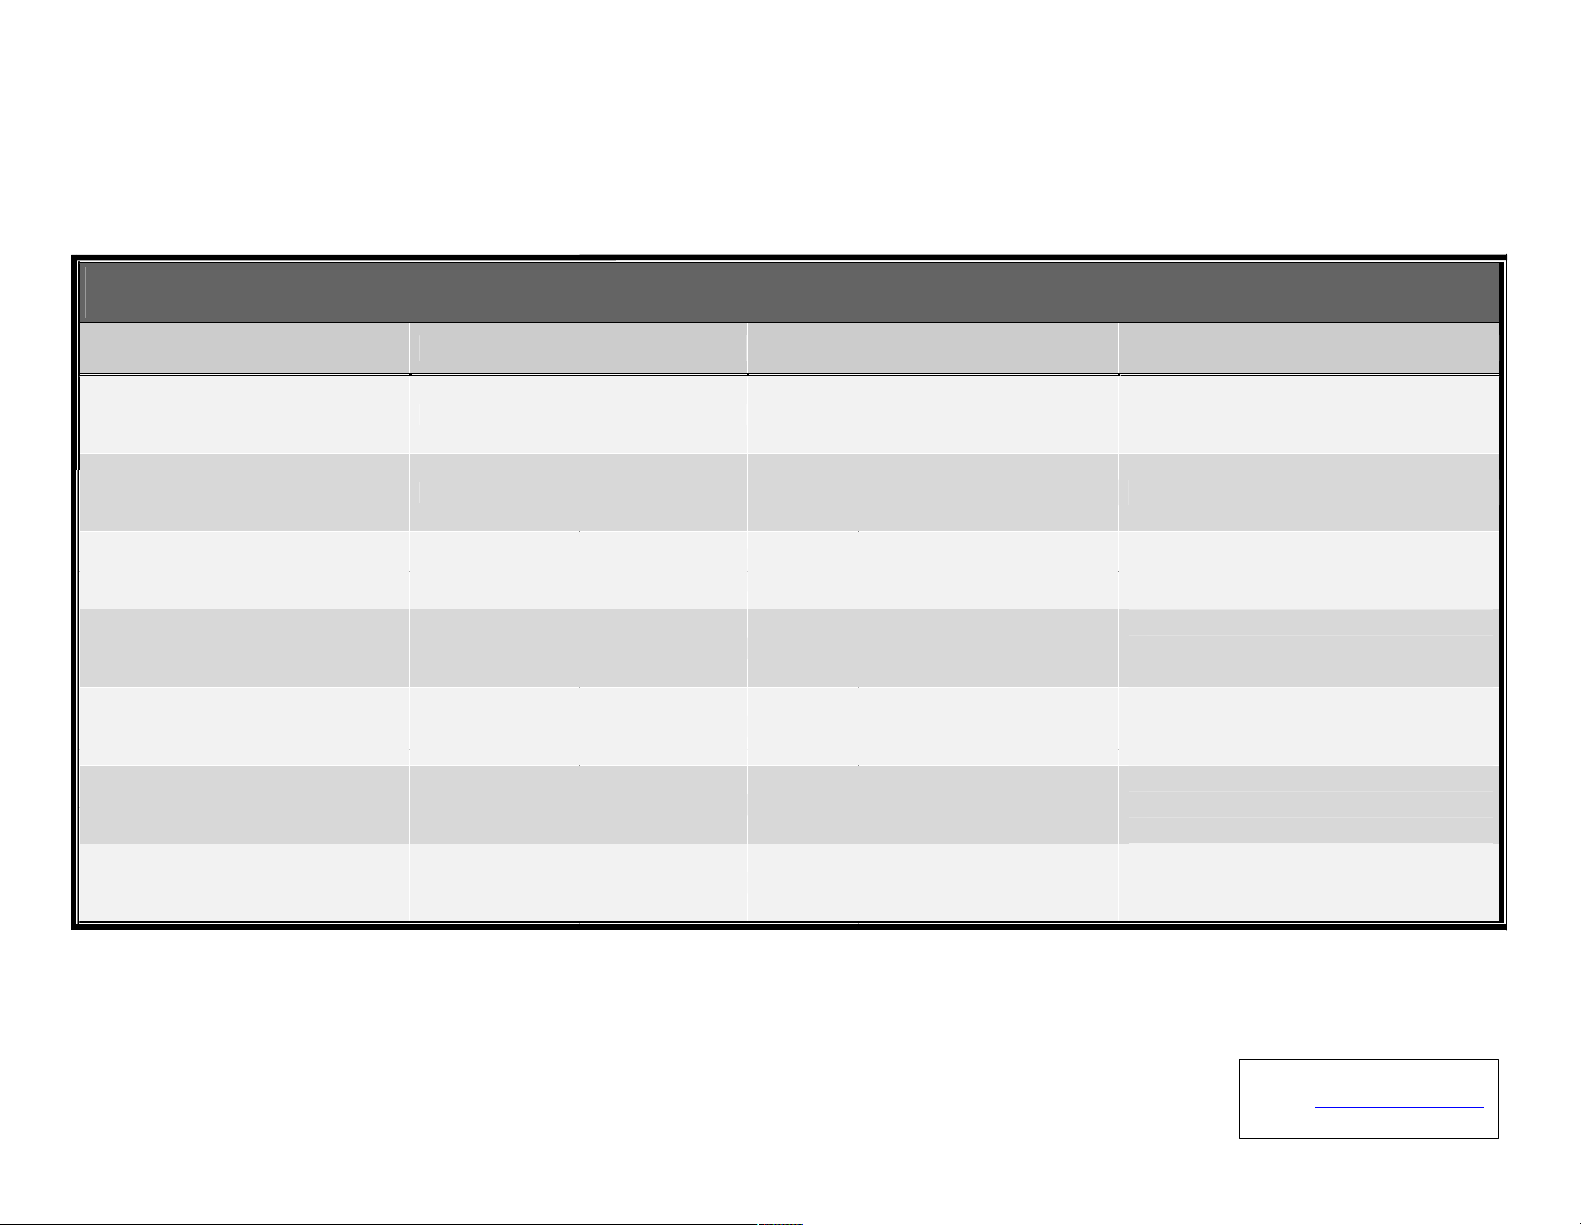
Step 1. Make sure all the computers that are to be
connected to the KVM Switch and their
peripherals are in powered-off state. If not, power
them off before you proceed with the following
steps.
Step 2. Connect the shared keyboard, monitor and mouse
each to its ports on your KVM switch.
Step 3. Connect each set of the built-in KVM cable to a
computer’s keyboard, video and mouse ports.
You can use individual standard keyboard, mouse
and video cables to extend the cable distance, but
depends on the type of the cables you use, the
maximum cable distance is limited to 5 ~ 7 meters
(15.5 ~ 23 feet).
Step 4. Power up the connected computers one by one.
After your computer is powered up the keyboard
and mouse will be recognized and now you can
begin operating the KVM switch.
D O NO T T R Y
t o co n n e ct t he b u i lt - in K V M c a b l e s t o t h e
co mp u t e r s w h i le t h e co m p u t er s ar e s ti l l i n p o w e r e d - on st at e s .
O th e rw i s e , th e c o m p u te r w ill h a v e di ff i c u lty r ecog ni z i n g y o u r
sh a r e d k e y b o a r d a n d m o u s e .
Easy Operation
There are two methods to select a specific computer: using
the push button or a hotkey sequence.
Push Button
The push button lets you have direct control over channel
switching. Simply press the button to select the computer.
See Quick Reference Sheet
Keyboard Hotkeys
A keyboard hotkey sequence consists of three specific
keystrokes: See Quick Reference Sheet
Hotkey sequence = ScrLk + ScrLk +
Command
key
T h e t wo c o n s e c u ti ve Sc r L k k ey s t r o k e s s h o u l d b e p r e s s ed
w ith in 2 se con d s an d t h e foll o w i n g co m m a n d k e y ( s ) s h o u ld al s o b e
p r e s s e d w ith in 2 s e co nd s in l i ke w i s e m a n ne r . O th e rw ise, the
hotk ey s eq u e n c e w ill n o t be v a l id a te d.
For d e ta i l e d H o tkey s e q u e n c e s a n d t h e ir c o r r e s po n d i n g
f un c ti o n s , p l ea s e r e f er t o th e Q ui c k r ef e r e n c e s h e e t.
Rev..1.4 Copyright© All rights reserved. Oct 1, 2003
Page 2
Quick Reference Sheet Applicable Model: LKV-M02
Quick Reference Sheet
QUICK REFERNCE SHEET for Super Mini Desktop KVM Switch Operation Commands
Hotkeys/ Front-Panel Button
Command Hotkeys Front-panel Button Description
Select PC
ScrLk + ScrLk + (x)1(channel no.)
Press the push button to toggle the PC
channel
Select the active PC channel
Next lo w er channel
ScrLk + ScrLk + ↑ (arrow up)
Press the push button to toggle the PC
channel
Next higher channel
ScrLk + ScrLk + ↓ (arrow down)
Press the push button to toggle the PC
channel
Beep Sound On/Off
ScrLk + ScrLk + B --
Select the next lower connected channel
Select the next higher connected
channel
Toggle on/off the beep sound for hotkey
and for switching confirmation while
autoscanning
Reset Con s ole Mouse
ScrLk + ScrLk + End --
Reset mouse on the console side
Autoscan
ScrLk + ScrLk + S --
Autoscan through every connected
channel for quick screen browsing of
each channel.
Stop Auto s can
Any key on keyboard --
Terminate Autoscan activity
Notes:
1. Note that (x) denotes a number key for the selected port number (x = 1 ~ 2). Currently only the top row number keys are available for hotkeys. Do not use the number pad for hotkey
commands.
LED information: the port status LED indicator on the face panel shows the connection status of your KVM Switch and PC. When you switch to a port, its status LED will be lit as
solid green to indicate a normal connection. A flashing LED indicates either the PC is powered off or not connected.
Rev..1.4 Copyright© All rights reserved. Oct 1, 2003
Technical Support
E-mail: btitech@linkskey.com
Website: www.linkskey.com
 Loading...