

Page 1
U
s
e
r
s
c
a
n
e
a
s
i
l
y
o
p
t
i
m
i
z
e
t
h
e
v
i
d
e
o
Hotkeys for full and view-only access control on the
c
te
o
em
r
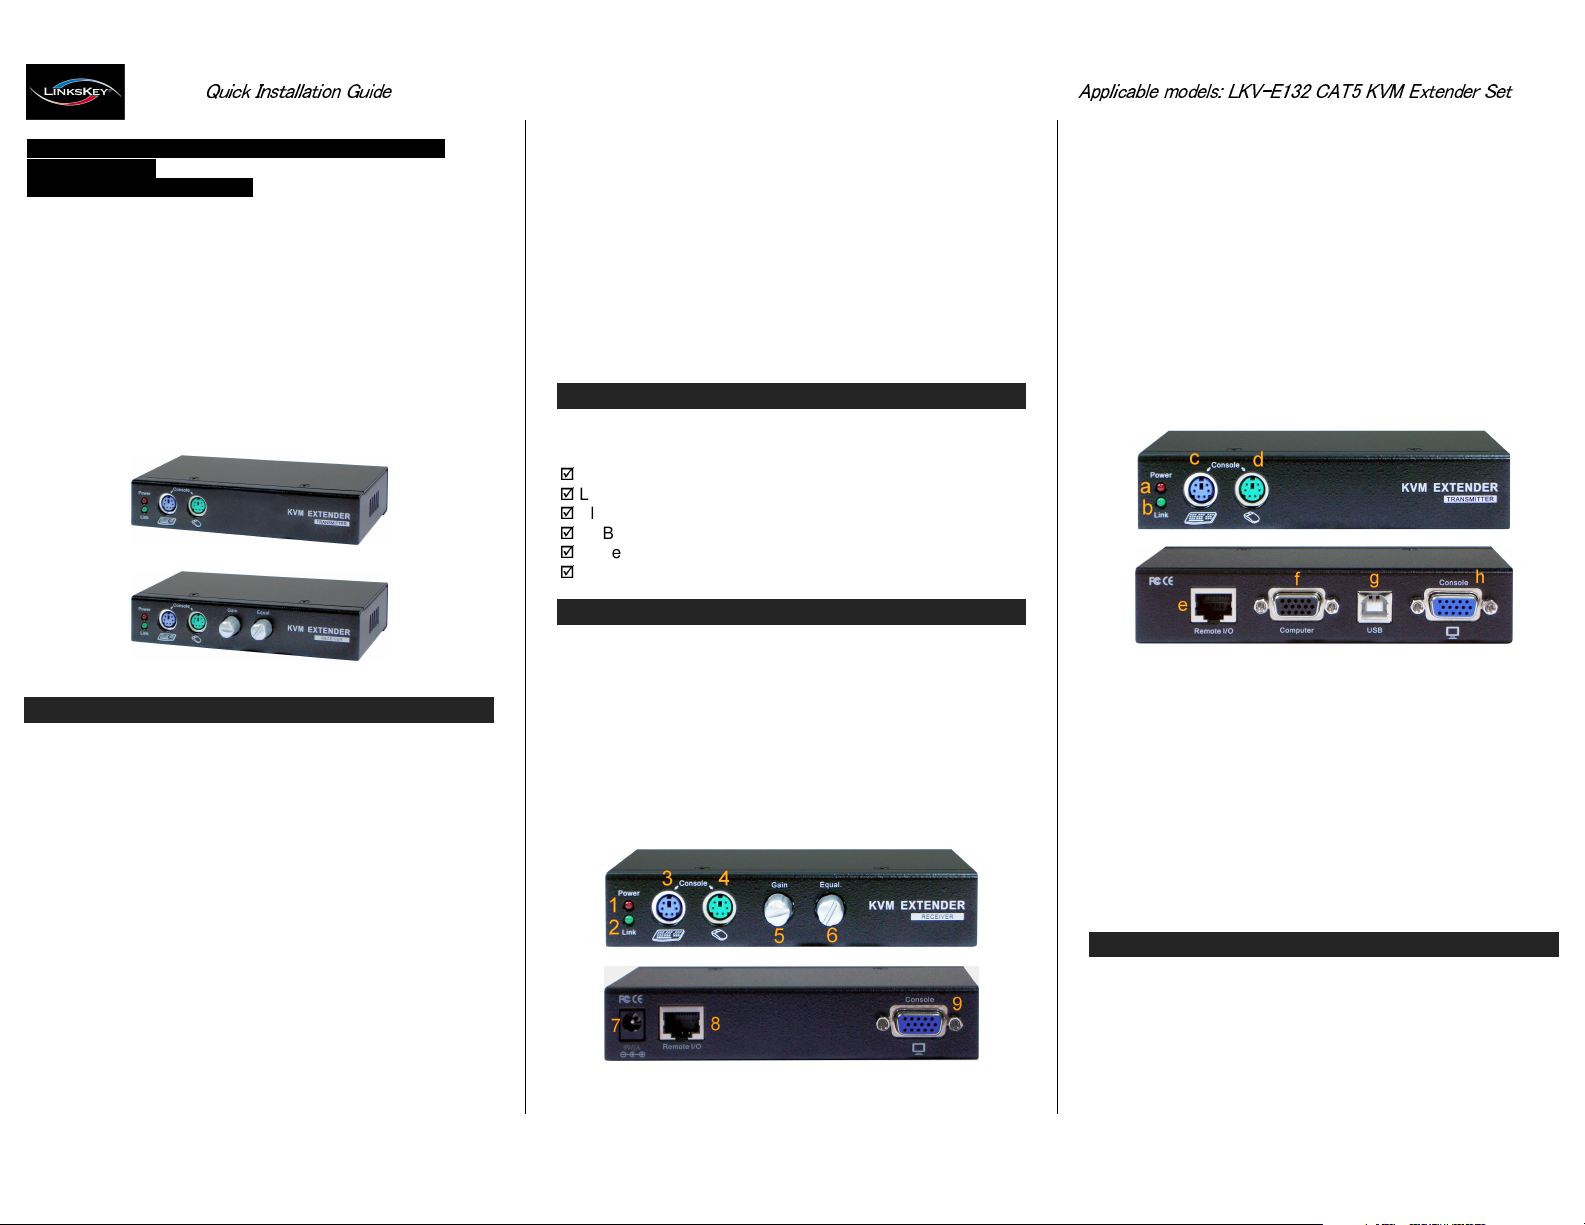
Cabling distance 100M/330ft
LKV-E132
P
&
B
S
U
Q
T
h
a
n
k
E
user can enjoy countless benefits from using this CAT5 KVM
Extender Set.
In
y
xt
e
nd
er
E
-
V
K
L
du
ro
t
e.
ol
ns
o
CAT5 KVM Extender Set
f
t
r
o
p
p
u
S
e
s
u
o
M
/
d
r
a
o
b
y
e
K
2
/
S
P
S
/
2
c
o
n
s
o
l
e
S
u
p
p
o
r
t
f
o
r
C
o
n
s
1
0
0
M
/
3
3
0
f
t
C
a
b
l
i
n
g
D
i
s
t
a
n
c
u
G
n
o
i
t
a
l
l
a
t
s
n
I
k
c
i
u
o
u
f
o
r
p
u
r
c
h
a
s
i
n
g
t
h
e
L
K
V
-
E
1
3
S
1
e
t!
W
i
th
o
u
r
hi
gh
l
y
re
l
ia
bl
e
l
u
d
o
M
r
e
t
u
p
m
o
C
X
T
-
2
3
Remote
-RX
-E132
c
LKV
o
ti
n
e
a
nd
h
t
i
w
Conso
2
q
o
L
o
e
c
le
r
e
t
u
p
m
o
C
r
o
l
e
e
d
i
C
A
T
5
K
V
M
u
al
it
y
p
n
o
C
l
a
ro
d
uc
t,
e
l
o
s
M
V
K
w
e
n
a
s
i
t
e
S
r
e
d
n
e
t
x
E
M
KV
5
T
A
C
2
3
1
E
-
V
K
L
e
h
T
e
x
t
e
n
d
e
r
t
e
c
h
n
o
l
o
g
y
t
h
a
t
u
t
i
l
i
z
e
s
C
A
T
5
m
e
d
i
a
t
e
c
h
n
o
l
o
g
y
t
o
extend your console up to 100M/330ft away. This KVM
x
E
from your computer up to 100M (330ft) away on a single
A
C
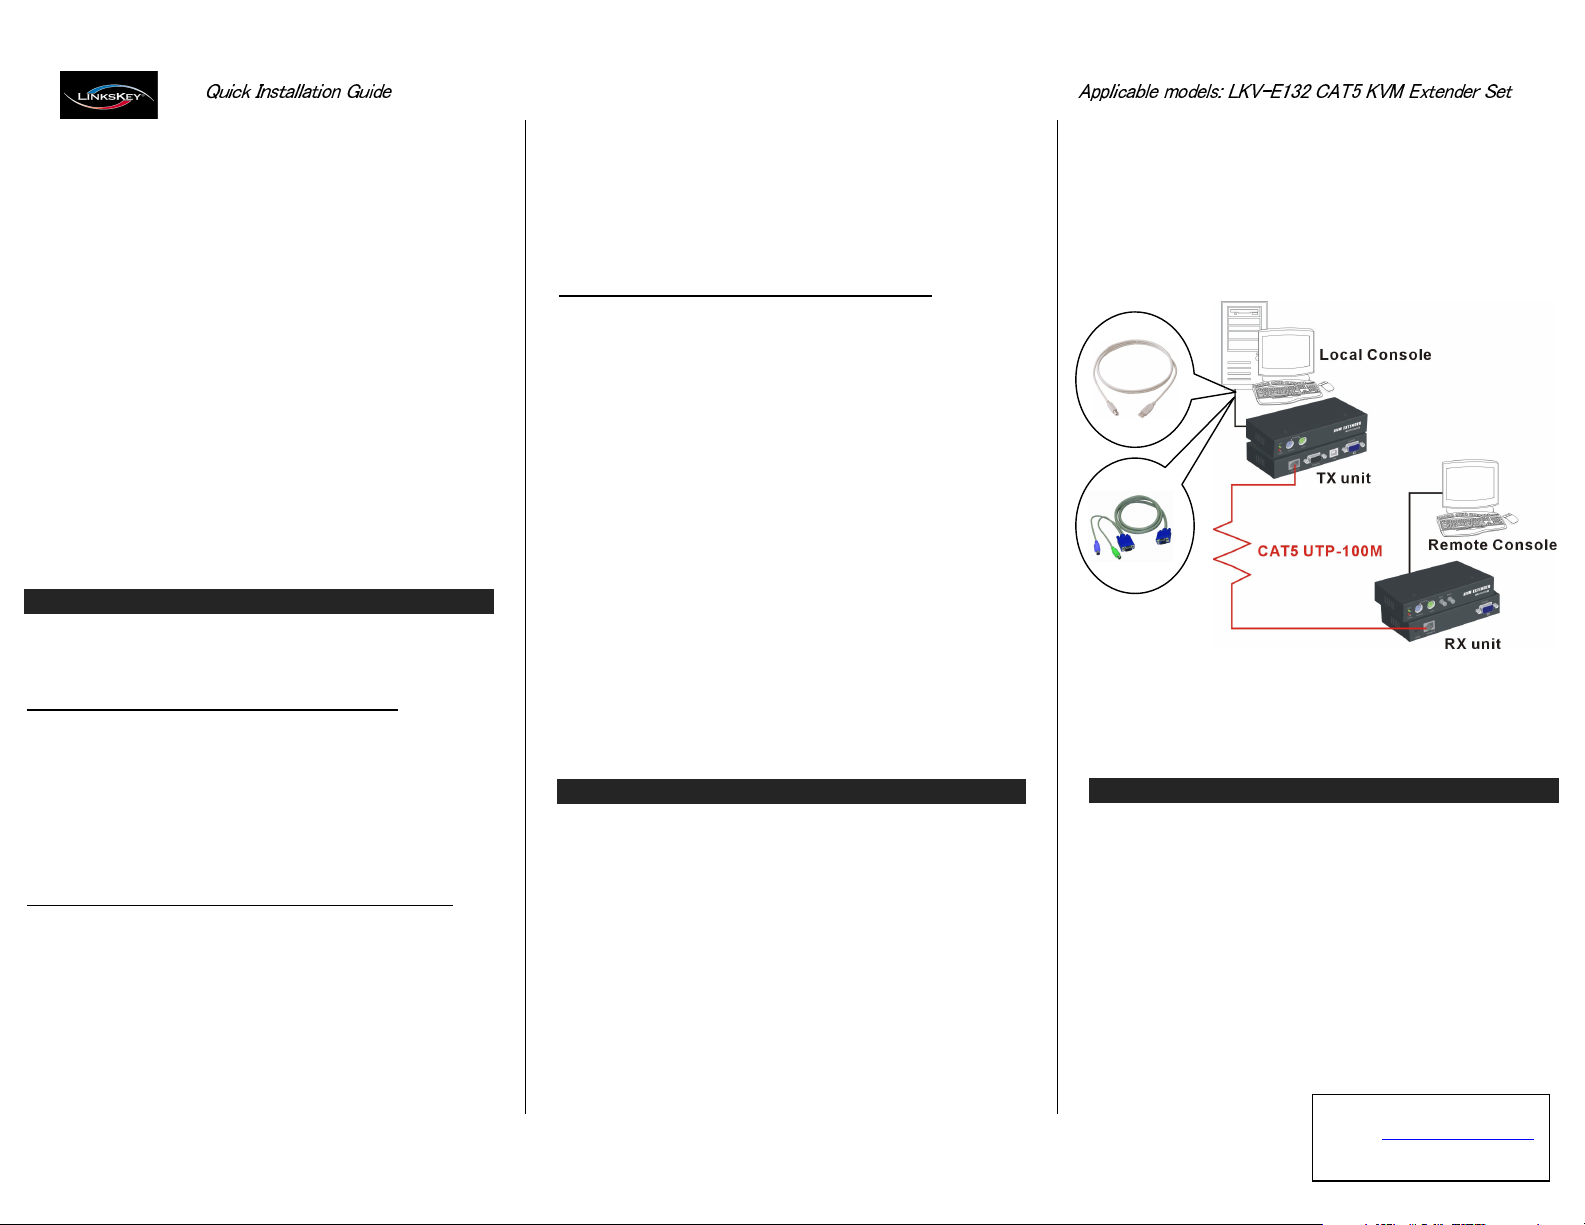
The LKV-E132 CAT5 KVM Extender Set comprises two
s
di
h
T
the receiver on one end of the UTP cable; while the LKVE132-TX is the computer module w/ local console, or simply
put the transmitter on the other end of the UTP cable.
However, the LKV-E132-TX also provides a local console, so
that user can also access the computer on local console, in
addition to the remote console on the LKV-E132-RX.
The LKV-E132 CAT5 KVM Extender Set allows manual
adjustment of video parameters such as gain and
equalization by mechanical knobs located on the front-panel.
S
r
e
d
n
e
t
P
T
U
5
T
u
e
t
a
r
a
p
E1
-
V
K
L
e
n
e
t
x
e
t
e
w
,
e
l
b
a
c
h
T
-
s
t
i
n
i
X
R
-
2
3
r
u
o
y
s
d
f
s
i
t
a
s
h
it
E
-
V
K
L
e
em
R
e
h
t
s
a
o
b
y
e
k
e
d
i
v
g
n
i
y
X
R
-
2
3
1
o
C
e
t
o
a
ni
o
m
,
d
r
t
i
l
a
u
q
o
h
t
d
n
u
e
l
o
s
n
d
n
a
r
o
t
.
y
E
-
V
K
L
e
m
i
s
r
o
,
it
n
e
s
u
o
m
.
X
T
2-
3
1
t,
u
p
y
l
p
re
mo
te
en
d
b
y
tu
r
ni
ng
t
h
e
panel. This direct and easy way of video adjustment proves to
b
e
a
d
ir
e
ct
a
n
d
ef
fi
c
quality based on varying cable characteristics.
I
t
i
s
es
p
computer/user topology over a long distance up to
00
1
or
w
m
i
s
et
user due to security or spatial concerns.
ec
aw
t
f
30
/3
M
or
o
fl
g
n
ki
s
s
i
o
n
-
c
r
i
t
i
a
c
l
lo
ws
y
o
ie
ia
l
ly
u
se
pp
A
y.
a
ri
cu
e
s
s,
a
l
s
c
e
n
a
u
to
lo
ca
me
nt
wa
y
t
o
f
ul
f
o
r
e
l
ab
ic
l
m,
o
ro
y
t
r
i
o
s
,
t
h
e
te
L
yo
ur
se
Pa c ka g e Co n te n ts
s
a
e
l
P
k
c
a
p
LK
LKV-E132-RX (Remote Console) x 1
Slim 3-in-1 PS/2 KVM Cable x 1
USB Cable x 1
Power Adapters (DC9V 1A) x 1 (for Remote Console Unit)
Th
o n
r
F
c
e
e
g
a
V-
E
is Qui
t
h
:
e
13
&
k
c
2-
ck Ins
R
e
h
t
e
h
w
T
X
(C
om
tion G
talla
V
r
e a
r
p
ut
i
o
y
er
e w
a
h
u
Mo
uide x
oth t
B
he fro
nt-pan
el and
rear
h
t
n
o
d
e
t
a
c
o
l
e
r
a
s
r
o
t
c
e
n
n
co
LKV-E132 CAT5 KVM Extender Set. Before you connect
t
h
e
s
e
t
w
o
u
n
i
t
s
t
o
a
n
y
c
o
mp
u
should get a glimpse of the main connectors you are going to
o
c
n
e
E
x
t
e
n
h
w
r
e
t
n
u
d
e
r
sy
s
LKV-E132-RX Remote Console Unit
u
o
y
n
e
t
e
m
[LKV-E132-RX - Front-panel]
t
t
e
s
o
t
y
r
t
c
ha
wo
se
t
he
t
ei
oc
l
K
V
rv
e
v
du
1
-panel
w
t
e
e
r
,
p
u
rk
ti
ng
r
k
-
E
e
r
a
l
e
o
c
a
t
ni
c
ou
u
ov
s
ed
1
3
ph
t
l
l
w/
are w
d
b
l
i
e
h
s
c
r
e
e
n
o
u
t
p
u
t
o
n
t
h
e
n
x
ro
h
x
a
e
di
fl
ex
r
r
t
e
m
e
1
o
l
s
5
f
ro
sp
l
ay
ib
m,
oo
h
ot
n
d
t
he
o
b
rious
h
t
f
,
y
o
V
K
nt
l
e
er
e
r
x
e
u
M
al
k
no
b
s
on
th
t
a
n
op
t
im
iz
ed
p
a
h
i
gh
ly
io
it
b
hi
ex
an
r
e
r
er
rv
e
2
C
A
T
5
ys
i
ca
ll
y
t
i
e
s
o
h
L
o
ca
l
C
here
e
t
a
r
a
p
s
i
n
g
s
o
r
p
1
-E
V
K
L
Rev. 1.1 Copyrightc All rights reserved
e
a
m
on
e
3
om
o
K
V
wa
p
r
i
2
,
M
y
f
n
i
s
so
l
e)
the va
e
c
e
i
p
h
e
A
C
o
e
t
s
r
T
1
2
3
4
5
6
[
7. Power receptacle (DC9V 1A)
8. CAT5 Extension Port [RJ-45, connect to a CAT5 UTP cable,
9
[LKV
a. Red LED indicator - Power
b. Green LED indicator Link
c
d. PS/2 mouse port
[
e.
f.
g. USB port (TypeB) for computer connection
h. Monitor port [HDB15]
Pre p ar a tio n b e fo re In s ta llat i o n
Before you install the two pieces of the LKV-E132 CAT5 KVM
Extender Set, you should have these items on the checklist
ready:
1. The computer for extension should be one with either
.
R
e
d
L
E
D
i
n
d
i
c
a
ic
d
in
D
LE
en
re
G
.
.
.
.
.
L
.
.
L
k
2
/
S
P
mo
2
/
PS
A
d
j
u
s
t
Ad
ju
s
tm
3
1
E
-
V
K
m
0M
0
1
o
t
i
n
o
M
L
K
V-
E1
-E132
P
S
/
2
k
2
3
1
E
-
V
K
C
A
T
5
100M max.]
u
p
m
o
C
a
o
b
y
e
k
PS/2 or USB interface.
o
b
y
e
se
u
m
e
n
en
R
-
2
ax
o
p
r
3
2-
TX
-TX
e
y
b
o
X
T
-
E
x
t
e
p
r
e
t
m
,
d
r
a
t
t
k
X
]
.
r
[
a
n
d
r
or
p
k
n
no
-
[
t
Co
Front-
r
d
B
s
i
r
o
u
o
p
t
o
b
b
B
H
n
p
a
o
n
f
t
e
s
t
o
at
o
f
a
D
Co
ne
o
c
r
o
r
f
B
rt
k
P
a
r
o
t
o
or
c
o
c
n
-
P
r
r
g
e
p
-
k
]
5
1
mp
ct
e
panel
n
a
p
r
t
[
m
o
v
d
o
w
e
r
k
n
Li
a
i
n
q
ua
li
z
at
io
n
.
]
l
e
n
a
u
te
r
M
od
ul
e
w
it
h
L
oc
al
C
o
ns
ol
e
d
wi
th
th
e
c
om
pu
t
er
]
l]
e
R
J
-
4
5
,
co
n
n
e
c
t
o
i
t
c
e
n
on
c
r
e
t
u
p
n
i
o
e
d
i
)
e
c
a
rf
e
t
]
t
o
a
C
A
T
5
U
T
w
d
e
t
a
r
g
e
t
n
i
(
n
P
c
a
b
l
e
,
2
/
S
P
h
t
i
Page 2
e
h
t
k
c
e
h
c
d
l
u
o
h
s
u
o
Y
.
2
no higher than 1600 x 1200 pixel dimension. And refresh
e
pp
su
er
nd
e
xt
e
M
KV
5
AT
C
2
13
E
V-
LK
he
t
ce
n
Si
.
3
s
t
a
n
d
a
r
d
5
-
k
e
y
m
o
u
s
e
a
n
d
k
e
y
b
o
a
r
d
,
a
ad
by
C
va
n
AT
ce
d
m
ou
se
/
ke
yb
oa
r
d
fu
n
ct
io
n
w
il
5
e
xt
e
ns
io
n
.
l
n
n
ot
b
e
s
or
up
l
on
s
t
y
m
o
r
po
r
te
0H
6
s
a
ch
u
s
ed
us
ly
on
m
om
c
e
or
m
is
at
th
ne
o
e
b
to
e
t
ra
.
tc
4. Use good quality UTP cable (max. 100M/330ft). Note that
go
c
an
st
di
er
ng
o
l
5
.
A
n
y
c
a
b
l
i
n
g
en
ce
mo
e
xp
e
ri
n.
a
sp
e
d
i
s
t
a
n
c
e
l
o
n
g
e
r
t
h
a
n
1
0
0
M
/
3
3
0
f
t
w
re
de
gr
ad
a
ti
on
wi
th
lo
ng
er
sp
an
.
H
ow
i
e
ve
it
w
e
om
c
ut
o
o
de
vi
r
e
tt
be
ve
gi
ll
wi
e
l
ab
c
y
it
al
u
q
od
good quality cable can reach out farther away.
ul
o
sh
e
l
ab
c
P
UT
5
AT
C
e
th
or
f
h
at
p
ut
o
ay
l
f
o
ce
i
ho
c
he
T
.
6
not only take into account the shortest possible path, but
a
e
c
n
e
r
e
f
r
e
t
n
i
c
i
t
e
n
g
a
m
o
r
t
c
e
l
e
t
n
a
c
i
f
i
n
g
i
s
7.
Pr
ep
ar
e
1
o
r
2
s
e
ts
o
f
k
ey
bo
a
rd
,
m
on
co
ns
e
s
et
f
or
lo
ca
l
c
on
s
ol
e
1
o
le
.
a
nd
ou
t
h
e
ot
h
.
e
c
r
u
o
s
se
a
n
d
mo
n
it
or
er
s
et
fo
r
r
em
ot
ny
a
m
ro
f
y
wa
a
r
he
rt
a
f
ly
ve
i
at
el
r
s
i
t
ha
t
ne
o
o
ls
8. There should be an available power outlet near where
unit.
onsole
ote c
he rem
cate t
you lo
Ou t-o f-t h e -b o x In s ta lla tio n
Ta
k e
t h
e
p a
ck a
g e
c
o n t
en
t s
o u
t
o f
t h
e
b o
x a
n d
b e
g i
in st a lla ti o nl .
Plan the layout path and deploy the UTP cable
i
h
w
h
g
u
o
r
h
t
h
t
a
p
e
h
t
an
l
P
.
1
p
e
t
S
deployed across the distance between the LKVE
1
3
2
-
R
X
a
n
d
L
K
V
-E
1
3
2
-
T
layout path not only base on shortest possible length
o
o
ls
a
t
u
b
,
n
o
i
t
a
r
e
d
i
s
n
o
c
interference.
S
t
e
p
2
.
L
a
y
o
u
t
t
h
e
U
T
P
c
a
b
le
a
c
c
o
path.
U
e
h
t
h
c
X
.
Y
o
u
s
t
s
a
e
l
n
r
d
i
n
g
t
o
le
du
Configure the LKV-E132-TX (Computer M
Step 3. Connect one end of the UTP cable to the CAT5
E
x
t
e
n
s
i
o
n
p
o
r
t
o
f
t
h
e
L
Step 4. Connect the LKV-E132-TX to the computer
(connector f), using the Slim 3-in-1 PS/2 KVM cable
and/or the USB cable (connector g). (Note that if you
need to connect with the USB interface, you should
connect the USB cable to the computer since the
Slim 3-in-1 PS/s2 KVM cable support only the PS/2
interface). The LKV-E132-TX is powered through the
connector interface with the computer.
o
K
V
-
E
1
3
2-
T
X
n
e
l
b
a
c
P
T
h
o
u
l
d
c
h
o
m
o
r
t
c
e
l
e
y
o
u
r
p
l
a
n
n
+ Console1)
.
b
l
l
i
w
o
s
e
t
h
i
t
e
n
g
a
e
d
S
,
z
S
y
e
d
m
ou
s
e
an
d
m
on
i
to
r
c
on
n
ec
to
rs
(c
te
p
6
.
Po
w
er
o
on
n
t
he
c
to
n
ec
to
r
o
mp
ut
mouse and video output on Local Console to see if it
wo
d
l
ou
sh
t
I
.
ne
i
f
ks
r
wo
n
x
e
.
s
p
e
t
s
t
e
l
o
s
n
o
C
l
a
c
o
L
p
u
t
e
S
.
5
p
e
t
h
l
l
r,
d
-
e
e
e
c
Configure the LKV-E132-RX (Remote Console)
Step 7. Connect the other end of the UTP cable to the CAT5
S
S
Ex
t
e
p
8
.
C
o
n
n
e
c
t
t
h
e
p
o
w
e
r
a
d
po
we
r
i
t
u
p
t
ep
9
.
S
et
be
up
t
h
e
Re
fo
mo
a
r
e
co
n
t
e
Co
L
he
t
f
o
rt
o
p
on
i
ns
te
keyboard, mouse and monitor to the LKV-E132-RX
Console ports (connectors 3, 4, 9).
S
ns
Co
te
mo
Re
h
t
a
v
e
dj
us
g
i
m
o
e
d
i
t
ed
a
nd
h
o
op
ee
s
o
t
le
r
e
v
e
b
t
ti
m
iz
ed
m
d,
ar
o
yb
ke
he
t
k
ec
Ch
.
0
1
ep
t
Step 11. Adjust the video gain and equalization level by
t
urning
the t
wo me
chanic
of the LKV-E132-TX unit. By conscientiously trials,
o reac
able t
d be
shoul
For
CAT5
KVM
KVM E
you
splay
di
Switch
outpu
Conso
xtende
t on t
r to
he Rem
le Ex
extend
tensio
Just connect the transmitter unit (LKV-E132-TX) to the
S
M
V
K
e
th
f
o
t
r
o
p
e
l
o
s
n
o
c
connection is just like what has been described above. Thus,
you can also extend the KVM switch console up to 100M
away.
e
tk
o
H
o n
i
at
r
gu
fi
n
Co
The LKV-E132 CAT5 KVM Extender Set provides
n
a
c
t
a
h
t
s
y
e
k
t
o
h
n
o
i
t
a
r
u
g
i
f
n
co
local console or the remote console for access control, view
o
n
l
y
m
o
d
e
a
s
w
e
l
l
a
s
h
o
t
k
e
y
p
There are hotkeys that are operable only on local console (on
we
s
a
)
t
i
n
u
X
T
-
2
13
E
-
V
K
L
e
h
t
operable on both local console and remote console. With
these hotkeys, users can either block or grant access from
the remote console, or toggle on/off the view-only mode on
the remote console. For someone who does need to use
different hotkey preceding sequence, it also provides 5
alternatives for choice. Thus, the Local Console (i.e. the TX
unit) will have permanent access of the computer without
limitation; the Remote Console can be enabled with full
access or view-only access, or access disabled entirely.
C
:
th
s
c,
e
r,
a
k
r
V-
K
p
t
e
ne
ct
n
so
us
o
i
f
i
u
l
b
y
.
al kno
your
c
t
i
w
ys
el
h
r
e
c
s
a
l
l
n
n
o
e
L
d
,
h
nd
e
n
fi
3
E1
r
t
o
i
ng
a
le
:
C
a
e
or
w
t
d
e
r
r
h an o
ote C
n: You
KVM S
,
h
o
y
p
e
d
i
n
o
h
e
KV
).
be
2-
t
h
on
nd
bs on
a
u
g
k
t
e
b
o
t
r
e
t
u
p
m
o
c
e
h
t
f
o
e
d
o
m
y
a
l
p
s
i
d
c
ch
e
ny
ks
s
RX
v
i
-E
fo
L
ne
n
ec
fi
de
i
c
r
K
de
ne
1
32
-T
X
C
on
so
l
e
k
t
he
k
e
yb
oa
r
d,
to
d
ee
c
ro
p
u
yo
e
.
V
-
E
1
3
2
-
R
X
t
o
vi
c
es
t
c
t
a
s
et
pu
t
ou
o
t
At
.
n
s
i
t
i
e
o
i
t.
o
f
e
th
n
o
t
,
me
i
t
is
h
t
e
y
t
o
[
Lo
ca
H
o
t
k
e
o ggl e
T
To ggl e R e m o te Co n so le Vi e w On ly ON / OFF
USB Cable
,
d
r
a
o
b
y
e
k
f
o
t
e
s
a
t
the f
ront-p
anel
deo
zed vi
ptimi
onsole
can
witch
h
t
d
n
f
n
o
c
s
e
q
u
ha
t
y
e
Rev. 1.1 Copyrightc All rights reserved
monit
e
u
g
i
e
n
t
also u
consol
s
e
r
e
e
r
c
e
s
e
r
a
t
or.
t
i
e
se the
e ¡ K.
f
o
r
e
h
l
e
ct
e
k
i
l
im
Sl
K
S/2
P
LKV-E132 CAT5 KVM Extender Configuration Diagram
e
th
e
h
t
i
o
n
.
e
s
i
w
[Remote Console hotkeys]
H o tke y Pre ce d in g Se qu e n ce
FCC / CE S ta te m en ts
FCC Statement: This equipment has been tested and found to
comply with the regulations for a Class B digital device, pursuant to
Part 15 of the FCC Rules. These limits are designed to provide
reasonable protection against harmful interference when the
equipment is operated in a commercial environment. This equipment
generates, uses, and can radiate radio frequency energy and, if not
i
n
s
t
a
l
l
e
may cause harmful interference to radio communications. Operation
of this equipment in a residential area is likely to cause harmful
interference in which case, the user will be required to correct the
interference at his/her own expense.
CE Statement: This is a Class B product in a domestic environment,
this product may cause radio interference, in which case the user
may be required to take adequate measures.
l
C
y
P
Re m
3-
VM
d
on
r
Scrol
S
S
in
S
a
n
e
c
r
croll
-1
Ca
c
r
d
s
ol
c
e
d
l +
o t e C
o
l
l
+ Sc
e
bl
o
l
l
u
s
e
i
+
+
e
ho
n
g
Scro l
o n so l
S
c
S
c
d
r
ro ll
r
i
n
S
t
o
o
ke
e
l + H
l
l
l
l
a
c
q
+
+ K
+
c
ys
u
e
e ON
S
H
o
r
d
]
n
c
e
F12
S,
AP
, C
ll
cro
S
x =
),
+ (x
+
a
/ OFF
Powe
(
n
P
o
w
e
r
L
E
D
f
l
a
s
h
e
s
r LE
D fla
sh es
x = Scr oll, CAPS, F12, NUM , Esc
x
)
,
c
e
w
i
t
h
t
h
i
s
Q
u
i
c
k
Technical Support
E-mail: btitech@linkskey.com
Website: www.linkskey.com
,
NUM
i
n
in s
I
n
f
a
s
t
Esc
,
s
t
m
low m
a
l
l
a
o
d
e
ode
t
i
o
n
G
u
i
d
e
,
 Loading...