

Page 1
Quick Installation Guide Applicable models: LKV-9208IP / LKV-9216IP 8/16-port IP KVM Switch
LKV-9208IP/LKV-9216IP
Prima IP
8/16-port Cascadable Rackmount IP KVM Switch
Dual Support for both USB and PS/2 computers
w/ serial power control
& PPP Sever/client connection support via external modem
Quick Installation Guide
Thank you for purchasing the LKV-9208IP/LKV-9216IP Prima IP
KVM Switch – a full - featured IP KVM Switch for remote
computer control over IP! This Quick Installation Guide will help
you connect the Prima IP KVM Switch to computer/servers and
install it within your networking environment for remote client
access across Intranet/Internet.
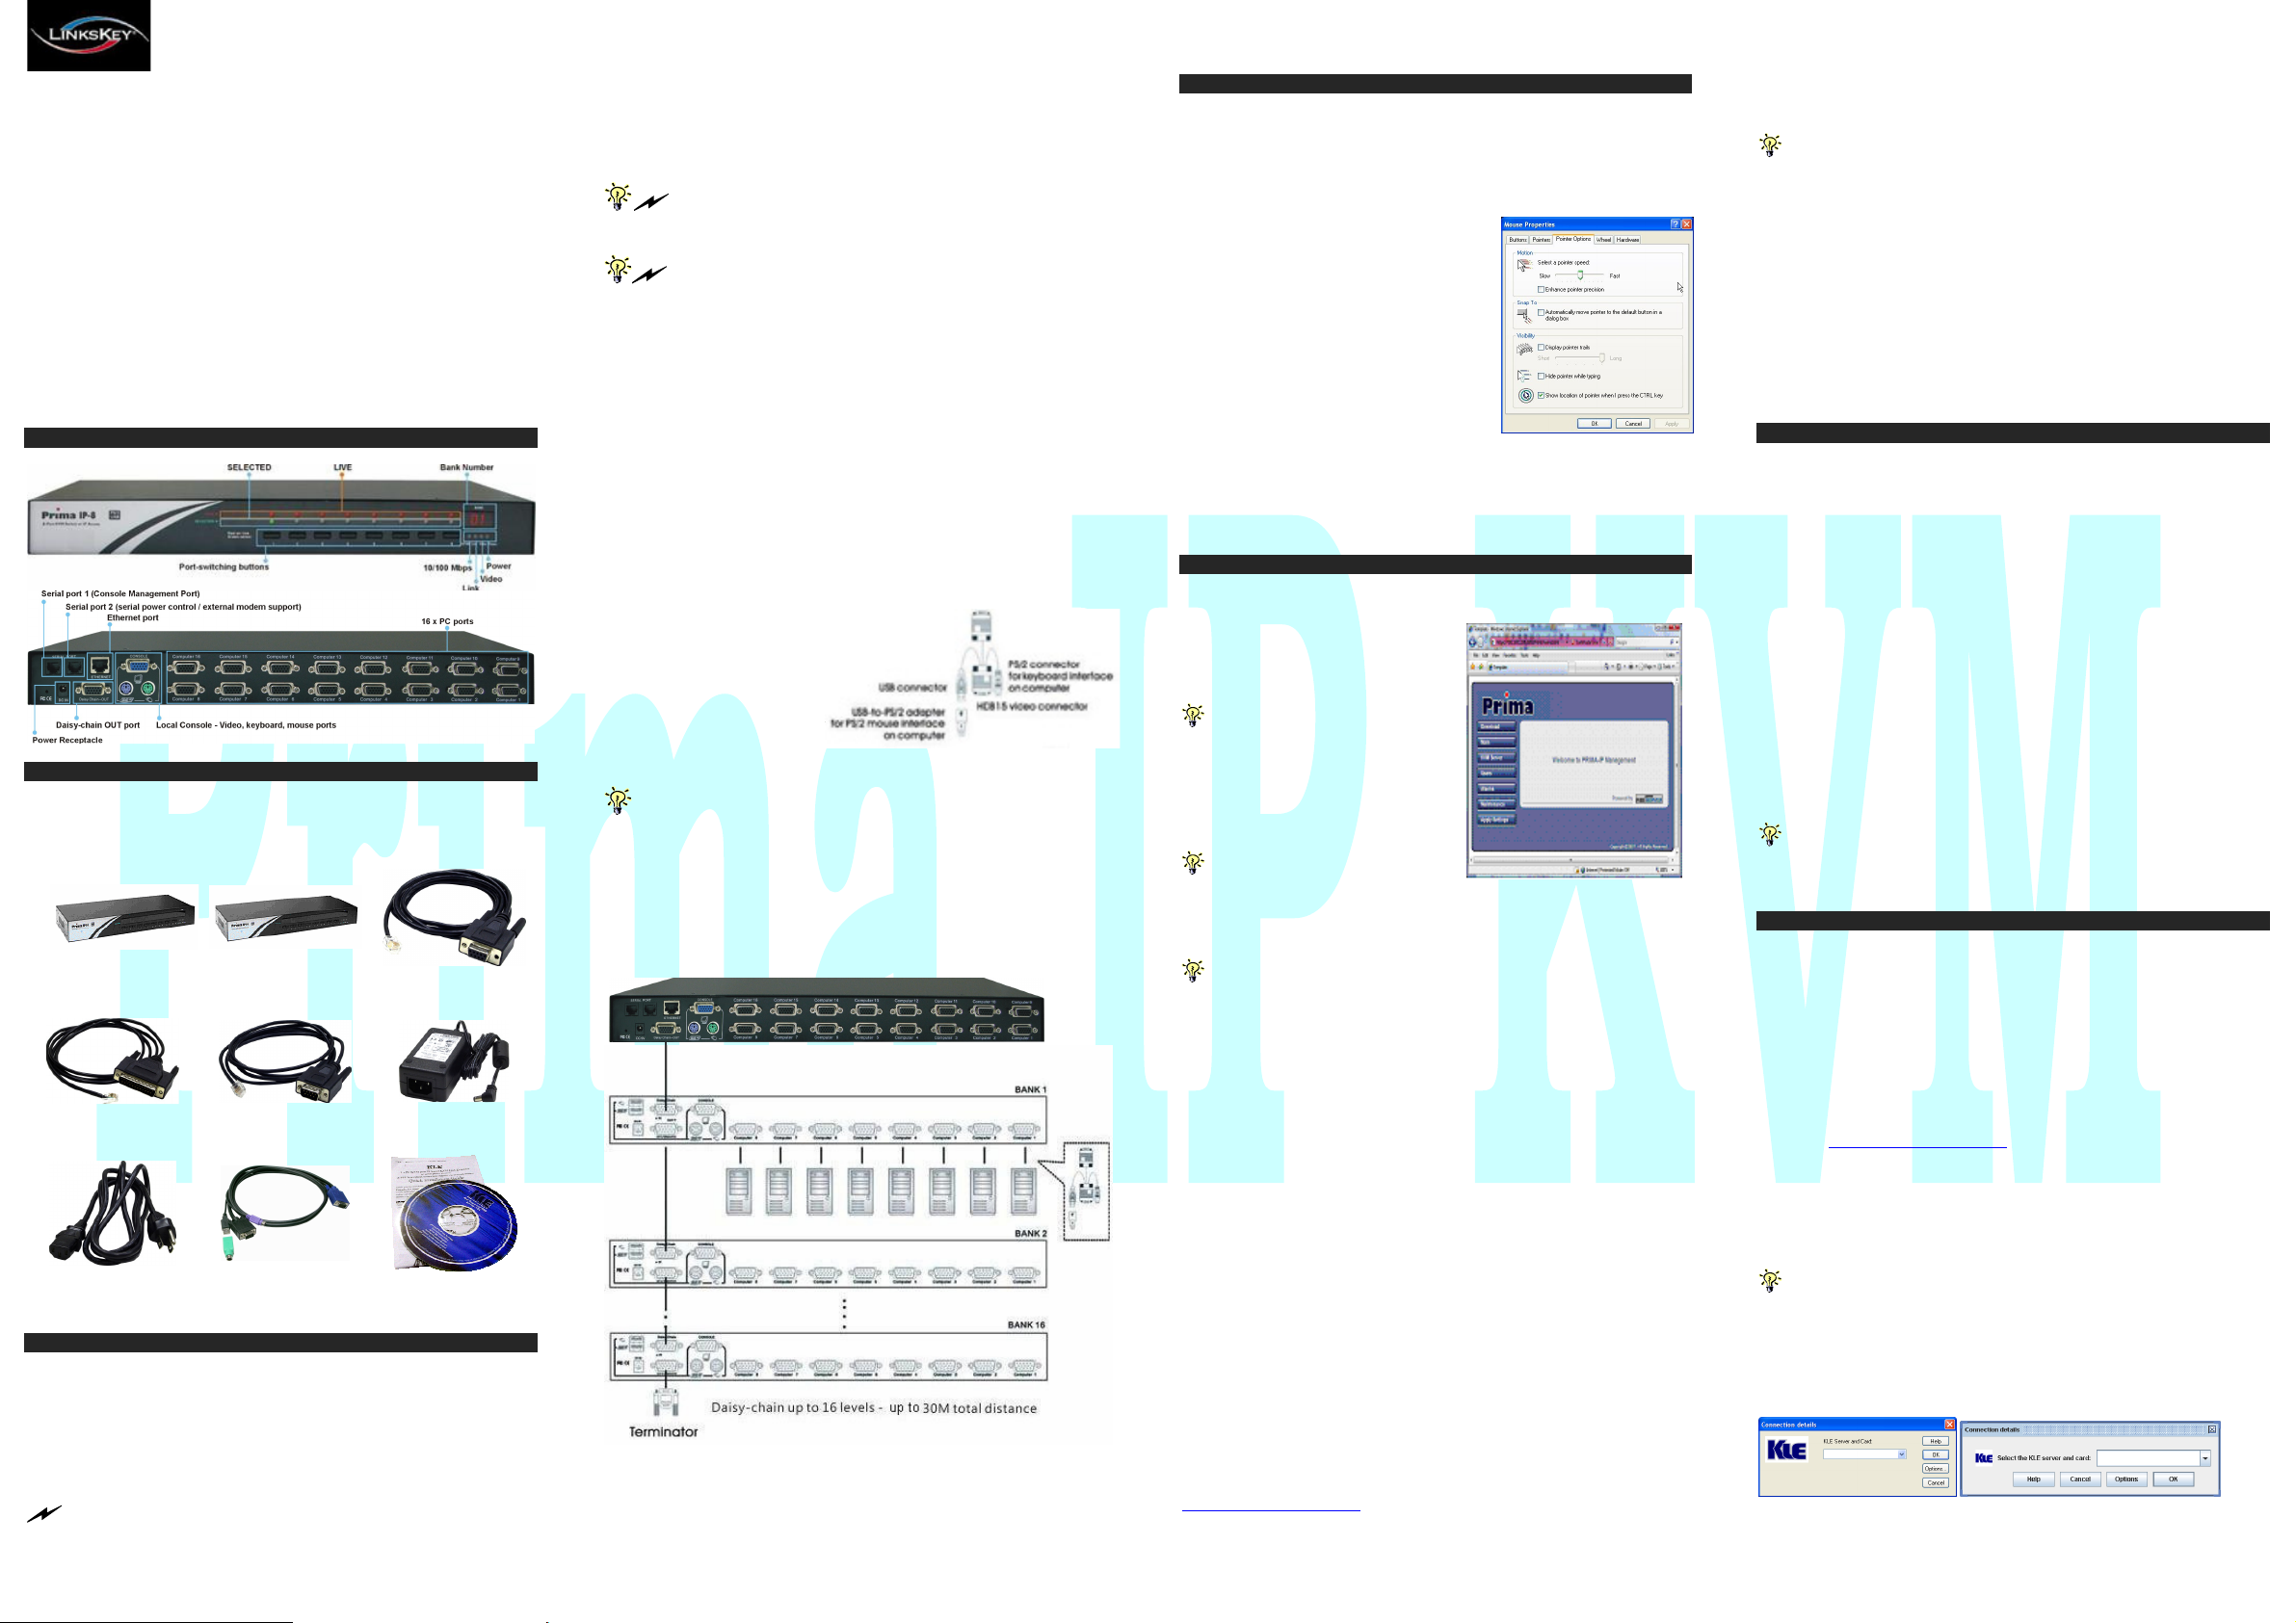
Front-Panel and Rear Panel Overview
Take out the Package contents
Take out the Prima IP and the accessories from the packaging box, and
check whether you have all these items in the Prima IP packaging box.
.
1. Prima IP 8 x 1
[Depends on
package]
3. Modem serial cable
[RJ12-DB25]
6. Power Chord
Begin your Prima IP installation …
4. Power control cable
7. Combo-free USB PS/2
KVM cable [C-KVM-SC
1. Power on the Prima IP: Plug the Power adapter into the power
receptacle on the backside of the Prima IP KVM Switch.
2. Set up your local console: Connect a PS/2 keyboard, mouse, and
monitor to the Prima local console ports.
3. Connect to computers: Connect each of you computers to a PC port
on the back panel of Prima IP, each using a USB PS/2 KVM combo
cable (Types of cables depend on your package).
If you are using any PS/2 computer: Please make sure all of your PS/2
Page 1 of 4
1. Prima IP 16 x 1
[Depends on
package]
[RJ12-RS232-M]
Series]
2. Console
Management Cable
[RJ12-RS232-F]
5. External Power
Adapter (Out: 9V 2A;
IN: 100~240V)
8. Installation Guide &
Support CD-ROM
computers are powered off before connecting to the KVM Switch. Otherwise, the
non-PnP PS/2 interfaces might not recognize the PS/2 keyboard and mouse later.
However, USB computers do not have this limitation.
3.1 Make sure (at least the PS/2) computers that are to be connected to
the KVM switch are powered off. If not, power them off before
you proceed with the following steps.
If you use only one single Prima IP KVM switch in noncascaded application, you should ignore step 3.2, 3.3, and 3.4 and jump
directly to step 4.
If you want to daisy-chain multiple Prima KVM Switches to the
[master] Prima IP KVM switch, go to step 3.2. You can daisy-chain up
to 16 levels of KVM Switches.
3.2 Use the daisy-chain cable (M-HDB15-HDB15-F) to connect the
DaisyChain OUT Port (HDB 15 female) of the [master]
Prima IP KVM Switch to the DaisyChain IN Port (HDB 15
male) of the second Prima KVM switch. Then connect the
power adapter cord to the second Prima KVM switch to power
it on.
3.3 If you have yet another switch to be daisy-chained, just repeat Step
3.1 to connect them. You can daisy-chain up to 16 units.
Remember to plug a Terminator onto the Daisy-chain Out
Port of the last Prima KVM switch unit.
3.4 (Now your Prima IP KVM switch, and those Prima KVM Switches
daisy-chained below should have been powered-up and
initialized….) Connect each computer to a PC port on the
backpanel of the KVM switch(es). You should use the special
USB-VGA KVM
Combo Cable (or
3-in-1 USB PS/2
KVM Combo
Cable with the
USB-to-PS/2
adapter) for
connection to a USB computer (PS/2 computer). (Other types
of cables may be used accordingly.)
The special 3-in-1 USB PS/2 KVM Combo Cable provides a
PS/2 keyboard connector, a USB connector and a HDB video
connector for the computer connection. When connecting with a USB
computer, just plug the USB connector to it and leave the PS/2
connector free. When connecting with a PS/2 computer, just add a
USB-to-PS/2 adapter to the USB connector and you’ll have a PS/2
connector for mouse. DO NOT try to connect both USB connector
and PS/2 keyboard connector to a computer at the same time.
4. Boot up connected computers (if they are not powered-on yet): On
the Prima local console, you should switch to every computer and verify
that the keyboard, mouse and monitor are all working on each of the
connected server(s).
Prepare your computers for Prima IP connection
1.Turn off the mouse acceleration and the “Snap to” option on each
of your computers/servers: Mouse synchronization can function
properly only when these two options are turned off on all connected
computers. Taking Windows XP/Server 2003 for example: Go to
Control Panel/Mouse/Pointer speed and set the mouse speed to be at the
exact middle of the scale, then uncheck
both the Enhance Pointer Precision option
and the Snap to option. For more details,
please refer to the User Guide, Section 2.2.
2. Use a more common display
frequency such as 60 Hz / 72 Hz / 75 Hz
and pixel dimension: We suggest you use
more standard display modes, such as:
800x600@60Hz / 72 Hz / 75 Hz
1024x768@60Hz / 70 Hz / 75 Hz
1280 x 1024@60 Hz
1600 x 1200@60 Hz
3. Disable transitional effect: Go to
Control Panel/ Display / Appearance / Effects. And then uncheck the
option to disable transition effects such as Fade for the menus and tool
tips. This will much improve your video quality when you are using
Medium or Low Quality as your Prima IP video filter setting.
Configure Prima IP for viewer connection within LAN
1. Connect the Prima IP to your LAN: Connect the Ethernet port of
the Prima IP to one of the LAN port on your network switch/hub within
your LAN, using a Cat5 UTP cable.
(Since the Prima IP accessories do
not include a UTP cable, you should
prepare one for use!)
Upon connection to LAN, the Link
LED will be lit to indicate ready
Ethernet connectivity. If it is not lit,
that means the connection is not
ready. An orange 10/100M LED is lit
to indicate a 100 Mbps connection;
otherwise, it’s 10 Mbps connection.
If your LAN is using different
network segment other than 192.168.1.xxx, you might consider
configuring one computer to have an IP address of 192.168.1.xxx such
that you can access the Prima web and then change Prima IP address to
one appropriate for your regular IP segment.
The factory default IP settings of Prima IP as you receive it in the
packaging box are such as:
Port base: 5900
IP address: 192.168.1.200
Subnet mask: 255.255.255.0
Default gateway: 192.168.1.254
DNS: 192.168.1.1
2. Log in Prima IP Web management interface: Access the Prima IP
web management interface by a standard browser connection. Just type
in the address bar of your browser:
https://<IP_address>:<PortBase+8>
For example: https://192.168.1.200:5908
and log in with the following username and password:
Username: superuser
Password: superu
3. Configure Prima IP TCP/IP settings: go to the LAN TCP/IP page to
configure settings such as port base, IP address, Network Mask,
Gateway and DNS server.
For example, we could configure Prima IP such as followings:
Port base: 6080
IP: 192.168.1.36
Subnet mask: 255.255.255.0
Default gateway: 192.168.1.11
DNS: 192.168.1.1
management access. And then within the viewer prompt window,
You should type: 192.168.1.36:6080
Note that the DNS setting is required only when you want to use the
mail alert function to notify users about specific server alert events via
e-mail.
4. Validate new settings: Click Submit button below to commit it to
Prima IP flash memory. Then go to the Apply Setting Page, and click the
Apply Setting button to make new settings effective on the Prima IP.
5. Verify the presence of Prima IP within your LAN: try to ping the
IP address of Prima IP from any computer on your LAN. For example,
in the DOS box you type:
ping 192.168.1.36
…. and it should reply your pinging.
You can now access Prima IP using any computer within your LAN
environment.
Configure router/firewall settings for internet access
To allow access to the Prima IP behind corporate firewall/router, please
configure the following settings on your router (not on your Prima IP):
1. Configure a virtual server on your router: you should configure (or
ask your net admin to configure for you!) a virtual server as mapped to
the Prima IP’s local IP address
2. Open a port range (<port_base> ~ <port_base_+_9>) both inbound
and outbound for the virtual server: you should open a port range
according to what you have configured as port base for Prima IP in
previous steps. Taking previous example, if we configure Prima IP as
having a port base of 6080, then we should open port range 6080~6089
(that is, <port_base> ~ <port_base +9>) both for inbound and outbound,
in which,
<port_base> = 6080 is the Prima IP viewer connection port
<port_base + 8> = 6088 is the browser SSL connection port
<port_base + 9> = 6089 is for viewer internal communication, etc.
For example:
Router internet IP virtual server (port range open) Prima IP’s local IP
61.232.134.120 virtual server (port 6080~6089 open) 192.168.1.36
Once you have changed the port base of your Prima IP, you should
also modify the port range open on your router accordingly, if you want
internet access to come across.
Test Prima IP viewer connection from LAN and Internet
After you have installed Prima IP within your KVM Switch / server(s) /
networking environment, you could now test the viewer connection from
LAN and across Internet.
1. Access Prima IP Browser Management Interface: Use a standard
browser to access Prima IP web management interface. Enter the valid
IP address and browser port number <port_base +8> within your
browser address bar.
https://IP_address:browser_port
Taking previous case for example, you should enter
https://192.168.1.36:6088
Then login with the default account:
User name: superuser
Password: superu
2. Download and install the Win32 viewer program: Go to the
Download page, download and install it on your computer client. After
installation, you’ll see a Prima IP viewer desktop icon on the desktop.
You can download either win32 viewer or java viewer. The java
viewer will require Java Runtime Environment 1.5.0 or above to be
already installed on your computer client. Java viewer won’t need
installation process, just double-click on it to run the java program.
3. Run the viewer program: double-click the Prima IP viewer desktop
icon and the Connection Details box appears.
With these settings, it means you’ll use 6080 for viewer port base and
6088 for SSL browser connection. For example, you should type
https://192.168.1.36:6088 in the browser address bar for Prima IP Web
Win32 viewer login Java viewer login
Rev. 1.22 Copyright© All rights reserved. 2006
Page 2

Quick Installation Guide Applicable models: LKV-9208IP / LKV-9216IP 8/16-port IP KVM Switch
4. Configure the connection options: click the Options button on the
Prima IP viewer Connection details box.
For viewer connection within LAN: you can choose LAN as your
encoding scheme. For connection from across internet: choose
internet. The 8-bit color reduction and the JPEG compression are also
options for use in limited bandwidth conditions. If you want no other
user to share your Prima IP viewer access while you are connected
with the Prima IP, you could uncheck the shared session option. After
you choose the suitable options, click OK.
5. Enter the access IP and viewer port number within the IP
address/domain name field:
From local LAN:
For example: 192.168.1.36:6080
<Prima IP_local_IP>:<port_base>
Or
From across internet through a firewall/router
For example: 61.232.134.120:6080
<router_Public_IP>:<port_base>
6. Click OK to make viewer connection …
Win32 viewer Java Viewer
Congratulation! Your first viewer connection is made!
And you’ll notice that there’s also a Select Computer box on top of the
viewer window with computer icons such as PC0101, PC0102, ….
PC0108. Later you can configure the name of the icon to be your real
computer name …
Mouse synchronization: Sometimes you will find the local mouse
cursor and the remote mouse cursor are out of sync. You can use the
following mouse synchronization hotkey to bring them in sync:
[Right_Ctrl] – [Right_Ctrl] – [Home]
….Use the right control key, not the left!
Prima IP display optimization
After you have made successful viewer connection to the Prima IP, you
can now go forth to optimize the display on the viewer screen.
1. Open a viewer connection. (See previous section)
2. Check the viewer screen for centering and video quality: Visually
check if the screen output is centered properly within the viewer screen.
To check for viewer
screen proper centering,
just try to hit the
Right_Ctrl – Right_Ctrl –
Home to sync your remote
and local mouse cursors. A
properly centered viewer
screen should have both
cursors align perfectly.
(But before that you should turn off the mouse acceleration. See previous
section for mouse acceleration turn-off). Also if a screen is not properly
centered it will have a black strip (offset) on edge of the screen.
3. If the viewer screen is not centered correctly, try: either (a) to click
the computer icon within the Select Computer Box to align it anew; or (b)
Go to the viewer Quick Menu (evoked by clicking the title bar icon of
the viewer window), and select Adjust Screen to bring out the Adjust
Screen box. First, uncheck the Automatic Centering option. And then
adjust the vertical and horizontal shift. This way, you can manually
center the screen output by the increment of one pixel. After the display
is centered again, you can choose to check the Automatic Centering
option again, or just leave it unchecked since you have made the
correction. However, remember to click the Store button to save this
correction into Prima IP memory, so that it will implement the stored
value when next time you switch to this computer if you choose not to
use the automatic centering!
After the optimization, you can always disable the Automatic
Centering option or even disable the Automatic Optimization option just
to make the viewer more efficient for initial capturing of the display
output from your PC. It will connect faster!
Configure your Computer Names
1. Go to the Computers page of Prima IP Web and configure the
computer names as you wish.
2. However, every time when you rename a computer, please hit the
Submit button to save the modification to the Prima IP database, and
then go to rename the next computer …. (Note that if you don’t click
Submit button, your modification won’t go into Prima IP database!)
3. After you have finished renaming all the connected computers, go to
the Apply Setting page and hit the Apply setting button to make the name
modifications effective. For details, please refer to User Guide, Section
4.7.
4. Establish a new viewer connection and you’ll see the Select Computer
box is now with new computer names you have specified.
Add, edit or delete Prima IP user accounts
Prima IP allows three types of user accounts with different privileges to
the access of Prima IP Web management features – SUPERADMINaccess to all management features / ADMIN – access to partial
management features / USER – access to minimal features. For details,
please refer to User Guide, Section 4.1.
1. Go to the User Management page on Prima IP Web.
2. Add, edit or delete the user accounts as well as assign access privilege.
There are three default user accounts:
username / password
superuser / superu SUPERADMIN privilege
admin / 123456 ADMIN privilege
user / 123456 USER privilege
We recommend you to add your own user accounts and delete or at
least modify the passwords of the existing default accounts for security
sake.
You should at least retain one account with SUPERADMIN privilege.
In fact, the Prima IP won’t allow you to delete the last SUPERADMIN
account so that you won’t lock yourself out by accidentally deleting all
SUPERADMIN accounts.
Install Certificates on both Prima IP and your client
computer
The certificates are only needed when you want to implement level 3
Security – SSL data encryption plus full PKI authentication - over
viewer connection. If you have no intention to implement level-3 security,
you could as well skip this section.
1. Obtain a set of certificates from your certification authority (CA):
This set of certificates should have the following file names and format
requirements:
root.crt file name is mandatory, in .crt format
server.crt file name is mandatory, in .crt format
serverkey.pem file name is mandatory, in .pem format
client_name.p12 file name could be freely chosen, in .p12 format.
2. Import certificates to both the Prima IP and the viewer on your
client computer: For details please refer to the User Guide, Section 3.3
and Section, 4.16.
You could also set up your own CA (Certification Authority) using
freeware such as XCA (downloadable from
http://sourceforge.net/projects/xca ) to generate the set of certificates
you need to implement full PKI authentication on your own with the
advantage of ultra-security yet without incurring extra costs of buying
certificates from external CA. For details, please refer to the document
How to generate Prima IP certificates using XCA (could be found on
the Prima IP Support CD-ROM).
Change Viewer Security Level
Prima IP offers three viewer connection security levels:
* Level 1: No SSL encryption, No SSL authentication
* Level 2: 256-bit encryption, server authentication by client
* Level 3: 256-bit encryption, full authentication (requires the
installation of certificates)
By factory default, the security level is set at level 2 - with SSL
encryption but without full PKI Authentication.
1. Go to the Security Page on Prima IP Web.
2. Choose your viewer connection Security Level: If you choose level
1 or level 2, you just select it and click Submit and Apply Settings.
However, if you intend to implement the highest level of security –
Level 3 – you should first upload the certificates to Prima IP and also
import certificates to the viewer on your client computer before you can
enable level 3 (SSL + full PKI authentication) security setting. For
details, please refer to the User Guide, Section 3.3.
3. Validate your settings: go to the Apply Setting page to hit the Apply
Setting button to validate the security setting…
Change Password Policy for viewer connection
Prima IP offers three viewer password control policies: No password –
No password is required for connection, Global password – a global
password is required for all users; User-specific password – each user
has a specific password. Each user account and its password are valid
for use only when Prima IP is adopting the User-specific password
policy. The password policy does not affect the browser access, which is
only granted using User-specific account and password. For details,
please refer to User Guide, Section 4.16.
1. Go to the Security page on Prima IP Web.
2. Select your password policy: select your password policy and click
Submit.
3. Validate your settings: go to the Apply Setting page and hit the Apply
Setting button to validate the new setting.
If you select Global Password policy, you will have to enter a global
password, which is used for all users when they want the viewer access
to the Prima IP.
By factory default, the password policy is User-specific Password,
which is a more secure policy than either No Password or Global
Password.
Power Control, Radius Accounting, Remote
Authentication and other Settings
Settings such as Power Control, Radius accounting and remote
authentication are disabled by factory default. If you are not going to use
these features, there is no need to enable it, so that it won’t take up
resource during boot time. However, if you are going to use any of these,
please configure the settings according to your requirements.
Power control - You should go to the Power Control page on Prima IP
Web to enable the power control over serial port, and configure all
required settings. For details, please refer to User Guide, Section 4.6.
Radius accounting setting - If you have a Radius accounting server,
you can go to the User Management page on Prima IP Web and check
the Radius accounting option, and configure all required settings. For
details, please refer to User Guide, Section 4.15.
Remote authentication - If you have implemented remote
authentication servers such as Active Directory, Radius or LDAP server,
you can go to the User Management page and check the Radius
accounting option, and configured all required settings. For details,
please refer to User Guide, Section 4.15.
Now Prima IP is ready for use
Now Prima IP is ready for connection, and you can distribute the
accounts, passwords and connection information to all Prima IP users.
Basically, one needs the following information for connection:
1. Prima IP’s access IP address (or domain name) and access port
number for Prima IP browser management and Prima IP viewer.
Taking example from previous case, it’s https://61.220.14.122:5908 for
browser access and 61.220.14.122:5900 for viewer access
2. User account and password: For example, Brian / zw2x5W. Or if
you choose a global password policy, it’ll be the global password. Or if
you choose No Password policy, there will be no need for password.
3. The certificates are required only if you enable level 3 security –
PKI authentication and SSL encryption - for the viewer connection.
Restore to Factory Default
In case you have totally forgot the access IP of your Prima IP, or you
want to restore Prima IP to its factory default, just take a pointed needle
or pen tip to depress the recessed Restore-to-default button for over 5
seconds on the Prima IP back-panel (located near the power receptacle).
Then release and wait for the Prima IP to load the factory default and
restart. When restarting, the Video and Link LED indicator will be off
for some seconds and then the Prima IP restart itself from ground up
with the default factory settings:
[TCP/IP settings]
Port base: 5900
IP address: 192.168.1.200
Subnet mask: 255.255.255.0
Default gateway: 192.168.1.254
DNS: 192.168.1.1
[username / password]
superuser / superu SUPERADMIN privilege
admin / 123456 ADMIN privilege
user / 123456 USER privilege
Then you can access Prima IP again with Browser by
https://192.168.1.200:5908 and with viewer by 192.168.1.200:5900
Other settings
There are some other more advanced settings that you could implement
on the Prima IP, such as ….
User Group – You can create different user groups, each of which
allows its users to access only those computers that are authorized for
that particular user group.
Local Console – You can specify whether the local console of Prima IP
should use password authentication for more security. And also the
mouse acceleration level can be specified [only] for the local console.
Local Console Operation
With Prima IP local console, the administrator can use either of the three
ways to select a specific computer (on a specific switch, if you have
multiple daisy-chained KVM switches)- by (1) front-panel push button,
(2) keyboard hotkey sequence, or (3) OSD Menu.
Front-panel push buttons
The front-panel buttons let you have direct control over KVM switch
operation and channel switching. Simply press a button to switch to its
corresponding channel. See Quick Reference Sheet
Keyboard hotkeys
A keyboard hotkey sequence consists of at least three specific keystrokes:
See Quick Reference Sheet
Hotkey sequence = ScrLk + ScrLk + Command key(s)
The two consecutive ScrLk keystrokes should be pressed within 2 seconds
and the following command key(s) should also be pressed within 2 seconds in
likewise manner. Otherwise, the hotkey sequence will not be validated.
Page 2 of 4
Rev. 1.22 Copyright© All rights reserved. 2006
Page 3

Quick Installation Guide Applicable models: LKV-9208IP / LKV-9216IP 8/16-port IP KVM Switch
For detailed Hotkey sequences and their corresponding functional
commands.
.
OSD Menu
To activate the OSD (On Screen Display) Menu, use the hotkey sequence:
Main OSD Menu Setup Menu
OSD Main menu
See Quick Reference Sheet
Activate OSD = ScrLk + ScrLk + Space Bar
Deactivate OSD = ESC (Escape key)
To select computer: use Up/Down Arrow key to navigate, PgUp/PgDn
to scroll page. Enter to select computer.
F1: Toggle between the OSD Main Page/ Setup Page/Status Page
F2: Logout: lock your keyboard and mouse for security. You have to
enter user name and password to gain access to the local console again.
The local console password authentication can be enabled/disabled
via Prima IP Web management interface. Just go to Prima IP Web/Local
Console Page/Local user needs Authentication – to enable/disable it. If
it is enabled, you will need to enter a user name and password for local
console access. Further, the local console user cannot perform port
switching on local console (that is, port switching is only possible with
remote viewer).
The local console only accepts user name and password with
UPPER CASE. Thus, to configure a password account that is usable not
only for the remote viewer connection but also for the local console
access, you should add a user name/password that is all in UPPER
CASE (that is all with CAPITAL LETTERS).
OSD Setup Menu
Autologout: specify a time for auto logout (00~99 min)
Title bar: specify the position of the OSD title bar
Hotkey: specify the hotkey preceding sequence
F12 or NUM LOCK)
IP: specify the IP address of the Prima IP KVM switch.
Submask: specify the subnet mask for the Prima IP KVM switch.
F 10: Save the configuration.
Esc: Quit
To change computer name, you have to access Prima IP Web
(SCROLL LOCK, CAPS,
management interface/Computer names. The OSD Menu does not
provide this computer naming function. Please refer to previous section,
Configure Computer Names.
Prima IP Basic Configuration Diagrams
Basic Configuration 1 – Prima IP 8 connected with 8 servers
Page 3 of 4
Basic Configuration 2 – Prima IP 8 connected with serial power
control device such as ioPower
Basic Configuration 3 – Prima IP 8 as a PPP server to receive
dial-in call from a PPP client
Basic Configuration 4 – Prima IP 8 as a PPP client to dial out to
a PPP server
Basic Configuration 5 – Prima IP 8 is cascaded with Prima KVM
switches to upscale port capacity up to hundred to computers.
Firmware/Software Upgrade
This KVM Switch allows its user to upgrade firmware/software
whenever is needed to enhance the compatibility to other devices or its
function and performance. Use the Prima IP Web to upload the
firmware/software upgrade files. To upgrade either the firmware or the
software, you should have your upgrade files ready on your client
computer, then go to the Maintenance page of your Prima IP Web
Mamgement, and upload the files therewith ….
Troubleshooting
Q. I can see the screen output on local console. It’s OK. However, there’s only
No Video on the viewer screen when connected. What’s up?
A. You might have adopted a resolution or refresh rate too peculiar for Prima IP,
please try to change the frequency to more standard ones such as 70/ 72/ /75 Hz.
And also if that does not help, try to change the pixel dimension as well to say
800 x 600 / 1024 x 768 / 1280 x 1024 / 1600 x 1200.
Q. The Prima IP booting time has become unduly longer over several minutes.
What’s wrong?
A. Please make sure that the external authentication, PPP server/client, time
server as well as power control settings are correct. If you don’t use all these
features or the authentication/time servers are not available, just try to disable
them to save booting time. If you don’t have all these servers present, the Prima
IP settings will force it to try to look for them till timeout. That will waste Prima
IP booting time considerably.
Q: Video response seems slower in limited bandwidth condition, are there ways
to increase the response speed?
A: There are several ways to increase the response speed on the viewer screen:
(1) Under bandwidth limited condition, you should select a more economical
encoding scheme such as Internet Encoding scheme instead of the LAN or
RAW encoding scheme from the viewer connection option menu. However,
if the connection is made only within LAN with plenty connection
bandwidth, LAN or RAW encoding scheme should be (paradoxically)
quicker than Internet scheme – since your client computer won’t dissipate
extra computing power for decoding the more-compressed internet scheme.
(2) Use 8-bit color reduction (with only 256 colors instead of the 65K colors in
16-bit settings).
(3) Use JPEG compression (for best video quality with optimized packet
quantities).
(4) Additionally, you could always select either Medium Quality/Low Quality
level for more speed as your Video Filter setting in the Video Server Page
of the Web Management Interface. You could also do something to increase
the response speed: use a server desktop of small resolution (such as 800 x
600) and use a solid plain color background for server desktop.
Finally, you should check also the networking environment to find if there is
some bottleneck that can be improved or eliminated for more bandwidth
throughput.
Q. When connection is first made, the display on the viewer screen seems not
centered correctly and there is black margin on the edge of the viewer screen.
How could I eliminate the black strip?
A. The black strip is the offset that will be seen when the display on viewer
screen is not centered correctly. Probably you have not enabled automatic
centering option on Prima IP, so please check the followings:
(1) Go to the Video Server page on Prima IP Web Management Interface to
check whether the Automatic Screen Alignment option is enabled. If it is not
yet enabled, please check the option, click Submit button and then go to
Apply Settings page to click the Apply Settings button to restart Prima IP
with new setting.
(2) When the viewer connection is made, select the Adjust Screen option on
Viewer’s Quick Menu, and the Adjust Screen dialog box appears. On it,
check whether you have Automatic Centering enabled. If it is not yet
enabled, please check this option to enable it. If it is already checked, please
uncheck it and then wait for at least 15 seconds and then check the option
again to force the video server to align (center) the display in the viewer
screen.
Q: I can log in and make successful browser connection with Prima IP. However,
I cannot make a valid viewer connection or the Prima IP does not respond to my
viewer connection request. What can I do about it?
A: The Prima IP video server might not function properly. First, make sure your
account have the SUPERADMIN privilege. If not, you should request one that
has the SUPERADMIN privilege to do the troubleshooting job for you. Next, go
to the Apply Settings Page on the Web Management Interface and then hit the
Apply Settings button to restart Prima IP. Then wait for at least 10 more seconds
for it to start completely. Try to make the viewer connection again to see if it is
back to normal. Second, If the Apply settings button could not bring back the
Prima IP video server to normal working condition, try to hit the Emergency
Reboot button (could be found on the Maintenance Page of the Web Management
Interface) for a complete start from ground level. An Emergency Reboot is a
clean reboot, and it takes longer time for Prima IP system and video server to load,
thus you have to wait at least a minute for the system to be up and running. Then
try to make the viewer connection again to see if it is brought back to normal
function again. A cold boot of Prima IP is always a last resort to bring the Prima
IP back – just try to disconnect the power adapter form Prima IP and wait for
sometime (30 seconds) before plugging in again for a cold start over.
Technical Support
Please contact LINKSKEY for technical support.
FCC / CE Statements
FCC Statement : This equipment has been tested and found t o comply with the regulations for a Class B
digital device, pursuant to Part 15 of the FCC Rules. These limits are designed to provide reasonable
protection against harmful interference when the equipment is operated in a commercial environment. This
equipment generates, uses, and can radiate radio frequency energy and, if not installed a nd used in
accordance with this User Guide, may cause harmful interference to radio communications. Operation o f this
equipment in a residential area is likely to cause harmful interference in which case, the user w ill be required
to correct the interference at his/her own expense.
CE Statement : This is a Class B product in a domestic environment, t his product may cause r adio
interference, in which case the user may be required to take adequate measures.
Technical Support
E-mail: btitech@linkskey.com
Website: www.linkskey.com
Rev. 1.22 Copyright© All rights reserved. 2006
Page 4

eriod
Quick Installation Guide Applicable models: LKV-9208IP / LKV-9216IP 8/16-port IP KVM Switch
QUICK REFERNCE SHEET
Prima IP KVM Switch Operation
Commands Hotkeys / OSD Menu / Web Management Viewer Menu
Command Hotkeys OSD control1 Prima IP Web Prima IP Viewer Description
Select Computer
Next lower channel
Next higher channel
Next lower bank
Next higher bank
Autoscan Beep Sound On/Off
Change Computer Name
Local Console Authentication Local Console page --
ScrLk + ScrLk + (a) + (b) + (y) + (z)
(ab = bank no. ; xy = channel no.)2
ScrLk + ScrLk + ↑ (arrow up)
ScrLk + ScrLk + ↓ (arrow down)
ScrLk + ScrLk + PgUp PgUp (w/ OSD Menu) -- --
ScrLk + ScrLk + PgDn PgDn (w/ OSD Menu) -- --
ScrLk + ScrLk + B -- -- --
-- -- Computers page --
Cursor keys to navigate
Enter to select
Cursor keys to navigate
Enter to select
Cursor keys to navigate
Enter to select
-- -- Select the active bank (switch) and channel
-- -- Select the next lower connected channel
-- -- Select the next higher connected channel
Select the next lower bank (switch) when with
multiple daisy-chained units
Select the next higher bank (switch ) when
with multiple daisy-chained units
Toggle on/off the beep sound for switching
confirmation
Change the computer name
[max. length = 8 alphanumeric characters]
Enable/Disable password authentication on
local console [When enabled, port switching
on local console will be restricted]
Show OSD Menu
Autoscan -- -- --
Autoscan Period
[Default = 10 seconds]
Autoscan Delay
[Default = 30 seconds]
Auto Logout Timeout Enable/Disable
[00 ~ 99 min; default = 00 min =
disabled ]
OSD Menu Timeout
[0 ~ 60 ~ 95 seconds]
OSD Title Bar On/Off
[ON/OFF]
OSD Title Bar Position
[Disabled/Left/Right]
User account and password
Notes:
1. OSD Menu control is only available when the OSD menu is activated on the screen. To activate the OSD menu, use the hotkey sequence ScrLk + ScrLk + (Space Bar). For detailed OSD operation reference, please refer to the User Guide.
When OSD Menu is active, the mouse will be locked until the OSD Menu is off.
2. Note that a, b, y and z each denotes a number key. (ab) = 01 ~ 16 ; (yz) = 01 ~ 08. For example, ScrLk + ScrLk + 03 + 06 is for bank 3 port 6. When using a single KVM Switch configuration, the default bank no. is 01, therefore hit ScrLk +
ScrLk + 01 + 12 for port 12 for a single KVM Switch configuration.
3. The password is up to 8-character length. You should remember the password since it is required for access to your KVM switch once you enable the password protection for your KVM switch. However, if you forget the password and thus
are blocked from KVM access, you should contact LINKSKEY for technical support.
3
ScrLk + ScrLk + (Space Bar) -- -- -- Activate the OSD Menu on the console screen
Viewer Quick Menu /
Scanning
-- --
-- --
--
--
ScrLk + ScrLk + T -- -- --
-- Main Menu / Setup / Title Bar -- --
-- -- User management Page --
Main Menu / Setup / Auto
Logout
Main Menu / Setup / OSD
Timeout
Video Server page /
Scanning Period
Video Server page /
Scanning Delay
-- --
-- --
--
--
Enable/Disable autoscan through every
connected channel for quick screen browsing
of each channel.
Specify the scanning period [default scanning
period = 10 sec ]
Specify the scanning delay [default scanning
delay = 30 sec. ]
Specify the time out for auto logout -- screen
/keyboard/mouse locked after timeout p
(default = 0 = Disable)
Specify the timeout for OSD menu
[default = 20 seconds; 0 = disable]
Toggle ON/OFF the OSD Title Bar
[default = OFF]
Enable/Disable and select the OSD title bar
position on your screen
Manage the accounts and passwords for local
console. [local console accepts only accounts
and passwords in upper case; while viewer
login accepts both upper case and lower case]
Page 4 of 4
Rev. 1.22 Copyright© All rights reserved. 2006
 Loading...