

Page 1
QuickInst
allationGuide
A
pplicablemo del:
LKU -UA02
KVM Switching Client Software for Windows
User-definable Hotkeys
Independent/Simultaneous Audio&PC Switching
Autoscan Delay Time Programmable
LKU -UA02
2 -port USB “KVM -in -th e -Cable” w / Audio&Mic
2 x built-in 1.5 M KVM Audio/Mic Combo Cables
Quick Installation Guide
Thank you for purchasing the LKU-UA02 USB “KVM-inthe- Cable” Switch w/ Audio&Mic Switching! With our
highly reliable and quality product, user can enjoy countless
benefits from using it.
programming, autoscanning, autoscan delay time programming,
independent/simultaneous audio&PC Switching, etc.
The LKU-UA02 USB “KVM-in-the-Cable” Switch offers USB
1.1 interface technology for Plug-and-Play and hot-pluggability.
Users can enjoy maximum flexibility and convenience with its
compact and one-piece design.
Out-of-Box Installation
Ta ke t h e C o m p ani o n Dis ke t te/C D R O M a n d th e K VM S w i t ch
o u t o f th e b o x a nd f o ll o w the s t ep s b el o w f o r installa ti o n … .
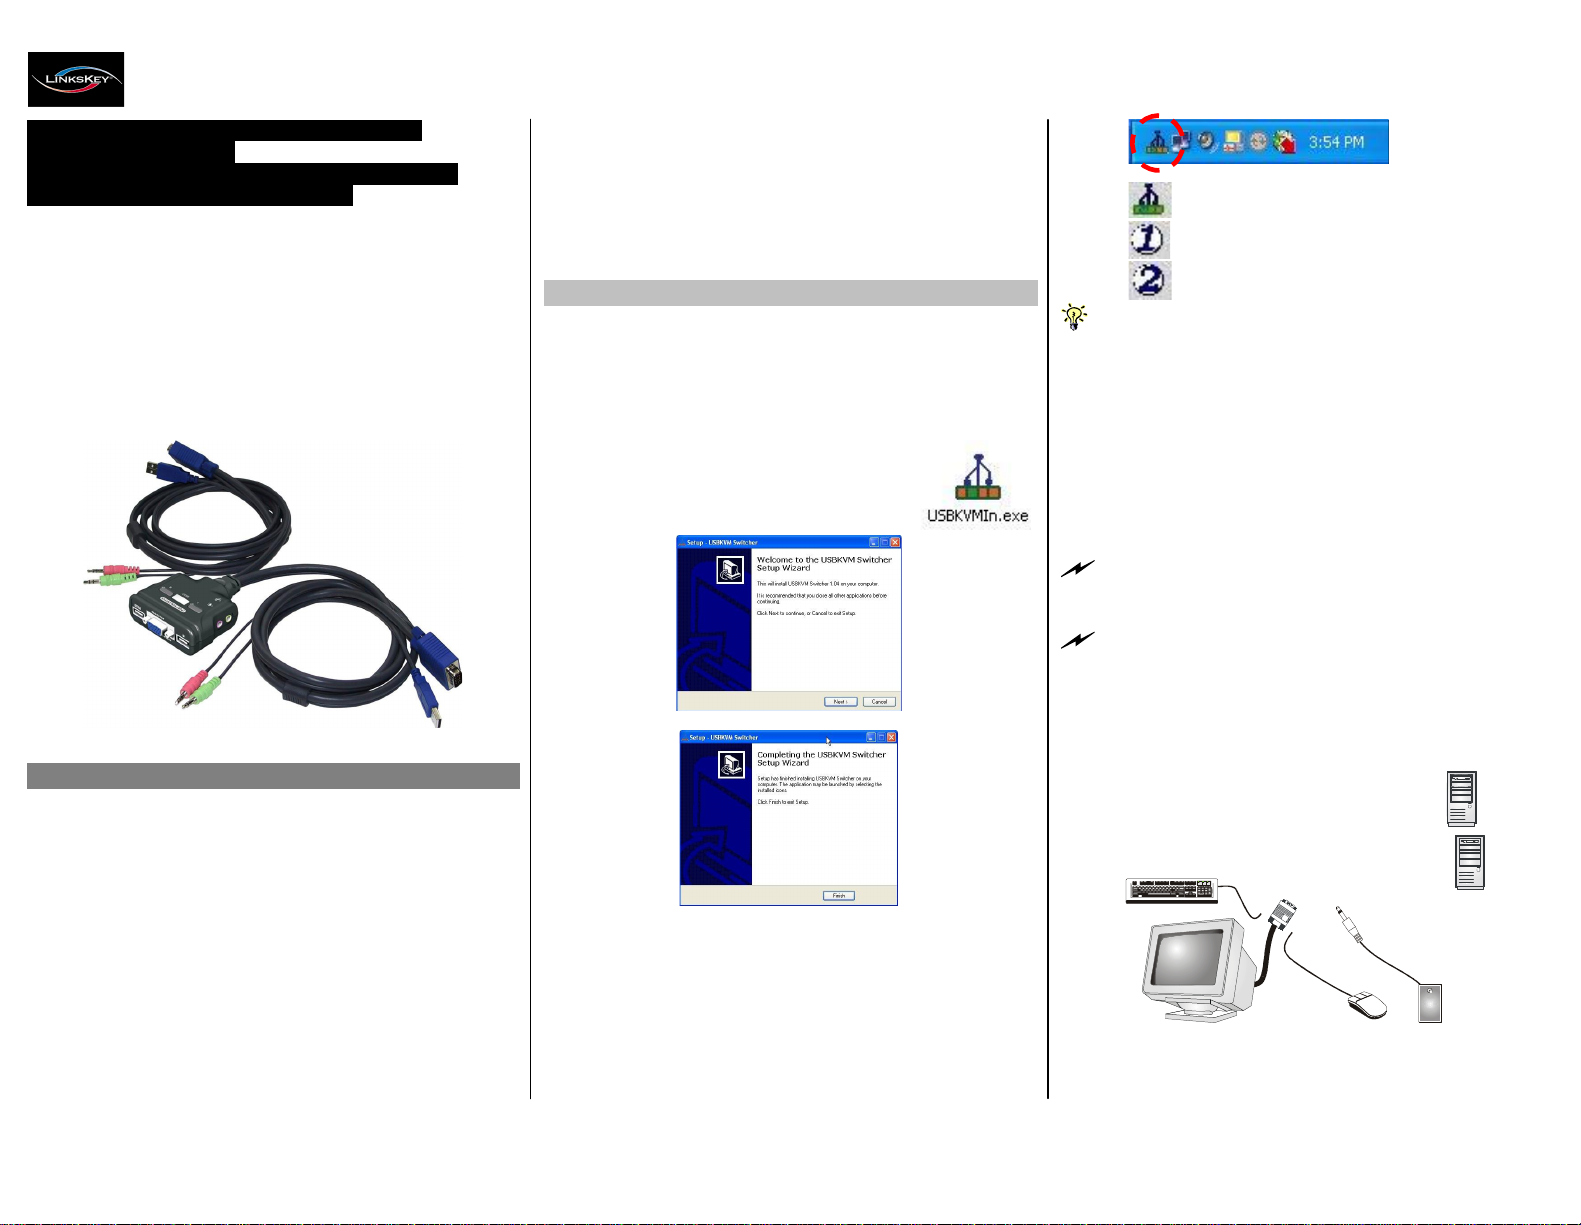
Step 1. Insert the companion CD ROM into your CD drive, and
the installer program, USBKVMIn.exe, will be run (or you
can find it with the Explorer and double-click its software
icon to start installation). Complete the
software installation on each of the
computers to be connected to the
KVM Switch.
: No liv e c o nn e ction d e tect e d
: Curr ent a c tive P C cha n nel is on p ort 1
: Curr ent a c tive P C cha n nel is o n po r t 2
The K V M S w it ch e r Softw a r e s u pp o r ts only th e W ind o ws p latfo rms.
For o t h er p la tf o r m s s u c h a s L i n u x or M a cOS, you ca n s till u s e th e
ke y b o a r d h ot k e y -
Sc r L k + S cr L K
- to s w i t ch P C.
Step 2. Connect the shared USB keyboard, mouse, monitor,
speaker/headphone and microphone each to its port on
your KVM Switch.
Step 3. Connect a set of the built-in KVM/Audio&Mic cables to a
computer’s connectors. Connect another set of cables to
another computer. Now you can operate the KVM
Switch immediately.
LKU -UA02
Introduction
Som e o l d e r co m p u te r s w i t h U S B i n te r fa c e m igh t n e ed t o m a nu ally
ena b le t h e USB opt io n i n the B I O S s etti ngs bef o re you can u s e an y
U SB de v i c es. I f yo u r U S B in t e rf a c e do e s no t w o r k, pl e a s e c h e c k t h e
U SB op tio n s tatus i n th e BIO S .
If yo u u s e W i n d o ws 9 5 / 9 8 /SE a n d h a s n ot y et i n s t a ll ed a U S B m o u s e
o n y o u r co m p u t e r , t h e r e m i g ht b e a n e rr o r m e s s a g e t e lli n g y o u t ha t
m o use i s no t de te c t e d a n d p r o m p t ing yo u to de cid e w h eth er to
ig n o r e t he s a m e m e ss a g e in t h e fu t u r e, a n d y et y o u fo u n d t h e r e is n o
m o u s e mov e m e n t to di s ab le t h is m e s s a g e … .So i t is s u gge s t e d t h a t
y o u s h o ul d i n s tall e d y o u r U S B m o u s e o n y o u r c o m p ut er f i rs t, b ef o r e
co n nec te d i t to t h is K V M Switch .
The LKU-UA02 is a 2-port USB “KVM-in-the-Cable” Switch with
audio and microphone switching function. It provides 2 sets of
built-in USB KVM combo cables to save you cabling troubles.
And its Audio and Microphone switching function offers you
uninterrupted multimedia experience. It allows you to access,
control, boot and reboot multiple USB-enabled multimedia
computers using only one USB keyboard, mouse, monitor and a
speaker set and microphone.
For PCs running Windows operating systems, it also provides an
innovative and easy-to-use KVM Switcher Software -- a small
windows client application to facilitate your KVM switching
operations such as PC selection and hotkey sequence
After the installation is completed, you will see a KVM
Switcher icon on the system tray of your window
desktop. Just right click to evoke the operation menu
and double-click to evoke configuration box. For
operation details of the KVM Switcher software, please
refer to the Operation Quick Reference.
Co n figu rati o n D iagram
Rev. 1.2 Copyright© All rights reserved. Sep 2004
Page 2
Operation
Quick
Reference
Applicable
model: LKU-UA02
USB “KVM-in-the-Cable” Operation Quick Reference
There are three methods to control your KVM Switch for
PC and Audio/Mic channel selection: using (1) the frontpanel push button, (2) a hotkey sequence or (3) the KVM
Switcher Software.
Face-panel button
The face-panel button allows you a direct control over KVM
switching operation. Simply press the button to switch to the
next connected PC and audio/mic channel (if binding is
enabled). By default, PC port switching and audio/mic port
switching are bound together.
You c an u se the fron t p a ne l butt o n to sw i t c h t o a n e m p t y p o r t th at is
n o t co nn e c t e d w ith a n y co m p u t er . No r m ally , if yo u u s e k e y b o a r d ho t ke y s
or t h e K V M S w i t c h e r s of t w a r e , yo u will not be a b le to s w i t ch t o an e m p ty
por t.
Keyboard hotkeys
User-definable hotkeys for PC selection:
Hotkey sequence = Ctrl + Alt + [command key]*
* Please refer to next section for keys that are qualified to
be used as a command key
Universal hotkey for PC toggle-switching:
Bot h t h e un iv e r s al hot k e y, S c r Lk + S cr L k a n d t h e u s e r - d e fi n ab l e
hot ke y , C t r l + Al t + [ co m m and ke y ]
W I L L NO T
a llow y ou to swi t c h to a n
empt y p o r t t hat is n o t co n nec te d w i th a n y c o m p u t e r . To f o r c e yo u r K V M
to swi t ch to an e m pty po r t, j u s t p r e ss t h e f r o n t - p an e l b u tt on to s w i tc h .
Universal Hotkey sequence = ScrLk + ScrLk
* For operating systems other than Windows, you can still use
this special hotkey to facilitate PC switching.
E a ch k e y s t r o k e w it h i n a h o t k e y s e q u e nc e s h o u l d b e p r es s e d w i t h in 2
s e c o n d s. O t h e r w i s e, t he hot k e y se q u e nc e w ill n o t b e val i dat e d.
A fter p erfo rm p o rt s w it ching , yo u ha v e t o wait till t he K VM S witch
ic on s h ow s f or t h the ta r get po r t be for e yo u c an p e r f o r m ne xt s wit c h in g
aga i n . T h e K V M Switc h er ico n co u l d b e fo u n d on t h e s y s t e m tr a y o f yo u r
W i n do w s d e s k t o p a ft e r i t s i n s t a ll a t io n .
KVM Switcher Software (only for Windows platform)
In a dditio n to P C swit c hin g , t h e K V M S wit cher S oft w a re a l s o
allow s y ou m ore advan ced fu nct ion s s uch as de s cribed in th e
next s ec tion… .
.
KVM Switcher Operation Reference
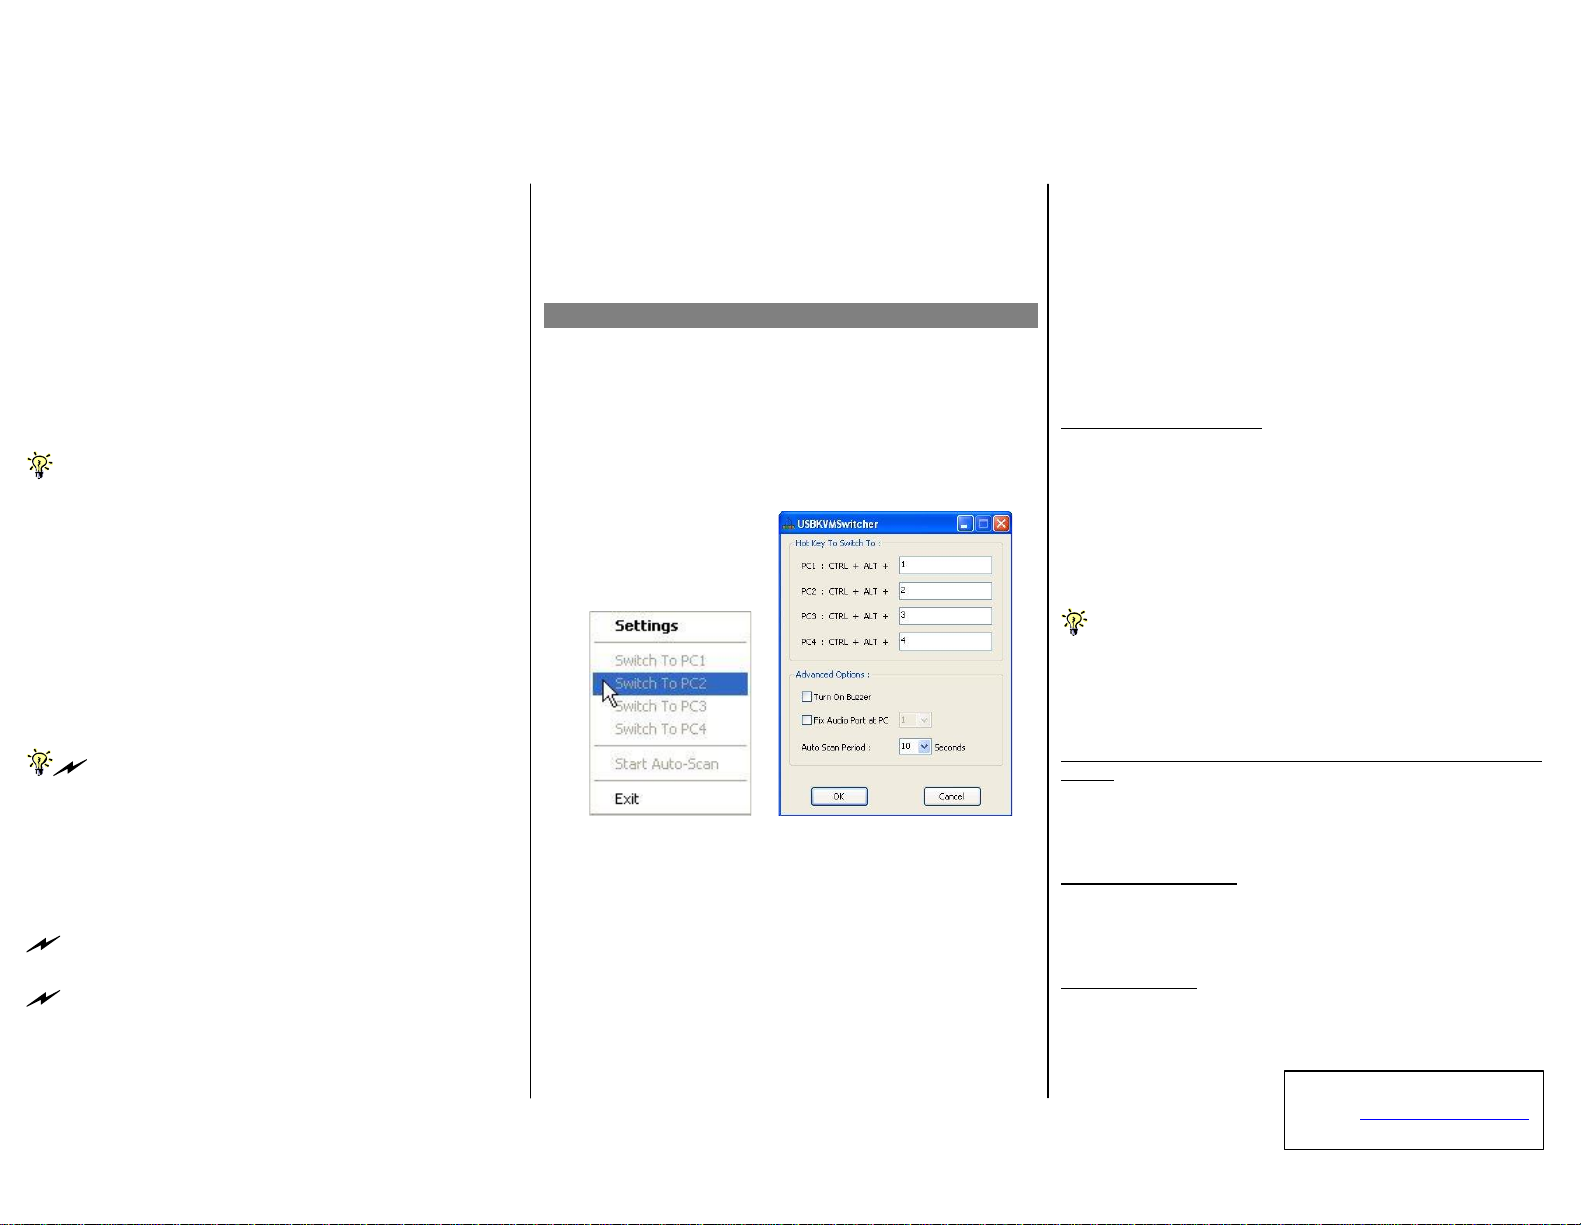
Switch to PC x by Operation Menu
Right-click the KVM Switcher icon to evoke the operation
menu, then select whichever PC that is available for switching.
Once you select a PC channel, it will immediately switch to
that PC. Note that the unconnected port(s) or the active port
will be grayed-out and non-selectable.
KVM SWITCHER Operation Menu KVM SWITCHER Configuration Dialog Box
Switch to PC x by Keyboard Hotkeys
Hit the hotkey according to your current hotkey definition:
Hotkey sequence = Ctrl + Alt + [command key]*
* The factory default hotkey setting is Ctrl + Alt + 1/2/3/4
for PC 1/2/3/4. You can also use ScrLk + ScrLk to switch PC.
Start Auto-scan
Right-click the KVM Switcher icon to evoke the operation
menu, then select
Sta r t A u t o -S c a n
to activate autoscanning.
Stop Auto-scan
(While autoscanning) right-click the KVM Switcher icon to
evoke the operation menu, then select
Sto p A u to - S can
to de-
activate autoscanning.
KVM Switcher configuration
Right-click the KVM Switcher icon and select
Settin g s
or
double-click the icon to bring up the configuration dialog box.
Define Hotkey commands
You can specify the command key as you like by typing it in.
For example, you can specify the hotkey for switching to PC 1
as CTRL + ALT + A by typing an A (not case-sensitive) in the
editable field.
Hotkey Sequence = CTRL + ALT + [command key]*
* The command key is user-definable via the configuration
dialog box
Ex c e p t t ho s e c o n tr ol k e y s s u c h a s A lt , C t r l, Sh i ft , CA P S , T a b , E s c a n d
th o se f u n ct io n s k e ys a nd e di t k eys , all oth er k e y s o n the k e yb oa r d,
i n cl u d i n g th o s e n u m b e r k e ys o n t h e n u m b e r pa d a r e all q u ali f i e d to be
use d a h o t k e y c om m and k e y. I n a d diti o n to t he softw are K V M Sw i t chi ng
by th e o p e r a tion m e n u a n d t h e u s e r - d efi n e d h o t ke y s , you can alw a y s u s e
th e u ni ver sa l ho t k ey fo r P C switch in g – S cr L k + S crL k
Turn On Buzzer (optional feature, not available on LKU-UA02
model)
This is feature is not available on this model. [Check this
option to turn on the buzzer sound for port switching/hotkey
execution confirmation.]
Fix Audio Port at PC x
Check this option and then select the PC to fix the audio/mic
channel to the selected PC. Once this option is checked, the
audio/mic channel will be fixed and become non-switchable.
Auto Scan Period
Select the Autoscan period from 10 ~ 60 seconds with an
increment of 5 seconds. The Autoscan period is the time your
KVM Switch will wait to switch to next PC.
Rev. 1.2 Copyright© All rights reserved. Sep 2004
Technical Support
E-mail: btitech@linkskey.com
Website: www.linkskey.com
 Loading...