

Page 1

USB2.0 Card reader Manual
Index
Product Features
. Manual for Windows 98 SE
1.
Installment under win 98SE 3
1.1.
1.2. Annotation 7
1.3. Check if the installment of driver under win98 SE 8
…………………………………………….2
2. Manual for Win ME, 2000, XP
2.1. Installment under Win ME, 2000, XP 10
2.2. Check if the installment of driver under Win ME, 2000, XP 14
2.3. Un-installment under win 98SE/ME/2000/XP 15
3. Installment Under the MAC 10.2.8 and 10.3.2
18
4. Installation Under Linux 20
1
Page 2

USB2.0 Card reader Manual
USB2.0 Card reader
The fast and easy way to transfer images, music, and data to your computer!
With all of the different types of memory cards available today, the Multi-Card
Reader is the most versatile solution for transferring files to your computer. You are
able to transfer files from devices such as digital cameras, video camcorders, MP3
players and even personal digital assistants (PDAs). Its compact size and USB
connectivity make it convenient to take it with you wherever you go.
Feature
1. Compliance with USB2.0 and 1.1
2. The device can work without plug adapter support NAND flash memory/Compact Flash
Card/IBM Micro Drive/Smart Media Card/ Multi Media Card/Security Digital/Card/Memory
Stick Card/Memory Stick PRO Card .
3. Device driver-less advantage when used in Windows ME/2000/XP, Mac (10.2.x and above),
and Linux (2.4.x and above) everywhere even without driver disk/CD
4. Provide LED indicators for card reader power supply and the accessing of flash card
System Requirement:
1. Windows 98se ,ME ,2000 ,XP
2. Mac 10.2.8 , 10.3
3. Linux 2.4.x and above
2
Page 3
USB2.0 Card reader Manual
1. Manual for Windows 98 SE
1.1. Installment under win 98SE
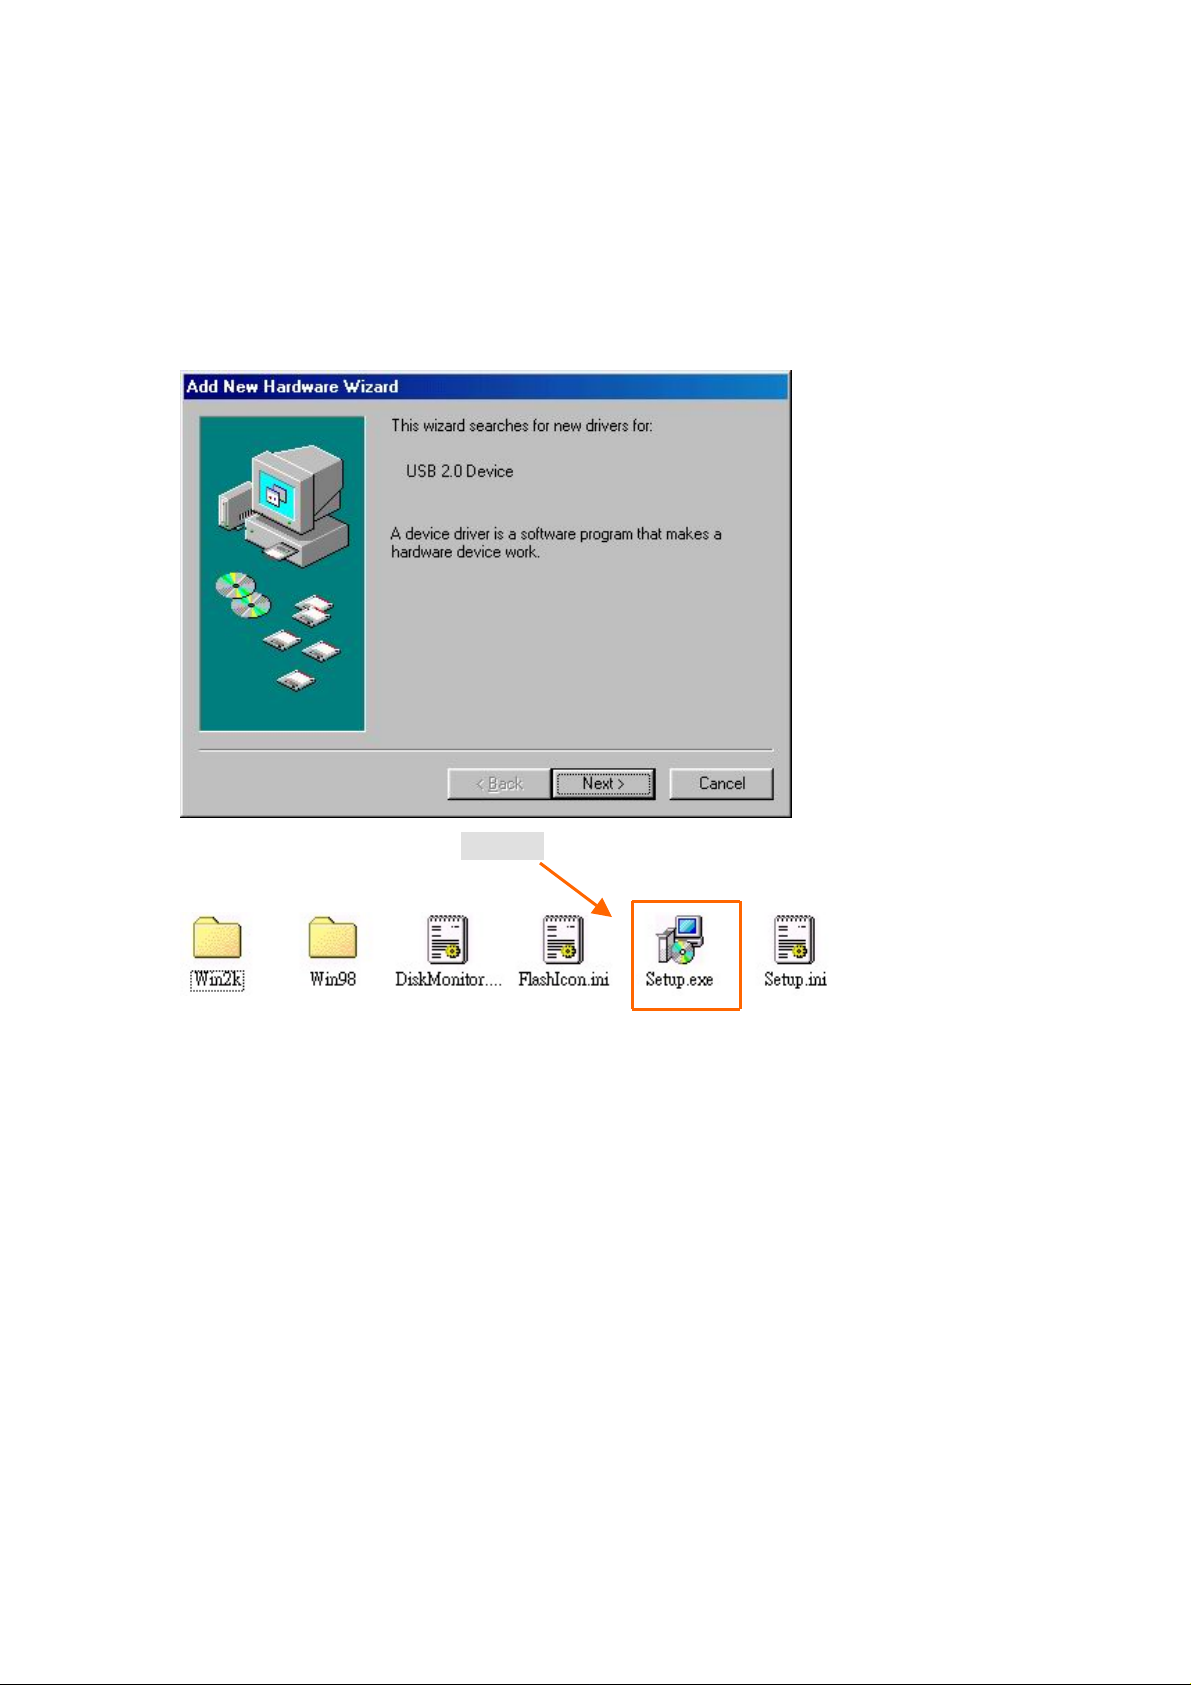
1. After you plug the Card reader into the USB2.0 Port, there will be a screen named
“Add New Hardware Wizard” on the desktop. Please click “Cancel” to continue.
2. Please find the file named “Setup” in the folder of driver CD and then double click
this file to install the driver.
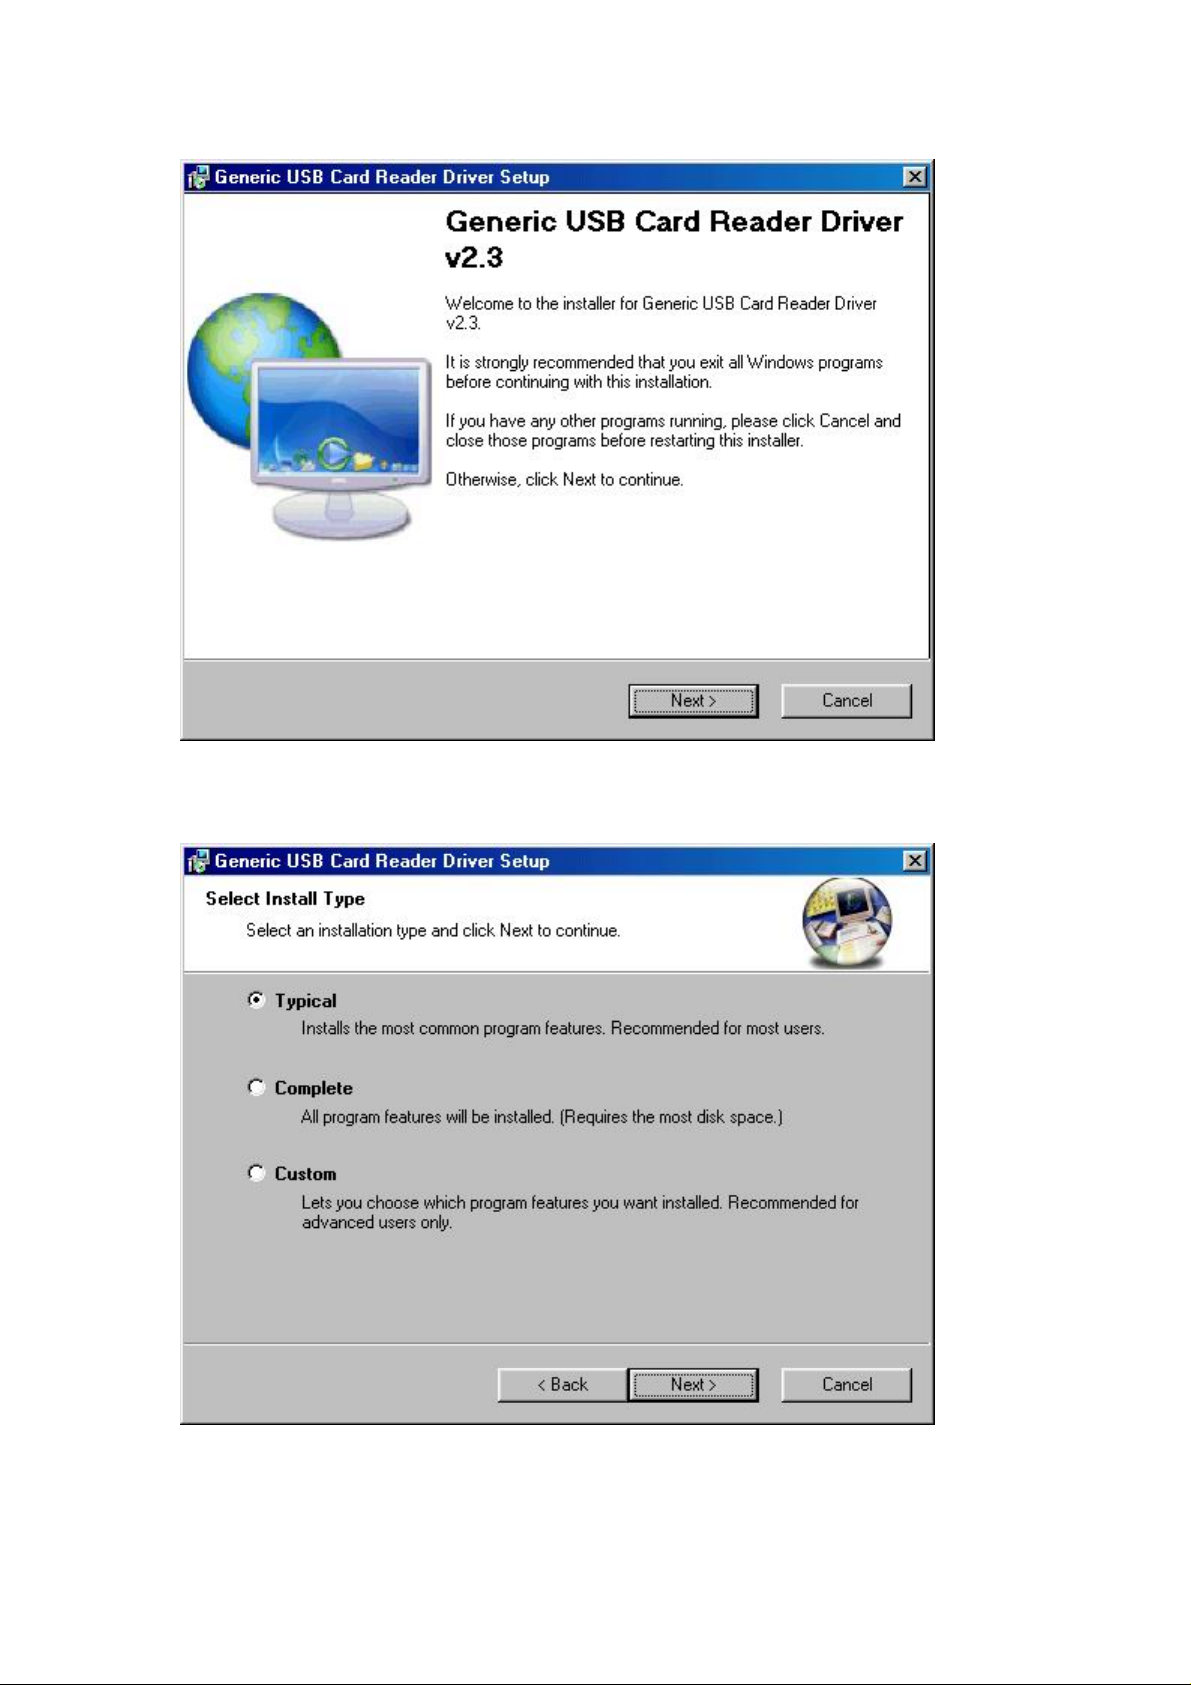
3. Then the setup dialogue will appear and then click “Next “ to continue.
3
Page 4
USB2.0 Card reader Manual
5 Choose one of the Install Type (Typical type is recommanded). Then select
“Typical” and click “Next “ to continue.
4
Page 5
USB2.0 Card reader Manual
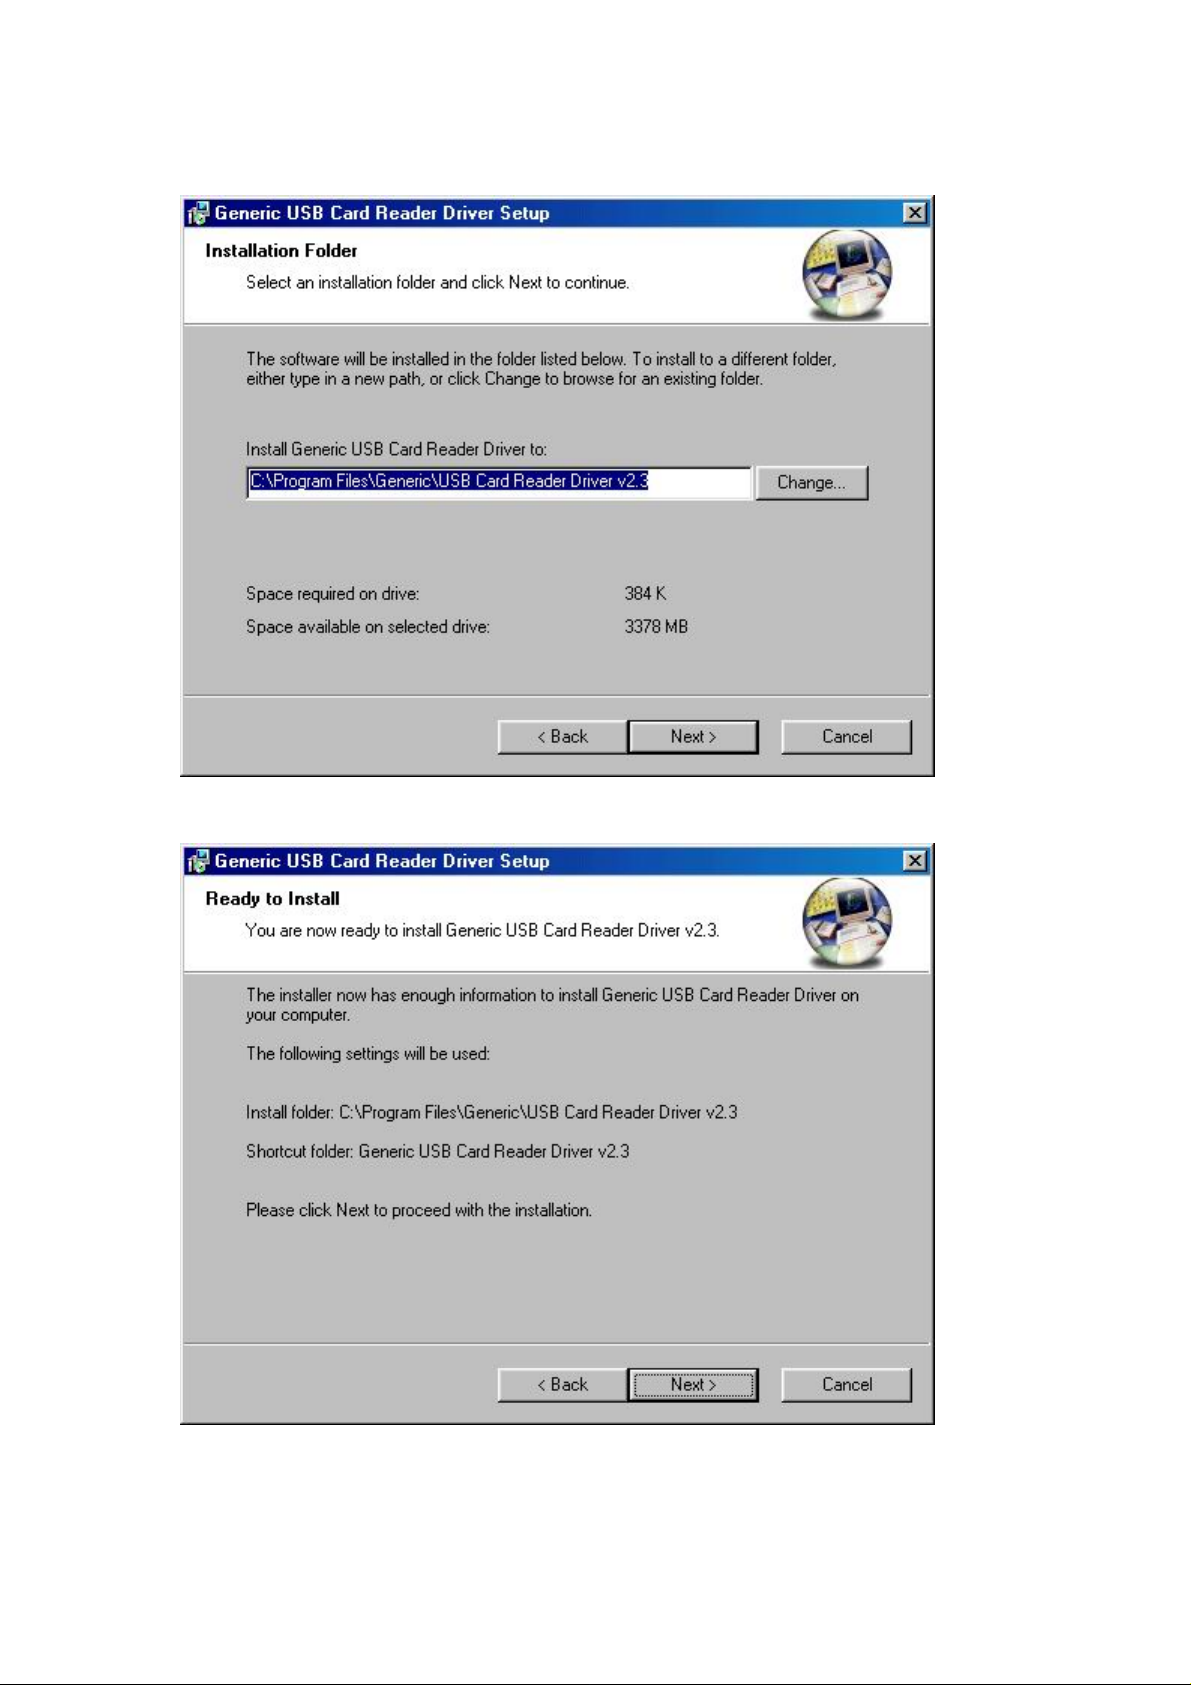
6. Select installation folder, and then click “Next “
7. Click “Next “to continue .
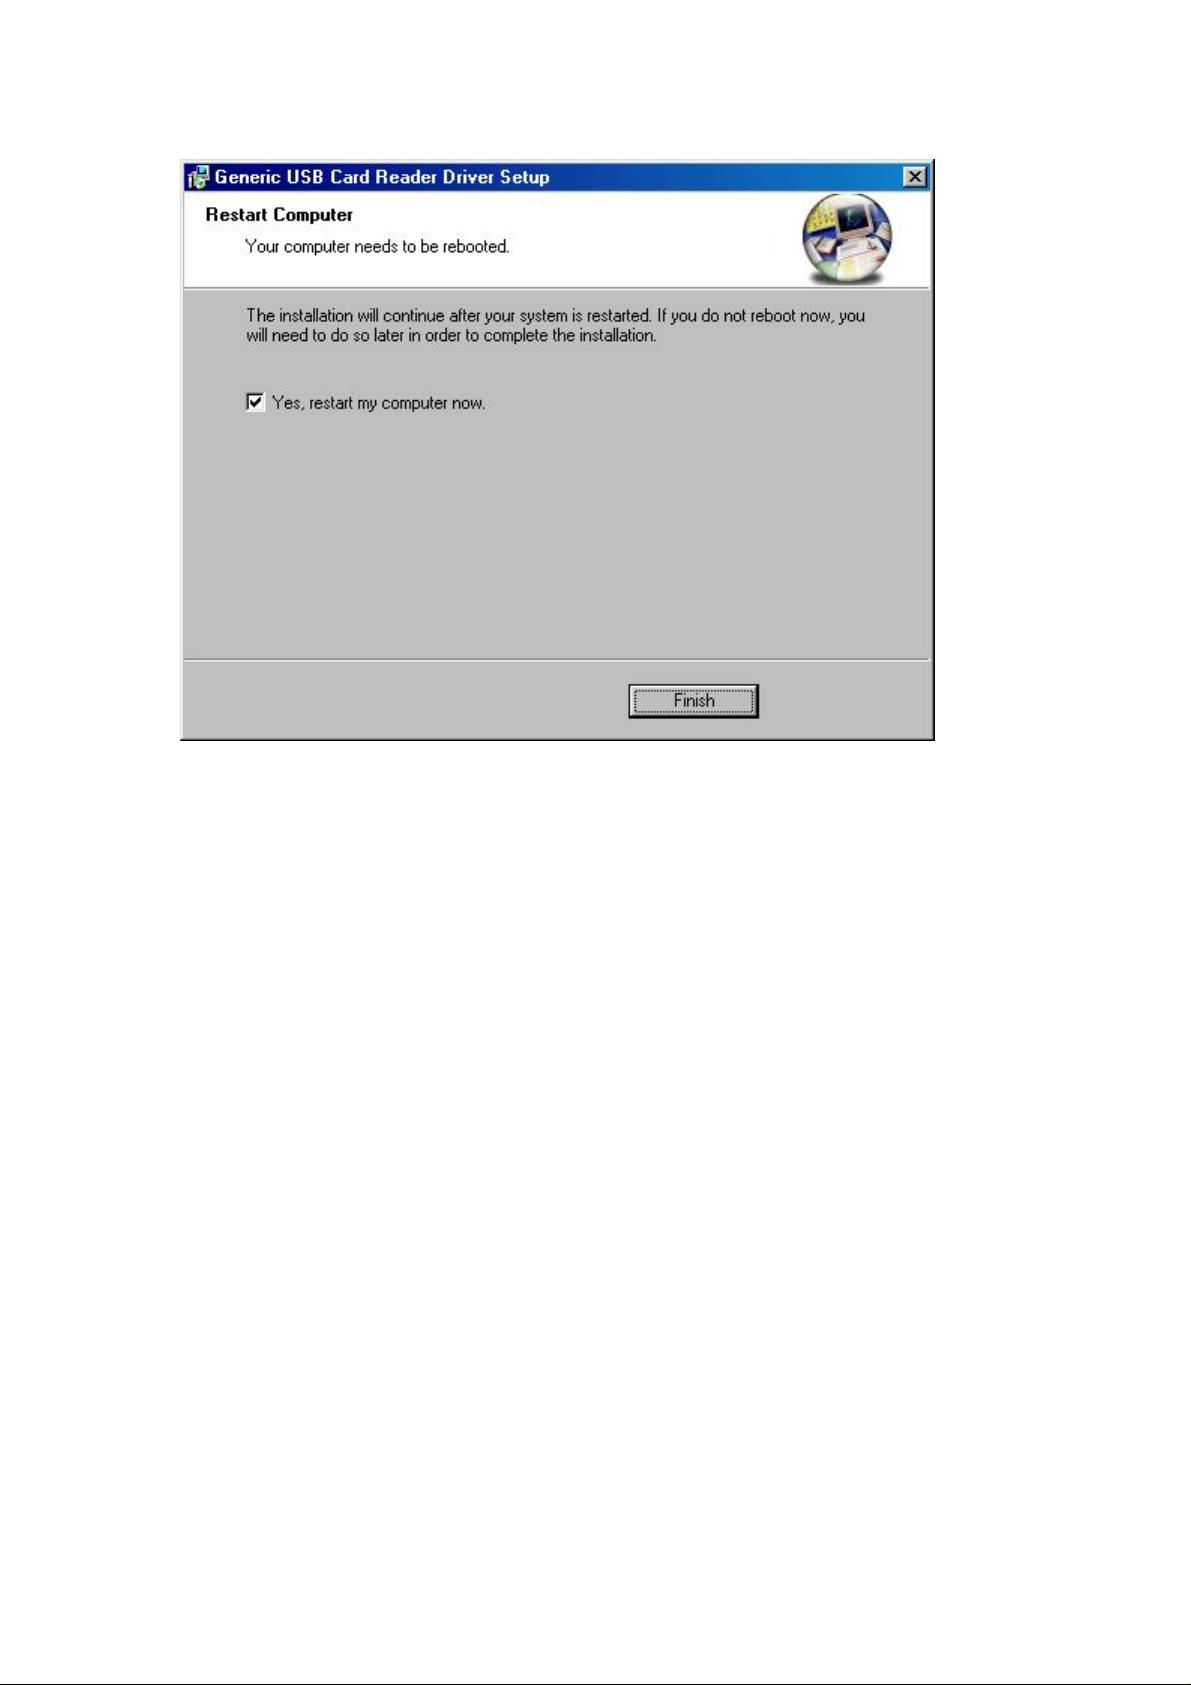
8. Finally, please Click “Finish” to finish
5
Page 6
USB2.0 Card reader Manual
6
Page 7
USB2.0 Card reader Manual
1.2. Annotation:
If you select the custom type for installment mentioned above, the following steps
will emerge
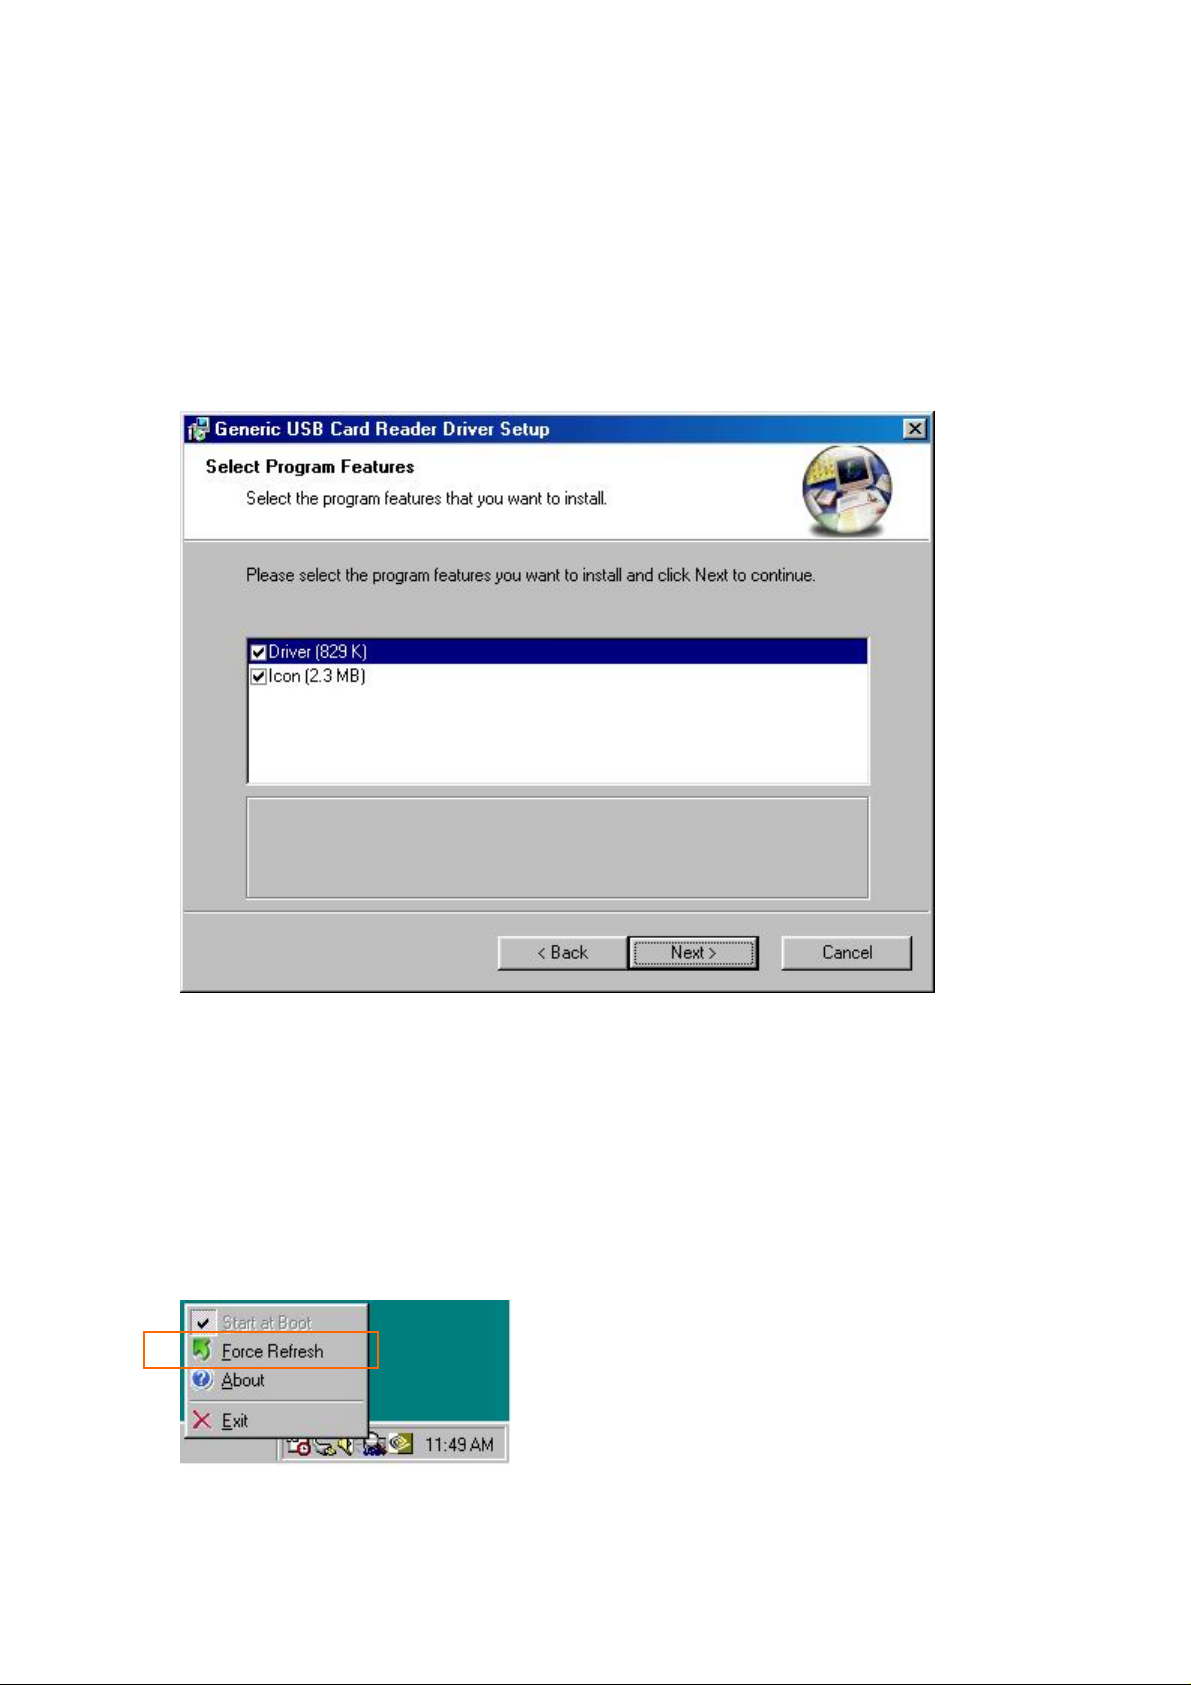
Step1. The following screen will appear. You have to choose the following both item
and then click “Next” to continue.
Step2 The following marked picture is Disk Monitor that used to detect the
situation of memory card disk. “Start at boot” means that the screen showing the
status of four memory card disks will appear automatically after booting the compute.
Besides, when “Force Refresh” is clicked, this screen will present to show the status
of memory card disk
Please click the “Force Refresh” of disk monitor showed as the marked picture to
detect the status of disk.
.
Windows 98SE
Step3 Then the special picture of four icons— disk I,J, K, L— will appear.
7
Page 8

USB2.0 Card reader Manual
1.3. Check if the installment of driver under win98 SE
Click My computer →System Properties →Device Manager→Universal Serial Bus
controllers to check if the “Generic USB2.0 Card Reader” is existed. The existence of
this item implies that the driver has been exactly installed.
8
Page 9

USB2.0 Card reader Manual
9
Page 10

USB2.0 Card reader Manual
2. Manual for Win ME, 2000, XP
2.1. Installment under Win ME, 2000, XP
The dialogue box say that the driver is built-in and you don’t need to install any
more driver.
1. Then the setup dialogue will appear and then click “Next “ to continue.
2. Choose “custom” and click “Next “ to continue.
10
Page 11

USB2.0 Card reader Manual
3. Choose “Icon” and click “Next “ to continue
Note 1:
The following marked picture is Disk Monitor that used to detect the situation of
memory card disk. “Start at boot” means that the screen showing the status of four
memory card disks will appear automatically after booting the compute. Besides,
11
Page 12

USB2.0 Card reader Manual
when “Force Refresh” is clicked, this screen will present to show the status of
memory card disk
4. Select installation folder, and then click “Next “
5. Click “Next “to continue .
12
Page 13

USB2.0 Card reader Manual
6. Finally, please Click “Finish” to finish
13
Page 14

USB2.0 Card reader Manual
2.2. Check if the installment of driver under winME/2000/XP is
actually completed
1: Right-click on “My Computer” →“System Properties” . → Click on” Device Manager” →
double click “Disk drivers” under “Device Manager” to check if the items- “ -CFC USB
Device” , -MSC USB Device, -SDC USB Device and -SMC USB Device A.-is existed.
The existence of the four items implies that the driver of USB2.0 PCI have been exactly installed.
2.Then the special picture of four icons— disk I,J, K, L— will appear.
14
Page 15

USB2.0 Card reader Manual
2.3. Two Kinds of methods for Un-installment under win
98SE/ME/2000/XP
Method 1. Select “Generic USB Card Reader Driver v2.3” and then click “add/remove
to uninstall.”
Method 2
1. Click start → programs→ Generic USB Card Reader Driver V2.3→→Uninstall
Genetic USB CARDREADER Driver v2.3
15
Page 16

USB2.0 Card reader Manual
2. click “Yes “
3. click ” Yes “
4. click “Finish” to reboot computer
16
Page 17

USB2.0 Card reader Manual
17
Page 18

USB2.0 Card reader Manual
3. Installment Under the MAC 10.2.8 and 10.3.2
Because the diver of card reader have been build in the win Mac, the O.S. will
automatically complete the installment of driver after inserting memory card in the
card reader. You only need to check if the driver of the devi ce was exactly installed.
Please follow the instruction mentioned below to verify completion of the install of
the driver
1. After you plug the card reader into the USB2.0 Port in your PC, the four icons- CF,
No Name and Take ITSO will appear on the screen . Then double click one the of the
icons- including “10.3.2”, “10.2.8” and “10.1.5”-on the screen (Deciding to click
which icon depends on what version that you are using. For example, if you use the
Mac 10.3.2 , please click the icon named “Mac 10.3.2”.)
Figure 1
2. After double clicking on one of the above mentioned item- 10.1.5 , 10.2.8 and
10.3.2-the screen of “Application” – which show as figure2 will present on the
desktop.
18
Page 19

USB2.0 Card reader Manual
Figure2
3. Then double click the “Disk Utility” to check if the four Disks- USB2.0 Compliant
Compact Flash Card Disk, U SB2.0 Smart Card Disk , USB2.0 Smart Card Disk and
USB2.0 Memory Stick Disk-showed in Figure3 are all existed or not. If the four Disks
are all existed, you have succeed install the driver of the card Reader.
Figure 3
19
Page 20

USB2.0 Card reader Manual
4. Installation Under Linux
This document was modified from
"http://www.linux-usb.org/USB-guide/book1.html" which was written by Brad Hards.
System Requirement:
kernel versions 2.2.7 and later contain the USB code.
Install Card Reader step by step:
1. Backup Kernel
#cd /usr/src
#cp linux-2.4 linux-2.4.bak
#cp /boot/vmlinuz vmlinuz.bak
2. configure USB into kernel. Use of "make menuconfig" is recommended.
Under "USB support", you need to select "Support for USB". You also need to
select either UHCI (Intel PIIX4, VIA, ...) support, UHCI Alternate Driver (JE)
support or OHCI-HCD (Compaq, iMacs, OPTi, SiS, ALi, ...) support. Which one you
select is dependent on what kind of motherboard or adapter you have.
select "USB Mass Storage support"
select "Preliminary USB Device Filesystem"
select "SCSI support"
select "SCSI disk support"
select "/proc support"
5. make dep (advanced user)
4. Append one line into /etc/modules.conf, then reboot Linux
options scsi_mod max_scsi_luns=8
*********************************************************************
. Rebuild the kernel and the modules (if you configured to build as modules),
and install the new kernel and the new modules. Reboot the system.
If you are using modules, you need to load the following modules:
a. usbcore.o
b. usb-uhci.o, uhci.o or usb-ohci.o
c. usb-storage.o
20
Page 21

USB2.0 Card reader Manual
Inspect the kernel logs. If there isn't anything that could be USB related,
likely causes are use of the wrong driver (UHCI when you needed OHCI or
OHCI when you needed UHCI), not physically installing the hardware,
a BIOS configuration that disables USB or stuffing up the configuration or
installation of the kernel.
Use the mount command: mount -t usbdevfs none /proc/bus/usb. Note that the
'none' keyword is arbitrary.
If you do not want to have to mount the filesystem each time you reboot the
system,you can add the following to /etc/fstab after the /proc entry.none .
/proc/bus/usb usbdevfs defaults 0 0
*********************************************************************
5. Edit /etc/fstab
The exact syntax depends on the Card Reader. The best way is to make suitable
entries in /etc/fstab. The suitable entries for Card Reader would be:
/dev/sda1 /mnt/sm auto noauto,user 0 0
/dev/sdb1 /mnt/cf auto noauto,user 0 0
/dev/sdc1 /mnt/mmc auto noauto,user 0 0
/dev/sdd1 /mnt/ms auto noauto,user 0 0
6 . To check if all flash card has been attached, type the following line at console
mode cat /proc/scsi/scsi
Linux will response as follows if the flash cards are attached successfully
[root@localhost root]# cat /proc/scsi/scsi
Attached devices:
Host: scsi0 Channel: 00 Id: 00 Lun: 00
Vendor: Generic Model: USB Storage-SMC Rev: I03A
Type: Direct-Access ANSI SCSI revision: 02
Host: scsi0 Channel: 00 Id: 00 Lun: 01
Vendor: Generic Model: USB Storage-CFC Rev: I03A
Type: Direct-Access ANSI SCSI revision: 02
Host: scsi0 Channel: 00 Id: 00 Lun: 02
Vendor: Generic Model: USB Storage-MMC Rev: I03A
Type: Direct-Access ANSI SCSI revision: 02
Host: scsi0 Channel: 00 Id: 00 Lun: 03
21
Page 22

USB2.0 Card reader Manual
Vendor: Generic Model: USB Storage-MSC Rev: I03A
Type: Direct-Access ANSI SCSI revision: 02
7. Create matching mount points in the actual file system:
mkdir /mnt/sm
mkdir /mnt/cf
mkdir /mnt/mmc
mkdir /mnt/ms
8. Mount Card Reader: Mount the detected flash card to a directory, please type the
following lines, then you can access the content of flash cards from the mapping
directory.
mount /dev/sda1 /mnt/sm
mount /dev/sdb1 /mnt/cf
mount /dev/sdc1 /mnt/mmc
mount /dev/sdd1 /mnt/ms
Note:
Note that the above entries assume you have no other SCSI devices.If you do have
other devices, then the USB disk may not be /dev/sda, but could instead be /dev/sdb,
/dev/sdc or some other device.
22
 Loading...