

Page 1
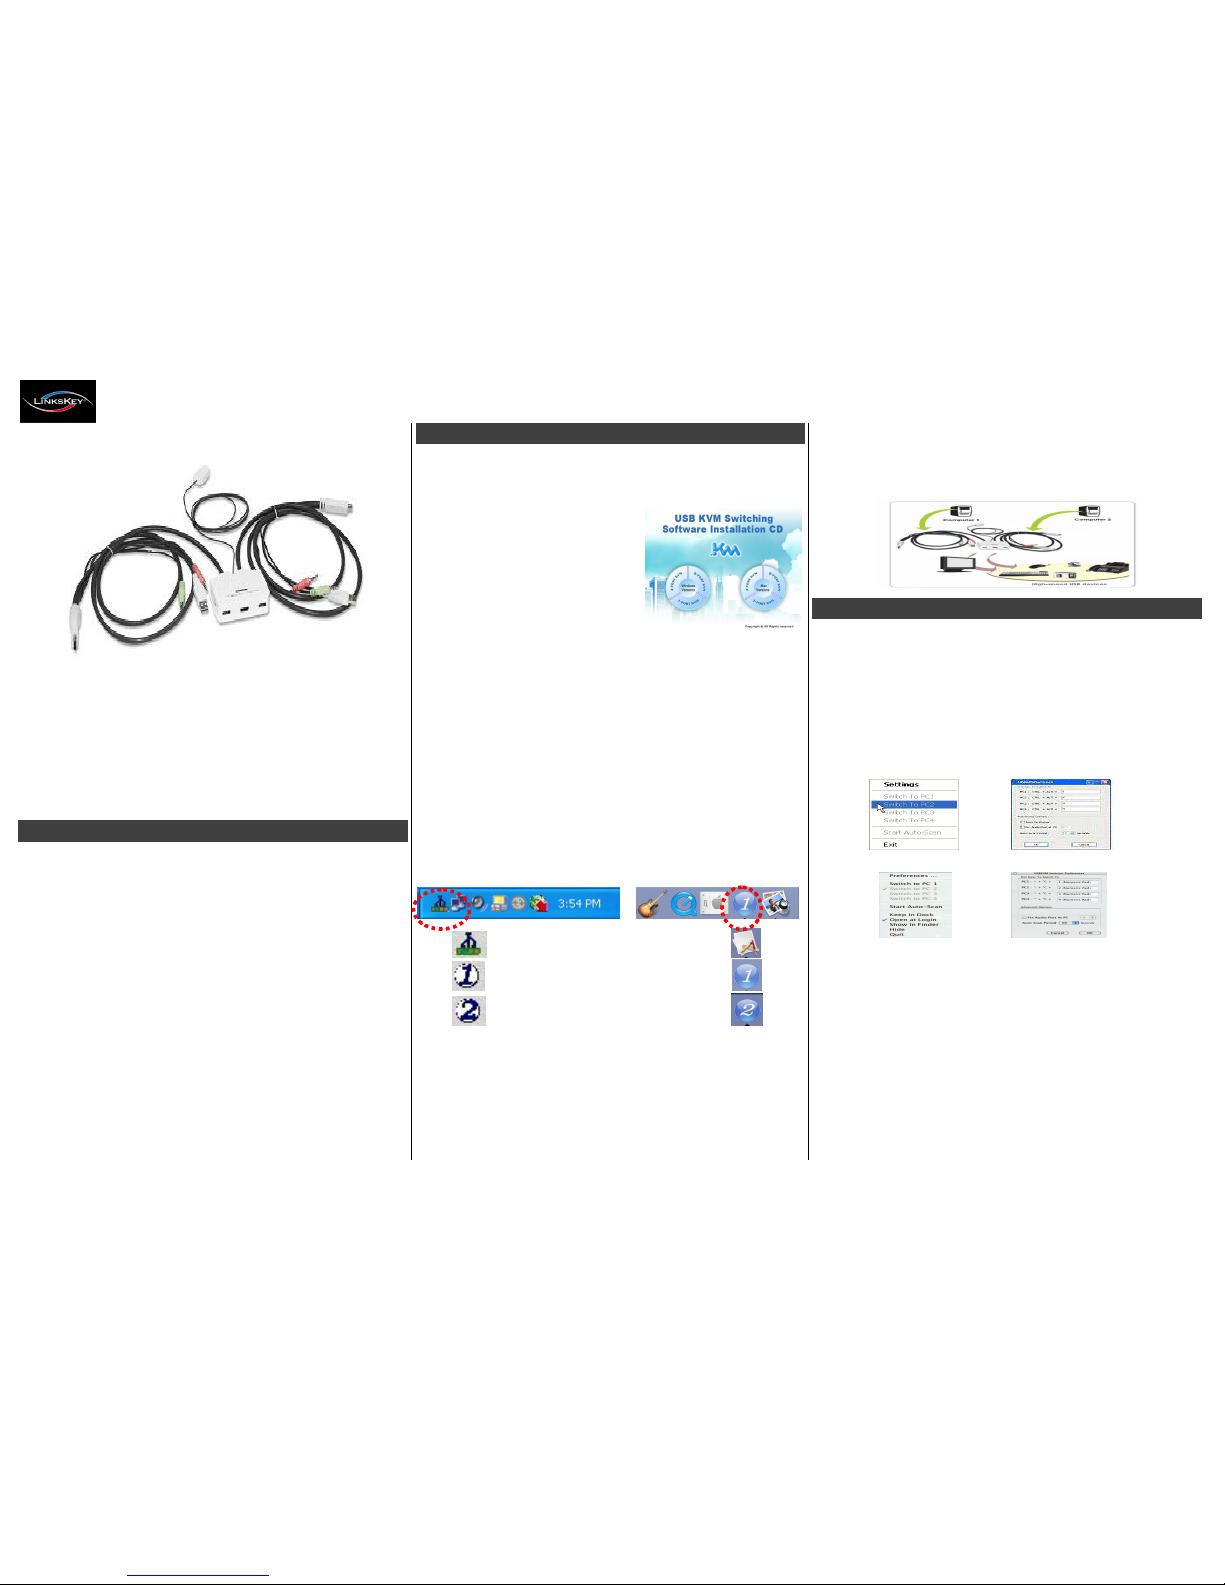
Quick Installation Guide Applicable Model : LDV-342ARC 2-Port HDMI USB Cable KVM Switch
1
Quick Installation Guide
Quick Installation GuideQuick Installation Guide
Quick Installation Guide
LDV-342ARC
2-Port HDMI USB Audio&Mic KVM
w/ Integrated Cable
Thank you for purchasing the LDV-342ARC 2-Port HDMI USB
Audio & Mic Cable KVM Switch! With our highly reliable and
quality product, you can enjoy countless benefits from using it.
INTRODUCTION
To ensure ultimate video compatibility requirements on recent
operating systems, the LDV-342ARC 2-Port HDMI USB Audio &
Mic Cable KVM
Switch,
features advanced Active Sync
Replication (A.S.R.) technology which supports all-time full DDC
emulation so that the video compatibility will be as constant and
stable as it should be. This all-time full DDC emulation can get rid
of those problems that are related to the absence of appropriate
DDC data on the KVM switch when port switching is taken place.
Equipped with LDV-342ARC Cable KVM Switch for computers
running Windows/Mac operating systems, a KVM Switching
Software will facilitate your KVM switching operations such as
computer selection, hotkey sequence programming, autoscanning, auto-scan delay time programming, and
independent/simultaneous audio switching, etc.
The LDV-342ARC Cable KVM Switch offers USB 2.0 interface
technology for Plug-and-Play. In addition to connect to mouse and
keyboard, these two USB 2.0 ports can also be connected to other
high-speed USB devices. You can enjoy maximum flexibility and
convenience with its compact and one-piece design.
INSTALLATION
Note: The LDV-342ARC Cable KVM Switch does not require any
drivers from installation CD-ROM to operate.
1. Use provided installation CD-ROM and follow the steps below
for KVM Switching Software
installation.
2. Insert the installation CD-ROM
into your CD-ROM drive, and
the installation menu will appear
(or double-click the Autorun.exe
on the installation CD-ROM If
the Autorun feature has not
been enabled on your
computer).
3. For Windows User: Click on the specific port for Windows
Versions to start KVM Switching Software installation. When
the installation is finished, right-click on the KVM Switching
icon in the system tray of your desktop to evoke the operation
menu.
4. For Mac User: Click on the specific port for Mac Versions to
start KVM Switching Software installation. If it does not start,
copy the file (*.pkg ) and install from local hard disk. When the
installation is finished, double-click on the KVM Switching
icon in the dock to evoke the configuration dialog box.
Note: The KVM Switching Software supports Mac OS 10.4 (Tiger)
and later. Earlier versions of the Mac OS might not work well.
Windows Mac
No live computer detected
Current port 1 computer is selected
Current port 2 computer is selected
5. Connect the shared USB keyboard, mouse, HDMI monitor,
speaker, and microphone to its relevant console port on the
KVM Switch.
Note: The HDMI connection carries both digital audio and video
signals from video card if supported.
6. Connect a set of KVM combo cable to the first computer, and
the other set to the second computer.
7. Now you can operate the Cable KVM Switch.
Note: If your keyboard and mouse use only one console USB
port on the KVM Switch, you can connect any other
USB device to the other console USB port on the KVM
Switch to share between the connected computers.
OPERATION
There are three methods to control your Cable KVM Switch.
(1) QuickSwitch Button (a wired remote control)
The QuickSwitch button is a wired remote control that allows
you a direct switching control. Simply press the button to
toggle between the two computers.
(2) KVM Switching Software (Windows & Mac platform)
For more information regarding the KVM Switching Software,
please refer to the “Quick Reference Sheet”.
Windows: Operation Menu Configuration Dialog Box
Mac: Operation Menu Configuration Dialog Box
(3) Keyboard Hotkeys
For Windows, you can switch computer by using hotkeys “Ctrl
+ Alt + [command key]” ( press three keys simultaneously ),
wh ic h is defin ab l e th rou gh KV M Sw it c hi ng So ftwar e.
For operating systems on PC platform such as Windows
and Linux, you can also use default hotkeys ScrLk + ScrLk.
(Each keystroke within a hotkey sequence should be pressed
within two seconds. Otherwise, the hotkey sequence will
not be validated.)
For Mac, you can switch Mac by using hotkeys “Command +
Option + [command key]” (press three keys simultaneously),
wh ic h is defin ab l e th rou gh KV M Sw it c hi ng So ftwar e.
Pl eas e see mo r e d et a il s in Quic k Ref e re n ce Sh eet .
Page 2
Quick Installation Guide Applicable Model : LDV-342ARC 2-Port HDMI USB Cable KVM Switch
2
Rev. 1.1
Copyright
© All rights reserved
Notes:
1. Each keystroke within a hotkey sequence should be pressed within two seconds. Otherwise, the hotkey sequence will not be validated.
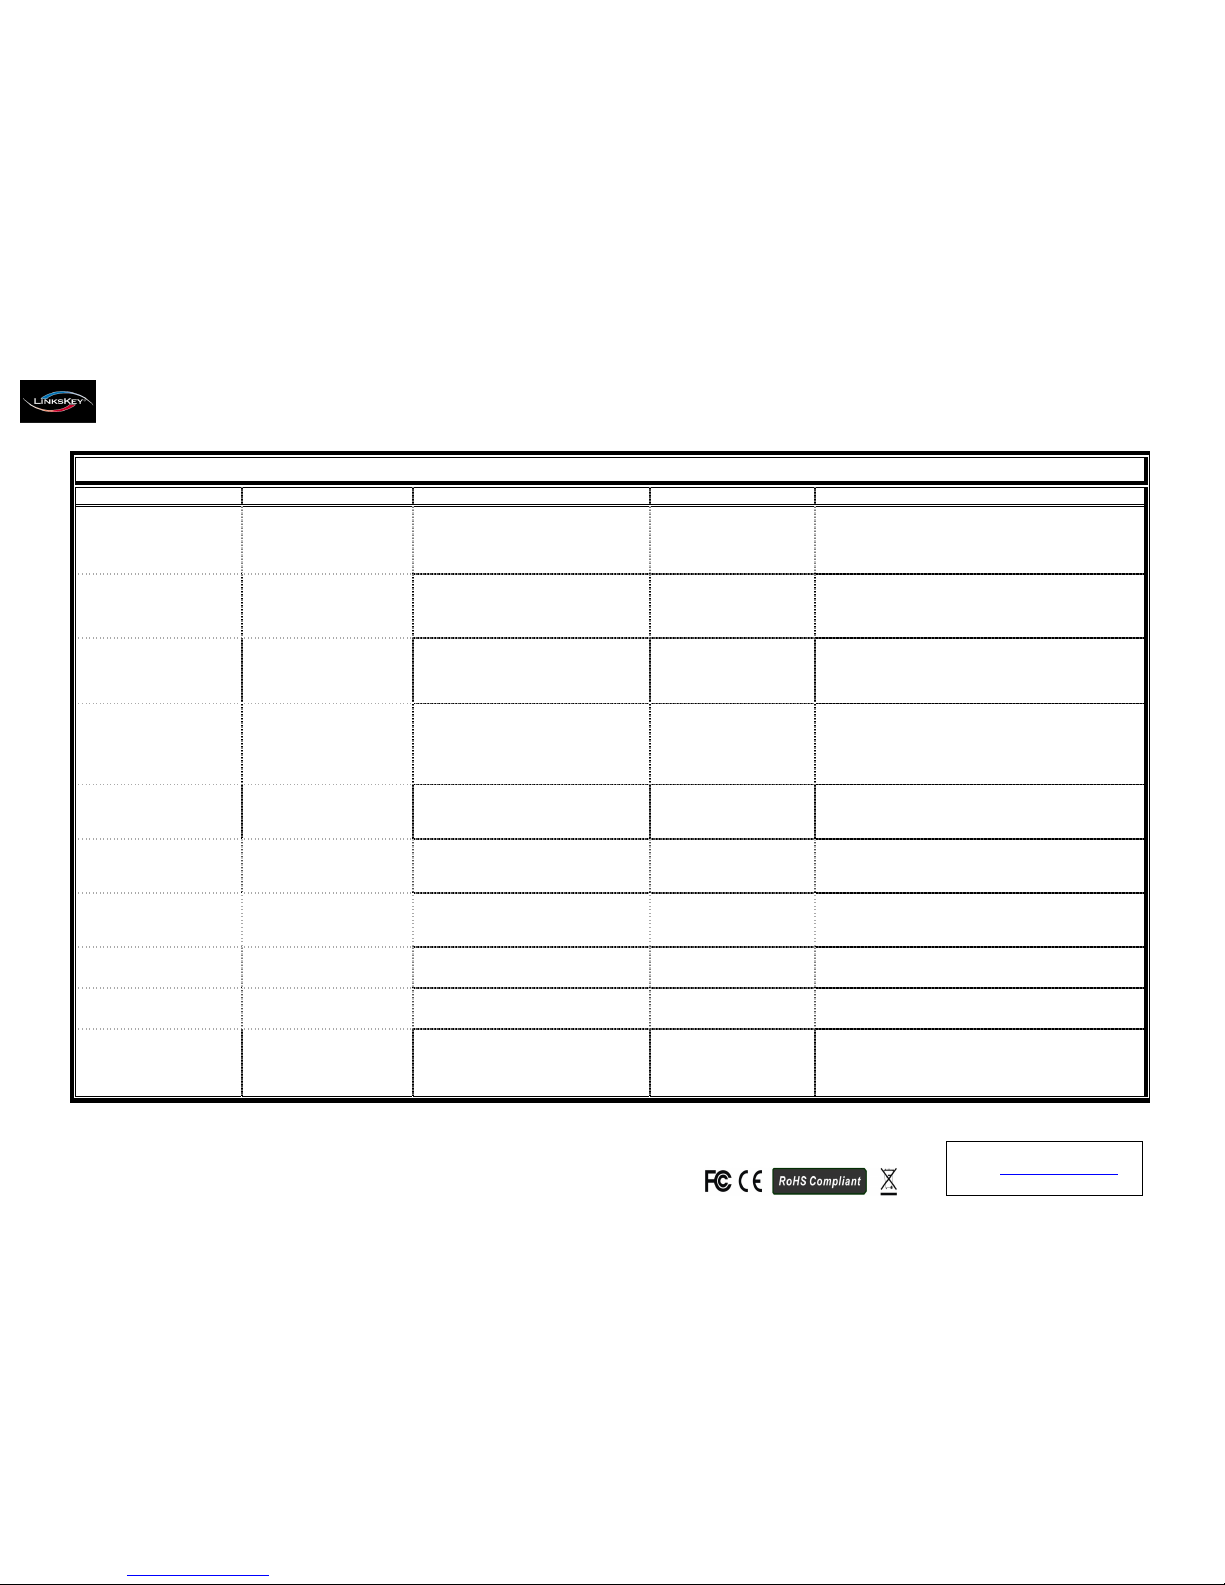
Quick Reference Sheet
Command QuickSwitch Button Switching Software Keyboard Hotkeys Description
Select PC Port
Press the QuickSwitch button
to toggle between the
connected two computers.
Open the KVM Switching icon in the
system tray or dock to evoke the operation
menu, then select the computer that you
would like to switch to.
Scroll Lock + Scroll Lock1
Select PC port
Next lower PC port
Press the QuickSwitch button
to toggle the next computer.
Open the KVM Switching icon in the
system tray or dock to evoke the operation
menu, then select the next computer that
you would like to switch to.
Scroll Lock + Scroll Lock1
Select next lower PC port
Next higher PC port
Press the QuickSwitch button
to toggle the next computer.
Open the KVM Switching icon in the
system tray or dock to evoke the operation
menu, then select the next computer that
you would like to switch to.
Scroll Lock + Scroll Lock1
Select next higher PC port
Define Hotkey Preceding
Sequence
---
Open the KVM Switching icon in the
system tray or dock to evoke the operation
menu, then select Settings (Windows)/
Preferences (Mac).
Windows : Ctrl + Alt +
“[command key]” (Press
three keys simultaneously)
Mac : Command + Option +
“[command key]” (Press
three keys simultaneously)
For PC, instead of default keyboard hotkeys, you may also
use user–definable hotkeys for computer selection.
For Mac, instead of Scroll Lock key, you may use userdefinable hotkeys to switch.
Auto-Scan
---
Open the KVM Switching icon in the
system tray or dock to evoke the operation
menu, then select Start Auto-Scan to
activate auto-scan.
--- Start Auto-scan
Auto-Scan with
Programmable Delay Time
---
Open the KVM Switching icon in the
system tray or dock to evoke the operation
menu, then select a desired Auto-Scan
Period in the Settings/Preferences.
---
Auto-Scan Period may select from 10 to 60 seconds with an
increment of 5 seconds.
Stop Auto-Scan
---
While in Auto-Scan mode, open the KVM
Switching icon in the system tray or dock
to evoke the operation menu, then select
Stop Auto-Scan to de-activate auto-scan.
--- Stop Auto-Scan
Keep in Dock (Mac only)
---
Open the KVM Switching icon in the dock
to evoke the operation menu, then select
“Keep In Dock”.
---
KVM Switching icon will appear in the dock of your Mac
desktop.
Open at Login (Mac only)
---
Open the KVM Switching icon in the dock
to evoke the operation menu, then select
“Open at login”.
--- Execute the KVM Switching Software after login
Fix Audio to Port
(Analog only)
---
Open the KVM Switching icon in the
system tray or dock to evoke the operation
menu, then check the box next to the “Fix
Audio to Port” and select the desired port
in the Settings/Preferences.
---
Check this option then select the computer that you would
like to fix the audio/mic port to the selected computer. Once
this option is checked, the audio/mic port will become nonswitchable. The HDMI audio will always stay with the current
working computer.
Technical Support
E-mail: [email protected]
Website: www.linkskey.com
 Loading...