

Page 1
LINKPOINT
A
LL-IN-ONE/3000
NASHVILLE
CONFIG 690 01.08.00
ANUAL
M
CONFIG690 01.08.00
Version 2.0
June, 2005
Page 2

LinkPoint® AIO/3000 Nashville;
Application ID CONFIG 690 01.08.00
Manual Version 2.0
Published June 2005
LinkPoint International, Inc.
6101 Condor Drive
Moorpark, CA 93021
www.linkpoint.com
Printed in the United States of America.
© Copyright 2005 LinkPoint® International, Inc. All rights reserved.
Under the copyright laws, no part of this publication may be copied, distributed, stored in a retrieval system,
translated into any language, transmitted, in any form or by any means, without the prior written agreement
of LinkPoint International, Inc. LinkPoint International reserves the right to make changes to this document
and the products it describes without prior notice. LinkPoint International shall not be liable for inadvertent
technical errors or omissions made herein, nor for incidental or consequential damages resulting from the
performance or use of this product.
LinkPoint AIO is a service mark (SM) of LinkPoint International, Inc.
Note: This equipment has been tested and found to comply with the limits for a Class A digital device,
pursuant to part 15 of the FCC Rules. These limits are designed to provide a reasonable protection
against harmful interference when the equipment is operated in a commercial environment. This
equipment generates, uses, and can radiate radio frequency energy and, if not installed and used in
accordance with the instruction manual, may cause harmful interference to radio communications.
Operation of this equipment in a residential area is likely to cause harmful interference in which case
the user will be required to correct the interference at their expense.
Caution: Danger of explosion if lithium battery is incorrectly replaced. Replace only with the same of
equivalent type recommended by the manufacturer. Dispose of used batteries according to the
manufacturer's instructions.
Page 3

NOTICE
LinkPoint International reserves the right to make changes to specifications at any time
and without notice. The information furnished in this publication is believed to be
accurate and reliable; however, no responsibility is assumed by LinkPoint International
for its use.
Page Brief Description Of Change Revision Date
233-236 Updated Report Copies and Layouts 5/11/05
50-88 Updated EBT PIN Pad Prompts 5/11/05
7 Added EBT Information 5/12/05
9, 149 Rewrote Tip Discount paragraph 5/12/05
13-24 Rewrote Initialization section 5/13/05
98 Added Enter Last 4 Digits prompt 5/16/05
144 Updated Auth Only Receipt Sample 5/16/05
150 Updated Offline Receipt Sample 5/18/05
152-162 Added TeleCheck Procedures 6/8/05
Page 4

TABLE OF CONTENTS
NTRODUCTION ................................................................................................................... 1
I
GETTING STARTED ............................................................................................................. 3
FEATURES AND OPTIONS .................................................................................................... 7
INITIALIZATION PARAMETERS ............................................................................................13
KEYPAD/TEMPLATE DESIGN.............................................................................................. 24
KEYPAD/TEMPLATE CHART...............................................................................................25
SETUP.............................................................................................................................. 26
MEMORY CLEAR ......................................................................................................... 26
DOWNLOAD PROCEDURES (TELEPHONE)..................................................................... 28
DOWNLOAD PROCEDURES (PC TO TERMINAL)............................................................. 31
FIVE MINUTE FOR AUTO DLL DOWNLOAD AFTER BATCH CLOSES................................ 34
AUTOMATIC DOWNLOAD PROCEDURES .......................................................................36
HOST SETUP PROCEDURES (INITIALIZATION) ............................................................... 37
PASSWORD PROTECTION ............................................................................................ 39
HOW TO ADD PASSWORD PROTECTION TO CREDIT CARD SETTINGS ............................ 41
DEMO MODE...............................................................................................................51
DEMO MODE RECEIPT SAMPLE ................................................................................... 53
DEMO MODE RECEIPT SAMPLE LAYOUT (MERCHANT COPY)........................................ 54
DEMO MODE RECEIPT SAMPLE LAYOUT (CUSTOMER COPY)........................................ 55
FOOD STAMP AND CASH BENEFIT TRANSACTIONS ............................................................ 56
EBT FOOD STAMP SALE ............................................................................................. 57
EBT FOOD STAMP SALE RECEIPT SAMPLE .................................................................60
EBT FOOD STAMP SALE RECEIPT SAMPLE LAYOUT .................................................... 61
EBT FOOD STAMP RETURN ........................................................................................62
EBT FOOD STAMP RETURN RECEIPT SAMPLE............................................................. 64
EBT FOOD STAMP RETURN RECEIPT SAMPLE LAYOUT ...............................................65
EBT FOOD STAMP BALANCE INQUIRY......................................................................... 66
EBT FOOD STAMP BALANCE INQUIRY REPORT SAMPLE .............................................. 68
EBT FOOD STAMP BALANCE INQUIRY REPORT SAMPLE LAYOUT ................................ 69
EBT FOOD STAMP VOUCHER CLEAR SALE .................................................................70
EBT FOOD STAMP VOUCHER CLEAR RECEIPT SAMPLE ...............................................72
EBT FOOD STAMP VOUCHER CLEAR RECEIPT SAMPLE LAYOUT.................................. 73
EBT FOOD STAMP VOUCHER CLEAR RETURN ............................................................. 74
EBT FOOD STAMP VOUCHER CLEAR RETURN RECEIPT SAMPLE ................................. 77
EBT FOOD STAMP VOUCHER CLEAR RETURN RECEIPT SAMPLE LAYOUT ....................78
EBT VOID LAST TRANSACTION ...................................................................................79
EBT VOIDED TRANSACTION RECEIPT SAMPLE ............................................................ 81
EBT VOIDED TRANSACTION RECEIPT SAMPLE LAYOUT ...............................................82
CASH BENEFIT SALE .................................................................................................. 83
CASH BENEFIT SALE RECEIPT SAMPLE .......................................................................86
CASH BENEFIT SALE RECEIPT SAMPLE LAYOUT..........................................................87
CASH BENEFIT BALANCE INQUIRY...............................................................................88
CASH BENEFIT BALANCE INQUIRY RECEIPT SAMPLE ...................................................90
© 2005 LinkPoint International, Inc. i Nashville LP AIO/3000 Manual
This information is Proprietary and Confidential to LinkPoint International - Reproduction without the
expressed, written consent of LinkPoint International is prohibited.
Page 5

C
ASH BENEFIT BALANCE INQUIRY SAMPLE LAYOUT ....................................................91
CASH BENEFIT VOID LAST TRANSACTION....................................................................92
CASH BENEFIT VOIDED TRANSACTION RECEIPT SAMPLE ............................................. 94
CASH BENEFIT VOIDED TRANSACTION RECEIPT SAMPLE LAYOUT................................ 95
CREDIT AND DEBIT CARD TRANSACTIONS ......................................................................... 96
RETAIL SALE (WITHOUT TIP ENTRY) ............................................................................ 97
RETAIL SALE RECEIPT SAMPLE ................................................................................ 101
RETAIL SALE RECEIPT SAMPLE LAYOUT ................................................................... 102
PRE SALE RECEIPT (NOT A TRANSACTION) ............................................................... 103
PRE-SALE RECEIPT COPY......................................................................................... 104
PRE-SALE RECEIPT COPY LAYOUT RETAIL SALE (WITH TIP ENTRY)...........................104
RETAIL SALE (WITH TIP ENTRY) ................................................................................105
RETAIL TIP SALE RECEIPT SAMPLE LAYOUT (WITHOUT TIP)....................................... 109
RETAIL TIP SALE RECEIPT SAMPLE LAYOUT (WITHOUT TIP)....................................... 110
RETAIL TIP SALE RECEIPT SAMPLE LAYOUT (WITH TIP) ............................................. 111
RESTAURANT SALE ..................................................................................................113
RESTAURANT SALE RECEIPT SAMPLE (WITHOUT TIP) ................................................ 117
RESTAURANT SALE RECEIPT SAMPLE LAYOUT (WITHOUT TIP)................................... 118
RESTAURANT SALE RECEIPT SAMPLE (WITH TIP) ......................................................119
RESTAURANT SALE RECEIPT SAMPLE LAYOUT (WITH TIP) ......................................... 120
OPEN TAB ................................................................................................................121
OPEN TAB RECEIPT SAMPLE..................................................................................... 124
OPEN TAB RECEIPT SAMPLE LAYOUT ....................................................................... 125
CLOSE TAB .............................................................................................................. 126
CLOSE TAB RECEIPT SAMPLE ................................................................................... 129
CLOSE TAB RECEIPT SAMPLE LAYOUT ..................................................................... 130
DEBIT RETAIL SALE ..................................................................................................131
DEBIT SALE RECEIPT SAMPLE LAYOUT .....................................................................134
DEBIT SALE RECEIPT SAMPLE LAYOUT .....................................................................135
DEBIT RESTAURANT SALE (DEBIT SALE WITH TIP)..................................................... 136
DEBIT RESTAURANT SALE RECEIPT SAMPLE ............................................................. 139
DEBIT RESTAURANT SALE RECEIPT SAMPLE LAYOUT ............................................... 140
AUTHORIZATION ONLY .............................................................................................. 141
AUTHORIZATION ONLY RECEIPT SAMPLE .................................................................. 144
AUTHORIZATION ONLY RECEIPT SAMPLE LAYOUT .....................................................145
OFFLINE ...................................................................................................................146
OFFLINE RECEIPT SAMPLE........................................................................................ 150
OFFLINE RECEIPT SAMPLE LAYOUT ..........................................................................151
CHECK TRANSACTIONS................................................................................................... 152
STANDARD CHECK AUTHORIZATION (WITH CHECK MICR READER)............................152
STANDARD CHECK AUTHORIZATION (WITHOUT CHECK MICR READER)...................... 154
CPO/ECA CHECK SALE ...........................................................................................156
TELECHECK ID CODES .............................................................................................159
CPO/ECA CHECK SALE RECEIPT SAMPLE ............................................................... 160
CPO/ECA CHECK SALE RECEIPT SAMPLE LAYOUT .................................................. 161
CPO/ECA CHECK SALE RECEIPT SAMPLE LAYOUT CONTINUED ............................... 162
ADJUSTMENTS................................................................................................................ 163
EDIT TRANSACTION .................................................................................................. 163
© 2005 LinkPoint International, Inc. ii Nashville LP AIO/3000 Manual
This information is Proprietary and Confidential to LinkPoint International - Reproduction without the
expressed, written consent of LinkPoint International is prohibited.
Page 6

E
DIT TAB .................................................................................................................. 165
SETTING TIP DISCOUNT............................................................................................. 168
TIP DISCOUNT SETUP REPORT .................................................................................. 172
EDIT TIPS .................................................................................................................173
VOID......................................................................................................................... 175
VOID RECEIPT SAMPLE .............................................................................................177
VOID SALE RECEIPT SAMPLE LAYOUT....................................................................... 178
RETURN ................................................................................................................... 179
RETURN RECEIPT SAMPLE ........................................................................................182
RETURN RECEIPT SAMPLE LAYOUT ........................................................................... 183
CLOSE...................................................................................................................... 184
CLOSE BATCH RECEIPT SAMPLE .............................................................................. 190
CLOSE BATCH RECEIPT SAMPLE LAYOUT ................................................................. 191
CLOSE BATCH RECEIPT SAMPLE LAYOUT CONTINUED .............................................. 192
CLOSE BATCH RECEIPT SAMPLE LAYOUT CONTINUED .............................................. 193
REVIEW .......................................................................................................................... 194
CURRENT BATCH TOTALS REVIEW ............................................................................ 194
BATCH HISTORY TOTALS REVIEW .............................................................................195
REPRINT................................................................................................................... 197
CREDIT— DEBIT— CHECK REPORTS ..............................................................................200
BATCH TOTALS REPORT ...........................................................................................200
CURRENT BATCH TOTALS REPORT SAMPLE .............................................................. 202
CURRENT BATCH TOTALS REPORT SAMPLE LAYOUT ................................................ 203
BATCH TOTALS HISTORY REPORT SAMPLE ............................................................... 204
BATCH TOTALS HISTORY REPORT SAMPLE LAYOUT.................................................. 205
SERVER TOTALS REPORT .........................................................................................206
EMPLOYEE ID TOTALS REPORT SAMPLE (SINGLE EMPLOYEE) ...................................208
EMPLOYEE ID TOTALS REPORT SAMPLE LAYOUT (SINGLE EMPLOYEE)...................... 209
EMPLOYEE ID TOTALS REPORT SAMPLE (SINGLE EMPLOYEE) ...................................210
EMPLOYEE ID TOTALS REPORT SAMPLE LAYOUT (SINGLE EMPLOYEE)...................... 211
EMPLOYEE ID TOTALS REPORT SAMPLE LAYOUT (SINGLE EMPLOYEE)...................... 211
EMPLOYEE ID TOTALS REPORT SAMPLE (MULTIPLE EMPLOYEES) ............................. 212
EMPLOYEE ID TOTALS REPORT SAMPLE LAYOUT (MULTIPLE EMPLOYEE).................. 213
EMPLOYEE ID TOTALS REPORT SAMPLE (MULTIPLE EMPLOYEES) ............................. 214
EMPLOYEE ID TOTALS REPORT SAMPLE LAYOUT (MULTIPLE EMPLOYEE).................. 215
CARD TYPE TOTALS REPORT.................................................................................... 216
CARD TOTALS REPORT SAMPLE (SPECIFIC CARD TYPE) ...........................................218
CARD TOTALS REPORT SAMPLE LAYOUT (SPECIFIC CARD TYPE) .............................. 219
CARD TOTALS REPORT SAMPLE (ALL CARD TYPES) .................................................220
CARD TOTALS REPORT SAMPLE LAYOUT (ALL CARD TYPES) .................................... 221
CARD TOTALS REPORT SAMPLE LAYOUT (ALL CARD TYPES CONTINUED) ................. 222
REPRINT................................................................................................................... 223
DUPLICATE RECEIPT SAMPLE ................................................................................... 225
DUPLICATE RECEIPT SAMPLE LAYOUT ......................................................................226
BATCH DETAIL REPORT ............................................................................................ 227
BATCH DETAIL REPORT SAMPLE LAYOUT (ALL CARD TYPES) ...................................228
BATCH DETAIL REPORT SAMPLE LAYOUT (ALL CARD TYPES CONTINUED) ................ 229
BATCH DETAIL REPORT SAMPLE LAYOUT (CARD DETAIL ONLY)................................ 230
© 2005 LinkPoint International, Inc. iii Nashville LP AIO/3000 Manual
This information is Proprietary and Confidential to LinkPoint International - Reproduction without the
expressed, written consent of LinkPoint International is prohibited.
Page 7

B
ATCH DETAIL REPORT SAMPLE LAYOUT (CHECK DETAIL ONLY).............................. 231
OPEN TAB REPORT................................................................................................... 232
OPEN TAB REPORT SAMPLE .....................................................................................233
OPEN TAB REPORT SAMPLE LAYOUT ........................................................................ 234
UNADJUSTED TIP REPORT ........................................................................................235
UNADJUSTED TRANSACTION REPORT SAMPLE ..........................................................236
UNADJUSTED TRANSACTION REPORT SAMPLE LAYOUT ............................................. 237
DETAIL REPORT BY EMPLOYEE ID............................................................................. 238
DETAIL REPORT BY EMPLOYEE ID SAMPLE (SINGLE EMPLOYEE)............................... 240
EMPLOYEE ID TOTALS REPORT SAMPLE LAYOUT (SINGLE EMPLOYEE CONT.) ...........242
DETAIL REPORT BY EMPLOYEE ID SAMPLE (MULTIPLE EMPLOYEES CONT.)...............244
EMPLOYEE ID TOTALS REPORT SAMPLE LAYOUT (MULTIPLE EMPLOYEE).................. 245
EMPLOYEE ID TOTALS REPORT SAMPLE LAYOUT (MULTIPLE EMPLOYEE CONT.) ....... 246
EMPLOYEE ID TOTALS REPORT SAMPLE LAYOUT (MULTIPLE EMPLOYEE CONT.) ....... 247
DETAIL REPORT BY EMPLOYEE ID SAMPLE (SINGLE EMPLOYEE)............................... 248
EMPLOYEE ID TOTALS REPORT SAMPLE LAYOUT (SINGLE EMPLOYEE CONT.) ...........250
DETAIL REPORT BY EMPLOYEE ID SAMPLE (MULTIPLE EMPLOYEES) ......................... 251
DETAIL REPORT BY EMPLOYEE ID SAMPLE (MULTIPLE EMPLOYEES CONT.)...............252
EMPLOYEE ID TOTALS REPORT SAMPLE LAYOUT (MULTIPLE EMPLOYEES)................ 253
EMPLOYEE ID TOTALS REPORT SAMPLE LAYOUT (MULTIPLE EMPLOYEES CONT.) ..... 254
EMPLOYEE ID TOTALS REPORT SAMPLE LAYOUT (MULTIPLE EMPLOYEES CONT.) ..... 255
OPEN TAB BY EMPLOYEE ID REPORT........................................................................ 256
OPEN TAB BY EMPLOYEE ID REPORT SAMPLE .......................................................... 258
OPEN TAB BY EMPLOYEE ID REPORT SAMPLE LAYOUT .............................................259
CARD TYPE DETAIL REPORT ..................................................................................... 260
CARD TYPE DETAIL REPORT SAMPLE (BY CARD TYPE)............................................. 262
CARD TYPE DETAIL REPORT SAMPLE LAYOUT (BY CARD TYPE)................................ 263
CARD TYPE DETAIL REPORT SAMPLE (BY CARD TYPE)............................................. 264
CARD TYPE DETAIL REPORT SAMPLE (BY CARD TYPE)............................................. 265
CARD TYPE DETAIL REPORT SAMPLE LAYOUT (BY CARD TYPE)................................ 266
CARD TYPE DETAIL REPORT SAMPLE (ALL CARD TYPES) .........................................267
CARD TYPE DETAIL REPORT SAMPLE LAYOUT (ALL CARD TYPES) ............................ 268
FIRST DATA GIFT CARD TRANSACTIONS .........................................................................269
GIFT CARD ACTIVATION ............................................................................................ 271
GIFT CARD ACTIVATION RECEIPT SAMPLE ................................................................ 273
GIFT CARD ACTIVATION RECEIPT SAMPLE LAYOUT ...................................................274
GIFT CARD REDEMPTION ..........................................................................................275
GIFT CARD REDEMPTION RECEIPT SAMPLE ............................................................... 277
GIFT CARD REDEMPTION RECEIPT SAMPLE LAYOUT ................................................. 278
GIFT CARD RELOAD..................................................................................................279
GIFT CARD RELOAD RECEIPT SAMPLE ......................................................................281
GIFT CARD RELOAD RECEIPT SAMPLE LAYOUT ......................................................... 282
GIFT CARD BALANCE................................................................................................283
GIFT CARD BALANCE RECEIPT SAMPLE ....................................................................285
GIFT CARD RELOAD RECEIPT SAMPLE LAYOUT ......................................................... 286
GIFT CARD TRANSFER RECEIPT SAMPLE .................................................................. 289
GIFT CARD TRANSFER RECEIPT SAMPLE LAYOUT ..................................................... 290
GIFT CARD VOID....................................................................................................... 291
GIFT CARD VOID RECEIPT SAMPLE ........................................................................... 293
© 2005 LinkPoint International, Inc. iv Nashville LP AIO/3000 Manual
This information is Proprietary and Confidential to LinkPoint International - Reproduction without the
expressed, written consent of LinkPoint International is prohibited.
Page 8

G
IFT CARD RELOAD RECEIPT SAMPLE LAYOUT ......................................................... 294
GIFT CARD REFUND.................................................................................................. 295
GIFT CARD REFUND SAMPLE .................................................................................... 297
GIFT CARD REFUND RECEIPT SAMPLE LAYOUT .........................................................298
GIFT CARD CASHOUT ............................................................................................... 299
GIFT CARD CASHOUT SAMPLE ..................................................................................301
GIFT CARD CASHOUT RECEIPT SAMPLE LAYOUT....................................................... 302
GIFT CARD REPORTS................................................................................................303
GIFT CARD REPORT SAMPLES ..................................................................................305
GIFT CARD TOTALS REPORT SAMPLE LAYOUT .......................................................... 306
GIFT CARD DETAIL REPORT SAMPLE LAYOUT ...........................................................307
GIFT CARD EMPLOYEE ID REPORT SAMPLE LAYOUT ................................................. 308
GIFT CARD BATCH CLEAR ........................................................................................309
GIFT CARD BATCH CLEAR REPORT SAMPLE ............................................................. 311
GIFT CARD BATCH CLEAR REPORT SAMPLE LAYOUT ................................................312
GIFT CARD REPRINT ................................................................................................. 313
GIFT CARD REPRINT SAMPLE.................................................................................... 315
GIFT CARD REPRINT SAMPLE LAYOUT ...................................................................... 316
GIFT CARD PARTIAL REVERSAL MESSAGES .............................................................. 319
PETROLEUM TRANSACTIONS........................................................................................... 320
FUEL SETUP AND EDIT.............................................................................................. 321
GIFT CARD TOTAL REPORT SAMPLE ......................................................................... 329
FUEL INFORMATION REPORT SAMPLE LAYOUT ..........................................................330
PETROLEUM SALE .................................................................................................... 331
PETROLEUM SALE RECEIPT SAMPLE......................................................................... 335
PETROLEUM SALE RECEIPT SAMPLE LAYOUT (CONTINUED) ......................................337
ERROR CODES ...............................................................................................................338
TERMINAL ASSIGNED ERROR CODES ........................................................................ 338
HOST ASSIGNED ERROR CODES ............................................................................... 339
© 2005 LinkPoint International, Inc. v Nashville LP AIO/3000 Manual
This information is Proprietary and Confidential to LinkPoint International - Reproduction without the
expressed, written consent of LinkPoint International is prohibited.
Page 9
INTRODUCTION
(
)
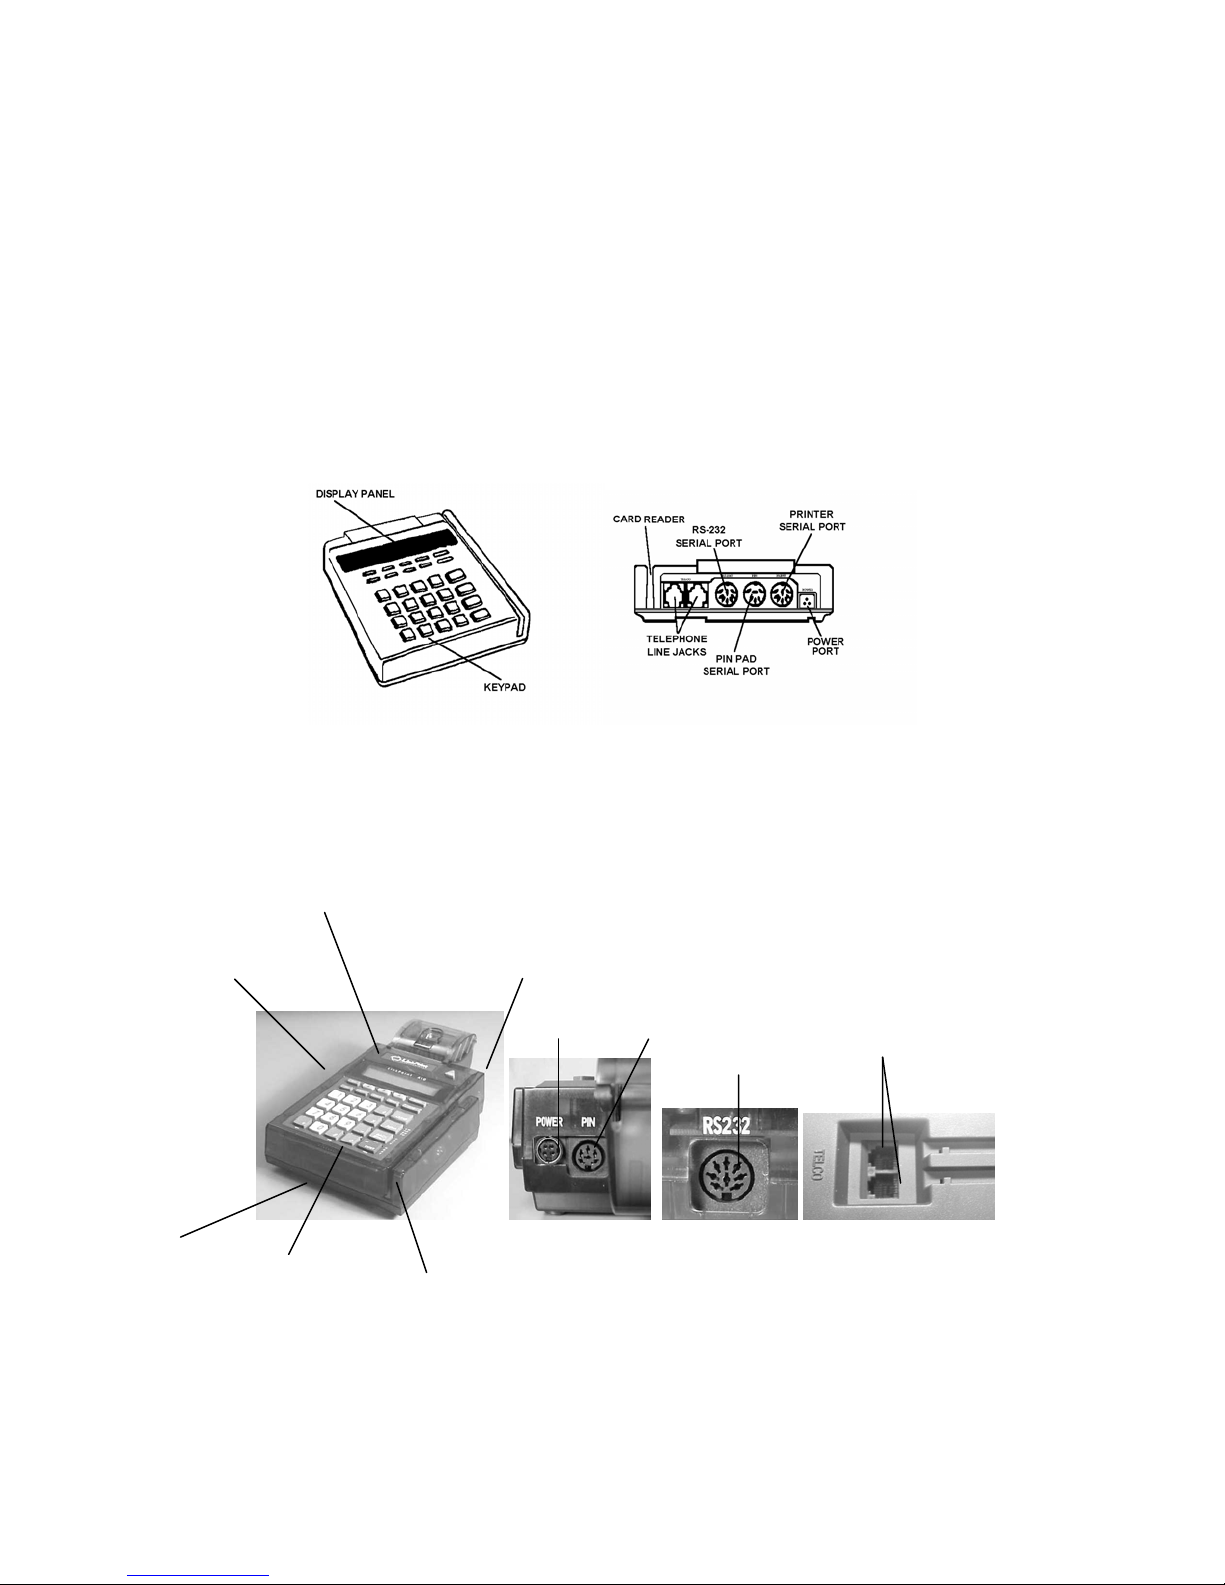
Congratulations on your choice of the LinkPoint® point-of-sale (POS) terminal. Whether
you purchased the LinkPoint All-In-One (AIO)
family of products is ideal for your point-of-sale needs. Scientifically engineered, the
LinkPoint combines user-friendly operation with “soft” programmable key functions. The
screen-addressable keys and innovative backlit display panel make the terminal
operation quick and easy. The LinkPoint 3000 is compatible with all major printers, while
the AIO integrates a high-speed, thermal printer. Both terminals also contain additional
serial ports for PIN pads, check readers and other peripherals.
LinkPoint 3000
Figure 1
RS 232 PORT
DISPLAY PANEL
(SIDE)
POWER AND PIN PAD
PORTS
BACK
POWER
PORT
or the LinkPoint 3000 the LinkPoint
PIN PAD
SERIAL PORT
RS 232 PORT
TELEPHONE
LINE JACKS
TELEPHONE
LINE JACKS
KEYPAD
CARDREADER
© 2005 LinkPoint International, Inc. 1 Nashville LP AIO/3000 Manual
This information is Proprietary and Confidential to LinkPoint International - Reproduction without the
expressed, written consent of LinkPoint International is prohibited.
LinkPoint AIO
Figure 2
Page 10

This manual includes step-by-step guides through specific transactions and operations,
and shows how to keep the terminal in peak operating condition. It was designed to also
assist card processor help desks and bank/ISO clients with easy installation and
troubleshooting procedures. Words that appear in capital letters and brackets, [LIKE
THIS], stand for keys on the terminal keypad. Words that appear in capital letters without
brackets, LIKE THIS, stand for either display messages or terminal feature settings.
Printers
The LinkPoint 3000 terminal supports all major terminal printers including the PrintPoint
1000 and 3000, the VeriFone® P250, P900 and the PrintPak 350. Printers attach easily
to the LinkPoint 3000 terminal with a connecting cable.
PIN Pad Devices
The application programmed in the LinkPoint terminals support the BankPoint PIN Pad
made by LinkPoint as well as VeriFone PINpads 102, 301, 1000, 1000SE and 2000 for
debit transactions. PIN pads attach easily to the PIN pad port on the back of each
terminal (please refer to the separate PIN pad manual for installation and operating
instructions). The DUKPT encryption method is supported.
Please note that all procedures written in this manual will be written using the LinkPoint
BankPoint PIN Pad for personal identification number entry.
Check Readers
Both LinkPoint terminals support the Mag-Tek® Mini MICR and the Ingenico eN 2500
check readers for check services.
© 2005 LinkPoint International, Inc. 2 Nashville LP AIO/3000 Manual
This information is Proprietary and Confidential to LinkPoint International - Reproduction without the
expressed, written consent of LinkPoint International is prohibited.
Page 11
GETTING STARTED
Unpacking
Carefully inspect the shipping carton and its contents for any damage that may have
occurred during shipping. If the terminal is damaged, file a claim immediately with the
shipping company or carrier and notify the company from which the equipment was
purchased.
Do not try to use a damaged terminal!
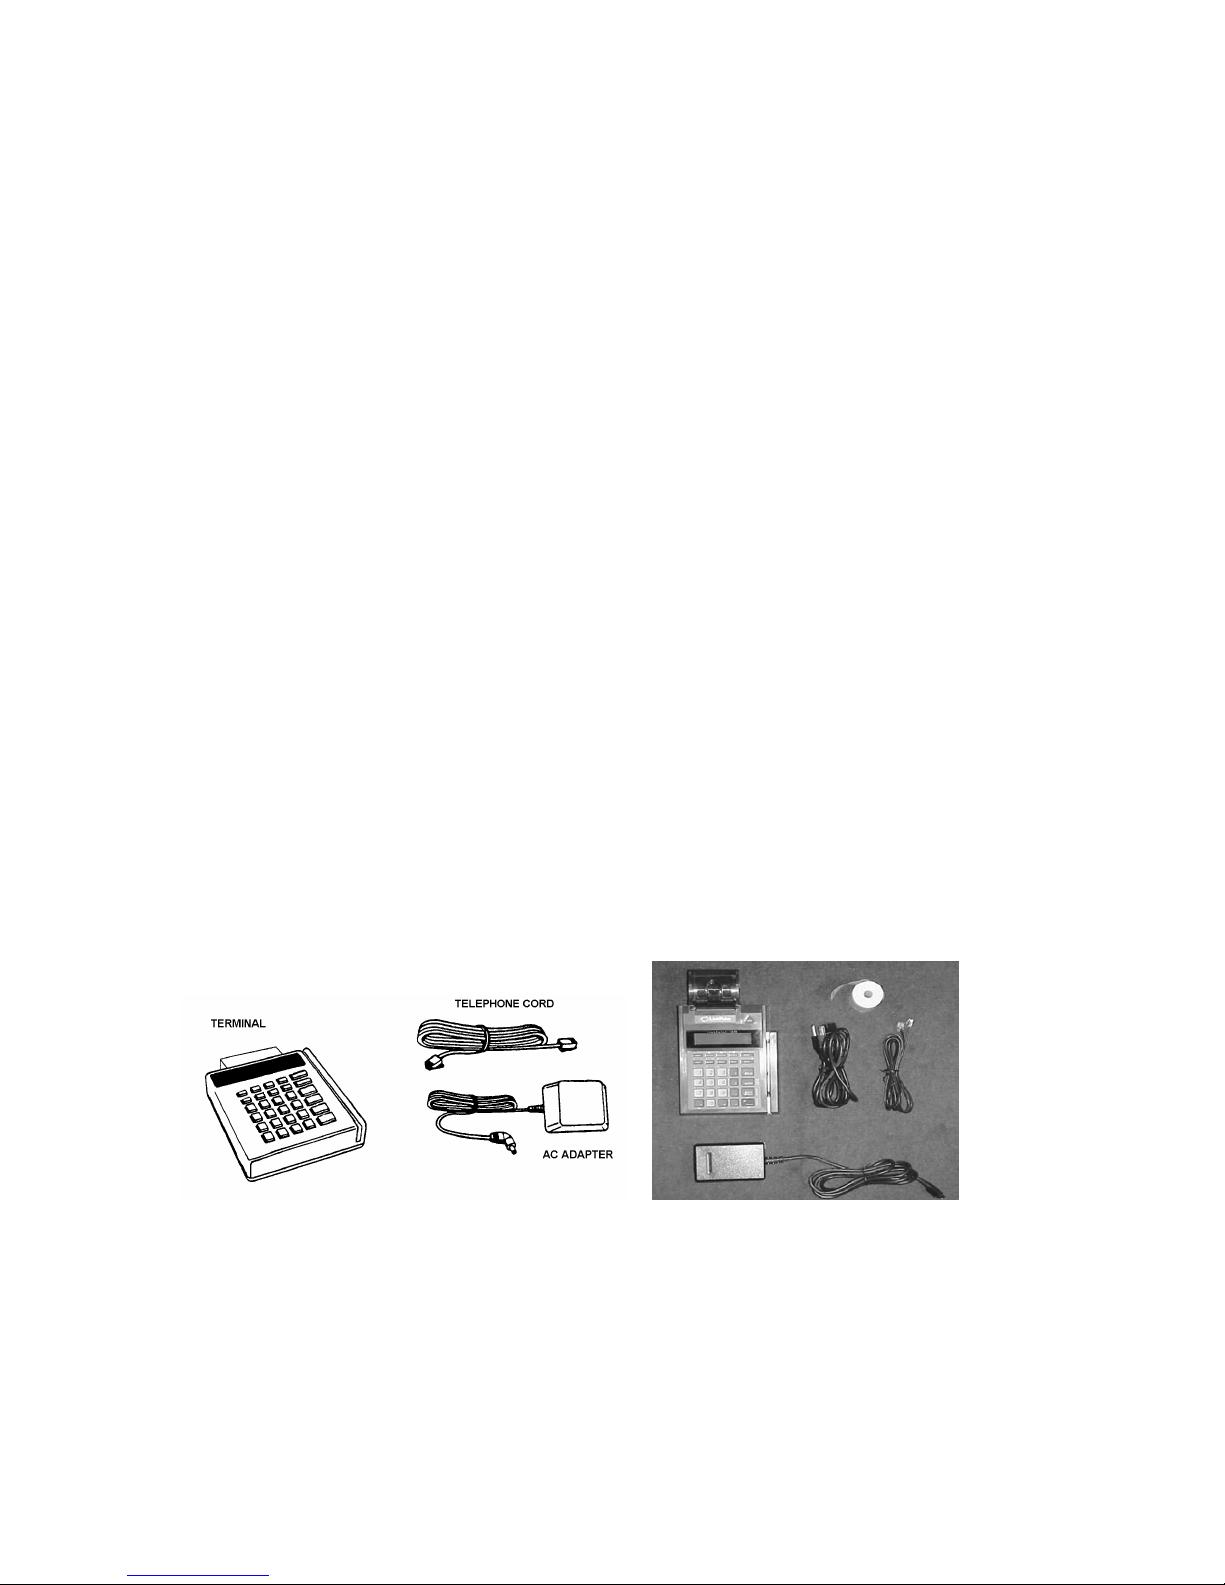
To unpack the LinkPoint:
1. With the shipping carton right side up, open the carton’s lid.
2. Lift the terminal, its AC adapter and line cord with modular plugs up and out of the
box.
3. Remove the terminal from its protective bubble wrap and place the bubble wrap back
in the shipping carton. Remove the AC adapter from its protective box and return the
box to the shipping carton. Close the shipping carton and save the shipping materials
so that the unit can be repacked for shipping or moving in the future.
4. Place the terminal on a desk or tabletop. When choosing a place for the LinkPoint
terminal, avoid areas with:
♦ Direct sunlight or objects that radiate heat
♦ Excessive dust
♦ Electrical devices that cause excessive voltage variations such as air
conditioners, space heaters, fans, or high-frequency security devices
LinkPoint 3000 Shipping Carton Contents LinkPoint AIO Shipping Carton Contents
Figure 3
© 2005 LinkPoint International, Inc. 3 Nashville LP AIO/3000 Manual
This information is Proprietary and Confidential to LinkPoint International - Reproduction without the
expressed, written consent of LinkPoint International is prohibited.
Page 12
Installation
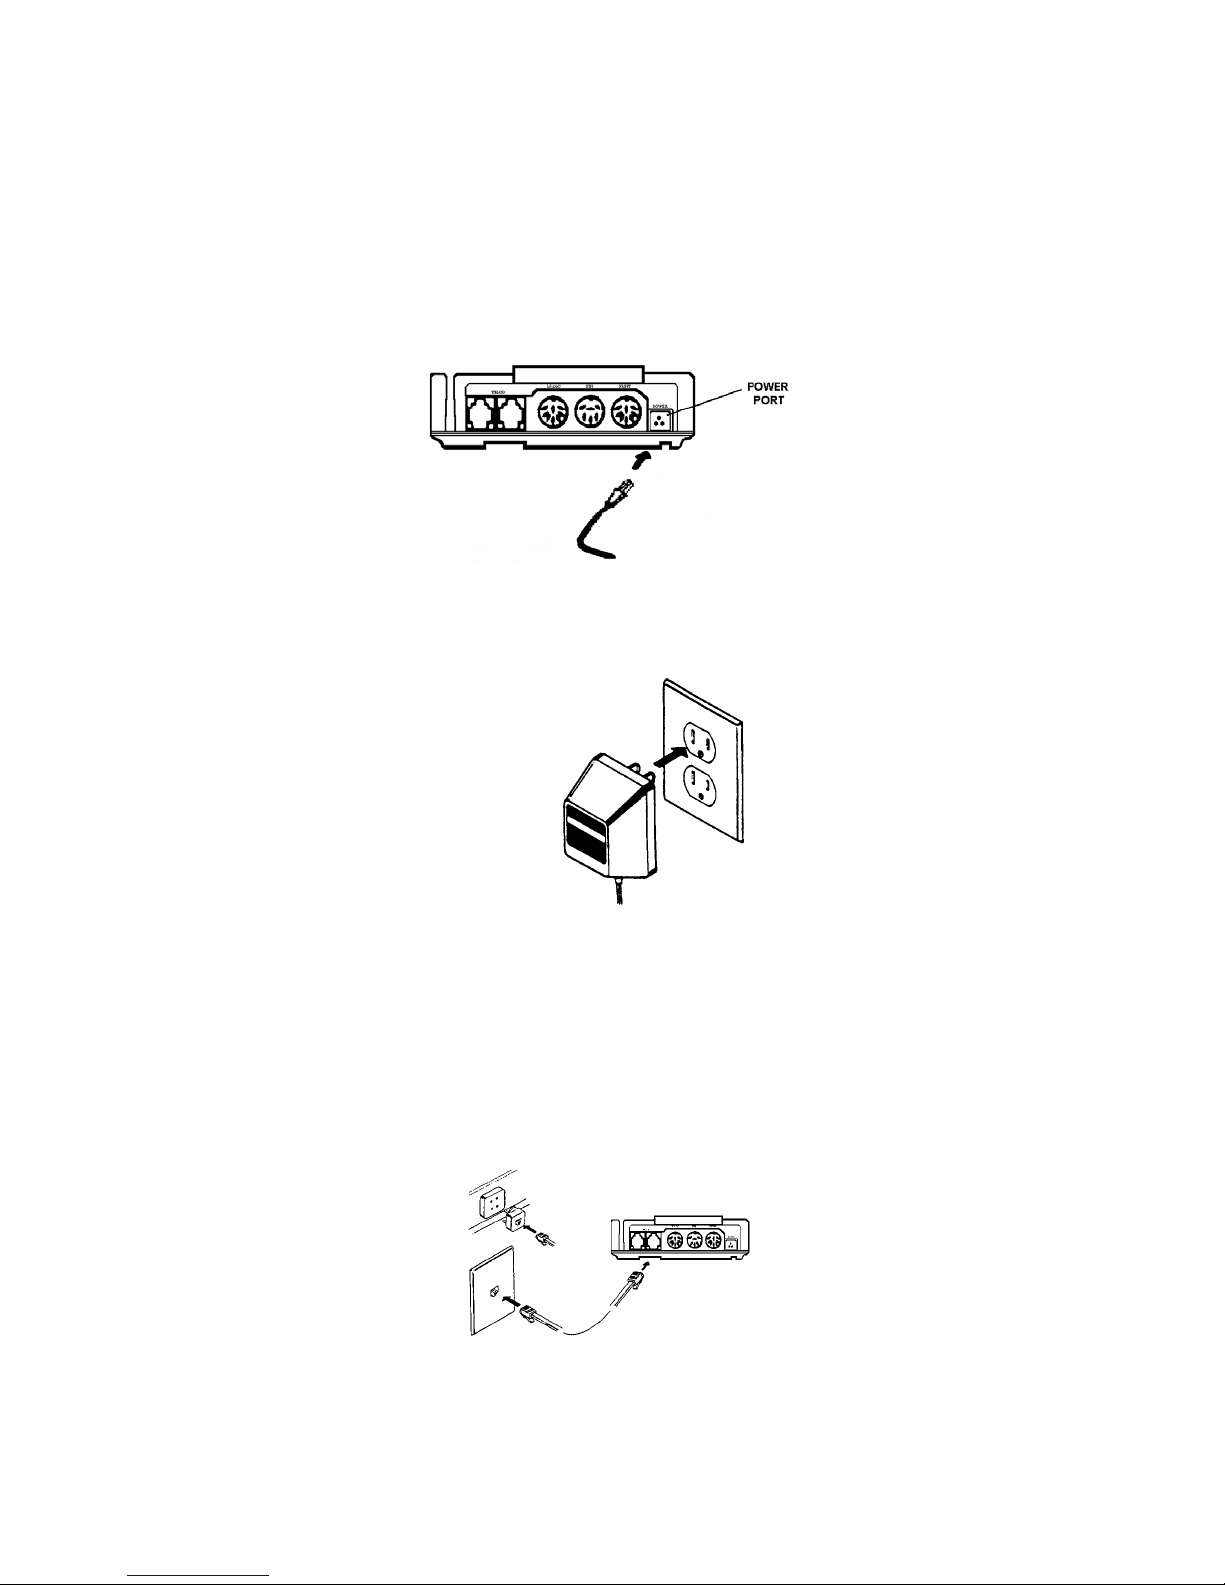
Installing either LinkPoint terminal is simple and requires no tools.
To install the LinkPoint 3000:
1. Connect the AC adapter’s triangular end to the power input at the rear of the
LinkPoint 3000 terminal (Figure 4).
Figure 4
2. Plug the adapter into a 120-volt electrical outlet (Figure 5) or into a quality surge
suppressor.
Figure 5
3. Insert one end of the telephone line cord into one of the modular jacks at the rear of
the terminal. Insert the other end of the line cord into a modular telephone wall jack;
just as one would connect a telephone (see Figure 6). The modular plug may be
inserted directly into the wall jack or use a 4-prong adapter (not included) for older 4prong jacks.
Note: A standard telephone may be connected to the other modular jack at the rear of
the terminal.
Figure 6
© 2005 LinkPoint International, Inc. 4 Nashville LP AIO/3000 Manual
This information is Proprietary and Confidential to LinkPoint International - Reproduction without the
expressed, written consent of LinkPoint International is prohibited.
Page 13

4. If the PrintPoint 1000, 3000, VeriFone P250, P900, PrintPak 350, or other compatible
printer is used with the LinkPoint 3000 terminal, please refer to the manual packaged
with the printer for installation and operating instructions.
5. When the terminal is plugged in, it will display the message APP. NOT AVAILABLE
(unless an application has been pre-downloaded).
To install the LinkPoint AIO:
1. Locate the power input port on the back of the AIO terminal (see Figure 7).
Figure 7
2. Connect the male AC adapter plug to the power input port at the rear of the
terminal (see Figure 8). The black sleeve that surrounds the plug has a round
area that is unmarked and a flat area that is marked with two arrows. In order to
connect the power adapter, please note that the plug must be turned
upside down, so that the flat area of the sleeve is facing down. The sleeve
acts as a lock to secure the plug to the terminal. Please note that if the cord must
be disconnected from the terminal, the sleeve must be slid back in order to
disconnect the plug.
3. Plug the adapter into a 120V electrical outlet or surge suppressor (see Figure 9).
© 2005 LinkPoint International, Inc. 5 Nashville LP AIO/3000 Manual
This information is Proprietary and Confidential to LinkPoint International - Reproduction without the
expressed, written consent of LinkPoint International is prohibited.
Figure 8
Figure 9
Page 14
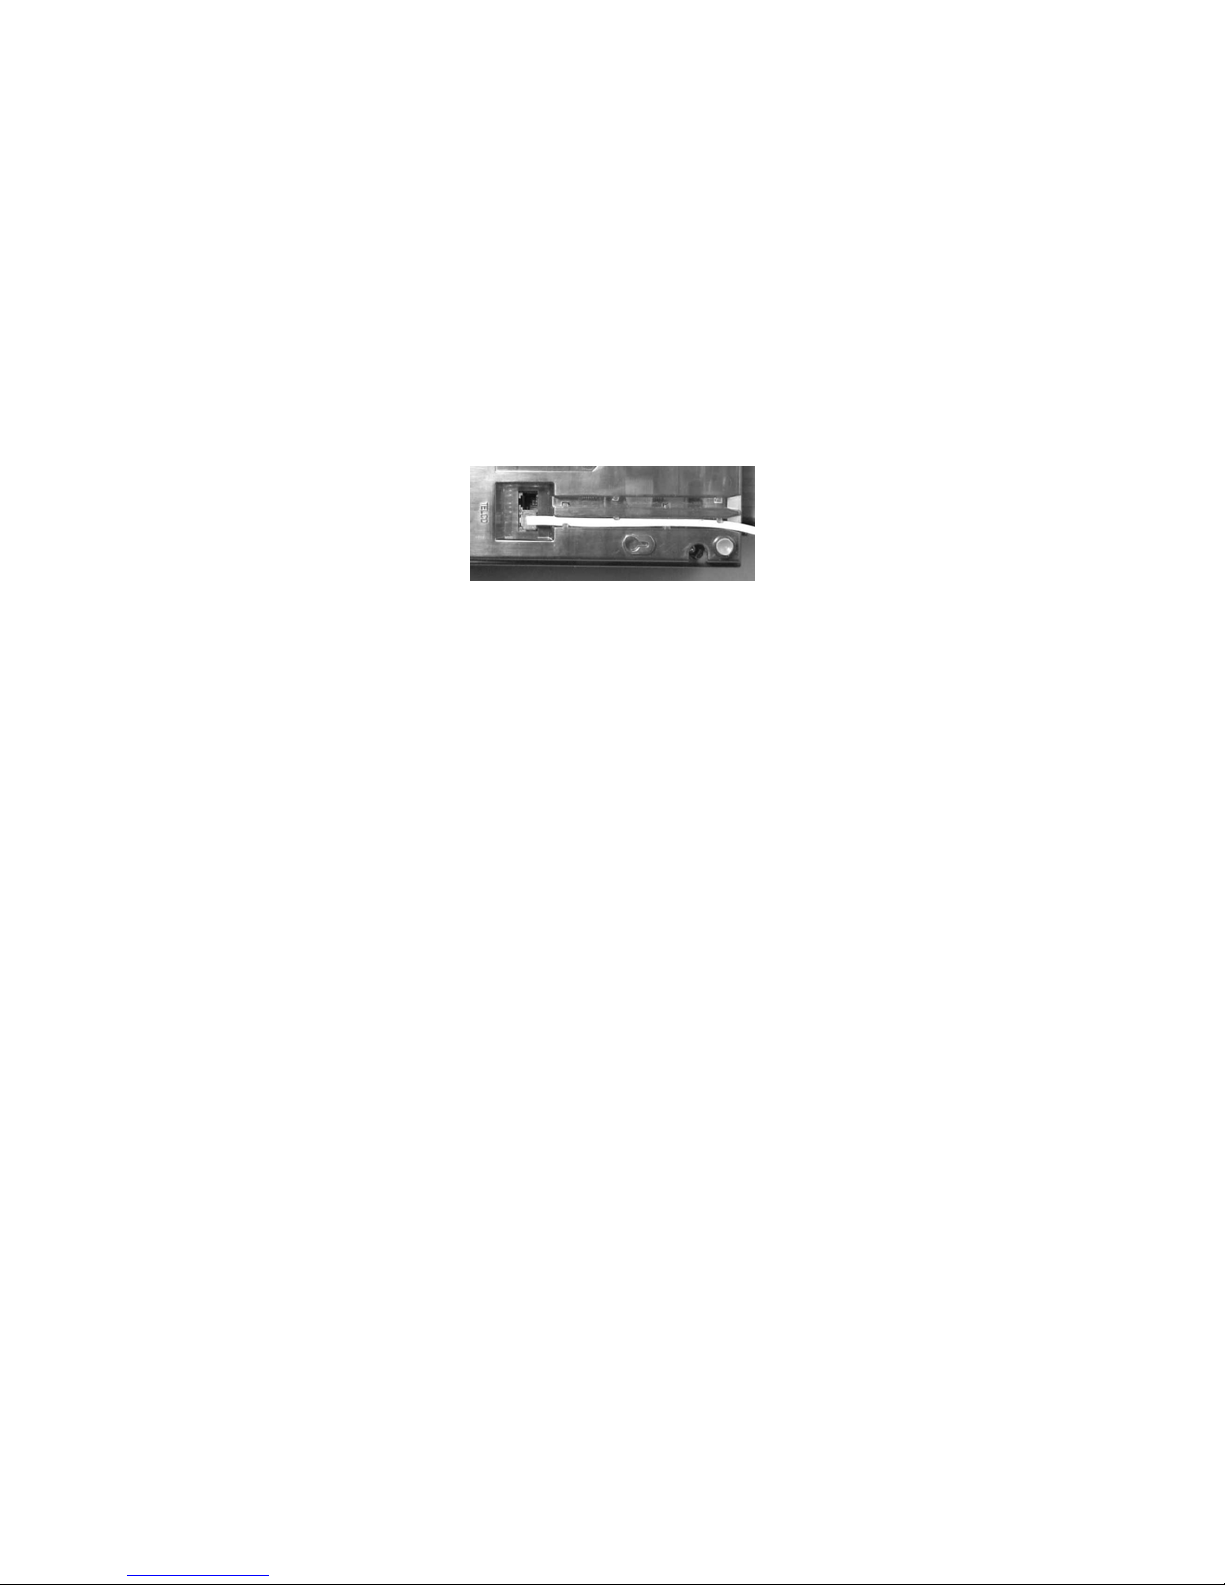
4. Connect one end of the telephone line cord into one of the modular jacks
underneath the terminal. Thread the phone cord through its designated channel
as shown in Figure 10. Insert the other end of the line cord into a modular
telephone wall jack just as you would to connect a telephone. The modular plug
may be inserted directly into the wall jack or into a four-prong adapter (not
included) for use with older four-prong jacks.
Note: You may connect a standard telephone to the other modular jack
underneath the terminal. This connection may not be compatible with
digital phone systems.
Figure 10
5. When the terminal is plugged in, it will display the message APP. NOT
AVAILABLE (unless an application has been pre-downloaded).
Maintenance
The LinkPoint system does not need preventive maintenance. However, LinkPoint
International does recommend periodic cleaning of the keypad, using a soft brush to
remove any dust. Because the terminal can be damaged by liquids, do not spray liquid
cleaners directly on the terminal. Always apply the cleaner to the cloth before cleaning
the terminal. To avoid costly downtime, LinkPoint International also recommends
protecting the terminal with a surge protector.
Returning the Terminal for Service
Please refer to your sales agreement for specific details on coverage to repair or replace
the LinkPoint terminal.
© 2005 LinkPoint International, Inc. 6 Nashville LP AIO/3000 Manual
This information is Proprietary and Confidential to LinkPoint International - Reproduction without the
expressed, written consent of LinkPoint International is prohibited.
Page 15

FEATURES AND OPTIONS
New Features Include:
Electronic Benefits Transfer Processing
The application Nashville Config 690 01.08.00 can be used in the LinkPoint AIO (All-InOne) and the LinkPoint 3000 terminals to accept Electronic Benefits Transfer (EBT)
cards to purchase food and other items. The terminal sends card and transaction type
information to the host computer and a host reply is sent back to the terminal. An
approval code confirms the funds are available for eventual settlement to the merchant
and usually includes card balance information. EBT cards replace traditional food
stamps. The EBT batch updates automatically, so there is no need to perform a close
batch transaction. See also the Credit, Debit or EBT Prompt paragraph later in this
chapter.
Enhanced Calculator Print Function
Standard calculator functions have been enhanced to include a print feature. The
function still allows simple arithmetic calculations and can still be accessed from the idle
menu by: pressing the numeric keys followed by a key representing a mathematical
symbol (÷, X, - or +) and then [ENTER] to obtain the result. In the enhanced version,
when the function is accessed, the printer is turned on automatically. The solution to the
calculation will print after the [ENTER] key is pressed. From the idle prompt, press [0] to
access function. Press [CLEAR] once to begin a new calculation, press [CLEAR] twice to
exit function.
Pre Sale Receipt
Merchants who use the tip function now have the ability to learn from the customer the
exact amount of their tip before they accept a credit card for payment. The pre sale
receipt feature allows the merchant to print a receipt that is presented to the customer.
This receipt does not contain a credit card number and no transaction is added to the
batch. The receipt has the base amount of the purchase and blank amount lines for tip
and total amounts. The customer then uses the blank lines to write the tip and total
transaction amount. The merchant then enters the customer credit card number into the
LinkPoint terminal to process the transaction.
Download Improvement
Currently, when a new terminal is deployed into the field, the terminal has to be fully
downloaded with the all merchant information and then sent to the merchant or the
terminal has to be sent out “blank” without any application or merchant information
loaded at all and then loaded from the field.
© 2005 LinkPoint International, Inc. 7 Nashville LP AIO/3000 Manual
This information is Proprietary and Confidential to LinkPoint International - Reproduction without the
expressed, written consent of LinkPoint International is prohibited.
Page 16

This version of the application features a download improvement. With this version of the
application, the download will stop after the base application has been loaded. After the
base application download, the terminal will prompt the user for a terminal ID and
download phone number. Once entered, the terminal will complete the download and
initialize the terminal so that it can be used by the merchant.
This improvement will allow a terminal to be stored with a Nashville base application, so
that a terminal to terminal download is possible without loading merchant information.
This feature also makes it possible for the terminal to be deployed with a base
application so that the unit can initialized quickly in the field.
Credit, Debit or EBT Prompt
When a card is swiped the terminal may display a prompt to choose whether a
transaction is a credit, EBT or debit transaction. When this prompt appears, the user
must press the correct [
S] key to choose the correct transaction type.
Display Message Operator Action and Comments
CREDIT EBT DEBIT
↓ ↓ ↓
Press the correct [S] key to continue...
Open Tabs Query
It is now possible to search for an open tab transaction by invoice number and employee
ID, as well as by sequence number. In the previous version of the application, it was
possible only to search for an open tab by sequence number.
Display Message Operator Action and Comments
EDIT TAB TIP
↓ ↓ ↓
After pressing the [ADJUST] key, this prompt appears.
Press the middle [
S] key to choose open tab
transaction.
INV SEQ SVR
↓ ↓ ↓
Open Tab Query by Sequence Number
This enhancement allows the user to search for and display open tabs by sequence
number. The current version of the application only allows these transactions to be
selected one at a time without being able to move on to the next one.
© 2005 LinkPoint International, Inc. 8 Nashville LP AIO/3000 Manual
This information is Proprietary and Confidential to LinkPoint International - Reproduction without the
expressed, written consent of LinkPoint International is prohibited.
Press the left [S] key to choose by invoice number, the
middle [
right [
S] key to choose by sequence number or the
S] key to choose by employee ID.
Page 17

Unadjusted Tip Query by Invoice, Sequence or Employee ID
This enhancement allows the user to search for and display unadjusted tip transactions
by invoice, sequence or employee ID number. In other words, when one transaction is
adjusted, it automatically displays the next one in the open batch. The current version of
the application only allows these transactions to be selected one at a time without being
able to move on to the next one automatically.
Tip Discount
The tip discount feature provides the terminal with the ability to control by card type the
amount subtracted from tips. In other words, if a card type is set to a tip discount of 10%,
when a tip amount is entered for that card type, 10% of the tip will be subtracted and a
net tip amount will be created. The gross tip amount, the amount subtracted and net tip
amount will printout on employee detail and employee total reports; it will not printout on
transaction receipts.
© 2005 LinkPoint International, Inc. 9 Nashville LP AIO/3000 Manual
This information is Proprietary and Confidential to LinkPoint International - Reproduction without the
expressed, written consent of LinkPoint International is prohibited.
Page 18
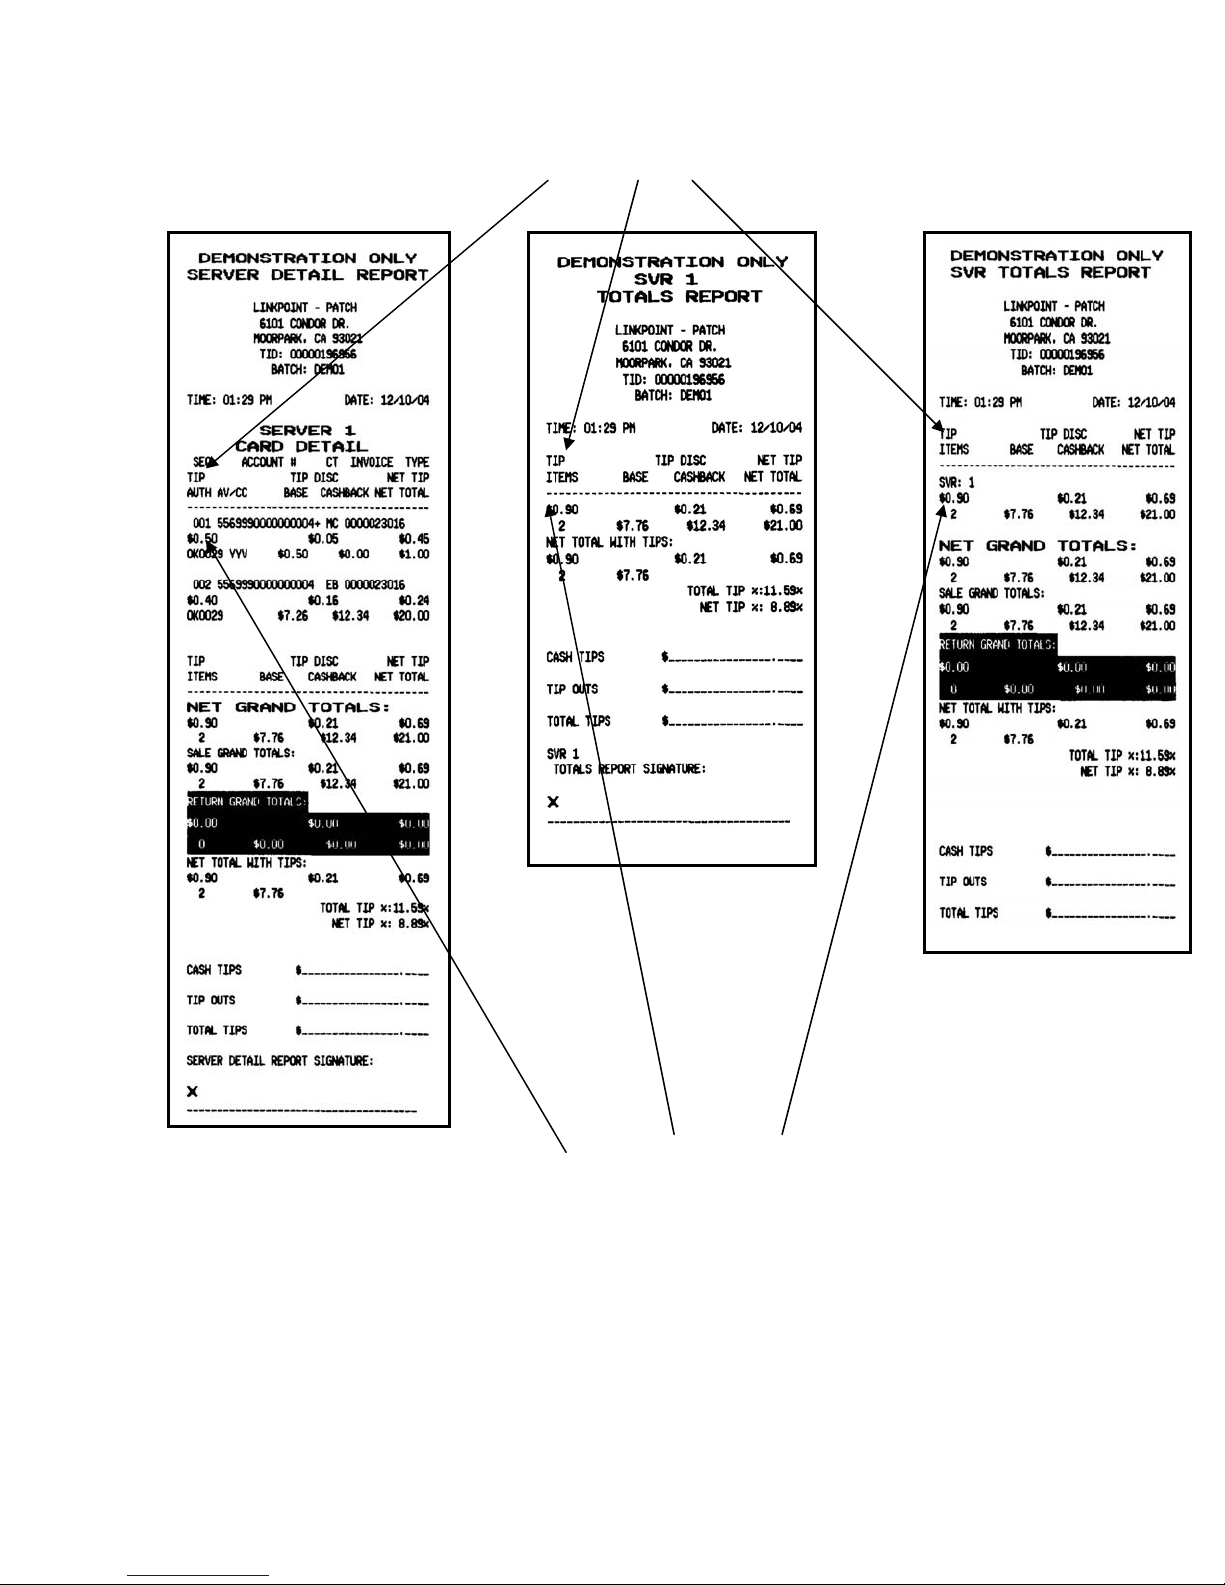
Tip Discount Headings (Tip Amount, Tip Discount, Net Tip)
Tip Discount Amounts (Tip Amount, Tip Discount, Net Tip)
© 2005 LinkPoint International, Inc. 10 Nashville LP AIO/3000 Manual
This information is Proprietary and Confidential to LinkPoint International - Reproduction without the
expressed, written consent of LinkPoint International is prohibited.
Page 19
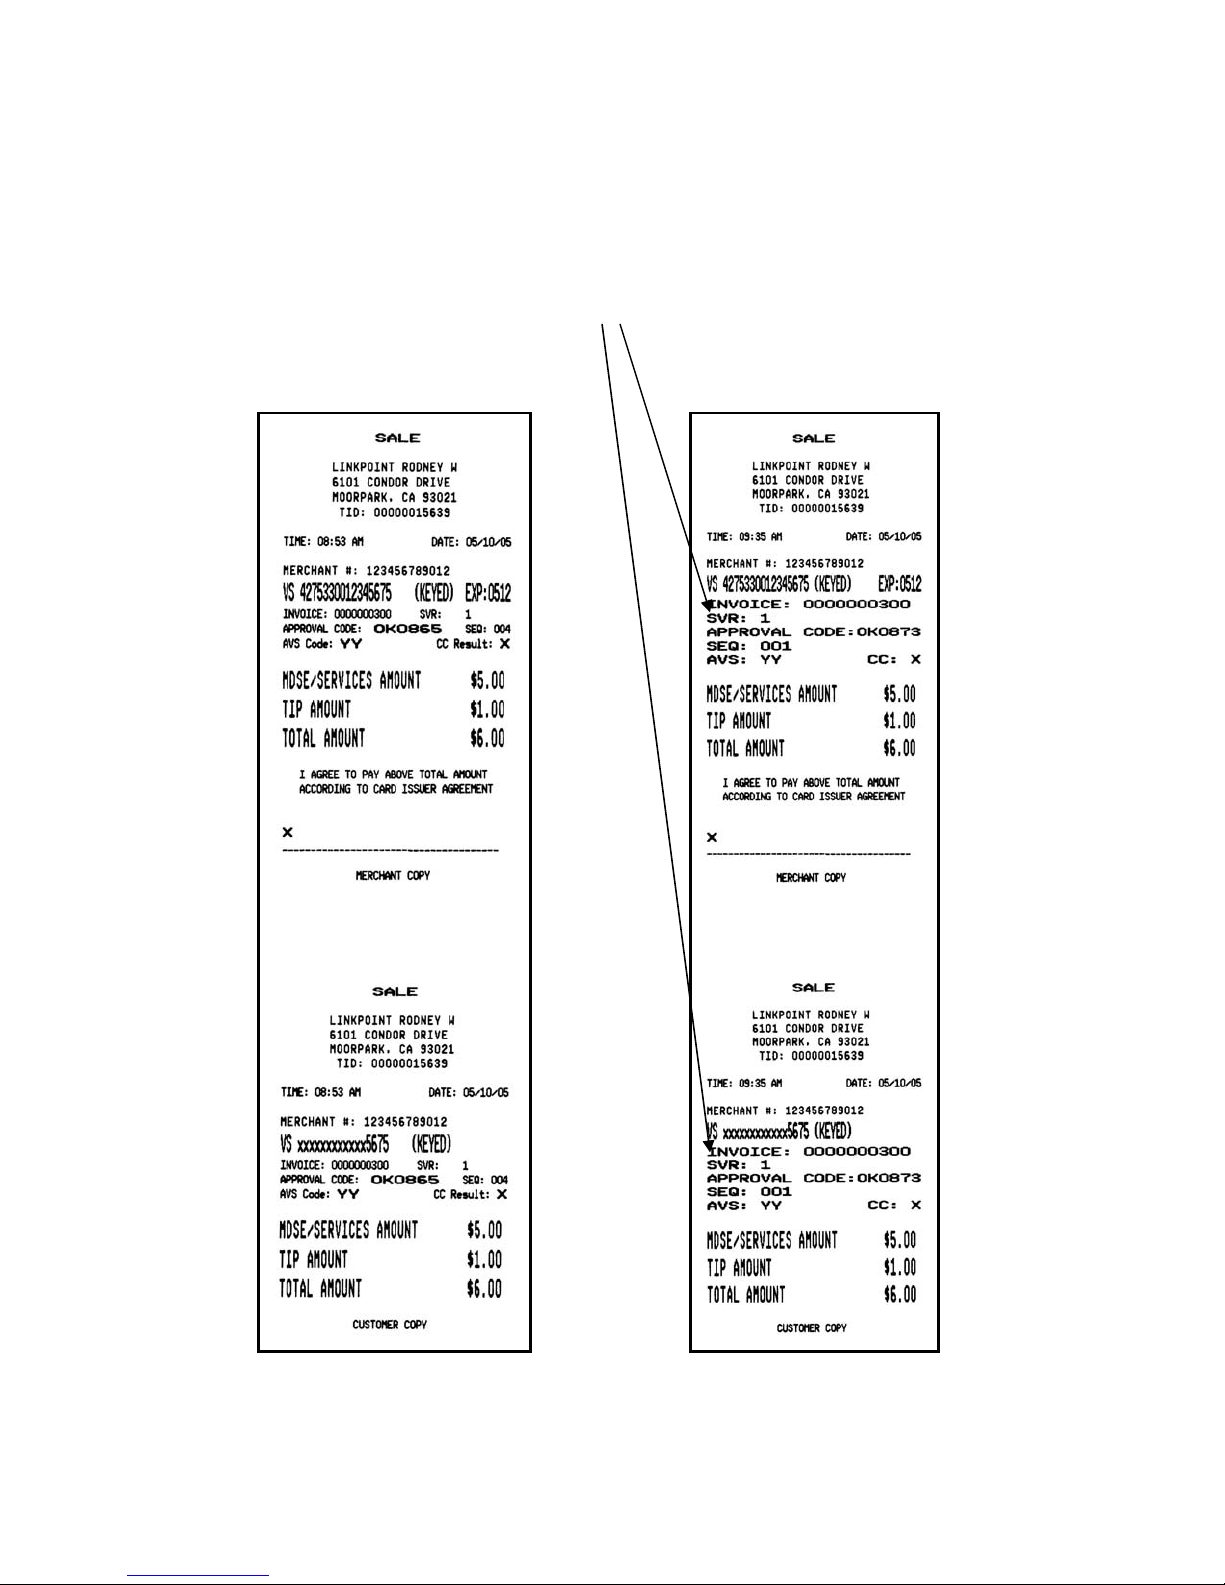
Enlarged Receipt Font
Selected lines of the credit, debit and ECA receipts will now print out using an enlarged
font. The font has been enlarged from 32 characters per line to 20 characters per line.
Please compare the old receipt copy to the current receipt copy:
Larger Font
Old Receipt Copy Current Receipt Copy
© 2005 LinkPoint International, Inc. 11 Nashville LP AIO/3000 Manual
This information is Proprietary and Confidential to LinkPoint International - Reproduction without the
expressed, written consent of LinkPoint International is prohibited.
Page 20

Batch Close Idle Prompt
If the terminal is set for automatic batch close, after a successful close, the REPRINT
TOTALS? prompt will display. If, after a successful automatic batch close, the setting for
Auto DLL download type is ‘1’ or ‘2’, then after five minutes (if no other keys are pressed
in that time) the terminal will return to the idle prompt. If the setting for Auto DLL
download type is ‘0’ then the terminal will remain at the REPRINT TOTALS? prompt until
the terminal is manually cleared.
Batch Close Five Minute Delay for Auto DLL Download
The Auto DLL download begins when all the proper conditions exist (batch closes, auto
download type is set to ‘1’ or ‘2’ and the auto download date and time have passed).
This setting adds a five minute delay to when the Auto DLL download initiates.
Timed Auto DLL Download Wait until Next Timed Occurrence
The Auto DLL download is set to ‘1’ the terminal will wait for the next occurrence of the
auto download time for a timed download to begin.
If the terminal receives the Auto DLL Download time and the terminal closes batch after
that time, please wait until the next timed occurrence to begin the DLL download.
© 2005 LinkPoint International, Inc. 12 Nashville LP AIO/3000 Manual
This information is Proprietary and Confidential to LinkPoint International - Reproduction without the
expressed, written consent of LinkPoint International is prohibited.
Page 21

INITIALIZATION PARAMETERS
Even though application CONFIG 690 01.08.00 features enhancements and revisions
(as explained earlier), most require no changes to be made to the parameters at the
present time.
Initialization requirement changes made to the parameters to accommodate the VP Dual
EBT entitlement include:
• a new EBT card type record (28n)
• an EBT card type flags record (19nn)
• a new EBT card range record (8nn)
Example EBT Card Type Table
ID Description Size Type Comment
28n EBT Card Type Record
Card Type Mnemonic 2 A EB
Card Type ID 2 N nn
Card Type Classification 2 N
Authorization Message Code 3 N 816
Service Code 2 N 02 - Capture/settlement transaction
Floor limit 4 N 0000
Reporting Group 2 N nn
Card Type Index 2 N nn
Note: The card type classification of ‘70’ in the card type record (‘28n’) identifies the
EBT entitlement.
EBT Example Card Type/Slot Flag (Locations 1981 – 1990/Card Type Slot 1-10)
70 - EBT Card Type
Loc Description Size Type Comment
19nn
Card Code Validation 1 N Disable
AVS/Card Present 1 N Disable
AVS/Card Not Present 1 N Disable
CPS/ICP 1 N Disable
ECI Indicator 1 N Disable
RPI Indicator 1 N Disable
Room Rate/Room Tax Prompt 1 N Disable
Rental class ID/Tax Exempt
© 2005 LinkPoint International, Inc. 13 Nashville LP AIO/3000 Manual
Card Type Flags
Prompt
This information is Proprietary and Confidential to LinkPoint International - Reproduction without the
expressed, written consent of LinkPoint International is prohibited.
1 N Disable
Page 22
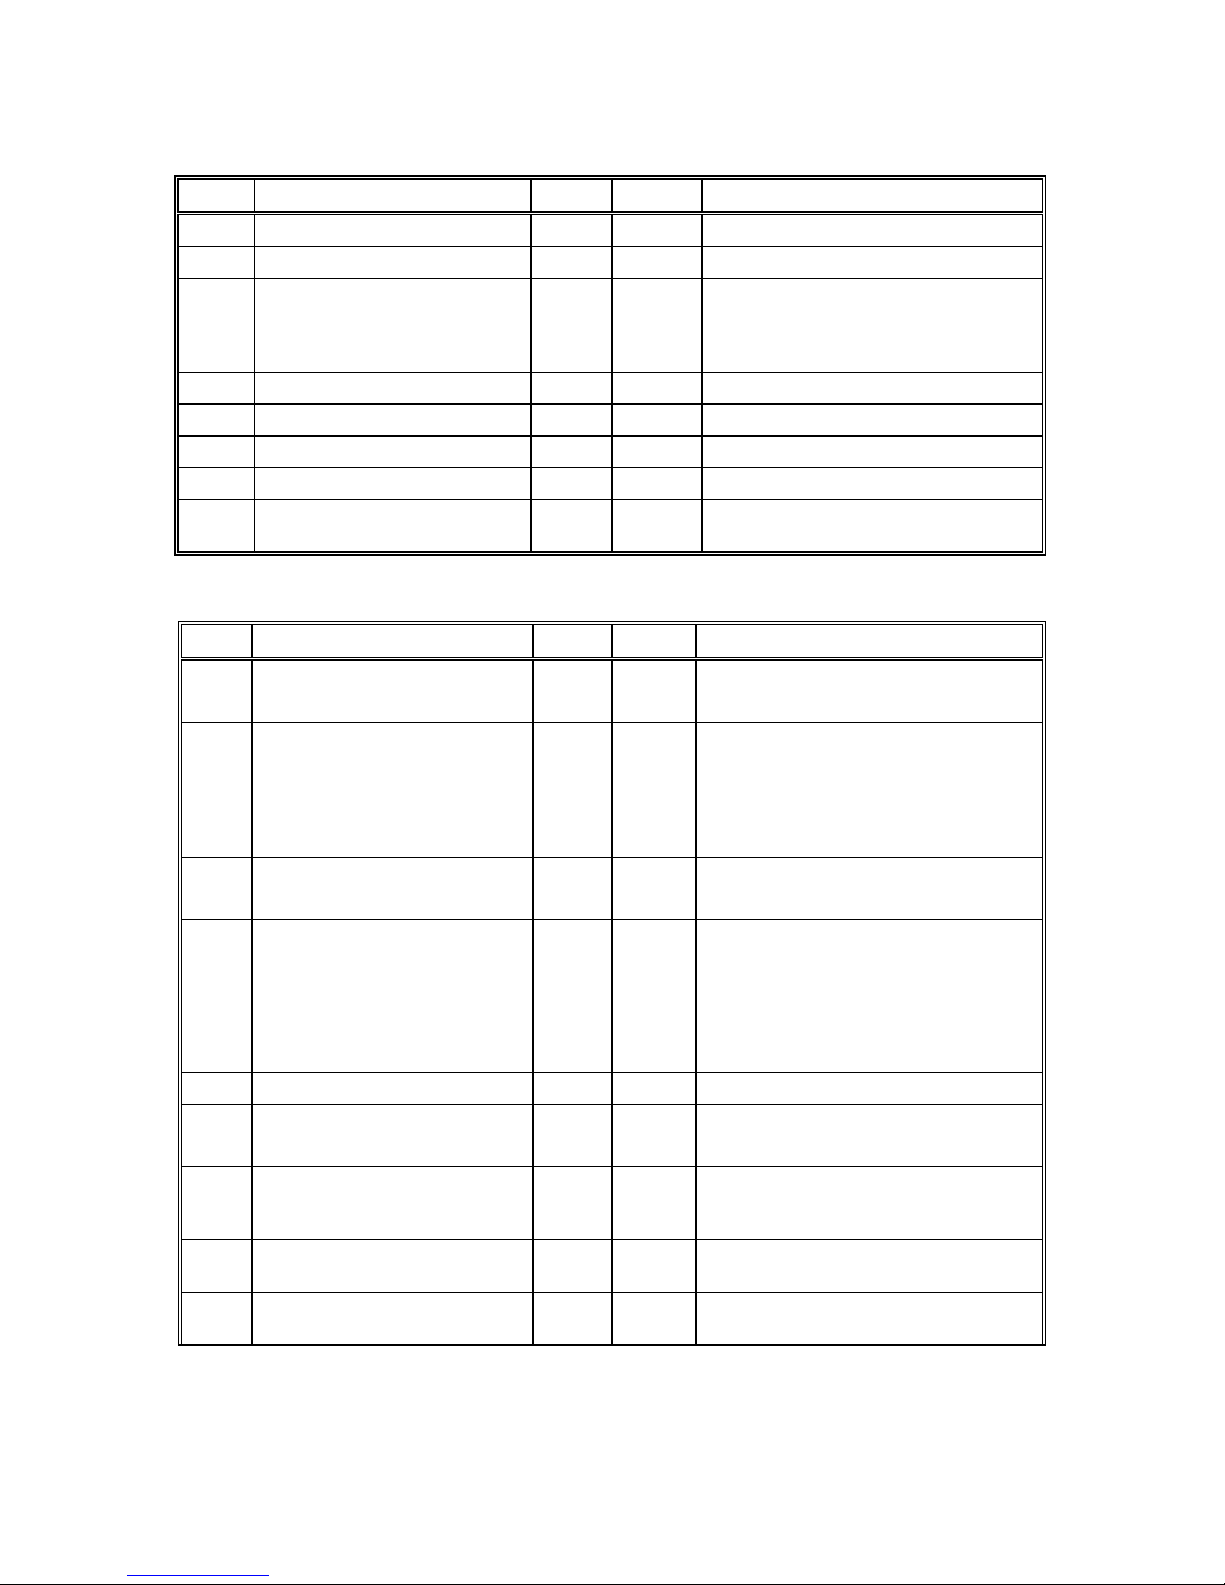
EBT Example Card Range Record
ID Description Size Type Comment
8nn Card Range Record
Min Account # Length 2 N 16
Card Type Record Pointer 1 N Card Type Record Pointer+1
corresponds to Card Type Index field in
Card Type record above (for example,
pointer 0 corresponds to Index 01).
Range Type 2 N
Account # Lower Prefix V N ‘00000001’
Account # Upper Prefix V N ‘99999999’
Max Account # Length 2 N 19
Commercial Card Type
Indicator
2 N ‘00’= Not a commercial card
01 - Card Type confirmation required
Defined Additional Data for EBT
ID Description Size Type Values/Comments
048 EBT Type Indicator 2 N ‘96’ – Cash Benefits
‘98’ – Food Stamps
049 EBT Balance Information May include up to 6 ‘sets of balance
information (account type through
balance amount) as part of additional
data field 049; the POS device prints
balances in order received; max size
would be 21X6 = 126 bytes
Account Type 2 N ‘96’ – Cash Benefits
‘98’ – Food Stamps
Amount Type 2 N ‘01’ – Ending Balance
‘02’ – Available Balance
‘18’ – Beginning Balance
‘40’ – Amount Cash
‘57’ – Pre Auth Amount
Currency Type 4 N ‘0840’ – US Dollars
+/- Amount 1 AN ‘C’ – Positive Amount
‘D’ – Negative Amount
Balance Amount 12 $ Twelve digits with two decimal places
implied (e.g. ‘000000009832’ represents
‘$98.32’.
050 EBT Voucher Number 15 N As keyed for EBT voucher clear
…
Repeat above fields up to 5 more time
as applicable
transactions (offline force sale or refund)
© 2005 LinkPoint International, Inc. 14 Nashville LP AIO/3000 Manual
This information is Proprietary and Confidential to LinkPoint International - Reproduction without the
expressed, written consent of LinkPoint International is prohibited.
Page 23

EBT Balance Information
Up to 6 EBT balances may be returned from the host on any EBT response other than a
void. Balance information can be returned for error responses as well as approval
responses and must be printed on the error receipt copies. Balances will printout on the
customer receipt copy in the order they appear in the response packet (VP Dual
Additional Data Field ‘049’); it is never printed on the merchant receipt copy. If no
balance information is returned, ‘Balances Not Returned’ is printed in place of the
balance information on the customer receipt copy. Each balance record includes the
following information:
Field Values Usage
Account Type ‘96’ – Cash Benefits
‘98’ – Food Stamps
Amount Type ‘01’ – Ending Balance
‘02’ – Available Balance
‘18’ – Beginning Balance
‘40’ – Amount Cash
‘57’ – Pre Auth Amount
‘nn’ - Undefined
Currency Type ‘0840’ – US Dollars Not used
+/- Amount ‘C’ – Positive Amount
‘D’ – Negative Amount
Balance
Amount
12 digits with two implied
decimal places
‘96’ prints ‘CA’ in column 1 and 2 of receipt
‘98’ prints ‘FS’ in column 1 and 2 of receipt
‘01’ prints ‘Ending Balance: ’ in columns 4-22 of receipt
‘02’ prints ‘Available Balance: ’ in columns 4-22 of receipt
‘18’ prints ‘Beginning Balance: ’ in columns 4-22 of receipt
‘40’ prints ‘Amount Cash: ‘ in columns 4-22 of receipt
‘57’ prints ‘Pre Auth Amount: ‘ in columns 4-22 of receipt
‘nn’ prints ‘Other Balance – nn:’ in columns 4-22 of receipt
‘C’ – not used
‘D’ – prints ‘-‘ before ‘$’ for negative amount
Prints ‘$nnnnnnnnnn.nn’ right justified on the balance line
(leading zeroes are suppressed to three characters before
adding ‘-‘ and/or ‘$’ - for example, ‘$0.50).
Example balances on receipt
Balance Information
FS Ending Balance: $500.00
FS Available Balance: $2000.00
FS Beginning Balance: $2000.00
CA Amount Cash: -$50.00
CA Pre Auth Amount: $50.00
CA Other Balance - nn: $0.90
© 2005 LinkPoint International, Inc. 15 Nashville LP AIO/3000 Manual
This information is Proprietary and Confidential to LinkPoint International - Reproduction without the
expressed, written consent of LinkPoint International is prohibited.
Page 24

EBT Error Receipts
EBT receipts (merchant and customer copies) must be printed regardless of the
approval status of the EBT transaction as long as a valid response is received from the
host. The terminal does not need to print an error receipt for general communication
errors (timeout, lost carrier, etc.). The error receipt will print a normal receipt through the
last amount line after which the terminal will skip a line and print the error condition as
indicated by the host according to the following table. In addition, the host may return
response text in VP Dual Additional Data Field 40 which must be printed on the receipt
as well. If balance information is returned on the host response, the terminal will skip a
line and print the balance lines after the error text on the customer receipt copy.
Description
VP Dual
Host
Error
Code
Decline ‘00’ ‘D’ ‘TRANSACTION
Referral ‘00’ ‘R’ ‘CALL VOICE
Expired Card ‘00’ ‘X’ ‘EXPIRED CARD’ Printed bold/centered
Host Timeout ‘00’ ‘O’ ‘CALL VOICE
Host Error ‘98’ N/A Display/print text
Parameter
‘18’ N/A N/A Perform standard
Update
Required
Other ‘nn’ N/A ‘SYSTEM ERROR nn’ Printed bold/centered
VP Dual
Response
Code
Receipt/Display
Verbiage
DECLINED’
CENTER!’
CENTER!’
received from host
Comment
Printed bold/centered
Printed bold/centered
Printed bold/centered
Print bold/centered
(wrap lines if needed)
parameter update
processing
© 2005 LinkPoint International, Inc. 16 Nashville LP AIO/3000 Manual
This information is Proprietary and Confidential to LinkPoint International - Reproduction without the
expressed, written consent of LinkPoint International is prohibited.
Page 25

Example Error Receipt (Merchant Copy)
FOOD STAMP SALE
DBA Name DBA Name
DBA Street Address DBA Street Address
DBA City, State, Zip DBA City, DBA State, DBA ZIP
TID: nnnnnnnnnnn DBA Phone Number
TIME: hh:mm DATE:
mm/dd/yy
MERCHANT #: nnnnnnnnnnnnnnnn Merchant ID
EB nnnn (KEYED)
INVOICE: nnnn CLK: nnnn Invoice number; clerk number if enabled
APPROVAL CODE: nnnnnn SEQ: nnn Approval code, sequence (transaction) number
TOTAL AMOUNT$ nnnnn.nn
TRANSACTION DECLINED
INSUFFICIENT FUNDS
MERCHANT COPY Receipt distribution
Transaction type
Transaction time and date
Card type, last 4 of PAN and entry method in parenthesis if
keyed
Total line
Response code text
Additional Data Field 40 text if received from host *
© 2005 LinkPoint International, Inc. 17 Nashville LP AIO/3000 Manual
This information is Proprietary and Confidential to LinkPoint International - Reproduction without the
expressed, written consent of LinkPoint International is prohibited.
Page 26

Example Error Receipt – Customer Copy
FOOD STAMP SALE
DBA Name DBA Name
DBA Street Address DBA Street Address
DBA City, State, Zip DBA City, DBA State, DBA ZIP
TID: nnnnnnnnnnn DBA Phone Number
TIME: hh:mm DATE:
mm/dd/yy
MERCHANT #: nnnnnnnnnnnnnnnn Merchant ID
EB nnnn (KEYED)
INVOICE: nnnn CLK: nnnn Invoice number
APPROVAL CODE: nnnnnn SEQ:
nnn
TOTAL AMOUNT$ nnnnn.nn
TRANSACTION DECLINED
INSUFFICIENT FUNDS
Balance Information
xx Ending Balance:
$nnnnnnnnnn.nn
xx Available Balance:
$nnnnnnnnnn.nn
xx Beginning Balance:
$nnnnnnnnnn.nn
xx Amount Cash:
$nnnnnnnnnn.nn
xx Pre Auth Amount:
$nnnnnnnnnn.nn
xx Other Balance - nn:
$nnnnnnnnnn.nn
CUSTOMER COPY Receipt distribution
Transaction type
Transaction time and date
Card type, last 4 of PAN and entry method in parenthesis if
keyed
Approval code, sequence (transaction) number
Total line
Response code text
Additional Data Field 40 text if received from host
Up to six lines of balance information if received from host.
Printed for balance type ‘01’
Printed for balance type ‘02’
Printed for balance type ‘18’
Printed for balance type ‘40’
Printed for balance type ‘57’
Printed for balance type ‘nn’ (any type not defined above)
© 2005 LinkPoint International, Inc. 18 Nashville LP AIO/3000 Manual
This information is Proprietary and Confidential to LinkPoint International - Reproduction without the
expressed, written consent of LinkPoint International is prohibited.
Page 27

Response Text (Additional Data Field 40)
For ECA and EBT transactions, the host can return response text to print on the receipt.
The response text is included in VP Dual Additional Data Field 40. The field should be
treated as variable length up to 64 characters delimited by an ASCII field separator. The
terminal should parse the data up to 64 characters or up to the field separator whichever
comes first. The response text prints on the settlement report. The leading and trailing
spaces will be removed and the text will be centered as much as possible. If there are
more characters than will print on a line, then characters will wrap to the next line.
VP Dual Additional Data Receipt Example
040INSUFFICIENT FUNDS<FS> INSUFFICIENT FUNDS
040This is an example of very long text that
needs to be printed.<FS>
040123456789012345678901234567890123456
78901234567890<FS>
This is an example of very long text
that needs to be printed.
12345678901234567890123456789
012345678901234567890
© 2005 LinkPoint International, Inc. 19 Nashville LP AIO/3000 Manual
This information is Proprietary and Confidential to LinkPoint International - Reproduction without the
expressed, written consent of LinkPoint International is prohibited.
Page 28

EBT Authorization Request
Element Size Type Comment
Message Code 3 N Supplied by host by card type
Processing Code 1 N S - As received from host for EBT sale, voucher clear sale or void sale
C - EBT refund, voucher clear refund or void refund
Capture Flag 1 A S – EBT sale/refund, voucher clear sale/refund, void sale/refund
A – EBT balance inquiry
Auth Type 1 A A – EBT sale/refund, voucher clear sale/refund, balance inquiry
V – EBT void sale/refund
Summary ID 5 N 00000 – 32000
Transaction ID 5 N 00000 – 32000
Card Number 19 N LJTB
Expiration Date 4 N From Track II or ‘0000’ if account # manually keyed
Transaction Amount 7 D Amount of transaction or ‘0000000’ for EBT balance inquiry
Invoice Number 10 N As keyed by clerk or assigned by terminal based on initialization option
Processing Flag 1 A Always ‘C’
Card Present Flag 1 A P - Card Present; N - Not Present
Merchant Type 1 A Supplied by initialization parameter
Card Number Source 1 N 1 - Track One; 2 - Track Two; 3 - Entered Manually
Customer Present 1 A P – Present; N - Not Present
Terminal Type 1 N 1 - Dial POS
Terminal Capability 1 N 2 - Mag stripe reader
Tip Amount 7 D As keyed or ‘0000000’ if not applicable
Filler (legacy server #) 2 X
Track Data V/76 N Data omitted if the account # was manually entered - if swiped, always Track 2
Field Separator 1 B ASCII FS
Auxiliary Data V X Transaction specific data (e.g. cash-back)
Field Separator 1 B ASCII FS
Server Number 4 N As keyed or ‘0000’ if not applicable
Original Tran Date 4 N MMDD
Field Separator 1 B ASCII FS
Debit/EBT Card Slot 2 N
PIN Pad Type 2 N Always ‘01’ (Omitted for voucher clear and void transactions)
PIN Block Format 2 N Always 01 (Omitted for voucher clear and void transactions)
Key Serial # 20 As received from PIN pad (Omitted for voucher clear and void transactions)
PIN Block 16 As received from PIN pad (Omitted for voucher clear and void transactions)
Field Separator 1 B ASCII FS
ADDITIONAL DATA FOLLOWS:
Start of Additional Data 1 B ASCII ESC (Hex 1B, Dec 27)
Additional Data ID [1] 3 N Identifies type of data
Additional Data [1] V X As defined in Appendix A
Field Separator 1 B ASCII FS
... Include ID/data pairs (separated by FS) as applicable
Additional Data ID [n] 3 N Identifies type of data
Additional Data [n] V X As defined below
End of Additional Data 1 B ASCII ESC (Hex 1B, Dec 27)
<spaces>
01 – 10 (Omitted for voucher clear and void transactions)
EBT CASH BENEFITS/FOOD STAMPS INDICATOR REQUIRED FOR ALL EBT TRANSACTIONS
VOUCHER # AND AUTH CODE REQUIRED FOR ALL EBT VOUCHER CLEAR TRANSACTIONS
© 2005 LinkPoint International, Inc. 20 Nashville LP AIO/3000 Manual
This information is Proprietary and Confidential to LinkPoint International - Reproduction without the
expressed, written consent of LinkPoint International is prohibited.
Page 29

EBT Authorization Response
Element Size Type Comment
Message Code 3 N One more than request message code
Host error code 2 N ‘00’ if no error, ’98’ for host error text or ‘nn’
Response Code 1 A 'A' – approved
'D' – declined
'R' – referred
'X' - expired card
'0' - host time-out (treat as referral)
Summary ID 5 N Echoed from request
Transaction ID 5 N Echoed from request
Auth code 6 X
Field Separator 1 B ASCII FS
Field Separator 1 B ASCII FS
Field Separator 1 B ASCII FS
Field Separator 1 B ASCII FS (Marks end of AVS Data)
Start of Additional Data 1 B ASCII ESC (Hex 1B, Dec 27)
Additional Data ID [1] 3 N Identifies type of data
Additional Data [1] V X As defined in Appendix A
Field Separator 1 B ASCII FS
... Include ID/data pairs (separated by FS) as applicable
Additional Data ID [n] 3 N Identifies type of data
Additional Data [n] V X As defined below
End of Additional Data 1 B ASCII ESC (Hex 1B, Dec 27)
For voucher clear transactions, the returned response auth code replaces
the keyed voice approval auth code. Auth code is ignored for balance
inquiry transactions.
ADDITIONAL DATA FOLLOWS:
EBT BALANCE INFORMATION MAY BE RETURNED ON ANY EBT RESPONSE
© 2005 LinkPoint International, Inc. 21 Nashville LP AIO/3000 Manual
This information is Proprietary and Confidential to LinkPoint International - Reproduction without the
expressed, written consent of LinkPoint International is prohibited.
Page 30
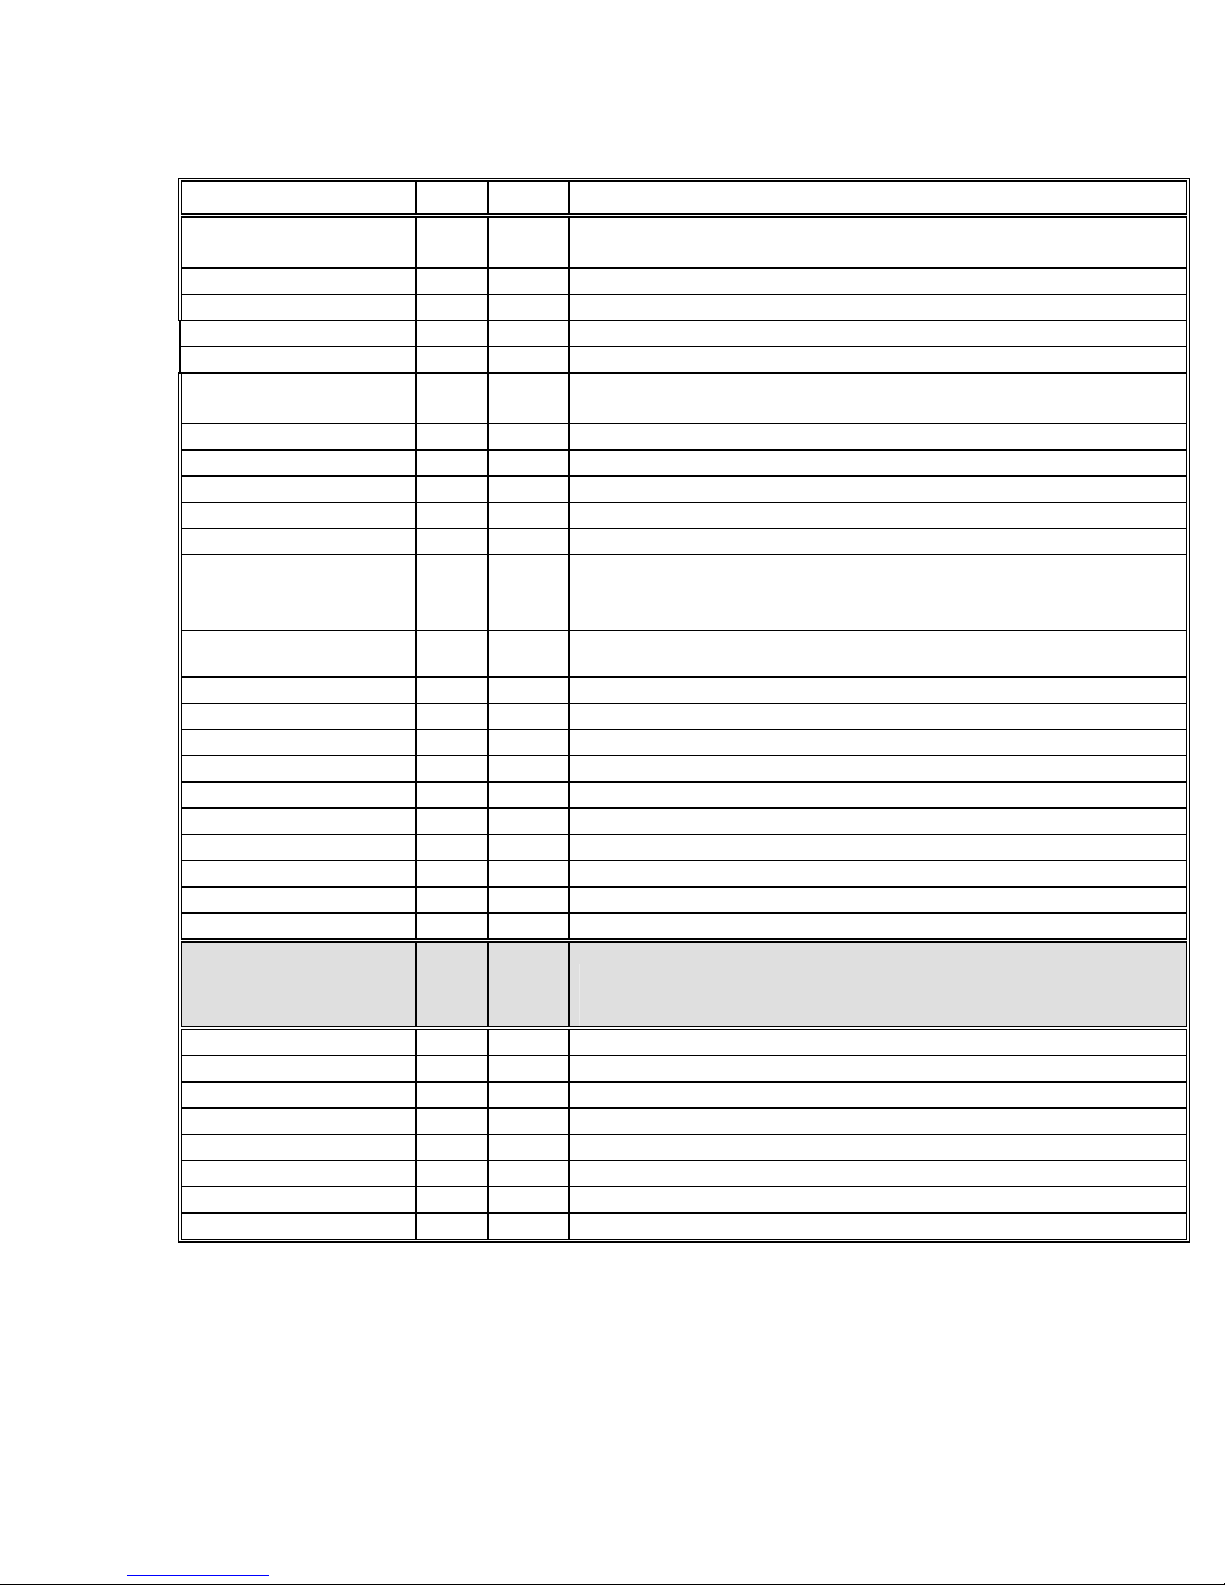
EBT Batch Upload (Discrepancy/Out of Balance) Detail Request - 580
Element Size Type Comment
Message code 3 N '580' – Batch Upload (Discrepancy/Out of Balance) Detail
Summary ID 5 N '00000' - '32000'
Card Type Group 2 N '01' - '10' (as supplied in initialization parameters)
Transaction status 1 A 'N' - Not changed or deleted
Transaction type 1 A 'N' - Original online authorization
Card Type Index/Slot 2 N '01' - '10' (as supplied in initialization parameters)
Processing Code 1 A S - As received from host for EBT sale or voucher clear sale
C - EBT refund or voucher clear refund
Transaction ID 5 N '00000' - '32000'
Card number 19 N Left justified/trailing spaces (zeroes if not applicable)
Transaction date 4 N MMDD (‘0000’ if not applicable)
Transaction amount 7 D Final settlement amount
Invoice # 10 N Required (as keyed or assigned by terminal)
Account # Entry Source 1 N '2' - Track II Swiped (Track II required for EBT swiped transactions)
'3' - Keyed manually
Authorization Code 6 X
Filler 2 X
Filler 2 N
Original Transaction ID 5 N
Original Amount 7 D
Tip Amount 7 D Zeroes if not applicable
Server Number 4 N Zeroes if not applicable
Field Separator 1 B ASCII FS
Auxiliary Data V Eg. EBT cash back
Field Separator 1 B ASCII FS
Field Separator 1 B ASCII FS
Start of Additional Data 1 B ASCII ESC (Hex 1B, Dec 27)
Additional Data ID [1] 3 N Identifies type of data
Additional Data [1] V X As defined in Appendix A
Field Separator 1 B ASCII FS
... Include ID/data pairs (separated by FS) as applicable
Additional Data ID [n] 3 N Identifies type of data
Additional Data [n] V X As defined below
End of Additional Data 1 B ASCII ESC (Hex 1B, Dec 27)
Spaces if not applicable – response auth code for EBT voucher clear
transactions – voucher clear auth code submitted as additional data below
Spaces
Zeroes
ADDITIONAL DATA FOLLOWS
EBT CASH BENEFITS/FOOD STAMPS INDICATOR FOR ALL EBT
TRANSACTIONS
EBT VOUCHER # FOR VOUCHER CLEAR TRANSACTION
© 2005 LinkPoint International, Inc. 22 Nashville LP AIO/3000 Manual
This information is Proprietary and Confidential to LinkPoint International - Reproduction without the
expressed, written consent of LinkPoint International is prohibited.
Page 31
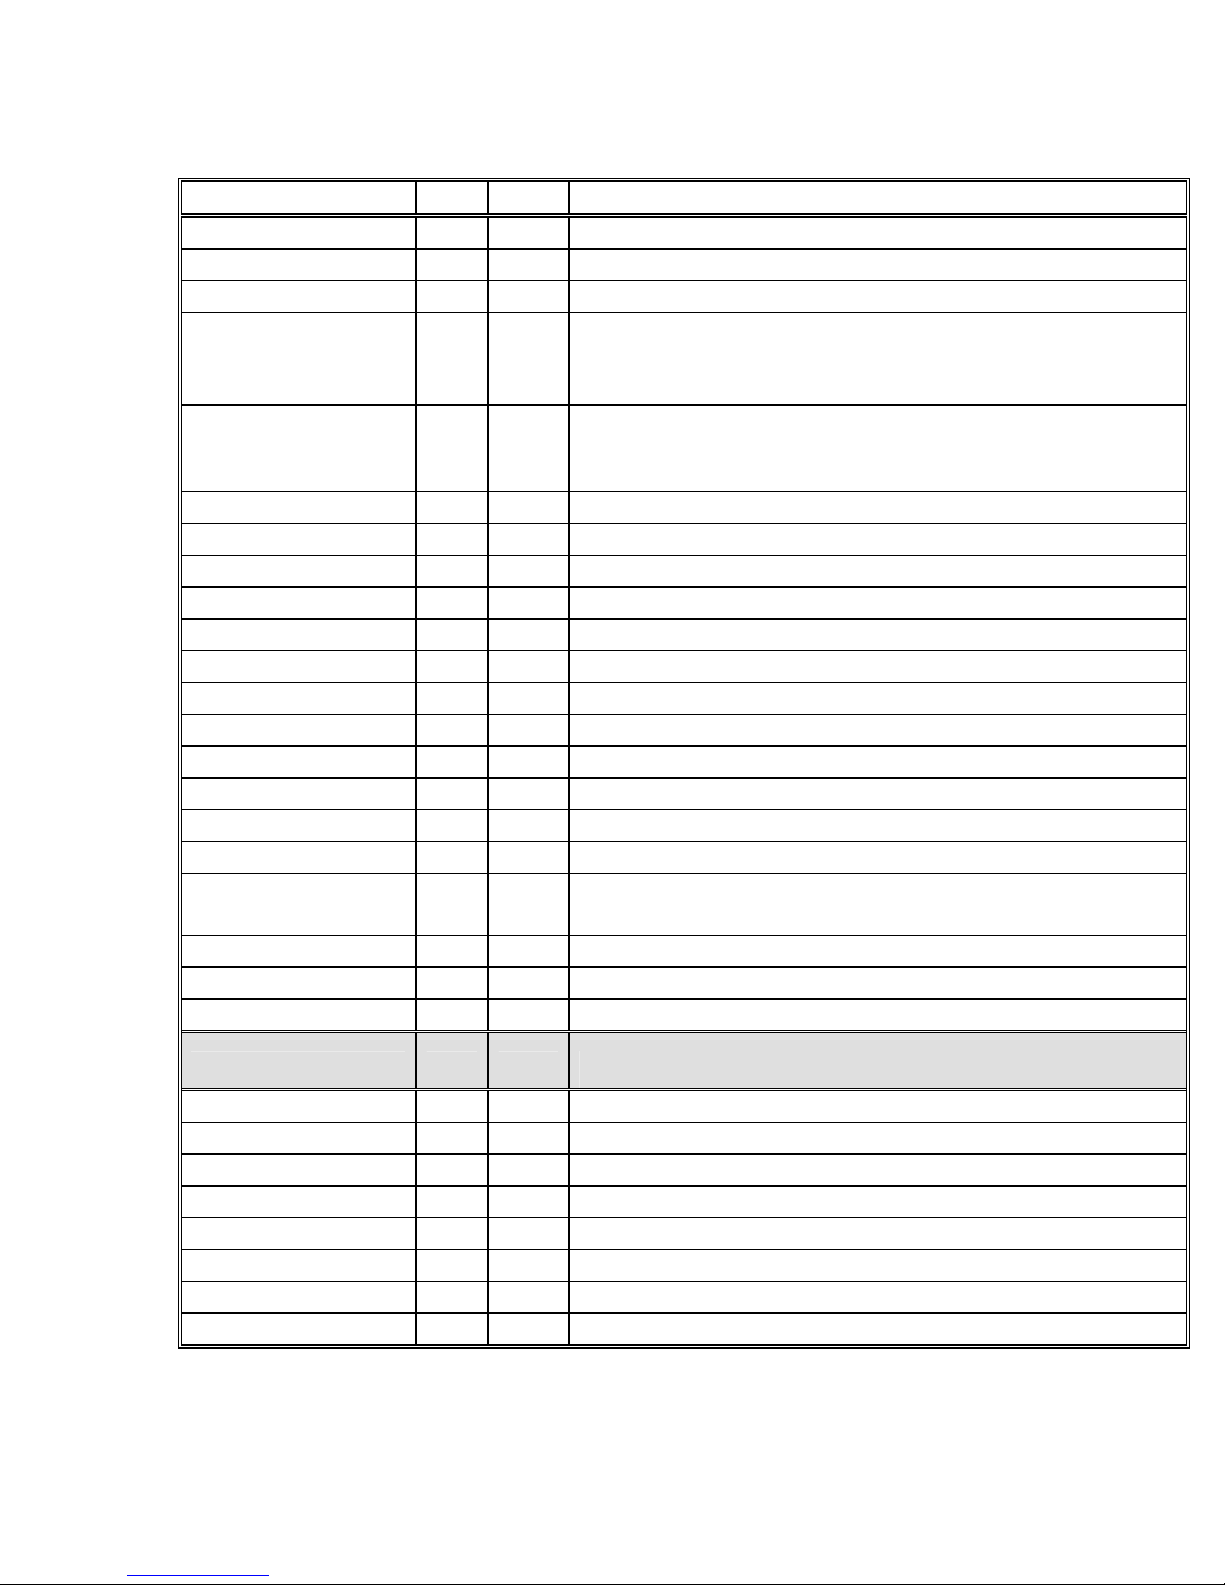
EBT Batch Download (Restore) Detail Response – 583
Element Size Type Comment
Message code 3 N ‘583’
Host Error Code 2 N ‘00’ if no error
Card Type Group 2 N '01' - '10'
Transaction Status 1 A 'N' - Not changed/adjusted (EBT voids are not reloaded)
Transaction Type 1 A 'N' - Original online
Card Type Slot 2 N '01' - '10'
Processing Code 1 A
Transaction ID 5 N '00000' - '32000'
Account # 19 N Left justified/trailing spaces
Transaction Date 4 N MMDD
Transaction Amount 7 D Final settlement amount
Invoice # 10 N
Account # Entry Source 1 N
Auth Code 6 X Spaces if not applicable
Card Type Mnemonic 2 X As supplied during initialization
Card type 2 N As supplied during initialization
Original Transaction ID 5 N If changed
Original Amount 7 D If changed
Tip Amount 7 D Zeroes if not applicable
Server Number 4 N Zeroes if not applicable
Additional Records? 1 A 'Y' - More records to restore
'N' - No more records to restore
Field Separator 1 B ASCII FS
Auxiliary Data V Eg. EBT cash back
Field Separator 1 B ASCII FS
ADDITIONAL DATA FOLLOWS
Start of Additional Data 1 B ASCII ESC (Hex 1B, Dec 27)
Additional Data ID [1] 3 N Identifies type of data
Additional Data [1] V X As defined below.
Field Separator 1 B ASCII FS
... Include ID/data pairs (separated by FS) as applicable
Additional Data ID [n] 3 N Identifies type of data
Additional Data [n] V X As defined below
End of Additional Data 1 B ASCII ESC (Hex 1B, Dec 27)
S - As received from host for EBT sale or voucher clear sale
C - EBT refund or voucher clear refund
'1' - Track I, '2' - Track II, '3' - Keyed manually
EBT CASH BENEFITS/FOOD STAMPS INDICATOR FOR ALL EBT TRANSACTIONS
EBT VOUCHER# FOR VOUCHER CLEAR TRANSACTION
© 2005 LinkPoint International, Inc. 23 Nashville LP AIO/3000 Manual
This information is Proprietary and Confidential to LinkPoint International - Reproduction without the
expressed, written consent of LinkPoint International is prohibited.
Page 32
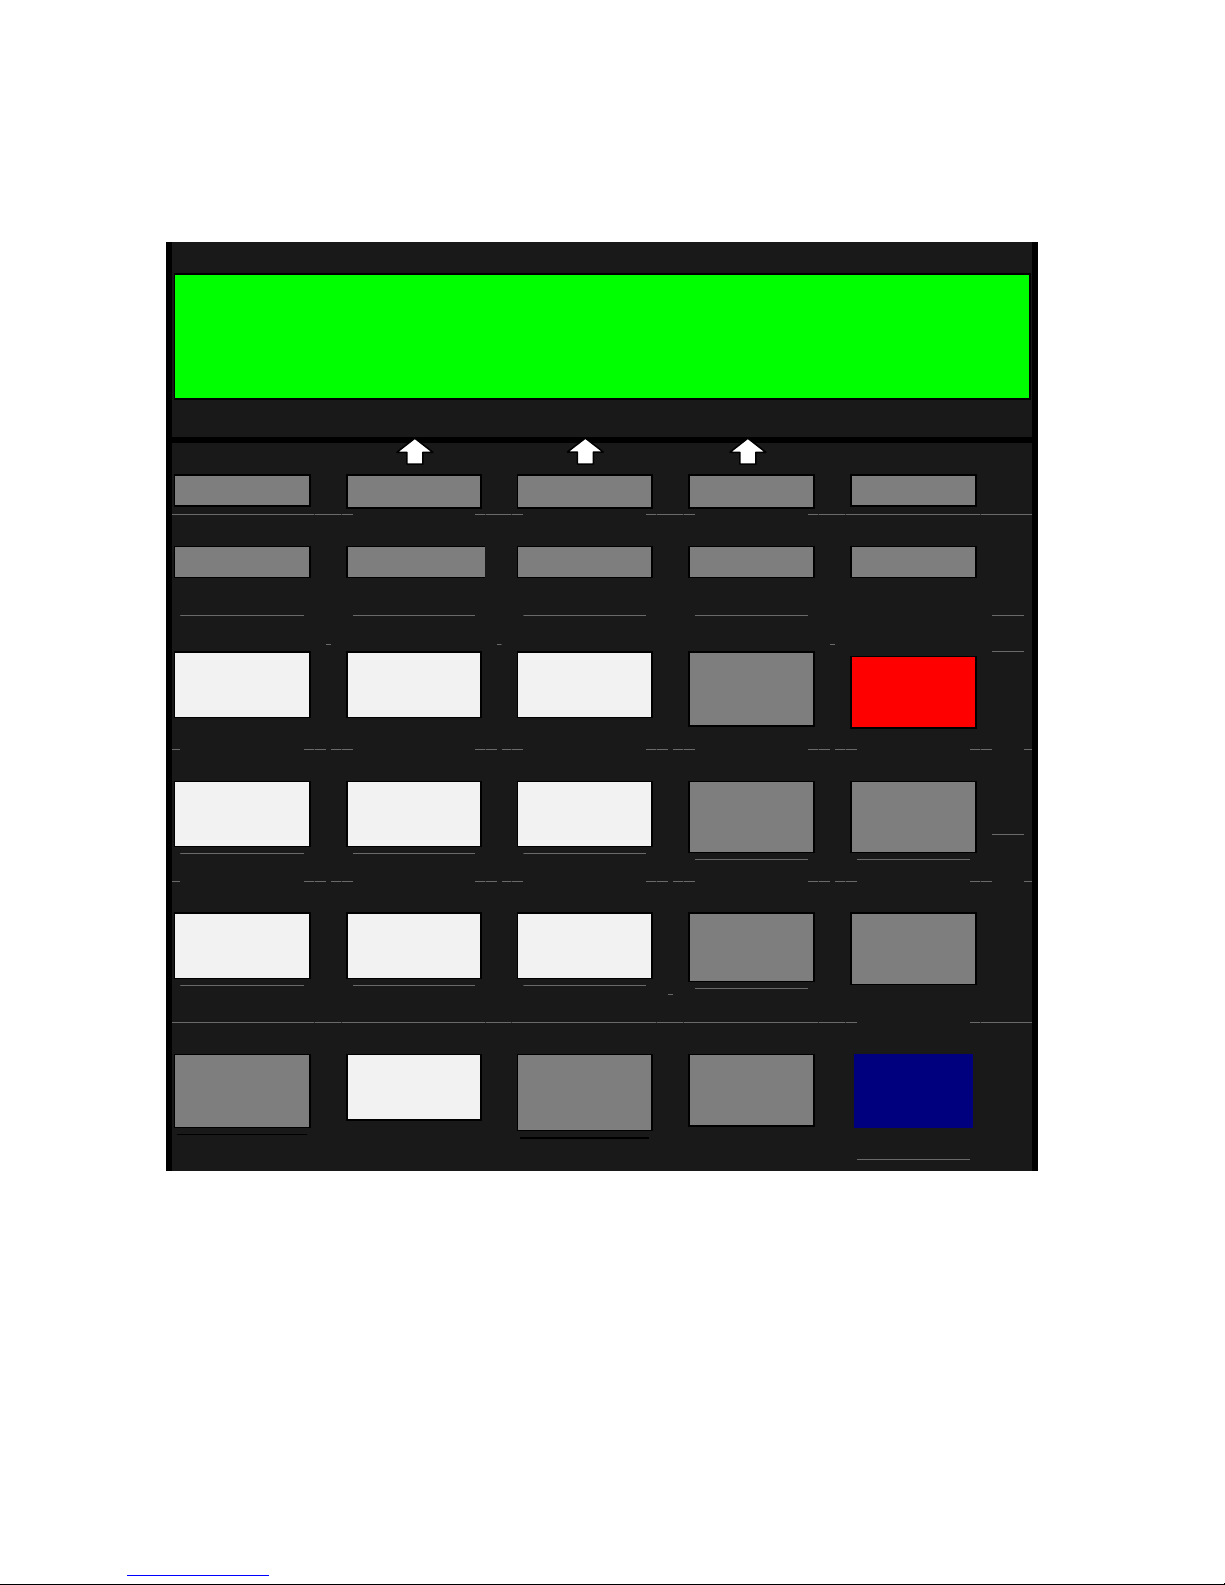
KEYPAD/TEMPLATE DESIGN
L i n k P o i n t A I O
A .
VOID
F ‘
SALE
K
1
O
4
S
7
W
Í
B - S C sp S D + S E ,
G “
✱
ATM/DEBIT
L
P
T
X
H :
2
5
8
0
CHECK
M
Q
U
Y
I ;
P
R
I
3
N
T
A
U
T
H
6
O
N
L
Y
O
F
F
L
I
9
N
E
A
D
J
U
S
T
#
REVIEW
N (
R )
X
V !
—
Z &
+
J @
÷
=
ENTER
Î
RETURN
CLOSE
CLEAR
ALPHA
BACK
SPACE
NO
YES
L M
A E
S N
T U
P
R
E
V
N
E
X
T
© 2005 LinkPoint International, Inc. 24 Nashville LP AIO/3000 Manual
This information is Proprietary and Confidential to LinkPoint International - Reproduction without the
expressed, written consent of LinkPoint International is prohibited.
Page 33
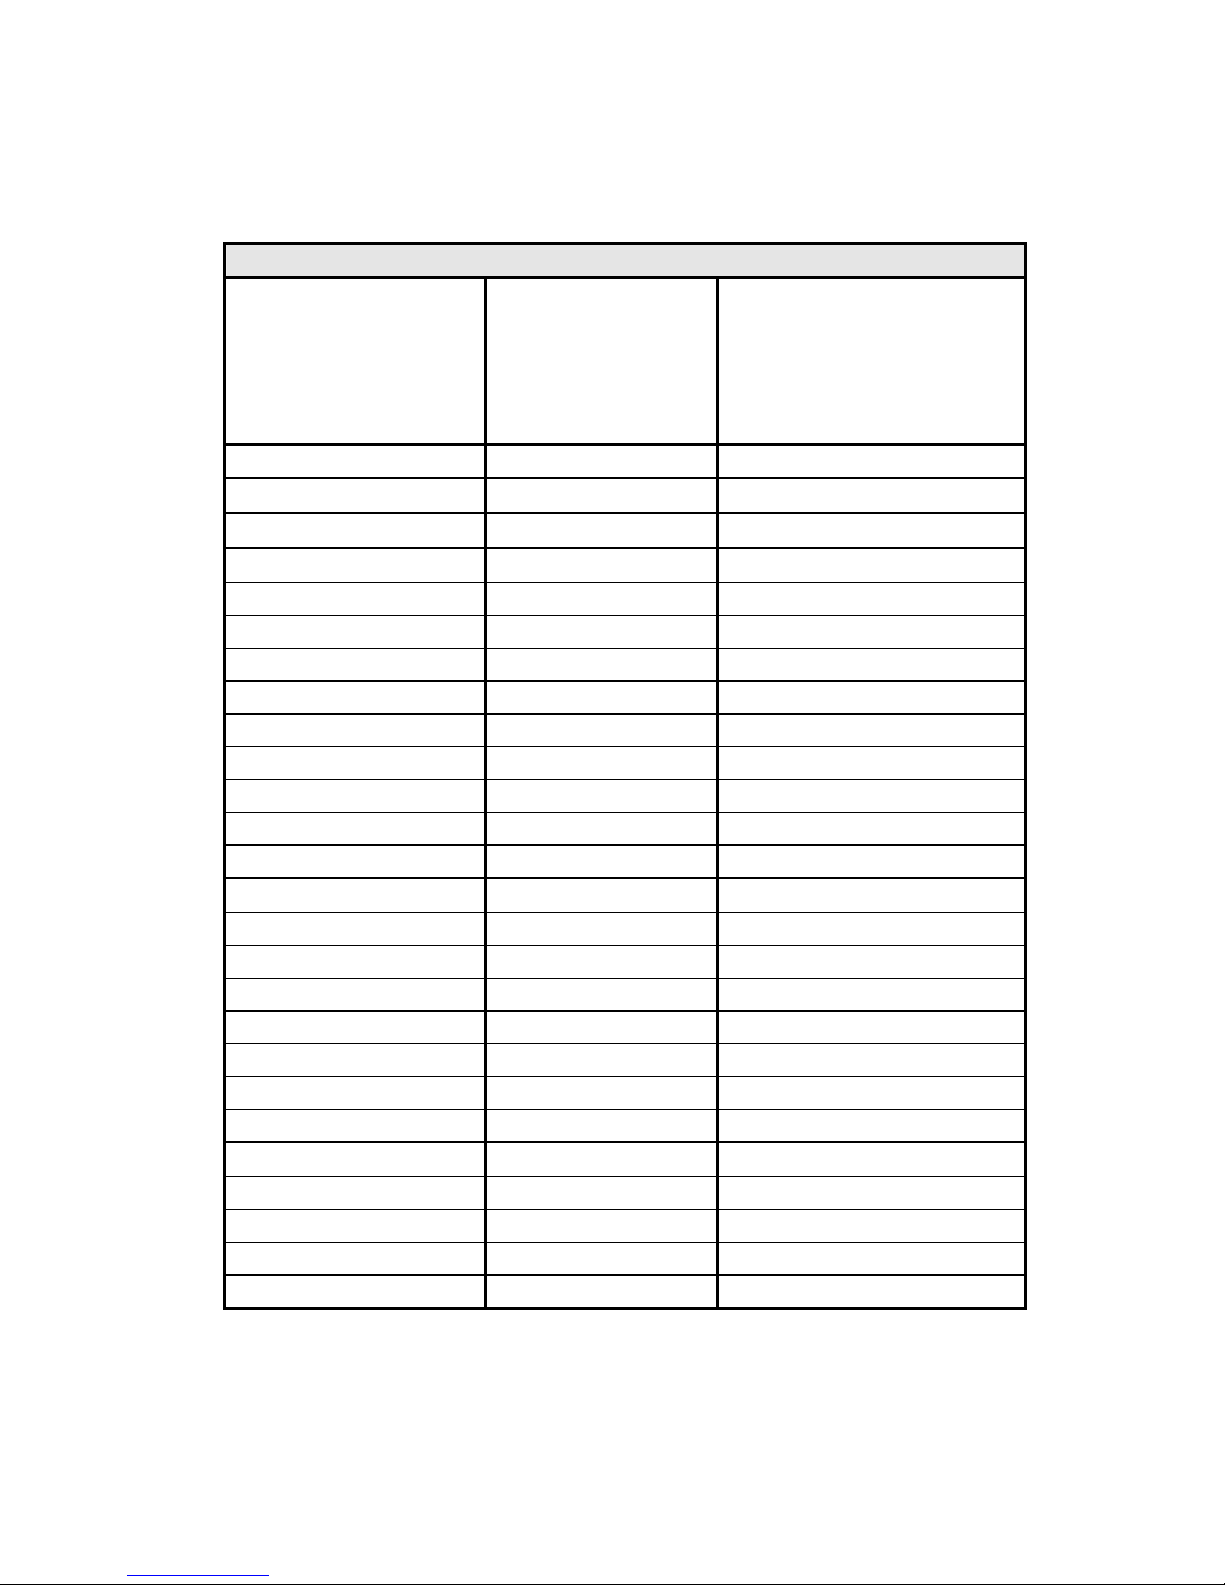
KEYPAD/TEMPLATE CHART
LINKPOINT AIO ALPHA/SYMBOL ASSIGNMENTS
Key Assignment ALPHA MODE
[ALPHA] is
depressed once or
twice prior to
pressing the
corresponding key
[VOID] A . (period)
Left Green [S]
Center Green [S]
Right Green [S]
[RETURN] E , (comma)
[SALE] F ‘ (apostrophe)
[ATM/DEBIT] G “ (quote)
[CHECK] H : (colon)
[REVIEW] I ; (semi-colon)
[CLOSE] J @ (“at”)
[1] K 1
[2] L 2
[3] M 3
[÷]
[4] O 4
[5] P 5
[6] Q 6
[x] R )
[7] S 7
[8] T 8
[9] U 9
[−]
[*] W * (asterisk)
[0] X 0
[#] Y # (pound)
[+] Z & (ampersand)
B - (hyphen)
C Space
D +
N (
V !
Symbol displayed when
pressing the corresponding
key directly
(NO ALPHA KEY)
© 2005 LinkPoint International, Inc. 25 Nashville LP AIO/3000 Manual
This information is Proprietary and Confidential to LinkPoint International - Reproduction without the
expressed, written consent of LinkPoint International is prohibited.
Page 34

SETUP
After the terminals have been unpacked and installed they may require setup. The
following procedures explain the setup procedures that are necessary to use the
LinkPoint AIO and 3000 terminals. Please note that any setup procedures performed by
the merchant must be attempted only after consulting with either your service
provider help desk or sale representative. Most terminals arrive at the merchant
location after these procedures have already been performed so they may not be
necessary for normal merchant use.
Memory Clear
This function is only performed before a full application download. Do not perform a
memory clear for parameter initialization or partial downloads. The memory clear
function clears the terminal memory of previous application installations and other stored
data and also prepares the terminal for a full application download.
IMPORTANT! Before a full application download can occur a full memory clear
procedure must be performed. This feature will also delete an open batch, so
please perform a batch close procedure before attempting a memory clear.
Please follow the procedures below to perform a full memory clear.
Display Message Operator Action and Comments
SWIPE CARD FOR SALE
MM-DD-YY DAY HH:MM
Existing Application: When this screen appears, an
existing application is installed on the terminal. Unplug
the power chord from the back of terminal. While holding
down the [CLEAR] key, re-install the power chord.
App. not available
Time Load Setup
Enter password:
CLEAR to cold start
Any other to resume
© 2005 LinkPoint International, Inc. 26 Nashville LP AIO/3000 Manual
This information is Proprietary and Confidential to LinkPoint International - Reproduction without the
expressed, written consent of LinkPoint International is prohibited.
No Application: When this screen appears, an
application is not installed on the terminal. Unplug the
power chord from the back of terminal. While holding
down the [CLEAR] key, re-install the power chord.
When this message appears, release the [CLEAR] key.
Key in [4] [6] [5] [1] [0] [7] [0] and press [ENTER].
Press the [CLEAR] key.
Page 35
Display Message Operator Action and Comments
AIO X.X L,XX/XX/XX
Select Test Number
The memory has now been cleared from a portion of the
terminal. Press the [*] key.
App. not available
Time Load Setup
Press the right [S] key.
Setup
Ports Model Test
Press the right [S] key.
Test
Mem Clear Diags
Press the left [S] key.
Enter password:
Press [4] [6] [5] [1] [0] [7] [0] and press [ENTER].
CLEAR: Are you sure?
Yes No
Press the left [S] key.
AIO X.X L,XX/XX/XX
Select Test Number
App. not available
Time Load Setup
The memory has now been cleared from both portions of
the terminal memory. Press the [*] key.
If this entire procedure has been followed, the memory
has been cleared from both portions of the terminal. It is
now ready to be downloaded.
© 2005 LinkPoint International, Inc. 27 Nashville LP AIO/3000 Manual
This information is Proprietary and Confidential to LinkPoint International - Reproduction without the
expressed, written consent of LinkPoint International is prohibited.
Page 36
Download Procedures (Telephone)
There are two different ways to download the LinkPoint terminal, telephone download
and PC to POS terminal download. Please follow the procedures below to download the
application by telephone. Please contact your service provider or sales rep for
assistance with all download procedures. DO NOT DOWNLOAD A TERMINAL
WITHOUT ASSISTANCE FROM YOUR SERVICE PROVIDER HELP DESK OR
SALES REPRESENTATIVE.
Display Message Operator Action and Comments
SWIPE CARD FOR SALE
MM-DD-YY DAY HH:MM
App. not available
Time Load Setup
Select app type
Base/SA Supt Lib
If this screen appears when the terminal is powered up,
the terminal is already loaded with an application. Even
though a download can take place with a loaded
terminal, it is recommended that the terminal memory be
cleared before downloading this application. Please see
the memory clear procedure printed earlier in this
chapter for instructions on how to clear the terminal
memory. Once the memory is clear, proceed with the
download.
When this screen appears, the application has been
deleted from the terminal. Press the middle [
S] key.
If this screen appears, press the left [S] key.
Download Set Port
Press the left [S] key.
Enter phone number.
Key in the download phone number and press [ENTER].
Enter Appl. ID
Key in application ID and press [ENTER]. Please see
page 25 for instructions on how to enter alphanumeric
information on the LinkPoint terminal.
Enter Terminal ID.
© 2005 LinkPoint International, Inc. 28 Nashville LP AIO/3000 Manual
This information is Proprietary and Confidential to LinkPoint International - Reproduction without the
expressed, written consent of LinkPoint International is prohibited.
Key in terminal ID and press [ENTER]. Please see page
25 for instructions on how to enter alphanumeric
information on the LinkPoint terminal.
Page 37
Display Message Operator Action and Comments
Modem download
Full Partial
Press the left [S] key.
Dialing…
Please wait, the terminal will display several messages.
CONNECTED 2400
XXXXXXXX,XXXXXXX
When the terminal successfully reaches the download
file, this screen will display. The modem speed,
application ID and terminal ID will display.
----------
XXXXXXXX,XXXXXXX
As the application is loaded into the terminal the bars on
the top line of the display will become asterisks. The
application ID and terminal ID will continue to display.
CREATING PROMPTS…
TID = XXXXXX
ENTER TERMINAL ID _
When the base application download is complete, this
message will display. Please wait…
After the base application has been downloaded, the
merchant specific information must be downloaded to
initialize the terminal. At this point, the user has the
option of either initializing the terminal now or
unplugging the terminal to be initialized later. To initialize
the terminal now, either key in the terminal ID, press
[ENTER] or simply press [ENTER] if the displayed ID is
correct.
PHONE=9,XXXXXXXXXXXN
ENTER PHONE # _
At this point, the user has the option of either initializing
the terminal now or unplugging the terminal to be
initialized later. To initialize the terminal now, key in the
initialization phone number, press [ENTER] or simply
press [ENTER] to use the displayed phone number.
MUST INITIALIZE!
PRESS ENTER TO START
MUST INITIALIZE!
DIALING…
Press [ENTER].
Please wait…
© 2005 LinkPoint International, Inc. 29 Nashville LP AIO/3000 Manual
This information is Proprietary and Confidential to LinkPoint International - Reproduction without the
expressed, written consent of LinkPoint International is prohibited.
Page 38
Display Message Operator Action and Comments
MUST INITIALIZE!
INITIALIZING NOW…
MUST INITIALIZE!
ENTER PHONE #
The terminal will load specific information to complete
the download.
The terminal did not complete the initialization process.
Either press [ENTER] to try again with the phone
number keyed in earlier or key in a different initialization
phone number and press [ENTER].
INITIALIZATION
COMPLETE!
The initialization process is complete. The terminal will
then display several messages.
SWIPE CARD FOR SALE
MM-DD-YY DAY HH:MM
The download was successful and terminal is ready to
process transactions.
© 2005 LinkPoint International, Inc. 30 Nashville LP AIO/3000 Manual
This information is Proprietary and Confidential to LinkPoint International - Reproduction without the
expressed, written consent of LinkPoint International is prohibited.
Page 39
Download Procedures (PC to Terminal)
There are two different ways to download the LinkPoint terminal, telephone download
and PC to POS terminal download. Please follow the procedures below to download the
application PC to POS terminal. Please make sure that your PC is set to the proper
download screen and that the download cable is plugged into the RS-232 port on the
LinkPoint terminal. The terminal must also be plugged into an active phone line to
complete this download. Please contact your service provider or sales rep for assistance
with all download procedures. DO NOT DOWNLOAD A TERMINAL WITHOUT
ASSISTANCE FROM YOUR SERVICE PROVIDER HELP DESK OR SALES
REPRESENTATIVE.
Display Message Operator Action and Comments
SWIPE CARD FOR SALE
MM-DD-YY DAY HH:MM
App. not available
Time Load Setup
Select app type
Base/SA Supt Lib
Download Set Port
Select download port
Modem RS232
RS232 setup
Baud Parity
If this screen appears when the terminal is powered up,
the terminal is already loaded with an application. Even
though a download can take place with a loaded
terminal, it is recommended that the terminal memory be
cleared before downloading this application. Please see
the memory clear procedure printed earlier in this
chapter for instructions on how to clear the terminal
memory. Once the memory is clear, proceed with the
download.
When this screen appears, the application has been
deleted from the terminal. It is now ready to be
downloaded. Press the middle [
S] key.
If this screen appears, press the left [S] key.
Press the right [S] key.
Press the right [S] key.
Press the left [S] key.
© 2005 LinkPoint International, Inc. 31 Nashville LP AIO/3000 Manual
This information is Proprietary and Confidential to LinkPoint International - Reproduction without the
expressed, written consent of LinkPoint International is prohibited.
Page 40
Display Message Operator Action and Comments
Current baud: 38400
1200 2400 9600
Confirm that the baud rate on the PC is the same baud
rate setting on the top line of this terminal. If it is not,
press the [*] or the [#] key to scroll through the different
rates. When the proper rate is displayed on the bottom
line, the appropriate [
S] key to choose the rate and
press [ENTER].
RS232 setup
Baud Parity
Select download port
Modem RS232
Download Set Port
Press the [CLEAR] key.
Press the [CLEAR] key.
Press the left [S] key.
Enter Appl. ID
Key in application ID and press [ENTER]. Please see
the Keypad Template Chart on page 25 for instructions
on how to enter alphanumeric information on the
LinkPoint terminal.
Enter Terminal ID.
Key in terminal ID and press [ENTER]. Please see the
Keypad Template Chart on page 25 for instructions on
how to enter alphanumeric information on the LinkPoint
terminal.
Direct Download
Full Partial
Press the left [S] key.
WAITING ON ENQ…
Please wait, the terminal will display several messages.
----------
XXXXXXXX,XXXXXXX
When the terminal successfully reaches the download
file, this screen will display. The application ID and
terminal ID will display.
© 2005 LinkPoint International, Inc. 32 Nashville LP AIO/3000 Manual
This information is Proprietary and Confidential to LinkPoint International - Reproduction without the
expressed, written consent of LinkPoint International is prohibited.
Page 41
Display Message Operator Action and Comments
*---------
XXXXXXXX,XXXXXXX
As the application is loaded into the terminal the bars on
the top line of the display will become asterisks. The
application ID and terminal ID will continue to display.
CREATING PROMPTS…
TID = XXXXXX
ENTER TERMINAL ID _
When the base application download is complete, this
message will display. Please wait…
After the base application has been downloaded, the
merchant specific information must be downloaded to
initialize the terminal. At this point, the user has the
option of either initializing the terminal now or
unplugging the terminal to be initialized later. To initialize
the terminal now, either key in the terminal ID, press
[ENTER] or press [ENTER] if the displayed ID is correct.
PHONE=9,XXXXXXXXXXXN
ENTER PHONE # _
At this point, the user has the option of either initializing
the terminal now or unplugging the terminal to be
initialized later. To initialize the terminal now, either key
in the initialization phone number, press [ENTER] or
press [ENTER] if the displayed phone number is correct.
MUST INITIALIZE!
PRESS ENTER TO START
MUST INITIALIZE!
INITIALIZING NOW…
Press [ENTER].
After the download, the terminal must use a phone line
to initialize the application. The terminal will load specific
information to complete the download.
MUST INITIALIZE!
ENTER PHONE #
The terminal did not complete the initialization process.
Either press [ENTER] to try again with the phone
number keyed in earlier or key in a different initialization
phone number and press [ENTER].
INITIALIZATION
COMPLETE!
SWIPE CARD FOR SALE
MM-DD-YY DAY HH:MM
The initialization process is complete. The terminal will
then display several messages.
The download was successful and terminal is ready to
process transactions.
© 2005 LinkPoint International, Inc. 33 Nashville LP AIO/3000 Manual
This information is Proprietary and Confidential to LinkPoint International - Reproduction without the
expressed, written consent of LinkPoint International is prohibited.
Page 42
Five Minute for Auto DLL Download after Batch Closes
When the terminal settings are automatically updated by the host, it is done through an
automatic download. This download will begin after the batch has closed. An
uninterrupted delay of five minutes will occur before the automatic download begins but
only after the download conditions have been met (batch is closed, auto download type
is set to ‘1’ or ‘2’ and the auto download time and date have passed), will the following
prompts appear.
Display Message Operator Action and Comments
CLOSE BATCH
REPRINT TOTALS?
CLOSE BATCH
ACCEPTED XXX
XXX SEC TO DOWNLOAD
MM-DD-YY DAY HH:MM
SWIPE CARD FOR SALE
MM-DD-YY DAY HH:MM
XXX SEC TO DOWNLOAD
MM-DD-YY DAY HH:MM
FULL DOWNLOAD NEEDED
START DOWNLOAD NOW?
WAITING ON ENQ…
----------
XXXXXXXX,XXXXXXX
When the batch has been closed successfully, a Close
Batch Report will print. Tear off the report copy. Either
press [ENTER] to reprint the batch close report or press
[CLEAR] to exit function.
Press [CLEAR] to return to the idle prompt.
If a five minute auto delay is set before the automatic
download occurs, the terminal will display a 300 second
countdown to when the download will begin. Press either
[CLEAR] or [BACKSPACE] to return to the idle prompt.
Terminal is idle. If the automatic download was
unsuccessful, the idle prompt will display for 60 seconds
before the automatic download will begin again.
The Auto DLL download process is initiated. Either press
[CLEAR] or [BACKSPACE] to return to the idle prompt
or let the countdown to the download continue.
When this screen appears, an automatic download is
being attempted. Either press [ENTER] to complete the
download or press [CLEAR] or [BACK SPACE] to exit
function.
Please wait, the terminal will display several messages
while the download is attempted.
As the application is loaded into the terminal the bars on
the top line of the display will become asterisks.
© 2005 LinkPoint International, Inc. 34 Nashville LP AIO/3000 Manual
This information is Proprietary and Confidential to LinkPoint International - Reproduction without the
expressed, written consent of LinkPoint International is prohibited.
Page 43

Display Message Operator Action and Comments
MUST INITIALIZE
INITIALIZING NOW…
After the download, the terminal must initialize the
application. The terminal will load specific information to
complete the download.
SWIPE CARD FOR SALE
MM-DD-YY DAY HH:MM
The automatic download was successful and terminal is
ready to process transactions.
© 2005 LinkPoint International, Inc. 35 Nashville LP AIO/3000 Manual
This information is Proprietary and Confidential to LinkPoint International - Reproduction without the
expressed, written consent of LinkPoint International is prohibited.
Page 44
Automatic Download Procedures
If the host determines that a download is necessary to improve terminal processing, it
will download the information into the terminal automatically. Please follow the
procedures below to complete the auto download procedure.
Display Message Operator Action and Comments
SWIPE CARD FOR SALE
MM-DD-YY DAY HH:MM
FULL DOWNLOAD NEEDED
START DOWNLOAD NOW?
WAITING ON ENQ…
Error
Carrier lost/timeout
Retrying…
One moment please
----------
XXXXXXXX,XXXXXXX
MUST INITIALIZE
INITIALIZING NOW…
MUST INITIALIZE!
ENTER PHONE #
SWIPE CARD FOR SALE
MM-DD-YY DAY HH:MM
Terminal is idle.
When this screen appears, an automatic download is
being attempted. Either press [ENTER] to complete the
download or press [BACK SPACE] to exit function.
Please wait, the terminal will display several messages
while the download is attempted.
If this message displays, the download was not
successful, please wait.
If this message displays, the terminal is attempting the
download again, please wait.
As the application is loaded into the terminal the bars on
the top line of the display will become asterisks.
After the download, the terminal must initialize the
application. The terminal will load specific information to
complete the download.
The terminal did not complete the initialization process.
Simply press [ENTER] to try again.
The automatic download was successful and terminal is
ready to process transactions.
© 2005 LinkPoint International, Inc. 36 Nashville LP AIO/3000 Manual
This information is Proprietary and Confidential to LinkPoint International - Reproduction without the
expressed, written consent of LinkPoint International is prohibited.
Page 45
Host Setup Procedures (Initialization)
After a terminal has been successfully downloaded, it may become necessary to
periodically update the terminal settings. The host may update this information at any
time and that updated information must be passed on to the merchant terminal. Please
follow the procedures below to update the host settings, also known as initialize, by
telephone. Please contact your service provider or sales rep for assistance with all setup
procedures. DO NOT DOWNLOAD OR SETUP A TERMINAL WITHOUT ASSISTANCE
FROM YOUR SERVICE PROVIDER HELP DESK OR SALES REPRESENTATIVE.
Initialization (After a Full Download)
Display Message Operator Action and Comments
SWIPE CARD FOR SALE
MM-DD-YY DAY HH:MM
LOCK MGMT SETUP
↓ ↓ ↓
HOST LOCAL REVIEW
↓ ↓ ↓
HOST SETUP
DIAL X,XXXXXXXXXXXN?
Press the [#] key.
Press the right [S] key.
Press the left [S] key.
When this screen appears, the terminal is confirming the
programmed host phone number is accurate. Press
[ENTER] to confirm the displayed phone number and
complete the setup or press [BACK SPACE] to enter a
new host phone number.
HOST SETUP
ENTER PHONE NUMBER
MUST INITIALIZE!
DIALING…
MUST INITIALIZE!
INITIALIZING NOW…
HOST SETUP
COMPLETE!
© 2005 LinkPoint International, Inc. 37 Nashville LP AIO/3000 Manual
This information is Proprietary and Confidential to LinkPoint International - Reproduction without the
expressed, written consent of LinkPoint International is prohibited.
Key in the correct phone number, including dial prefix
and area code, press [ENTER].
The terminal is dialing the host. Please wait…
The terminal has reached the host and is beginning to
update or initialize the terminal settings. Please wait…
The procedure has been completed successfully.
Page 46
Display Message Operator Action and Comments
SWIPE CARD FOR SALE
MM-DD-YY DAY HH:MM
The update (initialization) was successful and terminal is
ready to process transactions.
Initialization (After a Base Download)
Display Message Operator Action and Comments
TID = XXXXXX
ENTER TERMINAL ID _
To initialize the terminal, either key in the terminal ID,
press [ENTER] or press [ENTER] if the displayed ID is
correct.
PHONE=9,XXXXXXXXXXXN
ENTER PHONE # _
Either key in the initialization phone number, press
[ENTER] or press [ENTER] if the displayed phone
number is correct.
MUST INITIALIZE!
PRESS ENTER TO START
MUST INITIALIZE!
INITIALIZING NOW…
MUST INITIALIZE!
ENTER PHONE #
Press [ENTER].
The terminal will load specific information to complete
the download.
The terminal did not complete the initialization process.
Either press [ENTER] to try again with the phone
number keyed in earlier or key in a different initialization
phone number and press [ENTER].
INITIALIZATION
COMPLETE!
SWIPE CARD FOR SALE
MM-DD-YY DAY HH:MM
The initialization process is complete. The terminal will
then display several messages.
The download was successful and terminal is ready to
process transactions.
© 2005 LinkPoint International, Inc. 38 Nashville LP AIO/3000 Manual
This information is Proprietary and Confidential to LinkPoint International - Reproduction without the
expressed, written consent of LinkPoint International is prohibited.
Page 47
Password Protection
This procedure explains two things: how to change the password settings and how to
add password protection to the credit and gift card transactions. Changing the password
means having control over that setting in the program. Adding password protection to a
transaction means that any user will have to enter the appropriate password to perform
that transaction. This application features three levels of available password protection:
MIN, which means the minimum level of password protection, MED, which means the
medium or next level of password protection or MAX, which means the maximum level
of available password protection. Any credit or gift card transaction can be set for any
level of password protection. Please refer to the Password Section for more information
on passwords. Please follow the steps below to set password protection on gift card
transactions.
Password override: Any one of the three passwords can be overridden by entering the
override password for that day. The override password is the date
set into the terminal squared plus the number of the month. For
instance, to calculate the override password for February 15th,
use the following formula: 15x15 +2=227. 227 is the override
password and can be used to override all three levels of password
protection.
How to Set Passwords
Display Message Operator Action and Comments
SWIPE CARD FOR SALE
MM-DD-YY DAY HH:MM
LOCK MGMT SETUP
↓ ↓ ↓
HOST LOCAL REVIEW
↓ ↓ ↓
DIAL PASS OPTIONS
↓ ↓ ↓
PASSWORD
ENTER PASSWORD
Press the [#] key.
Press the right [S] key.
Press the middle [S] key.
Press the middle [S] key.
If the password setting is password protected, please
key in the appropriate password and press [ENTER].
© 2005 LinkPoint International, Inc. 39 Nashville LP AIO/3000 Manual
This information is Proprietary and Confidential to LinkPoint International - Reproduction without the
expressed, written consent of LinkPoint International is prohibited.
Page 48
Display Message Operator Action and Comments
PASSWORD LEVELS
↓ ↓
MIN=123123
REENTER TO CHANGE
Press the left [S] key.
Key in the desired numeric password and press
[ENTER] or press [ENTER] to bypass. The password
can be up to 24 digits.
MED=123123
REENTER TO CHANGE
Key in the desired numeric password and press
[ENTER] or press [ENTER] to bypass. The password
can be up to 24 digits.
MAX=123123
REENTER TO CHANGE
Key in the desired numeric password and press
[ENTER] or press [ENTER] to bypass. The password
can be up to 24 digits.
PASSWORD LEVELS
↓ ↓
Press [CLEAR] to exit function.
© 2005 LinkPoint International, Inc. 40 Nashville LP AIO/3000 Manual
This information is Proprietary and Confidential to LinkPoint International - Reproduction without the
expressed, written consent of LinkPoint International is prohibited.
Page 49
How to Add Password Protection to Credit Card Settings
Display Message Operator Action and Comments
SWIPE CARD FOR SALE
MM-DD-YY DAY HH:MM
LOCK MGMT SETUP
↓ ↓ ↓
HOST LOCAL REVIEW
↓ ↓ ↓
DIAL PASS OPTIONS
↓ ↓ ↓
PASSWORD
ENTER PASSWORD
PASSWORD LEVELS
↓ ↓
CREDIT GIFT
↓ ↓
SALE: NONE
PRESS # TO CHANGE
Press the [#] key.
Press the right [S] key.
Press the middle [S] key.
Press the middle [S] key.
If the password setting is password protected, please
key in the appropriate password and press [ENTER].
Press the right [S] key.
Press the left [S] key to adjust a credit card password
setting. Press [CLEAR] to exit function.
The current transaction setting is displayed for card sale;
either press [ENTER] to leave this setting unchanged
and move on to the next transaction or press [#] to
change the setting. Press the [#] key once to change the
NONE setting to MIN, press the [#] key twice to change
to MED, or press the [#] key three times to change to
MAX setting. Once the desired setting is displayed,
press [ENTER].
© 2005 LinkPoint International, Inc. 41 Nashville LP AIO/3000 Manual
This information is Proprietary and Confidential to LinkPoint International - Reproduction without the
expressed, written consent of LinkPoint International is prohibited.
Page 50

Display Message Operator Action and Comments
DEBIT: NONE
PRESS # TO CHANGE
The current transaction setting is displayed; either press
[ENTER] to leave this setting unchanged and move on
to the next transaction or press [#] to change the setting.
Press the [#] key once to change the NONE setting to
MIN, press the [#] key twice to change to MED, or press
the [#] key three times to change to MAX setting. Once
the desired setting is displayed, press [ENTER].
OFFLINE SALE: NONE
PRESS # TO CHANGE
The current transaction setting is displayed; either press
[ENTER] to leave this setting unchanged and move on
to the next transaction or press [#] to change the setting.
Press the [#] key once to change the NONE setting to
MIN, press the [#] key twice to change to MED, or press
the [#] key three times to change to MAX setting. Once
the desired setting is displayed, press [ENTER].
RETURN: NONE
PRESS # TO CHANGE
The current transaction setting is displayed; either press
[ENTER] to leave this setting unchanged and move on
to the next transaction or press [#] to change the setting.
Press the [#] key once to change the NONE setting to
MIN, press the [#] key twice to change to MED, or press
the [#] key three times to change to MAX setting. Once
the desired setting is displayed, press [ENTER].
AUTH ONLY: NONE
PRESS # TO CHANGE
The current transaction setting is displayed; either press
[ENTER] to leave this setting unchanged and move on
to the next transaction or press [#] to change the setting.
Press the [#] key once to change the NONE setting to
MIN, press the [#] key twice to change to MED, or press
the [#] key three times to change to MAX setting. Once
the desired setting is displayed, press [ENTER].
OPEN TAB: NONE
PRESS # TO CHANGE
The current transaction setting is displayed for balance
transfer; either press [ENTER] to leave this setting
unchanged and move on to the next transaction or press
[#] to change the setting. Press the [#] key once to
change the NONE setting to MIN, press the [#] key twice
to change to MED, or press the [#] key three times to
change to MAX setting. Once the desired setting is
displayed, press [ENTER].
© 2005 LinkPoint International, Inc. 42 Nashville LP AIO/3000 Manual
This information is Proprietary and Confidential to LinkPoint International - Reproduction without the
expressed, written consent of LinkPoint International is prohibited.
Page 51

Display Message Operator Action and Comments
CLOSE TAB: NONE
PRESS # TO CHANGE
The current transaction setting is displayed; either press
[ENTER] to leave this setting unchanged and move on
to the next transaction or press [#] to change the setting.
Press the [#] key once to change the NONE setting to
MIN, press the [#] key twice to change to MED, or press
the [#] key three times to change to MAX setting. Once
the desired setting is displayed, press [ENTER].
CHECK: NONE
PRESS # TO CHANGE
The current transaction setting is displayed; either press
[ENTER] to leave this setting unchanged and move on
to the next transaction or press [#] to change the setting.
Press the [#] key once to change the NONE setting to
MIN, press the [#] key twice to change to MED, or press
the [#] key three times to change to MAX setting. Once
the desired setting is displayed, press [ENTER].
SETTLE: NONE
PRESS # TO CHANGE
The current transaction setting is displayed; either press
[ENTER] to leave this setting unchanged and move on
to the next transaction or press [#] to change the setting.
Press the [#] key once to change the NONE setting to
MIN, press the [#] key twice to change to MED, or press
the [#] key three times to change to MAX setting. Once
the desired setting is displayed, press [ENTER].
EDIT: NONE
PRESS # TO CHANGE
The current transaction setting is displayed; either press
[ENTER] to leave this setting unchanged and move on
to the next transaction or press [#] to change the setting.
Press the [#] key once to change the NONE setting to
MIN, press the [#] key twice to change to MED, or press
the [#] key three times to change to MAX setting. Once
the desired setting is displayed, press [ENTER].
ADD TIP: NONE
PRESS # TO CHANGE
The current transaction setting is displayed; either press
[ENTER] to leave this setting unchanged and move on
to the next transaction or press [#] to change the setting.
Press the [#] key once to change the NONE setting to
MIN, press the [#] key twice to change to MED, or press
the [#] key three times to change to MAX setting. Once
the desired setting is displayed, press [ENTER].
© 2005 LinkPoint International, Inc. 43 Nashville LP AIO/3000 Manual
This information is Proprietary and Confidential to LinkPoint International - Reproduction without the
expressed, written consent of LinkPoint International is prohibited.
Page 52

Display Message Operator Action and Comments
VOID: NONE
PRESS # TO CHANGE
The current transaction setting is displayed; either press
[ENTER] to leave this setting unchanged and move on
to the next transaction or press [#] to change the setting.
Press the [#] key once to change the NONE setting to
MIN, press the [#] key twice to change to MED, or press
the [#] key three times to change to MAX setting. Once
the desired setting is displayed, press [ENTER].
BATCH REVIEW: NONE
PRESS # TO CHANGE
The current transaction setting is displayed; either press
[ENTER] to leave this setting unchanged and move on
to the next transaction or press [#] to change the setting.
Press the [#] key once to change the NONE setting to
MIN, press the [#] key twice to change to MED, or press
the [#] key three times to change to MAX setting. Once
the desired setting is displayed, press [ENTER].
BATCH REPORTS: NONE
PRESS # TO CHANGE
The current transaction setting is displayed; either press
[ENTER] to leave this setting unchanged and move on
to the next transaction or press [#] to change the setting.
Press the [#] key once to change the NONE setting to
MIN, press the [#] key twice to change to MED, or press
the [#] key three times to change to MAX setting. Once
the desired setting is displayed, press [ENTER].
EMP REVIEW: NONE
PRESS # TO CHANGE
The current transaction setting is displayed; either press
[ENTER] to leave this setting unchanged and move on
to the next transaction or press [#] to change the setting.
Press the [#] key once to change the NONE setting to
MIN, press the [#] key twice to change to MED, or press
the [#] key three times to change to MAX setting. Once
the desired setting is displayed, press [ENTER].
EMP REPORTS: NONE
PRESS # TO CHANGE
The current transaction setting is displayed; either press
[ENTER] to leave this setting unchanged and move on
to the next transaction or press [#] to change the setting.
Press the [#] key once to change the NONE setting to
MIN, press the [#] key twice to change to MED, or press
the [#] key three times to change to MAX setting. Once
the desired setting is displayed, press [ENTER].
© 2005 LinkPoint International, Inc. 44 Nashville LP AIO/3000 Manual
This information is Proprietary and Confidential to LinkPoint International - Reproduction without the
expressed, written consent of LinkPoint International is prohibited.
Page 53

Display Message Operator Action and Comments
REPRINT: NONE
PRESS # TO CHANGE
The current transaction setting is displayed; either press
[ENTER] to leave this setting unchanged and move on
to the next transaction or press [#] to change the setting.
Press the [#] key once to change the NONE setting to
MIN, press the [#] key twice to change to MED, or press
the [#] key three times to change to MAX setting. Once
the desired setting is displayed, press [ENTER].
DUP TRANS: NONE
PRESS # TO CHANGE
The current transaction setting is displayed; either press
[ENTER] to leave this setting unchanged and move on
to the next transaction or press [#] to change the setting.
Press the [#] key once to change the NONE setting to
MIN, press the [#] key twice to change to MED, or press
the [#] key three times to change to MAX setting. Once
the desired setting is displayed, press [ENTER].
ADJUST: NONE
PRESS # TO CHANGE
The current transaction setting is displayed; either press
[ENTER] to leave this setting unchanged and move on
to the next transaction or press [#] to change the setting.
Press the [#] key once to change the NONE setting to
MIN, press the [#] key twice to change to MED, or press
the [#] key three times to change to MAX setting. Once
the desired setting is displayed, press [ENTER].
MANUAL ENTRY: NONE
PRESS # TO CHANGE
The current transaction setting is displayed; either press
[ENTER] to leave this setting unchanged and move on
to the next transaction or press [#] to change the setting.
Press the [#] key once to change the NONE setting to
MIN, press the [#] key twice to change to MED, or press
the [#] key three times to change to MAX setting. Once
the desired setting is displayed, press [ENTER].
LOCK: NONE
PRESS # TO CHANGE
The current terminal setting is displayed; either press
[ENTER] to leave this setting unchanged and move on
to the next setting or press [#] to change the setting.
Press the [#] key once to change the NONE setting to
MIN, press the [#] key twice to change to MED, or press
the [#] key three times to change to MAX setting. Once
the desired setting is displayed, press [ENTER].
© 2005 LinkPoint International, Inc. 45 Nashville LP AIO/3000 Manual
This information is Proprietary and Confidential to LinkPoint International - Reproduction without the
expressed, written consent of LinkPoint International is prohibited.
Page 54

Display Message Operator Action and Comments
MANAGEMENT: MAX
PRESS # TO CHANGE
The current terminal setting is displayed; either press
[ENTER] to leave this setting unchanged and move on
to the next setting or press [#] to change the setting.
Press the [#] key once to change the MAX setting to
NONE, press the [#] key twice to change to MIN, or
press the [#] key three times to change to MED setting.
Once the desired setting is displayed, press [ENTER].
SETUP: MAX
PRESS # TO CHANGE
The current terminal setting is displayed; either press
[ENTER] to leave this setting unchanged and move on
to the next setting or press [#] to change the setting.
Press the [#] key once to change the MAX setting to
NONE, press the [#] key twice to change to MIN, or
press the [#] key three times to change to MED setting.
Once the desired setting is displayed, press [ENTER].
CREDIT GIFT
Press [CLEAR] to exit function.
↓ ↓
© 2005 LinkPoint International, Inc. 46 Nashville LP AIO/3000 Manual
This information is Proprietary and Confidential to LinkPoint International - Reproduction without the
expressed, written consent of LinkPoint International is prohibited.
Page 55
How to Add Password Protection to Gift Card Settings
Display Message Operator Action and Comments
SWIPE CARD FOR SALE
MM-DD-YY DAY HH:MM
LOCK MGMT SETUP
↓ ↓ ↓
HOST LOCAL REVIEW
↓ ↓ ↓
DIAL PASS OPTIONS
↓ ↓ ↓
PASSWORD
ENTER PASSWORD
PASSWORD LEVELS
↓ ↓
CREDIT GIFT
↓ ↓
ACTIVATE: NONE
PRESS # TO CHANGE
Press the [#] key.
Press the right [S] key.
Press the middle [S] key.
Press the middle [S] key.
If the password setting is password protected, please
key in the appropriate password and press [ENTER].
Press the right [S] key.
Press the left [S] key to set the password on credit card
transactions, press the right [
transactions. Press the right [
S] key to set gift card
S] key to follow the
procedures below.
The current transaction setting is displayed; either press
[ENTER] to leave this setting unchanged and move on
to the next transaction or press [#] to change the setting.
Press the [#] key once to change the NONE setting to
MIN, press the [#] key twice to change to MED, or press
the [#] key three times to change to MAX setting. Once
the desired setting is displayed, press [ENTER].
© 2005 LinkPoint International, Inc. 47 Nashville LP AIO/3000 Manual
This information is Proprietary and Confidential to LinkPoint International - Reproduction without the
expressed, written consent of LinkPoint International is prohibited.
Page 56
Display Message Operator Action and Comments
REDEEM: NONE
PRESS # TO CHANGE
The current transaction setting is displayed; either press
[ENTER] to leave this setting unchanged and move on
to the next transaction or press [#] to change the setting.
Press the [#] key once to change the NONE setting to
MIN, press the [#] key twice to change to MED, or press
the [#] key three times to change to MAX setting. Once
the desired setting is displayed, press [ENTER].
RELOAD: NONE
PRESS # TO CHANGE
The current transaction setting is displayed; either press
[ENTER] to leave this setting unchanged and move on
to the next transaction or press [#] to change the setting.
Press the [#] key once to change the NONE setting to
MIN, press the [#] key twice to change to MED, or press
the [#] key three times to change to MAX setting. Once
the desired setting is displayed, press [ENTER].
BALANCE: NONE
PRESS # TO CHANGE
The current transaction setting is displayed for balance
inquiry; either press [ENTER] to leave this setting
unchanged and move on to the next transaction or press
[#] to change the setting. Press the [#] key once to
change the NONE setting to MIN, press the [#] key twice
to change to MED, or press the [#] key three times to
change to MAX setting. Once the desired setting is
displayed, press [ENTER].
TRANSFER: NONE
PRESS # TO CHANGE
The current transaction setting is displayed for balance
transfer; either press [ENTER] to leave this setting
unchanged and move on to the next transaction or press
[#] to change the setting. Press the [#] key once to
change the NONE setting to MIN, press the [#] key twice
to change to MED, or press the [#] key three times to
change to MAX setting. Once the desired setting is
displayed, press [ENTER].
VOID: NONE
PRESS # TO CHANGE
The current transaction setting is displayed; either press
[ENTER] to leave this setting unchanged and move on
to the next transaction or press [#] to change the setting.
Press the [#] key once to change the NONE setting to
MIN, press the [#] key twice to change to MED, or press
the [#] key three times to change to MAX setting. Once
the desired setting is displayed, press [ENTER].
© 2005 LinkPoint International, Inc. 48 Nashville LP AIO/3000 Manual
This information is Proprietary and Confidential to LinkPoint International - Reproduction without the
expressed, written consent of LinkPoint International is prohibited.
Page 57
Display Message Operator Action and Comments
REFUND: NONE
PRESS # TO CHANGE
The current transaction setting is displayed; either press
[ENTER] to leave this setting unchanged and move on
to the next transaction or press [#] to change the setting.
Press the [#] key once to change the NONE setting to
MIN, press the [#] key twice to change to MED, or press
the [#] key three times to change to MAX setting. Once
the desired setting is displayed, press [ENTER].
CASHOUT: NONE
PRESS # TO CHANGE
The current transaction setting is displayed; either press
[ENTER] to leave this setting unchanged and move on
to the next transaction or press [#] to change the setting.
Press the [#] key once to change the NONE setting to
MIN, press the [#] key twice to change to MED, or press
the [#] key three times to change to MAX setting. Once
the desired setting is displayed, press [ENTER].
TOTAL REPORT: NONE
PRESS # TO CHANGE
The current transaction setting is displayed; either press
[ENTER] to leave this setting unchanged and move on
to the next transaction or press [#] to change the setting.
Press the [#] key once to change the NONE setting to
MIN, press the [#] key twice to change to MED, or press
the [#] key three times to change to MAX setting. Once
the desired setting is displayed, press [ENTER].
DETAIL REPORT: NONE
PRESS # TO CHANGE
The current transaction setting is displayed for balance
transfer; either press [ENTER] to leave this setting
unchanged and move on to the next transaction or press
[#] to change the setting. Press the [#] key once to
change the NONE setting to MIN, press the [#] key twice
to change to MED, or press the [#] key three times to
change to MAX setting. Once the desired setting is
displayed, press [ENTER].
CLK REPORT: NONE
PRESS # TO CHANGE
The current transaction setting is displayed; either press
[ENTER] to leave this setting unchanged and move on
to the next transaction or press [#] to change the setting.
Press the [#] key once to change the NONE setting to
MIN, press the [#] key twice to change to MED, or press
the [#] key three times to change to MAX setting. Once
the desired setting is displayed, press [ENTER].
© 2005 LinkPoint International, Inc. 49 Nashville LP AIO/3000 Manual
This information is Proprietary and Confidential to LinkPoint International - Reproduction without the
expressed, written consent of LinkPoint International is prohibited.
Page 58

Display Message Operator Action and Comments
CLEAR BATCH: NONE
PRESS # TO CHANGE
The current transaction setting is displayed; either press
[ENTER] to leave this setting unchanged and move on
to the next transaction or press [#] to change the setting.
Press the [#] key once to change the NONE setting to
MIN, press the [#] key twice to change to MED, or press
the [#] key three times to change to MAX setting. Once
the desired setting is displayed, press [ENTER].
REPRINT: NONE
PRESS # TO CHANGE
The current transaction setting is displayed; either press
[ENTER] to leave this setting unchanged and move on
to the next transaction or press [#] to change the setting.
Press the [#] key once to change the NONE setting to
MIN, press the [#] key twice to change to MED, or press
the [#] key three times to change to MAX setting. Once
the desired setting is displayed, press [ENTER].
CREDIT GIFT
↓ ↓
Press [CLEAR] to exit function.
© 2005 LinkPoint International, Inc. 50 Nashville LP AIO/3000 Manual
This information is Proprietary and Confidential to LinkPoint International - Reproduction without the
expressed, written consent of LinkPoint International is prohibited.
Page 59
Demo Mode
This procedure explains how to turn the demonstration mode or demo mode on and off.
The demo mode is used for terminal testing and sales purposes. It is called demo mode
because it demonstrates how the terminal looks and sounds when it processes
transactions by simulating the actual response screens and even producing receipts.
Any test transactions performed in a demonstration batch must be closed before the
terminal exit demo mode.
Please note: It is important to stay out of this mode when trying to process real
transactions. The mode simulates actual transactions and if a real
transaction is attempted while in demo mode, it will not be processed
even though it will appear to do so. The message DEMO MODE will
display as it alternates with the idle prompt and the words DEMO and
DEMONSTRATTION ONLY will print on the receipts and reports.
Display Message Operator Action and Comments
SWIPE CARD FOR SALE
MM-DD-YY DAY HH:MM
LOCK MGMT SETUP
↓ ↓ ↓
MANAGEMENT
ENTER PASSWORD
BATCH TEST DEMO
↓ ↓ ↓
DEMO MODE=OFF
PRESS # TO CHANGE
CANNOT CHANGE WITH
OPEN BATCH
Press the [#] key.
Press the middle [S] key.
If the management setting is password protected, please
key in the appropriate password and press [ENTER].
Press the right [S] key.
Press the [#] key to enter demo mode, then press
[ENTER].
If the terminal has an open batch, demo mode cannot be
entered. Even if the terminal is already in demo mode,
those transactions must be cleared before the terminal
can change modes.
BATCH TEST DEMO
↓ ↓ ↓
© 2005 LinkPoint International, Inc. 51 Nashville LP AIO/3000 Manual
This information is Proprietary and Confidential to LinkPoint International - Reproduction without the
expressed, written consent of LinkPoint International is prohibited.
Press [CLEAR] to exit function.
Page 60

Display Message Operator Action and Comments
SWIPE CARD FOR SALE
MM-DD-YY DAY HH:MM
DEMO MODE
MM-DD-YY DAY HH:MM
When in demo mode, the idle prompt alternates between
this prompt and the DEMO MODE prompt below.
When this prompt appears, follow this same procedure
to exit demo mode.
© 2005 LinkPoint International, Inc. 52 Nashville LP AIO/3000 Manual
This information is Proprietary and Confidential to LinkPoint International - Reproduction without the
expressed, written consent of LinkPoint International is prohibited.
Page 61
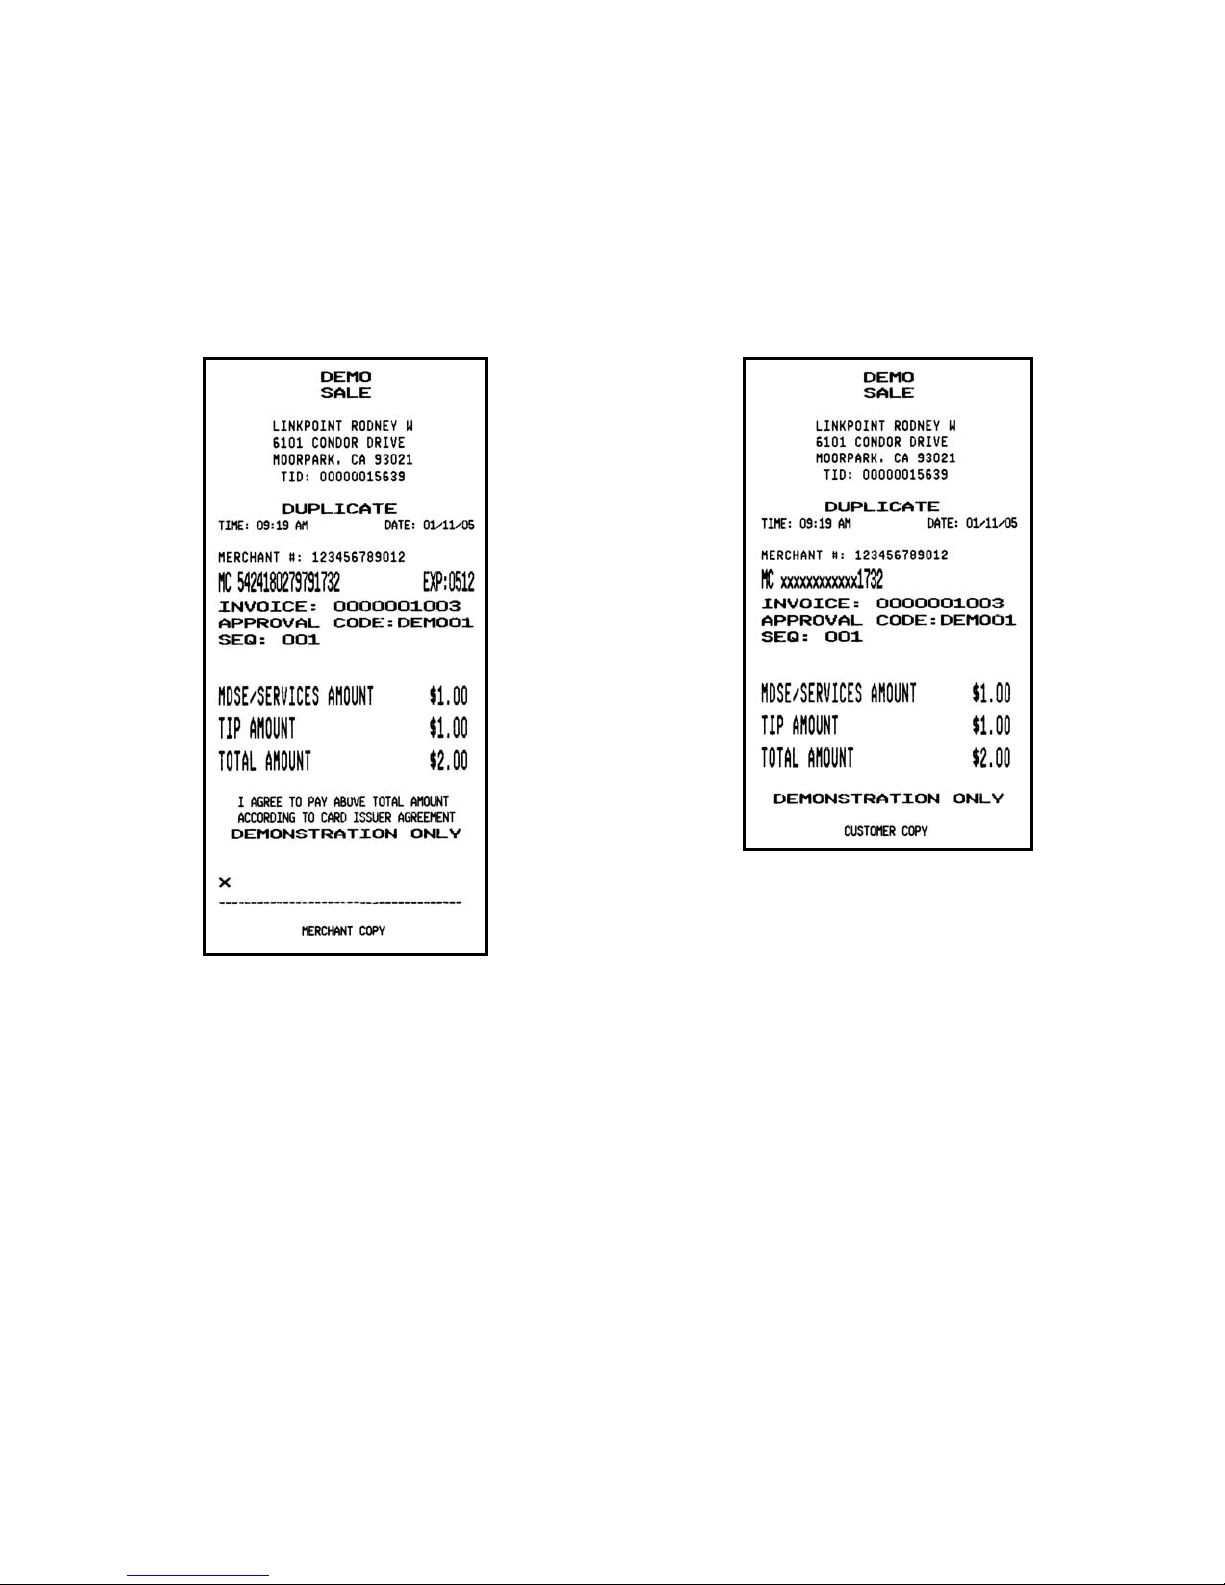
Demo Mode Receipt Sample
AIO SAMPLE RECEIPTS
Merchant Copy Customer Copy
© 2005 LinkPoint International, Inc. 53 Nashville LP AIO/3000 Manual
This information is Proprietary and Confidential to LinkPoint International - Reproduction without the
expressed, written consent of LinkPoint International is prohibited.
Page 62

Demo Mode Receipt Sample Layout (Merchant Copy)
CUSTOM HEADER 1
CUSTOM HEADER 2
DEMO
SALE
DBA Name
DBA Street Address
DBA City, State, Zip
TID: XXXXXXXXXXX
DUPLICATE
TIME: hh:mm AM/PM DATE: mm/dd/yy
MERCHANT #: 123456789012
MC 5424180279791732 EXP:0512
INVOICE: 0000001003
APPROVAL CODE:DEM001
SEQ: 001
MDSE/SERVICE AMOUNT $1.00
TIP AMOUNT $1.00
TOTAL AMOUNT $2.00
I AGREE TO PAY ABOVE TOTAL AMOUNT
ACCORDING TO CARD ISSUER AGREEMENT
DEMONSTRATION ONLY
x
--------------------------------------
CUSTOM FOOTER 1
CUSTOM FOOTER 2
MERCHANT COPY
Custom header line 1
Custom header line 2
Prints only if terminal was in demo mode
Transaction type (bold and centered)
H1 DBA Name (centered)
H2 DBA Street Address (centered)
H3 DBA City, DBA State, DBA ZIP (centered)
Terminal ID
Prints only on a receipt copy reprint
Transaction date and time
Merchant number
Card number, expiration date (yymm)
Invoice number
Approval code
Sequence number
Base transaction amount
Tip transaction amount
Total transaction amount
Merchant agreement (merchant copy only)
Customer signature line (merchant copy only)
Custom footer line 1
Custom footer line 2
Merchant copy prints first, customer copy prints second
© 2005 LinkPoint International, Inc. 54 Nashville LP AIO/3000 Manual
This information is Proprietary and Confidential to LinkPoint International - Reproduction without the
expressed, written consent of LinkPoint International is prohibited.
Page 63

Demo Mode Receipt Sample Layout (Customer Copy)
CUSTOM HEADER 1
CUSTOM HEADER 2
DEMO
SALE
DBA Name
DBA Street Address
DBA City, State, Zip
TID: XXXXXXXXXXX
DUPLICATE
TIME: hh:mm AM/PM DATE: mm/dd/yy
MERCHANT #: 123456789012
MC xxxxxxxxxxxx1732
INVOICE: 0000001003
APPROVAL CODE:DEM001
SEQ: 001
MDSE/SERVICE AMOUNT $1.00
TIP AMOUNT $1.00
TOTAL AMOUNT $2.00
DEMONSTRATION ONLY
CUSTOMER COPY
Custom header line 1
Custom header line 2
Prints only if terminal was in demo mode
Transaction type (bold and centered)
H1 DBA Name (centered)
H2 DBA Street Address (centered)
H3 DBA City, DBA State, DBA ZIP (centered)
Terminal ID
Prints only on a receipt copy reprint
Transaction date and time
Merchant number
Truncated card number, no expiration date
Invoice number
Approval code
Sequence number
Base transaction amount
Tip transaction amount
Total transaction amount
Prints only if terminal was in demo mode
Merchant copy prints first, customer copy prints second
© 2005 LinkPoint International, Inc. 55 Nashville LP AIO/3000 Manual
This information is Proprietary and Confidential to LinkPoint International - Reproduction without the
expressed, written consent of LinkPoint International is prohibited.
Page 64

FOOD STAMP AND CASH BENEFIT TRANSACTIONS
The application Nashville Config 690 01.08.00 can be used in the LinkPoint AIO (All-InOne) and the LinkPoint 3000 terminals to accept Electronic Benefits Transfer (EBT)
cards to purchase food and other items. The terminal sends card and transaction type
information to the host computer and a host reply is sent back to the terminal. An
approval code confirms the funds are available for eventual settlement to the merchant
and usually includes card balance information. EBT cards replace traditional food
stamps. The EBT batch updates automatically, so there is no need to perform a close
batch transaction.
The following section explains how EBT card processing works using the LinkPoint
terminals. For information about card processing not covered in these procedures,
please contact your credit card processing help desk or sales representative.
The transactions that are necessary for LinkPoint EBT card acceptance are:
Food Stamp Transaction Explanation
Sale A food item is bought with an EBT card
Return An item bought with an EBT card is returned for credit
Balance Inquiry Verifies the available amount on an EBT card
Voucher Clear Sale Completes a purchase using an authorization code
obtained earlier
Voucher Clear Return Completes a credit using an authorization code
obtained earlier
Void Cancels most recent food stamp item only
Cash Benefit Transaction Explanation
Sale A item is sold using the EBT card cash benefit
Purchase with Cash
Back
Cash Only Customer redeems an amount for cash only using the
Balance Inquiry Verifies available cash benefit amount of an EBT card
Void Cancels most recent cash benefit item only
A item is sold and cash is returned to the customer
using the EBT card cash benefit
EBT card cash benefit
© 2005 LinkPoint International, Inc. 56 Nashville LP AIO/3000 Manual
This information is Proprietary and Confidential to LinkPoint International - Reproduction without the
expressed, written consent of LinkPoint International is prohibited.
Page 65
EBT Food Stamp Sale
Please follow the procedures below to process an EBT sale. This transaction is a sale
paid for with an EBT card without the option of receiving cash back.
Display Message Operator Action and Comments
SWIPE CARD FOR SALE
MM-DD-YY DAY HH:MM
EBT DEBIT
↓ ↓
EBT or EBT/DEBIT
ENTER PASSWORD
EBT or EBT/DEBIT
INVALID PASSWORD
EBT DEBIT
↓ ↓
Either swipe the EBT card or press the [ATM/DEBIT]
key.
If this prompt appears after the card is swiped, press the
middle [
S] key to continue.
Special note:
EBT prompt only appears if EBT function is activated.
If prompted, key in either the MIN, MED, MAX or
override password and press [ENTER]. This prompt
cannot be bypassed. Password entry will not be
necessary for transactions where card number is
manually entered.
Special note:
The override password depends upon the date
displayed on the terminal because the password is
always the date squared plus the month.
If the wrong password is entered, the terminal displays
this message briefly before displaying the previous
ENTER PASSWORD prompt.
If this prompt appears after the password is entered,
press the left [
S] key.
© 2005 LinkPoint International, Inc. 57 Nashville LP AIO/3000 Manual
This information is Proprietary and Confidential to LinkPoint International - Reproduction without the
expressed, written consent of LinkPoint International is prohibited.
Page 66
Display Message Operator Action and Comments
FOOD CASH VCHR
↓ ↓ ↓
SALE RET BAL
↓ ↓ ↓
EB FS SALE
ENTER ACCOUNT #
EB FS SALE
ENTER AMOUNT
EB FS SALE
WAITING FOR PIN…
XX.XX
PIN=
EB FS SALE
ENTER INVOICE #
INV: 000000000X
DUPLICATE, RE-ENTER?
Press the left [S] key.
Press the left [S] key.
Either swipe the EBT card or manually key in the
account number and press [ENTER].
Key in the transaction amount and press [ENTER].
Customer must key in their PIN.
Customer is prompted to key in their PIN and press
[ENTER] on the PIN pad.
If prompted, key in the invoice number and press
[ENTER].
The invoice number is on a transaction currently in the
open batch. If prompted, either press [ENTER], key in a
new invoice number and press [ENTER] or press [BACK
SPACE] to use the invoice number on the current
transaction also.
EB FS SALE
ENTER EMP ID #
EB FS SALE
DIALING…
EB FS SALE
PRINTING…
© 2005 LinkPoint International, Inc. 58 Nashville LP AIO/3000 Manual
This information is Proprietary and Confidential to LinkPoint International - Reproduction without the
expressed, written consent of LinkPoint International is prohibited.
If prompted, key in the employee ID number and press
[ENTER].
Please note that the word EMP is never displayed. The
employee ID field will depend upon how the employee
ID prompt is programmed.
Please wait, the terminal is dialing the host computer.
The terminal displays several messages.
When the terminal receives a response, this prompt
displays and a receipt will print.
Page 67

Display Message Operator Action and Comments
EB FS SALE
TEAR NOW,PRESS ENTER
Tear off the merchant receipt copy. Press [ENTER] to
print a customer receipt copy or simply wait for the
receipt to print.
EB FS SALE
AP OKXXXX SEQ XXX
Press [CLEAR] to return to the idle prompt.
© 2005 LinkPoint International, Inc. 59 Nashville LP AIO/3000 Manual
This information is Proprietary and Confidential to LinkPoint International - Reproduction without the
expressed, written consent of LinkPoint International is prohibited.
Page 68
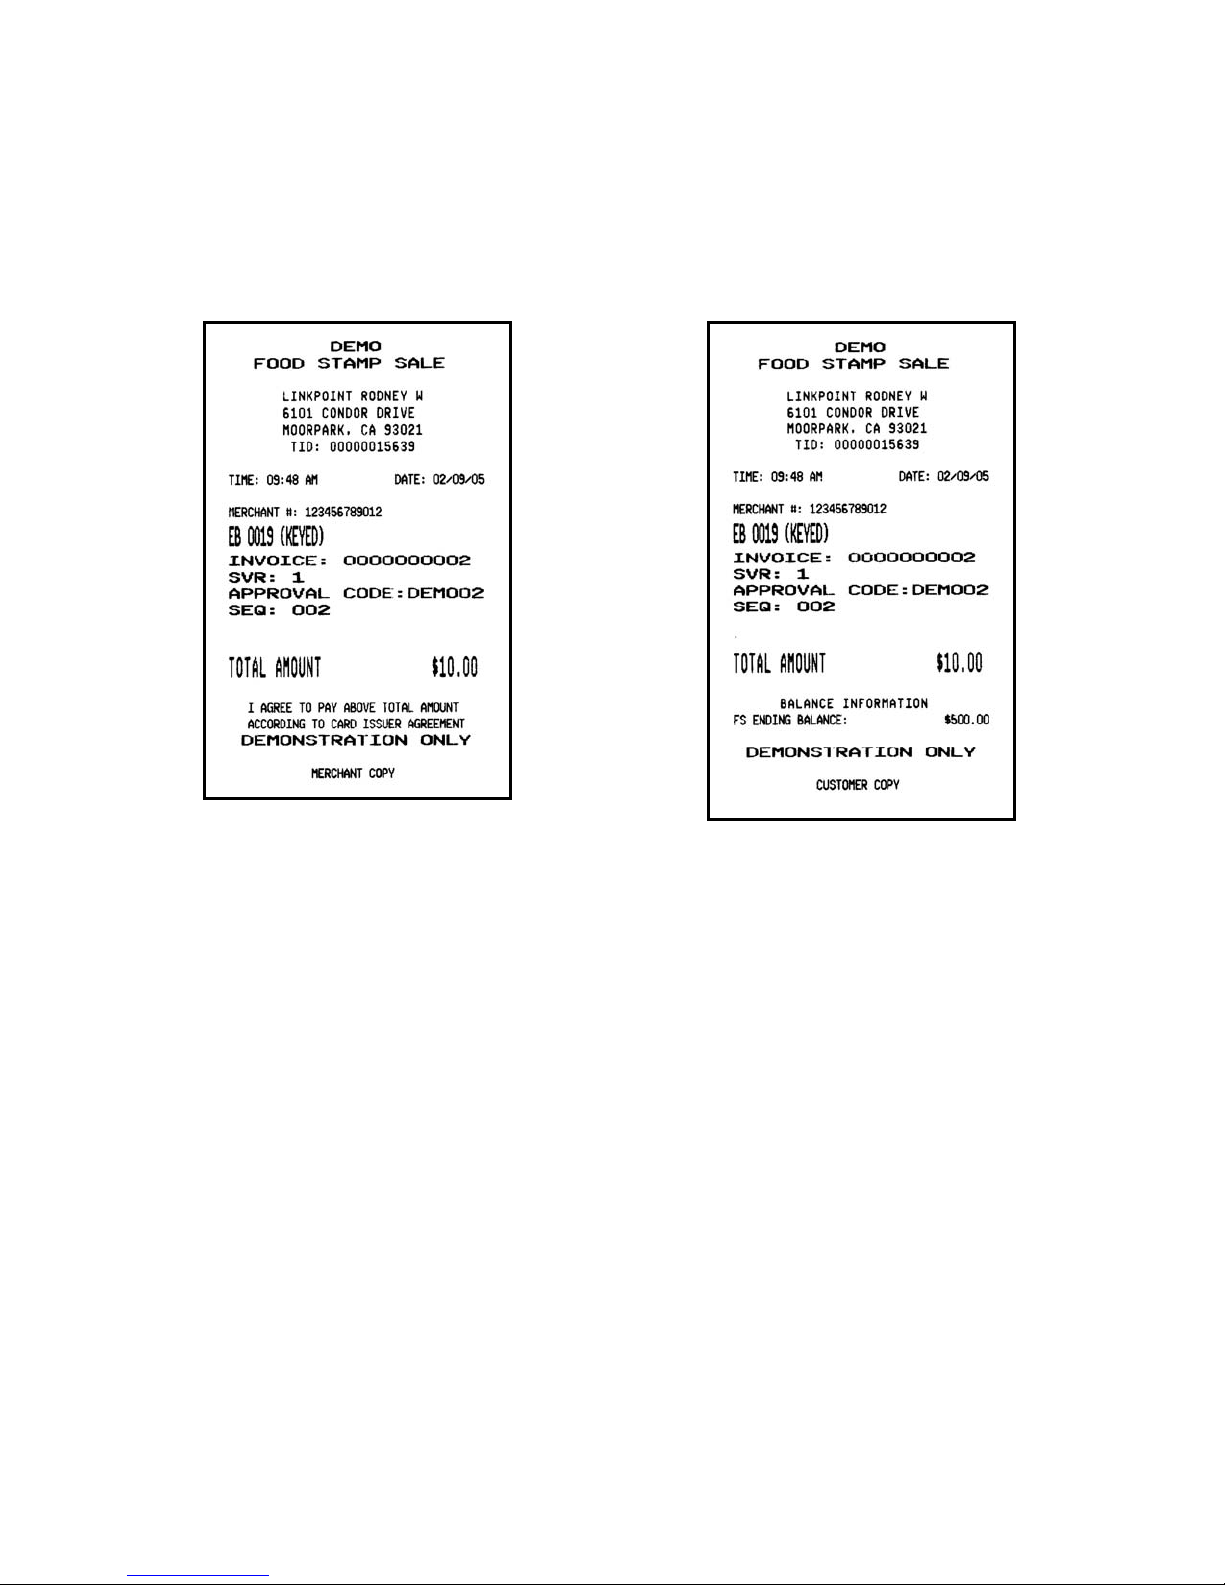
EBT Food Stamp Sale Receipt Sample
AIO SAMPLE RECEIPTS
Merchant Copy Customer Copy
© 2005 LinkPoint International, Inc. 60 Nashville LP AIO/3000 Manual
This information is Proprietary and Confidential to LinkPoint International - Reproduction without the
expressed, written consent of LinkPoint International is prohibited.
Page 69

EBT Food Stamp Sale Receipt Sample Layout
CUSTOM HEADER 1
CUSTOM HEADER 2
DEMO
FOOD STAMP SALE
DBA Name
DBA Street Address
DBA City, State, Zip
TID: XXXXXXXXXXX
DUPLICATE
TIME: hh:mm DATE: mm/dd/yy
MERCHANT #: XXXXXXXXXXX
EB 4444 (KEYED)
CLK: XXXX
INVOICE: XXXXXXXXXXX
APPROVAL CODE: XXXXXX
SEQ: XXXX
TOTAL AMOUNT $110.00
I AGREE TO PAY ABOVE TOTAL AMOUNT
ACCORDING TO CARD ISSUER AGREEMENT
DEMONSTRATION ONLY
BALANCE INFORMATION
FS ENDING BALANCE: $XXX.XX
CUSTOM FOOTER 1
CUSTOM FOOTER 2
MERCHANT or CUSTOMER COPY
Custom header line 1
Custom header line 2
Prints only if terminal was in demo mode
Transaction type (bold and centered)
H1 DBA Name (centered)
H2 DBA Street Address (centered)
H3 DBA City, DBA State, DBA ZIP (centered)
Terminal ID
Prints if receipt was a reprint
Transaction date and time
Merchant number
Card type, last four digits of card number, entry method
Employee ID number
Invoice number
Approval code
Sequence number
Total transaction amount
Cardholder agreement (only prints on merchant copy)
Prints only if terminal was in demo mode
Header information
Food stamp balance amount after transaction
Custom footer line 1
Custom footer line 2
Copy distribution
© 2005 LinkPoint International, Inc. 61 Nashville LP AIO/3000 Manual
This information is Proprietary and Confidential to LinkPoint International - Reproduction without the
expressed, written consent of LinkPoint International is prohibited.
Page 70
EBT Food Stamp Return
Please follow the procedures below to process an EBT return. This transaction is a
refund of an EBT card amount without the option of receiving cash back.
Display Message Operator Action and Comments
SWIPE CARD FOR SALE
MM-DD-YY DAY HH:MM
EBT DEBIT
↓ ↓
EBT or EBT/DEBIT
ENTER PASSWORD
EBT or EBT/DEBIT
INVALID PASSWORD
EBT DEBIT
↓ ↓
FOOD CASH VCHR
↓ ↓ ↓
SALE RET BAL
↓ ↓ ↓
Either swipe the EBT card or press the [ATM/DEBIT]
key.
If this prompt appears after the card is swiped, press the
middle [
S] key to continue.
Special note:
EBT prompt only appears if EBT function is activated.
If prompted, key in either the MIN, MED, MAX or
override password and press [ENTER]. This prompt
cannot be bypassed. Password entry will not be
necessary for transactions where card number is
manually entered.
Special note:
The override password depends upon the date
displayed on the terminal because the password is
always the date squared plus the month.
If the wrong password is entered, the terminal displays
this message briefly before displaying the previous
ENTER PASSWORD prompt.
If this prompt appears after the password is entered,
press the left [
S] key.
Press the left [S] key.
Press the middle [S] key.
© 2005 LinkPoint International, Inc. 62 Nashville LP AIO/3000 Manual
This information is Proprietary and Confidential to LinkPoint International - Reproduction without the
expressed, written consent of LinkPoint International is prohibited.
Page 71
Display Message Operator Action and Comments
EB FS RETURN
ENTER ACCOUNT #
EB FS RETURN
ENTER AMOUNT
EB FS RETURN
WAITING FOR PIN…
XX.XX
PIN=
EB FS RETURN
ENTER INVOICE #
INV: 000000000X
DUPLICATE, RE-ENTER?
Either swipe the EBT card or manually key in the
account number and press [ENTER].
Key in the transaction return amount, press [ENTER].
Customer must key in their PIN.
Customer is prompted to key in their PIN and press
[ENTER] on the PIN pad.
If prompted, key in the invoice number and press
[ENTER].
The invoice number is on a transaction currently in the
open batch. If prompted, either press [ENTER], key in a
new invoice number and press [ENTER] or press [BACK
SPACE] to use the invoice number on the current
transaction also.
EB FS RETURN
ENTER EMP ID #
If prompted, key in the employee ID number and press
[ENTER].
Please note that the word EMP is never displayed. The
employee ID field will depend upon how the employee
ID prompt is programmed.
EB FS RETURN
DIALING…
EB FS RETURN
PRINTING…
EB FS RETURN
TEAR NOW,PRESS ENTER
Please wait, the terminal is dialing the host computer.
The terminal displays several messages.
When the terminal receives a response, this prompt
displays and a receipt will print.
Tear off the merchant receipt copy. Press [ENTER] to
print a customer receipt copy or simply wait for the
receipt to print.
EB FS RETURN
AP OKXXXX SEQ XXX
© 2005 LinkPoint International, Inc. 63 Nashville LP AIO/3000 Manual
This information is Proprietary and Confidential to LinkPoint International - Reproduction without the
expressed, written consent of LinkPoint International is prohibited.
Press [CLEAR] to return to the idle prompt.
Page 72
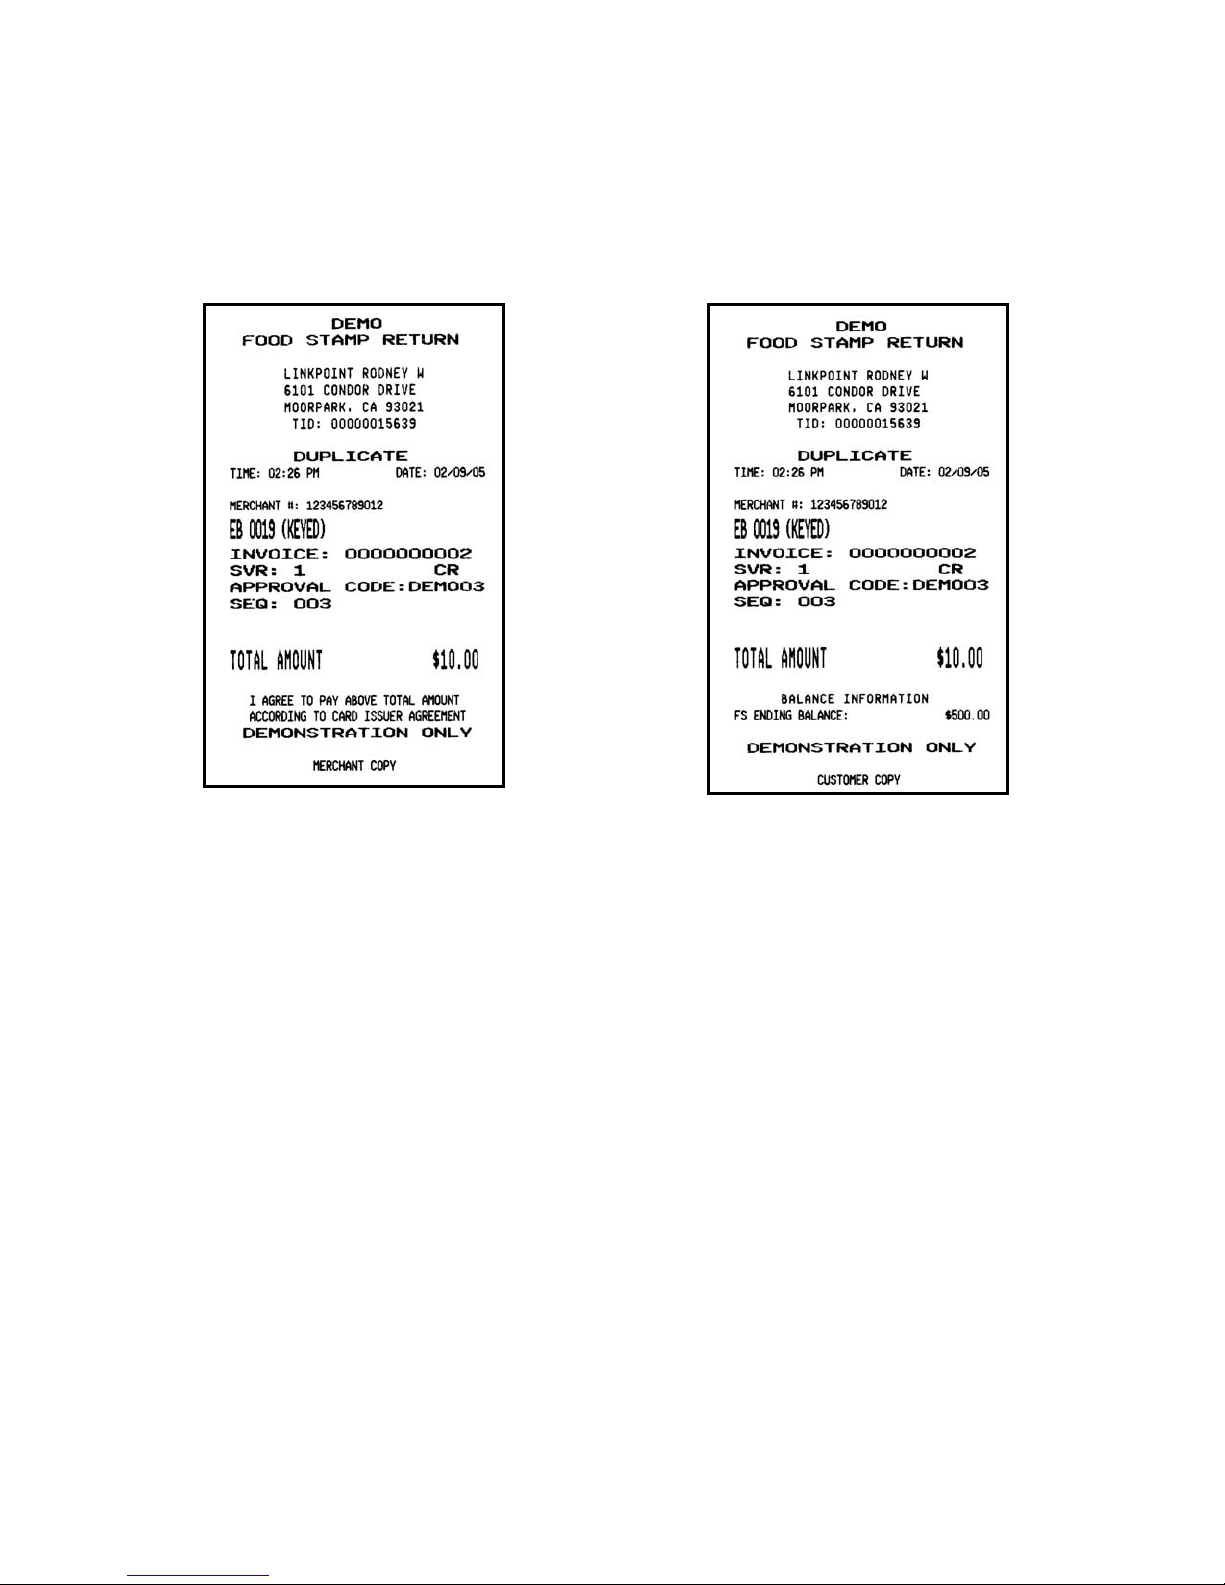
EBT Food Stamp Return Receipt Sample
AIO SAMPLE RECEIPTS
Merchant Copy Customer Copy
© 2005 LinkPoint International, Inc. 64 Nashville LP AIO/3000 Manual
This information is Proprietary and Confidential to LinkPoint International - Reproduction without the
expressed, written consent of LinkPoint International is prohibited.
Page 73

EBT Food Stamp Return Receipt Sample Layout
CUSTOM HEADER 1
CUSTOM HEADER 2
DEMO
FOOD STAMP RETURN
DBA Name
DBA Street Address
DBA City, State, Zip
TID: XXXXXXXXXXX
DUPLICATE
TIME: hh:mm DATE: mm/dd/yy
MERCHANT #: XXXXXXXXXXX
EB 4444 (KEYED)
INVOICE: XXXXXXXXXXX
CLK: XXXX CR
APPROVAL CODE: XXXXXX
SEQ: XXXX
TOTAL AMOUNT $10.00
I AGREE TO PAY ABOVE TOTAL AMOUNT
ACCORDING TO CARD ISSUER AGREEMENT
DEMONSTRATION ONLY
CUSTOM FOOTER 1
CUSTOM FOOTER 2
MERCHANT or CUSTOMER COPY
Custom header line 1
Custom header line 2
Prints only if terminal was in demo mode
Transaction type (bold and centered)
H1 DBA Name (centered)
H2 DBA Street Address (centered)
H3 DBA City, DBA State, DBA ZIP (centered)
Terminal ID
Prints if receipt was a reprint
Transaction date and time
Merchant number
Card type, last four digits of card number, entry method
Invoice number
Employee ID number, transaction type
Approval code
Sequence number
Total transaction amount
Cardholder agreement (only prints on merchant copy)
Prints only if terminal was in demo mode
Custom footer line 1
Custom footer line 2
Copy distribution
© 2005 LinkPoint International, Inc. 65 Nashville LP AIO/3000 Manual
This information is Proprietary and Confidential to LinkPoint International - Reproduction without the
expressed, written consent of LinkPoint International is prohibited.
Page 74
EBT Food Stamp Balance Inquiry
Please follow the procedures below to check the available balance on an EBT card.
Display Message Operator Action and Comments
SWIPE CARD FOR SALE
MM-DD-YY DAY HH:MM
EBT DEBIT
↓ ↓
EBT or EBT/DEBIT
ENTER PASSWORD
EBT or EBT/DEBIT
INVALID PASSWORD
EBT DEBIT
↓ ↓
FOOD CASH VCHR
↓ ↓ ↓
SALE RET BAL
↓ ↓ ↓
Either swipe the EBT card or press the [ATM/DEBIT]
key.
If this prompt appears after the card is swiped, press the
middle [
S] key to continue.
Special note:
EBT prompt only appears if EBT function is activated.
If prompted, key in either the MIN, MED, MAX or
override password and press [ENTER]. This prompt
cannot be bypassed. Password entry will not be
necessary for transactions where card number is
manually entered.
Special note:
The override password depends upon the date
displayed on the terminal because the password is
always the date squared plus the month.
If the wrong password is entered, the terminal displays
this message briefly before displaying the previous
ENTER PASSWORD prompt.
If this prompt appears after the password is entered,
press the left [
S] key.
Press the left [S] key.
Press the right [S] key.
© 2005 LinkPoint International, Inc. 66 Nashville LP AIO/3000 Manual
This information is Proprietary and Confidential to LinkPoint International - Reproduction without the
expressed, written consent of LinkPoint International is prohibited.
Page 75
Display Message Operator Action and Comments
EB FS INQUIRY
ENTER ACCOUNT #
EB FS INQUIRY
WAITING FOR PIN…
XX.XX
PIN=
EB FS INQUIRY
DIALING…
EB FS INQUIRY
PRINTING…
EB FS INQUIRY
TEAR NOW,PRESS ENTER
Either swipe the EBT card or manually key in the
account number and press [ENTER].
Customer must key in their PIN.
Customer is prompted to key in their PIN and press
[ENTER] on the PIN pad.
Please wait, the terminal is dialing the host computer.
The terminal displays several messages.
When the terminal receives a response, this prompt
displays and a receipt will print.
The inquiry will only produce a customer copy. Press
[ENTER] to exit function.
EB FS INQUIRY
AP OKXXXX
Press [CLEAR] to return to the idle prompt.
© 2005 LinkPoint International, Inc. 67 Nashville LP AIO/3000 Manual
This information is Proprietary and Confidential to LinkPoint International - Reproduction without the
expressed, written consent of LinkPoint International is prohibited.
Page 76
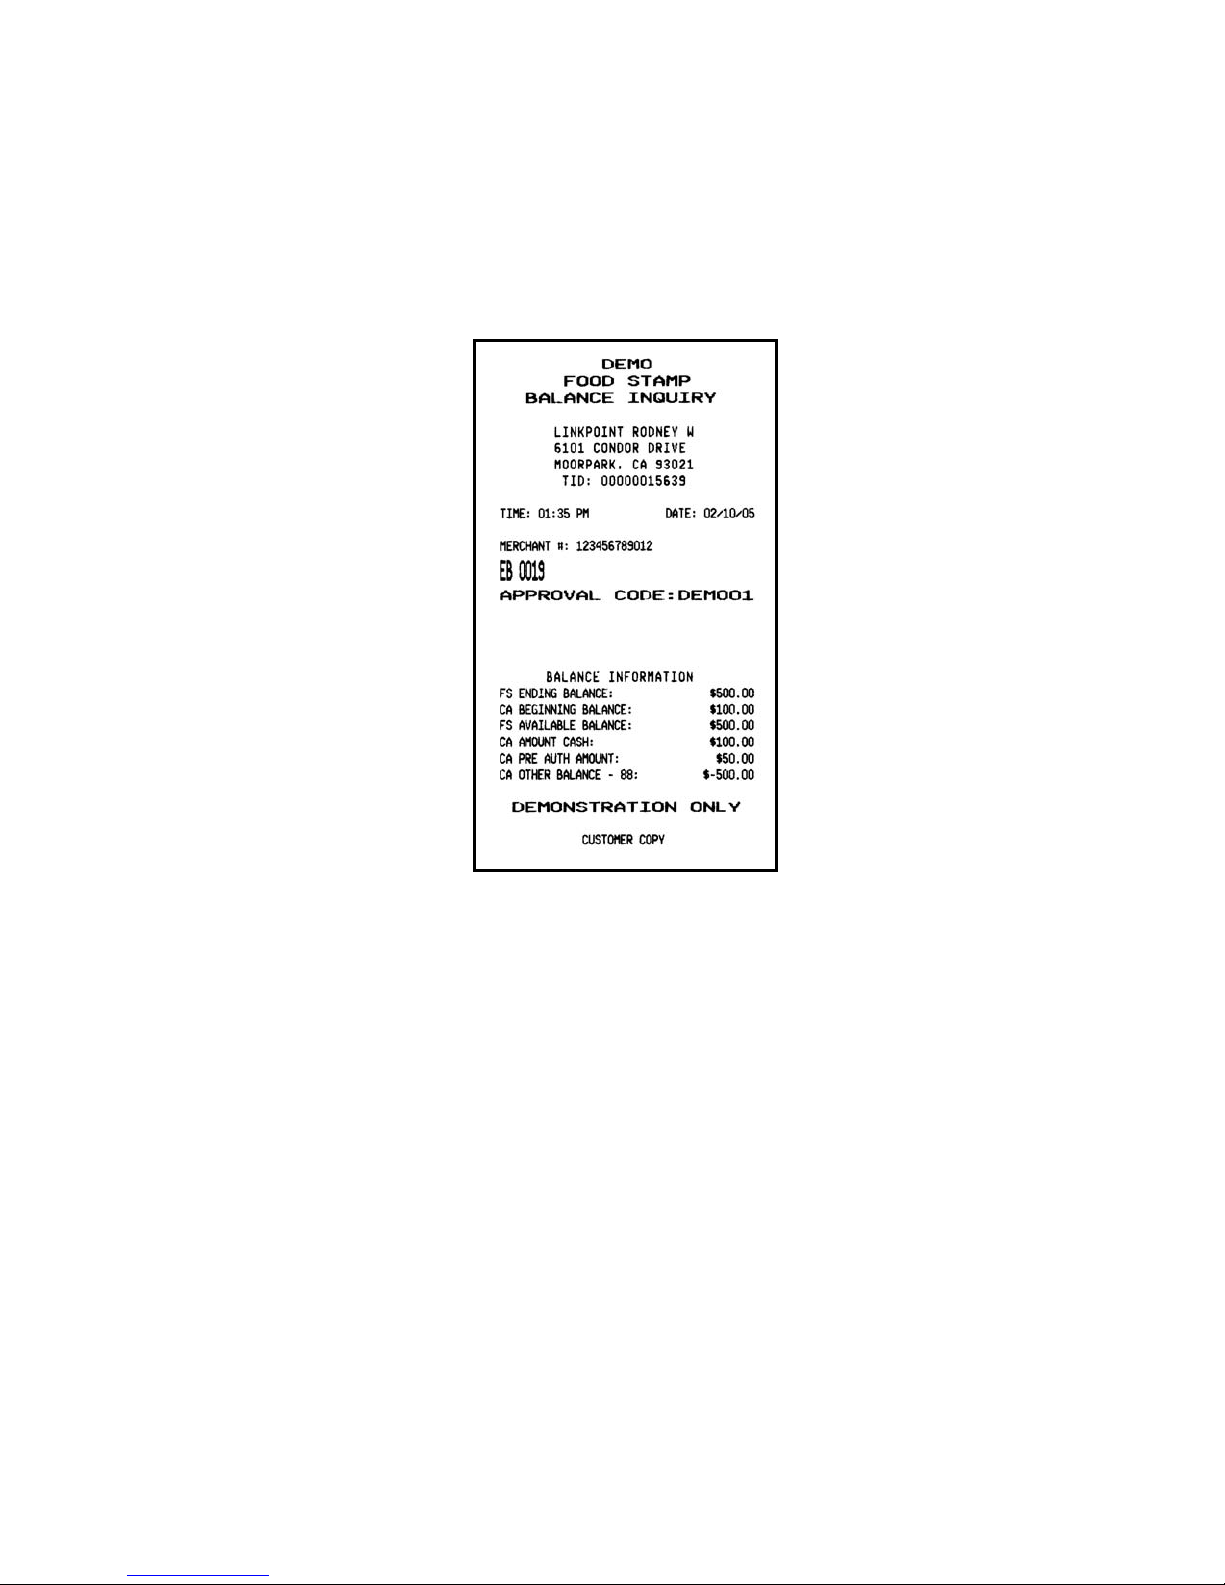
EBT Food Stamp Balance Inquiry Report Sample
AIO SAMPLE RECEIPT
Customer Copy
© 2005 LinkPoint International, Inc. 68 Nashville LP AIO/3000 Manual
This information is Proprietary and Confidential to LinkPoint International - Reproduction without the
expressed, written consent of LinkPoint International is prohibited.
Page 77

EBT Food Stamp Balance Inquiry Report Sample Layout
CUSTOM HEADER 1
CUSTOM HEADER 2
DEMO
FOOD STAMP
BALANCE INQUIRY
DBA Name
DBA Street Address
DBA City, State, Zip
TID: XXXXXXXXXXX
DUPLICATE
TIME: hh:mm DATE: mm/dd/yy
MERCHANT #: XXXXXXXXXXX
EB 4444 (KEYED)
APPROVAL CODE: XXXXXX
BALANCE INFORMATION
FS ENDING BALANCE: $500.00
CA BEGINNING BALANCE: $100.00
FS AVAILABLE BALANCE: $500.00
CA AMOUNT CASH: $100.00
CA PRE AUTH AMOUNT: $50.00
CA OTHER BALANCE – 88: $-500.00
DEMONSTRATION ONLY
CUSTOMER COPY
Custom header line 1
Custom header line 2
Prints only if terminal was in demo mode
Transaction type (bold and centered)
Transaction type (bold and centered)
H1 DBA Name (centered)
H2 DBA Street Address (centered)
H3 DBA City, DBA State, DBA ZIP (centered)
Terminal ID
Prints if receipt was a reprint
Transaction date and time
Merchant number
Card type, last four digits of card number, entry method
Approval code
Food stamp ending balance
Cash benefit beginning balance
Food stamp balance available after last transaction
Cash benefit balance available after last transaction
Cash benefit pre auth amount
Cash benefit other balance
Copy distribution (Only customer copy prints)
© 2005 LinkPoint International, Inc. 69 Nashville LP AIO/3000 Manual
This information is Proprietary and Confidential to LinkPoint International - Reproduction without the
expressed, written consent of LinkPoint International is prohibited.
Page 78
EBT Food Stamp Voucher Clear Sale
Please follow the procedures below to process an EBT voucher clear sale. A voucher
clear sale should only be attempted after an authorization number has been received.
Display Message Operator Action and Comments
SWIPE CARD FOR SALE
MM-DD-YY DAY HH:MM
EBT/DEBIT
ENTER PASSWORD
EBT/DEBIT
INVALID PASSWORD
EBT DEBIT
↓ ↓
FOOD CASH VCHR
↓ ↓ ↓
SALE RET
↓ ↓
EB FS VCLR SALE
ENTER ACCOUNT #
Press the [ATM/DEBIT] key.
If prompted, key in either the MIN, MED, MAX or
override password and press [ENTER]. This prompt
cannot be bypassed. Password entry will not be
necessary for transactions where card number is
manually entered.
Special note:
The override password depends upon the date
displayed on the terminal because the password is
always the date squared plus the month.
If the wrong password is entered, the terminal displays
this message briefly before displaying the previous
ENTER PASSWORD prompt.
If this prompt appears after the password is entered,
press the left [
S] key.
Press the right [S] key.
Press the left [S] key.
Manually key in the account number and press
[ENTER]. The card cannot be swiped for this transaction
from this prompt.
© 2005 LinkPoint International, Inc. 70 Nashville LP AIO/3000 Manual
This information is Proprietary and Confidential to LinkPoint International - Reproduction without the
expressed, written consent of LinkPoint International is prohibited.
Page 79
Display Message Operator Action and Comments
EB FS VCLR SALE
ENTER AMOUNT
EB FS VCLR SALE
ENTER INVOICE #
INV: 000000000X
DUPLICATE, RE-ENTER?
Key in the transaction amount and press [ENTER].
If prompted, key in the invoice number and press
[ENTER].
The invoice number is on a transaction currently in the
open batch. If prompted, either press [ENTER], key in a
new invoice number and press [ENTER] or press [BACK
SPACE] to use the invoice number on the current
transaction also.
EB FS VCLR SALE
ENTER EMP ID #
If prompted, key in the employee ID number and press
[ENTER].
Please note that the word EMP is never displayed. The
employee ID field will depend upon how the employee
ID prompt is programmed.
EB FS VCLR SALE
ENTER VOUCHER NUMBER
EB FS VCLR SALE
ENTER AUTH CODE
EB FS VCLR SALE
DIALING…
EB FS VCLR SALE
PRINTING…
EB FS VCLR SALE
AP OKXXXX SEQ XXX
Key in the voucher number and press [ENTER].
Key in the voice authorization code and press [ENTER].
Please wait, the terminal is dialing the host computer.
The terminal displays several messages.
When the terminal receives a response, this prompt
displays and a receipt will print.
Only the merchant receipt copy prints. Tear off the
receipt copy. Press [CLEAR] to return to the idle prompt.
© 2005 LinkPoint International, Inc. 71 Nashville LP AIO/3000 Manual
This information is Proprietary and Confidential to LinkPoint International - Reproduction without the
expressed, written consent of LinkPoint International is prohibited.
Page 80
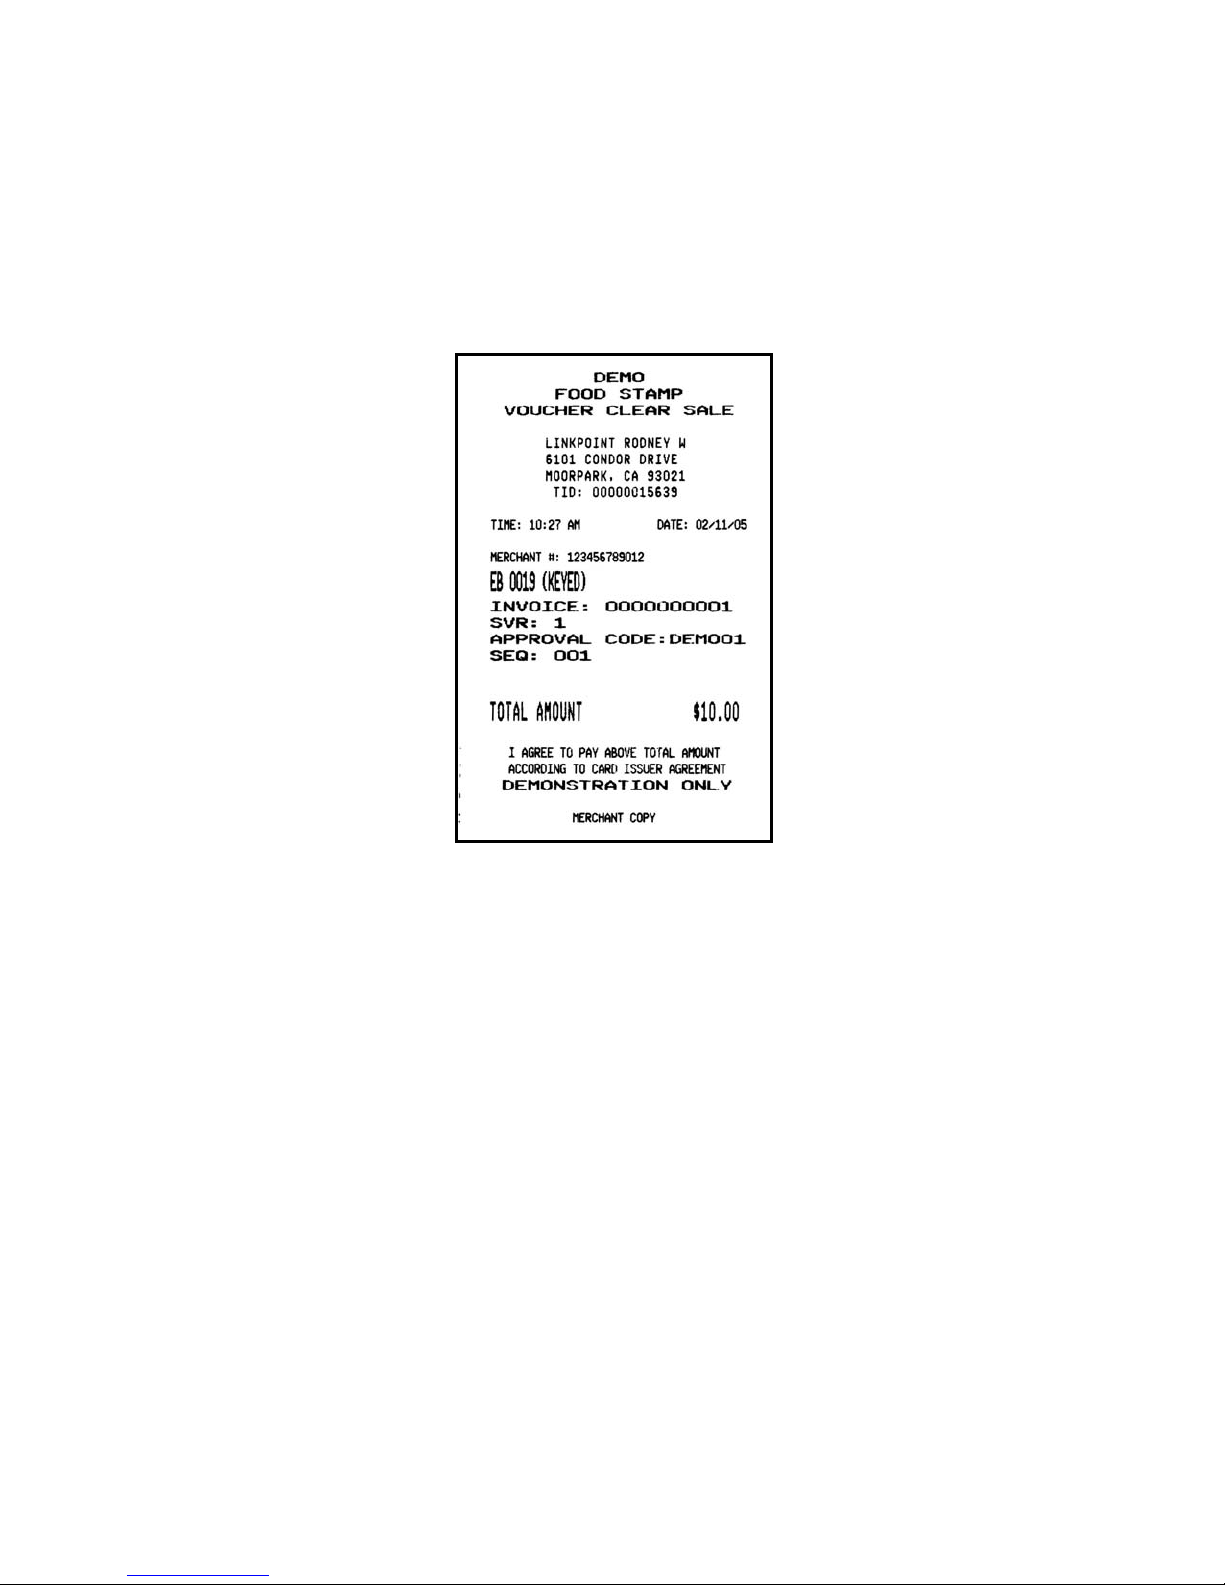
EBT Food Stamp Voucher Clear Receipt Sample
AIO SAMPLE RECEIPTS
Merchant Copy
© 2005 LinkPoint International, Inc. 72 Nashville LP AIO/3000 Manual
This information is Proprietary and Confidential to LinkPoint International - Reproduction without the
expressed, written consent of LinkPoint International is prohibited.
Page 81

EBT Food Stamp Voucher Clear Receipt Sample Layout
CUSTOM HEADER 1
CUSTOM HEADER 2
DEMO
FOOD STAMP
VOUCHER CLEAR SALE
DBA Name
DBA Street Address
DBA City, State, Zip
TID: XXXXXXXXXXX
DUPLICATE
TIME: hh:mm DATE: mm/dd/yy
MERCHANT #: XXXXXXXXXXX
EB 4444 (KEYED)
INVOICE: XXXXXXXXXXX
CLK: XXXX
APPROVAL CODE: XXXXXX
SEQ: XXXX
TOTAL AMOUNT $10.00
I AGREE TO PAY ABOVE TOTAL AMOUNT
ACCORDING TO CARD ISSUER AGREEMENT
DEMONSTRATION ONLY
MERCHANT COPY
Custom header line 1
Custom header line 2
Prints only if terminal was in demo mode
Transaction type (bold and centered)
Transaction type (bold and centered)
H1 DBA Name (centered)
H2 DBA Street Address (centered)
H3 DBA City, DBA State, DBA ZIP (centered)
Terminal ID
Prints if receipt was a reprint
Transaction date and time
Merchant number
Card type, last four digits of card number, entry method
Invoice number
Employee ID number
Approval code
Sequence number
Total transaction amount
Cardholder agreement (only prints on merchant copy)
Prints only if terminal was in demo mode
Copy distribution (Only merchant copy prints)
© 2005 LinkPoint International, Inc. 73 Nashville LP AIO/3000 Manual
This information is Proprietary and Confidential to LinkPoint International - Reproduction without the
expressed, written consent of LinkPoint International is prohibited.
Page 82
EBT Food Stamp Voucher Clear Return
Please follow the procedures below to process an EBT voucher clear sale return. A
voucher clear return should only be attempted after an authorization number has been
received.
Display Message Operator Action and Comments
SWIPE CARD FOR SALE
MM-DD-YY DAY HH:MM
EBT DEBIT
↓ ↓
EBT or EBT/DEBIT
ENTER PASSWORD
EBT or EBT/DEBIT
INVALID PASSWORD
EBT DEBIT
↓ ↓
FOOD CASH VCHR
↓ ↓ ↓
SALE RET
↓ ↓
Either swipe the EBT card or press the [ATM/DEBIT]
key.
If this prompt appears after the card is swiped, press the
middle [
S] key to continue.
Special note:
EBT prompt only appears if EBT function is activated.
If prompted, key in either the MIN, MED, MAX or
override password and press [ENTER]. This prompt
cannot be bypassed. Password entry will not be
necessary for transactions where card number is
manually entered.
Special note:
The override password depends upon the date
displayed on the terminal because the password is
always the date squared plus the month.
If the wrong password is entered, the terminal displays
this message briefly before displaying the previous
ENTER PASSWORD prompt.
If this prompt appears after the password is entered,
press the left [
S] key.
Press the right [S] key.
Press the right [S] key.
© 2005 LinkPoint International, Inc. 74 Nashville LP AIO/3000 Manual
This information is Proprietary and Confidential to LinkPoint International - Reproduction without the
expressed, written consent of LinkPoint International is prohibited.
Page 83
Display Message Operator Action and Comments
EB FS VCLR RETURN
ENTER ACCOUNT #
Manually key in the account number and press
[ENTER]. The card cannot be swiped for this
transaction.
EB FS VCLR RETURN
ENTER AMOUNT
EB FS VCLR RETURN
ENTER INVOICE #
INV: 000000000X
DUPLICATE, RE-ENTER?
Key in the transaction amount and press [ENTER].
If prompted, key in the invoice number and press
[ENTER].
The invoice number is on a transaction currently in the
open batch. If prompted, either press [ENTER], key in a
new invoice number and press [ENTER] or press [BACK
SPACE] to use the invoice number on the current
transaction also.
EB FS VCLR RETURN
ENTER EMP ID #
If prompted, key in the employee ID number and press
[ENTER].
Please note that the word EMP is never displayed. The
employee ID field will depend upon how the employee
ID prompt is programmed.
EB FS VCLR RETURN
ENTER VOUCHER NUMBER
EB FS VCLR RETURN
ENTER APPROVAL CODE
EB FS VCLR RETURN
DIALING…
EB FS VCLR RETURN
PRINTING…
EB FS VCLR RETURN
TEAR NOW,PRESS ENTER
Key in the voucher number and press [ENTER].
Key in the voice authorization code and press [ENTER].
Please wait, the terminal is dialing the host computer.
The terminal displays several messages.
When the terminal receives a response, this prompt
displays and a receipt will print.
Tear off the merchant receipt copy. Press [ENTER] to
print a customer receipt copy or simply wait for the
receipt to print.
© 2005 LinkPoint International, Inc. 75 Nashville LP AIO/3000 Manual
This information is Proprietary and Confidential to LinkPoint International - Reproduction without the
expressed, written consent of LinkPoint International is prohibited.
Page 84

Display Message Operator Action and Comments
EB FS VCLR RETURN
AP OKXXXX SEQ XXX
Press [CLEAR] to return to the idle prompt.
© 2005 LinkPoint International, Inc. 76 Nashville LP AIO/3000 Manual
This information is Proprietary and Confidential to LinkPoint International - Reproduction without the
expressed, written consent of LinkPoint International is prohibited.
Page 85
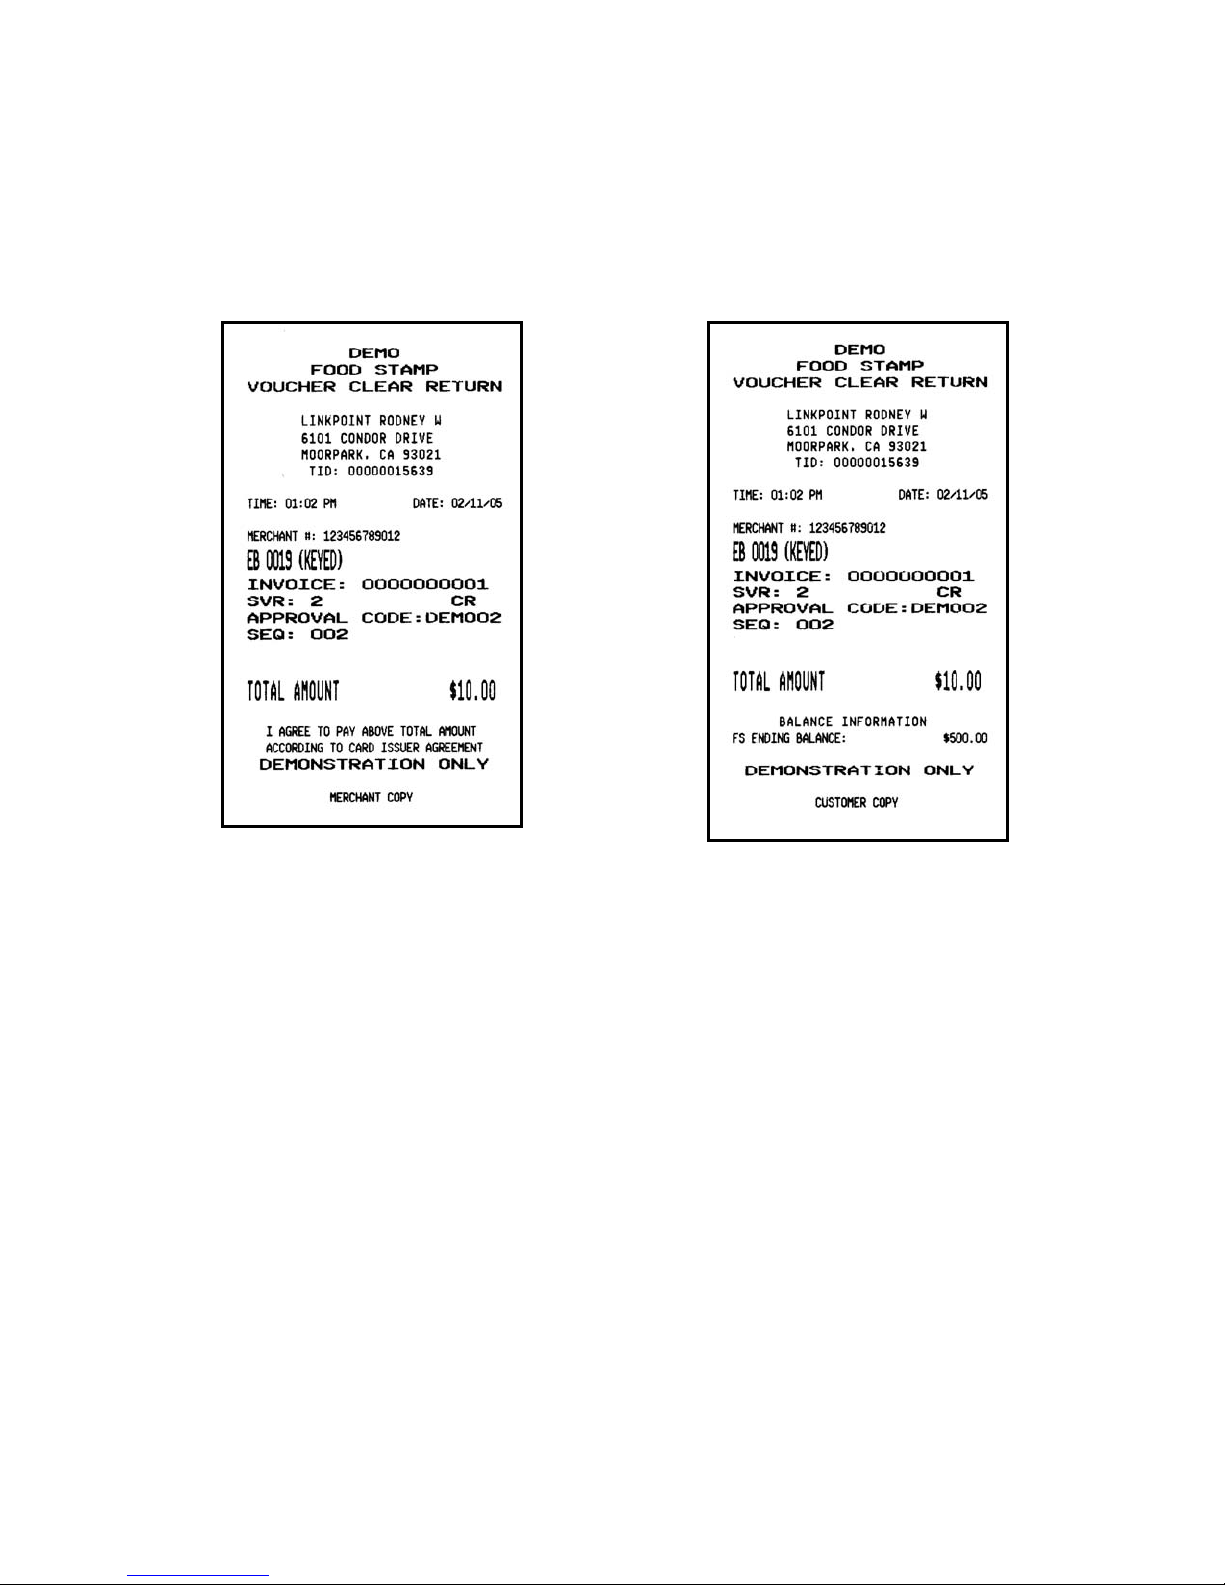
EBT Food Stamp Voucher Clear Return Receipt Sample
AIO SAMPLE RECEIPTS
Merchant Copy Customer Copy
© 2005 LinkPoint International, Inc. 77 Nashville LP AIO/3000 Manual
This information is Proprietary and Confidential to LinkPoint International - Reproduction without the
expressed, written consent of LinkPoint International is prohibited.
Page 86

EBT Food Stamp Voucher Clear Return Receipt Sample Layout
CUSTOM HEADER 1
CUSTOM HEADER 2
DEMO
FOOD STAMP
VOUCHER CLEAR RETURN
DBA Name
DBA Street Address
DBA City, State, Zip
TID: XXXXXXXXXXX
DUPLICATE
TIME: hh:mm DATE: mm/dd/yy
MERCHANT #: XXXXXXXXXXX
EB 4444 (KEYED)
INVOICE: XXXXXXXXXXX
CLK: XXXX CR
APPROVAL CODE: XXXXXX
SEQ: XXXX
TOTAL AMOUNT $10.00
I AGREE TO PAY ABOVE TOTAL AMOUNT
ACCORDING TO CARD ISSUER AGREEMENT
DEMONSTRATION ONLY
BALANCE INFORMATION
FS ENDING BALANCE: $500.00
MERCHANT OR CUSTOMER COPY
Custom header line 1
Custom header line 2
Prints only if terminal was in demo mode
Transaction type (bold and centered)
Transaction type (bold and centered)
H1 DBA Name (centered)
H2 DBA Street Address (centered)
H3 DBA City, DBA State, DBA ZIP (centered)
Terminal ID
Prints if receipt was a reprint
Transaction date and time
Merchant number
Card type, last four digits of card number, entry method
Invoice number
Employee ID number, transaction type
Approval code
Sequence number
Total transaction amount
Cardholder agreement (only prints on merchant copy)
Prints only if terminal was in demo mode
Food stamp ending balance
Copy distribution
© 2005 LinkPoint International, Inc. 78 Nashville LP AIO/3000 Manual
This information is Proprietary and Confidential to LinkPoint International - Reproduction without the
expressed, written consent of LinkPoint International is prohibited.
Page 87
EBT Void Last Transaction
Please follow the procedures below to void an EBT transaction. Please note that this
procedure will only work on the most recent transaction.
Display Message Operator Action and Comments
SWIPE CARD FOR SALE
MM-DD-YY DAY HH:MM
VOID
ENTER PASSWORD
VOID
INVALID PASSWORD
CARD CHECK
↓ ↓
INV SEQ PAN
↓ ↓ ↓
VOID
ENTER INVOICE #
VOID
ENTER SEQUENCE #
Press the [VOID] key.
If prompted, key in either the MIN, MED, MAX or
override password and press [ENTER]. This prompt
cannot be bypassed. Password entry will not be
necessary for transactions where card number is
manually entered.
Special note:
The override password depends upon the date
displayed on the terminal because the password is
always the date squared plus the month.
If the wrong password is entered, the terminal displays
this message briefly before displaying the previous
ENTER PASSWORD prompt.
Press the left [S] key.
Press the left [S] key to choose a transaction to void by
invoice number, press the middle [
S] key to choose
transaction to void by sequence number or press the
S] key to choose by last five digits or the card
right [
number to void.
If the left [S] key was pressed, key in the invoice
number of the transaction to be voided and press
[ENTER].
If the middle [S] key was pressed, key in the sequence
number of the transaction to be voided and press
[ENTER].
© 2005 LinkPoint International, Inc. 79 Nashville LP AIO/3000 Manual
This information is Proprietary and Confidential to LinkPoint International - Reproduction without the
expressed, written consent of LinkPoint International is prohibited.
Page 88
Display Message Operator Action and Comments
VOID
ENTER LAST 5 OF PAN
If the right [S] key was pressed, key in the last 5 digits
of the card number of the transaction to be voided and
press [ENTER].
NNN: INV $XXX.XX
VOID NOT ALLLOWED
VOID INV nnnnnnn?
nnnnnnnnnnnnnn
CONFIRM VOID?
YES NO
EB FS VOID
DIALING…
EB FS VOID
PRINTING…
EB FS VOID
TEAR NOW,PRESS ENTER
Displays if the transaction chosen is not the most recent
transaction.
To void the displayed transaction, press [ENTER], to
cancel the void request, press [BACK SPACE].
Press the left [S] key to void the transaction displayed
above, press [BACK SPACE].
Please wait, the terminal is dialing the host computer.
The terminal displays several messages.
When the terminal receives a response, this prompt
displays and a receipt will print.
Tear off the merchant receipt copy. Press [ENTER] to
print a customer receipt copy or simply wait for the
receipt to print.
EB FS VOID
AP OKXXXX SEQ NNN
Press [CLEAR] to return to the idle prompt.
© 2005 LinkPoint International, Inc. 80 Nashville LP AIO/3000 Manual
This information is Proprietary and Confidential to LinkPoint International - Reproduction without the
expressed, written consent of LinkPoint International is prohibited.
Page 89
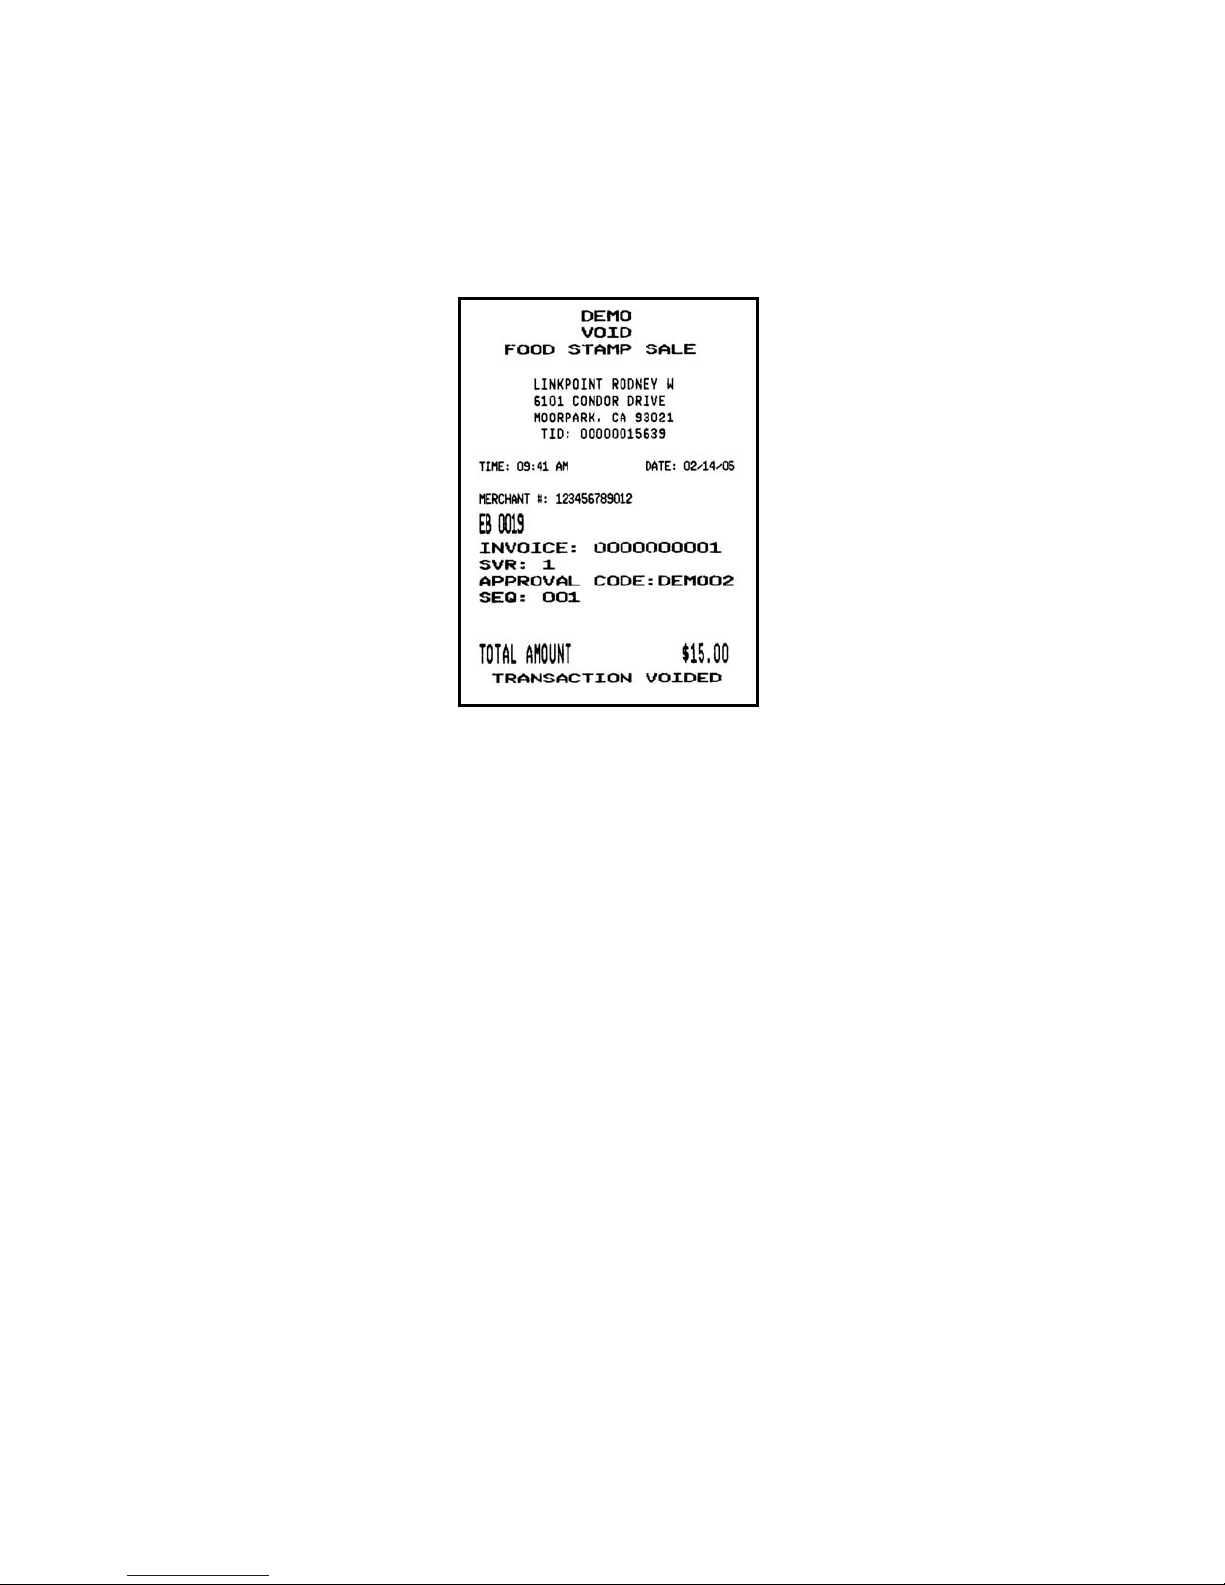
EBT Voided Transaction Receipt Sample
AIO SAMPLE RECEIPTS
© 2005 LinkPoint International, Inc. 81 Nashville LP AIO/3000 Manual
This information is Proprietary and Confidential to LinkPoint International - Reproduction without the
expressed, written consent of LinkPoint International is prohibited.
Page 90

EBT Voided Transaction Receipt Sample Layout
CUSTOM HEADER 1
CUSTOM HEADER 2
DEMO
VOID
FOOD STAMP SALE
DBA Name
DBA Street Address
DBA City, State, Zip
TID: XXXXXXXXXXX
DUPLICATE
TIME: hh:mm DATE: mm/dd/yy
MERCHANT #: XXXXXXXXXXX
EB 4444 (KEYED)
INVOICE: XXXXXXXXXXX
CLK: XXXX
APPROVAL CODE: XXXXXX
SEQ: XXXX
TOTAL AMOUNT $15.00
TRANSACTION VOIDED
Custom header line 1
Custom header line 2
Prints only if terminal was in demo mode
Transaction type (bold and centered)
Transaction type (bold and centered)
H1 DBA Name (centered)
H2 DBA Street Address (centered)
H3 DBA City, DBA State, DBA ZIP (centered)
Terminal ID
Prints if receipt was a reprint
Transaction date and time
Merchant number
Card type, last four digits of card number, entry method
Invoice number
Employee ID number
Approval code
Sequence number
Total transaction amount
Transaction type
© 2005 LinkPoint International, Inc. 82 Nashville LP AIO/3000 Manual
This information is Proprietary and Confidential to LinkPoint International - Reproduction without the
expressed, written consent of LinkPoint International is prohibited.
Page 91
Cash Benefit Sale
Please follow the procedures below so that customers can use EBT cards for cash
benefit purchases. A cash benefit sale can be used to buy petroleum products, enter tips
and allow cash back processing.
Display Message Operator Action and Comments
SWIPE CARD FOR SALE
MM-DD-YY DAY HH:MM
EBT DEBIT
↓ ↓
EBT or EBT/DEBIT
ENTER PASSWORD
EBT or EBT/DEBIT
INVALID PASSWORD
EBT DEBIT
↓ ↓
FOOD CASH VCHR
↓ ↓ ↓
SALE BAL
↓ ↓
Either swipe the EBT card or press the [ATM/DEBIT]
key.
If this prompt appears after the card is swiped, press the
middle [
S] key to continue.
Special note:
EBT prompt only appears if EBT function is activated.
If prompted, key in either the MIN, MED, MAX or
override password and press [ENTER]. This prompt
cannot be bypassed. Password entry will not be
necessary for transactions where card number is
manually entered.
Special note:
The override password depends upon the date
displayed on the terminal because the password is
always the date squared plus the month.
If the wrong password is entered, the terminal displays
this message briefly before displaying the previous
ENTER PASSWORD prompt.
If this prompt appears after the password is entered,
press the left [
S] key.
Press the middle [S] key.
Press the left [S] key.
© 2005 LinkPoint International, Inc. 83 Nashville LP AIO/3000 Manual
This information is Proprietary and Confidential to LinkPoint International - Reproduction without the
expressed, written consent of LinkPoint International is prohibited.
Page 92
Display Message Operator Action and Comments
EB CA SALE
ENTER ACCOUNT #
EB CA SALE
ENTER BASE AMOUNT
Either swipe the EBT card or manually key in the
account number and press [ENTER].
Key in the base transaction amount and press [ENTER]
or simply press [ENTER] for a cash only transaction.
Base amounts of $0.00 must be supported for cash only
transactions. Displays if petroleum processing is not
activated.
EB CA SALE
ENTER FUEL AMOUNT
Key in the fuel amount and press [ENTER] or simply
press [ENTER] to bypass.
Displays if petroleum processing is activated.
EB CA SALE
ENTER MISC AMOUNT
Key in the amount of the non fuel items and press
[ENTER] or simply press [ENTER] to bypass.
Displays if petroleum processing is activated.
EB CA SALE
ENTER TIP AMOUNT
Key in the tip amount or press [ENTER] or simply press
[ENTER] to bypass.
Displays if petroleum processing is activated.
TIP=
EB CA SALE
ENTER CASH BACK AMT
Key in the tip amount on the PIN pad and press
[ENTER].
Key in the cash back amount or press [ENTER] or
simply press [ENTER] to bypass.
Cash back amounts including $0.00 must be supported.
Displays only if cash back is enabled.
CASH=
TOTAL $X.XX
IS THIS CORRECT?
EB CA SALE
WAITING FOR PIN
Key in the cash back amount and press [ENTER] on the
PIN pad.
Either press [ENTER] to accept the amount or [BACK
SPACE] to reenter transaction amount.
Please wait…
© 2005 LinkPoint International, Inc. 84 Nashville LP AIO/3000 Manual
This information is Proprietary and Confidential to LinkPoint International - Reproduction without the
expressed, written consent of LinkPoint International is prohibited.
Page 93
Display Message Operator Action and Comments
XX.XX
PIN=
EB CA SALE
ENTER INVOICE #
INV: 000000000X
DUPLICATE, RE-ENTER?
Customer keys in their PIN and presses [ENTER] on the
PIN pad.
If prompted, key in the invoice number and press
[ENTER].
The invoice number is on a transaction currently in the
open batch. If prompted, either press [ENTER], key in a
new invoice number and press [ENTER] or press [BACK
SPACE] to use the invoice number on the current
transaction also.
EB CA SALE
ENTER EMP ID #
If prompted, key in the employee ID number and press
[ENTER].
Please note that the word EMP is never displayed. The
employee ID field will depend upon how the employee
ID prompt is programmed.
EB CA SALE
DIALING…
EB CA SALE
PRINTING…
EB CA SALE
TEAR NOW,PRESS ENTER
Please wait, the terminal is dialing the host computer.
The terminal displays several messages.
When the terminal receives a response, this prompt
displays and a receipt will print.
Tear off the merchant receipt copy. Press [ENTER] to
print a customer receipt copy or simply wait for the
receipt to print.
EB CA SALE
AP OKXXXX SEQ XXX
Press [CLEAR] to return to the idle prompt.
© 2005 LinkPoint International, Inc. 85 Nashville LP AIO/3000 Manual
This information is Proprietary and Confidential to LinkPoint International - Reproduction without the
expressed, written consent of LinkPoint International is prohibited.
Page 94
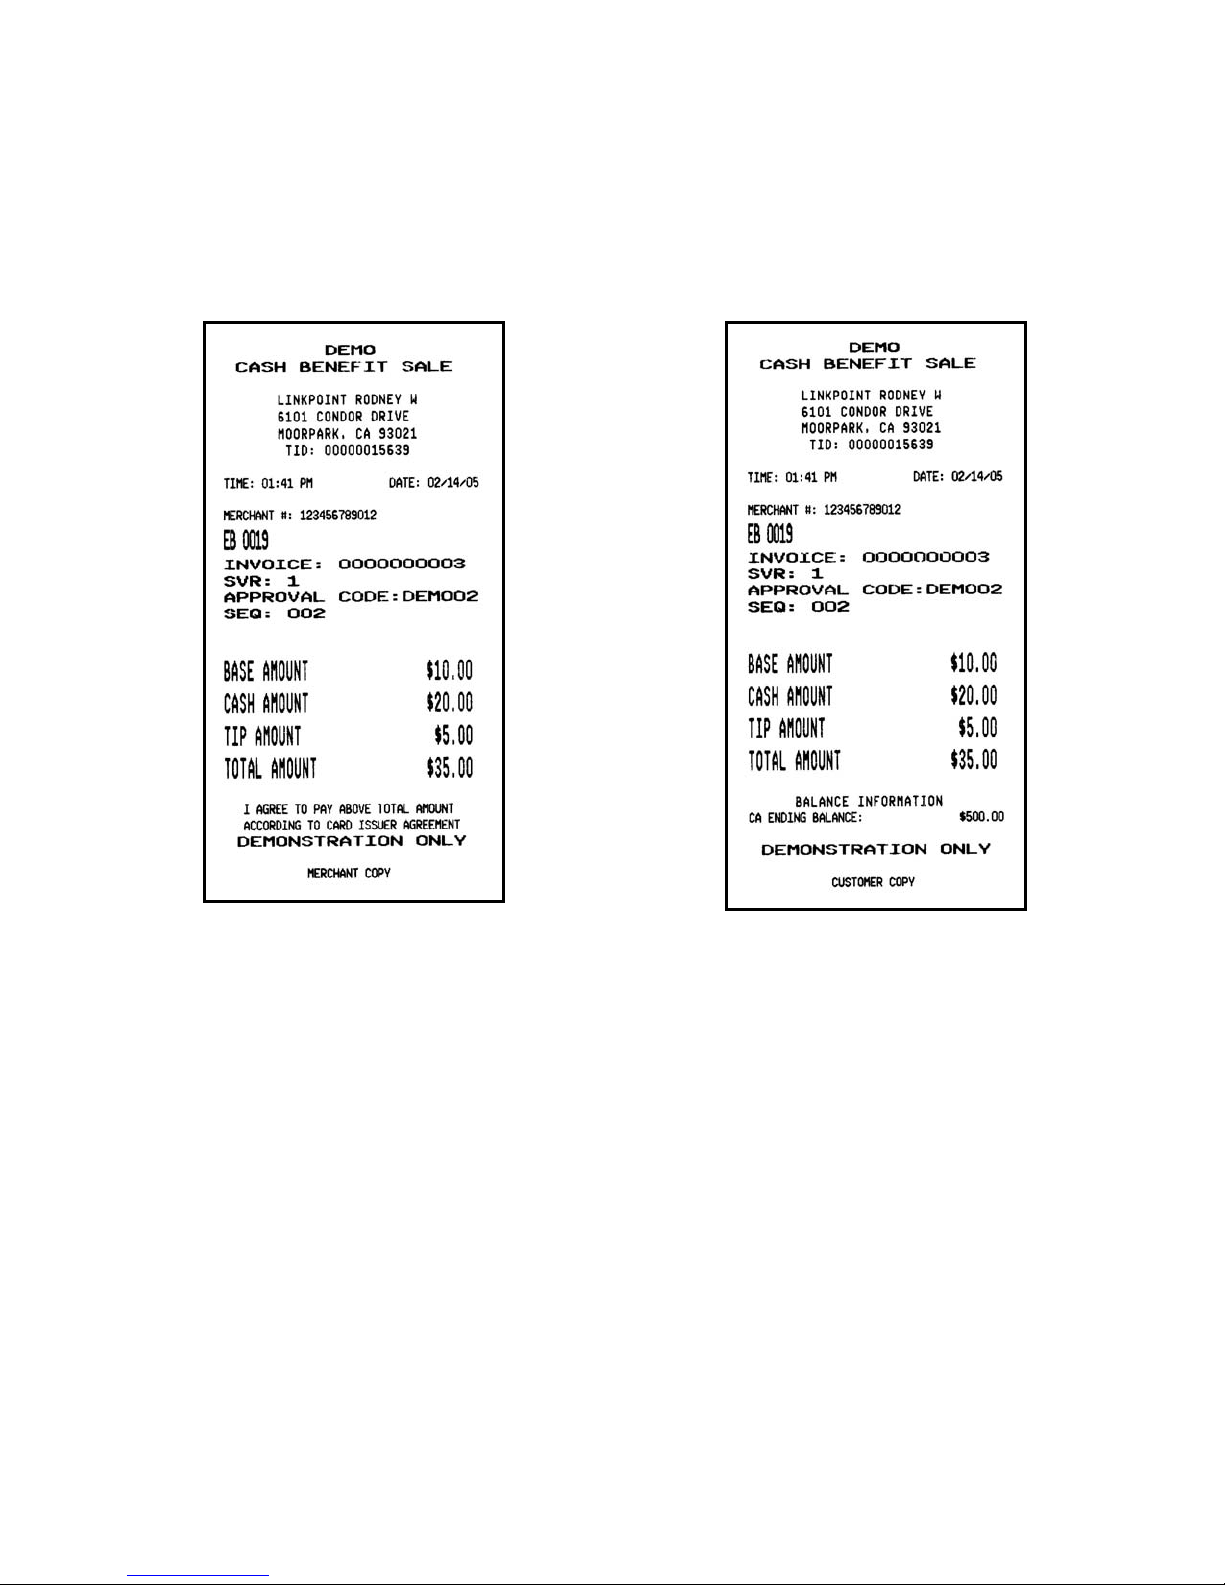
Cash Benefit Sale Receipt Sample
AIO SAMPLE RECEIPTS
Merchant Copy Customer Copy
© 2005 LinkPoint International, Inc. 86 Nashville LP AIO/3000 Manual
This information is Proprietary and Confidential to LinkPoint International - Reproduction without the
expressed, written consent of LinkPoint International is prohibited.
Page 95

Cash Benefit Sale Receipt Sample Layout
CUSTOM HEADER 1
CUSTOM HEADER 2
DEMO
CASH BENEFIT SALE
DBA Name
DBA Street Address
DBA City, State, Zip
TID: XXXXXXXXXXX
DUPLICATE
TIME: hh:mm DATE: mm/dd/yy
MERCHANT #: XXXXXXXXXXX
EB 4444 (KEYED)
INVOICE: XXXXXXXXXXX
CLK: XXXX
APPROVAL CODE: XXXXXX
SEQ: XXXX
BASE AMOUNT $10.00
CASH AMOUNT $20.00
TIP AMOUNT $5.00
TOTAL AMOUNT $35.00
I AGREE TO PAY ABOVE TOTAL AMOUNT
ACCORDING TO CARD ISSUER AGREEMENT
DEMONSTRATION ONLY
BALANCE INFORMATION
CA ENDING BALANCE: $500.00
MERCHANT OR CUSTOMER COPY
Custom header line 1
Custom header line 2
Prints only if terminal was in demo mode
Transaction type (bold and centered)
H1 DBA Name (centered)
H2 DBA Street Address (centered)
H3 DBA City, DBA State, DBA ZIP (centered)
Terminal ID
Prints if receipt was a reprint
Transaction date and time
Merchant number
Card type, last four digits of card number, entry method
Invoice number
Employee ID number
Approval code
Sequence number
Base transaction amount
Cash back transaction amount
Tip transaction amount
Total transaction amount
Cardholder agreement (only prints on merchant copy)
Prints only if terminal was in demo mode
Cash benefit ending balance
Copy distribution
© 2005 LinkPoint International, Inc. 87 Nashville LP AIO/3000 Manual
This information is Proprietary and Confidential to LinkPoint International - Reproduction without the
expressed, written consent of LinkPoint International is prohibited.
Page 96
Cash Benefit Balance Inquiry
Please follow the procedures below so that customers can confirm the available cash
amount on their EBT cards. A balance inquiry will only print a customer copy of the
balance receipt.
Display Message Operator Action and Comments
SWIPE CARD FOR SALE
MM-DD-YY DAY HH:MM
EBT DEBIT
↓ ↓
EBT or EBT/DEBIT
ENTER PASSWORD
EBT or EBT/DEBIT
INVALID PASSWORD
EBT DEBIT
↓ ↓
FOOD CASH VCHR
↓ ↓ ↓
SALE BAL
↓ ↓
Either swipe the EBT card or press the [ATM/DEBIT]
key.
If this prompt appears after the card is swiped, press the
middle [
S] key to continue.
Special note:
EBT prompt only appears if EBT function is activated.
If prompted, key in either the MIN, MED, MAX or
override password and press [ENTER]. This prompt
cannot be bypassed. Password entry will not be
necessary for transactions where card number is
manually entered.
Special note:
The override password depends upon the date
displayed on the terminal because the password is
always the date squared plus the month.
If the wrong password is entered, the terminal displays
this message briefly before displaying the previous
ENTER PASSWORD prompt.
If this prompt appears after the password is entered,
press the left [
S] key.
Press the middle [S] key.
Press the right [S] key.
© 2005 LinkPoint International, Inc. 88 Nashville LP AIO/3000 Manual
This information is Proprietary and Confidential to LinkPoint International - Reproduction without the
expressed, written consent of LinkPoint International is prohibited.
Page 97
Display Message Operator Action and Comments
EB CA INQUIRY
ENTER ACCOUNT #
EB CA INQUIRY
WAITING FOR PIN
XX.XX
PIN=
EB CA INQUIRY
DIALING…
EB CA INQUIRY
PRINTING…
EB CA INQUIRY
TEAR NOW,PRESS ENTER
Either swipe the EBT card or manually key in the
account number and press [ENTER].
Please wait…
Customer keys in their PIN and presses [ENTER] on the
PIN pad.
Please wait, the terminal is dialing the host computer.
The terminal displays several messages.
When the inquiry is complete, this prompt displays and a
receipt will print.
Tear off the customer receipt copy. This inquiry will not
print a merchant receipt copy. Press [ENTER] to exit
function.
EB CA INQUIRY
AP OKXXXX SEQ XXX
Press [CLEAR] to return to the idle prompt.
© 2005 LinkPoint International, Inc. 89 Nashville LP AIO/3000 Manual
This information is Proprietary and Confidential to LinkPoint International - Reproduction without the
expressed, written consent of LinkPoint International is prohibited.
Page 98
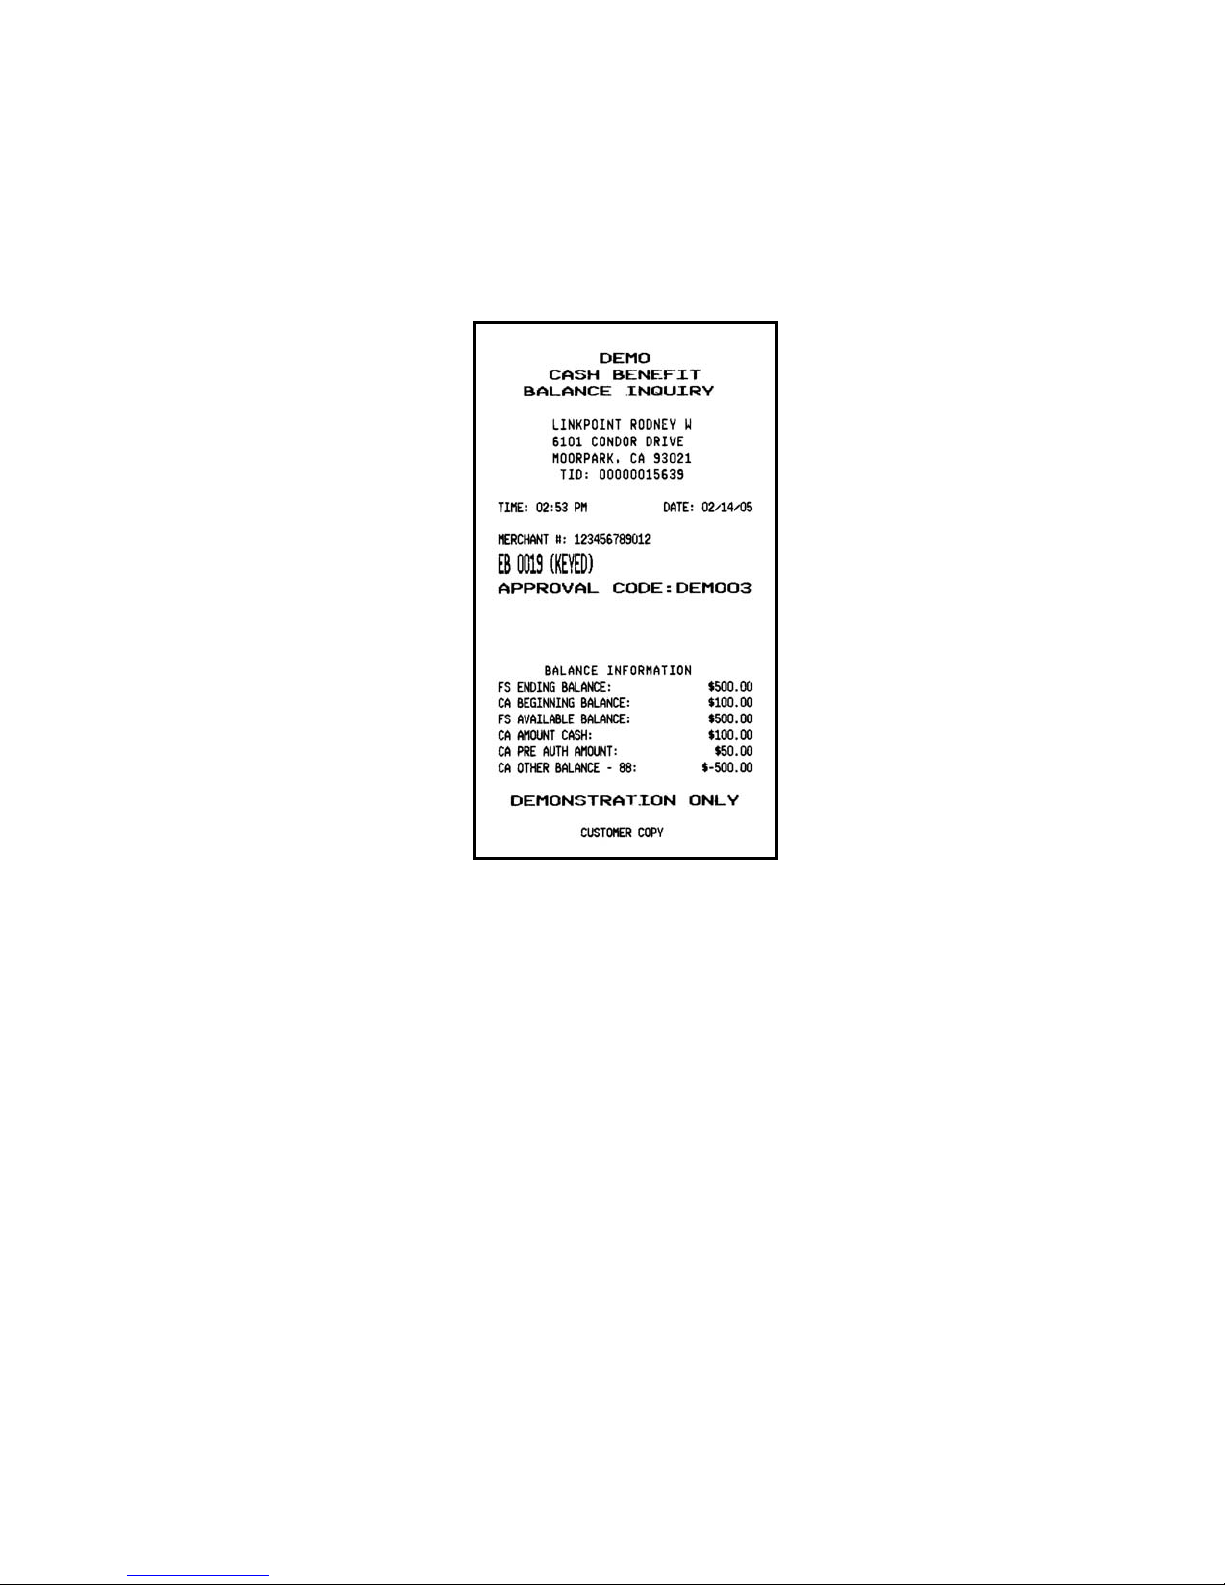
Cash Benefit Balance Inquiry Receipt Sample
AIO SAMPLE RECEIPTS
Customer Copy
© 2005 LinkPoint International, Inc. 90 Nashville LP AIO/3000 Manual
This information is Proprietary and Confidential to LinkPoint International - Reproduction without the
expressed, written consent of LinkPoint International is prohibited.
Page 99

Cash Benefit Balance Inquiry Sample Layout
CUSTOM HEADER 1
CUSTOM HEADER 2
DEMO
CASH BENEFIT
BALANCE INQUIRY
DBA Name
DBA Street Address
DBA City, State, Zip
TID: XXXXXXXXXXX
DUPLICATE
TIME: hh:mm DATE: mm/dd/yy
MERCHANT #: XXXXXXXXXXX
EB 4444 (KEYED)
APPROVAL CODE: XXXXXX
BALANCE INFORMATION
FS ENDING BALANCE: $500.00
CA BEGINNING BALANCE: $100.00
FS AVAILABLE BALANCE: $500.00
CA AMOUNT CASH: $100.00
CA PRE AUTH AMOUNT: $50.00
CA OTHER BALANCE – 88: $-500.00
DEMONSTRATION ONLY
CUSTOMER COPY
Custom header line 1
Custom header line 2
Prints only if terminal was in demo mode
Transaction type (bold and centered)
Transaction type (bold and centered)
H1 DBA Name (centered)
H2 DBA Street Address (centered)
H3 DBA City, DBA State, DBA ZIP (centered)
Terminal ID
Prints if receipt was a reprint
Transaction date and time
Merchant number
Card type, last four digits of card number, entry method
Approval code
Food stamp ending balance
Cash benefit beginning balance
Food stamp balance available after last transaction
Cash benefit balance available after last transaction
Cash benefit pre auth amount
Cash benefit other balance
Prints only if terminal was in demo mode
Copy distribution (Only customer copy prints)
© 2005 LinkPoint International, Inc. 91 Nashville LP AIO/3000 Manual
This information is Proprietary and Confidential to LinkPoint International - Reproduction without the
expressed, written consent of LinkPoint International is prohibited.
Page 100
Cash Benefit Void Last Transaction
Please follow the procedures below to void a cash benefit transaction. Please note that
this procedure will only work on the most recent transaction.
Display Message Operator Action and Comments
SWIPE CARD FOR SALE
MM-DD-YY DAY HH:MM
VOID
ENTER PASSWORD
VOID
INVALID PASSWORD
CARD CHECK
↓ ↓
INV SEQ PAN
↓ ↓ ↓
VOID
ENTER INVOICE #
VOID
ENTER SEQUENCE #
Press the [VOID] key.
If prompted, key in either the MIN, MED, MAX or
override password and press [ENTER]. This prompt
cannot be bypassed. Password entry will not be
necessary for transactions where card number is
manually entered.
Special note:
The override password depends upon the date
displayed on the terminal because the password is
always the date squared plus the month.
If the wrong password is entered, the terminal displays
this message briefly before displaying the previous
ENTER PASSWORD prompt.
Press the left [S] key.
Press the left [S] key to choose a transaction to void by
invoice number, press the middle [
S] key to choose
transaction to void by sequence number or press the
S] key to choose by last five digits or the card
right [
number to void.
If the left [S] key was pressed, key in the invoice
number of the transaction to be voided and press
[ENTER].
If the middle [S] key was pressed, key in the sequence
number of the transaction to be voided and press
[ENTER].
© 2005 LinkPoint International, Inc. 92 Nashville LP AIO/3000 Manual
This information is Proprietary and Confidential to LinkPoint International - Reproduction without the
expressed, written consent of LinkPoint International is prohibited.
 Loading...