

Page 1

- 0 -
HD Splitter with Scaler
LM-SP49
User Manual
For the safety of you and equipment, please read the safety
instructions carefully before using this equipment. If you have any
queries in use, please read the instructions first. A detailed
description of device operation is provided in the main body. If
there i s still d oubt, please cont act us. W e will give yo u a
satisfactory reply as soon as possible.
If there is any change in the instruction manual, without prior
notice, please understand.
Page 2

- 1 -
Catalog
1、Installation instructions ………………………………………… 2
2、Product overview …………………………………………………… 4
3、Panel operation introduction ……………………………………… 6
4、Introduction of remote control operation ………………………… 7
5、Menu introduction ………………………………………………… 8
6、Introduction to USB operation …………………………………… 10
7、control protocol ………………………………………………… 13
Page 3
- 2 -
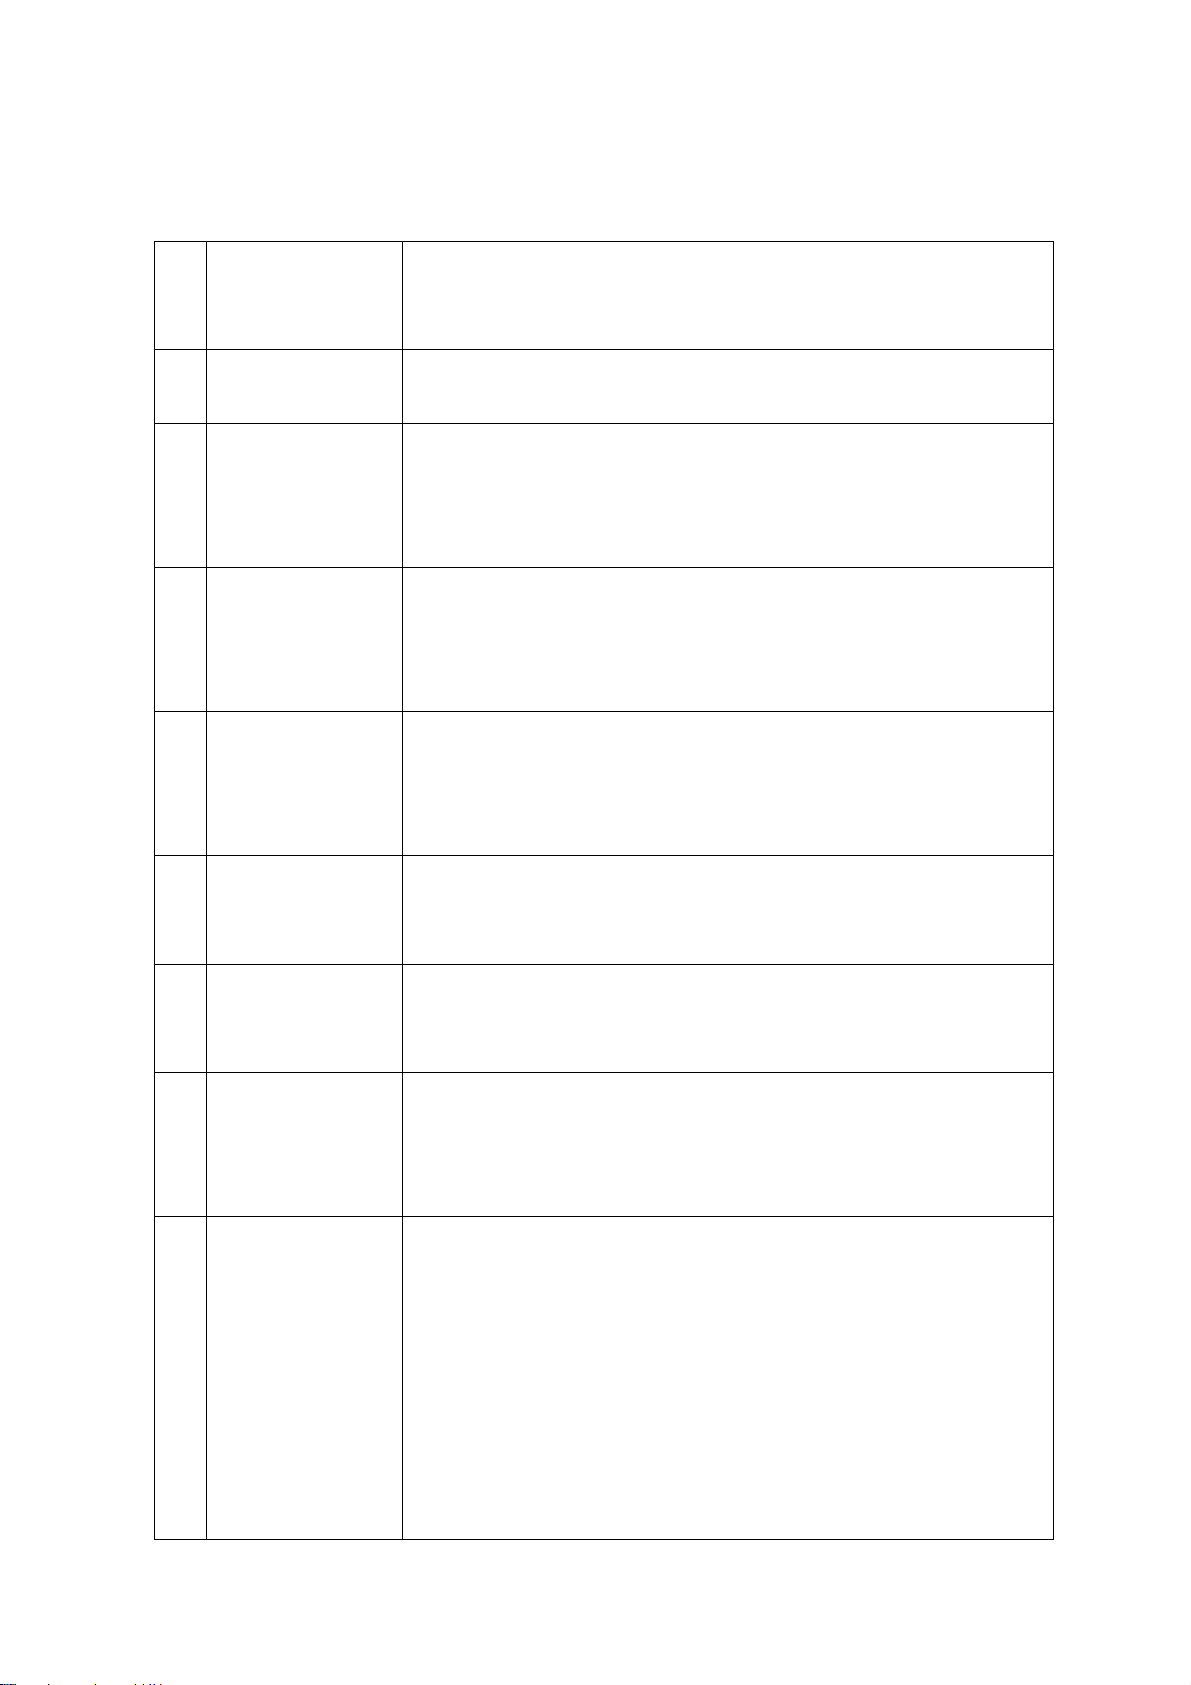
Chapter 1. Installation instructions
1
Power adapter
This equipment supports 100-240V AC input. In order to
make the equipment work properly, please do not replace
our standard power adapter easily.
2
Power
off
Turn off all the power supply, unplug the power plug, etc.
to ensure the safety of you and the equipment.
3
Cables
It is not possible to place objects on power lines,
signal lines, communication lines and other cables.
Cables should be avoided from being trampled or squeezed
to prevent leakage or short circuit.
4
Signal cables
When the signal line is inserted or pulled from the
equipment, the equipment needs to be cut off so as not to
damage the equipment. If not,The damage is not in
warranty
5
Heat
dissipating
hole
There may be openings on the outside surface of the
equipment for heat dissipation. Do not block these
openings to avoid heat accumulation, damage to the
equipment or cause fire hazards.
6
Equipment
placement
Equipment should be reasonably placed, such as standard
rack, chassis, cabinet, or placed on a stable and flat
work table to prevent equipment from falling.
7
Environment
The environment of equipment should pay attention to dust
proof and moisture proof, especially prevent liquid from
soaking and splashing into the equipment.
8
Repair
All maintenance work should be done by professional
maintenance personnel. Do not attempt to repair equipment
without training. To avoid the danger of electric shock,
do not unlock the case.
9
Safety
precautions
1, there is electricity inside the equipment, non
professional maintenance personnel shall not open the
chassis, in order to avoid any danger.
2, strictly prohibit water droplet or water splashing,
strictly prohibit putting any liquid container container
on the equipment.
3, in order to prevent fire, the equipment should not be
near the fire source.
4, in order to fully ventilate, the front and back panels
Page 4

- 3 -
of the equipment should maintain at least 20CM gap.
5, If the equipment makes strange noise, smoke or odor,
the power plug should be unplugged immediately and
handled by professional maintenance personnel.
6, in case of thunder or long absence, please unplug the
power supply.
7, do not plug any object from the ventilation hole of
the equipment, so as to avoid damage to the equipment or
electric shock.
8, it is not suitable to place this equipment in near
water or other damp places.
9, it is not suitable to place this equipment near heat
sink or other high temperature places.
10, please properly arrange the power cord to prevent
breakage.
11, under the following circumstances, the power plug of
this equipment should be removed and handled by
professional maintenance personnel.
1) when the plug power cord is damaged or worn;
2) when liquid splashes into the equipment.
3) when the equipment falls or the chassis is damaged.
4 ) w h e n t h e e qui p m en t h a s o b v i o u s f u n c t i o n a l
abnormalities or performance changes;
5) Regularly check whether the fan is working properly,
if the fan is not working, it should be immediately
unplugged and switched off the power supply of the
equipment, handled by professionals.
This equipment is not suitable for non professionals to operate and debug.
Users must receive professional training and guidance.
Page 5

- 4 -
Chapter 2. Product overview
The device is a multi-functional image processor, a single device can
complete multiple signal switching and format conversion, video 180
degree rotation, USB decode audio and video functions. The product
supports 1 channel AV, 1 channel VGA, 1 channel HDMI, 1 channel USB
input, 1 channel HDMI and 1 channel independent audio output. The
input and output signals can support full HD 1920 * 1080 @60HZ. At
the same time, a l l inpu t s igna ls o f the prod uct c a n supp ort
synchronous switching between images and audio.
Features
1. Built in Scaler inside;
2. With USB interface, most of the 1080P and below video can be
decoded and the video can be played automatically and circularly.
3, support 180 degree flip;
4. Modular design. The output can be customized according to the
actual situation of customers. The single machine supports 4-20
channels of customized output.
5, output resolution supports 1080P@60/720P@60/1024*768@60 optional.
6, the maximum output distance can reach more than 20 meters.
7, the standard 19 inch 1U chassis, 100-240V AC input.
Page 6
- 5 -
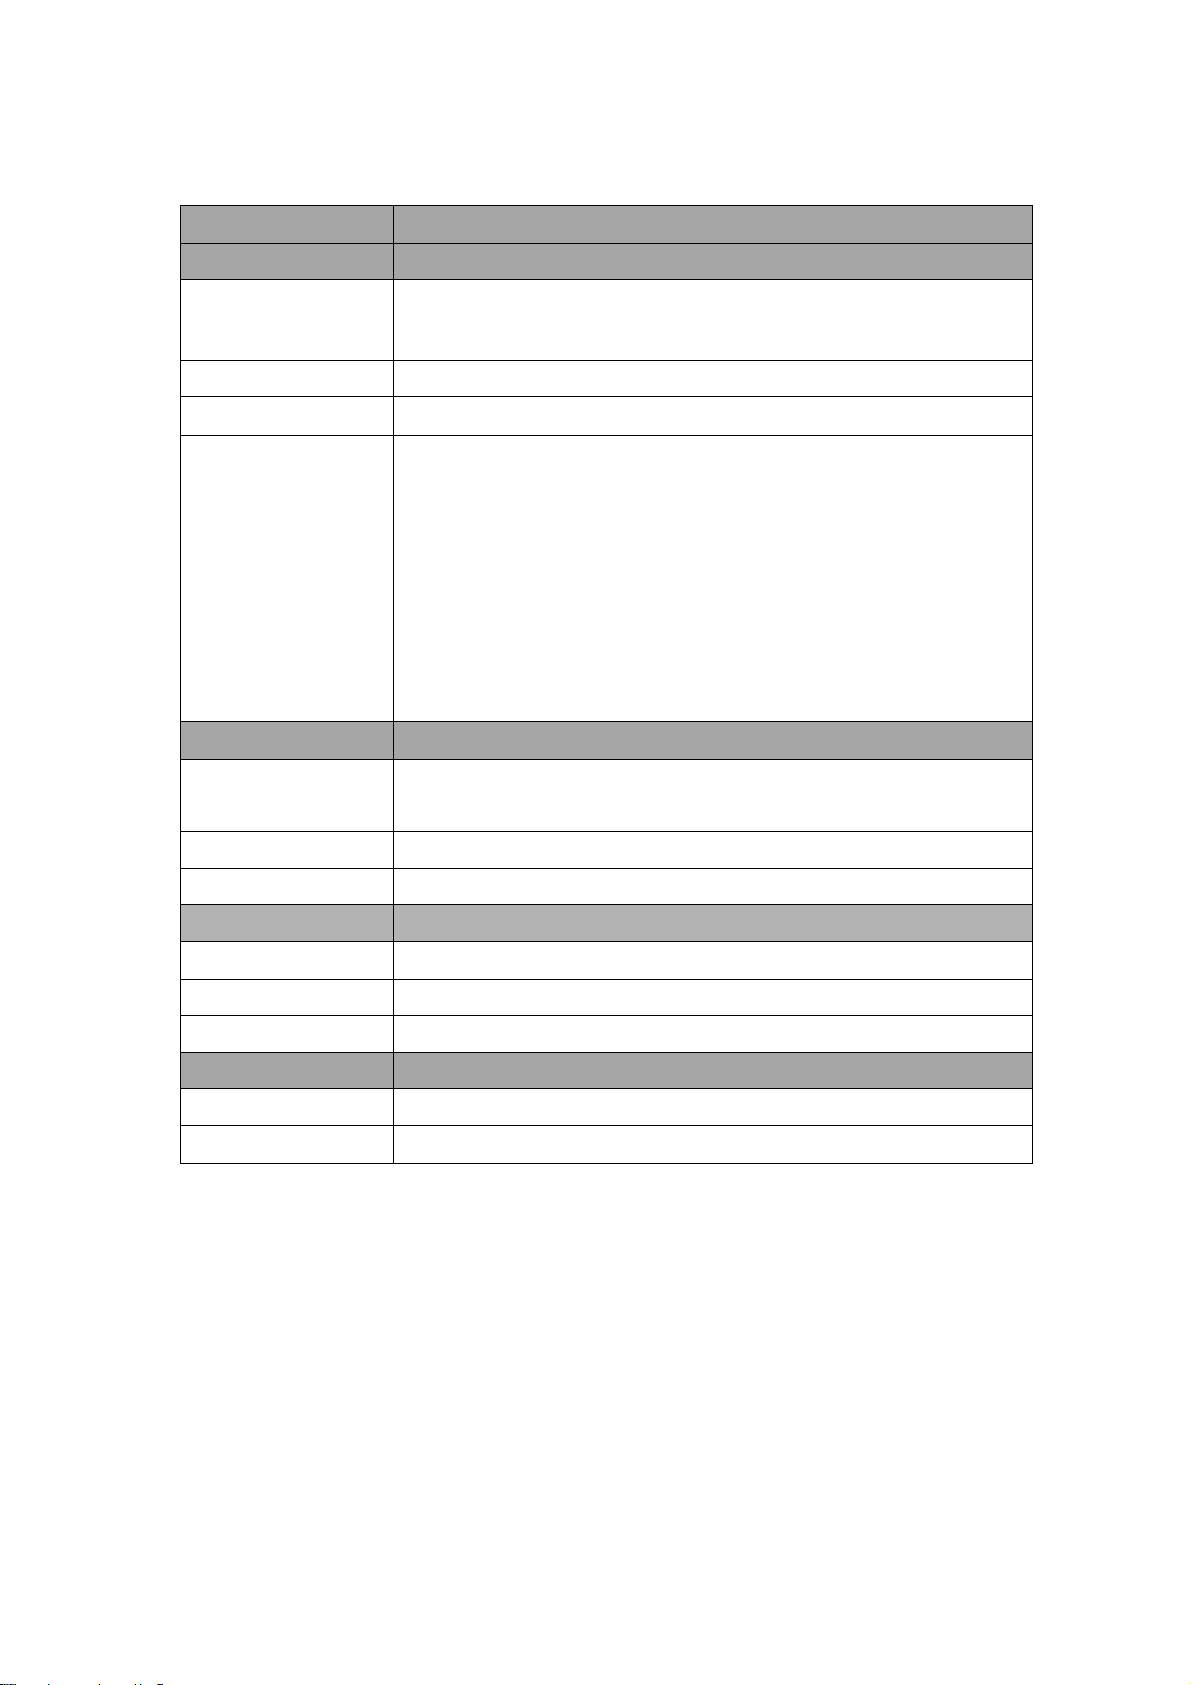
2.1 Technical parameter
Name
Specifications
Input signal
VGA signal
DB15 interface,Binding 1 channel 3.5 audio interface;
Support 640x480@85Hz to 1920x1200@60Hz.
HDMI signal
HDMI1.3(HDCP1.2) compatible DVI1.0
AV signal
Automatic recognition of NTSC, PAL and SECAM systems
USB
Standard USB2.0 interface, which can decode audio and
video.
Support video, picture, MP3, TXT;
Streaming media format support: Mpeg1, 2, 4 (1920 * 1080
@30P and below) / Divx, Xvid (1920 * 1080 @30P and below)
/ RM, RMVB (1920 * 1080 @25P and below) / H.264 (1920 *
1080 @30P and below) / VC-1 (1920 * 1080 @30P and below)
/ MJPEG (640 * 480 @30P).
Output signal
HDMI output
4 -2 0 c hannel H D M I o u tp ut ,suppo rt H D M I 1 . 3 a n d
DVI1.0(option)
HDMI resolution
1920x1080@60Hz、1280x720@60Hz、1024x768@60Hz
Audio output
3.5 audio interface, left and right channel stereo audio
Other
Control
Key panel,Remote control, RS-232 serial port
Power Supply
AC100-240V
Power waste
60W Max.
Size
Dimension
440mm(L)x240mm(D)x44mm(H)
Weight
3.5Kg
Page 7
- 6 -
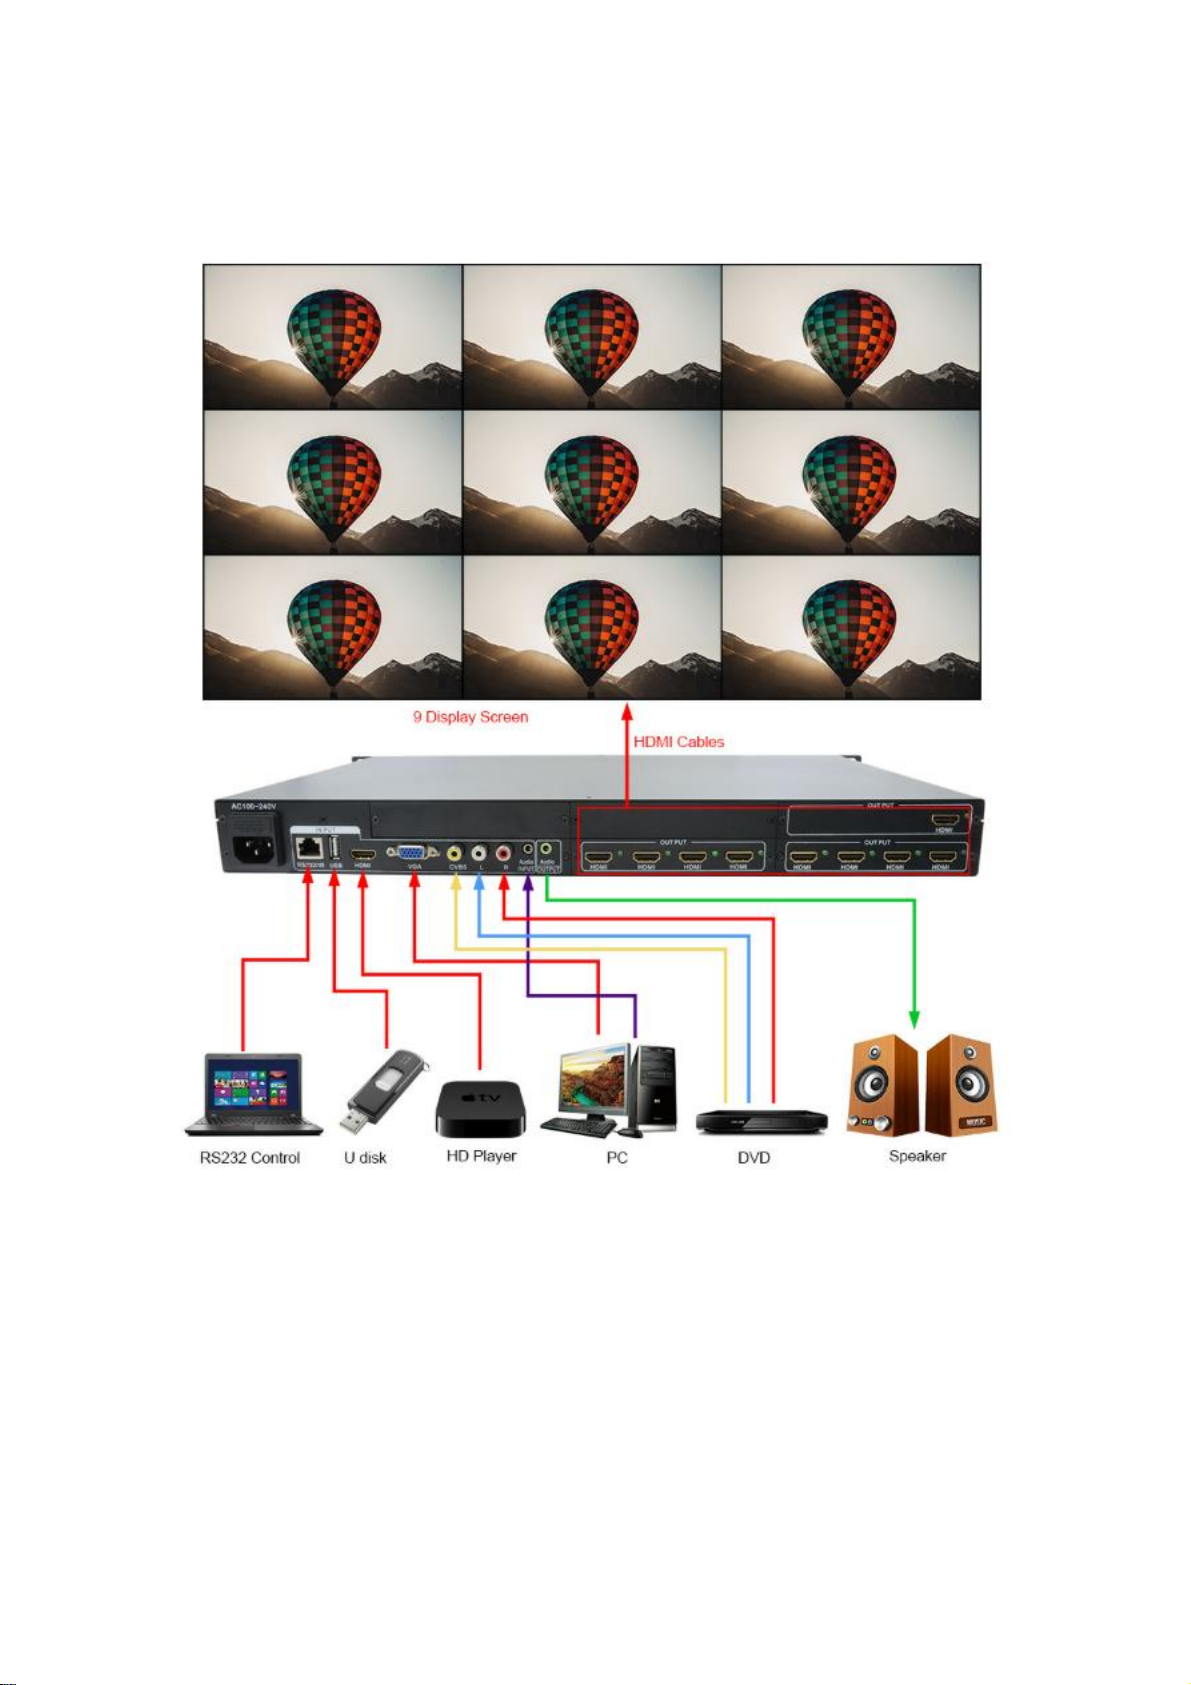
2.2 Product topological graph
Page 8
- 7 -
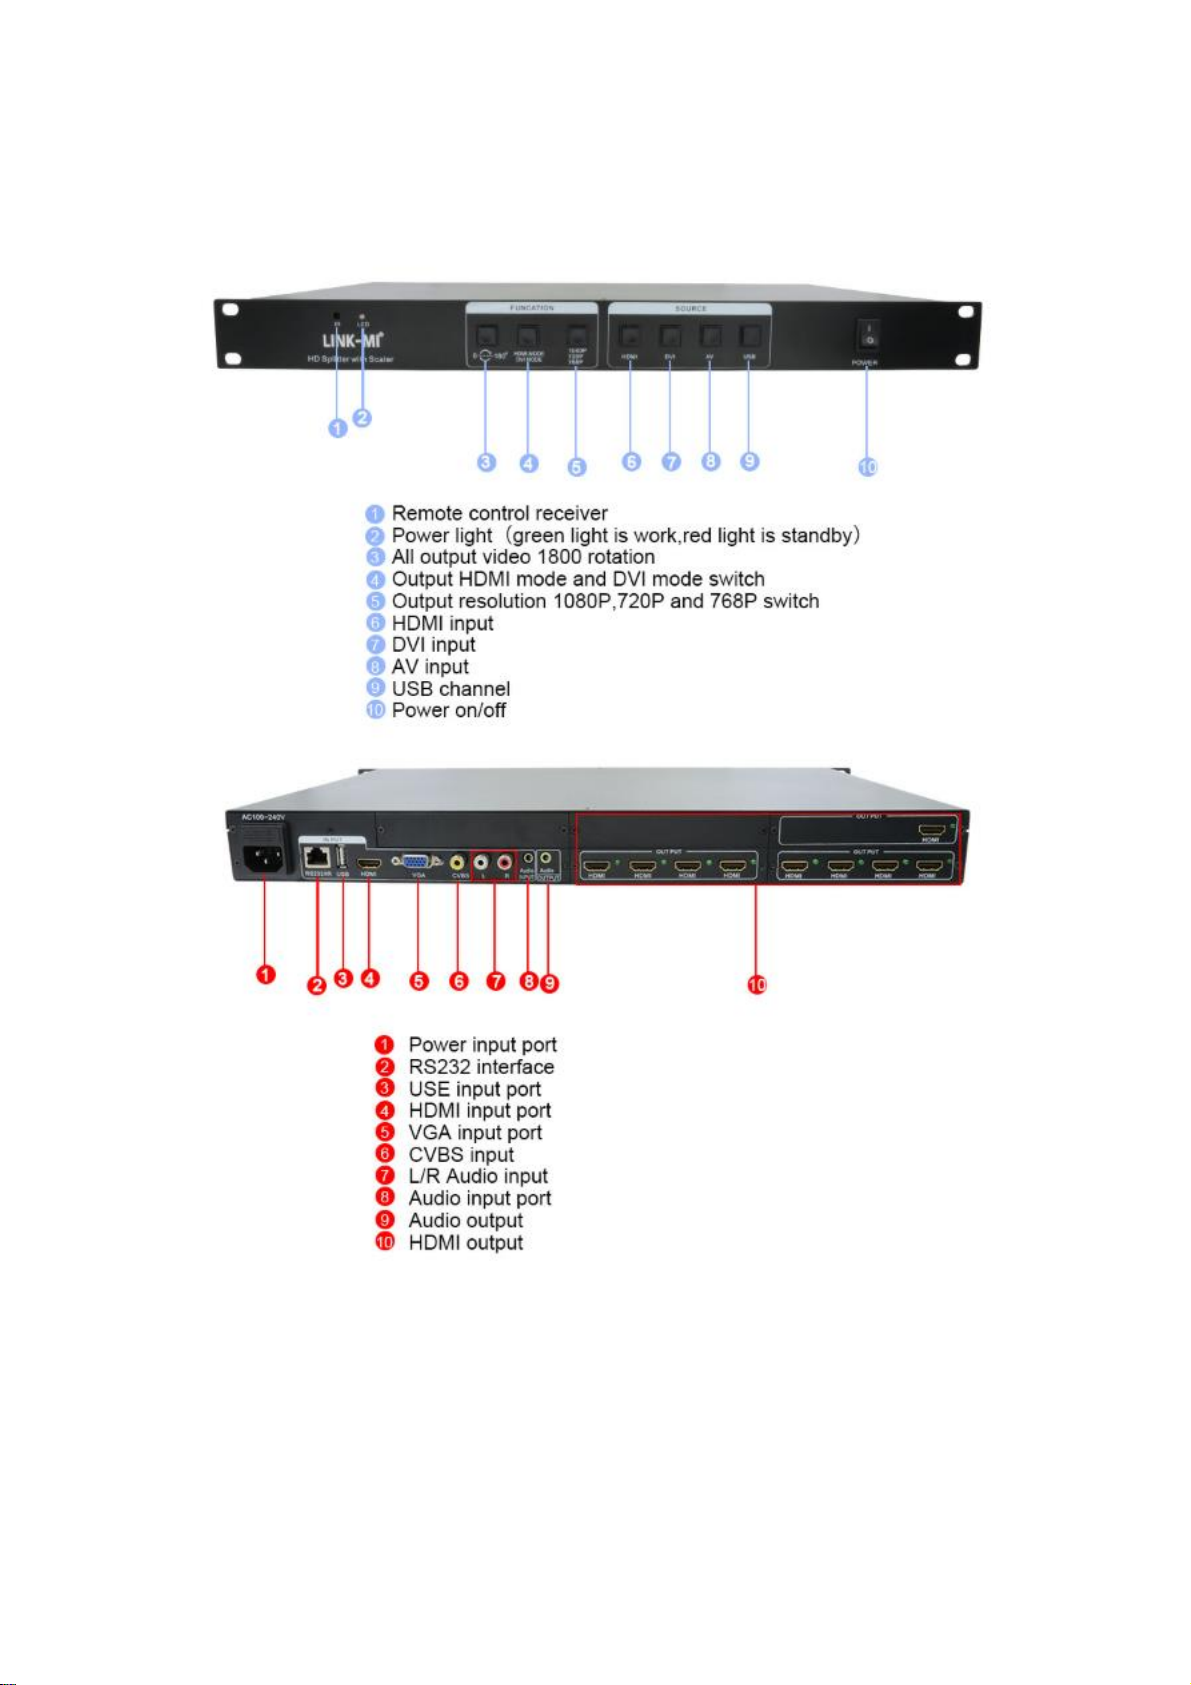
Chapter 3. Panel operation introduction
Page 9
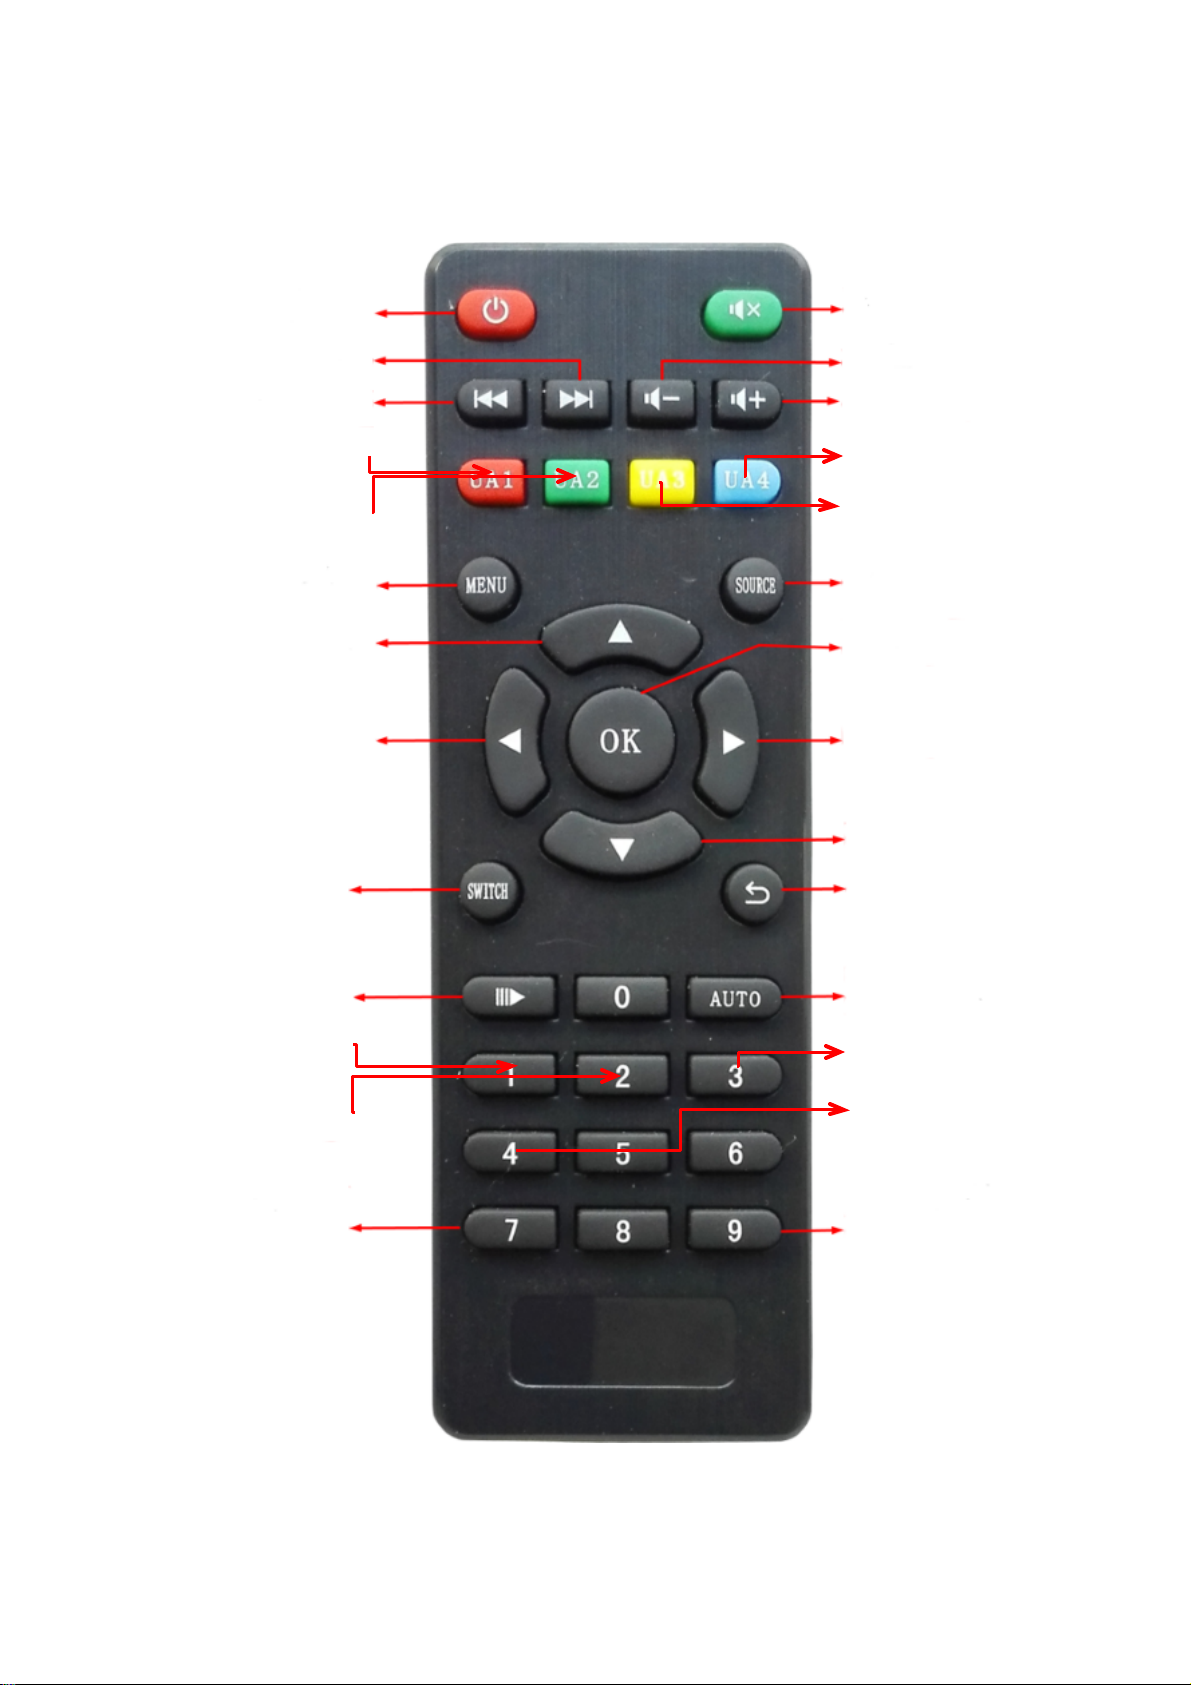
- 8 -
HDMI
VGA
USB
AV
HDMI
VGA
AV
USB
Power on/off
Mute
Next
Previous
Volume down
Volume increase
Signal source
Menu
Up
Left
Enter/ok
Right
Down
Resolution
back
VGA auto
Play/pause
Resolution
Output HDMI/DVI
mode switch
Chapter 4. Introduction of remote control operation
Page 10

- 9 -
Picture Mode
Color Temperature
Aspect Ratio
Noise Reduction
Screen
Clock
Off Time
On Time
Sleep Timer
Auto Sleep
PICTURE OPTION TIME SOUND
OSD Language English
Restore Factory Default
MIRROR
Out Mode 1080P60
Out Type HDMI
Sound Mode
Balance
Auto Volume
Surround Sound
SPDIF MODE PCM
1. Picture mode
Chapter 5. Menu introduction
1.1 picture mode :standard,mild,user,dynamic.Users can set their
favorite mode according to their own preferences. The factory is set
as a standard, and User changes are not recommended;
1.2 color temperature :medium,warm,user,cool.The factory is set as a
medium, and User changes are not recommended;
1.3 aspect ratio: 0-20 optional.Users can zoom in the size of the
video screen.
1.4 noise reduction middle: off,low,middle,high,default optional,The
factory is set as a middle, and User changes are not recommended;
1.5 Screen: no use;
1.6 Color Range: 0~255 and 16~235 optional,Professional users can
choose settings.
Option mode
2.1 OSD language: It includes 18 different languages, like Chinese
and English;
2.2 restore factory default: yes/no;
Page 11

- 10 -
2.3 mirror: output video 180 degree rotation;
2.4 out mode: support 1080P、720P、768P optional;
3.5 out type: HDMI and DVI optional,some DVI monitor must choose DVI
mode should be display video
3.6 OSD Duration:off、5sec、10sec、15sec optional;
Time mode
3.1 clock: Manually set date time;
3.2 off time: Set shutdown time;
3.3 on time: Set the boot time;
3.4 sleep timer: Set the sleep time;
3.5 auto sleep :off/on,The factory default settings is off, and
customers are not advised to open it.
Note: To turn on the function of the timing on and off function, it
is n ecessary to ensure that the power supply of the machine is
uninterrupted. Once the power supply is interrupted, all the settings
will disappear.。
Sound mode
sound mode: standard,music,movie,sports,user optional,Users can set
their favorite mode according to their own preferences. The factory
is set as a standard;
balance:-50~+50 optional,The factory is set as a 0
auto volume: off/on,The factory is set as off;
surround sound: off, surround,SRS Tru Surround XT,Users can set their
favorite mode according to their own preferences. The factory is set
as off
SPDIF mode PCM:no use;
EQ:Users c a n s e t thei r f avor i te m o d e a ccor ding to thei r o w n
preferences.
Page 12
- 11 -
Chapter 6. Introduction to USB operation
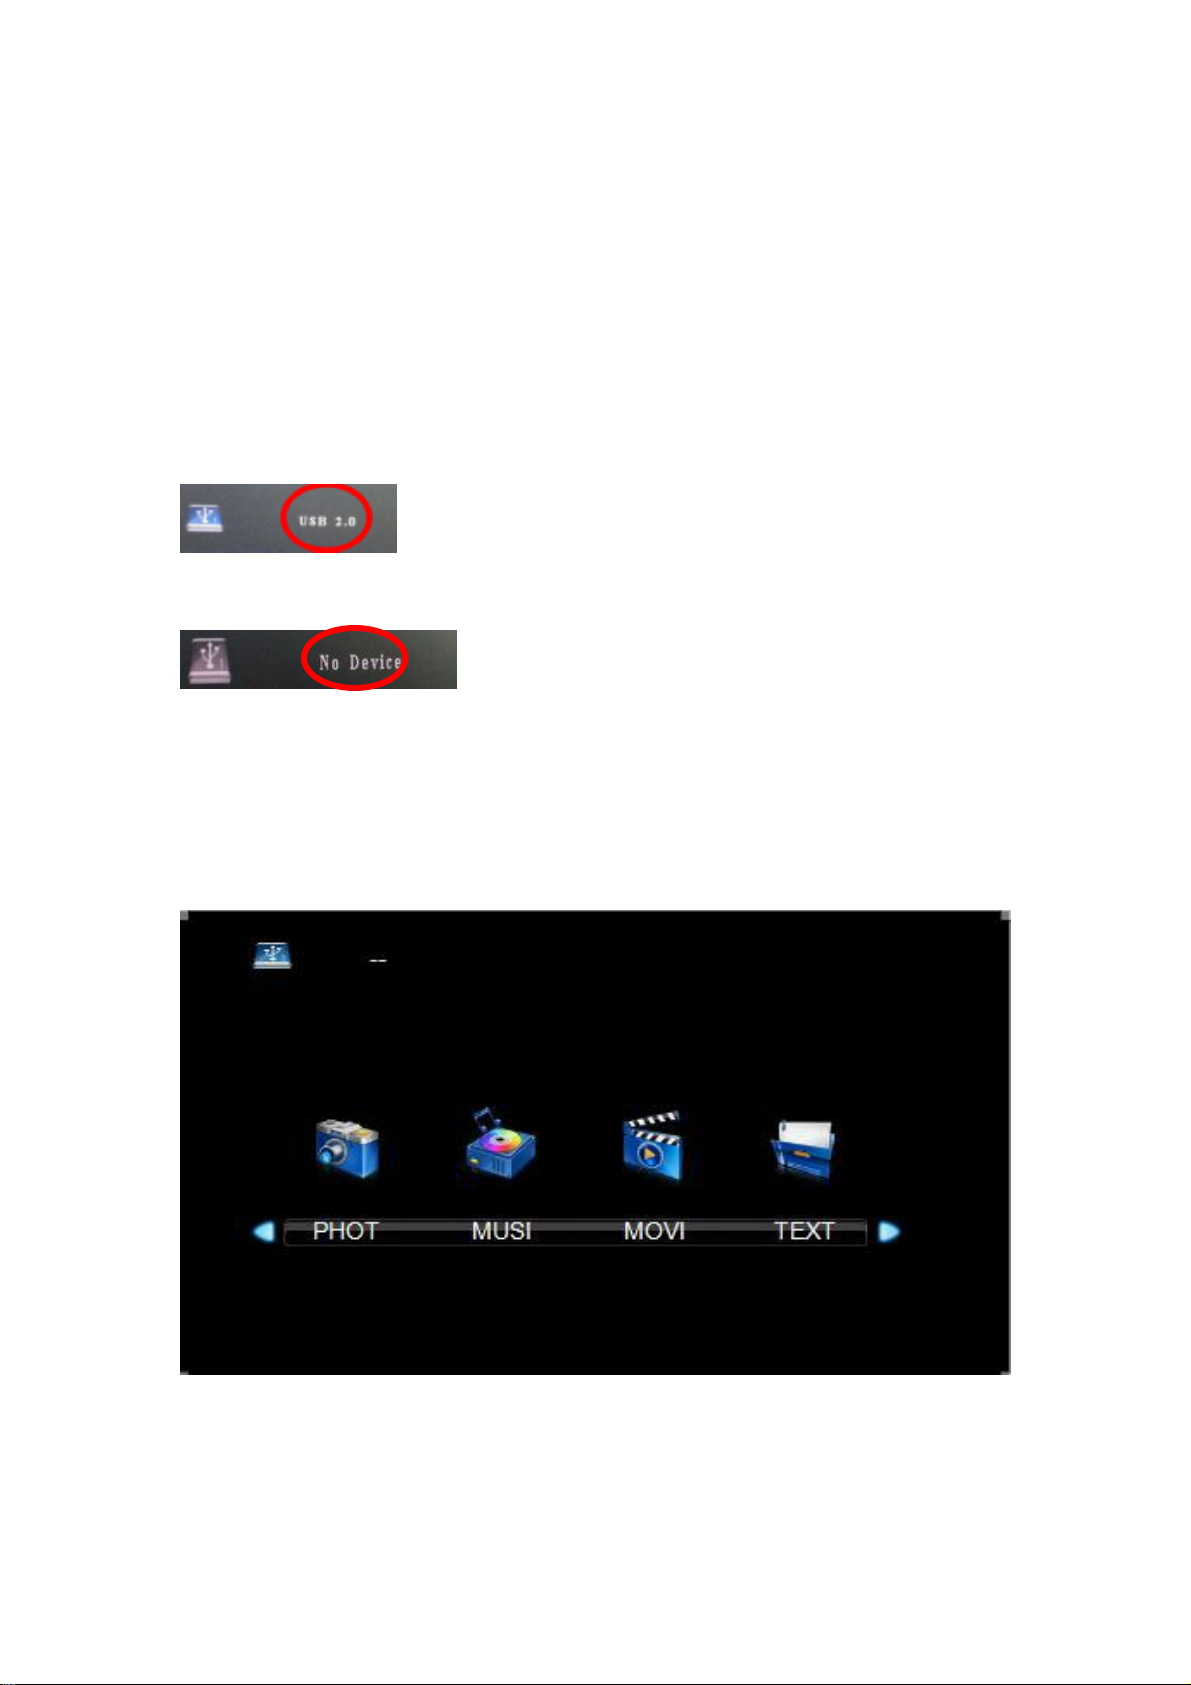
In the USB channel, the equipment has the default function of playing
the video in the U disk automatically.
1. Enter the menu of USB, pay attention to the upper left corner
information:
This representative has access to the U disk, and
the machine can recognize the U disk correctly.
This machine does not have access to the U
disk, or the machine can not recognize the U disk.
2. Choose pictures, music, video, text in the menu, press OK to enter
the next level menu, this manual as video as an example:
Page 13
- 12 -
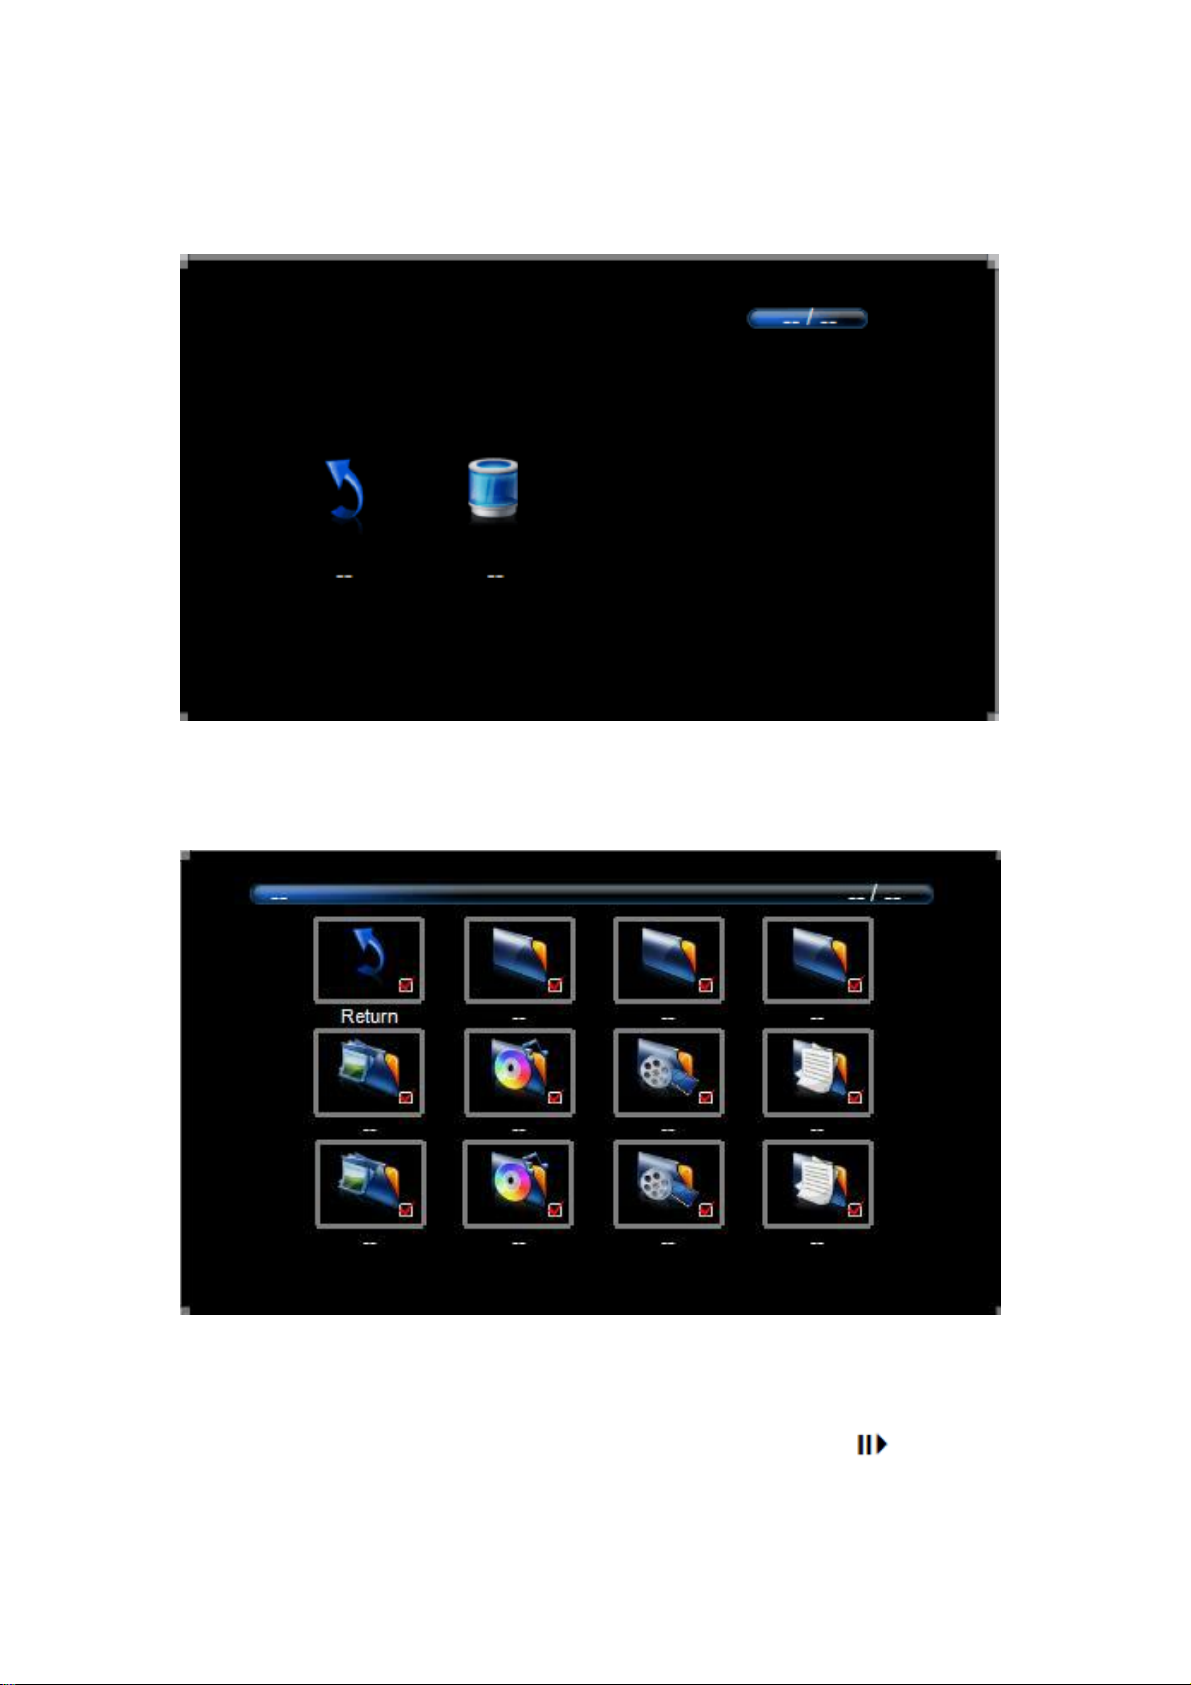
3. Select the name of your U disk and press the OK key to enter the
next menu.
4. Select the video and play
Operation: Move the cursor to the current document to
preview the current video file, press OK key to tick
the selection, if tick, then press the play key ,
Page 14
- 13 -
then only play tick video files; if no tick, directly
press the play key, then play all the video files.
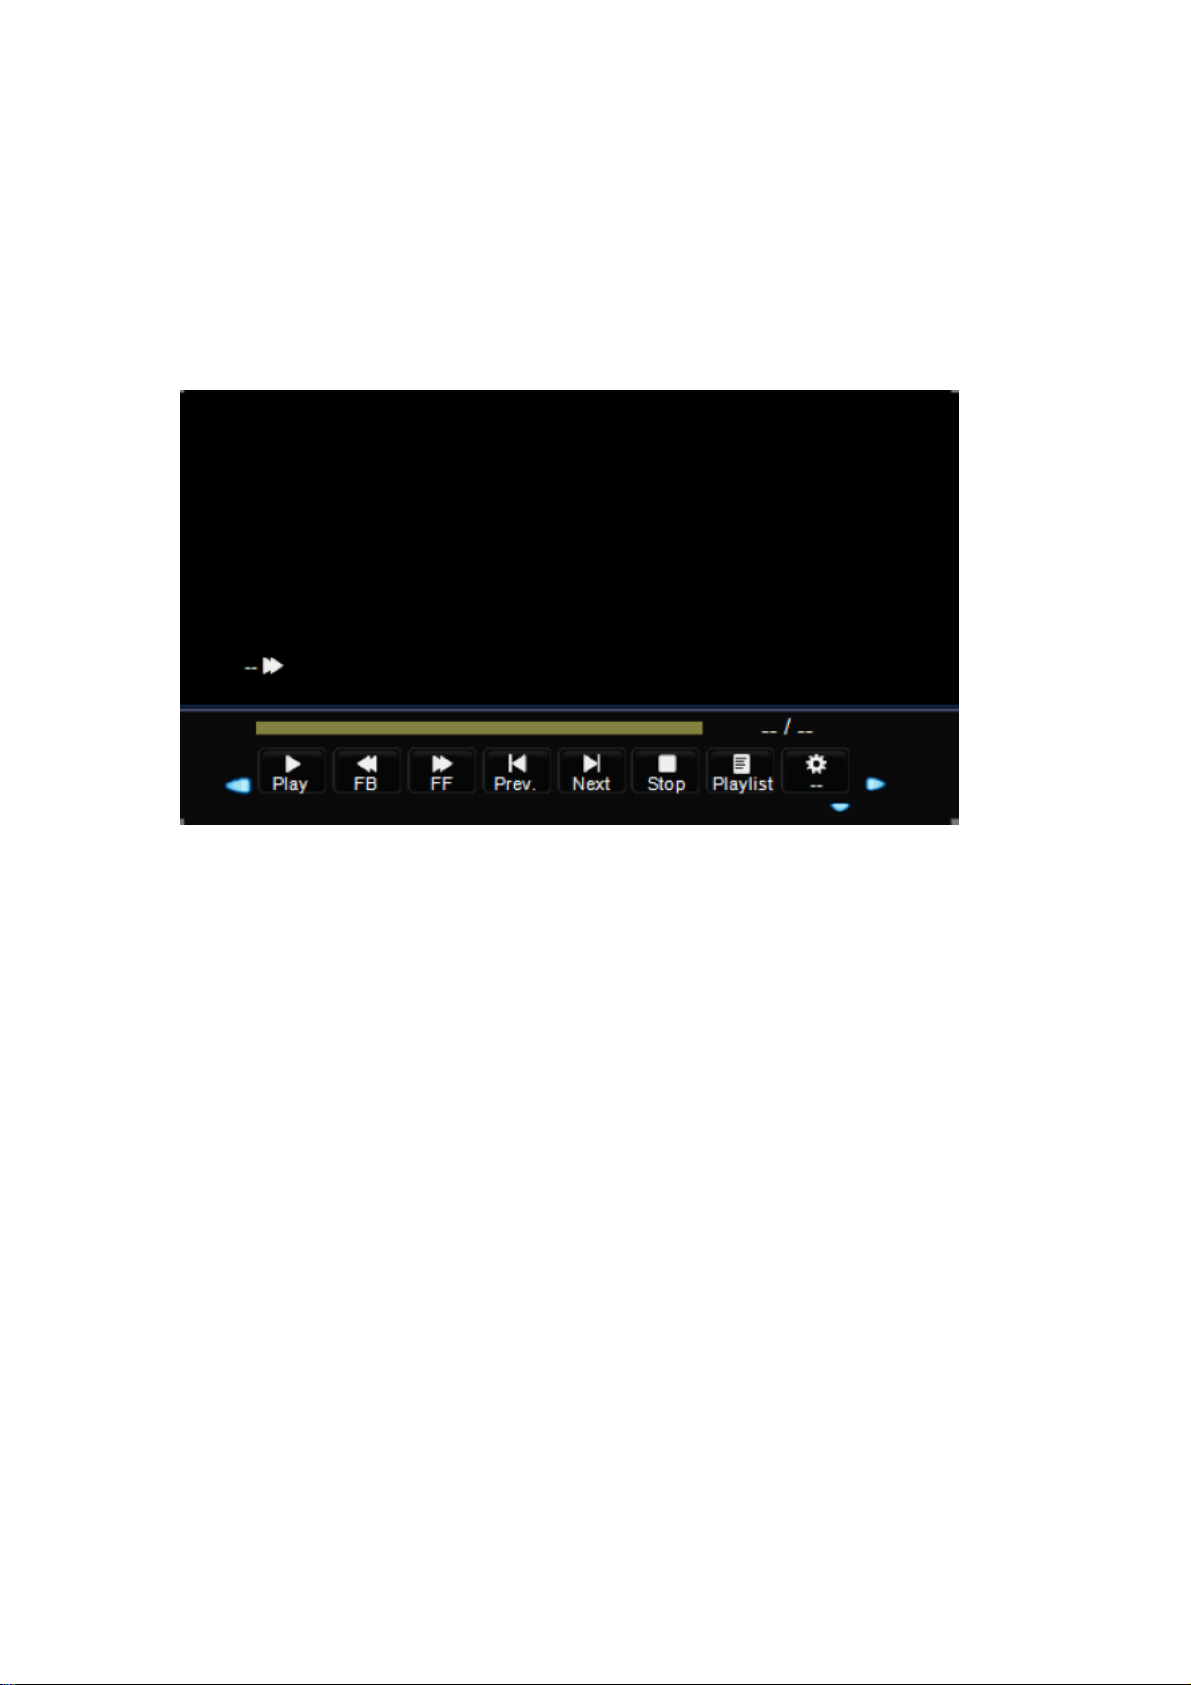
5. Play the video file, press the OK key to pop up the sub menu:
1、Pause/play:play or pause
2、FB:Fast back
3、FF:Fast forward
4、Prev.: Previous
5、Next:next
6、Stop:stop
7、R_All:All video playback
Random:Random loop play
R_None: Single video loop broadcast
8、Set A:Set the starting point of the current video cycle.
Set B:Set the end of the current video loop.
None:No circular play is set.
9、Playlist:play list
10、Info.:Current video information
11、Slow F..:slow play
Page 15

- 14 -
12、Step F..:step play
13、Zoom In:video zoom in
14、Zoom .. : video zoom out
15、Zoom mode: automatic, 16:9, 4:3 optional
Chapter 7. Control Protocol
Baud rate:9600 Data bit:8
Check bit:None Stop bit:1
AV channel: 0Xff,0Xf7,0x5a,0x00,0x30,0x00,0x80
VGA channel: 0Xff,0Xf7,0x5a,0x00,0x31,0x00,0x81
HDMI channel: 0Xff,0Xf7,0x5a,0x00,0x32,0x00,0x82
USB channel: 0Xff,0Xf7,0x5a,0x00,0x33,0x00,0x83
Output 1080P: 0Xff,0Xf7,0x5a,0x00,0x34,0x00,0x84
Output 720P: 0Xff,0Xf7,0x5a,0x00,0x35,0x00,0x85
Output 1024*768: 0Xff,0Xf7,0x5a,0x00,0x3b,0x00,0x8b
Output HDMI mode:0Xff,0Xf7,0x5a,0x00, 0x3D,0x00,0x8d
Output DVI mode: 0Xff,0Xf7,0x5a,0x00, 0x3E,0x00, 0x8e
1800Rotation:0Xff, 0Xf7, 0x5a, 0x00, 0x01, 0x00, 0x51
 Loading...