

Page 1
© Copyright 2012, LinkTV Media
User’s Guide
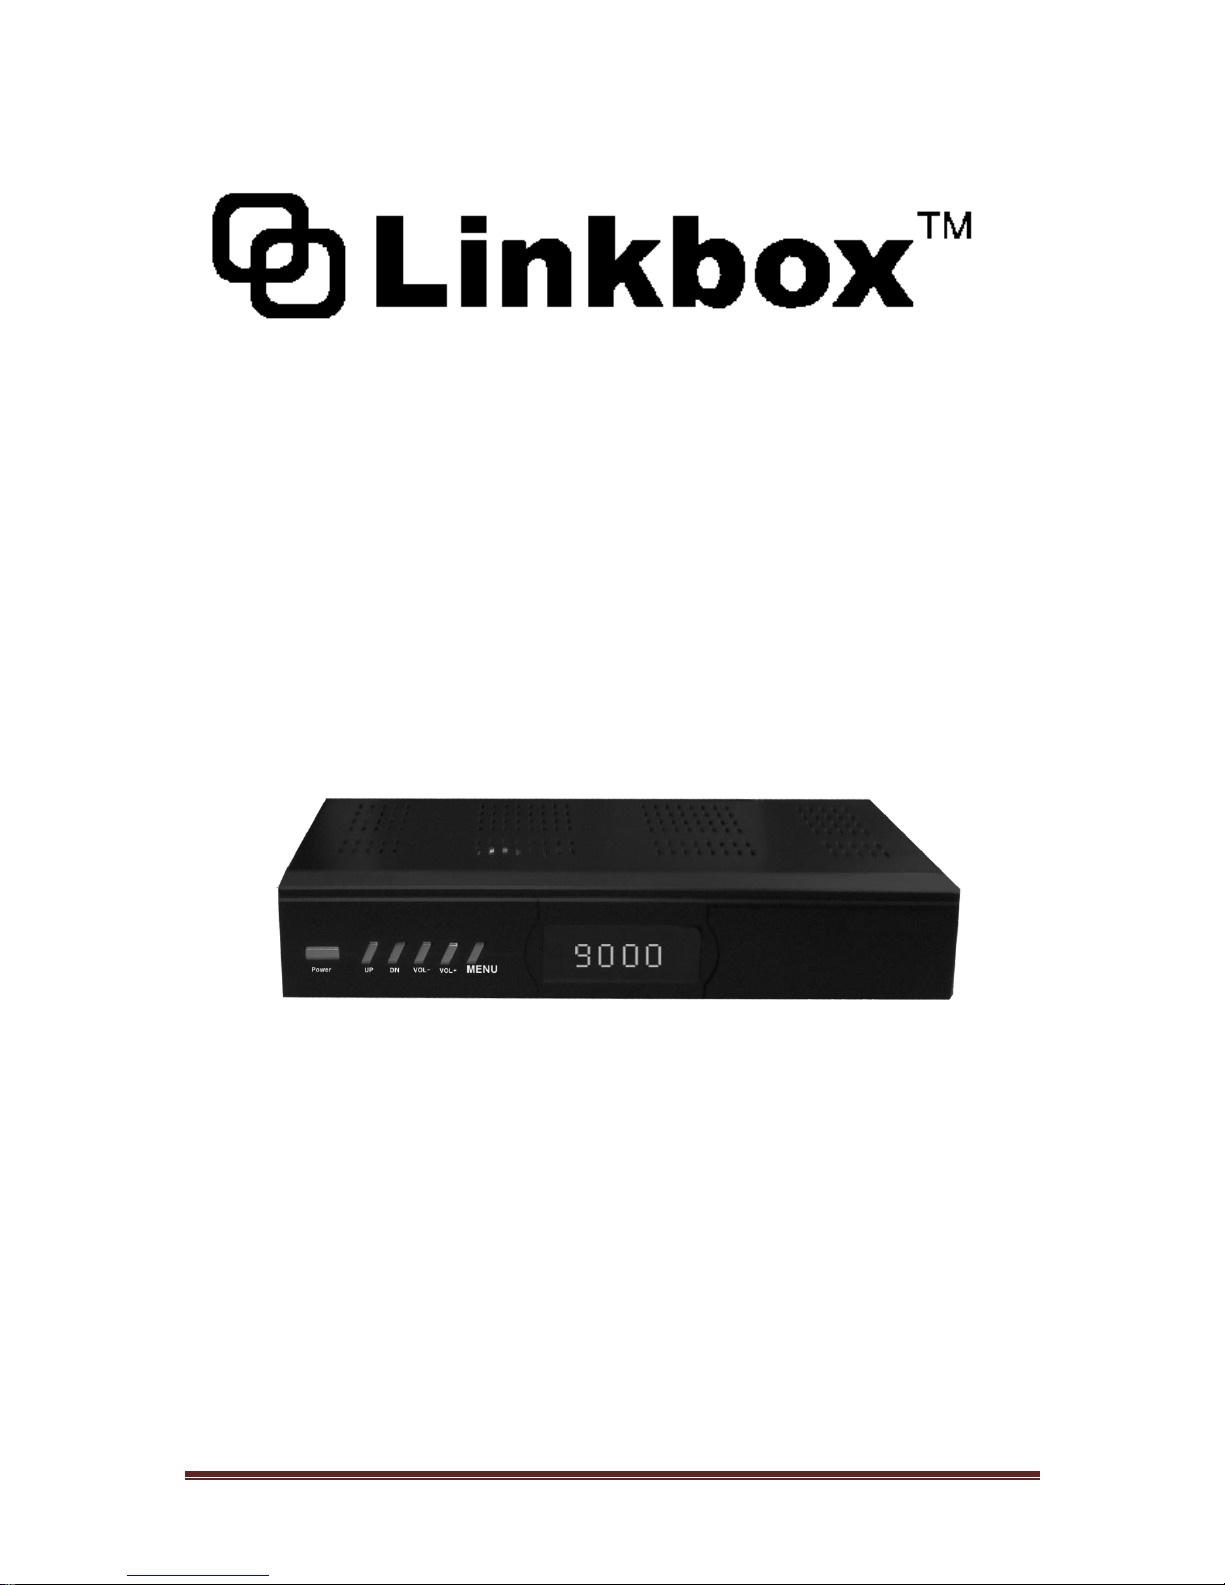
Linkbox 8000HD
HD Satellite Receiver
LinkTV Media
Sun Valley, California, U.S.A.
Page 2

© Copyright 2012, LinkTV Media Page 1
Page 3

© Copyright 2012, LinkTV Media Page 2
CONTENTS
1. GETTING STARTED ............................................................................................. 4
1.1 Introduction ........................................................................................................ 4
1.2 Caution ............................................................................................................... 4
1.3 What’s inside the box ......................................................................................... 5
2. Control and Displays ............................................................................................. 6
3. Operation ............................................................................................................... 8
3.1 Initial Setup ........................................................................................................ 8
3.2 Installation .......................................................................................................... 8
3.2.1 Antenna Connection ....................................................................................... 8
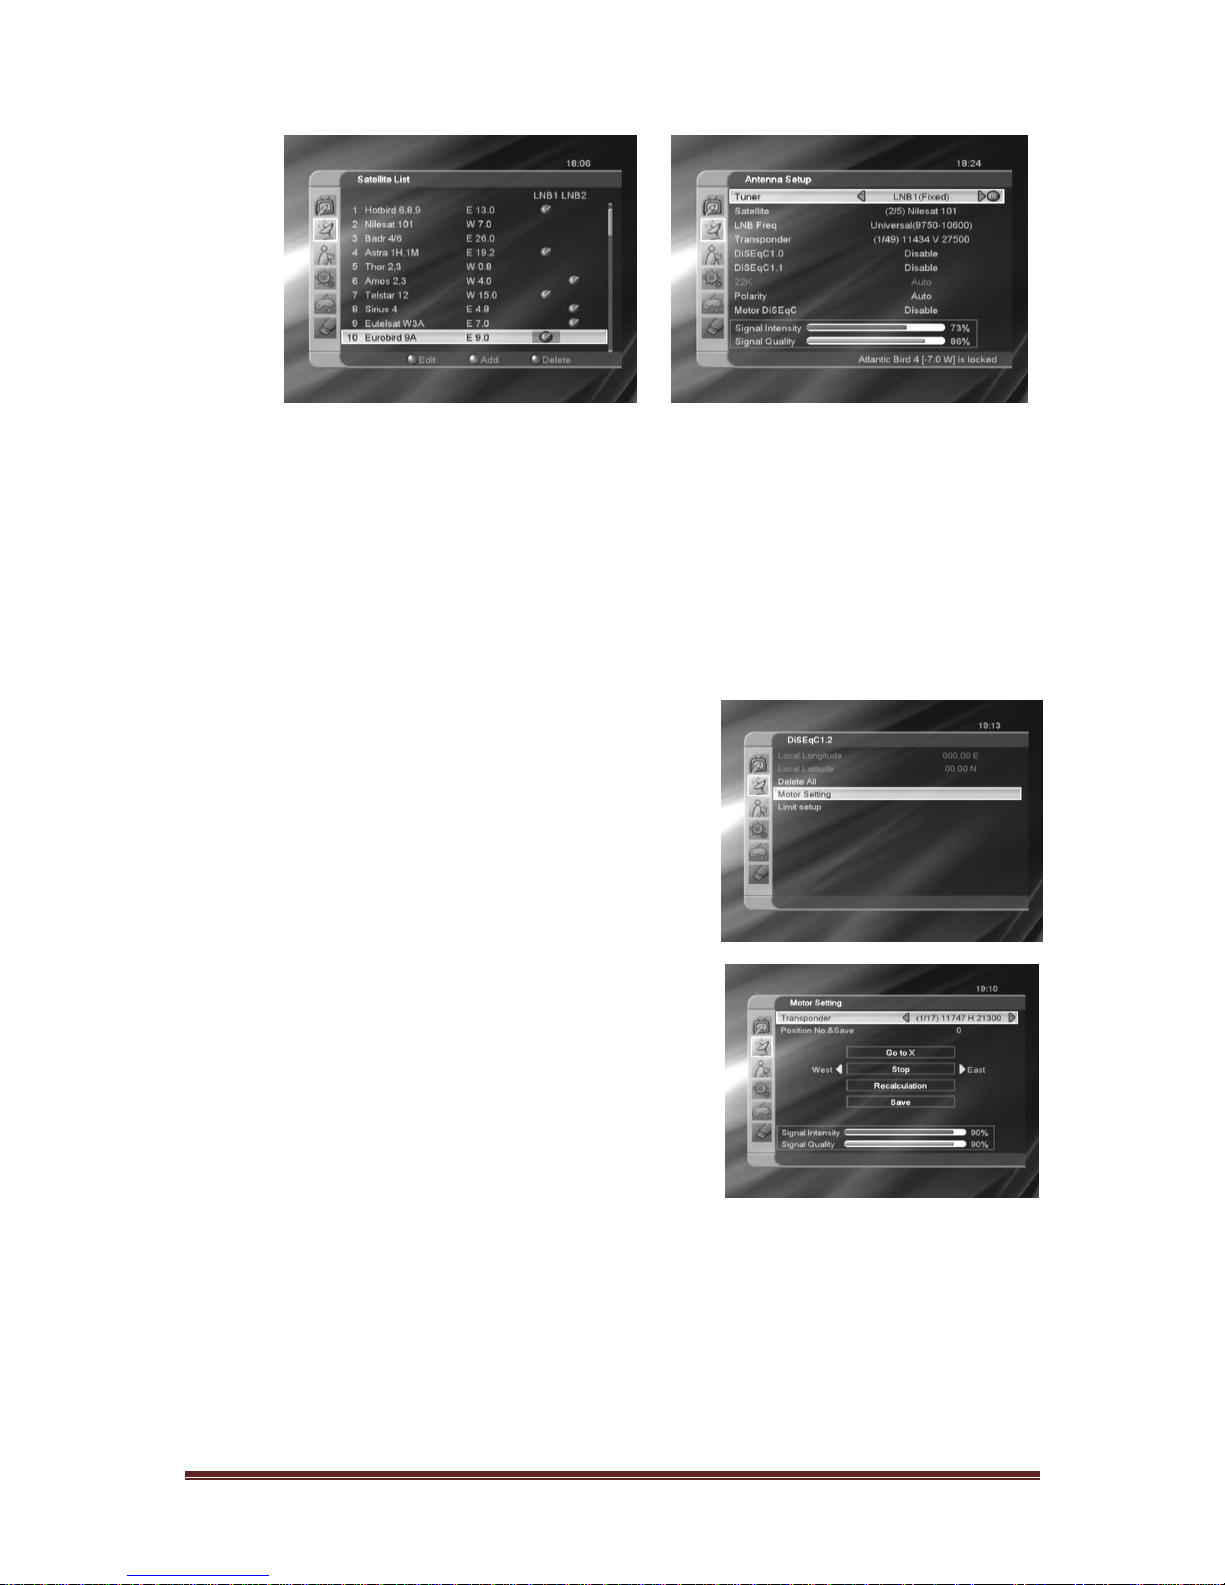
3.2.2 Satellite List and Antenna Setup ..................................................................... 8
3.2.3 Single Satellite Search .................................................................................. 10
3.2.4 Multi Satellite Search .................................................................................... 10
3.2.5 TP List and Search ....................................................................................... 10
3.3 Edit Channel..................................................................................................... 11
3.3.1 TV Channel List ............................................................................................ 11
3.3.2 Radio Channel List ........................................................................................ 13
3.3.3 Delete Channel ............................................................................................. 13
3.4 System Setup ................................................................................................... 13
3.4.1 Language ...................................................................................................... 13
3.4.2 TV System .................................................................................................... 13
3.4.3 Display Settings ............................................................................................ 14
3.4.4 Local Time Setting ........................................................................................ 14
3.4.5 Timer Setting ................................................................................................. 14
3.4.6 Parental Lock ................................................................................................ 15
3.4.7 OSD Setting .................................................................................................. 16
3.4.8 Favorite ......................................................................................................... 16
3.4.9 Others ........................................................................................................... 16
3.5 Tools ................................................................................................................. 16
3.5.1 Information ................................................................ ................................ .... 16
3.5.2 Factory Setting .............................................................................................. 16
3.5.3 Upgrade via RS232 (Receiver to Receiver) .................................................. 16
3.5.4 Upgrade via USB .......................................................................................... 17
3.6 Game ............................................................................................................... 17
3.7 HDD(PVR)........................................................................................................ 17
3.7.1 Record Manager ........................................................................................... 18
3.7.2 Storage Information....................................................................................... 18
Page 4

© Copyright 2012, LinkTV Media Page 3
3.7.3 PVR Setting .................................................................................................. 18
3.7.4 Media Player ................................................................................................. 18
3.8 PVR .................................................................................................................. 20
3.8.1 Recording ..................................................................................................... 20
3.8.3 Timeshift ....................................................................................................... 20
3.8.4 Jump ............................................................................................................. 21
3.9 Channel List ..................................................................................................... 21
3.10 Program Guide (EPG) ...................................................................................... 21
3.11 Audio Change .................................................................................................. 21
3.12 Favorite Channels ................................ ................................ ............................ 22
3.13 Video Mode ...................................................................................................... 22
4. SPECIFICATIONS ............................................................................................... 23
5. TROUBLESHOOTING ........................................................................................ 25
Page 5

© Copyright 2012, LinkTV Media Page 4
1. GETTING STARTED
1.1 Introduction
The Linkbox 8000HD allows you to record HD digital satellite programming
and enjoy it whenever you choose. You can enjoy the vivid picture and lifelike
sound of any of the digital broadcasting channels.
This manual will show you how to setup and operate the Linkbox 8000HD.
You will find the operation of the Linkbox 8000HD to be simple and easy to
handle. Any problems not addressed in this manual should be handles by
qualified personnel.
1.2 Caution
Do not attempt to open the cover. There is risk of malfunction or electric
shock.
When you are not using the product for extended periods of time, please
unplug the unit from the outlet.
Do not use damaged power cords. There is danger of fire or electric shock
if damaged power cords are used.
Do not install the unit on the following places:
o in direct sunlight
o in damp or wet areas
o in extremely cold or hot areas
o in very dusty areas
o in places that have hot fumes or oils
o in areas of high vibration or movement
o near open liquids
Do not cover the product or place heavy items on top of the product
Keep area around the unit clear for proper ventilation
Do not connect/disconnect any cables while the power cable is plugged in
Avoid using sprays or liquid materials around the unit. Caution should be
used to ensure foreign objects/materials do not enter the unit.
A means to disconnect the power cable should be easily accessible.
Page 6

© Copyright 2012, LinkTV Media Page 5
1.3 What’s inside the box
Please confirm that the following items are enclosed in the box when you
open it:
1- Remote Control
2- AAA Batteries
HDMI Cable
NOTE: If any of the items are missing, please contact the vendor where this
product was purchased.
Page 7
© Copyright 2012, LinkTV Media Page 6
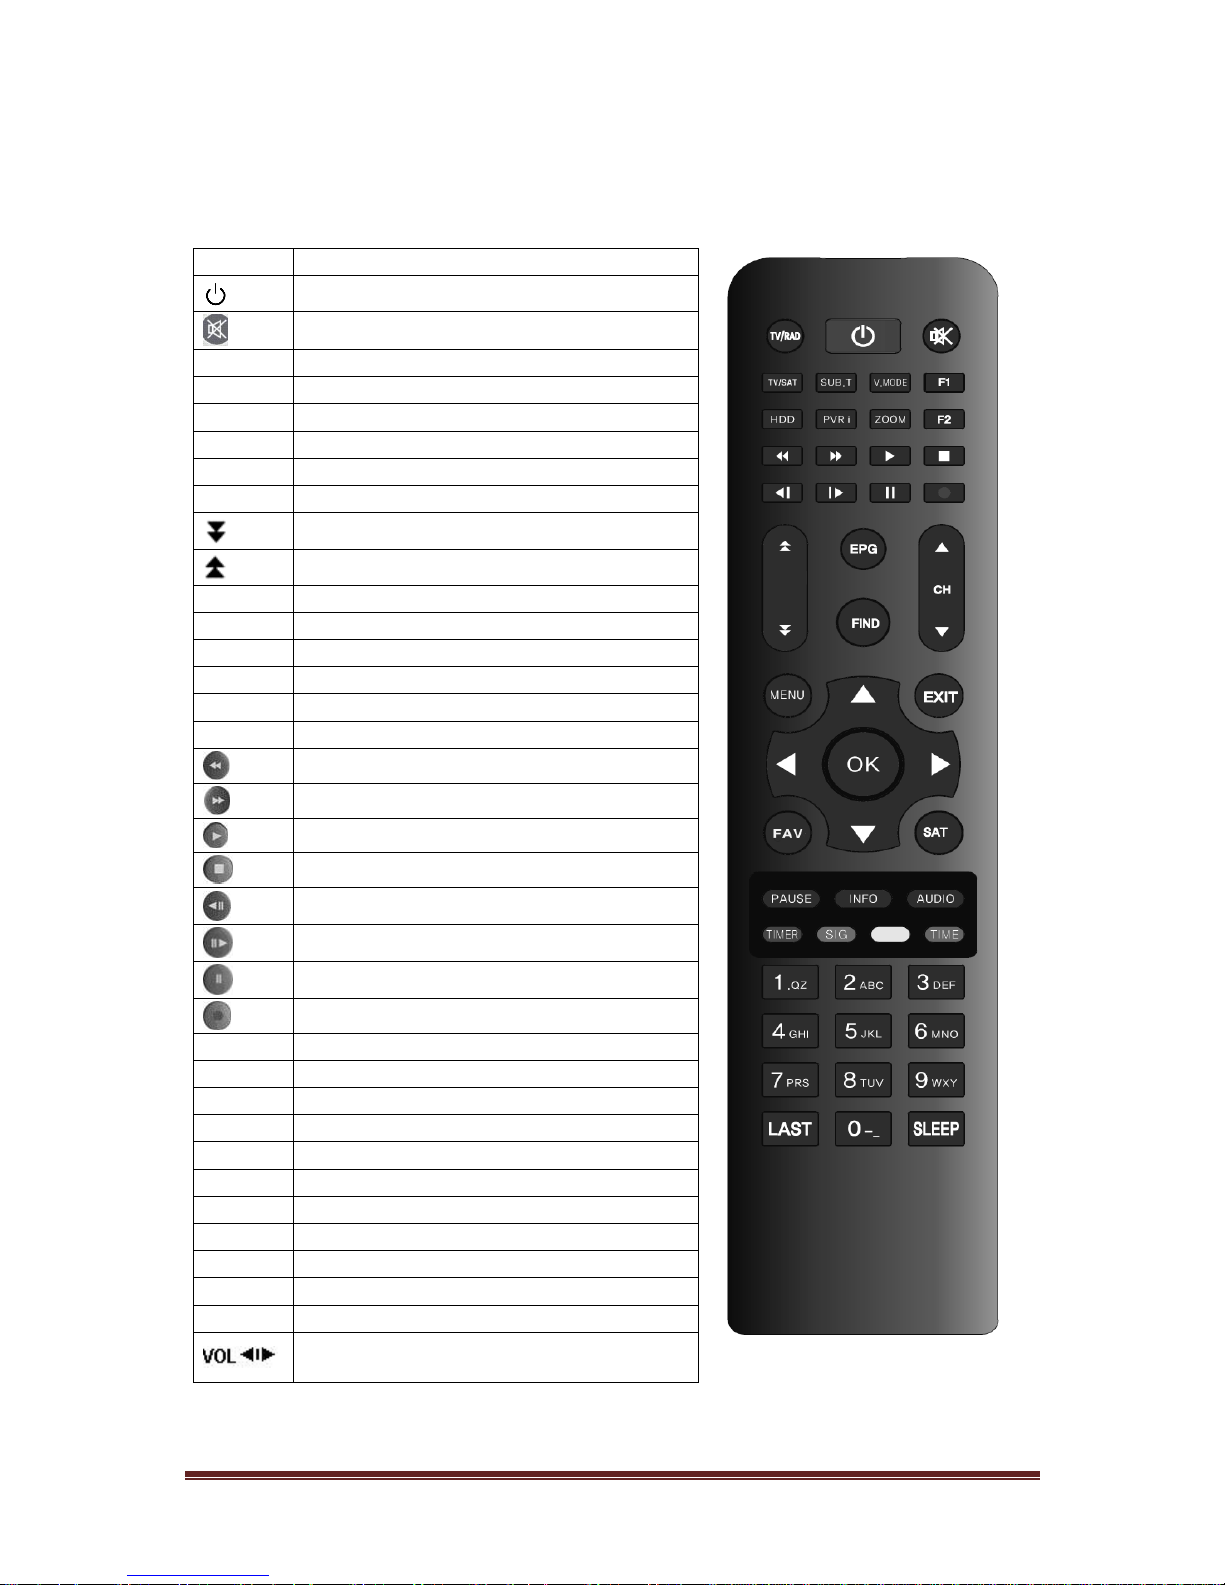
2. Control and Displays
Remote Control
Key
Function
Power on/off
Mute
PAUSE
Holds the picture or releases the pause
INFO
Shows channel information
AUDIO
Selects audio mode, Selects audio language
LAST
Returns to previous channel
MENU
Enter/Exit main menu screen
EXIT
Move to previous menu
Page down
Page up
FIND
Find Channel
EPG
Shows program information
FAV
Enter/Exit favorites menu
SAT
Enter programmed satellite list
SIG
Check signal quality
TIME
Shows current Time , Set time
Fast rewind playback
Fast forward playback
Plays recorded program
Stop recording or playing
Slow rewind
Slow forward
Pause the playback
Starts recording
HDD
Enter Hard Disk Recording menu
PVRi
PVR Information
ZOOM
Zoom Screen
SLEEP
Sleep timer
TV/SAT
Select TV/SAT
SUBT
Subtitle Function
V.MODE
Show/Modify video out resolution
OK
Shows Channel list. Confirm selection
TV/RADIO
Toggles between TV and Radio operation
F1
Function Key
F2
Function Key
Change the value of a selected line,
Volume up/down
Page 8
© Copyright 2012, LinkTV Media Page 7
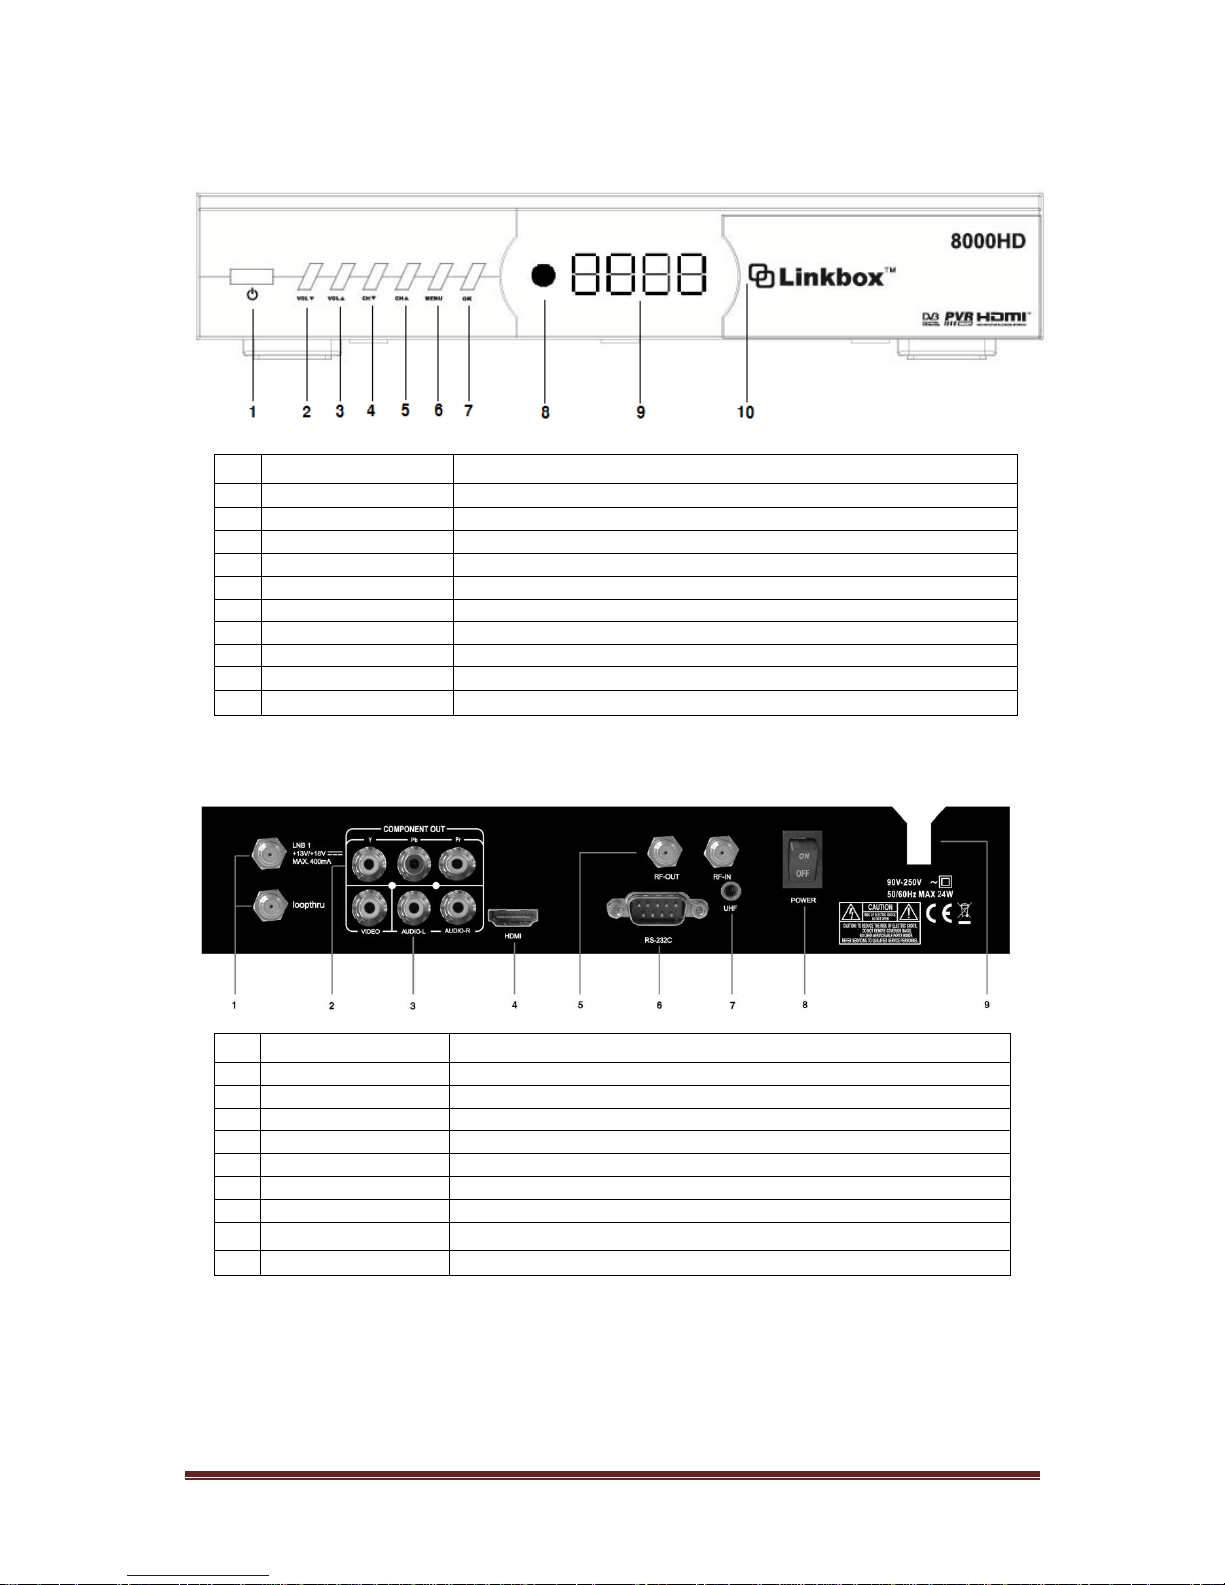
Front Panel
No
Name
Fuction
1
POWER
Switches the unit between standy and on
2
VOL ▼
Change volume up
3
VOL ▲
Change volume down
4
CH ▼
Change CH down
5
CH ▲
Change CH up
6
MENU
Moves to MENU
7
OK
Select in menus
8
DISPLAY
Segment LED Display
9
IR
IR Receiver
10
USB
USB Port (+5V 500mA)
Rear Panel
No
Name
Function
1
IF Input / Output
IF INPUT From LNB to receiver / IF Loop-through output to 2nd receiver
2
Component Output
Component Video Output(Y, Pb, Pr)
3
Composite Output
Composite Video Output/ Audio Left/Right Output.
4
HDMI
Digital Video/Audio Output
5
Moduator Output
CH 3/4 Modulator Output
6
RS232
Serial Port used for software upgrade
7
UHF
Option for UHF Remote Controller kit
8
AC POWER
AC Power Switch
9
POWER CORD
AC Power Cord
Page 9
© Copyright 2012, LinkTV Media Page 8
3. Operation
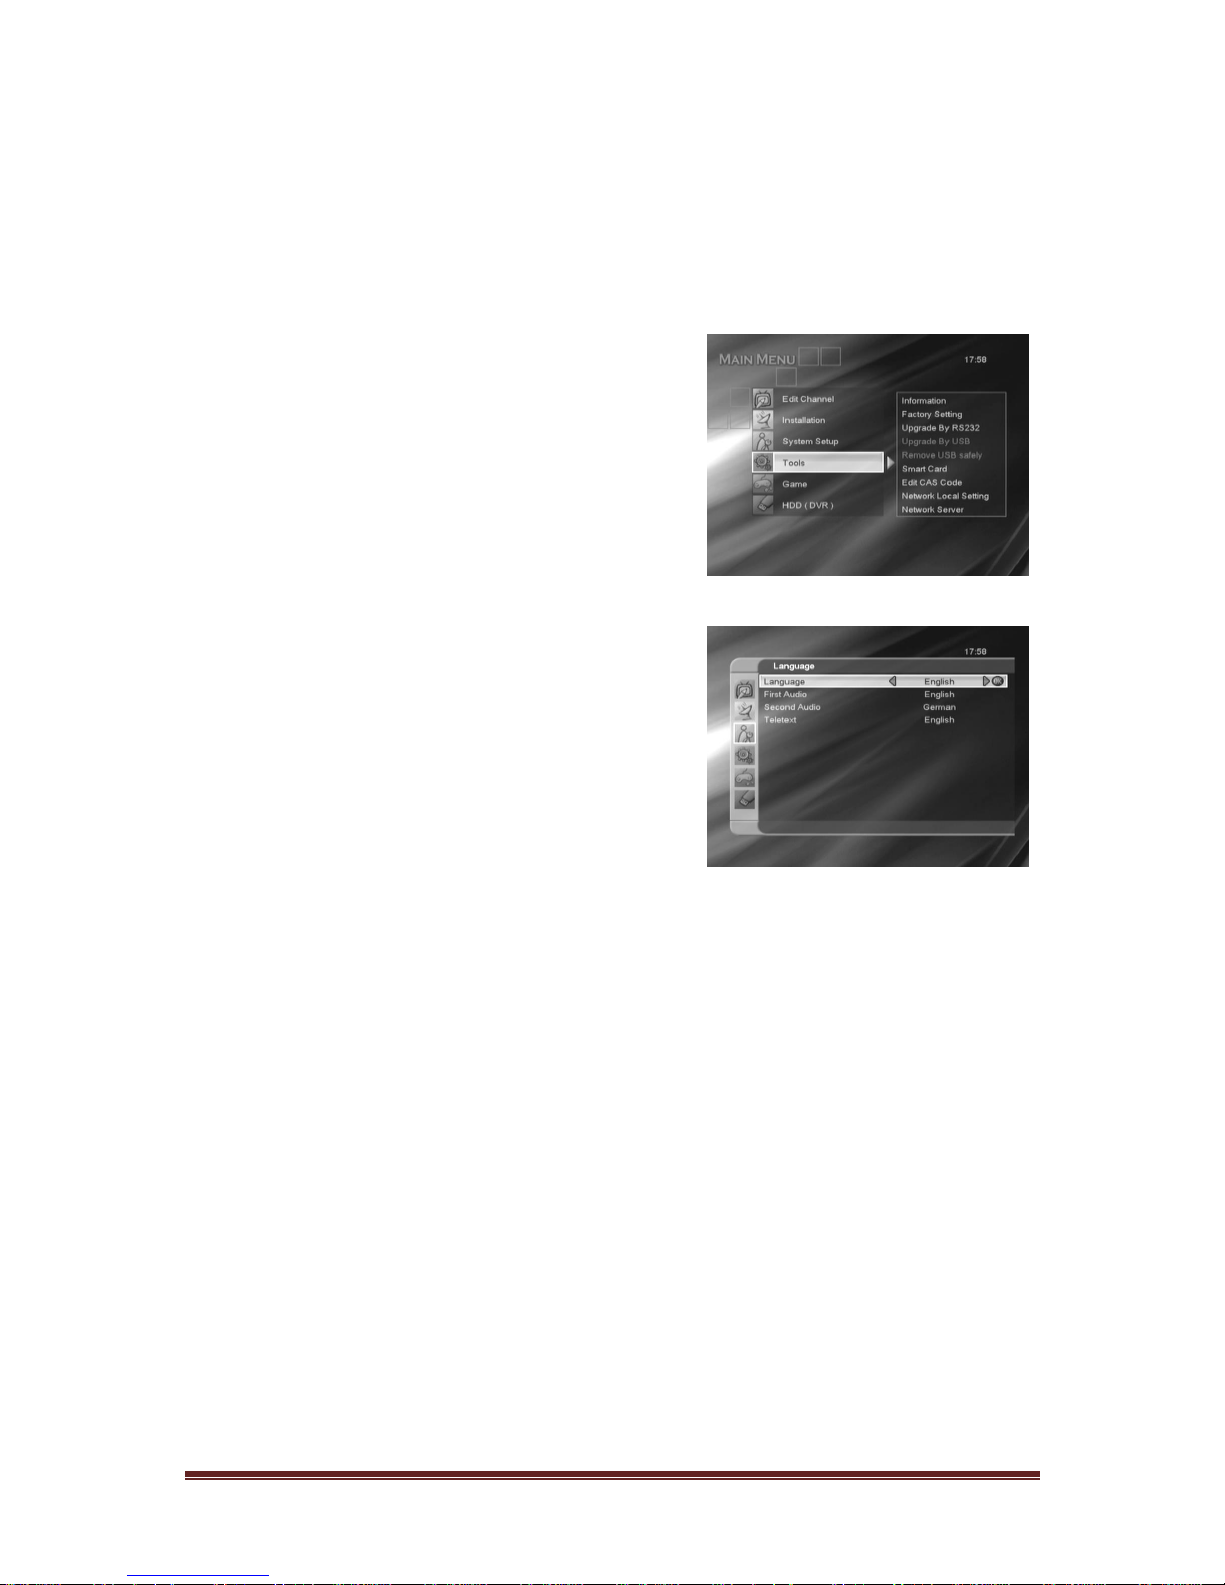
3.1 Initial Setup
When the receiver is powered on for the first time, the main menu will appear.
When first powering on the unit, please do
the following:
1) Select the System Setup
2) Switch the language using the ◀ ▶
buttons. Confirm the language by
pressing [OK].
3) Select installation on the main
menu and configure antenna
setting (See section 3.2)
4) Adjust the LNB configuration for
each satellite
5) Start scan to find programs
6) Exit the installation after all
programs are scanned and found
Use the ◀ ▶ ▲ ▼ buttons to navigate the menu and press [OK] on the
remote to make the selections.
3.2 Installation
The Installation menu is located on the main menu.
3.2.1 Antenna Connection
Use the ◀ ▶buttons to set the “Antenna Connection Type”.
3.2.2 Satellite List and Antenna Setup
Page 10
© Copyright 2012, LinkTV Media Page 9
You can Edit, Add, or Delete entries in
the Satellite List
Select Tune LNB1 or LNB2, Satellite,
LNB Type, transponder and
DiSEqC(1.0 and 1.1).
3.2.2.1 Motor DiSEqC
3.2.2.1.1 DiSEqC 1.2
“Local Longitude”/”Local Latitude” is disabled for DiSEqC 1.2
3.2.2.1.2 Motor Setting
Select “Motor Setting” in the
DiSEqC 1.2 menu
Press◀ ▶ buttons to change
satellite or transponder
Go to “Position No. & Save”
o Press ◀ ▶ buttons or
numbers to select or input
Position NO.
“Go to X”
o Press [OK] to open a list. You
can go to X or go to
reference.
Select “Satellite”
o Highlight“West/Save/East”
and press the ◀ ▶ buttons to
move the dish.
o Press [OK] to save the position.
“Recalculation”
o Selection this option and press [OK] to recalculate.
Page 11

© Copyright 2012, LinkTV Media Page 10
3.2.2.1.3 USALS
Set the satellite’s longitude and local longitude / local latitude.
USALS can move the dish automatically.
Local Longitude: Please input the Local Longitude using the
numeric keys. Adjust East/West using the ◀ ▶ buttons
Local Latitude: Please input the Local Latitude using the numeric
keys and adjust South/North using the ◀ ▶ buttons
Motor Setting: Switching the satellite can move the dish to the right
place
Limit Setup: When you set “limit setup” to “West Limit/ East Limit”,
you can move the dish to the west or east by pressing◀ ▶ buttons
manually. When you are finished moving to the target place, please
press [OK] key to save the point.
3.2.3 Single Satellite Search
Select the satellite to scan
Scan Option: Scan All Channels or Scan Free Channels
Scan Channel: Scan TV+Radio Channels, TV Channels, or Radio
Channels
Network Scan: Enable/Disable Network Scan
Scan Mode: Normal Scan or Blind Scan
Scan Start: After options are chosen press [OK] to start the search.
3.2.4 Multi Satellite Search
Under “Satellite”, press [OK] to view the selected satellite. The system will
use the DiSEqC1.0/DiSEqC1.2/USALS function to search for the satellite
and scan the channels. The satellites displayed in the bottom box will be
scanned.
3.2.5 TP List and Search
Press the ◀ ▶ buttons to switch between the satellites and press [OK] to
begin the TP Scan.
Page 12
© Copyright 2012, LinkTV Media Page 11
3.3 Edit Channel
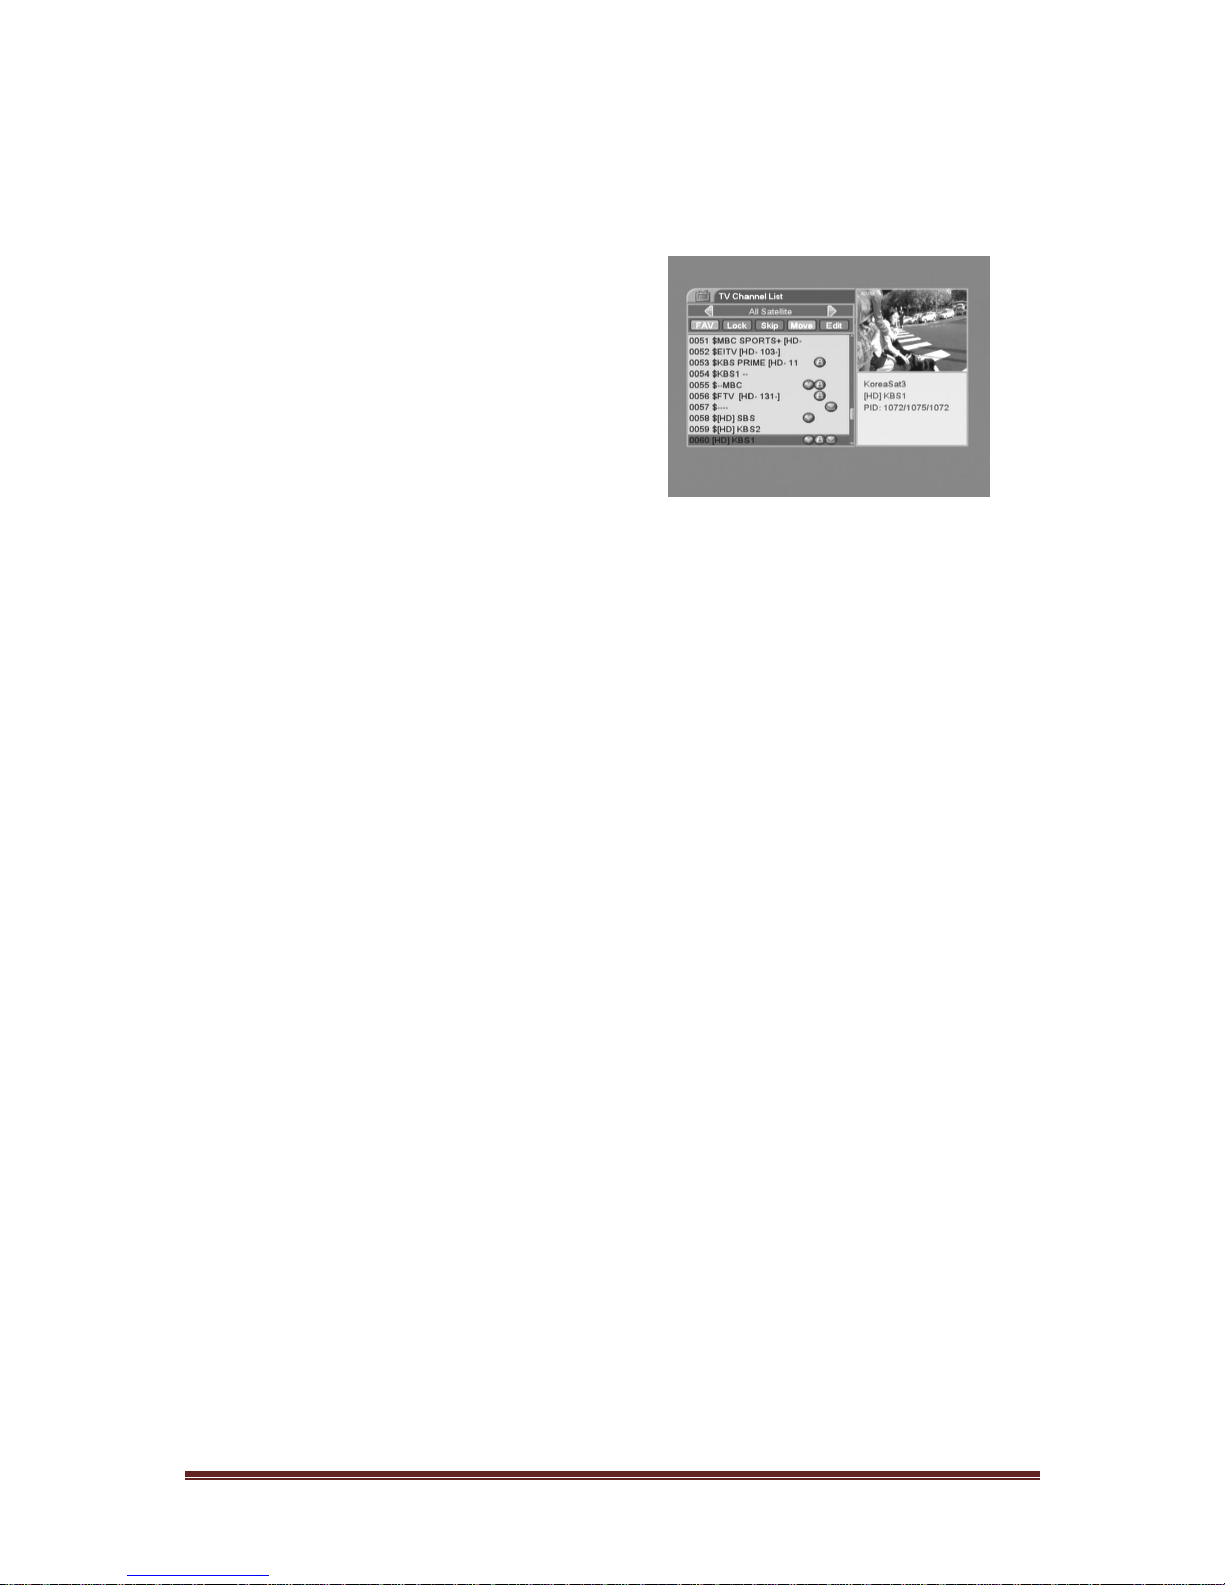
3.3.1 TV Channel List
Press [OK] key to preview
the highlighted program in
the right side window.
Use ◀ ▶ buttons to switch
the “Program Group”.
Press [Menu] or [Exit] keys
to go back to the “Edit Channel” menu.
Press the color key to implement the corresponding function in
“Channel List”.
3.3.1.1 Favorites
Choose between 8 different favorite groups using the ▲▼ buttons.
Press [OK] to place a favorite marker.
Press [OK] on a marked favorite group to cancel the existing
favorite marker.
When finished, press [EXIT[ to go back to “TV Channel List”. A
favorite marker should be visible on selected channels.
3.3.1.2 Lock
Press the red button.
The default password is “0000”. If the password is successfully
entered, you will see a lock figure on the right side of the
highlighted channel.
After saving and exiting the menu, the unit will require the password
to watch the locked channel.
3.3.1.3 Skip
Press the green button.
This will place a “skip” marker on the right side of the highlighted
channel.
After saving and exiting the menu, the channel will be skipped
when navigating through the channels.
3.3.1.4 Move
Press the yellow button.
Page 13

© Copyright 2012, LinkTV Media Page 12
This will place a “move” marker on the right side of the highlighted
channel.
Press the ▲▼ buttons to movethe channel to the desired position.
Press [OK] when finished.
3.3.1.5 Edit
Pressing the blue button will open the Edit menu
3.3.1.5.1 Sort
Press the red button in the Edit Channel menu.
Channels may be sorted in the following ways:
Name(A-Z): Sort in alphabetical order. “$” symbol is
ignored.
Name(Z-a): Sort in descending alphabetical order. “$”
symbol is ignored.
FTA: Sort the channel into free and scrambled order. Free
channels will be in the front of the channel list while
scrambled channels will be found at the end of the
channel list.
Lock: All locked channels will be placed in the end of the
channel list.
3.3.1.5.2 Edit
Press the green button in the Edit Channel menu.
Navigate to a channel and press [OK] to open the “Rename”
window.
1) Press the red button to switch to capital.
2) Press the green button to delete the character.
3) Press the yellow button to save the modification.
4) Press the blue button to cancel the operation.
3.3.1.5.3 Delete
Press the blue button in the Edit Channel menu.
Navigate to a channel and press [OK] to mark the channel for
deletion.
After saving and exiting the Edit Channel menu, the marked
Page 14

© Copyright 2012, LinkTV Media Page 13
channel(s) will be deleted.
3.3.2 Radio Channel List
Operation of the Radio Channel List is similar to operation of TV Channel
List. Please refer to the “TV Channel List” section.
3.3.3 Delete Channel
3.3.3.1 Deleting a satellite channel
Use the ◀ ▶ buttons to navigate.
Press [OK] to delete.
3.3.3.2 Delete All Satellite Channels
Press [OK] to delete all channels.
3.4 System Setup
Press [OK] or the ▶ button to enter the System Setup Menu from the Main
Menu.
Press▲▼ key to select menu items and press ◀ key or [Exit] key to go back
to main menu.
3.4.1 Language
Use the ◀ ▶ buttons to select menu languages
o Language options include: English, French, German, Russian,
Arabic, Portuguese, Turkish, Spanish, Polish, Italian and Persian.
First Audio: Some channels have more than one audio language option.
Use this function to set the default audio language. If a channel offers
the language you choose, it will be used by default.
Second Audio: If the channel does not offer audio in the language
selected in “First Audio”, it will play use the audio selected in “Second
Audio” if available.
3.4.2 TV System
Video Resolution : 576i, 576p, 720p, 1080i
o Press [OK] to select the Video Resolution (options : 576i, 576p,
720p, 1080i.). After selecting the resolution, it will ask you if you
would like to save the setting. If you select “No”, or if you do not
confirm in 15 seconds, it will go back to the original resolution.
Aspect Mode
Page 15

© Copyright 2012, LinkTV Media Page 14
o Set the TV aspect mode (4:3 Letter Box, 16:9, Auto, 4:3 Pan &
Scan) by using the ◀ ▶ buttons.
Video Output
o Use the ◀ ▶ buttons to switch between CVBS and RGB.
Digital Audio Out
o Set Digital Audio Out mode ( BS out, LPCM Out)
3.4.3 Display Settings
Use the ◀ ▶ buttons to fix Brightness, Contrast and Saturation of Display.
3.4.4 Local Time Setting
GMT Usage
o Use the ◀ ▶ buttons to switch between “On” and “Off”
GMT Offset
o This option is enabled only when you select “TDT Auto” mode.
o Use the ◀ ▶ buttons to switch the GMT Offset value. The range
is from -12:00 to +12:00 in half house increments.
Summer Time
o This option is enabled only when you select “TDT Auto” mode.
o When turned on, it will add one hour for Daylight Savings.
Date and Time
o These options are enabled only when the GMT Usage option is
turned off
o Use the ◀ ▶ buttons to navigate fields.
o Use the numeric buttons for input.
o If the current channel provides the correct time information, you
will see the current time while you enter the Time menu. If the
channel does not provide the time, you will have to input the date
and time information manually.
Press [Exit] to leave the Time menu.
3.4.5 Timer Setting
Use the ▲▼ buttons to select a timer, then press [Enter] to open the
timer menu.
Page 16

© Copyright 2012, LinkTV Media Page 15
The current time information will be displayed on the first column. If the
current time is incorrect, please modify the time information using the
Time item.
Timer Mode: There are several modes for Timer setting available.
These include Off, Once, Daily.
Recording: Select On/Off to enable or disable recording of the wakeup
program.
Wakeup Channel: Press [OK] to enter the channel list and select the
channel you want to play.
Wakeup Date: Use the number buttons to input the date.
Wakeup Time: Use the number buttons to input the wakeup time.
When the time has occurred, the system will automatically switch to the
wakeup channel, regardless of whether the system is in standby mode
or in use.
Duration: Once the wakeup duration has expired, the system will enter
standby mode. To disable the duration timer, set the duration to 00:00.
Select Save and press [OK] to save the timer settings. Select Cancel or
press [Exit] to cancel the operation.
3.4.6 Parental Lock
Select Parental Lock and enter the password. The default password is
“0000”.
Use the Menu Lock to enable/disable password entry into Edit
Channel/Installation/Tools menus.
Use the Channel Lock to enable/disable the password requirement for
locked channels.
To change the password, select New Password. Use the numerical
buttons to enter the new password when prompted. The user will be
asked to re-enter the new password to confirm. If both entries match,
the new password will be saved and you will be taken to the System
Setup menu.
Press [Exit] to leave the Parental Lock menu.
Page 17

© Copyright 2012, LinkTV Media Page 16
3.4.7 OSD Setting
You can adjust the OSD timeout and transparency by using the ◀ ▶
buttons.
3.4.8 Favorite
Press [OK] to rename the favorite group.
o Press the red button to switch to capital.
o Press the green button to delete the character.
o Press the yellow button to save the modification.
o Press the blue button to cancel the operation.
3.4.9 Others
LNB Power: If turned On, the receiver will supply power to the satellite
antenna. If the setting is Off, the receiver will not supply power to the
antenna.
Channel Play Type: You can choose to play Free, Scrambled, or All
channels.
Press [Exit] to exit the “Other” menu.
3.5 Tools
3.5.1 Information
Show the system information including model name, boot version, main, and
dB code.
3.5.2 Factory Setting
Use is option to revert the system to the default factory settings.
Select “Yes” to continue
Enter the 4 digit password when prompted and press [OK]. The default
password is “0000”. If you have forgotten your password, contact your
dealer for a master factory password.
If you do not wish to proceed, press [Exit] before password is entered.
3.5.3 Upgrade via RS232 (Receiver to Receiver)
Connect the master and slave receivers with a Null Modem RS232
Cable (Pins #2 and #3 twisted).
Page 18

© Copyright 2012, LinkTV Media Page 17
Connect the master receiver to the TV and select transfer mode.
Power on the slave receiver.
Select “Start on the master receiver screen and press [OK] to start the
upgrade.
When finished, press [Exit] button to save the parameters and exit
WARNING! Do not disturb the data transfer by pressing any remote
control buttons or disconnecting the RS232 cable, IF cable, RCA cable,
etc. during the data transfer until the “Please wait for saving” message
disappears.
3.5.4 Upgrade via USB
Download – USB Mode has the
following options:
o Maincode
o Ch Data
o All Code
o All Data + Boot_code
o Background
o Bootloader
o Upload(All Data Backup)
User needs to put the upgrade file under root in the USB storage
device.
When the user switches to the Download – USB mode, “File” field will
show the upgrade file.
Select the mode and download the file.
When complete, you can remove the USB device.
3.6 Game
Games such as Tetris, Othello, and Sudoku can be found in the Game menu.
3.7 HDD(PVR)
HDD and PVR setting information can be found in the USB menu.
Page 19

© Copyright 2012, LinkTV Media Page 18
3.7.1 Record Manager
To play recorded content;
Press [Play] to preview the content.
Press [OK] to play the content in full screen.
Press [Pause] once to pause the content.
Pressing [Pause] repeatedly will utilize the step function.
Use the buttons to rewind or fast forward at x2, x4, x8, x16, x24
speeds
Use the buttons to rewind or play at x1/2, x1/4, x1/8 speeds.
3.7.2 Storage Information
Storage Information of the USB or SATA device will be displayed if
connected to the unit.
Use the Yellow button to format the File System in either NTFS or FAT
Use the Blue button to set the DVR Type(REC & TMS, Record).
3.7.3 PVR Setting
Enable/Disable Timeshift, Timeshift to Record, PS Record options.
Jump: Fixes the time difference of a step move
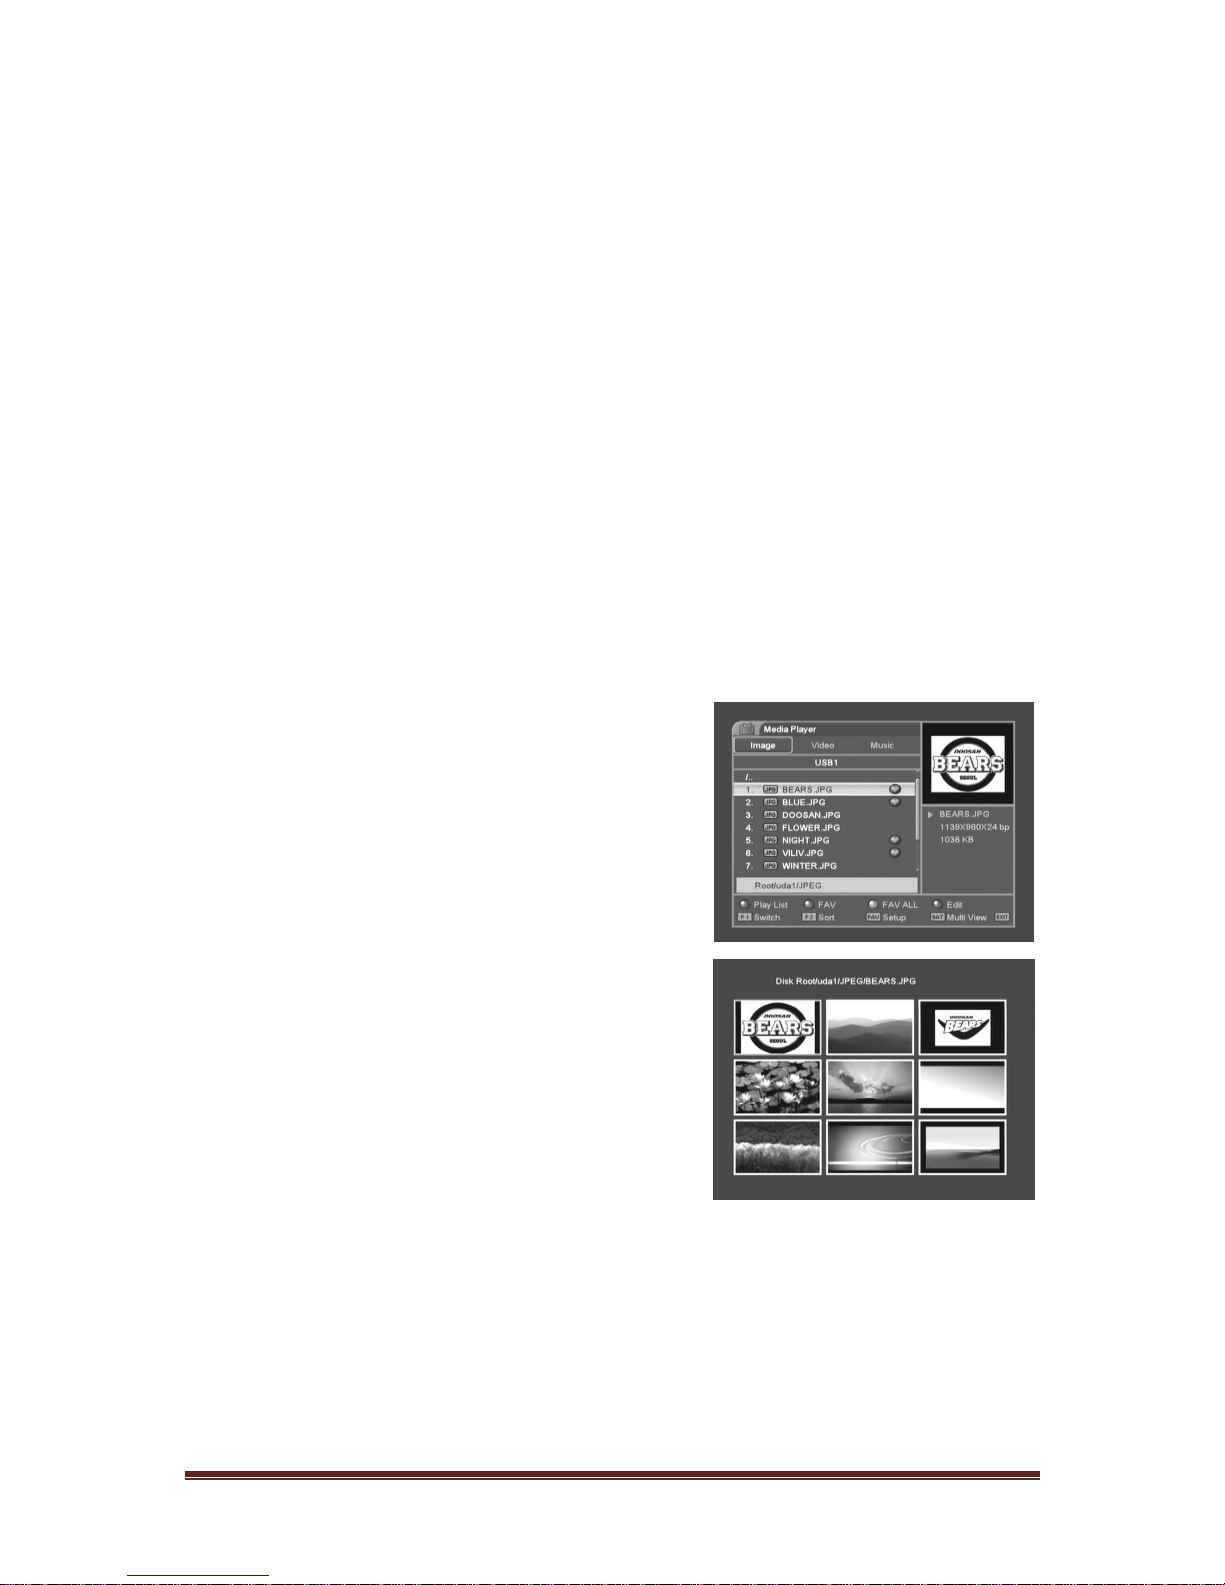
3.7.4 Media Player
The Media Playlist will be displayed if the USB device is plugged in.
Scroll through the playlist to preview pictures (JPG,BMP). A MP3 logo
is displayed for MP3 files.
Pressing [F1] once will allow the Storage Type (Partition and other
Device) to be changed.
Subsequent presses of [F1] will allow the Media PlayerType (Music,
Image, and Video) to be changed.
3.7.4.1 Music Player
Use the ▲▼ buttons to navigate to music files and press [OK] to
play. The music file information will be displayed in the right
window.
Use the [Red] button to show the playlist you selected.
Use the [Green] button to select the music file to play.
Page 20
© Copyright 2012, LinkTV Media Page 19
Use the [Yellow] button to select all files in the folder.
Use the [Blue] button to enter Edit Mode
o EDIT MODE
[Red] button: Use to change selected filename or folder
name
[Green] button: Use to copy selected file or folder into
other folders or storage.
[Yellow] button: Deletes selected file or foler.
[Blue] button: Remake the folder.
Use the [F1] button to change the Storage type and the Media type.
Use the [F2] button to sort by Name, Time, Size, or Favorite
Use the [FAV] button to choose the playback mode (Repeat the
folder contents, Shuffle, Repeat a single file)
3.7.4.2 Image Player
Use the ▲▼ buttons
to navigate through image files
(JPG,BMP) and display them in
the preview window.
Press [OK] to select a file and
start the slideshow.
Use the [Red] button
to show the playlist you
selected.
Use the [Green] button
To select the file.
Use the [Yellow] buttons
to select all files in the folder.
Use the [Blue] button to enter Edit Mode
Use the [FAV] button to set the slideshow time and mode
Use the [SAT] button to enter the Multi Image View Mode.
Navigate the files using the ▲▼◀▶ key and press [OK] to select
Slideshow can be viewed after the files are selected.
Page 21
© Copyright 2012, LinkTV Media Page 20
3.7.4.3 Video Player
Use the ▲▼ buttons to navigate through video files. A video preview will
be displayed in the preview window. Press [OK] to select a file and start
playback.
3.8 PVR
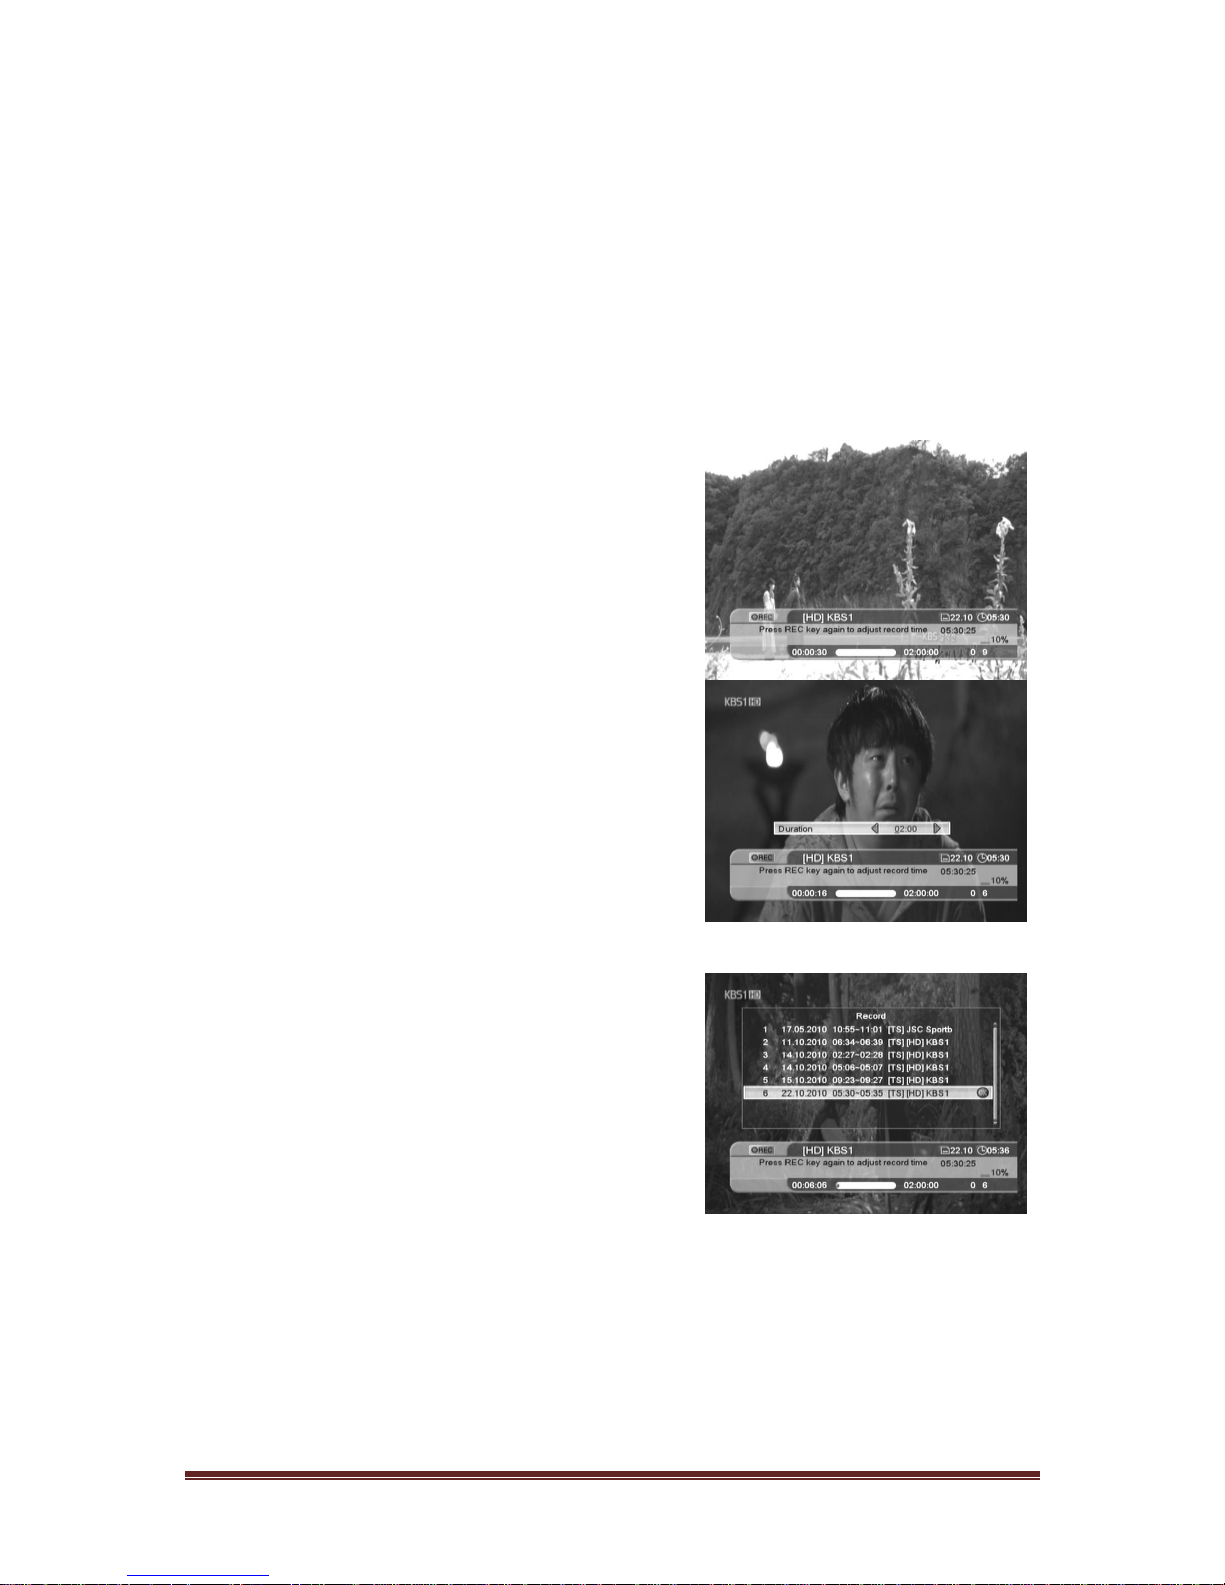
3.8.1 Recording
While watching a channel, pressing the
[REC] button will start recording for a set
duration of 2 hours.
If the [REC] button is pressed for a
second time, the user will be given the
option to change the record duration.
Pressing [STOP] at any time will stop the
recording.
3.8.2 Record File List
Use the [PVRi] button during the
playback of a recorded file to display the
recording file list. Selecting another file
will start playback of that file.
3.8.3 Timeshift
Use this option to enable or disable the Timeshift.
Enabling Timeshift will cause the system to store any current channel
into a buffer as it plays. This allows the user to [Pause/Play] or rewind the
current channel. Forwarding can also be done up until the time where the
program is being played live.
Page 22
© Copyright 2012, LinkTV Media Page 21
3.8.4 Jump
In the Jump menu, the user can choose between
30sec/1min/5min/10min/30min jump increments.
During playback of HDD recorded program, pressing [PREV]/[NEXT]
buttons will skip backward or forward the increment set by the user.
3.9 Channel List
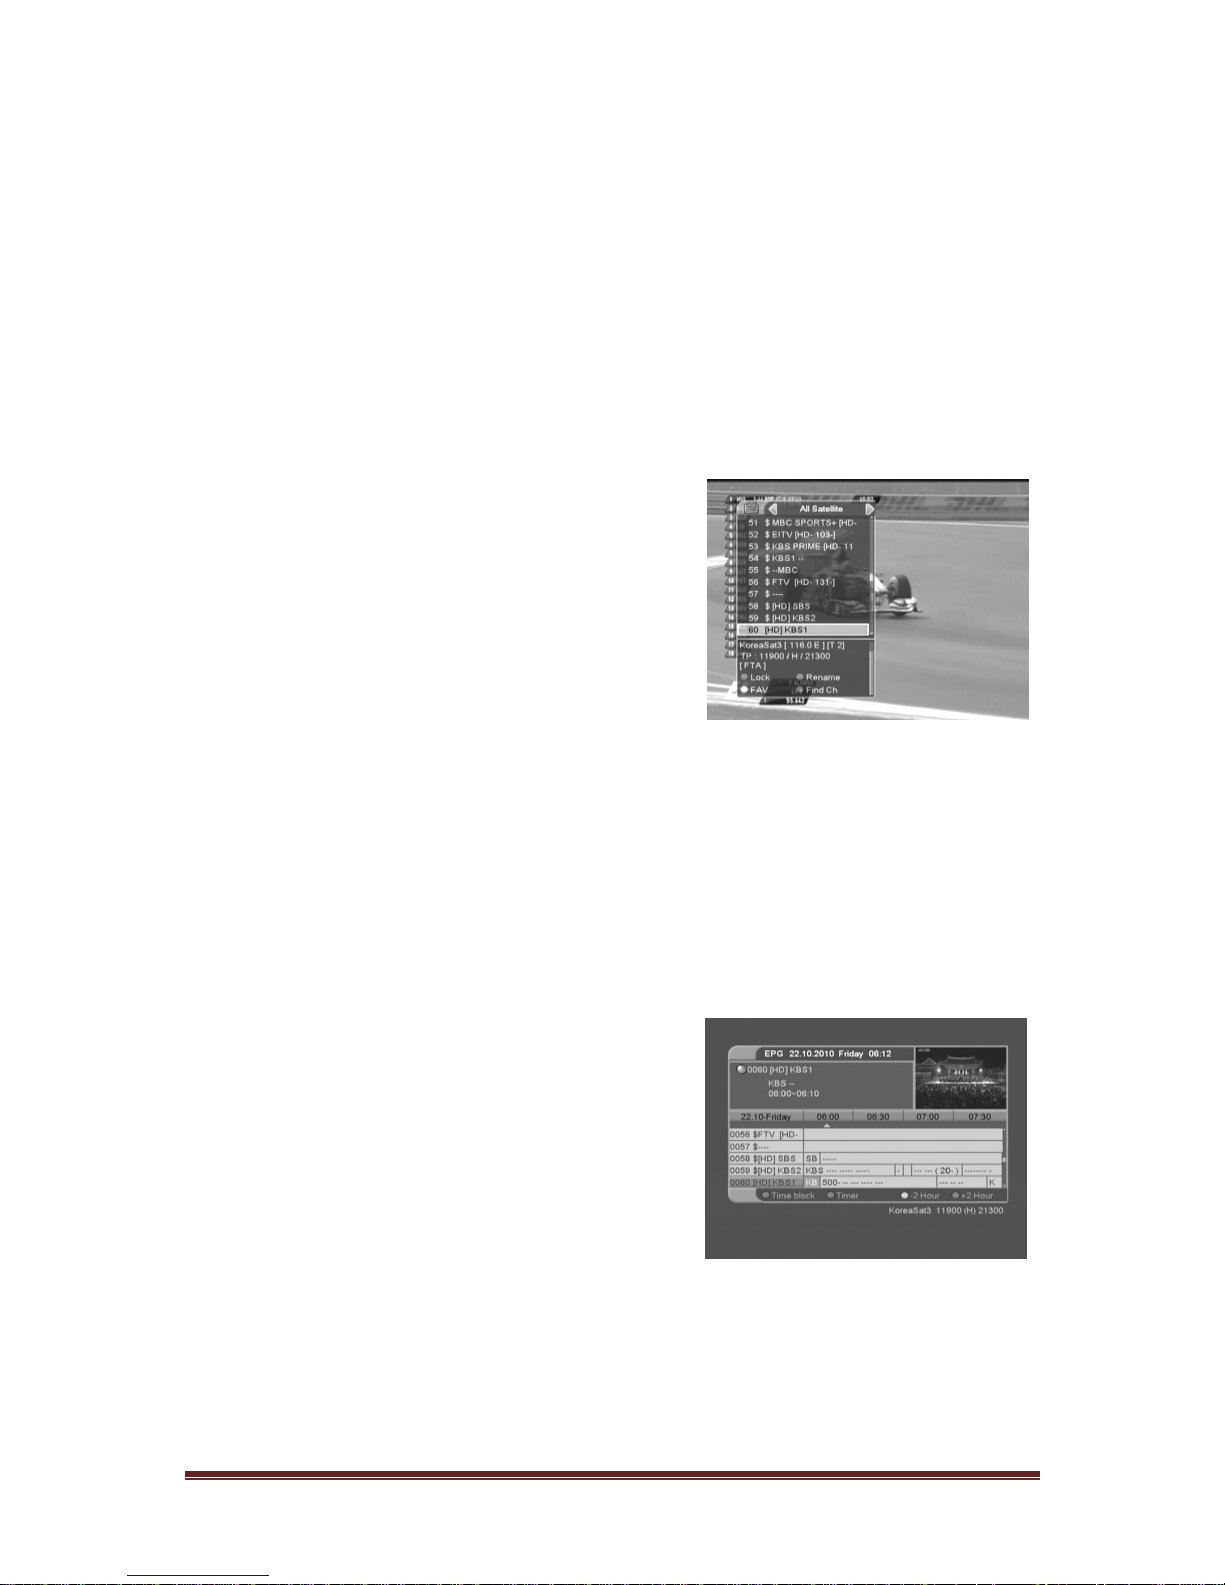
Press [OK] during playback to open the
channel list.
Navigate the channel list using the ▲▼
PG↑ PG↓ buttons.
Press [OK] to select a channel to
watch.
Press the [Red] button to set the
Parental Lock for the current program.
Press the [Green] button to change the name of the current program.
Press the [Yellow] button to display the favorites list.
Press the [Blue] button to search for a program by name.
3.10 Program Guide (EPG)
Press the [EPG] button to open the
program guide. The title and start time of
the program will be shown.
Navigate the channel list using the ▲▼
PG↑ PG↓ buttons.
Press [OK] to select a channel to
watch.
Press [Exit] to return to full screen.
3.11 Audio Change
While watching a program offering multiple audio languages
Press [Audio] and use the ▲▼ buttons to switch languages
Page 23

© Copyright 2012, LinkTV Media Page 22
To change the audio mode (L-Left, R-Right, L/R-Stereo)
Press [Audio] and use the ◀▶ buttons to switch modes
3.12 Favorite Channels
Press the [FAV] button to recall a stored favorite channel.
Favorite Channels are programmed and stored using the Favorite Edit
Menu.
3.13 Video Mode
Press the [V.MODE] button once to view the Video Mode (Resolution)
Press the [V.MODE] button again to change the Video Mode
(576i/576p/720p/1080i)
If a resolution is chosen that is not supported by the TV
o Press the [V.MODE] button after rebooting the STB
o Change the resolution using front LED display. Resolution will be
displayed by the LEDs. (TV screen and menu will not show up
without supported resolution setting)
Page 24

© Copyright 2012, LinkTV Media Page 23
4. SPECIFICATIONS
Satellite Tuner
Input Connector
F-type,IEC169-24
Frequency Range
950MHz to 2150MHz
Input Level
65 dBm~-25 dBm
LNB Power
14V/19V (400mA Max)
Symbol Rate
1 to 45Msps.(SCPC,MCPC)
DiSEqc
Diseqc 1.2 & USALS Compatible
Band Switch
22KHz tone
Demodulation
QPSK/8PSK/APSK
Viterbi Decoding Rate
1/2,2/3,3/4,5/6,7/8
Reed Solomon Decoding
FEC 204,188,t=8
Transport Stream A/V Decoding
Demultiplex
13818-1(System Layer)
Input stream
Max. 90Mbit/s
Aspect Ratio
4:3(default), 16:9 letterbox
Video Decoding
MPEG-4 Full HD Decoding
Video
Resolution
480i/p or 576i/p, 720p, 1080i
Audio Decoding
ISO/IEC13818-3 Digital Audio Decoding
Video Ouput
HDMI (HDCP), CVBS,YPbPr
Audio Mode
Single Channel /Dual Channel, Stereo,
Joint Stereo
Microprocessor & Memories
CPU Clock
398MHz
Flash Memory
4 Mbyte
SDRAM
128 Mbyte
Rear Features
HDMI
HDMI 1.2
Video/Audio
CVBS,AUDIO R/L,YPbPr
Tuner
1 input & 1 Loopout
Modulator
CH 3/4
Data Port
RS 232 (D-SUB)
UHF Input
Option for UHF Remote Kit
Page 25

© Copyright 2012, LinkTV Media Page 24
Front Features
7 Key
PWR,CH Up/Down, Volume Up/Down,
Menu,Exit
Display
4 Digit 7 Segment Display
USB
1 Host USB2.0
Remote Control
Type
IR RCU
Battery
2x1.5V AAA Type
Power Supply
Input Voltage
AC 90-250V, 50/60Hz
Type
AC Plug
Physical Specification
Dimension (WxDxH)
260mm x 180mm x 45mm
Weight
1.2Kg
Accessaries
HDMI Cable
Page 26

© Copyright 2012, LinkTV Media Page 25
5. TROUBLESHOOTING
If the unit is not functioning properly, use this guide to identify and
troubleshoot some common causes.
If your problem cannot be solved using this guide, please contact your vendor
to resolve the issue.
Problem
Possible causes
Remedy
No Picture or
Sound
1. Wrong connection of the
Component to
TV input Terminal
2. Wrong connection of HDMI
cable to TV
3. Wrong connection of antenna
cable
4. Wrong direction of antenna
5. No signal or weak signal
6. Wrong setting of channel
information in MENU screen
1. Connect two terminals
correctly
2. Connect two terminals
correctly
3. Connect the antenna
cable correctly
4. Adjust the direction of
antenna
5. Check the cable
connections,
6. Type the setting value
correctly
Black-and-
White
Screen or VHold
1. Your TV mode setting is
different from the
broadcasting mode
1. Set TV to correct mode
The remote
controller is not
working
1. Battery exhausted
2. Fluorescent light interfering
with the remote controller
3. Remote controller is
incorrectly aimed
1. Change the batteries
2. Try switching off the
light
3. Aim the remote control
at the receiver
Distorted
menu
screen
1. Improper brightness and
contrast
levels of TV set
1. Adjust brightness and
contrast to
lower levels
Not working
1. Process is down
1. Unplug and plug the
power code
Page 27
© Copyright 2012, LinkTV Media Page 26
LIMITED WARRANTY
LinkTV Media warrants to the original purchaser that this product shall be free
from defects in workmanship and material for two years from the date of
original purchase. During this warrant period LinkTV Media will provide free of
charge both parts and labor necessary to correct defects in workmanship or
material.
This warranty does not cover damage due to lightning, fire, flood, or other acts
of God, damage from accident abnormal conditions, improper use, or faulty
installation, unauthorized software/hardware modification or damage by
attempts to repair the units other than by the authorized service of LinkTV
Media.
LinkTV Media’s liability under this warranty is limited to servicing or adjusting
equipment returned to LinkTV Media authorized service centers with freight
prepaid.
LinkTV Media
Media System
PO Box 1368
11672 Tuxford St. Sun Valley, CA 91352, USA
TEL : 818-768-5494, FAX : 818-768-5040
E-mail : [email protected]
Web : www.Linkboxusa.com
 Loading...