

Page 1
Linkcom France 1
11 rue du Soleil Levant 92140 CLAMART Copyright © 2009 – Linkcom – All rights reserved
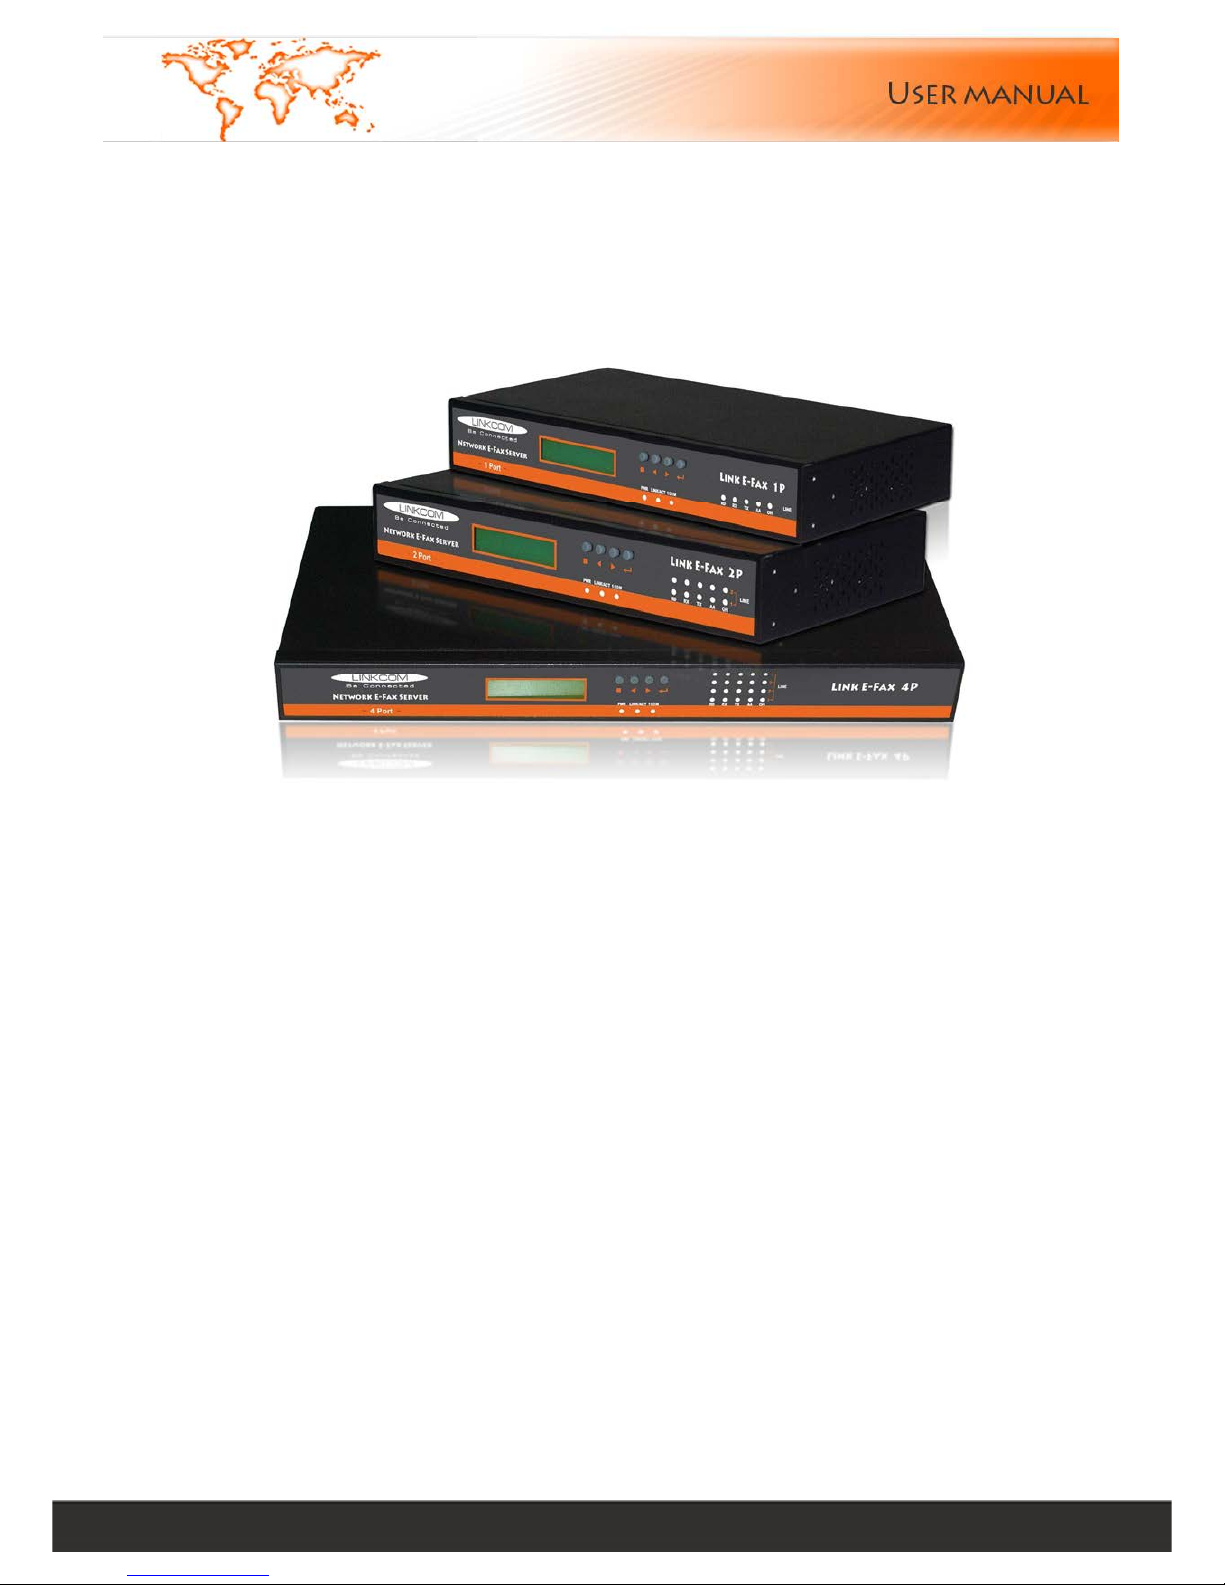
Link E-Fax 1P / 2P / 4P
Manual v1.0
Page 2

Linkcom France 2
11 rue du Soleil Levant 92140 CLAMART Copyright © 2009 – Linkcom – All rights reserved
Content
FAX SERVER CONNECTION DIAGRAM .................................................................................................................................4
1. IP ADDRESS AND SYSTEM TIME SETTING ...........................................................................................................................4
1.1. FAX SERVER FRONT PANEL ....................................................................................................................................................... 4
1.2. FAX SERVER BACK PANEL ........................................................................................................................................................5
2. LOGIN FAX SERVER ............................................................................................................................................................6
3. MAIN MENU ........................................................................................................................................................................7
4. SEND FAX............................................................................................................................................................................8
4.1. FORMAT CONVERSION ............................................................................................................................................................8
4.2. SEND FAX ..............................................................................................................................................................................8
4.3. FAX BROADCAST.....................................................................................................................................................................9
4.4. INTERNAL FILE FORWARD........................................................................................................................................................10
5. FAX FOLDERS ....................................................................................................................................................................11
5.1. INBOX ..................................................................................................................................................................................11
5.2. OUTBOX ...............................................................................................................................................................................11
5.3. SENTBOX ..............................................................................................................................................................................11
6. PHONE BOOKS ( SUPPORT UTF8).....................................................................................................................................12
6.1. PRIVATE PHONE BOOK ...........................................................................................................................................................12
6.2. PUBLIC PHONE BOOK.............................................................................................................................................................13
7. MANAGEMENT .................................................................................................................................................................14
7.1. DEPT MANAGE .....................................................................................................................................................................14
7.2. USER MANAGE .....................................................................................................................................................................14
7.2.1. ADD USER .........................................................................................................................................................................14
7.2.2. DELETE USER ......................................................................................................................................................................16
7.2.3. EDIT USER ..........................................................................................................................................................................16
7.3. FAX-ROUTING TABLE ..............................................................................................................................................................17
7.4. ROUTING STRATEGY ...............................................................................................................................................................17
8. MY SETTING.......................................................................................................................................................................19
8.1. SEND PREFERENCES ...............................................................................................................................................................19
8.2. MY ACCOUNT ......................................................................................................................................................................20
9. SERVER SETTING................................................................................................................................................................21
9.1. NETWORK .............................................................................................................................................................................21
9.2. LINE ......................................................................................................................................................................................22
9.3. VOICE SETTING......................................................................................................................................................................23
9.4. DIALRULES.............................................................................................................................................................................24
9.5. EMAIL2FAX ...........................................................................................................................................................................24
9.6. BACKUP................................................................................................................................................................................25
9.7. DELETE RULES.........................................................................................................................................................................25
9.8. TIME SETTING .........................................................................................................................................................................26
9.9. LANGUAGE SETTING ..............................................................................................................................................................26
9.10. REMOTE PRINTER .................................................................................................................................................................26
10. LOG AND TASK LIST........................................................................................................................................................27
10.1 EVENTS ................................................................................................................................................................................27
10.2. FAX QUEUE.........................................................................................................................................................................27
10.3. SENT ...................................................................................................................................................................................28
Page 3

Linkcom France 3
11 rue du Soleil Levant 92140 CLAMART Copyright © 2009 – Linkcom – All rights reserved
10.4. RECEIVED ...........................................................................................................................................................................29
10.5. DISTRIBUTION.......................................................................................................................................................................29
10.6. TRANSMIT ............................................................................................................................................................................30
11. TOOLS..............................................................................................................................................................................30
11.1 SERVER STATUS .....................................................................................................................................................................30
11.2. PING TEST ...........................................................................................................................................................................31
11.3. SMTP TEST ..........................................................................................................................................................................31
11.4. FILES DELETE........................................................................................................................................................................31
11.5. PARAMETERS BACKUP..........................................................................................................................................................32
11.6. UPDATE ..............................................................................................................................................................................32
11.7. FACTORY RESTORE ..............................................................................................................................................................32
11.8. REBOOT ..............................................................................................................................................................................32
12. DOWNLOADS .................................................................................................................................................................32
12.1. ALTERNATIFF ......................................................................................................................................................................32
12.2. PRINT DRIVERS ....................................................................................................................................................................32
12.3 PRINT2FAX USER’S GUIDE ......................................................................................................................................................33
12.4. VOICE RECORDING .............................................................................................................................................................39
APPENDIX (THE DEFAULT) ....................................................................................................................................................40
Page 4
Linkcom France 4
11 rue du Soleil Levant 92140 CLAMART Copyright © 2009 – Linkcom – All rights reserved
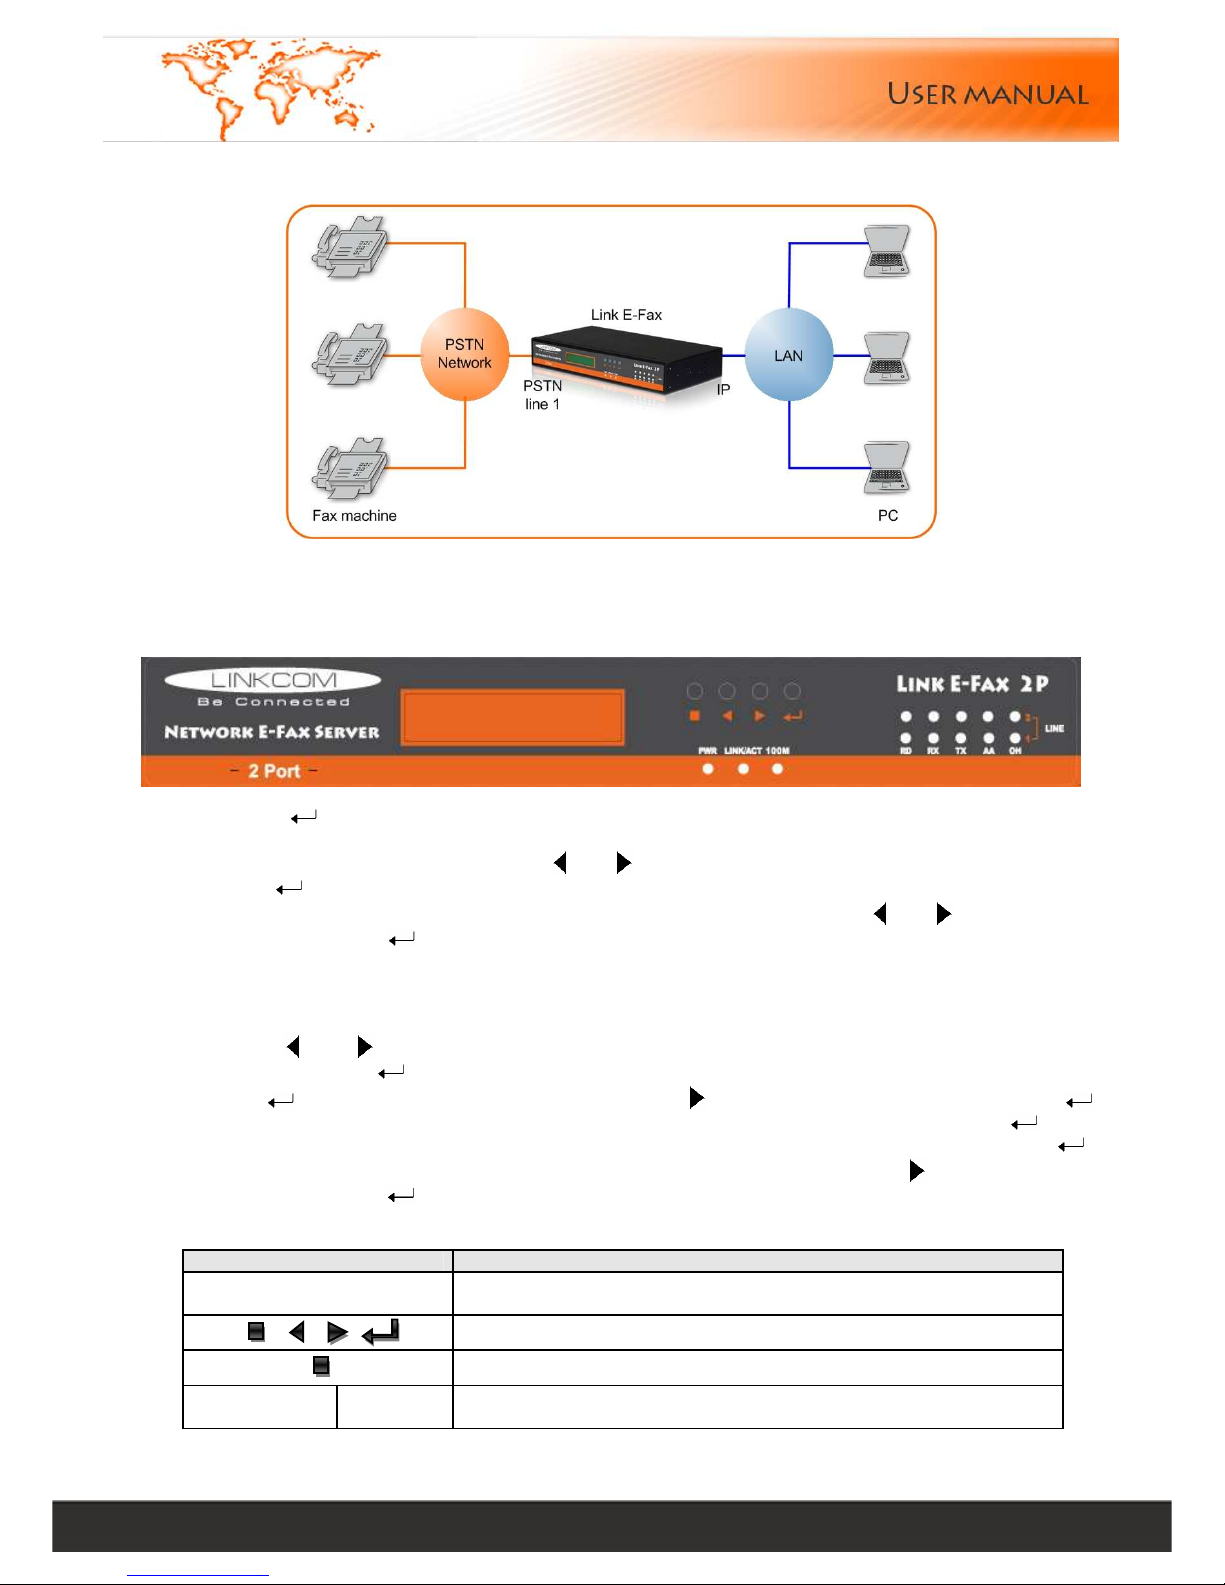
Fax Server Connection Diagram
1. IP Address and system time setting
1.1. Fax Server Front Panel
a) Press“ ”button, then IP Address1 will appear on LCD
b) Check Subnet Mask1, IP Address2, Subnet Mask2, IP Address3, Subnet Mask3, Router Address, DNS
Address ,Date and time by pressing the“ ”and“ ”buttons
c) Press“
”again while you need to modify the information menu, then login the setting model, LCD will
place the position by glittery cursor. Place the cursor position by pressing “ ”and“ ” to point the data
needs change. Press“ ” to update the pointed data
d) Press “■”to return the display model after the parameter set and the change will be saved temporarily
by system automatically. The updated information will be mark “*”and displayed on the top right corner of
LCD to notify users this information still not be stored into fax server
e) Repeat step 2, 3, 4 until all data you need to change is set
f) Press “ ” and“ ” till “Save Change” or “Discard Change” appears on LCD. If you need to store the
setting data, press“ ” while “Save Change” appears on LCD, then it will clue to “Save Change? Yes”,
press “ ” to store your setting, also you can press “ ”to switch to “Save Change? No”, press“ ”to
return the status of step4 without any saving. If you want to ignore the modification, press“ ” to login
the set model while “Discard Change” appears on LCD, LCD shows “Discard Change? No, press“ ” to
give up your current setting, and back to the status of step4; also you can press“ ” to switch to “Discard
Change? Yes”, press“ ” to ignore all changes and back to the status before system changed
g) Reboot fax server to active the modified IP
Names of parts Description
LCD Display Display system time, IP, and other information, MAC Address, WEB
Port, Display Language Choose, TOTAL/FREE
Set fax server’s IP address , date, time
Manual fax receive Button for FAX1 only
System
PWR Fax server main power indicator lights on while connects to power
supply
Page 5
Linkcom France 5
11 rue du Soleil Levant 92140 CLAMART Copyright © 2009 – Linkcom – All rights reserved
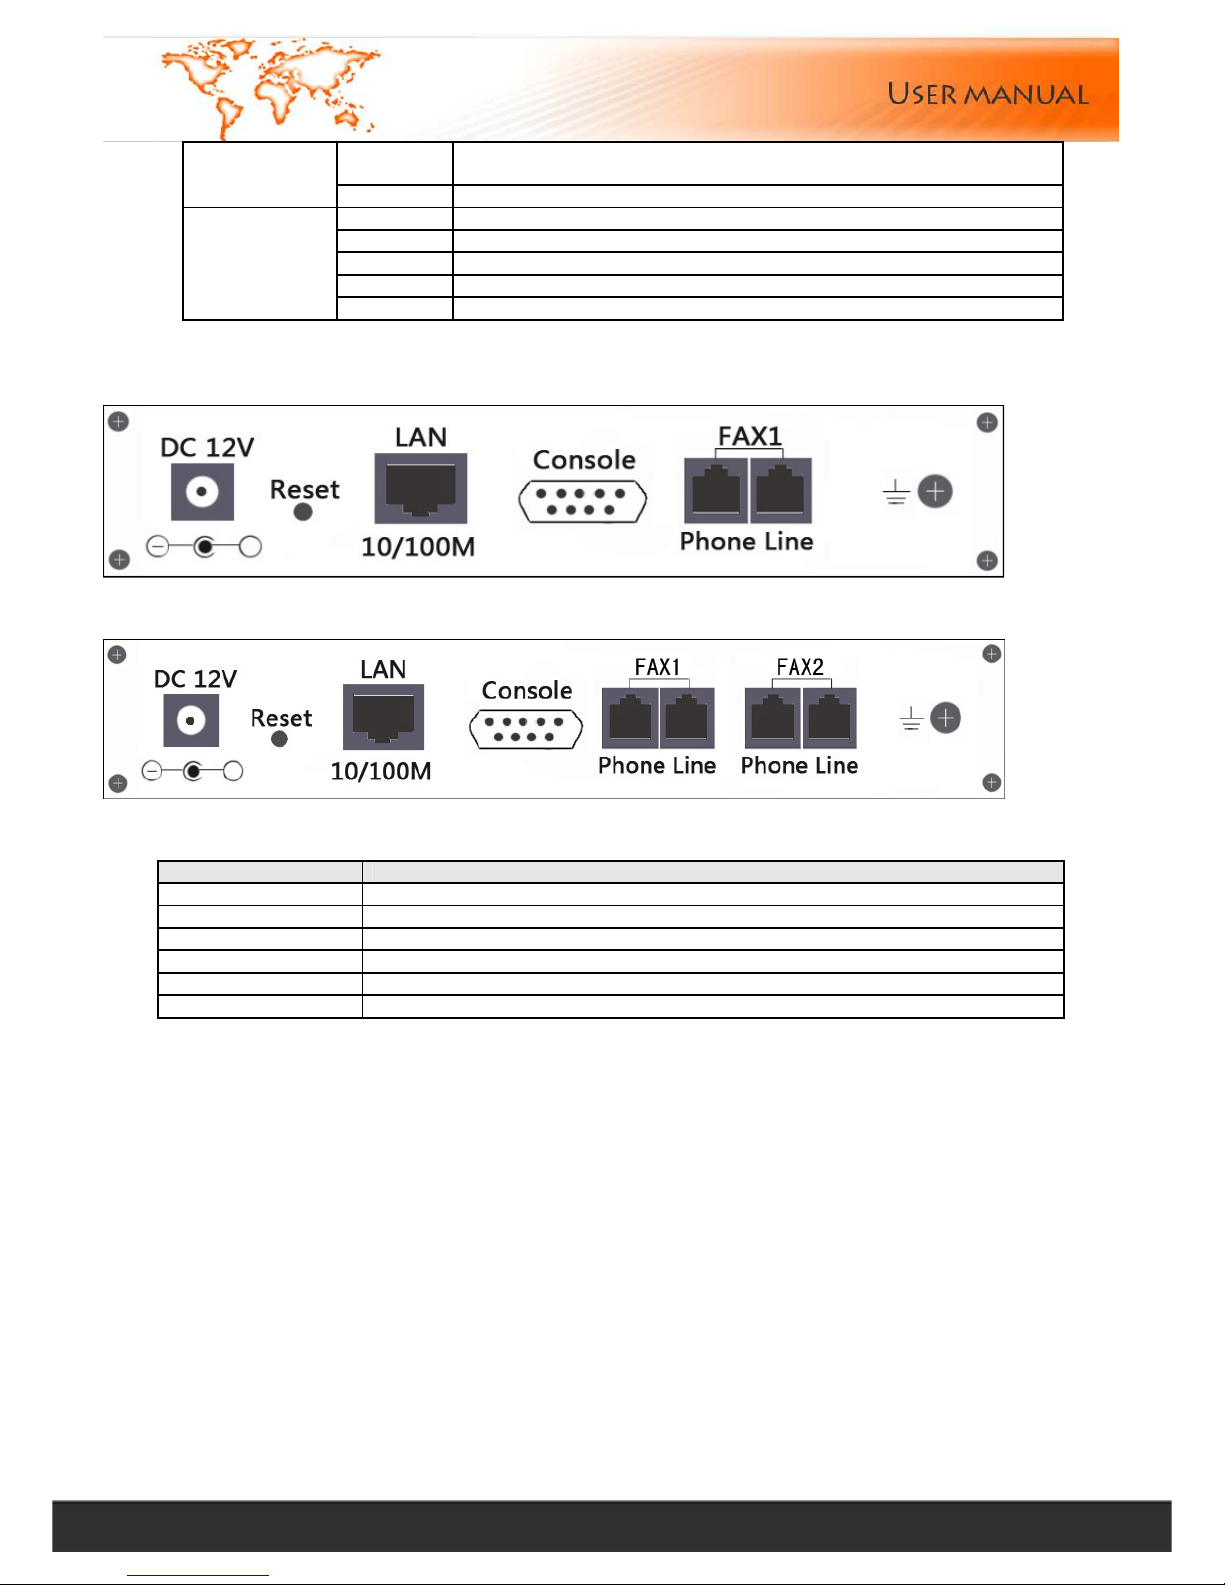
LINK/ACT Light up while connects to network. Blinking when network data
transmits
Indicator
100M Light up during Ethernet 100M. Blinking during Ethernet 10M
RD Light up while modem is ready
RX Blinking while receive data
TX Blinking while transmit data
AA Blinking while ringing
Line Indicator
OH Lights on while the line is in use
1.2. Fax Server Back Panel
E-Fax 1P Back Panel:
E-Fax 2P Back Panel:
Interface Name Description
DC 12V DC 12V power adapter
Reset Restore the factory setting
LAN RJ-45 standard network interface. Connect to LAN equipment
Console Standard RS-232 serial interface
Phone RJ-11 standard telephone line interface. Connect telephone or fax machine
Line RJ-11 standard telephone line interface. Connect telecom line
Page 6
Linkcom France 6
11 rue du Soleil Levant 92140 CLAMART Copyright © 2009 – Linkcom – All rights reserved
2. Login Fax Server
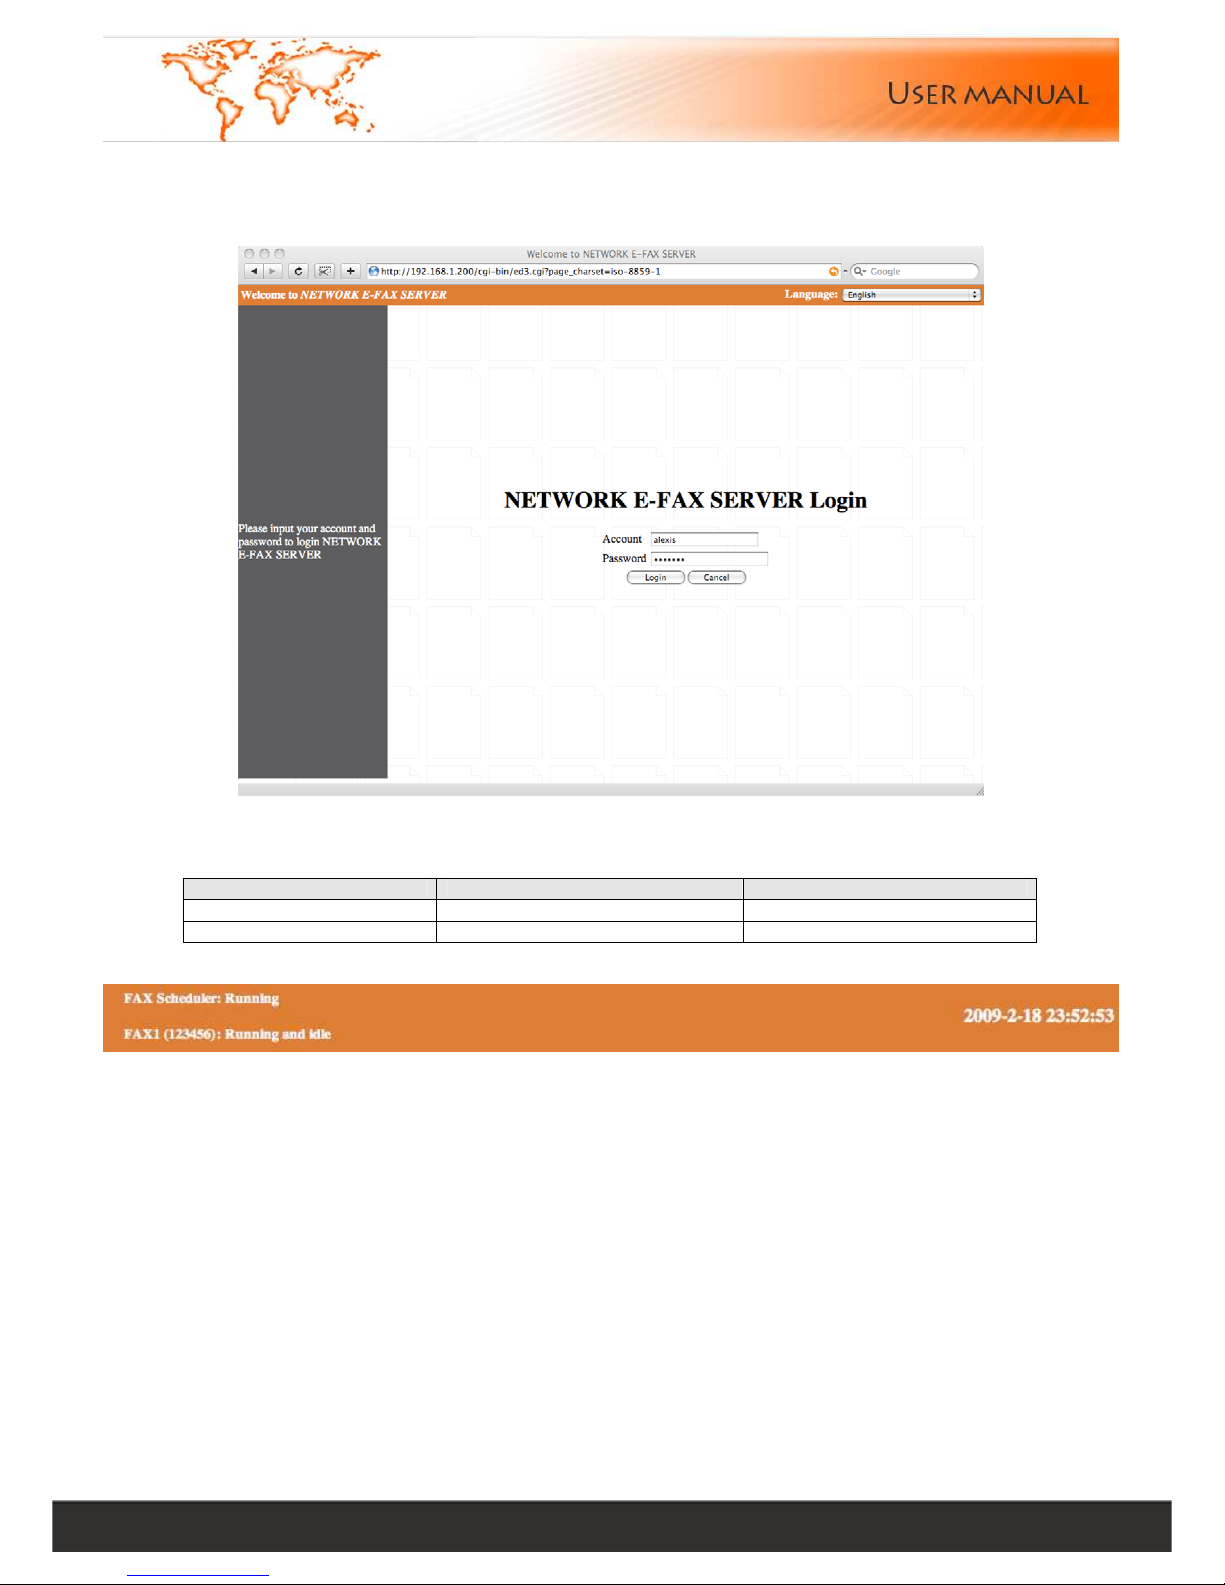
Open internet explorer, input IP address of E-Fax in the address fence. The default IP address: 192.168.1.200
Enter your user name and password in the login box ,then click “login”. It will display different interface according to
the different user’s rights.
System default users Default password Competence
admin 123456 System administrators
user 123456 Default user
Line Status:
Display the current status
Page 7
Linkcom France 7
11 rue du Soleil Levant 92140 CLAMART Copyright © 2009 – Linkcom – All rights reserved
3. Main menu
After login, the screen will show the following page
The menu item details:
Menu Description
Send FAX
Send Fax, Fax Broadcast, Intranet File Forward
Fax Folders
InBox store the sent and received private or public faxes OutBox show the
sending fax and fax queue events SentBox store your sent fax information
Phone books
Private Phone Book, Public Phone Book for all inner fax server users
Management
User Management, Department Management
My Setting
Send Preferences (the default setting for send option), My Account (user can
modify personal setting)
Server Setting
Network ,Line, Voice, Backup, Delete Rules, Time, Language, Remote Printer
Log
Fax Queue list sending and queuing tasks on server Sent list sent record
Received list received record Distribution (list distribution record)
Transmit list intranet file forward record
Tools
Server Status, Ping Test, SMTP Test, Files Delete, Parameters Backup, Update,
Factory Restore, Reboot
Download
Alternatiff , explorer plug-in download, Print Drivers
Logout
Logout system
Page 8
Linkcom France 8
11 rue du Soleil Levant 92140 CLAMART Copyright © 2009 – Linkcom – All rights reserved
4. Send FAX
4.1. Format Conversion
We need to convert the document into tiff format before sending fax. Open the document which you are ready to
send, then choose "File" --->"Print" --->"Web Printer" (see printer installation in "Download "-----" Web Printer
Download"). Document will be saved automatically in “C:\tiff” folder. The new file name=“old file name+ month +
date + time + minute.tif”
4.2. Send FAX
The menu item details:
Menu Description
File1 Click Browse option to select the send file(Tiff & pdf)
File2 Click Browse option to select the send file(Tiff & pdf)
File3 Click Browse option to select the send file(Tiff & pdf)
send Max. 3 files at
the same time
Sender Sender’s company name and sender’s name
Receiver Recipient’s company name and receiver’s name
Number Recipient fax number
Phone Books Select recipient in the list
Prefix Select the IP prefix or telephone card
Dials The retry times of this fax
Redial
intervening
Redial interval time
Validity The validation time of this fax
Priority FAX Priority Optional : HighNormal Low
Resolution FAX Resolution Optional: NormalFineSuperFine
Line Select fax line
Use Cover Enable fax cover pages
Schedule Delay fax send time to the specified time
Page 9
Linkcom France 9
11 rue du Soleil Levant 92140 CLAMART Copyright © 2009 – Linkcom – All rights reserved
4.3. Fax Broadcast
The menu item details:
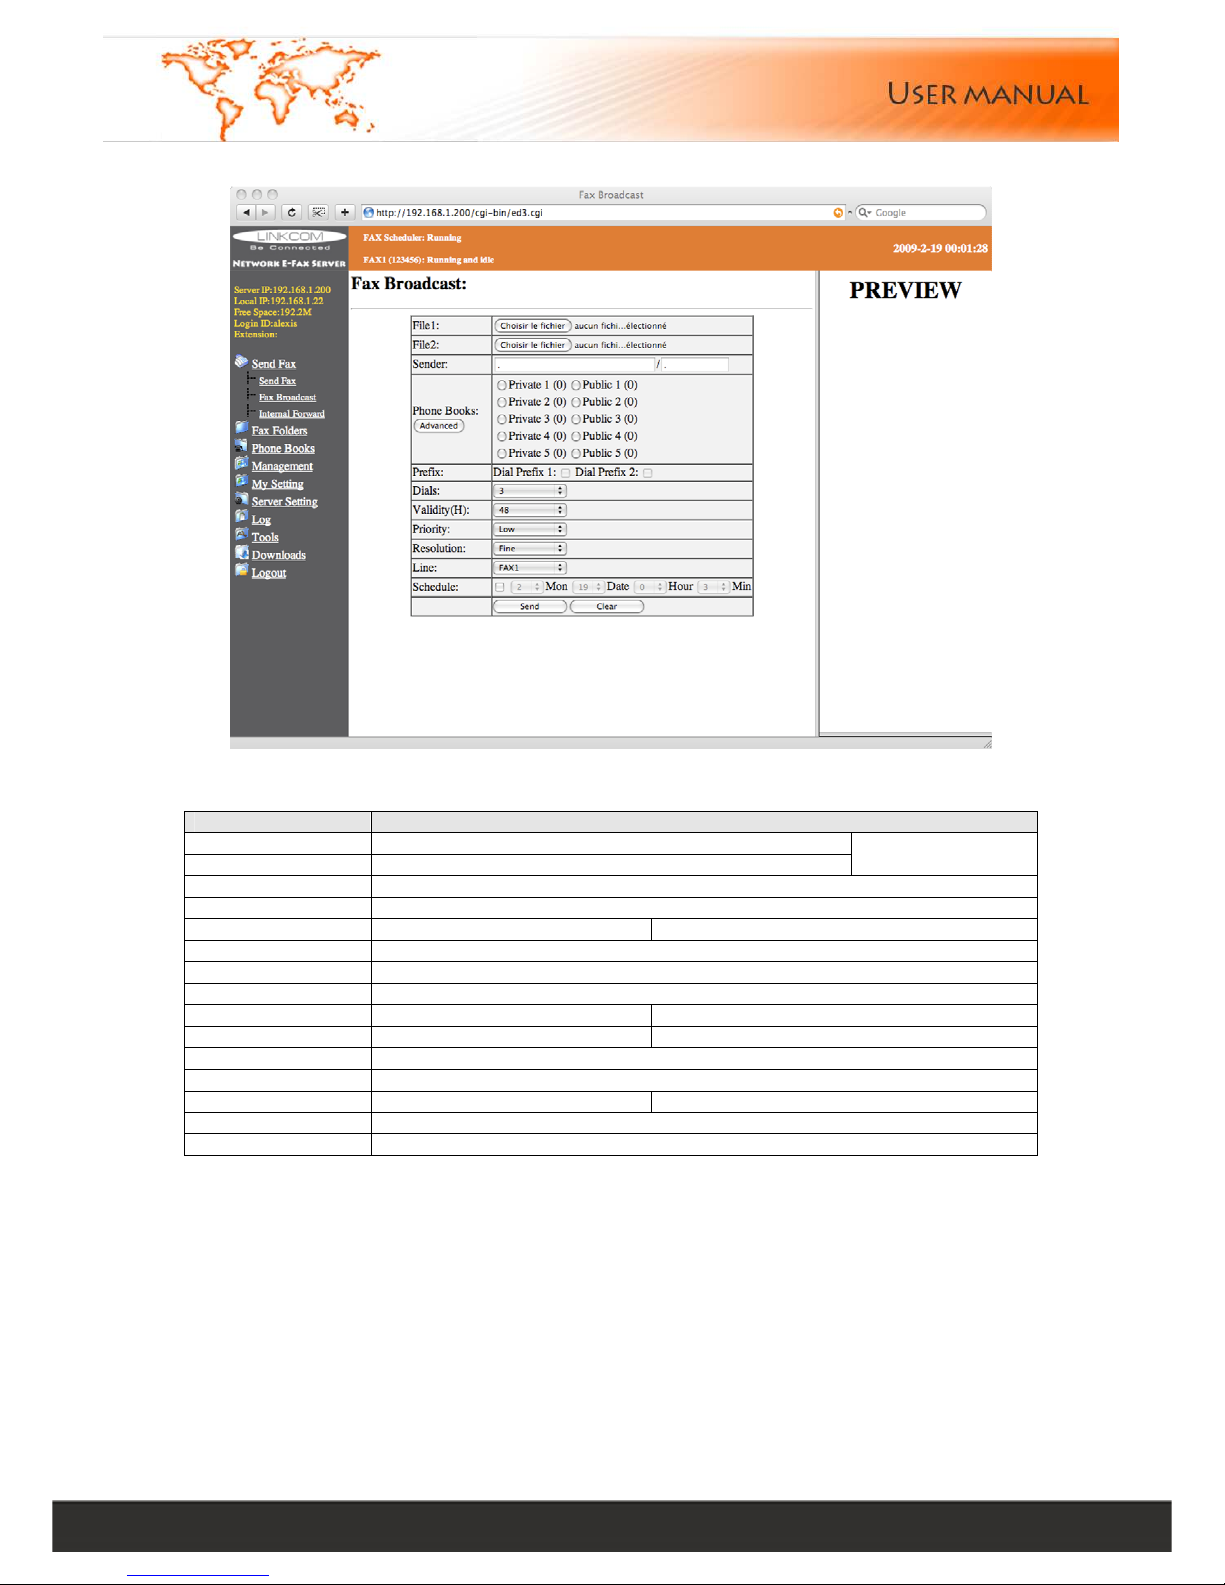
Menu Description
File1 Click Browse option to select the send file(TIFF only)
File2 Click Browse option to select the send file(TIFF only)
Send Max. 2 files
at the same time
Sender Sender’s company name and sender’s name
Receivers It will appear at the tagline
Phone Books
Select recipient in the list
Submit Max.500 faxes under this model
Prefix Select the IP prefix or telephone card
Dials The retry times of this fax
Validity(H) The validation time of this fax
Priority FAX Priority.
Optional : High/Normal/Low
Resolution FAX resolution
Optional: Normal/Fine/SuperFine
Line Select fax line
Schedule Delay fax send time at a specified time
Standard Change submitting model Submit Max.1000 faxes under this model
Manual Add one record each time
AddGroup Add the current group into fax broadcast group
Page 10

Linkcom France 10
11 rue du Soleil Levant 92140 CLAMART Copyright © 2009 – Linkcom – All rights reserved
4.4. Internal File Forward
The menu item details:
Menu Description
File Choose Browse option and select the send file (Format: Any)
Receivers Display recipient list
E-Fax Users Choose intranet fax users, click the name and it will be added to the recipient
list
Page 11
Linkcom France 11
11 rue du Soleil Levant 92140 CLAMART Copyright © 2009 – Linkcom – All rights reserved
5. Fax Folders
5.1. InBox
The menu item details:
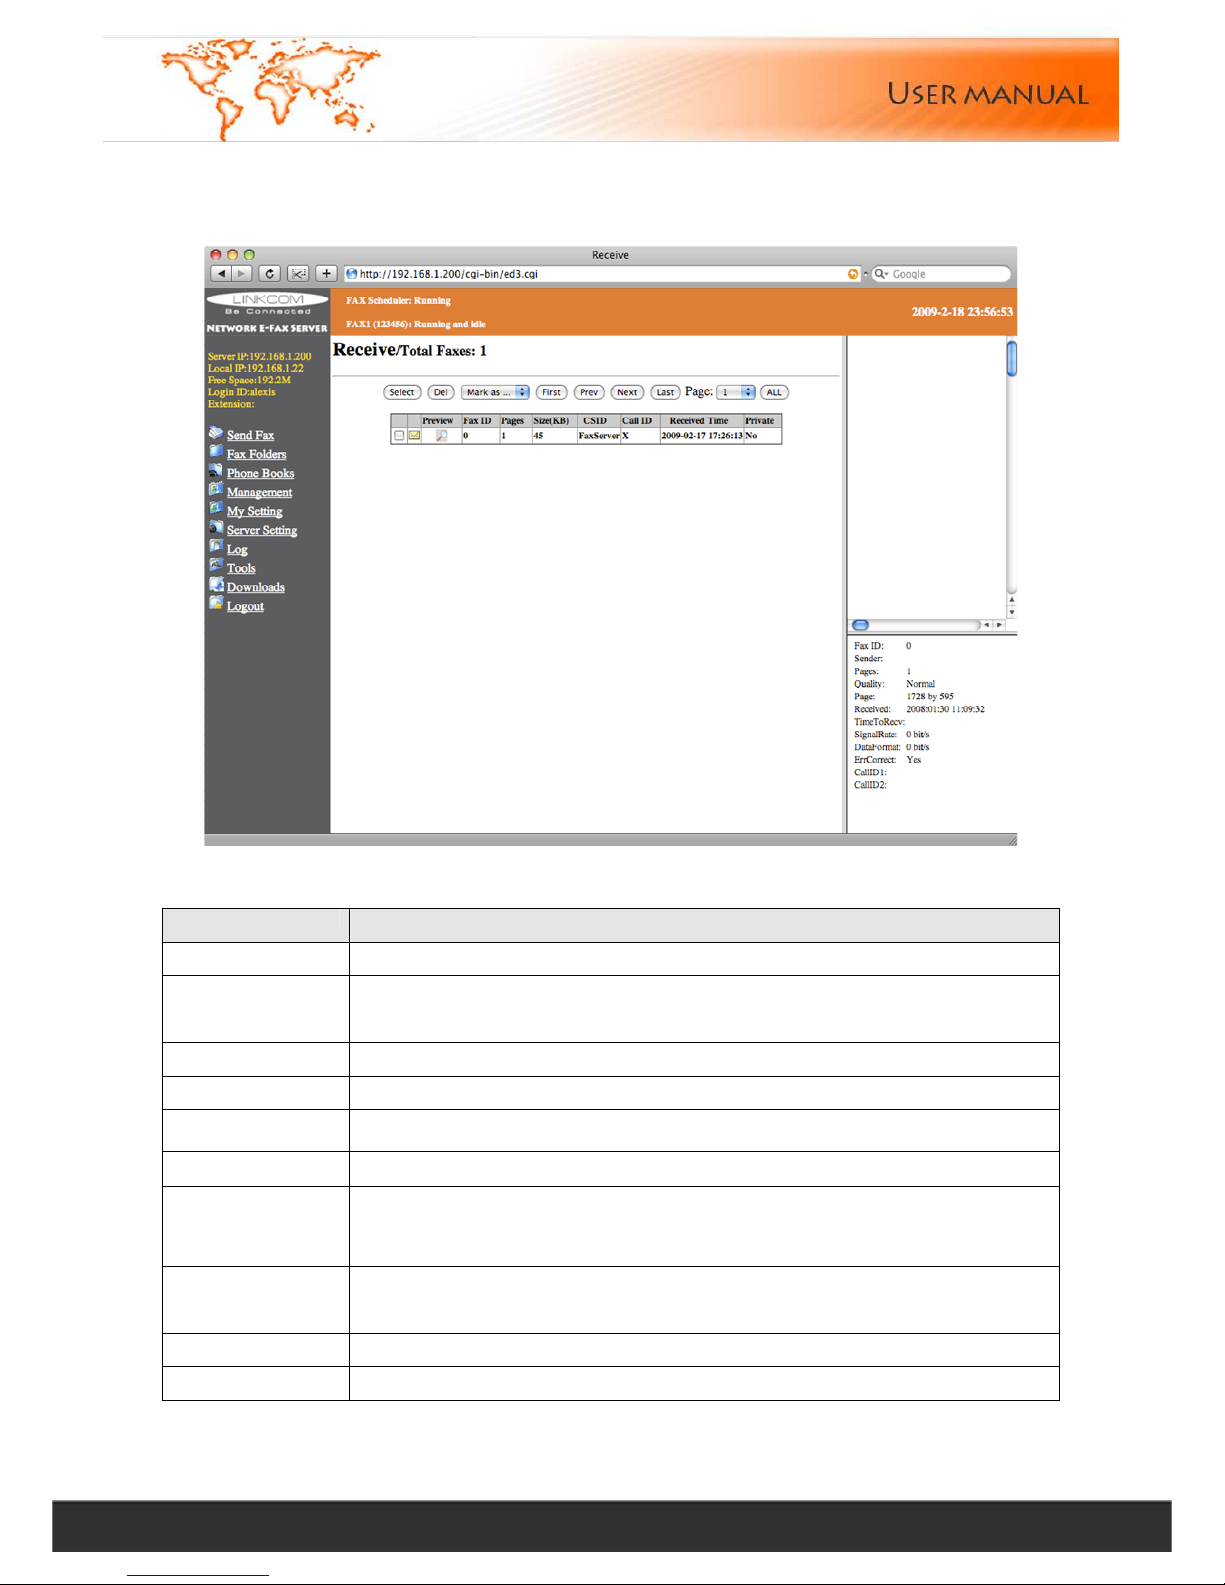
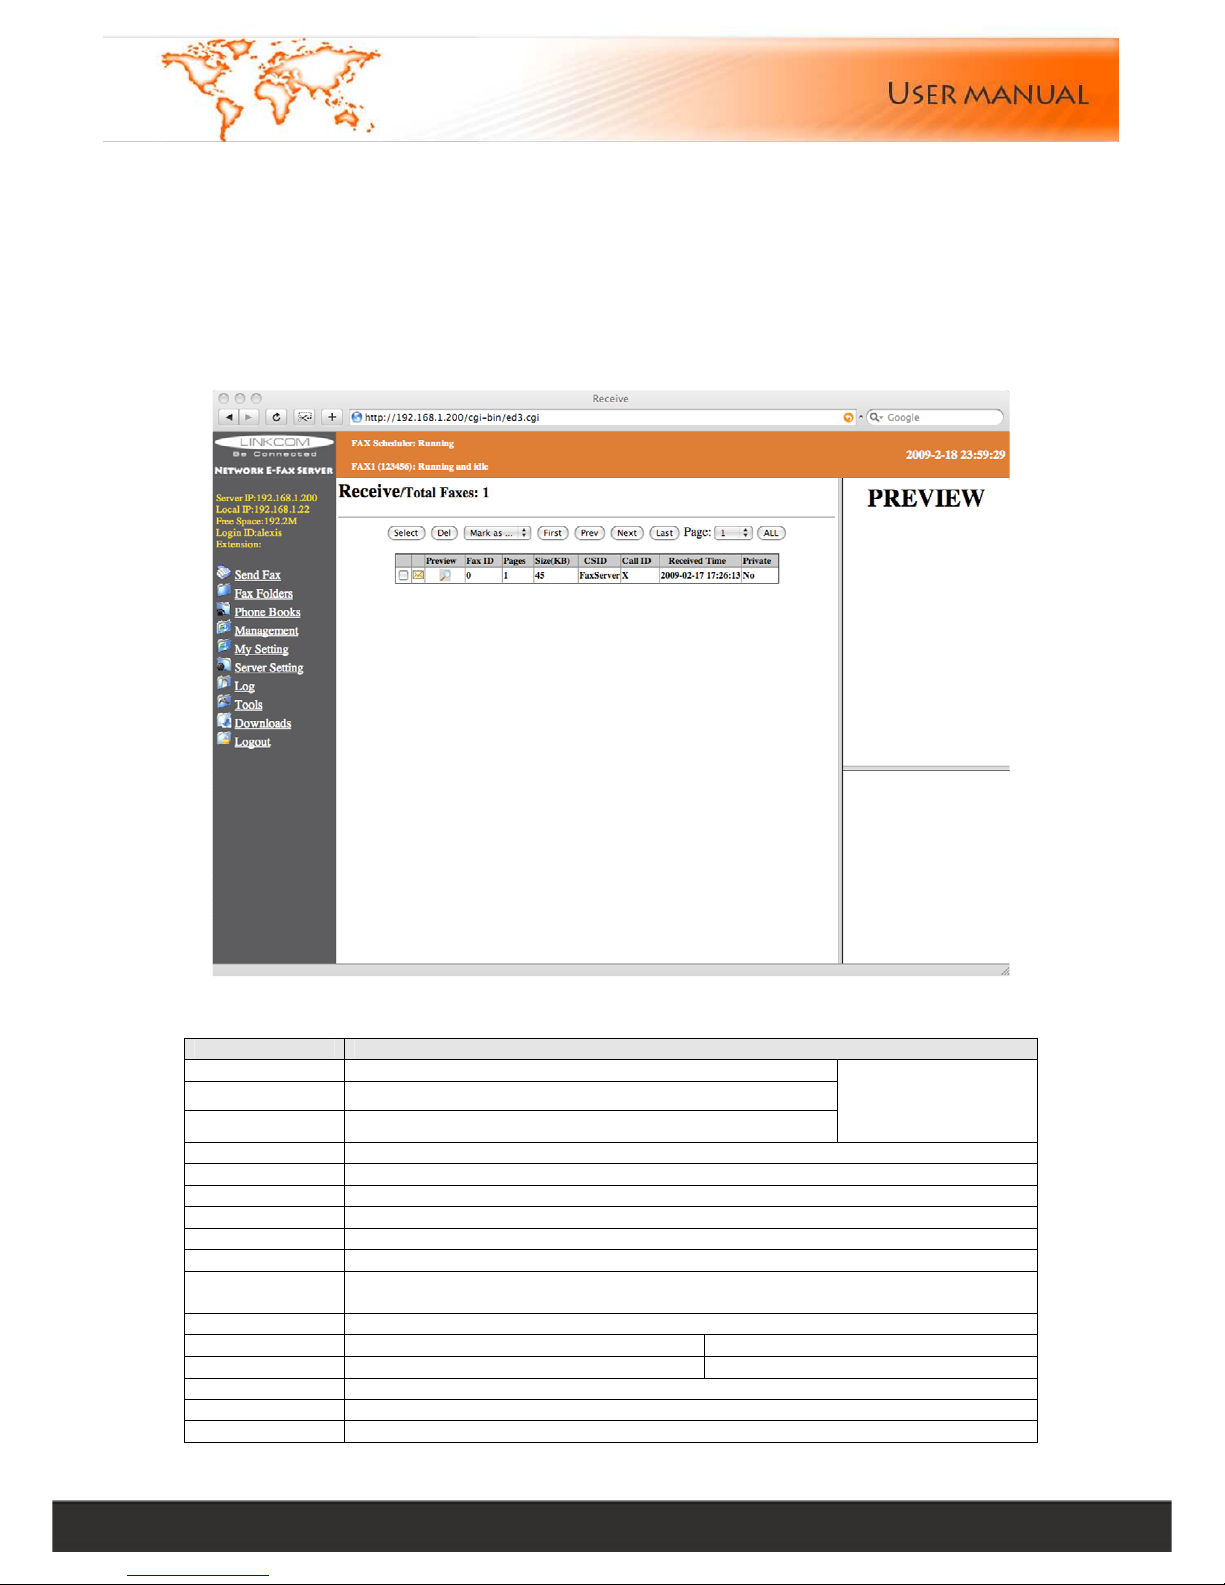
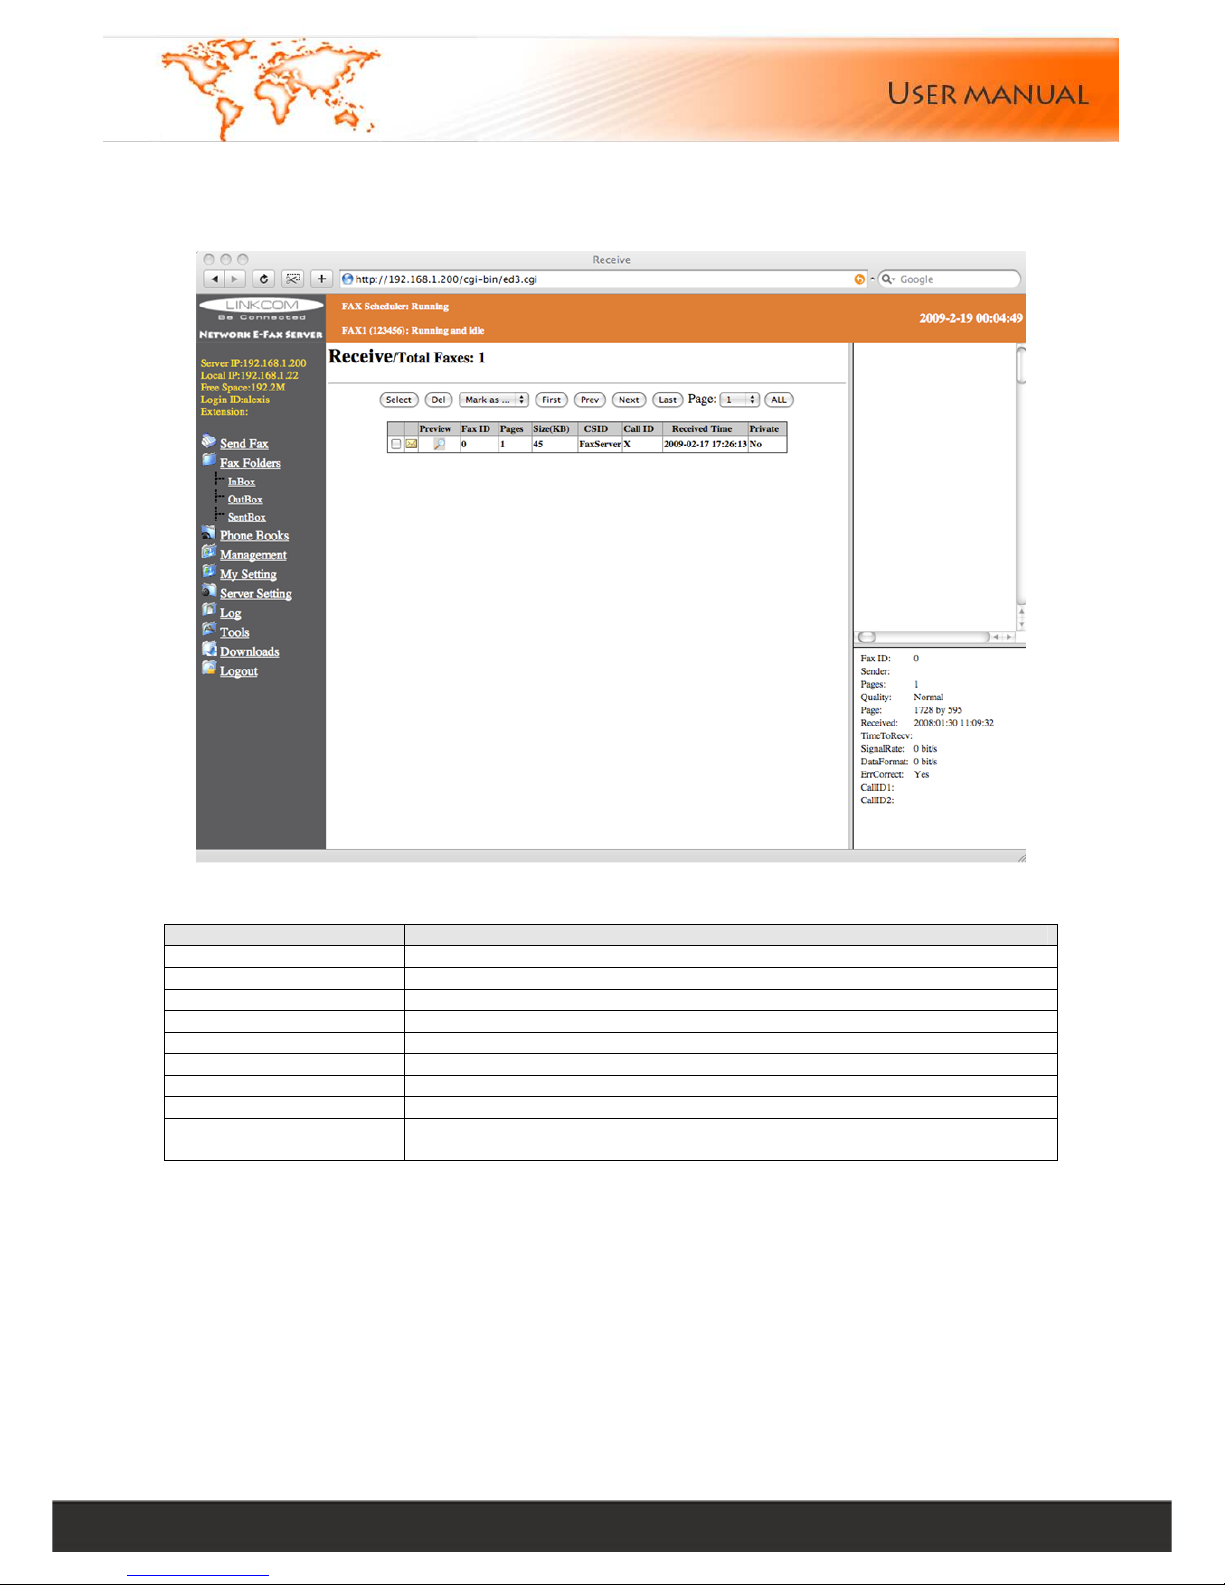
Menu Description
Select Select all or deselect to the selection
Del Delete the selected fax file
Mark as... Mark a fax as unread, read or star
First Return to the first page
Prev Previous page
Next Next page
Last Last page
All List all fax documents
Note
Click the fax ID to open the fax in a new window
Need to install AlternaTIFF and internet explorer plug-in for Preview
5.2. OutBox
Only display the user’s own sending and queuing tasks, and the completed tasks will be moved to SentBox
5.3. SentBox
Only display user’s own completed faxes (excluding "Intranet File Forward"), this will be kept three days
Page 12
Linkcom France 12
11 rue du Soleil Levant 92140 CLAMART Copyright © 2009 – Linkcom – All rights reserved
6. Phone books ( support UTF8)
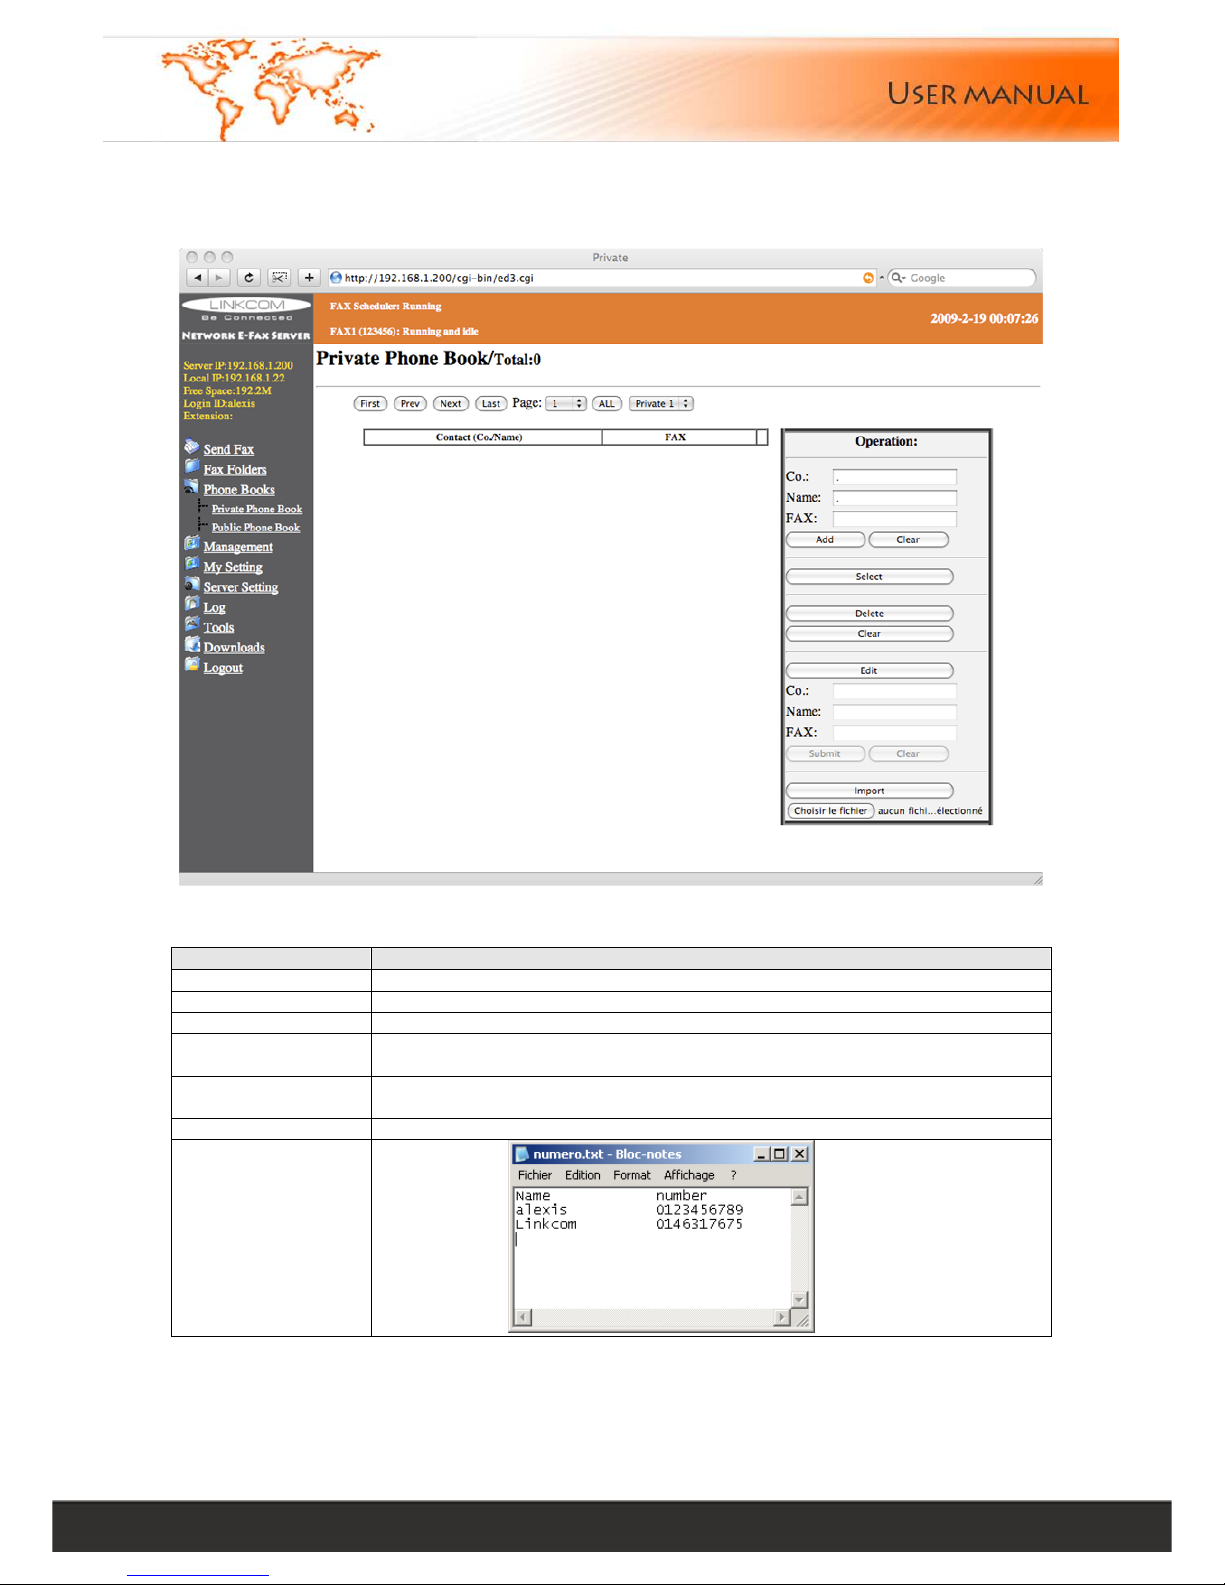
6.1. Private phone book
The menu item details:
Menu Description
Select Select all or deselect to the selection
Add Add a new telephone record
Clear Clear the current input information
Delete Select the corresponding records and click "Delete" button, the telephone
records will be deleted
Edit
Select the corresponding records and click "Edit" button, after the
completion of edit ,click on "Submit" to store the telephone records changes
All Display all fax numbers of one phone book
Import
Group import:
Page 13
Linkcom France 13
11 rue du Soleil Levant 92140 CLAMART Copyright © 2009 – Linkcom – All rights reserved
Numbers of
Private phone
books
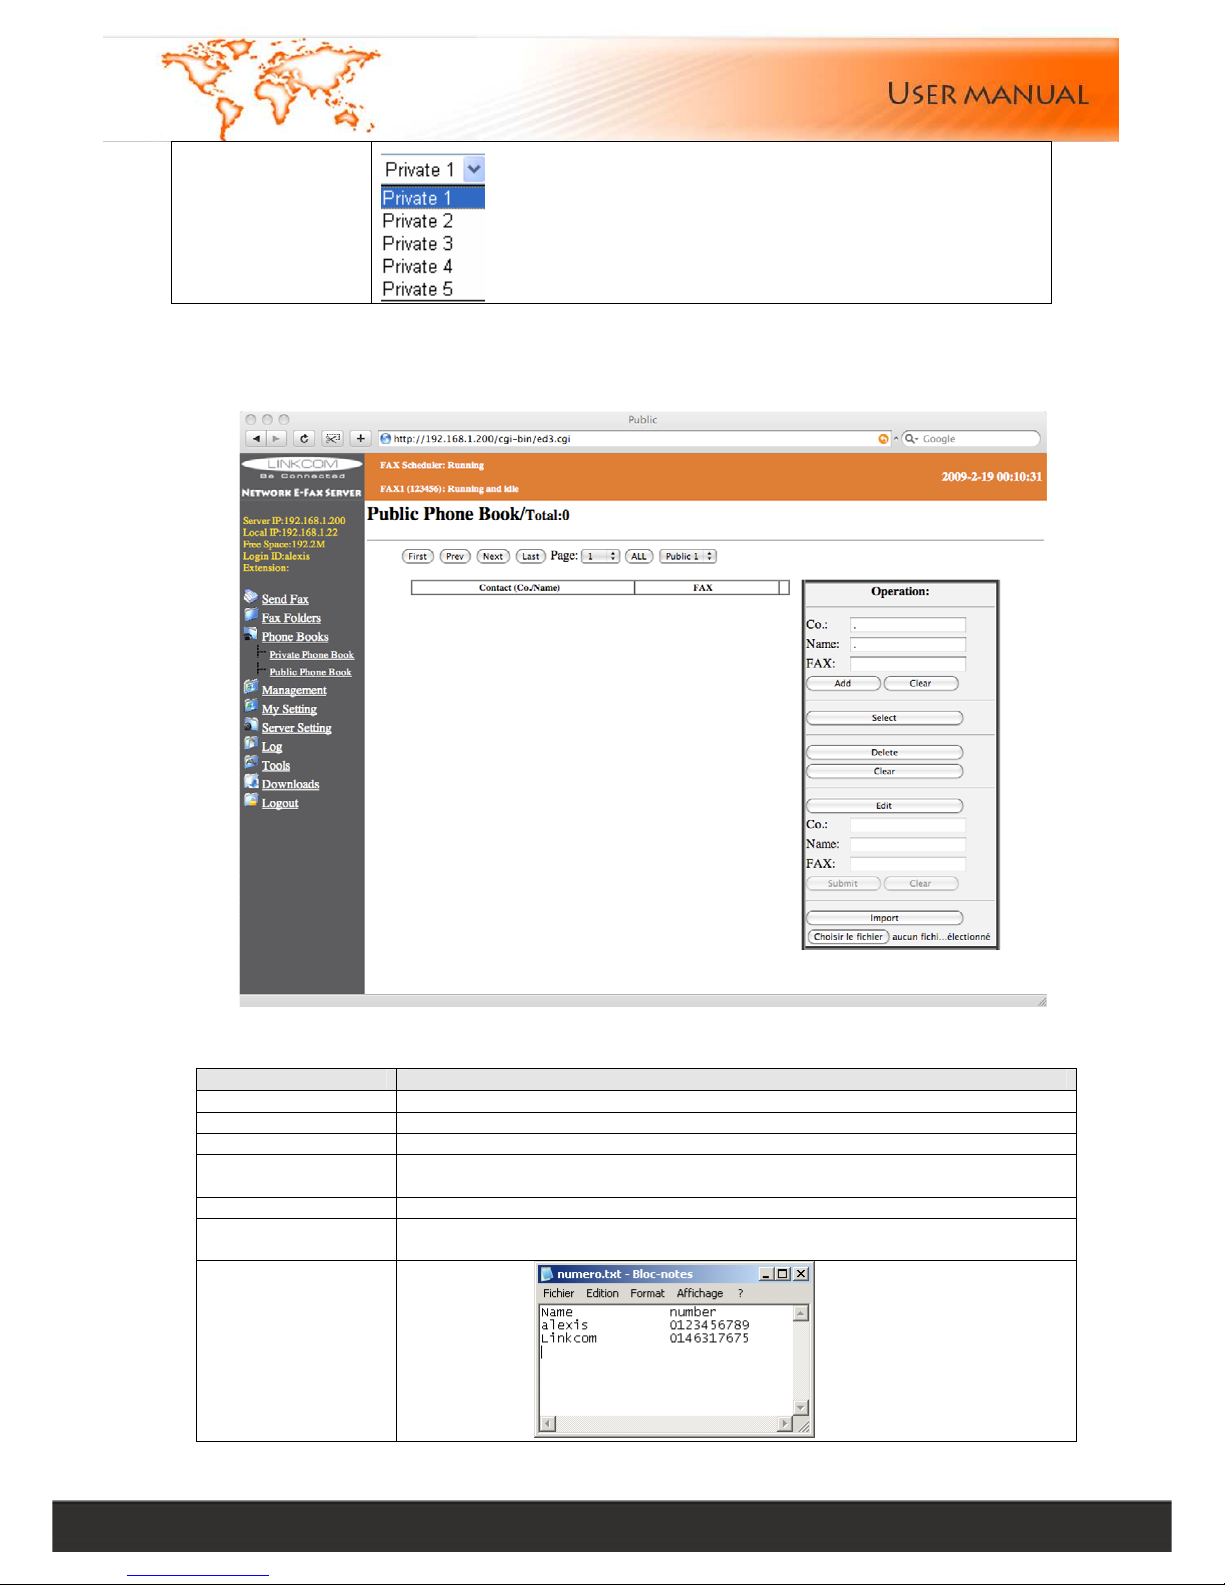
6.2. Public phone book
All user can add or delete public phone book in phone number
The menu item details:
Menu Description
Select Select all and deselect to the selection
Add Add a new telephone records
Clear clear the current input information
Delete Select the corresponding records and click "Delete" button, the telephone
records will be deleted
Clear Clear all records in phone book
Edit
Select the corresponding records and click "Edit" button, after the
completion of edit ,click on "Submit" to store the telephone records changes
Import
Group import:
Page 14
Linkcom France 14
11 rue du Soleil Levant 92140 CLAMART Copyright © 2009 – Linkcom – All rights reserved
7. Management
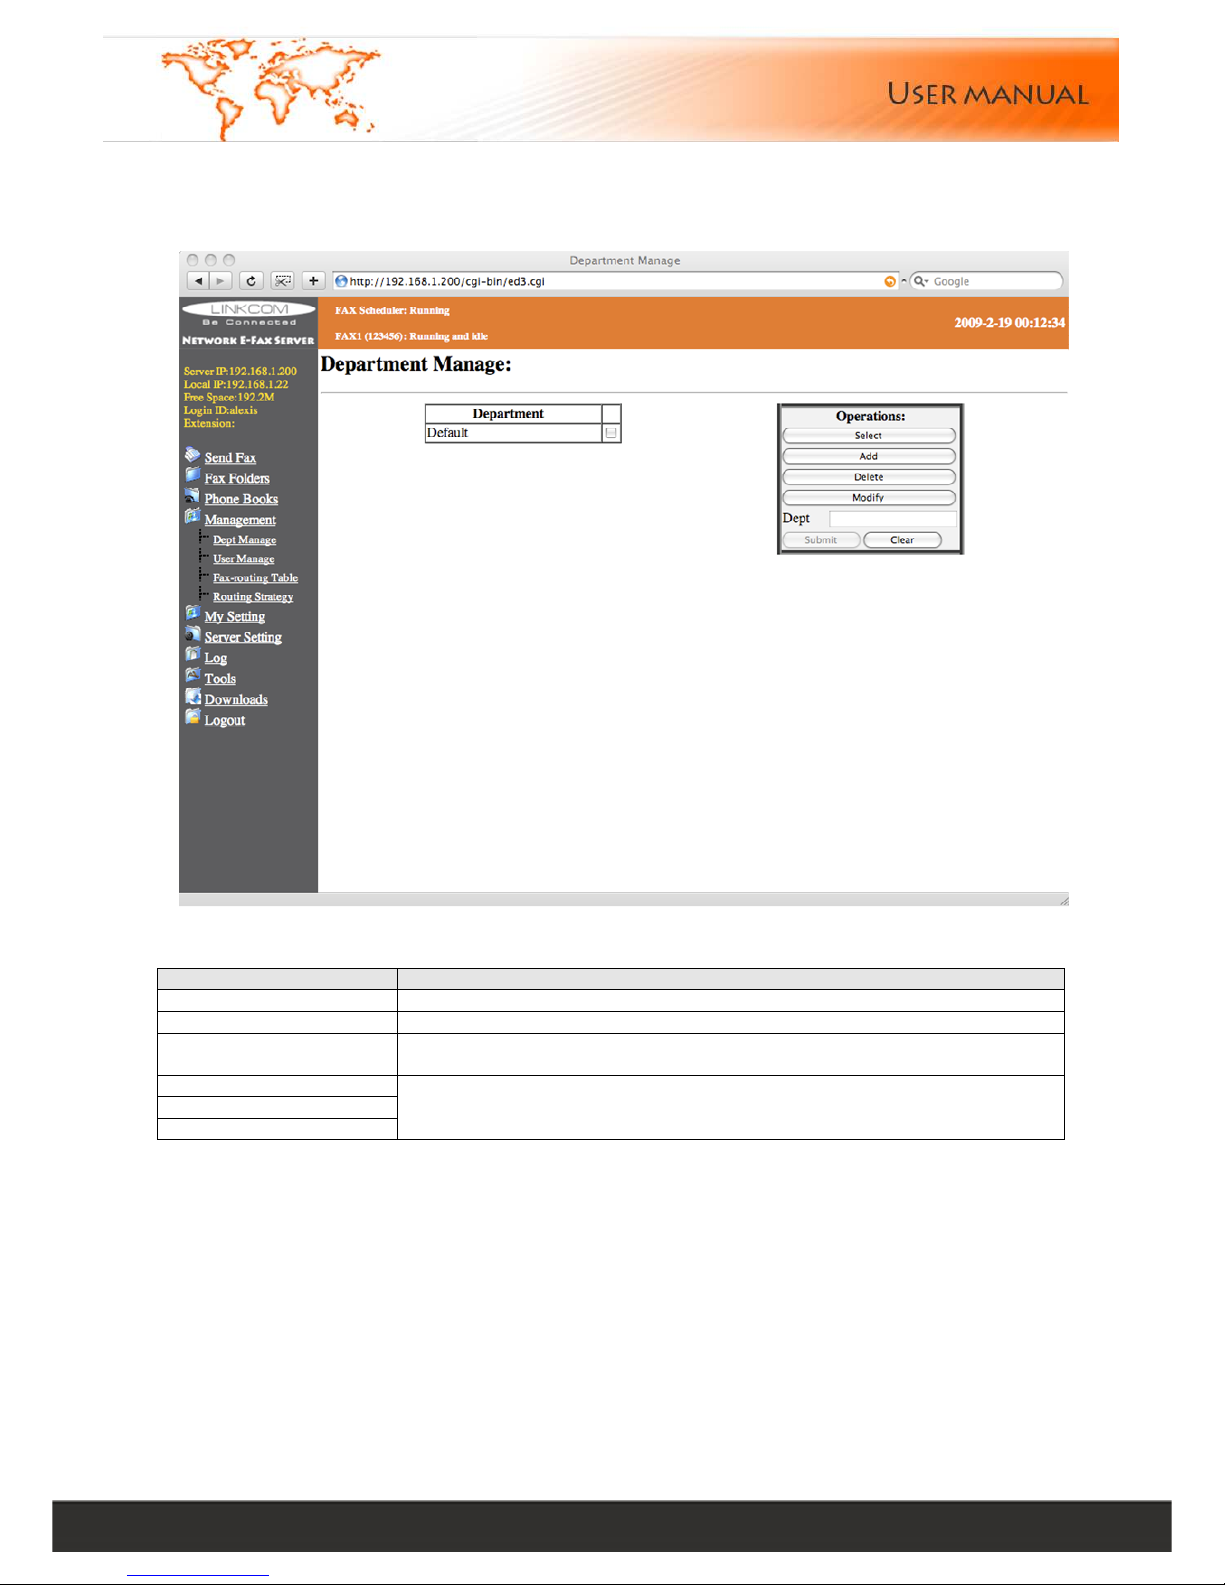
7.1. Dept Manage
The menu item details:
Menu Notes
Select Select all and deselect to the selection
Add In "Dept" window, input department name then click the “Add”
Delete Select the corresponding department and click "Delete" button, the
department will be deleted
Modify
Submit
Clear
Selected a department, click "Modify" to change the department name,
click "Submit" to save change, or click "Clear" to cancel modify
7.2. User Manage
Use the system administrator privileges user login to system, click "Management"----"User Manage" open the user
manage interface
7.2.1. Add User
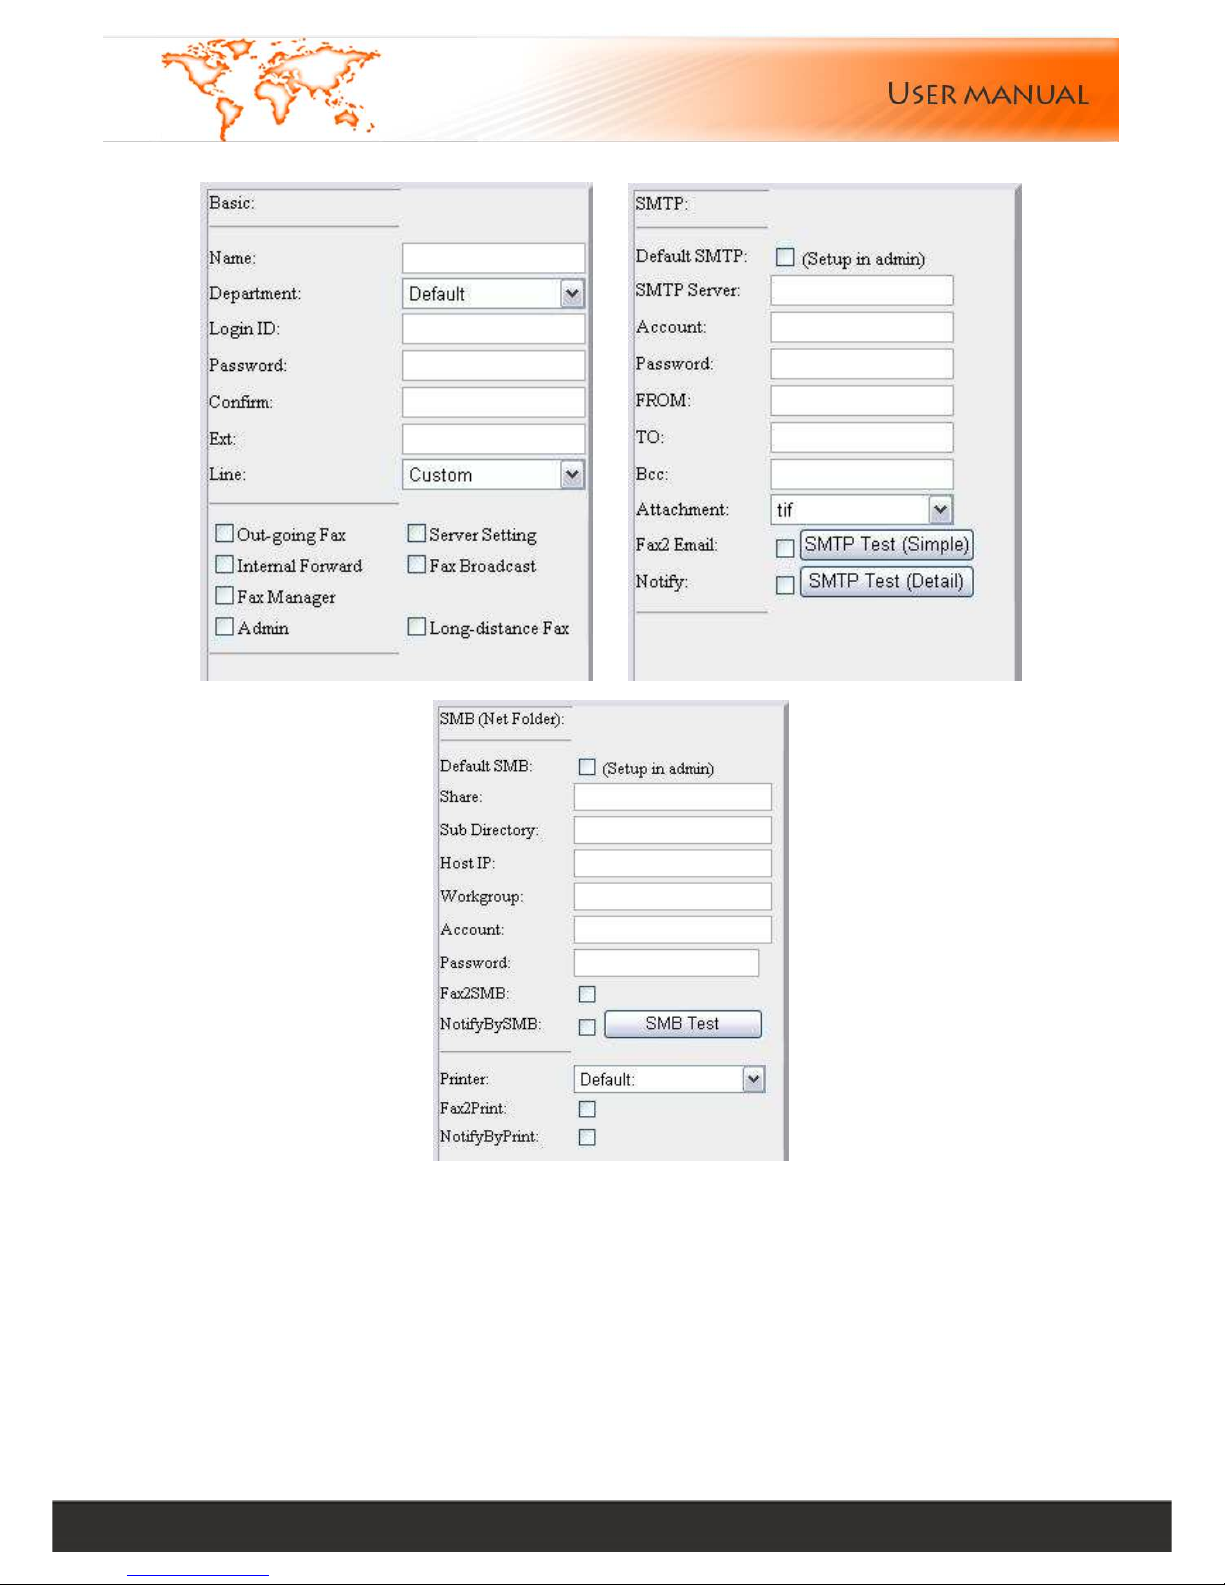
Input Name, Department, Login ID, Ext, Passwords, user rights and email info on the right side of User management
pages. After input click "Add" button to save
Page 15
Linkcom France 15
11 rue du Soleil Levant 92140 CLAMART Copyright © 2009 – Linkcom – All rights reserved
For each user, you can set the following user rights
Page 16
Linkcom France 16
11 rue du Soleil Levant 92140 CLAMART Copyright © 2009 – Linkcom – All rights reserved
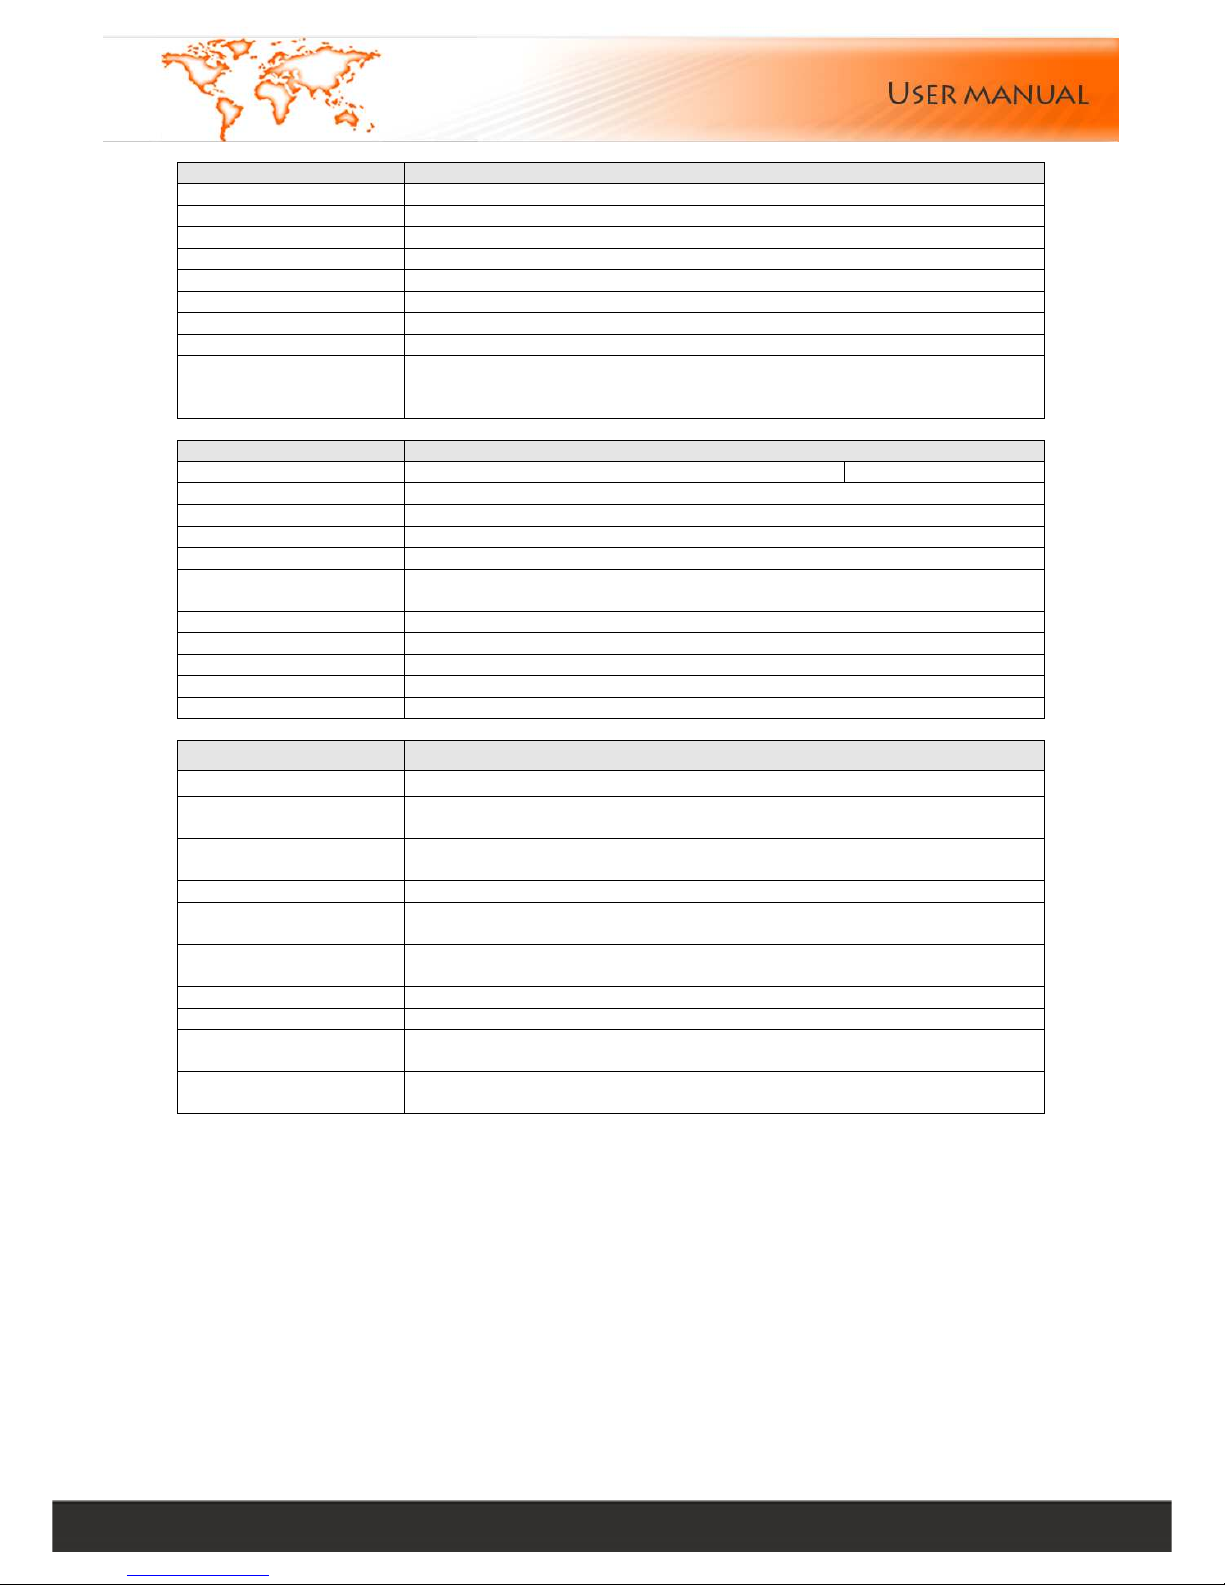
Menu Description
Out-going Fax User has right to send fax
Server setting User has right to set server parameter
Internal File Forward User has right to forward file on a network or through an intranet
Broadcast Fax User has right to send broadcast fax
Fax Manager User has right to receive public fax
Signature User has right to sign on the fax
Administrator User has right to manage user’s and department’s faxes
Long-distance Fax User has right to dial the fax number with the prefix of 0 or 1
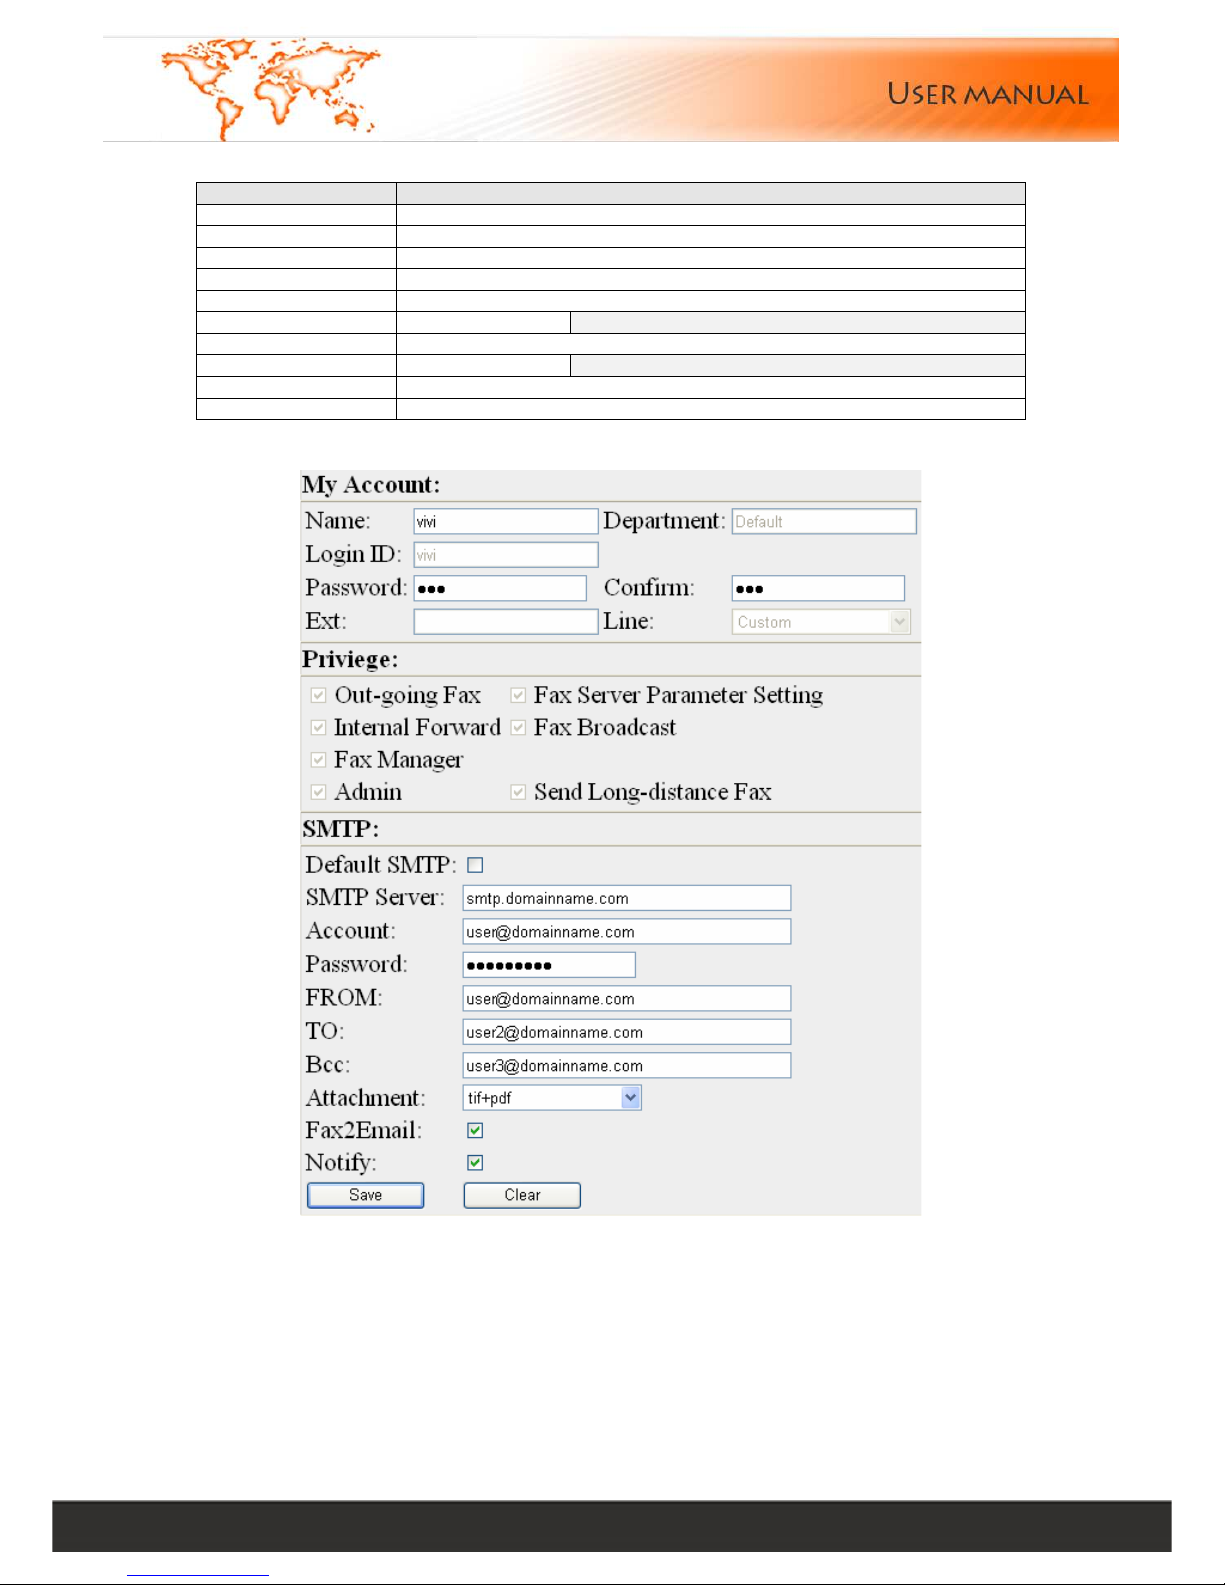
Default SMTP E-Fax supports setting the value of “SMTP Server”, “Account”,
“Password” and “FROM” with admin account as the default STMP
setting for other users.
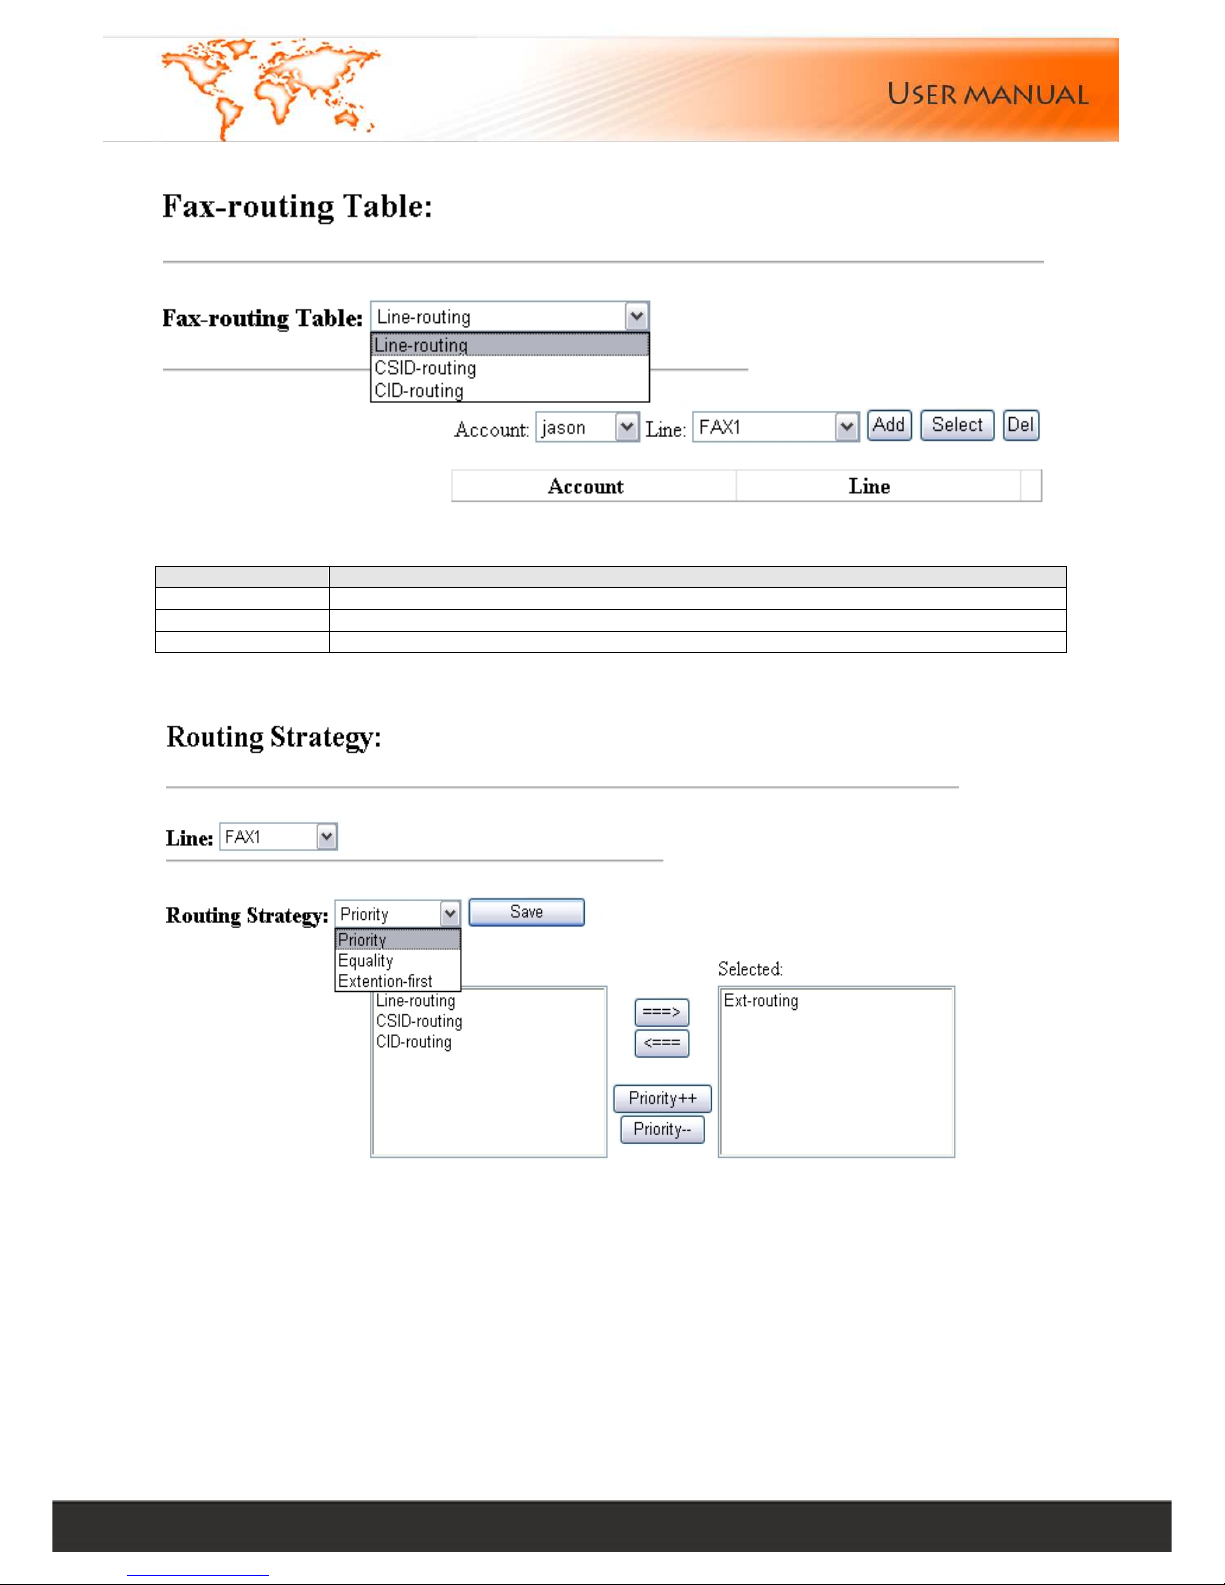
Menu Description
SMTP Server Input the domain or IP address of SMTP server e.g. smtp.host.com
Account Input sender’s e-mail accounts
Password Input sender’s e-mail login password
FROM Full path of E-mail Address
TO Input E-mail address to receive fax
Bcc
Send blind carbon copies to list, List should be a comma-separated list
of names.
Attachment Email received format
Fax2Email Enable fax to Email
Notify By Email E-mail informs user of done or failed transmission
SMTP Test (Simple) Start SMTP Test, test result without test log
SMTP Test (Detail) Start SMTP Test, test result with detail test log
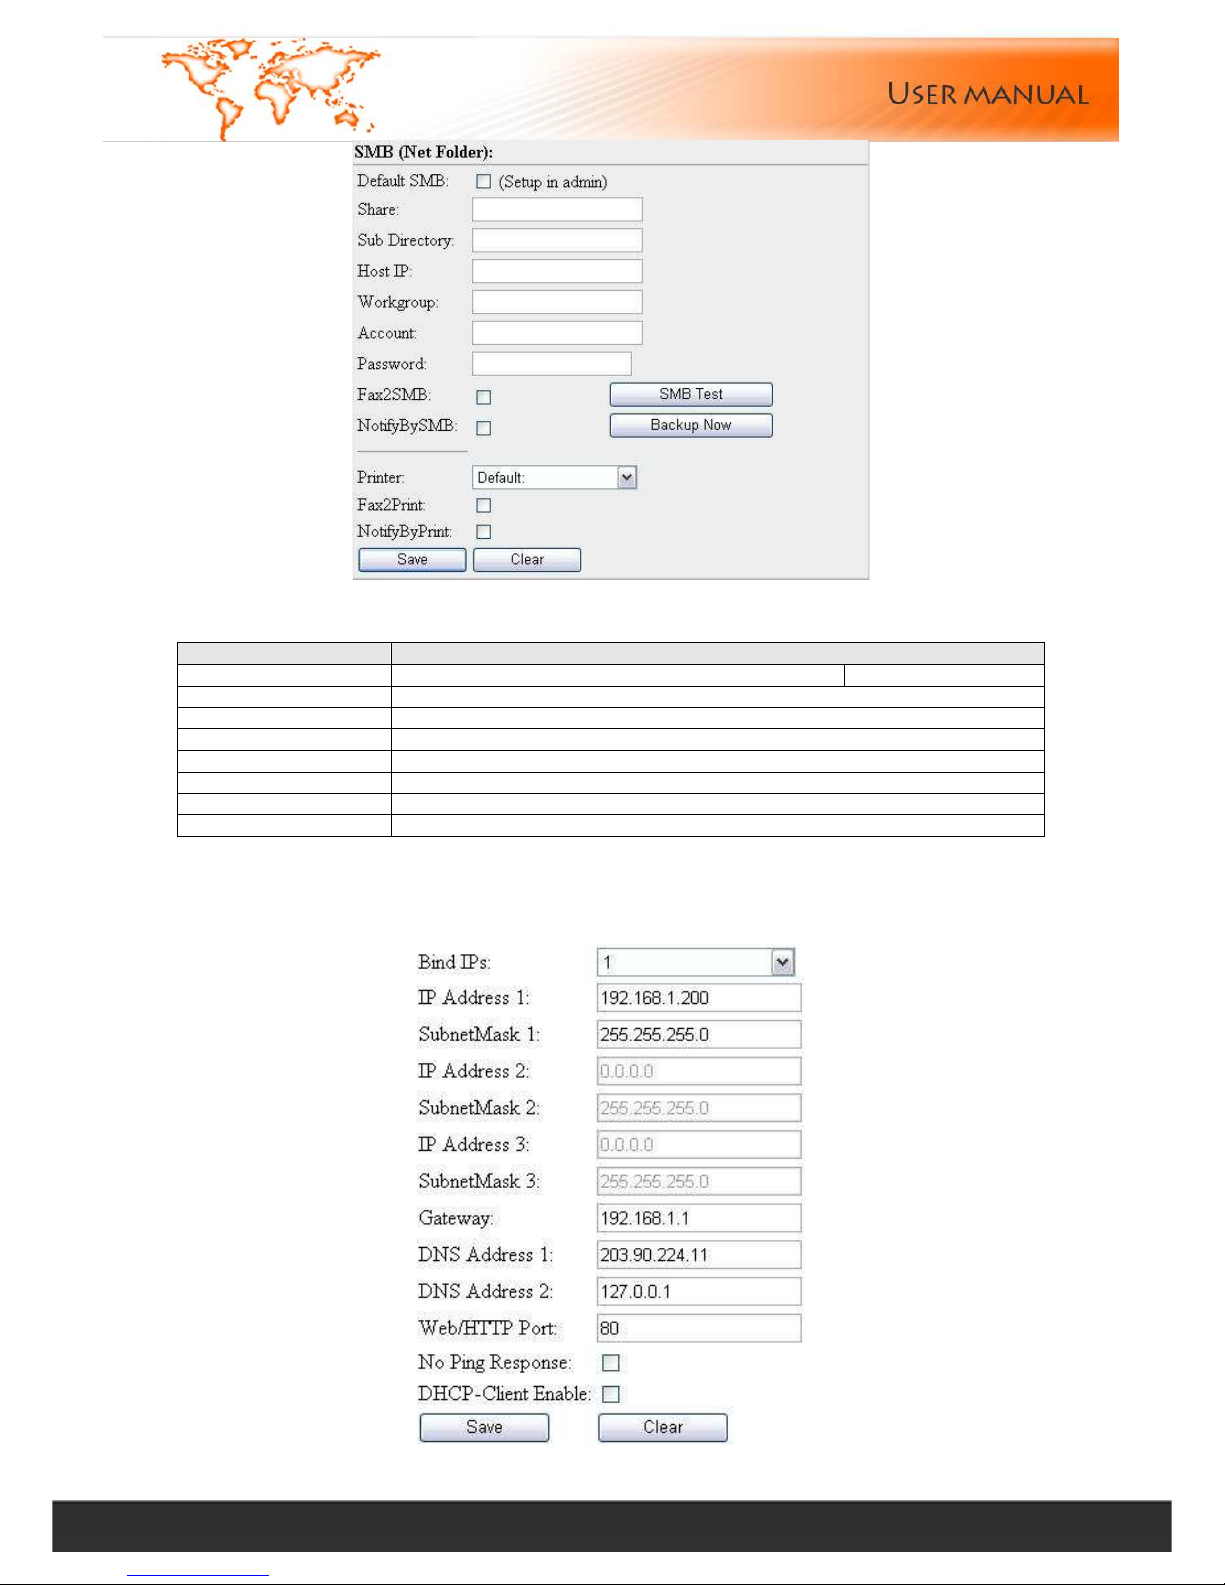
Menu Description
Default SMB
Select Default SMB, then other users share the admin’s setup
*Share
Specified Share Root Directory (Required information), Ensure share
path is with ASCII characters and no blank
Sub Directory
Specify Sub Directory of the Share Directory, under Root Directory. If
Sub Directory is not existed, it will be generated automatically.
*Host IP Specify the Share Server’s IP(TCP/IP4) address
Workgroup
Specify the workgroup, if no workgroup to be managed, it allows be
blank.
Account
The account of the specified Share Server Note: This account
requests permissions for the share folder
Password The password of the specified Share Server
Fax2SMB Enable the share function of SMB
NotifyBySMB
Allows to auto-store the received or sent faxes to any one share folder
over LAN
SMB Test
For test. Ensure setup is right, and click SMB Test, E-Fax will auto-
generate a test paper in the specified share directory
7.2.2. Delete User
Select the corresponding user and click "Delete" button, the user will be deleted
7.2.3. Edit User
Select a user then click "Modify" button to modify the user info
Page 17
Linkcom France 17
11 rue du Soleil Levant 92140 CLAMART Copyright © 2009 – Linkcom – All rights reserved
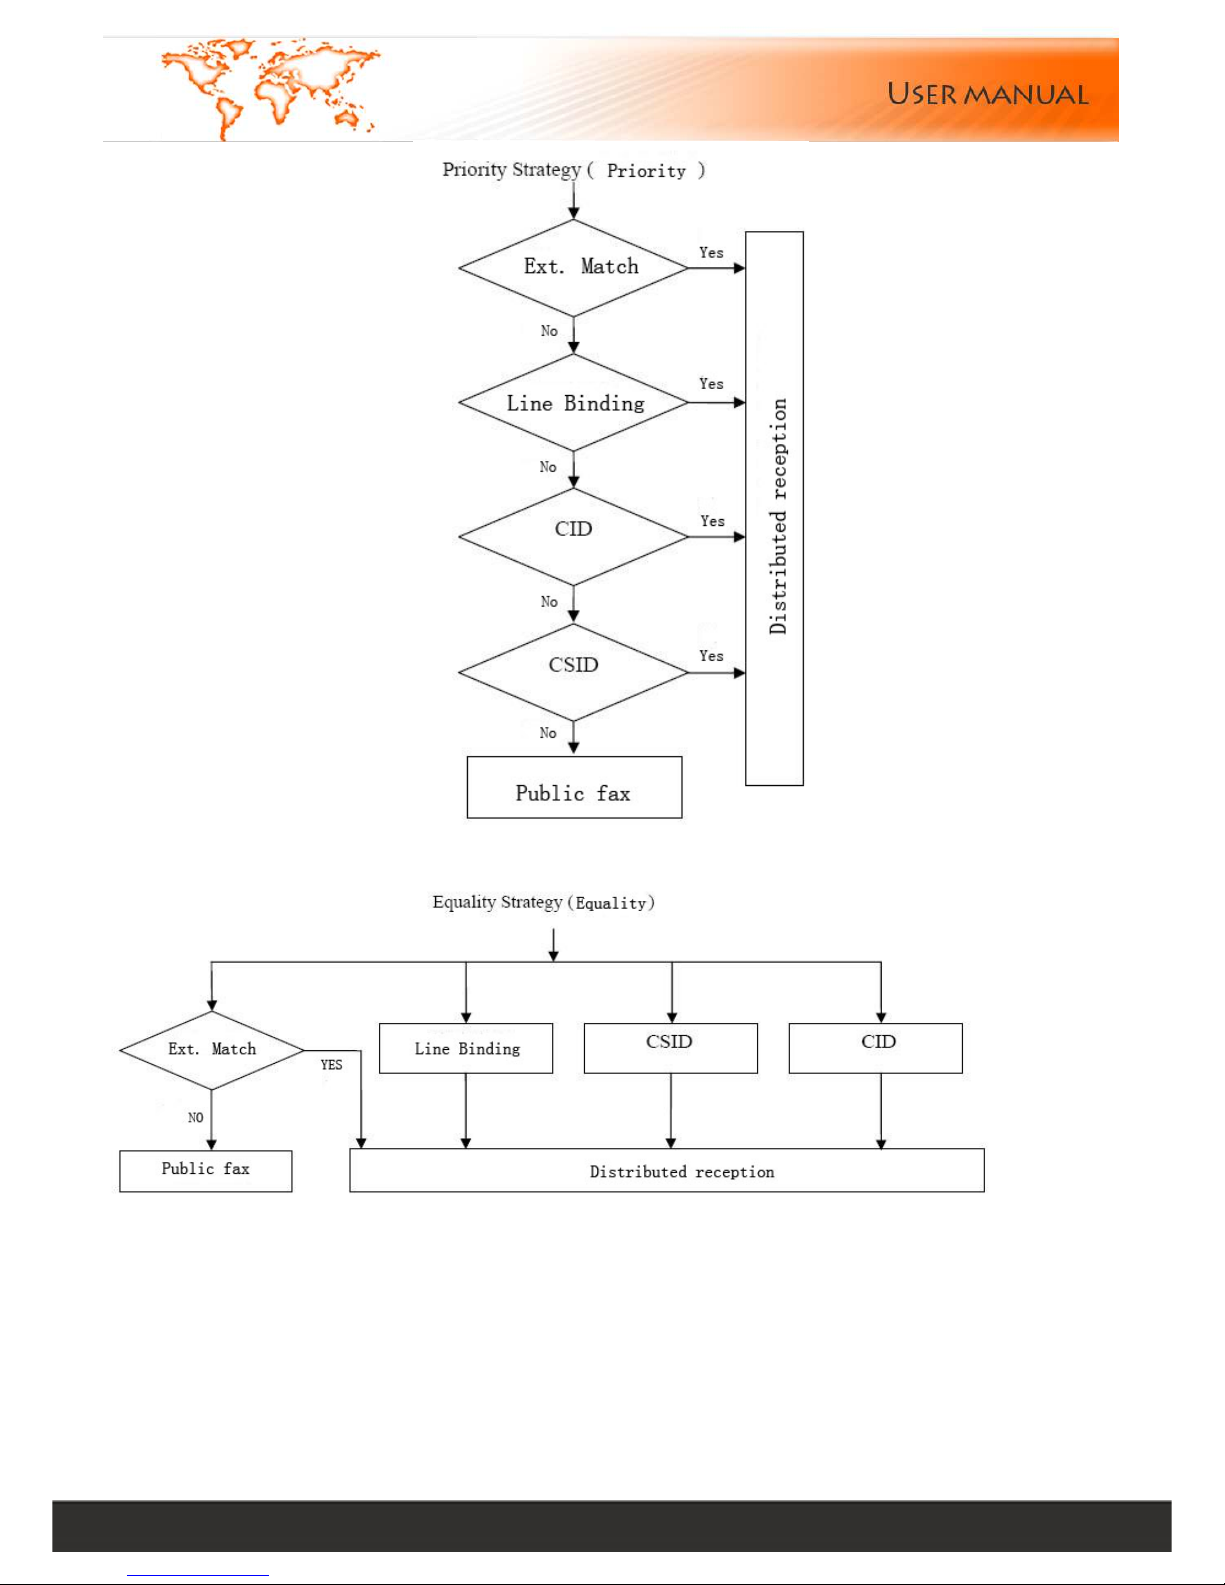
7.3. Fax-routing Table
The definition of line routing, fax identifier routing (CSID) and telephone number routing (CID)
Menu Description
Line Routing Route all incoming faxes of “FAX1” or “FAX2” to specify the user
CSID Routing Route all matched CSID faxes to specify the user
CID Routing Route all matched CID faxes to specify the user
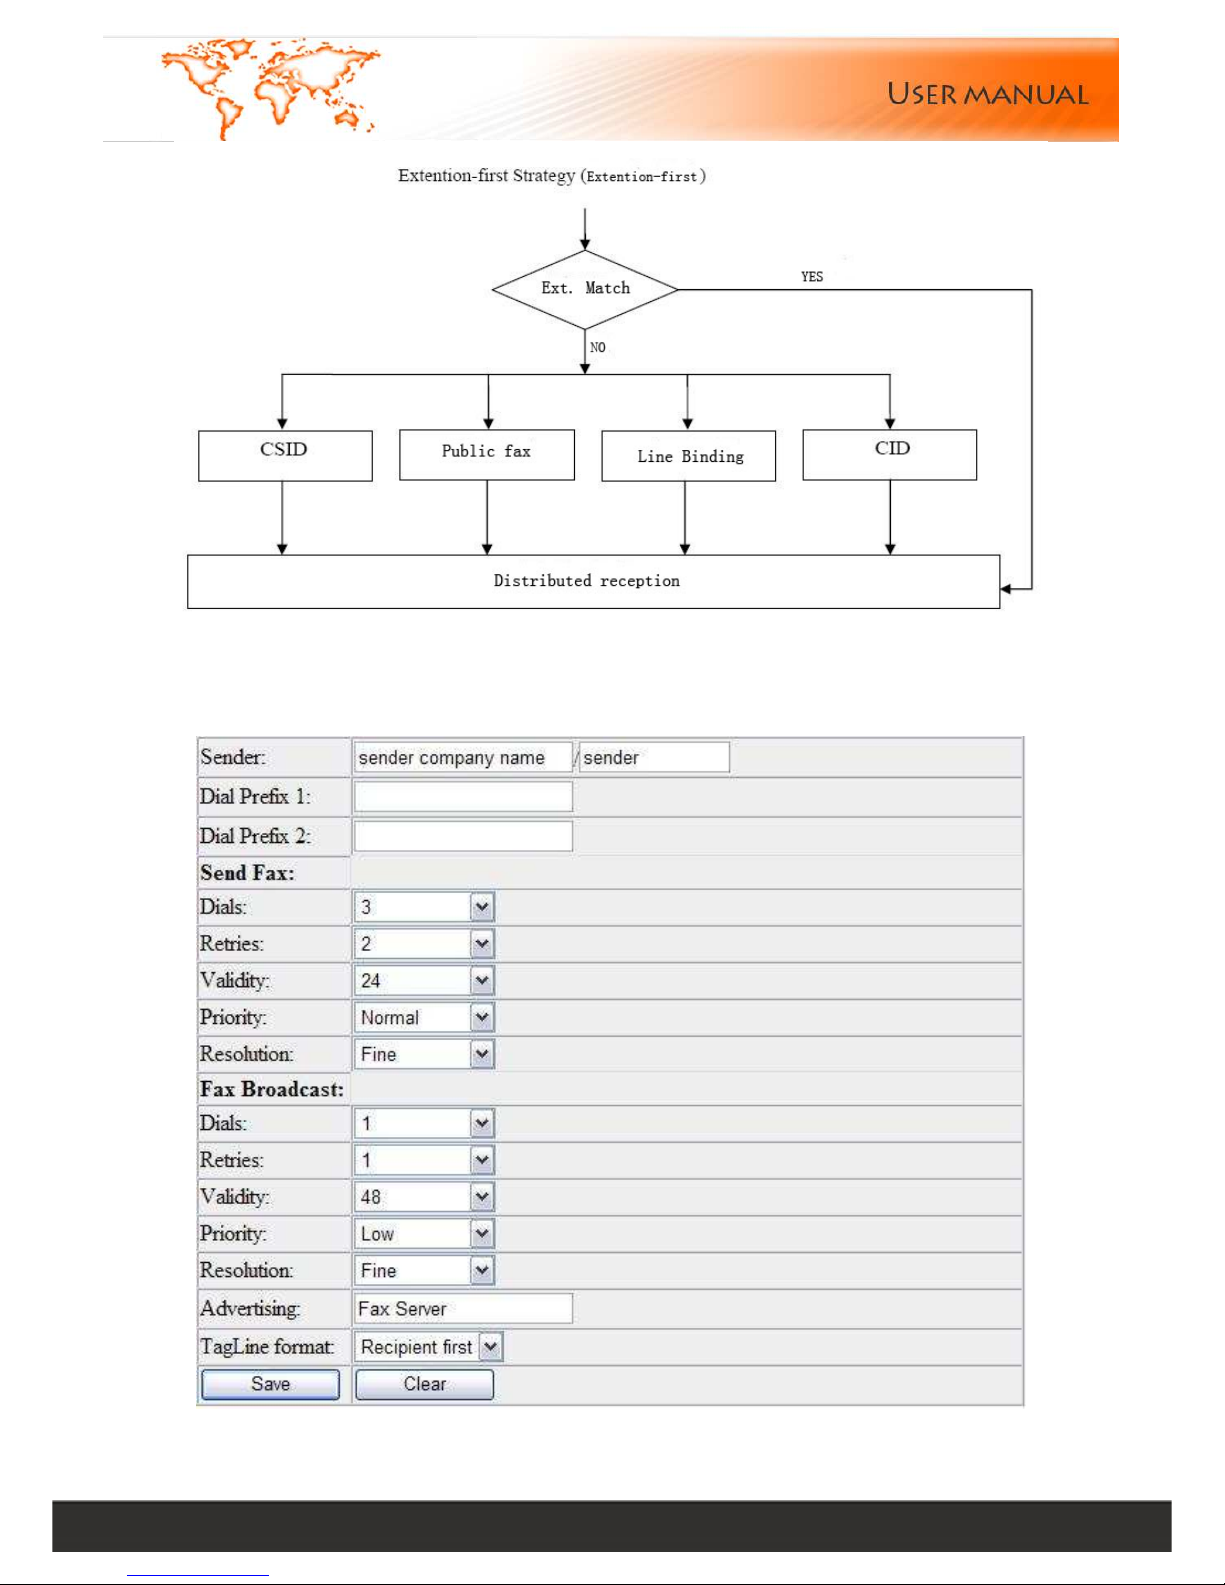
7.4. Routing Strategy
The strategy of incoming fax routing: priority strategy, parity strategy, ext. priority strategy
Page 18
Linkcom France 18
11 rue du Soleil Levant 92140 CLAMART Copyright © 2009 – Linkcom – All rights reserved
Page 19
Linkcom France 19
11 rue du Soleil Levant 92140 CLAMART Copyright © 2009 – Linkcom – All rights reserved
8. My Setting
8.1. Send Preferences
Page 20
Linkcom France 20
11 rue du Soleil Levant 92140 CLAMART Copyright © 2009 – Linkcom – All rights reserved
The menu item details:
Menu Description
Sender Sender’s company name and sender’s name
Dial Prefix 1 Input dial prefix 1
Dial Prefix 2 Input dial prefix 2
Dials Dial times
Retries Retry times
Priority Fax priority
Options : HighNormalLow
Validity The validation times of this fax
Resolution Fax resolutions
Options: NormalFineSuperFine
Advertising Input advertising words and will be displayed at the header
TagLine format Display the recipient firstly or sender firstly
8.2. My Account
Page 21
Linkcom France 21
11 rue du Soleil Levant 92140 CLAMART Copyright © 2009 – Linkcom – All rights reserved
The menu item details:
Menu Description
SMTP Server Input the domain or IP address of SMTP server e.g. smtp.host.com
Account Input sender’s e-mail account
Password Input sender’s e-mail login password
FROM Full path of E-mail Address
TO Input e-mail address to receive fax
Attachment Email received format
Fax2Email Enable fax to email
Notify By Email Notice by email after sending fax
9. Server Setting
9.1. Network
Page 22
Linkcom France 22
11 rue du Soleil Levant 92140 CLAMART Copyright © 2009 – Linkcom – All rights reserved
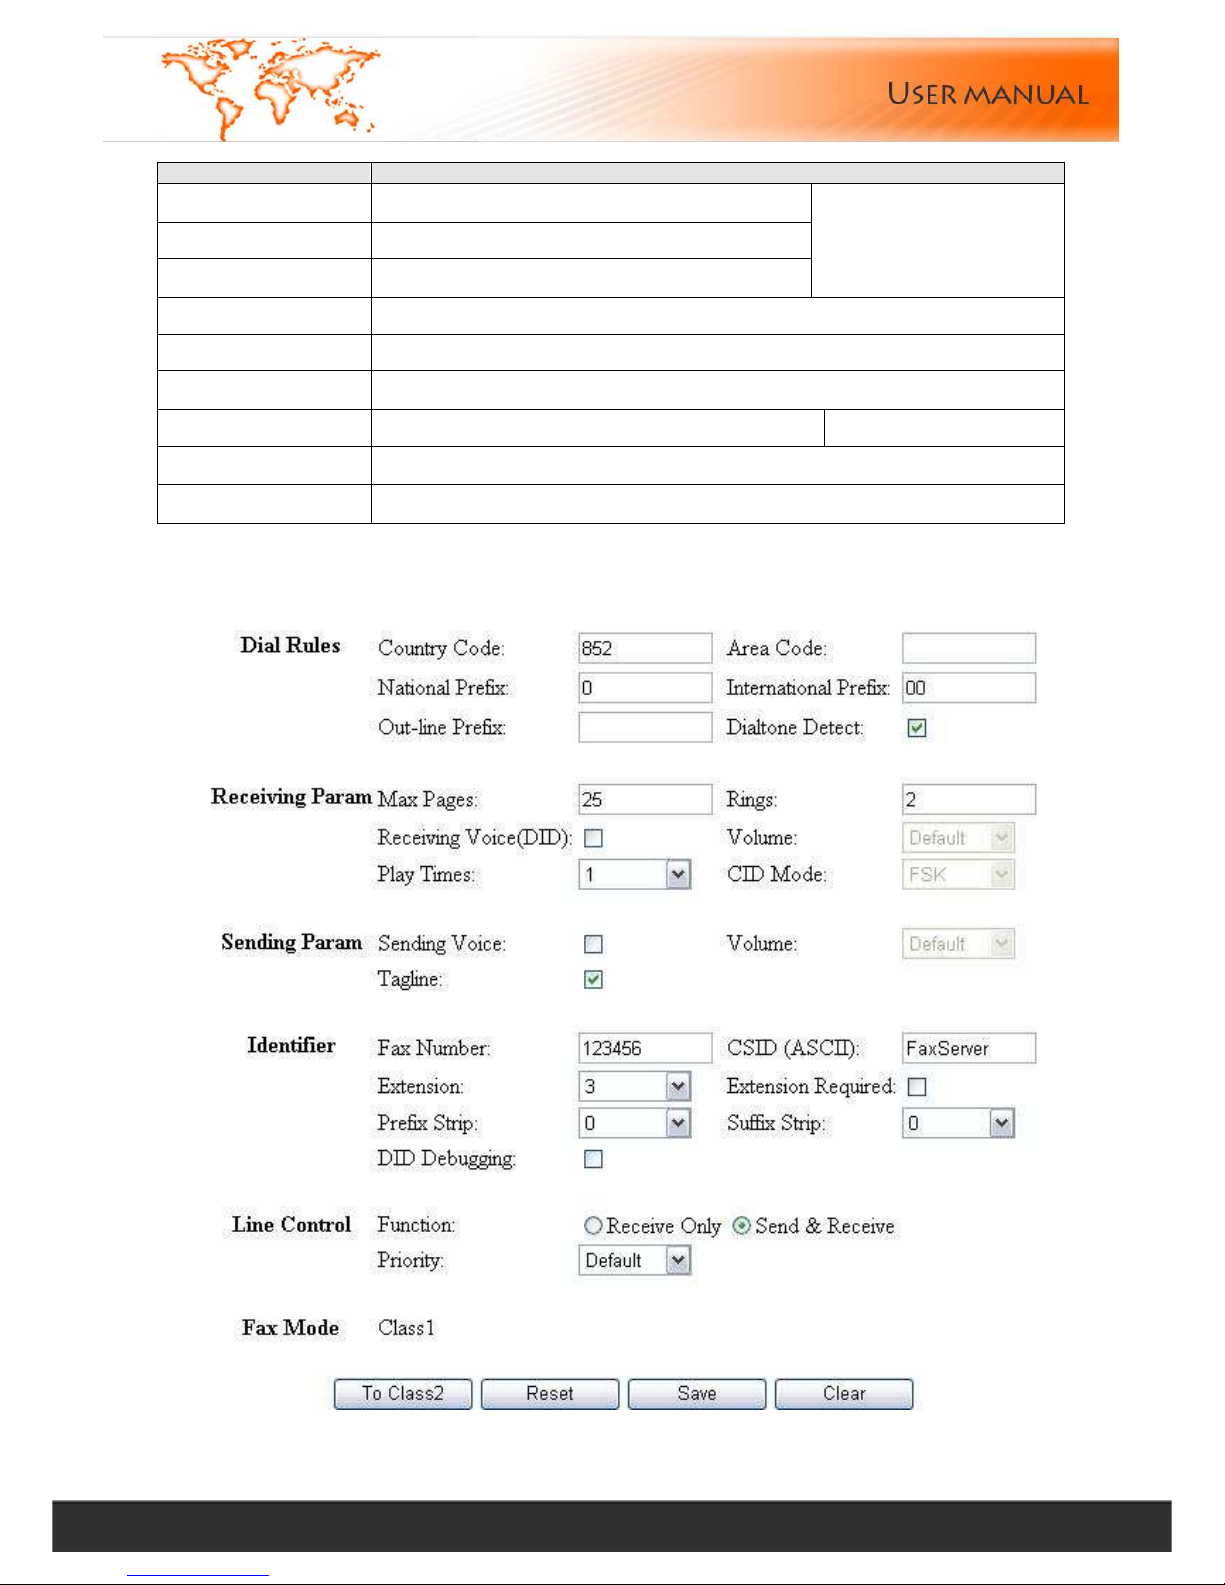
Menu Description
Bind IPs Choose IP address quantities 1-3
IP Address 1, 2, 3
Input the first IP address
SubnetMask 1, 2, 3
Input the first IP network subnet mask
Maximum 3 IP address.
Each IP address must
be unique
Gateway Input the gateway IP address
DNS Address 1 Input the preferred DNS server
DNS Address 2 Input the alternate DNS server
Web/HTTP Port Input the web page port Default: 80
No Ping Response Disable ping response
DHCP-Client Enable Get network configuration from DHCP server ( Linux suggested )
9.2. Line
Visit the line page and modify the parameters of fax server.
Page 23
Linkcom France 23
11 rue du Soleil Levant 92140 CLAMART Copyright © 2009 – Linkcom – All rights reserved
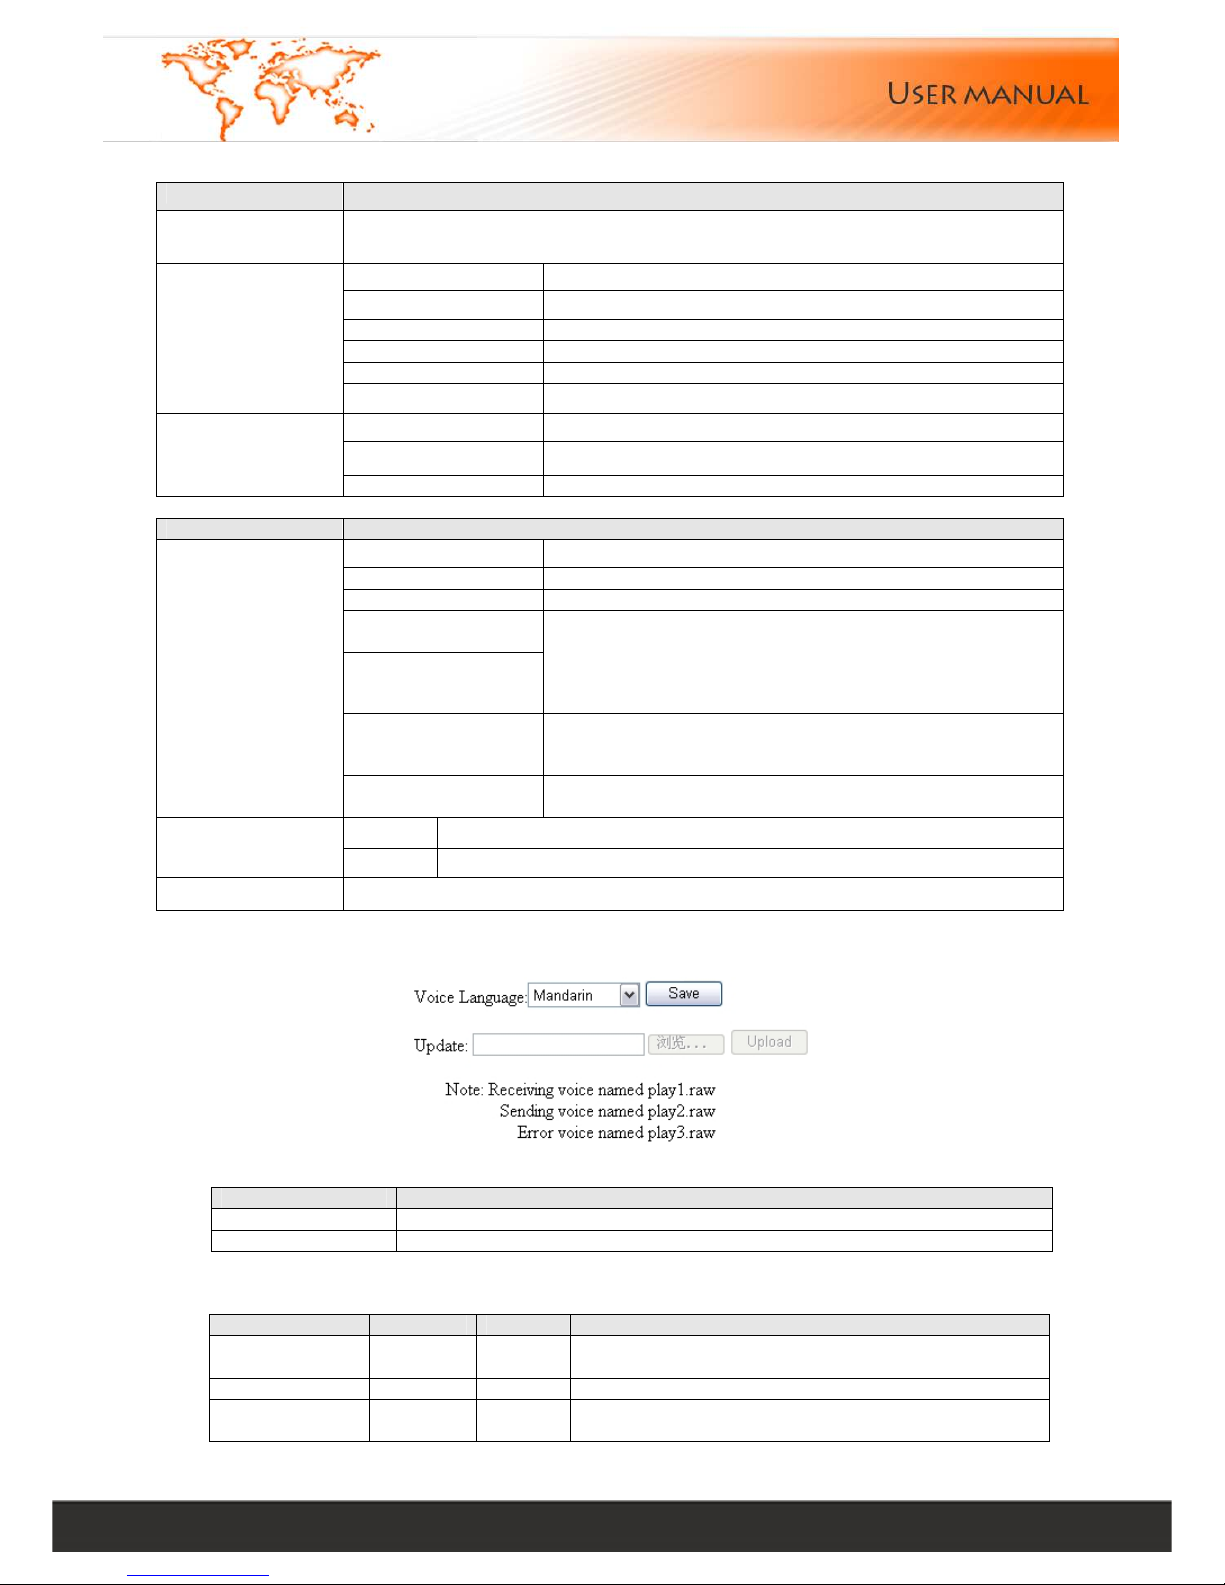
Notes: Only the user has setting right can visit and modify line setting
Menu Description
Dial Rules
Country code, area code, national prefix, out-line prefix, Dial tone Detect, if your
telephone line is connected with PBX, input dial prefix at "Out-line Prefix"
Max Page Maximum received page
Rings Set ring times for picking up
Received Voice Enable voice notice
Play Times The times of playing voice
CID Mode Call ID mode, FSK/DTMF
Receiving Param
Volume Select play volume
Sending Voice Enable voice prompt
Volume Select play volume
Sending Param
Tagline Enable display page heading information in each fax page
Menu Description
Fax Number Input the fax line number on the top of the page
CSID (ASCII) Input the local CSID
Extension (digit) Extension number
Prefix Strip
Suffix Strip
Extension number=Prefix Strip + Available Extension
number + Suffix Strip. Prefix Strip and Suffix Strip will be
cut after extension input. Generally, set the Prefix Strip
and Suffix Strip as 0.
Extension Required When checked, a correct extension is required for each in-
coming call, or else the fax server will inject the call and
hand up.
Identifier
DID Debugging DID debugging mode, when checked, there will be a link
to the report.
IO Set only receive or both send and receive
Line Control
Priority The scheduling priority to use for a line, if ready
To Class2
Use class2 fax mode
9.3. Voice Setting
The menu item details:
Menu Description
Voice Language Select voice language
Update Upload voice file to server
Default Voice:
Voice Type File Name Size Content
Receiver voice play1.raw 41
Welcome, please dial extension number or press start
for fax
Sending voice play2.raw 28 Please press start for receiving fax
Error voice Play3.raw 36
Sorry, the extension number doesn’t exist , please
redial
Page 24
Linkcom France 24
11 rue du Soleil Levant 92140 CLAMART Copyright © 2009 – Linkcom – All rights reserved
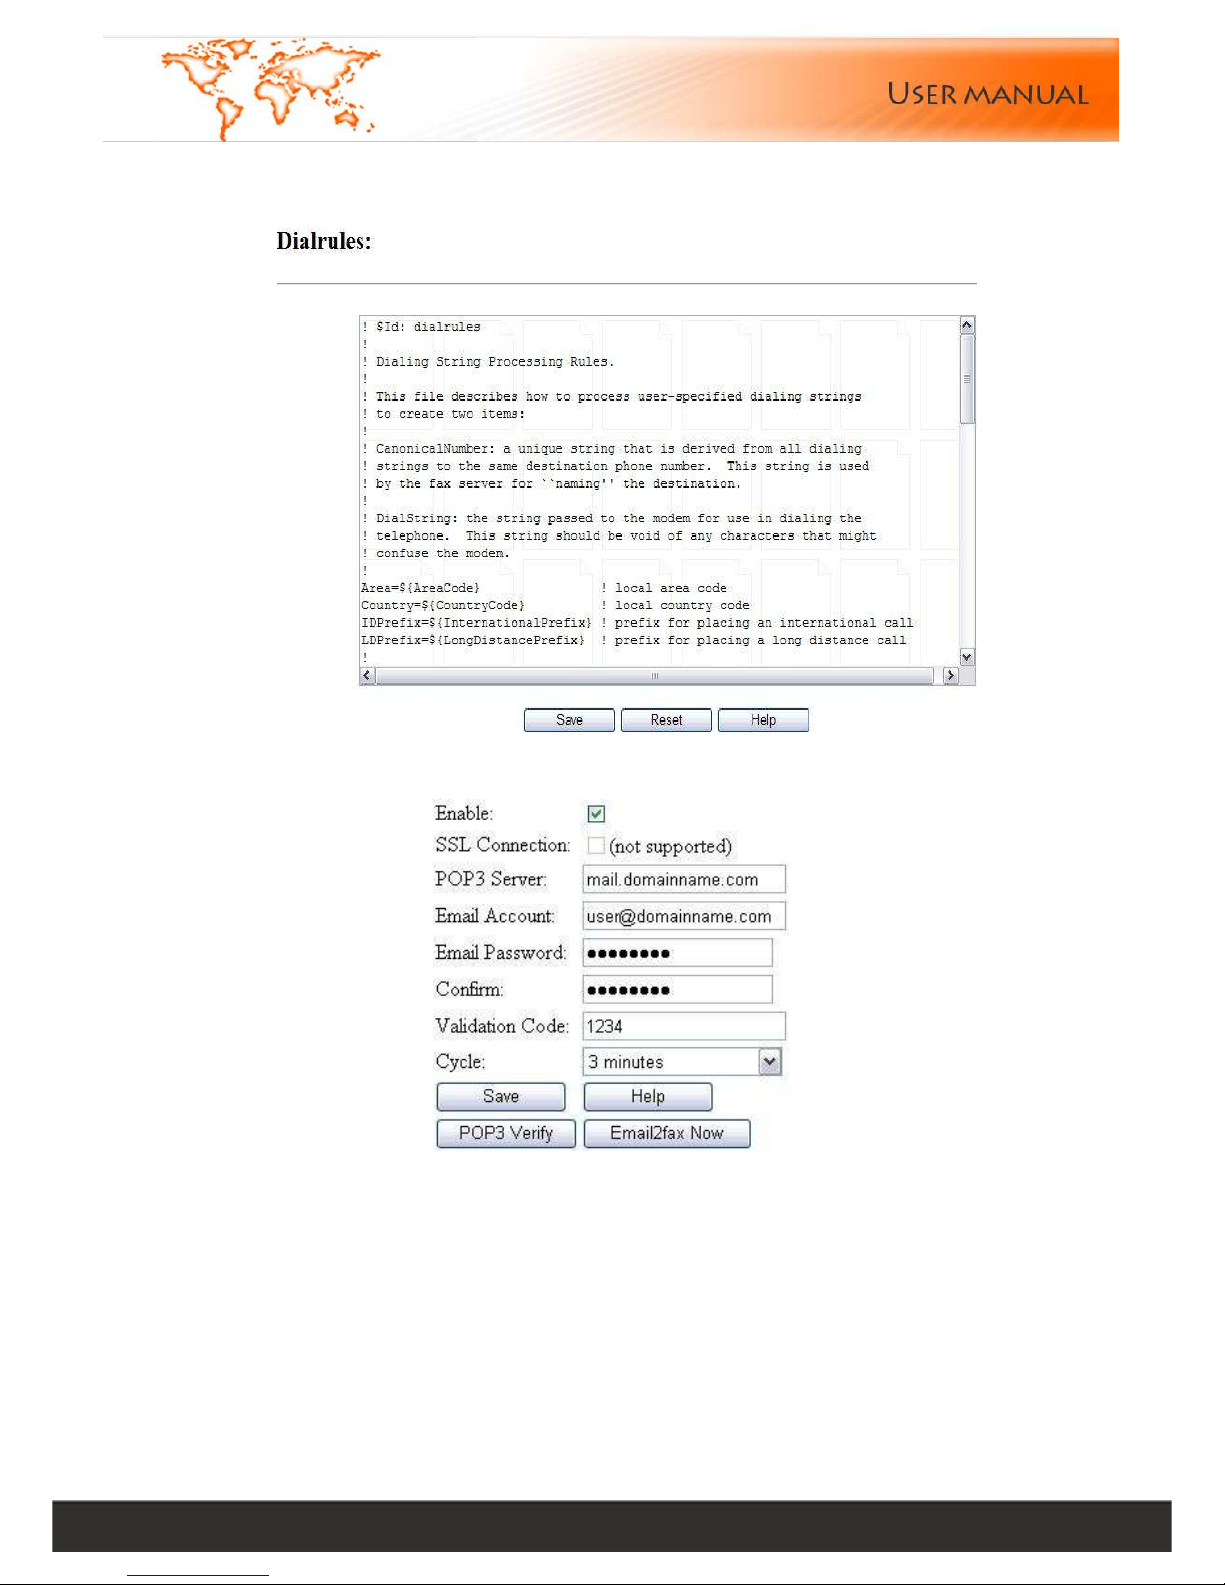
9.4. Dialrules
Dial string processing rules.( please click “Help” for detail )
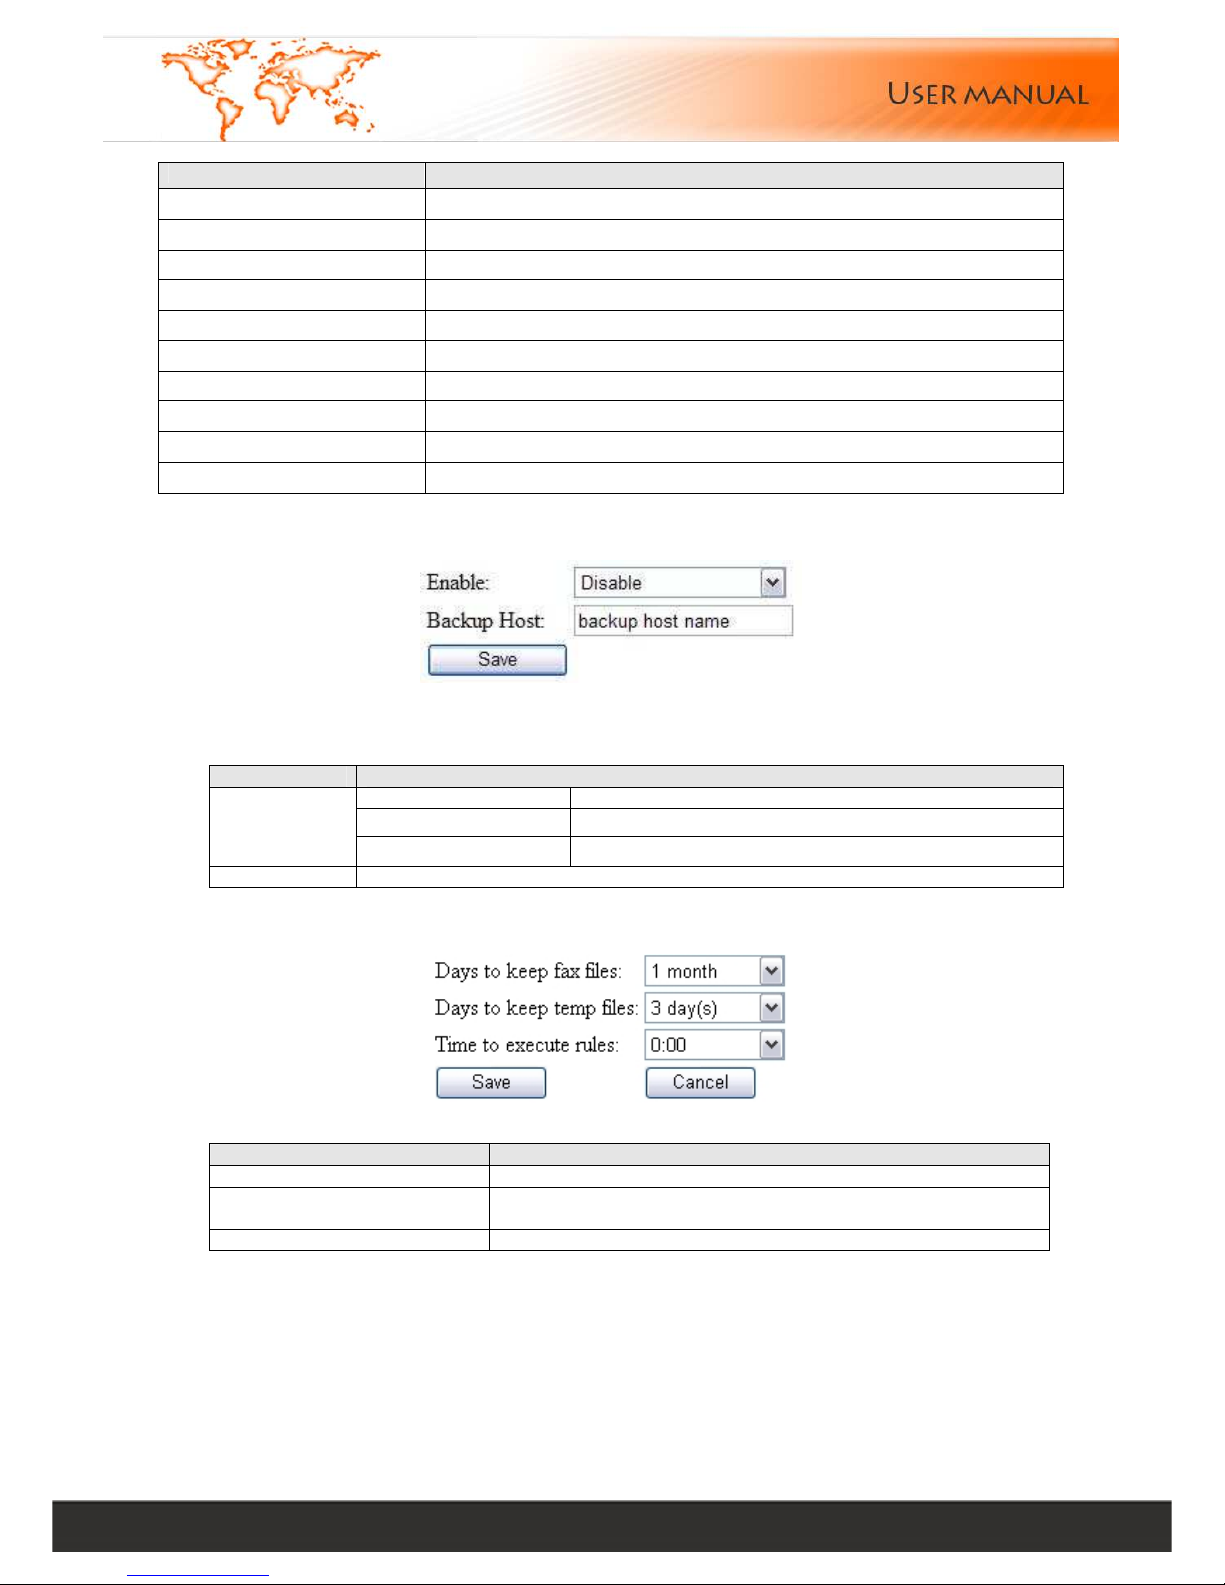
9.5. Email2fax
The actual Email can be composed in this way:
1. Attach a TIFF file as the fax body;
2. Send the email with a subject of the following formats:
A. validation code,account,sender,recipient@number
B. validation code,account,sender,recipient1@number1,recipient2@number2,recipient3@number3......
C. ,sender,recipient@number
3. The validation code can be empty if it's not required. The account field is not required, only if you want to
receive a notification by email. And no matter the validation code or the account is present or not, the "," is
required.
Note: The Email Account should be a new Email account for Email2fax only, instead of any other purposes, because
Email2fax function will remove all emails in the inbox, no matter they are suitable for Email2fax or not.
Page 25
Linkcom France 25
11 rue du Soleil Levant 92140 CLAMART Copyright © 2009 – Linkcom – All rights reserved
Menu Description
Enable Enable email2fax
SSL Connection (not supported)
POP3 Server Input the domain or IP address of POP3 server
Email Account Input sender’s e-mail accounts
Email Password Input sender’s e-mail login password
Confirm Confirm password
Validation Code Optional
Cycle Check for new messages periodically
POP3 Verify Verify POP3 account setting
Email2fax Now Retrieve email from mailbox
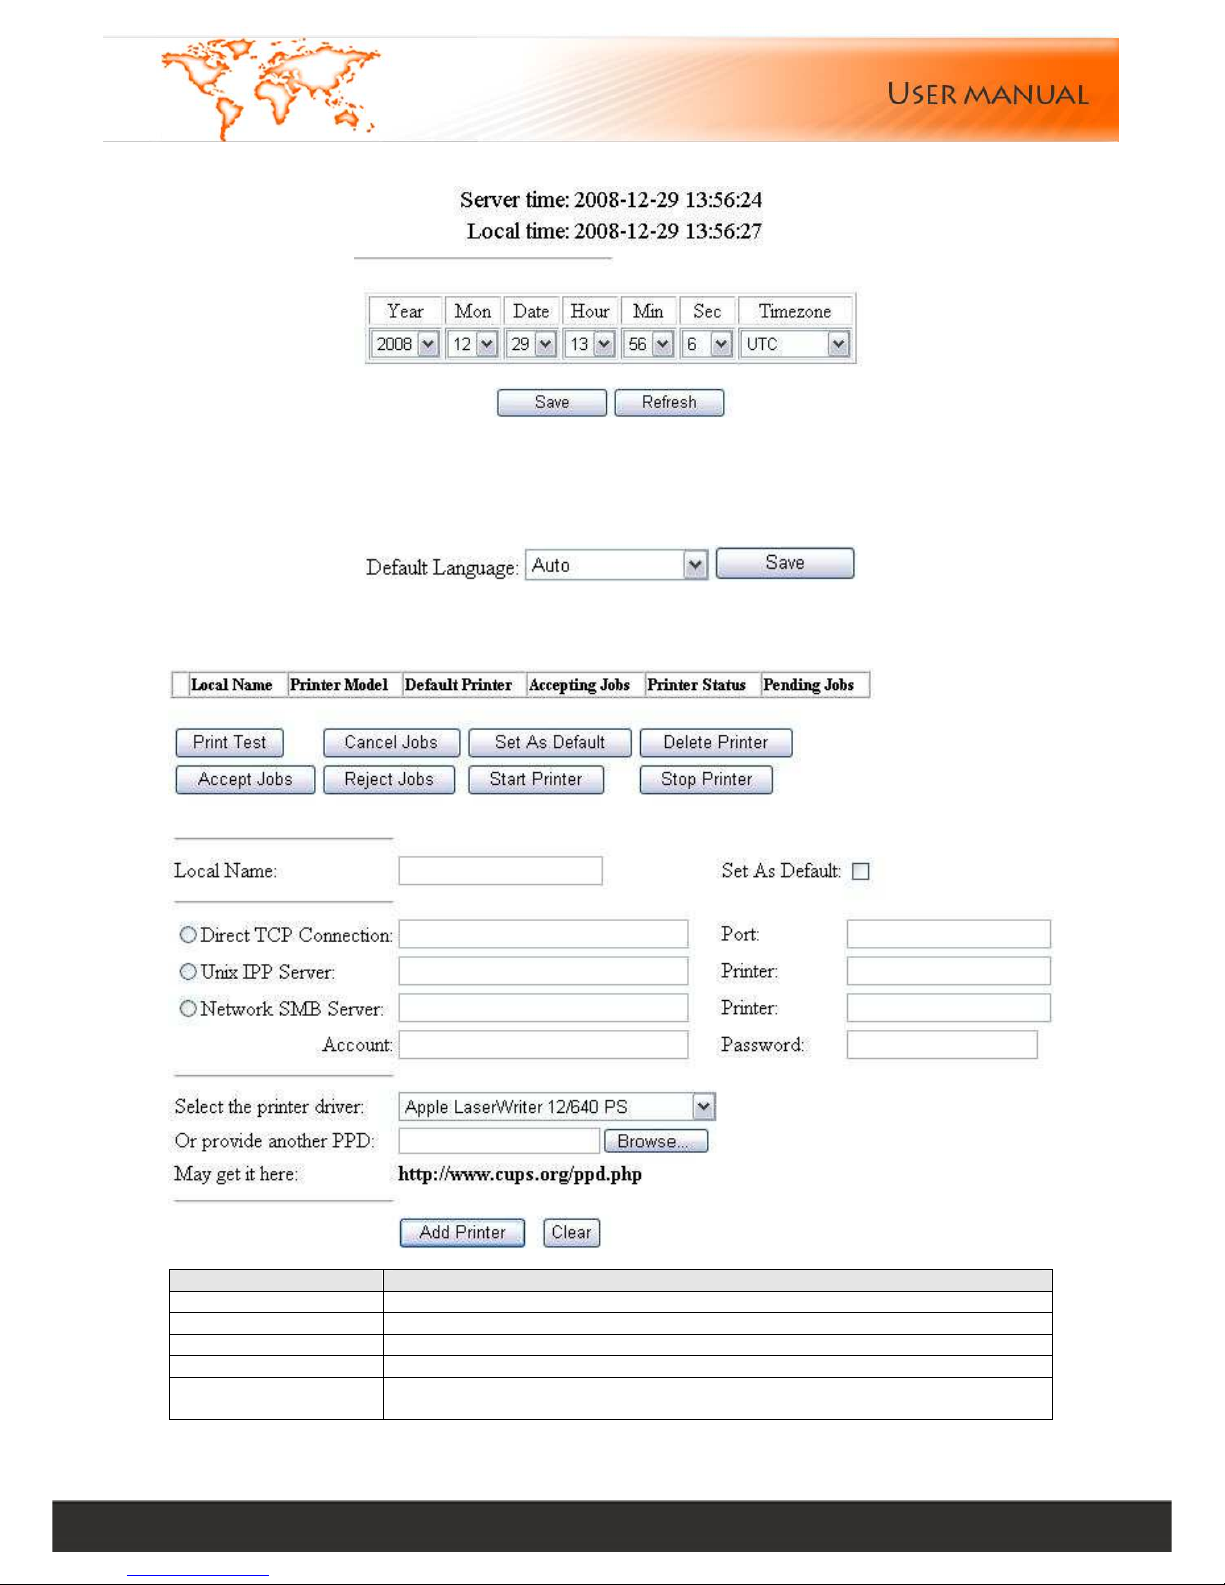
9.6. Backup
Install the provided backup software to enable fax backup function. Then input the computer name in the backup host
field
Menu Description
Disable Disable fax backup
Enable(Each User) Backup single user’s sent and received faxes
Enable
Enable(Each Fax) Backup all users’ sent and received faxes
Backup Host Input the name of the computer used for backup
9.7. Delete rules
Menu Description
Days for keeping fax files All user’s received faxes storage period in a fax server
Days for keeping temp
files
Temp files storage period in a fax server
Time to execute rules The execute times for above two rules
Page 26
Linkcom France 26
11 rue du Soleil Levant 92140 CLAMART Copyright © 2009 – Linkcom – All rights reserved
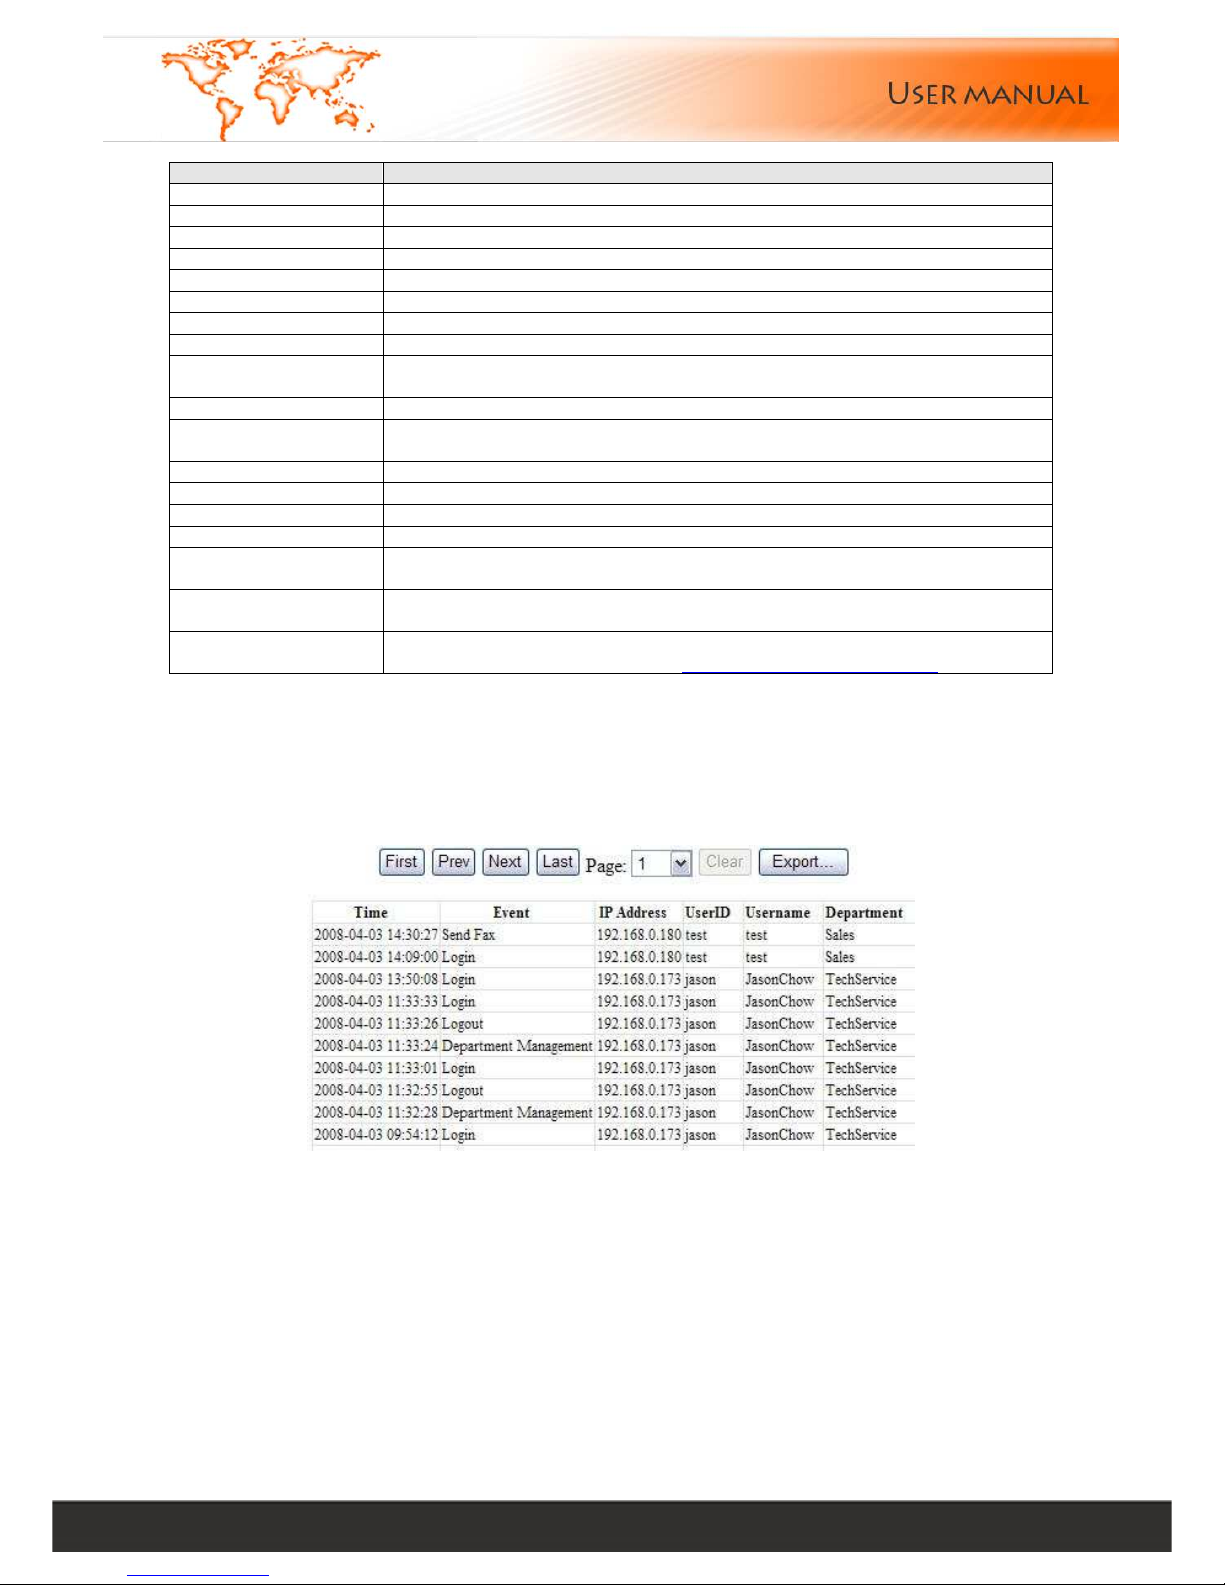
9.8. Time Setting
Click "Sync" button to match PC time. Please choose a correct time if manual setup,. Then click "Save" to modify fax
server time.
9.9. Language Setting
The web interface language supports Auto, Simplified Chinese, and Traditional Chinese. German
9.10. Remote Printer
Menu Description
Local Name Name of printer. User-defined
Printer Model Indicate printer model
Default Printer Set it as default printer
Accepting Jobs Indicate status of the printer, Yes means it is available to accept jobs
Printer State
Indicate status of the printer, Idle means it is available, while Stop means
it is unavailable
Page 27
Linkcom France 27
11 rue du Soleil Levant 92140 CLAMART Copyright © 2009 – Linkcom – All rights reserved
Menu Description
Pending Jobs The quantities of tasks waiting for print
Print Test Print test paper
Cancel Jobs Cancel the selected jobs waiting for print
Delete Printer Delete the selected printer
Accept Jobs Setup the selected printer as accepting jobs status again
Reject Jobs Setup the selected printer as reject jobs status
Start Printer Setup the selected printer as Stop status again
Stop Printer Setup the printer as Stop status
Direct TCP
Connection
HP JetDirect Connection technology via TCP. Connect printer to internet
directly
UnixIPP Server Base on Internet Printing Protocol
Network SMB
Server
Input Share server’s IP address. Windows Sharing or Linux Samba Sharing
Port User-defined Sharing Printer’s Port
Printer Input the Share name of the Sharing Printer. Case sensitive
Account Input account information
Password Input password information
Select the printer
driver
Select the right printer driver
Or provide another
PPD
User-defined printer driver
May get it here
If there is no matched printer driver from ”Select the printer driver” drop
down list, please get it from here http://www.cups.org/ppd.php
10. Log and task list
10.1 Events
With Events log, administrator can monitor event records in users' operations and system log
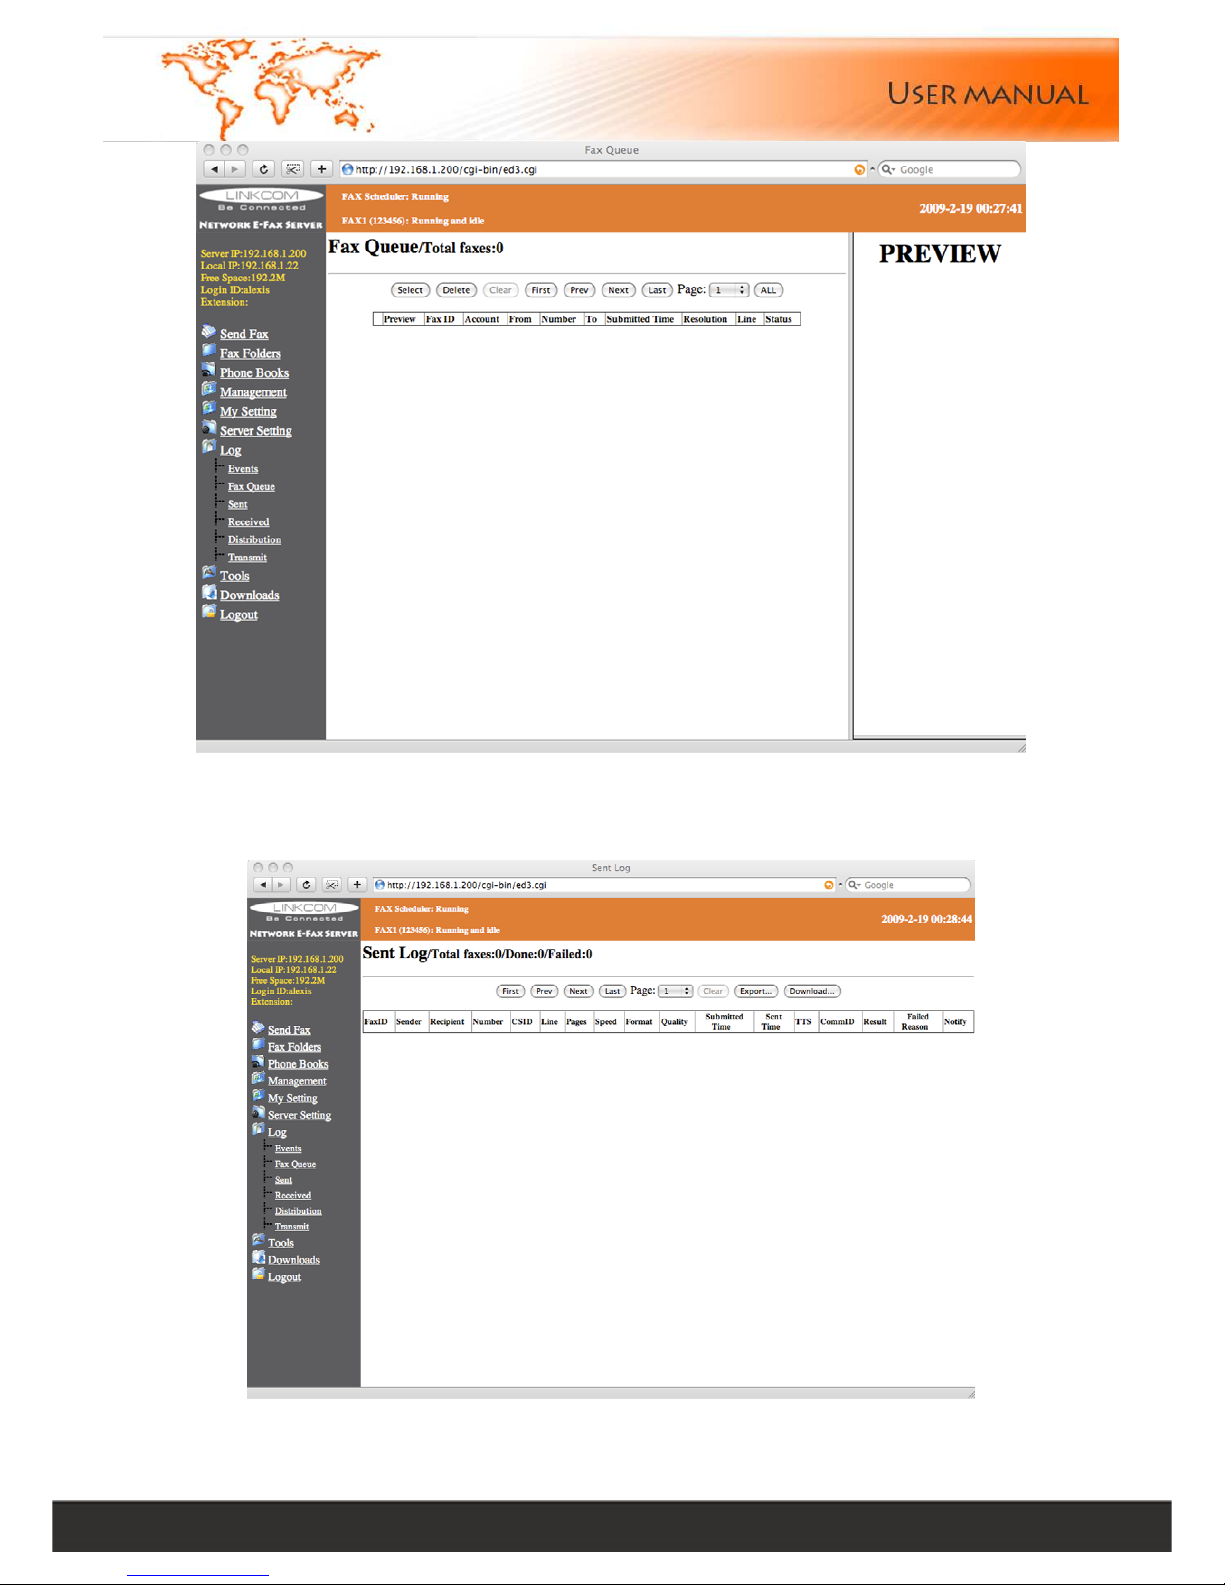
10.2. Fax Queue
Display all users’ sending tasks and queuing tasks, the system administrator can delete the selected fax task.
Page 28
Linkcom France 28
11 rue du Soleil Levant 92140 CLAMART Copyright © 2009 – Linkcom – All rights reserved
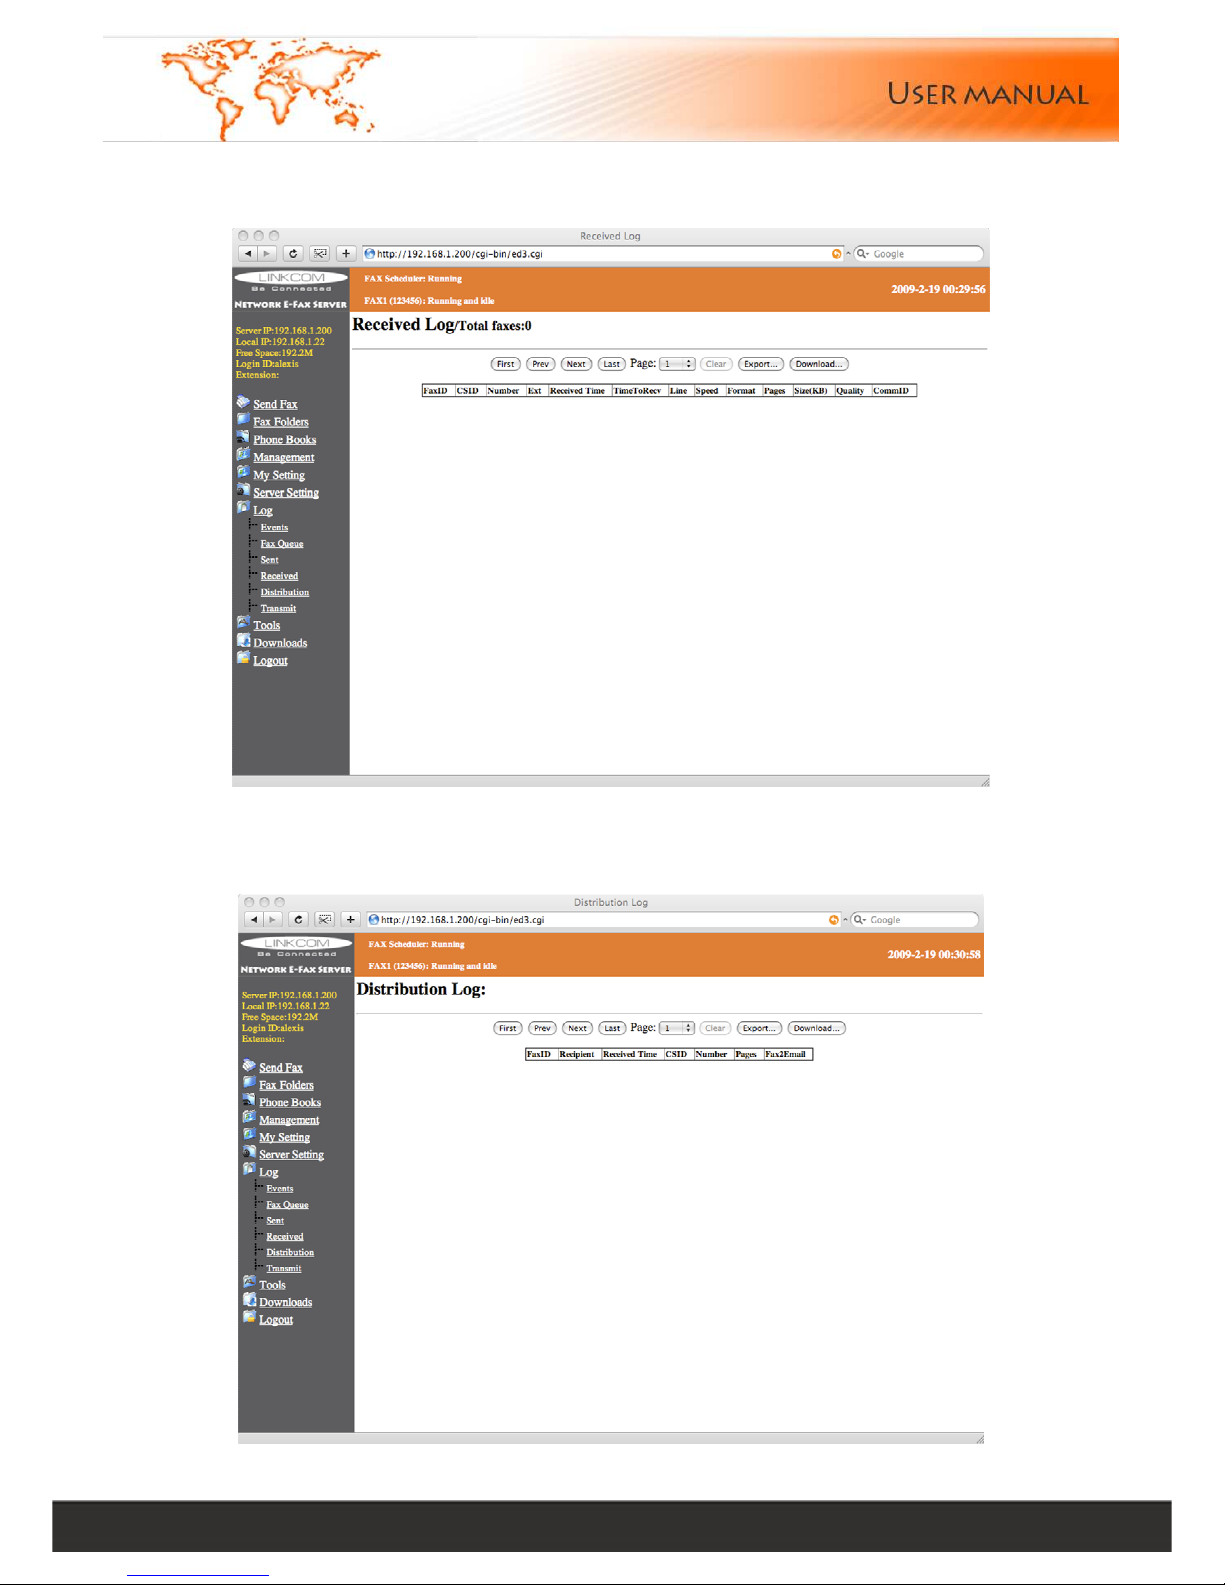
10.3. Sent
Display all users’ sent fax records, the list can be exported and be stored.
Page 29
Linkcom France 29
11 rue du Soleil Levant 92140 CLAMART Copyright © 2009 – Linkcom – All rights reserved
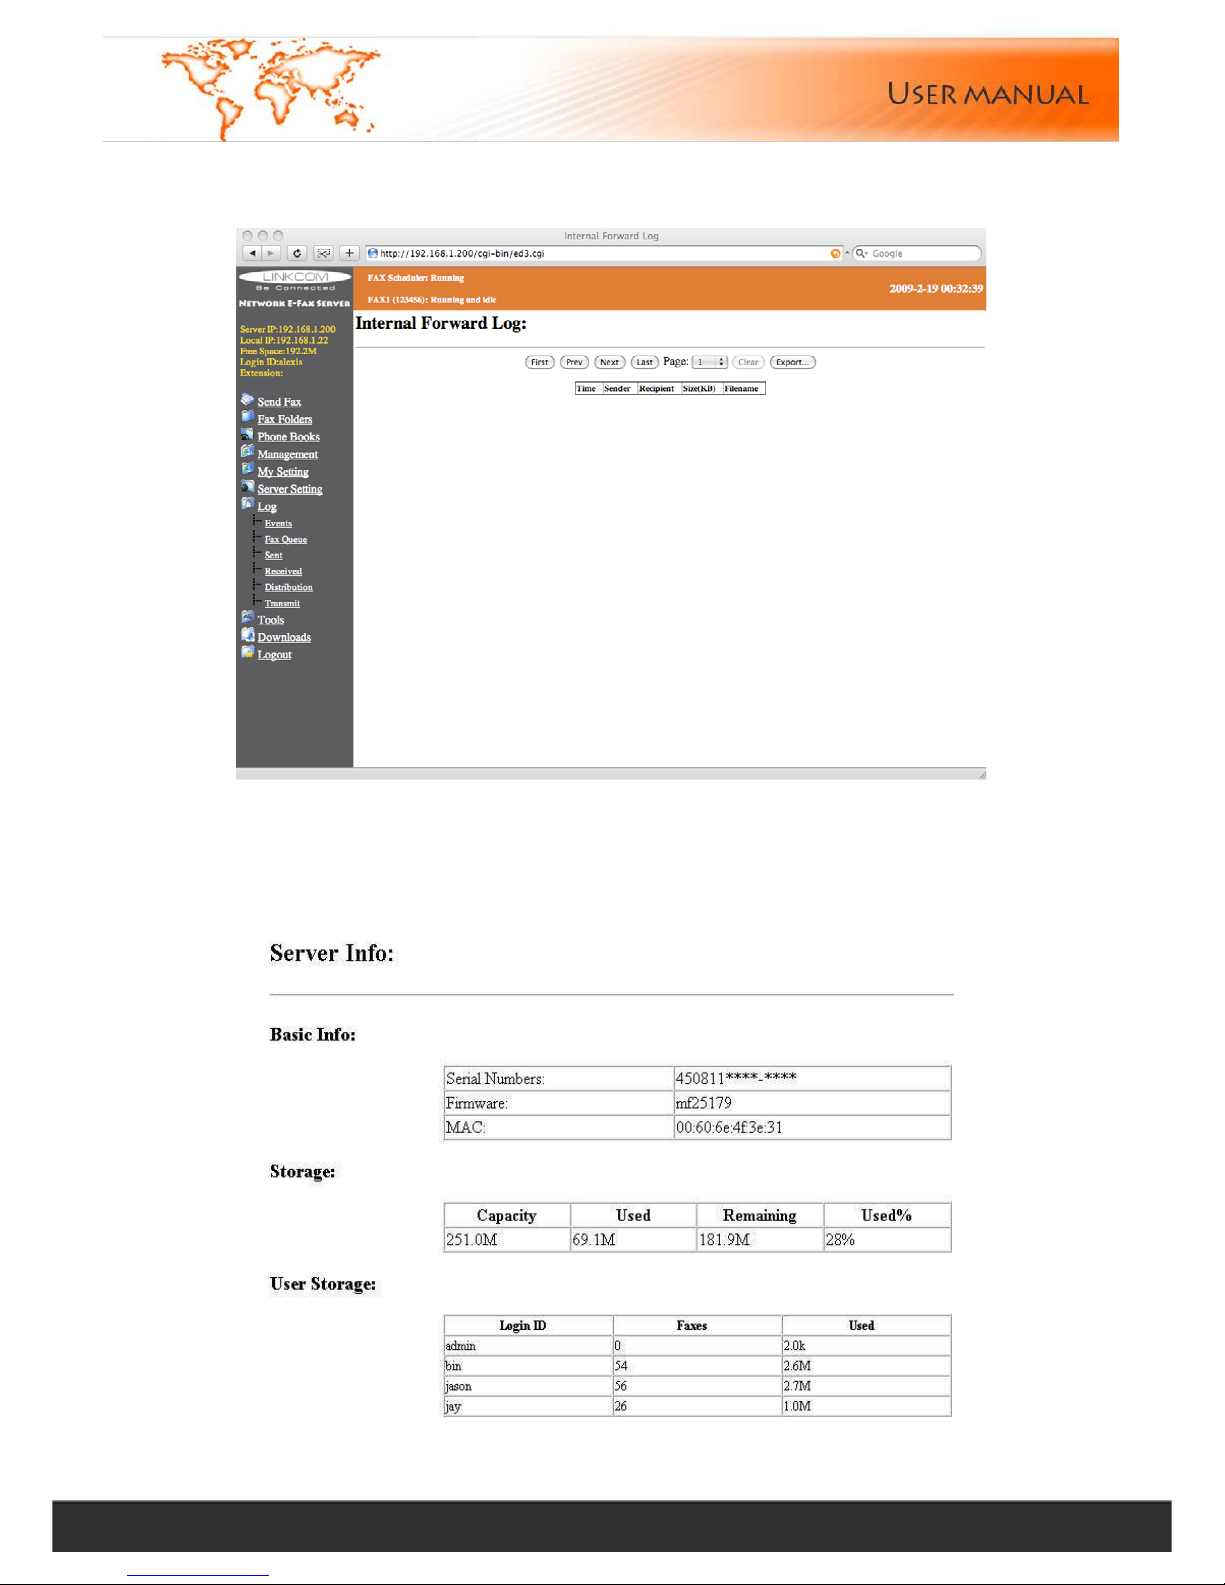
10.4. Received
Display all received fax records, the list can be exported and be stored, all records can be cleared.
10.5. Distribution
Display all users’ received fax distribution records, the list can be exported and be stored. All records can be cleared.
Page 30
Linkcom France 30
11 rue du Soleil Levant 92140 CLAMART Copyright © 2009 – Linkcom – All rights reserved
10.6. Transmit
Display the transfer records of all users’ intranet files.
11. Tools
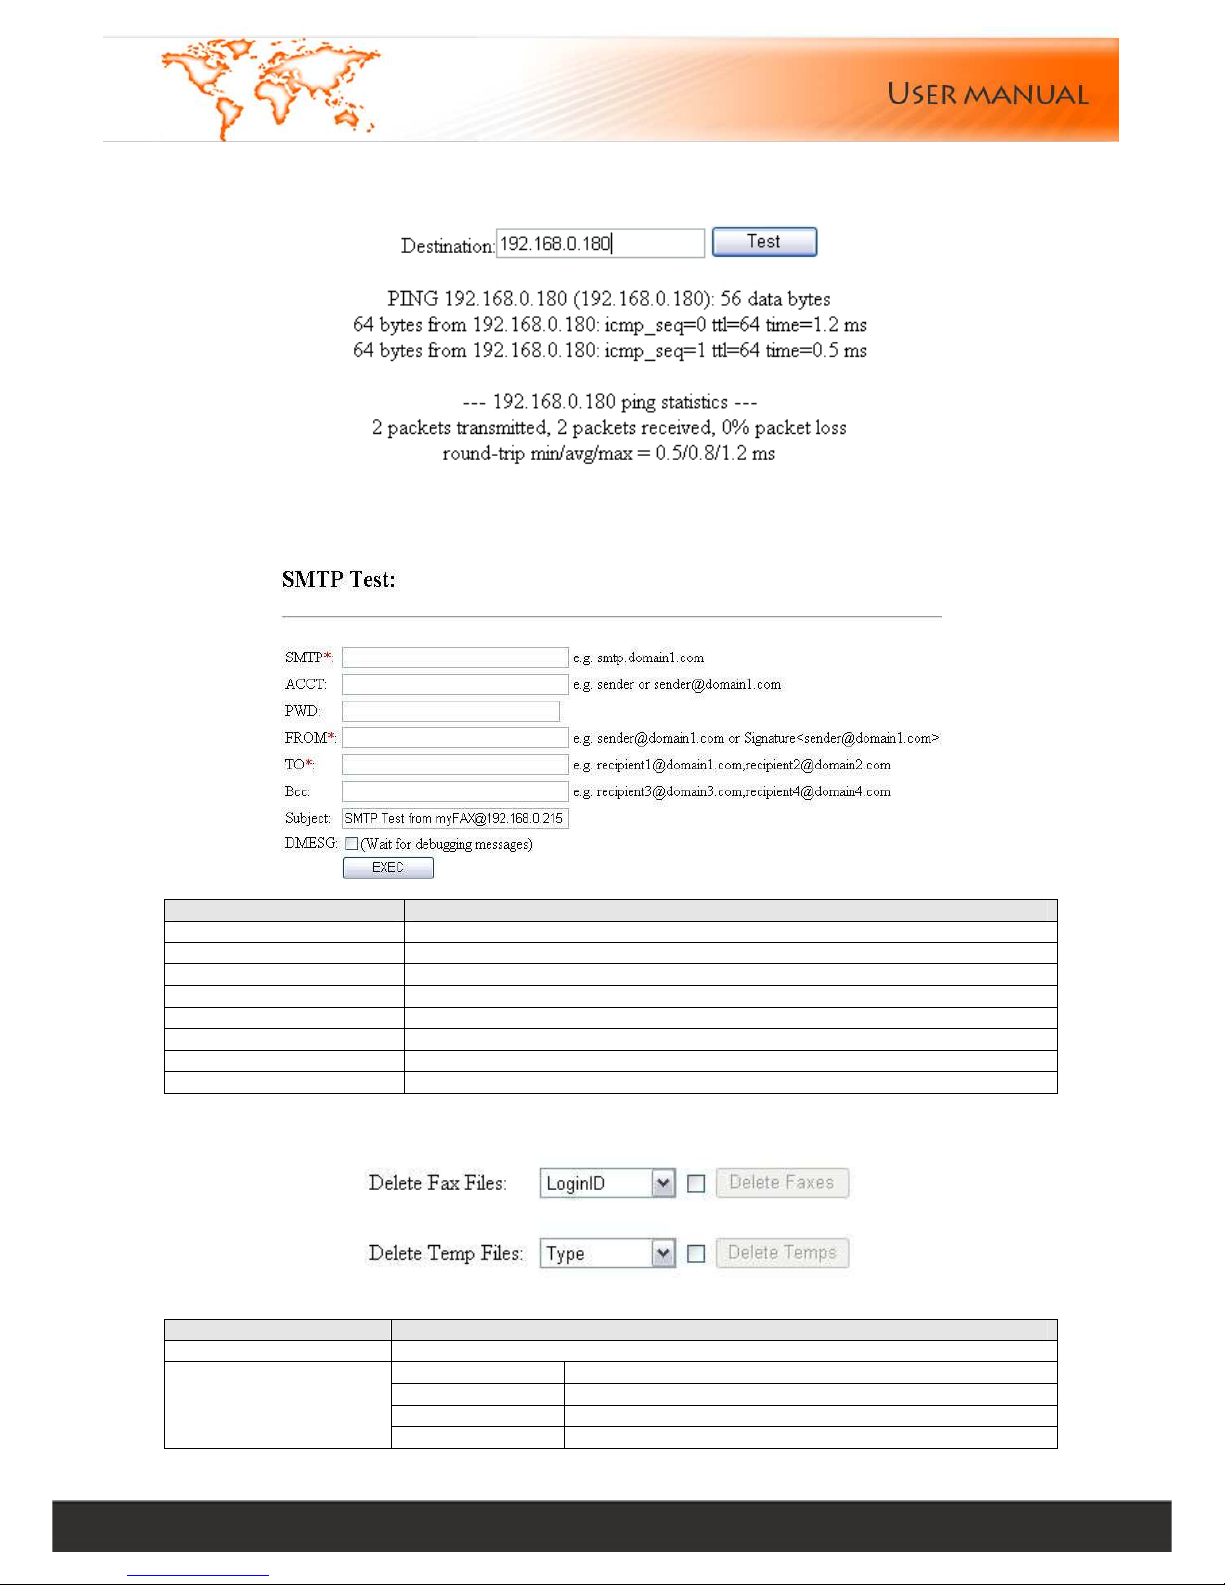
11.1 Server Status
This web interface displays server relative information
Page 31
Linkcom France 31
11 rue du Soleil Levant 92140 CLAMART Copyright © 2009 – Linkcom – All rights reserved
11.2. Ping Test
Input the destination IP address to ping IP
11.3. SMTP Test
SMTP server test
Menu Description
SMTP Input the domain or IP address of SMTP server
USER Input sender’s e-mail account
PASS Input sender’s e-mail login password
FROM Full path of E-mail Address
TO Input e-mail address to receive fax
SUBJECT Email Subject
DMESG Wait for debug message
EXEC Execute this test
11.4. Files Delete
The menu item details:
Menu Description
Delete Fax Files Delete all users’ or single user’s fax in the fax server
Fax Cache Delete temporary fax document
Fax Log Delete temporary fax log file
Numbers Delete temporary fax number file
Delete Temp Files
Done Log Delete temporary send info
Page 32
Linkcom France 32
11 rue du Soleil Levant 92140 CLAMART Copyright © 2009 – Linkcom – All rights reserved
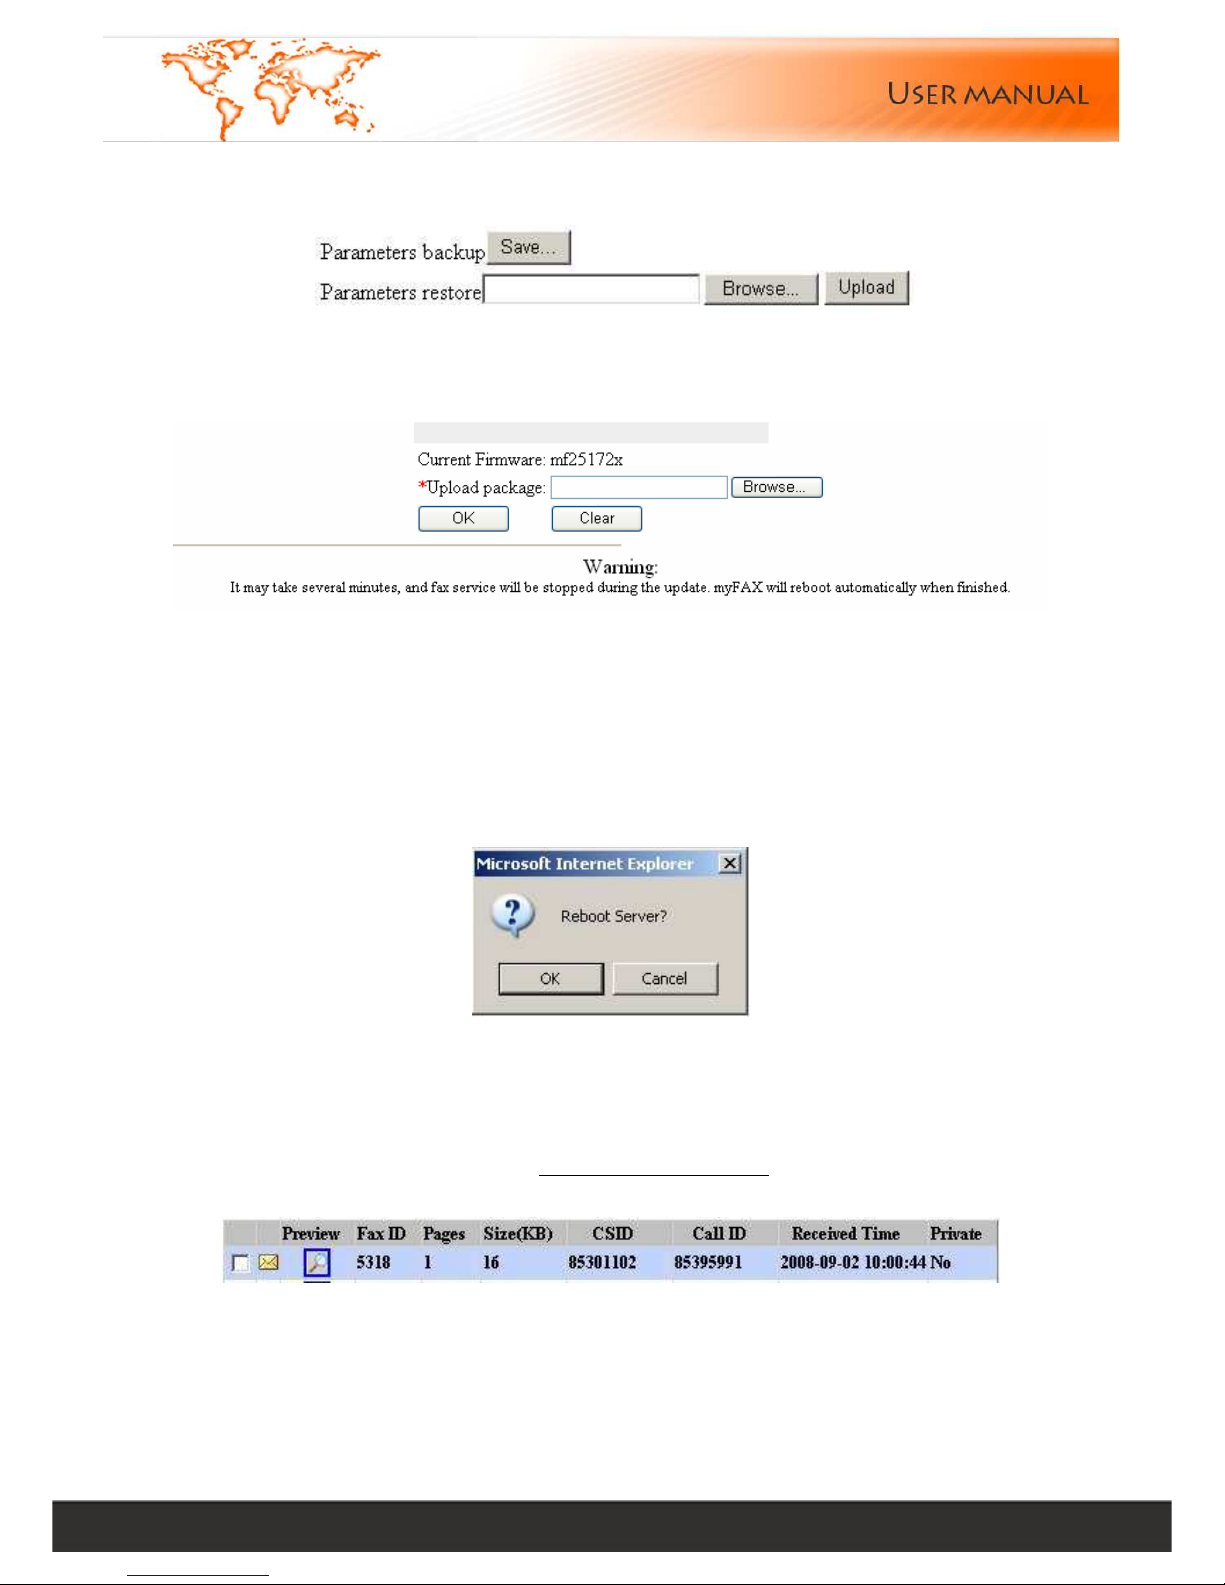
11.5. Parameters Backup
This web interface shows: Server parameters backup and server parameters restore.
11.6. Update
This web interface shows how to upgrade system firmware. The update files should be gotten from service provider
11.7. Factory Restore
This web interface shows how to restore the factory settings, including: user’s info, server setting, fax log, line
setting, fax server IP will resume: 192.168.1.200.
Please use with caution!
11.8. Reboot
Click “Confirm” to reboot the fax server
12. Downloads
12.1. AlternaTIFF
User needs to install “AlternaTIFF ActiveX control” to preview the TIFF file. Download AlternaTIFF ActiveX control on
"Download "---" Alternatiff”, or download it from http://www.alternatiff.com, AlternaTIFF control tools contains:
print, store to disk, copy, proper window width, fixed size, direction, opposite display, page control, menu and so on
12.2. Print Drivers
Download Print2Fax on "Download "---"Print Drivers”, then download “Print2fax.zip”
Page 33
Linkcom France 33
11 rue du Soleil Levant 92140 CLAMART Copyright © 2009 – Linkcom – All rights reserved
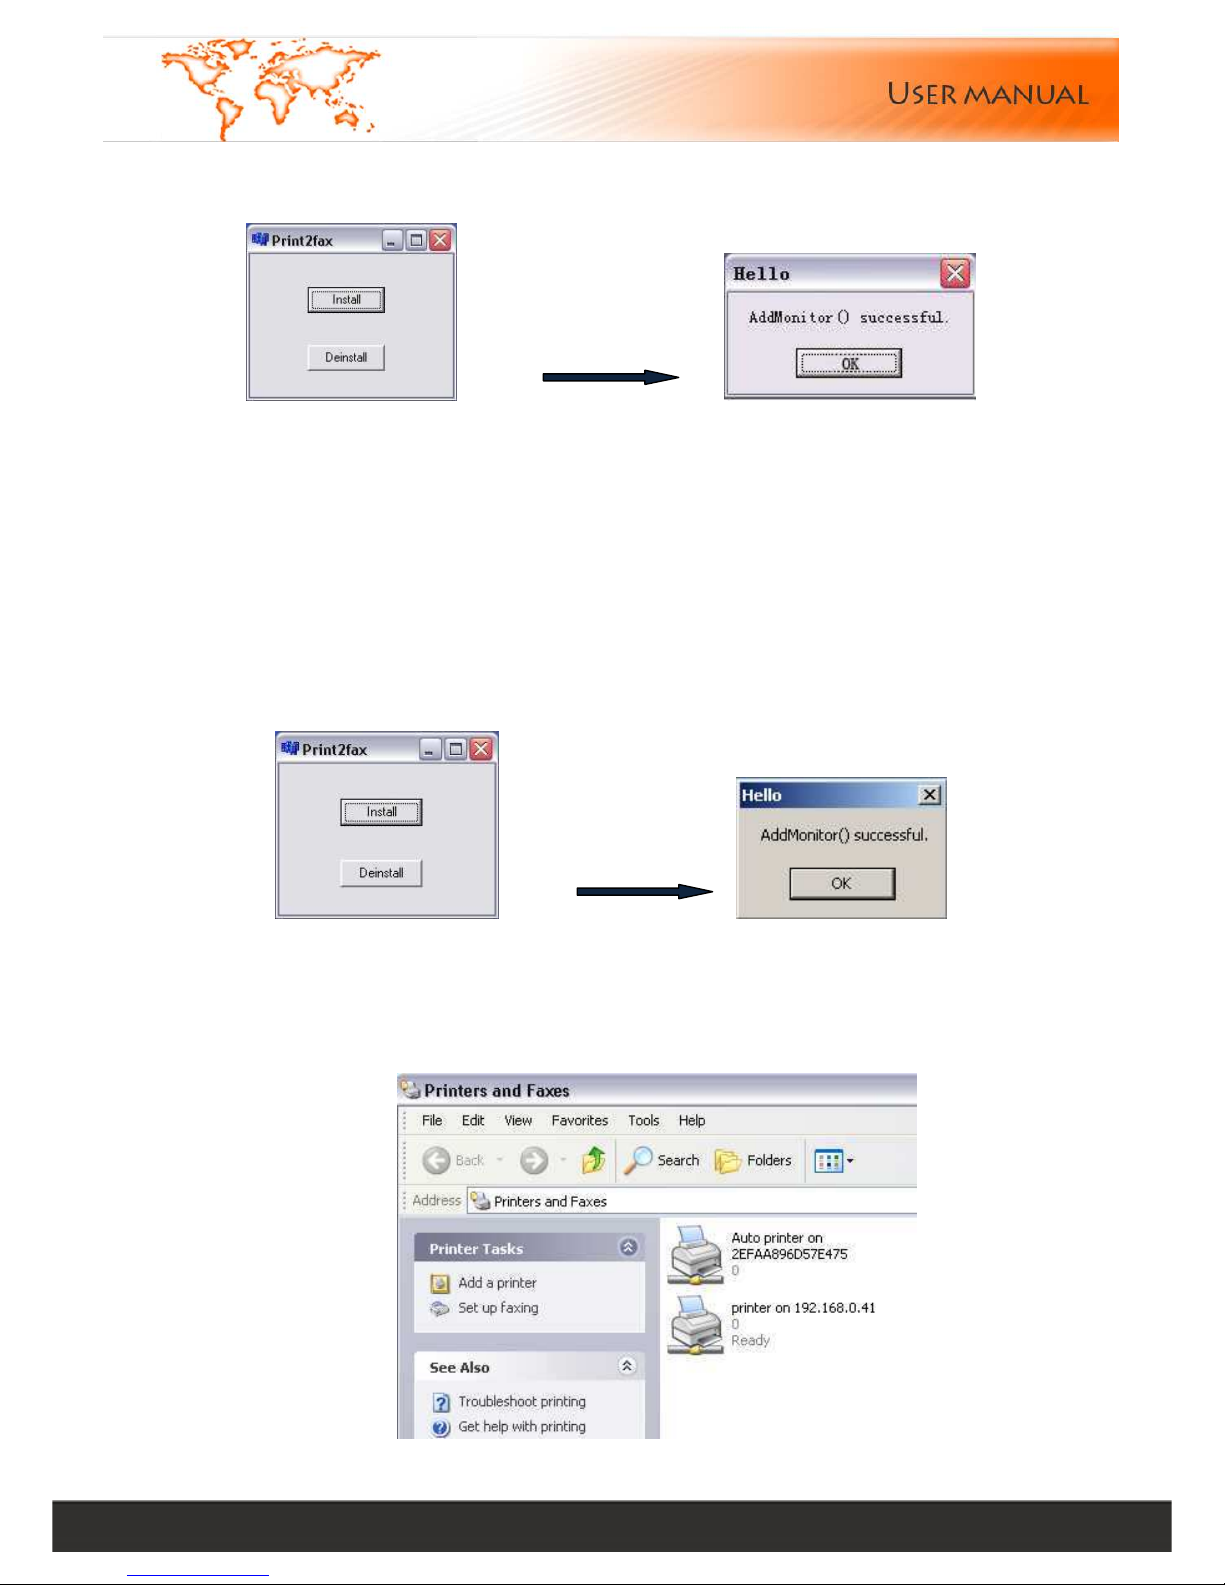
Print2fax is a Windows print monitor designed to send its output directly to a E-Fax. Once installed, you can print to a
E-Fax from any application, and it will pop up a simple dialog box, allowing you to enter the destination FAX number.
It's not intended to be fancy or all encompassing, just a quick and easy way to send fax from any Windows application
Click Install
It is packaged in the form of a Windows Installer, which installs the required sets of .DLL files and registers the
monitor with the system. This adds support for a new type of port to your system, called a " Print2fax Port." Once
you've successfully installed the files, setup is straightforward, but it has a number of steps
Please refer to Print2fax.zip user guide while install
12.3 Print2fax user’s guide
Print2fax is a Windows print monitor designed to send its output directly to a E-Fax Server. Once installed, you can
print to a E-Fax Server from any application, and it will pop up a simple dialog box, allowing you to enter the
destination FAX number. It's not intended to be fancy or all encompassing, just a quick and easy way to send FAXes
from any Windows application
Print2fax installation:
It is packaged in the form of a Windows Installer, which installs the required sets of .DLL files and registers the
monitor with the system. This adds support for a new type of port to your system, called a " Print2fax Port." Once
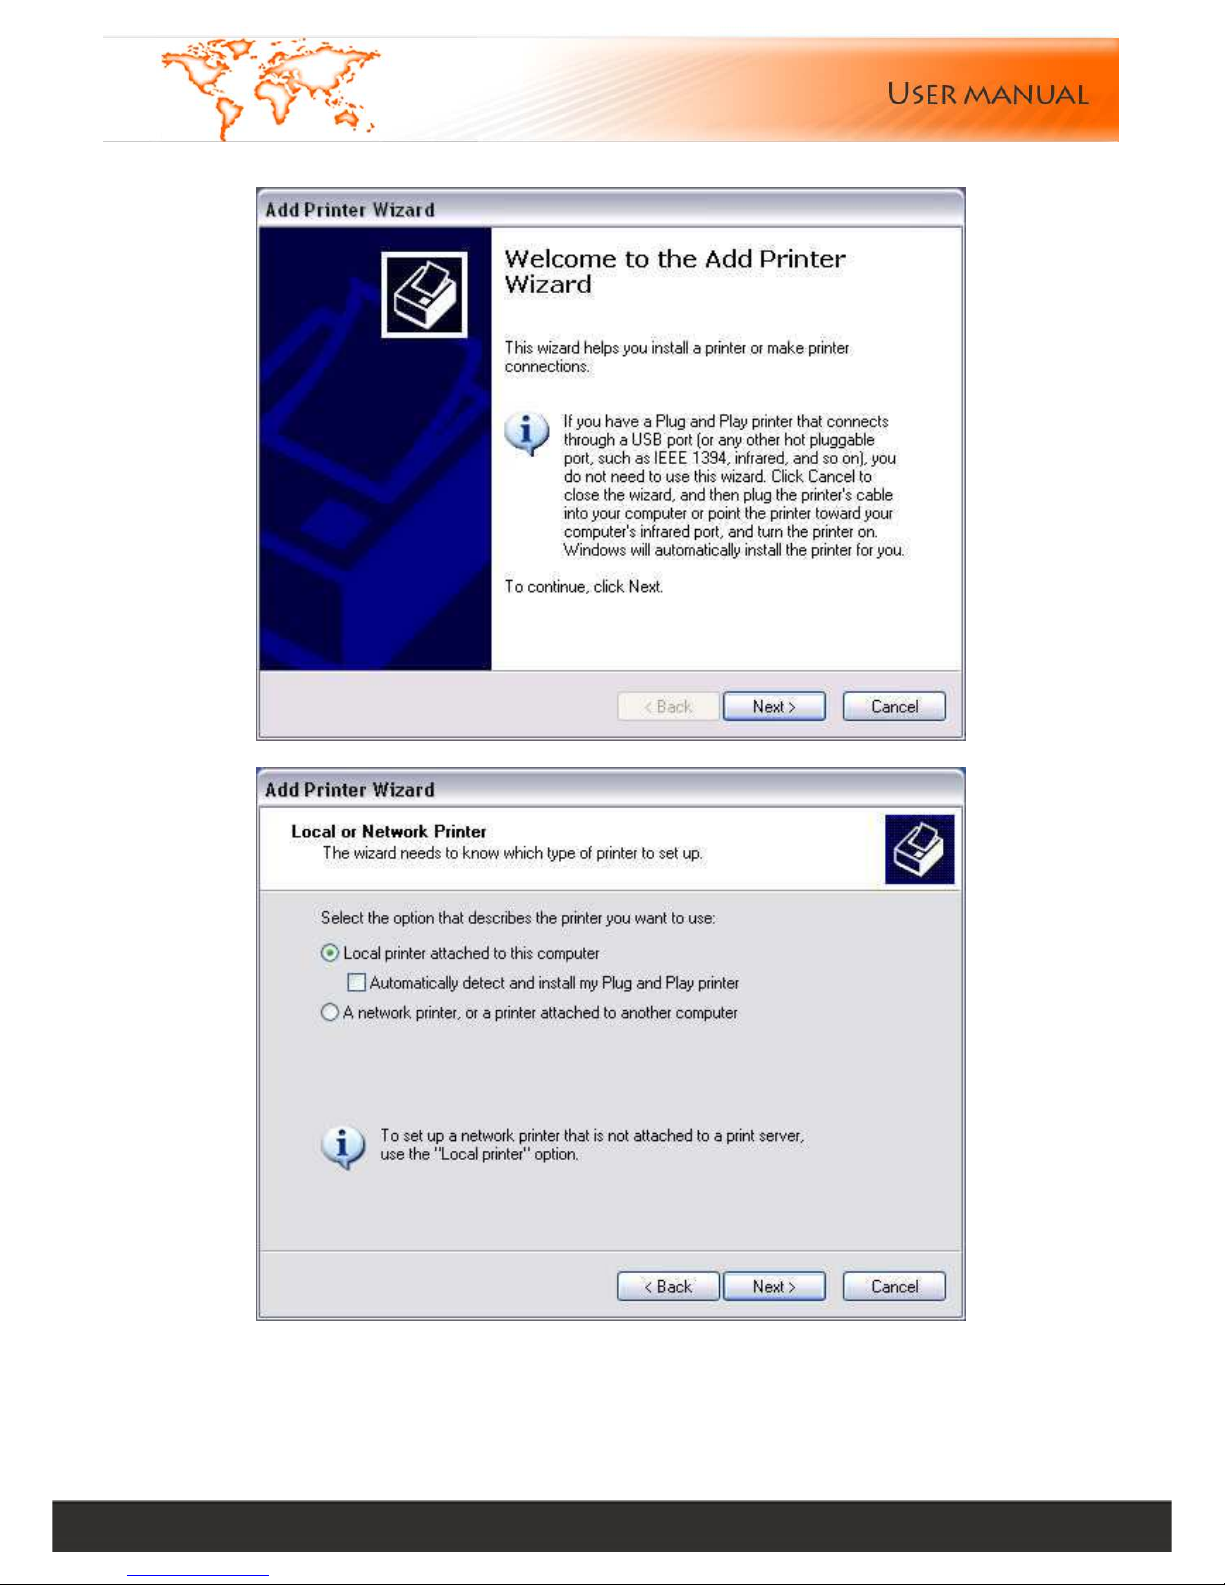
you've successfully installed the files, setup is straightforward, but it has a number of steps. First, you'll want to
create an appropriate PostScript printer using the "Add Printer" button. You want to select a "Local printer," but since
it's not a physical printer, uncheck the "Automatically detect and install my Plug and Play printer" box.
Page 34
Linkcom France 34
11 rue du Soleil Levant 92140 CLAMART Copyright © 2009 – Linkcom – All rights reserved
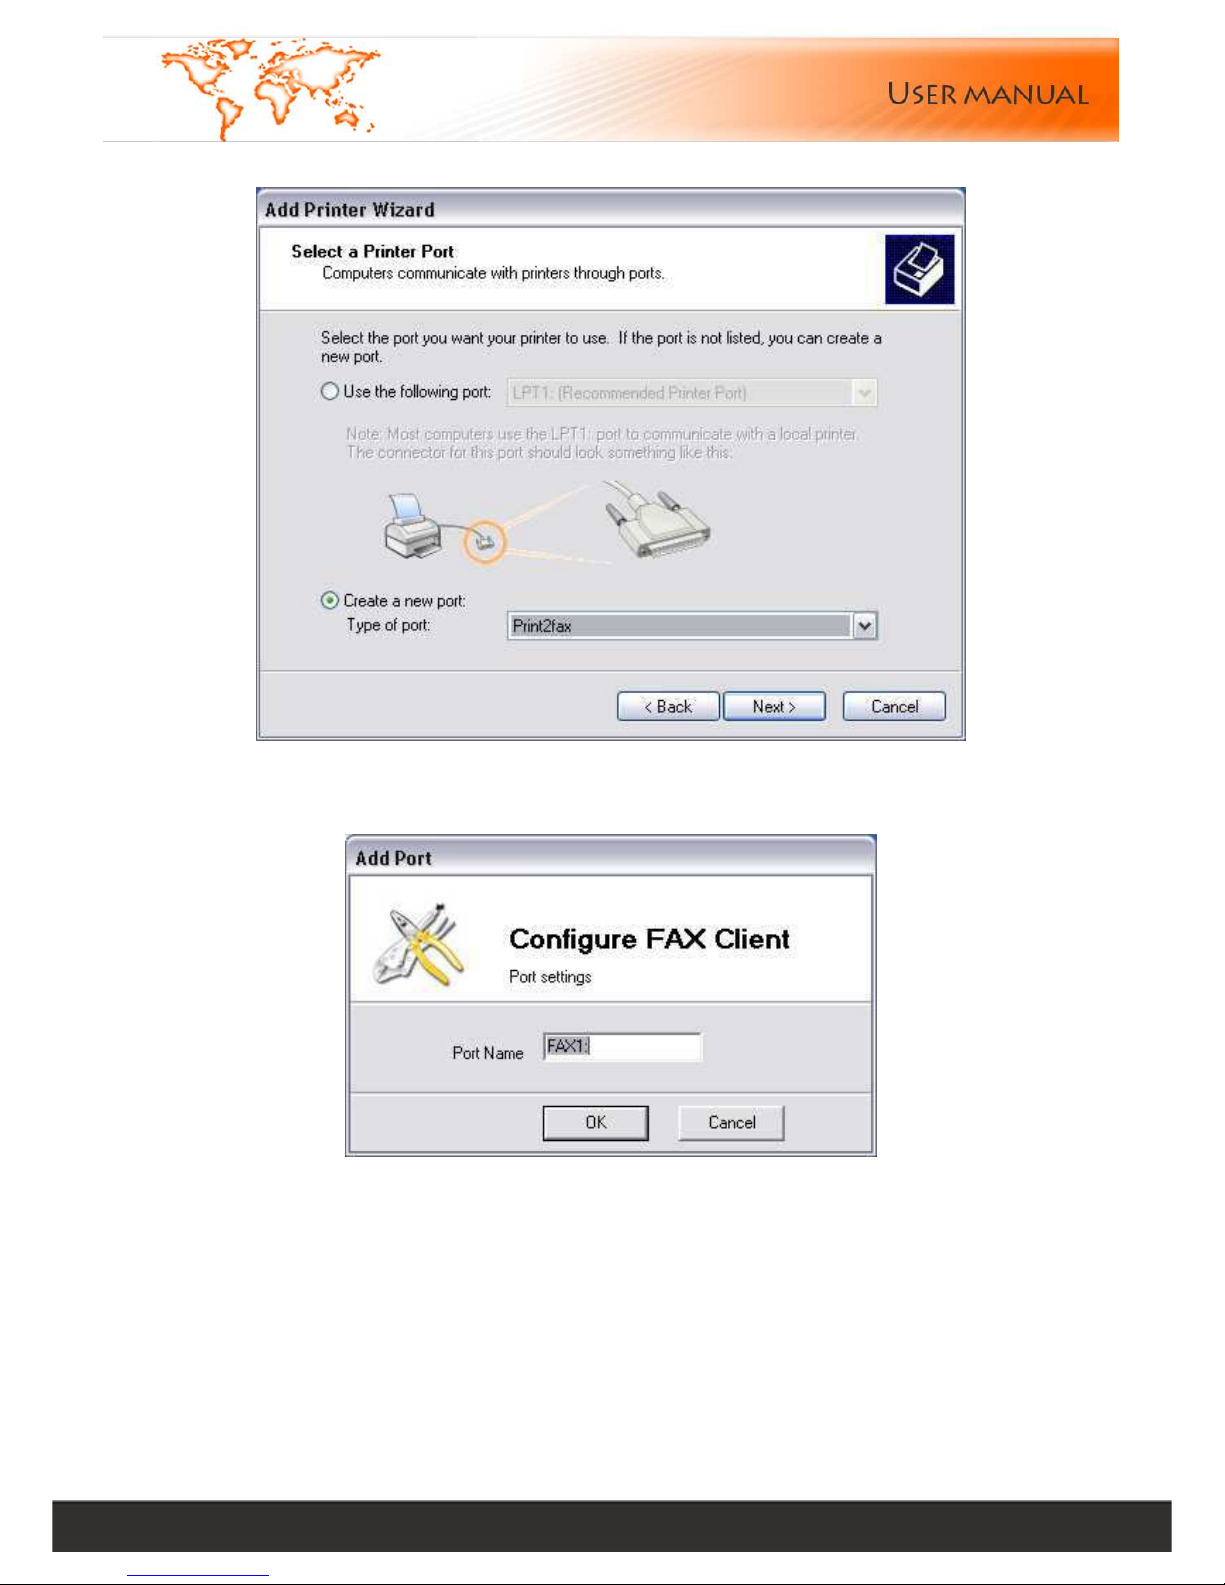
Next, you'll be asked what port to use. Select the radio button "create a new port type." If the installation went well,
you should see "Print2fax" as one of the options. The drop list might scroll, so it may not be obvious that it's at the
bottom of the list. (If it doesn't appear on the list at all, something went wrong with your installation.)
Page 35
Linkcom France 35
11 rue du Soleil Levant 92140 CLAMART Copyright © 2009 – Linkcom – All rights reserved
Next, a box will pop up for you to name the port. The name doesn't actually matter, but naming it FAX1: will help to
identify it.
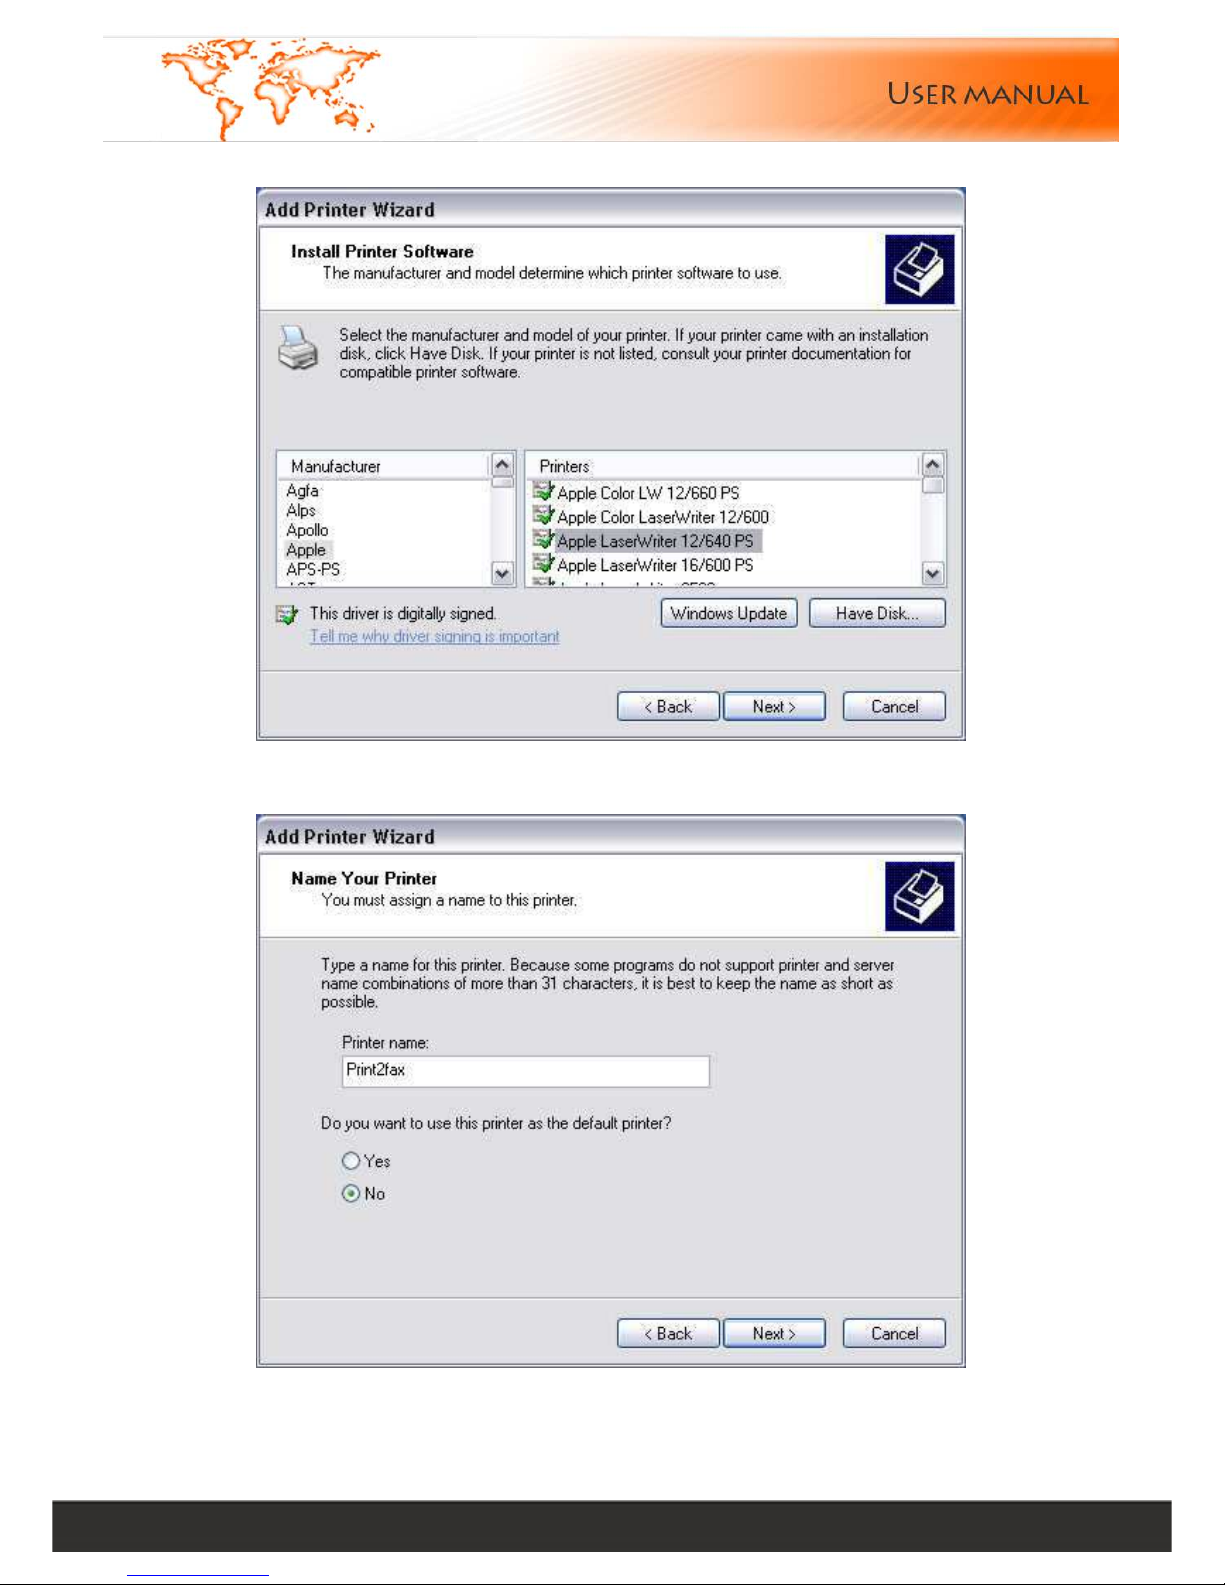
Next, select the printer type. Experience has shown that the “Apple LaserWriter 12/640 PS” and the “Canon C LBP
360PS” are good choices, and I recommend them. Most any other PostScript printer will probably work.
Page 36
Linkcom France 36
11 rue du Soleil Levant 92140 CLAMART Copyright © 2009 – Linkcom – All rights reserved
Of course, name it whatever you want, but we suggest this way "Print2fax"
Page 37
Linkcom France 37
11 rue du Soleil Levant 92140 CLAMART Copyright © 2009 – Linkcom – All rights reserved
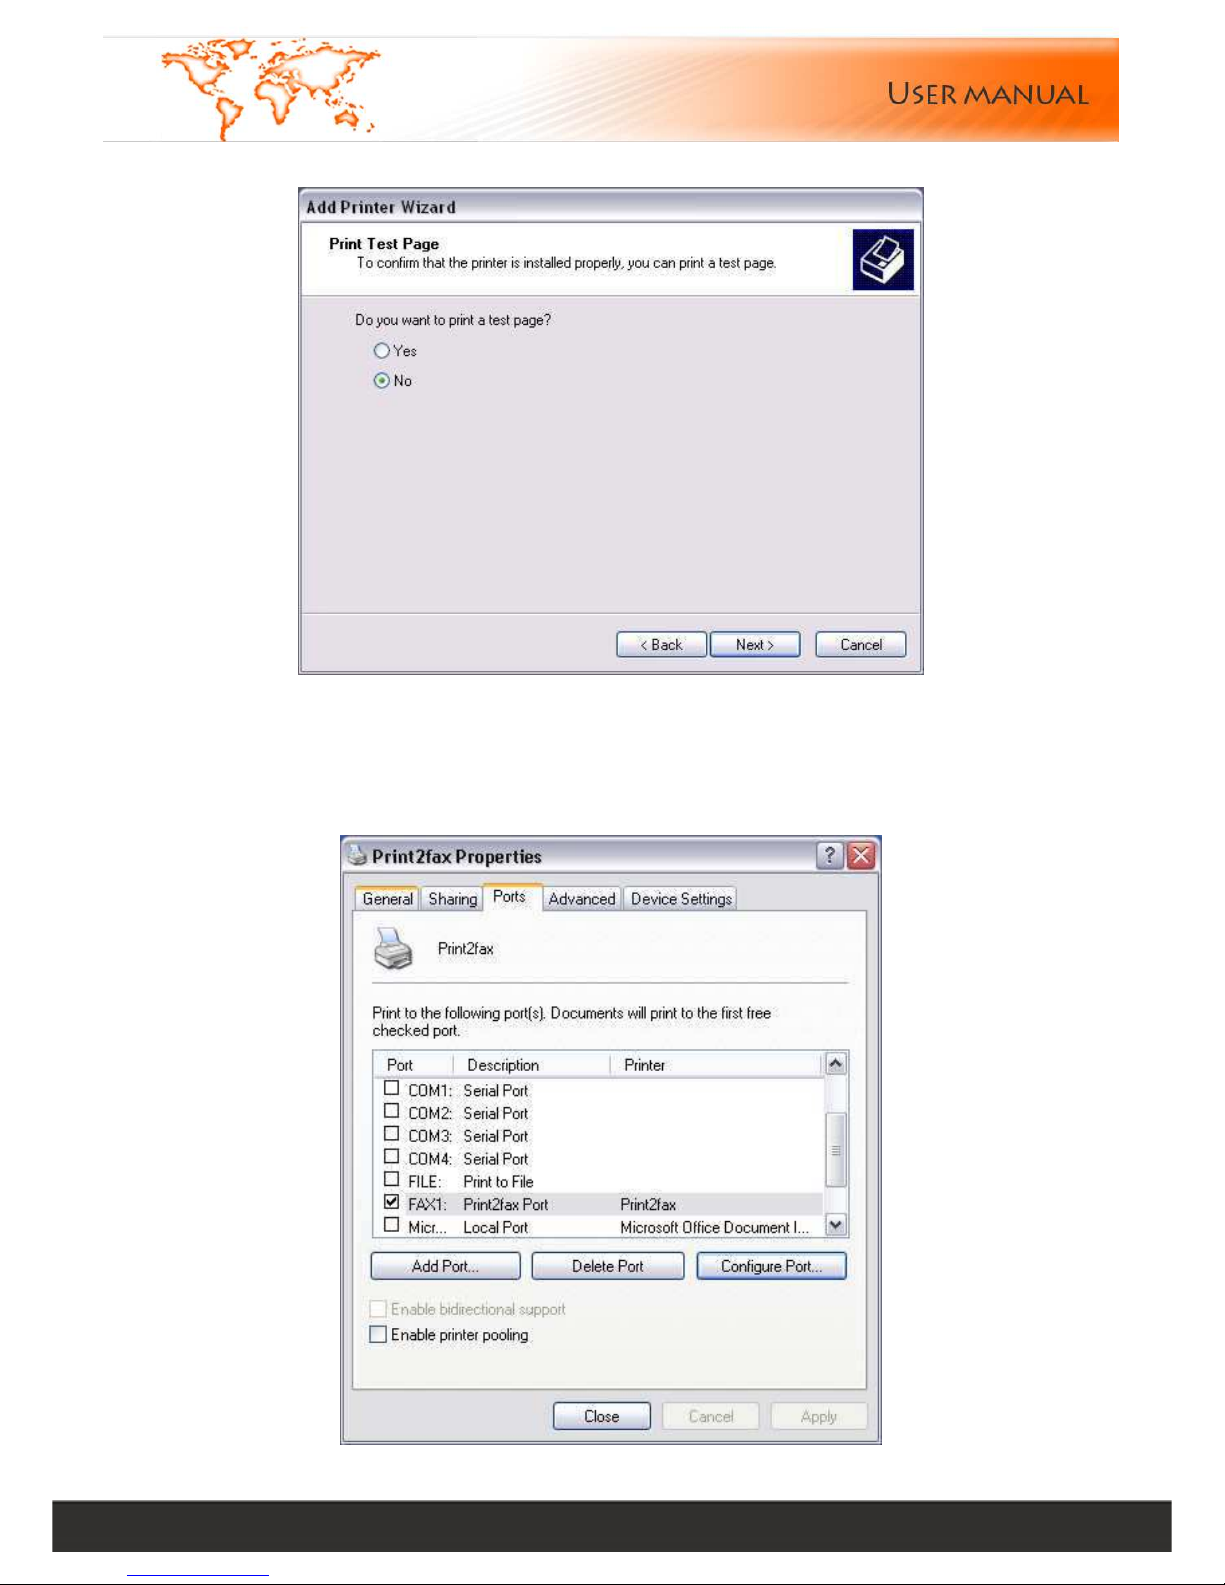
Do not share the printer. This is rather silly anyway, since you can locally install Print2fax on any system that needs
it, and it communicates directly with the E-Fax server. Since it pops up the dialog box asking where to send the FAX
job locally, this would be ugly, at best. Also, don't print a test page, since you're not done configuring the printer yet.
Right-click on the printer to call up its properties, and select the "Ports" tab. Locate the port you just created.
Page 38
Linkcom France 38
11 rue du Soleil Levant 92140 CLAMART Copyright © 2009 – Linkcom – All rights reserved
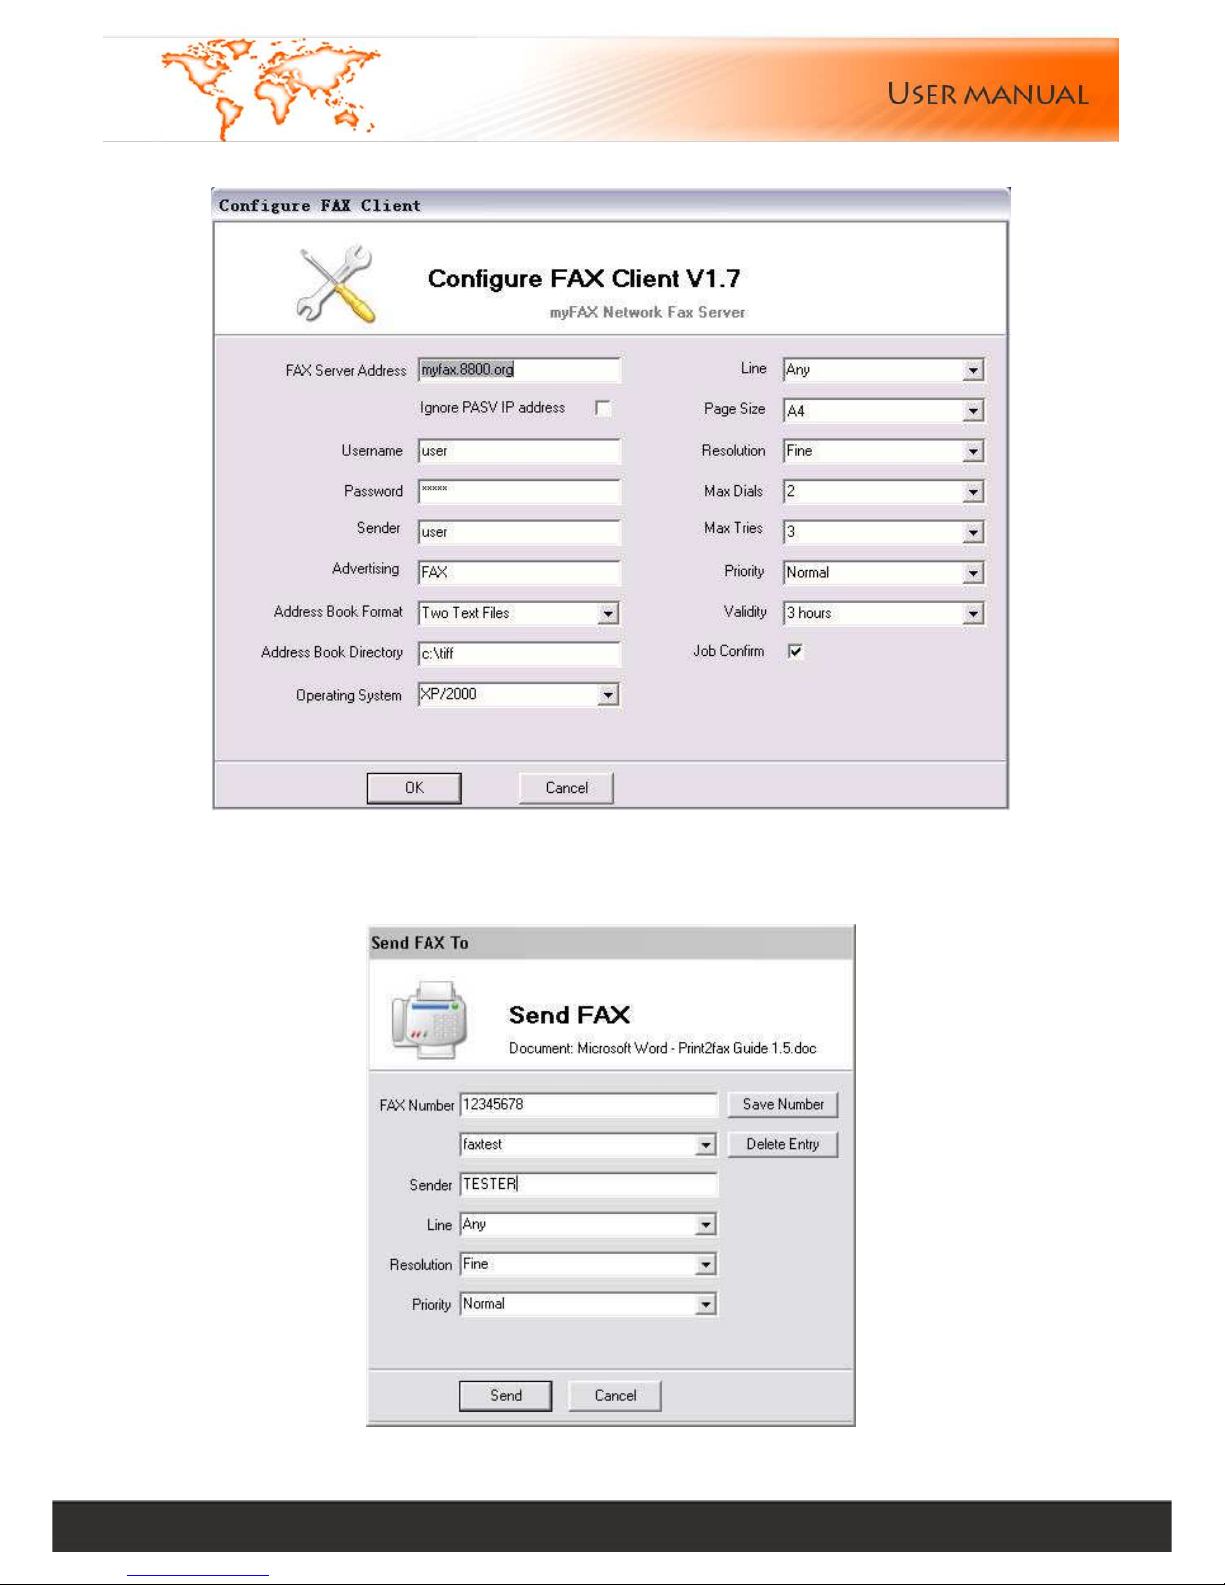
Press the "Configure Port" button to configure the connection to your E-Fax server.
Most people who have problems are going to have problems because their E-Fax server won't let them connect. Break
out your E-Fax server documentation, and make sure that you have set up the correct permissions. Okay, now you're
ready to print a test job. When you send anything to this printer, a dialog box will appear:
Page 39
Linkcom France 39
11 rue du Soleil Levant 92140 CLAMART Copyright © 2009 – Linkcom – All rights reserved
The FAX number is completely unedited and unverified. It relies on E-Fax’ dialing rules to make sense of it.
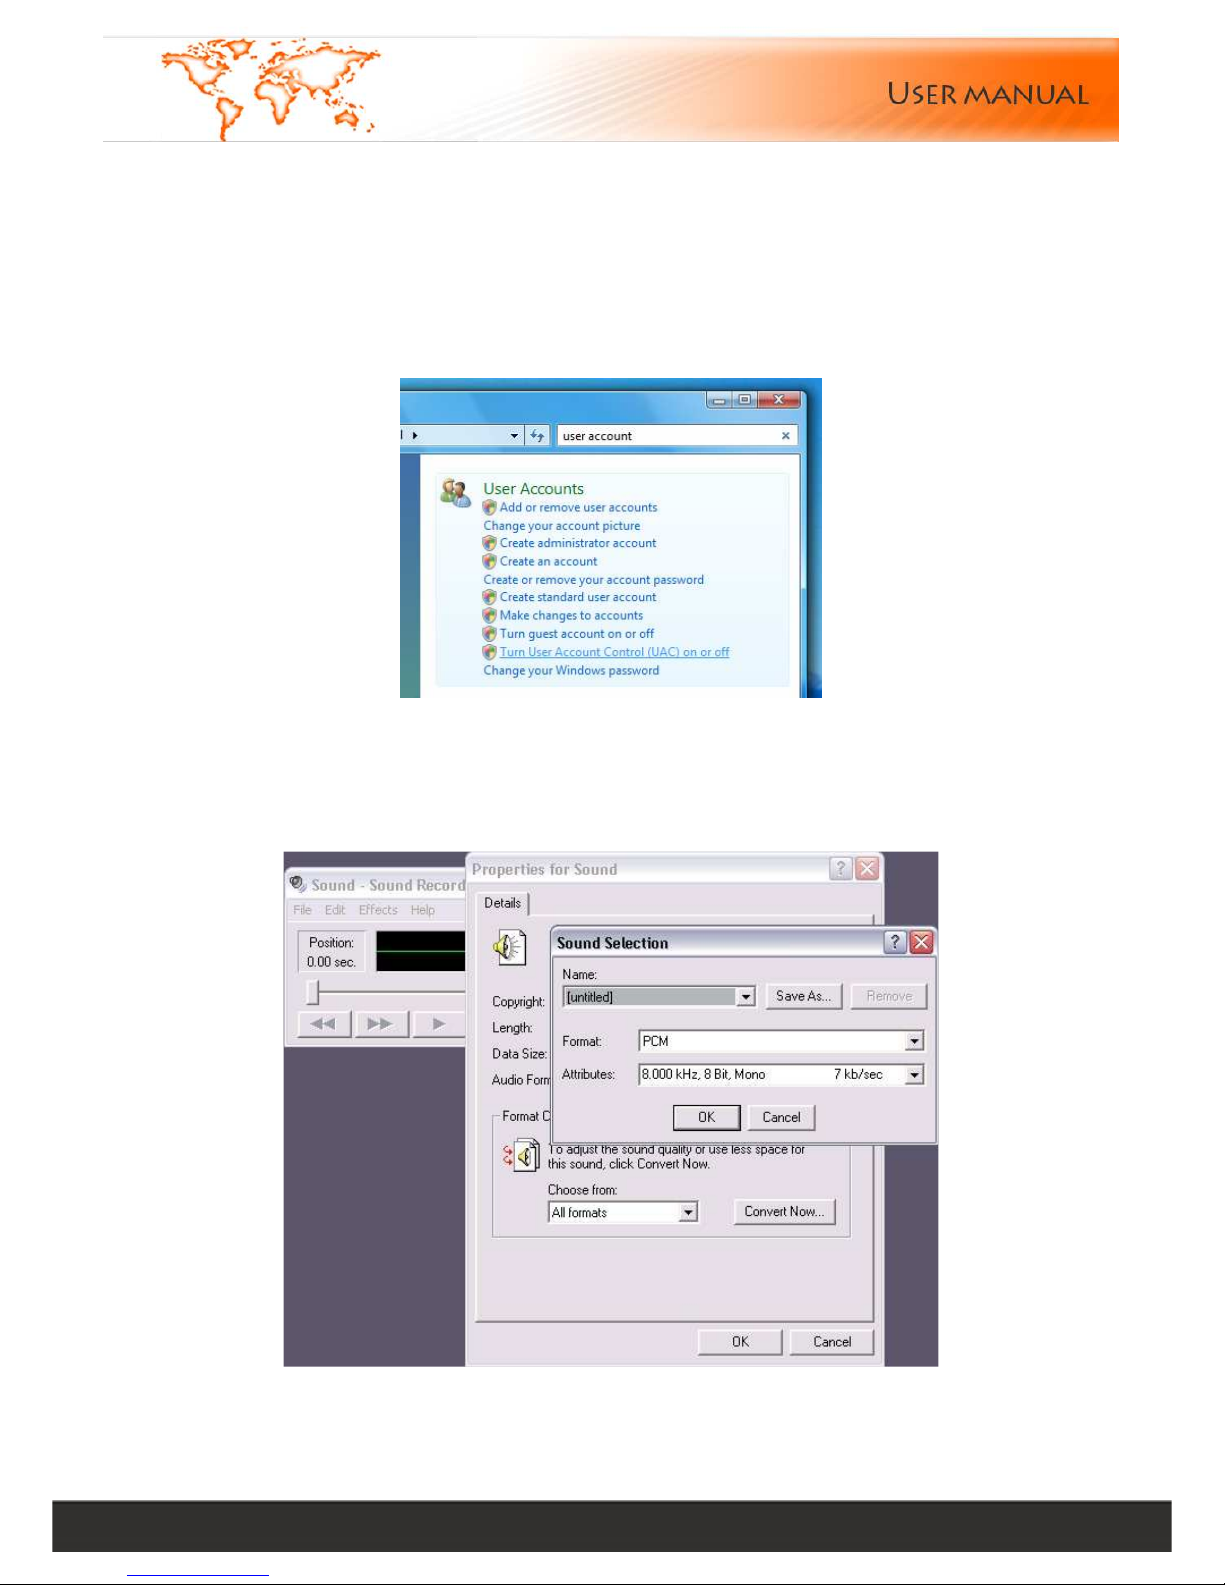
Note: If your OS is Windows Vista, before creating a new port of “Print2fax”, UAC should be turn off as following:
1. Click Start, and then click Control Panel.
2. In Control Panel, click User Accounts.
3. In the User Accounts window, click User Accounts.
4. In the User Accounts tasks window, click Turn User Account Control on or off.
5. If UAC is currently configured in Admin Approval Mode, the User Account Control message appears. Click Continue.
6. Clear the Use User Account Control (UAC) to help protect your computer check box, and then click OK.
7. Click Restart Now to apply the change right away, or click Restart Later and close the User Accounts tasks window.
12.4. Voice recording
Please use windows “Sound Recorder” to record the voice file. The file format: PCM attributes: 8000 kHz, 8, mono.
Saving format: play*.raw
Receiving voice named: play1.raw
Sending voice named: play2.raw
Error voice named: play3.raw
Page 40
Linkcom France 40
11 rue du Soleil Levant 92140 CLAMART Copyright © 2009 – Linkcom – All rights reserved
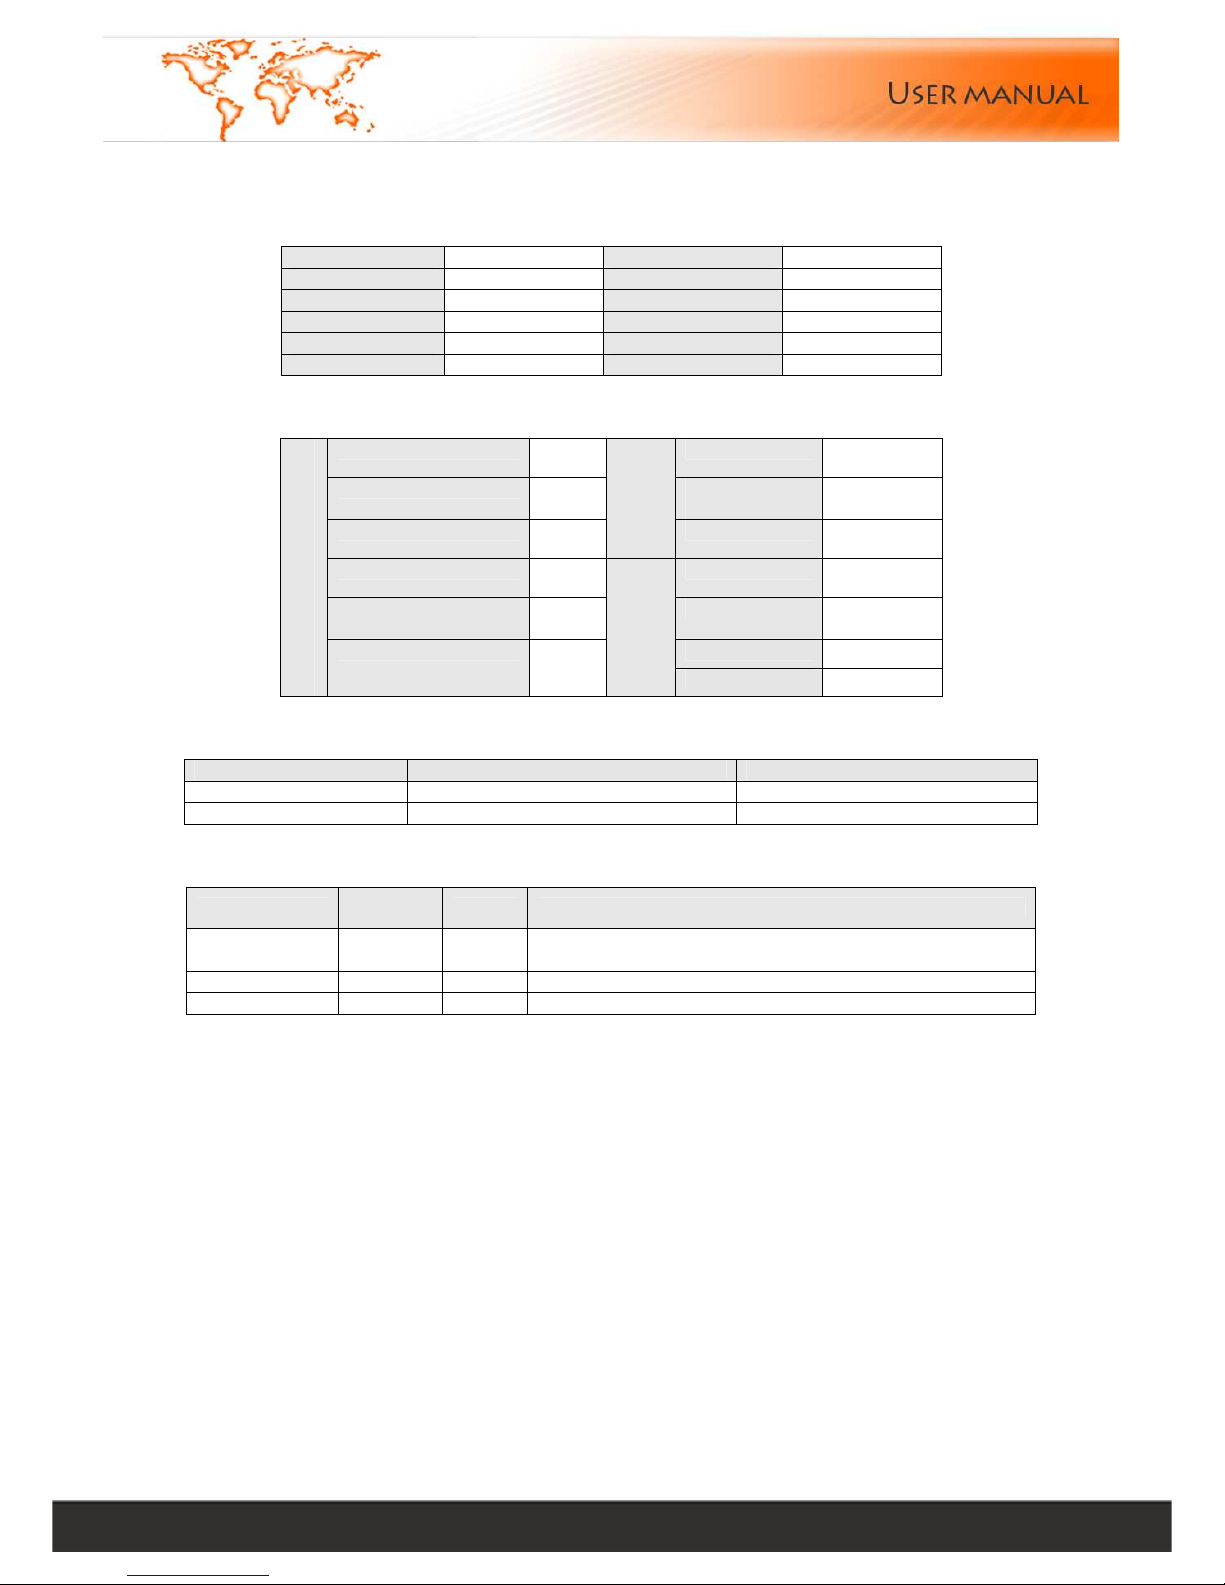
Appendix (the default)
a) Network and Time Default
IP Address 1 192.168.1.200 Router Address 192.168.1.1
Subnet Mask 1 255.255.255.0 DNS Address 1 203.90.224.11
IP Address 2 0.0.0.0 DNS Address 2 127.0.0.1
Subnet Mask 2 255.255.255.0
IP Address 3 0.0.0.0
Subnet Mask 3 255.255.255.0
b) Line Setting
Country Code 852 Max. Pages 25
Area Code None Receiving
Voice
No
National Prefix 0
Receiving
Param
Rings 2
International Prefix 00 Fax Number 123456
Out-line Prefix None Identifier Fax
Server
Prefix Strip 0
Dial Rules
Extention(digit) 3
Identifier
Suffix Strip 0
c) Default User
System default users
Default password Competence
admin 123456 System administrators
user 123456 Default user
d) Voice document default
Voice Type
File
Name
Size Content
Receiver voice play1.raw
41
Welcome, please dial extension number or press start
for fax
Sending voice play2.raw
28 Please press start for receiving fax
Error voice Play3.raw
36 Sorry, the extension number doesn’t exist , please redial
 Loading...