

Page 1
LINHOF PRÄZISIONS - SYSTEMTECHNIK GMBH E
MADE IN GERMANY
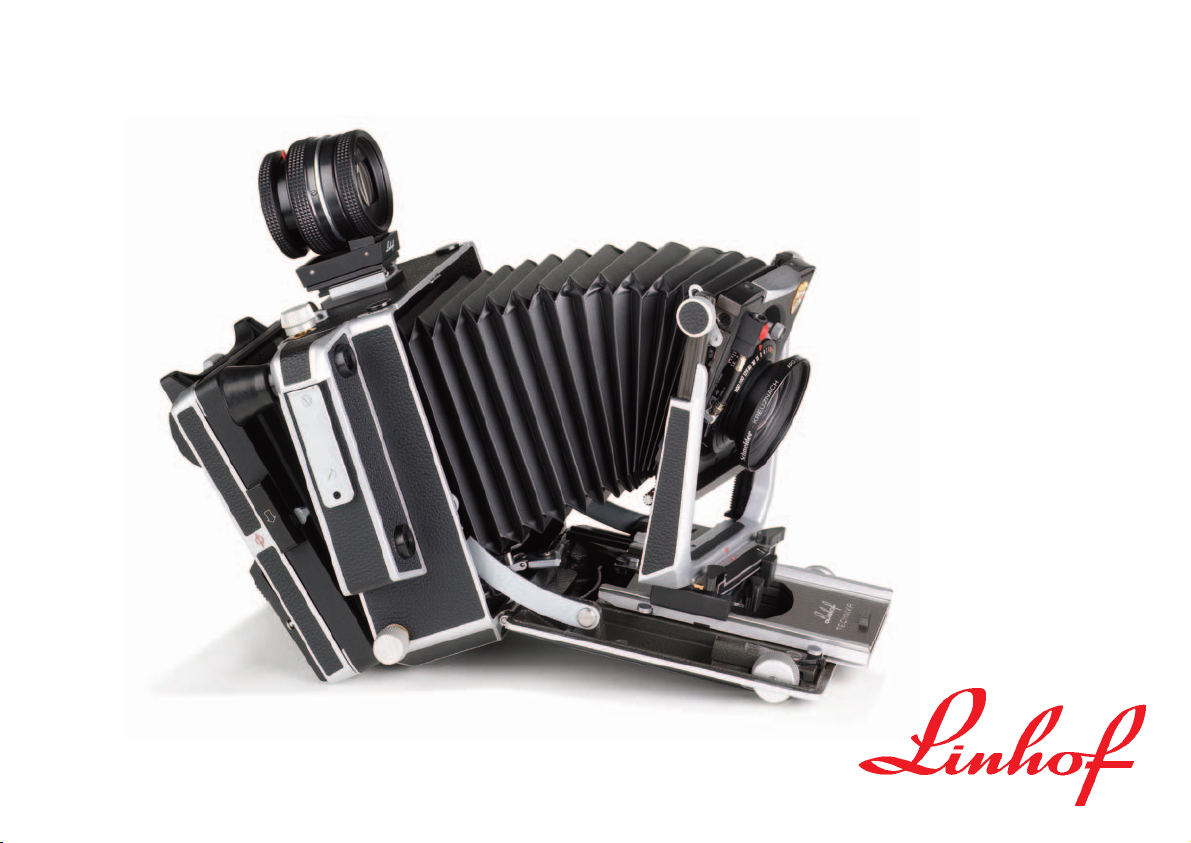
MASTER
TECHNIKA
SYSTEM
Page 2
2
We would like to congratulate you on acquiring your new
LINHOF MASTER TECHNIKA built in the best LINHOF tradition
of quality engineering and dedicated craftsmanship. Yet, it is a
precision instrument, and you should treat it as such.
Make it a habit to protect your camera from dust, sand or spray,
and avoid rough handling.
All movable parts are free from the necessity of continuous servicing. Keep gliding parts, such as upper track always clean. You
may apply a very thin film of chemically pure vaseline to the
upper track. Under no circumstances should oil be used.
After long years continuous intensive use, periodic inspection
and serving may become necessary.
In this case we recommend to return the camera to Linhof or an
authorized Linhof service station for inspection.
1. WELCOME TO THE LINHOF FAMILY
MASTER TECHNIKA classic and MASTER TECHNIKA 2000
Thanks to its drop-bed
technique the Technika can
completely be closed,
easily carried and set up
on location.
Page 3

3
2. CONTENTS
1. WELCOME TO THE LINHOF FAMILY
(classic and 2000) . . . . . . . . . . . . . . . . . . . . . . . . . . .2
2. CONTENTS . . . . . . . . . . . . . . . . . . . . . . . . . . . . . . . .3
3. OPERATING SELEMENTS
MASTER TECHNIKA classic . . . . . . . . . . . . . . . . . . .4, 5
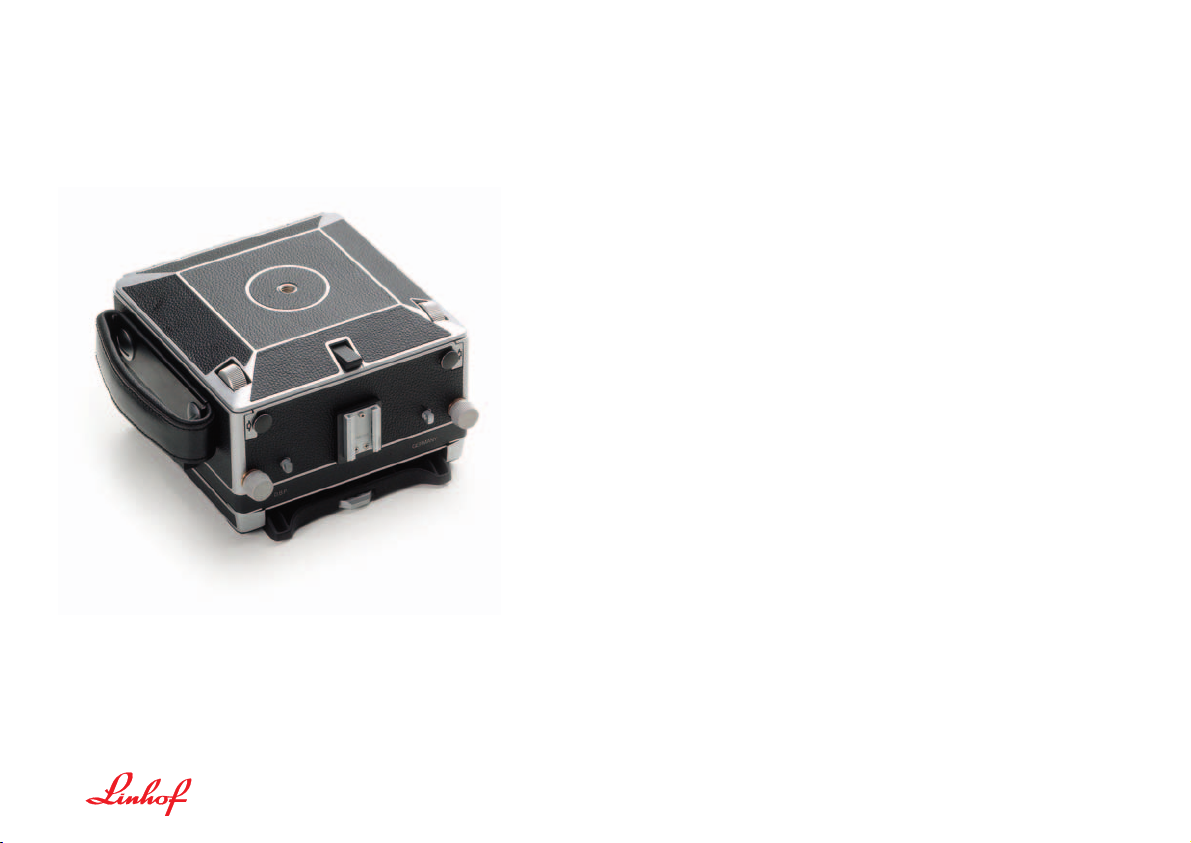
4 THE UNIVERSAL CAMERA BACK
MASTER TECHNIKA classic and 2000 . . . . . . . . . . . . .6
5. OPERATING ELEMENTS AND COMPONENTS
MASTER TECHNIKA classic . . . . . . . . . . . . . . . . . . . . .7
6. OPERATING ELEMENTS
MASTER TECHNIKA 2000 . . . . . . . . . . . . . . . . . . . . . .8
7. OPENING AND CLOSING THE CAMERA
(classic and 2000) . . . . . . . . . . . . . . . . . . . . . . . . . . .9
8. INFINITY POSITION (classic and 2000) . . . . . . . . . .10
9. DISTANCE SCALES
(classic and 2000) . . . . . . . . . . . . . . . . . . . . . . . . . .11
10. DEPTH-OF-FIELD TABLE
(classic and 2000) . . . . . . . . . . . . . . . . . . . . . . . . . .11
11. TRIPLE EXTENSION (classic and 2000) . . . . . . . . . . .12
12. GROUNDGLASS FOCUSING
(classic and 2000) . . . . . . . . . . . . . . . . . . . . . . . . . .13
13. WIDE-ANGLE PHOTOGRAPHY
(MASTER TECHNIKA classic) . . . . . . . . . . . . . . . . . . .14
14. WIDE-ANGLE PHOTOGRAPHY
WITH MASTER TECHNIKA 2000 . . . . . . . . . . . . . . . .15
15. WIDE-ANGLE SHOTS USING CAMERA
ADJUSTMENTS (classic and 2000) . . . . . . . . . . . . . . .16
16. RECESSED TECHNIKA LENSBOARD WITH HELICAL
FOCUSING MOUNT (MASTER TECHNIKA classic) . . .17
17. INTERCHANGE OF LENSES (classic and 2000) . . . . . .18
18. TECHNIKA LENSBOARD WITH ADDED COMFORT
(classic and 2000) . . . . . . . . . . . . . . . . . . . . . . . . . .19
19. INTERCHANGE OF COUPLING CAMS
(MASTER TECHNIKA classic) . . . . . . . . . . . . . . . . . . .20
20. RANGEFINDER FOCUSING
(MASTER TECHNIKA classic) . . . . . . . . . . . . . . . . . . .21
21. CAMERA MOVEMENTS (classic and 2000) . . . . . . . . .22
22. ADJUSTMENTS OF LENS STANDARD
(classic and 2000) . . . . . . . . . . . . . . . . . . . . . . .23, 24
23. THE UNIVERSAL CAMERA BACK:
THE SWING FRAME (classic and 2000) . . . . . . . . . . .25
24. THE UNIVERSAL CAMERA BACK:
THE REVOLVING FRAME (classic and 2000) . . . . . . .27
25. FILM HOLDERS
(classic and 2000) . . . . . . . . . . . . . . . . . . . . . . . . . .28
26. ADAPTER FOR DIGITAL BACKS
(classic and 2000) . . . . . . . . . . . . . . . . . . . . . . . . . .29
27. TECHNIKA SYSTEM ACCESSORIES
(classic and 2000) . . . . . . . . . . . . . . . . . . . . . . . . . .30
28. ALUMINIUM CASE FOR MASTER TECHNIKA
(classic and 2000) . . . . . . . . . . . . . . . . . . . . . . . . . .32
29. SYSTEM ACCESSORIES MASTER TECHNIKA classic . .33
30. SYSTEM ACCESSORIES MASTER TECHNIKA 2000 . . . .33
31. ACCESSORIES FOR MASTER TECHNIKA SYSTEM
(classic and 2000) . . . . . . . . . . . . . . . . . . . . . . . . . .34
32. TECHNICAL DATA MASTER TECHNIKA classic . . . . .35
33. TECHNICAL DATA MASTER TECHNIKA 2000 . . . . . . .35
Page 4
4
25
26
23
6
22
1
2
4
5
24
3
16
15
8
9
10
11
12
13
14a
17
18
19
39
21
18
27
28
3. OPERATING ELEMENTS
MASTER TECHNIKA classic
7
Page 5
31
30
29b
33
27
5
3. OPERATING ELEMENTS MASTER TECHNIKA classic
10
29a
1
4
14a
32
3
14b
45
46
Operating elements and
adjustment facilities of the
Master Technika classic and
the Master Technica 2000 are
very often identical.
Please see the specific features
of the Master Technika 2000.
Page 6
6
34
18
35
18
42
41
26
43
40
18
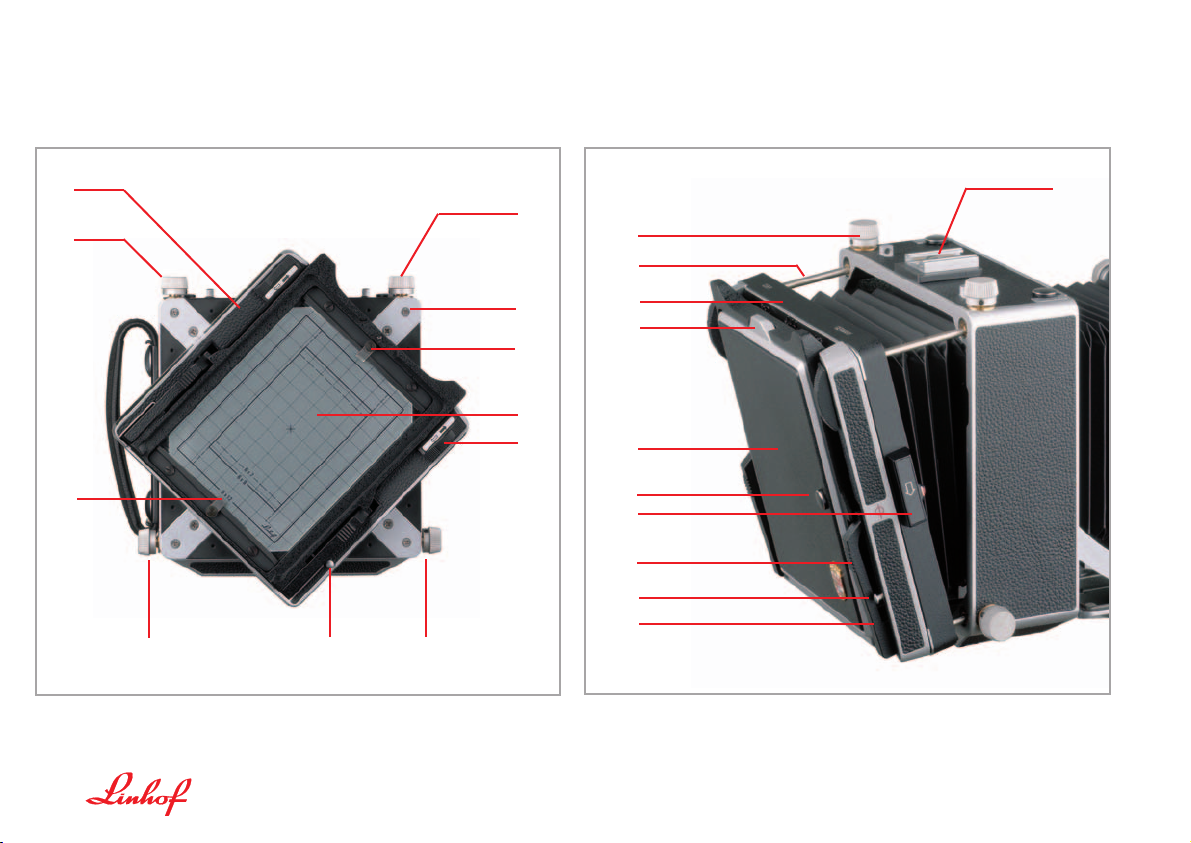
4. THE UNIVERSAL CAMERA BACK
MASTER TECHNIKA classic and 2000
39
22
38
44
37b
18
18
36
24
24
37a
THE SWING FRAME
THE REVOLVING FRAME
39
Page 7

7
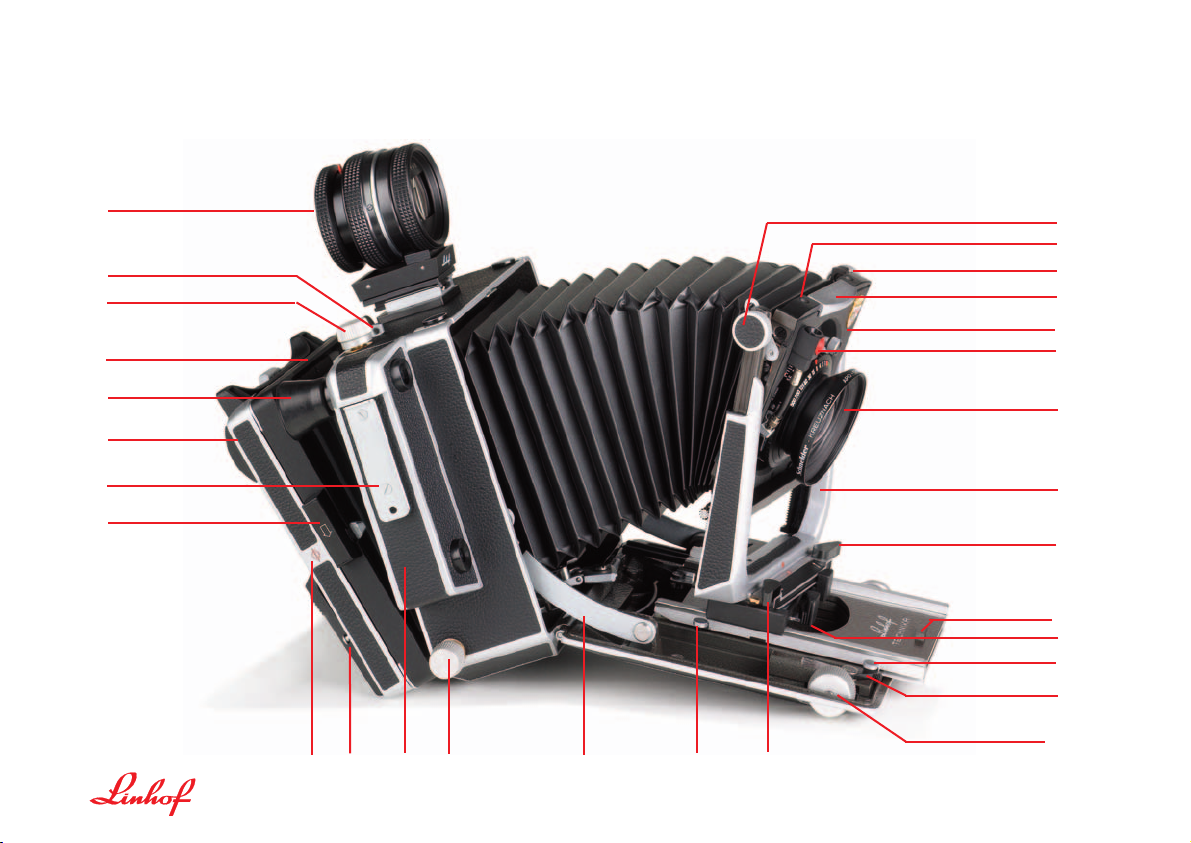
1 Locking screw for lensboard tilt
2 Sockets for wire-frame finder and compendium, as well as
gelatine filter holder
3 Release push-button for forward and backward tilt through
the center of the horizontal axis
4 Locking bar for interchangeable lensboard
5 Lensboard (flat or recessed)
6 Rapid cable release socket
7 Lens in Copal shutter
8 Lens standard frame with racks
9 Release lever for front swivel through vertical axis
10 Pull-out grip for upper track
11a,b Spring-tensioned grips for pulling out lens standard
12 Release for full extension and retraction for upper track
13 Locking lever for track extension
14a,b Rack and pinion focusing knob
15 Locking and release lever for lateral shift with zero click-stop
16 Release for pushing back the upper track when using
wide angle lenses or for pulling it forward for triple extension
17a,b Three position bed struts
18 Locking knobs (4) for swing frame
19 Multifocus coupled rangefinder
21 Position mark of focal plane
22 Swing frame zero lock
23 Bracket for flash unit or right-hand anatomical grip
24 Revolving frame
25 Rangefinder rubber eye piece
26 Swing frame
27 Eyelets for shoulder strap
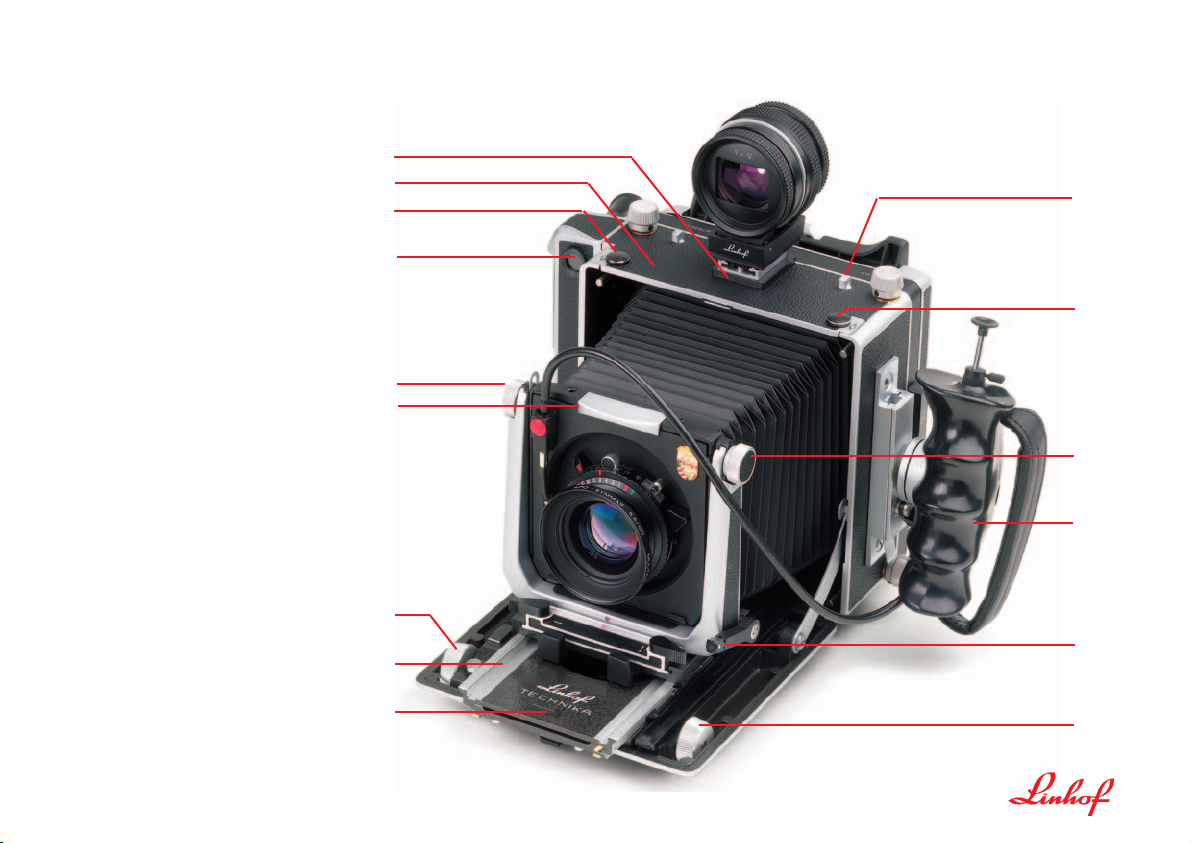
5. OPERATING ELEMENTS AND COMPONENTS
MASTER TECHNIKA classic
28 Multifocus Optical Viewfinder
29 a,b Sliding locks for flap of camera housing
30 Anatomical handgrip with cable release
31 Lift lever for operating rising front
32 Upper track of drop bed
33 Rangefinder meter
34 Slide (4) to hold revolving frame on swing frame
35 Linhof multi format groundglass with net grid
36 Sliding locks (2) to hold ROLLEX or other accessories
37a,b Spring-clip to hold fresnel screen
38 Accessory shoe
39 Release push-button for revolving frame
40 Spring-tensioned arms to hold groundglass frame
41 Snap button to open and close focusing hood frame
42 Light hood, closed
43 Pull-out handle for focusing hood frame
44 Guiding pins of swing frame
45 Flap of camera housing, can be lifted-up for rising
of lens standard after release of sliding locks 29a,b
46 Additional tripod socket 3/8" underneath accessory shoe
Page 8
8
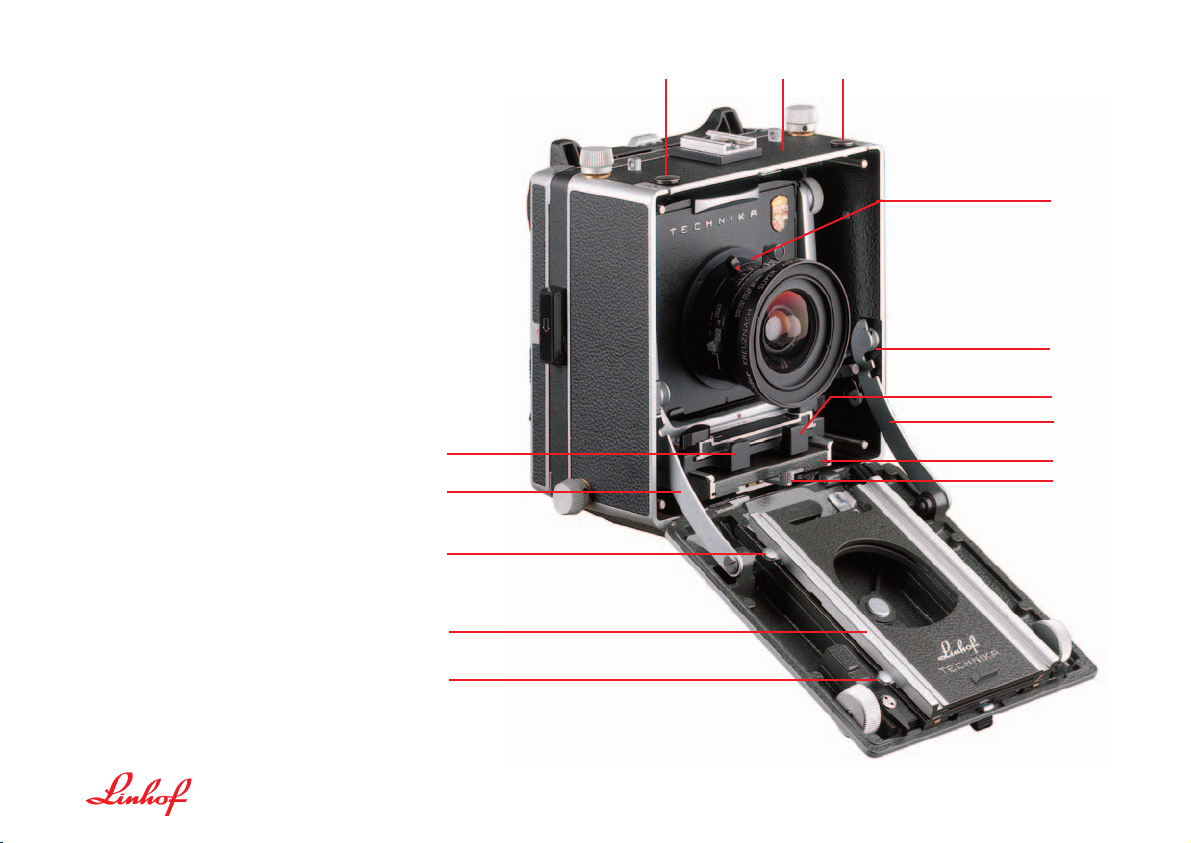
6. OPERATING ELEMENTS
MASTER TECHNIKA 2000
A
B
A Lens mounted in special tube on
lensboard 45
B Third notch of bed strut. If both struts (17a and
17b) are held in this position the dropbed is
lowered by 30°.
C Wide angle focusing track integrated in
housing of the camera
D Lever for moving focusing track
11b
17b
C
D
12
32
16
17a
11a
29a
45 29b
Page 9
9
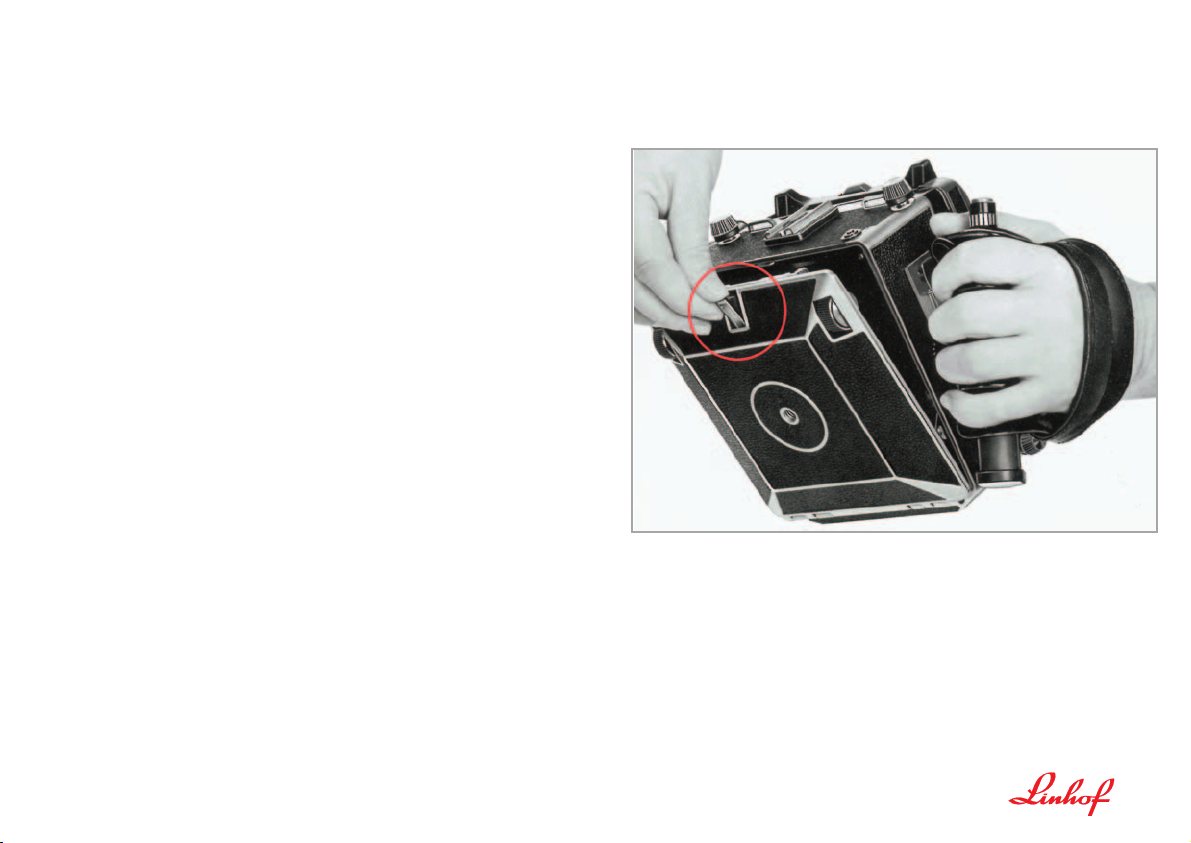
TO OPEN THE CAMERA:
To open the camera, push the drop-bed release catch down (see ill.). Let the
drop-bed down 90° until the bed struts click into the first notch.
TO CLOSE THE CAMERA:
When you close the camera after use, please make sure that it is in the same
position as it stands now before you. All swings and tilts must have been
returned to zero and the lens standard must be pushed back all the way into
the camera body. The focusing tracks must be all the way back in infinity position. Lenses of extra long constructional design (such as tele-photo lenses)
must be removed from the camera before closing. The cable release must be
separated from the shutter. This is easily done by operating the improved rapid
cable release socket. Without danger to the rangefinder linkage, the camera
may also be closed without coupling cam inserted (e.g. after groundglass focusing resp. after using an extreme wide-angle lens).
The normal lens 150 mm mounted on recessed lensboard can remain in the
camera.
7. OPENING AND CLOSING THE CAMERA
(classic and 2000)
Page 10
10
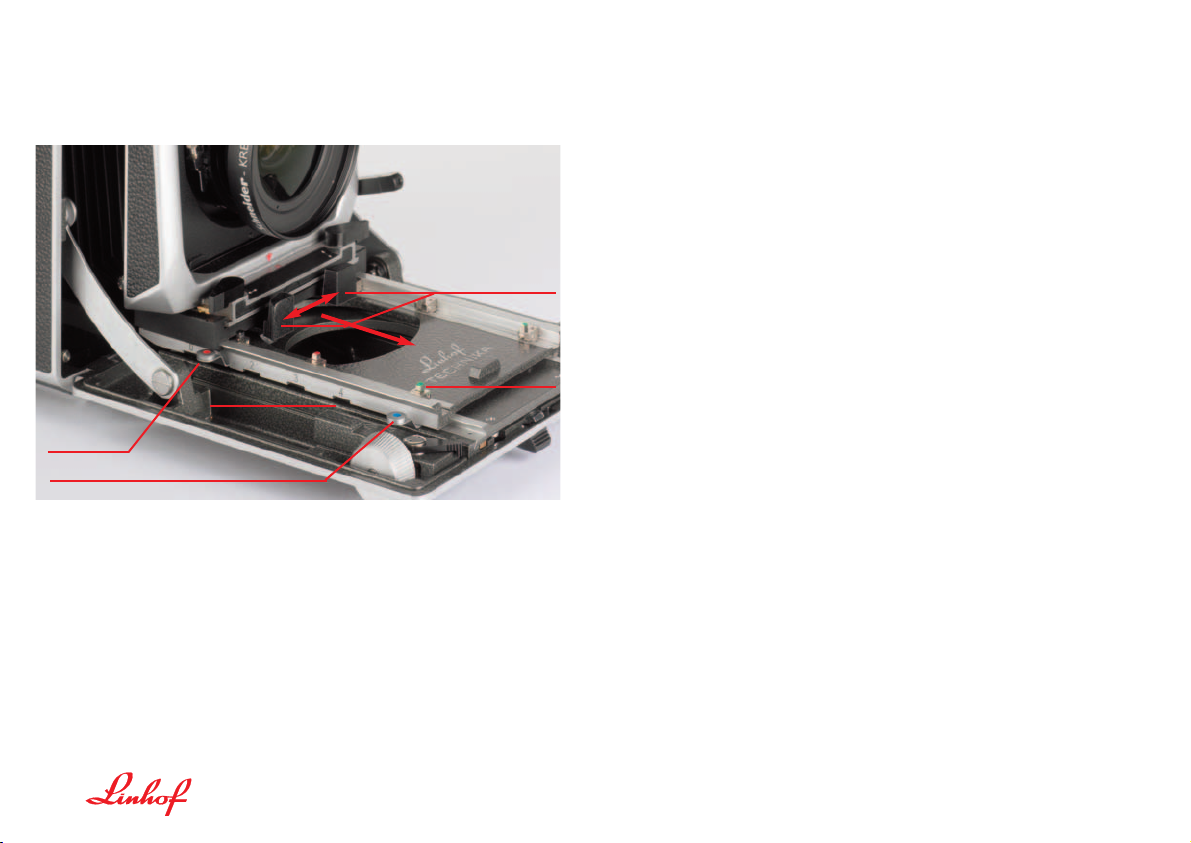
8. INFINITY POSITION (classic and 2000)
MASTER TECHNIKA with 5 notches at the upper track
INFINITY STOPS
Infinity stops secure a quick shooting availability of the MASTER TECHNIKA
classic and MASTER TECHNIKA 2000. One pair of parallel fold-up stops
belongs to each lens used on the camera. Infinity stops for different lenses
have different colors for easy identification.
Red is the distinguishing color for the normal, black for the wide-angle, and
green for the tele-photo lens. If more lenses are installed, additional colors
such as yellow or blue will be used. The colors of the infinity stops correspond
with the colors of the distance scales and the rangefinder coupling cams
(Master Technika classic).
SETTING TO INFINITY
Fold-up the pair of infinity stops in accordance with the lens used.
For release of upper track press down the red and blue release lever. Grasp the
lens standard by the pull-out grips (11), press them inward and pull the lens
standard out on the upper track against the desired infinity stops, which have
been folded up before. The camera is now set for infinity.
When using different lenses the individual procedure is as follows:
By pressing down the red or blue release lever (12 and 16) the combination of
notch/release will be adjusted. The lens standard is now pulled-out to the foldup stops by using the spring-tensioned grips.
COMMONLY USED COMBINATION OF NOTCH / RELEASE
We recommend the following combination for initial fitting of fold-up stops:
Notch 0 Standard position, normal lens (for example 150 mm)
Notches 1 and 2 Release red, Wide-angle lenses (push back upper track)
Notches 4 - 0 Release blue, Telephoto lenses (pull out upper track).
These are only examples which can vary in accordance with the use of
different lenses.
Pull-out grips
Infinity stop
Notch
Red or blue
release lever
Page 11
11
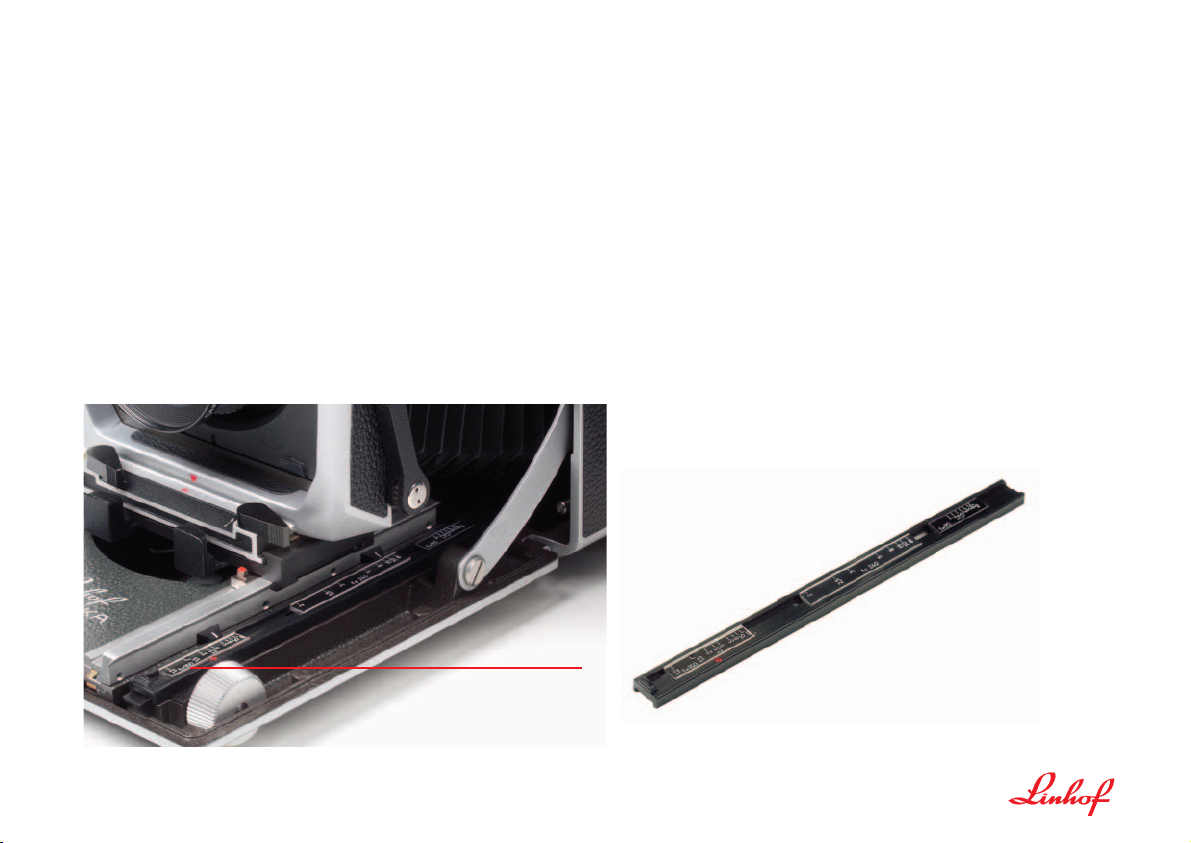
The detachable folding focusing hood includes a depth-of-field table for evaluating the depth-of-field for lenses of 90 to 300 mm.
Based on the distance selected a certain depth-of-field value can be determined for the necessary aperture. The data found are only valid for a camera
either totally unadjusted (basic position) or adjusted parallel.
When operating with adjustments according to Scheimpflug the aperture
selected may be considerably higher (lower f-stop figure).
9. DISTANCE SCALES
(classic and 2000)
Distance scales assist the focusing control of unadjusted cameras. The index
has to be located on the infinity mark at the distance scale corresponding to
the lens used.
The distance scale stage carries up to 3 scales. One each for wide angle,
normal and telephoto lens. Their color corresponds with the color of the infinity stops and range finder coupling cams. For telephoto and long focus lenses the distance scale located near the front edge of the drop-bed applies.
When more than three lenses are used on the camera, the scale stage may be
exchanged for another one simply by pulling it off its dovetail.
10. DEPTH-OF-FIELD TABLE
(classic and 2000)
Distance Scales
Distance Scales Stage
Page 12
12
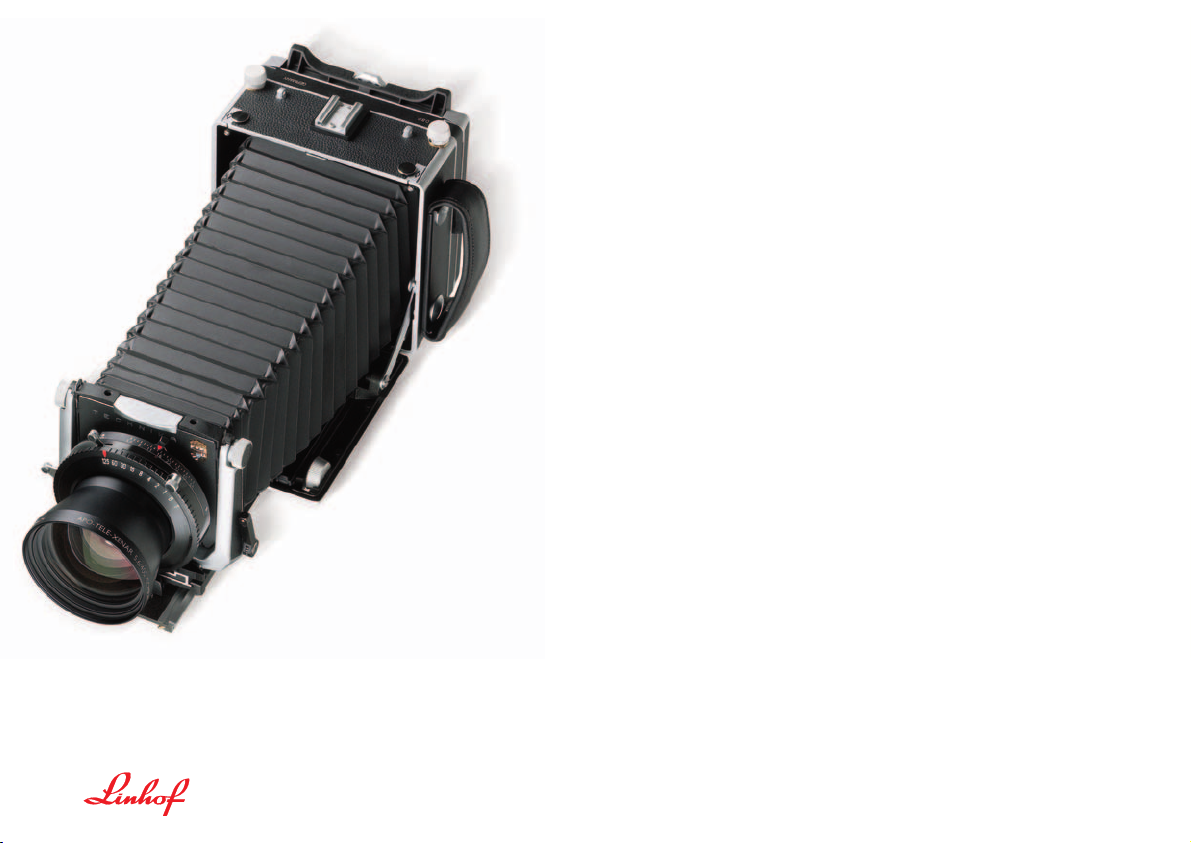
11. TRIPLE EXTENSION
(classic and 2000)
To focus on subjects closer than infinity, rotate the right or left focusing knob
(14a,b). To obtain additional bellows extention (for extreme close-ups, macro
photography, etc.), first disconnect the cable release from the socket on the
lensboard, and also detach it from anatomical grip.
Then hold down the track catch (16 and 12) and pull the upper track forward
with the pull-out grip (10) until it clicks into position.
Should the extension be insufficient hold down the track catch (16 and 12)
again thus prolonging the extension until the second notch. Then the front
track catch (12 = blue) can be hold down for another extension. For pullingout the lens standard on the upper track completely the infinity stops have to
be unfolded.
Use the focusing knob (14a,b) for fine focusing on the groundglass. Reconnect the cable release to the rapid-lock socket on the lensboard. After focusing is completed, it is recommended to operate the track locking lever (13).
This is particulary important when using the camera in a vertical position.
To return the upper track to its normal position, hold down the catch (12) while
you slide the track back until it clicks into place.
TRIPOD SOCKET:
To avoid a possible camera vibration with long bellows extensions, it is recommended to use the second tripod bushing located in the middle of the dropbed. For mounting the camera upside down, use the additional tripod socket
(46) located on top of the camera housing underneath the accessory shoe.
The precision-machined triple extension dropbed allows a maximum bellows draw of
430 mm to use standard view camera lenses
up to 400 mm. Even with the full bellows
extension, optimum stability is maintained.
The variable bellows extension is particularly
valuable in close-up and macro work where
superb sharpness can be obtained with
modern lens systems designed especially for
this type of work. The macro versions of standard view camera lenses, optimized for reproduction ratios from 1:3 to 3:1, can be used
without accessories.
Page 13
13
12. GROUNDGLASS FOCUSING
(classic and 2000)
CONTROL ACCESSORIES:
For precise focusing, without interference from stray light, the use of the
FOCUSING/METERING BELLOWS 45 (Code 002503) or the RIGHT ANGLE
REFLEX ATTACHMENT (Code 002628) is recommended.
Both these being exchangeable against the focusing hood.
Groundglass focusing and composition is required when camera adjustments
become necessary.
After setting the lens for infinity, the between-the-lens-shutter is opened. By
pushing the snap button (41) towards the center of the focusing hood cover,
the focusing hood snaps open by spring tension. The focusing hood prevents
stray light, so that a clear easily observable ground glass image becomes visible. It is always recommended to determine critical sharpness by means of a
FOCUSING MAGNIFIER. Before using the magnifier, fold away the focusing
hood. The focusing hood frame is held in place by a snap button; it is opened
by pulling on the grooved tab (43). After opening, the focusing hood may be
removed entirely by pressing the focusing hood frame to the right, so that it
disengages from its spring loaded hinge.
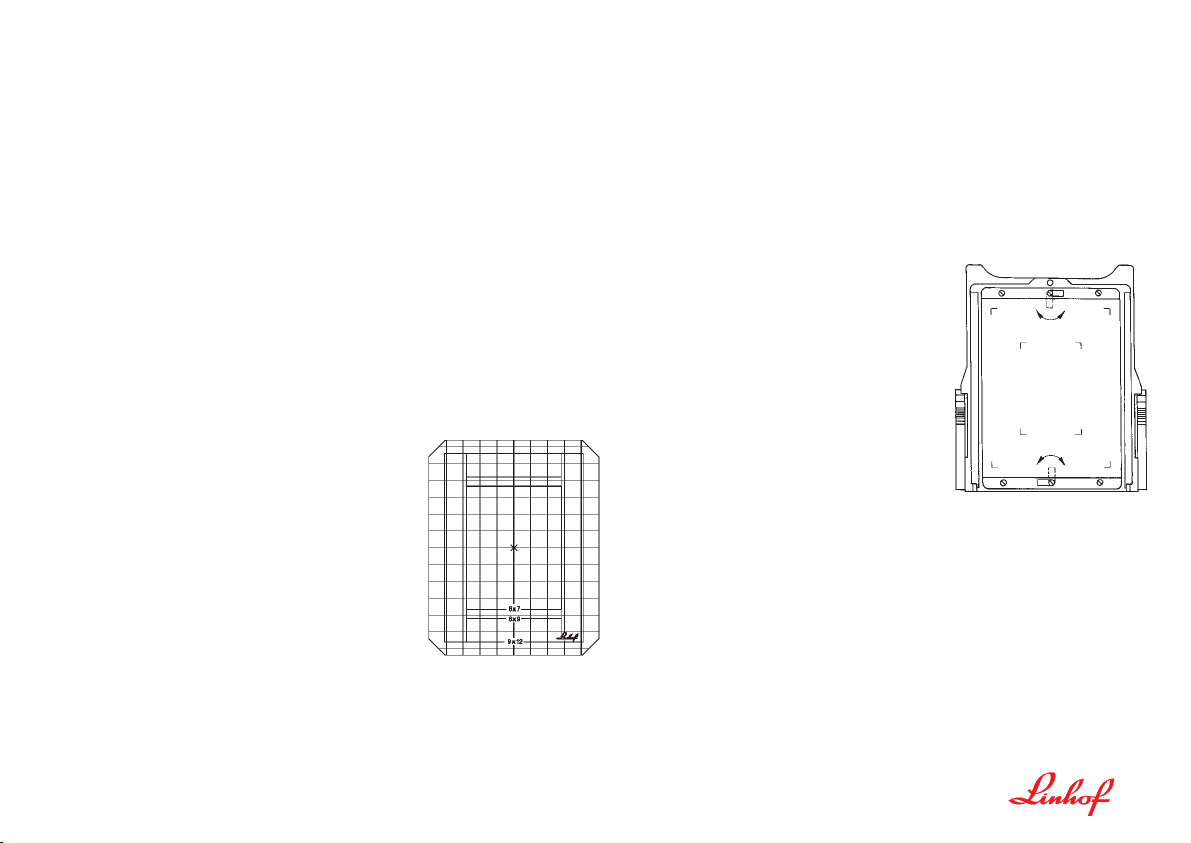
GROUNDGLASS:
In architectural photography the groundglass
with centimeter grid greatly facilitates to check
on vertical and horizontal lines. The multi format
groundglass is supplied with scoring for all rollfilm formats – 6x7, 6x9, 6x12 cm –, sheet film
9x12 cm and 4x5 inch (total area).
FRESNEL SCREEN 45:
A very desirable accessory, especially when using short focus (wide-angle)
lenses, is the FRESNEL SCREEN 45 (Code 002522). It provides a uniform
brightness of the groundglass image, even on its edges, so that focusing and
composition are greatly facilitated.
MOUNTING INSTRUCTION OF
FRESNEL SCREEN:
The FRESNEL SCREEN is placed over the
groundglass with the grooved side towards
the lens. Rotate top and bottom retaining clips
(37a and 37b) sideways, place FRESNEL
SCREEN over the groundglass and return
retaining clips to their original position.
Page 14

14
13. WIDE-ANGLE PHOTOGRAPHY
(MASTER TECHNIKA classic)
ATTENTION:
Remove rangefinder coupling cam before lowering the
dropbed into the wide angle position.
When using 72 mm and 90 mm wide angle lenses, the upper track must be
moved back as follows: Press the track lock button (16) just long enough to
release the track, and slide the track towards the camera body until it clicks
into position. When using the camera hand-held and with rangefinder focusing, the film back must be in horizontal position, in order to avoid vignetting
by the front edge of the drop bed. To take photographs in vertical position, the
entire camera must be turned by 90°. This camera operation is essential when
photographing with the coupled multifocus rangefinder. It is also recommended when focusing on the ground glass. In exceptional cases (vertical composition from a tripod with 72 mm or 90 mm Super Angulon without using the
rising front adjustment), it is possible to proceed in the following manner, in
order to avoid the need for a lateral tilt of the camera: Remove rangefinder
coupling cam, press down on both struts while you lower the drop-bed 30°
until it clicks into the third notch of the struts, loosen the locking screw (1) and
press the tilt release knob (3), tilt the lensboard all the way back and re-tighten the locking knob (1). Now, as described above, the upper track is pushed
to its rear position. Due to the inclined position of the drop-bed, the infinity
stops no longer indicate the wide angle infinity position. The lens is focused for
infinity by moving the lens standard back and forth on the upper track.
PLEASE NOTE:
The combination of 72 mm wide-angle lenses and shorter with 4 x 5 inch film
may cause slight vignetting even with the groundglass in horizontal position.
For rangefinder focusing with 72 mm lenses, a slight lens rise is therefore
recommended.
Page 15
15
14. WIDE-ANGLE PHOTOGRAPHY
WITH MASTER TECHNIKA 2000
Convenient focusing and highly precise groundglass control even with extreme wide-angle lenses by means of an additional focusing track is one of the
prominent features of the MASTER TECHNIKA 2000.
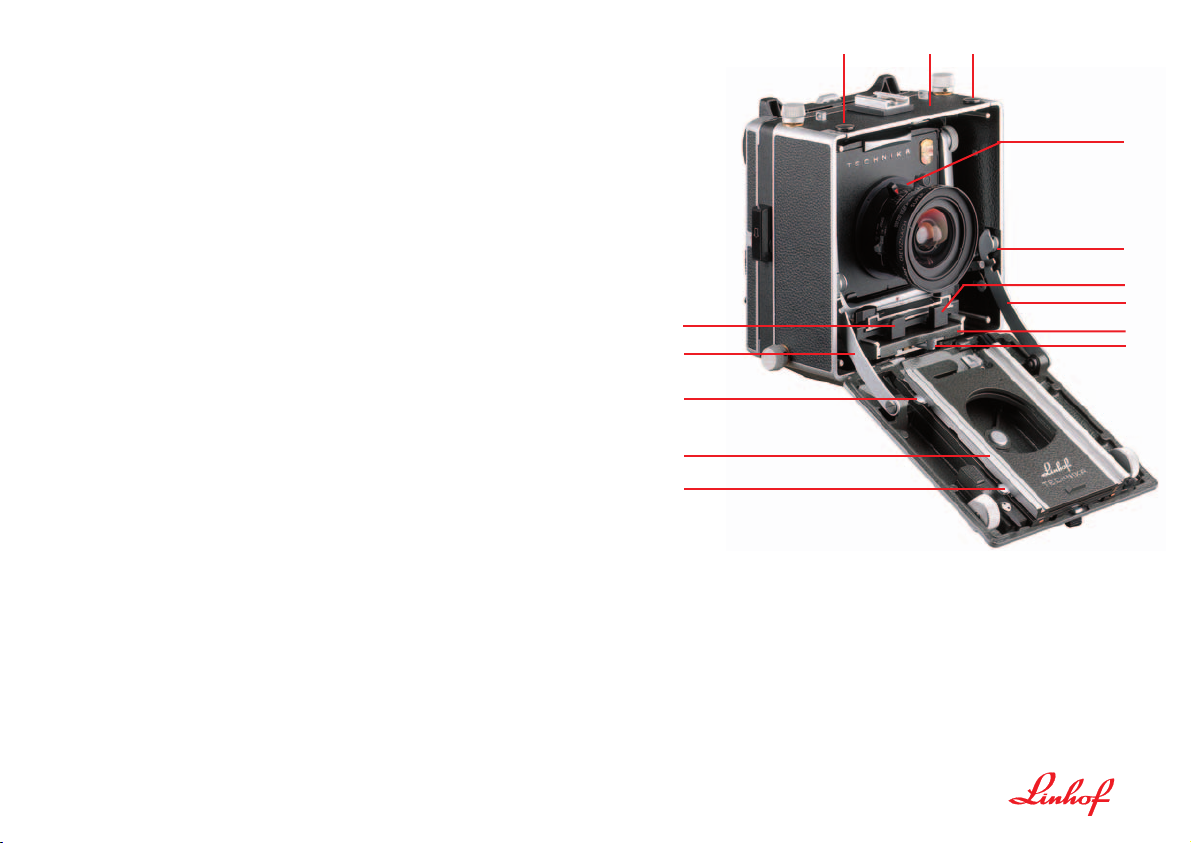
To slide the lens standard onto the wide-angle track (C) simply push it back
into the camera housing, pressing together the two spring-tensioned grips
(11a und 11b). Focusing is accomplished by moving the focusing lever (D)
sideways which slides the wide-angle track with the lens standard smoothly
forward and back assuring convenient and critical focusing with fingertip control. Position of the lens standard on the wide-angle track determines the basic
extension and the focusing range obtainable. Most wide-angle lenses, especially when used with 4 x 5 inch film, require a baseboard drop of 30° (third
notch = B) to avoid vignetting. This special wide-angle position is obtained by
depressing the dropbed struts (17a and 17b) simultaneously which enables
you to lower the dropbed until it clicks into the third notch (B).
Please note, that even with the dropbed in the 30° position, extremely short
wide-angle lenses may cause vignetting when the groundglass is in vertical
position. In this case, use groundglass back in horizontal position and rotate
the entire camera assembly through 90°.
Lenses of 90 or 120 mm are mounted on standard flat Technika 45 lensboards
with the upper focusing track (32) of the dropbed pushed back to the wideangle position. Depress track lock buttons (16 and 12) just long enough to
release the track, and slide it towards the camera body until it clicks into position. Dropbed stays in its normal 90° position. When using standard lenshoods or compendium bellows with wide-angle lenses, please check the
groundglass image very carefully to make sure there is no vignetting.
The Master Technika body has a flap on the top of the camera housing (45)
which allows a greater degree of lens rise when using wide angle lenses.
Unlock the two sliding catches (29a and 29b) and lift up the top flap. Elevate
the lens standard by operating the lift lever as usual.
A
B
11b
17b
C
D
12
32
16
17a
11a
29a
45 29b
CENTERFILTER:
Wide-angle lenses, when used to the limit of their image circle, exhibit a
certain amount of light fall off at the edges which is physically unavoidable.
To obtain a more uniform density over the entire picture area, especially important when using colour transparency film, use of a precisely matched graduated centerfilter is recommended.
ATTENTION:
Before closing the camera, focusing lever of the wide-angle focusing track
has to be moved completely to the right.
Page 16
16
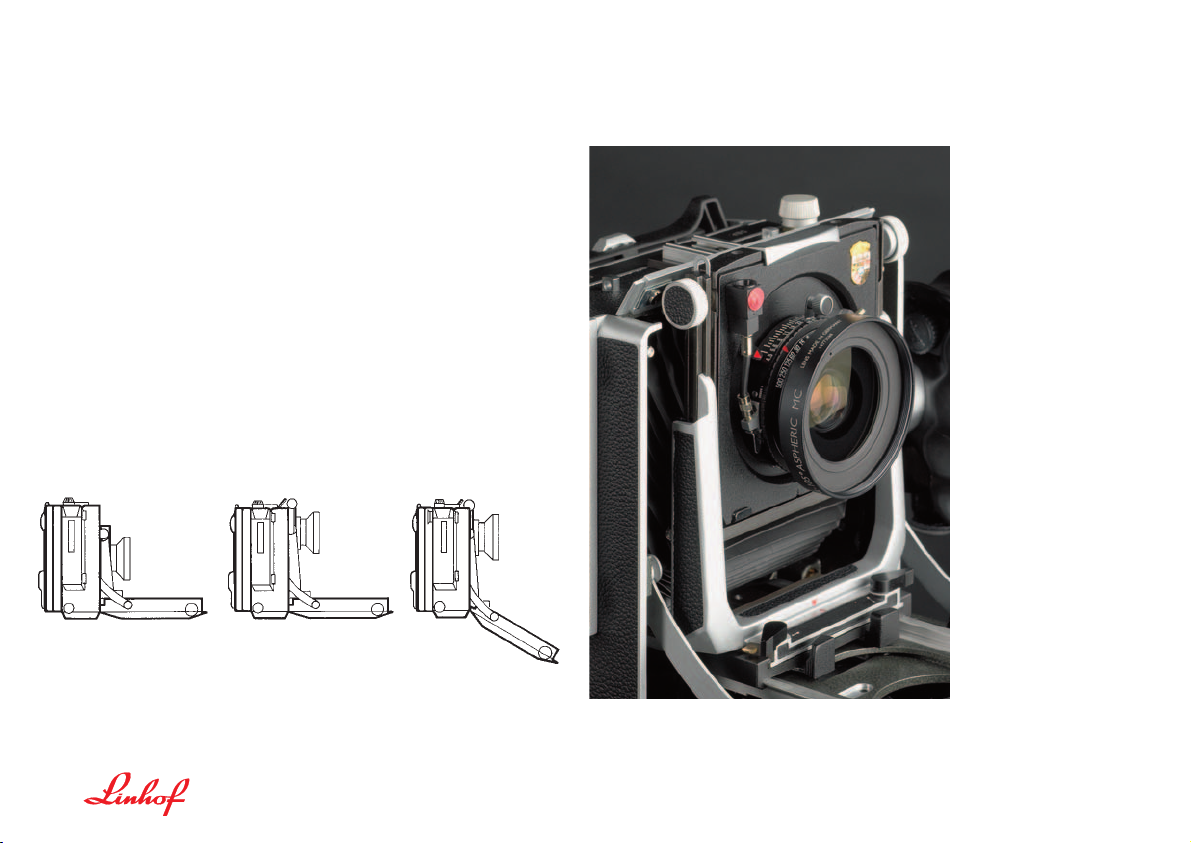
The Master Technika has a flap on the top of the camera housing which, when
lifted, allows a greater degree of movement when using wide-angle lenses and
permits a 55 mm off axis rise of the lens.
1. After pressing track lock catch (12), push upper track into
camera housing until it clicks into position.
2. Unlock the two sliding catches (29a and 29b) and lift up
the top flap (see ill.).
3. Raise the lens standard by operating the lift lever (31) as usual.
4. The dropbed should be lowered to avoid vignetting.
15. WIDE-ANGLE SHOTS USING CAMERA ADJUSTMENTS
(classic and 2000)
lens in camera
housing
lift-up flap
dropbed in 30°
position
Master Technika classic
with Super-Symmar XL
4,5 / 80 mounted on
recessed lensboard offering substantially more
rise with lift-up flap on
top of the camera housing
(55 mm).
The Technika lensboards
are precisely calibrated
to the focal lengths of
the individual lenses
resulting into a higher
degree of direct displacements.
The new rapid lock
cable release sockets
for perfect functioning
can be adapted more
easily.
Page 17
17
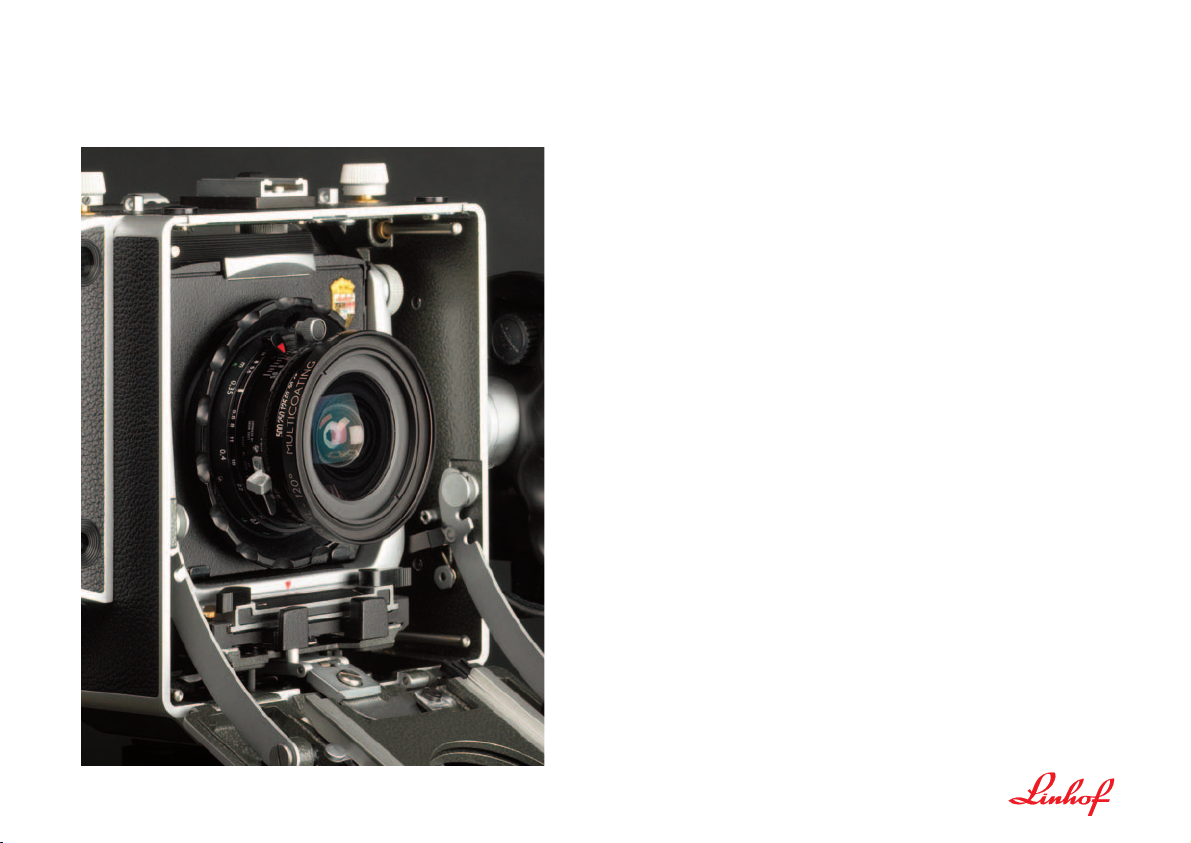
Master Technika classic
shown with Super-Angulon
XL 5,6/47 mm mounted on
recessed lensboard (001037)
in helical focusing mount
permits focusing even with
shortest extensions.
Mounting of lenses in
factory only.
The new Technika lensboards offer greater comfort when using lenses with
short focal lengths: More wide-angle lenses and more adjustment facilities for
Master Technika classic.
WIDE ANGLE FACILITIES
Now, even extreme wide angle lenses of 35 mm focal length can be used with
the Master Technika classic without wide-angle focus attachment.
Wide-angle lenses can now be supplied with integrated helical focusing
mounts complete with special lensboards. Easy focusing despite of positioning
the lens in the camera body.
Recessed Technika lensboard with helical focusing mount for
– Super-Angulon XL 5,6 / 38 001036
– Super-Angulon XL 5,6 / 47 001037
– Super-Angulon XL 5,6 / 58 001038
16. RECESSED TECHNIKA LENSBOARD WITH HELICAL FOCUSING MOUNT
(MASTER TECHNIKA classic)
Page 18
18
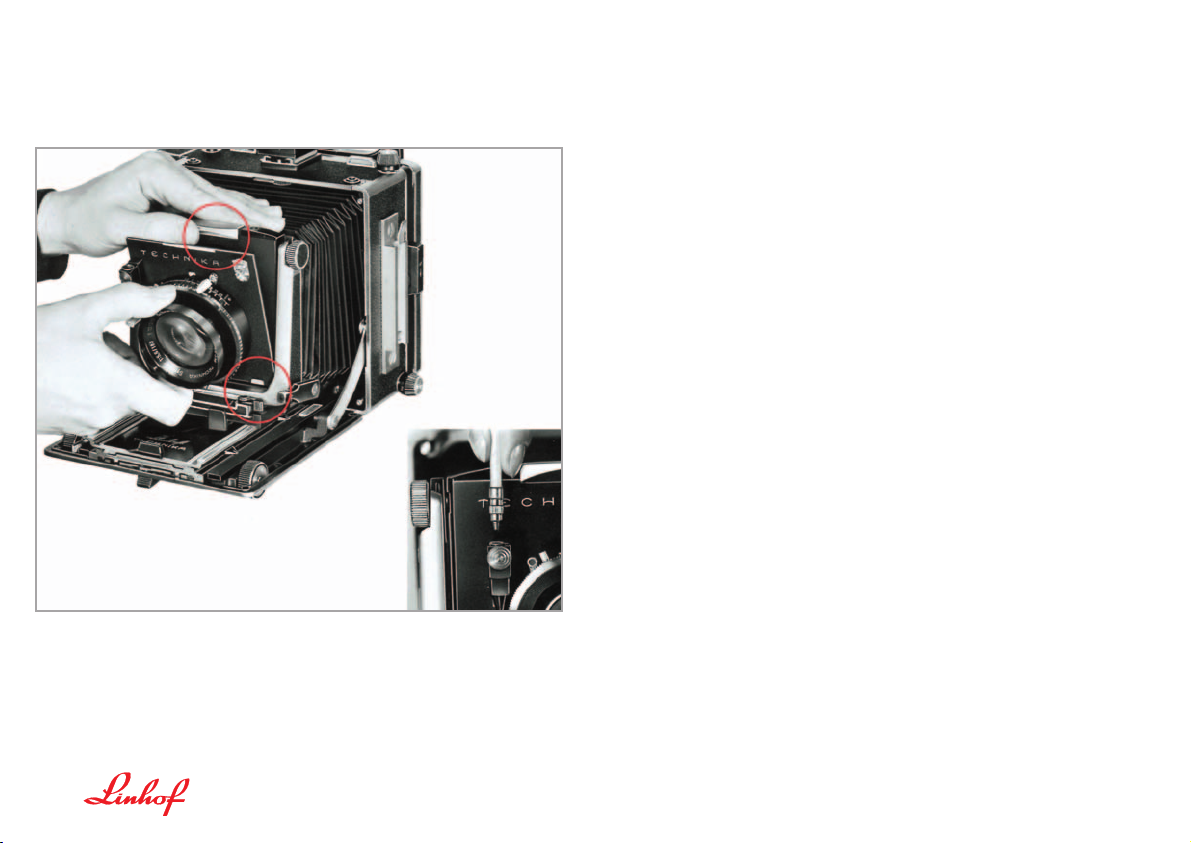
To change lenses, first remove the cable release from the shutter by sliding
down the red button of the rapid lock cable release socket, respectively
unscrew the cable release from its shutter socket if no rapid lock is provided.
Hold the lens by its shutter with one hand, lift the lensboard lock (4) with the
other. Now, the lens-shutter-lensboard assembly may be removed from the
lens standard. The new lens is inserted with the lower edge of the lensboard
into the retaining brackets (see ill.) and pushed back into the standard frame
while lifting the lensboard lock (4). Only then the lensboard lock should be
released. The insertion of lenses of long constructional design or with large
size back elements is greatly facilitated with a longer bellows extension.
When focusing according to the scale, the pertaining distance scale mounted
on the interchangeable scale stage must be used, i. e. for wide-angle lenses the
black engraved, for normal lenses, the red, and for telephoto lenses the green
scale.
If more than three lenses are coupled to the camera, additional colour codes
are available. The scale stage only contains as many scales as there are
lenses coupled to the camera. The scale stage is interchangeable against
another one, to provide corresponding distance scales for more than three
lenses. For focusing with the multifocus rangefinder, it is required to exchange
the coupling cam together with the lens.
Before closing the camera, lenses of long construction
must be removed from the lens standard!
17. INTERCHANGE OF LENSES (classic and 2000)
Page 19
19
18. TECHNIKA LENSBOARD WITH ADDED COMFORT
(classic and 2000)
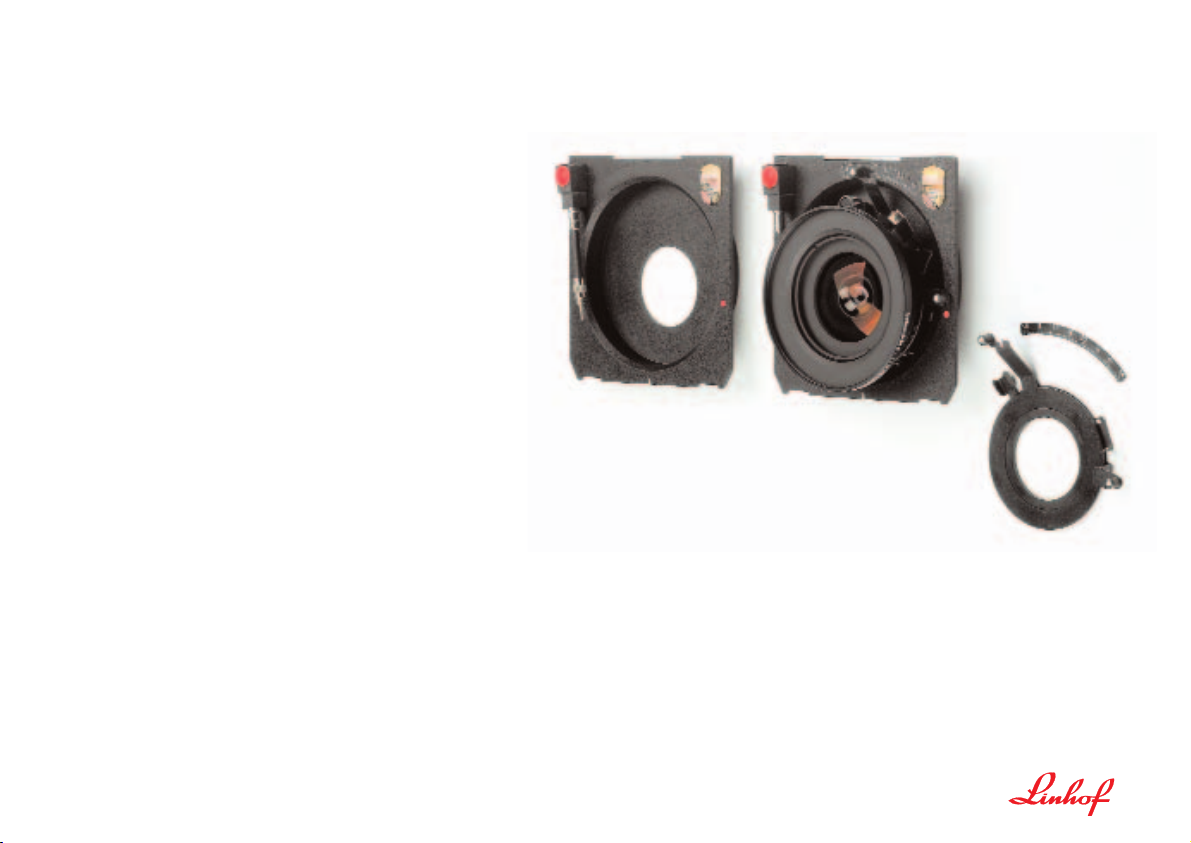
Lensboard (001016)
New lensboard (001015) with
operating elements, aperture
scale and mounted wide-angle
lens Super Angulon XL 5,5/38.
The shutter operation of lenses of focal lengths 38 – 90 mm
with large and very flat front elements mounted on classic
lensboards has ever been slightly difficult due to the space
situation.
The new Technika lensboard Code 001015 now offers more
operating comfort for aperture and pre-view lever movements. An additional aperture scale seen in front enables
easy reading. Since actual lensboards 001016 and 001015
are identical in size and design a modification with the new
operating elements and aperture scale is possible. Ordering
Code for the set is 022512.
Operating elements and
aperture scale (022512) for
modification of actual lensboards 001016.
Page 20
20
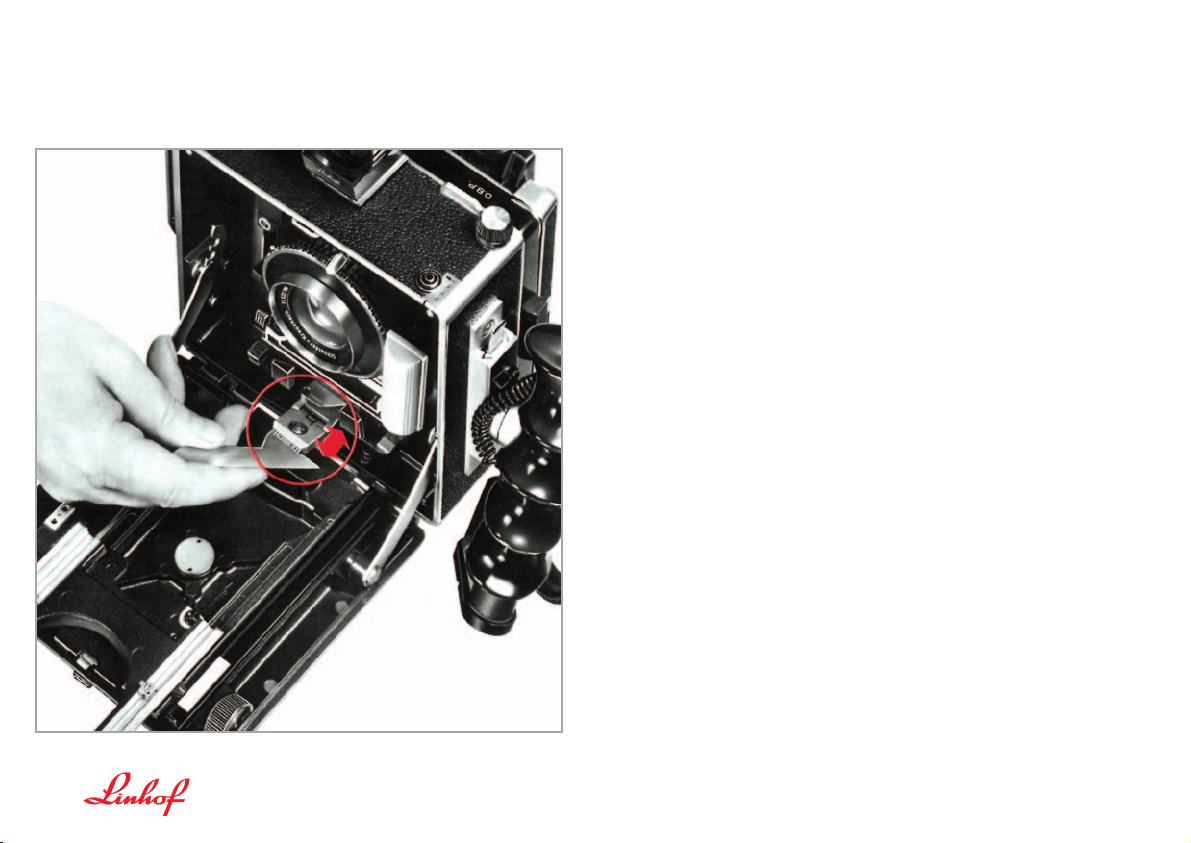
19. INTERCHANGE OF COUPLING CAMS
(MASTER TECHNIKA classic)
For coupling of subsequently purchased lenses, it is necessary to return the
Master Technika to Linhof or to a Linhof service center. Lenses from 72 to 400
mm focal length can be range-finder coupled.
Each rangefinder-coupled lens is supplied with a separate carefully matched
coupling cam. On each coupling cam, both lens serial number and focal length,
are engraved.
Before changing the coupling cam, the lens standard must be pushed back all
the way into the camera body. The upper track of the drop-bed is extended by
means of the focusing knop (14a,b) until the coupling cam is freely accessible. Now the coupling cam is slightly lifted and pulled out in a straight direction from the cam shoe (see ill.).
When inserting a new coupling cam, please make sure to push it into the cam
shoe until it comes to a positive stop. Pull out lens standard to the required
infinity stops.
Page 21

21
20. RANGEFINDER FOCUSING
(MASTER TECHNIKA classic)
FOCUSING WITH THE RANGEFINDER AND
MULTIFOCUS OPTCAL VIEWFINDER
Focusing with the rangefinder is carried out in the following way: Focus your
object trough the rubber eye piece (25) of the rangefinder. Operate the focusing knob (14a,b) until the double image of the rangefinder coincides completely. Looking straight through the center of the finder is of great importance.
Composition for vertical or horizontal format is carried out with the help of the
optical Multi-Focus Optical Viewfinder (28, codes 001377 or 001447) and the
corresponding format mask.
HAND-HELD PHOTOGRAPHY: The Master Technika classic permits even handheld photography. Operating and image composing are unique: The Master
Technika classic can be equipped with a Multi-Focus Optical Viewfinder for
exact control of the image composition complemented by a lens-coupled
multi-focus coincidence type rangefinder system for precise focus control
without groundglass.
NO CAMERA ADJUSTMENTS: When using the Multi-Focus Optical Viewfinder
with coupled rangefinder no camera adjustments can be applied.
ANATOMICAL GRIP: A very valuable accessory for hand-held work is the anatomical grip with cable-release inserted (Code 002549 left with 17 in. cable
release and code 002552 anatomical grip right).
Even when using the camera mounted on a tripod, the rangefinder will be very
useful, for instance when taking portraitures to check critical sharpness immediately before releasing the shutter, or when taking photographs in dark
interiors.
Page 22
22
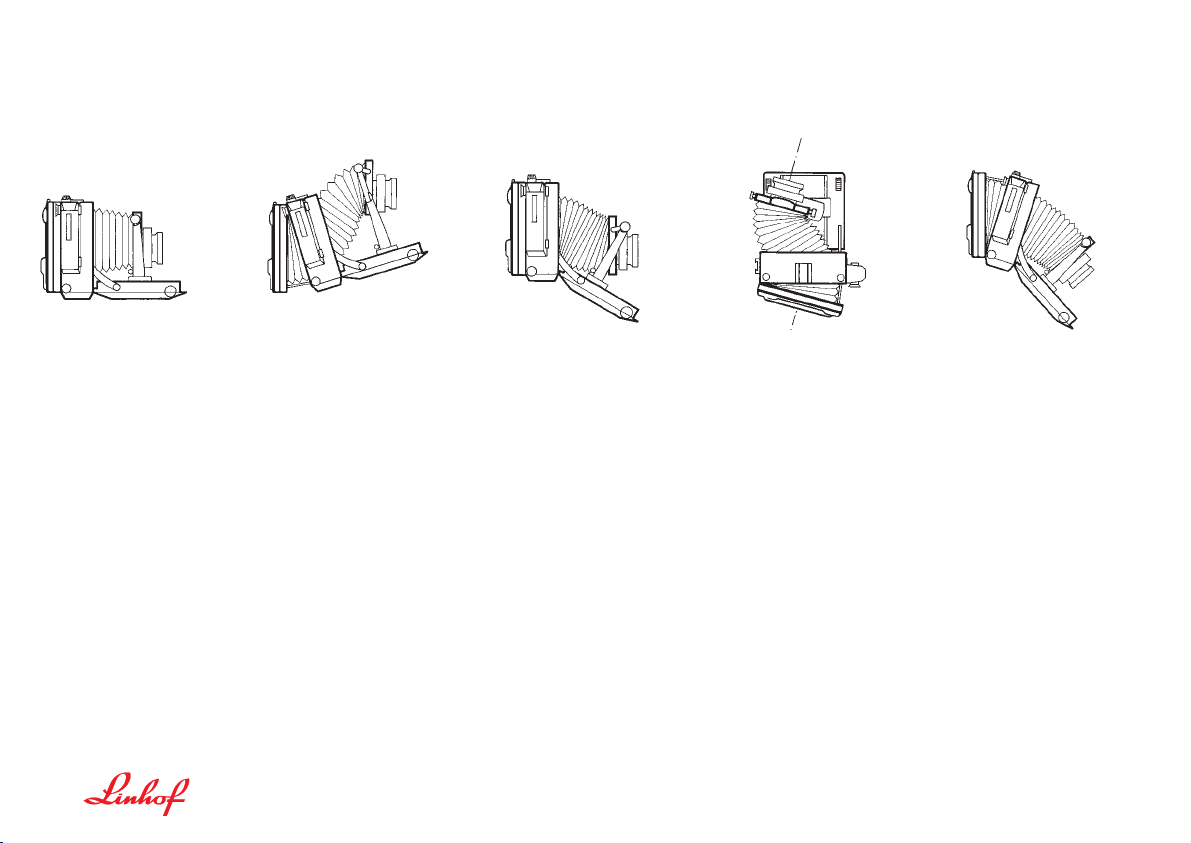
21. CAMERA MOVEMENTS (classic and 2000)
a
Normal position –
unadjusted camera.
The MASTER TECHNIKA is a large format camera system for virtually all fields
of professional photography. From studio table tops, portraiture, indoor shooting to travel, landscape, architectural and industrial subjects.
The TECHNIKA is a view camera offering all possibilities of image composing
with sophisticated mechanical adjustment facilities for perspective corrections
and depth-of-field control with groundglass observation.
b
Lens rise with indirect
displacements.
c
Lens drop with
lowered dropbed.
d
Lateral adjustment of lens.
Indirect parallel displacements
including swing frame.
e
Lens drop with lowered
dropbed. Swing frame
displaced in vertical
position for avoiding
converging lines.
The camera is extremely stable and practically free from vibrations. The
LINHOF MASTER TECHNIKA is especially suited for long-time exposures even
in adjusted positions.
When using camera movements
only groundglass control is applicable.
Page 23
23
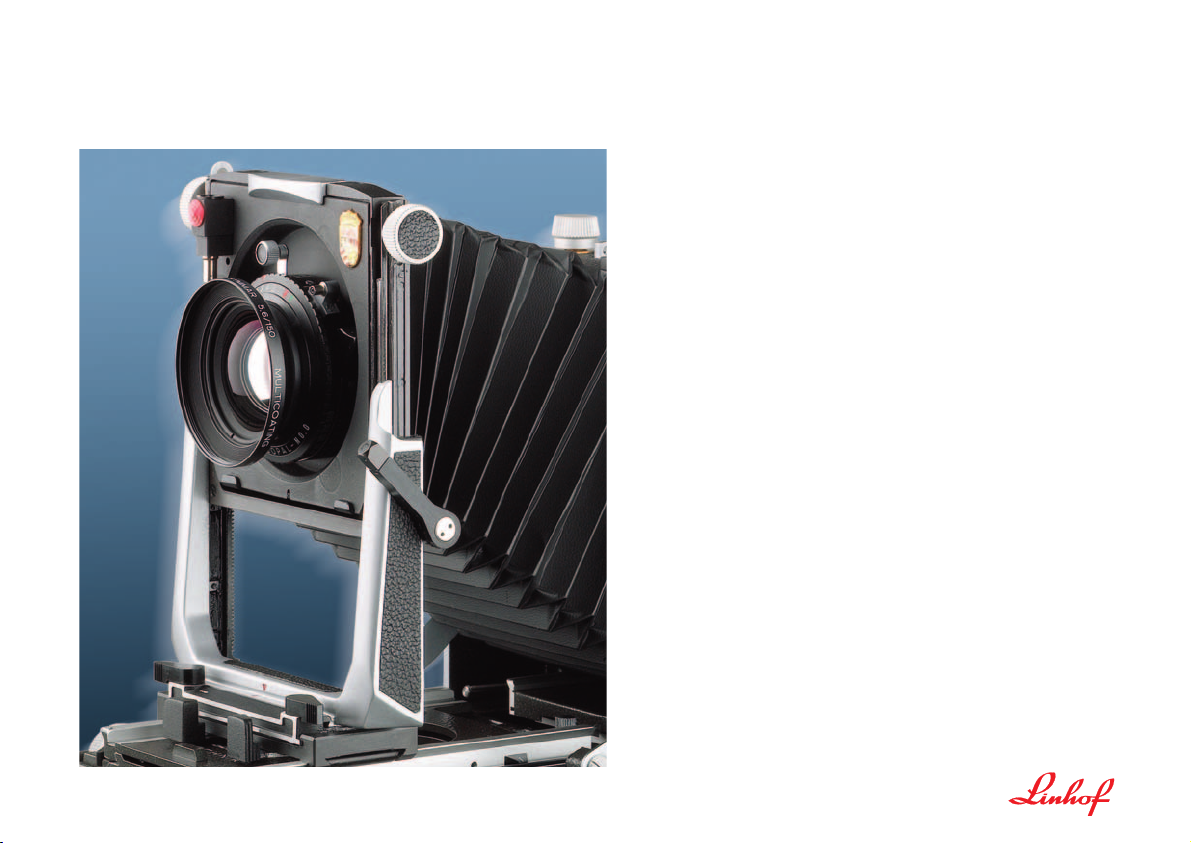
22. ADJUSTMENTS OF LENS STANDARD
(classic and 2000)
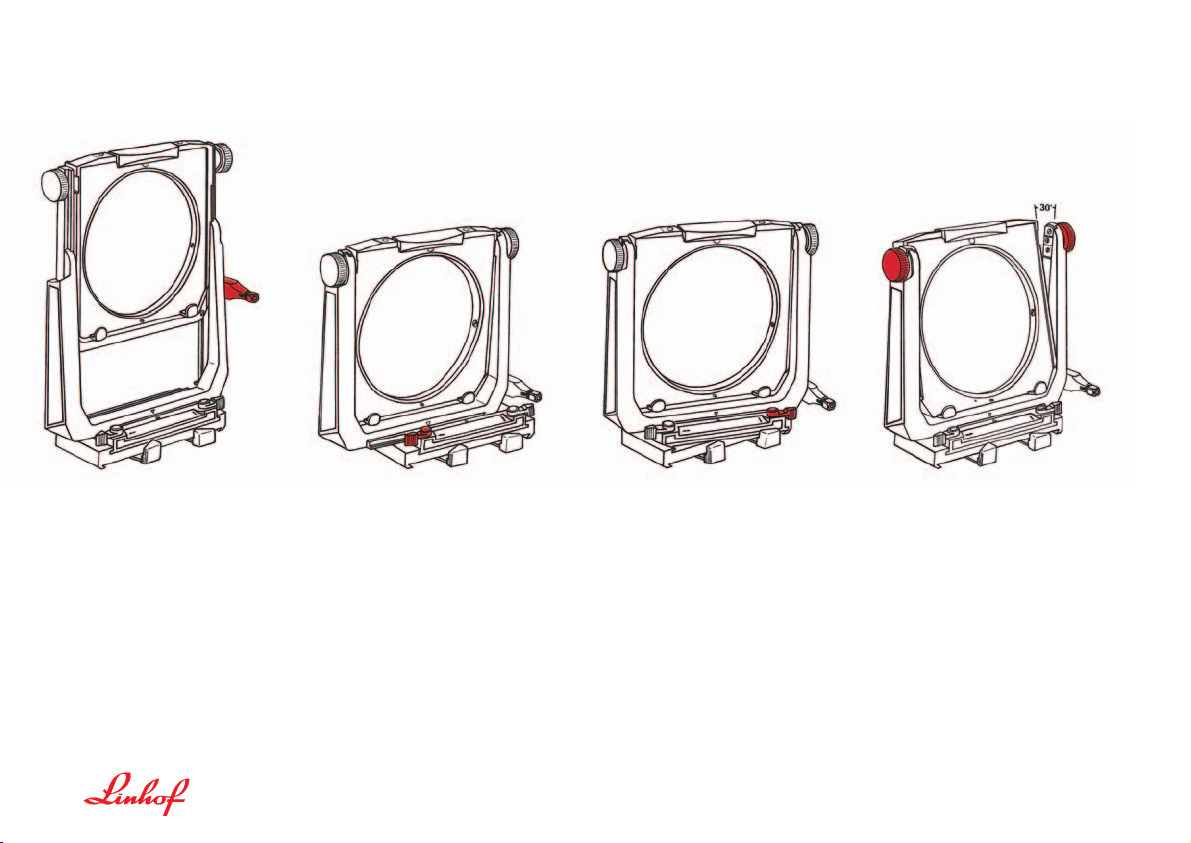
1. Rising of front is carried out by means of the lift lever (31) (see ill. 1, next
page), operated with the cubic shaped front grip. This grip handle can be
rotated after pulling out: If the white dot on the handle is on top, front will
rise when lever is actuated. To lower lens, rotate grip 180°, so that white
dot points downward; now there is a green dot visible on top. The action
of the lift lever is self-braking.
2. Lateral shift is effected by loosening the locking lever (see ill. 2, next
page) and by pushing the lens standard to the right or left. Maximum and
intermediate positions are locked by the same lever. This movement
effects lateral shift of the composition to the left or to the right. The zero
position is indicated by red triangle marks.
The vertical displacement of the lens standard should always be carried
out before any possible lateral shift is effected. If it is necessary to use
upward and sideways dislocation, the upward adjustment hase to be done
always before the sideways adjustment.
3. Swivel through the vertical axis: Turn the lever (9) in direction of the
arrow (see ill. 3, next page). Now, the lens standard can be swung 15° to
each side. When the lever is returned to zero position, the lens standard
locks in the normal position.
4. Tilt through the horizontal axis: First loosen the locking screw (1) (see ill.
4, next page), then press the knurled locking knob (3) (see ill. 5) against
the lens standard. Now the lens can be tilted 30° forward and backward
through its horizontal axis in or near the nodal point. Maximum and intermediate adjustments are locked by tightening the locking screw (1).
5. Lowering of lens standard: Turn camera by 180° (upside down position);
then loosen the knurled screw on the inside of the camera housing and
detach the accessory shoe (38). Now another tripod socket is visible, so
that the camera can be mounted on a tripod head.
Page 24
24
22. ADJUSTMENTS OF LENS STANDARD (classic and 2000)
1. Rising of front
2. Lateral shift 3. Swivel through the vertical axis
4. Tilt through the horizontal axis
Page 25
25
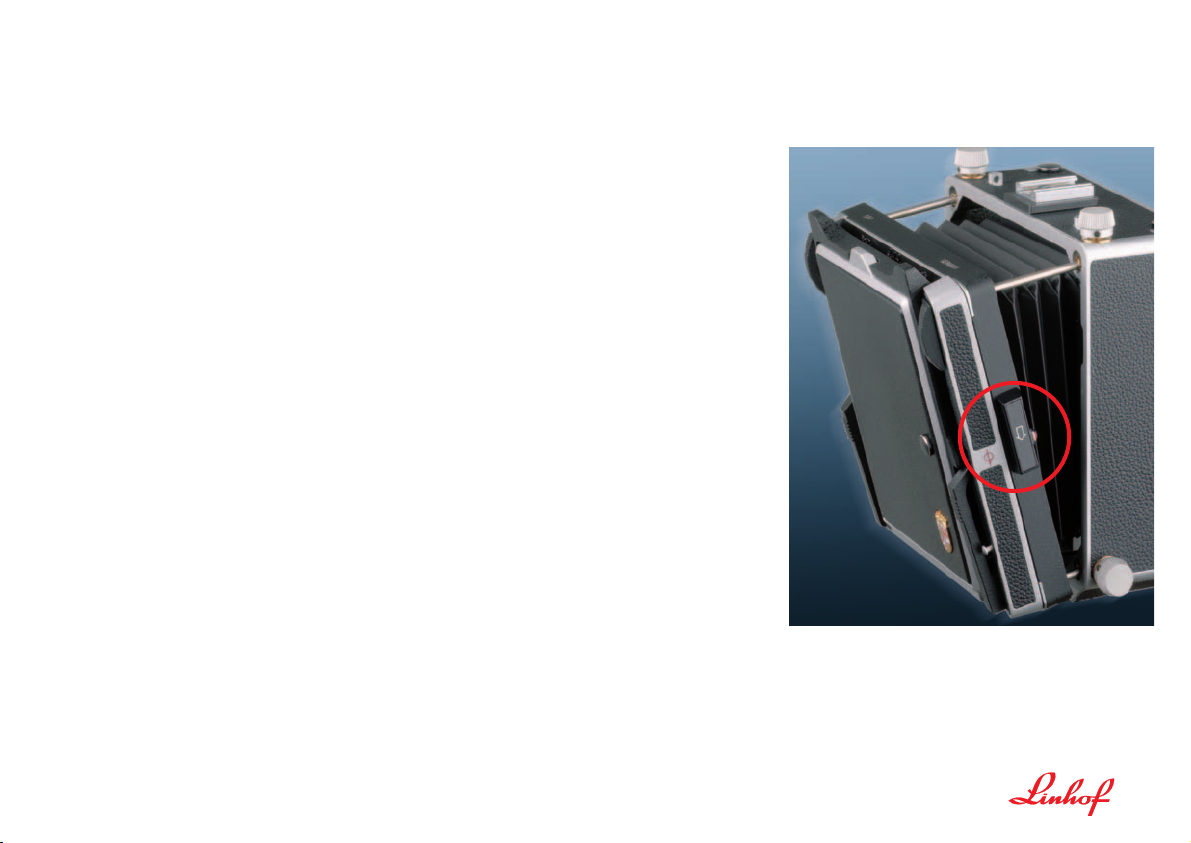
23. THE UNIVERSAL CAMERA BACK: THE SWING FRAME
(classic and 2000)
By means of the swing frame, the camera back can be adjusted in all directions. This allows manipulation of the depth-of-field and provides full control
of the perspective rendition. Before using the swing frame, the four knurled
locking screws (18) must be loosened. Then press down the two spring
tensioned locks (22) and pull camera back away from the camera housing.
After groundglass focusing, the swing frame can be locked in any position by
tightening the four locking knobs (18).
CAUTION: Before working again with the Multi-Focus Rangefinder, the swing
frame must be returned to zero position. Press camera back against housing
until it clicks into position. The focusing hood snaps open after pushing the sliding button (41) against the center of the focusing hood cover. For critical
focusing with the magnifier, the closed focusing hood (42) may be swung
back. By pulling on the grooved tap (43) the snap button is loosened. If necessary, the focusing hood frame may be removed entirely by pressing to the right
and unhooking the spring tensioned hinge.
SWING FRAME. The
exclusive swing frame
allows omnidirectional
displacements of up
to 20° for deliberate
perspective corrections
of depth-of-field
adjustments.
Swing frame and
groundglass frame
are securely held in
position by four
locking knobs which
also allow parallel
orientation relative
to the camera body
to gain extra bellows
extension.
Page 26
26
23. THE UNIVERSAL CAMERA BACK: THE SWING FRAME (classic and 2000)
EXTREME ADJUSTMENTS:
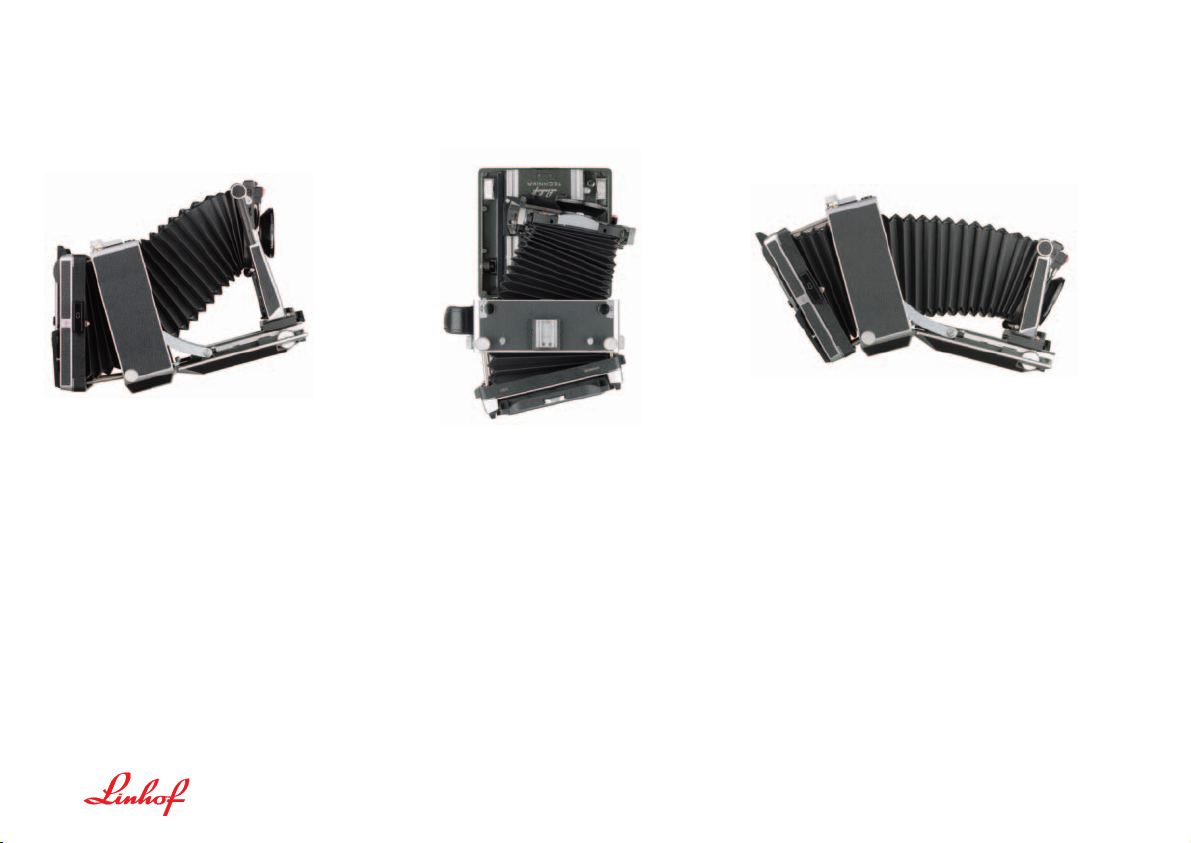
The combination of direct and indirect adjustments will result in extreme camera displacements normally associated with monorail
systems only. The swing back adjustment
(20° in all directions) together with the dropbed displacement and lens tilt of 30° each in
many cases exceed the covering power of the
lenses used.
SCHEIMPFLUG RULE
Swings and tilts can be used to influence perspective and increase depth-of-field in accordance with the subject’s requirements. Picture
shows rotation of front standard and film back
around the vertical axis to gain extended
depth-of-field which even the smallest apertures cannot provide.
PARALLEL SHIFTS
The generous direct lens rise can be further increased using indirect camera displacements, tilting the camera upwards and restoring vertical
orientation of lens and film plane using swing
frame and lens tilt adjustments.
The rising front, required to eliminate converging
lines, serves as a lens drop when the camera is
turned upside down using the additional tripod
socket located on top of the camera housing.
Page 27
27
24. THE UNIVERSAL CAMERA BACK: THE REVOLVING FRAME
(classic and 2000)
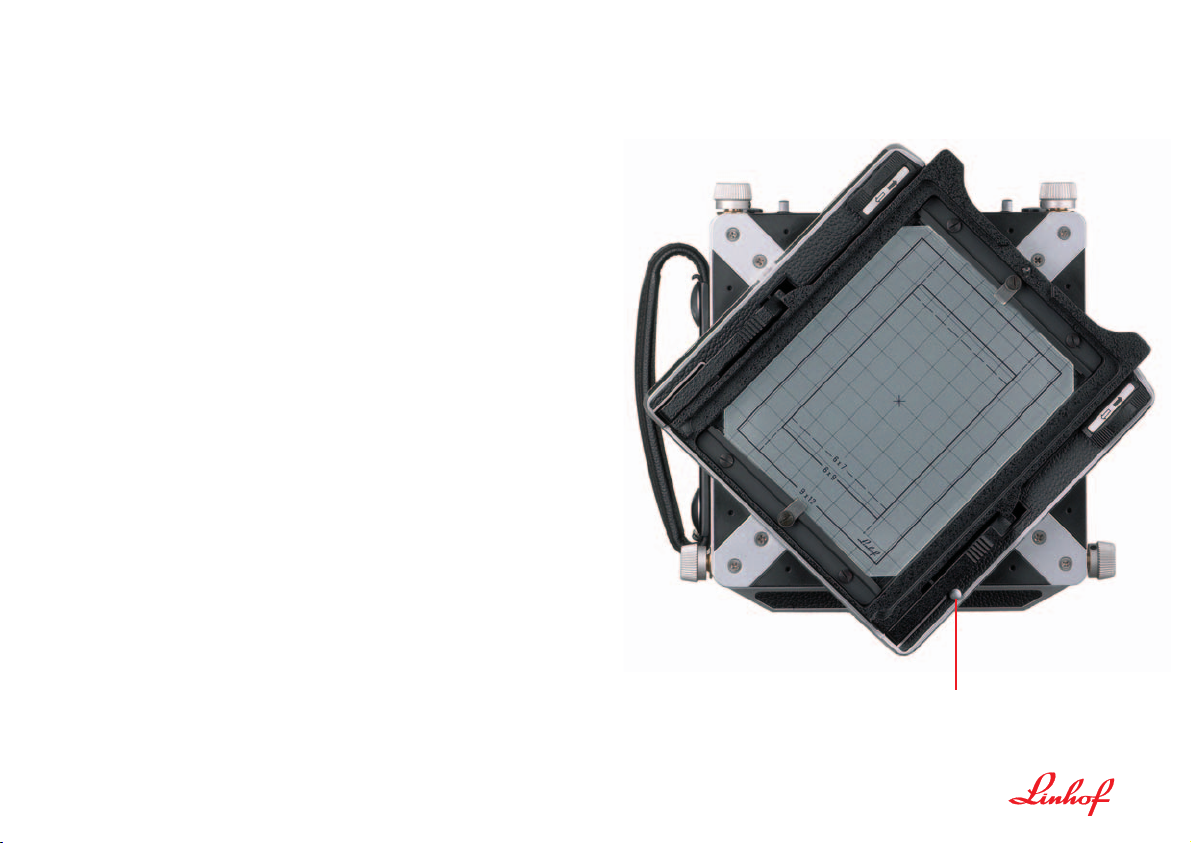
The swing back is equipped with a revolving groundglass frame (24) that
instantly adjusts to horizontal or vertical formats simply by rotating it to the
desired position. It is provided with click stops in these two positions. Unlock
by pressing locking button (39).
The revolving frame for
fast operation
39
Page 28

25. FILM HOLDERS
(classic and 2000)
CUTFILM HOLDERS
Cutfilm Holders are available either in 9 x 12 cm or 4 x 5 inch size. They are
inserted between the ground glass frame and the revolving frame of the camera back until they positively engage in the groove on the small side of the back
frame. Detailed operating instructions are enclosed with every holder.
ROLLEX ROLLFILM BACKS
To attach the LINHOF SUPER ROLLEX and TECHNO-ROLLEX for 120 or 220
rollfilm, the groundglass frame must be removed by pressing down its two
spring-tensioned retaining arms (40) while sliding up the frame. The rollfilm
holders are locked to the frame by pushing the two locking slides (36) in direction of the arrow.
To rotate the revolving frame, for either horizontal or vertical frame, unlock lateral knob (39).
The LINHOF RAPID ROLLEX slide-in rollfilm holder for format 6x7 cm is inserted between the groundglass frame and the revolving frame of the camera back
like a cutfilm holder.
28
Page 29
29
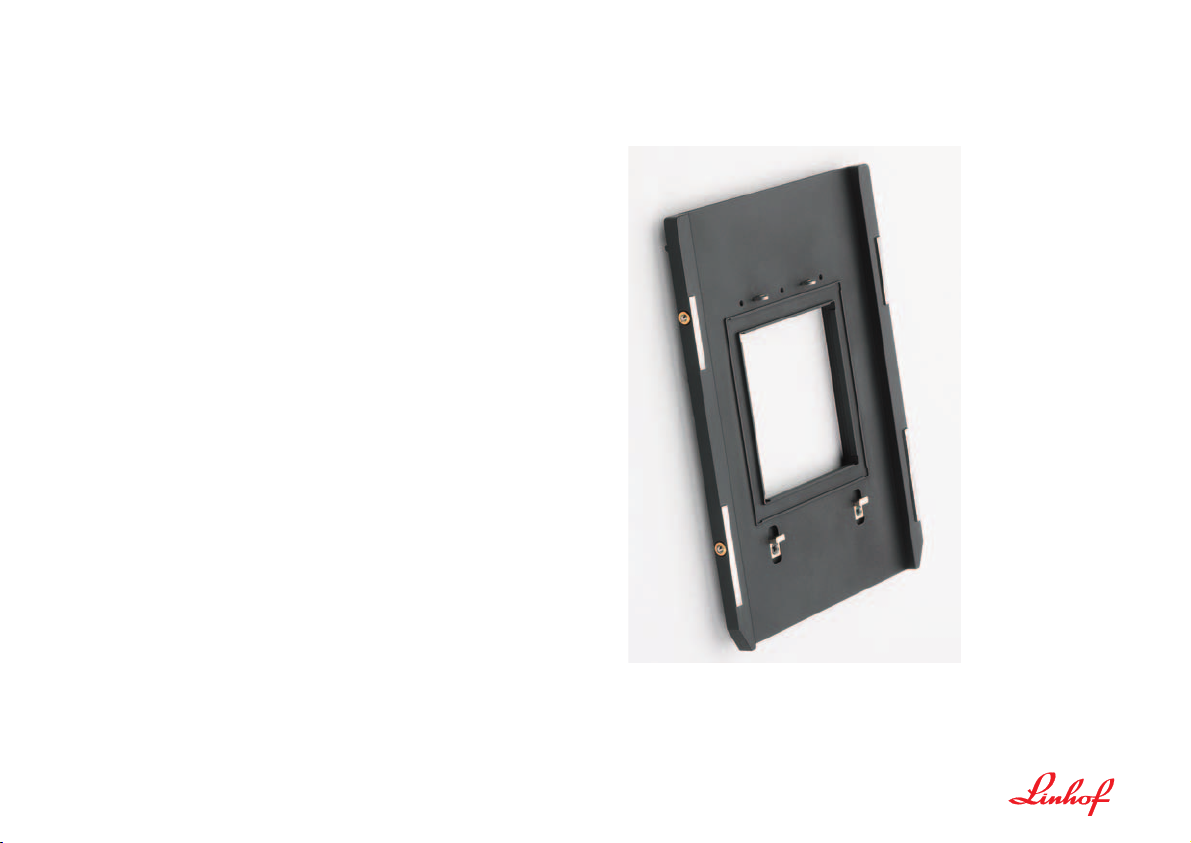
Even the change from sheet or rollfilm to digital imaging is no problem thanks
to the easy adaptation of high efficiency digital backs. The Hasselblad DigiAdapter (001693) is inserted into the International Graflok-type back and
accepts all Hasselblad V system adapted digital backs. No need to re-focus
after groundglass viewing.
FOR DIGITAL BACKS:
Hasselblad Digi-Adapter for Internat. Universal Back 001693
Groundglass Mask 45 / 24x36 001644
Groundglass Mask 45 / 37x37 001645
Groundglass Mask 45 / 4x5 cm 001646
26. ADAPTER FOR DIGITAL BACKS
(classic and 2000)
Digi Adapter for
International Back
Page 30
30
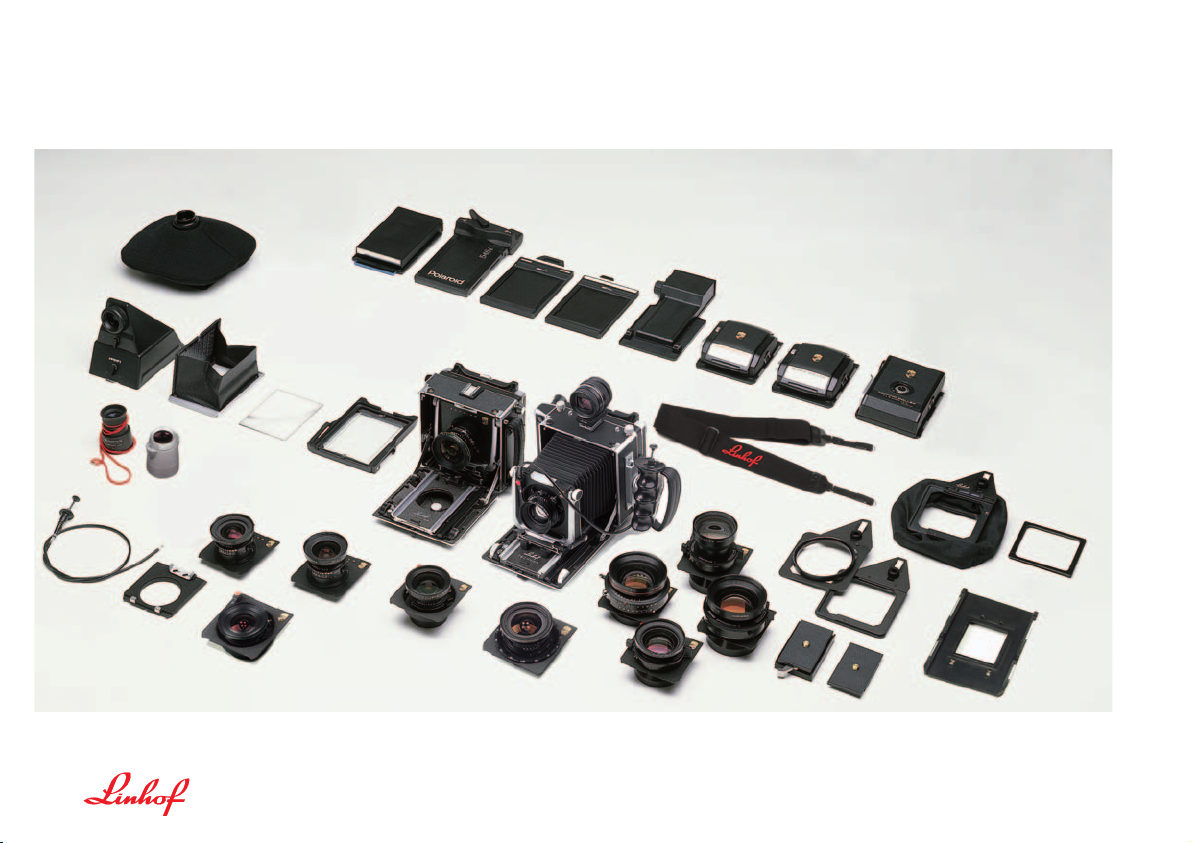
27. TECHNIKA SYSTEM ACCESSORIES
(classic and 2000)
2
1
4
5
6
7
9
8
10
11
12
13
14
15
16
17
19
18
20
21
22
23
24
25
26
27
28
29
30
3
31
Page 31

31
1 MASTER TECHNIKA 2000 - 4x5 (without lens) 000120
2 MASTER TECHNIKA classic - 4x5 (without lens) 000054
with left Anatomical Grip 002549
3 Multifocus Optical Viewfinder 001377
4 Groundglass frame with Multi-Format screen
(part of the camera) 001615
5 Fresnel Screen 45 002522
6 Folding Focusing Hood (part of the camera) 001612
7 Right Angle Reflex Attachment 45 002628
8 Focusing Magnifier 10x 022616
9 Focusing Magnifier, 4x 022613
10 Focusing/Metering Bellows 45 002503
11 Polaroid Filmpack Holder 550 021477
12 Polaroid Cutfilm Holder 545 021457
13 Cutfilm Holder Fidelity Astra,4x5, numbered 021480
14 Cutfilm Holder Fidelity Elite for 2 Cutfilms, format 4x5 021479
15 Rapid Rollex 45 slide-in rollfilm holder, format 6x7,
10 exp./ film 120 001567
SUPER ROLLEX ROLLFILM BACKS:
16 Format 6x9, 8 exp. / film 120 001523
17 Format 6x7, 10 exp. / film 120 001459
18 Techno Rollex Back, 6x12, 6 exp. / film 120 001560
19 Camera Neck Strap with embroidered Linhof Logo 022610
20 Compendium Lensshade 001926
21 Filter Holder M 95x1 and
22 Filter Holder 10x10 cm 001933
23 Filter Folding Frames 002013
24 Hasselblad Digi-Adapter for digital backs 001693
25 Quickfix II Camera-Tripod Quicklock Connector 003876
26 Quickfix II Camera Plate (spare) 003877
27 Lenses mounted on Technika 45 lensboards with shutter
28 Special Technika (classic) lensboard with
helical focusing mount for
– Super-Angulon XL 5,6 / 38 001036
– Super-Angulon XL 5,6 / 47 001037
– Super-Angulon XL 5,6 / 58 001038
29 Lenses mounted on Technika 45 lensboards with shutter
30 Technika Reducing Lensboard Adapter 45/23 001070
31 Profi Cable Release 700 mm 022767
Page 32
32
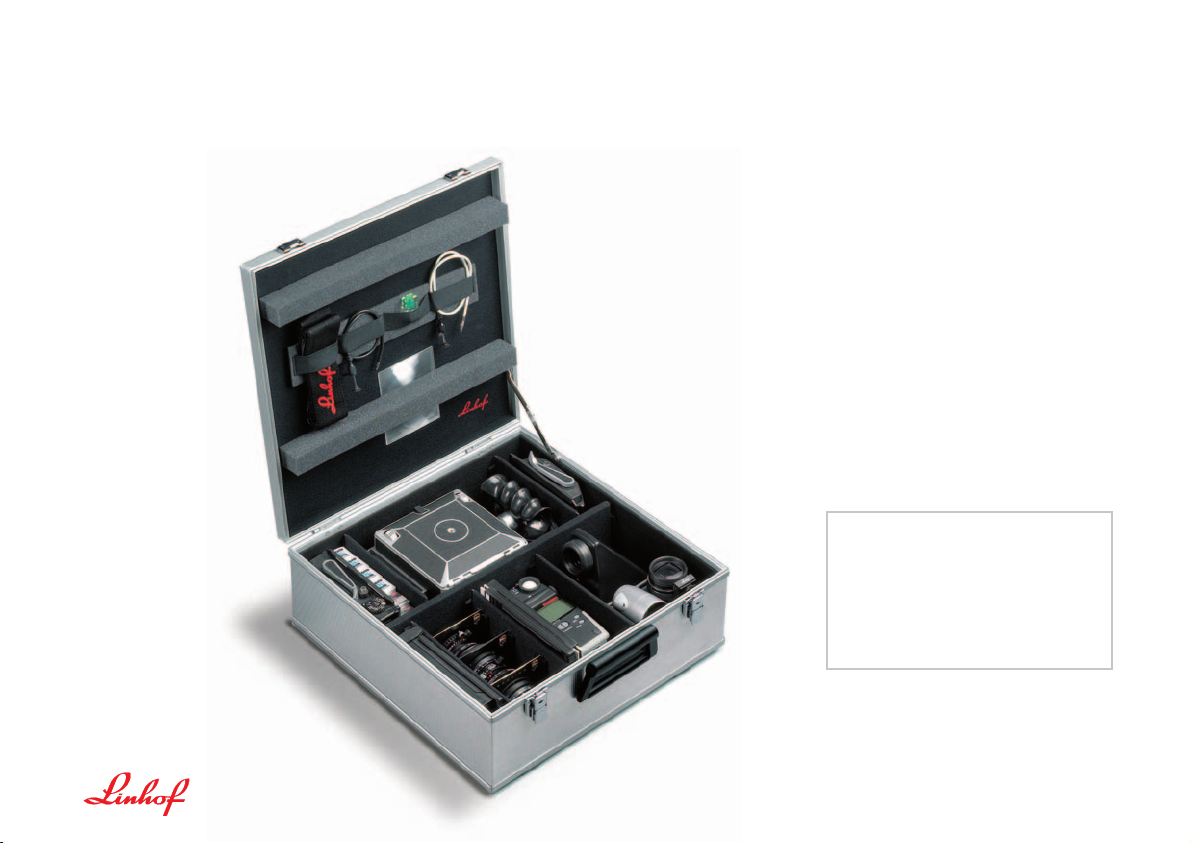
28. ALUMINIUM CASE FOR MASTER TECHNIKA
(classic and 2000)
Modified and covering more comfort in handling: The
aluminium cases for the LINHOF MASTER TECHNIKA
classic and the MASTER TECHNIKA 2000. The robust
camera case protects the valuable Technika equipment
at outdoor activity and also provides ideal features as
a depository.
Due to the dimensions of the aluminium case it is
allowed as carry-on baggage on aircrafts.
The camera case provides
space for MASTER TECHNIKA
with Anatomical Grip, lenses
on lensboards, Focusing
Magnifier, Multifocus Optical
Viewfinder, exposure meter,
Right Angle Reflex
Attachment, Neck Strap, filter,
Rollex Rollfilm Backs
and Cutfilm Holders
as well as film material.
ALU-CASE FOR MASTER TECHNIKA
Code 022457
Dimensions: 44 x 44 x 18 cm
Weight: 5 kg
Content: up to 20 kg
Page 33

33
30. SYSTEM ACCESSORIES
MASTER TECHNIKA 2000
29. SYSTEM ACCESSORIES
MASTER TECHNIKA classic
BASIC LENS COMBINATIONS MASTER TECHNIKA SYSTEM
SCHNEIDER in Copal- shutter + lensboard 4x5
Super-Angulon XL 5,6 / 90 000873 001016
Apo-Symmar-L 5,6 / 150 000641 001016
Tele-Xenar 5,6 / 250 000969 001026
RODENSTOCK
Grandagon-N 4,5 / 90 000834 001026
Apo-Sironar-N 5,6 / 150 000700 001016
Apo-Sironar-S 5,6 / 240 000882 001059z
MASTER TECHNIKA classic - 4x5
Camera body with built-in Range-Finder System, Revolving Groundglass Back incl. Groundglass and Folding Focusing Hood, less lens 000054
Anatomical Grip, left, with cable release 002549
Anatomical Grip, right 002552
Fresnel Screen 45 002522
Multifocus Optical Viewfinder,
– Distance scale in meters, with mask 9x12 001377
– Distance scale in meters, with mask 4x5 001447
– Distance scale in feet, with mask 4x5 001378
additional masks: 6x12/ 001444, 6x9/ 001381,
6x7/ 001382, 6x7 (Rapid-Rollex)/ 001448
Camera Neck Strap 022610
LENS COUPLING - up to 3 lenses f 72 - 400 mm
when ordered with camera, no charge.
Additional lenses, each 001716
Customer-owned lenses, each 001717
SPECIAL TECHNIKA LENSBOARD with helical focusing mount for
– Super-Angulon XL 5,6 / 38 001036
– Super-Angulon XL 5,6 / 47 001037
– Super-Angulon XL 5,6 / 58 001038
(Mounting of lenses in factory only.)
RECOMMENDED BASIC LENS COMBINATIONS
Lenses in Copal shutters. Extreme wide-angle: 38, 47, 58 mm
(with Special Technika lensboard and helical focusing mount)
Wide-angle, Normal lenses, Long lenses, Tele lenses:
72 / 90 – 150 – 240 / 250 mm – 300 / 400 mm
MASTER TECHNIKA 2000 - 4x5
Camera body only, with built-in Wide-Angle Focusing Track,
Revolving Groundglass Back incl. Groundglass
and Folding Focusing Hood, less lens 000120
Anatomical Grip, left, with cable release 002549
Fresnel Screen 45 002522
Camera Neck Strap 022610
Recommended BASIC LENS COMBINATION
Extreme wide-angle lenses:
35, 38, 45, 47, 55, 58, 65 mm, in Copal shutters
on lensboard for groundglass focusing w. Wide-Angle Focusing Track
Wide-angle, Normal lenses, Long lenses, Tele lenses:
72 / 90 – 150 – 240 / 250 mm – 300 / 400 mm
Page 34

34
31. ACCESSORIES FOR MASTER TECHNIKA SYSTEM
(classic and 2000)
Right Angle Reflex Attachment 45 002628
Focusing/Metering Bellows 45 002503
Compendium Lensshade 001926
– Filter Holder for M95x1 and 10x10 cm 001933
– Vignetting Mask Holder 001932
Aluminium Case Master Technika 022457
Cutfilm Holder Fidelity Astra, Format 4x5
for 2 cutfilms, numbered (Twin pack) 021480
Cutfilm Holder Fidelity Elite or 2 cutfilms (Twin pack)
Format 4x5 021479
SUPER ROLLEX BACKS 45:
– Format 6x9 cm / 2 1/4 x 3 1/4 – 8 exp./ film 120 001523
– Format 6x7 cm / 2 1/4 x 2 3/4 – 10 exp./ film 120 001459
– Format 6x7 cm / 2 1/4 x 2 3/4 – 20 exp./ film 220 001464
RAPID ROLLEX 45 SLIDE-IN ROLLFILM HOLDER
– Format 6x7 cm / 2 1/4 x 2 3/4 – 10 exp./ film 120 001567
TECHNO ROLLEX BACK 45
– Format 6x12 cm / 2 1/4 x 4 3/4 – 6 exp./ film 120 001560
Polaroid Filmpack Holder 405 021471
Polaroid Filmpack Holder 550 021477
Polaroid Cutfilm Holder 545 pro 021458
Aluminium Case Master Technika 022457
FOR DIGITAL BACKS:
Hasselblad Digi Adapter for Internat. Universal Back 001693
Groundglass Mask 45 / 24x36 001644
Groundglass Mask 45 / 37x37 001645
Groundglass Mask 45 / 4x5 cm 001646
Page 35

35
33. TECHNICAL DATA
MASTER TECHNIKA 2000
32. TECHNICAL DATA
MASTER TECHNIKA classic
TECHNICAL DATA MASTER TECHNIKA 2000
Front Lens center tilt 30° fwd. and bkwd.
Dropbed adjustment 15° and 30° with click-stop
Lens rise 55 mm
Lens standard shift 40 mm to either side
Back Swing / tilts 20° in all directions
Lenses 35 - 400 mm for groundglass focusing
Front standard accepts all lenses with a
maximum rear diameter of 83 mm
Bellows max. 430 mm
Dimensions 18 x 18 x 11 cm, closed
Weight 2550 g / 6 lb. without lens
TECHNICAL DATA MASTER TECHNIKA classic
Front Lens center tilt 30° fwd. and bkwd.
Dropbed adjustment 15° and 30° with click-stop
Lens rise 55 mm
Lens standard shift 40 mm to either side
Back Swing / tilts 20° in all directions
Lenses 38, 47, 58 mm with Special Technika lensboard
with helical focusing mount
72 - 400 mm can be rangefinder-coupled
Front standard accepts all lenses with a maximum
rear diameter of 83 mm
Bellows max. 430 mm
Dimensions 18 x 18 x 11 cm, closed
Weight 2600 g / 6 lb. without lens
Page 36

TECHNISCHE ÄNDERUNGEN VORBEHALTEN SPECIFICATIONS SUBJECT TO CHANGE PRINTED IN GERMANY 025642 / 12.2005
LINHOF PRÄZISIONS-SYSTEMTECHNIK GMBH
RUPERT- MAYER - STRASSE 45 | D-81379 MÜNCHEN
TEL. +49.89.724920 | FAX +49.89.72492250
[email protected] | www.linhof.de/
 Loading...